Owner Manual Toaster Ovens
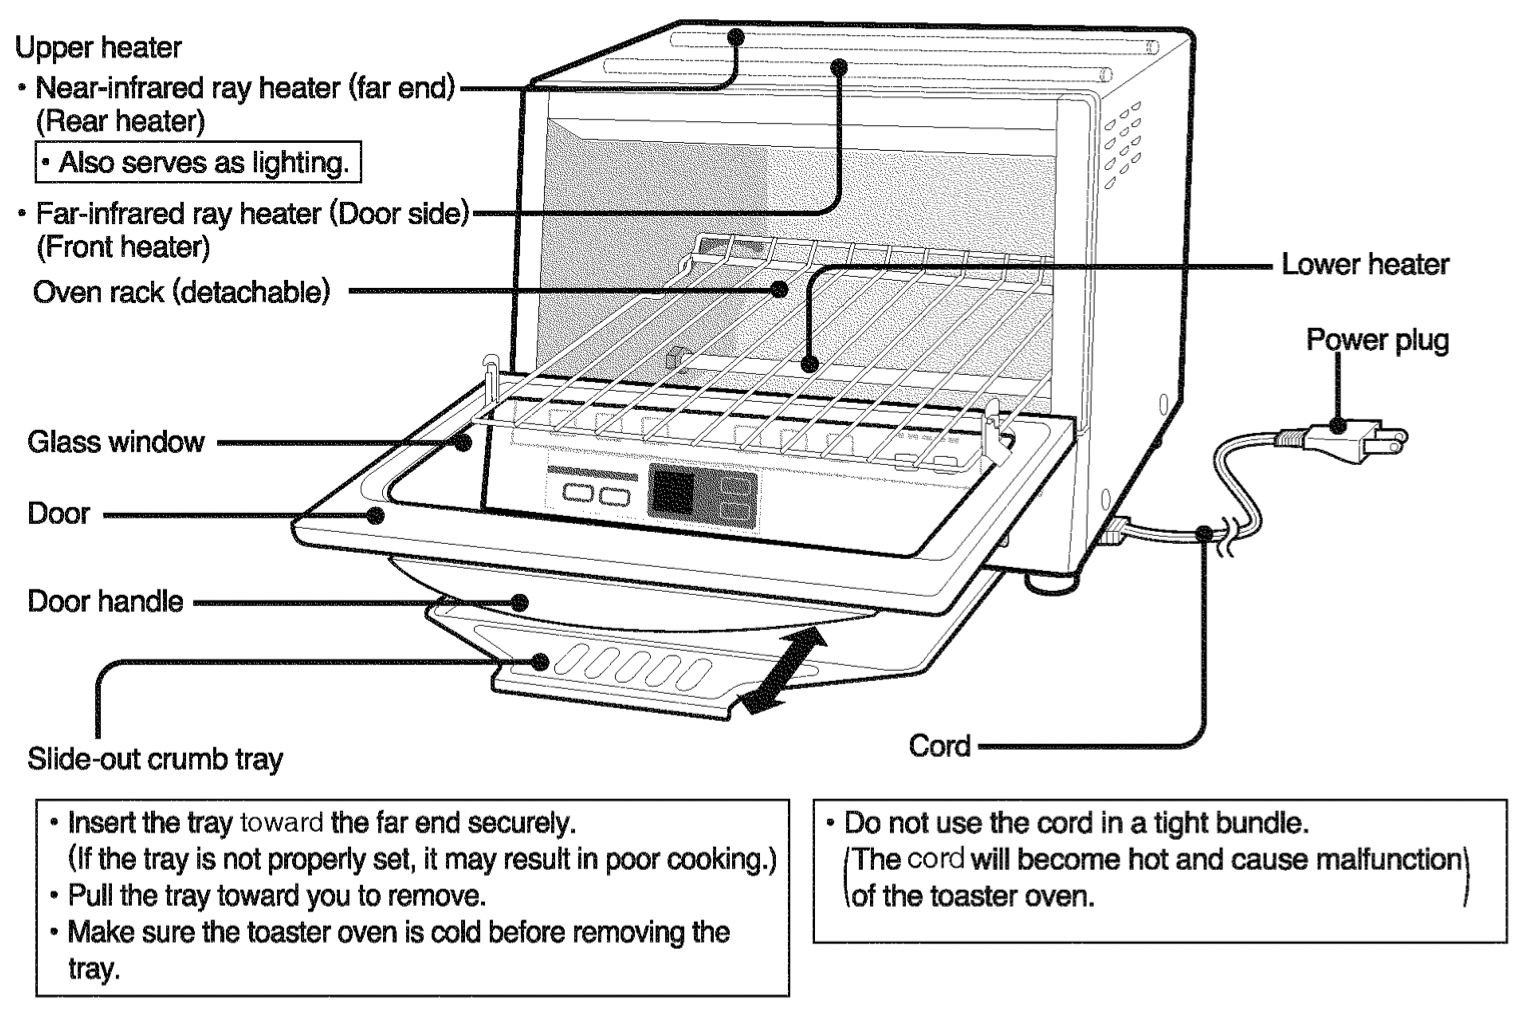
Part Names and Handling Instructions
Note: The heaters automatically turn off and on during operation to control the temperature during cooking. This is not a malfunction.
Important
- Do not open the door during cooking.
(Cooking will be uneven.)
- Do not pour water on the glass window if it is hot.
(The glass might break.)
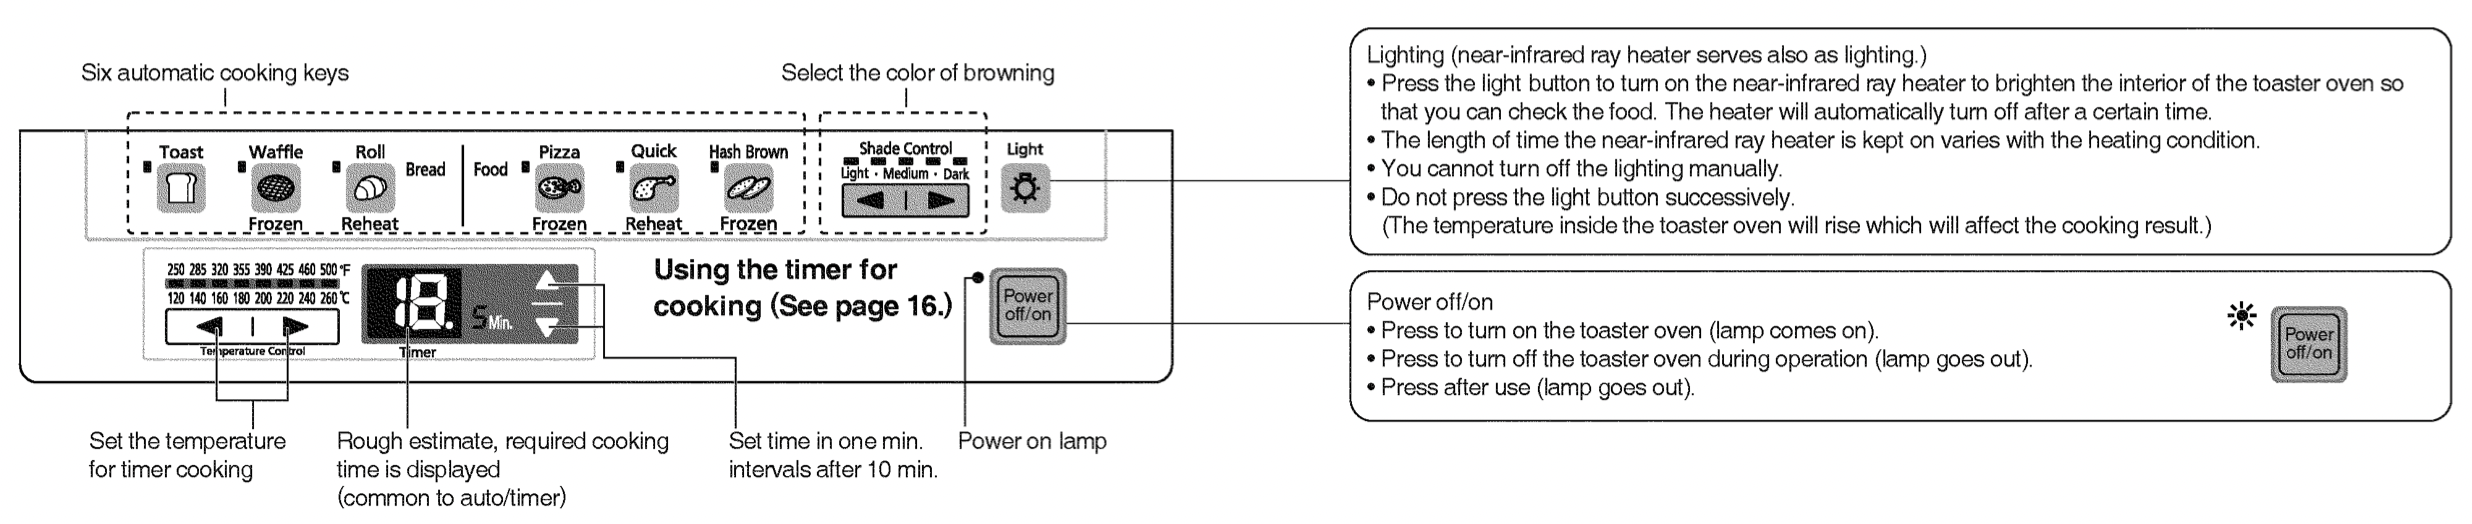
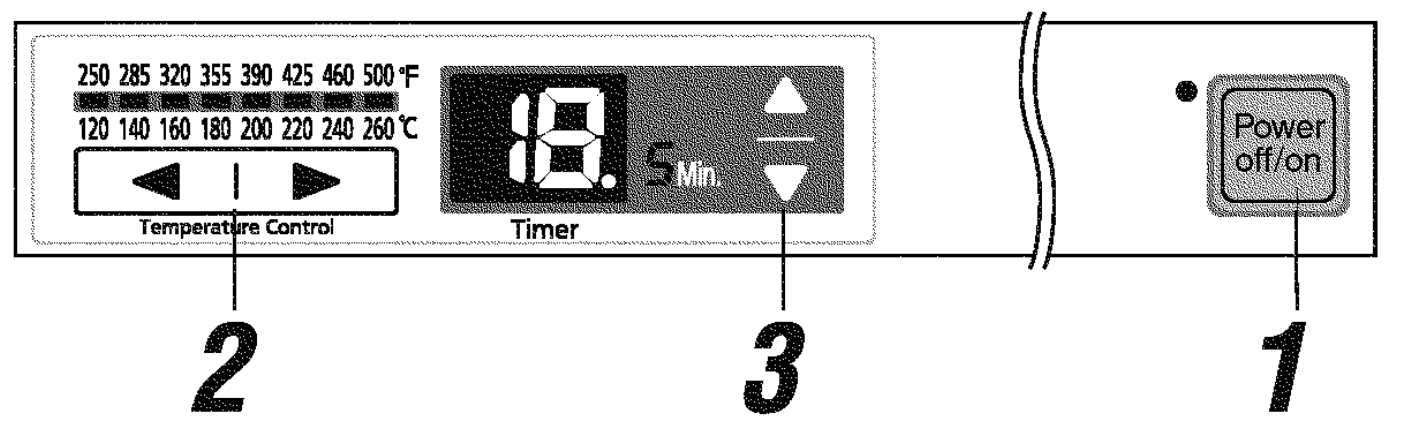
Operation panel
To remove oven rack
- Open the door halfway, pull the oven rack towards you to disengage it from the hooks.
- Disengage the hitches of the oven rack from the gridiron support.
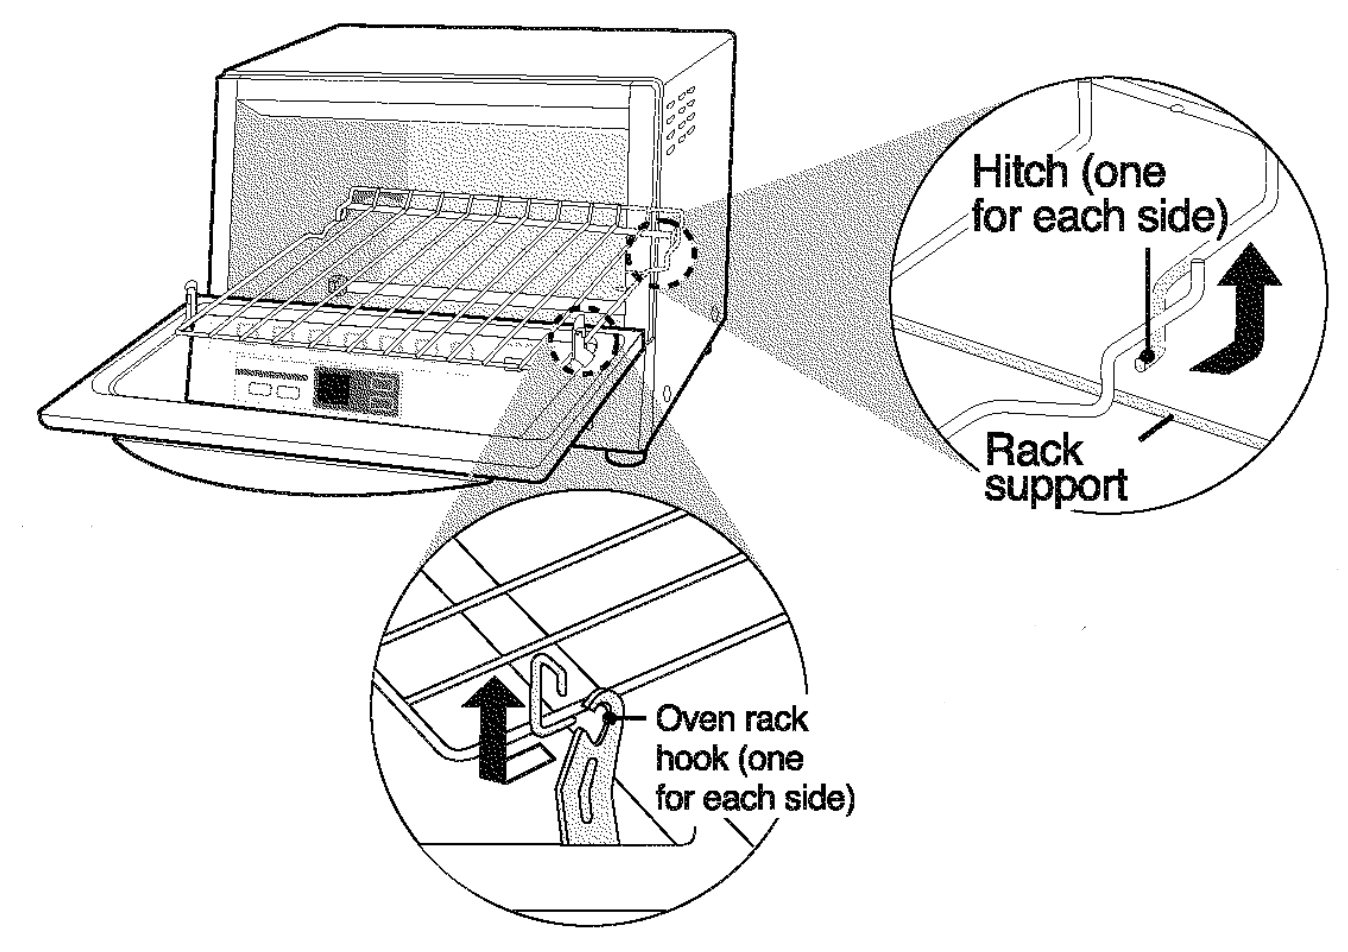
To attach
- Open the door.
Engage the hitches of the oven rack onto the rack support inside the toaster oven.
- Pull the oven rack toward you while closing the door halfway and engaging the oven rack onto the hooks.
Accessory
1 oven tray
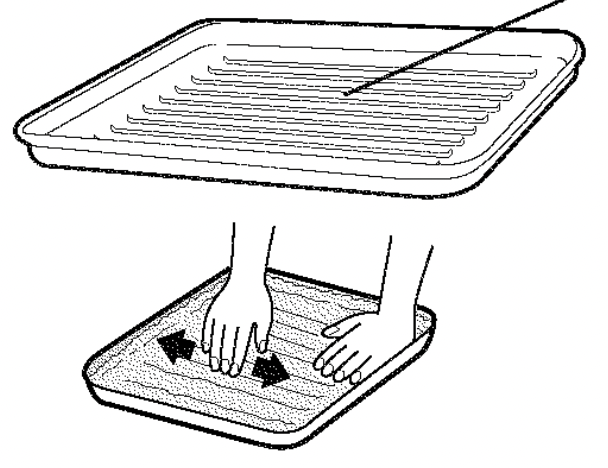
- The tray has a grooved surface for warming cold fried food efficiently. (The food might get groove patterns on its bottom).
- It is good practice to put a sheet of aluminum foil on the oven tray to prevent stains.
- It is advisable to put a sheet of aluminum foil on the tray, pressing it with fingers along the grooves to ensure that frozen pizza or cold fried food can be crispy cooked.
Note: It smells when using the product initially, but it won't smell after repeated using.
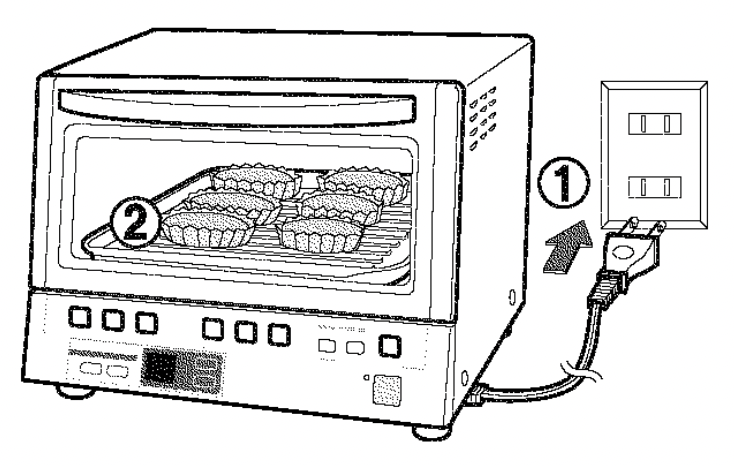
Cooking using automatic cooking keys (Operating procedure)
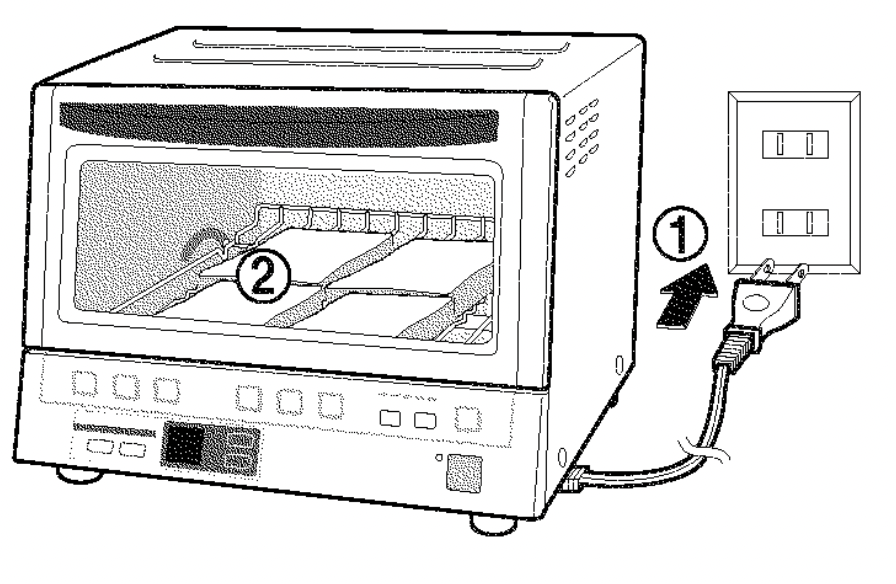
Preparations
- Insert the power plug into the wall outlet.
- Put the food inside the toaster oven.
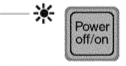
 Press [Power off/on] (Red power lamp comes on).
- Press any of the automatic cooking keys.
- Within 30 seconds,
 use the keys to adjust the color of browning.
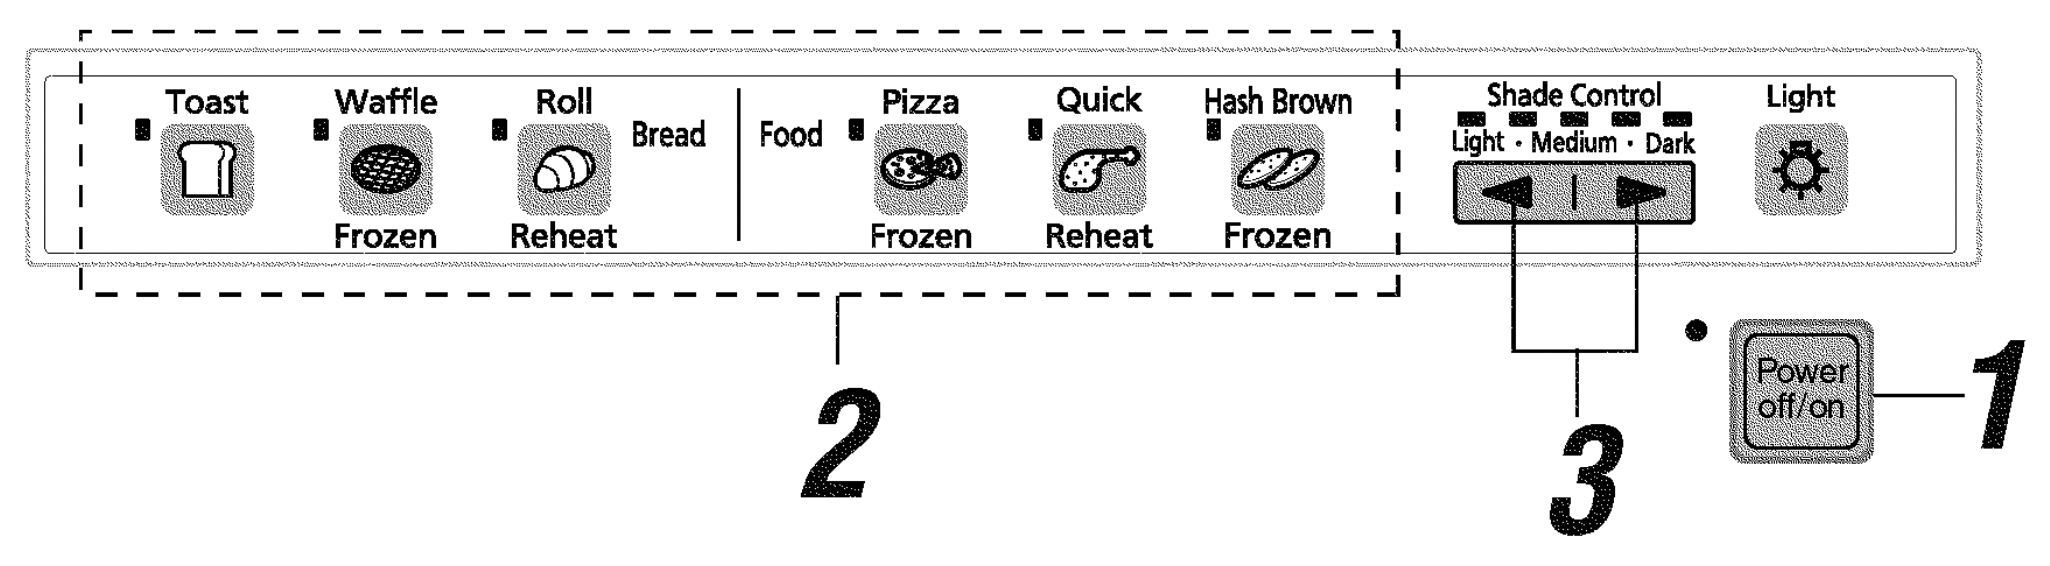
How to set the color of browning (Using the shade control)
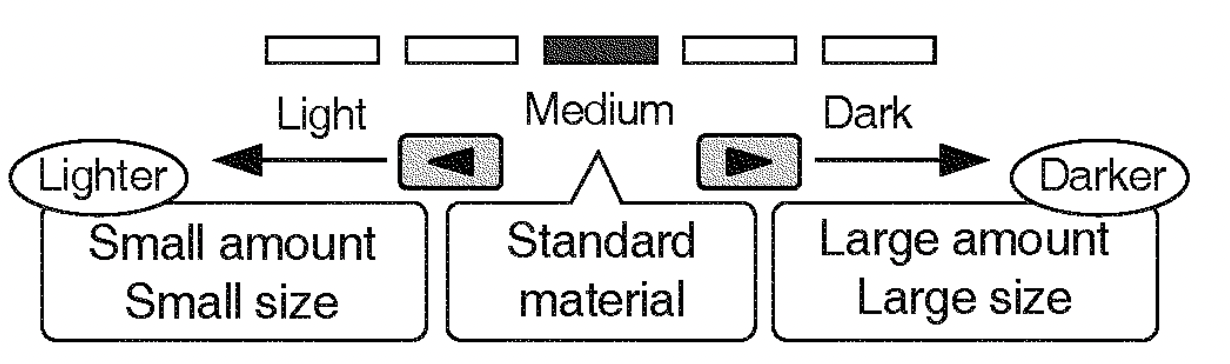
- Lighting of the lamps occur in intervals every time the button is pressed.
- The color of browning varies with the type and quantity of food and the size (weight) of each piece.
- Once the toaster oven is set to a color of browning, the next round of cooking will be performed at this setting.
*The setting stored in memory will be lost if the power plug is removed.
The color of browning will be set to medium when the power is turned on.
Cooking starts and the standard cooking time is displayed.

*The displayed time counts down in increments of 0.5 minutes during cooking.
Note: For a while after cooking starts, the cooking time blinks. During this time, the baking time is checked. When the cooking time is confirmed, the displayed time stays on.
When cooking is finished, the buzzer sounds and the power is automatically turned off.
Take out the food with a pot holder (oven mitt).
After use:  Turn off unit by pressing the power button. The lamp goes out. Remove the power plug.
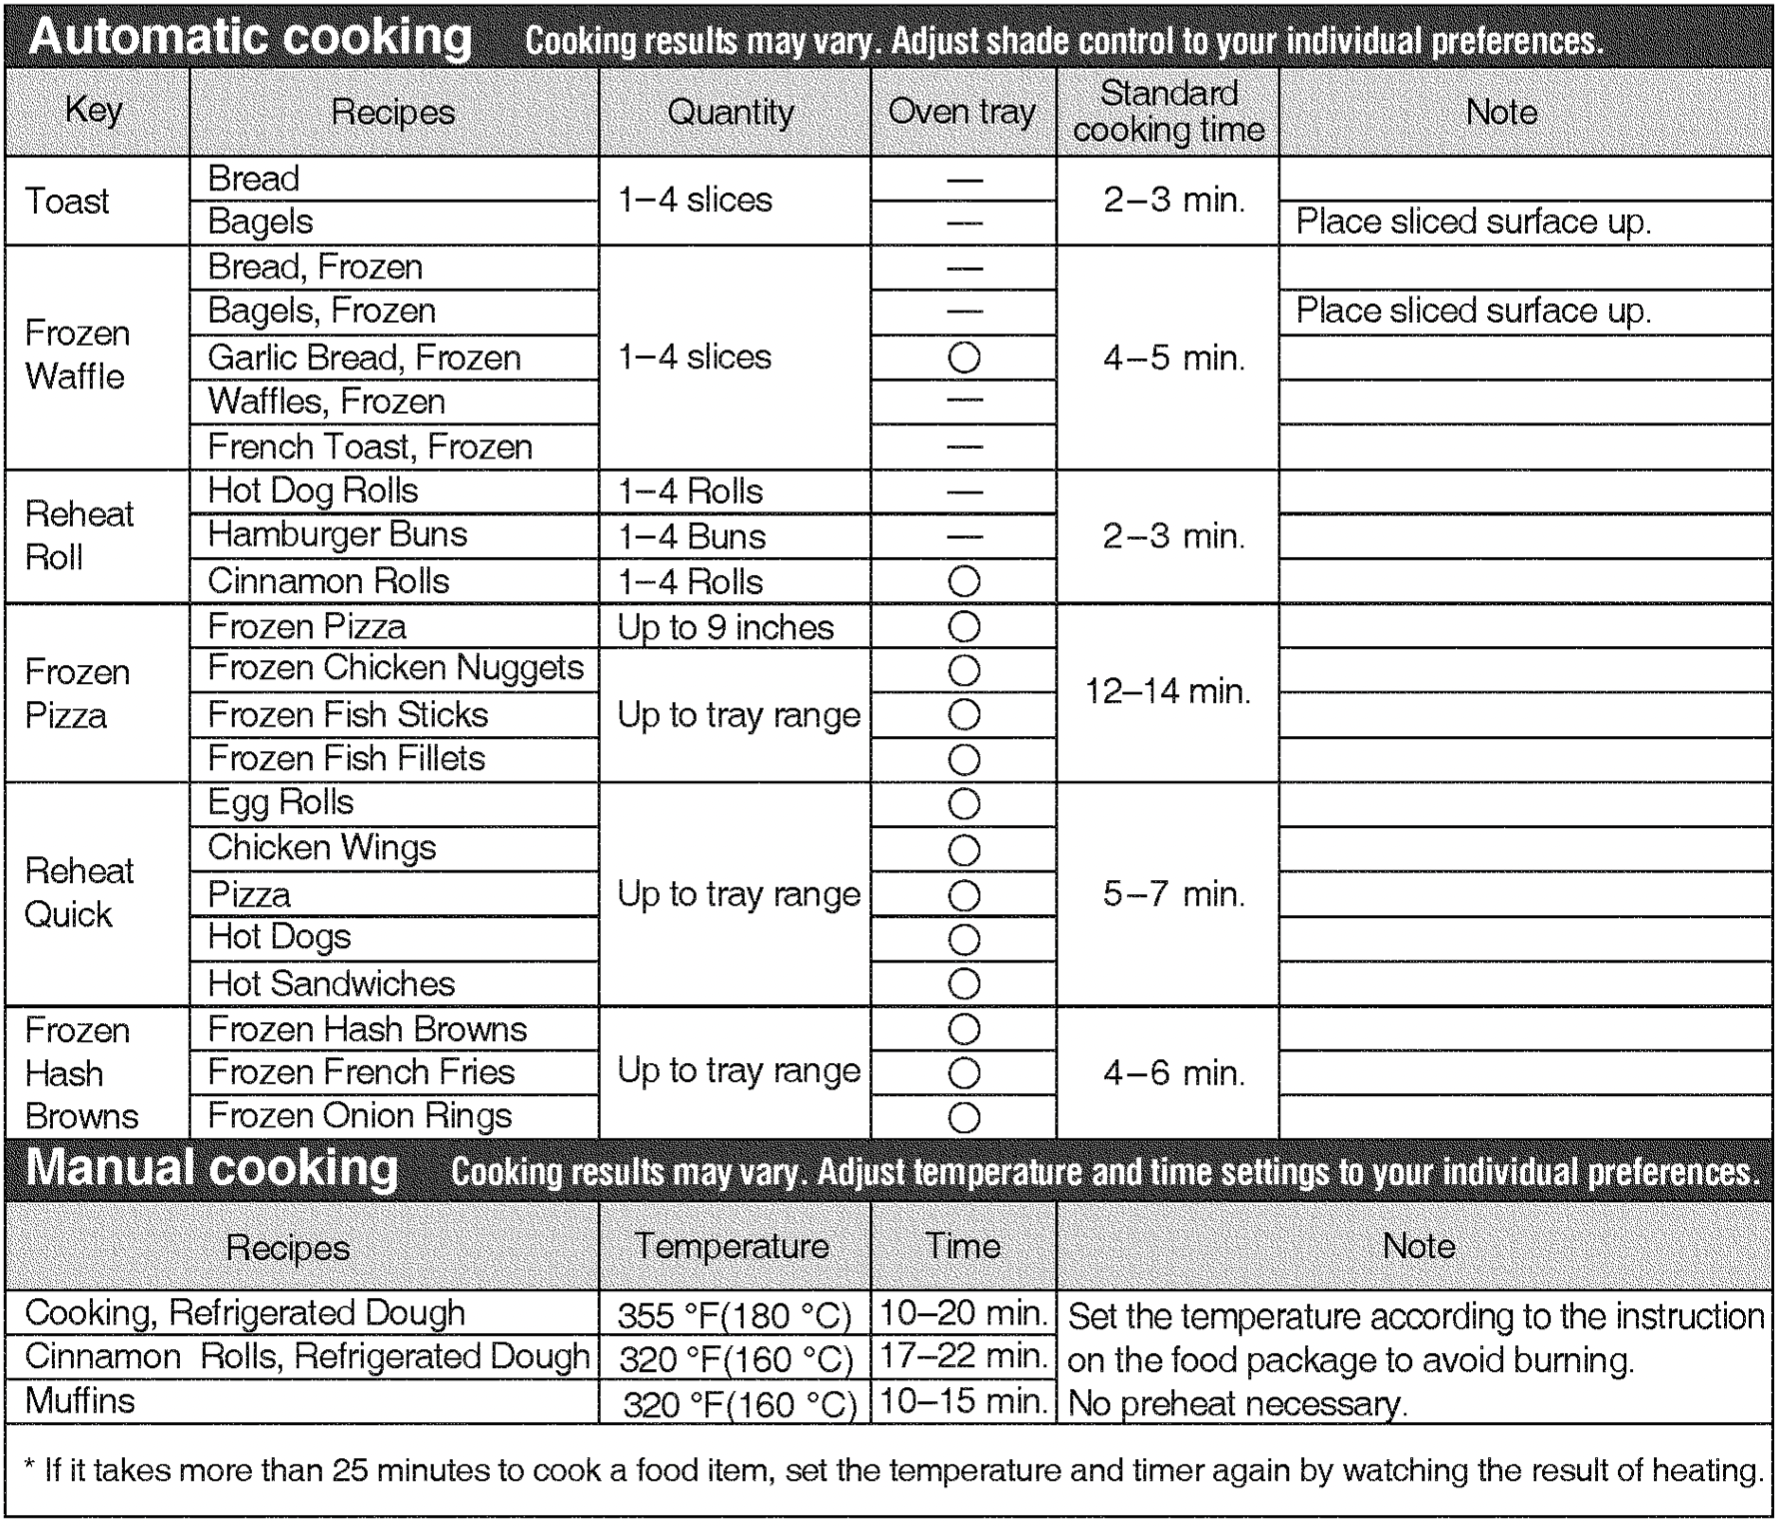
Toast  (1-4 slices)
Bread can be toasted to your desired color of browning.
How to place food inside: If you want to toast, place it at the center of oven rack
Cooking note:
- The color of browning varies with type, size and thickness of bread.
- Bread containing a lot of sugar will brown darker.
Set the level to the Light side.
- The surface of a thick slice of bread will brown a little darker.
- Standard cooking time: 2-3 min.
*Cooking time may vary according to shade control setting.
Frozen Waffle  (1-4 slices)
Frozen bread can also be toasted to your desired color of browning.
How to place food inside: Remove frost from the surface of frozen bread and place it on the oven rack.
Cooking note:
- The color of browning varies with the type, size and thickness of bread. In addition, the inside of bread might not heat enough in some cases.
- The cooking of frozen bread takes time because the toaster oven defrosts frozen bread by turning the heater on and off repeatedly.
- The toaster oven performs optimal heating.
It might take longer when the color of browning is set to Dark than when set to Light.
- When cooking bread containing a lot of sugar, set to the Light side.
- Standard cooking time: 4-5 min.
* Cooking time may vary according to shade control setting.
Reheat Roll  (1-4 pieces)
Rolls can be reheated without browning.
Cooking note:
- When cooking bread containing a lot of sugar, set the level of browning to the Light side.
- Use the timer when warming stuffed or cooked bread such as hamburgers or the like.
- Standard cooking time: 2-3 min.
*Cooking time may vary according to shade control setting.
Frozen Pizza  (12.5-22.5cm) (5-9 inches)
Baking pizza up to 22.5cm (9 inches) in diameter.
How to place food inside
- Place aluminum foil on the oven tray. (See page 11.)
- Remove frost from the surface of the pizza and place the frozen pizza on the tray.
- Place the tray inside the toaster oven.
Cooking note:
- If cooking a large pizza, the side closer to the door might not bake enough.
Make sure to put it toward the far end.
- Standard cooking time: 12-14 min.
* Cooking time may vary according to shade control setting.
Reheat Quick 
Warming fried food.
How to place food inside: Place aluminum foil on the oven tray. (See page 11.)Place cold fried food on the tray and place it inside the toaster oven.
Cooking note:
- The inside of chilled fries might not be heated enough.
- Provide additional heating. (See page 15.)
- Standard cooking time: 5-7 min.
*Cooking time may vary according to shade control setting.
Frozen Hash Browns  (Up to tray range)
Baking hash browns.
How to place food inside
- Remove frost from the surface of the hash browns.
- Place onto the tray and keep proper space between them, otherwise, they may swell too much or sag when heated.
Cooking note:
- Standard cooking time: 4-6 min.
*Cooking time may vary according to shade control setting.
Note:
- The heater might stay off for a few minutes.
This is not a malfunction. In particular, when the toaster oven is used immediately after high-temperature cooking, the heater might stay off for about 3 minutes.
- If you adjust the color of browning to the light side, the cooking might end as soon as the time interval is established.
Common to 6 automatic cooking menus
- To change the menus or the color of browning:
- The color of browning can be changed if it is within 30 seconds after the automatic cooking key is pressed. You cannot change the color of browning if 30 seconds have elapsed.
- If 30 seconds have elapsed or if you want to change the menu press the power button. The lamp goes out. Start over again from the first step of the operating procedure. (See page 12)
- To stop the cooking halfway:
Press the power button. The lamp goes out.
- To provide additional heating:
When the color of browning is lighter than you expected, or when the food was not heated enough.
- Press the same automatic cooking key you pressed in step 2 of the operating procedure. (See page 12)
- Stand by the toaster oven to watch how the food is heated. Press power button when necessary to stop cooking. The lamp goes out.
- To continue cooking in succession:
Set the toaster oven, starting with step 2 (see page 12) of the operating procedure.
*The food might not be browned properly compared with the first time or the inside of food might not be heated enough. It is advisable to open the door and keep it open fora while to cool down the inside of the toaster oven before starting cooking again.
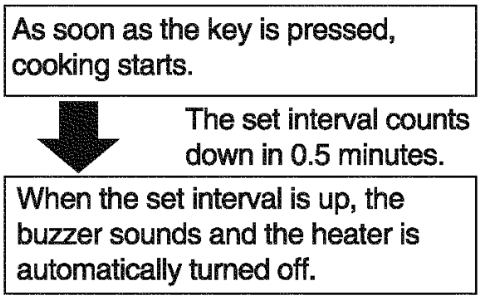
Cooking using the timer (Operating procedure)
Preparations
- Insert the power plug into the wall outlet.
- Place the food at the center inside the toaster oven.
- Place large food such as pizzas or cakes, or multiple food items such as cookies, at a position toward the far end, because those at the near end might not bake enough.
 Press [Power off/on].
Power lamp comes on

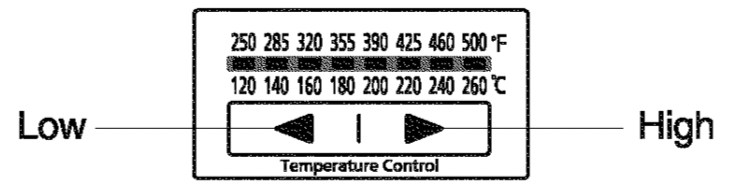
Select the cooking temperature.
Adjust the cooking temperature according to the recipe (Seepage 18)
(The 390F (200C) lamp comes on at first).
 Set the timer.
Take the food out from the toaster oven using a pot holder.
Adjust the cooking time according to the recipe. (See page 18.)
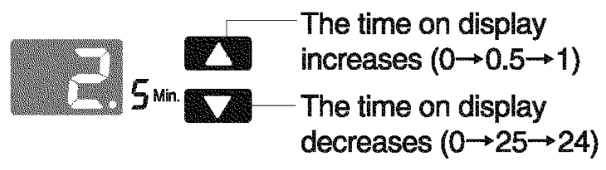
You can set the cooking time up to 10 min. in increments of 0.5 min. You can set up to 25 min. but in increments of one min. after 10 min.
Press and hold down the key to increase or decrease the number rapidly.
When the timer is set to “0” during cooking, the toaster oven will automatically turn off in 3seconds.
*You can change the cooking temperature and the set the time freely during cooking.
- To stop the cooking halfway
Press the Power off/on. (The heater lamp goes out.)
- To continue cooking in succession
Set the toaster oven, repeating with step 2 of the operating procedure.
- After use
Press the Power off/on. The red lamp goes out. Remove the power plug.
Points for cooking with timer
Cooking time
- There is no need for preheating.
- The standard time varies with the temperature, quality, quantity of food and material of the cooking tray. Adjust properly by watching how the food is heated.
- If it takes more than 25 minutes to cook food, set the temperature and timer again, checking the result from time to time.
- If you cook in succession, the food might not brown enough or the inside might not heat properly.
- It is advisable to open the door and keep it open for a while to cool down the inside of the toaster oven, before starting the cooking again.
- If the food is not sufficiently heated, use the timer to heat it further, checking the result from time to time.
* In particular, when baking cakes, cool down the inside of the toaster oven before cooking.
Cooking temperature
- If food is heated at the same temperature as used for a large oven, it might bake too much because of the difference in the interior size. Adjust the temperature properly watching how the food is heated.
- For food that has been cooked using a toaster oven without temperature control function, set the cooking temperature to 460℉-500℉ (240°C-260°C) and use the timer, cook and watch the result of baking.
When baking commercial frozen food
- Use the frozen food key for the toaster oven.
- Do not rely too much on the power level and refer cooking time written on the package.
When baking tall food items such as cakes
- Any tall food is browned easily. When the food is browned properly, cover it with a foil before baking further.
- Cut a sheet of aluminum foil into a size a little larger than the mold and use it, because large pieces off oil make it difficult to bake the food properly.
Baking mold for cakes
- Avoid using molds made of porcelain or heat-resistant glass, or those with a metal hook.Use the frozen food key for the toaster oven.
Important
- Do not try to bake meat or fish which oozes oil without wrapping. When baking meat or fish, wrap it in a foil to prevent oil from splashing, and put it on the oven tray.

- Do not use the toaster oven for steaming.
(Steam will cause malfunction of the toaster oven.)
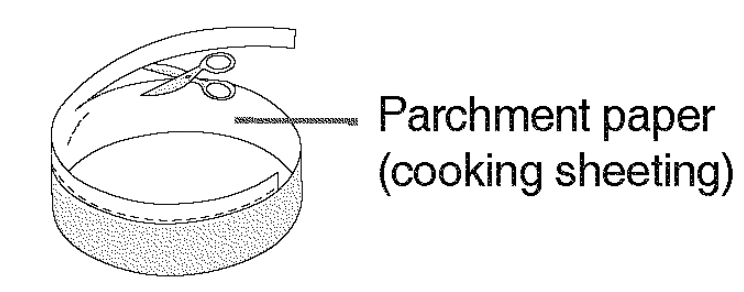
- Do not use parchment paper or cooking sheeting other than for putting it under cake molds.
Cut away excess parchment paper or cooking sheeting from under the cake molds.
(They might catch fire when in contact with the heater.)
- Do not use paper baking molds for cake mix.
(There is a danger of fire.)
- When cooking with foil, such as when baking cakes or large potatoes, use caution to prevent the foil from coming in contact with the heater.
(The foil might melt away and adhere to the surface of the heater, causing malfunction of the toaster oven.)
Note: When cooking at a low temperature 250°F-285℉ (120C-140°C), the heater will stay off for about 3 minutes. This is not a malfunction.
Cooking Guide
Maintenance
Remove the power plug and make sure the toaster oven is cold.
Wipe clean the exterior and interior of the toaster oven with a well-wrung towel.
* Do not use benzene, thinner or polishing powder, otherwise, the surface will be damaged.
- When the toaster oven is severely stained or dirty, wipe with a towel saturated with a diluted solution of neutral kitchen detergent.
- When cleaning the bottom of the interior, remove the oven rack and crumb tray.
*Do not touch the heaters to avoid damaging them.
Crumb tray, oven tray, oven rack (See page 11 for how to remove.)
Wash them with a diluted solution of neutral kitchen detergent and sponge and dry well.
* Do not use metal brush or nylon brush.
(The surfaces of the trays or gridiron might be damaged.)
* In particular, wash the crumb tray frequently.
Do not use a dirty tray; the baked may bum or might result in a lighter color of browning on the lower surface of food.
Troubleshooting
| If... |
Possible cause and how to fix
|
|
The toaster oven cannot be turned on when the power button is pressed.
|
Check to see if the power plug is securely inserted into the wall outlet.
|
| The automatic cooking function does not function properly. |
The plug has been disconnected.
- Read “Cooking using automatic cooking keys”. (See pages 12 to 15.)
|
| The heater turns on and off. |
It is not a malfunction.
The heater is automatically turned on and off by the microprocessor to control the cooking temperature.
|
| The heater turns off during cooking. |
It is not a malfunction.
The heater may stay off for about 3 minutes if low-temperature cooking is carried out immediately after high-temperature cooking.
|
| Light color of browning on the bottom surface of bread. |
Check the crumb tray if properly cleaned.
|
 appears on display (self-check function):
Please contact service center listed in the warranty.
Any other servicing should be performed by an authorized service representative.