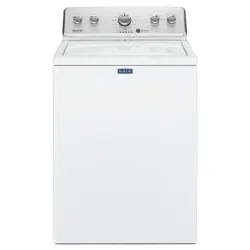
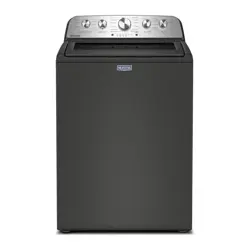
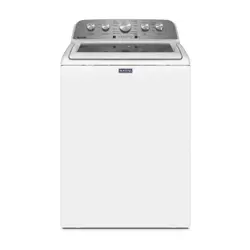
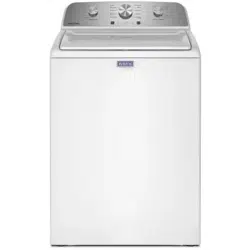
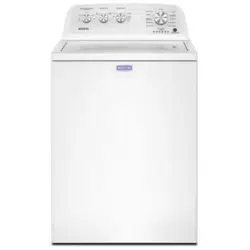
USE AND CARE GUIDE TOP-LOADING HIGH EFFICIENCY WASHER Maytag MVWC465HW
WHAT’S UNDER THE LID
Lid Lock
- To allow for higher spin speeds, the lid will lock and the Lid Locked light will turn on. When this light is lit, the lid is locked and cannot be opened without pausing the cycle. When this light is blinking, the washer is paused. When this light is off, the lid can be opened. After the cycle has started, the washer will fill to the appropriate water level. On select cycles, agitation will occur while the basket is filling with water. This is normal. When the washer is done filling, it will begin the wash phase. If you need to open the lid to add a garment after this point, the lid will remain unlocked during the entire agitation portion of the wash phase. The cycle will automatically pause when the lid is opened, and the cycle will resume once the lid is closed. The lid will lock before the spin phase begins. If you need to pause or stop after this point, you must press the START/PAUSE/CANCEL button and wait for the lid to unlock. The lid will only unlock after washer movement has stopped. Depending on when in the cycle you try to pause, it may take from several seconds to several minutes for the lid to unlock. Press START/PAUSE/CANCEL to resume the cycle.
Sensing
- This washer automatically senses the load size for most cycles, and chooses an appropriate water level according to the load size detected. This washer also performs a series of spins to check for load balance. During this time, a series of clicks and a whirring noise signal that sensing technology is determining if there is an off-balance load.
Water Level Options
- Set the Water Level knob to the Auto Sensing setting and the washer automatically adjusts the water level to the load size. Set the Water Level knob to the Deep Water Wash setting and the washer automatically adds more water to any cycle at any time during the wash process.
Normal Sounds You Can Expect
- At different stages of the wash cycle, you may hear sounds and noises that are different from those of your previous washer. For example, you may hear a clicking and hum at the beginning of the spin phase, as the lid lock goes through a self-test. There will be different kinds of humming sounds as the HE agitator tests for load balance or moves the load. And sometimes, you may hear nothing at all, as the washer determines the correct water level for your load or allows time for clothes to soak.
IMPORTANT:
- The lid must be closed before the washer basket fills with water and for the wash cycle to start. If the lid is opened, the cycle pauses and all filling/agitation motion halts. Once the lid is closed, the cycle automatically resumes. However, if the Start/Pause/Cancel button is pressed prior to opening the lid, the lid must be closed and the Start/Pause/Cancel button pressed again to resume the cycle.
- Rinse Option must be set to either 1 Rinse with Fabric Softener or 2 Rinses with Fabric Softener when using fabric softener in the fabric softener dispenser. This ensures that fabric softener is added at the correct time in the rinse phase and is evenly distributed.
Spray Rinse
- Select cycles default to a spray rinse. During these cycles, you will hear water enter the washer as the tub spins, allowing the rinse water to penetrate clothes. Check the “Cycle Guide” for details.
Choosing the Right Detergent
- Use only High Efficiency detergents. The package will be marked “HE” or “High Efficiency.” Using non-HE detergent will likely result in longer cycle times and reduced rinsing performance. It may also result in component malfunction and, over time, buildup of mold or mildew. HE detergents should be low-sudsing and quick-dispersing to produce the right amount of suds for the best performance. They should hold soil in suspension so it is not redeposited onto clean clothes. Not all detergents labeled as High Efficiency are identical in formulation and their ability to reduce suds. For example, natural, organic, or homemade HE detergents may generate a high level of suds. Always follow the detergent manufacturer’s instructions to determine the amount of detergent to use.

Use only High Efficiency (HE) detergent.
CONTROL PANEL AND FEATURES
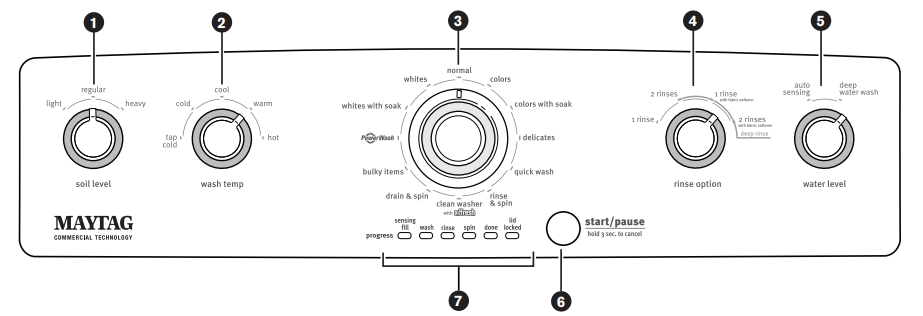
Not all features and options are available on all models. Appearance may vary.
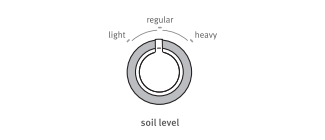
1. SOIL LEVEL
- Select the setting most suitable for your load. For heavily soiled and sturdy fabrics, select Heavy soil level for more wash time. For lightly soiled and delicate fabrics, select Light soil level for less wash time. A lighter soil level setting will help reduce tangling and wrinkling.
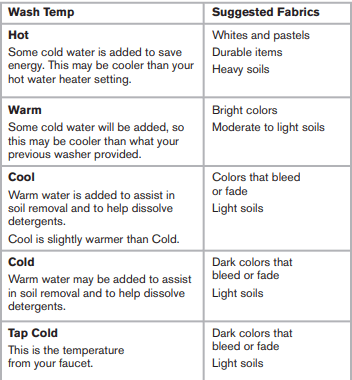
2. WASH TEMP
Wash Temp senses and maintains uniform water temperatures by regulating incoming hot and cold water. Select a wash temperature based on the type of fabric and soils being washed. For best results, use the warmest wash water safe for your fabric, as specifi ed by the garment label instructions.
- On some models and cycles, warm and hot water may be cooler than your previous washer.
- Even in a cold- and cool-water wash, some warm water may be added to the washer to maintain a minimum temperature. All rinses are cold
3. WASH CYCLE KNOB
- Use the Wash Cycle knob to select cycles on your washer. See “Cycle Guide” for detailed descriptions of cycles.
4. RINSE OPTION
The following options may be added to most cycles. See “Cycle Guide” for additional details.
- 1 RINSE This option is used to limit a cycle to one rinse.
- 2 RINSES This option can be used to automatically add a second rinse to all wash cycles
- 1 RINSE WITH FABRIC SOFTENER This option must be selected if using fabric softener during a cycle. It ensures that fabric softener is added at the correct time in the rinse for even distribution.
- 2 RINSES WITH FABRIC SOFTENER This option turns on both the Fabric Softener and the 2 Rinses option.
5. WATER LEVEL
- Set the Water Level knob to the Auto Sensing setting and the washer will automatically sense the appropriate water level for the load size and type.
- Set the Water Level knob to the Deep Water Wash setting and the washer will automatically add more water to any cycle at any time during the wash process.
NOTE: Expect longer cycle times due to extended fi ll times when using the Deep Water Wash option.
6. START/PAUSE/CANCEL BUTTON
- Press to start the selected cycle. Press again to pause the cycle and unlock the lid. Close the lid and press to restart the cycle. Press and hold to cancel a cycle and pump out the washer.
NOTE: If the washer is spinning, it may take several minutes to unlock the lid.
7. PROGRESS LIGHTS
- The Progress Lights show the progress of a cycle. At each stage of the process, you may notice sounds or pauses that are different from your previous washer.
SENSING/FILL
- When the Start/Pause/Cancel button is pressed and the Water Level knob is set to Auto Sensing, the washer will fi ll and begin sensing to determine load size and balance. A short but noticeable pause in the cycle action occurs during sensing. This is normal.
- Once sensing is complete, the washer will fi ll to the appropriate level for the detected load size and, on select cycles, agitation will occur during fi lling. This, too, is normal. When the washer is done fi lling, it will begin the wash phase of the cycle. To ensure that the most accurate load size is detected, avoid opening the lid during the “Sensing” phase.
NOTE: Sensing and wash phases will be paused by opening the unlocked lid. Close the lid to resume the cycle. If the lid is left open for more than 10 minutes, the washer will cancel the cycle and pump out the water.
WASH
- The washer will fi ll to the correct water level based on the load size and the Water Level selection. Certain cycles may agitate during the fi ll process to boost cleaning. When the wash cycle begins, you will hear the HE agitator increase speed. The motor sounds may change at different stages in the wash cycle while the washer performs different wash actions.
NOTE: The lid will automatically lock after the wash phase completes and before the initial spinout occurs, and will remain locked for the rest of the cycle
RINSE
- Certain cycles use a spray rinse, which adds water to the tub while the basket spins. You may hear the motor turning on briefl y (short hum) to move the basket while fi lling. In some cases, you may also hear sounds similar to the wash cycle as the washer fi lls, rinses, and moves the load.
SPIN
- The washer spins the load at increasing speeds for proper water removal based on the selected cycle and spin speed.
DONE
- Once the cycle is complete, the lid will unlock and this light will come on. For best results, promptly remove the load.
LID LOCKED
- The Lock feature allows for higher spin speeds. When lit, the lid is locked and cannot be opened without pausing the cycle. When the light is off, the lid can be opened.
- To open the lid after it has been locked, press START/ PAUSE/CANCEL. The lid will unlock once the washer movement has stopped. This may take several minutes if the load was spinning at high speed. Press START/ PAUSE/CANCEL while the lid is closed to resume the cycle.

CYCLE GUIDE
- For best fabric care, choose the cycle that best fits the load being washed.
- Recommended settings for best performance are shown in Bold.
- Not all cycles and options are available on all models. Not all settings and options are available on each cycle.
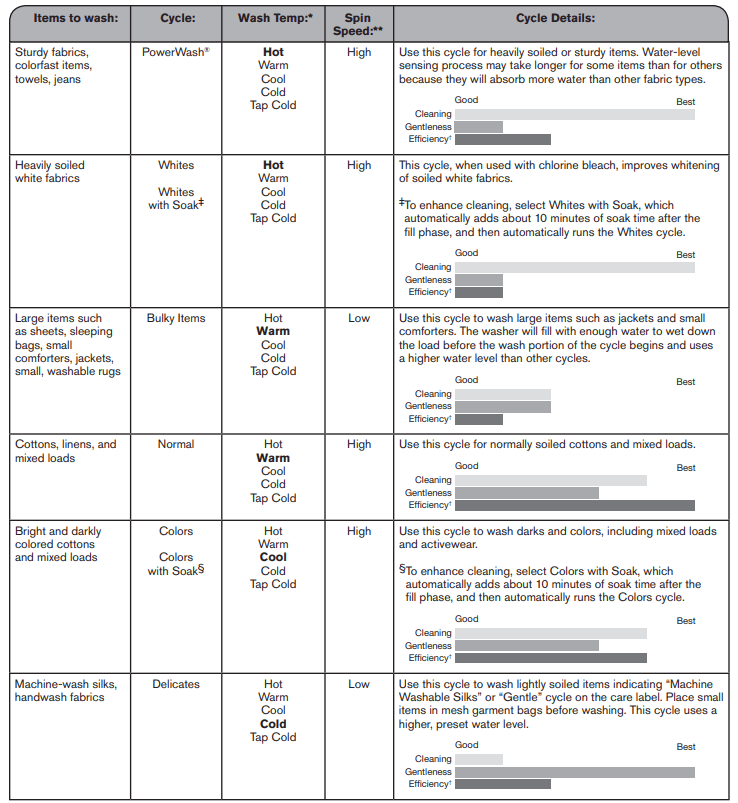
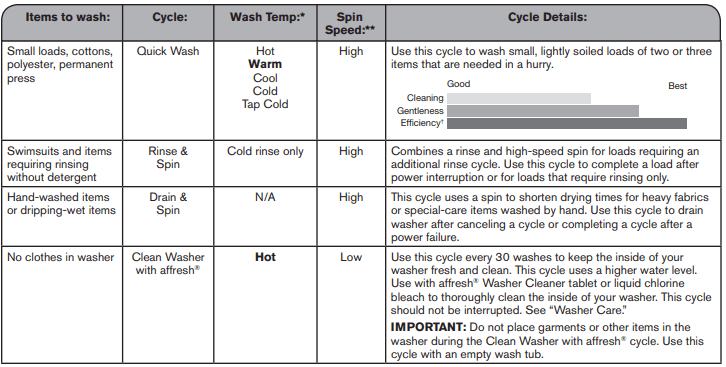
NOTE: If you are using fabric softener, be sure to select either 1 Rinse with Fabric Softener or 2 Rinses with Fabric Softener.
- **All rinses are cold.
- **Spin speed is integrated into the cycle and cannot be selected or modified.
- †Efficient use of resources, such as energy and water.
USING YOUR WASHER

- Never place items in the washer that are dampened with gasoline or other flammable fluids.
- No washer can completely remove oll.
- Do not dry anything that has ever had any type of oil on it (including cooking oils).
- Doing so can result in death. explosion. or fire.
- Plug into a grounded 3 prong outlet.
- Do not remove ground prong.
- Do not use an adapter.
- Do not use an extension cord.
- Failure to follow these instructions can result in death. fire. or electrical shock.
1. Sort and prepare your laundry
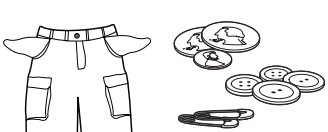
- Empty pockets. Loose change, buttons, or any small object can pass under the HE agitator and become trapped, causing unexpected sounds.
- Sort items by recommended cycle, water temperature, and colorfastness.
- Separate heavily soiled items from lightly soiled.
- Separate delicate items from sturdy fabrics.
- Do not dry items if stains remain after washing, because heat can set stains into fabric.
- Treat stains promptly.
- Close zippers, fasten hooks, tie strings and sashes, and remove non-washable trim and ornaments.
- Mend rips and tears to avoid further damage to items during washing
Helpful Tips:
- When washing water-proof or water-resistant items, load evenly.
- Use mesh garment bags to help avoid tangling when washing delicate or small items.
- Turn knits inside out to avoid pilling. Separate lint-takers from lint-givers. Synthetics, knits, and corduroy fabrics will pick up lint from towels, rugs, and chenille fabrics.
NOTE: Always read and follow fabric care label instructions to avoid damage to your items.
2. Add laundry products 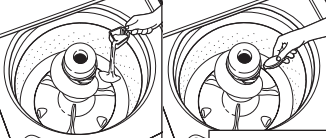
- Add a measured amount of HE detergent or single-dose laundry packet into the basket.
- If using Oxi-type boosters, color-safe bleach, or fabric-softener crystals, add to the bottom of the washer basket before adding clothes.
IMPORTANT: Use only High Effi ciency detergents. The package will be marked “HE” or “High Effi ciency.” Using regular detergent will likely result in longer cycle times and reduced rinsing performance. It may also result in component failures and noticeable mold or mildew. HE detergents are made to produce the right amount of suds for the best performance.
NOTE: Follow the manufacturer’s instructions to determine the amount of laundry products to use.
3. Load laundry into washer
- Load garments in loose heaps evenly around basket wall. For best results, do not pack the load tightly. Do not wrap large items such as sheets around the HE agitator; load them in loose piles around the sides of the basket. Try mixing different-sized items to reduce tangling.
IMPORTANT: Do not tightly pack or force items into washer. Items need to move freely for best cleaning and to reduce wrinkling and tangling
4. Add liquid chlorine bleach to dispenser
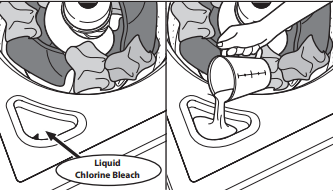
- Do not overfi ll, dilute, or use more than 1 cup (236 mL). Do not use color-safe bleach or Oxi products in the same cycle with liquid chlorine bleach.
5. Add fabric softener
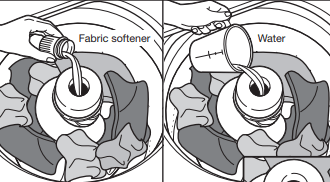
- Pour a measured amount of liquid fabric softener into dispenser; always follow manufacturer’s directions for correct amount of fabric softener based on your load size.
- Dilute liquid fabric softener by fi lling the dispenser with warm water until liquid reaches the underside of the rim. See max fi ll line arrows.
IMPORTANT: The Rinse Option knob must be set to either 1 Rinse with Fabric Softener or 2 Rinses with Fabric Softener when using fabric softener in the fabric softener dispenser. This ensures that fabric softener is added at the correct time in the rinse phase and is evenly distributed.
Adding Liquid Fabric Softener Manually to Wash Load
- During the fi nal rinse, wait until the washer has completed fi lling and press the START/PAUSE/CANCEL button to pause the washer. Lift the lid and add the measured, recommended amount of liquid fabric softener. Do not use more than the recommended amount. Close the lid and press the START/PAUSE/CANCEL button again to start the washer.
6. Select cycle

- Turn cycle knob to choose your wash cycle. For more information, see “Cycle Guide.”
7. Select soil level
- Once you select a cycle, select the soil level by turning the Soil Level knob to the desired setting.
8. Select wash temperature

- Once you select a cycle, select the wash temperature by turning the Wash Temp knob to the desired setting.
- Always read and follow fabric care label instructions to avoid damage to your items.
9. Select rinse option and water level

- Select the number of rinses by turning the Rinse Option knob to the desired setting.
IMPORTANT: The Rinse Option knob must be set to an option “with Fabric Softener” when using the fabric softener dispenser. This ensures that fabric softener is added at the correct time in the rinse for even distribution.
- Set the Water Level knob to the Auto Sensing setting and the washer will automatically sense the appropriate water level for the load size and type.
- Set the Water Level knob to the Deep Water Wash setting and the washer will automatically add more water to any cycle at any time during the wash cycle.
NOTE: The cycle will be longer due to extended fi ll times when using the Deep Water Wash setting.
10. Press START/PAUSE/CANCEL to begin wash cycle

- Press START/PAUSE/CANCEL to start the wash cycle. When the cycle has fi nished, the Done progress light will light. Promptly remove garments after cycle has completed to avoid odor, reduce wrinkling, and avoid rusting of metal hooks, zippers, and snaps.
Unlocking the lid to add garments
- If you need to add one or two missed garments after the wash has started, simply open the lid and this will pause the cycle. After adding the garments, simply close the lid and the cycle will resume. The washer may add some additional water to offset the added garments.
- If, instead, you press Start/Pause/Cancel to pause the cycle and then open the lid to add garments, you will need to press Start/Pause/Cancel after closing the lid to resume the cycle.
NOTE: Washer will not fi ll with the lid open.
IMPORTANT: If lid is left open for more than 10 minutes, the water will pump out automatically
Manual soak
- If you would like to manually soak your garments at any time during the wash portion of the cycle, press START/PAUSE/ CANCEL and leave the lid closed. Once your desired soak time has elapsed, press START/PAUSE/CANCEL again to continue the cycle. As long as the lid remains closed, your soak time can be longer than 10 minutes. However, if the lid is opened during the soak and remains open for more than 10 minutes, the water will pump out automatically
WASHER MAINTENANCE
WATER INLET HOSES
- Replace inlet hoses after 5 years of use to reduce the risk of hose failure. Periodically inspect and replace inlet hoses if bulges, kinks, cuts, wear, or leaks are found.
- When replacing your inlet hoses, mark the date of replacement on the label with a permanent marker.
NOTE: This washer does not include inlet hoses. See the Installation Instructions for more information.
WASHER CARE
Recommendations to Help Keep Your Washer Clean and Performing at its Best
- Always use High Effi ciency (HE) detergents and follow the detergent manufacturer’s instructions regarding the amount of detergent to use. Never use more than the recommended amount because that may increase the rate at which detergent and soil residue accumulate inside your washer, which in turn may result in undesirable odor.
- Use warm and hot wash water settings sometimes (not exclusively cold-water washes) because they do a better job of controlling the rate at which soils and detergent accumulate.
- Always leave the washer lid open between uses to help dry out the washer and prevent the buildup of odor-causing residue.
Cleaning Your Top Loading Washer
- Read these instructions completely before beginning the routine cleaning processes recommended below. This washer maintenance procedure should be performed, at a minimum, once per month or every 30 wash cycles, whichever occurs sooner, to control the rate at which soils and detergent may otherwise accumulate in your washer.
Cleaning the Inside of the Washer
To keep your washer odor-free, follow the usage instructions provided above and use this recommended monthly cleaning procedure:
Clean Washer Cycle
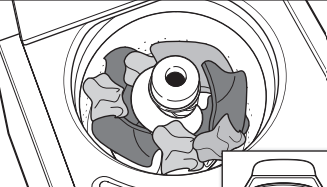
- This washer has a special cycle that uses higher water volumes in combination with affresh® Washer Cleaner or liquid chlorine bleach to clean the inside of the washer.
1. affresh® Washer Cleaner Cycle Procedure (Recommended for Best Performance):
- Open the washer lid and remove any clothing or items.
- Place an affresh® Washer Cleaner tablet in the bottom of the washer basket.
- Do not place an affresh® Washer Cleaner tablet in the detergent dispenser.
- Do not add any detergent or other chemical to the washer when following this procedure.
- Close the washer lid.
- Select the cycle recommended for cleaning the inside of the washer.
- Press the START/PAUSE/CANCEL button to start the cycle
NOTE: For best results, do not interrupt cycle. If cycle must be interrupted, press START/PAUSE/CANCEL once. After the cycle has stopped, run a Rinse & Spin cycle to rinse cleaner from washer.
2. Chlorine Bleach Procedure (Alternative):
- Open the washer lid and remove any clothing or items.
- Add 1 cup (236 mL) of liquid chlorine bleach to the bleach compartment.
- Close the washer lid.
- Do not add any detergent or other chemical to the washer when following this procedure.
- Select the cycle recommended for cleaning the inside of the washer.
- Press the START/PAUSE/CANCEL button to start the cycle.
NOTE: Use of more liquid chlorine bleach than is recommended above could cause washer damage over time.
NOTE: For best results, do not interrupt cycle. If cycle must be interrupted, press START/PAUSE/CANCEL once. After the cycle has stopped, run a Rinse & Spin cycle to rinse bleach from washer.
Description of Clean Washer Cycle Operation:
- This cycle will fi ll to a water level higher than in normal wash cycles to provide rinsing at a level above the water line for normal wash cycle.
- During this cycle, there will be some agitation and spinning to increase the removal of soils.
After this cycle is complete, leave the lid open to allow for better ventilation and drying of the washer interior.
Cleaning the Dispensers
- After a period of using your washer, you may fi nd some residue buildup in the washer’s dispensers. To remove residue from the dispensers, wipe them with an affresh® Machine Cleaning Wipe or a damp cloth and towel dry either before or after you run the Clean Washer cycle. Do not attempt to remove the dispensers or trim for cleaning. The dispensers and trim are not removable. If your model has a dispenser drawer, however, remove the drawer and clean it before or after you run the Clean Washer cycle. Use an all-purpose surface cleaner, if needed.
Cleaning the Outside of the Washer
- Use an affresh® Machine Cleaning Wipe, a soft, damp cloth, or a sponge to wipe away any spills. Use an affresh® Machine Cleaning Wipe or only mild soaps or cleaners when cleaning external washer surfaces.
IMPORTANT: To avoid damaging the washer’s fi nish, do not use abrasive products.
NON-USE AND VACATION CARE
Operate your washer only when you are home. If moving, or not using your washer for a period of time, follow these steps:
- Unplug or disconnect power to washer.
- Turn off water supply to washer, to avoid fl ooding due to water-pressure surge.
WINTER STORAGE CARE
IMPORTANT: To avoid damage, install and store washer where it will not freeze. Some water may stay in hoses, and freezing can damage washer. If storing or moving during freezing weather, winterize your washer.
To winterize washer:
- Shut off both water faucets; disconnect and drain water inlet hoses.
- Put 1 qt. (1 L) of R.V.-type antifreeze in basket and run washer on Rinse & Spin cycle for about 30 seconds to mix antifreeze and remaining water.
- Unplug washer or disconnect power.
TRANSPORTING YOUR WASHER
- Shut off both water faucets. Disconnect and drain water inlet hoses.
- If washer will be moved during freezing weather, follow “Winter Storage Care” directions before moving.
- Disconnect drain hose from drain system and drain any remaining water into a pan or bucket. Disconnect drain hose from back of washer.
- Unplug power cord.
- Place inlet hoses and drain hose inside washer basket.
- Drape power cord over edge and into washer basket.
- Place packing tray from original shipping materials back inside washer. If you do not have packing tray, place heavy blankets or towels into basket opening. Close lid and place tape over lid and down front of washer. Keep lid taped until washer is placed in new location. Transport washer in upright position.

- Plug into a grounded 3 prong outlet.
- Do not remove ground prong.
- Do not use an adapter.
- Do not use an extension cord.
- Failure to follow these instructions can result in death. fire. or electrical shock.
REINSTALLING/USING WASHER AGAIN
To reinstall washer after non-use, vacation, winter storage, or moving:
- Refer to Installation Instructions to locate, level, and connect washer.
- Before using again, run washer through the following recommended procedure:
To use washer again:
- Flush water pipes and hoses. Reconnect water inlet hoses. Turn on both water faucets.
- Plug in washer or reconnect power
- Run washer through Bulky Items cycle to clean washer and remove any antifreeze. Use half the manufacturer’s recommended amount of detergent for a medium-size load.
TROUBLESHOOTING
Vibration or Off-Balance
If you experience
- Check the following for proper installation or see “Using Your Washer” section.
Possible Causes
- Feet may not be in contact with the floor.
- Washer may not be level.
- Load could be unbalanced.
Solution
- Front and rear feet must be in firm contact with floor, and washer must be level to operate properly.
- Check floor for flexing or sagging. If flooring is uneven, a 3/4" (19 mm) piece of plywood under your washer will reduce sound.
- Load dry items in loose heaps evenly around basket wall. Adding wet items to washer or adding more water to basket could unbalance washer.
- Wash smaller loads to reduce imbalance.
- Do not tightly pack. Avoid washing single items.
- Use Bulky Items cycle for oversized, non-absorbent items such as comforters or poly-filled jackets.
- See “Cycle Guide” and “Using Your Washer” in this Use and Care Guide.
Noises
If you experience
- Clicking or metallic noises
- Gurgling or humming
- Humming
- Whirring
Possible Causes
- Objects caught in washer drain system.
- Washer may be draining water
- Load sensing may be occurring.
- Basket deceleration may be occurring
Solution
- Empty pockets before washing. Loose items such as coins could fall between basket and tub or may block pump. It may be necessary to call for service to remove items.
- It is normal to hear metal items on clothing such as metal snaps, buckles, or zippers touch against the basket.
- It is normal to hear the pump making a continuous humming sound with periodic gurgling or surging as final amounts of water are removed during the Drain/Spin cycles.
- You may hear the hum of the sensing spins after you have started the washer. This is normal.
- You may hear the whirring sound of the basket decelerating. This is normal.
Water Leaks
If you experience
- Check the following for proper installation:
Possible Causes
- Washer not level.
- Fill hoses not attached tightly.
- Fill hose washers.
- Drain hose connection.
- Check household plumbing for leaks or clogged sink or drain.
- Washer not loaded as recommended
Solution
- Water may splash off basket if washer is not level.
- Tighten fill hose connection.
- Make sure all four fill hose flat washers are properly seated.
- Pull drain hose from washer cabinet and properly secure it to drain pipe or laundry tub.
- Water can back up out of a clogged sink or drain pipe. Check all household plumbing for leaks (laundry tubs, drain pipe, water pipes, and faucets).
- Unbalanced loading can cause basket to be out of alignment and cause water to splash off tub. See “Using Your Washer” for loading instructions.
Washer Not Performing As Expected
If you experience
- Not enough water in washer
- Washer won’t run or fill, washer stops working, or wash light remains on (indicating that the washer was unable to fill appropriately)
- Washer not draining/ spinning, loads are still wet, or spin light remains on (indicating that the washer was unable to pump out water within 10 minutes)
Possible Causes
- Load not completely covered in water
- Check for proper water supply
- Check proper electrical supply.
- Normal washer operation.
- Washer may be tightly packed.
- Small items may have been caught in pump or between basket and tub, which can slow draining.
- Use a cycle with a low spin speed.
- The washer may be tightly packed or unbalanced.
Solution
- This is normal operation for a high efficiency washer. If the Water Level knob is set to Auto setting, the load will not be completely under water. The washer senses load sizes and adds correct amount of water for optimal cleaning.
- Use Bulky Items cycle for higher water fill, or set Water Level knob to Deep Water Wash setting. See “What’s Under the Lid” and “Cycle Guide” to match your load with the best cycle.
- Run Clean Washer with affresh® cycle to optimize the water level and wash performance due to soil buildup in washer basket.
- Both hoses must be attached and have water flowing to inlet valve.
- Both hot and cold water faucets must be turned on.
- Check that inlet valve screens have not become clogged.
- Check for any kinks in inlet hoses, which can restrict water flow.
- Plug power cord into a grounded 3 prong outlet.
- Do not use an extension cord.
- Ensure there is power to outlet.
- Reset a tripped circuit breaker. Replace any blown fuses. NOTE: If problems continue, contact an electrician.
- Lid must be closed for washer to run
- Washer will pause during certain phases of cycle. Do not interrupt cycle.
- Remove several items, rearrange load evenly in basket. Close lid and press START/PAUSE/CANCEL.
- Do not add more than one or two additional items after cycle has started to avoid tightly packing or unbalancing.
- Do not add more water to the washer.
- Empty pockets and use garment bags for small items.
- Cycles with lower spin speeds remove less water than cycles with high spin speeds. Use the recommended cycle/spin speed for your garment. To remove extra water in the load, select Drain & Spin. Load may need to be rearranged to allow even distribution of the load in the basket.
- Tightly packed or unbalanced loads may not allow the washer to spin correctly, leaving the load wetter than normal. Evenly arrange the wet load for balanced spinning. Select the Drain & Spin cycle to remove excess water. See “Using Your Washer” for loading recommendations.

- Plug into a grounded 3 prong outlet.
- Do not remove ground prong.
- Do not use an adapter.
- Do not use an extension cord.
- Failure to follow these instructions can result in death. fire. or electrical shock.
WASHER SAFETY
Your safety and the safety of others are very important.
We have provided many important safety messages inthis manual and on your appliance. Always read and obey all safety messages.
 This is the safety alert symbol.
This symbol alerts you to potential hazards that can killor hurt you an others.
Al safety messages will folow the safety alert symbol and either the word "DANGER" or “WARNING.”
These words mean:
 You can be killed or seriously injured if you don't immediately follow instructions.
 You can be killed or seriously injured it you don't follow instructions.
All safety messages wil tell you what the potential hazard is. tell you how to reduce the chance of injury. and tell you what can happen if the instructions are not folowed.
IMPORTANT SAFETY INSTRUCTIONS
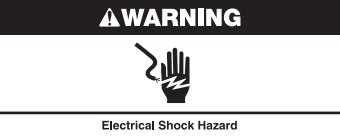
WARNING: To reduce the risk of fire. electric shock. or injury to persons when using the washer. follow basic precautions. including the foowing:
- Read all instructions before using the washer.
- Do not wash articles that have been previously cleaned in. washed in. soaked in. or spotted with gasoline. dry-cleaning solvents. other flammable. or explosive substances as they give off vapors that could ignite or explode.
- Do not add gasoline. dry-cleaning solvents. or other lammable. or explosive substances to the wash water. These substances give off vapors that could ignite or explode.
- Under certain conditions. hydrogen gas may be produced in a hot water system that has not been used for 2 weeks or more. HYDROGEN GAS IS EXPLOSIVE. If the hot water system has not been used for such a period. before using the washing machine. turn on all hot water faucets and let the water flow from each for several minutes. This will release any accumulated hydrogen gas. As the gas is flammable. do not smoke or use an open flame during this time
- Do not allow children to play on or in the washer. Close supervision of chikiren is necessary when the washer is used near children.
- Before the washer is removed from service or discarded. remove the door or lid
- Do not reach into the washer if the drum. tub or agitator is moving.
- Do not install or store the washer where it will be exposed to| the weather.
- Do not tamper with controls.
- Do not repair or replace any part of the washer or attempt any servicing unless specifically recommended in this manual or in published userrepair instructions that you understand and have the skills to carry out.
- See “Electrical Requirements” located in the installation instructions for grounding instructions.
State of California Proposition 65 Warnings:
WARNING: This product contains one or more chemicals known to the State of California to cause cancer.
WARNING: This product contains one or more chemicals known to the State of California to cause birth defects or other reproductive harm.
MAYTAG® LAUNDRY LIMITED WARRANTY
ATTACH YOUR RECEIPT HERE. PROOF OF PURCHASE IS REQUIRED TO OBTAIN WARRANTY SERVICE.
Please have the following information available when you call the Customer eXperience Center:
- Name, address, and telephone number
- Model number and serial number
- A clear, detailed description of the problem
- Proof of purchase including dealer or retailer name and address
IF YOU NEED SERVICE:
- Before contacting us to arrange service, please determine whether your product requires repair. Some questions can be addressed without service. Please take a few minutes to review the Troubleshooting section of the Use and Care Guide or visit the “HOW-TOS & FAQS” section of https://www.maytag.com/owners.html.
- All warranty service is provided exclusively by our authorized Maytag Service Providers. In the U.S. and Canada, direct all requests for warranty service to: Maytag Customer eXperience Center In the U.S.A. call 1-800-344-1274. In Canada call 1-800-688-2002. If outside the 50 United States and Canada, contact your authorized Maytag dealer to determine if another warranty applies.
TEN YEAR LIMITED WARRANTY
WHAT IS COVERED
FIRST YEAR LIMITED WARRANTY (PARTS AND LABOR)
- For one year from the date of purchase, when this major appliance is installed, operated, and maintained according to instructions attached to or furnished with the product, Maytag brand of Whirlpool Corporation or Whirlpool Canada LP (hereafter “Maytag”) will pay for factory specified parts and repair labor to correct defects in materials or workmanship that existed when this major appliance was purchased, or at its sole discretion replace the product. In the event of product replacement, your appliance will be warranted by the remaining term of the original unit’s warranty period.
SECOND THROUGH TENTH YEAR LIMITED WARRANTY (DRIVE MOTOR AND WASH BASKET ONLY - LABOR NOT INCLUDED)
In the second through tenth years from the date of original purchase, when this major appliance is installed, operated, and maintained according to instructions attached to or furnished with the product, Maytag will pay for factory specified parts for the following components to correct non-cosmetic defects in materials or workmanship in these parts that prevent function of this major appliance and that existed when this major appliance was purchased. This is a limited 10 year warranty on the below named parts only and does not include repair labor.
- Drive Motor
- Wash Basket (Side Walls Only)
YOUR SOLE AND EXCLUSIVE REMEDY UNDER THIS LIMITED WARRANTY SHALL BE PRODUCT REPAIR AS PROVIDED HEREIN. Service must be provided by a Maytag designated service company. This limited warranty is valid only in the United States or Canada and applies only when the major appliance is used in the country in which it was purchased. This limited warranty is effective from the date of original consumer purchase. Proof of original purchase date is required to obtain service under this limited warranty.
WHAT IS NOT COVERED
- Commercial, non-residential, multiple-family use, or use inconsistent with published user, operator, or installation instructions.
- In-home instruction on how to use your product
- Service to correct improper product maintenance or installation, installation not in accordance with electrical or plumbing codes, or correction of household electrical or plumbing (e.g., house wiring, fuses, or water inlet hoses).
- Consumable parts (e.g., light bulbs, batteries, air or water filters, preservation solutions)
- Defects or damage caused by the use of non-genuine Maytag parts or accessories.
- Conversion of your product from natural gas or propane gas or reversal of appliance doors.
- Damage from accident, misuse, abuse, fire, floods, acts of God, or use with products not approved by Maytag
- Repairs to parts or systems to correct product damage or defects caused by unauthorized service, alteration, or modification of the appliance.
- Cosmetic damage including scratches, dents, chips, and other damage to appliance finishes unless such damage results from defects in materials and workmanship and is reported to Maytag within 30 days.
- Discoloration, rust, or oxidation of surfaces resulting from caustic or corrosive environments, including but not limited to, high salt concentrations, high moisture or humidity, or exposure to chemicals.
- Pick-up or delivery. This product is intended for in-home repair.
- Travel or transportation expenses for service in remote locations where an authorized Maytag servicer is not available.
- Removal or reinstallation of inaccessible appliances or built-in fixtures (e.g., trim, decorative panels, flooring, cabinetry, islands, countertops, drywall) that interfere with servicing, removal, or replacement of the product.
- Service or parts for appliances with original model/serial numbers removed, altered, or not easily determined.
The cost of repair or replacement under these excluded circumstances shall be borne by the customer.
DISCLAIMER OF IMPLIED WARRANTIES
IMPLIED WARRANTIES, INCLUDING ANY IMPLIED WARRANTY OF MERCHANTABILITY OR IMPLIED WARRANTY OF FITNESS FOR A PARTICULAR PURPOSE, ARE LIMITED TO TEN YEARS OR THE SHORTEST PERIOD ALLOWED BY LAW. Some states and provinces do not allow limitations on the duration of implied warranties of merchantability or fitness, so this limitation may not apply to you. This warranty gives you specific legal rights, and you also may have other rights that vary from state to state or province to province.
DISCLAIMER OF REPRESENTATIONS OUTSIDE OF WARRANTY
Maytag makes no representations about the quality, durability, or need for service or repair of this major appliance other than the representations contained in this Warranty. If you want a longer or more comprehensive warranty than the limited warranty that comes with this major appliance, you should ask Maytag or your retailer about buying an extended warranty.
LIMITATION OF REMEDIES; EXCLUSION OF INCIDENTAL AND CONSEQUENTIAL DAMAGES
YOUR SOLE AND EXCLUSIVE REMEDY UNDER THIS LIMITED WARRANTY SHALL BE PRODUCT REPAIR AS PROVIDED HEREIN. MAYTAG SHALL NOT BE LIABLE FOR INCIDENTAL OR CONSEQUENTIAL DAMAGES. Some states and provinces do not allow the exclusion or limitation of incidental or consequential damages, so these limitations and exclusions may not apply to you. This warranty gives you specific legal rights, and you also may have other rights that vary from state to state or province to province.