Connecting an antenna, cable set-top box or satellite receiver
To connect an antenna,cable set-top box or satellite receiver:
Connect one end of a coaxial cable (not included) to the RF OUT port on the antenna, cable or satellite box. If you are using an antenna with twin-lead cable, you may need a 300-75 Ohm adapter (not provided) to connect it to the back of your TV. Likewise, if you are using several antennas, you may need a combiner (not provided).
Connect the other end of the cable to the ANT/CABLE port on the side of TV.
Using your remote, select the Inputs icon in Home screen and select Channels as the input source.
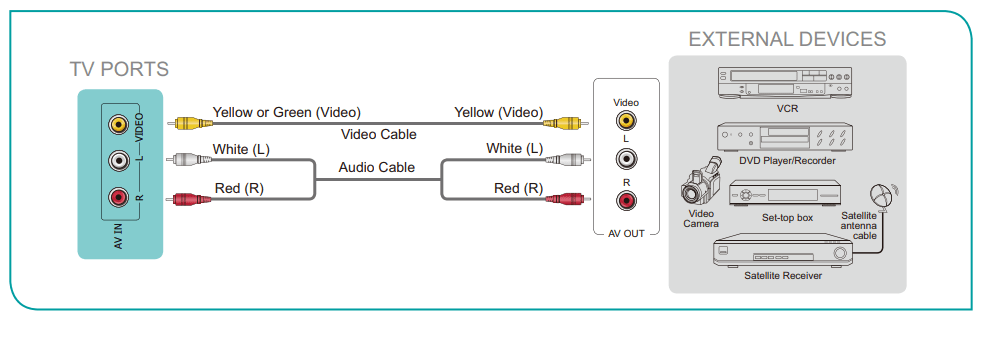
Connecting a satellite receiver, DVD player or other audio visual (AV) devices with a composite video cable (yellow/white/red)
To connect an AV device with a composite video cable (not provided):
Use the audio and video cables to connect the composite video/audio ports of the external AV device to the AV IN ports of the TV. (Video = yellow, Audio Left = white, and Audio Right = red)
Plug the connected devices into the AV connectors on the TV before switching it on.
Using your remote, select the Inputs icon in Home screen and select Composite as the input source.
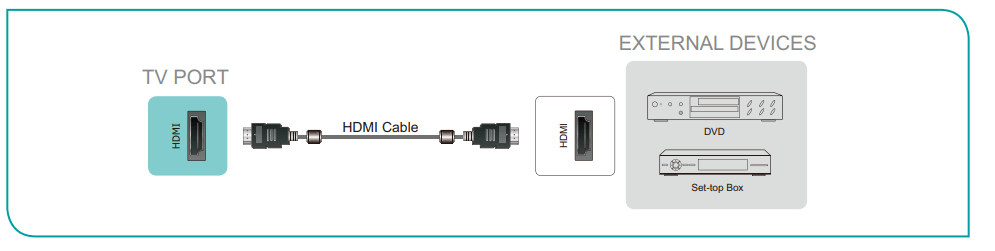
Connecting an AV device with an HDMI cable
This 4K TV has two different software versions of HDMI ports to connect HDMI-enabled devices. The high-powered HDMI version 2.0 inputs that enable you to connect 4K Ultra-HD external devices, a better experience when connected to the HDMI1 port. For example, if you have an X-box or Blu-ray player that supports the 2.0 standard, more details will be transmitted to the TV screen to maximize your entertainment experience. The HDMI version 1.4 inputs are great for any of your external devices that support a standard full high-definition resolution of 1080p.
Please refer to the User Manual that came with your device for step-by-step instructions.
To connect an AV device with an HDMI cable (not provided):
Use an HDMI cable to connect the HDMI output port of the AV device to the HDMI port of the TV.
Plug the connected devices into the HDMI port on the TV before switching it on.
Using your remote, select the Inputs icon in Home screen and select the corresponding HDMI input.
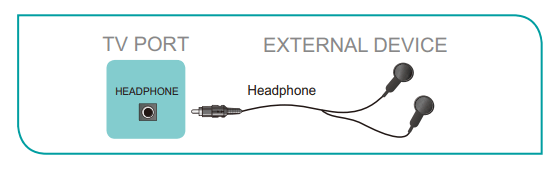
Connecting a headphone
You can connect headphone (not provided) to the HEADPHONE port on your TV. While the headphone is connected, the sound from the built-in speakers will be disabled.
NOTES
Headphones with microphones are not supported.
If "Headphone with Speakers" in the sound menu is selected manually, the headset and the whole machine will have sound at the same time.
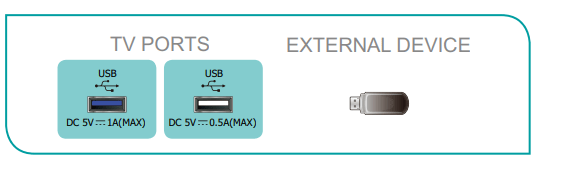
Connecting a USB device
You can connect the USB devices such as hard drives, USB sticks and digital cameras for browsing photos, listening to music and watching recorded videos.
Connect a USB device into the USB port.
Select the content you want to play or view
NOTES
When connecting a hard disk or a USB hub, always connect the mains adapter of the connected device to the power supply. Exceeding a total current consumption may result in damage. The USB1.1 and USB2.0 devices maximum current consumption are 500mA.
For individual non-standard high-capacity mobile hard disk, if its impulse current is greater than 500mA, it may cause TV-rebooting or self-locking. So the TV does not support it.
The USB port supports a voltage of 5V.
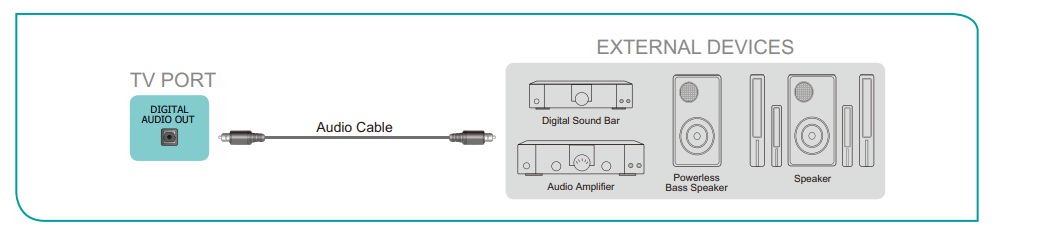
Connecting speakers or other audio receivers
To connect speakers or other audio receivers with an audio cable (not provided):
Use an audio cable to connect the digital audio in port of the audio receiver device to the DIGITAL AUDIO OUT port of the TV.
Plug the connected devices into the main power socket before switching on the TV.
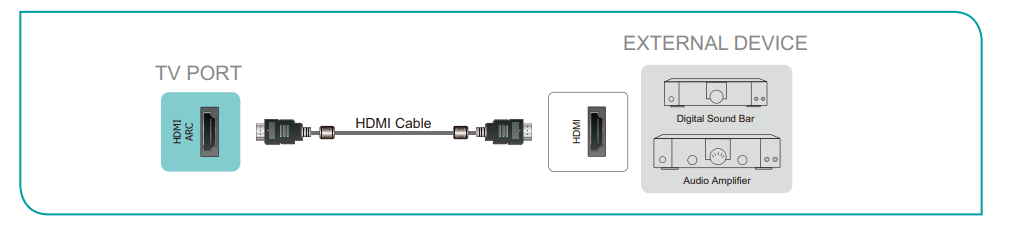
Connecting a digital sound bar to use Audio Return Channel (ARC)
If you’d like to use the Audio Return Channel (ARC) feature to have sound sent from the TV back down an HDMI cable to a digital sound bar, then you will need to connect the cable to the HDMI / ARC port. By using this feature, you will also be able to control the sound bar with your TV remote instead of using multiple remotes for each device.
To connect a digital sound bar with an HDMI cable (not provided):
Connect the cable that’s attached to the sound bar to the HDMI / ARC port on the TV.
Turn on the sound bar by pressing the Power button.
Press the [ ] button on your remote and select the Settings icon, then go to Sound > Speakers.
Select the ARC option.
NOTES
Only digital sound bars that require a wired connection are compatible with the TV.
If the device has an Input Selector feature then make sure to change it to TV.
CH (channel) audio is available when the TV is connected to an external device that supports a 5.1 channel surround sound. You can go to the Settings / Menu > Sound > Advanced settings > Digital audio out to select
Dolby Digital Plus to receive the 5.1 channel audio. You will need to also go into the sound or audio settings of your device to ensure it is set to 5.1 Channel output. It may read ‘Bitstream’, ‘RAW’ or ‘Digital’.
Connecting Your TV to a Wireless or Wired Network
Connecting to a wireless network
Our built-in wireless LAN adapter supports the IEEE 802.11 ac/b/g/n communication protocols and we recommend that you use an IEEE 802.11n or IEEE 802.11ac router. When you play a video over an IEEE 802.11 b/g connection, the video may not play smoothly
NOTES
You must use the built-in Wireless LAN Adapter to use a wireless network because the set does not support an external USB network adapter.
To use a wireless network, your TV must be connected to a wireless IP sharer. If the wireless IP sharer supports
Dynamic Host Configuration Protocol (DHCP), your TV can use a DHCP or static IP address to connect to the wireless network.
Select a channel for the wireless IP sharer that is not currently being used. If the channel set for the wireless IP sharer is currently being used by another device nearby, this will result in interference and communication failure.
If you apply a security system other than the systems listed below, it will not work with the TV.
If Pure High-throughput (Greenfield) 802.11N mode is selected and the Encryption type is set to WEP, TKIP or
TKIP-AES (WPS2 Mixed) for your Access Point (AP), then the TV will not support a connection in compliance with these Wi-Fi certification specifications.
If your access point (AP) supports Wi-Fi Protected Setup (WPS), you can connect to the network via Push Button
Configuration (PBC) or PIN (Personal Identification Number). WPS will automatically configure the SSID and WPA key in either mode.
Connecting to a wired (Ethernet) network
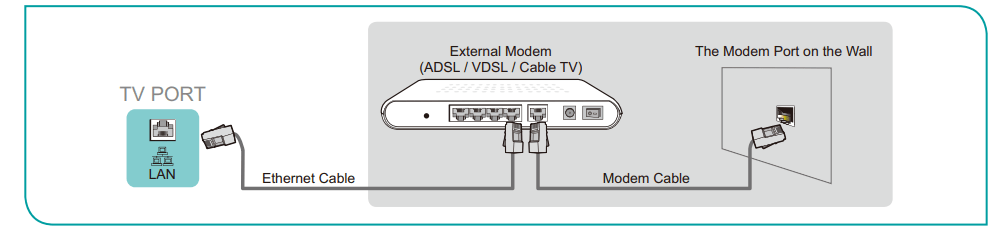
Option 1: You can attach your TV to your LAN by connecting the LAN port on the back of your TV to an external modem using a Cat 5 LAN cable. See the illustration below.
Option 2: You can attach your TV to your LAN by connecting the LAN port on the back of your TV to an IP Sharer which is connected to an external modem. Use an Ethernet cable for the connection. See the illustration below
Option 3: Depending on how your network is configured, you may be able to attach your TV to your LAN by connecting the LAN port on the back of your TV directly to a network wall outlet with an Ethernet cable. See the diagram below.
If you have a Dynamic Network, you should use an ADSL modem or router that supports Dynamic Host Configuration Protocol (DHCP). Modems and routers that support DHCP automatically provide the IP address, subnet mask, gateway, and DNS, so you don’t have to enter them manually. Most home networks are Dynamic Networks.
Some networks require a Static IP address. If your network requires a Static IP address, you must enter the IP address, subnet mask, gateway, and DNS values manually on your TV’s Cable Setup Screen when you set up the network connection. To get the IP address, subnet mask, gateway and DNS values, contact your Internet Service Provider (ISP).
Using Your TV Remote Control
Remote control range information
The remote control can work at a distance of up to 26 feet in front of the TV set.
It can work at a 30 degree horizontal or vertical angle.
Begin using your remote
Slide the back cover to open the battery compartment of the remote control.
Insert two AAA size batteries. Make sure to match the (+) and (-) ends of the batteries with the (+) and (-) ends indicated in the battery compartment.
Replace the battery compartment cover.
NOTES
Discard batteries in a designated disposal area. Do not throw them into a fire.
Remove old batteries immediately to prevent them from leaking into the battery compartment.
If you do not intend to use the remote control for a long time, remove the batteries.
Battery chemicals can cause a rash. If the batteries leak, clean the battery compartment with a cloth. If chemicals touch your skin then wash it immediately.
Do not mix old and new batteries.
Do not mix alkaline, standard (carbon-zinc) or rechargeable (NiCd, NiMH, etc.) batteries.
Do not continue using the remote if it gets warm or hot.
Call our Support Center immediately on the support website.
Pairing the Remote Control
Pair the remote to the TV after you power it on. Keep the remote control within 10 feet from the TV. Press and hold the [ ] button at least 3 seconds to start pairing.
If the remote paired successfully then a confirmation will display on the screen. If it did not pair successfully then an unsuccessful message will display. Repeat step 1.
NOTES
If an unknown error occurred with the remote then it could have been caused by interference. Try to remove what's causing the interference and pair it again.
If an unknown error occurred in the remote control while the battery power is normal, you can take out the batteries and press any key for 1~2 seconds, then the remote control can work normally.
The remote cannot be paired to the TV while the TV is in standby mode.
Completing the Setup Wizard Menu
Plug the power cord into an AC outlet, the TV will turn on.
After the splash screen that displays the logo appears, begin the Setup Wizard menu.
The guide setting is completed according to the boot navigation prompt. The navigation information is specific to the actual condition.
The Home screen will be your starting point for navigating the TV.
Shortcuts Instructions
Turning your TV on or off
To turn your TV on:
Connect the power cord to the back of the TV, then plug the power cord into an AC outlet.
When the TV is powered on, press the button on the remote to turn on TV.
To turn your TV off, press the button on the remote.
NOTES
When your TV is in standby mode, it is still consuming power. To completely disconnect power, please remove the plug from the AC outlet.
If your TV does not receive an input signal for several minutes, it automatically goes into standby mode.
Using the Live TV
To view broadcast programs, press the button on your remote, select the Inputs icon in Home screen and select Channels as the input source.
Channel search guide: When you select Channels as input, if no TV channels were saved before, you will be prompted to do a channel search. You can also go to Menu > Channels to change the channel settings.
Launch Live TV
After channel scaning is done for the first time, the screen will display LiveTV operating tutorial, including: how to Load the info Bar, how to load the channel list and so on.
Press the UP button to view channel and program information.
Press the OK button to view Channel List
Press the MENU button to configure settings of broadcast TV.
Press the BACK button to return to the channel last viewed.
Home
Getting familiar with the Home screen
The simple design of the Home screen menu makes it easy to navigate. And you can easily add or delete applications in the Home interface according to your needs.
To access the Home screen, press the button on your remote control and use the D-pad to make your selection.
Indicators and Icons on the top of the Home screen
Google Assistant: You can search movies, TV, and more by speaking.
Google Search: You can search movies, TV, and more by typing.
Notifications: Notifications can come from the system, an external device, an application, the media player etc.
Inputs: Select the Input source depending on the device you have connected to your TV.
Settings: Settings lets you configure the TV, set app options, add accounts, and change other preferences.
Time: You can always view the current time at the top right corner of the Home screen.
Names of sections that appear on the Home screen - The Home screen displays the following section names:
Apps
Feature Apps
Recommended content
Settings
Network
Wi-Fi: Turn on the Wi-Fi to access the Internet via a wireless network connection.
Select an available network, press [OK] to confirm. A screen will appear prompting you to enter the password if necessary.
Connect via WPS: If your access point (AP) supports Wi-Fi Protected Setup (WPS), you can connect to the network via press the Wi-Fi Protected Setup button on your router. WPS will automatically configure the SSID and WPA key.
Add new network: You can add wireless network.
Scanning always available: Check to scan for networks even when Wi-Fi is turned off.
Anyview Stream: Allow to view videos, images and music shared from another device in your network.
Connected / Not connected: Show whether the Ethernet is connected
Proxy settings: You can set the proxy server.
IP settings: Configure the IP setting for your network connection.
Inputs
You can see the state of devices that the TV connected: Connected Input, Standby Inputs and Not connected Input.
Consumer Electronic Control (CEC)
HDMI control: Allow the TV to control HDMI devices.
Device auto power off: Power off HDMI devices with the TV.
TV auto power on: Power on the TV with HDMI device.
Google Cast
Enables you to extend your app to direct its streaming video and audio to the TV.
Apps
You can view details about an app or other item listed. The information and controls available vary among different types of apps.
Screen saver
Enables Screen saver when the TV is idle.
Usage Mode
Set the TV to use in Home (energy preferred), Store or Store Mode with Video.
Wake Up
Wake on LAN: An application on your second screen with Wake on Wired LAN will turn on your TV when you use the feature.
Your TV and the device must in the same LAN.
Click the screencast icon in the device's app (like YouTube). The device displays the ID of all available devices.
Click on your TV name, the TV opens the app or casts the contents on the app to the TV. When the device casts the contents of app to the TV which in standby mode, the TV automatically boots.
Wake on Wireless Network: An application on your second screen with Wake on Wireless will turn on your TV when you use the feature. (See "Wake on LAN" for more details.)
Wake on Cast: Wake up the TV with the cast function.
Send Diagnostics and Usage
Allow to send the diagnostics and usage of the report.
Setup assistant
Use the Setup assistant for instructions to help you set up your TV.
Enhanced Viewing
Provide useful information based on content that appears on your TV.(only for some countries)
Storage & reset
You can view the TV storage and also you can reset to the factory data.
About - You can view the version information, the status of network, and other information. You can also update the software version or change the TV's name.
System update: We will provide software updates to continuously enhance your TV and correct any issues that may impact your user experience; therefore, we recommend that you keep your TV connected to the Internet to automatically receive updates when they are available.
Device name: Choose a name for your TV. The name will be shown to devices that are available for sharing data.
Date & time
Automatic date & time: Use network-provided time. You can also set the current time manually when Off is selected.
Set date: Set the date.
Set time: Set the time.
Set time zone: Select your time zone.
Use 24-hour format: Set the time to display in a 12 or 24-hour format.
Timers
Sleep timer: Set the sleep timer to automatically turn the TV off within a specified time: off, 10 Minutes, 20 Minutes, 30 Minutes, 40 Minutes, 50 Minutes, 60 Minutes, 90 Minutes and 120 Minutes.
Power on timer: Set the clock for the time you want the TV to turn on automatically.
Power off timer: Set the clock for the time you want the TV to turn off automatically.
Language
Adjust the default Language settings for the TV.
Keyboard
Adjust the default settings for the keyboard.
Home screen
Customize channels: Add or delete the app icon from Home screen.
Enable video previews: Enables or disables the video previews.
Enable audio previews: Enables or disables the audio previews.
Reorder apps / Reorder games: Rearrange the Apps screen.
Android TV Home / Android TV Core Services: See the information of open source software licences.
Google
You can view permissions about accounts and limit the search results.
Accessibility
Captions: Displays and sets the closed captions.
Live TV Closed Captioning: Displays and sets the TV closed captions.
High contrast text: Improves contrast for visually impaired.
Video description: Enables broadcasted descriptive audio for visually impaired.
TalkBack: Controls spoken feedback for visually impaired users.
Switch Access: Collects all of the text you type, except passwords. This includes personal data such as credit card numbers.
HisRemoteNow: Collects all of the text you type, except passwords. This includes personal data such as credit card numbers.
Text to speech: Lets you specify text-to-speech engine details and speech rate.
Serial Communication Port
The Serial communication port protocol is used for communication between a PC or video system controller and TV(s).
Add accessory
Connect your Bluetooth devices (like a keyboard, a mouse, a soundbar etc.) to the TV. Before you can use a Bluetooth device with your TV, you must first pair it.
Make the device you want to pair discoverable. See the documentation that came with your device to learn how to make it discoverable.
The TV displays the ID of all available devices in range.
Click the ID of the Bluetooth device in the list on your TV to pair with it.
Follow the prompts to complete the pairing.
Remote
This menu only appears when your remote is connected to your TV in Bluetooth mode.
To connect your remote through Bluetooth, press and hold the Menu button until you hear a beep.
After successfully paired, you can enter a new name for your remote, unpair and check the battery status.
Location
Your TV can use different modes to access location information. Each mode uses different sources to estimate the TV’s location.
Security & restrictions
Enables unknown sources, checking of apps installed for harmful behavior.
Reset Advertising ID
Reset your advertising ID. You may still receive the same number of ads but they may not be relevant to your interests. (only for some countries)
Usage & Diagnostics
Help improve Android performance by automatically sending diagnostics information.
Add account
You can use multiple Google Accounts on your TV. You may also be able to add other kinds of accounts, depending on your apps.
Apps
Installing an App
To install an app:
From the Home screen, click on the Apps and select the Get more apps.
Use the navigation buttons on your remote to select the app that you want to install.
Select the INSTALL.
Removing an App
You can only delete apps that you’ve installed to the TV. Factory-installed apps can not be deleted.
To delete an app:
From the Apps screen, use the navigation buttons on your remote to select the app that you want to remove. Long press the [OK] button on your remote.
Click on Uninstall.
A dialog message displays that asks do you want to uninstall this app. Confirm and the icon is removed from the Apps screen.
NOTE: If an app is deleted, the information related to that app is also removed.
Moving App Icons around
To move an app:
From the Apps screen, use the navigation buttons on your remote to select the app that you want to move. Long press the [OK] button on your remote.
Click Move.
Use the navigation buttons on your remote to move the location of app. Press the [OK] button to confirm.
Quick Problem-Solving Tips
No sound or picture
Check if the power cord is plugged into a powered AC outlet.
Press the button on the remote control to activate the unit from ‘Standby’ mode.
Check to see if the LED light is on or not. If it is, then the TV is receiving power.
I have connected an external source to my TV and I get no picture and/or sound
Check for the correct output connection on the external source and for the correct input connection on the TV.
Make sure you have made the correct selection for the input mode for the incoming signal.
When I turn on my TV, there is a delay for a few seconds before the picture appears. Is this normal?
Yes, this is normal. The TV is initializing and searching for previous setting information.
The picture is normal but there is no sound
Check the volume settings.
Check if ‘Mute’ mode is set to On.
Sound but no picture or black and white picture
If the picture is black and white, unplug the TV from the AC outlet and replug it after 60 seconds.
Check that the Color is set to 50 or higher.
Try different TV channels.
The sound and/or picture is distorted or appears wavy
An electric appliance may be affecting the TV. Turn off any appliances that are nearby and move it farther away from the TV.
Insert the power plug of the TV set into another power outlet.
The sound and picture is blurry or cuts out
If using an external antenna, check the direction, position and connection of the antenna.
Adjust the direction of your antenna or reset or fine tune the channel.
A horizontal or vertical stripe appears on the picture and/or the picture is shaking
Check if there is an appliance or electric tool nearby that is causing interference.
The plastic cabinet makes a clicking” type of sound
The ‘click’ sound can occur when the temperature of the television changes.
This change causes the television cabinet to expand or contract, which makes the sound. This is normal and the TV is OK.
The remote control does not work
Confirm that TV still has power and is operational.
Change the batteries in the remote control.
Check if the batteries are correctly installed.
NOTE: For usage in Mexico , operation of this equipment is subject to the following two conditions : 1 ) it is possible that this device doesn’t cause any detrimental interference and 2 ) this device must take any kind of interference, including that which may cause its malfunctioning.
 Inputs icon in Home screen and select Channels as the input source.
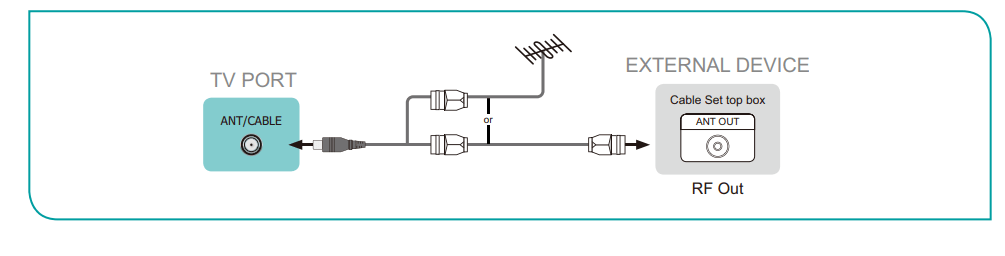
 ] button on your remote and select the Settings icon, then go to Sound > Speakers.
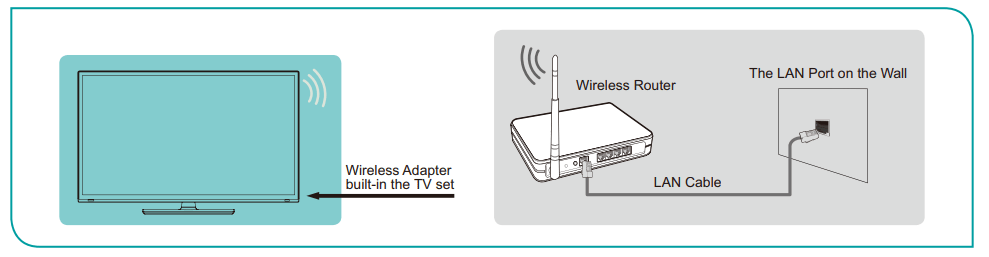


 ] button at least 3 seconds to start pairing.
 button on the remote to turn on TV.
 button on your remote control and use the D-pad to make your selection.