User Manual
OPERATING INSTRUCTIONS
Features
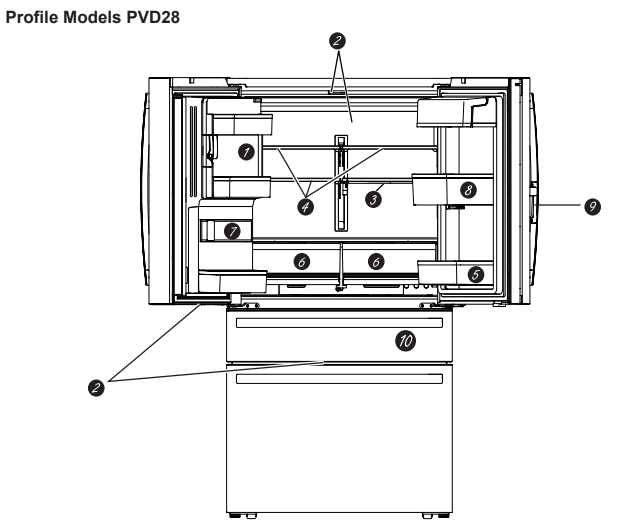
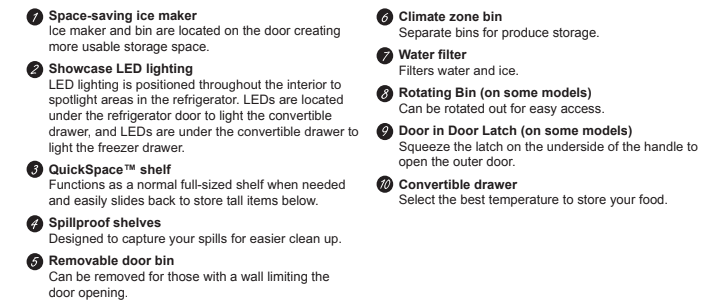
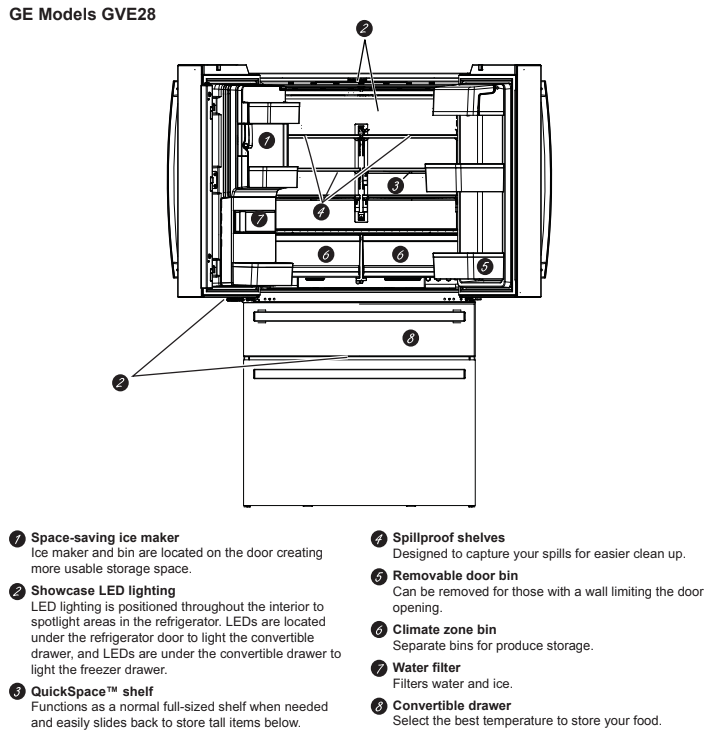
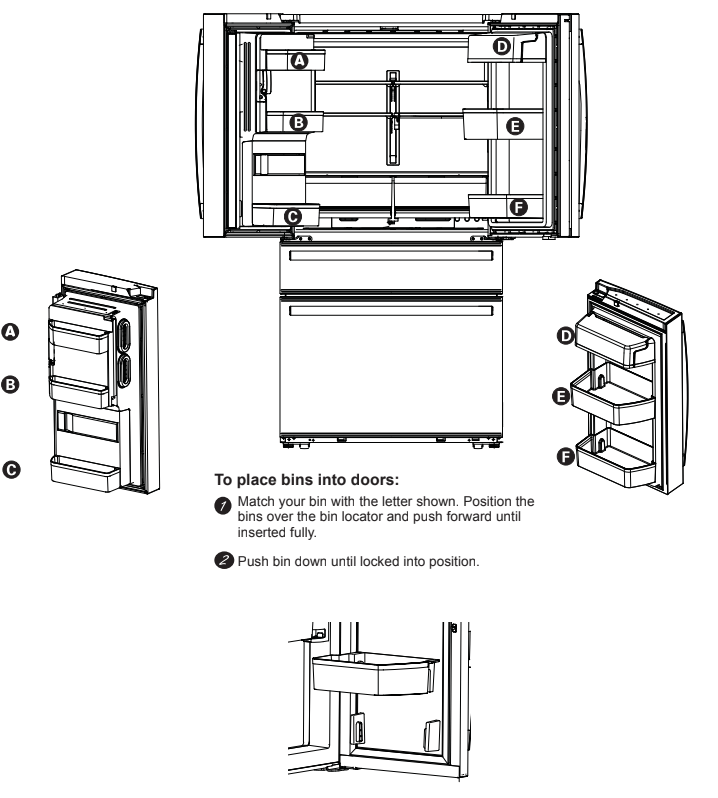
Door ice bin
1. Open left refrigerator door
2. Pull down latch to release bin door
3. Using handhold lift ice bucket up and out to clear locators in bottom of bin
4. To replace the ice bucket, set it on the guide brackets and push until the ice bucket seats properly.
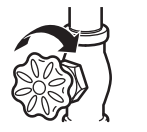
5. If bucket cannot be replaced, rotate the Ice Bucket Fork 1/4 turn clockwise.
Ice/water filter
Certified to reduce chlorine-resistant cysts, lead, select pharmaceuticals, and more. For easy filter replacement instructions see page 13.
Controls
REFRIGERATOR/FREEZER CONTROLS
The refrigerator is shipped with protective film covering the controls. If the film was not removed during installation, remove it now.
The recommended temperature settings, preset from the factory, are 37°F (3°C) for the refrigerator and 0°F (-18°C) for the freezer.

Changing the Temperature
To Change the Refrigerator Temperature:
Press the Settings button until "Fridge" is highlighted. Press the Up or Down arrow buttons to increase or decrease temperature settings.
To Change the Freezer Temperature:
Press the Settings button until "Freezer" is highlighted. Press the Up or Down arrow buttons to increase or decrease temperature settings.
The cooling system can be turned off by pressing the Settings button until either "Fridge" or "Freezer" is highlighted. Press and hold both the Up and Down arrow buttons for 3 seconds. "--" will be displayed when the system is off. Turning the cooling system off stops the cooling to the refrigerator, but it does not shut off the electrical power. The cooling system can be turned on by returning to the "Fridge" or "Freezer" setting and pressing the On button.
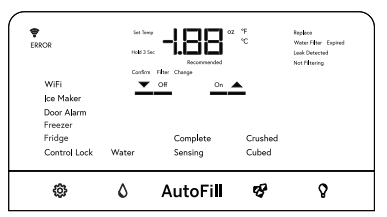
Settings  -Press to scroll through the refrigerator functions.
- Control Lock - Press ON to lock out ice and water dispenser and all feature and temperature buttons. Press and hold OFF for 3 seconds to deactivate.Fridge - Press Up or Down button to increase or decrease temperature from 34°F (1°C) to 42°F (6°C)
- Freezer - Press Up or Down button to increase or decrease temperature from -6°F (-21°C) to 5°F (-15°C).
- Door Alarm - Sounds an alert when the freezer or refrigerator doors have been left open. Snooze the alert by pressing any key. Press On or Off to activate or deactivate Door Alarm while an alert is not active.
- Ice Maker - Press On or Off to start/stop Ice Maker.
- WiFi - (on some models) Press On to start the WiFi connection process per the instructions on Page 12. Press Off to disable WiFi. Note that restarting WiFi requires repeating the WiFi connection process .GE Profile Door-in-Door models PVD28 have built-in Wifi GEA models GVE28 are Connect Plus Ready
- Water
 - Press to select Water to dispense when the paddle is pressed.
- AutoFill* - Press to initiate automatic sensing to fill from dispenser.
- Ice
 - Press to select crushed or cubed ice when the paddle is pressed.
- Light
 Press to control dispenser lighting. Chime will accompany each press.
- Fahrenheit / Celsius:
- Temperature display can be switched between Fahrenheit and Celsius. Press Settings button
 to navigate to "Fridge" or "Freezer", then press and hold the Ice button and Light button for three seconds.
- Volume Control: Alert volume can be adjusted from High to Low and Off Press Settings button
 to navigate to "Icemaker". then press and hold the Ice button and Light button for three seconds.
- Sabbath Mode: Simultaneously hold the Settings
 . Water, and Light buttons for three seconds to enter and exit Sabbath mode.
CARE AND CLEANING
Cleaning the Outside
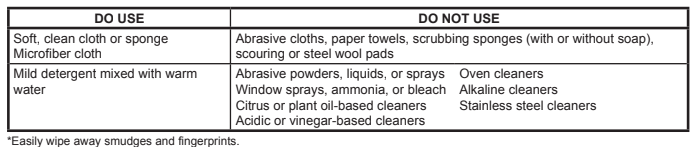
FINGERPRINT RESISTANT STAINLESS STEEL*, BLACK STAINLESS, SLATE, DARK
SLATE, PAINTED - Outside surfaces, door handles, and trim
IMPORTANT: The use of incorrect products may damage the outer finish of Fingerprint Resistant Stainless and Black Stainless models. Please follow these instructions and use only the appropriate items below to clean your appliance surfaces.
- Clean interior/exterior surfaces with warm water, mild soap or detergent, and a soft or microfiber cloth to avoid damage.
- Wipe the appliance surface dry with a soft clean cloth or microfiber towel to avoid streaking or water spotting.
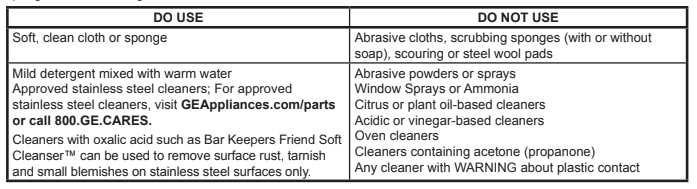
STAINLESS STEEL - Outside surfaces, door handles, and trim
NOTE: DO NOT allow stainless steel cleaner to come in contact with any plastic parts such as trim pieces, handle hardware and liners. If unintentional contact of cleaners with plastic parts does occur, clean plastic part with a sponge and mild detergent mixed with warm water.
Cleaning the Inside
To help prevent odors, leave an open box of baking soda in the refrigerator and freezer compartments.
Unplug the refrigerator before cleaning.
- If this is not practical, wring excess moisture out of sponge or cloth when cleaning around switches, lights or controls.
- Use an appliance wax polish on the inside surface between the doors.
- Use warm water and baking soda solution-about a tablespoon (15 ml) of baking soda to a quart (1 liter) ofwater.This both cleans and neutralizes odors. Rinse and wipe dry.
To clean the inside metal panel*, open the outer door using the Door in Door Latch. Clean the panel with a mild detergent and then wipe dry with a soft cloth. Do not use any stainless steel cleaner on the panel as it may damage the surrounding plastic.
Behind the Refrigerator
- Be careful when moving the refrigerator away from the wall. All types of floor coverings can be damaged, particularly cushioned coverings and those with embossed surfaces.
- Raise the leveling legs located at the bottom front of the refrigerator.
- Pull the refrigerator straight out and return it to position by pushing it straight in. Moving the refrigerator in a side direction may result in damage to the floor covering or refrigerator.
- Lower the leveling legs until they touch the floor.
Preparing for Vacation
For long vacations or absences, remove food and unplug the refrigerator. Clean the interior with a baking soda solution of one tablespoon (15 ml) of baking soda to one quart (1 liter) of water. Leave the doors open.
If the temperature can drop below freezing, have a qualified service technician drain the water supply system to prevent serious property damage due to flooding.
1. Turn refrigerator off (see CONTROLS, page 10) or unplug the refrigerator.
2. Empty ice bucket
3. Turn water supply off
If you cut the water supply off, turn off the ice maker.
Upon returning from vacation:
1. Replace the water filter.
2. Run 2 gallons (7.57 liters) of water through the cold water dispenser (about 5 minutes) to flush the system.
Preparing to Move
- Secure all loose items such as shelves and drawers by taping them securely in place to prevent damage.
- When using a hand truck to move the refrigerator, do not rest the front or back of the refrigerator against the hand truck. This could damage the refrigerator.
- Handle only from the sides of the refrigerator.
- Be sure the refrigerator stays in an upright position during moving.
Replacing the Lights
Refrigerator Lights (LEDs)
Appearance may vary by model.
There is LED lighting in the refrigerator compartment, the bottom of the left-hand refrigerator door, and the bottom of the convertible drawer.
An authorized technician will need to replace the LED light.
If this assembly needs to be replaced , visit GEAppliances.com/service or call 800.GE.CARES. In Canada, visit GEAppliances.ca/service or call 800.561.3344
INSTALLATION INSTRUCTIONS
Refrigerator
Read these instructions completely and carefully.
Built-in style models are top heavy, especially with any doors open. These models must be secured with the anti-tip floor bracket to prevent tipping forward, which could result in death or serious injury. Read and follow the entire installation instructions for installing the anti-tip floor bracket packed with your refrigerator.
- IMPORTANT — Observe all governing codes and ordinances. Save these instructions for local inspector’s use.
- Note to Installer – Be sure to leave these instructions with the Consumer.
- Note to Consumer –Keep these intructions for future reference .
- Skill level – Installation of this appliance requires basic mechanical skills.
- Completion time – Refrigerator Installation can vary
Water Line Installation 30 minutes
- Proper installation is the responsibility of the installer.
- Product failure due to improper installation is not covered under the Warranty.
MOVING THE REFRIGERATOR INDOORS
If the refrigerator will not fit through a doorway,the refrigerator doors and freezer drawer can be removed
- To remove the refrigerator doors , see the Installing the Refrigerator section.
- To remove the refrigerator freezer drawer , see the Removing the Freezer Drawer section .
WATER SUPPLY TO THE ICEMAKER AND DISPENSER
If the refrigerator has an ice maker, it will have to be connected to a cold water line.
A GE Appliances water supply kit (containing tubing, shutoff valve, fittings and instructions) is available at extra cost from your dealer, by visiting our website at GEAppliances.com (in Canada at GEAppliances.ca) or from Parts and Accessories, 888.959.8688 (in Canada 1.800.661.1616).
NOTE: It is recommended that the floor be protected with a plastic covering throughout the installation process
NOTE: Not recommended for installation on carpeted flooring.
- MOVING THE REFRIGERATOR
- Using the chart below determine if the width of your passageway can accommodate the depth of the refrigerator. Ensure you have clearance to prevent damage to the refrigerator before safely moving it to the final location.
- If passageways are large enough to accommodate the refrigerator without removing the handles skip to Step 6.
- Leave tape, film and all packaging on doors until the refrigerator is in the final location.
- NOTE: Use a padded hand truck or moving straps to move this refrigerator. Place the refrigerator on the hand truck with a side against the truck. We strongly recommend that two people move and complete this installation.
INSTALLING THE REFRIGERATORS
- REFRIGERATOR LOCATION
- Do not install the refrigerator where the temperature will go below 60°F (16°C) because it will not run often enough to maintain proper temperatures.
- Do not install the refrigerator where the temperature will go above 100°F (37°C) because it will not perform properly.
- Do not install the refrigerator in a location exposed to water (rain, etc.) or direct sunlight.
- Install it on a floor strong enough to support it fully loaded.
- CLEARANCES
Allow the following clearances for ease of installation, proper air circulation and plumbing and electrical connections.
Sides 1/8" (3 mm)
Top 1" (25 mm) Cabinet/Hinge Cover
Back 2" (50 mm)
- REMOVING THE REFRIGERATOR DOORS
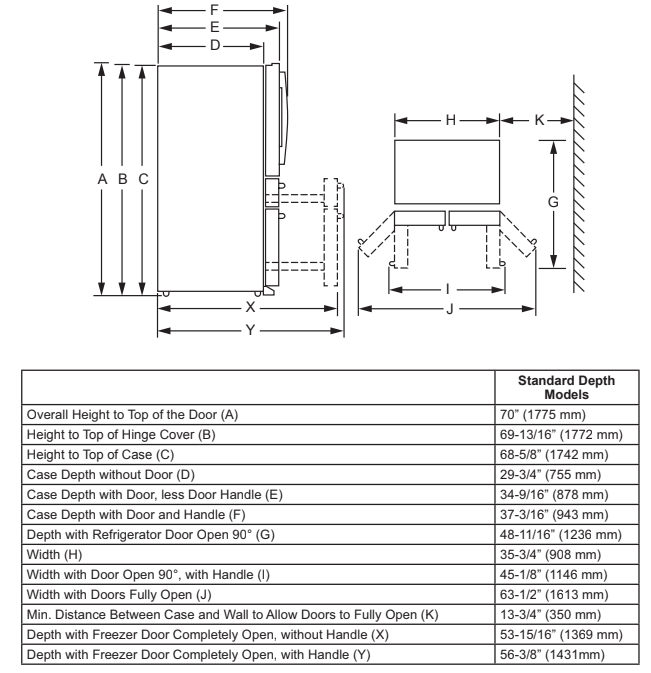
- IMPORTANT NOTE: This refrigerator is 37-1/8" (943 mm) deep (refer to chart on previous page). Doors and passageways leading to the installation location must be at least 37-1/8" (943 mm) wide in order to leave the doors and handles attached to the refrigerator while transporting it into the installation location. If passageways are less than 37-1/8" (943 mm), the refrigerator doors and handles can easily be scratched and damaged. The top cap and doors can be removed to allow the refrigerator to be safely moved indoors. If passageways are less than 34-9/16" (878 mm) start with Step 1.
- If it is not necessary to remove doors, skip to Step 11. Leave tape and all packaging on doors until the refrigerator is in the final location.
- NOTE: Use a padded hand truck to move this refrigerator. Place the refrigerator on the hand truck with a side against the truck. We strongly recommend that TWO PEOPLE move and complete this installation.
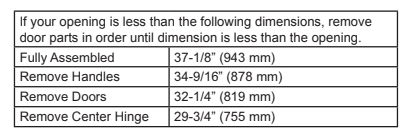
► 1. REMOVE THE REFRIGERATOR AND FREEZER DOOR HANDLES (if necessary)
Handle design varies; however installation is the same.
- Tighten/loosen the handle to/from the door by turning set screw with 1/8" Allen wrench. Leave film on door until installation is finished.
- If handle mounting fasteners need to be tightened or removed, use a 3/16" Allen wrench.
► 2. REMOVE THE LEFT-HAND DOOR
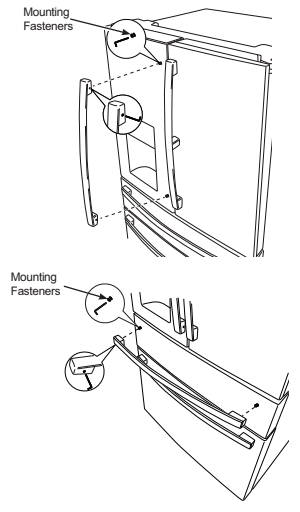
- Loosen the icemaker water supply tube.
- Remove the black collar from water supply tube- connector at the top right back of the refrigerator
- Press the white flange down and separate the water supply line from the connector.
- Loosen and remove the tubing clamp, from the back of the refrigerator and the water supply tube.
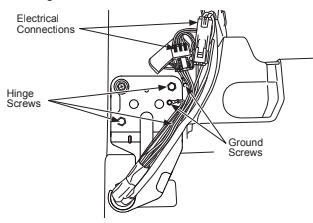
- Remove 2 hinge cover screws with a Phillips head screwdriver. Remove left hinge cover. Disconnect electrical connectors and pull icemaker water hose through case.
- Securely tape the door shut with masking tape or have a second person support the door.
- Remove screws holding hinge with a 5/16" socket. Lift hinge from refrigerator and door.
► 2. REMOVE REFRIGERATOR DOORS (cont)
For proper installation later, please follow these next steps carefully:
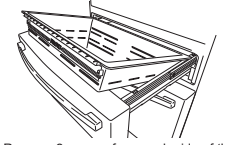
- Remove the tape keeping the door as straight as possible, then lift up to remove .
► 3. REMOVE THE RIGHT-HAND DOOR
- Remove right hinge cover.
- Securely tape the door shut with masking tape or have a second person support the door.
- Remove screws holding hinge with a 5/16" socket. Lift hinge from refrigerator and door.
For proper installation later, please follow these next steps carefully:
- Remove the tape keeping the door as straight as possible, then lift up to remove.
To reassemble doors, reverse removal steps.
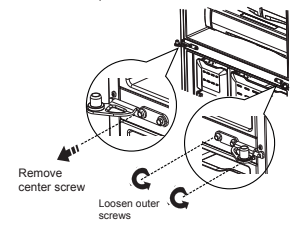
► 4. REMOVE CENTER HINGE (if necessary)
Remove screws that secure hinge to the cabinet. Inner screws need a 5/16" socket. Outer screw needs a Phillips #2.
► 5. REINSTALLING THE LEFT-HAND AND RIGHT-HAND DOORS
1. Reinstall center hinge first and torque the screw to 65 in-lbs (7.34 N-m) and small screw to 25 in-lbs (2.82 N-m). Rotating the screw by 1/3 turn after it is flush with mating surface will achieve these torques.
2. Lower the refrigerator door onto the center hinge.
3. Securely tape the door shut with masking tape or have a second person support the door.
4. Reinstallation is the reverse of the removal instructions.
5. Be sure to reinstall the ground wire and strain relief to the top hinge.
6. Reinstall hinge cover. NOTE: Ensure wires are not pinched or under screw bosses before tightening screws.
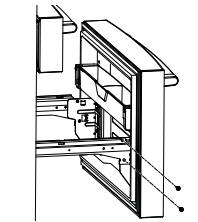
► 6. REMOVING CONVERTIBLE DRAWER
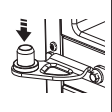
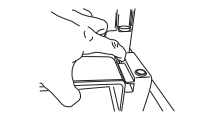
1. Remove the convertible drawer basket by lifting while rotating the basket upward.
2. Remove 2 screws from each side of the frame with a 5/16" socket.
3. Disconnect the control connection for the convertible drawer.
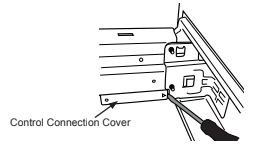
- Using a flat-head screwdriver, remove cover over electric connectors on inside right of the drawer frame. The cover hooks through the drawer frame toward the inside of the refrigerator
- Press the tab in the center of the connector to separate.
- Remove door by lifting off hooks.
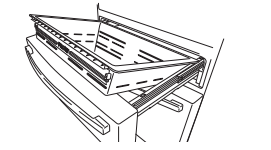
► 7. REMOVE LOWER FREEZER BASKET
■ Pull the top freezer drawer basket forward until it is out of the track in the freezer compartment. Lift, while rotating the basket upward to remove.
■ Press the tab on the right side bracket to remove the freezer door bin.
■ Lift the bottom freezer drawer basket slightly back, then up and out of the drawer.
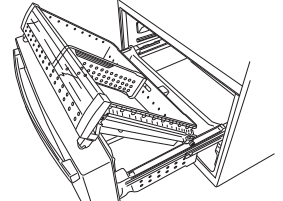
■ Pull the lower basket and slide mechanism to full extension using both hands.
■ Remove the top freezer drawer by fully extending the drawer then lifting up and out.
■ Remove the basket resting on the slides.
Push the bottom basket slides back until the slide mechanism self retracts.
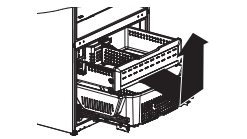
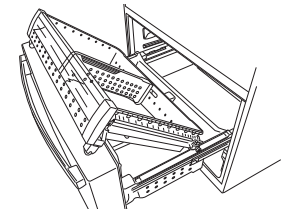
► 8. REMOVE THE FREEZER DRAWER
1. Pull the freezer drawer open to full extension.
2. Remove two screw from each side of the frame with a 5/16" socket.
3. Remove the door by lifting off hooks.

► 9.RE-INSTALL CONVERTIBLE DRAWER
To reassemble doors, reverse removal steps.
Convertible drawer basket will be loose if re-installed backwards. Look for "FRONT" emboss to help with re-installation.
► 10. REPLACE FREEZER DRAWER
1. Pull the lower basket slide mechanism to full extension with both hands.
2. Lift the freezer door and align the hooks with the notches on the slide mechanisms. NOTE: Place one side in first, then align the other side.
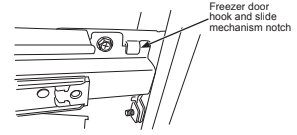
3. Replace the attachment screws and torque the screws to 65 in-lb (7.34 N-m)
► 11. RE-INSTALL LOWER FREEZER BASKET
1. Re-install lower freezer basket
2. Check for smooth operation of basket.
3. Re-install freezer drawer by placing the drawer wheels onto the top of the track mounted to the side of the freezer walls. The wheels on the freezer drawer should be on top of the bottom basket sides.
► 12. CONNECTING THE REFRIGERATOR TO THE HOUSE WATER LINE
A cold water supply is required for automatic ice maker operation. If there is not a cold water supply, you will need to provide one. See Installing the Water Line section.
NOTES:
- Before making the connection to the refrigerator, be sure the refrigerator power cord is not plugged into the wall outlet.
- If your refrigerator does not have a water filter, we recommend installing one if you water supply has sand or particles that could clog the screen of the refrigerator's water valve. Install it in the water line near the refrigerator. If using SmartConnect™ Refrigerator Tubing Kit, you will need an additional tube (WX08X10002) to connect the filter. Do not cut plastic tube to install filter.
- Before connecting the water line to the house, purge the house line for at least 2 minutes.
A . If you are using copper tubing, place a compression nut and ferrule (sleeve) onto the end of the tubing coming from the house cold water supply. If you are using the SmartConnect™ tubing, the nuts are already assembled to the tubing.
B. If you are using copper tubing, insert the end of the tubing into the refrigerator connection, at the back of the refrigerator, as far as possible. While holding the tubing, tighten the fitting.
If you are using SmartConnect™ tubing, insert the molded end of the tubing into the
refrigerator connection, at the back of the refrigerator, and tighten the compression nut
until it is hand tight. Then tighten one additional turn with a wrench. Over tightening may cause leaks.
C .Fasten the tubing into the clamp provided to hold it in position. You may need to pry open the clamp.
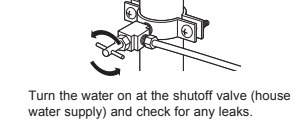
► 13.TURN ON THE WATER SUPPLY
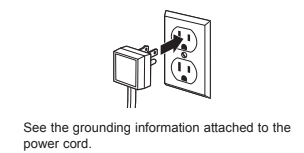
► 14. PLUG IN THE REFRIGERATOR
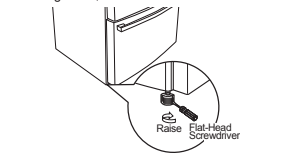
► 15 LEVEL THE REFRIGERATOR
The leveling legs have 2 purposes:
1. Leveling legs adjust so the refrigerator is firmly positioned on the floor and does not
wobble.
2. Leveling legs serve as a stabilizing brake to hold the refrigerator securely in position
during operation and cleaning. The leveling legs also prevent the refrigerator from tipping.
- Turn the leveling legs clockwise to raise the refrigerator, counterclockwise to lower it.
NOTICE: To avoid possible property damage, the leveling legs must be firmly touching the
floor.
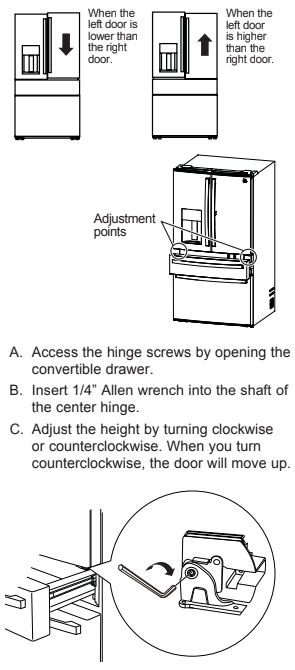
► 16. LEVEL THE REFRIGERATOR DOORS
Remember a level refrigerator is necessary for getting the doors perfectly even. If you
need help, review the previous section on leveling the refrigerator.
Four Door Models
Profile Four Door, Door-in-Door Models
INSTALLING THE WATER LINE
BEFORE YOU BEGIN
Recommended copper water supply kits are WX8X2, WX8X3 or WX8X4, depending on the amount of tubing you need. Approved plastic water supply lines are SmartConnect™ Refrigerator Tubing (WX08X10006, WX08X10015 and WX08X10025). When connecting your refrigerator to a GE Appliances Reverse Osmosis Water System, the only approved installation is with a GE Appliances RVKit. For other reverse osmosis water systems, follow the manufacturer's recommendations.
If the water supply to the refrigerator is from a Reverse Osmosis (RO) Water Filtration System AND the refrigerator also has a water filter, use the refrigerator's filter bypass plug. Using the refrigerator's water filtration cartridge in conjunction with the RO water filter can result in hollow ice cubes. Some models do not come equipped with the filter bypass plug. To obtain a free bypass plug, call 800.GE CARES. In Canada, visit call 800.561.3344.
This water line installation is not waranted by the refrigerator or ice maker manufacturer. Follow these instructions carefully to minimize the risk of expensie water damage.
Water hammer (water banging in the pipes) in house plumbing can cause damage to refrigerator parts and lead to water leakage or flooding. Call a qualified plumber to corect water hammer before installing the water supply line to the refrigerator.
To prevent burns and product damage, do not hook up the water line to the hot water line.
If the refrigerator is operated before the water Connection is made to the ice maker, see Controls section on page 10 to tum ice maker off.
Do not install the ice maker tubing in areas wher.temperatures fall below freezing.
When using any electrical device (such as a power drill) during installation, be sure the device is double insulated or grounded in a manner to prevent the hazard of electric shock, or is battery powered. All instalations must be in accordance with local plumbing code requirements.
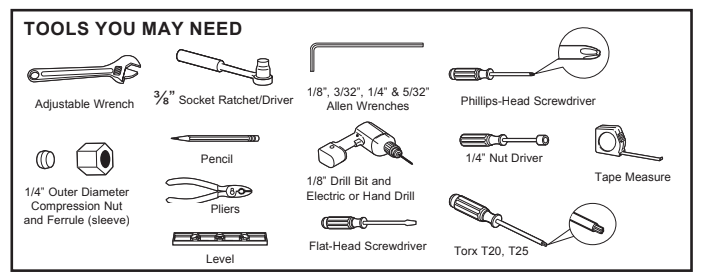
WHAT YOU WILL NEED
- Copper or SmartConnect Refrigerator Tubing kit, 1/4 outer diameter to connect the refrigerator to the water supply. If using copper, be sure both ends of the tubing are cut square.
To determine how much tubing you need: measure the distance from the water valve on the back of the refrigerator to the water supply pipe. Be sure there is sufficient extra tubing to allow the refrigerator to move out from the wall after installation.
SmartConnect Refrigerator Tubing Kits are available in the following lengths:
8 (2.4 m)- WX08X10006
15 (4.6 m)- Wx08X10015
25 (7.6 m) -Wx08X 10025
NOTE: The only Café approved plastic tubing is that supplied in SmartConnect Refrigerator Tubing kits. Do not use any other plastic water supply line because the line is under pressure at all times. Certain types of plastic will crack or rupture with age and cause water damage to your home.
- A GE Appliances water supply kit (containing tubing, shutoff valve and fittings listed below) is available at extra cost from your dealer or from Parts and Accessories, 877-959-8688 (in Canada 1.800.661.1616).
- A cold water supply. The water pressure must be between 20 and 120 p.s.i. (1.4-8.1 bar).

- Power drill.
- 1/2 or adjustable wronch.
- Straight and Phillips blade sorewdriver
- Two 1/4" outer diameter compression nuts and 2 femules (sleeves) to connect the copper tubing to the shutof valve and the refrigerator water valve.
OR
- If you are using a SmartConned Refrigerator
- Tubing kit, the necessary fittings are preassembled to the tubing .

- If your existing copper water line has a flared fitting at the end, you will need an adapter (available at plumbing supply stores) to connect the water line to the refrigerator OR you can cut off the flared fitting with a tube cutter and then use a compression fitting. Do not cut formed end from SmartConnect™ Refrigerator tubing.

- Shutoff valve to connect to the cold water line. The shutoff valve should have a water inlet with a minimum inside diameter of 5/32" at the point of connection to the COLD WATER LINE. Saddle-type shutoff valves are included in many water supply kits. Before purchasing, make surea saddle-type valve complies with your local plumbing codes.
Install the shutoff valve on the nearest frequenty used drinking water line.
► 1. SHUT OFF THE MAIN WATER SUPPLY
Tum on the nearest faucet long enough to clear the line of water.
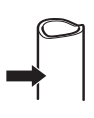
► 2. CHOOSE THE VALVE LOCATION
Choose a location for the valve that is easily accessible. It is best to connect into the side of a vertical water pipe. When it is necessary to connect into a horizontal water pipe, make the connection to the top or side, rather than at the bottom, to avoid drawing off any sediment from the water pipe.
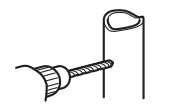
► 3. DRILL THE HOLE FOR THE VALVE
Drill a 1/4" hole in the water pipe (even if using a self-piercing valve), using a sharp bit. Remove any burrs resulting from drilling the hole in the pipe.
Take care not to allow water to drain into the drill.
Failure to drill a 1/4" hole may result in reduced ice production or smaller cubes .
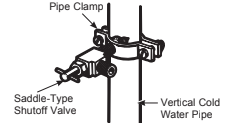
► 4.FASTEN THE SHUTOFF VALVE
Fasten the shutoff valve to the cold waler pipe with the pipe damp.
NOTE: Commonwealth of Massachusetts Plumbing Codes 248CMR shall be adhered to. Saddle valves are illegal and use is not permitted in Massachusetts. Consult with your licensed plumber.
► 5. TIGHTEN THE PIPE CLAMP
Tighten the damp screws until the sealing washer begins to swell.
NOTE: Do not over tighten or you may crush the tubing.

► 6. ROUTE THE TUBING
Route the tubing between the cold water line and the refrigerator.
Route the tubing through a hole drilled in the wall or floor (behind the refrigerator or adjacent base cabinet) as close to the wall as possible .
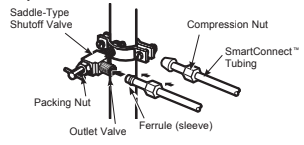
► 7.CONNECT THE TUBING TO THE VALVE
Place the compression nut and ferrule (sleeve) for copper tubing onto the end of the tubing and connect it to the shutoff valve.
Make sure the tubing is fully inserted into the valve. Tighten the compression nut securely.
For plastic tubing from a SmartConnect Refrigerator Tubing kit, insert the molded end of the tubing into the shutoff valve and tighten compression nut until it is hand tight, then tighten one additional turm with a wrench. Over tightening may cause leaks.
NOTE: Commonwealth of Massachusetts Plumbing Codes 248CMR shall be adhered to Saddle valves are illegal and use is not permitted in Massachusetts. Consult with your licensed plumber.
► 8.FLUSH OUT THE TUBIN
Turn the main water supply on and flush out the tubing until the water is clear.
Shut the water off at the water valve after about one quart (1 liter), or 2 minutes, of water has been flushed through the tubing.
To complete the installation of the refrigerator, go back to Step 12 in lInstalling the Refrigerator.
TROUBLESHOOTING
Normal Operating Conditions.
Do you hear what I hear? These conditions are normal.
HUMMM...
WHOOSH...
- The new high efficiency compressor may run faster and longer than your old refrigerator and you may hear a high-pitched hum or pulsating sound while it is operating.
- You may hear a whooshing sound when the doors close. This is due to pressure equalizing within the refrigerator.
- After dispensing ice, a motor will close the ice chute to keep warn room air from entering the ice bucket, maintaining ice at a freezing temperature.
The hum of the motor closing the ice chute is normal, shortly after dispensing ice.
CLICKS, POPS, CRACKS and SNAPS
- You may hear cracking or popping sounds when the refnigerator is first plugged in. This happens as the refrigerator cools to the corect temperature.
- The compressor may cause a clicking or chirping sound when attempting to restart (this could take up to 5 minutes).
- Expansion and contraction of cooling coils during and after defrost can cause a cracking or popping sound.
- On models with an ice maker, after an ice making cycle, you may hear the ice cubes dropping into the ice bucket.
- After dispensing ice, a motor will close the ice chute to keep warm room air from entering the ice bucket, maintaining ice at a freezing temperature.
START UP COOLING
It can take up to 24 hours for the refrigerator and freezer temperatures to match the display. During that time refrigerator and freezer door openings should be minimized.
TIPS
- Freezer cools first.
- Refrigerator compartment cools last; it may take several hours after the freezer.
- Turning off ice maker makes both refrigerator and freezer food cool faster.
WHIR!

You may hear the fans spinning at high speeds. This happens when the refigerator is first plugged in, when the doors are opened frequently or when a large amount of food is added to the refrigerator or freezer compartments. The fans are helping to
maintain the comect temperatures.
The fans change speeds in order to provide optimal cooling and energy savings.
WATER SOUNDS

- The flow of refrigerant through the cooling coils may make a gurgling noise like boiling water .
- Water dropping on the defrost heater can cause a sizzling. popping or buzzing sound during the defrost cycle.
- A water dripping noise may occur during the defrost cycle as ice melts from the evaporator and flows into the drain pan.
- Closing the door may cause a gurgling sound due to pressure equalization.
Troubleshooting Tips... Before you call for service
Not fitering
- Filter bypass installed
- Install correct water filter
Reset Water Filter
Water Filter Expired
- Water filter leaking or needs replacing
- Replace water filter, or install fiter bypass
- To reset fiter timer, press the Settings
 button until "Icemaker is highlighted, then hold down the Water and Ice buttons simultaneously for 3 seconds.
Water filter indicator light is not lit
- This is normal .This indicator will turn on to tell you that you need to replace the filter soon
- See Water Filter for more information
Handle is loose/handle has a gap.
Refrigerator beeping
- This is door alarm
- Turn off or disable with door closed
- If door open and alarm is sounding, you can only snooze the alarm
Not cooling
- The cooling system is off
Water has poor taste/odor
- Water dispenser has not been used for a long time
- Dispense water, until all water in system is replenished
Water in glass is warm
- Normal when refrigerator is first installed
- Wait 24 hours for the refrigerator to completely cool down.
- Water system has drained
- Allow several hours for replenished supply to chill
- Water dispenser has not been used for a long time
- Dispense water, until all water in system is replenished
Water dispenser does not work
- Water supply line turned off or not connected
- See Installing the Water Line
- Water filter clogged or filter/bypass plug not installed
- Replace filter cartridge or remove filter and install bypass plug
- Air may be trapped in the water system
- Press the dispenser arm for at least 5 minutes.
- Water in reservoir is frozen because the controls are set too cold
- Set the refrigerator control to a warmer setting and wait 24 hours. If the water does not dispense after 24 hours, call for service .
Water spurting from dispenser
- Newly installed filter cartridge
- Run water from the dispenser for 5 minutes (about 2 gallons)
No water or ice cube production
See Controls
Water is leaking from dispenser
- Air may be prensent in the water line system , causing water to drip after being dispensed
- Dispensed water for at least 5 minutes to remove air from system
AUTO FILL under fill/no fill
- Not all containers work with AUTOFILL
- Error message
- See page 11
- Clean sensor. See page 11
AUTO FILL overfills
- Not all containers work with AUTOFILL
- Try different container
- Use less ice
- Ensure hands are away from the cup prior to pressing the AutoFill key
Freezer cooling, refrigerator not cooling
- Normal , when refrigerator first plugged in or affter extended power outage
- Wait 24 hours for temperature in both compartment to reach selected temperatures
lce dispenser opens after closing freezer drawer
- Normal
- The ice dispenser door may open after closing freezer door to allow access
My refrigerator door squeaks
- Diminished lubricant because of accidental cleaning of the lubricant on the hinge
- It is best to order GEA lubricant service part number WR97X166 and apply on the hinge at specified location. It is possible to spray some non-toxic lubricant such as silicone based non- stick cooking spray, petroleum jelly or NSF approved food grade lubricants.
- IMPORTANT: Do not use WD-40 as it will remove any remaining grease in or around the hinge
- Improper leveling
- Make sure the unit is leveled
- If doors were removed and re- assembled during installation process, waterline and/harness under Top Hinge cover may get out of position and rub against door while door swivels.
- Remove the Top Hinge cover and make sure the waterline and hamess that passes through the hinge pin has been properly seated and does not touch the any of the door parts during rotation.
- Applying some food grade lubricant around door thimble area will also help.
Truth or Myth
The refrigerator water filter may require replacement, even though the filter indicator has not turned red, or reads "Filter Expired".
- TRUE: The water filter indicator will indicate the need to replace the water filter every six months. Water quality varies from city to city; if water flow from the dispenser slows, or ice production decreases, the water filter should be replaced, even though the filter indicator may not indicate the need for replacement.
The automatic ice maker in my refrigerator will produce ice when the refrigerator is plugged in to a power receptacle.
- MYTH: The refrigerator must be connected to water, and the ice maker must be turned on. Make sure the ice maker is turned on, only after the water line is connected and water is turned on. The ice maker can be turned on/off from the controls and ensure the ice maker is on, as indicated on the refrigerator control panel. See Automatic Ice Maker section in the full owner’s manual available online
After the refrigerator has been plugged in and connected to water, I will immediately have unlimited chilled water available from the water dispenser.
- MYTH : The water dispenser tank located inside the refrigerator stores water for dispensing. The water in this tank requires 24 hours to chill after installation. High usage conditions will not allow time for the water to chill.
After water dispenses, a few drops of water are normal.
- TRUE : A few drops of water may fall from the dispenser, after the dispenser paddle has been released. To minimize the drops, remove the glass slowly from the dispenser.
I will never see frost inside the freezer compartment.
- MYTH:Frost inside the freezer typically indicates that the door is not properly sealed, or has been left open. If frost is found, clear the frost using a plastic spatula and towel, then check to ensure that no food packages or containers are preventing the freezer door from closing. Check the refrigerator control panel to ensure the door alarm is on.
When the refrigerator is installed, or after replacing the water filter, I must dispense water for five minutes.
- TRUE : A newly installed refrigerator or water filter contains air in the water lines. Press the dispenser paddle and dispense cold water for at least 5 minutes to remove air from the water line, and flush the filter.
To fill the ice bucket to the maximum capacity, I should dispense 12 and 18 hours after installation.
- TRUE : Dispensing 3-4 cubes 12 hours and 18 hours after installation, allows ice to disperse within the ice bucket, which in turns calls on the ice maker to produce additional ice. Normal ice production = 100 cubes in 24 hours.
I can use the water filter bypass plug to determine if the filter requires replacement.
- TRUE : Decrease in flow from the water dispenser, or decreased ice production, may indicate the need to replace the water filter. Install the water filter bypass plug (provided with the refrigerator on some models"), and check flow from the dispenser. If water flow returns to normal with the bypass plug in place, replace the water filter.
The top of the refrigerator doors will always be aligned.
- MYTH : Several things can affect the refrigerator door alignment, including the floor the refrigerator is installed on and loading of doors. If the top of the refrigerator doors are not aligned, use a 1/4" allen wrench to adjust the right/left hand door. The adjustment screw is located on the bottom right or left hand side of the door. Refrigerator doors should be open during height adjustment. Open the freezer door to access the screw. See Step 8.
Refrigerator door handles can be easily tightened.
- TRUE : If door handles are loose or have a gap, the handle can be adjusted using a 1/8" allen wrench, on set screws located on the ends of the handles.
There may be odor and taste problems with your ice.
- TRUE : After starting the ice maker throw away 24 hours of ice production to avoid odor and taste problems.
I can make fine adjustments to the Refrigerator Doors to align them
- TRUE : If the refrigerator doors are not aligned, use a 1/4" Allen wrench to adjust the right hand door. The adjustment screw is located on the bottom of the right door. Open the freezer door to access. See step 8.
Door handles should always be removed for installation.
- MYTH : Check chart on reverse side of this instruction. If the doors must be removed do not remove the handles, or if the refrigerator will fit easily through the passage way opening. Adjust handles that are loose or have a gap, by adjusting 1/8" set screws on either end of handles.
Door removal is always required for installation.
- MYTH : Check chart on reverse side of this instruction. Doors should only be removed when necessary to prevent damage from passage way or access to final location.
Refrigerator doors will self-close if left open.
- MYTH : Refrigerator doors need to be closed by consumer. A gentle bounce back is a designed feature on some models that gives a positive feedback to the user so that they can initiate and complete the door closing action.
There is an adjustment to rear wheels.
- MYTH : Front leveling legs are adjustable and should be used to balance the refrigerator. Leveling legs are used to make initial refrigerator door adjustment.
Check for leaks after all water connections are made.
- TRUE : While purging the air from the water system, check all water line connections for leaks. Check the connection to the household water supply at back of refrigerator, and door water line connect.
Any packaging residue can be cleaned off the refrigerator using any cleaner.
- MYTH : Do not use wax, polish, bleach. or other products containing chlorine on Stainless Steel panels, door handles and trim. Check this instruction under "Cleaning the Outside for full details .