USER MANUAL SpotClean Pet Pro™ Portable Carpet Cleaner
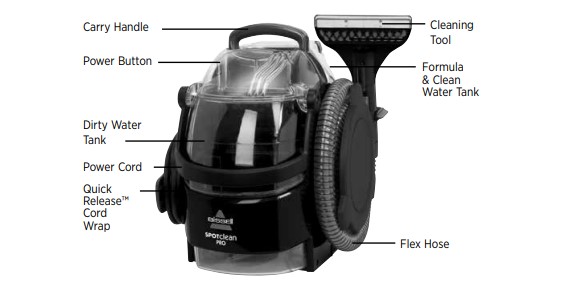
Product View
WARNING: To reduce the risk of fire and electric shock due to internal component damage, use only BISSELL cleaning formulas intended for use with the deep cleaner.
WARNING: Do not plug in your cleaner until you have completely assembled it per the above instructions and are familiar with all instructions and operating procedures.
Keep plenty of genuine BISSELL for portable spot cleaning machines on hand so you can clean whenever it fits your schedule. Always use genuine BISSELL cleaning formulas.
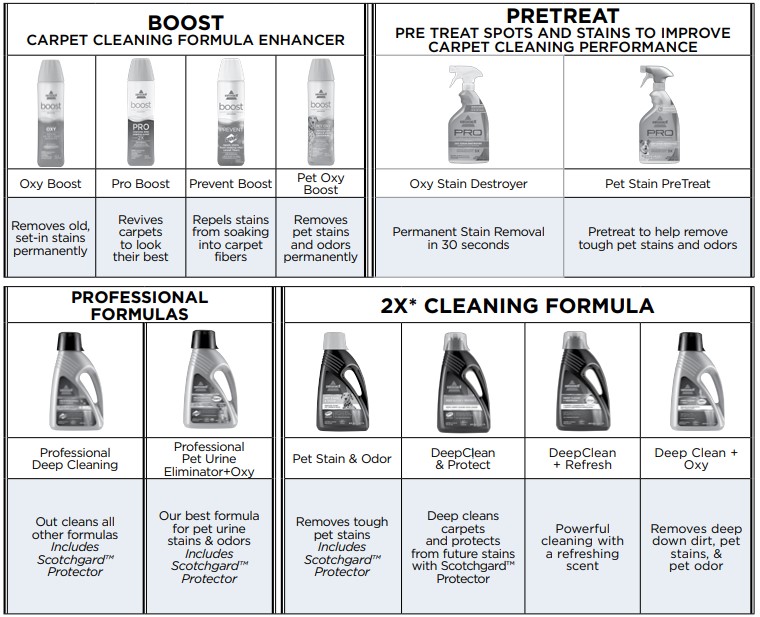
ONLY BISSELL Protects from future stains with Scotchgard™ Protector. Scotchgard™ is a trademark of 3M®. *2.5 fl. oz. of 2X concentrated formula is equivalent to 5.0 fl. oz. of non-concentrated formula.
Assembly
Before you clean
1. Remove loose dirt and impediments before deep cleaning.
2. Pretreating (optional):
2a. Pretreating is recommended to improve cleaning effectiveness for heavily soiled carpet in high traffic areas such as entryway and hallways.
2b. BISSELL Stain Pretreat Spray any BISSELL Stain Pretreat formula onto heavy traffic areas, soiled areas or stains. Allow to penetrate for at least 3 minutes. Clean as normal, following the instructions below.
Preparing the machine
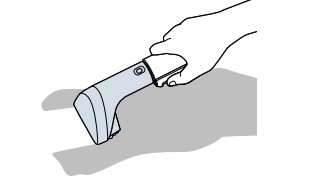
- Release flex hose by twisting the hose secure latch clockwise. Unwrap flex hose completely.
- Attach the Large Stain Tool or Tough Stain Tool to the hose grip until it snaps together. Make certain the tool is securely attached.
- Twist the Quick Release™ cord wrap clockwise to unwrap the power cord completely and plug into grounded outlet.
Filling the formula & water tank
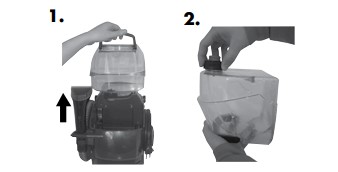
- Remove tank from the back of the machine by lifting up tank carry handle. Note: This tank was designed with a flat bottom so it can be easily filled.
- Unscrew the black cap and remove bottle insert.
- Fill tank with hot tap water (140° F/60° C MAX) to the water fill line. Add 60 mL/2 oz of BISSELL 2X formula to the tank.
- Replace the bottle insert in the tank and tighten the black cap. Replace the tank on the machine.
Operations
Cleaning with your spot cleaner
- Plug unit in and turn on by pressing power button.
- Hold cleaning tool approximately 2.5cm above soiled surface. Press spray trigger to apply cleaning solution to soiled area.
- Using the brush on the cleaning tool, gently scrub area to be cleaned.
- For thorough cleaning, spray additional solution while brush and suction are in contact with surface.
- Apply downward pressure on cleaning tool and pull it toward you. The suction will remove the dirt and cleaning solution. Continue until no more dirt can be removed.
- As a final step, use “drying strokes” (by not pressing the spray trigger) to remove as much liquid/moisture as possible. Repeat this step as often as necessary.
Cleaning with 3"/4"/6" tool
- Attach the 3”/4”/6” Tough Stain Tool to the handheld cleaning hose.
- Press the spray trigger to mist solution over and onto the soiled area.
- Release spray trigger and gently scrub the stain.
- To lift the stain away, apply downward pressure on the tool and slowly pull it toward you. Then use “drying strokes” (by not pressing down trigger) to remove remaining moisture. Repeat as needed.
Cleaning with stain trapper tool*
*select models only
- Attach the Stain Trapper tool to the end of the hose.
- Slowly move the tool back and forth over the stain. Be careful not to move the tool back and forth too quickly or soiled water will flow back into the hose.
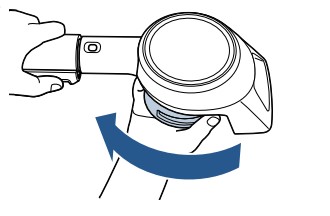
- To empty the tool, rotate the small tank on the bottom of the tool to unlock it.
- Dump dirty water into a sink or toilet and rinse the tank out with clean water.
- Replace the tank by lining up the locking teeth with their mating slots (make sure the two teeth that are closest together are pointed toward the brush). Turn the tank to lock it into place.
Maintenance & Care
Empty dirty tank
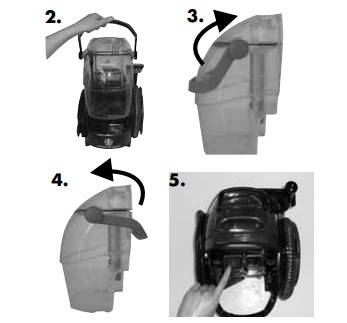
- When the dirty tank reaches the “FULL” line on the tank it is time to empty.
- Remove dirty tank and carry to a utility sink, toilet or outside (where you will dispose of the dirty water).
- To unlock the dirty tank lid, rotate handle over the back of the tank. Remove lid and pour out dirty water. Rinse out dirty tank to remove any debris.
- Replace top of tank, and rotate the handle forward to lock in place on front of tank.
- Before replacing tank on machine, wipe debris from red filter.
Cleaning machine
- Remove and rinse the tools under clean, running water. Allow tools to dry.
- It is recommended that you suction clean water from a bowl to rinse out the hose. Then lift end of hose and stretch out to ensure all water is cleared from hose.
- Wrap the flex hose around the hose wrap and secure with latch.
Machine care (check regularly)
Cleaning Debris Filter
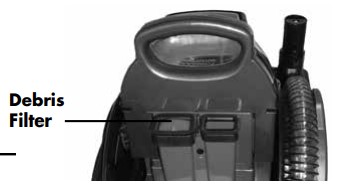
- Remove all hair and debris from the red filter.
- Place the Dirty Water Tank back onto the machine.
Machine storage
- Store machine in a protected dry area.
Troubleshooting
WARNING: To reduce the risk of electric shock, turn power switch off and disconnect plug from electrical outlet before performing maintenance or troubleshooting checks.
Reduced spray or no spray
- Formula and water tank may be empty
- Formula and water tank may not be seated completely
- Turn power OFF; Remove and reseat tank
- Pump may have lost prime
- Hold end of hose below water level in tank to prime
Loss of suction power
- Tanks may not be seated properly
- Pick up both tanks and reseat them so they fit snuggly on the unit
- Dirty tank has picked up maximum amount of dirty water and has reached full line
- Formula and water tank is empty
- Check fluid levels in formula and water tank
Safety Instructions
WARNING: TO REDUCE THE RISK OF FIRE, ELECTRIC SHOCK, OR INJURY
- Connect to a properly grounded outlet only. See grounding instructions. Do not modify the 3-prong grounded plug.
- Do not leave appliance when it is plugged in. Unplug from outlet when not in use and before servicing.
- Do not expose to rain. Store indoors.
- Do not allow to be used as a toy. Close attention is necessary when used by or near children.
- Do not use for any purpose other than described in this User’s Guide. Use only manufacturer’s recommended attachments.
- Do not use with damaged cord or plug. If appliance is not working as it should, has been dropped, damaged, left outdoors, or dropped into water, have it repaired at an authorized service center.
- Always install float before any wet pick-up operation.
- Do not pull or carry by cord, use cord as a handle, close a door on cord, or pull cord around sharp edges or corners. Do not run appliance over cord. Keep cord away from heated surfaces.
- Do not unplug by pulling on cord. To unplug, grasp the plug, not the cord.
- Do not handle plug or appliance with wet hands.
- Do not put any object into openings. Do not use with any opening blocked; keep openings free of dust, lint, hair, and anything that may reduce air flow.
- Keep hair, loose clothing, fingers, and all parts of body away from openings and moving parts.
- Turn off all controls before plugging or unplugging appliance.
- Use extra care when cleaning on stairs.
- Do not use to pick up flammable or combustible materials (lighter fluid, gasoline, kerosine, etc.) or use in areas where they may be present.
- Do not use appliance in an enclosed space filled with vapors given off by oil base paint, paint thinner, some moth proofing substances, flammable dust, or other explosive or toxic vapors.
- Do not use to pick up toxic material (chlorine bleach, ammonia, drain cleaner, etc.).
- Do not pick up anything that is burning or smoking, such as cigarettes, matches, or hot ashes.
- Use only BISSELL cleaning products intended for use with this appliance to prevent internal component damage. See the Cleaning Fluid section of this guide.
- Keep appliance on a level surface.
- Do not carry the appliance while in use.