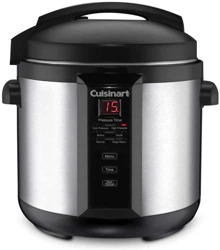
Owner Manual Pressure Cooker
PARTS AND FEATURES
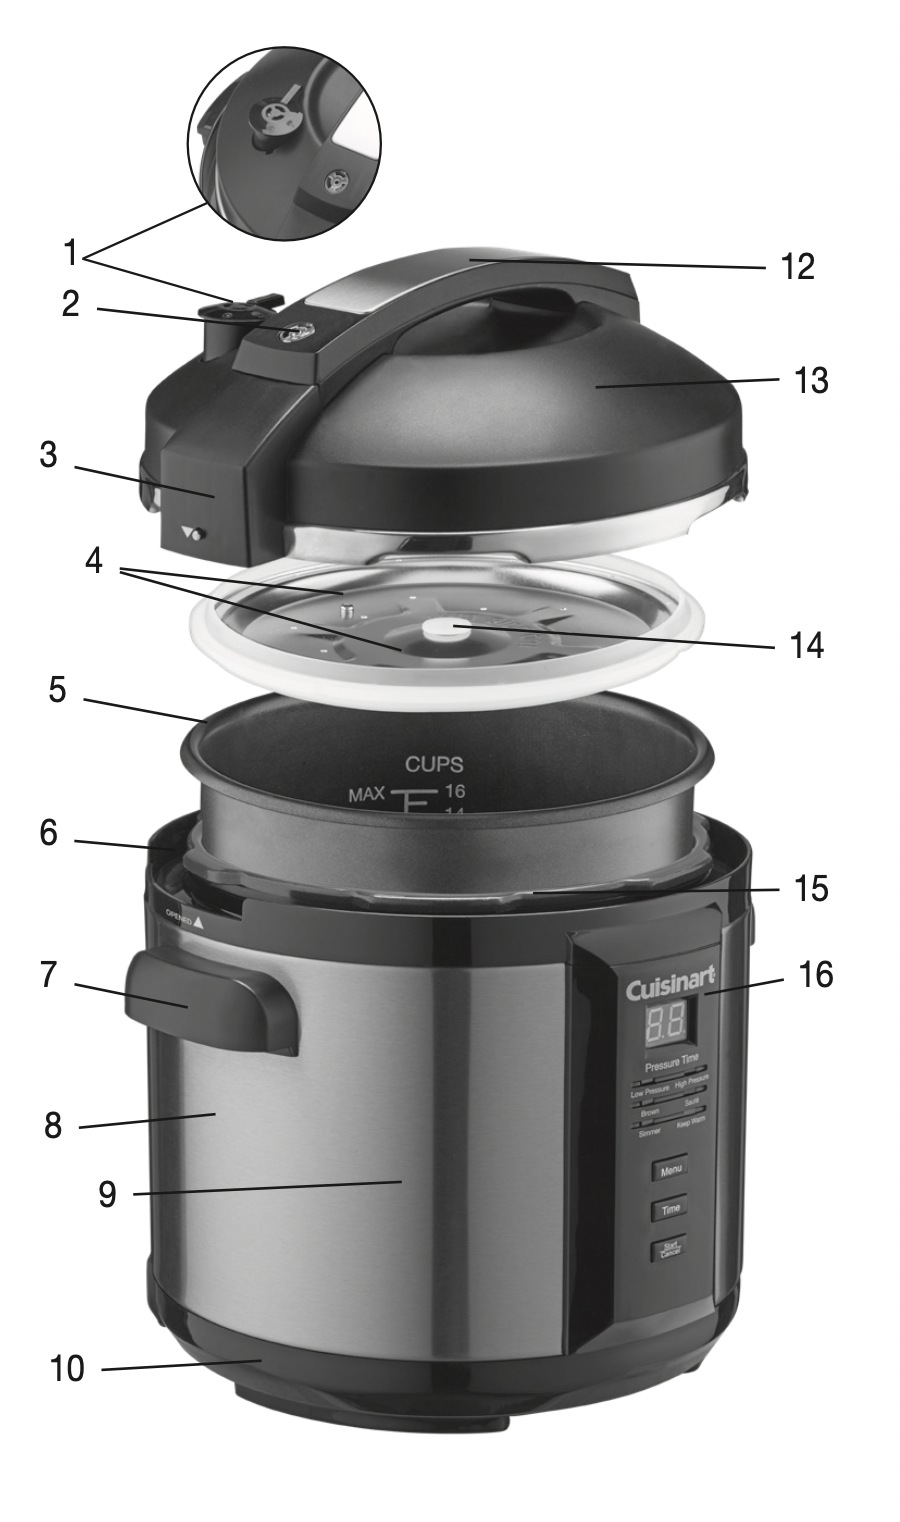
- Pressure Limit Valve
- Red Float Valve (Pressure Indicator)
- Push Rod
- Sealing Ring Assembly
- Cooking Pot
- Condensation Collector
- Side Handle
- Outer Body
- Heating Plate (not shown)
- Base
- Power Cord (not shown)
- Lid Handle
- Lid
- Rubber Grommet
- Upper Ring
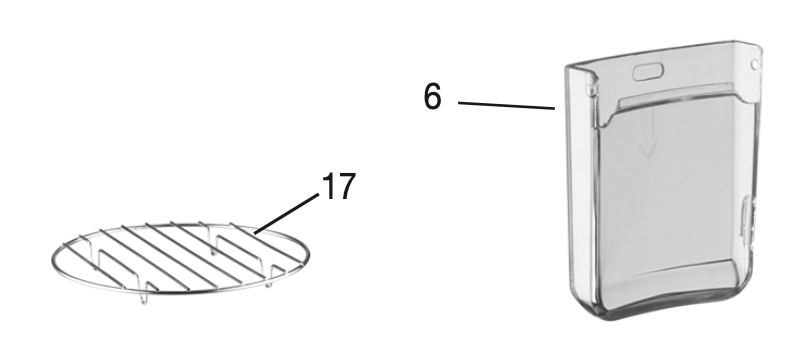
- Control Panel
- Trivet – Used for some recipes. See Recipe Booklet. Trivet is specially designed for this pot and will not damage the coating.
BEFORE FIRST USE
Remove any packing materials and promotional labels from your electric pressure cooker.
Be sure all parts have been included before discarding any packing materials. You may want to keep the box and packing materials for use at a later date.
Before using your Cuisinart® Electric Pressure Cooker for the first time, remove any dust from shipping by wiping clean with a damp cloth. Thoroughly clean the cooking pot and sealing ring assembly (Part #4) in the dishwasher or with warm, soapy water. Rinse, towelor air-dry, and place in the pressure cooker.
- Place the pressure cooker on a clean, flat surface.
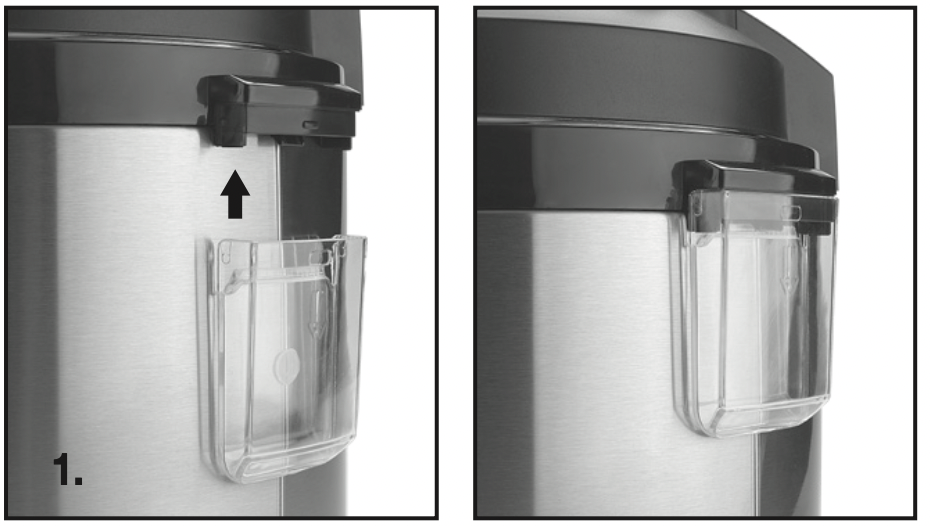
- Place the condensation collector in rear of the unit until it clicks into place (as shown below in figure 1; and #6 on diagram, page 3).
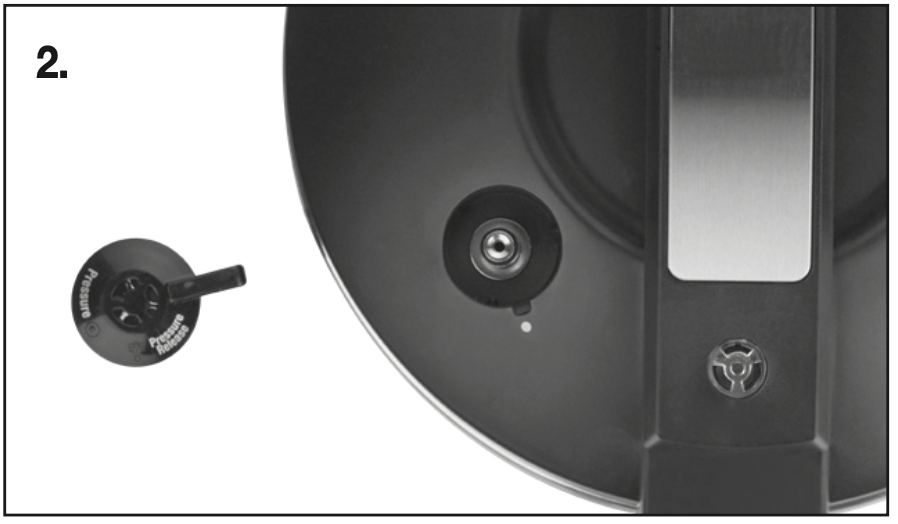
- Press the pressure limit valve in place on the lid, as shown in figure 2.
NOTE: The pressure limit valve does not click or lock into place. Even though it will have a loose fit, it is secure.
- Plug the power cord into the pressure cooker and then into the wall outlet. The LED display will show
 .
.
INSTRUCTIONS FOR USE
- To remove lid, grasp lid handle, turn clockwise until lid
 icon is directly above the opened
  icon. Lift to remove.
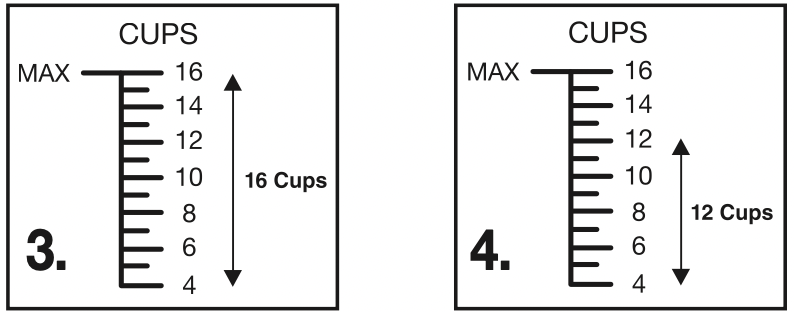
- Insert cooking pot into pressure cooker and add food and liquids as the recipe directs. NOTE: The total volume of food and liquid must not exceed (16 cups/Max fill line) the capacity of the cooking pot (figure 3). For foods such as dried vegetables and beans, or rice and grains, the total volume must not exceed (12 cups) capacity (figure 4).
NOTE: Overfilling may clog the pressure limit valve, which can cause excess pressure to develop.
NOTE: Always use at least ½ cup of liquid when pressure cooking.
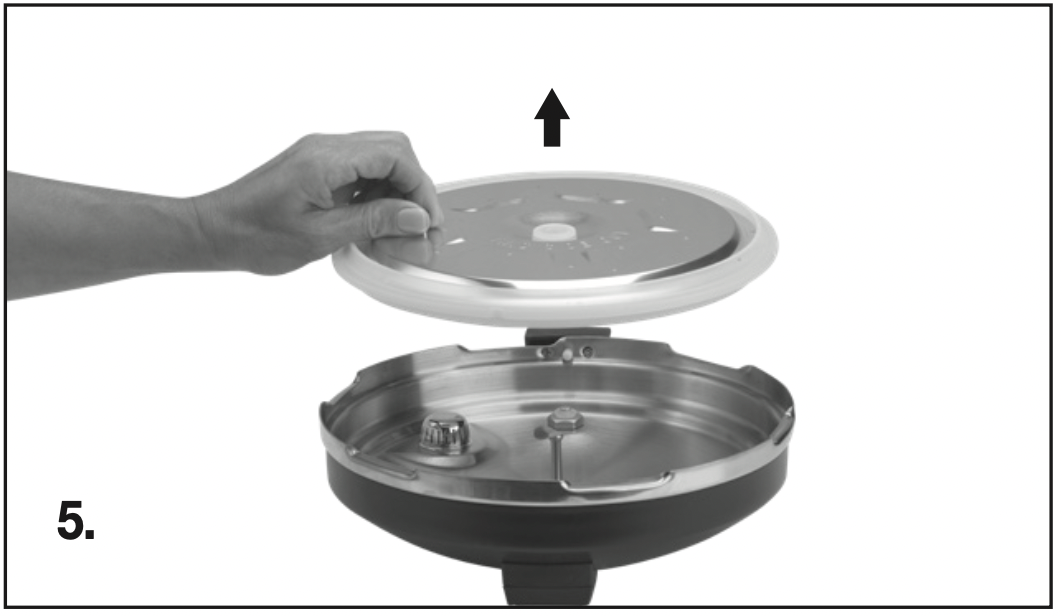
- If sealing ring assembly has been removed from lid, check to ensure flexible ring is properly and securely in place on the metal plate. Then, holding the knob on the metal plate, place the assembly over the center post of inner lid and press down firmly to secure (figure 5). Be sure knob faces out with “THIS SIDE OUT” displayed.
- To close the lid, remove any food residue from upper rim of cooking pot to ensure a proper seal. With the control panel facing you, place lid on pressure cooker with the red float valve on the left at 10 o’clock. Place lid firmly onto pressure cooker and align lid
 icon with opened
  icon, then turn counter-clockwise to align lid
  icon with the closed
  icon (figure 6a & 6b).
- Check that the position of the pressure limit valve (Part #1, located on lid) is set to the • (as in figure 2).
- The red float valve in handle must be in the down position and the lid must be in the closed
 position before pressure cooking. If you need to re-open cooker while making certain recipes, pressure may need to be released again.
OPERATING INSTRUCTIONS
To Select Low or High Pressure
Add food to pressure cooker and close the lid.
To verify the lid is closed, ensure the red float valve is down and the lid icon is aligned with the closed icon.

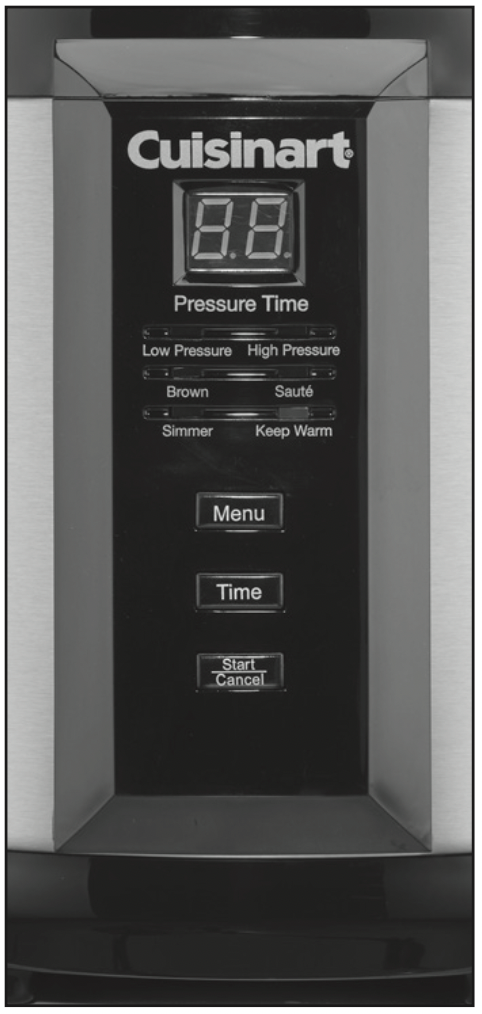
With the cooker on and the LED displayed, press the MENU button to select the desired pressure cooking function (Low or High Pressure). The selected function light will flash.
Press and hold TIME to select number of minutes needed for pressure cooking. Time increases in 1-minute increments up to 40 minutes. Time increases in 5-minute increments from 40 to 99 minutes. After 99 minutes, the timer will reset to 00.
Once cooking time is programmed, press START/ CANCEL to start the cooking process.
As the cooker heats up and pressure builds, the red float valve will rise. The amount of liquid and other ingredients in the pressure cooker determines the length of time needed for full pressure to build generally 5 to 40 minutes, depending on the recipe. (A red blinking dot on lower right-hand corner of LED indicates the unit is on and heating up.)
NOTE: When full pressure is reached, the red light in the lower right-hand corner of the LED will stop flashing and remain lit. Pressure cooking will begin and the timer will start to count down. If your cooker displays a [- -] on the LED screen, there is not enough liquid in the cooker to pressure cook.
The raised red float valve indicates you are cooking under pressure.
YOU SHOULD NEVER ATTEMPT TO OPEN THE LID WHILE PRESSURE COOKING.
Automatic Keep Warm
When LED display reaches 00, the pressure cooker automatically shifts to Keep Warm. The yellow Keep Warm light will turn on and the cooker will beep several times to indicate cooking is complete.
NOTE: The cooker is still under pressure in the automatic Keep Warm feature. Pressure will need to be released before lid is removed. NEVER ATTEMPT TO FORCE LID OPEN.
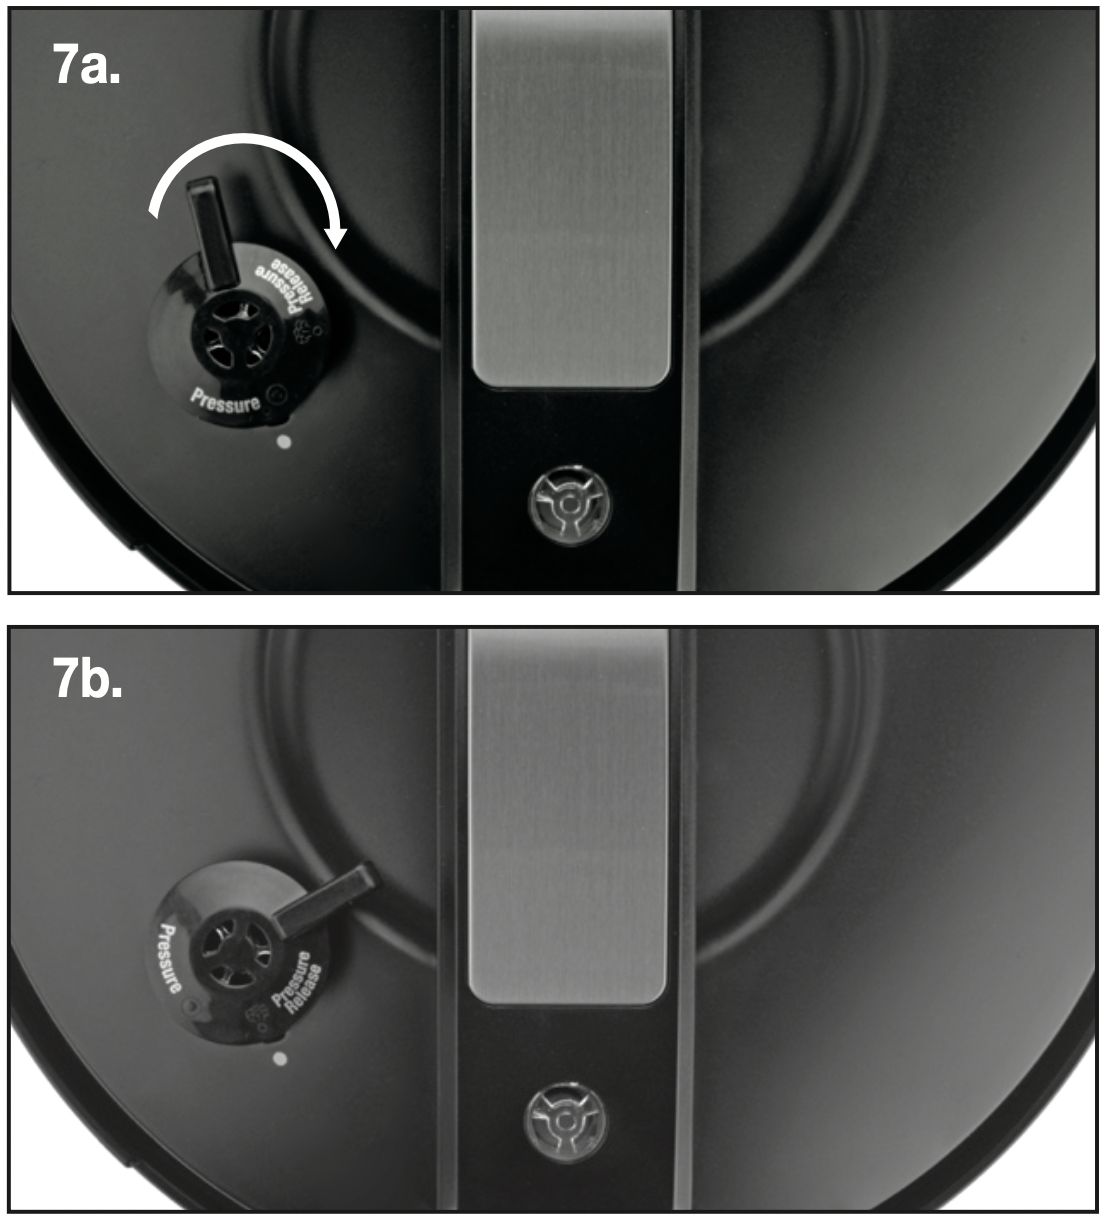
To end the automatic Keep Warm and remove food, release the pressure by opening the pressure release valve (Part #1) by aligning  . Pressure Release with the • (figures 7a & 7b).
Once all the steam is released, the red float valve falls and then the lid can be opened easily.
NOTE: The Keep Warm function should be used moderately, as the quality or texture of the food will begin to change after extended time on Keep Warm.
To Select Brown or Sauté
With the cooker on and the LED displayed, press the MENU button to select the desired cooking function. The selected function light will flash.
Press the START/CANCEL, and cooker will begin to heat up. The selected function will go from blinking to solid. Add food to cooker. When browning or sautéing is complete, press the START/CANCEL to cancel the program.
If using a pressure function after Brown or Sauté, press MENU again and select Low or High Pressure function. Refer to “To Select Low or High Pressure” in Operating Instructions, Section 1.
To Select Simmer
With the cooker on and the LED displayed, press the MENU button to select Simmer function. The selected function will flash.
Press the START/CANCEL and the cooker will begin to heat up. The simmer function will light up and go from blinking to solid. When simmer is complete, press the START/CANCEL to end the function.
To Select Keep Warm
After pressure cooking, the cooker will automatically go into Keep Warm function.
With the cooker on and the LED displayed, press the MENU button to select Keep Warm function. The selected function light will go from blinking to solid. Add food and press the START/CANCEL, and cooker will start to heat up.
To Cancel
Press the START/CANCEL button at any time to cancel current activity or to stop cooker. Unit may still be under pressure if using pressure cooker setting.
To Remove Lid
When pressure cooking cycle is finished, the unit will automatically switch to the Keep Warm position. At this point, you may choose to release pressure in one of three ways – Natural Pressure Release, Quick Pressure Release, or a combination of both. The choice will be dictated by the particular food being cooked and indications in the recipe. If adapting your own recipe for pressure cooking, find a similar recipe in our recipe booklet and use that as a guide.
WARNING: USE EXTREME CAUTION WHEN RELEASING PRESSURE.
- Natural Pressure Release – Following pressure cooking, you will hear a series of beeps indicating the unit is transitioning to Keep Warm. Pressure will begin to drop. Time for pressure to drop will depend on the amount of liquid in the pressure cooker and the length of time that pressure was maintained. Natural Pressure Release will take from 12 to 40 minutes. During this time, cooking continues, so it is recommended to use Natural Pressure Release for tougher cuts of meats and some heartier items. When pressure is fully released, the red float valve (pressure indicator) will drop and the lid will be unlocked, allowing lid to be rotated clockwise to the open icon and removed.
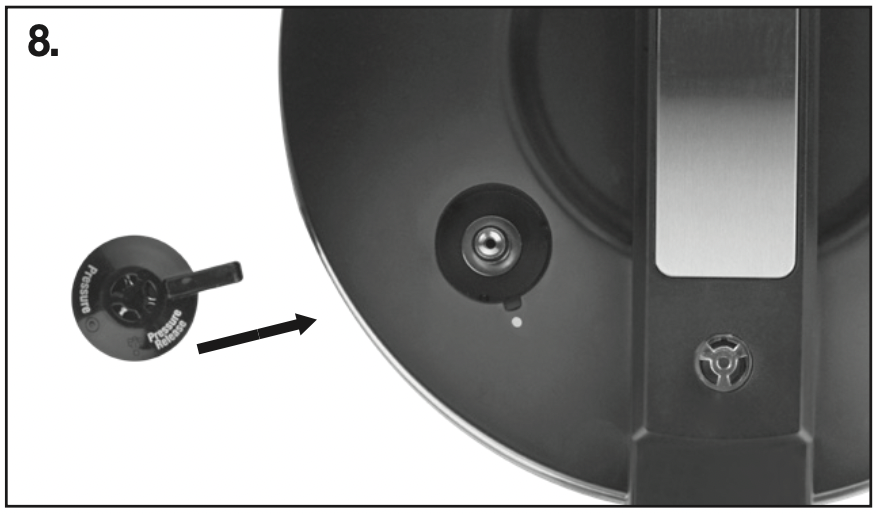
- Quick Pressure Release – Following pressure cooking, you will hear a series of beeps when the time is up. The unit will then transition to Keep Warm. For Quick Pressure Release, rotate the pressure limit valve handle (see figure 8). The cooker will stay in the Keep Warm mode up to 12 hours, or until START/CANCEL is pressed.
WARNING: When rotating the pressure limit valve, do not touch it with your hand. Use tongs or another tool.
Steam will immediately begin to release through the valve. Keep face and hands away from steam, as it is released rapidly, and do not release pressure under hanging cabinets, which can be damaged by steam. When pressure is fully released, the red float valve will drop, indicating lid is unlocked.
Using Quick Pressure Release stops the pressure cooking immediately after pressure has lowered and red float valve is dropped. If further cooking is necessary, the unit may be returned to Pressure, or the food may be further cooked on the Simmer setting.
- Combination Natural Pressure Release and Quick Pressure Release – For some recipes, a combination of Natural Pressure Release and Quick Pressure Release is useful. Allow Natural Pressure Release for the time indicated in the recipe (food will continue to cook slightly), followed by Quick Pressure Release.
WARNING: USE TONGS OR SIMILAR UTENSIL TO TURN PRESSURE LIMIT VALVE CLOCKWISE.
When the red float valve is completely down, turn the lid clockwise and lift to remove.
PRESSURE COOKER FUNCTIONS
- Low Pressure
- High Pressure
- Brown
This preset temperature allows cooking over high heat, without the lid, before pressure cooking. Browning foods in a small amount of fat in this way seals the outer surfaces of meats and vegetables, producing a visually appealing, flavorful exterior with a moist, tender interior.
Browning reduces the time it takes full pressure to build and pressure cooking to begin.
NOTE: Use wooden spoon/spatula to scrape up the brown bits. DO NOT use metal utensils.
- Sauté – This preset temperature, done prior to pressure cooking with lid removed, allows you to quickly soften vegetables in a small amount of fat or liquid without browning, and to cook items such as rice. Sautéing reduces the time it takes full pressure to build and pressure cooking to begin.
- Simmer – This preset temperature, after pressure cooking, allows you to cook liquids at a lower temperature without lid. It is primarily used to finish cooking some items, e.g., to add ingredients to a risotto, sauce, or stew or to continue cooking process to achieve preferred texture.
- Keep Warm – Holds and keeps cooked food warm for up to 12 hours.
SAFETY FEATURES
There are seven safety devices installed in the pressure cooker to assure its reliability.
- Opening, Closing and Locking Lid
The appliance will not start pressurizing until the lid is properly assembled and closed. The lid cannot be opened if the appliance is pressurized.
- Pressure Control
The correct pressure level is automatically maintained during the cooking cycle.
- Pressure Limit Control
The pressure limit valve will release air automatically when the pressure inside exceeds the preset pressure.
WARNING: Overfilling the pressure cooker (see Instructions for Use on pg. 4) may clog the pressure limit valve, which can cause excess pressure to develop.
- Anti-Block Cover
Prevents solid food material from blocking the pressure limit valve.
- Excess Pressure Relief System
When the pressure cooker exceeds the maximum allowable pressure and temperature, the cooking pot will move down until lid separates from the sealing ring, releasing air pressure.
CAUTION: Cooker may still be under pressure.
- Thermal Control
The power will automatically shut off when the cooking pot temperature reaches the preset value, or the pressure cooker is heating without any food inside.
- Overload Protection
The circuit will open when the pressure cooker’s thermal protection device exceeds maximum allowable temperature.
CAUTION: Cooker may still be under pressure.
CLEANING AND MAINTENANCE
- Unplug the power cord before cleaning.
- Clean the outer body with a soft cloth, such as a paper towel or microfiber cloth. Do not immerse the outer body in water or pour water into it.
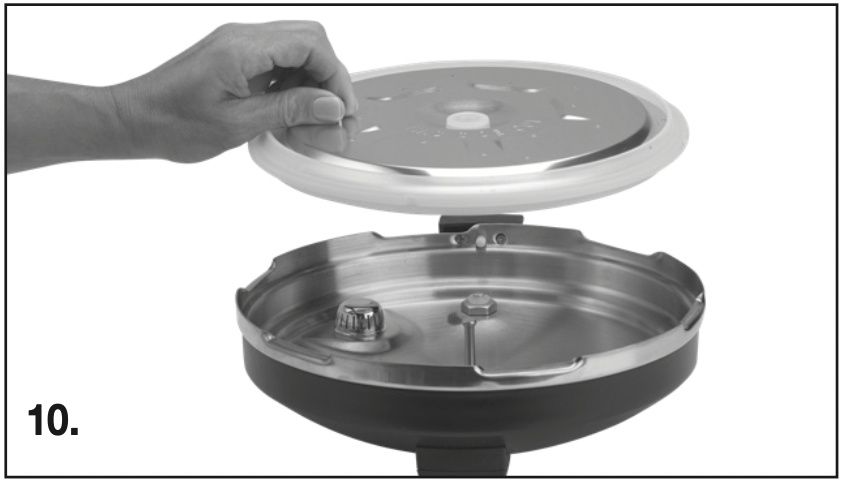
- Remove the sealing ring assembly (Part #4) from the inside of the lid by grasping the knob and pulling. Set aside.
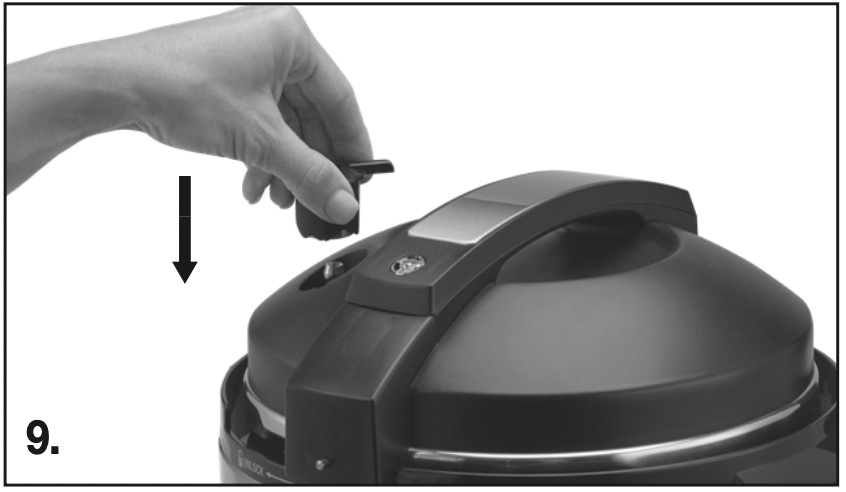
- Remove the pressure limit valve (Part #1) (see figure 9) from the lid by gripping and pulling firmly upward. Rinse with warm water, and dry.
- Rinse the upper and underside of the lid (Part #13) with warm water, including the air escape on the underside and the red float valve (Part #2). Dry completely, and replace pressure limit valve (Part #1).
- To clean sealing ring assembly, carefully remove sealing ring assembly (Part #4) and clean with a dampened cloth or microfiber cloth. Do not use chemical cleaners. Wash metal plate with warm, soapy water, dry thoroughly and replace sealing ring or placein dishwsher.
- To clean the rubber grommet in center of sealing ring assembly, carefully remove it, clean it, and replace it.
- Replace sealing ring assembly in lid. BE SURE KNOB FACES OUT (figure 10) and “THIS SIDE OUT” is facing you.
- Cooking pot is dishwasher safe. To hand-wash the pot, use warm, soapy water and wipe dry. Be careful not to damage the inside coating. Never use harsh chemicals or scouring pads or metal utensils.
NOTE: If scouring is necessary, use a nonabrasive cleaner or liquid detergent with a nylon pad or brush.
- To clean the condensation collector, remove and clean it with warm, soapy water, then reinstall it (figure 11).
[IMAGE]
NOTE: Condensation may collect on the bottom rim of the lid. Liquid will collect on the top of the base and drain into the condensation collector.
- Any other servicing should be performed by an authorized service representative.
TROUBLESHOOTING
|
Symptom
|
Possible Reasons
|
Solutions
|
|
Lid does not close.
|
The sealing ring assembly is not properly installed in lid.
|
Re-install the sealing ring assembly as instructed in INSTRUCTIONS FOR USE, #3 page 4.
|
|
The red float valve is seized by the push rod.
|
Push the rod with hands.
|
|
Cannot open the lid after pressure is released.
|
The red float valve is still up.*
|
Press the red float valve down. Tap the lid above the red float valve.
|
|
Air escapes from the rim of the lid.
|
No sealing ring was installed.
|
Install the sealing ring.
|
|
Food residue on sealing ring.
|
Clean sealing ring.
|
|
Sealing ring worn out.
|
Replace the sealing ring.
|
|
Lid not locked properly.
|
Be sure lid is firmly on unit and the lid icon is directly above the closed icon.
|
|
Air escapes from the red float valve.
|
Food stuck on the sealing ring of the float valve.
|
Clean the sealing ring.
|
|
The sealing ring on the float valve wore out.
|
Replace the sealing ring.
|
|
The red float valve will not rise.
|
The pressure limit valve is not placed properly.
|
See Before First Use, #3, page 4.
|
|
Not enough food and water.
|
Check recipe for proper quantities.
|
|
Air escaping from the rim of the lid and the pressure limit valve.
|
Call our Consumer Service Center toll- free at 1-800-726-0190.
|
|
Unit shuts off when START is pressed to begin pressure cooking.
|
Brown function was just used and temperature in unit is higher than pressure cooking temperature, so safety shutoff occurs.
|
After browning, let unit cool down for 2 or 3 minutes before you start pressure cooking.
|
*Do not attempt to force lid open until red float valve has dropped.