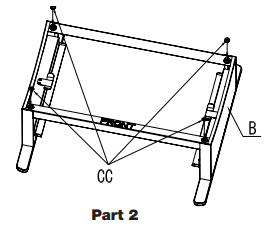
Step 1: Place one washer (Part CC) on each of the four corners of the leg assembly Part (B) as shown.
Step 2:
• Align all four holes of the fire box with the 4 four corners of the leg assembly.
• Secure the grill with the leg assembly with a washer (Part CC) and nut (Part BB) of the back side of the grill. Then secure it with a washer (Part CC) and a screw (Part AA) of the front side of the grill as shown.
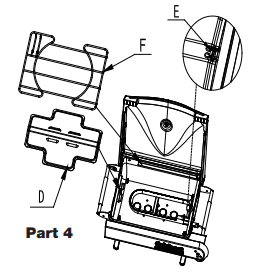
Step 3:
Put the Flame Tamer (Part D) on to brackets that located on both left and right sides of the fire box as shown. Insert the lock pins (Part E) into the right side bracket to secure the flame tamer.
Then put the pizza stone holder (Part F) on top of the firebox.
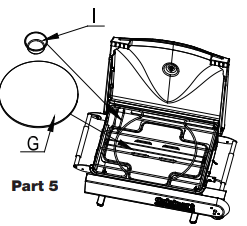
Step 4:
Place the Smoke Chip Cup (Part I) into the top left corner of the pizza stone holder.
Place the Pizza Stone (Part G)at the center of the pizza stone holder.
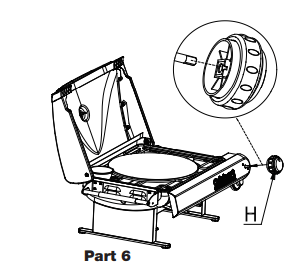
Step 5:
Assemble the control knob.
Align and insert the flat side of the shaft from the regulator to the flat side of hole behind the knob (Part H). The knob indicator should be pointing straight up to the off position.
Step 6:
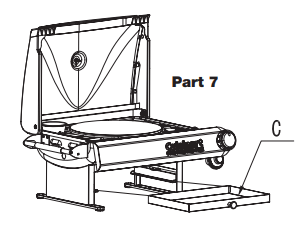
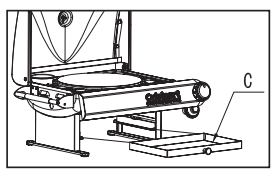
Install The Warming Tray
Slide the warming tray (Part C) onto the brackets mounted to the base (Part B).
Operating Your Grill
Select a Proper Location
Once you have assembled your new grill, find a suitable location for use.
Note: The use of installation of this product must conform to local codes. In absence of local codes, use the National Fuel Gas Code: ANSI Z223.1/NFPA54, Storage and Handling of Liquified Petroleum Gases, ANSI.NFPA 58 or Natural Gas and Propane Installation Code, CSA B149.1; Propane Storage and Handling, CSA B149.2.
Never use this outdoor grill inside any building, garage, shed or breezeway, or inside any boat, trailer or recreational vehicle and/or boat, to prevent possible fire and to prevent the possibility of carbon monoxide poisoning or asphyxiation.
Always place your grill on a hard and level surface far away from combustible materials and structures.
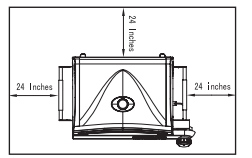
Do not use this grill under an overhead combustible surface or covered area ( e.g., awnings, umbrellas, porches or gazeboes ). Keep all combustible surfaces at least 24” (61cm) away.
Locate the grill away from any combustible and non-combustible material or construction by at least 24 inches (61cm) from back and 24 inches (61cm) from side.(See the diagram below)
Never store or use gasoline or other flammable or volatile substances in the vicinity of this grill or in the vicinity of any other heat-generating appliance, because of the danger of starting a fire.
Do not obstruct the flow of combustion and ventilation air.
Special Instructions for the Use of Regulator and Propane Cylinder
A propane gas cylinder is required for operation. Use1.00lbs (465g; 16.4oz). propane cylinder.
This Cuisinart grill is equipped with a regulator having a CGA No.600 cylinder connection.
1. Only cylinders marked “propane” must be used.
2. The cylinders should be disconnected when the appliances is not in use
3. Do not store a spare LP-gas cylinder under or near this appliance;
4. Never fill the cylinder beyond 80 percent full: and 5. If the instructions in steps 3 and 4 are not followed exactly, a fire causing death or serious injury may occur.
· Propane cylinder size:D10cmXH20cm, Only cylinders marked “PROPANE” must be used.
· The propane cylinder must be constructed and marked in accordance with the specifications for LPGas cylinders of the U.S Department of Transportation (D.O.T) or the National standard of Canada, CAN/CSA-B339,Cylinders, spheres and Tubes for Transportation of Dangerous Goods.
· Store spare fuel canisters in a well-ventilated area away from the grill.
· Do not puncture or burn fuel canister.
· If the grill is not in use, the control knob must be turned to the “OFF” position to shut off the gas flow from the cylinder.
REMOVAL OF THE GAS CYLINDER
(please see the 5.3 Installing the gas cylinder) “picture.”
1. Turn the burner control knob to “OFF” position.
2. Grasp the grill handle nearest to the regulator with on hand, and turn the cylinder counterclockwise until it comes off.
• Do not store a spare propane cylinder under or near this grill. Never fill the cylinder beyond 80 percent full. If this instruction is not followed exactly, a fire causing death or serious injury may occur.
• Save the cylinder cap and reinstall when not in use.
• Cylinder supply system must be arranged for vapor withdrawal. Do not block the pressure relief valve during use or storage.
• The cylinder must be disconnected when the appliance is not in use.
1. Do not store a spare LP-gas cylinder under or near this appliance;
2. Never fill the cylinder beyond 80 percent full; and
3. If the instructions in step 1 and 2 are not followed exactly, a fire casing death or serious injury may occur.
Installing the Gas Cylinder
(The propane gas cylinder is not provided with the appliance.)
A gas cylinder complying with the requirements listed in section 5.2 must be obtained before the grill can operate. Connect the LP cylinder to the grill outdoors only. Read and follow all direction on the cylinder.
Turn the burner control knob to “OFF” position.
Remove the protective caps from the cylinder valve and coupling nut, if present.
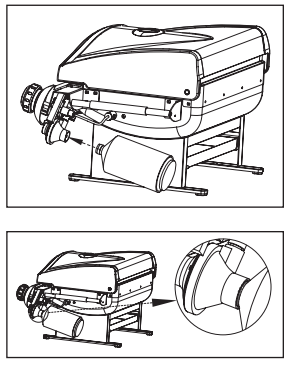
Open grill lid for easier access to regulator assembly.
Grasp the grill handle nearest to the regulator with one hand, and with the other hand push the cylinder into the threaded regulator connector and turn clockwise until tight.
TIGHTEN BY HAND ONLY. Do not use tools.
Removal Of The Gas Cylinder
Turn the burner control knob to “OFF” position.
Grasp the grill handle nearest to the regulator with one hand, and turn the cylinder counterclockwise until it comes off.
Checking for Gas Leak
Check gas system for leaks to prevent fire or explosion hazard
The “Leak Check” must be performed before lighting the grill and each time the cylinder is connected for use.
Do not smoke or allow other sources of ignition in the area while conducting a leak test.
Conduct the leak test outdoors in a well-ventilated area.
Do not use matches, lighters or a flame to check for leaks.
Do not use grill until all leaks have been stopped. If you are unable to stop a leak, disconnect the propane supply, and call for gas application service or your local propane gas supplier.
Leak Check Method
Make 2-3 oz. of leak solution by mixing one part liquid dishwashing soap with three parts water.
Make sure control knob is in the “OFF” position.
Spray or paint some leak solution on the cylinder and regulator connection.
Inspect the solution at the connections, looking for bubbles. If no bubbles appear, the connection is secure.
If bubbles appear, a leak is detected. Go to step 6.
Disconnect the cylinder from the regulator, and reconnect. Make sure the connection is secure and no leak is found before using the grill.
If you continue to see bubbles, DO NOT USE THE GRILL. Repeat the above process with a different LP cylinder. If leaks are still present, contact the customer service center.
Lighting Instructions
Read all instructions before lighting.
Open lid during lighting.
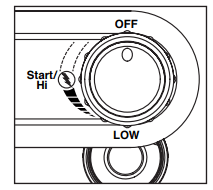
Make sure the gas control knob is in “OFF” position.
Push the gas control knob and quickly turn counterclockwise to “Start/High” position. The igniter will click and light the burner.
If ignition does not occur in 5 seconds, turn the gas control knob off, wait 5 minutes, and repeat step 4.
* Before cooking on this grill for the first time, operate the grill for about 15 minutes with the lid closed and the gas turned on “HIGH”. This will “heat clean” the internal parts and dissipate odor from the painted finish.
*Clean your grill after each use. DO NOT use abrasive or flammable cleaners,
As it will damage the parts of this product and may start a fire.
If the burner does not light, turn the gas control knob off and wait 5 minutes to let the gas clear before you try again.( please see the 5.3 Installing the gas cylinder)
Match lighting
Match lighting instructions:
Read all instructions before lighting.
Open lid during lighting.
Make sure the gas control knob is in “OFF” position.
Strike a long wooden match and position the burning match through the match lighting hole in the firebox bottom. Place the flame near the bottom edge of the burner.
Push down and turn the burner control knob counter-clockwise to the high setting.
The burner should light. The flame will carry around the burner. Allow grill to pre-heat with the grill lid closed for 2-3 minutes before cooking.
Using the Grill
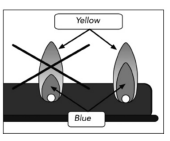
Inspect the burner flame by looking through the match lighting holes.
A good flame should be blue with some yellow tips coming from the burner holes. Yellow tips on flames up to 1/4“ in height are acceptable as long as no carbon or soot deposits appear.
During operation, stand to the side of grill when opening the grill lid.
Do not expose any part of your body directly above the cooking area.
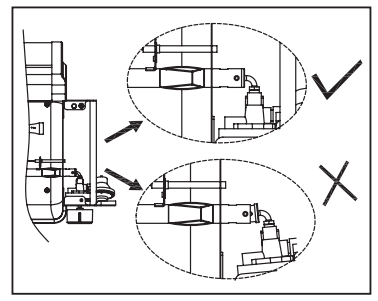
The burner opening must be positioned properly over the valve orifices.
Warming Tray
The warming tray is an easy way to keep cooked pizzas warm while cooking more. Simply slide the tray out and place cooked food on surface and return to it’s original position. Some pizzas may be larger than the tray in which case it is OK to have some over hang or cut the pizza to fit. Always use caution when using the warming tray as this area can get hot.
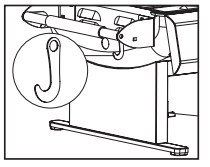
Tool Hooks
Two tool hooks are included on the left carry handle of your grill. They flip up into the handle for out of the way storage when not in use and you can swing them down to hang tools on when cooking. Best when used on a stand or at the left edge of the table you are cooking on.
Care And Maintenance
Care
Regular care of your grill will help keep it operating properly. All maintenance should be done only when the grill is cool and with the fuel supply turned off. Occasionally inspect and tighten hardware that may become loose.
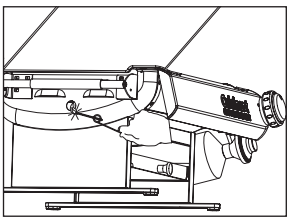
Cleaning The Venturi Tube
A spider’s nest or wasp’s mud inside the Venturi Tube can block gas flow and can even cause a fire at the gas control valve. Such a fire can cause operator injury and serious damage to your grill. To prevent insect related problems, inspect the Venturi Tube screen cover regularly and remove any dirt.
Cleaning And Maintenanc
WARNING: Do not clean any grill surface while grill is operating. Let grill cool to a safe temperature prior to cleaning.
• Disconnect the fuel supply and remove the fuel supply cylinder prior to cleaning.
• Cleaning should be done where detergent won’t harm work surface or lawn.
Exterior Cleaning
• Clean grill exterior surfaces with warm soapy water and stainless steel cleaner.
• Wash drip tray in warm soapy water – do not run through dishwasher.
Pizza Stone Cleaning
You can scrape debris off when you’re done to keep the surface clear, and you can wash the stone with water if you choose, but it is not necessary. Pizza stones condition a lot like a cast iron pan. You can also “bake” the stone clean by running on high for about 15 minutes with nothing on it. The high temperatures will burn off a lot of the material. Never use detergents to clean the stone as it is porous and will absorb the detergents.
Interior Cleaning
• Cooking grate can be cleaned with a grill brush. For best results, cooking grate should be warm (warm, not hot – never brush with grill operating, or when interior is very hot). If desired, cool cooking grate can be removed from grill and cleaned with warm soapy water.
• Should you wish to remove accumulated debris from the bottom of the fire box, proceed as follows:
– Let grill cool completely
– Remove cooking grate and set aside
– Remove flame tamer and set aside! CAUTION Flame tamer edges and surface are sharp – use care when handling
– Carefully scrape and remove debris from bottom of firebox using care not to touch burner element, igniter, or igniter wire.
WARNING: DO NOT APPLY ANY CLEANERS OR LIQUIDS TO BURNER ELEMENT OR ATTEMPT TO CLEAN IN ANY WAY.
– DO NOT USE WATER OR LIQUIDS TO CLEAN GRILL INTERIOR
– Replace flame tamer and securing screw. CAUTION: DO NOT OPERATE GRILL WITHOUT FLAME TAMER IN PLACE.
Frequently Asked Questions
· CAN I USE MY CUISINART GAS GRILL WITH NATURAL GAS?
NO. Your Cuisinart Gas Grill is intended for use only with LP (Liquid Propane) gas. Natural Gas is NOT Liquid Propane Never use any other fuel source with your grill, as it will create a dangerous situation.
· CAN I ADD LAVA ROCKS, CERAMIC TILES, OR CHARCOAL BRIQUETTES TO MY CUISINART GAS GRILL?
NO. Your grill is not intended to operate with these items, and doing so may create an unsafe situation, and will void your warranty. You may use wood planks or a wood chip “smoker box” on top of the cooking grate surface, but nothing should go under the cooking grate.
· CAN I BUY ACCESSORIES FOR MY GRILL OVER THE PHONE?
Yes, you can call 1-800-211-9604 for assistance.
Troubleshooting
•BURNER WON’T LIGHT (USING A 16.4OZ OR 14.1OZ LP BOTTLE)
• Be sure LP bottle still has fuel in it by gently shaking it - there will be sounds of liquid inside if fuel remains.
• Check to see that the venturi tube air inlet screen is not covered or clogged (see 6. Care and Maintenance ).
• Check to see that burner orafice holes are clear. If obstructed, with gas bottle disconnected, gently brush orafice holes with a small brush.
• Check to see that ignitor is producing a spark against the burner (best checked in shady spot).
If above do not solve problem, unless LP tank is new, replace with new tank and attempt lighting again.
•GRILL DOESN’T REACH HIGH ENOUGH TEMPERATURE (USING LP BOTTLE)
• Be sure LP bottle still has fuel in it by gently shaking it - there will be sounds of liquid inside if fuel remains.
• Check to see that the venturi tube air inlet screen is not covered or clogged (see 6. Care and Maintenance ).
• Test gas system for leaks (see 5.4 Leak Check Method)