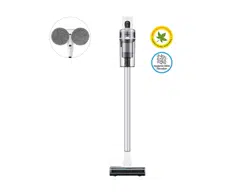
VS20T75**** Series : Lithium-ion 21.9 V, 2850 mAh, 6 cell
VS15T70**** Series : Lithium-ion 21.6 V, 1800 mAh, 6 cell
❇ Those two batteries are not compatible with each other.
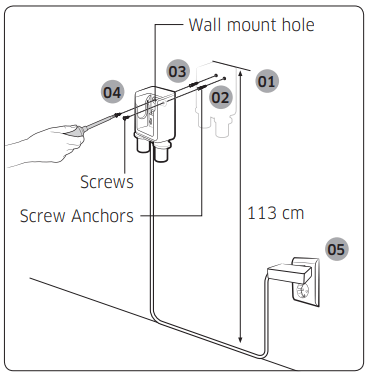
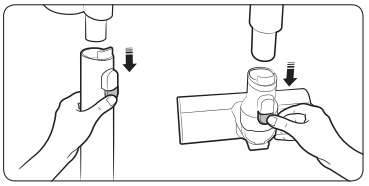
Installing the wall mount
Assembling the wall mount
• To disassemble the wall mount, follow steps in reverse order.
Installing the wall mount
01 The wall mount installation should be set so the top of the wall mount is 113 cm (44 1/2 in)from the floor.
02 Using the wall mount as a template, mark where the screw holes will be placed.
03 Drill the holes to a depth of 50 mm (2 in) using a 6 mm (1/4 in) drill bit, and put the provided screw anchors into the hole.
04 Fix the wall mount to the wall with the provided screws.
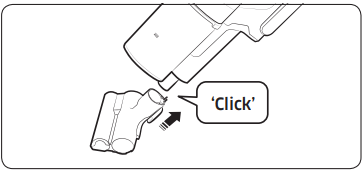
05 Plug in the wall mount, place the vacuum into the wall mount, and then confirm that the battery level indicator is displayed.
Using the vacuum cleaner
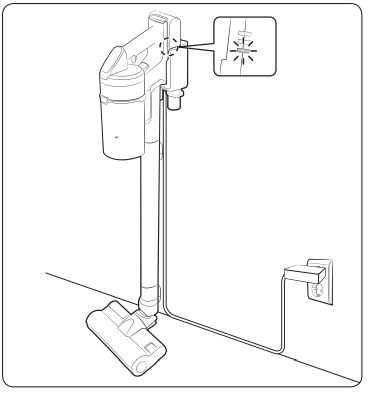
Using the wall mount
Charging
❇ Make sure the back of the battery is correctly placed onto the vacuum charging part.
❇ Check if the battery level indicator is displayed while charging.
❇ The battery level indicator blinks while charging. When charging is complete, the blinking stops and the light level dims.
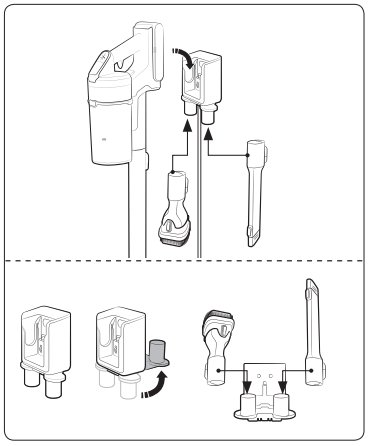
Storing the accessories
Wall mount
❇ When accessories are disassembled to be stored, dust may fall from the suction part of the vacuum cleaner.
❇ After cleaning, operate in MAX mode for 10 seconds.
Desk charger
❇ Place the desk charger on a desk after folding the accessory holders and assemble the accessories to the holders as shown in the picture.
❇ If the Extension Crevice Tool is inserted first, the accessory holders can be folded more easily.
Charging the battery
❇ When the battery level indicator is at its lowest level and blinks( ) charge the battery.
❇ When charging the vacuum, make sure the connection part of the wall mount is correctly connected
❇ The vacuum cleaner cannot be used while it is charging.
CAUTION
• Before ejecting the battery, the product must be turned off. (If the battery is forcibly ejected while the vacuum is operating, the vacuum can malfunction.)
• Be careful not to drop the battery. If you do, you can injure yourself or damage the battery.
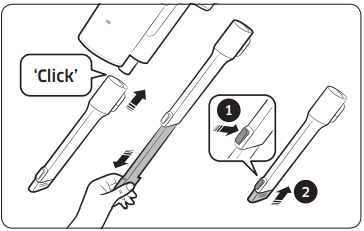
Ejecting the battery
Press the battery release button at the rear of the handle to eject the battery
Re-inserting the battery
Push the battery to the end until you hear it click
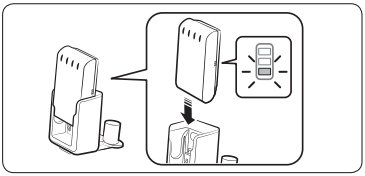
Charging with a desk charger
• Charge the battery at the desk charger.
• Push the battery in firmly.
• Check if the battery level indicator is displayed while charging.
Operating the vacuum cleaner
If the brush clings to floors (such as a carpet, a mat, or bedding, etc.) or does not spin properly, change the suction power to ‘MIN’ or ‘MID’ mode.
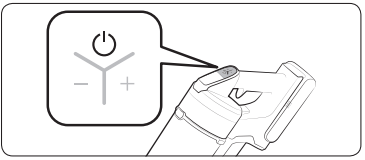
Power on / off
When pressing the power button, the vacuum cleaner starts operation in ‘MID’ mode.
• When the wet brush is assembled, operation starts in ‘WET’ mode.
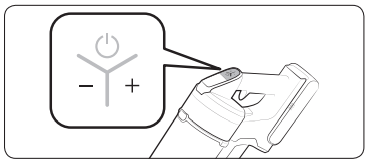
Controlling suction power
You can control the suction power of the vacuum cleaner.
• + button: Increases suction power.
• - button: Decreases suction power.
❇ The suction power control button does not work in ‘WET’ mode.
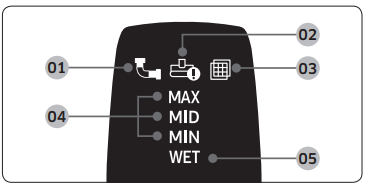
Checking the display
01 Clogged: Something is clogging the dustbin, pipe, or the connected suction accessory.
02 Spinning brush stuck: Something is stuck in the connected spinning brush accessory.
❇ The spinning brush stuck display will not turn on if the spinning brush motor stops because it has overheated.
03 No Filter: The washable micro filter is not assembled correctly
04 Suction power: Displays the current suction power.
05 Wet brush cleaning mode: Displays when the wet brush is assembled.
❇ If either 01, 02, or 03 blinks a few times and the vacuum cleaner stops operation, please take action by referring to the maintenance part of this manual.
Using the accessories
If the spinning brush stops working, check whether it has overheated or has something stuck in it. (Please refer to the troubleshooting part of this manual.)
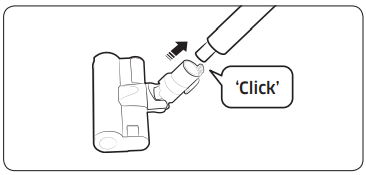
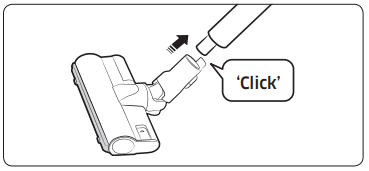
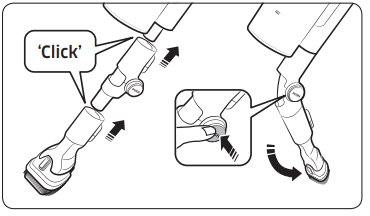
Disassembling the accessories
• When disassembling the pipe, press the release button at the rear of the pipe.
• Before disassembling the accessories, operate in MAX mode for more than 10 seconds to clean the accessories of any remaining dust or foreign matter.
• When disassembling the brush, press the release button at the rear of the brush.
Soft Action Brush
Use to clean a wood or linoleum floor.
Turbo Action Brush
Use to clean various floor conditions at home, it is also suitable to clean carpet.
Mini Motorized Tool
Use to clean bedding.
Combination Tool
Use to remove dust from curtains, furniture, sofas, etc.
Extension Crevice Tool
Use to remove dust from grooves of window frames, chinks, corners, etc.
Flexible Tool
Use to clean the places hard to reach such as the upper or rear parts of furniture, or ceilings.
NOTE
• The Flexible Tool can only be connected to the Combination Tool or the Extension Crevice Tool.
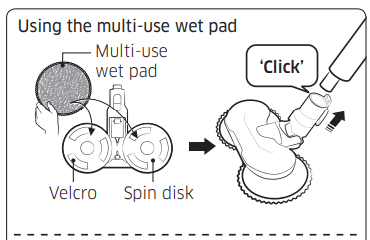
Wet Brush
Use to clean a wood or linoleum floor with a wet pad.
❇ The Wet Brush does not have a dust suction function.
❇ When attaching the wet pad, make sure the pad is in the center of the spin disk.
Using the multi-use wet pads
Attach a multi-use wet pad to each spin disk.
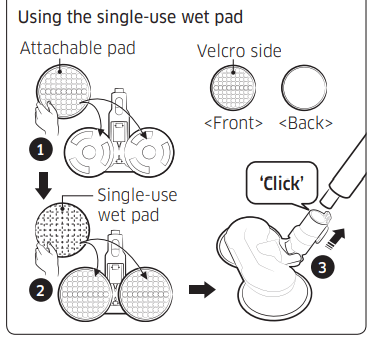
Using the single-use wet pads
Attach an attachable pad to each spin disk and attach a single-use wet pad on top of each of the attachable pads.
❇ When using the single-use wet pad, make sure the direction of the attachable pad is correct. Velcro side is the front side.
❇ Discard single-use wet pads after use. Keep the attachable pads for future use.
❇ If you use single-use wet pads without the attachable pads, the cleaning performance will not be as good.
Maintaining the vacuum cleaner
CAUTION
Turn off the vacuum cleaner before cleaning it.
If the dustbin or filter is filled with dust, the vacuum cleaner may stop to prevent overheating.
You should clean the dustbin or filter before it fills to the MAX line.
When to empty the dustbin
An easy way to empty the dustbin without making a mess
Emptying and cleaning the dustbin
After pressing the dustbin release button, pull the dustbin in the direction of the arrow.
Pull the washable micro filter out by pulling up on the filter handles inside the washable micro filter. (marked PULL)
While pressing the button, turn the dustbin cover and remove it from the dustbin.
Brush the dust off the metal mesh grille filter with the combination tool.
❇ Do not pull the rubber attached to the metal mesh grille filter.
After emptying the dustbin, clean it and dry in the shade.
❇ When heat is applied, product malformation may occur.
Reassemble the dustbin cover aligning the dustbin release button with the groove of dustbin.
Put the washable micro filter in the dustbin cover by fitting in grooves of the dustbin cover.
Assemble the dustbin to the vacuum in the order shown in the image by pushing it until you hear it click.
Cleaning the filter
• To maintain the best performance of the filter, remove the dust on the filter frequently and clean the filter with water once a month.
– After cleaning, dry completely for more than 24 hours in the shade before use.
– When heat is applied, product malformation may occur.
Washable micro filter
Ultra fine dust filter
❇ When assembling, turn the filter until the line below the lock image is not visible
Cleaning the accessories
Mini Motorized Tool
Extension Crevice Tool / Pipe
Soft Action Brush
NOTE
When foreign matter remains on the brush, remove it with a wet tissue or a dry cloth.
CAUTION
Do not clean the spinning brush and suction part with water.
Do not use the Soft Action Brush to remove moisture such as spilt liquid or pet’s waste.
Turbo Action Brush
• If the foreign matter is not removed, use scissors to remove it.
NOTE
• If a cloth or other foreign matter is vacuumed up and tangled with the spinning brush, the spinning brush will stop working to protect the brush motor. After cleaning the brush, turn the power off and then on again.
• If a brush does not work after cleaning, turn the power off and then on again.
• When cleaning the brush, be careful not to catch your fingers in the fold of the brush.
Wet Brush
NOTE
• If the spinning brush does not work even after cleaning the Soft Action Brush and Wet Brush, the overheating prevention device of the brush motor might be in operation. Wait 30 minutes or more to cool the motor and operate again.
Troubleshooting
Before calling for service, review the problems and solutions below. If none of the suggested solutions resolve your problem, please visit our website at samsung or call Samsung Customer Care. Note that you will be charged for any service calls in which no defects were found. Prob
The vacuum cleaner does not work.
• Check the battery level and charge the battery.
• Check whether the product is turned off, and then press the power button to turn it on.
• Check whether the pipe, dustbin or brush is blocked.
• Check whether the washable micro filter is inserted correctly.
• If the vacuum has not been used for a long time, charge the battery.
• If the battery dies, replace the battery
Suction force decreases suddenly and the vacuum makes a vibrating sound
• Check whether a brush, dustbin or pipe is clogged with foreign matter and remove it.
• Check whether the dustbin is fully filled with dust. If it is, empty the bin.
• Check whether the filter is dirty. If it is, clean the filter
The vacuum cleaner cannot be charged.
• Confirm that the voltage provided to the wall mount matches the requirements of the wall mount.
• Check that the vacuum cleaner is properly aligned on the charging station and the LED of the battery level indicator is turned on.
• Check if foreign matter (dust) is on the charging terminal. Remove any foreign matter with a cotton swab or soft cloth.
The spinning brush (drum) inside a brush does not work.
• When the spinning brush stuck display is turned on, turn off the vacuum and check whether the brush is clogged with foreign matter. If so, remove the foreign matter and restart the vacuum.
• Check if the vacuum cleaner is turned on and then turn it off and on again.
– For the Soft Action Brush and Wet brush, if the vacuum overheats, it may take about 30 minutes for the motor to cool.
An odor is coming from the air outlet or filter of the vacuum cleaner
• Empty the dustbin and clean the filters frequently.
– As your vacuum cleaner is a new product, it may have a slight odor for the first 3 months after purchase.
– If you use the vacuum cleaner frequently, accumulated dirt in the dustbin or dust on the filter may generate an odor.
• Replacement filters are available at your local Samsung service agent.
Cleaning is finished but small dust particles come out of the brush.
• After cleaning, operate the vacuum for 10 seconds or more on the MAX setting to suction up the small dust particles.
Vacuum cleaner stops operation during cleaning.
• As this product has the overheating prevention device of the brush motor, product will stop operation temporarily for the following conditions
– When the vacuum operates with a full dustbin.
– When the vacuum operates with suction part or brush clogged.
– When the Extension Crevice Tool is used for long hours.
• Check these problems then turn the vacuum on after a while. (This case may differ depending on the ambient temperature.)
Static electricity occurs when cleaning a thick and soft mat.
• Materials of a mat (childcare center mat, noise prevention mat for between floors, etc.) may cause the static electricity.
– Move the brush on a normal floor for a while and clean again, then the static electricity should disappear.
-423177.png)
 button

 ) charge the battery.
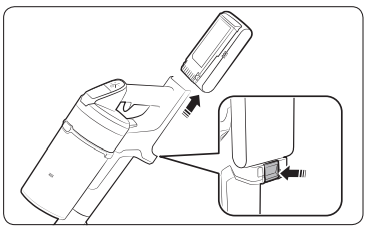


 Attach an attachable pad to each spin disk and
 attach a single-use wet pad on top of each of the attachable pads.


 After pressing the dustbin release button,
  pull the dustbin in the direction of the arrow.

 remove it from the dustbin.