, _ , ,,
,SO96_,,,,,,,,,,,,,,serles
UU_ Oc_NQ,,,F,
er manu,,,a,,,i,,
100%
Recycled Paper
T_'l,s"'mar_ual,,_i,smade wi_h 1"80% recycl'ed pr_,er.
the possibilities
Thank you for purchasing a Sarnsung product
To receive more complete service,
please register your product at
www.samsung.com/register
nform on
J
SAFETY INFORMATION
/k
WARNING
/k
WARNING
• Before operating the appliance, please read this manual thoroughly and retain
it for your reference.
• Because the following operating instructions cover various models, the
characteristics of your vacuum cleaner may differ slightly from those
described in this manual.
CAUTION/WARNING SYMBOLS USED
Z_ Indicates that a risk of death or serious injury exists.
WARNING
Z_ Indicates that a risk of personal injury or material damage exists.
CAUTION
OTHER SYMBOLS USED
Represents something you must NOT do.
[_ Represents something you must follow.
Indicates that you must disconnect the power plug from the socket.
This vacuum cleaner is designed for domestic household use only. Do not use this
WARNINGvacuum cleaner to clear building waste or debris. Do not use this vacuum cleaner with
any of the filters removed as this could cause damage to the internal components and
void your warranty.
SAVE THESE INSTRUCTIONS
POLARIZED PLUG INSTRUCTIONS
- To reduce the risk of electric shock, this appliance has a polarized plug (one blade is wider than
the other). This plug will fit in a polarized outlet only one way. Ifthe plug does net fit fully in the
outlet, reversethe plug. Ifit stilldoes net fit, contact a qualified electrician to installthe proper
outlet. De net change the plug inany way.
2 safety information
nform on
J
IMPORTANT SAFETY INSTRUCTIONS
When using an electrical appliance, you should always follow these basic precautions:
READ ALL INSTRUCTIONS BEFORE USING YOUR CANISTER VACCUM
WARNING- Torodocothor,sko,f,ro,o,octr,cshock,or,ojory"
1. Do not leave the appliance unattended when it is plugged in. Unplug from the outlet
when not in use and before servicing.
2. Do not use outdoors or on wet surfaces.
3. Do not allow the vacuum to be used as a toy. Pay close attention when the vacuum is
used by or near children.
4. Use only as described in this manual. Use only manufacturer's recommended
attachments.
5. Do not use with a damaged cord or plug. Ifthe appliance is not working as it should,
has been dropped, damaged, left outdoors, or dropped into water, bring it to a service
center.
6. Do not pull or carry by the cord, use the cord as a handle, close a door on the cord, or
pull the cord around sharp edges or corners. Do not run appliance over the cord.
Keep the cord away from heated surfaces.
7. Do not unplug by pulling on the cord. To unplug, grasp the plug, not the cord.
8. Do not handle the plug or appliance with wet hands.
9. Do not put any object into openings. Do not use with any opening blocked.
Keep free of dust, lint, hair,and anything that may reduce air flow.
10. Keep hair, loose clothing, fingers, and all parts of your body away from openings and
moving parts.
11. Turn off all controls before unplugging.
12. Use extra care when cleaning on stairs.
13. Do not use to pick up flammable or combustible liquids, such as gasoline, or use in
areas where they may be present.
14. Do not pick up anything that is burning or smoking, such as cigarettes, matches, or
hot ashes.
15. Do not use without the dirt cup and/or filters in place.
16. Do not use the vacuum cleaner in an enclosed space filled with vapors given off by oil
base paint, paint thinner, some moth proofing substances, flammable dust, or other
explosive or toxic materials.
17. Do not pick up hard or sharp objects such as glass, nails, screws, coins, etc.
18. The hose contains electrical wires. Do not use when damaged, cut, or punctured.
19. Always turn off this appliance before connecting or disconnecting either the hose or
motorized nozzle.
20. Unplug before connecting the motorized nozzle.
21. Hold the plug when rewinding onto the cord reel. Do not allow the plug to whip when
rewinding.
safety information $
ASSEMBLING THE VACUUM 05 Assemblingthe vacuum
OPERATING THE VACUUM
06 Power cord
06 On/Off switch
07 Power control
08 Power Brush
MAINTAINING THE TOOLS AND
FILTERS
09 Using accessories
10 Maintaining floor tools
11 Emptying the dust bin
12 Cleaning the dust pack
14 Cleaning the outlet filter
14 Changing the battery
TROUBLESHOOTING
4 contents
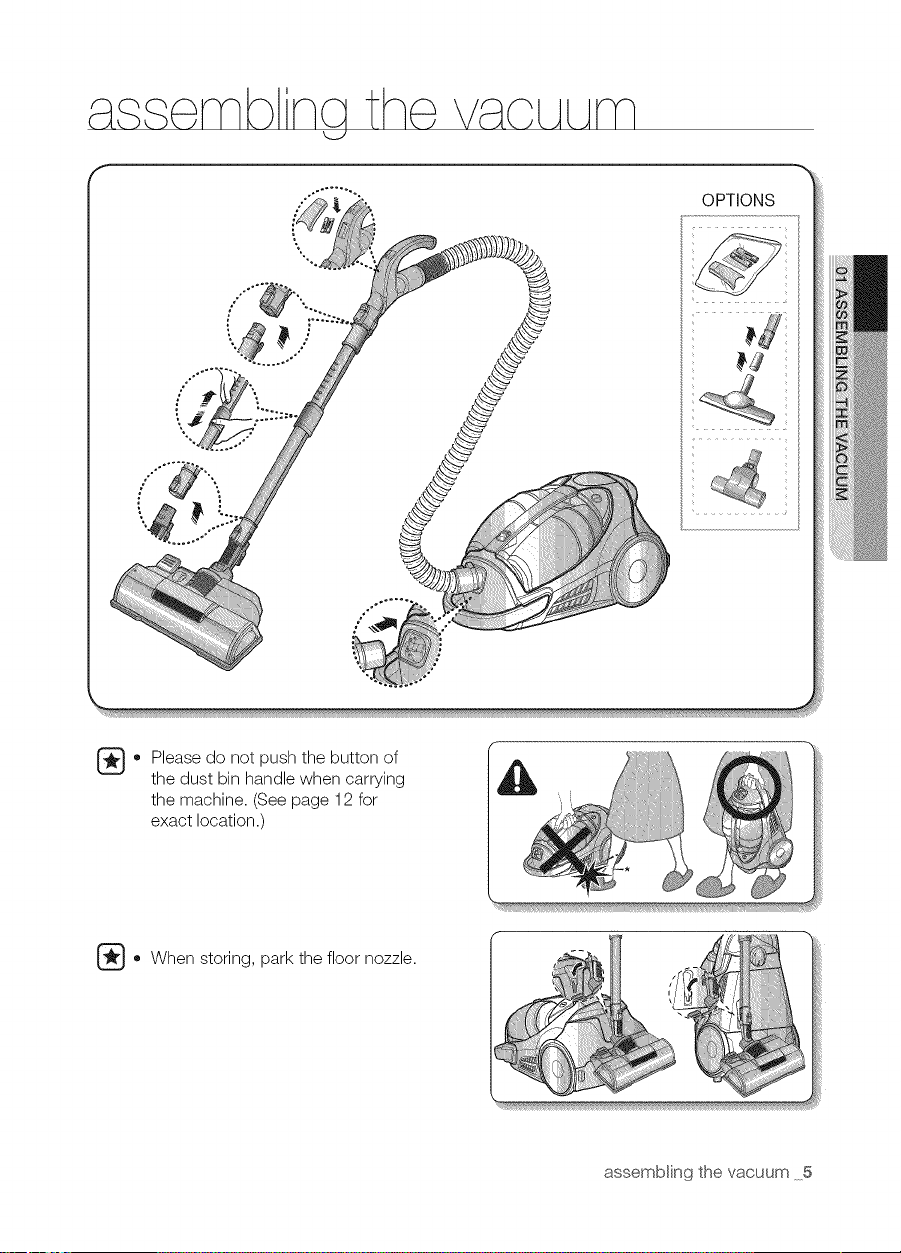
assemb nq the VaCLALAm
OPTIONS
'i17/1 77/ iiii ...........
.... ......
o lease do not push the button of
the dust bin handle when carrying
the machine. (See page 12 for
exact location.)
Go When storing, park the floor nozzle.
assembling the vacuum 5
o_r_ nGth_ V_OLALAm
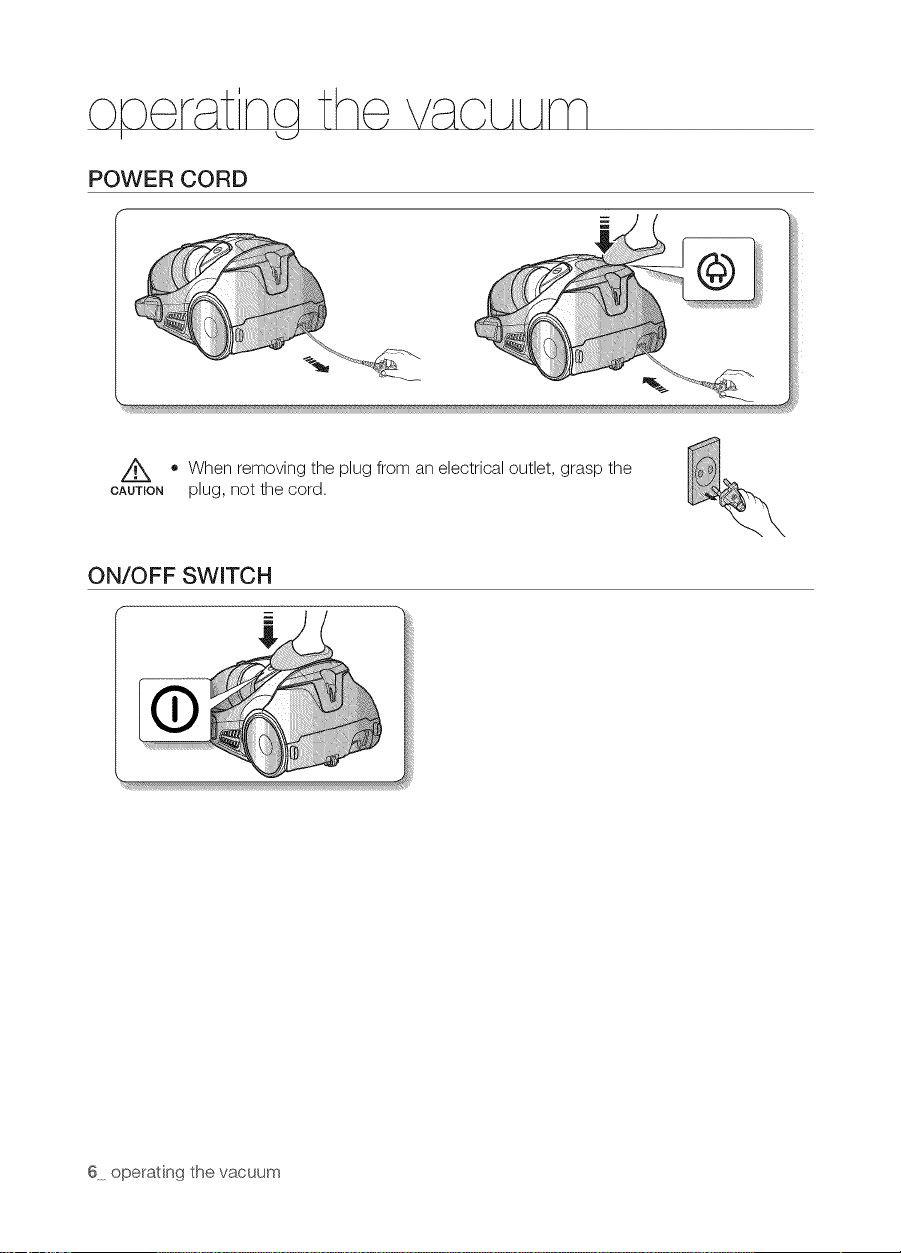
POWER CORD
• When removing the plug from an electrical outlet, grasp the
CAUTION plug, not the cord.
ON/OFF SWITCH
6 operating the vacuum
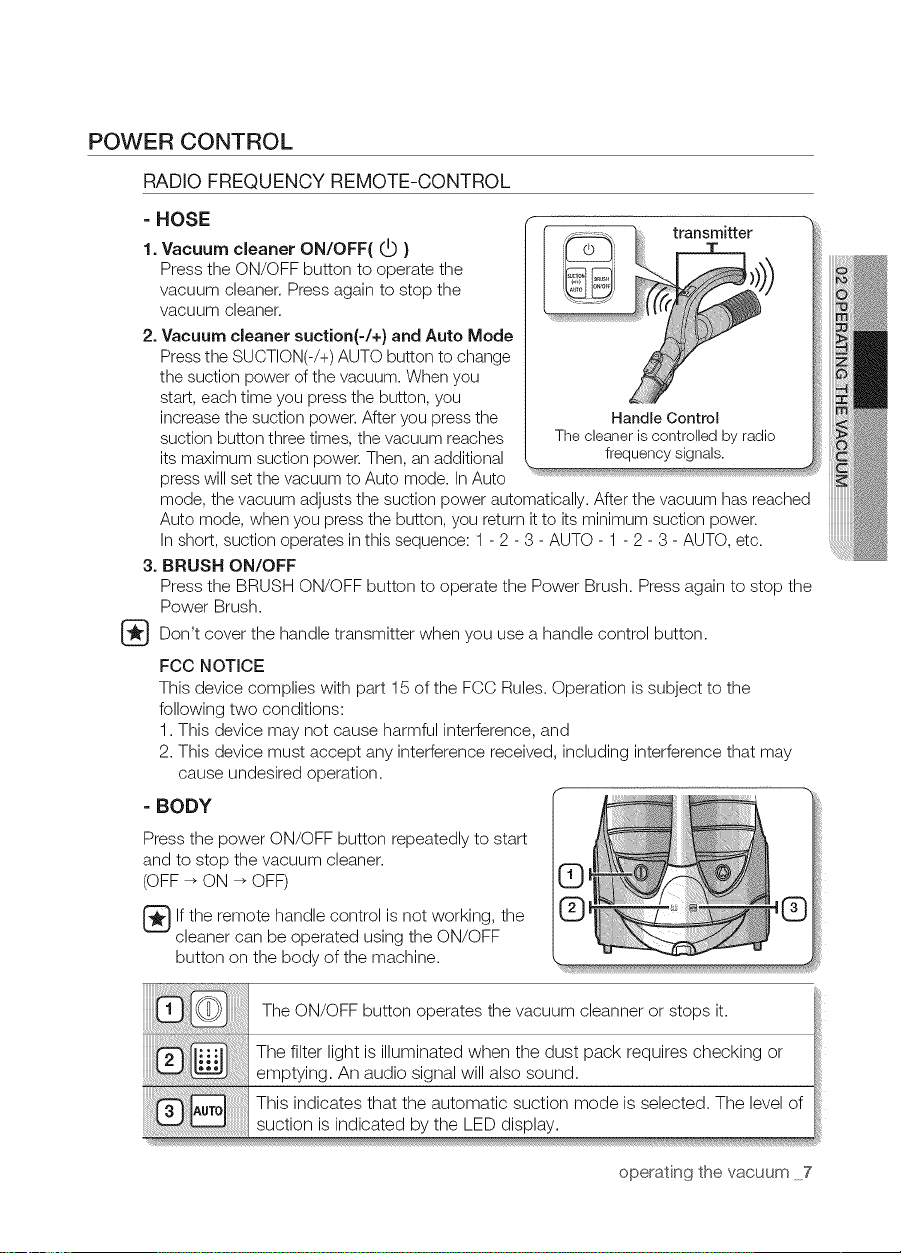
POWER CONTROL
RADIO FREQUENCY REMOTE-CONTROL
- HOSE
1.Vacuum cleaner ON/OFF( C_ }
Press the ON/OFF button to operate the
vacuum cleaner. Press again to stop the
vacuum cleaner.
2. Vacuum cleaner suction(-/+} and Auto Mode
Pressthe SUCTION(-/+)AUTO button to change
the suction power of the vacuum. When you
start, each time you pressthe button, you
increase the suction power. After you pressthe
suction button three times, the vacuum reaches
its maximum suction power. Then, an additional
press will set the vacuum to Auto mode. InAuto
mode, the vacuum adjusts the suction power automatically. After the vacuum has reached
Auto mode, when you press the button, you return itto its minimum
In short, suction operates in this sequence: 1- 2 - 3 - AUTO - 1 - 2 - 3 - AUTO, etc.
3. BRUSH ON/OFF
Press the BRUSH ON/OFF button to operate the Power Brush. Press again to stop the
Power Brush.
Don't cover the handle transmitter when you use a handle control button.
FCC NOTICE
This device complies with part 15 of the FCC Rules. Operation is subject to the
following two conditions:
1. This device may not cause harmful interference, and
2. This device must accept any interference received, including interference that may
cause undesired operation.
=BODY
Pressthe power ON/OFF button repeatedly to start
and to stop the vacuum cleaner.
(OFF _ ON _ OFF)
lf the remote handle control is not working, the
cleaner can be operated using the ON/OFF
button on the body of the machine.
ransmitter
!!iii
The ON/OFF button operates the vacuum cleanner or stops it.
The filter light is illuminated when the dust pack requires checking or
emptying. An audio signal will also sound.
This indicates that the automatic suction mode is selected. The level of
suction is indicated by the LED display.
operating the vacuum 7
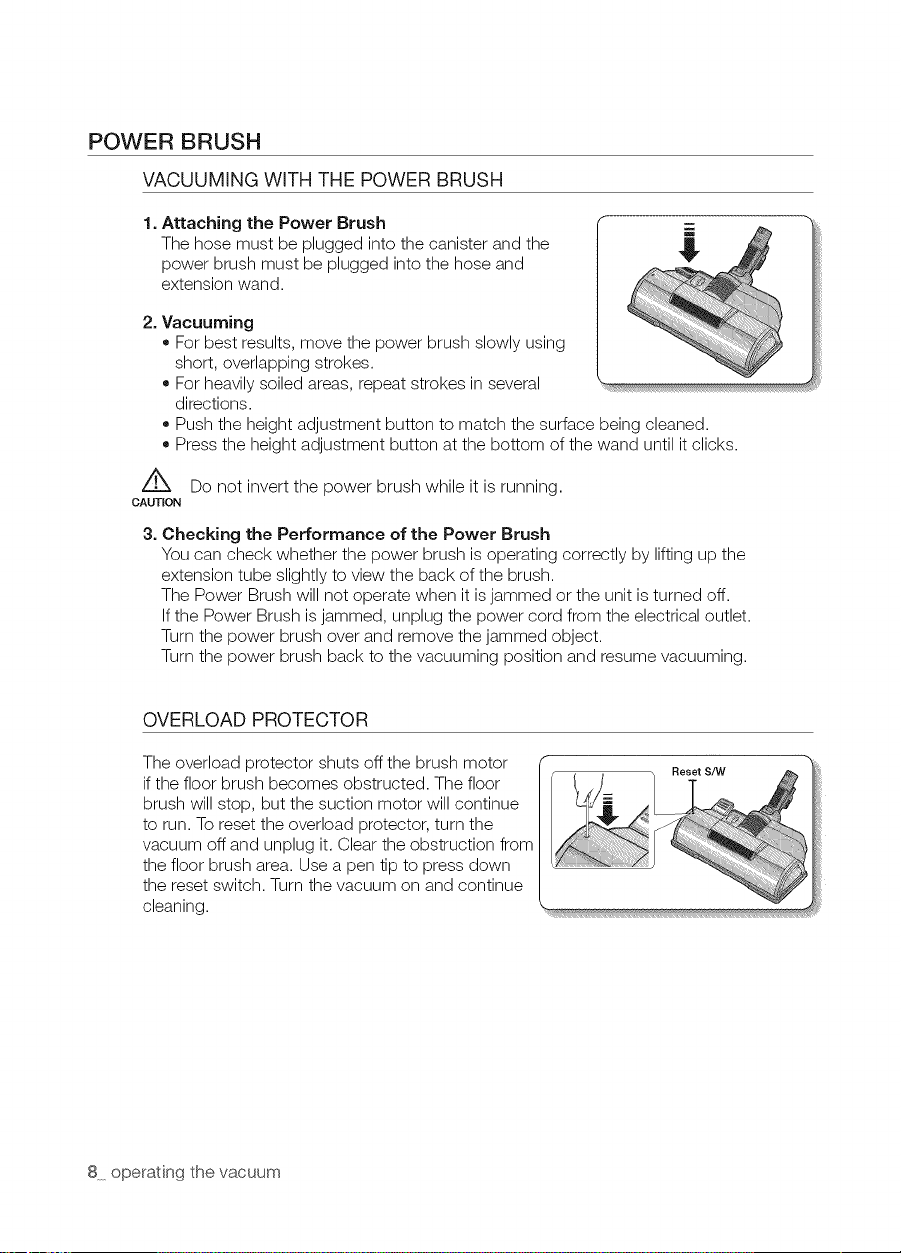
POWER BRUSH
VACUUMING WITH THE POWER BRUSH
1.
Attaching the Power Brush
The hose must be plugged into the canister and the
power brush must be plugged into the hose and
extension wand.
2. Vacuuming
• For best results, move the power brush slowly using
short, overlapping strokes.
• For heavily soiled areas, repeat strokes in several
directions.
• Push the height adjustment button to match the surface being cleaned.
• Press the height adjustment button at the bottom of the wand until it clicks.
z_ Do not invert the power brush while it is running.
CAUTION
3. Checking the Performance of the Power Brush
You can check whether the power brush is operating correctly by lifting up the
extension tube slightly to view the back of the brush.
The Power Brush will not operate when it is jammed or the unit is turned off.
Ifthe Power Brush is jammed, unplug the power cord from the electrical outlet.
Turn the power brush over and remove the jammed object.
Turn the power brush back to the vacuuming position and resume vacuuming.
OVERLOAD PROTECTOR
The overload protector shuts off the brush motor
if the floor brush becomes obstructed. The floor
brush will stop, but the suction motor will continue
to run. Toreset the overload protector, turn the
vacuum off and unplug it. Clear the obstruction from
the floor brush area. Use a pen tip to press down
the reset switch. Turn the vacuum on and continue
cleaning.
8 operating the vacuum
ma nta nnq the too s
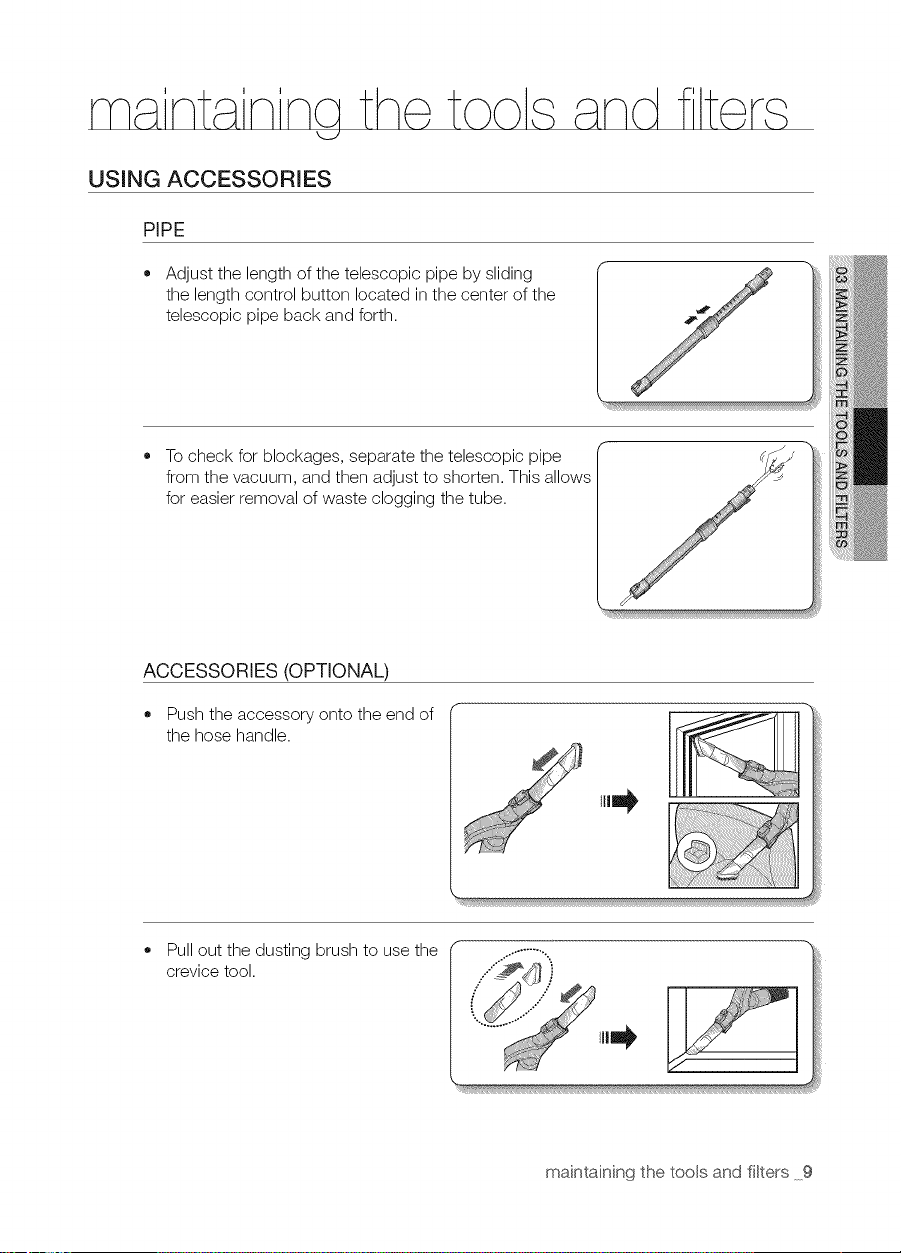
USING ACCESSORIES
PIPE
• Adjust the length of the telescopic pipe by sliding
the length control button located in the center of the
telescopic pipe back and forth.
To check for blockages, separate the telescopic pipe
from the vacuum, and then adjust to shorten. This allows
for easier removal of waste clogging the tube.
ACCESSORIES (OPTIONAL)
Push the accessory onto the end of
the hose handle.
Pull out the dusting brush to use the
crevice tool.
maintaining the tools and filters 9
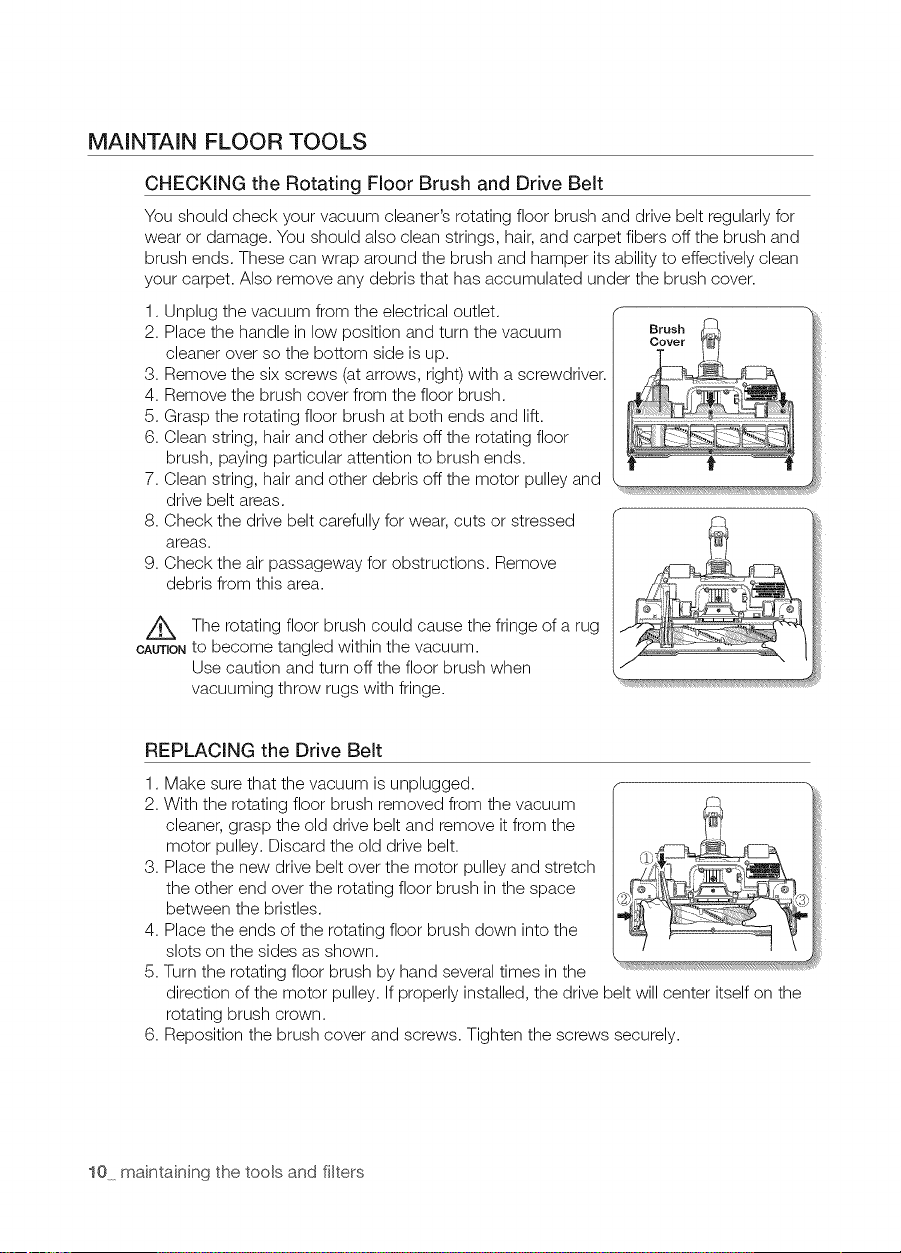
MAINTAIN FLOOR TOOLS
CHECKING the Rotating Floor Brush and Drive Belt
You should check your vacuum cleaner's rotating floor brush and drive belt regularly for
wear or damage. You should also clean strings, hair, and carpet fibers off the brush and
brush ends. These can wrap around the brush and hamper its ability to effectively clean
your carpet. Also remove any debris that has accumulated under the brush cover.
1. Unplug the vacuum from the electrical outlet.
2. Place the handle in low position and turn the vacuum
cleaner over so the bottom side is up.
3. Remove the six screws (at arrows, right) with a screwdriver.
4. Remove the brush cover from the floor brush.
5. Grasp the rotating floor brush at both ends and lift.
6. Clean string, hair and other debris off the rotating floor
brush, paying particular attention to brush ends.
7. Clean string, hair and other debris off the motor pulley and
drive belt areas.
8. Check the drive belt carefully for wear, cuts or stressed
areas.
9. Check the air passageway for obstructions. Remove
debris from this area.
The rotating floor brush could cause the fringe of a rug
OAUnONto become tangled within the vacuum.
Use caution and turn off the floor brush when
vacuuming throw rugs with fringe.
REPLACING the Drive Belt
1,
2.
3,
4,
5.
6,
Make sure that the vacuum is unplugged.
With the rotating floor brush removed from the vacuum
cleaner, grasp the old drive belt and remove it from the
motor pulley. Discard the old drive belt.
Place the new drive belt over the motor pulley and stretch
the other end over the rotating floor brush in the space
between the bristles.
Place the ends of the rotating floor brush down into the
slots on the sides as shown.
Turn the rotating floor brush by hand several times in the _'_"_'_*'_
direction of the motor pulley. If properly installed, the drive belt will center itself on the
rotating brush crown.
Reposition the brush cover and screws. Tighten the screws securely.
10 maintaining the tools and filters
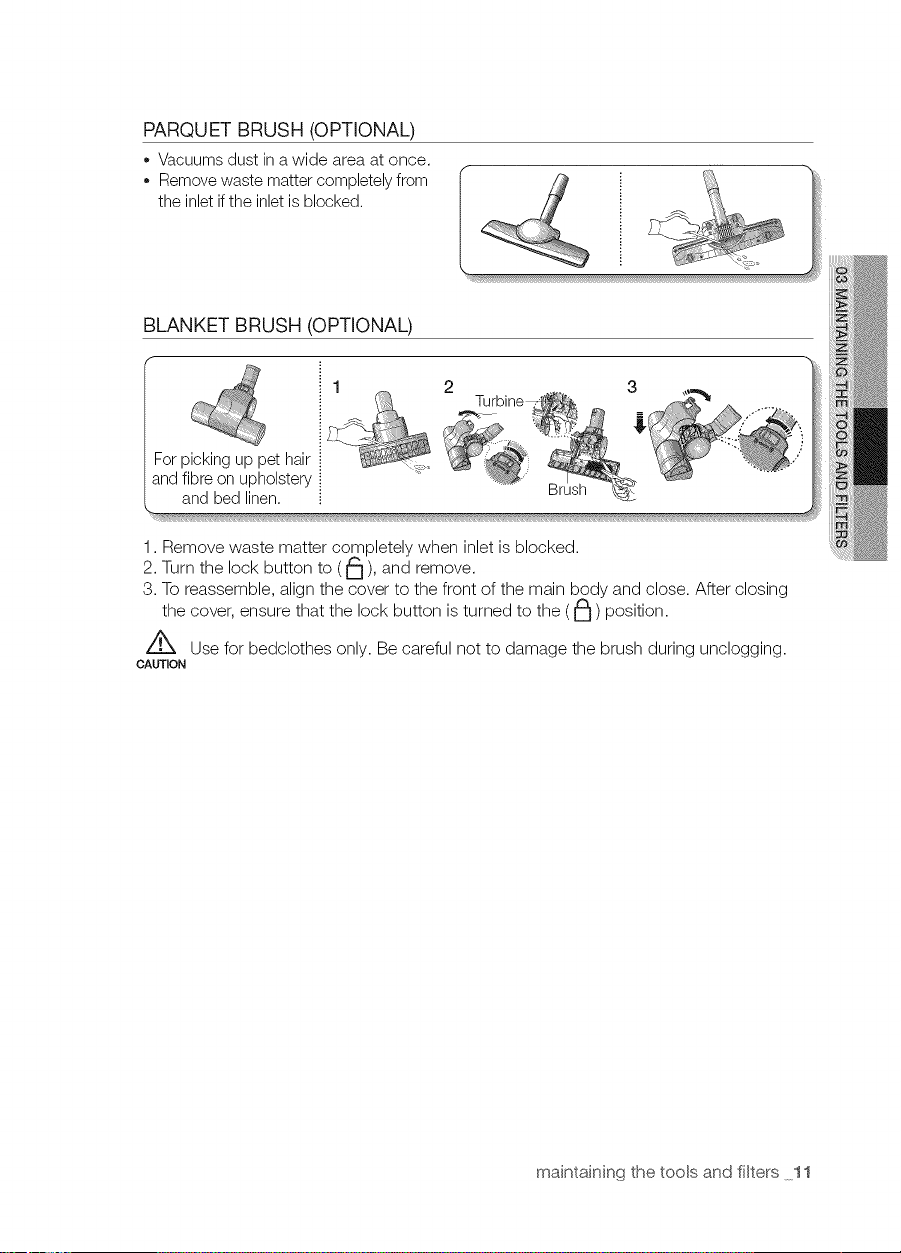
PARQUET BRUSH (OPTIONAL)
o Vacuums dust ina wide area at once.
Removewaste matter completely from
the inlet ifthe inletis blocked.
BLANKET BRUSH (OPTIONAL)
Forpicking up pet hair
andfibreon upholstery
and bed linen.
1. Remove waste matter completely when inlet is blocked.
2. Turn the lock button to (_), and remove.
3. To reassemble, align the cover to the front of the main body and close. After closing
the cover, ensure that the lock button is turned to the (J_) position.
Z_ Use for bedclothes only. Be careful not to damage the brush during unclogging.
CAUTION
maintaining the tools and filters 11
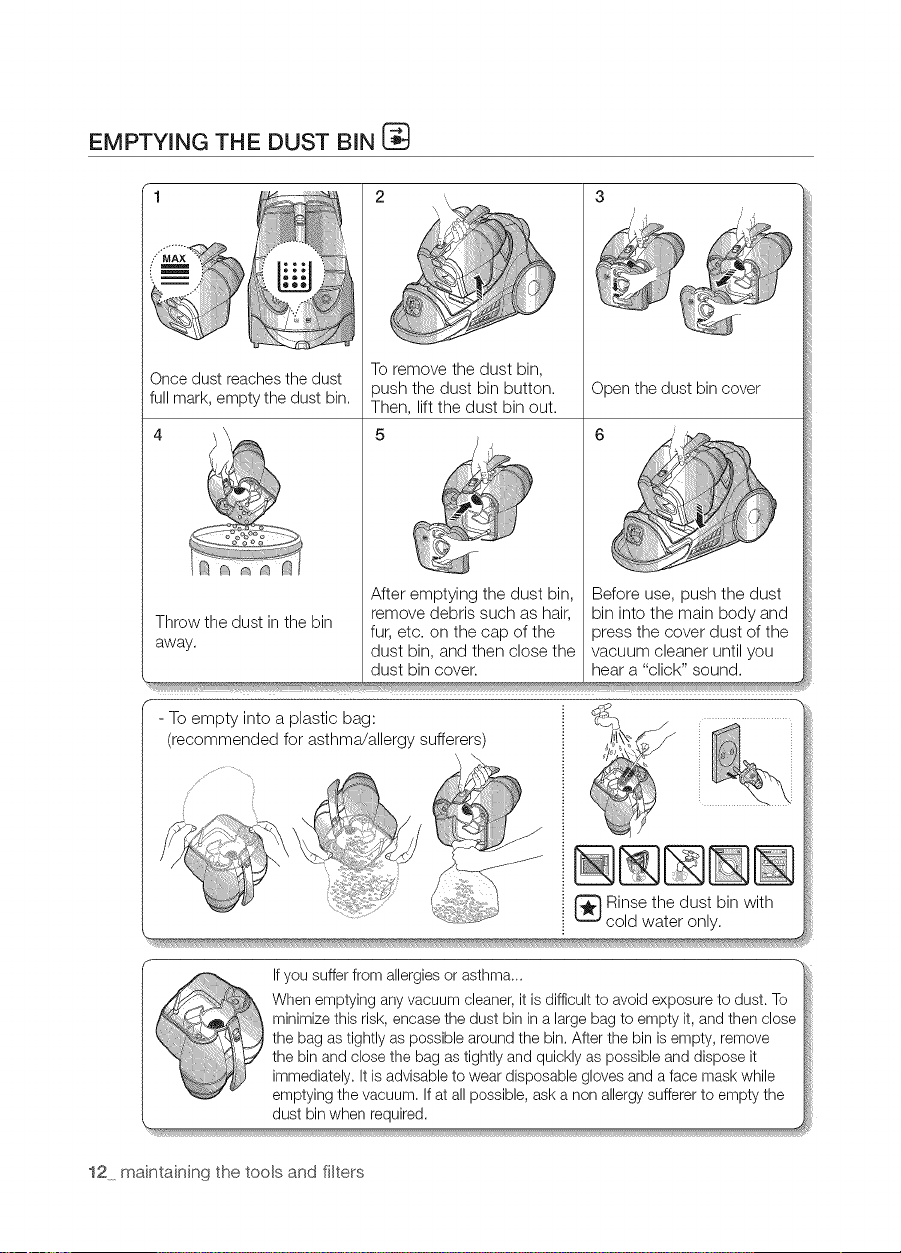
EMPTYING THE DUST BIN [_
1 3
Once dust reaches the dust
full mark, empty the dust bin.
Throw the dust in the bin
away.
s
2
Toremove the dust bin,
oush the dust bin button.
Then, lift the dust bin out.
Open the dust bin cover
Before use, push the dust
bin into the main body and
press the cover dust of the
vacuum cleaner until you
hear a "click" sound.
After emptying the dust bin,
remove debris such as hair,
fur, etc. on the cap of the
dust bin, and then close the
dust bin cover.
- To empty into a plastic bag:
(recommended for asthma/allergy sufferers)
_ inse the dust bin with
cold water only.
r" Ifyou suffer from allergies or asthma...
When emptying any vacuum cleaner, it is difficult to avoid exposure to dust. To
minimize this risk, encase the dust bin in a large bag to empty it, and then close
the bag as tightly as possible around the bin. After the bin is empty, remove
the bin and close the bag as tightly and quickly as possible and dispose it
immediately. It is advisable to wear disposable gloves and a face mask while
emptying the vacuum. Ifat all possible, ask a non allergy sufferer to empty the
dust bin when required.
12 maintaining the tools and filters
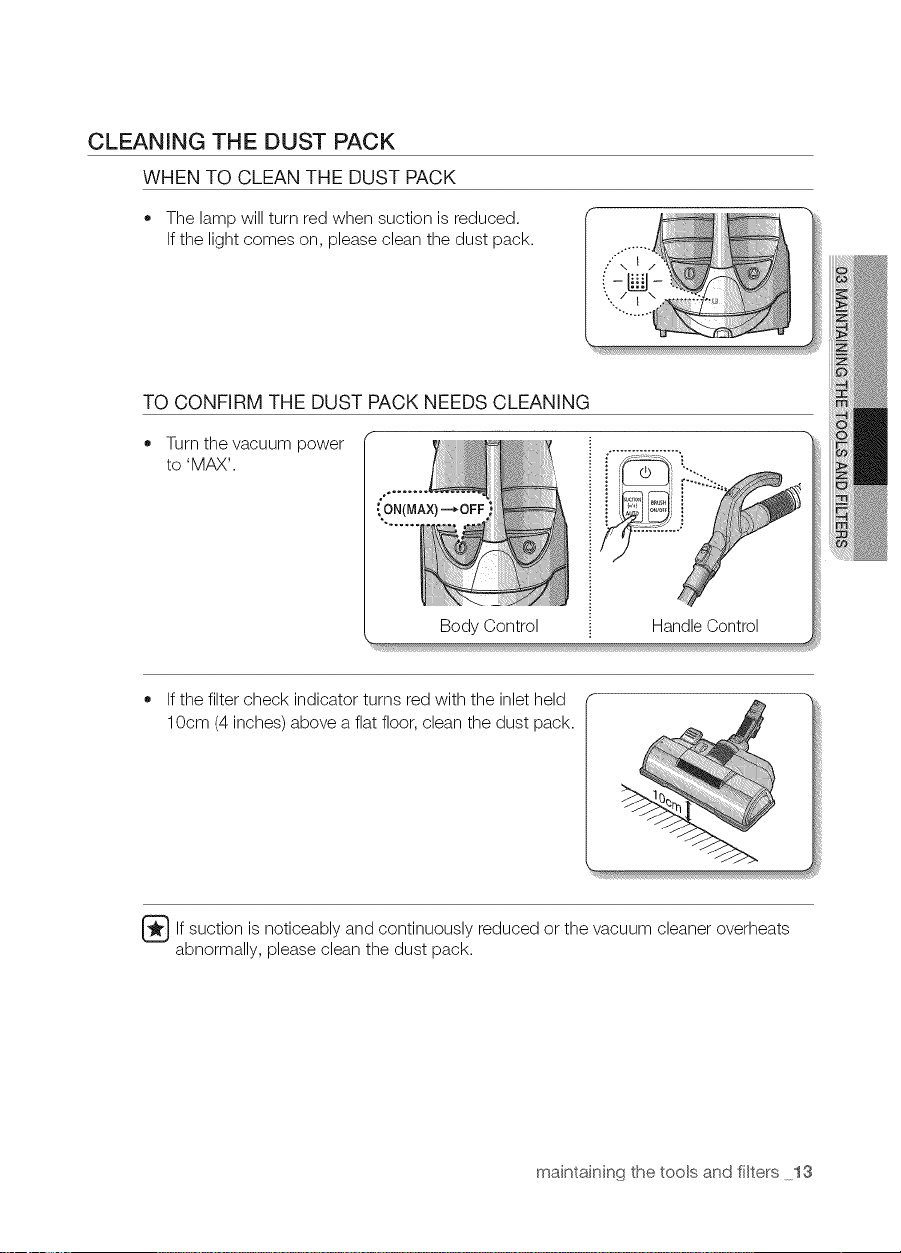
CLEANING THE DUST PACK
WHEN TO CLEAN THE DUST PACK
• The lamp will turn red when suction is reduced.
If the light comes on, please clean the dust pack.
TO CONFIRM THE DUST PACK NEEDS CLEANING
Turn the vacuum power
to 'MAX'.
°_ .......
ON(MAX) -*OFF
Body Control
HandleControl
If the filter check indicator turns red with the inlet held
10cm (4 inches) above a flat floor, clean the dust pack.
_lf suction is and reduced the cleaner overheats
noticeably continuously
or vacuum
abnormally, please clean the dust pack.
maintaining the tools and filters 13
CLEANING THE DUST PACK
_i_ !i!iiiiiiiiii:iiiiiiiiiii!....
(i_i_i_i_i_ii_i_i_ii_ilil1__
3
/
/
Takethe dust bin out.
->
Pullthe dust pack coverto
open.
Remove the sponge and
filter from the dust pack.
Putthe sponge and filter into
the dust pack.
Make sure the filter is completely dry before putting it back
into the vacuum cleaner. Allow 12 hours for it to dry.
14 maintaining the tools and filters
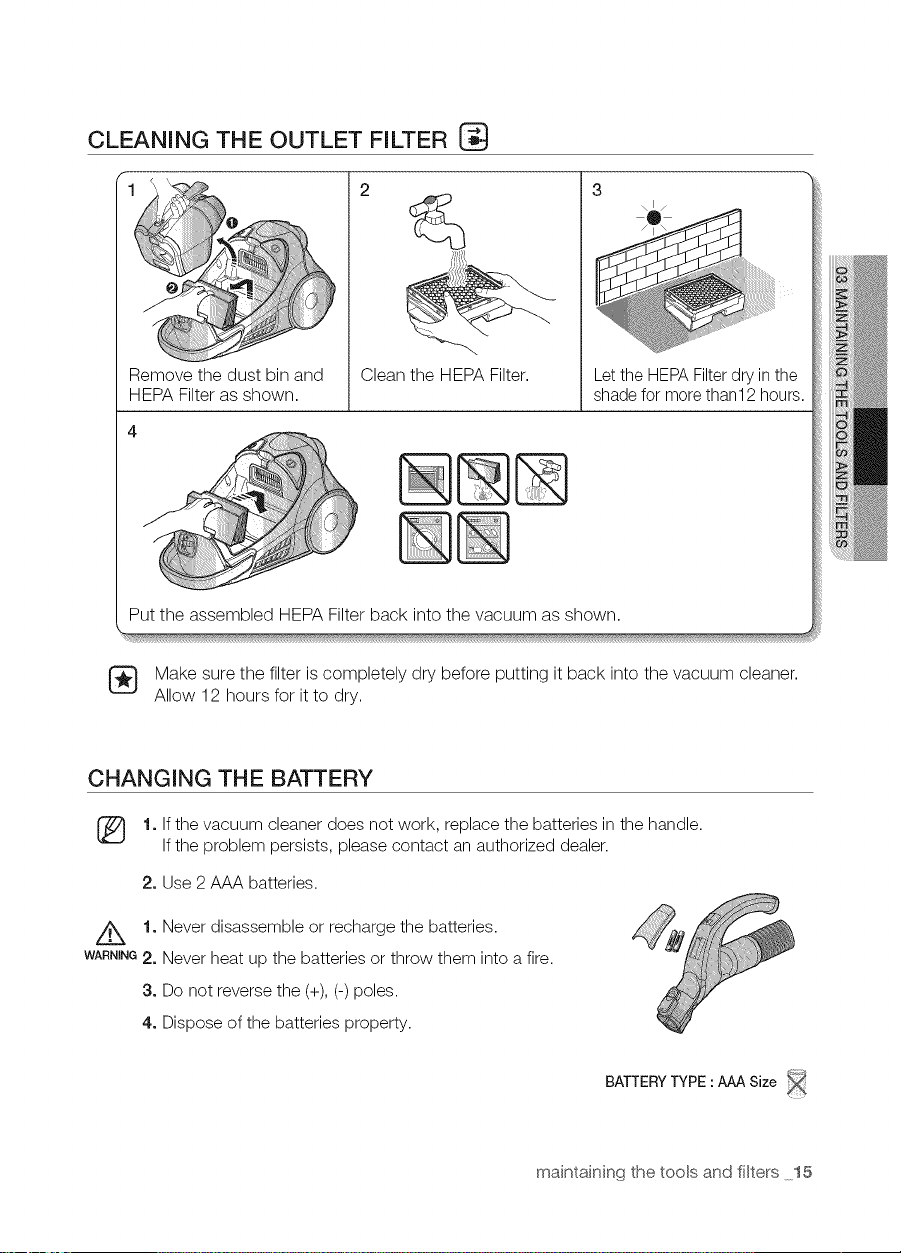
CLEANING THE OUTLET FILTER
1
Remove the dust bin and
HEPA Filter as shown.
Clean the HEPA Filter.
Let the HEPAFilterdry in the
shade for more than12 hours.
Put the assembled HEPA Filter back into the vacuum as shown.
Make sure the filter is completely dry before putting it back into the vacuum cleaner.
Allow 12 hours for it to dry.
CHANGING THE BATTERY
[_ 1. Ifthe vacuum cleaner does not work, replace the batteries in the handle.
Ifthe problem persists, please contact an authorized dealer.
2. Use 2 AAA batteries.
//_ 1. Never disassemble or recharge the batteries.
WANNING2. Never heat up the batteries or throw them into a fire.
3. Do not reverse the (+), (-) poles.
4. Dispose of the batteries property.
BATTERYTYPE :AAA Size
maintaining the tools and filters 15
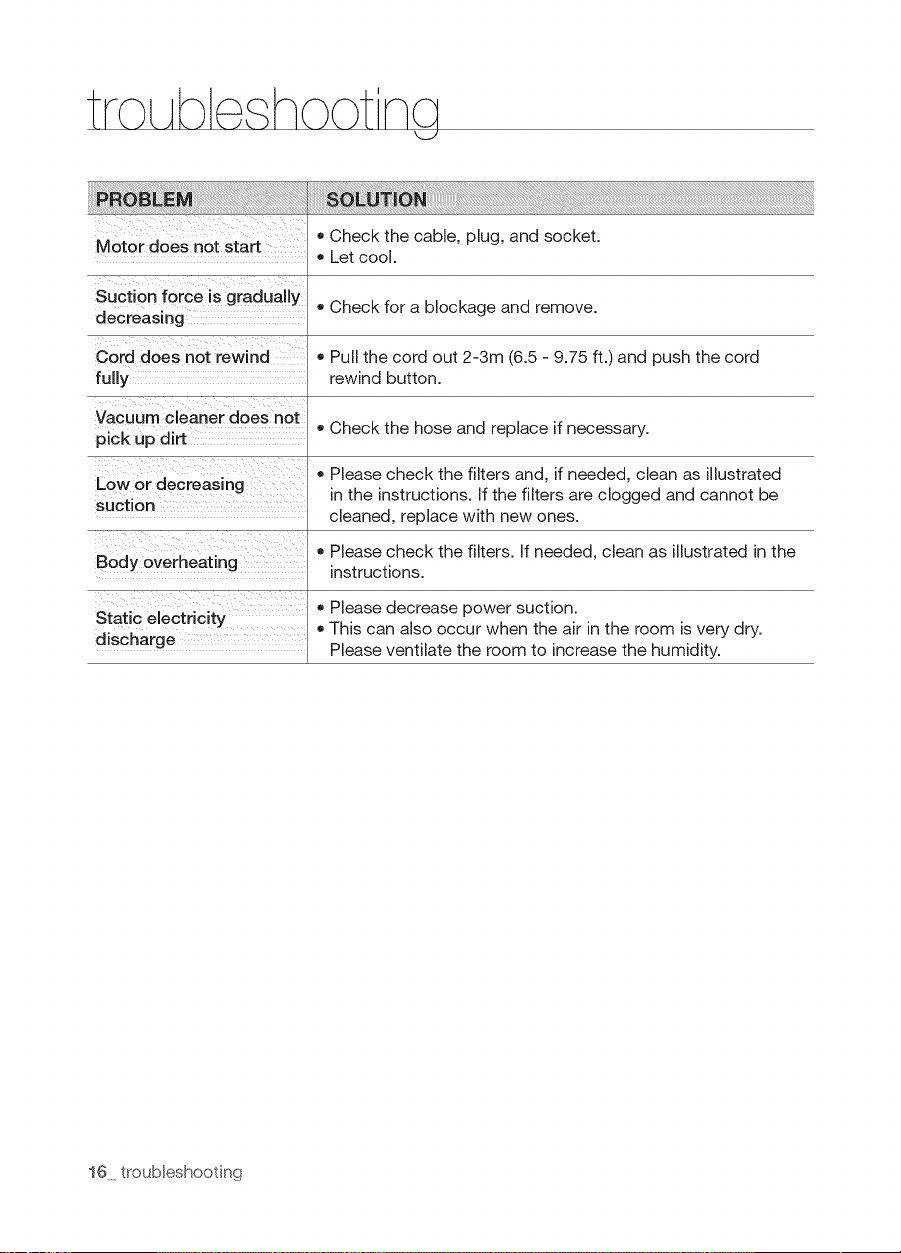
troLAb hoot
Motor does not start
Suction force is gradually
decreasing
Cord does not rewind
fully
Vacuum cleaner does not
pick up dirt
Low or decreasing
suction
Body overheating
Static electricity
discharge
• Check the cable, plug, and socket.
Let cool.
• Check for a blockage and remove.
Pull the cord out 2-3m (6.5 - 9.75 ft.) and push the cord
rewind button.
Check the hose and replace if necessary.
• Please check the filters and, if needed, clean as illustrated
in the instructions. If the filters are clogged and cannot be
cleaned, replace with new ones.
• Please check the filters. If needed, clean as illustrated in the
instructions.
• Please decrease power suction.
• This can also occur when the air in the room is very dry.
Please ventilate the room to increase the humidity.
16 troubleshooting

N_N_O

S'_ie,,,S_96P*
Aspir ctor
manu,al dei u,su,ario.......
100%
Recycled Paper
Esle manu'al""_'_t_, im'pt¢so en,,,,,,papelllllll_"O'O_io _eoi,o,l:'_'_o,
las posibilidades
Gracias pot aclquirir un producto Samsung
Para recibir un servicio mb,s completo,
registre su producto en
www.samsung.com/register
INFORMACIONSOBRESEGURIDAD
Z_ • Antes de poner en funcionamiento el aspiradora, lea detenidamente este
ADVERTENC_Amanual y cons@rvelopara su referencia.
Z_ • Debido a que las siguientes instrucciones de funcionamiento corresponden a
ADVERTENC_Adiversos modelos, es posible que las caracterfsticas de su aspiradora difieran
ligeramente de lasque se describen en este manual.
S[MBOLOS DE CUIDADO Y ADVERTENCIA UTILIZADOS
z_ Indica que existe riesgo de muerte o lesiones graves.
ADVERTENOIA
Z_ Indica que existe riesgo de lesi6n personal o danos materiales.
PRECAUCION
OTROS S[MBOLOS UTILIZADOS
Representa algo que NO se debe hacer.
Representa algo que se debe respetar.
Indica que se debe desconectar el enchufe de la pared.
Esta aspiradora est6.disenada para uso dom_stico solamente. No utilice esta
ADVERTENClAaspiradorapara limpiar escombros o residuos. No utilice esta aspiradora sin sus filtros
ya que podr(a causar danos a los componentes internos e invalidar su garant(a.
GUARDE ESTAS INSTRUCCIONES
Esta aspiradora es 861ode uso dom_stico.
INSTRUCCIONES SOBRE EL ENCHUFE POLARIZADO
- Para redueir el riesgo de descarga electrica, este eleetrodomestico euenta con un enehufe
polarizado (una punta es mb_saneha que laotra). S01ohay una manera en que el enehufe se
eoneetarb_con un tomaeorriente polarizado. Devuelta el enehufe si no eabe totalmente en el
tomaeorriente. Si el enehufe aun no eabe, eomunfquese con un electrieista ealifieado para que
instale el tomaeorriente eorrecto. No modifique el enehufe de ninguna forma.
2 informaci6n sobre seguddad

nformac'i n sobre seqLArdad
INSTRUCCIONES DE SEGURIDAD
IMPORTANTES
Cuando se utilizan aparatos electricos, siempre se deben seguir estas instrucciones bs.sicas
de seguridad:
LEA TODAS LAS INSTRUCCIONES ANTES DE USAR SU ASPIRADORA
,,r,-,..- Par.redoc,,e,.es0ode,oceod,o.deso.r0.s
el@ctricas o lesiones:
1. No deje el electrodom@stico conectado. Desconectado cuando no Io utilice y antes de
realizar el mantenimiento.
2. No utilice la aspiradora en el exterior o sobre superficies hOmedas.
3. No permita que se utilice la aspiradora como un juguete. Es necesario prestar atenci6n
cuando se utilice la aspiradora cerca de los ninos.
4. Utilice laaspiradora s61ocomo se describe en el manual. Utilice s61olos accesorios
recomendados por el fabricante.
5. No utilice la aspiradora si elcable o el enchufe est6.ndanados. Si el electrodom_stico
no funciona como corresponde, se ha ca(do, se ha danado, ha permanecido a la
intemperie o se ha ca(do en el agua, II_veloa un centro de servicio.
6. No tire del cable ni Io utilice para trasladar la aspiradora, no Io utilice como asa, no
Io aplaste con la puerta ni tire de @1contra bordes o esquinas filosas. No pase el
electrodom_stico sobre el cable. Mantenga el cable alejado de superficies calientes.
7. No desconectela aspiradoratirandodel cable.Paradesconectar,tome elenchufe,no elcable.
8. No toque el enchufe o el electrodom_stico con las manos hOmedas.
9. No inserte ningOnebjete en lasaberturas. Noutilicela aspiraderasi hayaberturasebstruidas.
Mant@ngalalibrede pelve,pelusa,cabellee cualquiercesa que reduzca elfluje de aire.
10. Mantenga el cabello, ropa suelta, sus dedos y todas las partes de su cuerpo lejos de
las aberturas o partes m6viles.
11. Apague todos los controles antes de desenchufar.
12. Tenga especial cuidado cuando limpie las escaleras.
13. No utilice la aspiradora para aspirar I(quidos combustibles o inflamables, tales como
gasolina, ni en _reas donde estas sustancias puedan estar presentes.
14. No aspire nada que est_ encendido o humeando, como cigarrillos, f6sforos o cenizas
calientes.
15. No utilice la aspiradora sin el dep6sito para polvo y/o filtros en su lugar.
16. No utilice la aspiradora en espacios cerrados donde se concentren vapores
despedidos por pinturas al 6leo, disolventes de pinturas, sustancias antipolillas,
polvos inflamables y dem6.s vapores t6xicos o explosivos.
17. No aspire objetos duros o cortantes, tales como vidrio, unas, tornillos, monedas, etc.
18. La manguera contiene cables el_ctricos. No la utilice si se encuentra danada, cortada
o pinchada. Evite aspirar objetos cortantes.
19. Siempre apague este electrodom_stico antes de conectar o desconectar la
manguera o la boquilla motorizada.
20. Desenchufe la aspiradora antes de conectar la boquilla motorizada.
21. Sujete el enchufe cuando enrolle el cable. No deje que elenchufe d_ latigazos al
enrollarlo.
informaci6n sobre seguridad 3
ARMADO DE LA ASPIRADORA o5 Armado de la aspiradora
FUNCIONAMIENTO DE LA
ASPIRADORA
MANTENIMIENTO DE LOS
ACCESORIOS Y DE LOS FILTROS
06 Cable de alimentaci6n
06 Interruptor de encendido/apagado
07 Control de potencia
08 Cepillo mec_.nico
09 Uso de accesorios
10 Mantenimiento de accesorios para piso
11 Vaciado del dep6sito de polvo
12 Limpieza de la caja para polvo
14 Limpieza del filtro de salida
14 Cambio de pilas
SOLUCION DE PROBLEMAS
4 contenido

I
OPCIONAL
.... ......
_ No presione el bot6n de la manija
del dep6sito de polvo al trasladar
la m6.quina.
_ AI guardar la aspiradora, deje la boquilla
para pisos como se muestra.
armado de [a aspiradora 5
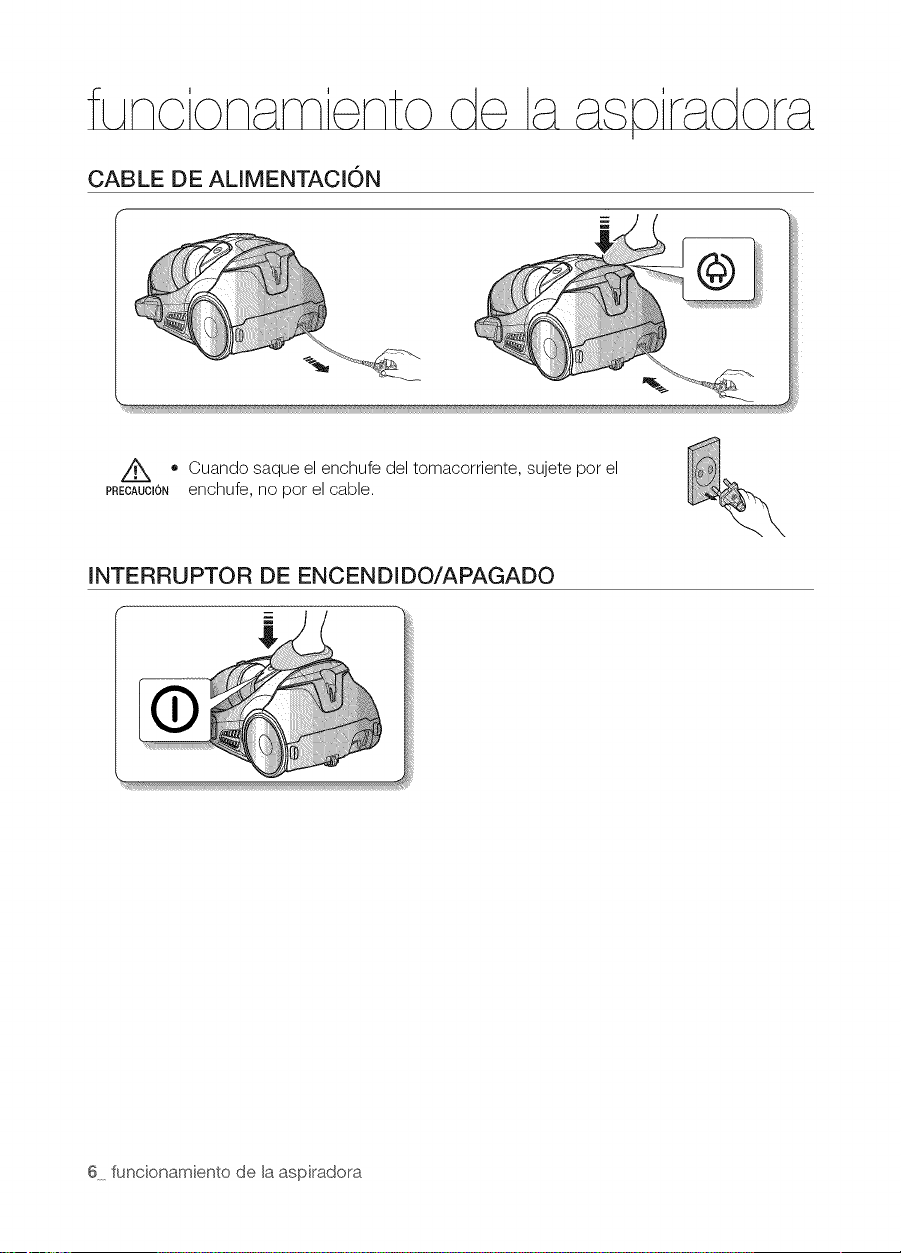
CABLE DE ALIMENTACION
Z_ • Cuando saque el enchufe del tomacorriente, sujete pot el
PRECAUTIONenchufe, no por el cable.
INTERRUPTOR DE ENCENDIDO/APAGADO
6 funcionamiento de la aspiradora
CONTROL DE POTENCIA
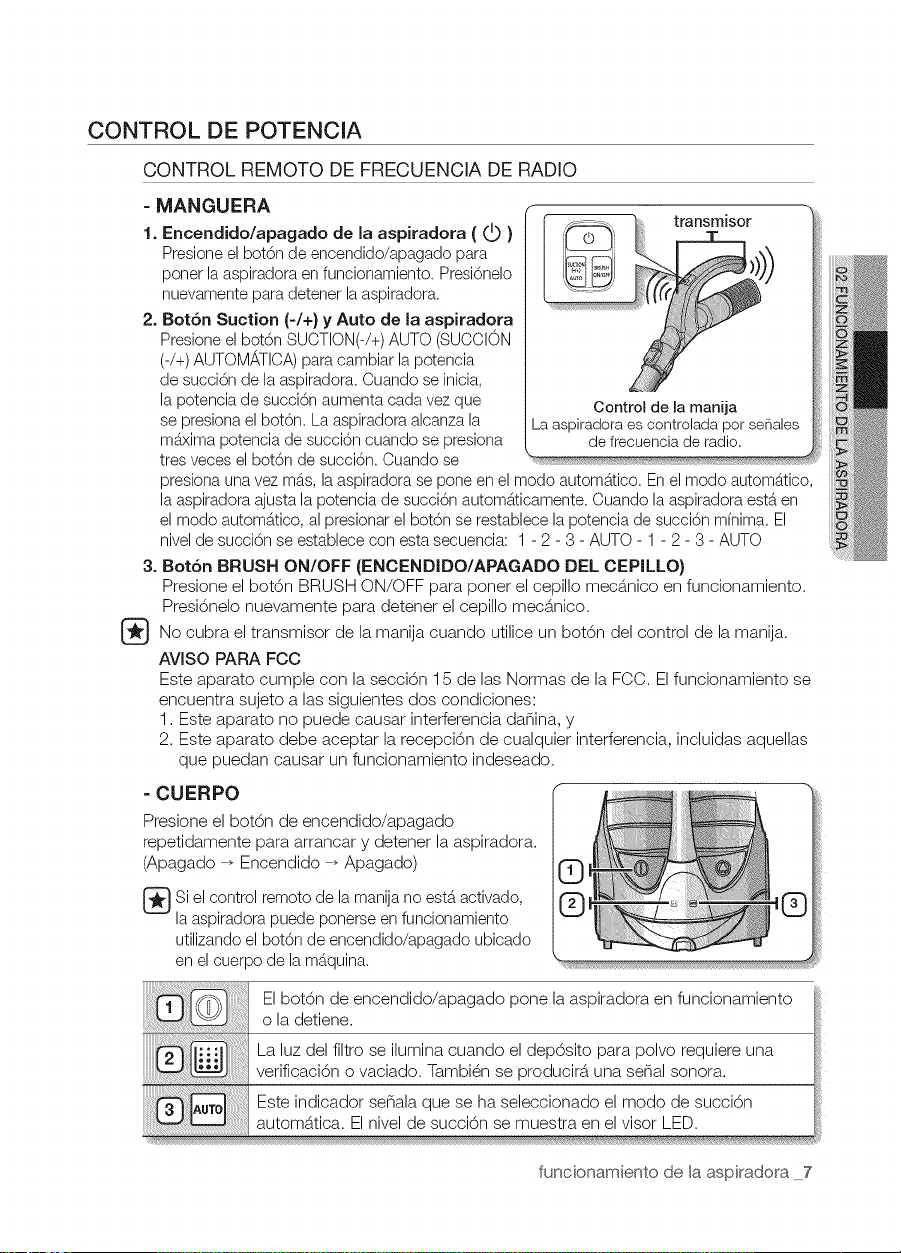
CONTROL REMOTO DE FRECUENCIA DE RADIO
= MANGUERA
1. Encendido/apagado de la aspiradora ( _ )
Presioneel bot6n de encendido/apagado para
ponerla aspiradoraen funcionamiento. Presi6nelo
nuevamentepara detenerlaaspiradora.
2. Bot6n Suction (-/+} y Auto de la aspiradora
Presioneel bot6n SUCTION(-/+)AUTO(SUCCION
(-/+)AUTOMATICA)paracambiar la potencia
de succi6n de laaspiradora. Cuando se inicia,
la potencia de succi6n aumentacada vezque
sepresionaelbot6n. Laaspiradoraalcanzala
m_xima potenciade succi6n cuando se presiona
tres veces el bot6n de succi6n. Cuando se
presionaunavezm_.s,laaspiradora se pone en el modo autom_.tico.Enel modo autom_tico,
la aspiradoraajusta la potencia de succi6n autom_.ticamente.Cuando laaspiradoraest_ en
el modo autom_.tico,al presionar el bot6n se restablecela potenciade succi6n mfnima. El
nivelde succi6n se establece con esta secuencia: 1- 2 - 3 - AUTO - 1- 2 - 3 - AUTO
3. BotSn BRUSH ON/OFF (ENCENDIDO/APAGADO DEL CEPILLO}
iiiii iii!iiiiil
i@iiii
iiiii@i!ii!_
_i'i'i'i'i¢!!!!({{_!_
iiii_iiii¸ i
iiii_b}_i_i_;¸
...._iiiqli!ii!ii!i!iill
Presione el bot6n BRUSH ON/OFF para poner el cepillo mec6.nicoen funcionamiento.
Presi6nelo nuevamente para detener el cepillo mec6.nico.
No cubra el transmisor de la manija cuando utilice un bot6n del control de la manija.
AVlSO PARA FCC
Este aparato cumple con la secci6n 15 de las Normas de la FCC. Elfuncionamiento se
encuentra sujeto alas siguientes dos condiciones:
1. Este aparato no puede causar interferencia danina, y
2. Este aparato debe aceptar la recepci6n de cualquier interferencia, incluidas aquellas
que puedan causar un funcionamiento indeseado.
= CUERPO
Presione el bot6n de encendido/apagado
repetidamente para arrancar y detener laaspiradora.
(Apagado _ Encendido _ Apagado)
Si el control remotode la manijano est,.activado,
la aspiradorapuede ponerse enfuncionamiento
utilizandoel bot6n de encendido/apagado ubicado
en elcuerpo de la m_.quina.
El bot6n de encendido/apagado pone la aspiradora en funcionamiento
o la detiene.
La luz del filtro se ilumina cuando el dep6sito para polvo requiere una
verificaci6n o vaciado. Tambi_n se producir_, una serial sonora.
Este indicador senala que se ha seleccionado el modo de succi6n
autom_.tica. El nivel de succi6n se muestra en el visor LED.
funcionamiento de la aspiradora 7

CEPILLO MEC,,_NICO
COMO ASPIRAR CON EL CEPILLO MECANICO
1. Colocaci6n del cepillo mec_nico
La manguera debe conectarse al trineo y el cepillo
mecS.nico debe conectarse a la manguera y al tubo de
extensi6n.
2. C6mo aspirar
• Para obtener mejores resultados, desplace el cepillo
mecS.nicolentamente haciendo recorridos cortos y
superpuestos.
En5.teasmuy sucias, repita los recorridos en distintas direcciones.
Presione el bot6n de ajuste de altura para que coincida con la superficie que estS.
limpiando.
Pulse el boton hasta que haga clic.
/X
No invierta el cepillo mecb.nico mientras est&.en funcionamiento.
PREOAUOION
3=
Verificaci6n del rendirniento del cepillo mec&nico
Puede verificar si el cepillo mecS.nico funciona con normalidad levantando levemente el
tubo de extensi6n para vet la parte posterior del cepillo.
El cepillo mecS.nico no funcionarS,si se encuentra atascado o si la unidad estS.
apagada.
Si el cepillo mecS.nico se encuentra atascado, desenchufe el cable de alimentaci6n del
tomacorriente.
D_ vuelta el cepillo mecS.nicoy quite elobjeto atascado.
Vuelva a colocar el cepillo mecS.nicoen la posici6n adecuada y siga aspirando.
PROTECTOR CONTRA SOBRECARGA
Elprotector contra sobrecarga apaga el motor del
cepillo si el cepillo para piso se obstruye. Elcepillo
para piso se detendrS.,pero el motor de succi6n
seguir&,en funcionamiento. Para restablecer el
protector contra sobrecarga, apague la aspiradora y
desenchOfela. Elimine laobstrucci6n del cepillo para
piso. Utilice la punta de un bol(grafo para presionar
el interruptor para restablecer el protector. Encienda
la aspiradora y siga limpiando.
8 funcionamiento de la aspiradora
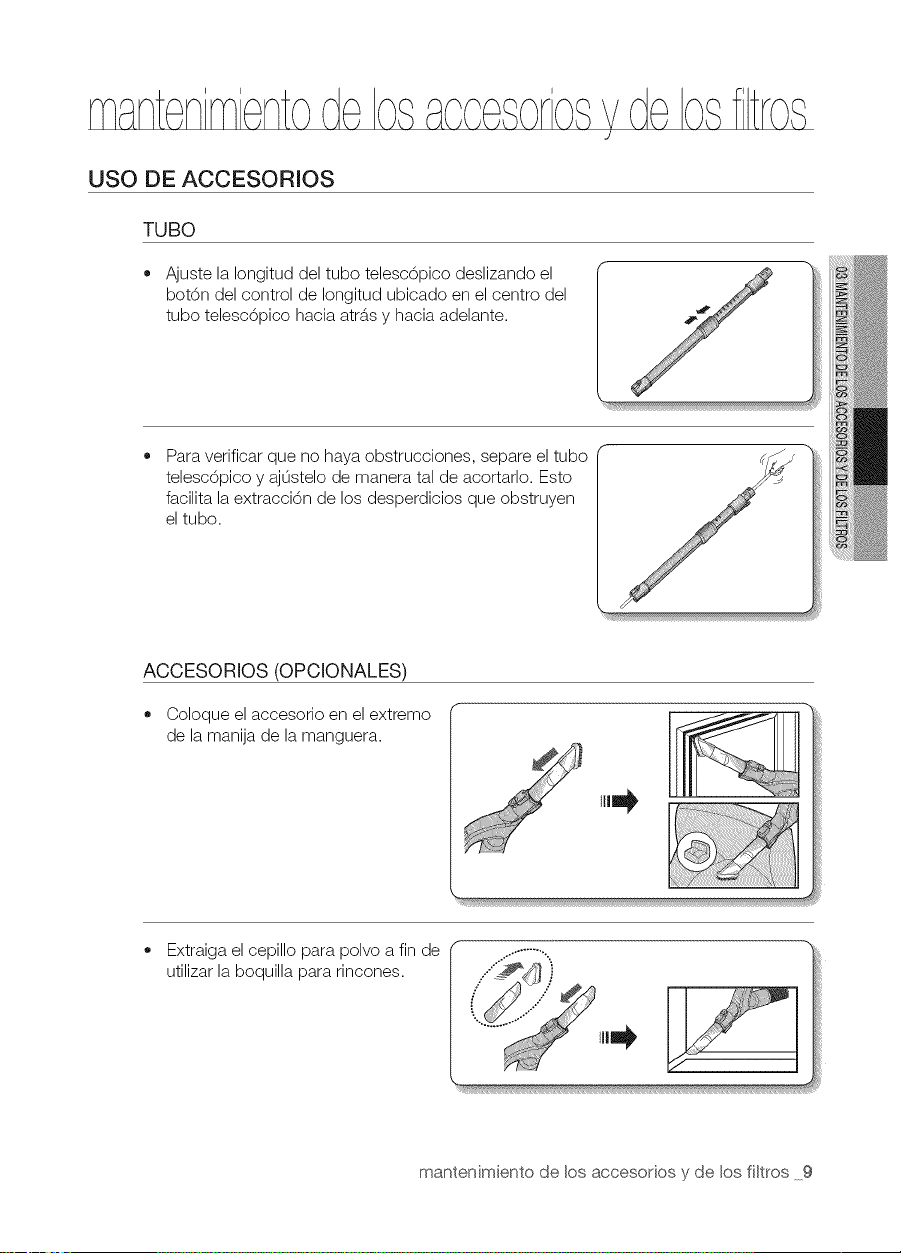
USO DE ACCESORIOS
TUBO
• Ajuste la Iongitud del tubo telesc6pico deslizando el
bot6n del control de Iongitud ubicado en el centro del
tubo telesc6pico hacia atr6.sy hacia adelante.
Para verificar que no haya obstrucciones, separe el tubo
telesc6pico y aj0stelo de manera tal de acortarlo. Esto
facilita la extracci6n de los desperdicios que obstruyen
el tubo.
ACCESORIOS (OPCIONALES)
Coloque el accesorio en el extremo
de la manija de la manguera.
Extraiga el cepillo para polvo a fin de
utilizar laboquilla para rincones.
mantenimiento de los accesorios y de los fi[tros 9
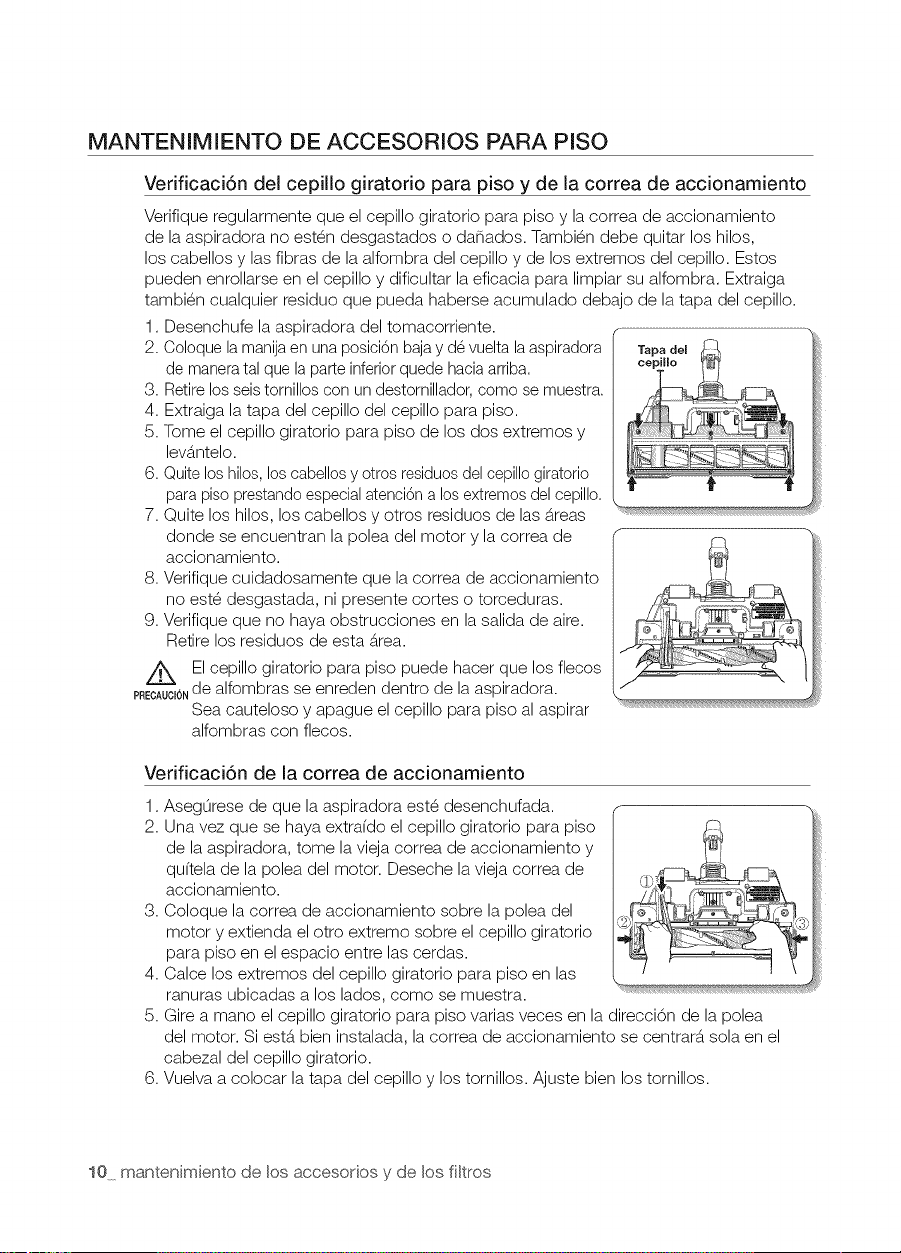
MANTENIMENTO DE ACCESORIOS PARA PISO
Verificaci6n del cepillo giratorio para piso y de la correa de accionamiento
Verifique regularmente que el cepillo giratorio para piso y la correa de accionamiento
de la aspiradora no est_n desgastados o danados. Tambi_n debe quitar los hilos,
los cabellos y las fibras de la alfombra del cepillo y de los extremos del cepillo. Estos
pueden enrollarse en el cepillo y dificultar la eficacia para limpiar su alfombra. Extraiga
tambi_n cualquier residuo que pueda haberse acumulado debajo de la tapa del cepillo.
1. Desenchufe la aspiradora del tomacorriente.
2. Coloquela manijaen unaposici6nbajay d6 vueltalaaspiradora Tapadel
de maneratal que la parteinferiorquede haciaarriba, cepil[o
3. Retirelos seis tornilloscon undestornillador,como se muestra.
4. Extraiga la tapa del cepillo del cepillo para piso.
5. Tome el cepillo giratorio para piso de los dos extremos y
lev6.ntelo.
6. Quiteloshilos,los cabellosy otrosresiduosdelcepillogiratorio
parapiso prestandoespecialatenci6na losextremosdelcepillo.
7. Quite los hilos, los cabellos y otros residuos de las 6.reas
donde se encuentran la polea del motor y la correa de
accionamiento.
8. Verifique cuidadosamente que la correa de accionamiento
no est_ desgastada, ni presente cortes o torceduras.
9. Verifique que no haya obstrucciones en la salida de aire.
Retire los residuos de esta _rea.
El cepillo giratorio para piso puede hacer que los flecos
PRECAU¢IONde alfombras se enreden dentro de la aspiradora.
Sea cauteloso y apague el cepillo para piso al aspirar
alfombras con flecos.
Verificaci6n de la correa de accionamiento
1.
2.
3,
4,
5.
6,
AsegOrese de que la aspiradora est_ desenchufada.
Una vez que se haya extra(do el cepillo giratorio para piso
de la aspiradora, tome la vieja correa de accionamiento y
qu(tela de la polea del motor. Deseche la vieja correa de
accionamiento.
Coloque la correa de accionamiento sobre la polea del
motor y extienda el otro extremo sobre el cepillo giratorio
para piso en el espacio entre las cerdas.
Calce los extremos del cepillo giratorio para piso en las
ranuras ubicadas a los lados, como se muestra.
Gire a mano el cepillo giratorio para piso varias veces en la direcci6n de la polea
del motor. Si est_ bien instalada, la correa de accionamiento se centrar_ sola en el
cabezal del cepillo giratorio.
Vuelva a colocar la tapa del cepillo y los tornillos. Ajuste bien los tornillos.
i!J
10 mantenimiento de los accesorios y de los fi[tros

CEPILLO PARA PARQUI2(OPCIONAL)
,, Aspirael pelve de unavez en _treas
amplias.
,, Extraigacempletamente los materiales
de desperdicie de la entrada, siesta se
encuentrablequeada.
CEPILLO DE MANTAS (OPCIONAL)
iliminaci6nde10spel0sdelas
masc0tasylasfibrasdelas
tapicerfasylar0padecama.
1. Retire completamente la suciedad si la entrada esterobstruida.
2. Ponga elbot6n de bloqueo en la posici6n(_) y elimine toda la suciedad.
3. Para volver a montar, alinee la cubierta con la parte frontal del cuerpo principal y
ci_rrela. Despu_s de cerrar la cubierta, vuelva a poner el bot6n de bloqueo en la
posici6n( I_ ).
$61ose utiliza con la ropa de cama. Tenga cuidado en no danar el cepillo al
PREOAUO_0Ndesobturarlo.
mantenimiento de los accesorios y de los filtros 11

VACIADO DEL DEPOSITO DE POLVO
1 2 3
Cuando el polvo Ilegue
hasta la marca que indica
que la aspiradora est&.Ilena,
vade el dep6sito de polvo.
Desecheel polvo del
dep6sito.
Extraigael dep6sito de
polvo presionando el bot6n.
Trasvaciar el dep6sito de polvo,
elimine obstaculos tales como
cabellos o pelaje de la tapa del
dep6sito de polvo. Luego, cierre
la tapa del dep6eito de polvo.
Separe latapa del dep6sito
de polvo.
Antesdeutilizarlaaspiradora
nuevamente,introduzcaeldepOsito
depolvoenelcuerpoprincipalde
laaspiradoraypresionelatapa
hastaescucharunclic,
- Para vaciarlo en una bolsa de pl&.stico:
(recomendado para asmS.ticos/al6rgicos)
[_ Puedeenjuagareldep6sito
de polvos61ocon aguafrfa.
Es muy dificil evitar la exposici6n al polvo al vaciar cualquier aspiradora.
Para minimizar este riesgo, asegOrese de recubrir el dep6sito de
polvo con una bolsa grande a fin de vaciarlo y de cerrar la bolsa Io
mas fuertemente posible alrededor del dep6sito. Extraiga el dep6sito
y cierre la bolsa Iomas fuerte y rapido que sea posible y desechela
inmediatamente. Se recomienda utilizar guantes descartables y una
mascara al vaciar la aspiradora. De ser posible, pidale a una persona que
no sea alergica que vacie eldep6sito de polvo cuando sea necesario.
12 mantenimiento de los accesodos y de los filtros
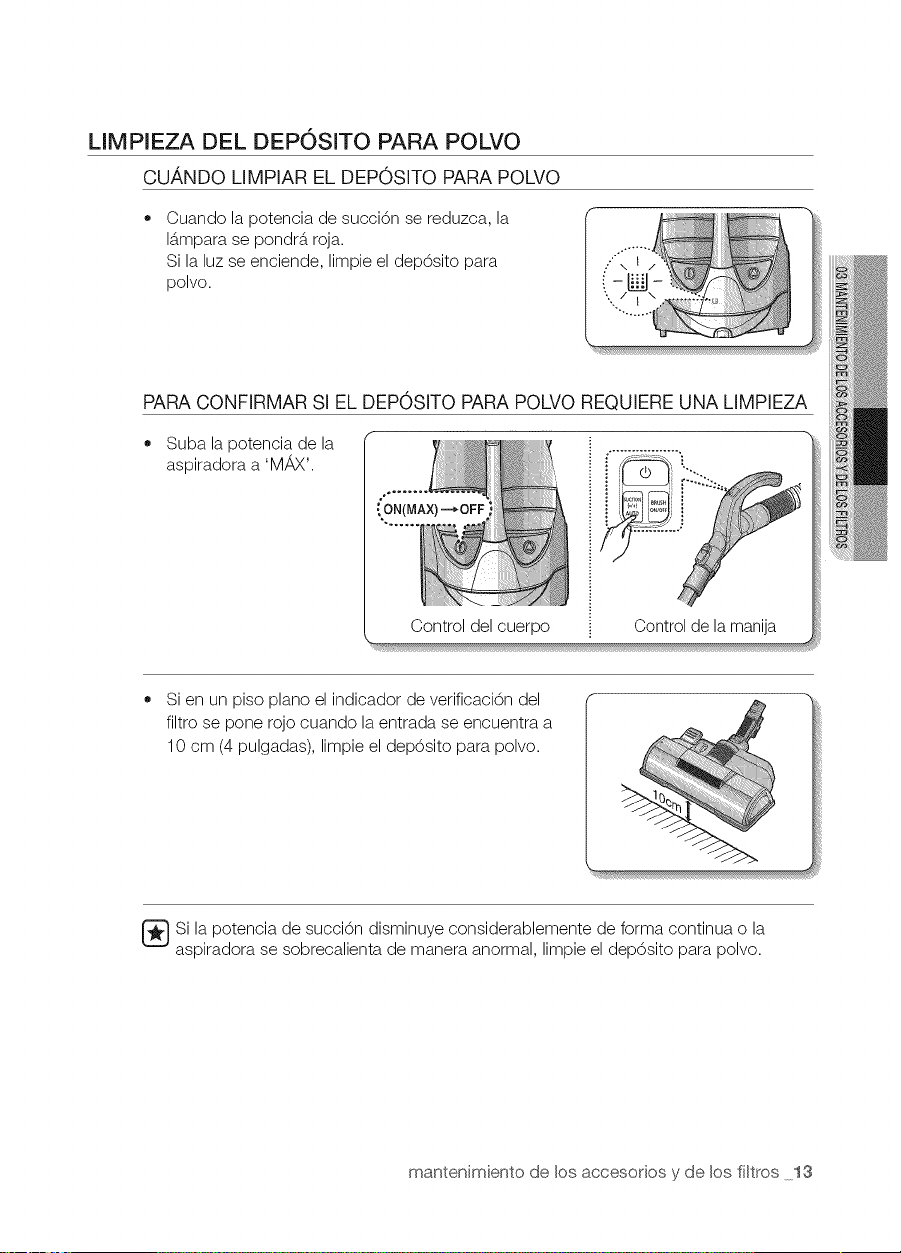
LIMPIEZA DEL DEPOSITO PARA POLVO
CU,ANDO LIMPIAR EL DEPOSITO PARA POLVO
Cuando la potencia de succi6n se reduzca, la
15.mparase pondrS,roja.
Si laluz se enciende, limpie el dep6sito para
polvo.
PARACONFIRMAR Sl EL DEP0SlTO PARAPOLVO REQUIERE UNA LIMPIEZA
Suba la potencia de la
aspiradora a 'M_vX'.
Control del cuerpo Control de la manija
Si en un piso piano el indicador de verificaci6n del
filtro se pone rojo cuando laentrada se encuentra a
10 cm (4 pulgadas), limpie el dep6sito para polvo.
[_Si la potencia de succi6n disminuye considerablemente de forma continua o la
aspiradora se sobrecalienta de manera anormal, limpie el dep6sito para polvo.
mantenimiento de los accesorios y de los filtros lS
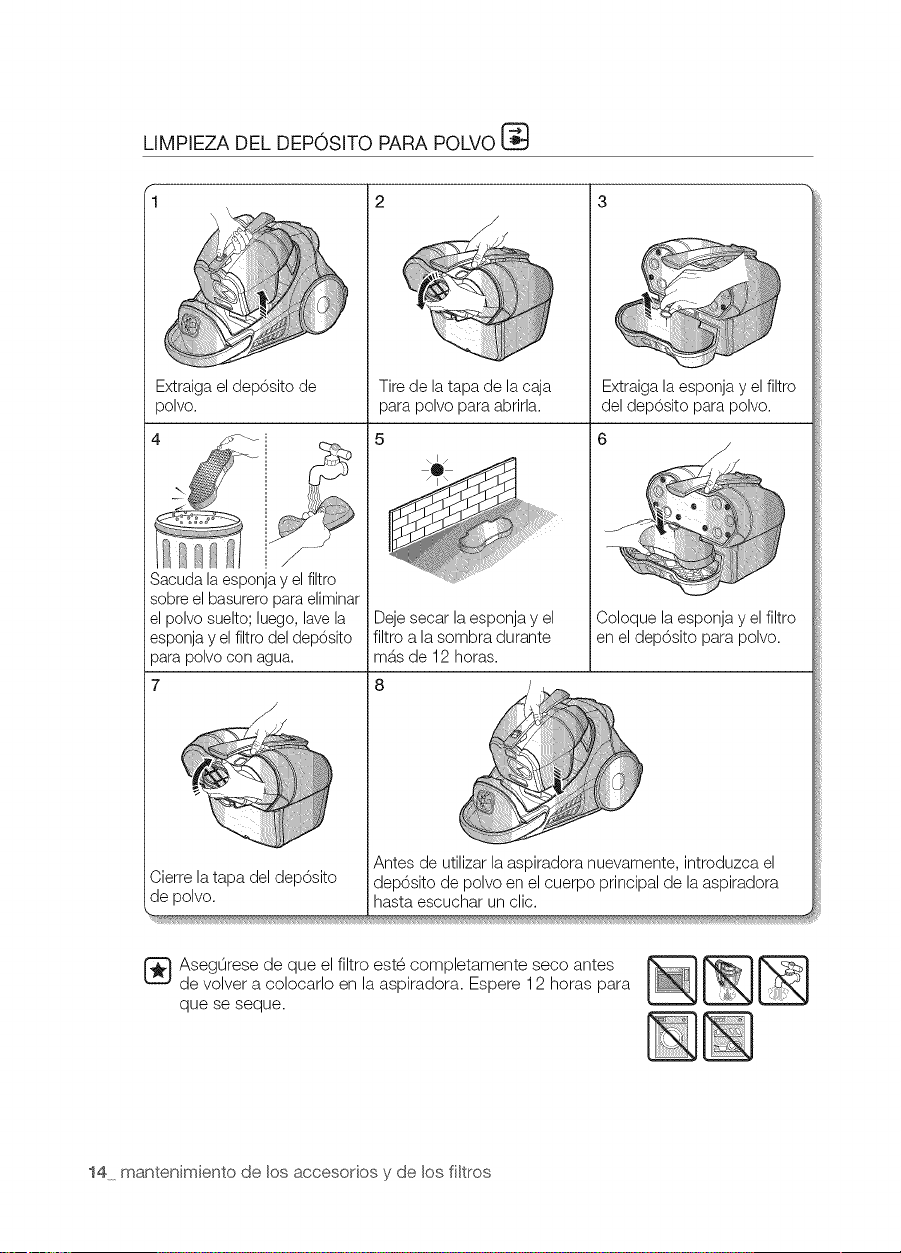
LIMPIEZA DEL DEPOSITO PARA POLVO
Extraigael deposito de
polvo.
)_ " !i
el polvosuelto;luego,lavela
esponjay elfiltro deldep6sito
parapolvo con agua.
7
/
Cierrela tapa del dep6sito
de polvo.
2
/
Tirede latapa de la caja
para polvo para abrirla.
Extraigala esponja y el filtro
del deposito para polvo.
_ seg0rese de que el filtro est6 completamente seco antes
de volver a colocarlo en la aspiradora. Espere 12 horas para
que se seque.
14 mantenimiento de los accesorios y de los filtros
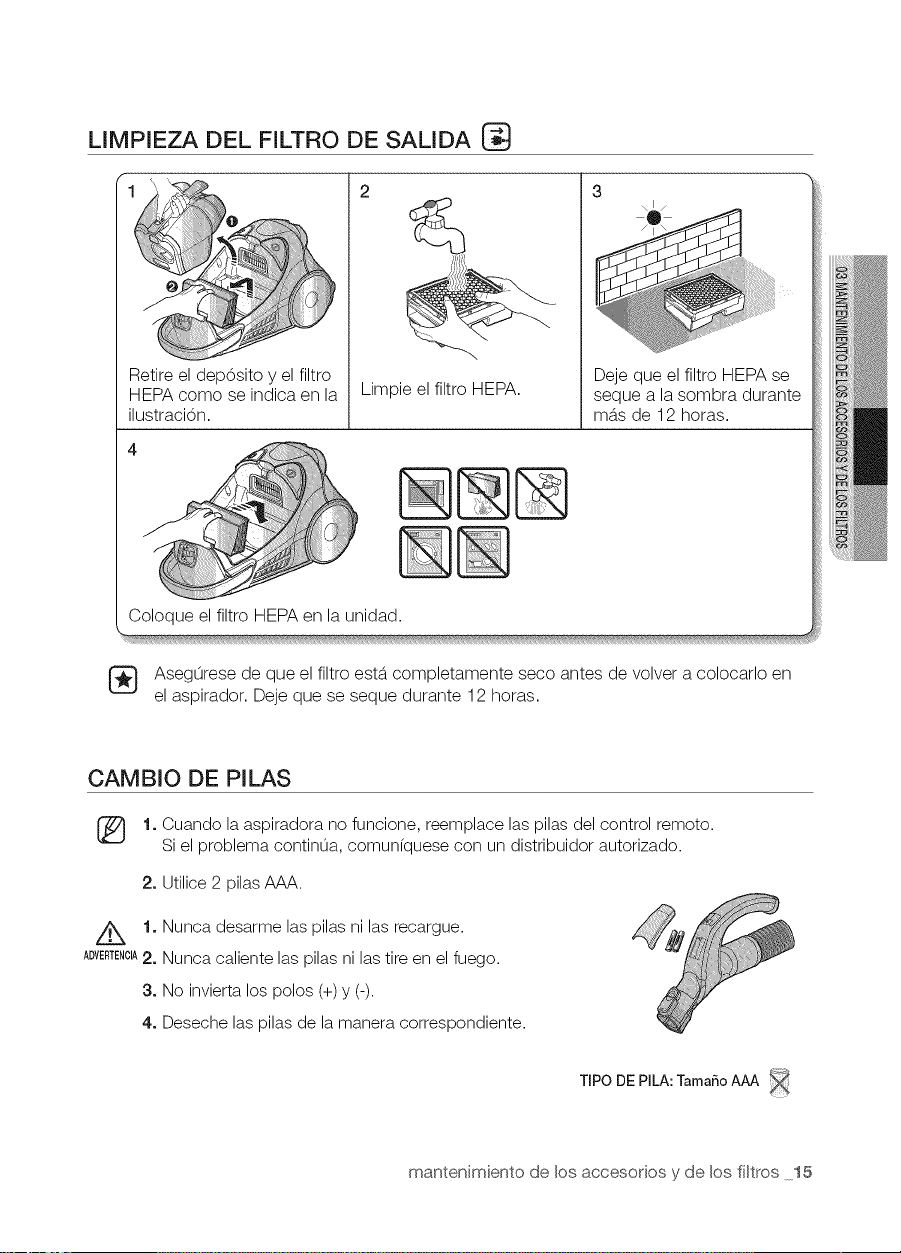
LIMPIEZA DEL FILTRO DE SALIDA
2
@
Limpie el filtro HEPA.
Deje que el filtro HEPA se
seque a la sombra durante
m_.sde 12 horas.
Coloque el filtro HEPA en la unidad.
AsegOrese de que el filtro est6. completamente seco antes de volver a colocarlo en
el aspirador. Deje que se seque durante 12 horas.
CAMBIO DE PILAS
[_ 1oCuando laaspiradora no funcione, reemplace las pilas del control remoto.
Si el problema contin0a, comun(quese con un distribuidor autorizado.
2. Utilice 2 pilas AAA.
Z_ 1. Nunca desarme las pilas ni las recargue.
ADVERTENOlA2. Nunca caliente las pilas ni lastire en el fuego.
3oNo invierta los polos (+)y (-).
4oDeseche las pilas de la manera correspondiente.
TIPO DEPILA: TamaSoAAA
mantenimiento de los accesodos y de los fi[tros 15
LAcd nde rob
I
El motor no arranca
La potencia de succ[6n
dJsm[nuye gradua[mente
El cable no se enrolla
completamente
La asp[radora no aspira
polvo
Potenc[a de succ[6n baja
o decrec[ente
• Verifique el cable, el enchufe y el tomacorriente.
• Deje enfriar.
• Verifique si hay obstrucciones y eliminelas.
• Tire del cable unos 2 a 3 m (6,5 a 9,75 pies) y luego presione
el bot6n para enrollar el cable.
• Verifique el estado de la manguera y rempl6,cela de set
necesar[o.
• Verifique el estado de los filtros y, de ser necesario, limpielos
como se indica en las instrucciones. Si los filtros est6,n
obstruidos y no pueden limpiarse, reempl6,celos por unos
nuevos.
Sobrecalentamiento del • Verifique el estado de los fikros. De ser necesario, limpielos
cuerpo de la aspiradora como se indica en las instrucciones.
• Baje la potencia de succi6n.
Descarga de electricidad • Esto tambi@n puede suceder si el aire de la habitaci6n es
est_.tica muy seco.
Ventile la habitaci6n para aumentar la humedad.
16 so[uci6n de prob[emas

N_N_O

N_N_O

N_N_O
If you have any questions or comments relating to Samsung products,
please contact the SAMSUNG customer care center.
U.S
CANADA
I
CodeNo. DJ68-00621J
REV(0.1)