Remington F5-5800 Foil Shaver, Electric Razor
Product's Documents
Below are documents related to this product, you can read online or download:
- User Manual - (English) Read Online | Download pdf

User Manual Remington Foil Shaver.

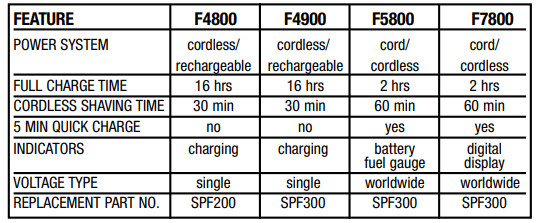
Cordless/Rechargeable -shaver can only be used without the power cord.
Cord/Cordless – shaver can be used with or without the power cord.
Quick Charge - Shaver will charge long enough for one shave in 5 minutes.
Indicators
Charging Indicator – green light that glows when the shaver is being charged.
Low Battery – red light that glows when batteries need re-charge.
Battery Fuel Gauge – displays the amount of battery remaining, including low battery.

Digital Display – displays the number of minutes of remaining battery power.

Worldwide Voltage – shaver automatically adapts to an outlet voltage between 100V and 240V.
Before using, read the important safety instructions in front of the manual.
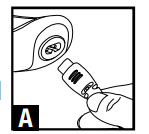
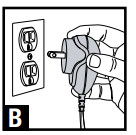
1. Connect the cord to the shaver and then to the electrical outlet. (Diagrams A & B) The charging indicator light will glow green.
2. Charge your new shaver for 24 hours before its first use. This first charge is important to the shaver’s battery life. (Diagram C)

**Use the product until the battery is low. To preserve the life of the batteries, let them fully run out every six months, then recharge them for a full 24 hours*
CAUTION!
■ Make sure the shaver and your hands are dry when placing the shaver on charge.
■ Always charge the shaver in a cool, dry place.
Before using, read the important safety instructions in front of the manual.
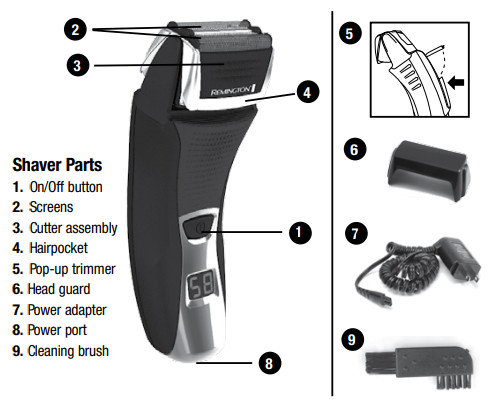
1. Begin by removing the protective head guard from your shaver.
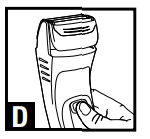
2. Press the on/off button to turn on. (Diagram D)
3. Stretch the skin with your free hand so the hairs stand upright.
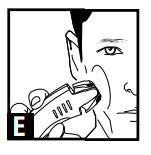
4. Hold the shaving head so all screens touch your skin simultaneously. The independently floating screens automatically adjust to the contours of your face. Only apply light pressure on the shaving head while shaving and use short, circular strokes. (Diagram E)
5. After shaving, turn the shaver off. (Diagram D)
**Remington recommends that you use your new shaver daily for up to three weeks to allow time for your hair and skin to become accustomed to the new shaving system**
■ Ensure your skin is dry and free of oils.
■ Wait at least 15 minutes after getting up before shaving, to ensure your face is free of puffiness that may be present from sleeping.
■ Always hold the shaver at a right angle to the skin so the screens are touching the skin with equal pressure.
■ Stretch skin with the free hand so hairs stand upright, making it easier for them to enter the cutting chamber.
■ Shave with short, circular strokes. The use of short, circular motions in stubborn areas may obtain a closer shave, especially along the neck and chin line.
■ Do not press hard against the skin in order to avoid damage to the foil heads.
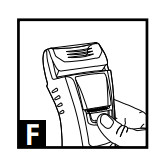
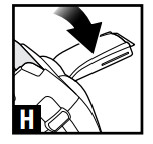
1. Pull trimmer release button to engage trimmer. (Diagram F)
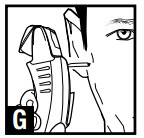
2. Trim long, difficult hairs and side burns. (Diagram G)
3. Close trimmer by pressing down. (Diagram H)
 The shaver is a washable appliance. The head assembly part may be cleaned under water.
NOTE: **When cleaning your shaver, make sure the shaver is turned off and disconnected from the power cord.** For optimal shaver performance, clean your shaver after each use.
CAUTION!
■ Shaver can be placed under running water for cleaning only. Never submerge the shaver in water.
■ Do not remove or replace head assembly while shaver is running as it may cause damage to the unit’s foils and cutters.
■ To clean the external surfaces of the shaver, use a damp cloth. Do not use strong detergents or other chemicals.
■ To dry, wipe the surface of the shaver with a dry towel. Do not use a hair dryer or heater to dry the shaver.
■ The shaver should not be used until it has dried. n This product contains no user serviceable parts.
Daily Cleaning:
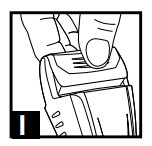
1. Grasp the front and back of the cutter assembly and pull away from the shaver body. (Diagram I)
2. Tap the stubble from the foils and cutters.
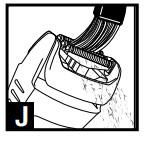
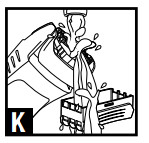
3. Use the cleaning brush to sweep any loose hairs from the cutters, hairpocket, and trimmer. Pay close attention to cleaning out the corners and crevices inside the hairpocket. (Diagrams J–K)
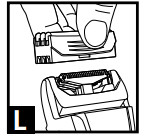
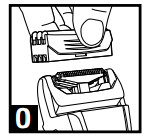
4. After cleaning, replace the hairpocket assembly. (Diagram L)
Monthly Cleaning:
1. Perform the daily cleaning steps 1-4.
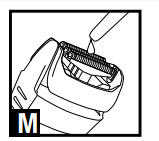
2. Place a drop of liquid soap on each cutter and in the hairpocket. (Diagram M)
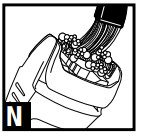
3. Brush the soap around vigorously with the supplied cleaning brush. Be sure to work the soap into the corners of the hairpocket and into any especially dirty cutters. (Diagram N)
4. Add a small amount of water to the cutters.
5. Replace the foil assembly. (Diagram O)
6. Turn on the shaver for approximately 30 seconds.
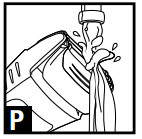
7. While the shaver is running, rinse the foils under running water. (Diagram P)
8. Turn off shaver.
9. Remove foil assembly.
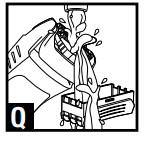
10.Rinse the cutters, hairpocket, and foil assembly thoroughly. (Diagram Q)
11. Shake off excess water.
12. Replace foil assembly. (Diagram O)
13. Allow shaver to dry before next use.
When your rechargeable shaver reaches the end of its useful life, the batteries must be removed from the shaver and recycled or disposed of properly in accordance with your state and local requirements. If this is not required by law, you may elect to dispose of the shaver with the batteries.
CAUTION! Do not put in fire or mutilate your batteries when disposing as they may burst and release toxic materials. Do not short circuit as it may cause burns. Dispose of properly in accordance with your local and state requirements.
To Remove the Rechargeable Battery:
1. Remove headguard and hair pocket from shaver.
2. Using a small screwdriver, pry power switch off of shaver.
3. Using a small screwdriver, pry front cover plate (painted section) off of shaver.
4. Using a Phillips screwdriver, remove (4) screws from front of shaver.
5. Take rear housing off of shaver to expose batteries.
6. Cut wires connecting batteries to the circuit board.
7. Remove batteries and dispose of properly
Please refer to the shaver comparison and features chart near the front of this manual that lists the correct replacement part number for your shaver.
It is very important to replace your head and cutters when necessary to ensure a close, comfortable shave without irritation. We recommend they be replaced every 6 months. Here are some signs of head and cutter wear, indicating that replacement is needed:
■ Irritation: As the heads get excessively worn you may experience some skin irritation. This would be especially noticeable when you apply moisturizing lotion.
■ Pulling: When the cutters wear you may feel a sense of pulling and a loss of closeness when you shave. This is an indication that it is time to replace your heads and cutters.
Reference file: Remington F5-5800 Foil Shaver, Electric Razor
Additionally, the document applies to other Remington models: F4800, F4900, F5800, F7800