*1:Canadian models only: Apply and hold the brake pedal before selecting the ON mode.
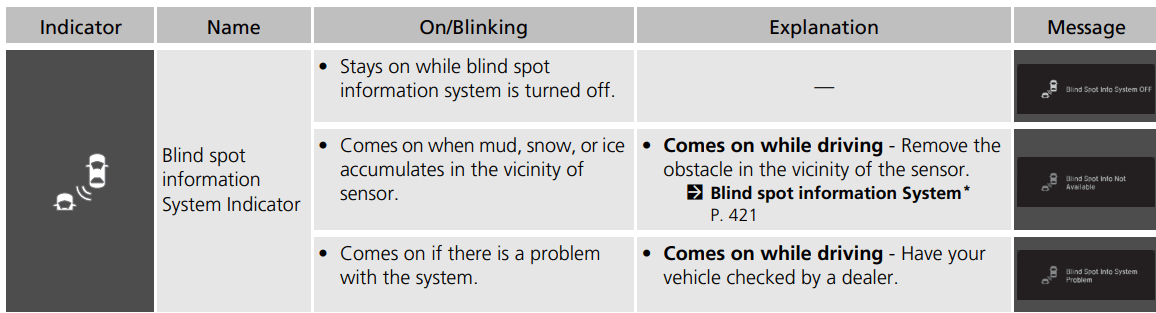
Models with Blind spot information System
Controls
Clock
Adjusting the Clock
Models without navigation system
You can adjust the time manually in the audio/information screen, with the power mode in ON.
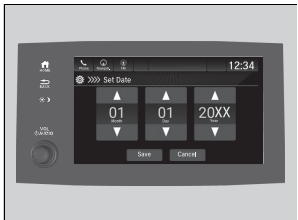
■ Adjusting the Time
Using the Settings menu on the audio/ information screen
Select , then select Settings.
Select System.
Select Date & Time.
Select Set Date & Time.
Select Automatic Date & Time, then select OFF.
To adjust time:
6. Select Set Time. 7. Selecting . -AM/PM icon can be switched to each other either by selecting , or by directly touching the icon. -When you customize the clock display to 24 hour clock, AM/PM icon is not displayed. 8. Select Save to set the time.
Models with navigation system
The clock is automatically updated through the navigation system, so the time does not need to be adjusted.
Using the Settings menu on the audio/information screen
You can also adjust the clock by touching the clock displayed on the upper right corner of the display or the Clock icon on the home screen.
Touch the clock on the display. The clock screen of the select face-type appears.
Select Settings.
Select Date & Time Settings.
Select Set Date & Time.
Select Automatic Date & Time, then select OFF.
Select Set Date or Set Time.
Adjusting the dates, hours and minutes by selecting .
Select Save to set the time.
You can customize the clock display to show the 12 hour clock or 24 hour clock.
To adjust date:
6. Select Set Date. 7. Selecting . 8. Select Save to set the date.
Locking and Unlocking the Doors
Key Types and Functions
This vehicle comes with the following keys: Use the keys to start and stop the engine, and to lock and unlock all the doors and tailgate.
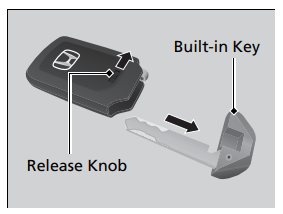
Built-in Key The built-in key can be used to lock/unlock the doors when the smart entry remote battery becomes weak and the power door lock/ unlock operation is disabled. To remove the built-in key, slide the release knob and then pull out the key. To reinstall the built-in key, push the built-in key into the smart entry remote until it clicks.
Key Number Tag Contains a number that you will need if you purchase a replacement key. Keep the key number tag separate from the key in a safe place outside of your vehicle. If you wish to purchase an additional key, contact a dealer. If you lose your key and you cannot start the engine, contact a dealer.
Low Smart Entry Remote Signal Strength
The vehicle transmits radio waves to locate the smart entry remote when locking/ unlocking the doors and tailgate, or to start the engine.
In the following cases, locking/unlocking the doors and tailgate, or starting the engine may be inhibited or operation may be unstable:
Strong radio waves are being transmitted by nearby equipment.
You are carrying the smart entry remote together with telecommunications equipment, laptop computers, cell phones, or wireless devices.
A metallic object is touching or covering the smart entry remote.
Communication between the smart entry remote and the vehicle consumes the smart entry remote’s battery. Battery life is about two years, but this varies depending on regularity of use. The battery is consumed whenever the smart entry remote is receiving strong radio waves. Avoid placing it near electrical appliances such as televisions and personal computers.
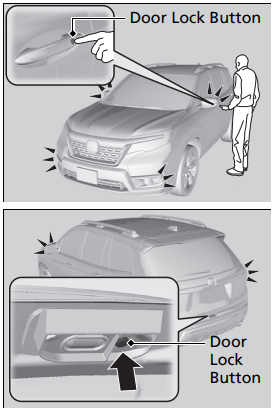
Locking/Unlocking the Doors from the Outside
Using the Smart Entry with Push Button Start System
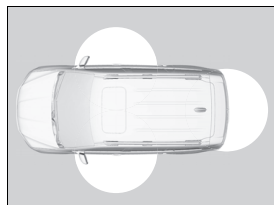
When you carry the smart entry remote, you can lock/unlock the doors and the tailgate. You can lock/unlock the doors and the tailgate within a radius of about 32 inches (80 cm) of the outside door handle or tailgate outer handle.
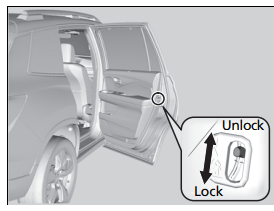
Locking the doors and tailgate
Press the door lock button on a front door or the tailgate.
Some exterior lights flash; the beeper sounds; all the doors and tailgate lock; and the security system sets.
Unlocking the doors and tailgate Grab the driver’s door handle:
The driver’s door unlocks.
Some exterior lights flash twice and the beeper sounds twice.
Grab the front passenger’s door handle:
All doors and the tailgate unlock.
Some exterior lights flash twice and the beeper sounds twice.
Press the tailgate outer handle:
The tailgate unlocks and opens.
Some exterior lights flash twice and the beeper sounds twice. → Using the Tailgate Outer Handle P. 144
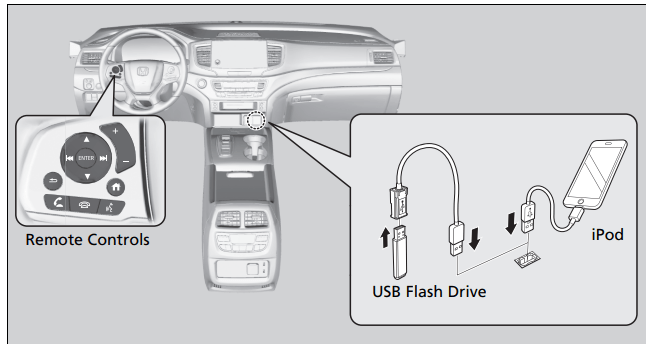
Childproof Door Locks
The childproof door locks prevent the rear doors from being opened from the inside regardless of the position of the lock tab.
To open the door from the inside when the childproof door lock is on, put the lock tab in the unlock position, lower the rear window, put your hand out of the window, and pull the outside door handle.
Setting the Childproof Door Locks Slide the lever in the rear door to the lock position, and close the door.
When opening the door Open the door using the outside door handle.
Auto Door Locking/Unlocking
Your vehicle locks or unlocks all doors automatically when a certain condition is met.
You can turn off or change to another auto door locking/unlocking setting using the audio/ information screen.
Auto Door Locking Drive lock mode: All doors and tailgate lock when the vehicle’s speed reaches about 10 mph (15 km/h).
Auto Door Unlocking Driver’s door open mode: All doors and tailgate unlock when the driver’s door is opened.
Features
Audio System
About Your Audio System
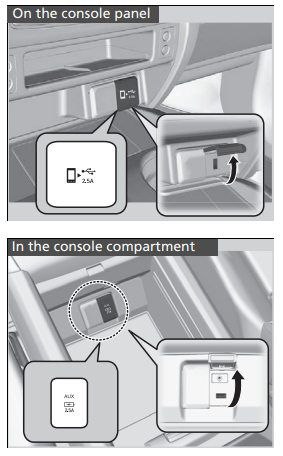
The audio system features AM/FM radio and SiriusXM® Radio* service. It can also play USB flash drives, and iPod, iPhone, iPad and Bluetooth® devices. You can operate the audio system from the knobs on the panel, the remote controls on the steering wheel, or the icons on the touchscreen interface.
USB Ports
On the console panel The USB port (2.5A) is for charging devices, playing audio files and connecting compatible phones with Apple CarPlay or Android Auto.
To prevent any potential issues, be sure to use an Apple MFi Certified Lightning Connector for Apple CarPlay, and for Android Auto, the USB cables should be certified by USB-IF to be compliant with USB 2.0 Standard.
In the console compartment The USB port (2.5A) is only for charging devices.
USB charge: The USB port can supply up to 2.5A of power. It does not output 2.5A unless requested by the device. For amperage details, read the operating manual of the device that needs to be charged.
In the console compartment: This port is for battery charge only. You cannot play music even if you have connected a music player to it.


 , then select Settings.
 .
.