Loading ...
Loading ...
Loading ...
• the mains cable is wired directly into a 13 amp
cable outlet, controlled by a switch, (in
compliance with BS 5733) which is accessible
without moving the appliance.
!!
!!
! For appliances with a rating greater than 13 amp
(eg: electric hob, double ovens and freestanding
electric cookers etc.) the mains cable must be wired
into a cooker output point with a rating of 45 amp. In
this case the cable is not supplied.
Removing the plug:
If your appliance has a non-rewireable moulded plug
and you should wish to remove it to add a cable
extension or to re-route the mains cable through
partitions, units etc., please ensure that either:
• the plug is replaced by a fused 13 amp re-
wireable plug bearing the BSI mark of approval.
or:
Disposing of the plug:
Ensure that before disposing of the plug itself, you
make the pins unusable so that it cannot be
accidentally inserted into a socket. Instructions for
connecting cable to an alternative plug:
!!
!!
! The wires in the mains lead are coloured in
accordance with the following code:
Disposing of the appliance
When disposing of the appliance please remove the
plug by cutting the mains cable as close as
possible to the plug body and dispose of it as
described above.
How to connect an alternative plug:
The wires in this mains lead are coloured in
accordance with the following code:
BLUEBLUE
BLUEBLUE
BLUE “
NEUTRALNEUTRAL
NEUTRALNEUTRAL
NEUTRAL” (“
NN
NN
N”)
BROWNBROWN
BROWNBROWN
BROWN “
LIVELIVE
LIVELIVE
LIVE” (“
LL
LL
L”)
GREEN AND YELLOWGREEN AND YELLOW
GREEN AND YELLOWGREEN AND YELLOW
GREEN AND YELLOW “
EARTHEARTH
EARTHEARTH
EARTH” (“
EE
EE
E”)
GREEN &
YELLOW
BROWN
BLUE
13 amp fuse
CROSS-BAR
CORD GRIP
Green & Yellow - Earth
Blue - Neutral
Brown - Live
If the colours of the wires in the mains lead do not
correspond with the coloured markings identifying
the terminals in your plug, proceed as follows:
Connect Green & Yellow wire to terminal marked “
EE
EE
E”
or or coloured Green or Green & Yellow.
Connect Brown wire to terminal marked “
LL
LL
L” or
coloured Red.
Connect Blue wire to terminal marked “
NN
NN
N” or
coloured Black.
If a 13 amp plug (BS 1363) is used it must be fitted
with a 13 amp fuse. A 15 amp plug must be
protected by a 15 amp fuse.
If you are in any
doubt about the electrical supply to your machine,
consult a qualified electrician before use.
EN
WARNING : This operation must be perfomed
by a qualified technician
INSTALLATION TIPSINSTALLATION TIPSINSTALLATION TIPSINSTALLATION TIPSINSTALLATION TIPSINSTALLATION TIPS
8
Adapting to different types of gas
It is possible to adapt the appliance to a type of gas other
than the default type (this is indicated on the rating label
on the cover).
Adapting the hob
Replacing the nozzles for the hob
burners:
1. Remove the hob grids and
slide the burners off their seats.
2. Unscrew the nozzles using a 7
mm socket spanner ( see figure),
and replace them with nozzles
suited to the new type of gas(see Burner and nozzle
specifications table).
3. Replace all the components by following the above
instructions in reverse.
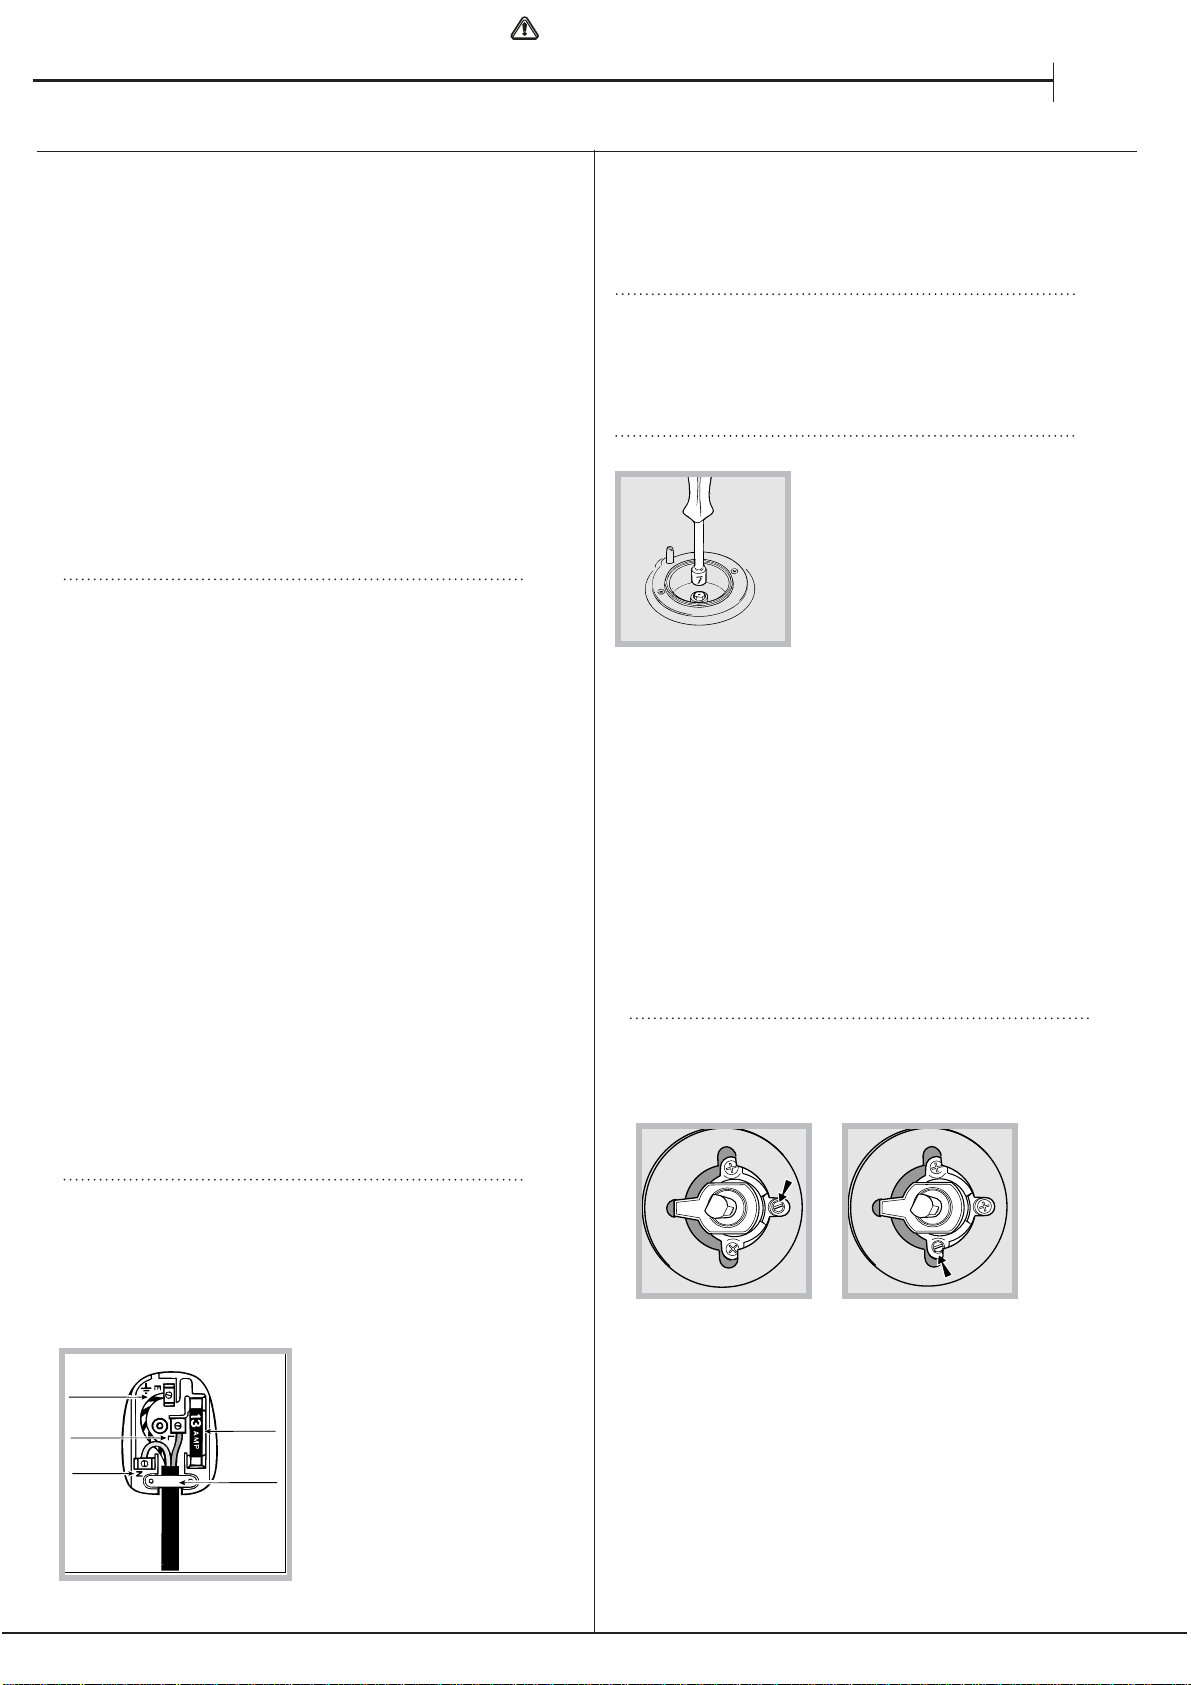
Adjusting the hob burners’ minimum setting:
1. Turn the tap to the minimum position.
2. Remove the knob and adjust the regulatory screw,
which is positioned inside or next to the tap pin, until the
flame is small but steady.
! If the appliance is connected to a liquid gas supply, the
bypass screw must be set to a minimum.
3. While the burner is alight, quickly change the position of the
knob from minimum to maximum and vice versa several times,
checking that the flame is not extinguished.
! The hob burners do not require primary air adjustment.
Upon completion of adjustment, reseal using sealing
wax or an equivalent material.
! After adjusting the appliance so it may be used with a
different type of gas, replace the old rating label with a
new one which corresponds to the new type of gas (these
labels are available from Authorised Technical Assistance
Centres).
! Should the gas pressure used be different (or vary
slightly) from the recommended pressure, a suitable
pressure regulator must be fitted to the inlet hose in
accordance with current standards EN 88-1 and EN
88-2 relating to “regulators for channelled gas”.
Loading ...
Loading ...
Loading ...