Warm air may be released from the top and bottom vents before, during and after cooking. It is normal to see steam escaping from these vents, and condensation may collect in this area. Do not block any vents, since they are important for air circulation.
5. Time display
Digital display,99 minutes, 99 seconds.
6. Safety door latches
The oven will not operate unless the door is securely closed.
7. Oven light
The oven light turns off to save energy after one minute with the door open. To turn the light back on, close the door and open it again.
8. Waveguide cover
DO NOT REMOVE
9. Glass microwave tray
Use for microwave cooking. Food like potatoes can be directly placed on the glass tray
10. Turntable
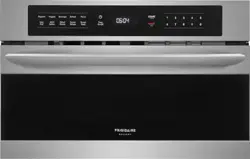
CONTROL PANEL
Number next to the control panel illustration indicates pages on which there are feature descriptions and usage information.
Words in the lower portion of the display will light to indicate what function is in progress.
BEFORE OPERATING
1.Before operating your new oven make sure you read and understand this Use and Care Guide completely.
2.Before the Built-in Convention Microwave Oven can be used, follow these procedures:
• Plug in the oven. Close the door. The oven display will show 12:00.
• If no operation after 3 seconds, the oven will show 12:00.
3. Set clock. See below.
TO SET THE CLOCK
Suppose you want to enter the correct time of day 12:30 (A.M or P.M.).
TO SET THE TIMER
• Set the timer for 3 minutes.
STOP/CLEAR
Press the to:
Erase if you make a mistake during programming.
Stop the signal after cooking.
Return the time of day to the display.
Stop a program during cooking, press once.
MANUAL COOKING
USING ONE TOUCH START
This is a time saving pad that will automatically start cooking 2 seconds after selected. Numeric key 1 to 9 can be touched for a 1 minute to minutes automatic start cooking feature.
• Suppose you want to cook 3 minutes at 100% power
USING ADD 30 SEC.
This is a time-saving pad. It is a simplified feature that lets you quickly set and start microwave cooking at 100% power.
• Suppose you want to set and start microwave cooking at 100% for 30 SEC.
SETTING TIMED COOKING WITH POWER LEVEL
This feature lets you program a specific cook time and power. For best results, there are 11 power level settings in addition to HIGH (100%) power. Refer to the "Microwave Power Levels" table.
• Suppose you want to cook for five minutes at 70% power.
SETTING TWO-STAGE COOKING
For best results, some recipes call for different power levels during a cook cycle. You can program your oven for two power level stages during the cooking cycle.
• To set a 2-stage cook cycle. The first stage is a 2 minutes cook time at 30% cook power then a 4 minutes cook time at 70% cook power.
When the first stage finishes, the oven will beep. "FIRST STAGE DONE" will show on the display. The second stage starts automatically.
AUTO COOKING
USING AUTO DEFROST
Three defrost sequences are preset in the oven. The auto defrost feature provides you with the best defrosting method for frozen foods. The cooking guide will show you which defrost sequence is recommended for the food you are defrosting.
For added convenience, the Auto Defrost includes a built-in beep mechanism that reminds you to check, turn over, separate, or rearrange the food in order to get the best defrost results. Three different defrosting levels are provided:
1. MEAT
2. POULTRY
3. FISH
Available weight is 0.1-6.0 lbs.
• Suppose you want to defrost 0.6 lbs of meat.
OPERATING TIPS
• For best results, remove fish, shellfish,meat, and poultry from its original closed paper or plastic package (wrapper). Otherwise, the wrap will hold steam and juice close to the foods, which can cause the outer surface of the foods to cook.
• For best results, roll your ground meat into a ball before freezing. During the DEFROST cycle, the microwave will signal when it is time to turn the meat over. Scrape off any excess frost from the meat and continue defrosting.
• Place foods in a shallow containers or on a microwave roasting rack to catch drippings.
This table shows food type selections and the weights you can set for each type. For best results, loosen or remove covering on food.
Weight conversion table
You are probably used to measuring food in pounds and ounces that are fractions of a pound (for example, 4 ounces equals 1/4 pound). However, in order to enter food weight in Auto Defrost, you must specify pounds and tenths of a pound.
If the weight on the food package is in fractions of a pound, you can use the following table to convert the weight to decimals.
DEFROSTING TIPS
When using Auto Defrost, the weight to be entered is the net weight (the weight of the food minus the container).
Before starting, make sure to remove any and all metal twist-ties that often come with frozen food bags, and replace them with strings or elastic bands.
Open containers, such as cartons, before placing in the oven.
Always slit or pierce plastic pouches or packaging.
If food is foil wrapped, remove foil and place food in a suitable container
Slit the skin of skinned food, such as sausage.
Bend plastic pouches of food to ensure even defrosting.
Always under estimate defrosting time. If defrosted food is still icy in the center, return it to the microwave oven for more defrosting.
The length of defrosting time varies according to how solidly the food is frozen.
SETTING BEVERAGE
Press key 1,2 or 3 to select the amount of beverage.
• Suppose you want to have 1 cup of beverage.
CONVENIENT FEATURES
USER REFERENCE
This section gives instructions for operating each function. Please read this section carefully.
USER PREF
The microwave oven has settings that allow you to customize the operation for your convience. Below is the table showing the various settings. Touch the User Pref key multiple times to scroll to the desired setting function.
SETTING CONTROL LOCK ON/OFF
Suppose you want to turn on the Control Lock.
Display for 2 seconds then clear.
SETTING ENERGY SAVINGS
• Suppose you want to turn on energy savings. Turning On energy savings turns off the time of day clock display.
Display for 2 seconds then clear.
SETTING AUDIO LOW/MED/HIGH/OFF
• Suppose you want to turn on the Audio Off.
Display for 2 seconds then clear.
SETTING WEIGHT LBS/KG
• Suppose you want to toggle weight between pounds & kilograms.
Display for 2 seconds then clear.
SETTING LANGUAGE MODE
• Suppose you want to enter Language mode.
Display for 2 seconds then clear.
SETTING DEMO MODE
• Suppose you want to enter Demo mode. When Demo mode is ON programming functions will work in a rapid countdown mode with no cooking power.
Display for 2 seconds then clear.
CLEANING AND CARE
EXTERIOR
The outside surface is precoated steel and plastic. Clean the outside with mild soap and water; rinse and dry with a soft cloth. Do not use any type of household or abrasive cleaner.
DOOR
Disconnect the power cord or deactivate the oven with setting Child Lock before cleaning to prevent unexpected manipulation.
Wipe the window on both sides with a soft cloth to remove any spills or spatters. Metal parts will be easier to maintain if wiped frequently with a soft cloth. Avoid the use of spray and other harsh cleaners as they may stain, streak or dull the door surface.
Your microwave oven(some models) may have a Stainless Steel finish or coating. Clean the stainless with warm soapy water using a clean sponge or cloth. Rinse with clean water and dry with a soft clean cloth. DO NOT use ANY store bought cleaners like Stainless Steel cleaners or any other types of cleaners containing any abrasive, chlorides, chlorines or ammonia. It is recommended to use mild dish soap and water or a 50/50 solution of water and vinegar.
INTERIOR
Cleaning is easy because little heat is generated to the interior surfaces; therefore, there is no baking and setting of spills or spattering. To clean the interior surfaces, wipe with a soft cloth and warm water. DO NOT USE ABRASIVE OR HARSH CLEANERS OR SCOURING PADS. For heavier soil, use baking soda or a mild soap; rinse thoroughly with hot water. The rack can be cleaned with hot soapy water, rinsed and dried.
WAVEGUIDE COVER
The waveguide cover is located on the ceiling in the microwave oven cavity. It is made from mica so requires special care. Keep the waveguide cover clean to assure good microwave oven performance. Carefully wipe with a damp cloth any food spatters from the surface of the cover immediately after they occur. Built-up splashes may overheat and cause smoke or possibly catch fire. DO NOT REMOVE THE WAVEGUIDE COVER.
ODOR REMOVAL
Occasionally, a cooking odor may remain in the microwave oven. To remove, combine 1 cup water, grated peel and juice of 1 lemon and several whole cloves in a 2-cup glass measuring cup. Boil for several minutes using 100% power. Allow to set in microwave oven until cool. Wipe interior with a soft cloth.
TOUCH CONTROL PANEL
Care should be taken in cleaning the touch control panel. If the control panel becomes soiled, open the microwave oven door before cleaning. Wipe the panel with a cloth dampened slightly with water only. Dry with a soft cloth. Do not scrub or use any sort of chemical cleaners. Close door and touch STOP/CLEAR
SPECIFICATIONS
The International Electrotechnical Commission’s standardized method for measuing output wattage. This test method is widely recognized.
This is the classification of ISM (Industrial. Scientific and Medical) equipment described in the International Standard CISPR11.
Internal capacity is calculated by measuring maximum width. depth and height. Actual capacity for holding food is less.


 to:
to:


 The International Electrotechnical Commission’s standardized method for measuing output wattage. This test method is widely recognized.
 This is the classification of ISM (Industrial. Scientific and Medical) equipment described in the International Standard CISPR11.
 Internal capacity is calculated by measuring maximum width. depth and height. Actual capacity for holding food is less.