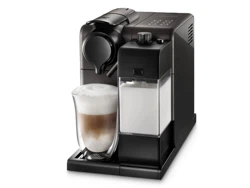
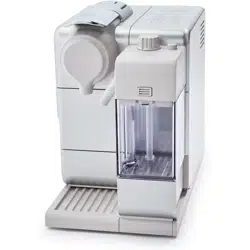
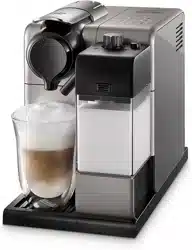
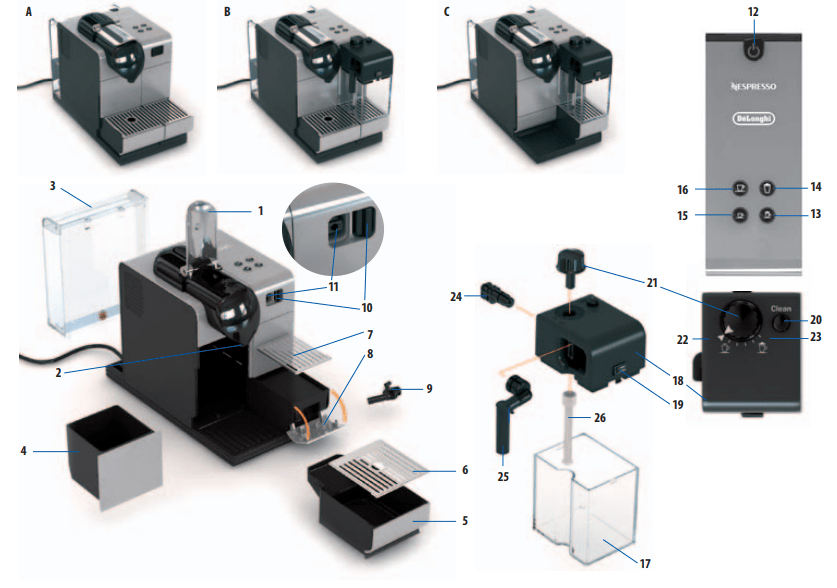
Machine with the Rapid Cappuccino System (for Cappuccino)
Machine with the Rapid Cappuccino System (for Latte Macchiato)
Lever
Coffee outlet
Water tank (0.9 l)
Used capsule container.
Drip tray (push inside for Latte Macchiato glass)
Left Grid
Right Grid
Descaling pipe storage door (pull to open)
Descaling pipe
Steam connector door
Steam connector
ON/OFF button Backlight Buttons
Cappuccino
Latte Macchiato
Espresso
Lungo
Milk container (0.35 l)
Milk container Lid
Lids detach button.
Rinsing button
Milk Froth regulator knob
Min. froth
Max. froth
Rapid Cappuccino System connector
Milk spout
Milk aspiration tube
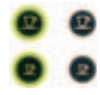
Backlight Buttons indication
Energy saving settings, refer to page 26 When the machine is switched on, buttons light for 2sec: Lungo= power off after 9 min Espresso= power off after 30 min Both Lungo+ Espresso = power off after 8h.
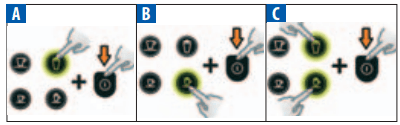
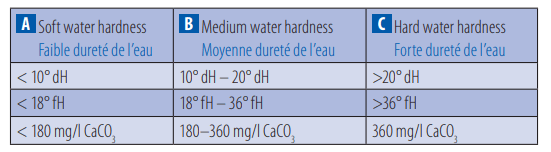
Water hardness settings, refer to page 28 When the machine is switched on, buttons light for 2sec: Latte Macchiato= Soft water hardness Cappuccino= Medium water hardness Latte Macchiato+Cappuccino= Hard water hardness
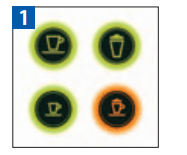
Coffee mode is ready
Coffee and milk recipe modes are ready
Descaling alert, refer to page 27.
First use or after a long period of non-use
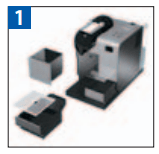
Remove the plastic film from both the left and right grid, and machine panels.
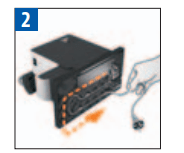
Remove the water tank, drip tray, and capsule container. Adjust the cable length and store the excess in the cable guide under the machine.
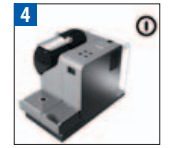
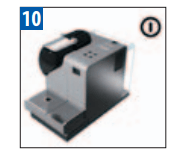
Put the machine in the upright position and plug it into the mains.
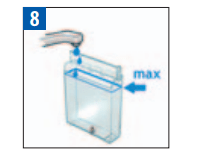
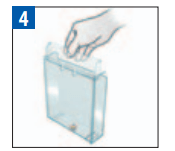
The water tank can be carried by its cover.
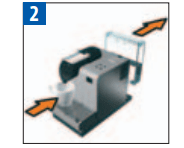
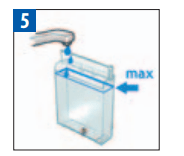
Rinse the water tank before filling with potable water up to the maximum level.
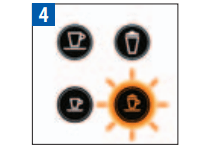
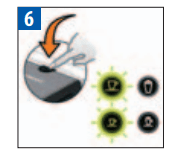
Switch the machine on. Blinking light: heating up for approximately 40 sec. Steady light: ready Refer to the button indications on page 18.
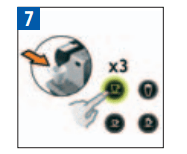
Rinsing: Place a container under the coffee outlet and press the Lungo button. Repeat three times. Machines are fully tested after being produced. Some traces of coffee powder could be found in the rinsing water.
Rinse the Rapid Cappuccino System (R.C.S.) by following the section “Care of the Rapid Cappuccino System (R.C.S) twice a week”, p. 25.
Coffee preparation
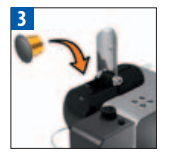
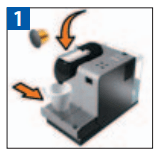
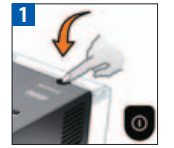
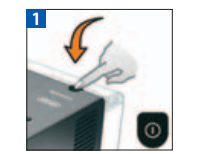
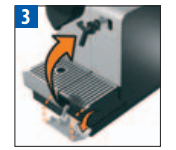
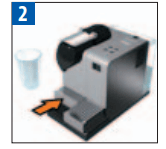
Lift the lever completely and insert a Nespresso capsule. Close the lever and place a cup under the coffee outlet.
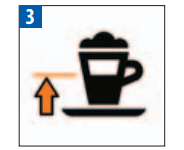
For a Latte Macchiato glass, push the drip tray inside the machine.
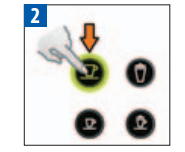
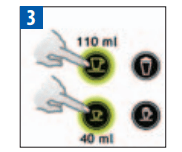
Press the Espresso (40 ml / 1.35 oz) or the Lungo (110 ml / 3.7 oz) button. Preparation will stop automatically. To stop the coffee flow or top up your coffee, press again.
Take the cup. Lift and close the lever to eject the capsule into the used capsule container.
Assembling / disassembling of the Rapid Cappuccino system (R.C.S)
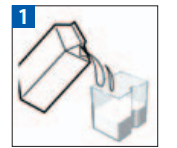
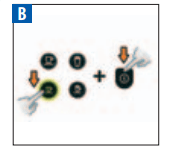
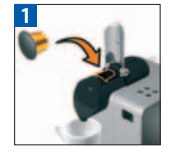
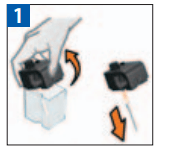
Remove the milk container lid and unplug the milk aspiration tube.
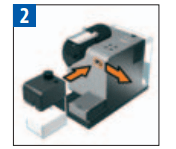
Remove the milk froth regulator knob by turning it to () and pulling it up.
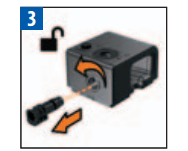
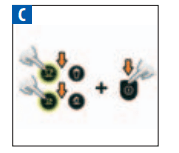
Unlock and remove the Rapid Cappuccino System connector by turning it from () to () and pulling it off.
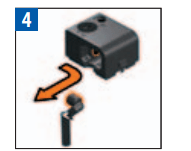
Remove the milk spout by pulling it off.
Preparing A Cappuccino and Latte Macchiato
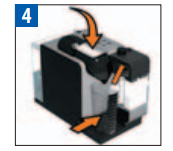
Fill the milk container with your desired quantity of milk. When the milk container is empty, before refilling, thoroughly rinse it and the milk aspiration tube with potable water.
Close the milk container. Open the steam connector door by sliding it to the right. Connect the Rapid Cappuccino System to the machine. Milk recipe buttons blink: the Rapid Cappuccino heats up. Steady light: ready
Lift the lever completely and insert a Nespresso capsule.
Close the lever, place a Cappuccino cup or a Latte Macchiato glass under the coffee outlet and adjust the position of the milk spout.
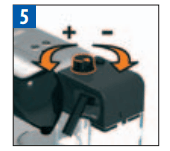
Adjust the milk froth regulator knob according to the quantity of froth you want.
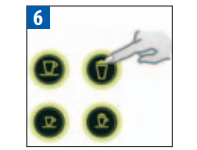
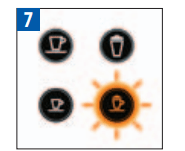
Press the Cappucino or Latte Macchiato button. The preparation starts after a few seconds (first milk and then coffee) and will stop automatically.
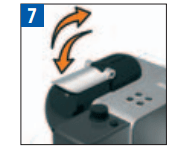
At the end of the preparation, lift and close the lever to eject the capsule into the used capsule container.
Rinse after each use as described in the section “Rinsing after each milk recipe preparation”.
Programming the water volume
Fill the water tank, switch the machine on and insert a Nespresso capsule. Close the lever and place a cup under the coffee outlet.
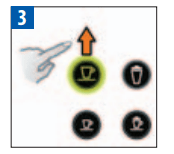
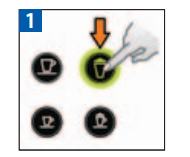
Press and hold the Espresso or Lungo button. Brewing starts. Button blinks quickly: programming mode.
Release the button when the desired volume is reached.
The water volume is now stored for future coffee preparations. Button blinks 3 times: confirm the new water volume min 20 ml / max 300 ml.
Programming Cappuccino/Latte Macchiato Volume
Follow the steps 1-5 of section “Preparing a Cappuccino and Latte Macchiato”
Milk: min 20 ml/max 300 ml. Coffee: min 20 ml/max 300 ml
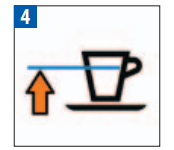
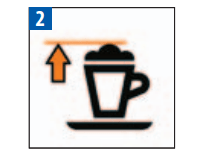
Press and hold the Cappuccino or Latte Macchiato button. Milk frothing starts. Button blinks quickly: programming mode.
Release the button when your desired volume of milk froth is reached. Button blinks quickly: programming mode
Press and hold the same button. Brewing starts. Release the button when your desired coffee volume is reached. The recipe volume is now stored for future preparations. Button blinks 3 times: confirm the new recipe volume. Eject the capsule and press the clean button.
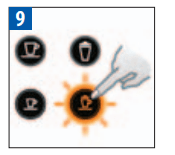
Rinsing after each milk recipe preparation
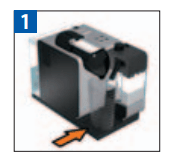
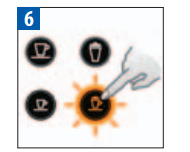
Place a container under the milk spout.
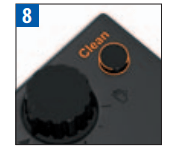
Press and hold the ”CLEAN” button until machine stops pumping automatically. Milk recipe buttons blink: rinsing process approximately 10 sec. Steady light: rinsing process finished.
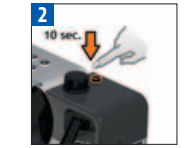
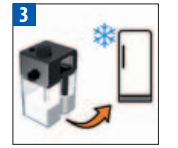
Disconnect the R.C.S. from the machine and place it in the refrigerator. Close the machine steam connector door. This milk should not be kept for more than 2 days.
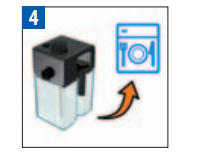
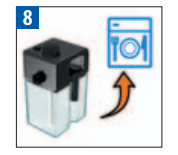
All the milk container components are dishwasher proof. Twice a week, follow the section “Care of Rapid Cappuccino System twice a week”.
Daily cleaning
Do not use any strong cleaning agent or solvent cleaner. Use a damp cloth and mild cleaning agent to clean the surface of the machine. Do not put in a dishwasher.
Remove the drip tray, capsule container and water tank. Empty and rinse. Both left and right grid can be removed for easy cleaning. Clean the coffee outlet regularly with a damp cloth.
Care of Rapid Cappuccino System (R.C.S.) twice a week
Disassemble the Rapid Cappuccino System. Refer to section” Assembling/ Disassembling of Rapid Cappuccino System (R.C.S)”.
Clean all components in the upper level of a dishwasher at least twice a week.
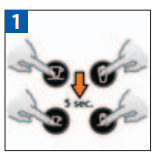
Emptying the system before a period of non-use, for frost protection or before a repair
Switch on the machine.
Remove the water tank. Close the lever (without a capsule inside). Place a container under the coffee outlet.
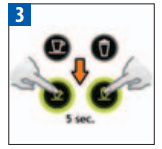
Press the Cappuccino and Espresso buttons simultaneously for 5 seconds. Preparation buttons blink alternately: emptying mode is in progress.
When the process is finished, the machine switches off automatically.
ENERGY SAVING CONCEPT
Switch the machine off
Press and hold the Lungo button and switch the machine on.
Press and hold the Espresso button and switch the machine on.
Press and hold both the Lungo and Espresso button and switch machine on.
Descaling
Descale the machine when the Cappuccino button shines orange in ready mode (descaling alert).
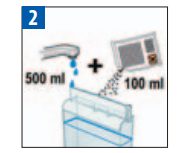
Empty the drip tray and the used capsule container. Fill the water tank with 100 ml of Nespresso descaling agent and 500ml water.
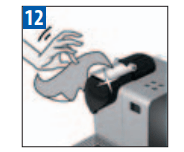
Open the descaling pipe storage door. Plug the descaling pipe into the steam connector.
The machine enters the descaling mode (70°C setting). Cappuccino button blinks orange.
Place a minimum 1 liter container under both the coffee outlet and descaling pipe nozzle.
Press the Cappuccino button. The descaling agent flows alternately through the coffee outlet, descaling pipe and drip tray. The Cappuccino and Macchiato button blink alternatively.
When the descaling cycle is finished (water tank runs empty), the Cappuccino button blinks.
Empty the used capsule container and drip tray, rinse and fill the water tank with fresh potable water up to the MAX level. Repeat step 5 again.
Press the Cappuccino button again. The rinsing cycle continues through the coffee outlet, descaling pipe and drip tray until the water tank is empty. The Cappuccino and Macchiato button blink alternatively
Once the rinsing process is finished, the machine switches off.
Remove and store the descaling pipe. Empty the drip tray and used capsule container. Fill the water tank with fresh potable water.
Clean the machine using a damp cloth. You have now finished descaling the machine.
Water hardness setting
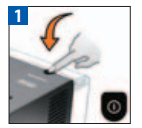
Switch the machine off.
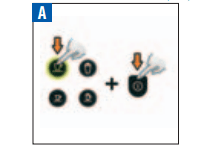
Press and hold the indicated buttons and switch the machine on.
Programmed buttons blink 3 times: water hardness is set.
Restoring volumes to factory settings
Press all 4 buttons for 5 sec (when machine is switched on). All buttons blink 3 times: all volumes are reset.
110 ml (3.7oz)
Milk*: 150ml (5 oz)/Coffee: 40 ml (1.35 oz)
40 ml (1.35 oz)
Milk*: 50ml (1.7 oz)/Coffee: 40ml (1.35 oz)
The volume of milk froth depends on the kind of milk that is used and its temperature.
Troubleshooting
No indicator light
Check the mains, plug, voltage, and fuse. In case of problems, call the Nespresso Club.
No coffee, no water.
Water tank is empty. Fill water tank. ➔ Descale if necessary; see Descaling section.
Coffee comes out very slowly.
Flow speed depends on the coffee variety. ➔ Descale if necessary; see Descaling section.
Coffee is not hot enough.
Preheat cup. ➔ Descale if necessary; see Descaling section.
Capsule area is leaking (water in capsule container).
Position capsule correctly. If leakages occur, call the Nespresso Club.
Irregular blinking.
Send appliance for repair or call the Nespresso Club.
No coffee, just water runs out (despite inserted capsule).
Call the Nespresso Club.
Lever cannot be closed completely.
Empty capsule container. Make sure that no capsule is blocked inside the capsule container
Quality of milk froth is not up to standard.
Use skimmed or semi-skimmed milk at refrigerator temperature (about 4° C) / Rinse after each milk preparation (see p. 25). Descale the machine (see. p. 27)
Yes the touch model has a milk froth only setting.
#2 What part of the milk dispenser can go into the dishwasher? Can the main element go in the dishwasher or just the smaller pieces?
Just the container can go into the dishwasher in my experience. The actual dispenser which froths and dispenses the milk is steam-cleaned through a cleaning step in the machine after each use where the user has to press and hold a bottom.
#3 Can you just steam milk with the flavor or capsule
There's a button for just steamed milk. If you have a capsule with the flavor, you can use that instead of coffee. Otherwise, it's probably best to put it in the cup first, then steam just milk into it.
#4 What's the difference between the plus and the touch?
I'm not completely sure but it appears the plus offers more cup sizes and possibly faster brewing for several cups in succession. There is a chart at the bottom of the description page comparing the machines.
No... it only uses Nespresso capsules... you can make a "lungo" or a "cappucino" but both of these are smaller than a regular "American" coffee... and you must use the Nespresso capsules. It's a great machine... but basically makes only variations of espresso coffee.
#6 How does this do multiple layers of milk like in the image?
It is a programming feature that is included in the manual. You can actually program the buttons to have different functions and how long it's going to happen.
 Energy saving settings, refer to page 26 When the machine is switched on, buttons light for 2sec: Lungo= power off after 9 min Espresso= power off after 30 min Both Lungo+ Espresso = power off after 8h.
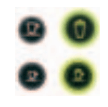 Water hardness settings, refer to page 28 When the machine is switched on, buttons light for 2sec: Latte Macchiato= Soft water hardness Cappuccino= Medium water hardness Latte Macchiato+Cappuccino= Hard water hardness
 Coffee mode is ready
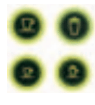 Coffee and milk recipe modes are ready
 Descaling alert, refer to page 27.
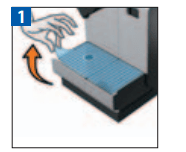


 ) and pulling it up.
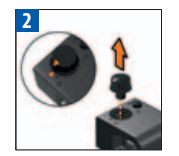
 ) to (
 ) and pulling it off.