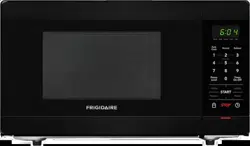
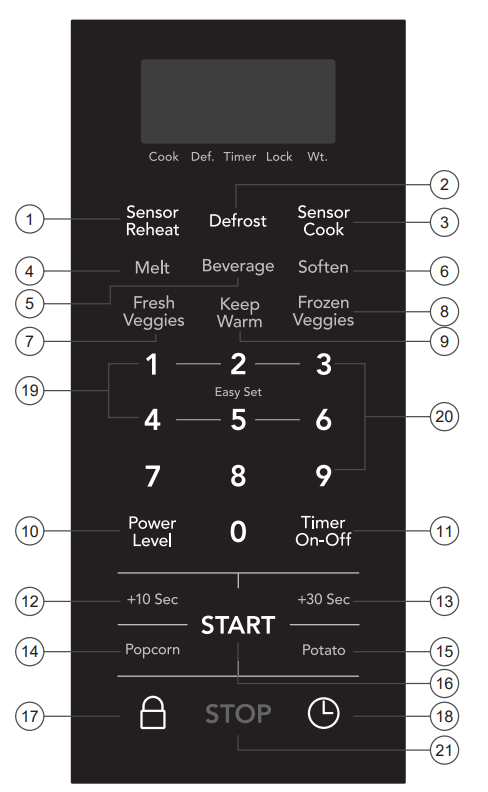
(12) +10 Sec (13) +30 Sec (14) Popcorn (15) Potato (16) START ~ Begin cooking time. (17) Safety Lock (18) Clock/Options (19) Easy Set (6 instant settings) (20) Number Pads (0-9) (21) STOP ~ Before cooking: clears all previous settings. During cooking: press this pad once to pause cooking function, press this pad twice to cancel cooking and any other entries.
MANUAL OPERATION
Setting the clock
The clock can be disabled when the microwave is first plugged in and the STOP pad is selected. To re-enable the clock follow clock instructions.
1. Press Clock/Options pad.
2. Enter time using number pads.
3. Press START pad.
NOTE:
1. If you begin to enter in an incorrect time (e.g. 2:89) the 8 is an invalid digit and cannot be entered. Enter the correct time.
2. If you press STOP pad while setting the clock, the display will show the last time of day set.
Microwave utensil guide
Use
Do not use
Oven proof glass (specifically treated for high intensity heat): Utility dishes, loaf dishes, pie plates,cake plates, liquid measuring cups,casseroles and bowls withoutmetallic trim.
China: Bowls, cups, serving plates and platters without metallic trim.
Plastic: Plastic wrap (as a cover) - lay the plastic wrap loosely over the dish and press it to the sides. Vent plastic wrap by turning back one edge slightly to allow excess steam to escape. The dish should be deep enough so that the plastic wrap will not touch the food. Use plastic dishes, cups, semirigid freezer containers and plastic bags for short cooking times. Use these with care because the plastic may soften from the heat of the food.
Paper: Paper towels, waxed paper, paper napkins and paper plates with no metallic trim or design. Look for the manufacturer’s label for any special instructions for use in the microwave oven.
Metal utensils: Metal shields the food from microwave energy and produces uneven cooking. Also, avoid metal skewers, thermometers or foil trays. Metal utensils can cause arcing, which can damage your microwave oven.
Metal decoration: Bowls, cups, serving plates and platters without metallic trim.
Aluminum foil: Avoid large sheets of aluminum foil because they hinder cooking and may cause harmful arcing. Use small pieces of foil to shield poultry legs and wings. Keep ALL aluminum foil at least 1 inch from the side walls of the oven cavity and door of the microwave.
Wood: Wooden bowls and boards will dry out and may split or crack when you use them in the microwave oven. Baskets made of wood will react in the same way.
Tightly covered utensils: e sure to leave openings for steam to escape from covered cookware. Pierce plastic pouches of vegetables or other food items before cooking. Tightly closed pouches may explode.
Brown paper: Avoid using brown paper bags. They absorb heat and can burn.
Flawed or chipped cooking utensils: Any utensil that is cracked, flawed or chipped may break in the oven.
Metal twist ties: Remove metal twist ties from plastic or paper bags. They become hot and could cause a fire.
Setting the timer
Example: setting timer for 5 minutes:
1. Press Timer On-Off pad once
2. Enter time using number pads. (timer may be set up to 99 minutes and 99 seconds).
3. Touch Timer pad again.
Timer count down does not stop even if the door is open. To cancel the timer, press Timer On-Off pad once again.
Safety Lock
You may lock the control panel to prevent the microwave from being accidentally started or used by children. The safety lock feature is very useful when cleaning the control panel. The lock will prevent accidental programming when wiping the control panel.
Using Easy Set
Microwave heating or cooking may be quickly set at 100% power level for 1, 2, 3, 4, 5 or 6 minutes. Use the number pads 1, 2, 3, 4, 5 or 6 to choose the desired minutes of cook time (this option will only work using the 1, 2, 3, 4, 5 or 6 numeric pads.)
NOTE: "Food" will be displayed if a Easy Set cooking cycle or press +30 sec or +10 Sec pad is not selected within 5 minutes of placing food in the microwave. You must open then close the door again to clear ''Food" from the display.
Heating with high power level
1. Use the number pads to enter desired heating time (cook time may be set up to 99 minutes and 99 seconds).
NOTE: For time sets that start with numbers 1 - 6, the remaining numbers must be entered within 2 second from the first pad press, otherwise the Easy Set time will be used.
2. Press START pad. When finished, you will hear a series of beeps
Heating with lower power levels
Using the highest power level to heat foods does not always give the best results when some types of food need slower cooking, such as roasts, baked goods or custards. Your oven has nine other power levels you may choose.
Example: to heat for 4 minutes and 30 seconds at 70% power:
1. Use the number pads to enter desired heating time (cook time may be set up to 99 minutes and 99 seconds).
NOTE: For time sets that start with numbers 1 - 6, the remaining numbers must be entered within 2 second from the first pad press, otherwise the Easy Set time will be used.
2. Press Power Level pad 4 times more (70 % power). P-70 appears in the display
3. Press START pad. When finished, you will hear a series of beeps.
Heating with multiple cooking stages
For best results, some microwave recipes call for different power levels or different lengths of time for cooking. Your microwave may be set to change from one stage to another automatically (2 stages maximum).
Example: to cook food at 80%power for 3 minutes and then 50% power for 6 minutes 30 seconds:
1. Use the number pads to enter desired heating time for the first stage (cook time may be set up to 99 minutes and 99 seconds).
NOTE: For time sets that start with numbers 1 - 6, the remaining numbers must be entered within 2 second from the first pad press, otherwise the Easy Set time will be used.
2. Press Power Level pad 3 times for power level 80 (80% power) for first stage. P-80 appears in the display.
3. Use the number pads to enter desired heating time for the second stage (cook time may be set up to 99 minutes and 99 seconds).
4. Press Power Level pad 6 times for power level 50 (50% power) for the second stage. P-50 appears in the display.
5. Press START pad.
Adding cook time (+30 Sec)
Pressing the +30 Sec pad once starts 30 seconds of cooking at a 100% power level. Pressing the +30 Sec pad during cooking adds 30 seconds (for each press) to the cook time..
Example: to add 1 minute of cook time at the power level of 100%:
1. Press +30 Sec pad 2 times.
NOTE: "Food" will be displayed if a Easy Set cooking cycle or press +30 sec or +10 Sec pad is not selected within 5 minutes of placing food in the microwave. You must open then close the door again to clear ''Food" from the display.
Adding cook time (+10 Sec)
Pressing the +10 Sec pad once starts 10 seconds of cooking at a 100% power level.
Pressing the +10 Sec pad during cooking adds 10 seconds for each press) to the cook time.
NOTE: "Food" will be displayed if a Easy Set cooking cycle or press +30 sec or +10 Sec pad is not selected within 5 minutes of placing food in the microwave. You must open then close the door again to clear ''Food" from the display
Setting Defrost (by Weight)
1. Press Defrost pad once.
2. . Use the number pads to enter weight of food to defrost in pounds. You may enter weight from 0.5 to 7.0 pounds. (0.2 to 3.2 kg)
3. Press START pad
When finished, you will hear a series of beeps.
Note:
1. The weight amount must be a valid entry for this feature to start. A valid weight entry is 0.5 to 7.0 pounds A decimal point is assumed before the right-most digit. For example, enter 5 for 0.5 pounds and enter 50 for 5.0
2. The oven will beep during the Defrost cycle. At this time, open the door and turn, separate, or rearrange the food. Remove any portions that have thawed. Return frozen portions to the oven and press START pad to resume the defrost cycle.
Setting Defrost (by Time)
1. Press Defrost pad twice.
2. Use the number pads to enter desired defrost time (defrost time may be set up to 99 minutes and 99 seconds).
3. Press START pad.
NOTE: The oven will beep during the Defrost cycle. At this time, open the door and turn, separate, or rearrange the food. Remove any portions that have thawed. Return frozen portions to the oven and press START pad to resume the defrost cycle.
Keep Warm
The Keep Warm feature maintains food at a warm temperature.
Example: keep warm for 5 minutes
1. Press Keep Warm pad.
2. Enter desired time using number pads. (keep warm may be set up to 99 minutes and 99 seconds).
3. Press START pad.
CONVENIENCE OPERATION
Convenience Operation (One Touch)
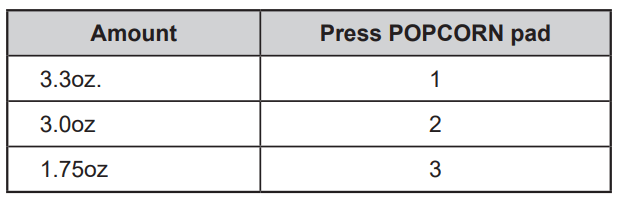
Popcorn
CAUTION DO NOT leave microwave oven unattended while popping corn.
The popcorn feature lets you pop 3 different commercially packaged microwave popcorn sized bags. Use the table below to determine the setting to use:
Press POPCORN pad twice (refer to table above).
Press START pad.
When cooking is finished, you will hear a series of beeps.
Important Information About Microwave Popcorn Feature:
If / when the popcorn bag expands and no longer rotates properly, please press STOP pad once. Open the oven door and adjust the bag position to ensure even cooking. Close the oven door, press START pad to continue cooking.
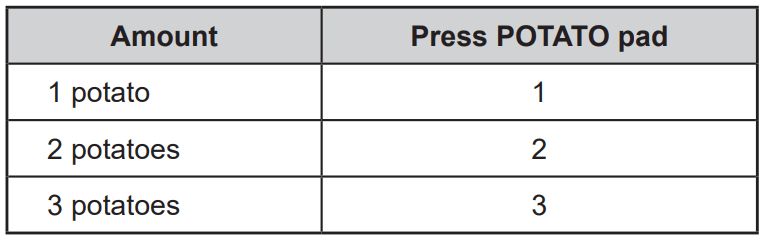
Potato
The potato feature cooks 1, 2, or 3 potatoes automatically (cooking times based on 8 to 24 oz.). Use the table below to determine the setting to use:
Press POTATO pad (refer to table above).
Press START pad.
When cooking is finished, you will hear a series of beeps.
NOTE:
Before cooking, pierce potato with fork several times..
After cooking, let potatoes stand for 5 minutes.
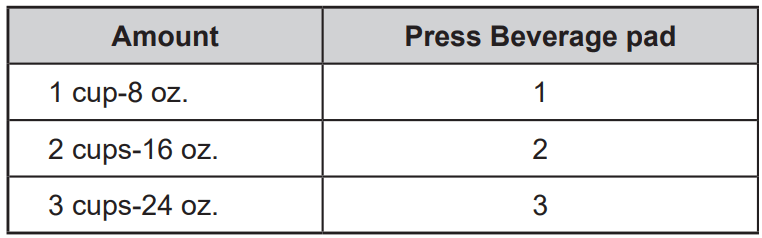
Beverage
The beverage feature can be used to cook 1,2 or 3 cups automatically. See the table for specific settings to use.
Press Beverage pad. (refer to table above)
Press START pad.
When finished, you will hear a series of beeps.
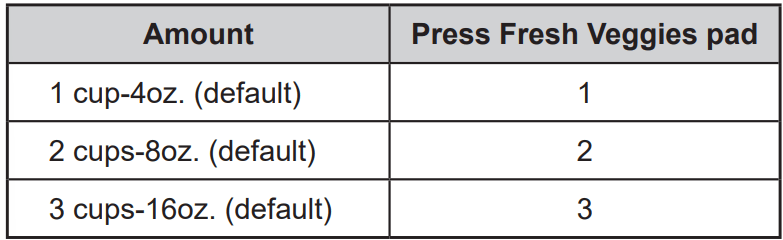
Fresh Vegetables
The fresh vegetables allow you to cook 4, 8 or 16 oz. vegetables. Use the table below to determine the setting to use.
Press Fresh Vegetables pad once (refer to table above).
Press START pad.
When finished, you will hear a series of beeps.
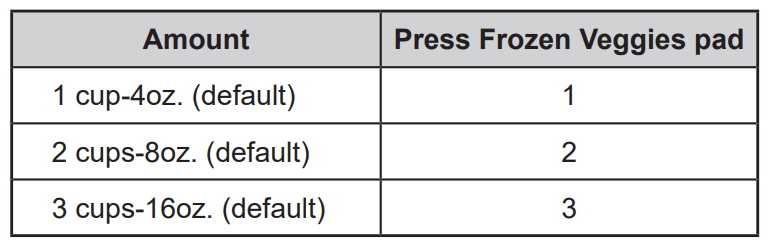
Frozen Vegetables
The frozen vegetables allow you to cook 4, 8 or 16 oz. vegetables. Use the table below to determine the setting to use.
Press Frozen Veggies pad twice (refer to table above).
Press START pad.
When finished, you will hear a series of beeps.
Convenience Operation (Melt/Soften)
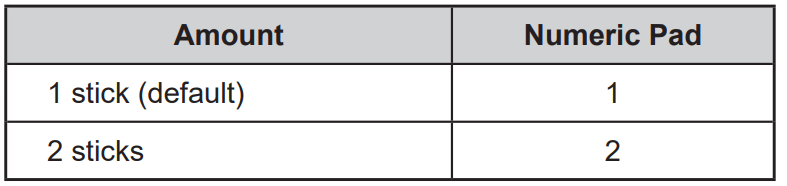
Melt Butter
The butter feature allows you to melt butter that are 1 stick or 2 sticks. Use the table below to determine the setting to use:
Press Melt pad once. EL-1 appears in the display.
Press numeric pad per the table above. (If you are using the default amount, you may skip this step).
Press START pad.
When finished, you will hear a series of beeps.
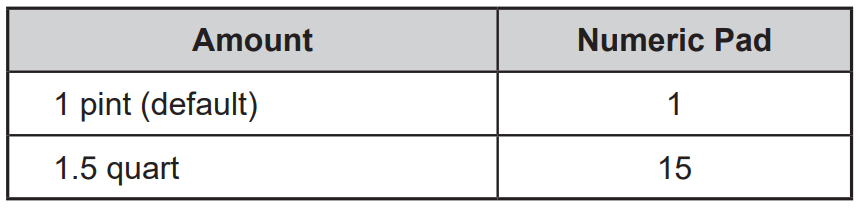
Soften Ice Cream
The ice cream feature allows you to soften ice cream that are 1 pint or 1.5 quart. Use the table below to determine the setting to use:
Press Soften pad once. So-1 appears in the display.
Press numeric pad per the table above. (If you are using the default amount, you may skip this step).
Press START pad.
When finished, you will hear a series of beeps.
Melt Chocolate
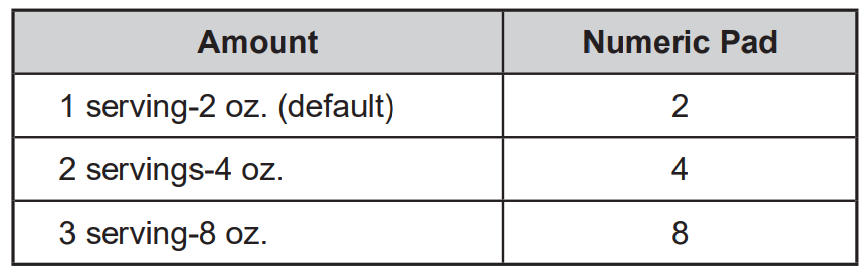
The chocolate feature allows you to melt chocolates that are 1, 2 or 3 servings .Use the table below to determine the setting to use:
Press Melt pad twice. EL-2 appears in the display
Press numeric pad per the table above. (If you are using the default amount, you may skip this step).
Press START pad.
When finished, you will hear a series of beeps.
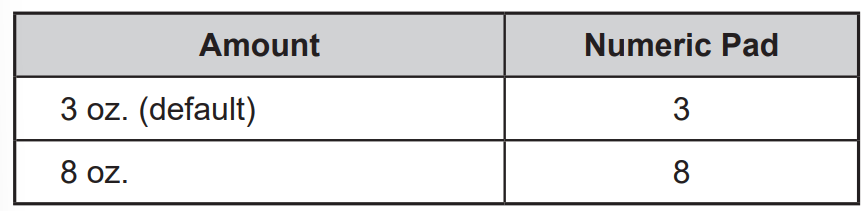
Soften Cream Cheese
The cream cheese feature allows you to soften cream cheese that are 3 oz. or 8 oz. Use the table below to determine the setting to use:
Press Soften pad twice. So-2 appears in the display.
Press numeric pad per the table above. (If you are using the default amount, you may skip this step).
Press START pad.
When finished, you will hear a series of beeps.
SENSOR OPERATIONS
Sensor Cook Operating Tips
The Sensor Cook categories are designed to detect the increasing humidity released by the food during the cooking process. The microwave oven sensor will automatically adjust the cooking time to the type and amount of food. The food categories that are controlled with the humidity sensor are:
Frozen Entree
Meat
Seafood
For best results, do not use one of the Sensor Cook categories twice in succession on the same food portion.
This may result in severely overcooked or burnt food. If the food appears to be undercooked, use one of the Easy Set pads or cook time pads to add more time.
Additional sensor cook suggestions are:
Never start with less than 4 oz. of food.
Use proper containers and covers for best sensor cooking results.
Always use microwave-safe containers and cover them with loose fitting lids or vented plastic wrap. Never use tight sealing plastic containers. They will prevent steam from escaping and this will mislead the sensor, usually causing the food to overcook.
Be sure the outside of the cooking containers and the cavity of the microwave oven are dry before placing food in the oven. Excessive moisture turning into steam that does not result from the food cooking can mislead the sensor.
Frozen Entree
The frozen entree sensor setting is designed for single frozen entree or frozen convenience foods such as frozen dinners from 8 to 32 oz. In size (starting with Frozen Entree temperature at 5°F).
Press Sensor Cook pad once. Sc-1 appears in the display.
Press START pad.
When finished, you will hear a series of beeps. If additional time is needed, continue cooking manually.
Notes:
ALWAYS be sure to follow the directions that are spec for the microwave oven that is printed on the packaging for the food being prepared. Many times there are special instructions to follow in order to achieve best results.
Be sure to allow for moisture to escape from the packaging. All frozen entree instructions specify that you poke holes in the film covering with a fork before cooking.
Be careful when removing the film covers after cooking frozen convenience foods. Remove facing away from you to avoid steam burns.
If the food is not done when the cook time is done finish cooking manually
Meat (fresh)
The meat sensor setting cooks from 4 to 16 oz. of ground meat automatically (starting with meat temperature at 35-40 °F).
Press Sensor Cook pad 2 times. Sc-2 appears in the display.
Press START pad.
When finished, you will hear a series of beeps. If additional time is needed, continue cooking manually.
Notes:
Break meat apart in glass bowl or container.
Cover meat with lid or vented plastic wrap.
Juices should be clear when finished cooking, then drain.
About mid-way through the displayed cook time, press STOP pad to pause the cooking and mix; after mixing , press START to continue cooking with the remaining cook time displayed.
Seafood (fresh)
The seafood sensor setting cooks from 8 to 16 oz. of fish or seafood automatically (starting with a temperature at 35-40°F).
Press Sensor Cook pad 3 times. Sc-3 appears in the display.
Press START pad.
When finished, you will hear a series of beeps. If additional time is needed, continue cooking manually.
Notes:
Arrange fish in a single layer.
Cover with lid or vented plastic wrap. Be sure to leave enough space in the venting or lid for steam to escape.
About mid-way through the displayed cook time, press STOP pad to pause the cooking and turn over the fish; after turning, press START to continue cooking with the remaining cook time displayed.
Sensor Reheat
The sensor reheat feature is designed to detect the increasing humidity released by the food during the cooking process. The microwave oven sensor will automatically adjust the cooking time to the type and amount of food.
The food types to avoid using with the reheat feature are:
Uncooked or raw foods.
Bread and other dry types of food such as crackers, biscuits, or cakes.
Beverages or frozen foods.
Frozen pizza.
Notes concerning sensor reheat:
For casseroles, add 2-3 tablespoons of liquid, cover with lid or vented plastic wrap.
For canned foods, empty contents of can into a casserole dish or serving bowl. Cover dish with lid or vented plastic wrap. Let stand a few minutes before serving.
For plates of food, arrange food on plate and add any butter or gravies, etc. Cover with loose-fitting lid or vented plastic wrap. After reheating, let stand a few minutes.
CONVENIENT FEATURES
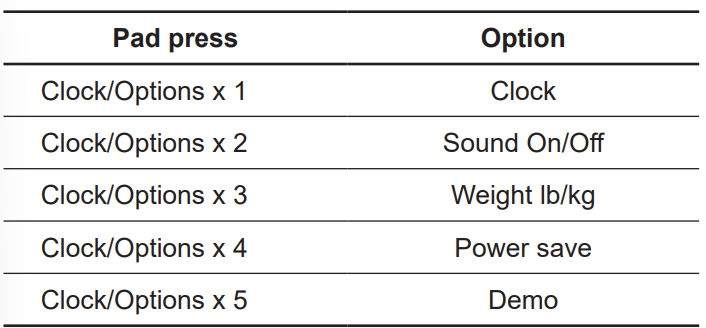
Clock & Options
The microwave oven has settings that allow you to customize the operation for your convenience. Below is the table showing the various settings. Press Clock & Options pad multiple times to the desired setting function.
Setting Clock
The clock can be disabled when the microwave is first plugged in and the STOP pad is selected. To re-enable the clock follow clock instructions.
Example: setting clock display for 9:00:
1. Press Clock/Options pad once.
2. Enter time using number pads.
3. Press START pad.
NOTE:
If you begin to enter in an incorrect time (e.g. 2:89) the 8 is an invalid digit and cannot be entered. Enter the correct time.
If you press STOP while setting the clock, the display will show the last time of day set.
Turning Sound On/Off
Audible signals are available to guide you when setting and using your oven.
A key press tone.
Three tones signal the end of a Kitchen Timer count down or end of a cooking cycle.
1. Press Clock/Options pad twice to turn Sound On/Off. oP-2 appears in the display.
2. Press START pad. oP-2 appears in the display during 2 seconds. Auto scroll every 2 seconds through on, oFF selection.
3. Press START pad to active displayed selection. Display selection for 2 seconds.
Setting Weight Lb/Kg
Setting weight between pounds or kilograms.
1. Press Clock/Options pad 3 times to set weight Lb/Kg. oP-3 appears in the display.
2. Press START pad. oP-3 appears in the display during 2 seconds. Auto scroll every 2 seconds through lb, G (kg) selection.
3. Press START pad to active displayed selection. Display selection for 2 seconds.
Setting Power Save On/Off
Turning ON power save turns off the time of day clock display.
1. Press Clock/Options pad 4 times to set Power Save On/Off. oP-4 appears in the display.
2. Press START pad. oP-4 appears in the display during 2 seconds. Auto scroll every 2 seconds through on, oFF selection.
3. Press START pad to active displayed selection. Display selection for 2 seconds.
Setting Demo Mode On/Off
Suppose you want to enter Demo mode. When Demo is ON programming functions will work in a rapid countdown mode with no cooking power.
1. Press Clock/Options pad 5 times to set Demo Mode On/Off. oP-5 appears in the display.
2. Press START pad. oP-5 appears in the display during 2 seconds. Auto scroll every 2 seconds through on, oFF selection.
3. Press START pad to active displayed selection. Display selection for 2 seconds
COOKING CHARTS
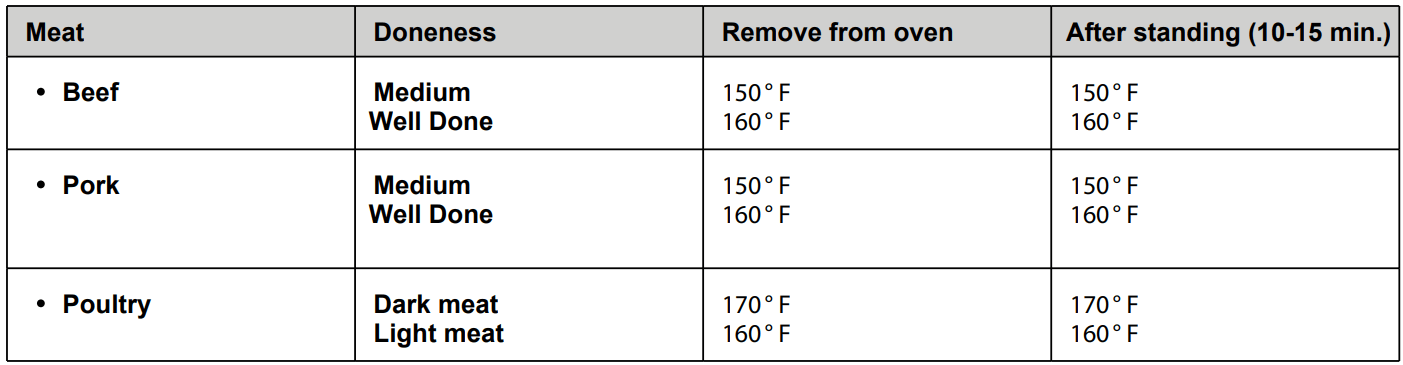
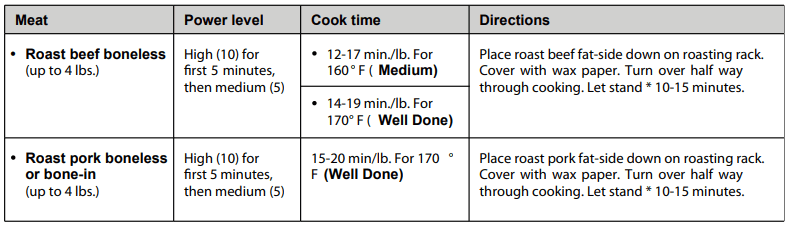
Cooking meat in your microwave
Be sure to place prepared meats on a microwave-safe roasting rack in a microwave-safe dish. Start cooking the meat fat side down and if necessary, use narrow strips of aluminum foil to shield any bone tips or thin meat areas. After cooking, check the temperature in several places before letting the meat stand the recommended time. Please note that the temperatures in the following charts are temperatures at removal time; the temperature will rise during the standing period.
* Expect a 10° F rise in the temperature during the standing period.
Cooking poultry in your microwave
Be sure to place poultry on a microwave-safe roasting rack in a microwave-safe dish. Cover poultry with wax paper to prevent splattering. Use narrow strips of aluminum foil to shield any bone tips or thin meat areas, or areas that start to overcook. After cooking, check the temperature in several places before letting the meat stand the recommended time.
Cooking eggs in your microwave
Never cook eggs in the shell and never warm hard- cooked eggs in the shell; they can explode.
Always pierce whole eggs to keep them from bursting.
Cook eggs just until set; they will become tough if overcooked.
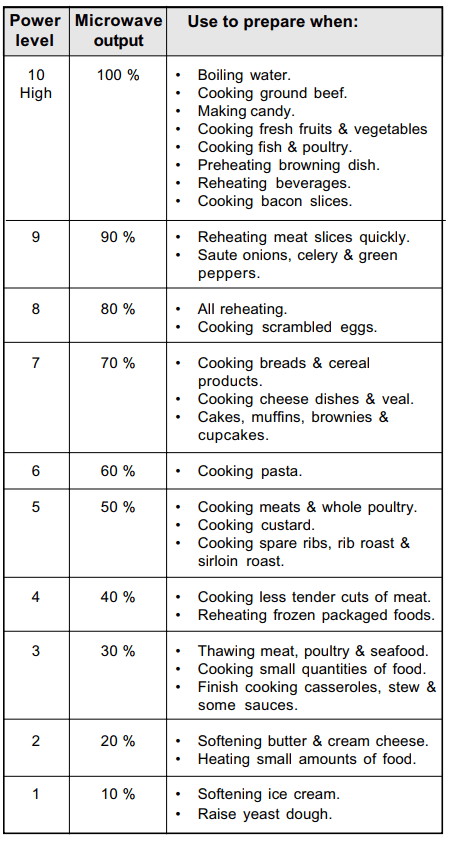
Suggested power levels for cooking
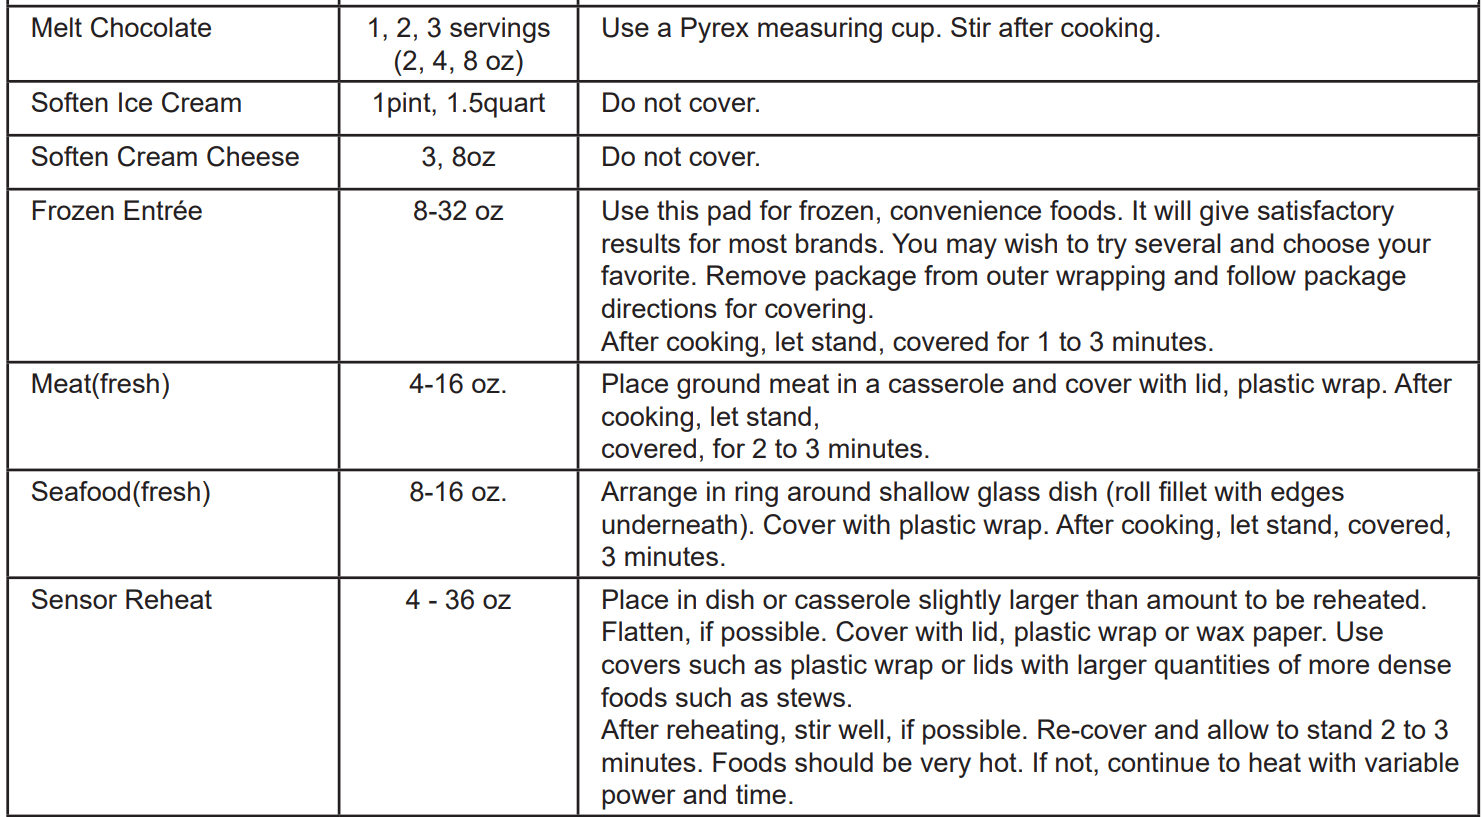
Convenience cooking suggestions
Defrosting tips
Whenusingthe defrost weightfeature,theweight enteredshouldalwaysbe 0.5 to 6.5 pounds.
Use both defrost weight and defrost time featuresfor rawfood items only.Defrosting gives bestresultswhen food to be thawed is a minimum of 0°F (taken directly from a true freezer). Ifthe food has been stored in a refrigerator-freezerthat does not maintain a temperature of 5° F or below, always program a lowerfoodweight or lower cook time to prevent cooking the food.
If the frozen food is stored outside the freezer for up to minutes, enter a reduced cook time or weight.
The shape ofthe package will alterthe defrosting time.
Shallowrectangularfoodpacketsdefrostmorequickly than a deep frozenblock offood.
Separatepieces astheybegin to defrost. Separated frozenpiecesoffooddefrostbetter.
Shield warm areas of food with small pieces of foil ifthey startto become warm.
You may use small pieces of aluminum foilto shield food itemslike chicken wings, leg tips and sh tails, but do not allow the foilto touch the oven cavity walls when defrosting.
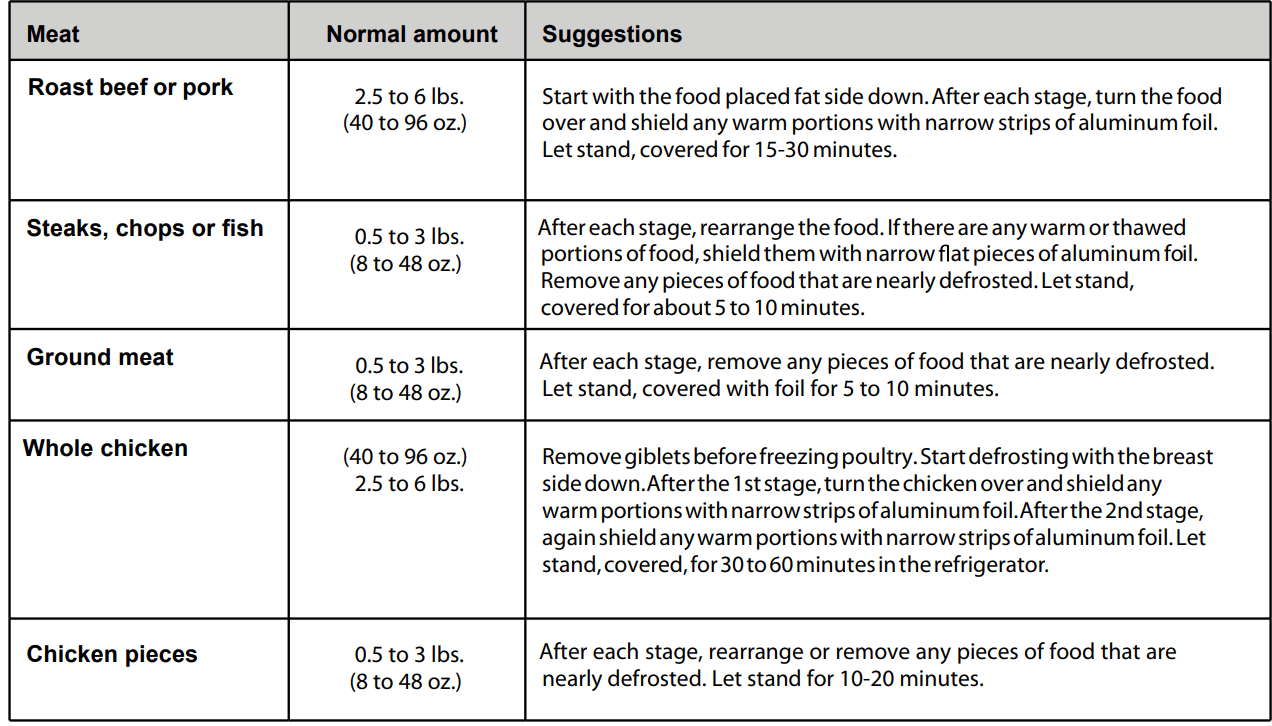
Defrosting suggestions for meats
CARE AND CLEANING
Cleaning suggestions
For best performance and for safety reasons, keep the oven clean inside and outside. Take special care to keep the inner door panel and oven from frame free of food and grease build-up.
Never use rough scouring powder or pads on the microwave. Wipe the microwave oven inside and out with a soft cloth and warm (not hot) mild detergent solution. Then rinse and wipe completely dry.
Wipe spatters immediately with a wet paper towel, especially after cooking greasy foods like chicken or bacon.
Clean your microwave oven weekly or more often, if needed.
Follow these instructions to clean and care for your microwave oven:
Keep the inside (cavity) of the oven clean. Food particles and spilled liquids can stick to the oven walls, causing the oven to wok less efficiently.
Wipe up spills immediately. Use a damp, clean cloth and mild soap. DO NOT use harsh detergents or abrasive cleaners.
To help loosen baked-on food particles or liquids, heat 2 cups of water (add the juice of 1 lemon if you desire to keep the oven fresh smelling) in a 4 cup measuring glass at High power for 5 minutes or until boiling. Let stand in oven cavity for 1 or 2 minutes.
Remove the glass turntable tray from the oven when cleaning the oven cavity or tray. To prevent the glass turntable from breaking, handle with care and do not put it in water immediately after cooking. Wash the turntable tray in warm sudsy water or in the dishwasher.
Your microwave oven(some models) may have a Stainless Steel finish or coating. Clean the stainless with warm soapy water using a clean sponge or cloth. Rinse with clean water and dry with a soft clean cloth. DO NOT use ANY store bought cleaners like Stainless Steel cleaners or any other types of cleaners containing any abrasive, chlorides, chlorines or ammonia. It is recommended to use mild dish soap and water or a 50/50 solution of water and vinegar. To prevent damage to the operating parts of the oven, do not let water seep into any vents or openings.
Care should be taken in cleaning the touch control panel. If the control panel becomes soiled, open the microwave oven door before cleaning. Wipe the panel with a cloth dampened slightly with water only. Dry with a soft cloth. Do not scrub or use any sort of chemical cleaners. Close door and touch STOP key.
Wash the oven door window with very mild soap and water. Be sure to use a soft clean cloth to avoid scratching.
If steam accumulates inside or outside the oven door, wipe with a soft cloth. Steam can accumulate when operating the oven in high humidity and in no way indicates microwave leakage.
Never operate the oven without food in the oven cavity; this can damage the magnetron tube or glass tray. You may wish to leave a cup of water standing inside the oven when it is not in use to prevent damage if the oven is accidentally turned on.
TROUBLESHOOTING
Neither the microwave’s display or oven operates -
Properly insert the plug into a grounded power outlet.
Remove the plug from the outlet, wait 10 seconds, then plug the microwave in again.
Reset the household circuit breaker or replace any blown fuses.
Plug a different appliance into the power outlet. If the other appliance will not operate, have a qualified electrician repair the outlet.
Plug the microwave into a different power outlet.
The oven display works, but the oven will not operate -
Make sure the oven door is closed securely and completely.
Check to see if packing material or other materials are stuck to the door seal.
Check for damage to the oven door.
Press the STOP pad twice and attempt to re-enter cooking instructions.
Plug a different appliance into the power outlet. If the other appliance will not operate, have a qualified electrician repair the outlet.
Plug the microwave into a different power outlet.
The power goes off before the cook time has elapsed -
If there has been a power interruption, remove the plug from the outlet; wait 10 seconds, then plug the microwave in again. If there was a power outage, the time indicator in the display will show 00:00.
Reset the clock and any cooking instructions.
Reset the household circuit breaker or replace any blown fuses.
Press the STOP pad twice and attempt to re-enter cooking instructions.
Plug a different appliance into the power outlet. If the other appliance will not operate, have a qualified electrician repair the outlet.
Plug the microwave into a different power outlet.
Food is cooking too slowly -
Make sure the oven is on a separate 20 amp circuit line.
Operating another appliance on the same circuit can cause a voltage drop. If necessary, move the microwave to its own circuit.
You see sparks or arcing -
Remove any metallic utensils, cookware or metal ties from the oven cavity. If using aluminum foil, use only narrow strips and allow at least one inch between the foil and the interior oven walls.
The turntable makes noises or sticks -
Clean the turntable, roller ring and oven cavity bottom.
Make sure the turntable and roller ring are positioned correctly.
Using your microwave causes TV or radio interference -
This is similar to the interference caused by other small appliances, such as hair dryers. Move your microwave further away from other appliances, like your TV or radio.
#1 How do I change the surface light in my microwave?
It only takes five easy steps to change this light bulb.
Pull on your safety gloves, and let's get it done. First, unplug the microwave or turn off the power at the main circuit breaker. Then, remove the the bulb covering mounting screws at both positions under the microwave. Remove and replace the old bulbs with 30-watt appliance bulbs. Reinstall the bulb cover and mounting screws. That's it! Plug the mircowave back into the power supply or turn the power back on at the main circuit breaker.
It's easier than you might think to keep your microwave clean and looking new.
First, unplug the power cord. Clean the outside surface with mild soap and water, then rise and dry with a soft cloth. Wipe the window on both sides of the door with a soft cloth. Cleanliness is easier to maintain if this is done frequently. If your model has a Smudge-Proof stainless steel finish, clean it with mild dish soap and warm water, or a 50/50 solution of water and vinegar. Rinse and dry with a soft cloth. Do not use store-bought stainless steel cleaners. Simply wipe the touch control panel with a damp cloth, and dry it off. Be sure not to scrub. Use a damp cloth to carefully wipe spatters off the wave guide cover as soon as they happen. Do not remove this cover for any reason. Most of the time, the interior can be cleaned with just warm water and a soft cloth. For heavier soil, you can use baking soda or a mild soap. Need to remove a cooking odor? Combine 1 cup of water, the grated peel and juice of 1 lemon, and several whole cloves in a 2-cup glass measuring cup. Boil for several minutes at 100% power. After it cools, wipe the interior with a soft cloth. The turn table and turn table support are removeable for easy cleaning. You can wash them in mild sudsy water, or place them in the upper rack of your dishwasher. The wire rack and shelf can also be cleaned with hot soapy water.
#3 Is it okay to install my microwave over a gas range?
Yes. All of our over-the-range (OTR) microwaves are certified by Underwriters Laboratories for use over a gas range.
#4 Do I need a special plate to cook popcorn in my microwave?
If your microwave model has a glass tray or turn table, then follow the instructions printed on the popcorn label and place the bag on the turn table.
In some instances, if you have a metal turn table (instead of glass), you do need to set the popcorn bag on a popcorn/bacon plate.
This plate will lift the popcorn bag off of the microwave’s metal turntable, which can otherwise interfere with the metal contained in the popcorn bag.


 * Expect a 10° F rise in the temperature during the standing period.