Loading ...
Loading ...
Loading ...
05 GB
When installing a hood above the hob, please consult the installation
requirements specified for the hood but, in any case, the distance
between the hob and the hood must not be lower than 700 mm.
Leave a distance of at least 55 mm between the hob and the back wall
and of at least 150 mm between the hob and the vertical furniture or
walls in the lateral side. If a furniture is installed above the hob, the
minimum distance required is 700 mm.
If the bottom part of the hob is adjacent to an area normally accessible
for handling or cleaning operations, a separator it must be put 20 mm
below the bottom part of the hob. (see Figure 4)
(see Figure 3)
When installing an oven under the hob, separator must not be put and
the minimum distance between the bottom part of the hob and the
oven must not be lower than 10 mm. Do not install not cooled oven
under this hob and install the oven following its own installation
requirements. (see Figure 5)
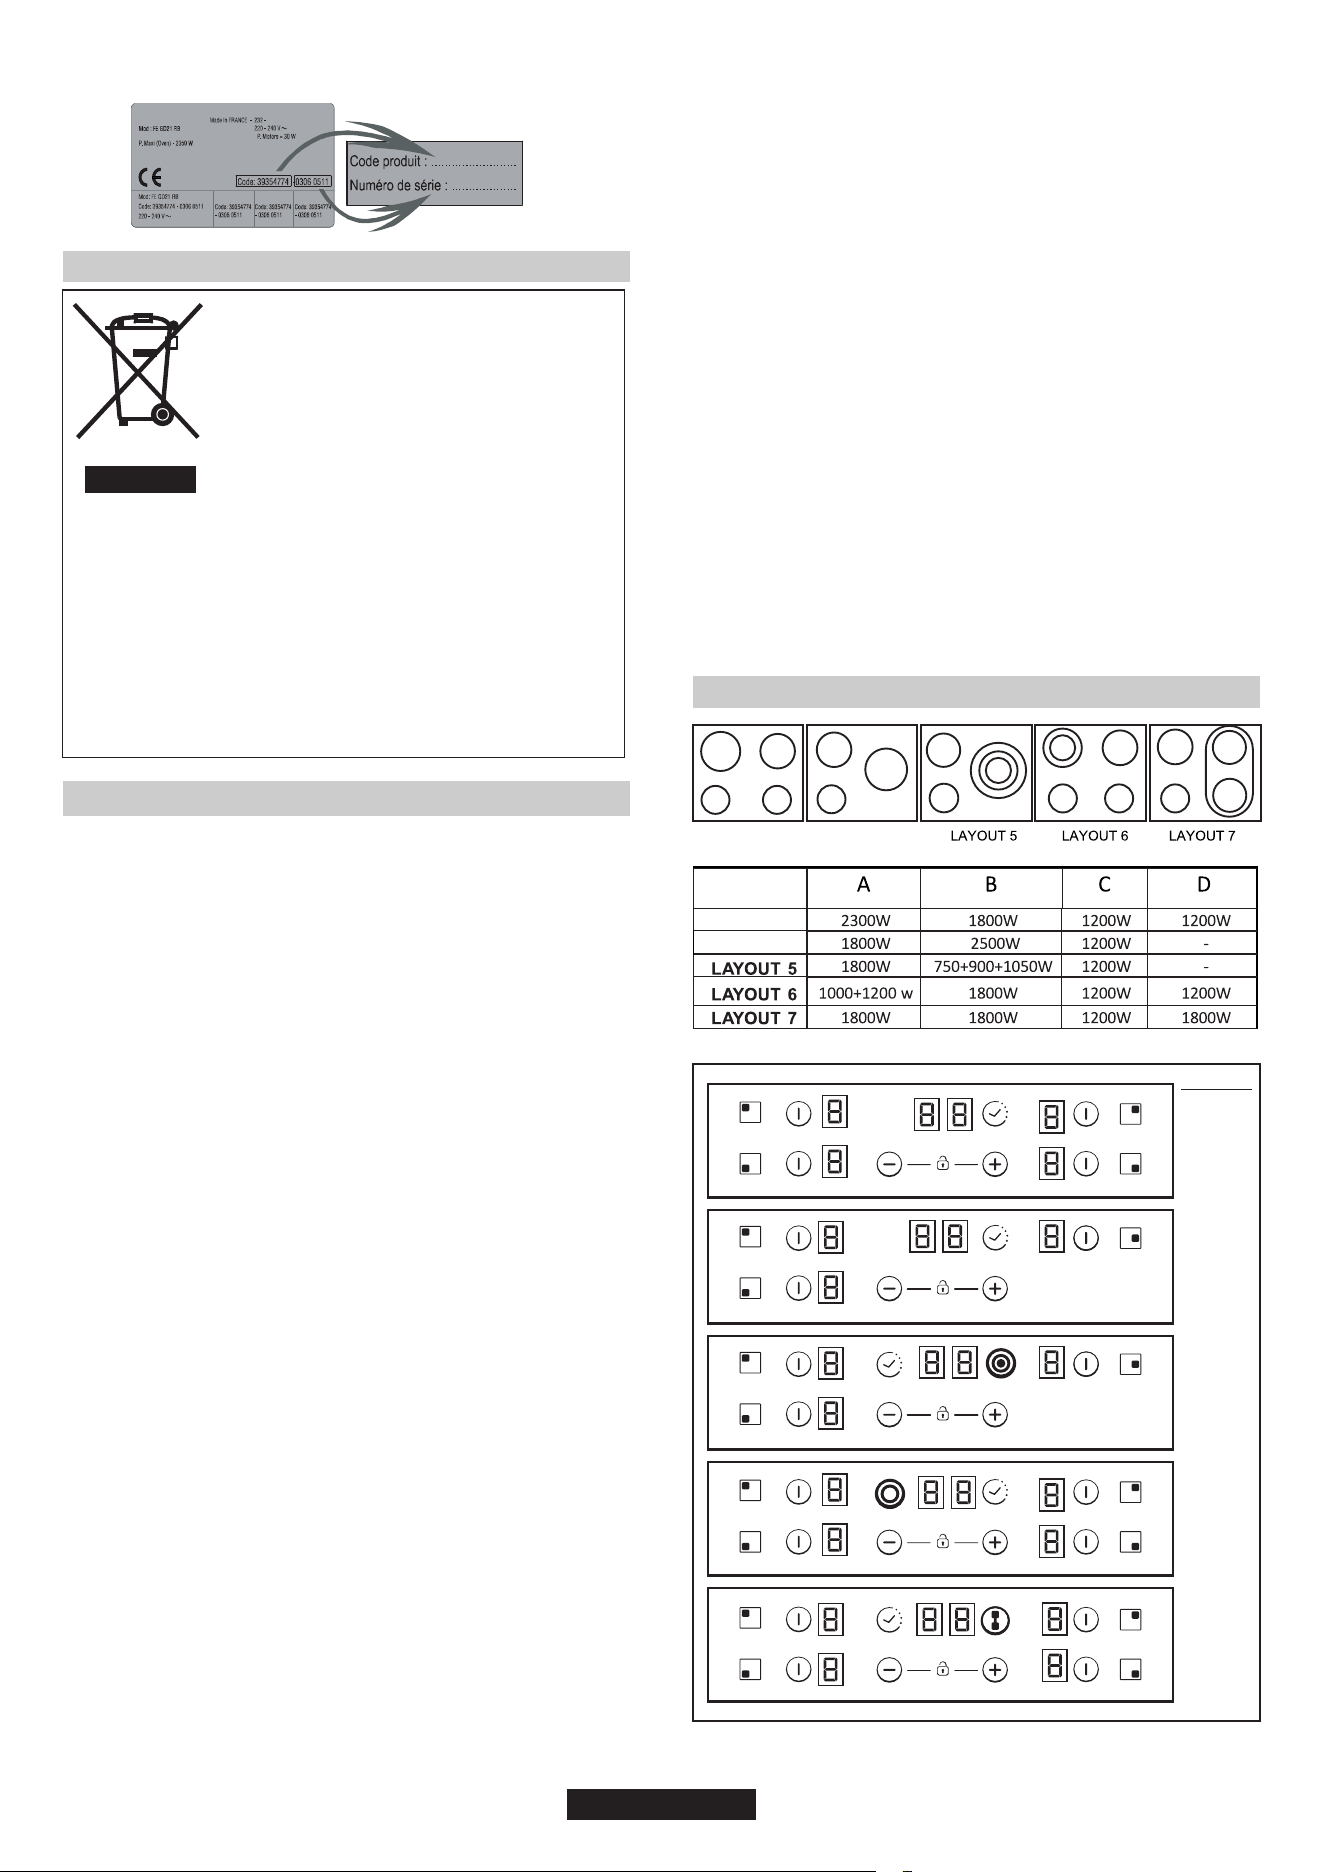
PRODUCT CODE T
Identification Plate (located under the hob's bottom casing)
1. PROTECTION OF THE ENVIRONMENT
This appliance is marked according to European
Directive 2012/19/EU on Waste Electrical and
Electronic Equipment (WEEE).
WEEE contains both polluting substances (which
can cause negative consequences for the
environment) and basic components which can be
reused.It is important to have WEEE subjected to
specific treatments, in order to remove and dispose
properly all pollutants and recover and recycle all
materials.
• WEEE shall not be threatened as household waste.
• WEEE shall be handled over to the relevant collection points
managed by the municipality or by registered companies. In many
Countries, for large WEEE, home collection could be present.
• In many Countries, when you buy a new appliance, the old one
may be returned to the retailer who has to collect it free of charge on
a one-to-one basis, as long as the appliance is of equivalent
typology and has the same functions as the supplied one.
Individuals can play an important role in ensuring that the WEEE
does not become an environmental issue; it is essential to follow
some basic rules:
2. INSTALLATION
In addition, all decorative laminates should be fixed with high-resistance
glue.
Installing a domestic appliance it is a complicated operation which, if
not carried out correctly, can seriously have impact on safety of goods,
properties or people. For this reason, it should be carried out by a
professionally qualified person in accordance with technical
regulations.
In the event that this advice it is ignored and installation is carried out
by an unqualified person, the Manufacturer declines all responsibility
for any technical failure of the appliance whether or not it results in
damage of goods or properties or in injury of people or animals.
After having removed the packaging please be sure that the appliance
it is not damaged, otherwise contact the Retailer or Manufacturer After
Sales Service.
Make sure that the furniture in which the appliance will be fitted and all
other furniture in the nearby are made with materials which can
withstand high temperatures (min 100 °C).
Appliance can be installed in a Built-in furniture in “Standard” (see Figure
1) or “Flush” (see Figure 2) mode.
Worktop thickness should be between 25 and 45 mm.
Press the sides of hob until it is supported around its entire perimeter.
(see Figure 10)
After checking that the position of the hob is correct fill the gap
between the worktop and the hob with silicone adhesive. Flatten the
silicone layer with a scraper or with wet finger damped with water and
soap before it forms.
Normal Fixing:
FLUSH INSTALLATION
A watertight seal gasket is supplied with the hob. Fit the seal gasket
around the bottom hob as described and make sure that it is properly
fitted to avoid any leakage into the supporting furniture. (see Figure 6)
Get four springs form accesory bag and screw them onto bottom box
as shown in figure. (see Figure 9)
- Get the fixing clips from accessory bag and screw them into the
position shown on bottom box. (Do not tighten the screws to block
clips, they should move freely) (see Figure 7)
- Insert the hob in center position of cut out.
Quick Fixing: (Depending on model)
- Turn the clips and tighten them fully. (see Figure 8)
Center and insert the hob.
Do not use the hob until the silicone layer it is completely dry.
supported around its entire perimeter. (see Figure 11)
Note: Inner perimeter dimensions are same with standard installation
3. ELECTRICAL CONNECTION
A
B
C D
A
B
C
A
C
B
C
A B
D
A
B
C
D
LAYOUT 1-3 LAYOUT 2-4
LAYOUT 1-3
LAYOUT 2-4
1
2
5
5
7
3
5
5
6
6
6
6
6
6
5
5
3
1
2
4
5
5
6
6
1
2
3
6
6
6
4
5
5
5
6
6
5
5
3
1
2
5
5
6
6
1
2
3
6
6
6
5
5
5
1-3
2-4
5
6
7
LAYOUT
Loading ...
Loading ...
Loading ...