
ENGLISH
FU-55SE
AIR PURIFIER
OPERATION MANUAL
LUFTREINIGER
BEDIENUNGSANLEITUNG
PURIFICATEUR D'AIR
MANUEL D'UTILISATION
PURIFICADOR DE AIRE
MANUAL DE USO
PURIFICATORE DELL’ARIA
MANUALE OPERATIVO
LUCHTREINIGER
GEBRUIKSAANWIJZING
Floor / Tabletop type
Boden- / Tischgerät
Type mobile
De instalación en el suelo / mesa
Tipo da pavimento / tavola
Vloermodel / tafelmodel
R
ENGLISH
DEUTSCH
FRANÇAIS
ESPAÑOL
ITALIANO
NEDERLANDS
“Plasmacluster” is trademark of
Sharp Corporation.
LL
LL
L
Downloaded from: http://www.usersmanualguide.com/


ENGLISH
FEATURES
Cluster Ion Balance Control
The unit controls the ratio of Negative clus-
ter ions and Positive cluster ions depend-
ing on the condition of the room.
• Clean mode
Approximately the same amount of Posi-
tive and Negative cluster ions are dis-
charged. This mode is effective for reduc-
ing some airborne mold.
• Ion control mode
It is said that plenty of Negative cluster
ions exist in places such as waterfalls or
forests in natural environment. In this op-
eration mode, Negative cluster ions will
be released in an increased rate, in order
to bring the room atmosphere close to this
condition.
• AUTO cluster ion mode
The unit will switch between Clean mode
and Ion control mode automatically de-
pending on the amount of pollution in the
air detected by dust and odor sensor.
HEPA filter
• High-efficiency dust collection
Active carbon filter
Powerful deodorization by large particles
of columnar charcoal.
CONTENTS
SAFETY PRECAUTIONS........................ E-2
• CAUTIONS CONCERNING THE OPERATION
OF THIS PRODUCT ....................................E-3
• CAUTIONS CONCERNING
THE INSTALLATION ....................................E-3
• ABOUT THE FILTER ...................................E-3
NAMES OF PARTS .................................E-4
• MAIN UNIT DISPLAY...................................E-4
• EXPLODED DIAGRAM................................E-4
• BACK ...........................................................E-6
• ACCESSORIES ...........................................E-6
SPECIFICATIONS ...................................E-6
PREPARATION........................................E-7
• INSERTING BATTERIES
IN THE REMOTE CONTROL.......................E-7
• USING THE REMOTE CONTROL...............E-7
• INSTALLING THE FILTERS .........................E-8
OPERATION .......................................... E-10
• MAIN UNIT OPERATION .......................... E-10
• REMOTE CONTROL OPERATION........... E-11
GUIDE FOR OPERATION ..................... E-12
CARE AND MAINTENANCE................. E-13
• MAIN UNIT................................................ E-13
• FILTER CLEANING................................... E-13
• DUST SENSOR, ODOR SENSOR ........... E-13
• GUIDE FOR LIFE OF FILTERS ................ E-14
TROUBLE SHOOTING.......................... E-15
Thank you for purchasing the SHARP FU-60SE.
Please read this manual carefully for the cor-
rect operation. Before using this product, be
sure to read The section: “Safety Precautions.”
After reading this manual, retain it in a conven-
ient location for future reference.
This product is for household use only.
E-1
FOR UNDERSTANDING
THE PRODUCT
Some of the odor ingredients ab-
sorbed by the filters become sepa-
rated and are discharged through the
Air Outlet as odor.
Depending on the usage environment,
this odor may become strong in sev-
eral months and the Air Outlet may
smell.
In this case, purchase an exchange
filter FZ-60SEF of the option goods,
and replace the filters.
This equipment complies with
the requirements of Directives
89/336/EEC and 73/23/EEC as
amended by 93/68/EEC.
ENGLISH
FU-55SE_Eng.6.5 03.7.17, 8:53 AM1
Downloaded from: http://www.usersmanualguide.com/

• Do not use the unit if the power cord or plug is damaged or the connection to the wall outlet is
loose.
Electrical shock, short circuit and/or fire may occur as a result.
• Do not damage, break, coat, forcefully bend, pull, twist, bundle, pinch or place heavy objects
on the power cord.
If the power cord is damaged, fire and/or electrical shock may occur as a result.
• Use AC 220-240V only.
Fire and/or electrical shock may occur as a result.
• Do not modify. Repair and disassembly of this product are to be performed by authorized
service personnel only.
Fire, electrical shock and/or bodily injury may occur if not.
For repair, contact your dealer of purchase or the nearest Sharp Service Centre.
• Periodically remove dust from the power plug
Accumulated dust on the power plug may cause bad insulation from humidity, etc.
Fire and/or electrical shock may occur as a result.
• When cleaning the unit, be sure to remove the power plug from the wall outlet.
In addition, never handle the power plug with wet hands.
Electrical shock and/or bodily injury may occur as a result.
• Do not use the unit where there are oil ingredients such as cooking oil, etc., in the air.
Cracking of the unit surface may occur as a result.
• Do not wipe the unit with benzene or paint thinner. Also, do not spray insecticides on the unit.
Cracking, electrical shock and/or fire may occur as a result.
• Do not operate the unit when using indoor smoke-generating insecticides.
Chemical ingredients may accumulate within the unit and then discharge from the Air Outlet when the
unit operates. Discharge of such chemicals may be unhealthy to your body.
• Do not allow the unit to intake flammable gases, sparks from lit cigarettes, incense, etc.
The unit may ignite as a result.
• Do not use the unit where it is humid, such as in a bathroom, or where the unit may get wet.
Electrical shock and/or malfunction may occur as a result.
• Do not insert fingers or foreign objects into the intake or Air Outlet.
Electrical shock and/or malfunction may occur as a result.
• When removing the power plug, always hold the plug and never pull the cord.
Electrical shock and/or fire from short circuit may occur as a result.
• Ventilate when using the unit along with a heating appliance.
Carbon monoxide poisoning may occur as a result.
• Remove the power plug when not using the unit.
Electrical shock from bad insulation and/or fire from short circuit may occur as a result.
• If the supply cord is damaged, it must be replaced by the manufacturer or its service agent or
similarly qualified person in order to avoid a hazard.
• The batteries must be removed from the appliance before it is scrapped and that they are
disposed of safely.
SAFETY PRECAUTIONS
E-2
FU-55SE_Eng.6.5 03.7.17, 8:53 AM2
Downloaded from: http://www.usersmanualguide.com/

ENGLISH
CAUTIONS CONCERNING THE OPERATION OF THIS PRODUCT
• Do not block the intake and Air Outlet.
• Do not use the unit near or on hot objects, such as a stove, etc. Also, do not use the unit where
it may come into contact with steam.
• Do not use the unit on its side.
Deformation, malfunction and/or overheating of the motor may occur as a result.
• Do not install when there is generation of lampblack, such as in a kitchen.
• Do not use detergent when cleaning the unit.
The unit surface may become damaged or cracked.
In addition, the sensors may malfunction as a result.
• Do not operate the unit without the filter.
It will have no purification effect. In addition, it becomes the cause of the trouble.
• Do not wash and reuse filters.
They do not have effect, and it becomes an electric shock and the cause of the trouble.
CAUTIONS CONCERNING THE INSTALLATION
DO NOT USE THE REMOTE CONTROL IN THE FOLLOWING LOCATIONS
• Location where there are inverter lighting equipment or electronic spontaneous lighting equip-
ment
The remote control may become inoperative. In this case, move away from such lighting equipment
or change direction.
• Location exposed to direct sunlight
The unit may not receive signals from the remote control.
The unit may not respond to the signals of the remote control if the ends of fluorescent lighting
become black or lights flicker due the depletion of service life; however, this is not a malfunction of the
remote control or the main unit. In this case, replace the lighting with new fluorescent tubes.
TAKE CAUTION TO THE FOLLOWING DURING INSTALLATION
• Leave at least 2m of space from televisions, radios and wave clocks.
Electrical interference may occur if not.
• Leave at least 60cm of space from the wall
The motor may overheat, causing malfunction if not.
• Avoid a location where sensors are exposed to direct wind
The unit may not operate properly.
• Avoid a location where curtains, etc., come into contact with the intake or Air Outlet.
Curtains, etc., may become dirty or malfunction may occur as a result.
EFFECTIVE OPERATION
• Place on a stable surface with sufficient air circulation
ABOUT THE FILTER
• Do not wash and reuse HEPA filter and Active carbon filter. They do not effect, and may become a
cause of electric shock and trouble.
• The wall, etc., behind the Air Outlet may become dirty as time passes. When using the unit for
extensive period in the same location, use a vinyl sheet, etc., to prevent the wall from becoming dirty.
In addition, periodically clean the wall, etc.
E-3
FU-55SE_Eng.6.5 03.7.17, 8:53 AM3
Downloaded from: http://www.usersmanualguide.com/
E-4
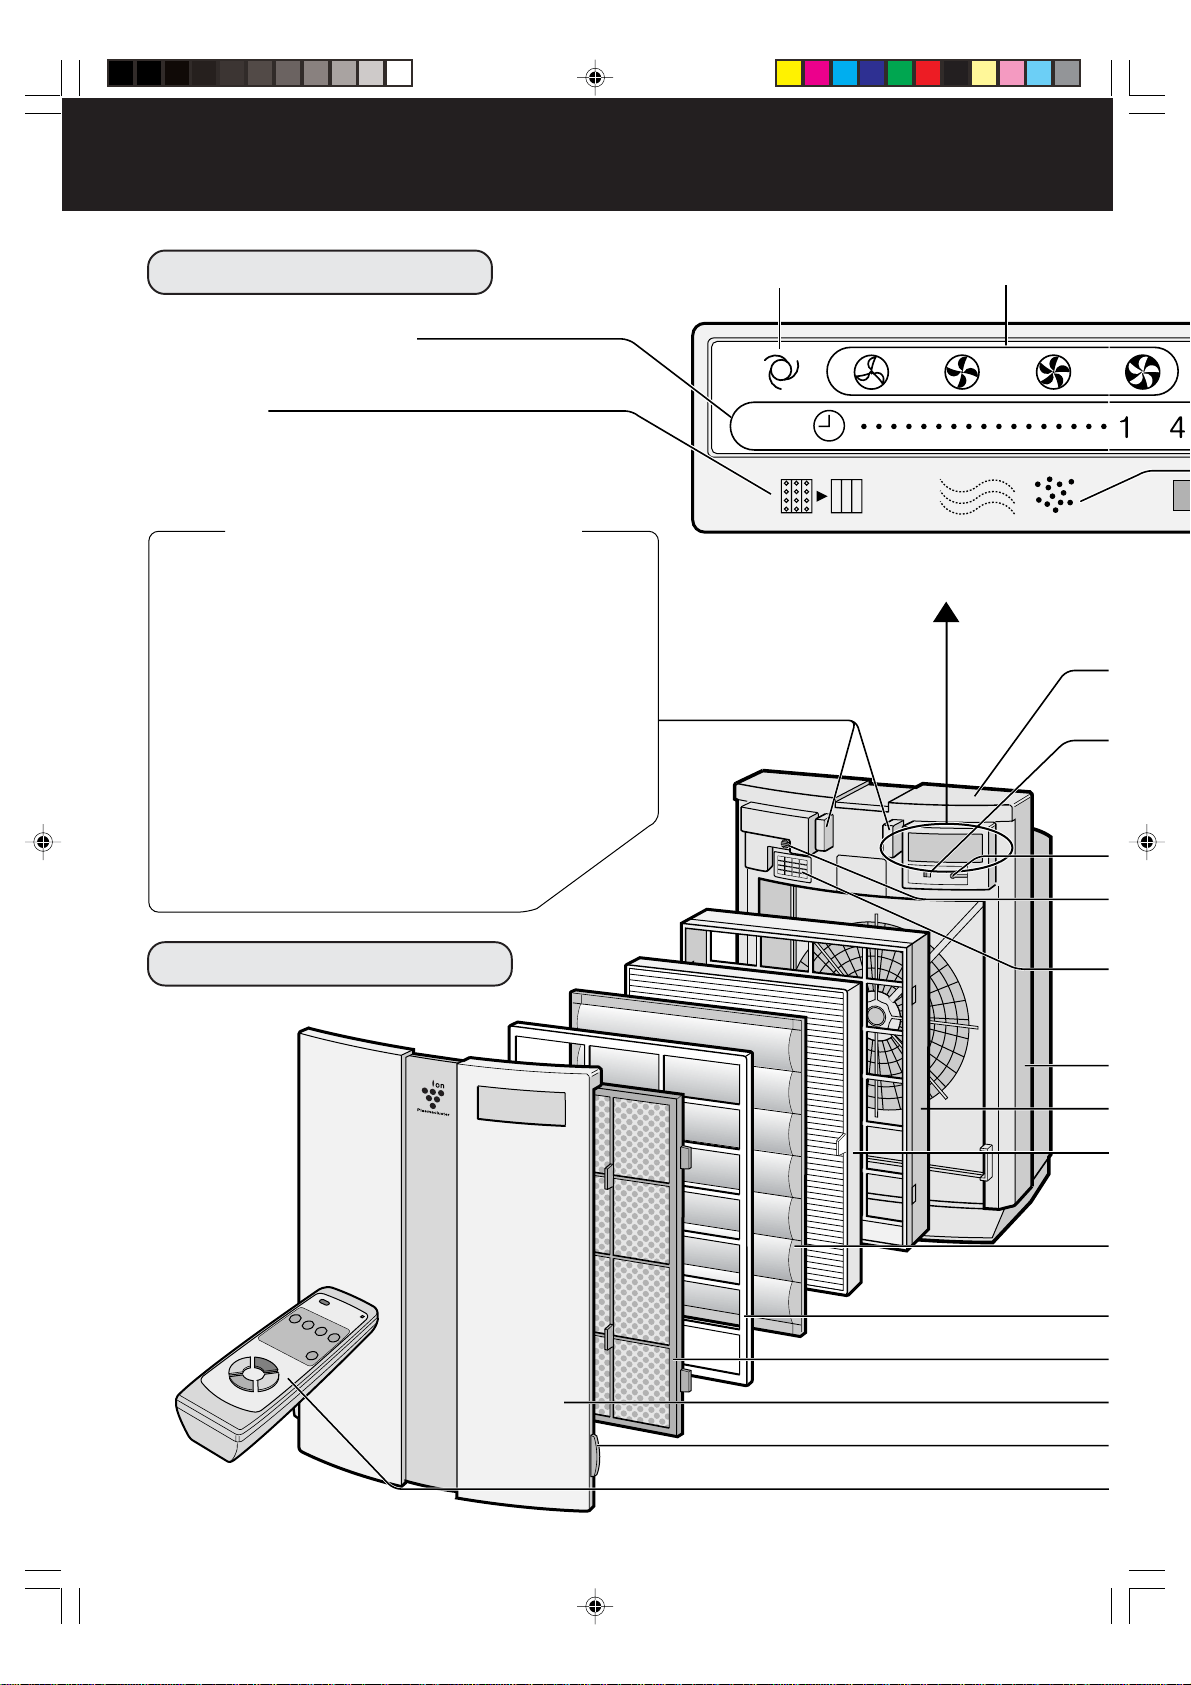
NAMES OF PARTS
MAIN UNIT DISPLAY
OFF timer display lamps
(set using remote control)
Filter lamp
If the Filter lamp is lit, it indicates filter
replacement period.
AUTO operation lamp
Fan level lamps
CLUSTER ION LAMP
Cluster ion operation is selected using the remote control.
Blue light
When the cluster ion operation is in Clean mode or AUTO
cluster ion mode and the air in the room is dirty, this light
turns on and the unit will operate in Clean mode.
Green light
When the cluster ion operation is in Ion control mode or
AUTO cluster ion mode and the air in the room is clean, this
light turns on and the unit will operate in Ion control mode.
Light off
No cluster ions are generated.
• The light can be turned off by using the ‘DIS-
PLAY ON/OFF button’ on the remote control
even while cluster ions are generated
(Please turn off the lights when not required.)
EXPLODED DIAGRAM
FU-55SE_Eng.6.5 03.7.17, 8:53 AM4
Downloaded from: http://www.usersmanualguide.com/
ENGLISH
E-5
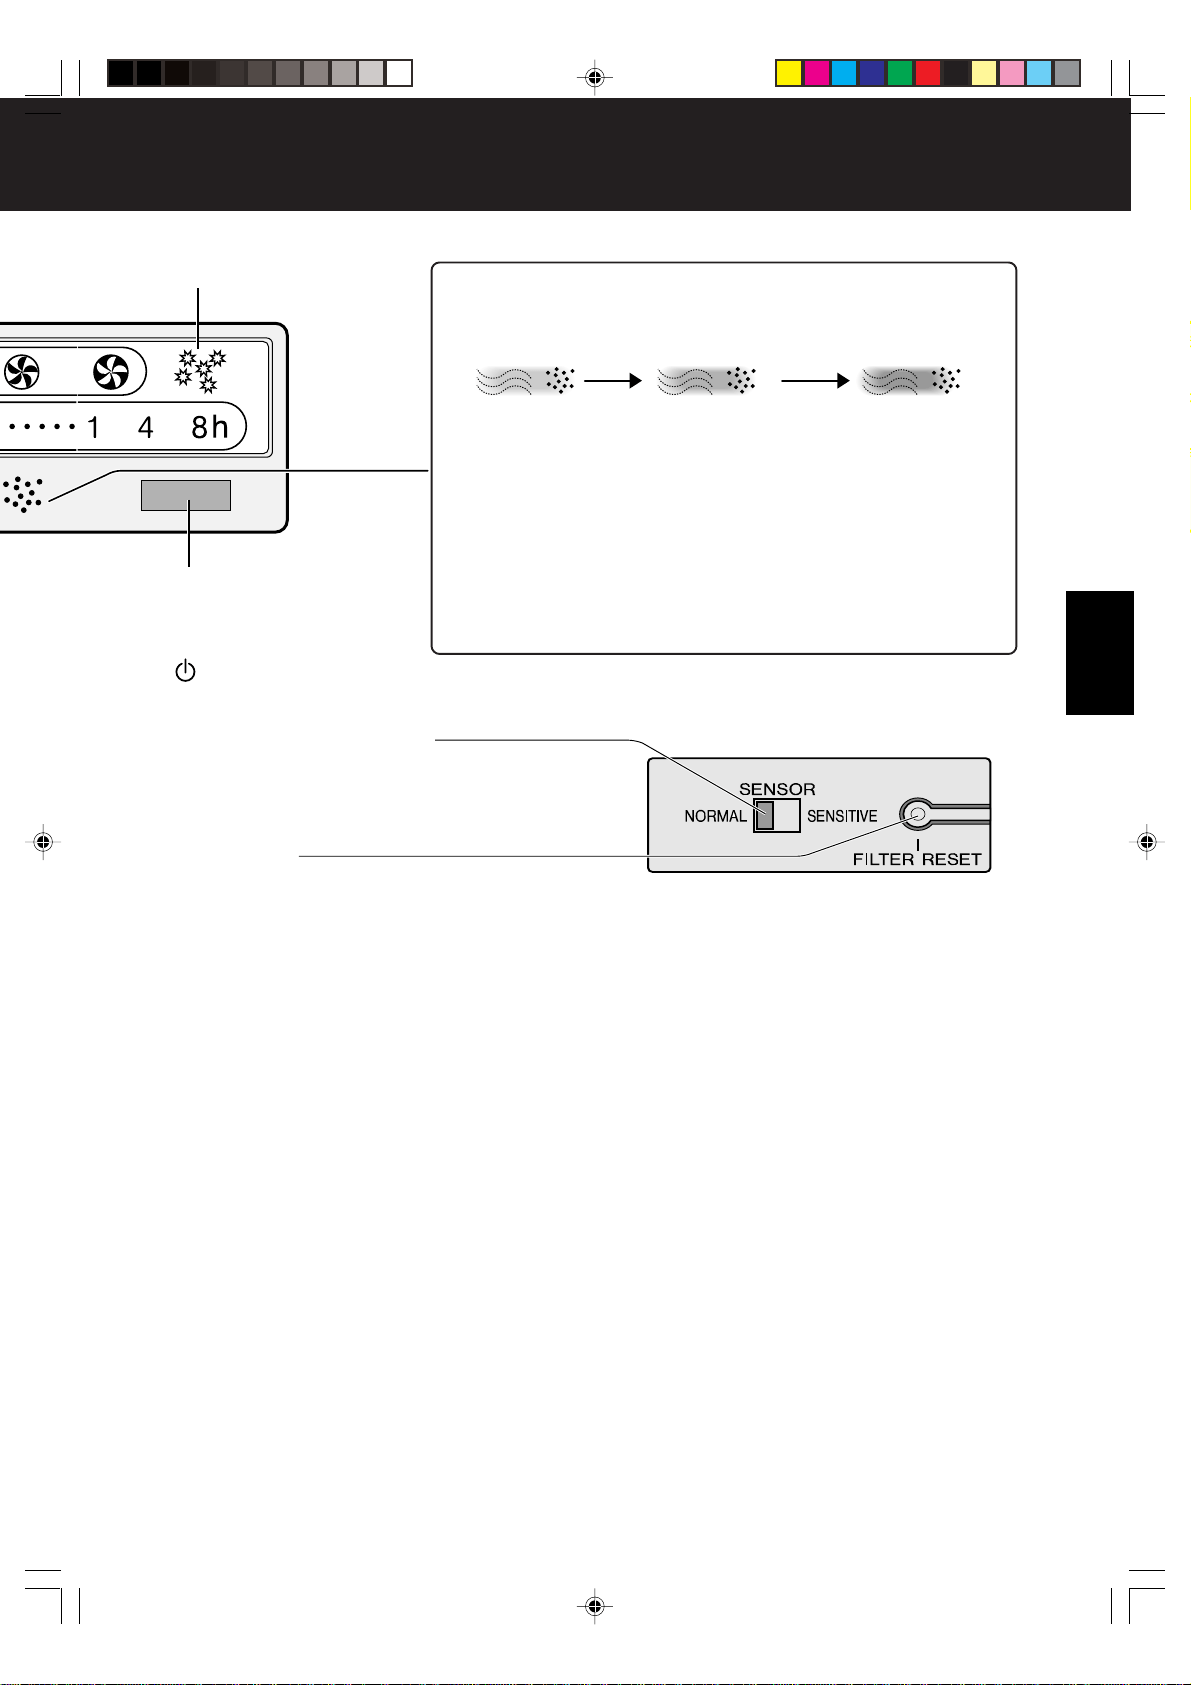
Pollen mode operation lamp
Remote control receiver
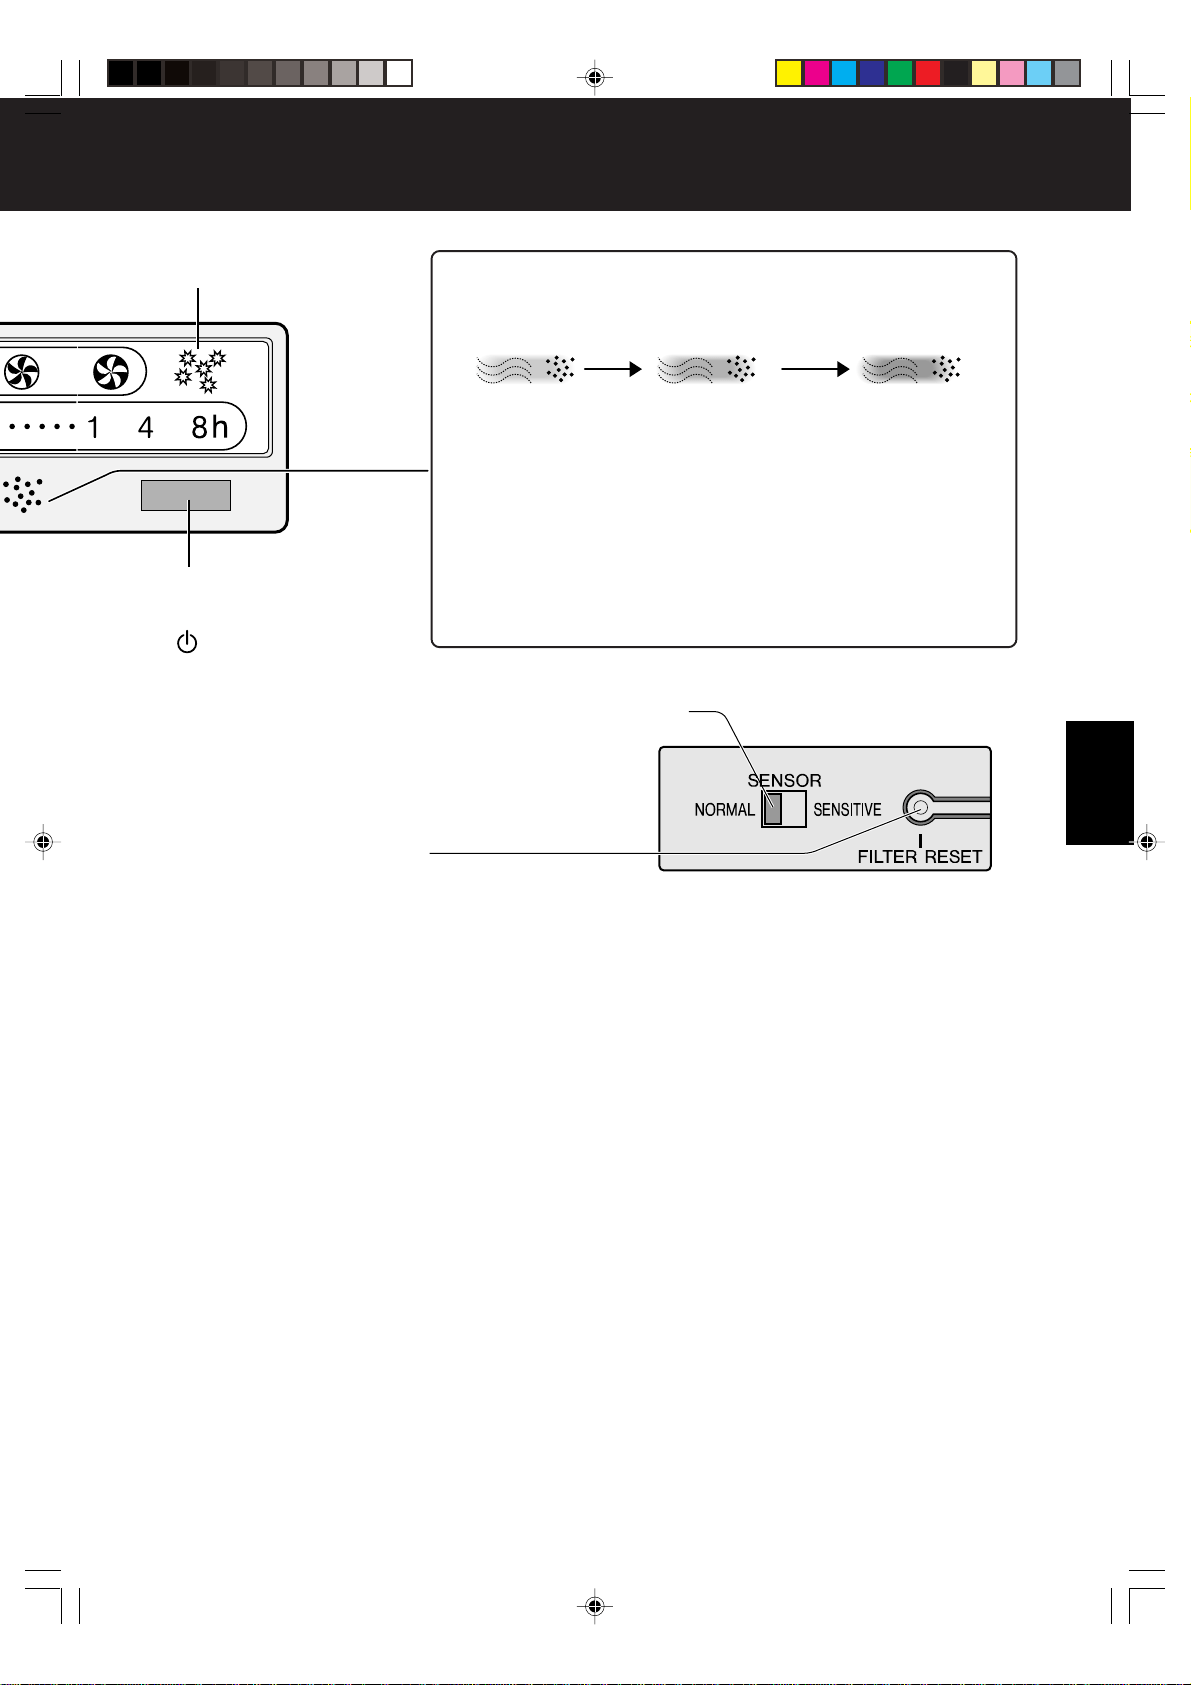
CLEAN-SIGN
The color changes when the air is dirty.
Clean (green) Slightly dirty (orange) Very dirty (red)
ABOUT THE CLEAN-SIGN
• The sensor displays a CLEAN-SIGN lamp depending on relative
changes to the environment from the time the power plug is inserted
into the wall outlet and thereafter.
• When the air is extremely dirty at the time the power plug is inserted,
the CLEAN-SIGN lamp may light green since the polluted state is
the environment against which the sensor bases the pollution rate
on.
In this case, switch manually to the desired operation mode as it is
ineffective in auto operation. See Page E-11
• The CLEAN-SIGN lamp can be turned off using the “DISPLAY ON/
OFF” button of the remote control. See Page E-11
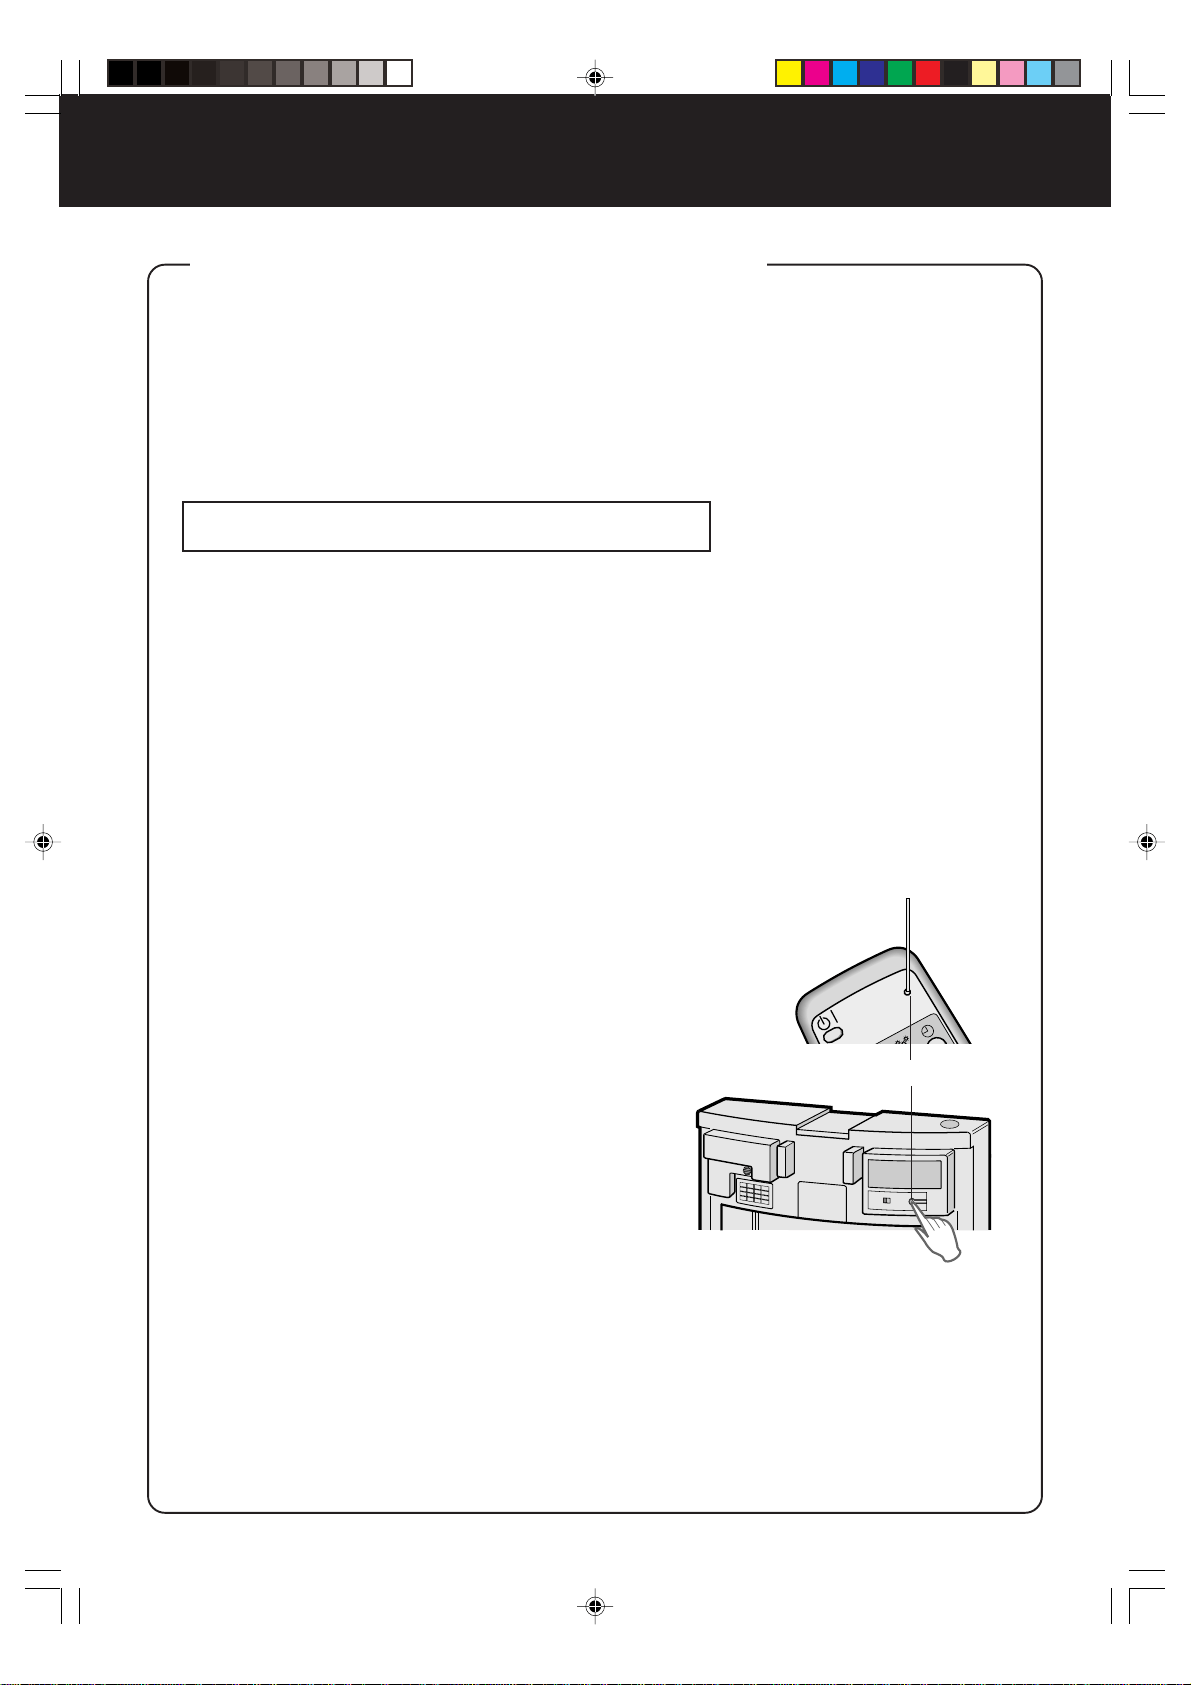
*Before pressing the Filter reset but-
ton, be sure to connect the power plug
to a wall outlet.
There is also a Filter reset button on
the remote control.
Point the remote control toward the
main unit before pressing the Filter
reset button on it.
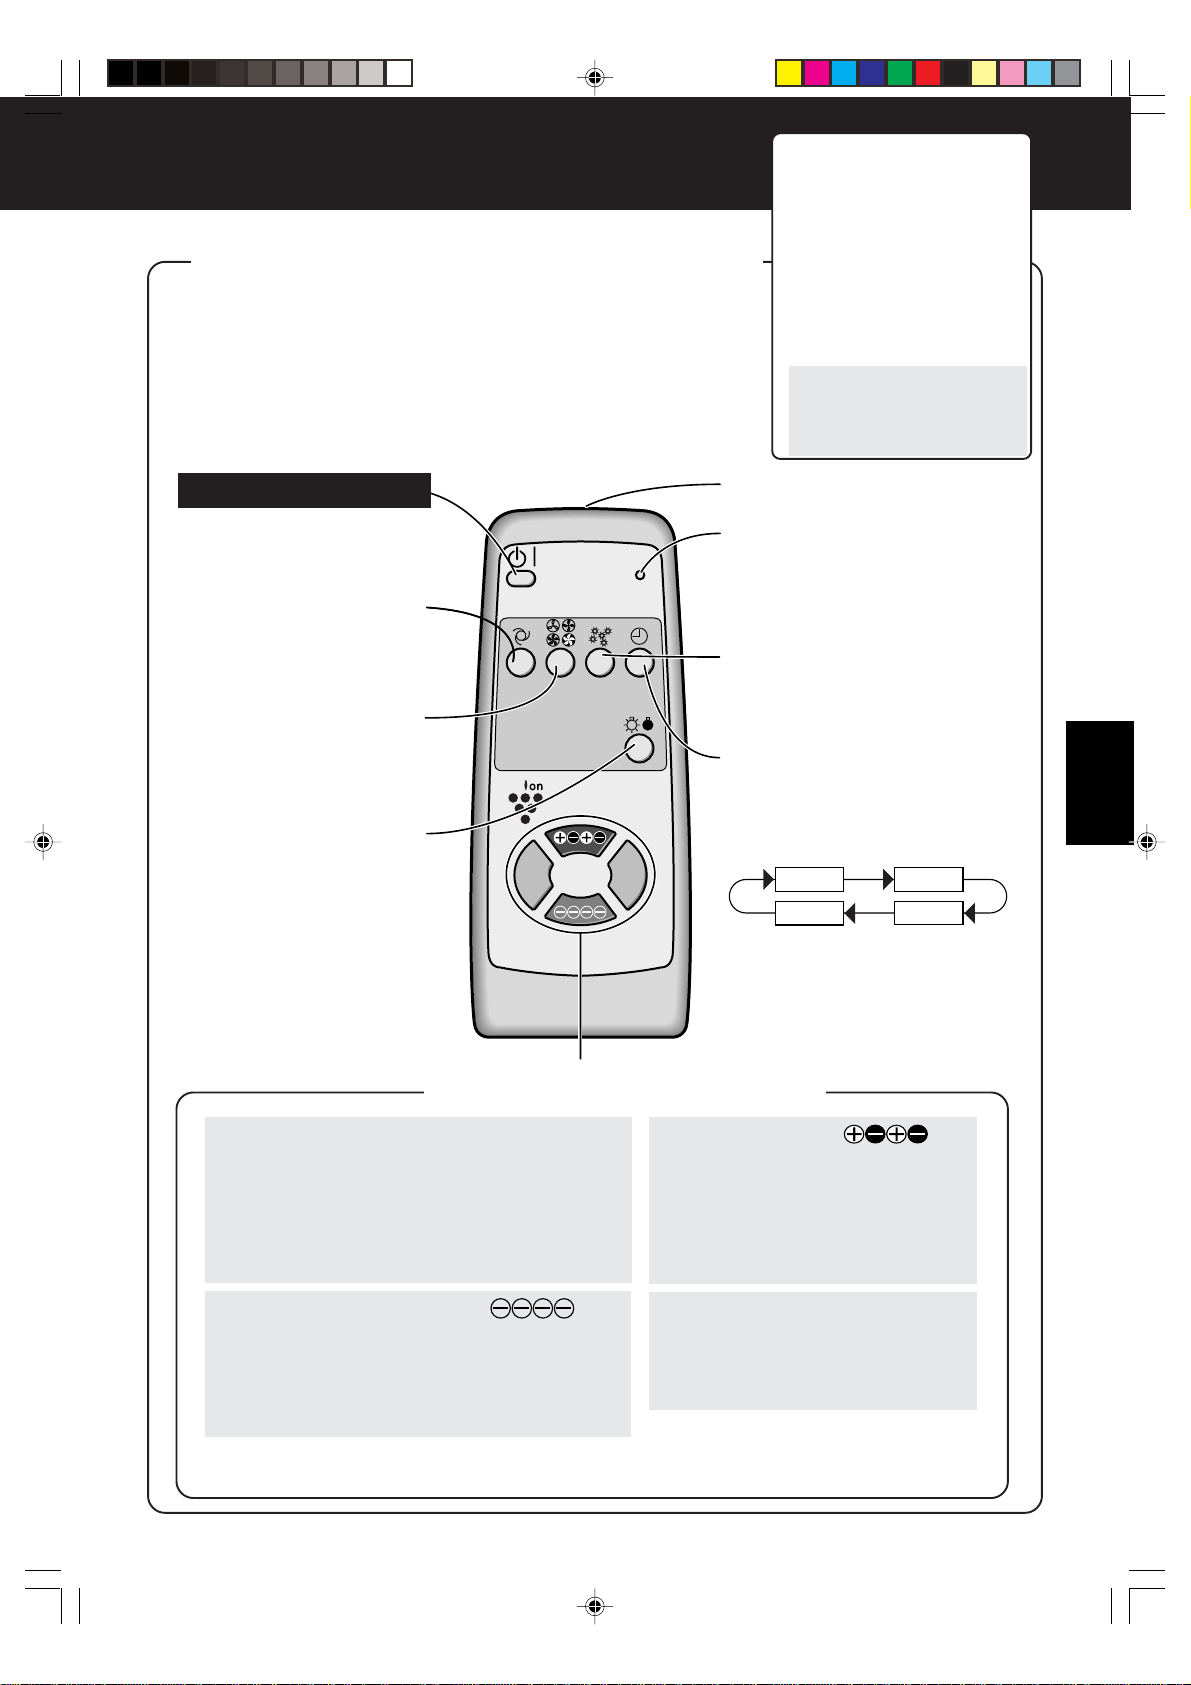
MODE/ button See Page E-10
(Used to select operation modes or turn the unit off)
Sensor sensitivity select switch
The sensitivity of odor and dust detection can be adjusted.
This setting is factory set to “Normal”. Normally, use the
unit in this setting. Set the sensitivity to “High” if the sensi-
tivity seems too low depending on the room condition.
Filter reset button
Odor sensor
Detects odors such as tobacco smoke, incense, pets, cos-
metics, etc.
Sensor cover / Dust sensor
Detects dusts, smoke, pollen, house dust, etc. See Page
E-12,E-13
Main unit
Filter frame
HEPA filter (white)
See Page E-14
(Dust collection filter)
Active carbon filter (black) See Page E-14
(Deodorizing filter)
Filter separator
Pre-filter
Front panel
Hook
Remote control See Page E-11
FU-55SE_Eng.6.5 03.7.17, 8:53 AM5
Downloaded from: http://www.usersmanualguide.com/

E-6
NAMES OF PARTS
BACK
Ion wide louver
• The output direction of the purified air can
be changed to the directions indicated by
the arrows.
• Set the output direction as desired.
Handle
Air Outlet
Power cord
Power plug
ACCESSORIES
Remote control (1 unit) Battery (R6(AA) battery X 2)
Attached leaflet
• Operation Manual
SPECIFICATIONS
Model
Power supply
Fan level adjustment
Rated power
Fan level
Applicable floor surface
Cord length
Dimensions
Weight
Fan level
operation
FU-55SE
220-240V / 50Hz
~42 m
2
*
2.5 m
415 mm(W)x238 mm(D)x572 mm(H)
9.3 kg
Max
43 W
330m
3
/hour
High
19 W
218m
3
/hour
Medium
6 W
95m
3
/hour
Silent
4 W
43 m
3
/hour
* The applicable floor surface area is the surface area for when operating the unit in Max fan level.
(JEM 1467, The Japan Electrical Manufacturers’ Association)
About the reduction of standby power
In order to operate the electrical circuits while the power plug is inserted in the wall outlet, this
product consumes about 0.9W of standby power.
For the conservation of energy, remove the power plug when not using the unit.
FU-55SE_Eng.6.5 03.7.17, 8:53 AM6
Downloaded from: http://www.usersmanualguide.com/
ENGLISH
E-7
PREPARATION
INSERTING BATTERIES IN THE REMOTE CONTROL
About the batteries
• The battery life is about 1 year.
• Replace the batteries when the remote control becomes inoperative.
• Incorrect usage of the batteries may cause battery fluid leakage and/or
damage. Take care of the following when handling:
• When replacing the batteries, replace both batteries with new ones
of the same type. (Use R6(AA) manganese batteries (2 units).)
• When not using the unit or remote control for an extended period,
remove the batteries. This prevents malfunction of the remote control
from battery fluid leakage.
*The batteries of the accessory are for initial use only and may be
depleted within 1 year.
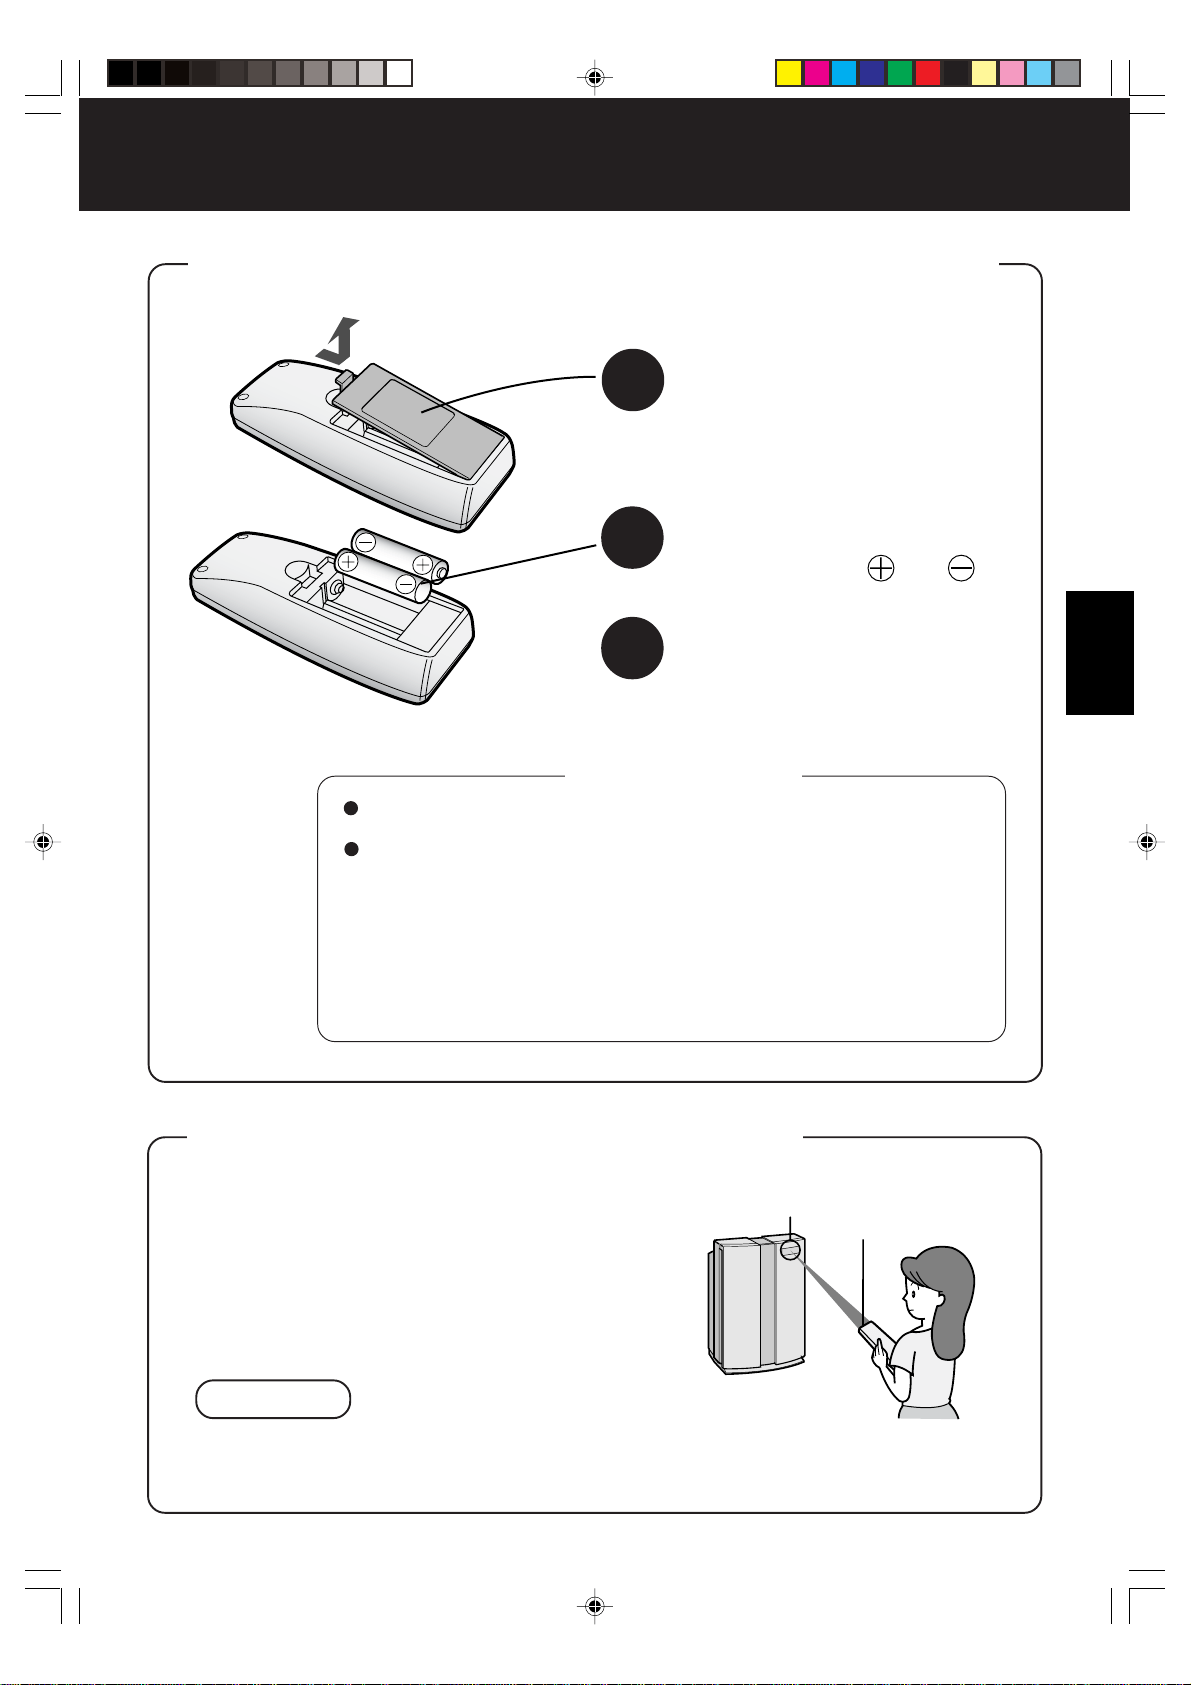
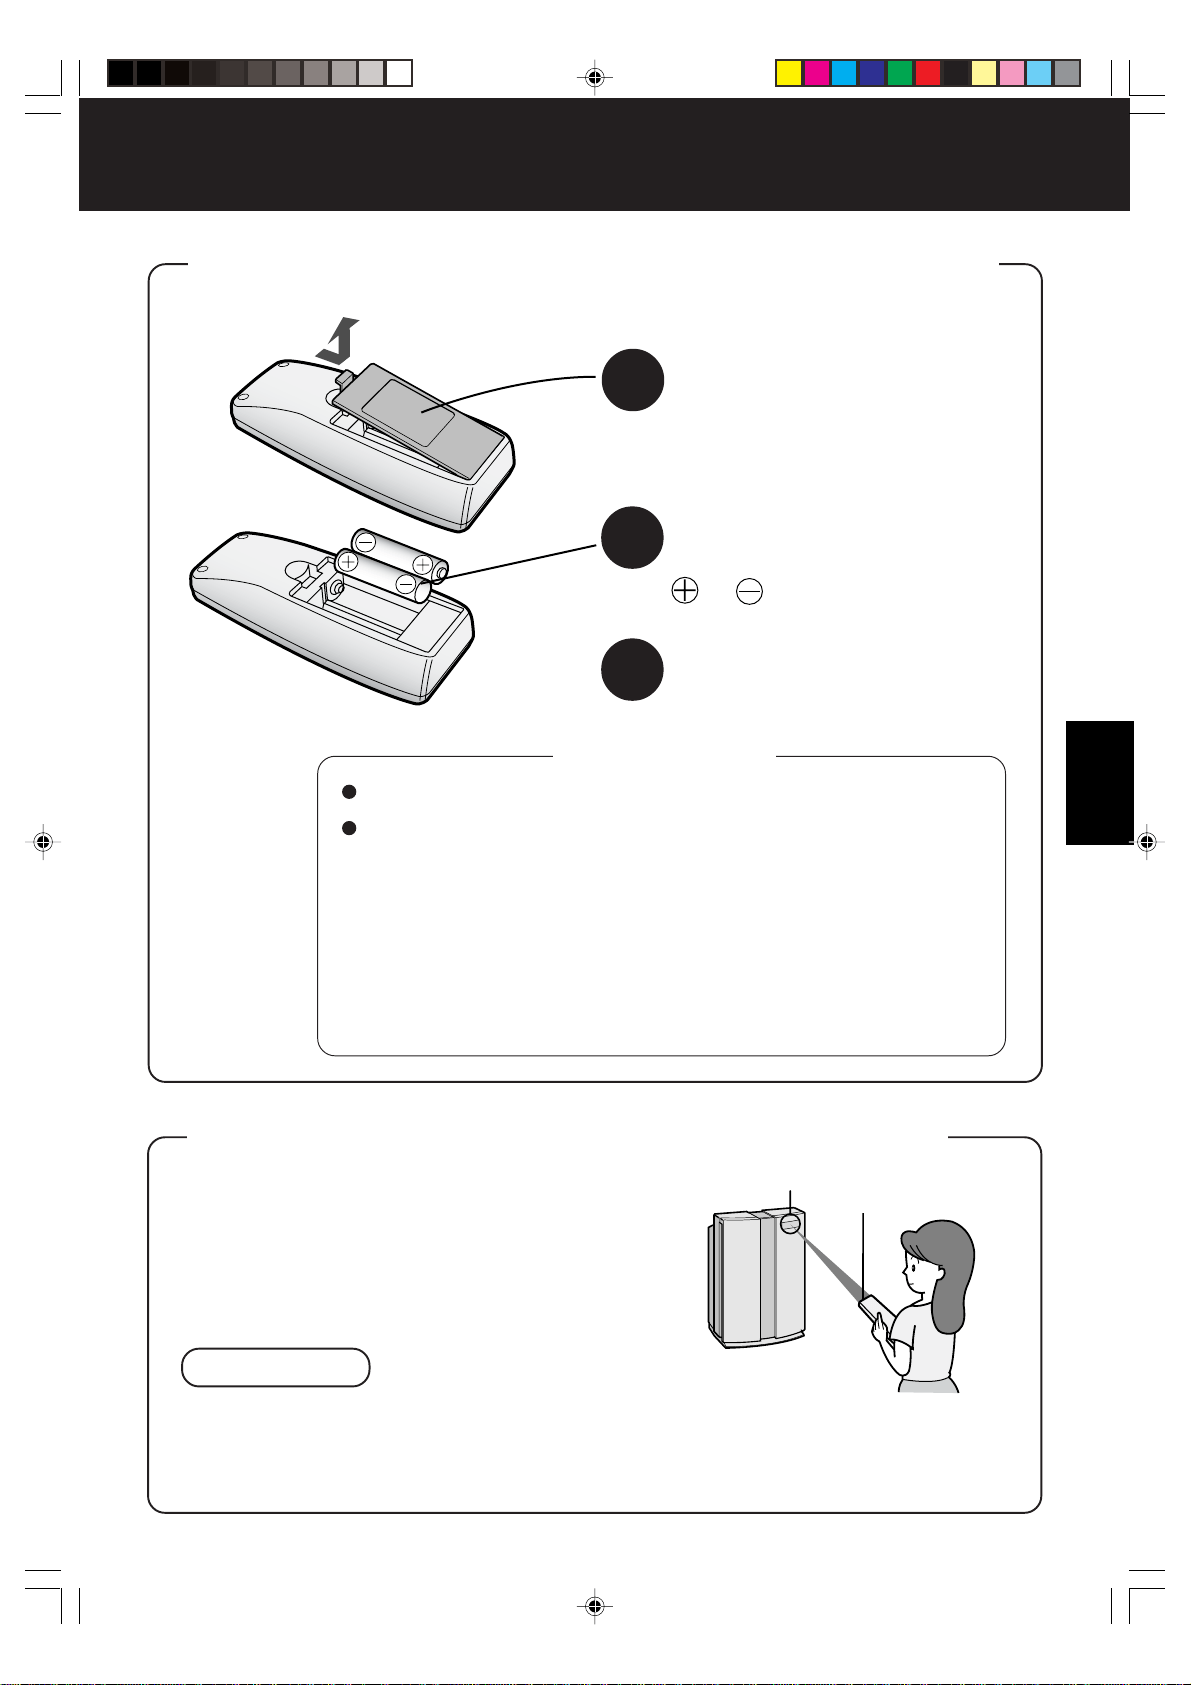
1
Remove the back cover
Press and slide the back cover to re-
move.
2
Insert batteries
Insert batteries with
and as
shown below.
3
Close the back cover
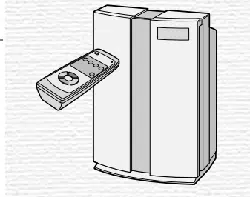
USING THE REMOTE CONTROL
• Operate the remote control facing the main unit
(Receiver).
• The signal range is about 7m (front).
• Make sure there are no objects blocking the path
of the signal.
NOTE
• Avoid strong impact on the remote control. In addition, do not wet the remote control or
place it under direct sunlight or near a stove, etc., otherwise a malfunction may occur.
Receiver
Transmitter
FU-55SE_Eng.6.5 03.7.17, 8:53 AM7
Downloaded from: http://www.usersmanualguide.com/

Be sure to remove the power plug from the wall outlet.
E-8
PREPARATION
• Be sure to remove the power plug from the wall outlet.
1
1
1
2
2
Table
Soft cloth
Front panel
Filter frame
Pre-filter
Filter separator
Active carbon filter
HEPA filter
Filter frame
Hook
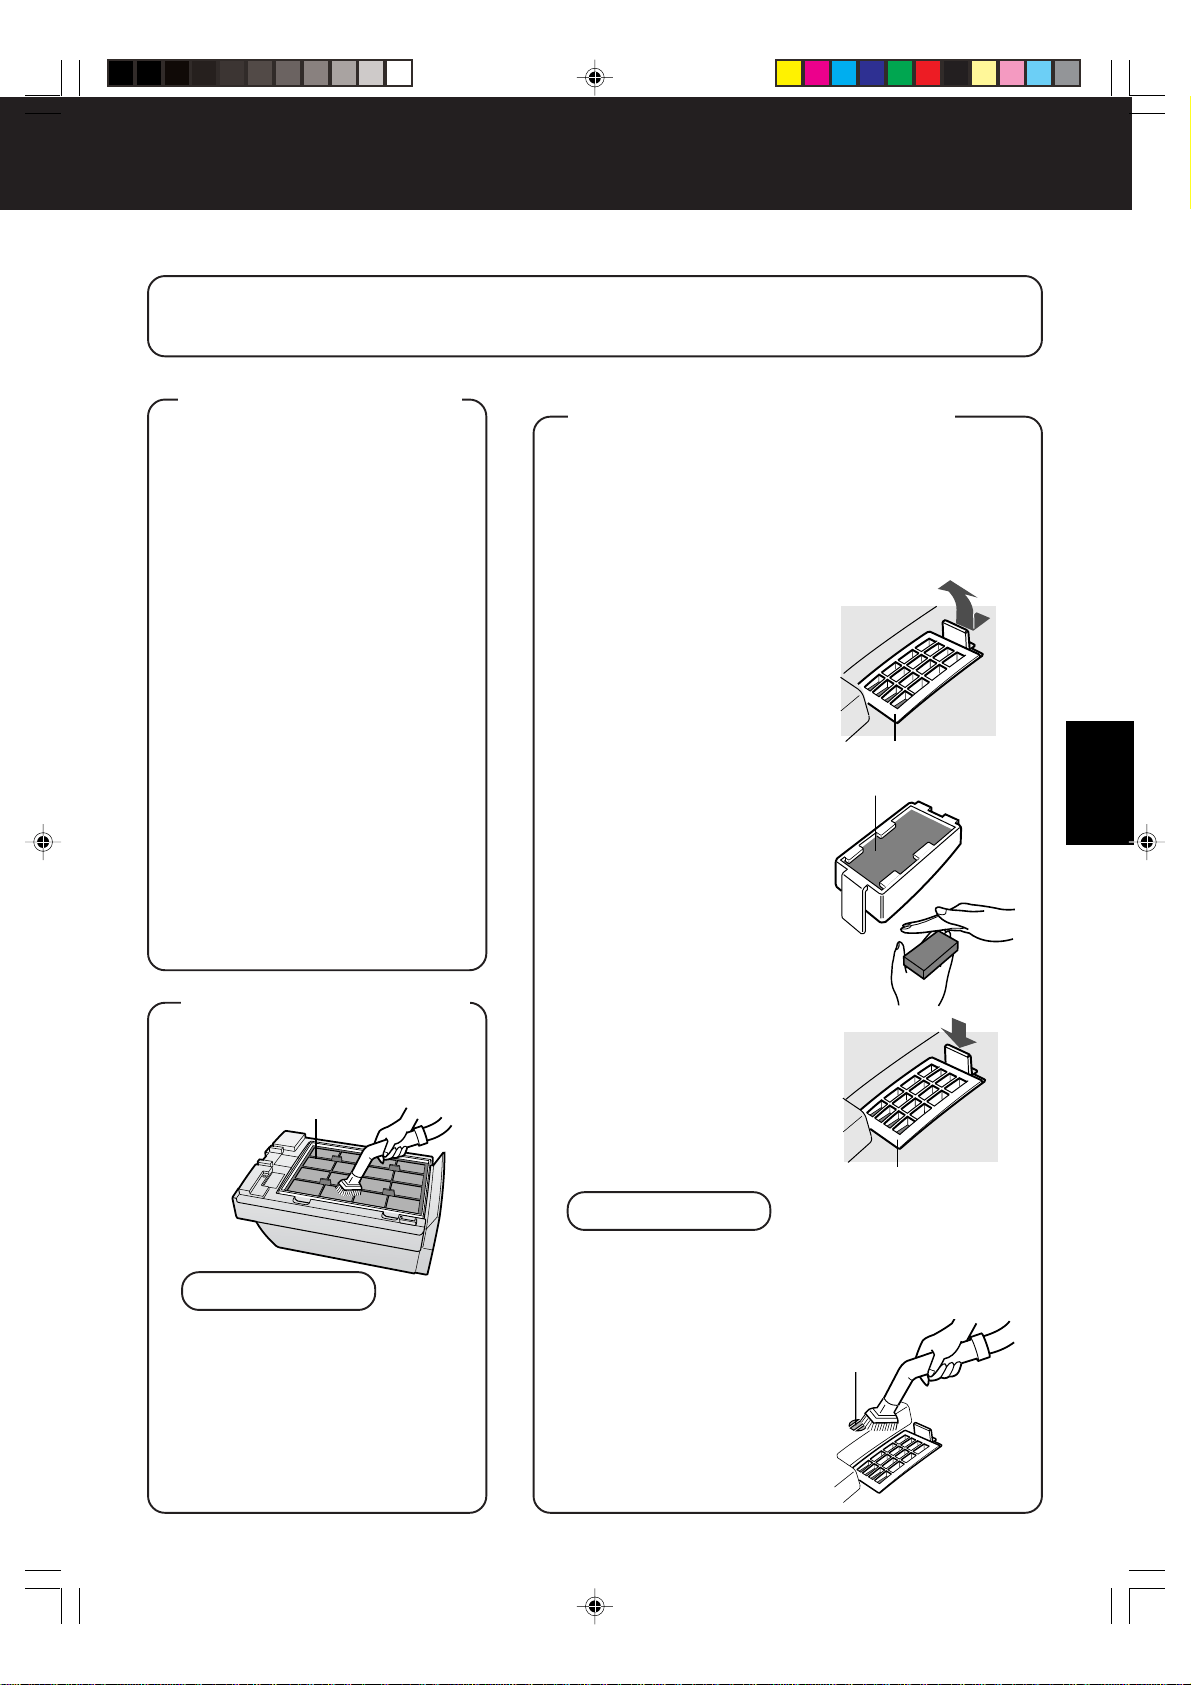
INSTALLING THE FILTERS
To maintain the quality of the filters, they are installed in the main unit within plastic
bags. Be sure to remove the filters from the plastic bags before using the unit.
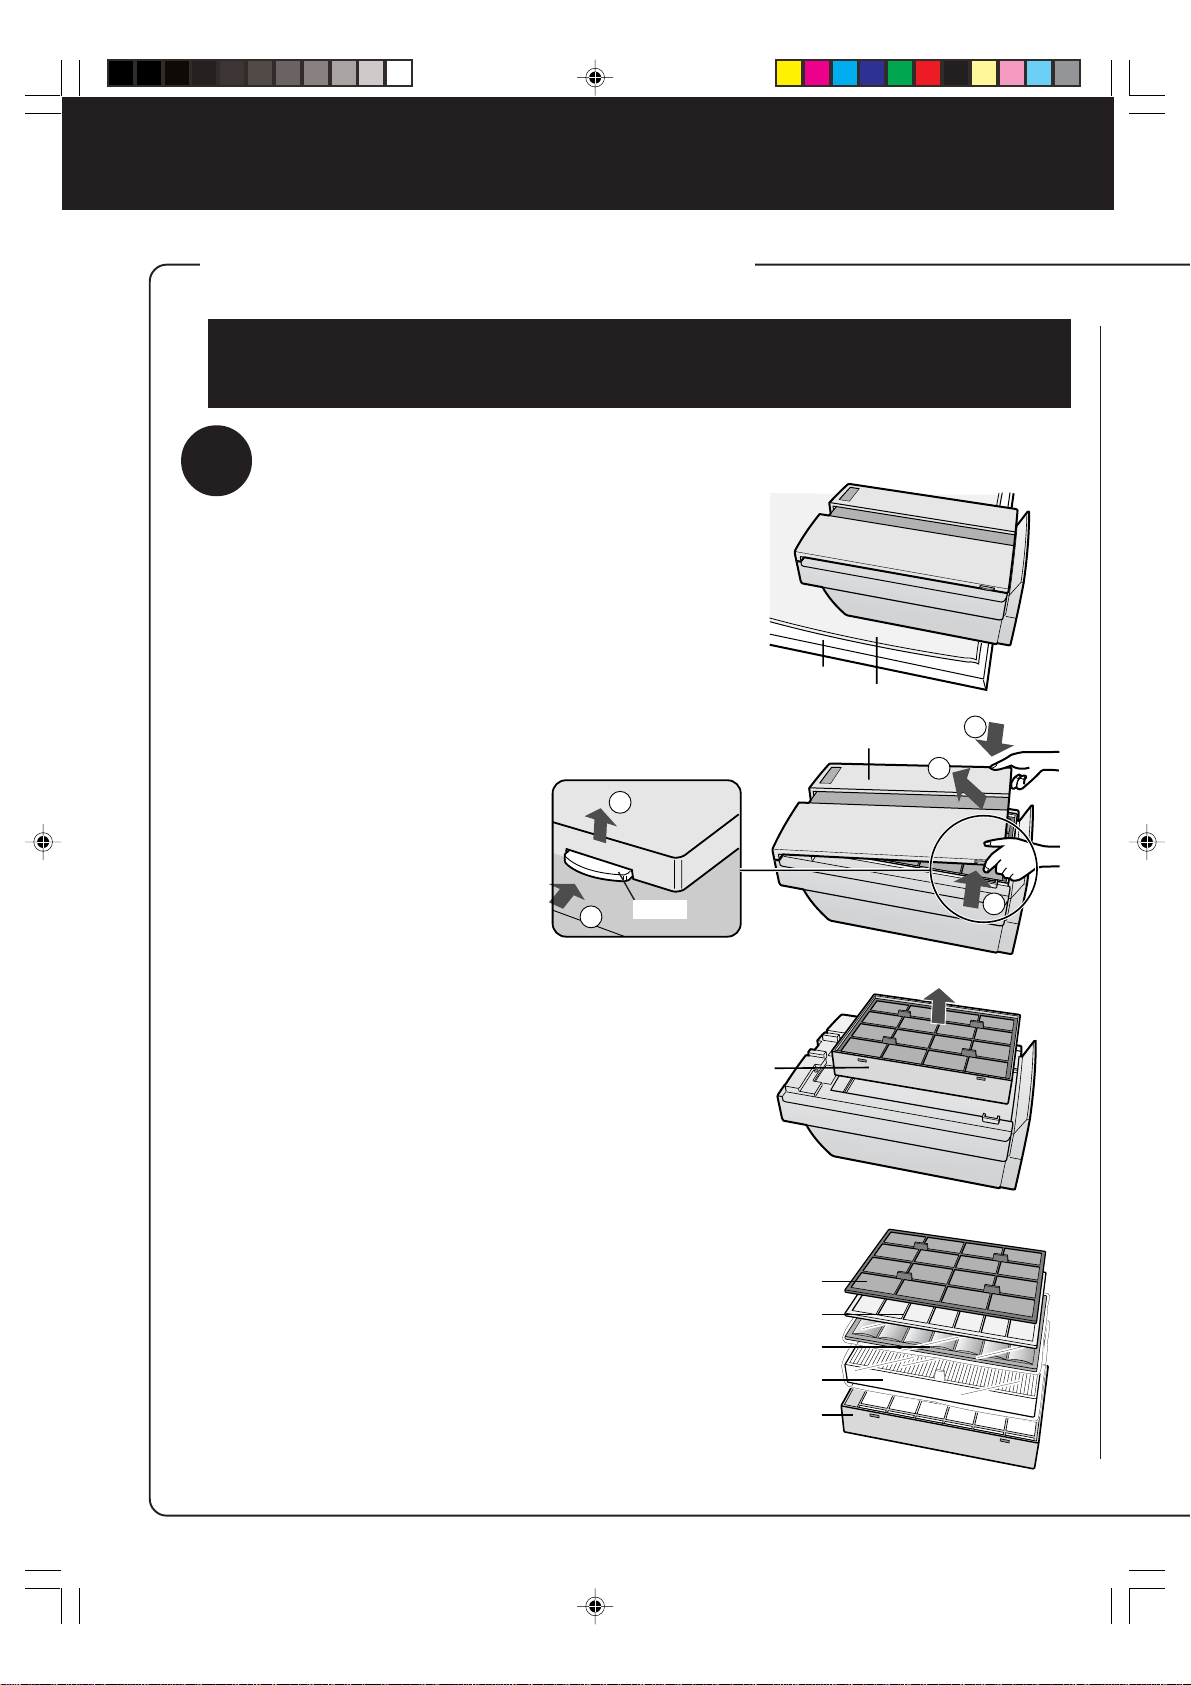
1
Remove the filters
1
Place the unit facing up.
Lay the unit on a table, etc., while
making sure not to pinch the
power cord on the rear of the
unit.
2
Remove the Front panel.
Press in the hook on the bottom
of the Front panel and lift to re-
move.
3
Pull out the Filter frame and
remove the Pre-filter and Fil-
ter separator.
4
Remove the Active carbon
filter (black) and HEPA filter
(white) from the plastic bag.
FU-55SE_Eng.6.5 03.7.17, 8:53 AM8
Downloaded from: http://www.usersmanualguide.com/
ENGLISH
E-9
outlet.
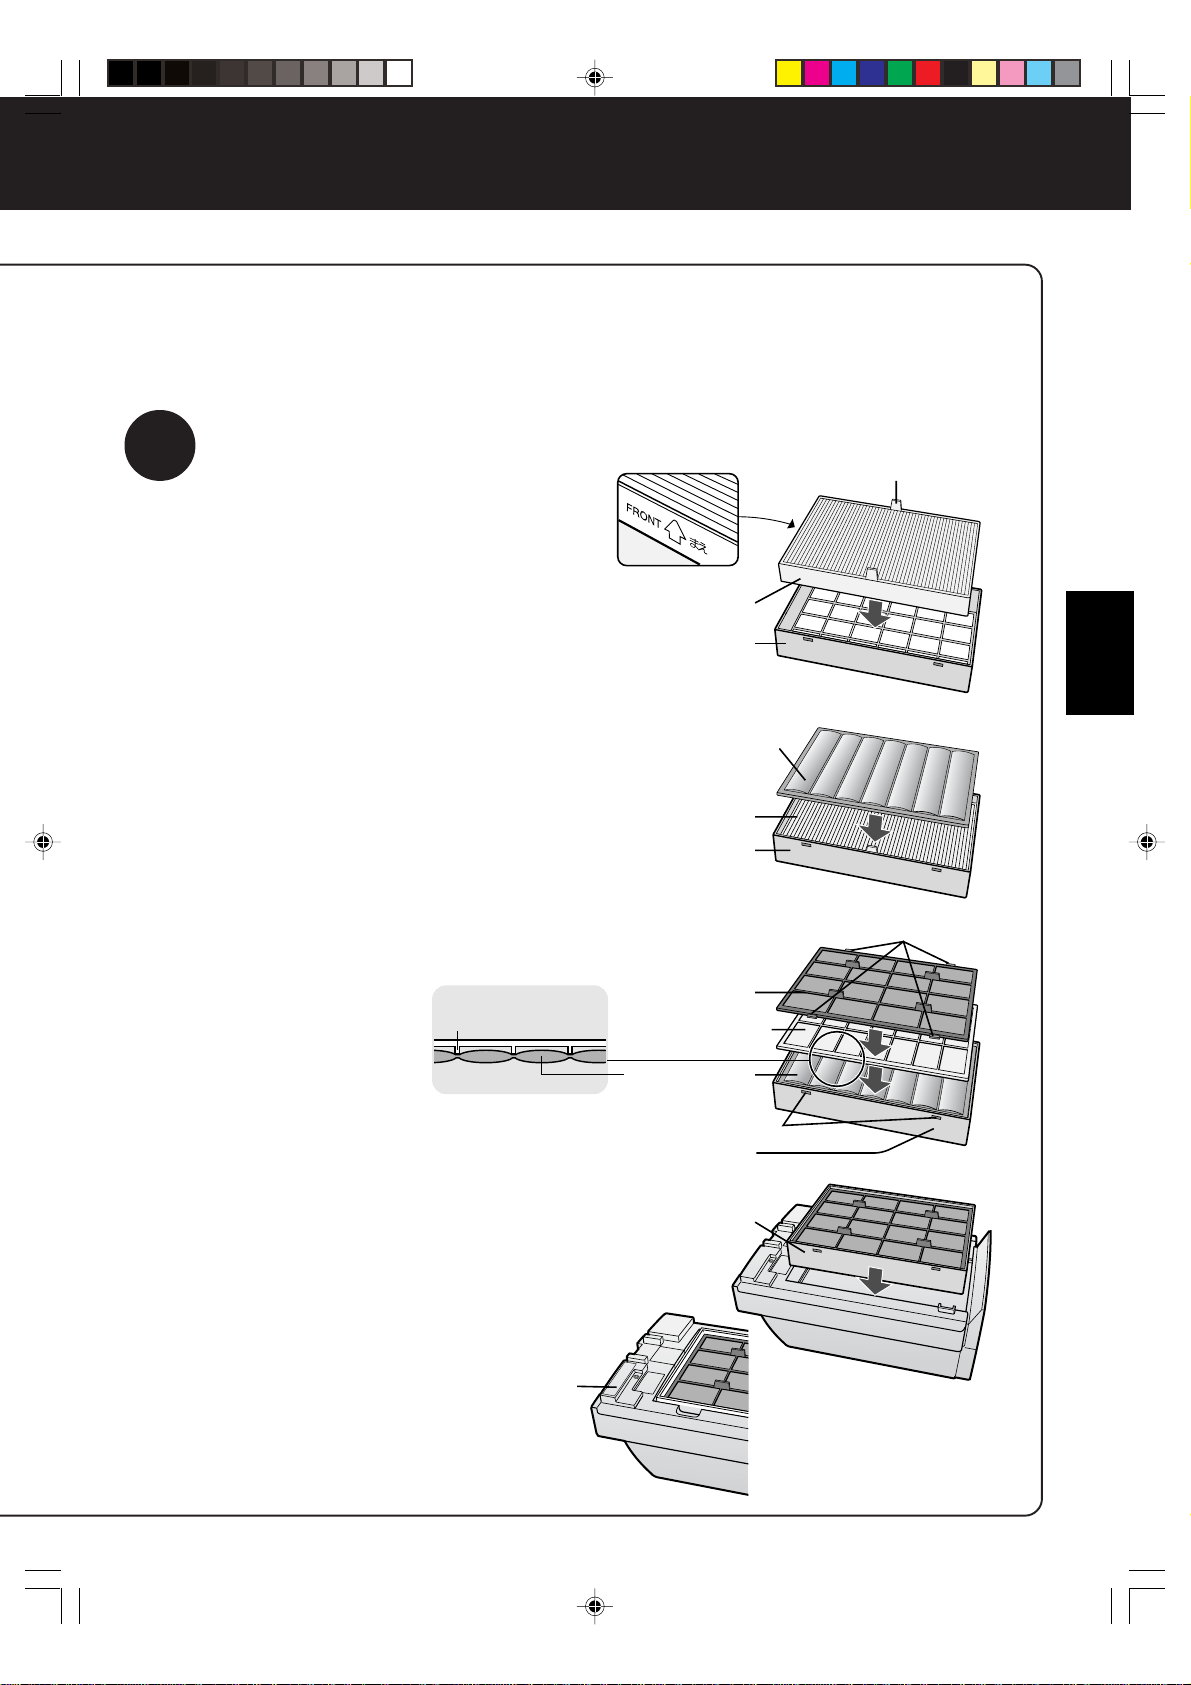
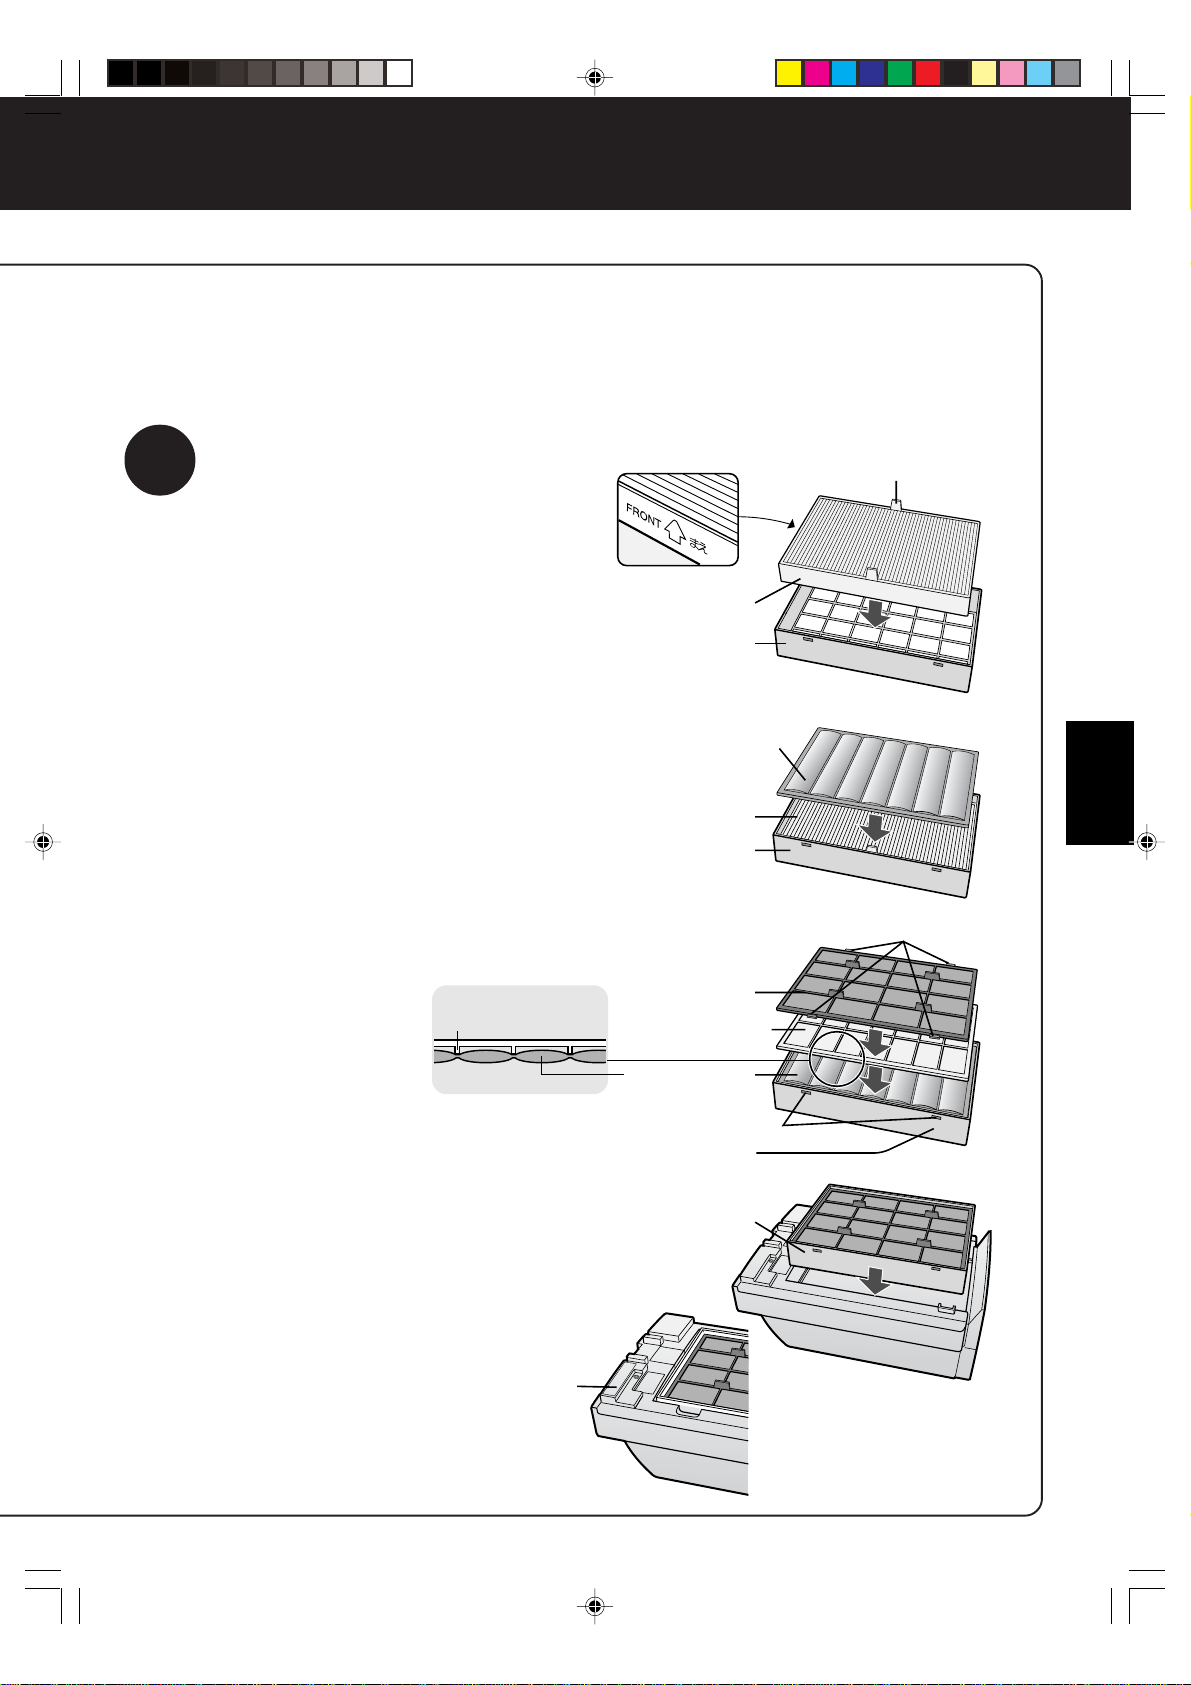
2
Install the filter
1
Remove the HEPA filter from
the plastic bag and mount it
within the Filter frame with the
“FRONT” sign facing up.
Insert so that the tabs on the HEPA filter
are facing toward you.
Proper operation cannot be achieved
when installing the filter backwards.
2
Remove the Active carbon fil-
ter from the plastic bag and
mount it within the Filter frame.
3
Mount the Filter separator and
Pre-filter within the Filter frame
in the respective order.
• Place the Filter sepa-
rator so that the ribs
are facing down as
shown in the diagram
on the right.
• Insert the tabs of the
Pre-filter (4 locations)
in the holes of the Fil-
ter frame.
• Set the Filter frame to the main unit as
shown in the diagram on the right
(There is no vertical orientation).
4
Fill in the usage start date on
the Date label affixed on the
main unit.
Use the date as a
guide for the filter
replacement pe-
riod.
Tabs
HEPA filter
Filter frame
Active carbon filter
HEPA filter
Filter frame
Pre-filter
Tabs (4 places)
Filter separator
Active carbon filter
Holes
Filter frame
Filter frame
Date label
Rib of the filter separator
FU-55SE_Eng.6.5 03.7.17, 8:53 AM9
Downloaded from: http://www.usersmanualguide.com/

Plasmacluster
E-10
OPERATION
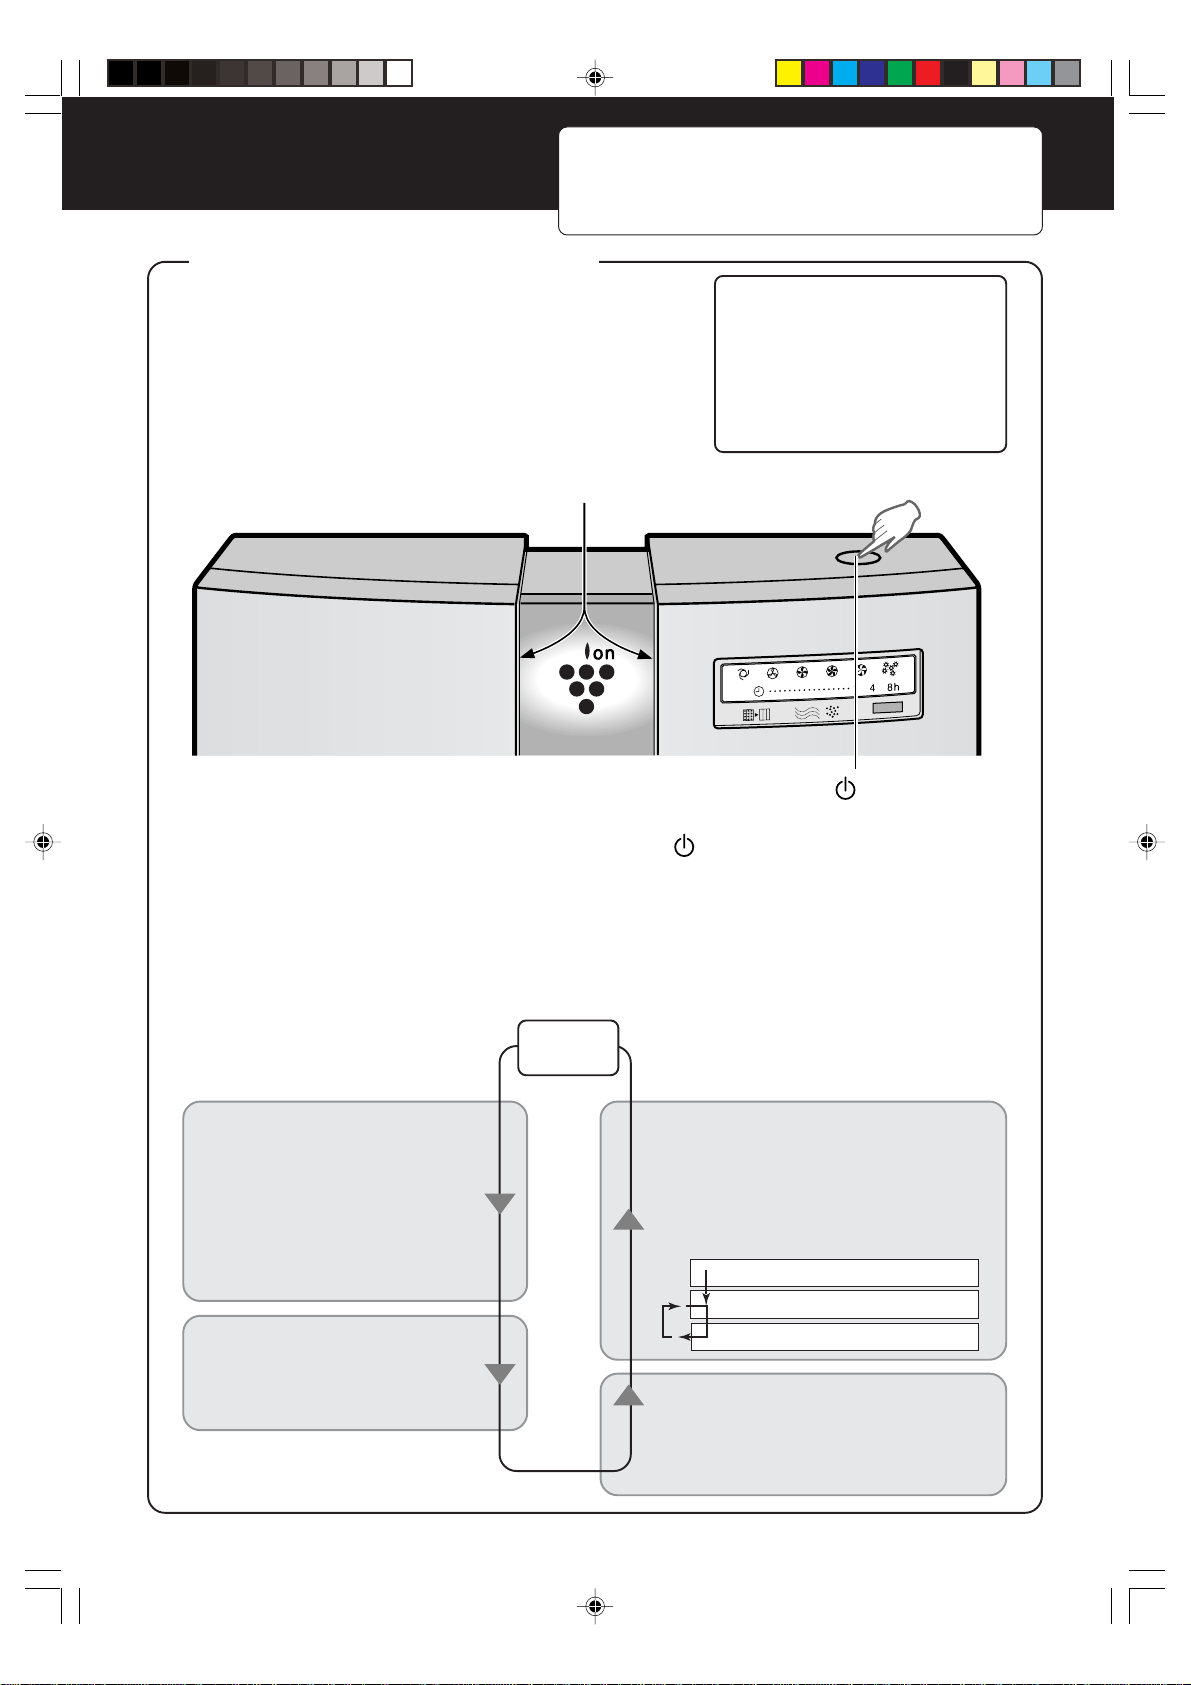
MAIN UNIT OPERATION
Operations available with main unit
• AUTO operation (fan level)
• Silent operation (fan level)
• Medium operation (fan level)
• High operation (fan level)
• Max operation (fan level)
• Pollen mode operation
The unit will start operation when the MODE/
button is pressed.
The unit will start operation in AUTO operation (fan level).
• During operation, the cluster ion lamp will be lit.
The operation mode is switched as follows every time the button is pressed.
The lamp for the operation mode that has been set is lit.
The operation mode suited to the usage condition can be set.
Stop
Auto operation
The fan level is automatically
switched (High, Medium, Si-
lent) depending on the amount
of pollution in the air detected
by the sensor for efficient air
purification.
Silent operation
The unit will operate quietly
using minimal air intake.
Pollen mode Operation
The unit will operate at High level for
10 minutes, then will alternate be-
tween Medium and High.
Medium to Max operation
The unit will operate at a fan level of
medium, high or max.
For the first 30 seconds after the power plug is in-
serted into the wall outlet, the unit will check the con-
dition of the air. If operation is set to ON during this
time, the CLEAN-SIGN lamp will alternately flash
green, orange and red.
Cluster ion lamp
MODE/
button
10 minutes: High fan level
20 minutes: Medium fan level
20 minutes: High fan level
FU-55SE_Eng.6.5 03.7.17, 8:53 AM10
Downloaded from: http://www.usersmanualguide.com/
ENGLISH
Plasmacluster
AUTO
RESET
OFF
E-11
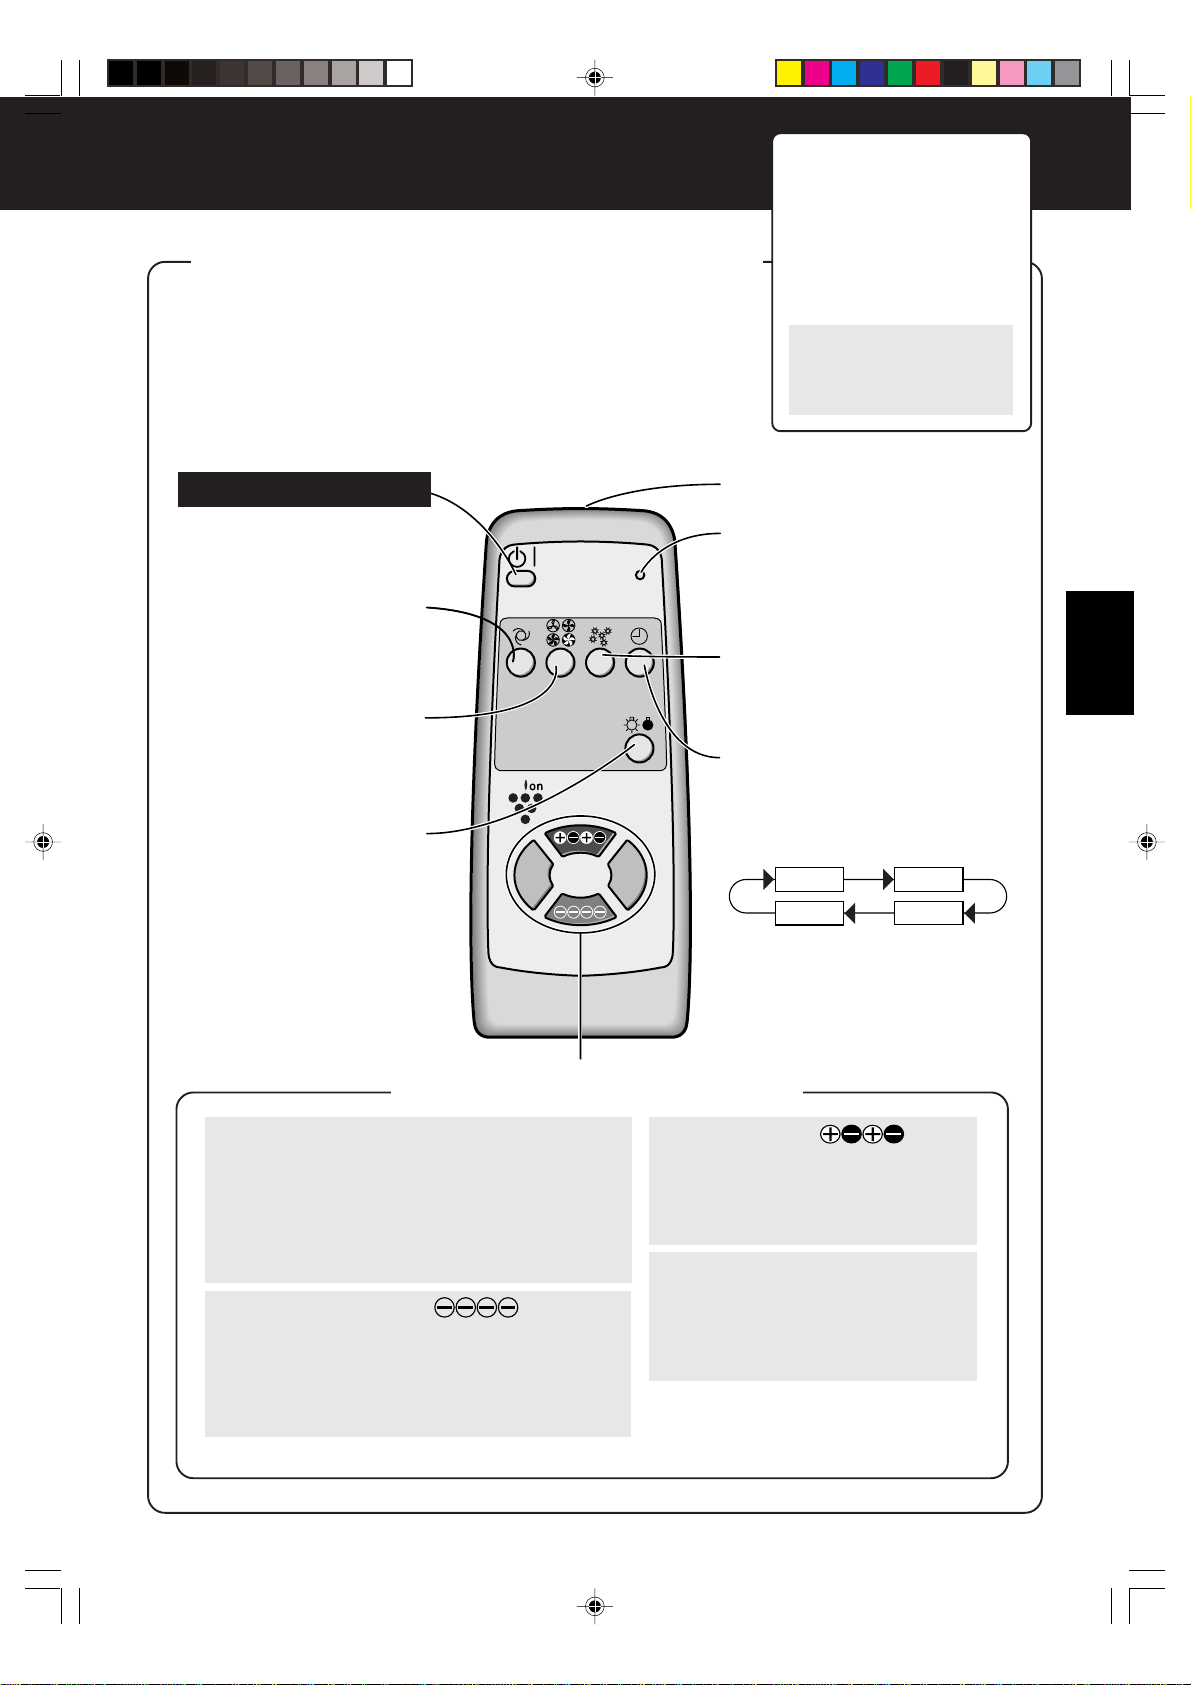
REMOTE CONTROL OPERATION
Operations available
with remote control
• AUTO operation (fan level)
• MANUAL operation (fan level)
• Pollen mode operation
• OFF timer setting
• DISPLAY ON/OFF
• Cluster ion mode selection
•
AUTO cluster ion mode
• Clean mode
• Ion control mode
•
Cluster ion OFF mode
• To start operation, press the POWER ON/OFF button.
A short beep will sound and operation will start in AUTO opera-
tion (fan level).
AUTO cluster ion mode is selected for cluster ion operation.
• To stop operation, press the POWER ON/OFF button again.
A long beep will sound and operation will stop.
POWER ON/OFF button
Used to start AUTO opera-
tion (short beep) and stop op-
eration (long beep).
AUTO (fan level) button
The fan level switches auto-
matically depending on the
amount of pollution in the air.
MANUAL (fan level) button
The fan level can be switched
between Silent, Medium,
High and Max.
DISPLAY ON/OFF button
Switches the Cluster ion
lamp and CLEAN-SIGN
lamp either ON or OFF.
• The cluster ion lamp is
turned on for about 3 sec-
onds by pressing the clus-
ter ion select button (ex-
cluding the OFF button)
during “DISPLAY OFF”
mode.
Transmitter
Filter reset button
Press this button after replacing
the filters.
Pollen mode operation button
The unit operates effectively
when you suspect there is pol-
len in the air. See Page E-10
OFF timer button
Used to set the OFF timer.
The set time switches every time
the button is pressed as shown
below.
1 hour 4 hours
Cancel 8 hours
• The remaining time is indicated
by the lamp as time passes.
• The unit will stop operation
when the set time is up.
Cluster ion select button
AUTO cluster ion button
The unit will switch between Clean mode and
Ion control mode automatically depending on
the amount of pollution in the air detected by
the dust and odor sensors.
‘Clean mode’ operation is carried out for about
1 minute when operation first starts.
Ion control button
The unit will constantly operate in Ion control
mode.
Ion balance is maintained in the room by in-
creasing the ratio of Negative cluster ions.
(Cluster ion lamp on (green))
Clean button
The unit will constantly operate in
Clean mode. Clean mode is effec-
tive for reducing some airborne
mold. (Cluster ion lamp on (blue))
OFF button
The generation of ions is stopped
and the cluster ion lamp is turned
off.
If the room smells especially moldy, operate the unit in Clean mode.
FU-55SE_Eng.6.5 03.7.17, 8:53 AM11
Downloaded from: http://www.usersmanualguide.com/

GUIDE FOR OPERATION
GUIDE FOR ODOR SENSOR
• In addition to odor such as cigarette smoke and pet odor, the odor sensor also responds to the
following.
• Insecticide, cosmetics, spray, alcohol.
• Sudden changes in temperature or humidity.
• When the unit is in automatic operation and cosmetics or the like are used in a closed room, it
is normal for the sensor to respond by increasing the air flow. If this is not desirable, change
the sensitivity of the sensor.
GUIDE FOR DUST SENSOR
• The dust sensor detects dust particles in room air, such as cigarette smoke and house dust.
• Compared with cigarette smoke, the amount of dust released when making your bed is so
small that it may not be detected by the dust sensor. Therefore, the amount of dust seen with
the eye may differ from the indication of the clean-sign lamp.
GUIDE FOR FILTER RESET BUTTON
• After replacing filters, make sure to connect the power plug to a wall outlet, and press the filter
reset button on the main unit or on the remote control. The “BEEP” sound indicates that the
stored operating time has been reset.
If the filter lamp is lit at that time, it will now go off.
E-12
FU-55SE_Eng.6.5 03.7.17, 8:53 AM12
Downloaded from: http://www.usersmanualguide.com/
ENGLISH
CARE AND MAINTENANCE
(To maintain the best performance of this product, please clean the unit periodically.)
When cleaning, be sure to remove the power plug from the wall outlet. In addition, never handle
the power plug with wet hands.
Electrical shock and/or bodily injury may occur as a result.
MAIN UNIT
For soiling on the main unit and
the installed floor / table surface,
clean as early as possible. Stub-
born dirt may be hard to remove.
Dry wipe with a soft cloth
For stubborn dirt, wipe with a
soft cloth dampened with water
or warm water of 40°C or less.
Do not use volatile fluids
Benzene, paint thinner, polish-
ing powder, etc., may damage
the unit surface.
Do not use detergents
Detergent ingredients may dam-
age the unit surface.
Keep the unit dry
Never apply water on the unit.
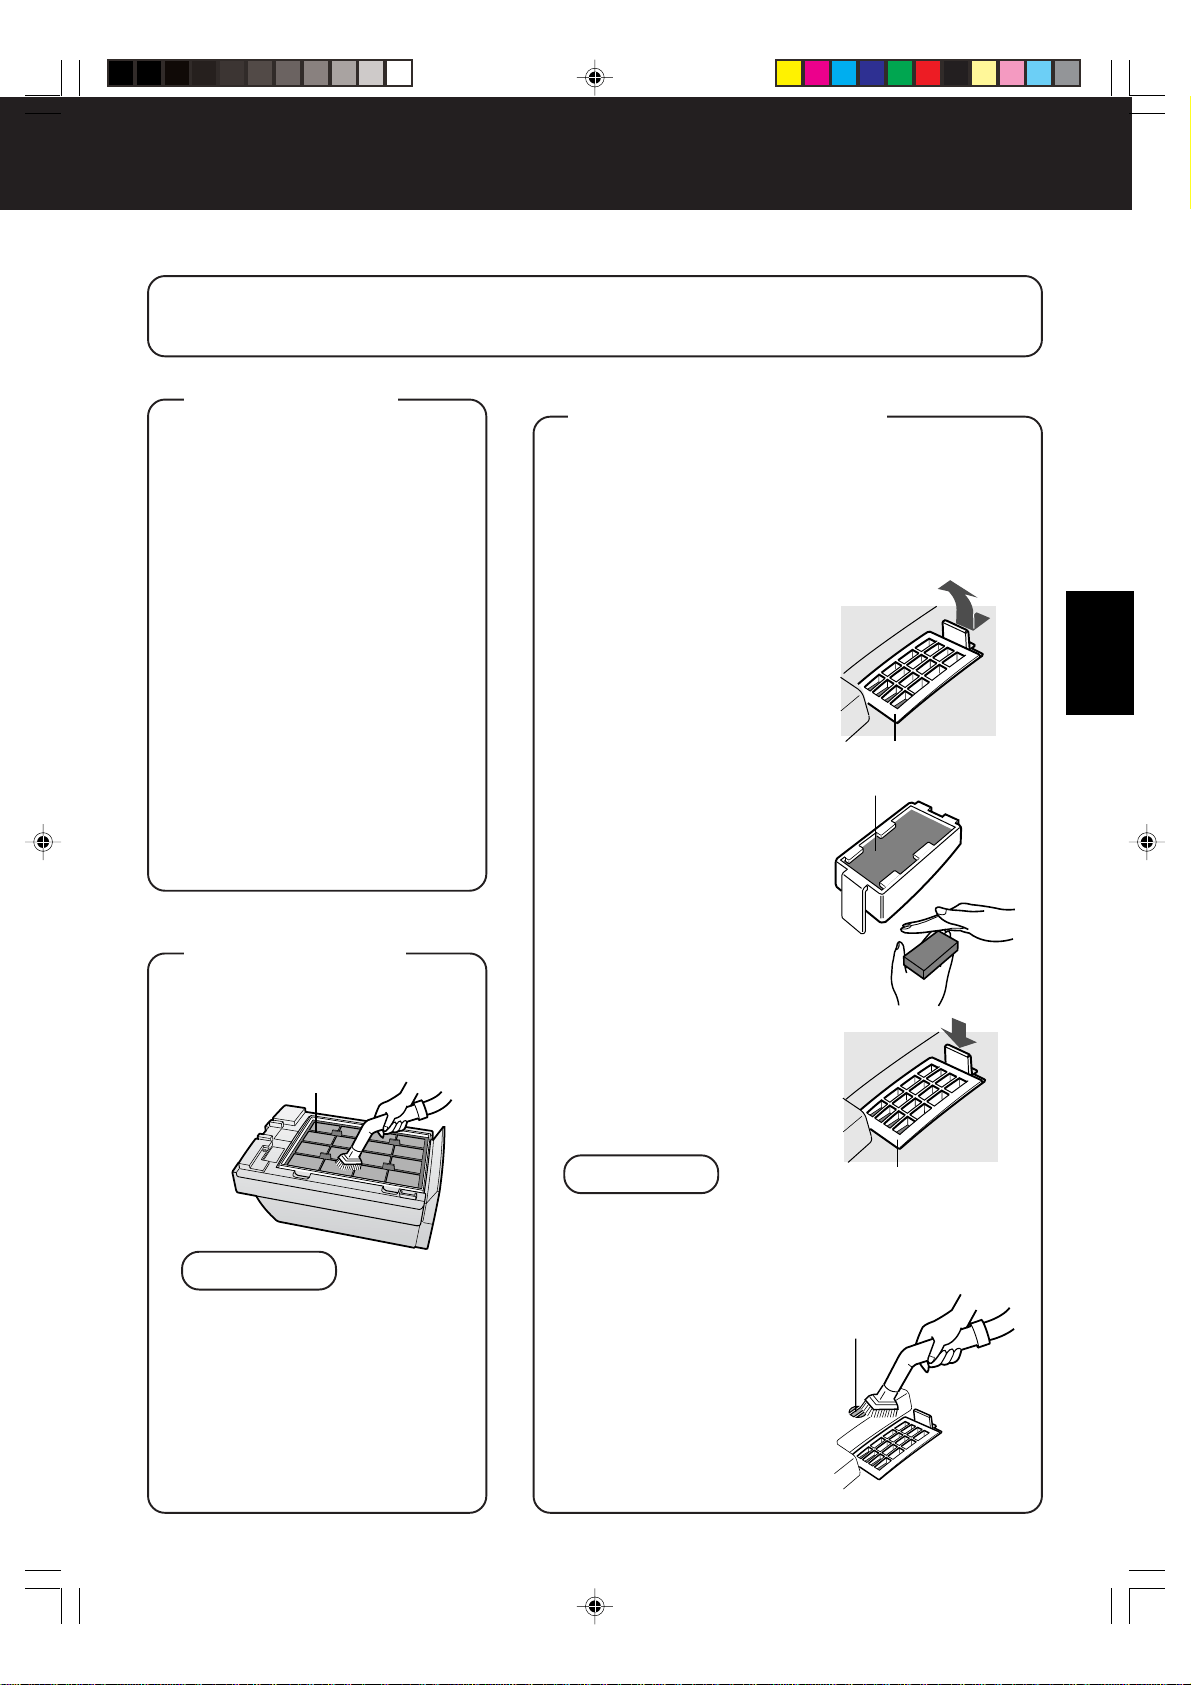
DUST SENSOR
ODOR SENSOR
The care cycles of ODOR SENSOR and DUST
SENSOR are once three months.
The sensitivity of the sensors will become unstable
if the odor or dust sensor is dirty or blocked. Please
clean these parts as follows.
DUST SENSOR
1
Remove the front
panel and detach the
sensor filter
• Detach the sensor filter
while pulling the tab on
the sensor cover.
2
Remove dust from
sensor filter.
• Detach the sensor fil-
ter, and tap it lightly
with your hand to re-
move the dust.
If it is very dirty, wash it
with water and then al-
low it to dry thoroughly.
3
Insert the sensor fil-
ter into the cover, in-
stall it in the main
unit and attach the
front panel.
• The sensor filter can be
inserted either way
round.
CAUTION
• Do not forget to reinstall the sensor cover before
restarting the unit.
• Do not insert foreign object (toothpick, etc,)
into the filter. This may result in damage or mal-
functioning of the unit.
ODOR SENSOR
Remove dust from the sur-
face of the sensor opening
with a vacuum cleaner.
E-13
Sensor cover
Sensor filter
Sensor cover
Sensor
opening
FILTER
CLEANING
Clean the top surface of the pre-
filter lightly with a vacuum
cleaner.
NOTE
• The HEPA filter is damaged
easily. Do not bring it into di-
rect contact with the nozzle of
a vacuum cleaner.
Also make sure never to wash
it with water.
• The HEPA filter and Active
carbon filter do not need clean-
ing.
Pre-filter
FU-55SE_Eng.6.5 03.7.17, 8:53 AM13
Downloaded from: http://www.usersmanualguide.com/
E-14
CARE AND MAINTENANCE
GUIDE FOR LIFE OF FILTERS
Filter reset button
RESET
The filter replacement period is indicated by the Filter lamp.
(The lamp will light up in about 5 years, when using the unit for 12 hours daily.)
• The operation hours are saved in memory even when removing the power plug for transpor-
tation to another room, etc.
The Filter lamp is to be used only as a guide.
If dust or odors cannot be removed easily, replace the filters.
Guide for replacing the filters
• HEPA filter About 5 years after opening
• Active carbon filter About 5 years after opening
The replacement period is subject to smoking 10 cigarettes per day and the dust collection/
deodorization ability is reduced by half than that of new filters.
The replacement period differs depending on the operation hours and location of installation.
(JEM 1467, The Japan Electrical Manufacturers’ Association)
Depending on the usage environment, odor may be noticed from the Air Outlet in several
months. (For understanding the product. Refer to page E-1)
REPLACING THE FILTERS
1
See page E-8 “Installing the filters” for the replacement method.
2
Fill in the date for which you start using the new filters on the
date label.
3
Make sure to connect the power
plug to a wall outlet, point the re-
mote control toward the receiver
on the main unit, and press the fil-
ter reset button with a pointed ob-
ject on the remote control. Or
press the filter reset button on the
main unit. (Refer to page E-11)
• The “BEEP” sound indicates that the stored op-
erating time has been reset.
• If the filter lamp is lit at that time, it will now go
off.
• Press the Filter reset button on the main unit
after removing the front panel.
Replacement filters (Model: FZ-60SEF)
• HEPA filter: 1 unit
• Active carbon filter: 1 unit
Please ask for replacement filters at your dealer of purchase.
Cautions concerning the disposal of filters
Please dispose of replaced filters according to the local disposal laws and regulations.
HEPA filter materials: Active carbon filter materials:
• Filter: Polypropylene • Deodorizer: Activated charcoal
• Frame: Polyester • Net: Polypropylene 60% Polyester 40%
FU-55SE_Eng.6.5 03.7.17, 8:53 AM14
Downloaded from: http://www.usersmanualguide.com/
ENGLISH
TROUBLESHOOTING
Before calling for repair, check the symptoms below for possible remedies, since the problem may
not be a malfunction of the unit.
SYMPTOM
REMEDY (not a malfunction)
The remote control does not
work
• Have the batteries been depleted?
• Are the batteries inserted correctly?
• Is a fluorescent lighting in the room flickering due to service
life? (Refer to E-3,E-7)
Odor and dust cannot be re-
moved easily
• Are the filters heavily soiled? (Refer to E-14)
The CLEAN-SIGN lamp lights
green even when the air is dirty
• Is the opening of the odor sensor blocked or the sensor filter
clogged? (Refer to E-13)
• Was the air already dirty when the power plug was inserted
into the wall outlet? (Refer to E-5)
The CLEAN-SIGN lamp lights
orange or red even when the air
is clean
• Is the sensor filter dirty or clogged?
The sensitivity of the sensor becomes unstable when the open-
ing of the dust sensor is dirty or is clogged.
Remove dust from the sensor filter. (Refer to E-13)
• During Clean mode (or Ion control mode), the cluster ion lamp
colour will not change.
A sound is
heard from the
unit
Click, click
Tick, tick, tick
• This is the sound that is emitted when the unit is in Ion control
mode.
If the sound is irritating, set the unit away from you.
• This is the sound that is emitted when the unit is generating
cluster ions.
If the sound is irritating, such as when sleeping, set the unit
away from you.
A sound “tick, tick, tick” is
sometimes heard from the unit
and is not sometimes heard.
• A sound is sometime low, loud or none. But the effect of the
cluster ion is the same.
The discharged air smells
• Are the filters heavily soiled?
Replace the filters. (Refer to E-14)
• The ozone generated by the cluster ion generator may have
an odor. However, the density of ozone generated is very little
and is harmless to the human body. Furthermore, the ozone
decomposes quickly so it does not accumulate in the room.
E-15
The cluster ion lamp remains
green (blue) and does not
change
The unit does not operate even
when smoking cigarettes
• Is the unit installed in a location that is difficult for the sensors
to detect cigarette smoke?
• Are the odor or dust sensor openings blocked or clogged?
(In this case, clean the openings.) (Refer to E-13)
The filter lamp is lit even after
replacing filters.
• After replacing filters, connect the power plug to a wall outlet,
and press the filter reset button on the main unit or on the
remote control. (Refer to E-14)
The cluster ion lamp or the
CLEAN-SIGN lamp does not
light.
• Is DISPLAY OFF mode selected?
• Press the DISPLAY ON/OFF button on the remote control.
(Refer to E-11)
FU-55SE_Eng.6.5 03.7.17, 8:53 AM15
Downloaded from: http://www.usersmanualguide.com/

DEUTSCH
HAUPTMERKMALE
Cluster-Ionen-Balanceregelung
Das Gerät regelt das Verhältnis der
Negativ-Cluster-Ionen und Positiv-Cluster-
Ionen in Abhängigkeit vom Raumklima.
• Reinigungsmodus
Es werden etwa die gleiche Anzahl an
Positiv- und Negativ-Cluster-Ionen
ausgegeben. Dieser Modus reduziert
bestimmte in der Luft befindliche
Schimmelpilze.
• Ionen-Regelungsmodus
Eine große Anzahl an Negativ-Cluster-
Ionen sollen größtenteils in der natürlichen
Umwelt, wie beispielsweise in der Nähe
von Wasserfällen oder Wäldern gefunden
werden können. In diesem Betriebsmodus
werden mehr Negativ-Cluster-Ionen
ausgegeben, damit die Luft im Raum an
diese Umweltbedingung heranreicht.
• AUTO-Cluster-Ionen-Modus
Das Gerät wechselt je nach Verschmut-
zungsgrad der Luft, erkannt vom Staub-
und Geruchssensor, automatisch
zwischen Reinigungsmodus und Ionen-
Regelungsmodus.
HEPA-Filter
• Hochleistungsstaubfilter
Aktivkohlefilter
Wirkungsvolle Geruchsbeseitigung durch
große Kohlestiftpartikel.
INHALTSVERZEICHNIS
VORSICHTSMASSNAHMEN ..................D-2
• SICHERHEITSHINWEISE FÜR DIE
GERÄTEBEDIENUNG.................................D-3
• SICHERHEITSHINWEISE FÜR DIE
INSTALLATION ............................................D-3
•
ÜBER DEN FILTER ..........................................
D-3
BEZEICHNUNG
DER BEDIENUNGSELEMENTE .............D-4
• DISPLAY DES HAUPTGERÄTS.................. D-4
• EXPLOSIONSANSICHT ..............................D-4
• RÜCKSEITE ................................................ D-6
• ZUBEHÖR ................................................... D-6
TECHNISCHE DATEN.............................D-6
VORBEREITUNG ....................................D-7
• EINLEGEN DER BATTERIEN
IN DIE FERNBEDIENUNG ..........................D-7
•
VERWENDUNG DER FERNBEDIENUNG...
D-7
• INSTALLIEREN DER FILTER ......................D-8
BETRIEB ...............................................D-10
• BETRIEB DES HAUPTGERÄTS ...............D-10
• BETRIEB DER FERNBEDIENUNG........... D-11
RICHTLINIEN FÜR DEN BETRIEB.......D-12
PFLEGE UND WARTUNG ....................D-13
• HAUPTGERÄT .......................................... D-13
• FILTERREINIGUNG................................... D-13
• STAUBSENSOR, GERUCHSSENSOR ..... D-13
• RICHTLINIEN FÜR DIE LEBENSDAUER
DER FILTER .............................................. D-14
STÖRUNGSBESEITIGUNG ..................D-15
Vielen Dank, dass Sie sich für den FU-60SE
von SHARP entschieden haben. Bitte lesen Sie
sich für die richtige Bedienung des Geräts diese
Bedienungsanleitung sorgfältig durch. Lesen
Sie vor dem Gerätebetrieb unbedingt den
Abschnitt “Vorsichtsmassnahmen”.
Bewahren Sie dieses Handbuch nach der
Durchsicht für ein späteres Nachschlagen griff-
bereit auf.
Dieses Gerät ist nur für den Hausgebrauch bestimmt.
D-1
ZUM BESSEREN
VERSTÄNDNIS
Einige der von den Filtern absorbierten
Geruchsbestandteile werden gespalten
und von der Luftauslassöffnung als Geruch
ausgegeben.
Je nach Betriebsumgebung kann dieser
Geruch in einigen Monaten streng werden,
und die Luftauslassöffnung fängt
möglicherweise an zu riechen.
Kaufen Sie sich in diesem Fall den
Ersatzfilter FZ-60SEF aus der Liste der
Zubehörteile und tauschen Sie die Filter
aus.
Dieses Gerät entspricht den An-
forderungen der Richtlinien 89/
336/EEC und 73/23/EEC, ergänzt
durch 93/68/EEC.
DEUTSCH
FU-55SE_Ger.6.5 03.7.17, 8:55 AM1
Downloaded from: http://www.usersmanualguide.com/

• Verwenden Sie das Gerät nicht, wenn das Netzkabel oder der Netzstecker beschädigt oder der
Anschluss zur Steckdose locker ist.
Dies könnte einen Stromschlag, einen Kurzschluss und/oder einen Brand verursachen.
• Beschädigen, quetschen, bedecken, verbiegen Sie das Kabel nicht und ziehen Sie nicht daran.
Verdrehen, bündeln und klemmen Sie es nicht ein und stellen Sie keine schweren Gegenstände darauf.
Wenn das Netzkabel beschädigt ist, könnte ein Brand und/oder ein elektrischer Schlag verursacht werden.
• Verwenden Sie nur 220 - 240 V Wechselstrom.
Anderenfalls könnten ein Brand und/oder ein elektrischer Schlag verursacht werden.
• Modifizieren Sie nichts. Reparaturarbeiten und der Auseinanderbau des Gerätes darf nur von
einem autorisierten Kundendienst ausgeführt werden.
Anderenfalls könnten ein Brand, ein elektrischer Schlag und/oder Personenschäden verursacht werden.
Wenden Sie sich zwecks Reparaturarbeiten an Ihren Verkaufshändler oder an den Sharp-Kundendienst
in Ihrer Nähe.
• Entfernen Sie regelmäßig Staub vom Netzstecker.
Auf dem Netzstecker angesammelter Staub kann eine schlechte Isolierung gegen Feuchtigkeit usw.
verursachen.
Es könnten ein Brand und/oder ein elektrischer Schlag verursacht werden.
• Wenn Sie das Gerät reinigen möchten, ziehen Sie unbedingt den Netzstecker aus der Steckdose.
Fassen Sie außerdem den Netzstecker niemals mit nassen Händen an.
Anderenfalls könnten ein Brand, ein elektrischer Schlag und/oder Personenschäden verursacht werden.
• Verwenden Sie das Gerät niemals an Orten, an denen sich Ölbestandteile wie Speiseöl usw. in
der Luft befinden.
Anderenfalls könnten das Gehäuse des Gerätes Risse bekommen.
• Wischen Sie das Gerät nicht mit Benzin oder Farbverdünner ab. Sprühen Sie ebenfalls keine
Insektizide auf das Gerät.
Anderenfalls könnten ein Riss im Gehäuse, ein elektrischer Schlag und/oder ein Brand verursacht werden.
• Nehmen Sie das Gerät nicht in Betrieb, wenn Sie Rauch erzeugende Insektizide im Raum verwenden.
Chemische Bestandteile könnten sich im Innern des Gerätes ansammeln und bei Inbetriebnahme des
Gerätes von der Luftauslassöffnung ausgegeben werden. Der Ausstoß solcher Chemikalien kann
ungesund sein.
• Lassen Sie das Gerät keine brennbaren Gase, Funken von angezündeten Zigaretten, Weihrauch
usw. einsaugen.
Das Gerät könnte sich daraufhin entzünden.
• Verwenden Sie das Gerät nicht in feuchten Räumen wie im Badezimmer, oder an Orten, an
denen es nass werden könnte.
Anderenfalls könnten ein elektrischer Schlag und/oder eine Fehlfunktion verursacht werden.
• Stecken Sie keine Finger oder Gegenstände in die Einsaug- und Auslassöffnungen.
Anderenfalls könnten ein elektrischer Schlag und/oder eine Fehlfunktion verursacht werden.
• Halten Sie beim Herausziehen des Netzsteckers stets den Stecker fest und ziehen Sie nicht am Kabel.
Anderenfalls könnten ein elektrischer Schlag und/oder ein Brand aufgrund eines Kurzschlusses
verursacht werden.
• Wenn das Gerät zusammen mit einem Heizgerät verwendet wird, sorgen Sie für ausreichend Lüftung.
Anderenfalls könnten es zu einer Kohlenstoffmonoxidvergiftung kommen.
• Ziehen Sie den Netzstecker ab, wenn das Gerät nicht verwendet wird.
Anderenfalls könnten ein elektrischer Schlag aufgrund einer schlechten Isolierung und/oder ein Brand
aufgrund eines Kurzschlusses verursacht werden.
• Wenn das Netzkabel beschädigt ist, muss es vom Hersteller, seinem Kundendienst oder einem anderen
qualifizierten Personal ausgetauscht werden, damit Gefahrensituationen vermieden werden.
• Die Batterien müssen aus dem Gerät herausgenommen und sicher entsorgt werden, bevor das
Gerät ausrangiert wird.
VORSICHTSMASSNAHMEN
D-2
FU-55SE_Ger.6.5 03.7.17, 8:55 AM2
Downloaded from: http://www.usersmanualguide.com/

DEUTSCH
SICHERHEITSHINWEISE FÜR DIE GERÄTEBEDIENUNG
• Blockieren Sie nicht die Einsaug- und Auslassöffnungen.
• Verwenden Sie das Gerät nicht in der Nähe oder auf heißen Gegenständen, wie z.B. auf einem
Ofen usw. Verwenden Sie das Gerät nicht dort, wo es mit Dampf in Kontakt kommen kann.
• Verwenden Sie das Gerät nicht, wenn es auf der Seite liegt.
Verformung, Fehlfunktion und/oder Überhitzung des Motors könnten die Folge sein.
• Installieren Sie das Gerät nicht dort, wo Lampenruß erzeugt wird, wie beispielsweise in einer
Küche usw.
• Verwenden Sie für die Reinigung des Gerätes keine Reinigungsmittel.
Das Gehäuse des Geräts könnte beschädigt werden oder Risse bekommen.
Außerdem könnte dies zu einer Fehlfunktion der Sensoren führen.
• Verwenden Sie das Gerät nicht ohne Filter.
Es wird kein Reinigungseffekt erzielt. Ferner wird eine Störung verursacht.
• Waschen Sie die Filter nicht und verwenden Sie sie nicht wieder.
Es wird keine Wirkung erzielt, die Filter verursachen einen elektrischen Schlag und Störungen.
SICHERHEITSHINWEISE FÜR DIE INSTALLATION
SEHEN SIE AN FOLGENDEN ORTEN VON DEM BETRIEB DER FERNBEDIENUNG AB
• Orte, an denen Inverter-Lichtanlagen oder elektronisch selbststeuernde Lichtanlagen zum
Einsatz kommen.
Die Fernbedienung könnte funktionsunfähig werden. Bewegen Sie in diesem Fall die Fernbedienung
von solchen Lichtanlagen weg oder ändern Sie die Richtung.
• Orte, die direktem Sonnenlicht ausgesetzt sind.
Das Gerät empfängt möglicherweise keine Signale von der Fernbedienung.
Das Gerät reagiert möglicherweise auf keine Signale der Fernbedienung, wenn die Enden der
Leuchtstoffröhren aufgrund abgelaufener Lebensdauer flimmern; dies bedeutet jedoch keine
Fehlfunktion der Fernbedienung oder des Hauptgeräts. Tauschen Sie in diesem Fall die
Leuchtstoffröhren aus.
ACHTEN SIE BEI DER INSTALLATION AUF FOLGENDES:
• Halten Sie zu Fernseher, Radios und Radiowecker einen Mindestabstand von 2 m.
Anderenfalls könnte es zu elektrischen Interferenzen kommen.
• Halten Sie zu Wänden einen Mindestabstand von 60 cm.
Anderenfalls könnte der Motor überhitzt werden und Fehlfunktionen verursachen.
• Vermeiden Sie Orte, an denen Sensoren direkter Windeinwirkung ausgesetzt sind.
Anderenfalls funktioniert das Gerät möglicherweise nicht einwandfrei.
• Vermeiden Sie Orte, an denen Vorhänge usw. die Einsaug- oder Auslassöffnung berühren könnten.
Vorhänge usw. könnten schmutzig werden oder es könnten Fehlfunktionen auftreten.
EFFEKTIVER BETRIEB
• Stellen Sie das Gerät auf eine stabile Fläche mit ausreichender Lüftung.
ÜBER DEN FILTER
• Den HEPA-Filter und den Aktivkohlefilter nicht waschen und wiederverwenden. Er ist nicht mehr
wirksam und kann die Ursache eines elektrischen Schlags und einer Fehlfunktion sein.
• Die Wand o.Ä. hinter der Luftauslassöffnung wird mit der Zeit schmutzig. Wenn das Gerät über einen
langen Zeitraum hinweg am gleichen Ort verwendet wird, verwenden Sie bitte eine Vinylschutzfolie
o.Ä., damit die Wand nicht schmutzig wird. Reinigen Sie außerdem die Wand o.Ä. in regelmäßigen
Abständen.
D-3
FU-55SE_Ger.6.5 03.7.17, 8:55 AM3
Downloaded from: http://www.usersmanualguide.com/

D-4
BEZEICHNUNG DER BEDIENUNGSELEMENTE
AUTO-Betriebslampe
EXPLOSIONSANSICHT
DISPLAY DES HAUPTGERÄTS
Filterlampe
Falls die Filterlampe leuchtet, zeigt diese den
Zeitraum für den Austausch des Filters an.
Gebläseleistungs-
Lampen
CLUSTER-IONEN-LAMPE
Der Cluster-Ionen-Betrieb wird mit der Fernbedienung eingestellt.
Blaues Licht
Wenn sich der Cluster-Ionen-Betrieb im Reinigungsmodus oder im
AUTO-Cluster-Ionen-Modus befindet und die Luft im Zimmer
verschmutzt ist, wird dieses Licht eingeschaltet und der Reinigungs-
modus aktiviert.
Grünes Licht
Wenn sich der Cluster-Ionen-Betrieb im Ionen-Regelungsmodus
oder im AUTO-Cluster-Ionen-Modus befindet und die Luft im Zimmer
sauber ist, wird dieses Licht eingeschaltet und der Ionen-Rege-
lungsmodus aktiviert.
Ausgeschaltetes Licht
Kein Cluster-Ionen-Betrieb.
• Das Licht kann mit der “DISPLAY ON/OFF”-Taste auf
der Fernbedienung ausgeschaltet werden, auch
während Cluster-Ionen erzeugt werden.
(Bitte schalten Sie die Lampen aus, wenn sie nicht
erforderlich sind.)
Displaylampen OFF-Timer
(mit der Fernbedienung einstellen)
FU-55SE_Ger.6.5 03.7.17, 8:55 AM4
Downloaded from: http://www.usersmanualguide.com/
DEUTSCH
D-5
Pollenmodus-Betriebslampe
Fernbedienungsempfänger
REINIGUNGSANZEIGE
Die Farbe ändert sich, wenn die Luft verschmutzt ist.
Rein (grün) Etwas verschmutzt (orange) Sehr verschmutzt (rot)
ÜBER DIE REINIGUNGSANZEIGE
• Der Sensor zeigt je nach relativer Umgebungsänderung bei Einstecken
des Netzsteckers in die Steckdose eine REINIGUNGSANZEIGE -
Lampe an.
• Wenn die Luft bei Einstecken des Netzsteckers sehr verschmutzt
ist, leuchtet die REINIGUNGSANZEIGE-Lampe möglicherweise grün
auf, da der Verschmutzungsstatus die Umgebung ist, auf die der
Sensor den Verschmutzungsgrad stützt. Schalten Sie in diesem Fall
manuell in den gewünschten Betriebsmodus, da er im Auto-Modus
unwirksam ist. Siehe Seite D-11.
• Die REINIGUNGSANZEIGE-Lampe kann mit der “DISPLAY ON/
OFF”-Taste auf der Fernbedienung ausgeschaltet werden. Siehe
Seite D-11.
*Bevor die Filter-Nullstelltaste gedrückt
wird, unbedingt den Netzstecker in
eine Steckdose stecken.
Auf der Fernbedienung gibt es auch
eine Filter-Nullstelltaste.
Richten Sie die Fernbedienung auf das
Hauptgerät, bevor die darauf
befindliche Filter-Nullstelltaste
gedrückt wird.
MODE/ Taste Siehe Seite D-10.
(Zur Auswahl der Betriebsmodi und zum Ausschalten des Geräts.)
Sensorempfindlichkeits-Auswahlschalter (Sensor sensitivity)
Die Empfindlichkeit der Geruchs-
und Stauberkennung kann eingestellt werden.
Diese Einstellung wurde werkseitig auf “Normal” eingestellt.
Normalerweise sollte das Gerät mit dieser Einstellung verwendet
werden. Stellen Sie die Empfindlichkeit auf “High”, wenn die
Empfindlichkeit je nach Raumbedingung zu niedrig erscheint.
Filter-Nullstelltaste (Filter reset)
Geruchssensor
Erfasst Gerüche, wie Tabakrauch, Weihrauch, Haustiere,
Kosmetik usw.
Sensorabdeckung
Staubsensor
Erfasst Staub, Rauch, Pollen, Hausstaub usw.
Siehe Seite D-12, D-13.
Hauptgerät
Filterrahmen
HEPA-Filter (weiß)
Siehe Seite D-14.
(Staubansaugfilter)
Aktivkohlefilter (schwarz) Siehe Seite D-14.
(Luftreinigungsfilter)
Filterseparator
Vorfilter
Frontgehäuse
Haken
Fernbedienung Siehe Seite D-11.
FU-55SE_Ger.6.5 03.7.17, 8:55 AM5
Downloaded from: http://www.usersmanualguide.com/

D-6
BEZEICHNUNG DER BEDIENUNGSELEMENTE
Griff
Luftaustritt
Netzkabel
Netzstecker
ZUBEHÖR
Fernbedienung (1 Einheit) Batterie (R6 (AA) Batterie x 2)
Beiliegende Broschüre
•Bedienungsanleitung
TECHNISCHE DATEN
Modell
Stromversorgung
Gebläseleistungs-Einstellung
Nennleistung
Gebläseleistung
Anwendbare Bodenfläche
Kabellänge
Abmessungen
Gewicht
Gebläse-
leistungs-
betrieb
FU-55SE
220 - 240 V/50 Hz
~ 42 m
2
*
2,5 m
415 mm (B) x 238 mm (T) x 572 mm (H)
9,3 kg
Max.
43 W
330m
3
/Stunde
Hoch
19 W
218m
3
/Stunde
Mittel
6 W
95m
3
/Stunde
Ruhe
4 W
43m
3
/Stunde
*Der anwendbare Bodenflächenbereich ist der Flächenbereich für den Gerätebetrieb mit maximaler
Gebläseleistung.
(JEM 1467, The Japan Electrical Manufacturers’ Association)
Reduzierung der Standby-Leistung
Um die elektrischen Schaltkreise zu aktivieren, während der Netzstecker an eine Steckdose
angeschlossen ist, verbraucht dieses Produkt etwa 0,9 W der Standby-Leistung.
Sparen Sie Strom und ziehen Sie den Netzstecker ab, wenn das Gerät nicht verwendet wird.
RÜCKSEITE
Ionen-Lüftungsschlitz
• Die Ausgaberichtung der gereinigten Luft
kann in die durch die Pfeile angezeigten
Richtungen geändert werden.
• Stellen Sie die Ausgaberichtung beliebig
ein.
FU-55SE_Ger.6.5 03.7.17, 8:55 AM6
Downloaded from: http://www.usersmanualguide.com/
DEUTSCH
D-7
EINLEGEN DER BATTERIEN IN DIE FERNBEDIENUNG
Über die Batterien
• Die Lebensdauer der Batterien beläuft sich auf etwa 1 Jahr.
• Tauschen Sie die Batterien aus, wenn die Fernbedienung funktionsunfähig ist.
• Eine falsche Verwendung der Batterien kann dazu führen, dass Batterieflüssig-
keit ausläuft und/oder ein Schaden verursacht wird. Achten Sie beim Handhaben
der Batterien auf Folgendes:
• Wenn die Batterien ausgetauscht werden, müssen beide Batterien durch
neue des gleichen Typs ersetzt werden. (Verwenden Sie R6 (AA)-
Manganbatterien (2 Stück).)
• Nehmen Sie die Batterien heraus, wenn das Gerät oder die Fernbedienung
über einen längeren Zeitraum hinweg nicht verwendet wird. Dadurch wird
verhindert, dass die Fernbedienung durch Austreten der Batterieflüssigkeit
nicht einwandfrei funktioniert.
* Die beiliegenden Batterien sind für den anfänglichen Betrieb bestimmt und
können innerhalb eines Jahres erschöpft sein.
1
Nehmen Sie den Deckel des
Batteriefachs ab.
Drücken Sie auf den Deckel und
schieben Sie ihn, um ihn abzunehmen.
2
Legen Sie die Batterien ein.
Legen Sie die Batterien mit der Polarität
und wie neben stehend gezeigt ein.
3
Schließen Sie das Batteriefach.
VERWENDUNG DER FERNBEDIENUNG
• Drücken Sie die Fernbedienung, wenn Sie sich
direkt vor dem Hauptgerät (Empfänger) befinden.
• Der Signalbereich liegt bei etwa 7 m (Vorderseite).
• Vergewissern Sie sich, dass keine Gegenstände
den Signalpfad blockieren.
HINWEIS
• Setzen Sie die Fernbedienung keinen starken Belastungen aus. Lassen Sie die
Fernbedienung außerdem nicht nass werden, setzen Sie sie keiner direkten
Sonneneinstrahlung aus und legen Sie sie nicht neben einen Ofen o.Ä. Anderenfalls könnten
Fehlfunktionen auftreten.
Empfänger
Transmitter
VORBEREITUNG
FU-55SE_Ger.6.5 03.7.17, 8:55 AM7
Downloaded from: http://www.usersmanualguide.com/
D-8
VORBEREITUNG
•Ziehen Sie unbedingt den Netzstecker
aus der Steckdose heraus.
1
1
1
2
2
Tisch
Weiches Tuch
Frontgehäuse
Filterrahmen
Vorfilter
Filterseparator
Aktivkohlefilter
HEPA-Filter
Filterrahmen
INSTALLIEREN DER FILTER
Damit die Qualität der Filter aufrechterhalten bleibt, wurden sie in Plastikbeuteln
verpackt in das Hauptgerät installiert.
Entfernen Sie vor Inbetriebnahme des Geräts unbedingt die Plastikbeutel.
1
Nehmen Sie
die Filter heraus
1
Stellen Sie das Gerät mit
der Vorderseite nach
oben weisend auf.
Stellen Sie das Gerät auf einen
Tisch o.Ä., und achten Sie dabei
darauf, dass das Netzkabel hinten
am Gerät nicht eingeklemmt wird.
2
Nehmen Sie das Front-
gehäuse ab.
Drücken Sie den Haken am Boden
des Frontgehäuses an und heben
Sie das Gehäuse an, um es ab-
zunehmen.
3
Ziehen Sie den Filterrahmen
heraus und entfernen Sie
den Vorfilter und den Filter-
separator.
4
Nehmen Sie den Aktivkohle-
filter (schwarz) und den
HEPA-Filter (weiß) aus dem
Plastikbeutel heraus.
Haken
FU-55SE_Ger.6.5 03.7.17, 8:55 AM8
Downloaded from: http://www.usersmanualguide.com/
DEUTSCH
D-9
2
Installieren Sie die Filter
1
Entfernen Sie den Plastikbeutel
vom HEPA-Filter und installieren
Sie den Filter im Filterrahmen,
wobei die Anzeige “FRONT” nach
oben zeigt.
Setzen Sie den Filter so ein, dass die
Halteklemmen am HEPA-Filter auf Sie
gerichtet sind.
Ein einwandfreier Betrieb ist nicht möglich,
wenn der Filter umgekehrt installiert wird.
2
Nehmen Sie den Aktivkohlefilter
aus dem Plastikbeutel heraus und
befestigen Sie den Filter am
Filterrahmen.
3
Befestigen Sie den Filterseparator und
den Vorfilter in dieser Reihenfolge im
Filterrahmen.
• Setzen Sie den
Filterseparator so ein,
dass die Lamellen
nach unten zeigen, wie
rechts in der Abbildung
gezeigt.
• Setzen Sie die Halte-
klemmen des Vorfilters
(4 Stellen) in die Löcher
am Filterrahmen ein.
• Setzen Sie den Filterrahmen im
Gerät ein, wie rechts in der
Abbildung gezeigt
(keine vertikale Ausrichtung).
4
Notieren Sie das Anfangs-
datum der Verwendung auf
dem Datumsaufkleber, der
am Hauptgerät befestigt ist.
Verwenden Sie das Datum als
Richtlinie für die Filter-
austauschperiode.
Halteklemmen
HEPA-Filter
Filterrahmen
Aktivkohlefilter
HEPA-Filter
Filterrahmen
Vorfilter
Halteklemmen (4 Stellen)
Filterseparator
Aktivkohlefilter
Löcher
Filterrahmen
Filterrahmen
Datums-
aufkleber
Lamelle des Filterseparators
FU-55SE_Ger.6.5 03.7.17, 8:55 AM9
Downloaded from: http://www.usersmanualguide.com/
Plasmacluster
D-10
BETRIEB
BETRIEB
DES HAUPTGERÄTS
Verfügbare Betriebsarten
dieses Geräts
•
AUTO-Betrieb (Gebläseleistung)
•
Ruhe-Betrieb (Gebläseleistung)
•
Mitte-Betrieb (Gebläseleistung)
•
Hoch-Betrieb (Gebläseleistung)
•
Max. Betrieb (Gebläseleistung)
•
Pollenmodus-Betrieb
Der Gerätebetrieb startet, wenn die MODE/ Taste gedrückt wird.
Das Gerät startet im AUTO-Modus (Gebläseleistung).
• Während des Betriebs leuchtet die Cluster-Ionen-Lampe.
Der Betriebsmodus wird bei jeder Tastenbetätigung wie folgt umgeschaltet:
Die Lampe des eingestellten Betriebsmodus leuchtet auf.
Der für die jeweiligen Bedingungen erforderliche Betriebsmodus kann eingestellt werden.
Stopp
AUTO-Betrieb
Die Gebläseleistung wird je
nach Verschmutzungsgrad der
Luft, der vom Staubsensor er-
kannt wird, und für effektive Luft-
reinigung automatisch geregelt
(Hoch, Mitte, Ruhe).
Ruhe-Betrieb
Das Gerät arbeitet leise bei
minimaler Lufteinsaugung.
Pollenmodus-Betrieb
Das Gerät aktiviert für 10 Minuten
den hohen Leistungsbetrieb, an-
schließend schaltet sich das Gerät
abwechselnd in den mittleren und
hohen Leistungsbetrieb.
Mittlerer bis Max. Betrieb
Das Gerät betreibt das Gebläse im
mittleren, hohen oder max. Leistungs-
betrieb.
In den ersten 30 Sekunden nach Einstecken des
Netzsteckers in die Steckdose prüft das Gerät die
Luftbedingungen. Wenn der Betrieb in dieser Zeit
aktiviert wird (ON), blinkt die REINIGUNGSANZEIGE-
Lampe abwechselnd grün, orange und rot.
Cluster-Ionen-Lampe
MODE/ Taste
10 Minuten:Hoher Gebläseleistungsbetrieb
20 Minuten:Mittlerer Gebläseleistungsbetrieb
20 Minuten:Hoher Gebläseleistungsbetrieb
FU-55SE_Ger.6.5 03.7.17, 8:55 AM10
Downloaded from: http://www.usersmanualguide.com/
DEUTSCH
Plasmacluster
AUTO
RESET
OFF
D-11
BETRIEB DER FERNBEDIENUNG
Verfügbare
Fernbedienungsfunktionen
•
AUTO-Betrieb
(Gebläseleistung)
•
MANUELLER-Betrieb
(Gebläseleistung)
•
Pollenmodus-Betrieb
•
OFF-Timer-Einstellung
•
DISPLAY ON/OFF
•
Cluster-Ionen-Modusauswahl
•
AUTO-Cluster-Ionen-Modus
•
Reinigungsmodus
•
Ionen-Regelungsmodus
•
Cluster-Ionen-OFF-Modus
• Drücken Sie die POWER ON/OFF-Taste, um den Betrieb zu starten.
Ein kurzer Piepton wird ausgegeben und der Betrieb startet im AUTO-
Betrieb (Gebläseleistung).
Der AUTO-Cluster-Ionen-Modus wird für den Cluster-Ionen-Betrieb
eingestellt.
• Drücken Sie die POWER ON/OFF-Taste noch einmal, um den Betrieb
zu stoppen.
Ein langer Piepton wird ausgegeben und der Betrieb stoppt.
POWER ON/OFF-Taste
Zum Starten des AUTO-
Betriebs (kurzer Piepton) und
Stoppen des Betriebs (langer
Piepton).
AUTO-Taste
(Gebläseleistung)
Die Gebläseleistung wird je
nach Verschmutzungsgrad der
Luft automatisch eingestellt.
MANUELL-Taste
(Gebläseleistung)
Die Gebläseleistung kann
zwischen Ruhe, Mittel, Hoch
und Max. umgeschaltet werden.
DISPLAY ON/OFF-Taste
Schaltet die Cluster-Ionen-
Lampe und REINIGUNGS-
ANZEIGE-Lampe entweder
EIN oder AUS.
• Die Cluster-Ionen-Lampe
wird durch Drücken der
Cluster-Ionen-Auswahltaste
(außer die OFF-Taste) im
“DISPLAY OFF”-Modus für
etwa 3 Sekunden einge-
schaltet.
Transmitter
Filter-Nullstelltaste
Drücken Sie diese Taste nach
Austausch der Filter.
Pollenmodus-Betriebstaste
Das Gerät arbeitet effektiv, wenn
Sie in der Luft Pollen vermuten.
Siehe Seite D-10.
OFF-Timer-Taste
Für das Einstellen des OFF-Timers.
Bei jedem Drücken der Taste
ändert sich die Zeiteinstellung
wie nachfolgend angegeben:
1 Stunde 4 Stunden
Abbrechen 8 Stunden
• Die verbleibende Zeit wird
während des Ablaufs mithilfe
der Lampe angezeigt.
• Das Gerät beendet den
Betrieb, wenn die eingestellte
Zeit abgelaufen ist.
Cluster-Ionen-Wahltaste
AUTO Cluster-Ionen-Taste
Das Gerät wechselt je nach Verschmut-
zungsgrad der Luft, erkannt vom Staub- und
Geruchssensor, automatisch zwischen
Reinigungsmodus und Ionen-Regelungsmodus.
Der Reinigungs-Betrieb wird etwa 1 Minute
ausgeführt, wenn der Betrieb startet.
Ionen-Regelungs-Taste
Das Gerät arbeitet kontinuierlich im Ionen-
Regelungsmodus.
Die Ionen-Balance wird im Raum beibehalten,
indem das Verhältnis der Negativ-Ionen erhöht
wird. (Cluster-Ionen-Lampe eingeschaltet (grün).)
Reinigen-Taste
Das Gerät arbeitet kontinuierlich im
Reinigungsmodus. Der Reinigungs-
modus reduziert bestimmte in der
Luft befindliche Schimmelpilze.
(Cluster-Ionen-Lampe eingeschaltet
(blau).)
OFF-Taste
Die Erzeugung von Ionen wird
gestoppt und die Cluster-Ionen-
Lampe wird ausgeschaltet.
Wenn das Zimmer besonders schimmelig riecht, schalten Sie das Gerät in den
Reinigungsmodus.
FU-55SE_Ger.6.5 03.7.17, 8:55 AM11
Downloaded from: http://www.usersmanualguide.com/

RICHTLINIEN FÜR DEN BETRIEB
RICHTLINIEN FÜR DEN GERUCHSSENSOR
• Der Geruchssensor reagiert außer auf Gerüche, wie Zigarettenrauch oder Tiergerüche, auf
Folgendes:
• Insektizide, Kosmetik, Spray, Alkohol.
• Plötzliche Temperatur- oder Feuchtigkeitsschwankungen.
• Wenn sich das Gerät im AUTO-Betrieb befindet und Kosmetik oder Ähnliches in einem
geschlossenen Raum verwendet wird, reagiert der Sensor normalerweise durch Erhöhen der
Luftansaugung. Die Empfindlichkeit des Sensors sollte nicht geändert werden.
RICHTLINIEN FÜR DEN STAUBSENSOR
• Der Staubsensor erkennt Staubpartikel wie Zigarettenrauch und Hausstaub in der Raumluft.
• Verglichen mit Zigarettenrauch ist der Staubgehalt beim Bettenmachen so gering, dass der
Staubsensor diesen nicht erkennt. Aus diesem Grund kann der von Ihnen beobachtete
Staubgehalt von der Anzeige der Reinigungsanzeige-Lampe abweichen.
RICHTLINIEN FÜR DIE FILTER-NULLSTELLTASTE
• Stellen Sie nach dem Austausch der Filter sicher, dass der Netzstecker in eine Steckdose
gesteckt und die Filter-Nullstelltaste am Hauptgerät oder auf der Fernbedienung gedrückt
wird. Der “PIEP”-Ton zeigt an, dass die gespeicherte Betriebszeit auf Null gestellt wurde.
Wenn die Filterlampe zu diesem Zeitpunkt leuchtet, wird sie nun ausgeschaltet.
D-12
FU-55SE_Ger.6.5 03.7.17, 8:55 AM12
Downloaded from: http://www.usersmanualguide.com/
DEUTSCH
PFLEGE UND WARTUNG
(Reinigen Sie das Gerät bitte regelmäßig, damit die bestmögliche Leistung dieses Produkts aufrechterhalten bleibt.)
Wenn Sie das Gerät reinigen wollen, ziehen Sie unbedingt den Netzstecker aus der Steckdose.
Fassen Sie außerdem den Netzstecker niemals mit nassen Händen an.
Anderenfalls könnten ein Brand, ein elektrischer Schlag und/oder Personenschäden verursacht werden.
D-13
Sensorabdeckung
Sensorfilter
Sensorabdeckung
FILTERREINIGUNG
Reinigen Sie die Oberfläche des
Vorfilters vorsichtig mit einem
Staubsauger.
HINWEIS
• Der HEPA-Filter wird sehr
schnell beschädigt. Berühren
Sie ihn nicht mit der Düse des
Staubsaugers.
Stellen Sie ferner sicher, dass er
niemals mit Wasser gewaschen wird.
• Der HEPA-Filter und der
Aktivkohlefilter müssen nicht
gereinigt werden.
HAUPTGERÄT
Entfernen Sie Verunreinigungen am
Hauptgerät und auf der
Aufstellfläche/Tischfläche möglichst
sofort. Hartnäckiger Schmutz kann
schwierig zu entfernen sein.
Wischen Sie mit einem
weichen Tuch trocken.
Wischen Sie hartnäckigen Schmutz
mit einem weichen Tuch weg, das mit
Wasser oder warmen Wasser von
40 °C oder weniger angefeuchtet ist.
Verwenden Sie keine
flüchtigen Flüssigkeiten.
Benzin, Farbverdünner, Putzmittel
o.Ä. könnten das Gerätegehäuse
beschädigen.
Verwenden Sie keine
Reinigungsmittel.
Bestandteile von Reinigungsmitteln
könnten das Gerätegehäuse
beschädigen.
Lassen Sie das Gerät
nicht nass werden.
Lassen Sie niemals Wasser auf das
Gerät gelangen.
Vorfilter
Sensor-
öffnung
STAUBSENSOR
GERUCHSSENSOR
Der GERUCHSSENSOR und der STAUBSENSOR
sollten einmal alle drei Monate gewartet werden.
Die Empfindlichkeit der Sensoren wird unbeständig,
wenn der Geruchs- oder Staubsensor verschmutzt
oder blockiert ist. Bitte reinigen Sie diese Teile wie folgt:
STAUBSENSOR
1
Entfernen Sie das
Frontgehäuse und
den Sensorfilter.
•
Nehmen Sie den Sensorfilter
ab, während Sie die Halte-
klemme an der Sensorab-
deckung drücken.
2
Entfernen Sie Staub
vom Sensorfilter.
•
Nehmen Sie den Sensorfilter
ab und klopfen Sie mit der
Hand leicht gegen ihn, um
den Staub zu entfernen.
Wenn der Filter sehr ver-
schmutzt ist, reinigen
Sie ihn mit Wasser und
lassen Sie ihn danach
vollständig trocknen.
3
Setzen Sie den Sensorfil-
ter in die Abdeckung ein,
installieren Sie diese am
Hauptgerät und befesti-
gen Sie das Frontgehäuse.
• Der Sensorfilter kann
beliebig herum eingesetzt
werden.
VORSICHT
• Vergessen Sie nicht, die Sensorabdeckung wieder
anzubringen, bevor das Gerät wieder gestartet
wird.
• Stecken Sie keine Fremdgegenstände (Zahn-
stocher o.Ä.) in den Filter.
Dies könnte eine Beschä-
digung oder Fehlfunktion
am Gerät verursachen.
GERUCHSSENSOR
Entfernen Sie Staub von der
Oberfläche der Sensoröffnung
mit einem Staubsauger.
FU-55SE_Ger.6.5 03.7.17, 8:55 AM13
Downloaded from: http://www.usersmanualguide.com/

D-14
PFLEGE UND WARTUNG
RICHTLINIEN FÜR DIE LEBENSDAUER DER FILTER
Die Filteraustauschperiode wird anhand der Filterlampe angezeigt.
(Wenn das Gerät 12 Stunden täglich in Betrieb ist, leuchtet die Lampe in etwa 5 Jahren auf.)
• Die Betriebsstunden sind im Speicher gespeichert, auch wenn der Netzstecker für den Trans-
port in einen anderen Raum, usw. abgezogen wird.
Die Filterlampe dient nur als Richtlinie.
Wenn es schwierig wird, Staub oder Gerüche zu entfernen, tauschen Sie die Filter aus.
Richtlinien für den Austausch der Filter
• HEPA-Filter Etwa 5 Jahre nach dem Öffnen
• Aktivkohlefilter Etwa 5 Jahre nach dem Öffnen
Die Austauschperiode ist so eingestellt, als würden 10 Zigaretten pro Tag geraucht, und die
Staubansaug-/Luftreinigungsleistung ist auf die Hälfte der Leistung neuer Filter reduziert.
Die Austauschperiode ist je nach Betriebsstunden und Aufstellungsort unterschiedlich.
(JEM 1467, The Japan Electrical Manufacturers’ Association)
Je nach Betriebsumgebung kann in einigen Monaten Geruch von der Luftauslassöffnung
wahrgenommen werden.
(ZUM BESSEREN VERSTÄNDNIS. Beziehen Sie sich auf Seite D-1)
AUSTAUSCH DER FILTER
1
Sie können das Austauschverfahren der Seite D-8 “Installieren
der Filter” entnehmen.
2
Notieren Sie das Startdatum der neuen Filter auf dem Datumsaufkleber.
3
Vergewissern Sie sich, dass der
Netzstecker in eine Steckdose ge-
steckt und die Fernbedienung auf
den Empfänger am Hauptgerät ge-
richtet wird; drücken Sie die Filter-
Nullstelltaste auf der Fernbedienung
mit Hilfe eines spitzen Gegenstands
oder drücken Sie die Filter-Nullstell-
taste am Hauptgerät.
(Siehe Seite D-11.)
• Der “PIEP”-Ton zeigt an, dass die gespeicherte
Betriebszeit auf Null gestellt wurde.
• Wenn die Filterlampe zu diesem Zeitpunkt
leuchtet, wird sie gleich ausgeschaltet.
• Drücken Sie die Filter-Nullstelltaste am
Hauptgerät, nachdem das Frontgehäuse
abgenommen wurde.
Austauschfilter (Modell: FZ-60SEF)
• HEPA-Filter: 1 Einheit
• Aktivkohlefilter: 1 Einheit
Wenden Sie sich hinsichtlich der Austauschfilter an Ihren Verkaufshändler.
Die Filterentsorgung betreffende Maßnahmen
Entsorgen Sie ersetzte Filter gemäß den örtlichen Gesetzen und Verordnungen.
HEPA-Filtermaterialien: Aktivkohlefilter-Materialien:
• Filter: Polypropylen • Luftreiniger: Aktive Holzkohle
• Rahmen: Polyester • Netz: Polypropylen 60 %, Polyester 40 %
Filter-Nullstelltaste
RESET
FU-55SE_Ger.6.5 03.7.17, 8:55 AM14
Downloaded from: http://www.usersmanualguide.com/
DEUTSCH
STÖRUNGSBESEITIGUNG
Prüfen Sie vor Benachrichtigung des Kundendienstes die nachstehenden Symptome auf mögliche Abhilfe-
maßnahmen, da das aufgetretene Problem nicht unbedingt auf eine Gerätefehlfunktion hinweisen muss.
SYMPTOM
ABHILFE (keine Fehlfunktion)
Die Fernbedienung arbeitet
nicht.
• Sind die Batterien leer?
• Wurden die Batterien richtig herum eingelegt?
• Flimmert eine Leuchtstoffröhre im Raum, weil die Lebensdauer
abge-laufen ist? (Siehe Seite D-3, D-7.)
Gerüche und Staub können nicht
ohne Weiteres beseitigt werden.
• Sind die Filter stark verschmutzt? (Siehe Seite D-14.)
Die REINIGUNGSANZEIGE-
Lampe leuchtet in der Farbe
Grün, obwohl die Luft
verschmutzt ist.
• Ist die Öffnung des Geruchssensors blockiert oder ist der
Sensorfilter verstopft? (Siehe Seite D-13.)
• War die Luft schon verschmutzt, als der Netzstecker in die
Steckdose gesteckt wurde? (Siehe Seite D-5.)
Die REINIGUNGSANZEIGE-
Lampe leuchtet in der Farbe
Orange oder Rot, obwohl die
Luft sauber ist.
• Ist der Sensorfilter verschmutzt oder verstopft?
Die Empfindlichkeit des Sensors wird unbeständig, wenn die
Öffnung des Staubsensors verschmutzt oder verstopft ist.
Entfernen Sie den Staub vom Sensorfilter. (Siehe Seite D-13.)
• Im Reinigungsmodus (oder Ionen-Regelungsmodus) ändert
sich die Farbe der Cluster-Ionen-Lampe nicht.
Ein Ton wird
vom Gerät
ausgegeben.
Klick, Klick
Tick, tick, tick
• Dieser Ton wird ausgegeben, wenn sich das Gerät im Ionen-
Regelungsmodus befindet.
Wenn der Ton stört, stellen Sie das Gerät weiter entfernt auf.
• Dieser Ton wird ausgegeben, wenn das Gerät Cluster-Ionen
erzeugt.
Wenn das Geräusch stört, z. B. beim Schlafen, stellen Sie das
Gerät weiter entfernt auf.
Manchmal ist ein “Tick, Tick,
Tick” vom Gerät hörbar und
manchmal ist der Ton nicht
hörbar.
• Ein Ton ist manchmal tief, laut oder ist nicht hörbar. Die
Wirksamkeit der Cluster-Ionen ist allerdings die gleiche.
Die ausgegebene Luft riecht
eigenartig.
• Sind die Filter stark verschmutzt?
Tauschen Sie die Filter aus. (Siehe Seite D-14.)
• Dies kann vom Ozon verursacht werden, das durch den Clus-
ter-Ionen-Generator erzeugt wird. Die Dichte des erzeugten
Ozons ist sehr gering und für Menschen ungefährlich. Das
Ozon löst sich außerdem schnell auf und sammelt sich nicht
im Raum an.
D-15
Die Farbe der Cluster-Ionen-
Lampe bleibt Grün (Blau) und
ändert sich nicht.
Das Gerät arbeitet nicht, obwohl
Zigaretten geraucht werden.
• Ist das Gerät an einem Ort installiert, an dem es für die
Sensoren sehr schwierig ist, Zigarettenrauch zu erkennen?
• Sind die Öffnungen des Geruchs- oder Staubsensors blockiert
oder verstopft? (Reinigen Sie in diesem Fall die Öffnungen.)
(Siehe Seite D-13.)
Die Filterlampe leuchtet, auch
wenn die Filter ausgetauscht
wurden.
• Stecken Sie nach dem Austausch der Filter den Netzstecker
in eine Steckdose und drücken Sie die Filter-Nullstelltaste am
Hauptgerät oder auf der Fernbedienung. (Siehe Seite D-14.)
Die Cluster-Ionen-Lampe oder
die REINIGUNGSANZEIGE-
Lampe leuchtet nicht.
• Ist der DISPLAY OFF-Modus eingestellt?
• Drücken Sie die DISPLAY ON/OFF-Taste auf der Fernbe-
dienung. (Siehe Seite D-11.)
FU-55SE_Ger.6.5 03.7.17, 8:55 AM15
Downloaded from: http://www.usersmanualguide.com/

FRANÇAIS
CARACTERISTIQUES
Contrôle d’équilibrage de
groupes d’ions négatifs
L’appareil contrôle le rapport des groupes
d’ions négatifs et positifs en fonction des
conditions dans la pièce.
• Mode de nettoyage
Environ la même quantité de groupes
d’ions négatifs et positifs est déchargée.
Ce mode est efficace pour lutter contre la
moisissure ambiante.
• Mode contrôle d’ions
Il est dit que l’on trouve beaucoup d’ions
négatifs à proximité des chûtes d’eau et
dans les forêts. Dans ce mode opératoire,
des ions négatifs sont libérés en propor-
tions plus élevées pour créer une
atmosphère similaire.
• Mode groupes d’ions AUTO
Cet appareil se commute automatiquement
entre les modes de nettoyage et de
rafraîchissement suivant l’importance de la
pollution de l’air détectée par le capteur de
poussière et d’odeur.
Filtre HEPA
• Collecteur de poussière à grande
efficacité
Filtre à charbon actif
Désodorisation puissante à l’aide de
grosses particules de charbon actif
TABLE DES MATIERES
PRECAUTIONS DE SECURITE.............. F-2
• PRECAUTIONS CONCERNANT
D’UTILISATION DE CET APPAREIL ........... F-3
• PRECAUTIONS CONCERNANT
L’INSTALLATION .........................................F-3
• A PROPOS DU FILTRE ............................... F-3
DESIGNATIONS DES PIECES ............... F-4
• VOYANTS INDICATEURS DE L’UNITE
PRINCIPALE ................................................ F-4
• VUE ECLATEE............................................. F-4
• DOS DE L’APPAREIL .................................. F-6
• ACCESSOIRES ...........................................F-6
CARACTERISTIQUES ............................ F-6
PREPARATION........................................ F-7
• MISE EN PLACE DES PILES
DANS LA TELECOMMANDE....................... F-7
• UTILISATION DE LA TELECOMMANDE..... F-7
• INSTALLATION DES FILTRES ....................F-8
FONCTIONNEMENT ............................. F-10
•
FONCTIONNEMENT DE L’UNITE PRINCIPALE .....
F-10
•
FONCTIONNEMENT DE LA TELECOMMANDE ....
F-11
GUIDE D’UTILISATION ......................... F-12
SOINS ET ENTRETIEN ......................... F-13
• UNITE PRINCIPALE .................................. F-13
• NETTOYAGE DU FILTRE .......................... F-13
• CAPTEUR DE POUSSIERE,
CAPTEUR D’ODEUR ................................ F-13
• GUIDE DE DUREE D’UTILISATION
DES FILTRES ............................................ F-14
RESOLUTION DES PROBLEMES ....... F-15
Merci de vous être porté acquéreur du FU-60SE
de SHARP. Veuillez lire ce manuel avec atten-
tion afin d’utiliser ce produit correctement. Avant
d’utiliser ce produit, consultez impérativement
la section “Précautions” de sécurité.
Après avoir lu ce manuel, gardez-le à portée
de main pour future référence.
Cet appareil est destiné uniquement à un us-
age domestique.
F-1
POUR UNE BONNE
CONNAISSANCE DE L’APPAREIL
Certains composants odorants absorbés
par les filtres se séparent et sont évacués
par la sortie d’échappement comme
odeurs.
Suivant le lieu d’utilisation, cette odeur ris-
que de devenir forte au bout de quelques
mois et la sortie d’échappement peut
dégager une odeur désagréable.
Dans ce cas, remplacez les filtres par le
filtre de rechange FZ-60SEF proposé
comme consommables en option.
L’équipement est conforme aux
conditions des Directives 89/336/
EEC et 73/23/EEC amendées
par 93/68/EEC.
FRANÇAIS
FU-55SE_Fre.6.5 03.7.17, 8:55 AM1
Downloaded from: http://www.usersmanualguide.com/

• N’utilisez pas cet appareil si le câble d’alimentation ou sa prise est endommagé ou encore, si
le raccordement à la prise du secteur n’est pas sûr.
Cela risque de provoquer une électrocution, un court-circuit et/ou déclencher un incendie.
• Prenez garde de ne pas soumettre le câble d’alimentation à des contraintes risquant de
l’endommager, ne posez aucun objet lourd dessus.
Si le câble d’alimentation est endommagé, cela risque de provoquer un incendie et/ou une électrocution.
• Utilisation uniquement avec du 220-240 V alternatif.
Dans le cas contraire, cela risque de provoquer un incendie et/ou une électrocution.
• N’effectuez aucune modification. Seul un personnel d’entretien qualifié peut effectuer les in-
terventions et réparations de cet appareil.
Dans le cas contraire, cela peut provoquer un incendie, une électrocution et/ou des blessures corporelles.
Pour toute réparation, contactez votre revendeur ou le centre SAV Sharp le plus proche.
• Nettoyez périodiquement la prise du secteur pour la débarrasser de toute poussière.
La poussière accumulée sur la prise du secteur peut, en se combinant à l’humidité, provoquer un
défaut d’isolement, etc.
Dans le cas contraire, cela risque de provoquer un incendie et/ou une électrocution.
• Lors du nettoyage de l’appareil, débranchez d’abord la prise du secteur.
De plus, ne jamais manipuler la prise du câble d’alimentation avec les mains mouillées.
Car vous vous exposez à une électrocution.
• N’utilisez pas cet appareil dans les lieux exposés aux vapeurs d’huile de cuisine, etc.
La finition de surface de l’appareil risque de se craqueler.
• Ne pas essuyer l’appareil avec du benzène ou du diluant de peinture. Ne pas non plus pulvériser
d’insecticide dessus.
Dans le cas contraire, cela peut provoquer des craquelures, une électrocution et/ou déclencher un
incendie.
• Ne pas utiliser cet appareil en même temps que des fumigènes insecticides pour intérieur.
Les composants chimiques peuvent s’accumuler à l’intérieur de l’appareil et être ensuite refoulés par
la sortie d’échappement en cours de fonctionnement. Ces composants chimiques risquent d’être
dangereux pour la santé.
• Ne pas exposer cet appareil à des gaz inflammables, à la fumée de cigarette, d’encens, etc.
L’appareil risque de s’enflammer.
• Ne pas utiliser cet appareil dans les endroits humides comme une salle de bains, ou dans un
endroit où il risque d’être mouillé.
Dans le cas contraire, cela risque de provoquer une électrocution et/ou un dysfonctionnement.
• Ne pas introduire les doigts ou le moindre objet dans les ouïes d’entrée d’air ou d’évacuation.
Dans le cas contraire, cela risque de provoquer une électrocution et/ou un dysfonctionnement.
• Pour débrancher le câble d’alimentation, tirez-le en le tenant par la prise, ne tirez jamais sur le câble.
Cela risque de provoquer une électrocution, un court-circuit et/ou déclencher un incendie.
• Ventilez lors d’une en utilisation de l’appareil en même temps qu’un appareil de chauffage.
Cela peut entraîner une asphyxie au monoxyde de carbone.
• Débranchez l’appareil du secteur lorsque celui-ci n’est pas utilisé.
Cela risque de provoquer une électrocution par mauvaise isolation et/ou un court-circuit.
• Si le câble d’alimentation est endommagé, celui-ci doit être remplacé par le fabricant ou le
SAV pour éviter tout danger.
• Retirez les piles de l’appareil avant de mettre l’appareil au rebut et débarrassez-vous en
respectant la réglementation.
PRECAUTIONS DE SECURITE
F-2
FU-55SE_Fre.6.5 03.7.17, 8:55 AM2
Downloaded from: http://www.usersmanualguide.com/

FRANÇAIS
PRECAUTIONS CONCERNANT L’UTILISATION DE CET APPAREIL
• Ne pas obturer les ouïes d’entrée et d’évacuation.
• Ne pas utiliser cet appareil à proximité, ou sur une source de chaleur telle qu’un chauffage,
etc. Ne pas non plus utiliser cet appareil à proximité d’une source de vapeur d’eau.
• Ne pas utiliser cet appareil en le plaçant sur le côté.
Une déformation, un dysfonctionnement et/ou une surchauffe du moteur risque de se produire.
• Ne pas utiliser cet appareil dans une cuisine, etc., pour éviter le noircissement de la lampe.
• Ne pas utiliser de détergent pour nettoyer l’appareil.
Sa surface risque d’être endommagé ou craquelée.
De plus les capteurs risquent de ne plus fonctionner.
• Ne pas faire fonctionner cet appareil sans son filtre.
Il n’aura aucun effet purificateur. De plus, cela devient la cause du problème.
• Ne pas laver et réutiliser les filtres.
Ils perdent totalement leur efficacité et présentent des risques d’électrocution et de dysfonctionnement.
PRECAUTIONS CONCERNANT L’INSTALLATION
NE PAS UTILISER LA TELECOMMANDE DANS LES ENDROITS SUIVANTS :
• Les endroits où un éclairage fluorescent ou spontané est utilisé.
La télécommande risque de ne pas fonctionner. Dans ce cas, éloignez-vous de cet éclairage ou
changez de sens.
• Les emplacements exposés au soleil.
L’appareil risque de ne pas recevoir les signaux de la télécommande.
L’appareil risque de ne pas répondre aux signaux de la télécommande si l’extrémité du tube fluores-
cent devient noire ou si le tube commence à clignoter en fin de vie ; cependant, cela ne signifie pas
un dysfonctionnement de la télécommande ou de l’unité principale. Dans ce cas, remplacez le tube
fluorescent par un neuf.
PRENDRE LES PRECAUTIONS SUIVANTES LORS DE L’INSTALLATION
• Installez l’appareil à plus de 2 m de distance d’une télévision ou radio.
Sinon, des interférences électriques risquent de se produire.
• Placez l’appareil au moins à 60 cm des murs.
Sinon, le moteur risque de surchauffer et de causer un dysfonctionnement.
• Evitez les emplacements où les capteurs sont exposés directement au vent.
Dans le cas contraire, l’appareil risque de ne pas fonctionner correctement.
• Evitez les emplacements où des rideaux risque d’entrer en contact avec les ouïes d’entrée ou
d’évacuation.
Les rideaux, etc., risquent de se salir et un dysfonctionnement se produire.
FONCTIONNEMENT EFFICACE
• Placez l’appareil sur une surface stable dans un endroit aéré.
A PROPOS DU FILTRE
• Ne pas laver et réutiliser les filtres HEPA et à charbon actif. Ils perdent totalement leur efficacité et
présentent des risques d’électrocution et de dysfonctionnement.
• Le mur, etc., situé derrière l’ouïe d’évacuation peut devenir sale avec le temps. Lors d’une utilisation
pendant une longue période de temps au même endroit, utilisez une feuille de vinyl, etc., pour empêcher
que le mur ne se salisse. De plus, nettoyez le mur périodiquement, etc.
F-3
FU-55SE_Fre.6.5 03.7.17, 8:55 AM3
Downloaded from: http://www.usersmanualguide.com/
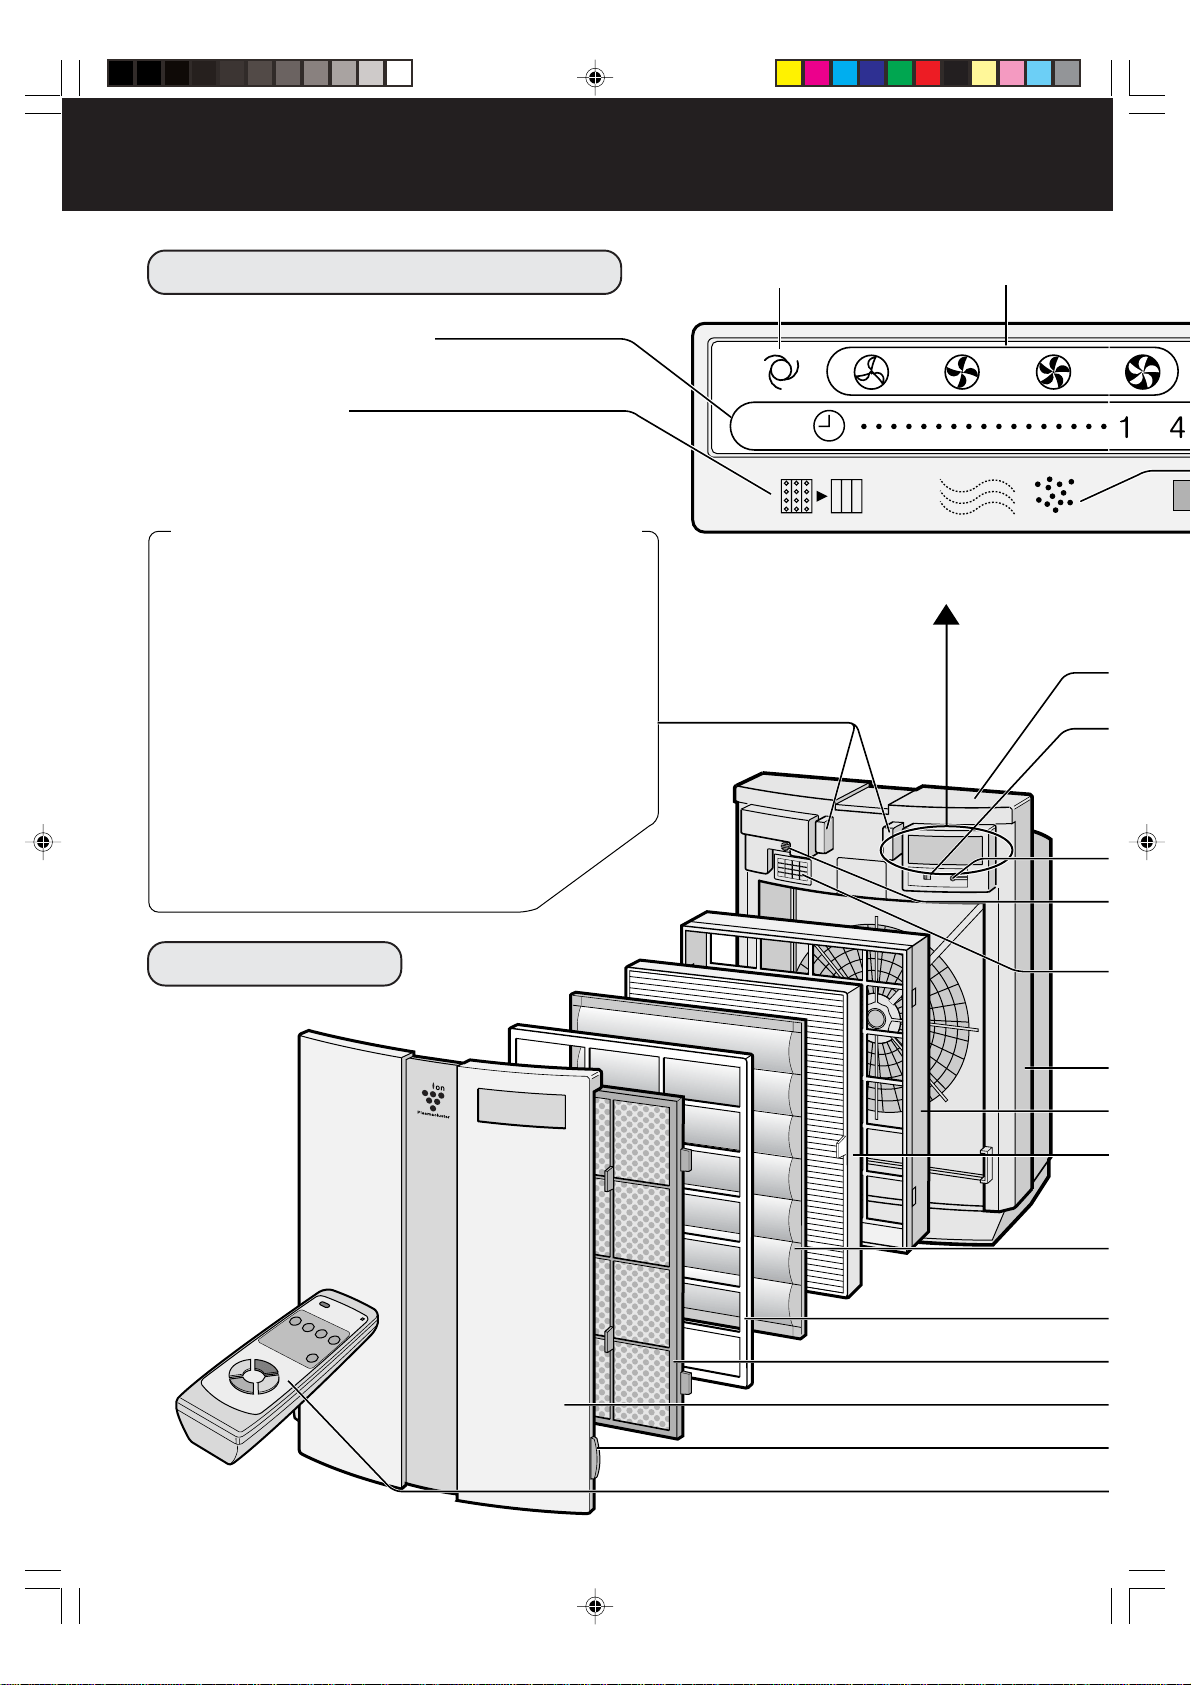
F-4
DESIGNATIONS DES PIECES
Voyant de
fonctionnement AUTO
Voyants de vitesse
de ventilation
VUE ECLATEE
VOYANTS INDICATEURS DE L’UNITE PRINCIPALE
LAMPE DE GROUPES D’IONS
Le fonctionnement en groupes d’ions est sélectionné en
utilisant la télécommande.
Voyant bleu
Lorsque le fonctionnement en groupes d’ions est en mode nettoyage
ou AUTO et que l’air de la pièce est sale, le voyant s’allume et
l’appareil fonctionne en mode de nettoyage.
Voyant vert
Lorsque le fonctionnement en groupes d’ions est en mode de contrôle
d’ions ou de groupe d’ions AUTO et que l’air de la pièce est propre,
ce voyant s’allume et l’appareil fonctionne en mode de contrôle d’ions.
Voyant éteint
Aucun groupe d’ion n’est généré.
• Ce voyant peut être éteint en utilisant le bouton de
commande des voyants d’affichage sur la télécom-
mande même pendant la génération de groupes d’ions.
(Veuillez éteindre les voyant quand ceux-ci sont
inutiles.)
Voyants indicateurs
de temporisation d’arrêt
(à régler en utilisant la télécommande)
Voyant
indicateur de filtre
Si la lampe de filtre est allumée, cela
indique que le filtre doit être remplacé.
FU-55SE_Fre.6.5 03.7.17, 8:55 AM4
Downloaded from: http://www.usersmanualguide.com/
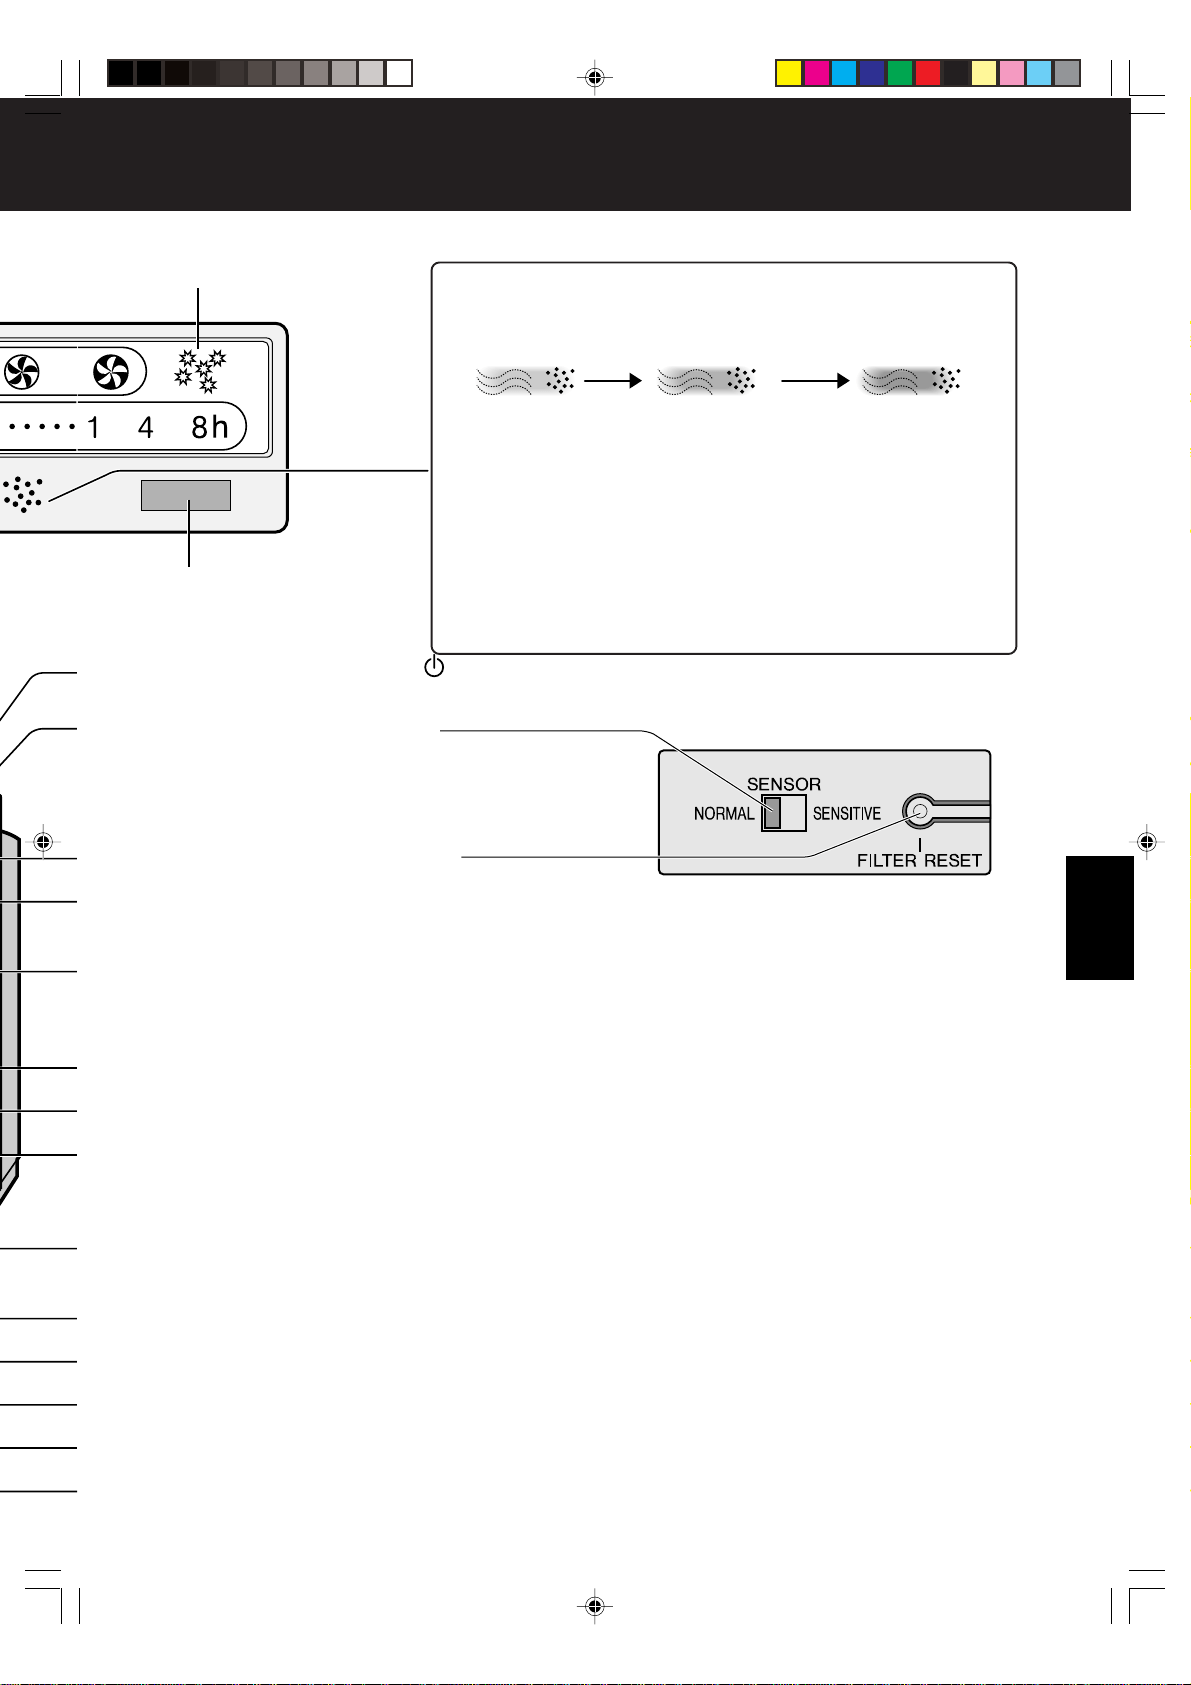
FRANÇAIS
F-5
Voyant indicateur
d’élimination de pollen
Récepteur
de télécommande
VOYANT INDICATEUR D’ETAT DE PROPRETE
Sa couleur change lorsque l’air est sale.
Propre (vert) Légèrement sale (orange) Très sale (rouge)
A PROPOS DU VOYANT INDICATEUR DE PROPRETE
• Le capteur de saleté affiche l’indication propre suivant l’état de
l’environnement au moment du branchement du câble d’alimentation
dans une prise du secteur et ce qu’il détecte ensuite.
• Lorsque l’air est extrêmement sale au moment du branchement du
câble d’alimentation sur le secteur, le capteur de poussière peut
s’allumer en vert puisque l’environnement est pollué.
Dans ce cas, commutez manuellement sur le mode de
fonctionnement souhaité puisque le mode automatique est inefficace.
Voir Page F-11.
• Le voyant indicateur d’état de propreté peut être éteint en utilisant le
bouton de commandes des voyants indicateurs sur la télécommande.
Voir Page F-11.
Bouton de sélection de MODE/ Voir Page F-10.
(S’utilise pour sélectionner le mode de fonctionnement ou pour arrêter l’appareil)
Sélecteur de sensibilité de capteur
La sensibilité de la détection d’odeur et de poussière est réglable.
Cette fonction est réglée en usine sur “Normal”. En utilisa-
tion normale, utilisez cet appareil avec ce réglage. Réglez la
sensibilité sur “High” si celle-ci semble trop faible en fonction
des conditions ambiantes.
Bouton de réinitialisation du filtre
(Filter reset)
Capteur d’odeur
Détecte les odeurs telles que la fumée de tabac, d’encens,
d’animaux domestiques, de cosmétiques, etc.
Couvercle de capteur
Capteur de poussière
Détecte la poussière, la fumée, le pollen, la poussière
domestique, etc. Voir Page F-12, F-13.
Unité principale
Cadre de filtre
Filtre HEPA (blanc)
Voir Page F-14.
(Filtre de récupération de la poussière)
Filtre à charbon actif (noir) Voir Page F-14.
(Filtre désodorisant)
Filtre séparateur
Pré-filtre
Panneau avant
Crochet
Télécommande
Voir Page F-11.
*N’oubliez pas de rebrancher l’appareil
avant d’appuyer sur le bouton de
réinitialisation des filtres.
La télécommande comporte aussi un
bouton de réinitialisation de filtre.
Avant d’appuyer sur le bouton de
réinitialisation des filtres de la
télécommande, dirigez-la vers l’unité
principale.
FU-55SE_Fre.6.5 03.7.17, 8:55 AM5
Downloaded from: http://www.usersmanualguide.com/
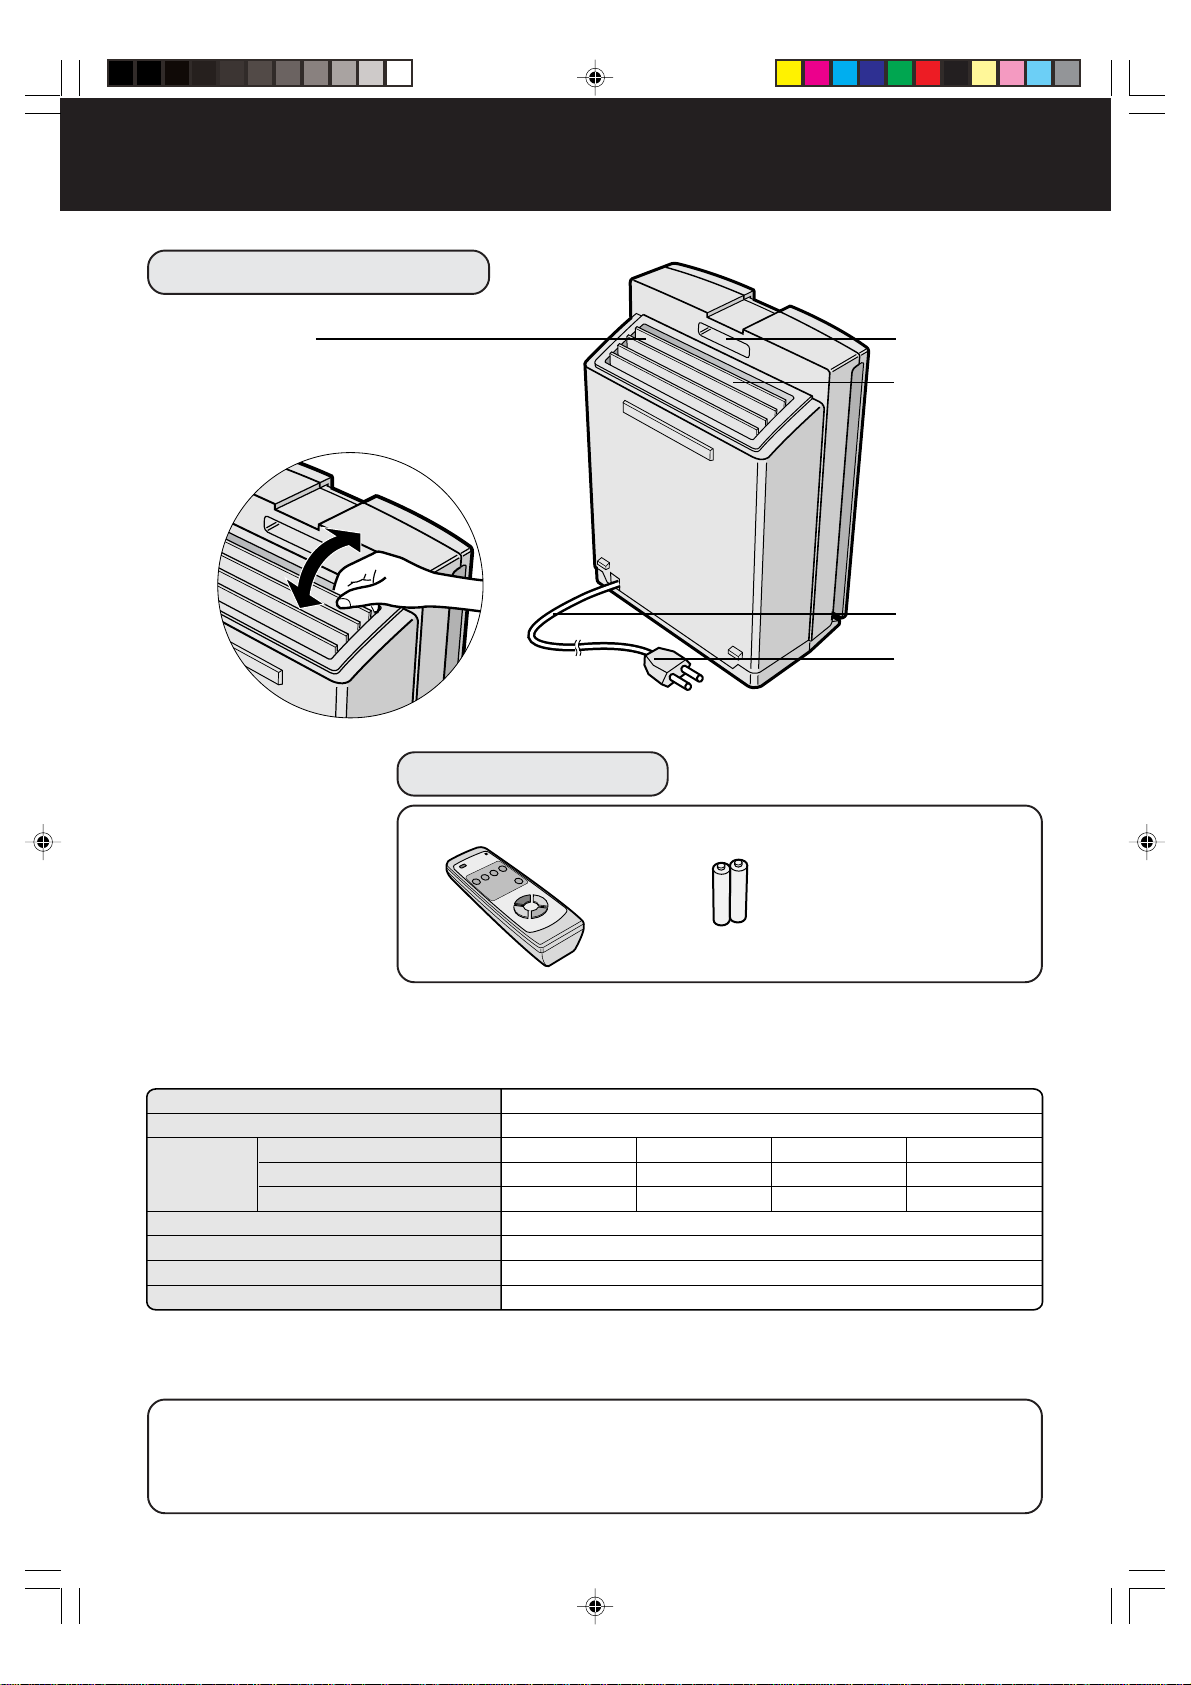
F-6
DESIGNATIONS DES PIECES
Poignée
Sortie d’air
Câble
d’alimentation
Prise du
câble
d’alimentation
ACCESSOIRES
Télécommande (1 unité) Piles (R6 (AA) x 2)
Feuillet joint
•Manuel d’Utilisation
CARACTERISTIQUES
Modèle
Alimentation
Réglage de la vitesse du ventilateur
Puissance nominale
Vitesse de ventilation
Surface de sol applicable
Longueur du câble
Dimensions
Poids
Fonctionnement
avec changement
de vitesse de
ventilation
FU-55SE
220-240 V/50 Hz
~42 m
2
*
2,5 m
415 mm (L) x 238 mm (P) x 572 mm (H)
9,3 kg
Maxi.
43 W
330m
3
/heure
Fort
19 W
218m
3
/heure
Moyen
6 W
95m
3
/heure
Silencieux
4 W
43m
3
/heure
*La surface au sol applicable est la surface de fonctionnement de l’appareil à la vitesse de ventila-
tion maximale.
(JEM 1467, The Japan Electrical Manufacturers’ Association)
Au sujet de la réduction de consommation en veille
Pour être capable de faire fonctionner les circuits électriques lorsque le câble d’alimentation est
raccordé au secteur, cet appareil consomme environ 0,9 W en mode veille. Pour économiser de
l’énergie, débranchez l’appareil lorsque celui-ci ne va pas être utilisé.
DOS DE L’APPAREIL
Volet large d’ion
• Le flux de la sortie d’air purifié peut être
orienté dans toutes les directions indiquées
par les flèches.
• Réglez l’orientation du flux d’air purifié dans
le sens souhaité.
FU-55SE_Fre.6.5 03.7.17, 8:55 AM6
Downloaded from: http://www.usersmanualguide.com/
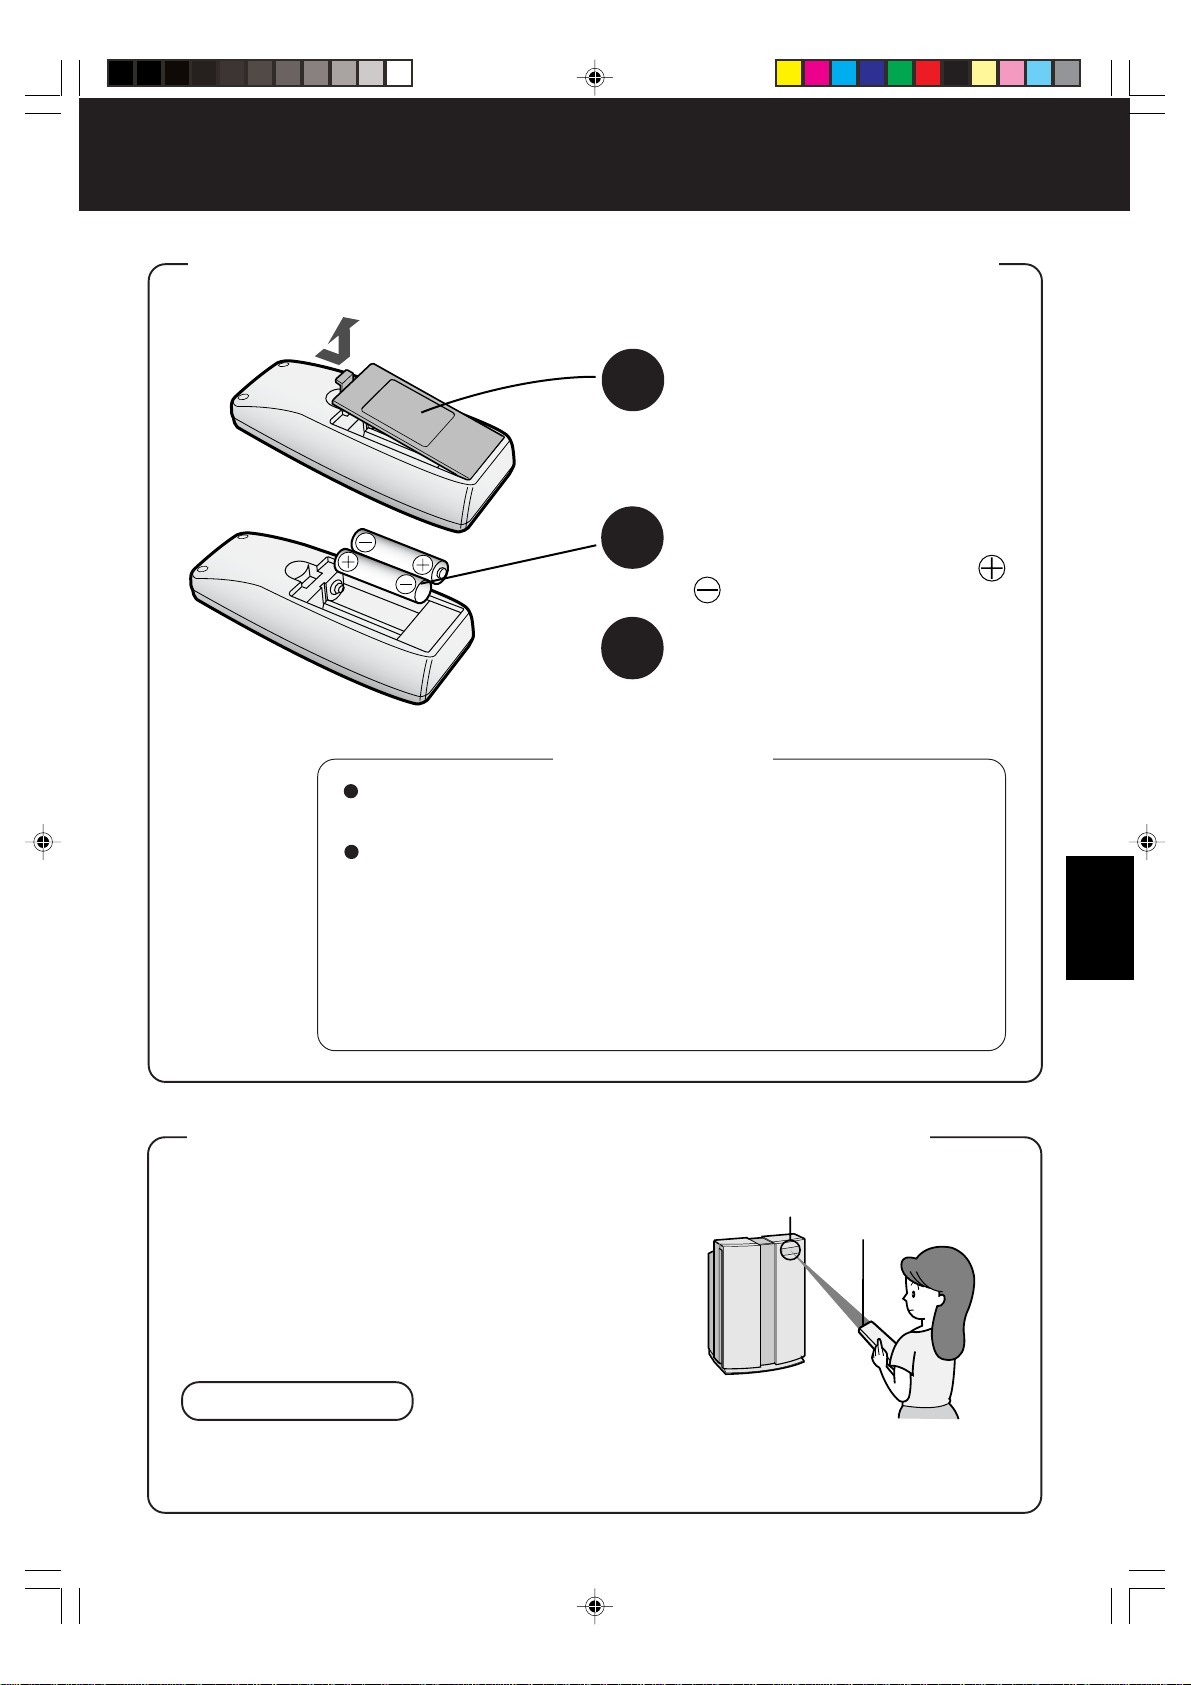
FRANÇAIS
F-7
MISE EN PLACE DES PILES DANS LA TELECOMMANDE
Au sujet des piles
• La durée de vie des piles est d’environ 1 an.
• Remplacez les piles lorsque la télécommande commence à ne pas
fonctionner normalement.
Une utilisation incorrecte des piles peut causer une fuite du liquide des
piles et/ou des dommages. Prendre les précautions suivantes lors de
la manipulation :
• Lors du remplacement des piles, remplacez les deux piles par des neuves
du même type. (Utilisez des piles au manganèse R6 (AA) (qté 2).)
• Lorsque l’appareil ou la télécommande ne va pas être utilisé pendant une
longue période, retirez les piles. Cela évitera tout risque de dysfonctionne-
ment de la télécommande causé par une fuite du liquide des piles.
*Les piles de l’accessoire sont destinées uniquement à l’utilisation
initiale et risquent d’être épuisées dans l’année.
1
Retirez le couvercle arrière
Pressez et faites glisser le couvercle
arrière pour le retirer.
2
Introduisez les piles
Introduisez les piles en positionnant
et comme illustré ci-dessous.
3
Refermez le couvercle arrière
UTILISATION DE LA TELECOMMANDE
• Utilisez la télécommande en la tenant face à l’unité
principale (récepteur).
• La distance de fonctionnement est d’environ 7 m
(devant).
• Vérifiez qu’aucun obstacle ne se trouve entre la
télécommande et l’appareil.
REMARQUE
• Evitez d’exposer la télécommande aux chocs. De plus, évitez de la mouiller, de l’exposer
au soleil ou à la chaleur, etc., car celle-ci risque de ne pas fonctionner correctement.
Récepteur
Transmetteur
PREPARATION
FU-55SE_Fre.6.5 03.7.17, 8:55 AM7
Downloaded from: http://www.usersmanualguide.com/

F-8
PREPARATION
• Ne pas oublier de débranchez d’abord la prise
du secteur.
1
1
1
2
2
Table
Chiffon doux
Panneau avant
Cadre de filtre
Pré-filtre
Séparateur de filtre
Filtre à charbon actif
Filtre HEPA
Cadre de filtre
INSTALLATION DES FILTRES
Pour protéger les filtres, ceux-ci sont placés dans l’unité principale à l’intérieur de
sacs en plastique. Ne pas oublier de retirer les filtres des sacs avant d’utiliser l’appareil.
1
Retirez les filtres
1
Placez l’appareil avec la
façade vers le haut.
Couchez l’appareil sur une table,
etc., en prenant garde de ne pas
pincer le câble d’alimentation à
l’arrière de l’appareil.
2
Retirez le panneau avant.
Appuyez sur le crochet au bas
du panneau avant et soulevez-
le pour le retirer.
3
Extrayez le cadre de filtre et
retirez le pré-filtre et le sépa-
rateur de filtre.
4
Retirez le filtre à charbon
actif (noir) et le filtre HEPA
(blanc) du sac en plastique.
Crochet
FU-55SE_Fre.6.5 03.7.17, 8:55 AM8
Downloaded from: http://www.usersmanualguide.com/
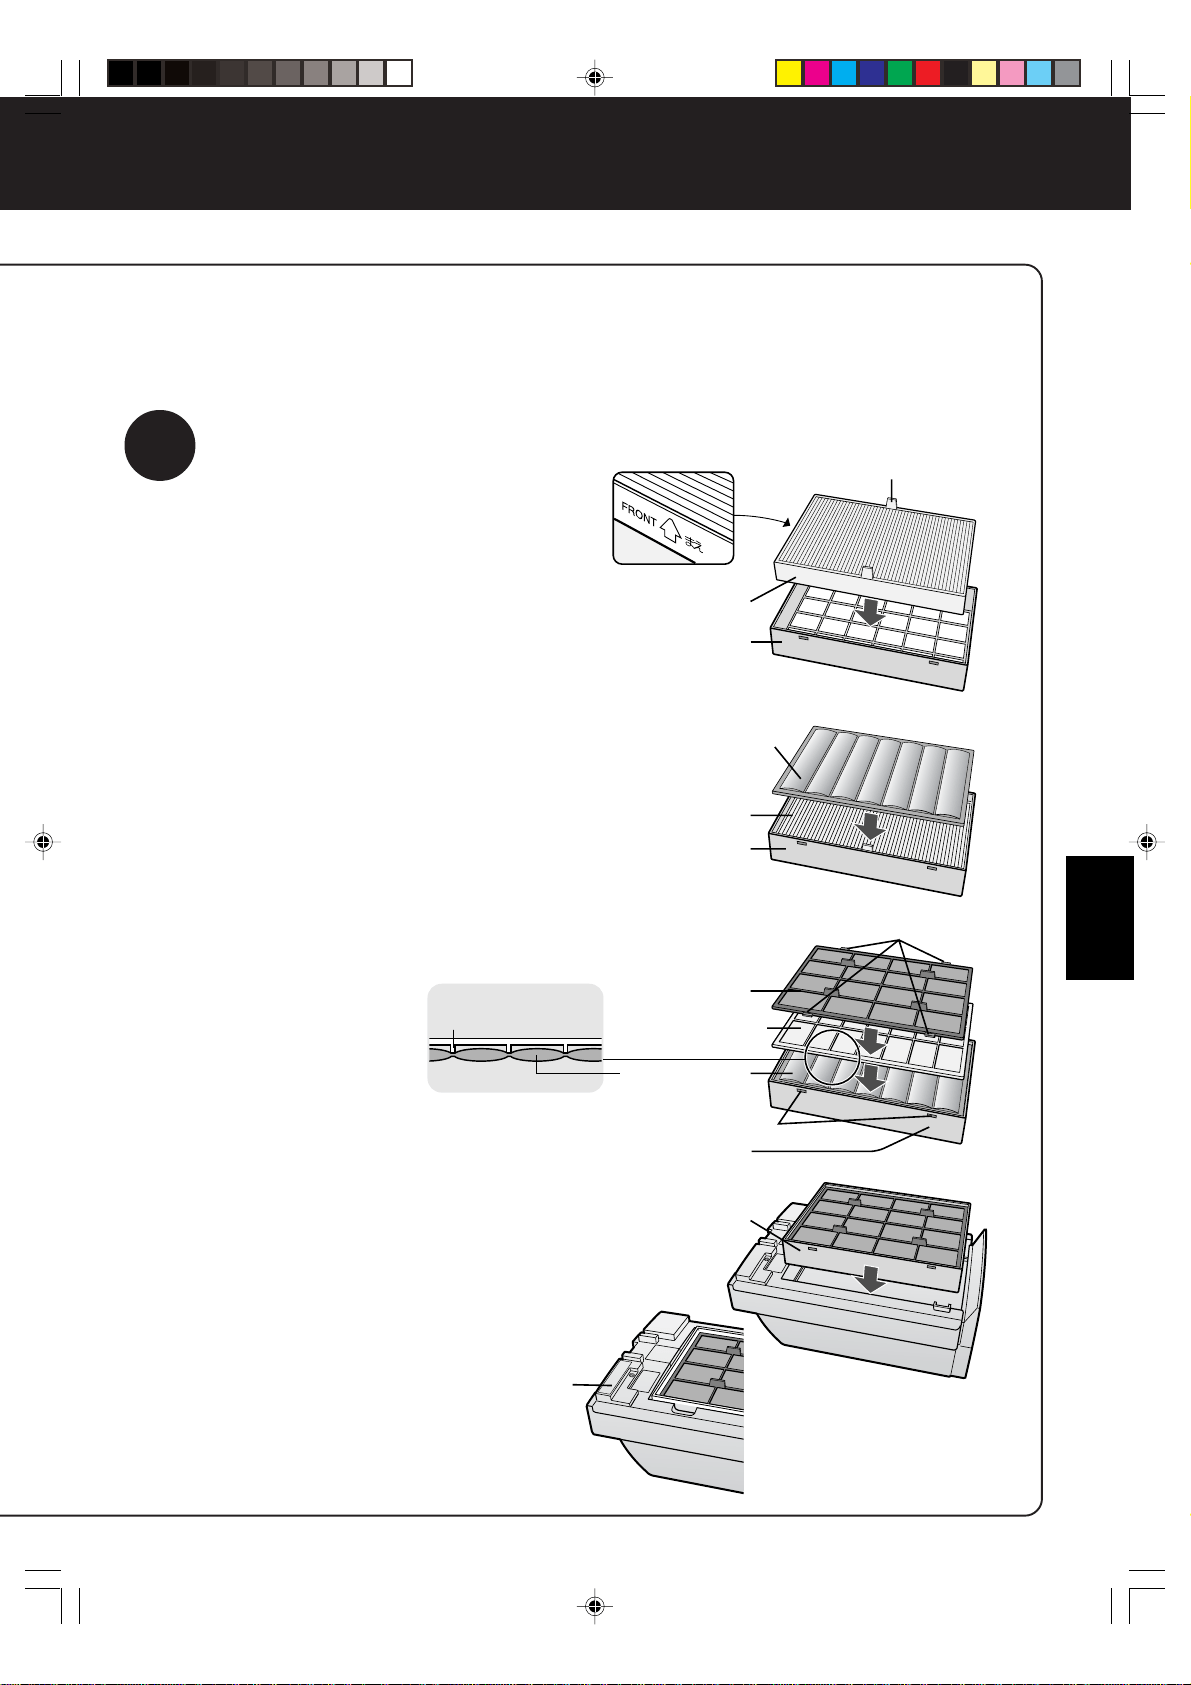
FRANÇAIS
F-9
2
Installez le filtre
1
Retirez le filtre HEPA du sac en
plastique et installez-le dans
l’unité principale avec le repère
“FRONT” dirigée vers le haut.
Le mettre en place avec les languettes
du filtre HEPA dirigées vers vous.
L’appareil ne pourra fonctionner correc-
tement si le filtre est placé à l’envers.
2
Retirez le filtre à charbon actif
du sac en plastique et instal-
lezle dans le cadre de filtre.
3
Montez le séparateur de filtre
et le pré-filtre dans le cadre de
filtre dans cet ordre.
• Placez le séparateur
de filtre avec les
nervures vers le bas
comme indiqué sur
l’illustration à droite.
• Introduisez les langu-
ettes du pré-filtre (4
emplacements) dans
les encoches du cadre
de filtre.
• Mettre en place le cadre de filtre dans
l’unité principale comme indiqué sur
l’illustration à droite (il n’y a pas d’orien-
tation verticale).
4
Inscrivez la date de début d’uti-
lisation sur l’étiquette collée sur
l’unité principale.
Utilisez la date
pour déterminer la
période de rempla-
cement du filtre.
Languettes
Filtre HEPA
Cadre de filtre
Filtre à charbon actif
Filtre HEPA
Cadre de filtre
Pré-filtre
Languettes (4 emplacements)
Séparateur de filtre
Filtre à charbon actif
Trous
Cadre de filtre
Cadre de filtre
Etiquette de date
Nervures du
séparateur de filtre
FU-55SE_Fre.6.5 03.7.17, 8:55 AM9
Downloaded from: http://www.usersmanualguide.com/
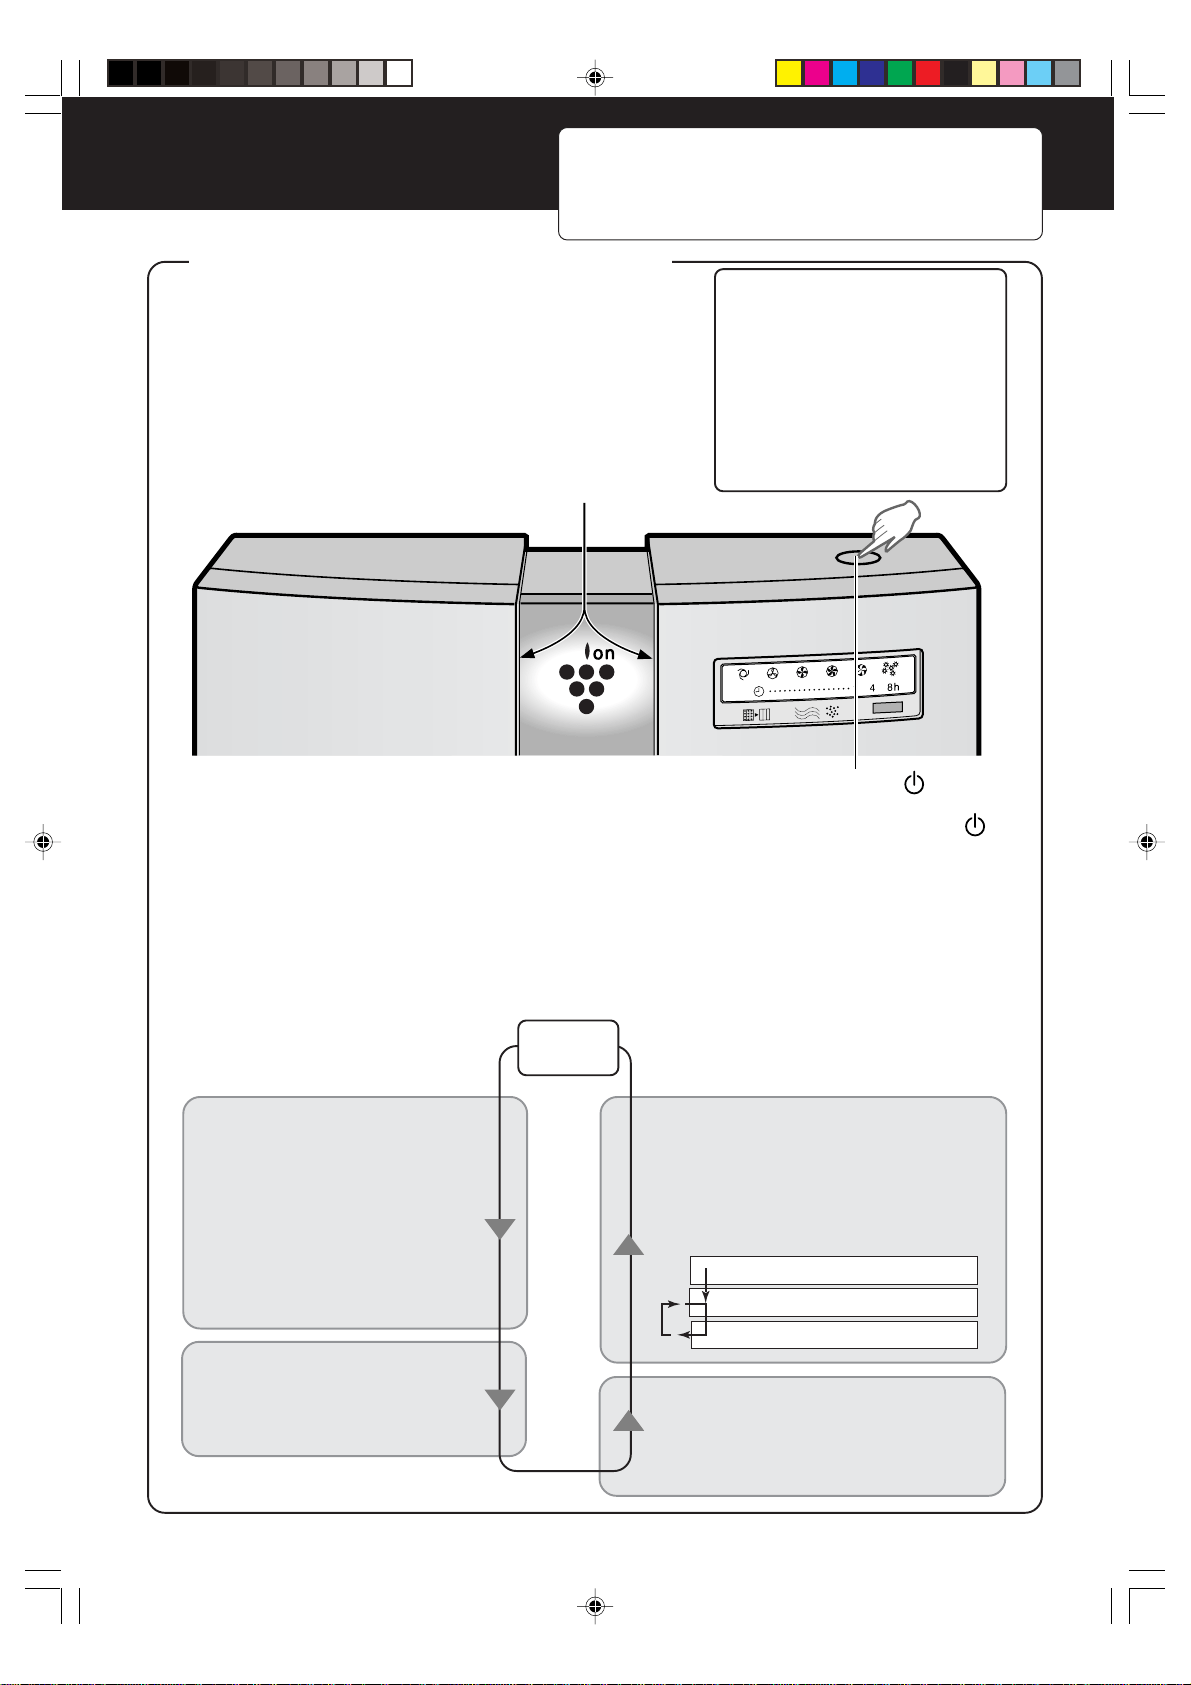
Plasmacluster
F-10
FONCTIONNEMENT
FONCTIONNEMENT
DE L’UNITE PRINCIPALE
Fonctions disponibles avec l’unité principale
•
Fonctionnement AUTO (vitesse de ventilation)
• Fonctionnement silencieux
(vitesse de ventilation)
• Fonctionnement moyen
(vitesse de ventilation)
• Fonctionnement élevé
(vitesse de ventilation)
• Fonctionnement maximal
(vitesse de ventilation)
• Fonctionnement en mode
d’élimination de pollen
L’appareil commence à fonctionner lorsque l’on appuie sur le bouton de MODE/ .
L’appareil démarrera en fonctionnement automatique (vitesse de ventilation).
• En cours de fonctionnement, le voyant de groupes d’ions s’allume.
Le mode de fonctionnement se commute de la façon suivante à chaque
pression sur le bouton.
Le voyant de mode de fonctionnement a été réglé pour s’allumer.
Le mode de fonctionnement approprié aux conditions d’utilisation peut être réglé.
Arrêt
Fonctionnement AUTO
La vitesse de fonctionnement
du ventilateur se commute
automatiquement sur élevé,
moyen ou silencieux suivant le
niveau de pollution de l’air
détecté par le capteur de
poussière pour régler l’efficacité
de la purification de l’air.
Fonctionnement silencieux
L’appareil fonctionne en aspir-
ant le minimum d’air.
Fonctionnement en mode
d’élimination de pollen
L’appareil fonctionne à régime élevé de ven-
tilation pendant 10 minutes et commute
ensuite alternativement entre vitesse de
ventilation moyenne et élevée.
Fonctionnement de vitesse
moyenne à maximale
L’appareil fonctionne avec une vitesse de
ventilation moyenne, élevée ou maxi.
Pendant les premières 30 secondes suivant le branchement
du câble d’alimentation dans une prise du secteur murale,
l’appareil vérifie les conditions de l’air. Si l’appareil est en
marche sur ON pendant cette période, le voyant indicateur
d’état de propreté clignote alternativement en vert, en orange
et en rouge.
Lampe de groupes d’ions
Bouton de MODE/
10 minutes : Vitesse de ventilation élevée
20 minutes : Vitesse de ventilation moyenne
20 minutes : Vitesse de ventilation élevée
FU-55SE_Fre.6.5 03.7.17, 8:55 AM10
Downloaded from: http://www.usersmanualguide.com/
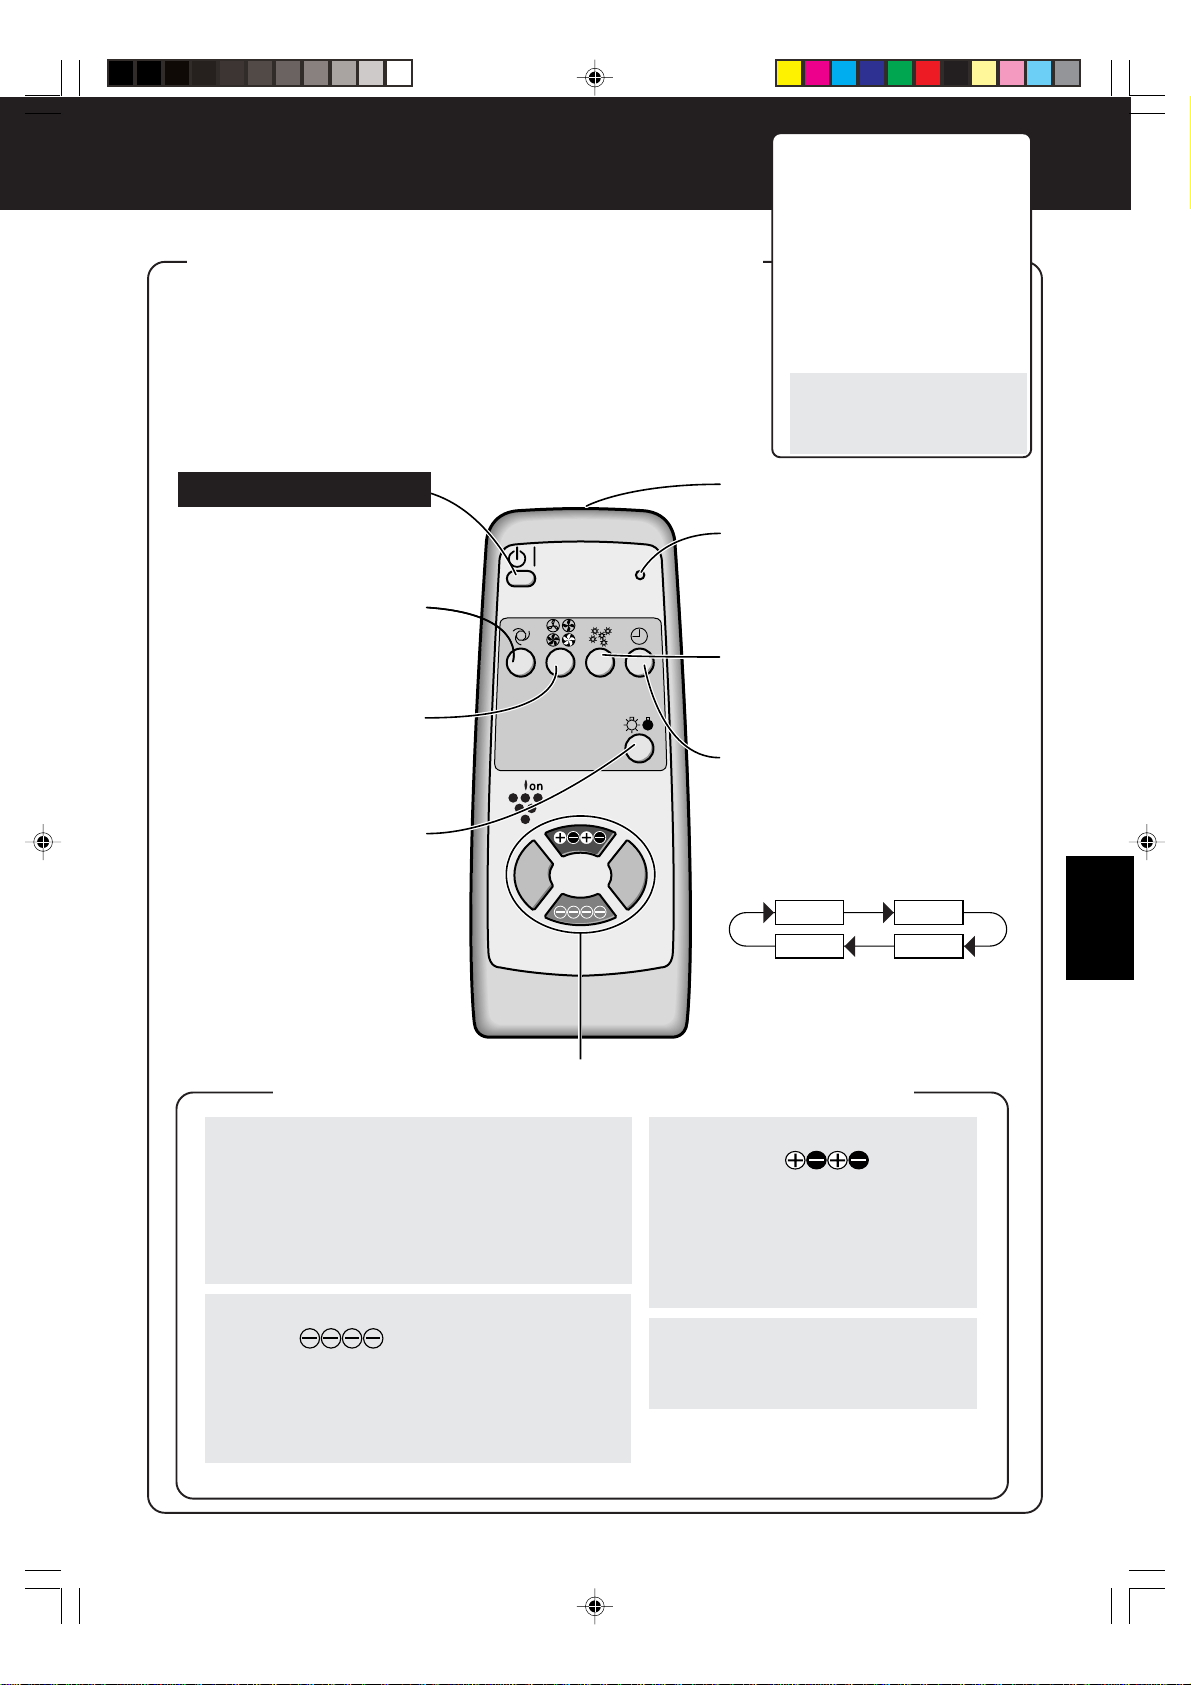
FRANÇAIS
Plasmacluster
AUTO
RESET
OFF
F-11
FONCTIONNEMENT DE LA TELECOMMANDE
Fonctions disponibles
avec la télécommande
•Fonctionnement AUTO
(vitesse de ventilation)
•Fonctionnement manuel
(vitesse de ventilation)
•Fonctionnement en mode
d’élimination de pollen
•Réglage de minuterie de
désactivation
•Activation des voyants
•
Sélection du mode groupes d’ions
•
Mode groupes d’ions AUTO
•
Mode de nettoyage
•
Mode contrôle d’ions
•
Mode groupes d’ions désactivé
• Pour mettre l’appareil en marche, appuyez sur le bouton Marche/
Arrêt.
Un bip court retentit et le fonctionnement commence en mode AUTO.
Le mode groupes d’ions AUTO est sélectionné pour fonctionnement
en groupes d’ions.
• Pour arrêter l’appareil, appuyez à nouveau sur le bouton Marche/
Arrêt.
Un bip long retentit et l’appareil s’arrête.
Bouton Marche/Arrêt
S’utilise pour lancer le
fonctionnement AUTO (bip
court) et arrêter le fonction-
nement (bip long).
Bouton de commande AUTO
(vitesse de ventilation)
La vitesse de ventilation se com-
mute automatiquement suivant
l’importance de la pollution de l’air.
Bouton de commande manuelle
(vitesse de ventilation)
La vitesse de ventilation peut
être commutée entre silen-
cieux, moyen, fort et maxi.
Bouton de commandes
des voyants indicateurs
Active ou désactive les
voyants de groupes d’ions et
indicateur de propreté.
• Le voyant de groupes d’ions
s’allume pendant environ 3
secondes en appuyant sur
le bouton de sélection de
groupes d’ions (à l’exception
du bouton OFF) en mode
voyants éteints.
Transmetteur
Bouton de réinitialisation
du filtre
Appuyez sur ce bouton après
avoir remplacé les filtres.
Bouton de commande mode
d’élimination de pollen
L’appareil fonctionne effectivement
en mode d’élimination de pollen
lorsque l’on suspecte la présence
de pollen dans l’air. Voir Page F-10.
Bouton de temporisation
d’arrêt de l’appareil
S’utilise pour régler la minuterie
de désactivation.
La durée du réglage se commute
à chaque pression sur le bouton
comme indiqué ci-dessous.
1 heure 4 heures
Annuler 8 heures
• Le temps restant est indiqué par
le voyant, au fur et à mesure que
le temps s’écoule.
• L’appareil s’arrête lorsque la
minuterie se déclenche.
Bouton de sélection de groupes d’ions
Bouton de groupes d’ions sur AUTO
Cet appareil se commute automatiquement en-
tre les modes de nettoyage et de rafraîchissement
suivant l’importance de la pollution de l’air détectée
par le capteur de poussière et d’odeur.
L’appareil fonctionne en mode de nettoyage pen-
dant environ 1 minute suivant la mise en marche.
Bouton de contrôle de groupes
d’ions
L’appareil fonctionne constamment en mode de
contrôle de groupes d’ions.
L’équilibrage d’ions est maintenu dans la pièce
en augmentant le taux de groupes d’ions négatifs.
(Voyant de groupes d’ions allumé (en vert).)
Bouton OFF
La génération d’ions est arrêtée et le
voyant de groupes d’ions est éteint.
Si la pièce sent fortement le moisi, faites fonctionner l’appareil en mode de nettoyage.
Bouton de mode
nettoyage
L’appareil fonctionne constamment
en mode de nettoyage. Le mode
Nettoyage est efficace pour lutter
contre la moisissure ambiante.
(Voyant de groupes d’ions allumé (en
bleu).)
FU-55SE_Fre.6.5 03.7.17, 8:55 AM11
Downloaded from: http://www.usersmanualguide.com/

GUIDE D’UTILISATION
GUIDE POUR CAPTEUR D’ODEUR
• En plus des odeurs telles que celles de la fumée de tabac ou d’animal domestique, le capteur
d’odeur est aussi sensible aux produits et facteurs suivants :
• Insecticide, cosmétiques, aérosols, alcool.
• Brusques changements de température ou d’humidité.
• Lorsque l’appareil est en fonctionnement automatique et que des produits cosmétiques ou
similaire sont utilisés dans une pièce fermée, il est normal que le capteur réagisse en
augmentant le débit d’air. Si cela n’est pas souhaitable, modifier la sensibilité du capteur.
GUIDE POUR CAPTEUR DE POUSSIERE
• Le capteur de poussière détecte les particules de poussière dans l’air de la pièce, telles que
celles de fumée de cigarette et poussière domestique.
• Comparée à la fumée de cigarette, la quantité de poussière libérée en faisant un lit peut être
trop faible pour être détectée par le capteur de poussière. Donc, la quantité de poussière
visible à l’oeil nu peut être différente de l’indication du voyant de nettoyage.
GUIDE POUR BOUTON DE REINITIALISATION
DE FILTRE
• Après le remplacement des filtres, ne pas oublier de rebrancher le câble d’alimentation et
d’appuyer sur le bouton de réinitialisation de filtre sur l’unité principale ou la télécommande.
Un “BIP” indique que la durée d’utilisation enregistrée a été réinitialisée.
Si le voyant de filtre est allumé à ce moment là, il s’éteint.
F-12
FU-55SE_Fre.6.5 03.7.17, 8:55 AM12
Downloaded from: http://www.usersmanualguide.com/
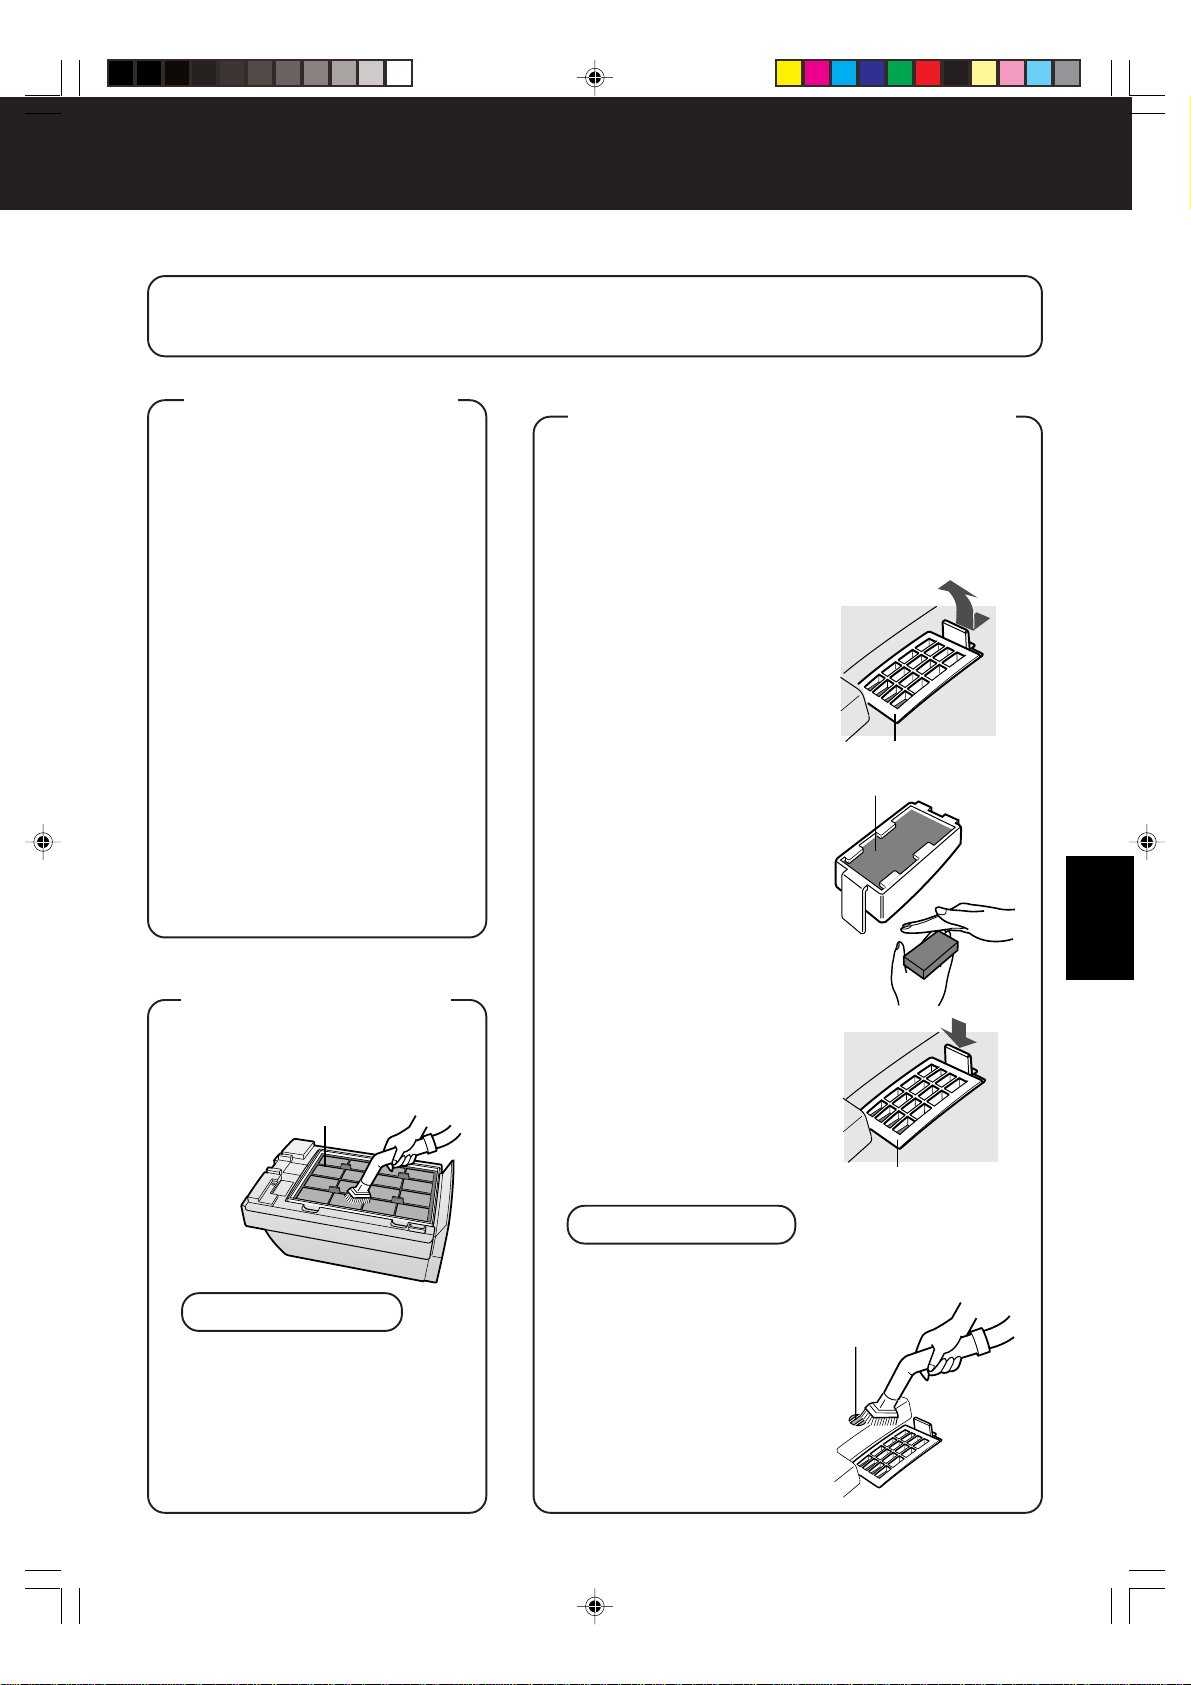
FRANÇAIS
SOINS ET ENTRETIEN
(Pour obtenir les meilleures performances de cet appareil, veuillez le nettoyer périodiquement.)
Lors du nettoyage de l’appareil, débranchez d’abord la prise du secteur. De plus, ne jamais
manipuler la prise du secteur avec les mains mouillées.
Car vous vous exposez à une électrocution.
UNITE PRINCIPALE
Nettoyez l’unité principale et la
surface d’installation le plus
rapidement possible. Les
salissures rebelles peuvent être
difficile à retirer.
Essuyez à sec avec un
chiffon doux
Pour les salissures rebelles,
essuyez avec un chiffon doux
humide ou imbibé d’eau tiède à
40°C au plus.
Ne pas utiliser de solvant
Le benzène, diluant de peinture,
pâte à polir, etc., risquent d’endom-
mager la surface de l’appareil.
Ne pas utiliser de détergent
Les détergent risquent d’endom-
mager la surface de l’appareil.
Ne pas mouiller l’appareil
Ne jamais projeter d’eau sur
l’appareil.
CAPTEUR DE POUSSIERE
CAPTEUR D’ODEUR
Le cycle d’entretien des CAPTEURS D’ODEUR et
DE POUSSIERE est d’une fois tous les trois mois.
La sensibilité des capteurs devient instable s’ils sont
sales ou obturés. Nettoyer ces composants de la
façon suivante :
CAPTEUR DE POUSSIÈRE
1
Retirez le panneau
avant et détachez le
filtre du capteur.
• Détachez le filtre du
capteur tout en tirant sur
la languette du couvercle
de capteur.
2
Eliminez la poussière
qui souille le filtre du
capteur.
• Détachez le filtre du
capteur et tappotez-le
légèrement à la main
pour retirer la poussière.
Si ce dernier est très
sale, lavez-le à l’eau et
laissez-le bien sécher.
3
Placez le filtre du
capteur dans le cou-
vercle, mettez-le en
place dans l’unité
principale et fixez le
panneau avant.
• Le filtre du capteur peut
être mis en place dans
les deux sens.
ATTENTION
• Ne pas oublier de réinstaller le couvercle du
capteur avant de rédémarrer l’appareil.
• Ne pas introduire d’objet
étranger (cure-dent, etc,) dans
le filtre. Cela peut causer des
dommages ou dysfon-
ctionnements de l’appareil.
CAPTEUR D’ODEUR
Retirez la poussière des sur-
faces de l’ouverture de cap-teur
en utilisant un aspirateur.
F-13
Couvercle de capteur
Filtre de capteur
Couvercle de capteur
Ouverture
de capteur
NETTOYAGE
DE FILTRE
Nettoyez la surface supérieure
du pré-filtre avec un aspirateur.
REMARQUE
• Le filtre HEPA est très fragile. Ne
pas le mettre en contact direct
avec l’embout de l’aspirateur.
Ne jamais le laver avec de l’eau.
• Les filtres HEPA et à charbon
actif ne nécessitent pas de
nettoyage.
Pré-filtre
FU-55SE_Fre.6.5 03.7.17, 8:55 AM13
Downloaded from: http://www.usersmanualguide.com/

F-14
SOINS ET ENTRETIEN
Bouton de réinitialisation du filtre
RESET
GUIDE DE DUREE D’UTILISATION DES FILTRES
La période de remplacement du filtre est indiqué par le voyant de filtre
(le voyant s’allumera dans 5 ans environ pour une utilisation de l’appareil de 12 heures par jour).
• Les heures d’utilisation sont enregistrées en mémoire, même si l’appareil est débranché pour
être transporté dans une autre pièce, etc.
Le voyant de remplacement doit uniquement être utilisé comme guide.
Si la poussière ou les odeurs ne sont plus éliminées facilement, remplacez les filtres.
Guide pour le remplacement des filtres
• Filtre HEPA Environ 5 ans après ouverture
• Filtre à charbon actif Environ 5 ans après ouverture
La période de remplacement a été établie en fonction d’une exposition à la fumée de 10 ciga-
rettes par jour et de la durée moyenne au bout de laquelle la capacité de dépoussiérage et de
désodorisation est réduite de moitié par rapport à des filtres neufs.
La période de remplacement dépend du nombre d’heures de fonctionnement et de
l’emplacement de l’installation(JEM 1467, The Japan Electrical Manufacturers’ Association).
Suivant l’environnement d’utilisation, une odeur peut se dégager de la sortie d’air au bout de
quelques mois (Pour une bonne compréhension du fonctionnement de l’appareil, veuillez-
vous référer à la page F-1).
REMPLACEMENT DES FILTRES
1
Voir page F-8 “Installez le filtre” pour la méthode de remplacement.
2
Remplir la date de départ d’utilisation de filtres neufs sur l’étiquette de date.
3
N’oubliez pas de brancher la câble
d’alimentation, pointez la télécom-
mande vers le récepteur sur l’unité
principale et appuyez sur le bou-
ton de réinitialisation de filtre avec
un objet pointu sur la télécom-
mande ou appuyer sur celui de
l’unité principale. (Veuillez-vous référer
à la page F-11.)
• Le “BIP” indique que la durée d’utilisation
enregistrée a été réinitialisée.
• Si le voyant de filtre est allumé à ce moment
là, il s’éteint.
• Appuyer sur le bouton de réinitialisation du filtre
de l’unité principale après avoir retiré le panneau
avant.
Filtres de rechange (Modèle : FZ-60SEF)
• Filtre HEPA : (qté 1)
• Filtre à charbon actif : (qté 1)
Procurez-vous les filtres de rechange auprès de votre revendeur.
Précautions à prendre pour mettre les filtres au rebut
Veuillez-vous débarrasser des filtres remplacés selon la législation locale.
Matériaux de filtre HEPA : Matériaux du filtre à charbon actif :
• Filtre : polypropylène • Désodorisant : charbon actif
• Cadre : polyester • Net : polypropylène 60%, polyester 40%
FU-55SE_Fre.6.5 03.7.17, 8:55 AM14
Downloaded from: http://www.usersmanualguide.com/

FRANÇAIS
RESOLUTION DES PROBLEMES
Avant de faire appel au sav, vérifiez les symptômes ci-dessous pour déterminer une solution possi-
ble, car le problème n’est peut être pas un dysfonctionnement de l’appareil.
SYMPTOME
SOLUTION (pas un dysfonctionnement)
La télécommande
ne fonctionne pas.
• Est-ce que les piles sont à plat ?
• Est-ce que les piles sont insérés correctement ?
• Est-ce qu’un éclairage fluorescent clignote dans la pièce à
cause de son vieillissement ? (Veuillez vous référer à la page
F-3 et F-7.)
Les odeurs et la poussière
ne s’éliminent pas facilement.
• Est-ce que les filtres sont très sales ? (Veuillez vous référer à
la page F-14.)
Le voyant de nettoyage
s’allume en vert même lorsque
l’air est sale.
• Est-ce que l’ouverture du capteur d’odeur est bouchée ou le filtre
du capteur obturé ? (Veuillez-vous référer à la page F-13.)
• Est-ce que l’air était déjà sale lors du raccordement de l’appareil
au secteur ? (Veuillez vous référer à la page F-5.)
Le voyant vert de nettoyage
s’allume en orange ou en rouge
même lorsque l’air est propre.
• Est-ce que le filtre du capteur est sale ou obturé ?
La sensibilité des capteurs devient instable lorsque l’ouverture
du capteur de poussière est sale ou obturée.
Eliminer la poussière qui souille le filtre du capteur. (Veuillez
vous référer à la page F-13.)
• En mode de nettoyage (ou de contrôle d’ions), le voyant de
groupes d’ions ne change pas de couleur.
Un son est
émis par
l’appareil.
Clic, clic
Tic, tic, tic
• C’est le son qui est émis lorsque l’appareil est en mode de
contrôle d’ions.
Si le bruit est gênant, éloignez l’appareil.
• C’est le son qui est émis lorsque l’appareil est en mode de
génération de groupes d’ions.
Si le son est gênant, empêche de dormir, etc., éloignez
l’appareil.
L’appareil peut parfois émettre
un bruit de “tic, tic, tic” et
d’autres fois pas.
• Le bruit est parfois faible, fort ou absent. Mais l’effet sur les
groupes d’ions est le même.
L’air refoulé ne sent pas bon.
• Est-ce que les filtres sont très sales ?
Remplace des filtres. (Veuillez vous référer à la page F-14.)
• L’ozone généré par le générateur de groupes d’ions a peut-
être une odeur. Cependant, la densité de l’ozone généré est
très faible et ne présente aucun danger pour l’être humain. De
plus, l’ozone se décompose rapidement et donc ne s’accumule
pas dans la pièce.
F-15
Le voyant de groupes d’ions
reste vert (bleu) et ne change
pas.
L’appareil ne fonctionne pas
même lorsque l’on fume des
cigarettes.
• Est-ce que l’appareil est installé dans un endroit difficile aux
capteurs à détecter la fumée de cigarette ?
• Est-ce que l’ouverture du capteur d’odeur ou de poussière est
sale ou bouchée ? (Dans ce cas, nettoyez les ouvertures.)
(Veuillez vous référer à la page F-13.)
Le voyant de filtre reste allumé
après avoir remplacé les filtres.
• Après le remplacement des filtres, ne pas oublier de rebrancher
le câble d’alimentation et d’appuyer sur le bouton de
réinitialisation de filtre sur l’unité principale ou la télécommande.
(Veuillez vous référer à la page F-14.)
Le voyant de groupe d’ions ou
celui de nettoyage ne s’allume
pas.
• Est-ce que le mode voyants indicateurs désactivés est sélectionné ?
• Appuyer sur le bouton d’activation des voyants indicateurs sur
la télécommande. (Veuillez vous référer à la page F-11.)
FU-55SE_Fre.6.5 03.7.17, 8:55 AM15
Downloaded from: http://www.usersmanualguide.com/

ESPAÑOL
CARACTERÍSTICAS
Control de equilibrio
de iones agrupados
El aparato controla la relación de iones
agrupados negativos y iones agrupados
positivos de acuerdo con las condiciones
de la habitación.
• Modo de limpieza
El aparato descarga aproximadamente la
misma cantidad de iones agrupados po-
sitivos y negativos. Este modo es efectivo
para reducir algunos mole en suspensión.
• Modo de control de iones
Se dice que hay una gran cantidad de
iones negativos en ambientes naturales
tales como cascadas y bosques. En este
modo de funcionamiento, los iones ne-
gativos son descargados a una velocidad
creciente a fin de que la atmósfera de la
habitación se asemeje lo más posible a
esta condición.
•
Modo de iones agrupados AUTO
El aparato cambia automáticamente en-
tre el modo de limpieza y el modo de con-
trol de iones dependiendo del grado de
contaminación del aire detectado por el
sensor de polvo y el sensor de olores.
Filtro HEPA
•
Recolección de polvo de alta eficiencia
Filtro de carbón amctivo
Poderosa desodorización mediante grandes
partículas de carbón en forma de columnas.
ÍNDICE
PRECAUCIONES DE SEGURIDAD........ S-2
• PRECAUCIONES CONCERNIENTES
AL USO DE ESTE PRODUCTO .................. S-3
• PRECAUCIONES CONCERNIENTES
A LA INSTALACIÓN ..................................... S-3
• ACERCA DEL FILTRO................................. S-3
NOMBRE DE LOS COMPONENTES...... S-4
• PANTALLA DE VISUALIZACIÓN
DE LA UNIDAD PRINCIPAL ........................ S-4
• DIAGRAMA DETALLADO ............................ S-4
• PARTE POSTERIOR ................................... S-6
• ACCESORIOS ............................................. S-6
ESPECIFICACIONES.............................. S-6
PREPARATIVOS ..................................... S-7
• INSTALACIÓN DE LAS PILAS
EN EL MANDO A DISTANCIA ..................... S-7
• USO DEL MANDO A DISTANCIA ................ S-7
• INSTALACIÓN DE LOS FILTROS ............... S-8
FUNCIONAMIENTO .............................. S-10
• FUNCIONAMIENTO DE LA UNIDAD
PRINCIPAL ................................................ S-10
• CONTROL DEL APARATO CON
EL MANDO A DISTANCIA ......................... S-11
GUÍA DE USO........................................S-12
CUIDADO Y MANTENIMIENTO............ S-13
• UNIDAD PRINCIPAL.................................. S-13
• LIMPIEZA DE LOS FILTROS..................... S-13
• SENSOR DE POLVO,
SENSOR DE OLORES.............................. S-13
• DURACIÓN DE LOS FILTROS.................. S-14
ANTES DE SOLICITAR
REPARACIONES .................................. S-15
Gracias por adquirir el purificador de aire FU-
60SE de SHARP. Por favor lea cuidadosa-
mente este manual para aprender a utilizar
correctamente el producto. Antes de usar el
producto, asegúrese de leer la sección “Precau-
ciones de seguridad”.
Después de leer el manual, guárdelo en un lugar
apropiado para poder consultarlo en el futuro.
Este producto es solamente para uso doméstico.
S-1
PARA COMPRENDER
EL FUNCIONAMIENTO
DEL PRODUCTO
Algunos de los elementos odoríferos
absorbidos por los filtros son sepa-rados
y descargados a través de la salida de
aire como olor.
Dependiendo del ambiente en que se use
el aparato, este olor puede tor-narse fuerte
al cabo de varios meses
y la salida de aire puede producir olor.
Si esto sucediera, adquiera el filtro de
reemplazo FZ-60SEF (accesorio) y
reemplace los filtros.
Este equipo cumple con los re-
quisitos de las directrices 89/336/
EEC y 73/23/EEC, rectificadas
por la directriz 93/68/EEC.
ESPAÑOL
FU-55SE_Spa.6.5 03.7.17, 8:56 AM1
Downloaded from: http://www.usersmanualguide.com/

• No use el aparato si el cable o la clavija de alimentación están dañados o si la conexión a la
toma de corriente mural no es segura.
De lo contrario, podrían producirse descargas eléctricas, cortocircuitos y/o incendios.
• Asegúrese de no dañar, romper, cubrir, doblar excesivamente, tirar, torcer, agrupar con otros
cables o pellizcar el cable de alimentación, y no coloque objetos pesados encima de él.
Un cable de alimentación dañado puede ocasionar incendios y/o descargas eléctricas.
• Use solamente una fuente de alimentación de CA de 220-240 V.
De lo contrario, podrían producirse descargas eléctricas y/o incendios.
• No modifique el producto. Este producto sólo debe ser reparado y desmontado por personal
de servicio autorizado.
La modificación del producto puede ocasionar incendios, descargas eléctricas y/o lesiones corporales.
Para reparaciones, tome contacto con el distribuidor donde adquirió el aparato o con el centro de
servicio Sharp más cercano.
• Quite periódicamente el polvo de la clavija de alimentación
La acumulación de polvo en la clavija de alimentación puede reducir la aislación contra la humedad, etc.
De lo contrario, podrían producirse descargas eléctricas y/o incendios.
• Al limpiar el aparato, asegúrese de desconectar la clavija de alimentación de la toma de
corriente mural.
Asimismo, nunca manipule la clavija de alimentación con las manos mojadas.
De lo contrario, podrá sufrir descargas eléctricas y/o lesiones corporales.
• No use el aparato en lugares donde el aire contenga vapor de aceite (aceite de cocinar, etc.).
De lo contrario, la superficie del aparato podrá agrietarse.
• No limpie el aparato con benceno o diluyente para pintura. Asimismo, no rocíe insecticidas
sobre el aparato.
Esto puede dar origen a grietas y causar descargas eléctricas y/o incendios.
• No utilice el aparato al usar insecticidas (para interiores) que generan humo.
Las sustancias químicas pueden acumularse en el interior del aparato y luego ser descargadas por
la salida de aire del mismo al ser nuevamente puesto en funcionamiento. La descarga de tales
sustancias químicas puede ser peligrosa para la salud.
• No permita que el aparato capte gases inflamables, humo de cigarrillos encendidos, incienso, etc.
De lo contrario, el aparato podría incendiarse.
• No use el aparato en lugares húmedos o donde pueda mojarse, como por ejemplo en un
baño, etc.
De lo contrario, podrían producirse descargas eléctricas y/o mal funcionamiento.
• No introduzca sus dedos u objetos extraños en entrada o salida de aire.
De lo contrario, podrían producirse descargas eléctricas y/o mal funcionamiento.
• Al desconectar la clavija de alimentación, asegúrese de tomar la clavija - no tire del cable.
De lo contrario, podrían producirse descargas eléctricas y/o incendios causados por cortocircuitos.
• Ventile la habitación al usar el aparato junto con un aparato calefactor.
De lo contrario, podría sufrir una intoxicación por monóxido de carbono.
• Desconecte la clavija de alimentación cuando no esté usando el aparato.
De lo contrario, podrían producirse descargas eléctricas y/o incendios como resultado de una mala
aislación o por cortocircuitos.
• Si el cable de alimentación está dañado, deberá ser reemplazado por el fabricante o su
representante de servicio, o por una persona equivalentemente cualificada, para evitar peligros.
• No olvide retirar las pilas antes de desechar el aparato; asimismo, asegúrese de desechar las
pilas de forma segura.
PRECAUCIONES DE SEGURIDAD
S-2
FU-55SE_Spa.6.5 03.7.17, 8:56 AM2
Downloaded from: http://www.usersmanualguide.com/

ESPAÑOL
PRECAUCIONES CONCERNIENTES AL USO DE ESTE PRODUCTO
• No bloque la entrada ni la salida de aire.
• No use el aparato cerca o encima de objetos calientes, tales como estufas, etc. Asimismo,
tampoco use el aparato en lugares donde pueda entrar en contacto con vapor.
• No use el aparato sobre su costado.
Esto podría causar la deformación o mal funcionamiento del aparato, y/o el recalentamiento del motor.
• No instale el aparato en lugares tales como la cocina, etc., donde haya generación de hollín.
• No use detergente para limpiar el aparato.
La superficie del aparato podría dañarse o agrietarse.
Además, los sensores podrían comenzar a funcionar incorrectamente.
• No use el aparato sin el filtro instalado.
Esto no tendrá ningún efecto de purificación. Además, esto puede causar problemas.
• No lave ni reutilice los filtros.
Los filtros no tendrán ningún efecto; además existe el riesgo de descarga eléctrica y otros problemas.
PRECAUCIONES CONCERNIENTES A LA INSTALACIÓN
NO USE EL MANDO A DISTANCIA EN LOS SIGUIENTES LUGARES
• Lugares donde haya equipos de iluminación por inversor o equipos electrónicos de iluminación
espontánea.
El mando a distancia podría dejar de funcionar. Si esto sucediera, aléjese del equipo de iluminación
o cambie la dirección del mando a distancia.
• Lugares expuestos a la luz directa del sol.
El aparato puede no recibir las señales desde el mando a distancia.
El aparato podrá no responder a las señales del mando a distancia si los extremos de un tubo
fluorescente se tornan negros o si la lámpara parpadea debido a que ha llegado al fin de su vida útil;
sin embargo, esto no indica mal funcionamiento del mando a distancia ni del aparato. En este caso,
reemplace los tubos fluorescentes por tubos nuevos.
OBSERVE LAS SIGUIENTES PRECAUCIONES DURANTE LA INSTALACIÓN
• Deje un espacio de al menos 2 m entre el aparato y televisores, radios y relojes.
De lo contrario, podrían producirse interferencias eléctricas.
• Deje un espacio de al menos 60 cm entre el aparato y la pared.
De lo contrario, el motor podrá recalentarse y causar el mal funcionamiento del aparato.
• Evite instalar el aparato en lugares donde los sensores que directamente expuestos al viento.
De lo contrario, el aparato podrá funcionar incorrectamente.
• Evite instalar el aparato en lugares donde elementos tales como cortinas, etc. queden en
contacto con la entrada o salida de aire.
Las cortinas, etc., podrían ensuciarse y el aparato podría comenzar a funcionar incorrectamente.
FUNCIONAMIENTO EFECTIVO
• Instale el aparato en una superficie estable, donde haya buena circulación de aire.
ACERCA DEL FILTRO
• No lave el filtro HEPA ni el filtro de carbón activo para reutilizarlos. Esto no tiene ningún efecto
y puede causar descargas eléctricas y otros problemas.
• La pared, etc., detrás de la salida de aire puede ensuciarse con el paso del tiempo. Al usar el aparato
durante períodos prolongados en un mismo lugar, use una hoja de vinilo, etc., para evitar que la
pared se ensucie. Además, limpie periódicamente la pared, etc.
S-3
FU-55SE_Spa.6.5 03.7.17, 8:56 AM3
Downloaded from: http://www.usersmanualguide.com/
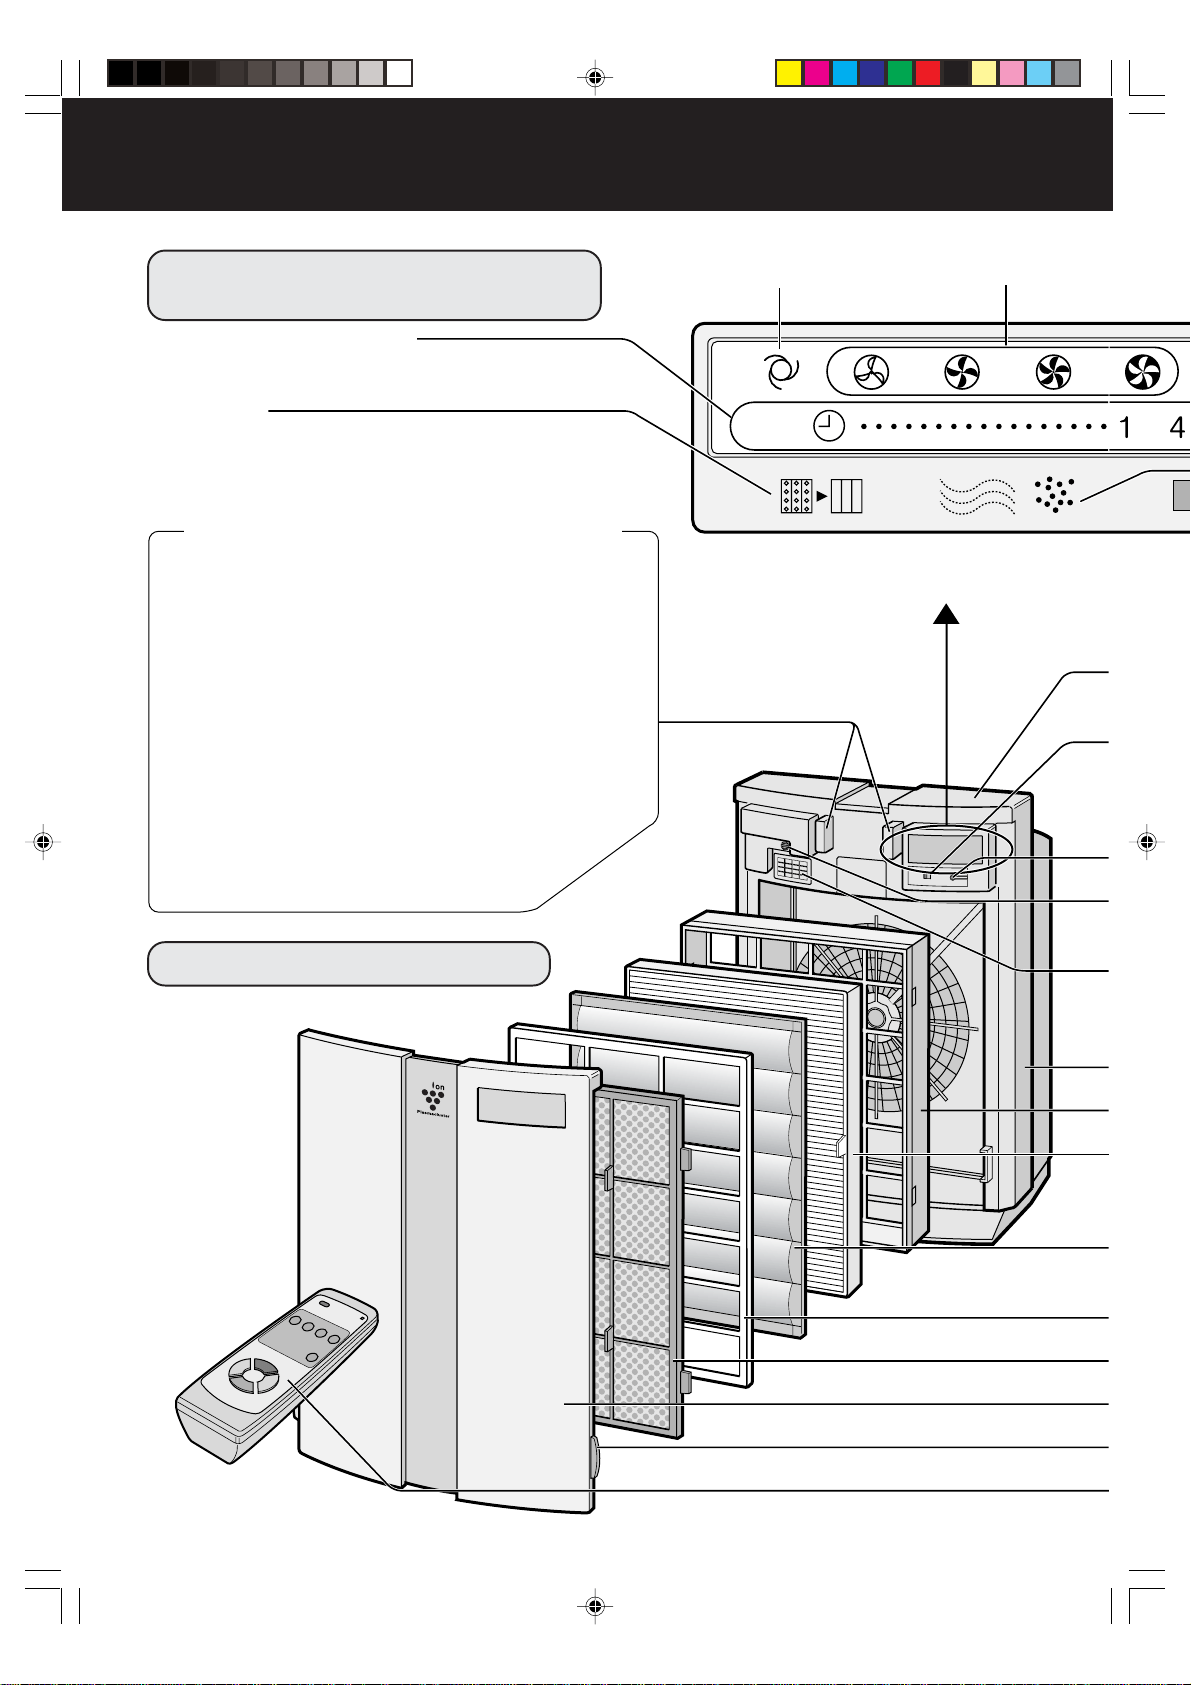
S-4
NOMBRE DE LOS COMPONENTES
Lámpara
de modo AUTO
DIAGRAMA DETALLADO
Lámparas indicadoras del
temporizador de desactivación
(se programa con el mando a distancia)
PANTALLA DE VISUALIZACIÓN
DE LA UNIDAD PRINCIPAL
Lámpara de
filtro
Si el filtro de la lámpara está encendido, esto indica
que es el momento de reemplazar el filtro.
Lámparas de nivel
de ventilador
LÁMPARA DE IONES AGRUPADOS
El modo de iones agrupados se selecciona con el mando a distancia.
Luz de color azul
Cuando la función de iones agrupados se encuentra en el modo de
limpieza o en el modo AUTO y el aire de la habitación está sucio, esta
lámpara se enciende y el aparato funcionará en el modo de limpieza.
Luz de color verde
Cuando la función de iones agrupados se encuentra en el modo
de control de iones o en el modo AUTO y el aire de la habitación
está limpio, esta lámpara se enciende y el aparato funcionará
en el modo de control de iones.
Lámpara apagada
No se generan iones agrupados.
• Para apagar la lámpara, use el botón “de activación/
desactivación de la visualización” del mando
a distancia, incluso mientras se generan iones
agrupados.
(Apague la lámpara cuando no la necesite.)
FU-55SE_Spa.6.5 03.7.17, 8:56 AM4
Downloaded from: http://www.usersmanualguide.com/
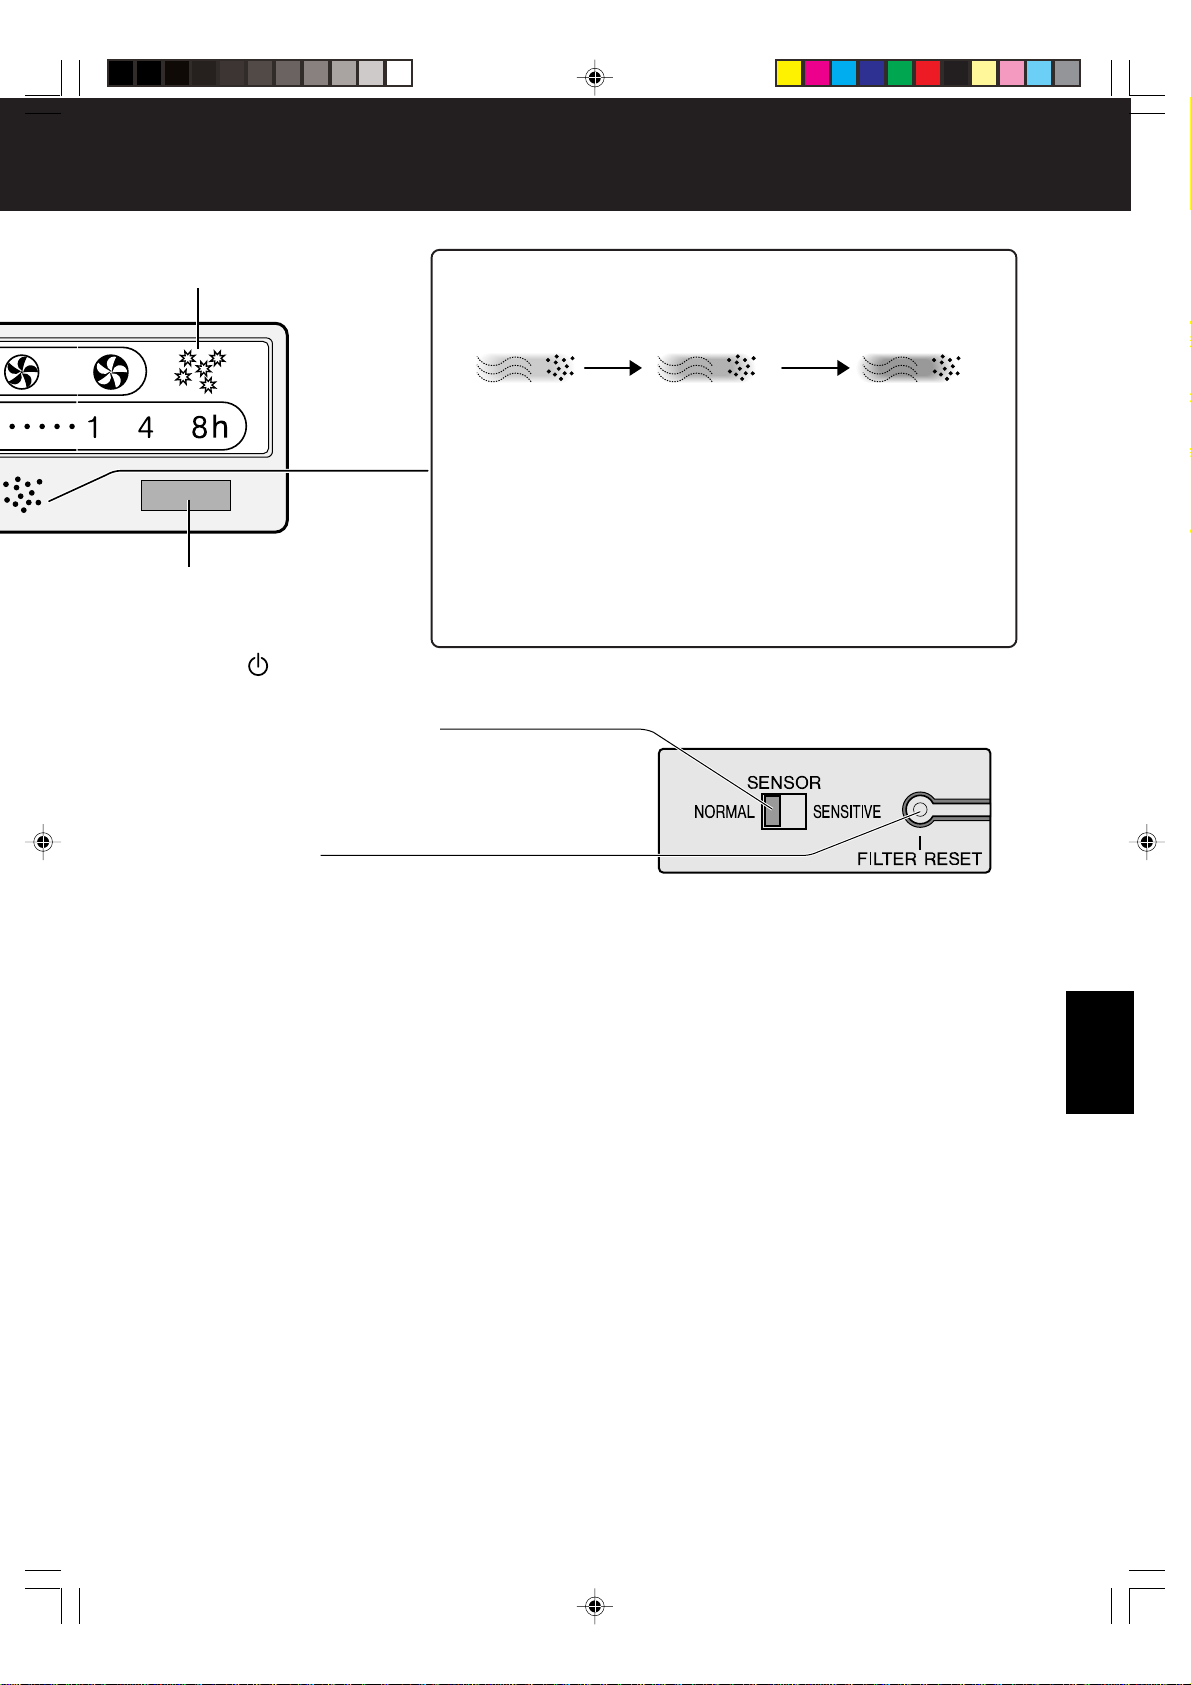
ESPAÑOL
S-5
Lámpara de modo
de eliminación de polen
Receptor de señales
de mando a distancia
SIGNO DE LIMPIEZA
El color cambia cuando el aire está sucio.
Limpio (verde) Ligeramente sucio (naranja) Muy sucio (rojo)
ACERCA DEL SIGNO DE LIMPIEZA
• El sensor de suciedad mostrará un lámpara del SIGNO DE LIMPIEZA
dependiendo del cambio relativo del ambiente en el momento en que se
inserta la clavija de alimentación en la toma de corriente mural y después
de esto.
•
Si el aire está extremadamente sucio en el momento en que se inserta la
clavija de alimentación, el
lámpara del SIGNO DE LIMPIEZA
podrá
encenderse de color verde debido a que el estado de contaminación es
el estado en que el sensor se basa para establecer la tasa de polución.
En este caso, cambie manualmente al modo de funcionamiento deseado,
ya que el modo automático no funcionará. Consulte la página S-11.
• La lámpara del SIGNO DE LIMPIEZA puede apagarse con el botón
“de activación/desactivación de la visualización” del mando a distancia.
Consulte la página S-11.
*Antes de pulsar el botón de reajuste
de filtro, asegúrese de conectar la
clavija de alimentación a una toma de
corriente mural.
También hay un botón de reajuste de
filtro en el mando a distancia.
Antes de pulsar el botón de reajuste
de filtro del mando a distancia, apunte
el mando de distancia hacia la unidad
principal.
Botón MODE/ Consulte la página S-10.
(Se utiliza para seleccionar modos de funcionamiento o para
apagar el aparato)
Interruptor Sensor sensitivity
Permite ajustar la sensibilidad de detección de olores y polvo.
El ajuste de fábrica es “Normal”. Normalmente, use el aparato con
este ajuste. Ajuste la sensibilidad a “High” si le parece que el nivel
actual es demasiado bajo para las condiciones de la habitación.
Botón de reajuste
de filtro (Filter reset)
Sensor de olores
Detecta olores tales como humo de tabaco, incienso,
mascotas, cosméticos, etc.
Cubierta del sensor
Sensor de polvo
Detecta polvo, humo, polen, polvo doméstico, etc.
Consulte las páginas S-12 y S-13.
Unidad principal
Bastidor de filtro
Filtro HEPA (blanco)
Consulte la página S-14.
(Filtro recolector de polvo)
Filtro de carbón activo (negro)
Consulte la página S-14.
(Filtro de desodorización)
Separador de filtro
Prefiltro
Panel delantero
Gancho
Mando a distancia Consulte la página S-11.
FU-55SE_Spa.6.5 03.7.17, 8:56 AM5
Downloaded from: http://www.usersmanualguide.com/

S-6
NOMBRE DE LOS COMPONENTES
Mango
Salida
de aire
Cable de
alimentación
Clavija de
alimentación
ACCESORIOS
Mando a distancia (1 unidad) Pilas (pila R6 (AA) x 2)
Folleto incluido
• Manual de uso
ESPECIFICACIONES
Modelo
Fuente de alimentación
Ajuste del nivel del ventilador
Potencia nominal
Nivel del ventilador
Superficie de suelo aplicable
Longitud del cable
Dimensiones
Peso
Funcionamiento
del ventilador
FU-55SE
220-240 V/50 Hz
~42 m
2
*
2,5 m
415 mm (ancho) x 238 mm (prof.) x 572 mm (alto)
9,3 kg
Máximo
43 W
330m
3
/hora
Alto
19 W
218m
3
/hora
Medio
6 W
95m
3
/hora
Silencioso
4 W
43m
3
/hora
*La superficie de suelo aplicable es el área que se necesita para utilizar el aparato funcionando
a nivel máximo de ventilador.
(JEM 1467, The Japan Electrical Manufacturers’ Association)
Reducción del consumo de energía en modo de espera
A fin de poder utilizar los circuitos eléctricos mientras la clavija de alimentación está enchufada en
la toma de corriente mural, este producto consume aproximadamente 0,9 W en modo de espera.
Para ahorrar energía, desenchufe la clavija de alimentación cuando no vaya a usar el aparato.
PARTE POSTERIOR
Rejilla de salida
• La dirección de salida del aire purificado
puede cambiarse en las direcciones indi-
cadas por las flechas.
• Ajuste la dirección de salida según lo desee.
FU-55SE_Spa.6.5 03.7.17, 8:56 AM6
Downloaded from: http://www.usersmanualguide.com/
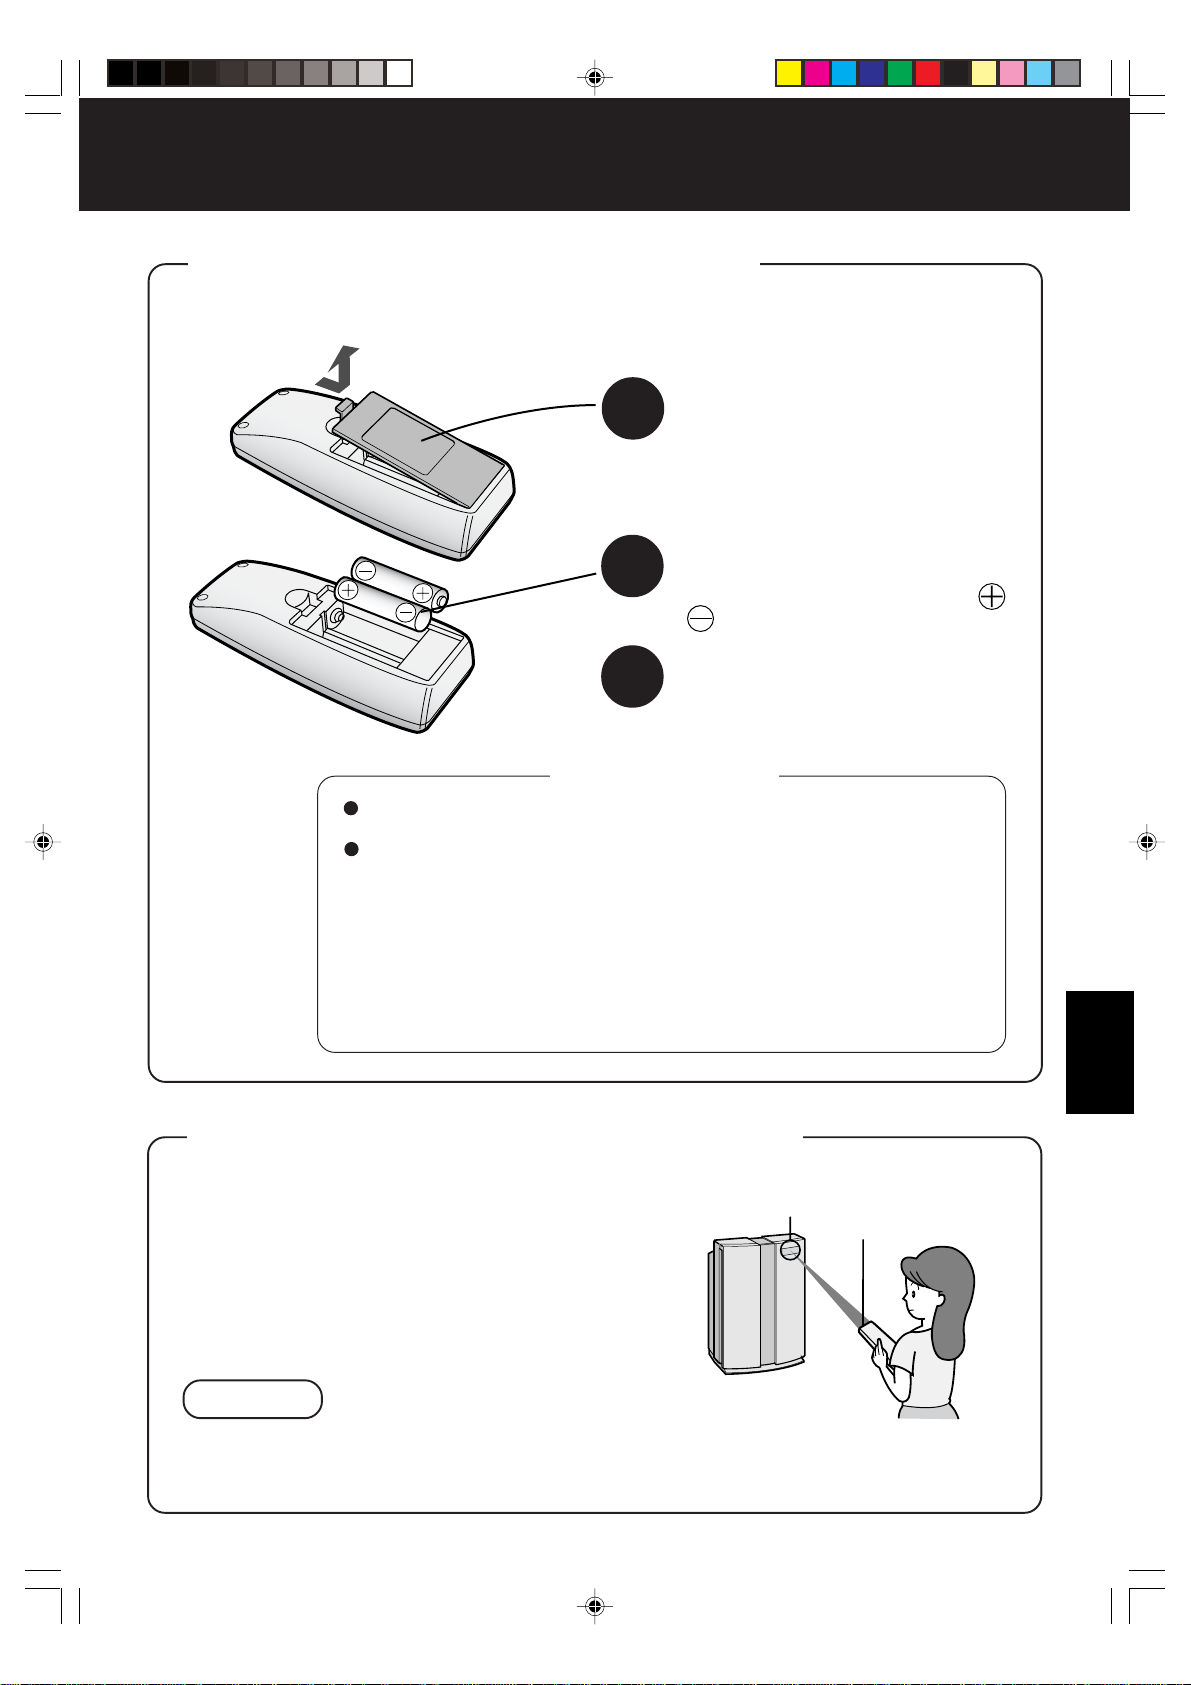
ESPAÑOL
S-7
INSTALACIÓN DE LAS PILAS
EN EL MANDO A DISTANCIA
Acerca de las pilas
• Las pilas tienen una vida útil de aproximadamente 1 año.
• Reemplace las pilas cuando el mando a distancia deje de funcionar.
• El uso incorrecto de las pilas puede causar pérdida de electrólito y/o
daños. Al manipular las pilas, tenga presente lo siguiente:
• Al reemplazar las pilas, reemplace ambas pilas por pilas nuevas del
mismo tipo. (Use pilas de manganeso R6 (AA) (2 unidades).)
• Cuando no vaya a usar el aparato o el mando a distancia por un
período prolongado de tiempo, retire las pilas. Esto evitará que el
mando a distancia funcione incorrectamente debido a pérdida de
electrólito.
*Las pilas incluidas como accesorios son solamente para el uso inicial
del mando a distancia y pueden agotarse dentro de 1 año.
1
Retire la cubierta trasera
Presione y deslice la cubierta trasera
para retirarla.
2
Instale las pilas
Instale las pilas con los signos
y como se indica a continuación.
3
Cierre la cubierta trasera
USO DEL MANDO A DISTANCIA
• Para usar el mando a distancia, apúntelo hacia
la unidad principal (receptor).
• Las señales del mando a distancia tienen un
alcance de aproximadamente 7 m (hacia ade-
lante).
• Asegúrese de que no haya objetos que bloqueen
la trayectoria de las señales.
NOTA
• Evite someter el mando a distancia a golpes fuertes. Asimismo, no moje el mando a distancia
y no lo deje directamente expuesto a la luz del sol, cerca de una estufa, etc. Esto podría
causar mal funcionamiento.
Receptor
Transmisor
PREPARATIVOS
FU-55SE_Spa.6.5 03.7.17, 8:56 AM7
Downloaded from: http://www.usersmanualguide.com/
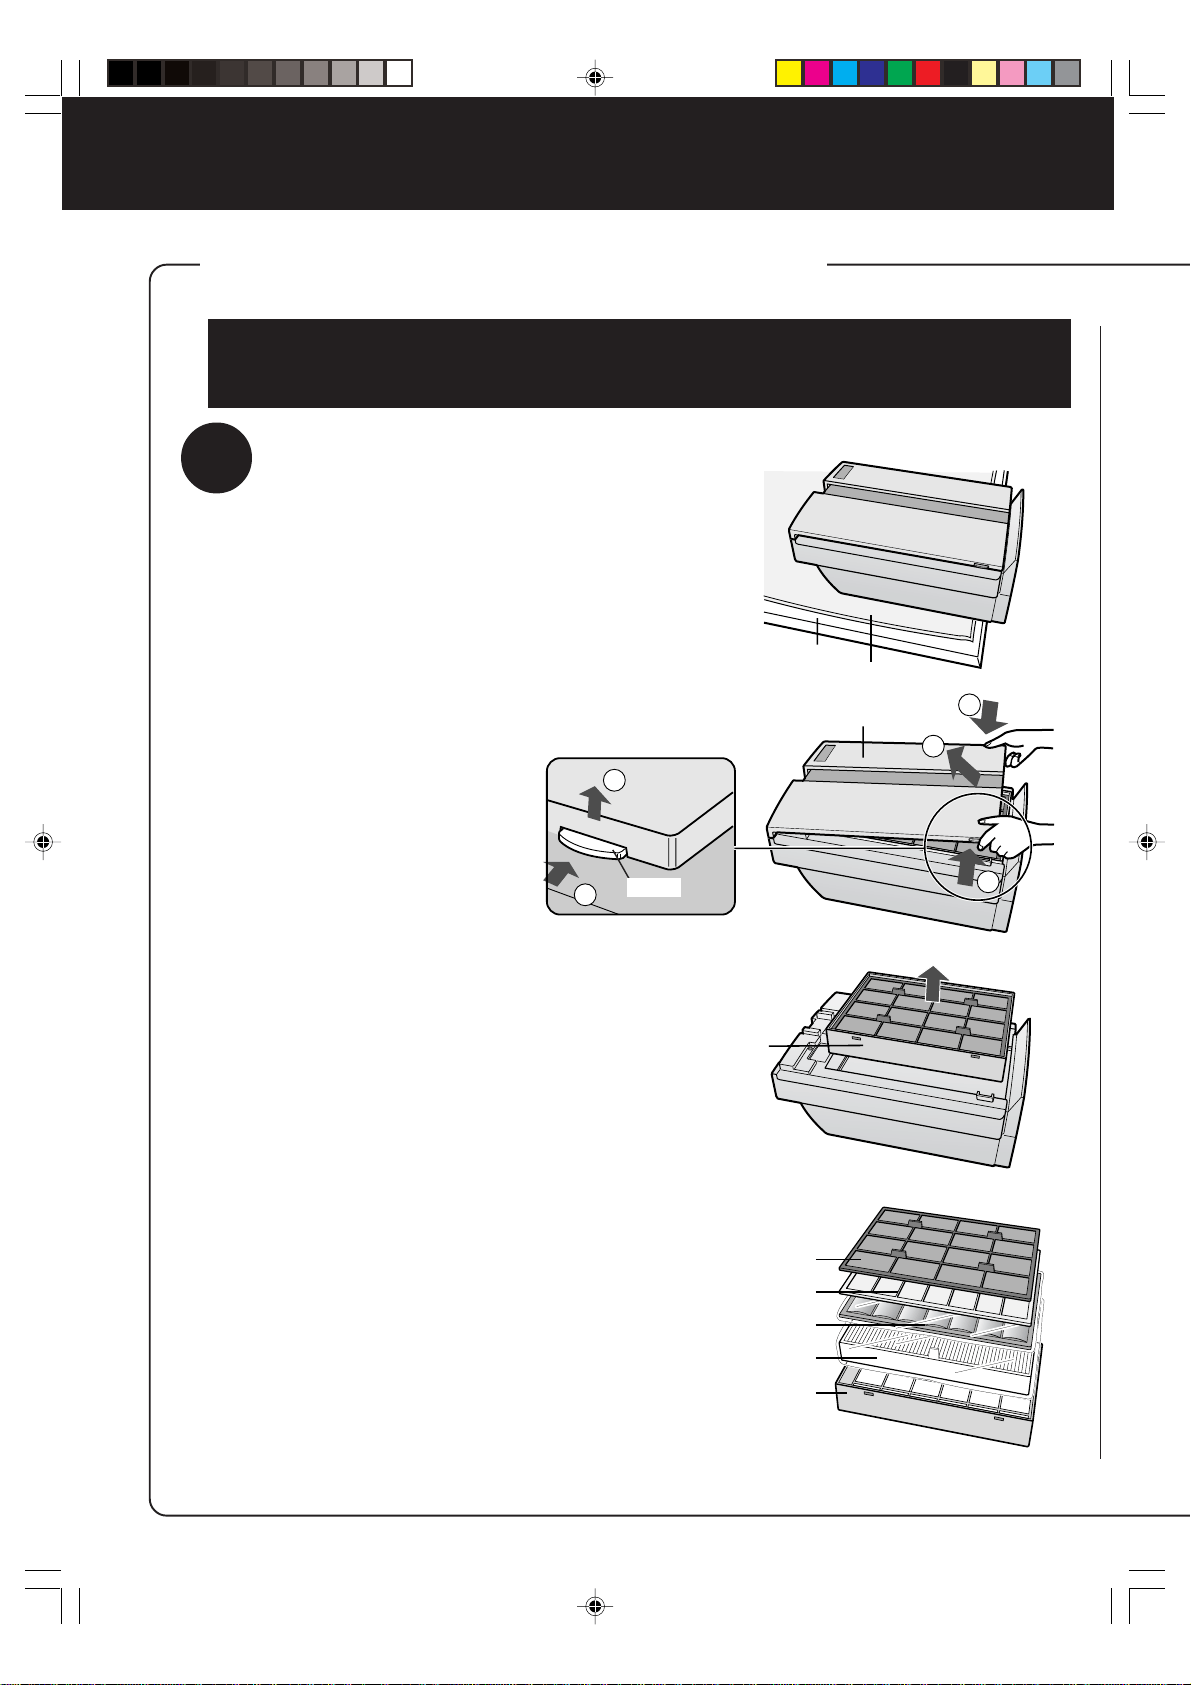
S-8
PREPARATIVOS
•Asegúrese de desconectar la clavija de alimentación
de la toma de corriente mural.
1
1
1
2
2
Mesa
Paño suave
Panel delantero
Prefiltro
Separador de filtro
Filtro de carbón activo
Filtro HEPA
Bastidor de filtro
Gancho
INSTALACIÓN DE LOS FILTROS
Para mantener la calidad de los filtros, éstos vienen instalados en la unidad principal
dentro de bolsas plásticas. Asegúrese de retirar los filtros de las bolsas plásticas
antes de usar el aparato.
1
Retire los filtros
1
Coloque el aparato cara
arriba.
Ponga el aparato en una mesa,
etc., asegurándose de no pelliz-
car el cable de alimentación en
la parte posterior del aparato.
2
Desmonte el panel delan-
tero.
Presione hacia dentro el gancho
situado en la parte inferior del
panel delantero, y levante el
panel para retirarlo.
3
Desmonte el bastidor de
filtro y retire el prefiltro y el
separador de filtro.
4
Saque el filtro de carbón
activo (negro) y el filtro HEPA
(blanco) de la bolsa plástica.
Bastidor
de filtro
FU-55SE_Spa.6.5 03.7.17, 8:56 AM8
Downloaded from: http://www.usersmanualguide.com/
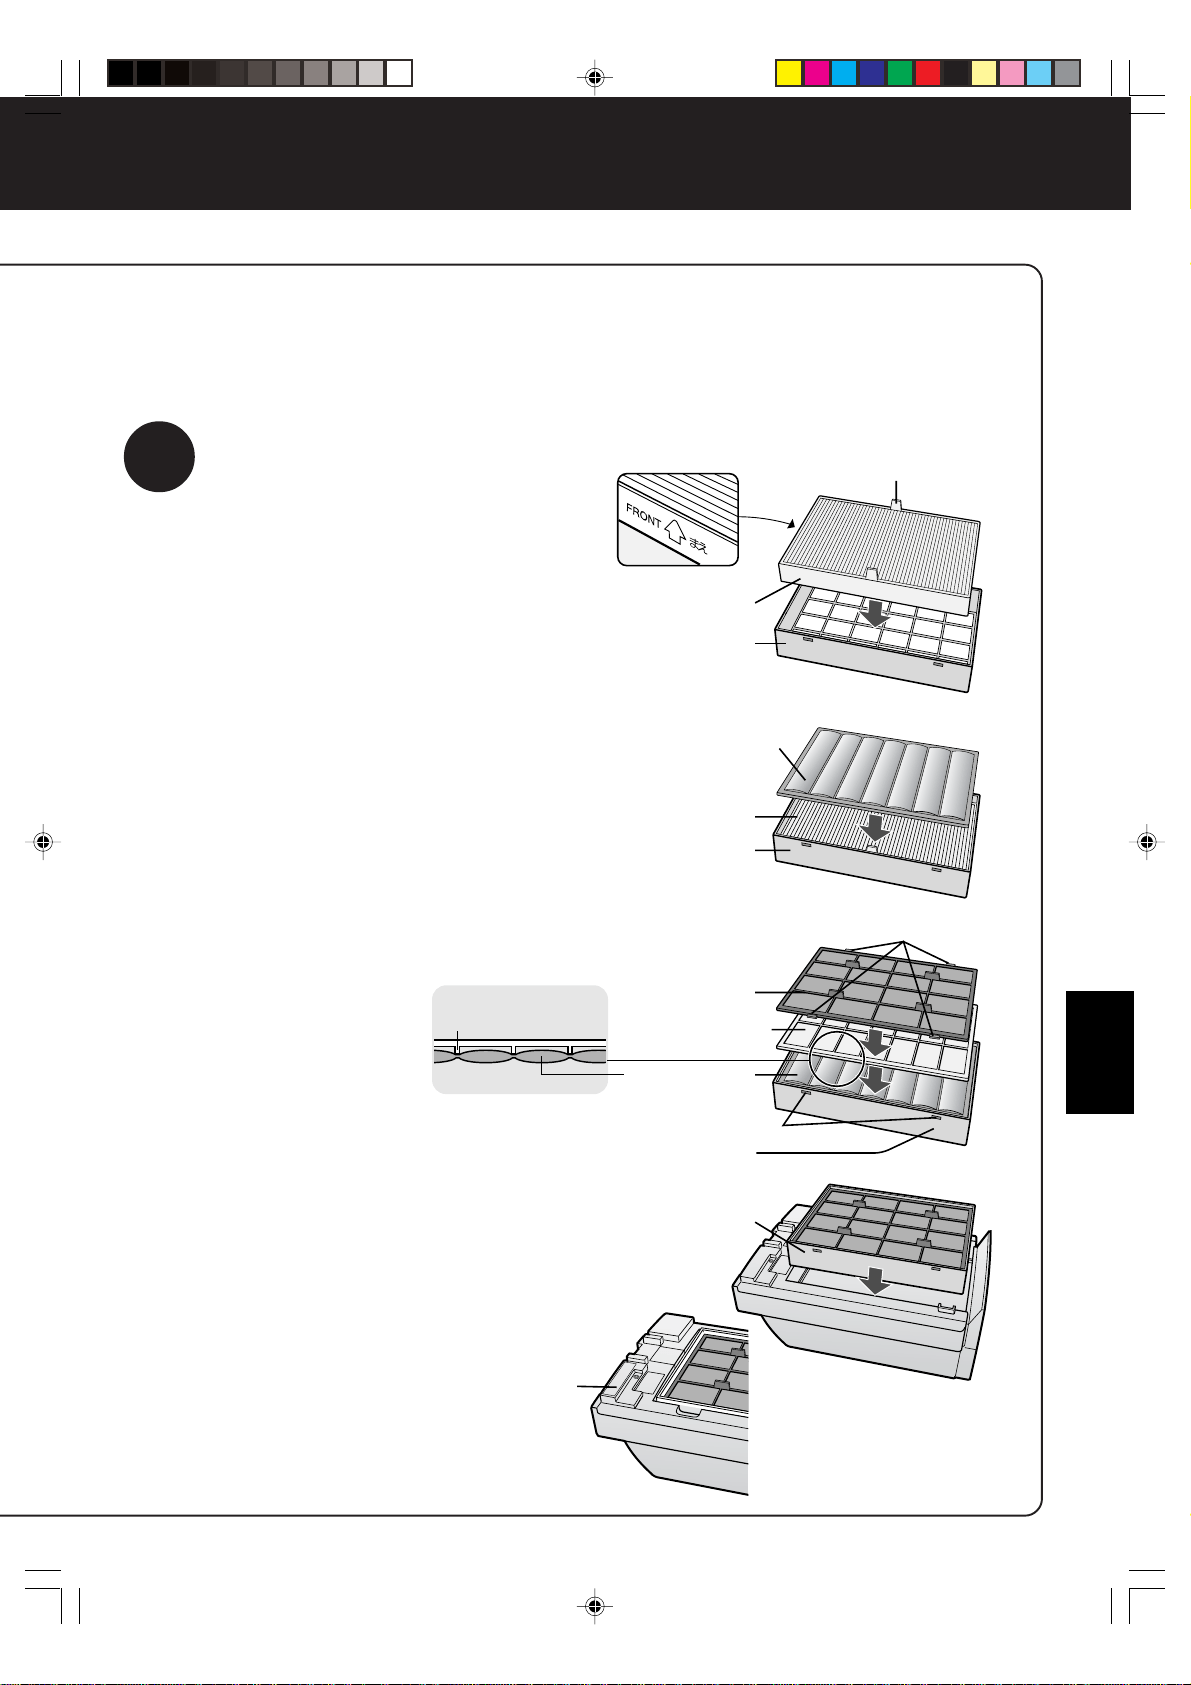
ESPAÑOL
S-9
2
Instale el filtro
1
Saque el filtro HEPA de la bolsa
plástica e instálelo en el bas-
tidor de filtro con el signo
“FRONT” de cara hacia arriba.
Inserte el filtro HEPA de manera tal que
las lengüetas del mismo queden de cara
hacia usted.
El filtro no funcionará correctamente si
es instalado al revés.
2
Saque el filtro de carbón activo
de la bolsa plástica e instálelo
en el bastidor de filtro.
3
Instale el separador de filtro
y el prefiltro en el bastidor en el
orden que se indica.
• Instale el separador de
filtro de modo que los
rebordes queden hacia
abajo, como se mues-
tra en el diagrama de la
derecha.
• Inserte las lengüetas
del prefiltro (4 posicio-
nes) en los agujeros
del bastidor de filtro.
• Instale el bastidor de filtro en el aparato
como se muestra en el diagrama de la
derecha (no hay orientación vertical).
4
Anote la fecha de comienzo
de uso en la etiqueta de fecha
que se encuentra adherida al
aparato.
Use la fecha como
una guía para el
intervalo de reem-
plazo del filtro.
Lengüetas
Filtro HEPA
Bastidor
de filtro
Filtro de carbón activo
Filtro HEPA
Bastidor
de filtro
Prefiltro
Lengüetas (4 posiciones)
Separador
de filtro
Filtro de carbón
activo
Agujeros
Bastidor
de filtro
Bastidor
de filtro
Etiqueta
de fecha
Reborde del separador de filtro
ción
FU-55SE_Spa.6.5 03.7.17, 8:56 AM9
Downloaded from: http://www.usersmanualguide.com/
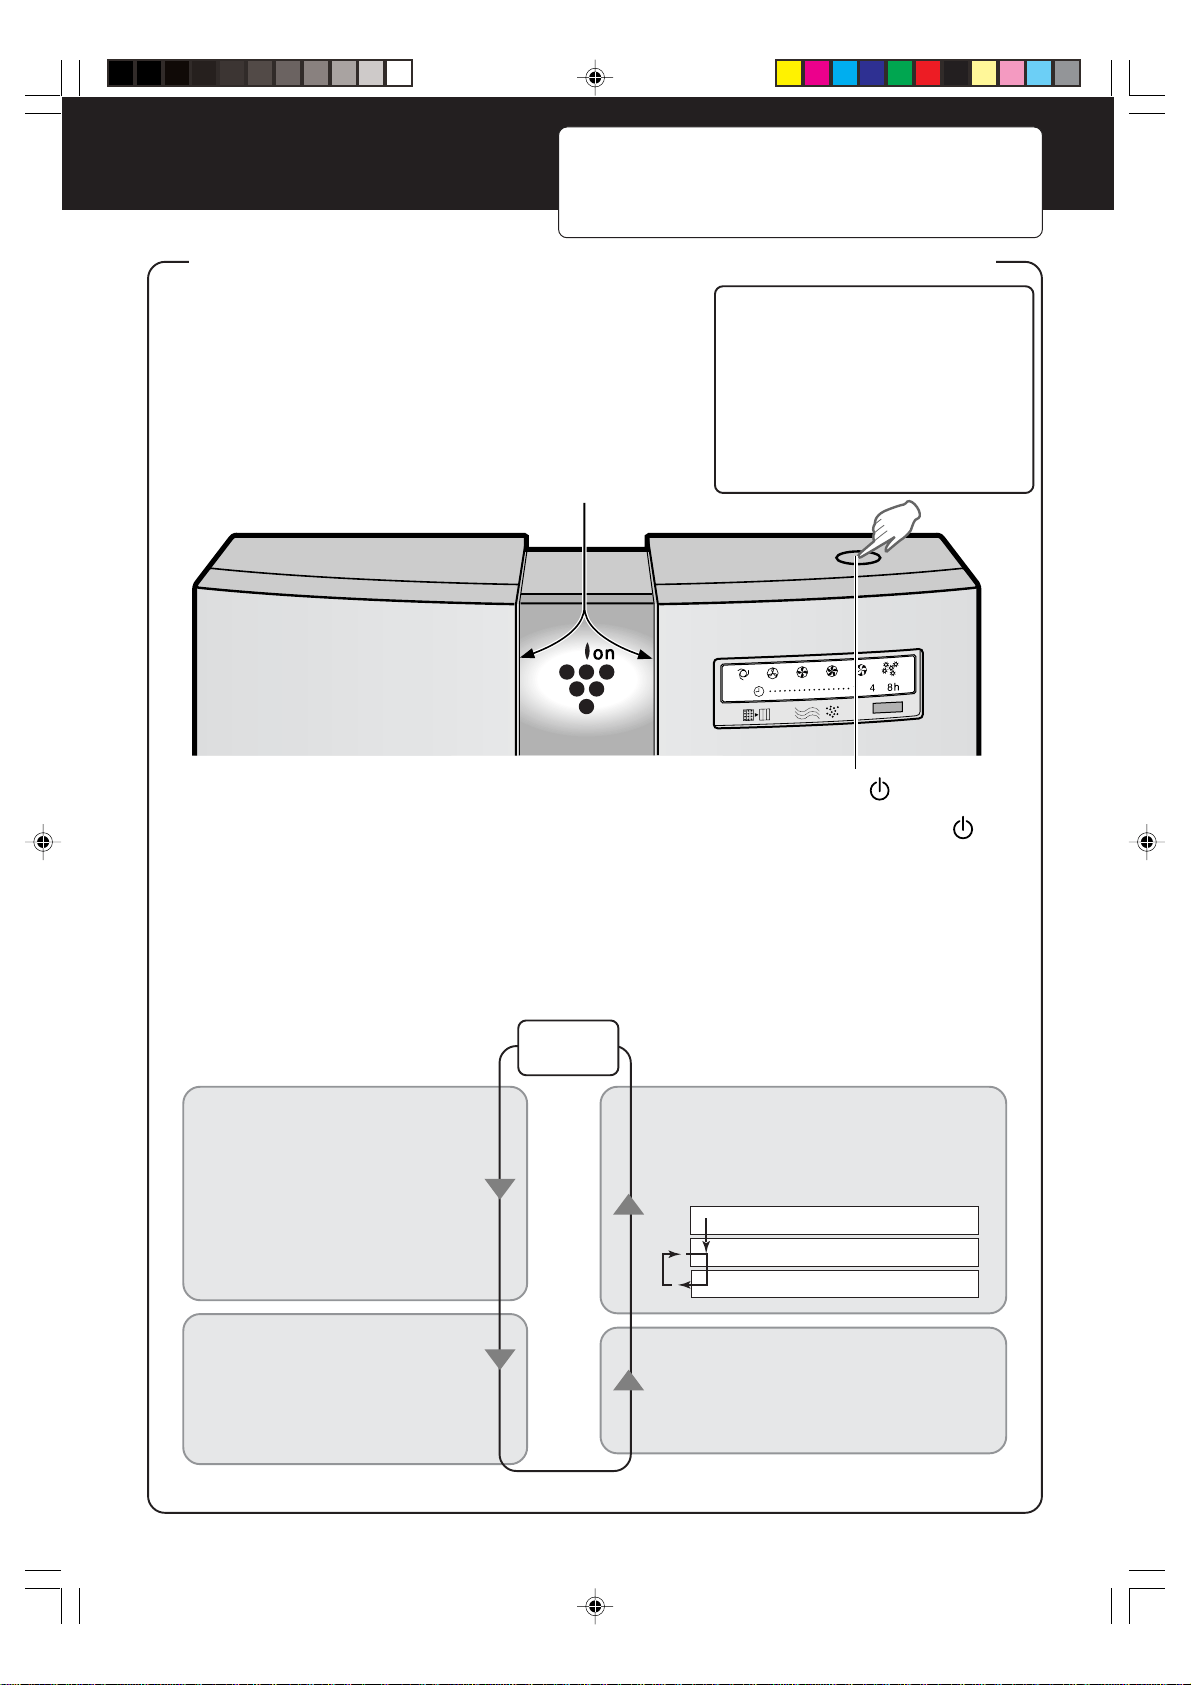
Plasmacluster
S-10
FUNCIONAMIENTO
FUNCIONAMIENTO DE LA UNIDAD PRINCIPAL
Modos de funcionamiento disponibles
en la unidad principal
• Modo AUTO (nivel de ventilador)
• Funcionamiento silencioso
(nivel de ventilador)
• Funcionamiento a nivel medio
(nivel de ventilador)
• Funcionamiento a nivel alto
(nivel de ventilador)
• Funcionamiento al máximo
(nivel de ventilador)
• Modo de eliminación de polen
El aparato comenzará a funcionar cuando se pulse el botón MODE/
.
El aparato comenzará a funcionar en el modo AUTO (nivel de ventilador).
• Durante el funcionamiento, la lámpara de iones agrupados se encenderá.
Cada vez que se pulsa el botón, el modo de funcionamiento cambia como se
indica a continuación.
Se enciende la lámpara correspondiente al modo de funcionamiento seleccionado.
Se puede seleccionar el modo de funcionamiento apropiado para las condiciones de uso.
Parada
Modo AUTO
Para una purificación de aire
eficiente, el nivel del ventilador
cambia automáticamente (entre
alto, medio y silencioso) de-
pendiendo del grado de conta-
minación del aire detectado por
el sensor de polvo.
Funcionamiento
silencioso
El aparato funcionará silencio-
samente captando una canti-
dad mínima de aire.
Modo de eliminación de polen
El aparato funciona en nivel alto du-
rante 10 minutos, después de lo cual
alterna entre medio y alto.
Funcionamiento en nivel
medio a máximo
El aparato funciona en el nivel de
ventilador medio, alto o máximo.
Cuando se conecta la clavija de alimentación a la toma de
corriente mural, el aparato comprueba durante los 30
segundos iniciales las condiciones del aire. Si se selecciona
el modo ON en el transcurso de estos 30 segundos, el
lámpara del SIGNO DE LIMPIEZA parpadeará
alternadamente en color verde, naranja y rojo.
Lámpara de iones agrupados
Botón MODE/
10 minutos: Nivel de ventilador alto
20 minutos: Nivel de ventilador medio
20 minutos: Nivel de ventilador alto
FU-55SE_Spa.6.5 03.7.17, 8:56 AM10
Downloaded from: http://www.usersmanualguide.com/
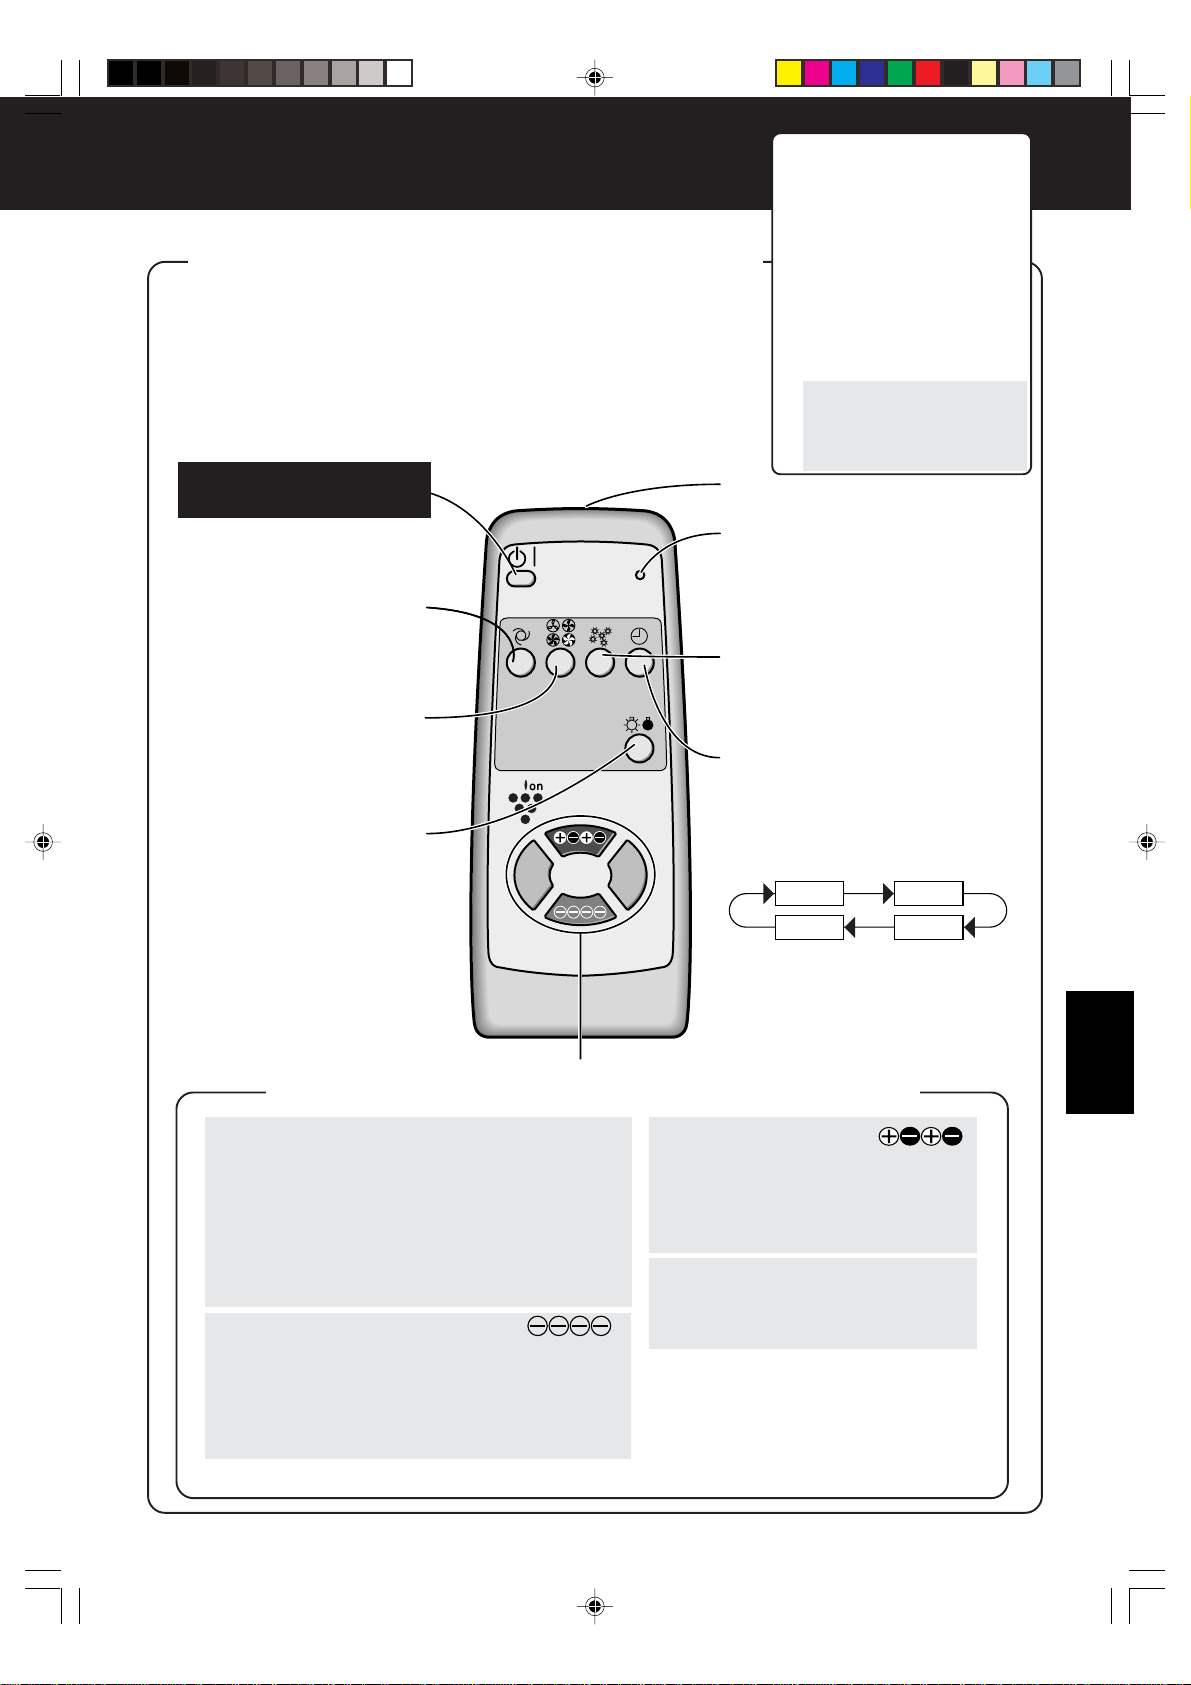
ESPAÑOL
Plasmacluster
AUTO
RESET
OFF
S-11
CONTROL DEL APARATO CON EL MANDO A DISTANCIA
Operaciones que se
pueden controlar con el
mando a distancia
•
Modo AUTO (nivel de
ventilador)
•
Funcionamiento MANUAL (nivel
de ventilador)
•
Modo de eliminación de polen
•
Programación del temporizador
de desactivación
• Activación/desactivación de la
visualización
• Selección del modo de iones
agrupados
•
Modo de iones agrupados AUTO
• Modo de limpieza
• Modo de control de iones
•
Modo de iones agrupados
desactivado
• Para poner en funcionamiento el aparato, pulse el botón
de activación/desactivación de la alimentación.
El aparato emitirá una breve señal auditiva y comenzará
a funcionar en el modo AUTO (nivel de ventilador).
El modo de iones agrupados AUTO se selecciona para funcionamiento.
• Para apagar el aparato, vuelva a pulsar el botón de activación/
desactivación de la alimentación.
El aparato emitirá una señal auditiva larga y se apagará.
Botón de activación/
desactivación de la alimentación
Se usa para encender el aparato
(modo AUTO - señal auditiva
breve) y para apagar el aparato
(señal auditiva larga).
Botón AUTO (nivel de ventilador)
El nivel del ventilador cambia
automáticamente dependiendo
del grado de contaminación del
aire.
Botón de control manual
(nivel de ventilador)
El nivel del ventilador puede
cambiarse entre silencioso,
medio, alto y máximo.
Botón de activación/
desactivación de la visualización
Enciende o apaga la lámpara de
iones agrupados y la lámpara del
SIGNO DE LIMPIEZA.
• Durante el modo “visualización
desactivada”, la lámpara de
iones agrupados se enciende
durante aproximadamente 3
segundos cuando se pulsa
el botón selector de iones
agrupados (excluyendo el
botón OFF).
Transmisor
Botón de reajuste de filtro
Pulse este botón después de
reemplazar los filtros.
Botón de modo de
eliminación de polen
El aparato funciona de forma
efectiva cuando se cree que hay
polen en el aire. Consulte la pá-gina
S-10.
Botón del temporizador de
desactivación
Se usa para programar el tem-
porizador de desactivación.
La hora establecida cambia como se
indica a continuación cada vez que
se pulsa el botón.
1 hora 4 horas
Cancelar
8 horas
• El tiempo restante es indicado por
la lámpara a medida que el tiempo
pasa.
•
El aparato se apagará cuando se
alcance el tiempo de desactivación
programado en el temporizador.
Botón de selección de iones agrupados
Botón de selección AUTO
de iones agrupados
El aparato cambia automáticamente entre el modo
de limpieza y el modo de control de iones
dependiendo del grado de contaminación del aire
detectado por el sensor de polvo y el sensor de olores.
La operación limpieza se lleva a cabo durante
aproximadamente 1 minuto cuando el aparato es
inicialmente puesto en funcionamiento.
Botón de control de iones
El aparato funciona constantemente en el modo
de control de iones.
El equilibrio de iones en la habitación se mantiene
aumentando la razón de iones agrupados
negativos. (La lámpara de iones agrupados se
enciende (verde).)
Botón de limpieza
El aparato funciona constantemente en
el modo de limpieza. El modo de
limpieza es efectivo para reducir los
moles en suspensión. (La lámpara de
iones agrupados se enciende (azul).)
Botón OFF
La generación de iones se detiene y la
lámpara de iones agrupados se apaga.
Si la habitación está particularmente enmohecida, use el aparato en el modo de limpieza.
FU-55SE_Spa.6.5 03.7.17, 8:56 AM11
Downloaded from: http://www.usersmanualguide.com/

GUÍA DE USO
SENSOR DE OLORES
• Además de ser sensible a olores tales como humo de cigarrillo u olor de mascotas, el sensor
de olores también responde a lo siguiente.
• Insecticidas, cosméticos, aerosoles, alcohol.
• Cambios repentinos de temperatura o humedad.
• Cuando se utilizan cosméticos o sustancias similares en una habitación cerrada mientras el
aparato se encuentra en modo de funcionamiento automático, es normal que el sensor
responda a estas sustancias incrementando el flujo de aire. Si no desea un mayor flujo de
aire, cambie la sensibilidad del sensor.
SENSOR DE POLVO
• El sensor de polvo detecta partículas de polvo en el aire de la habitación, por ejemplo, humo
de cigarrillo y polvo doméstico.
• Si se la compara con el humo de cigarrillo, la cantidad de polvo que se libera cuando se hace
una cama es tan pequeña que puede no ser detectada por el sensor de polvo. Por esta razón,
la cantidad de polvo que se ve a simple vista puede no coincidir con la indicación de la
lámpara de limpieza.
BOTÓN DE REAJUSTE DE FILTRO
• Después de reemplazar los filtros, asegúrese de conectar la clavija de alimentación a una
toma de corriente mural, y pulse el botón de reajuste de filtro del aparato o del mando a
distancia. El sonido “BEEP” indica que el tiempo de funcionamiento almacenado se ha borrado.
Si la lámpara de filtro está encendida en ese momento, ésta se apagará.
S-12
FU-55SE_Spa.6.5 03.7.17, 8:56 AM12
Downloaded from: http://www.usersmanualguide.com/
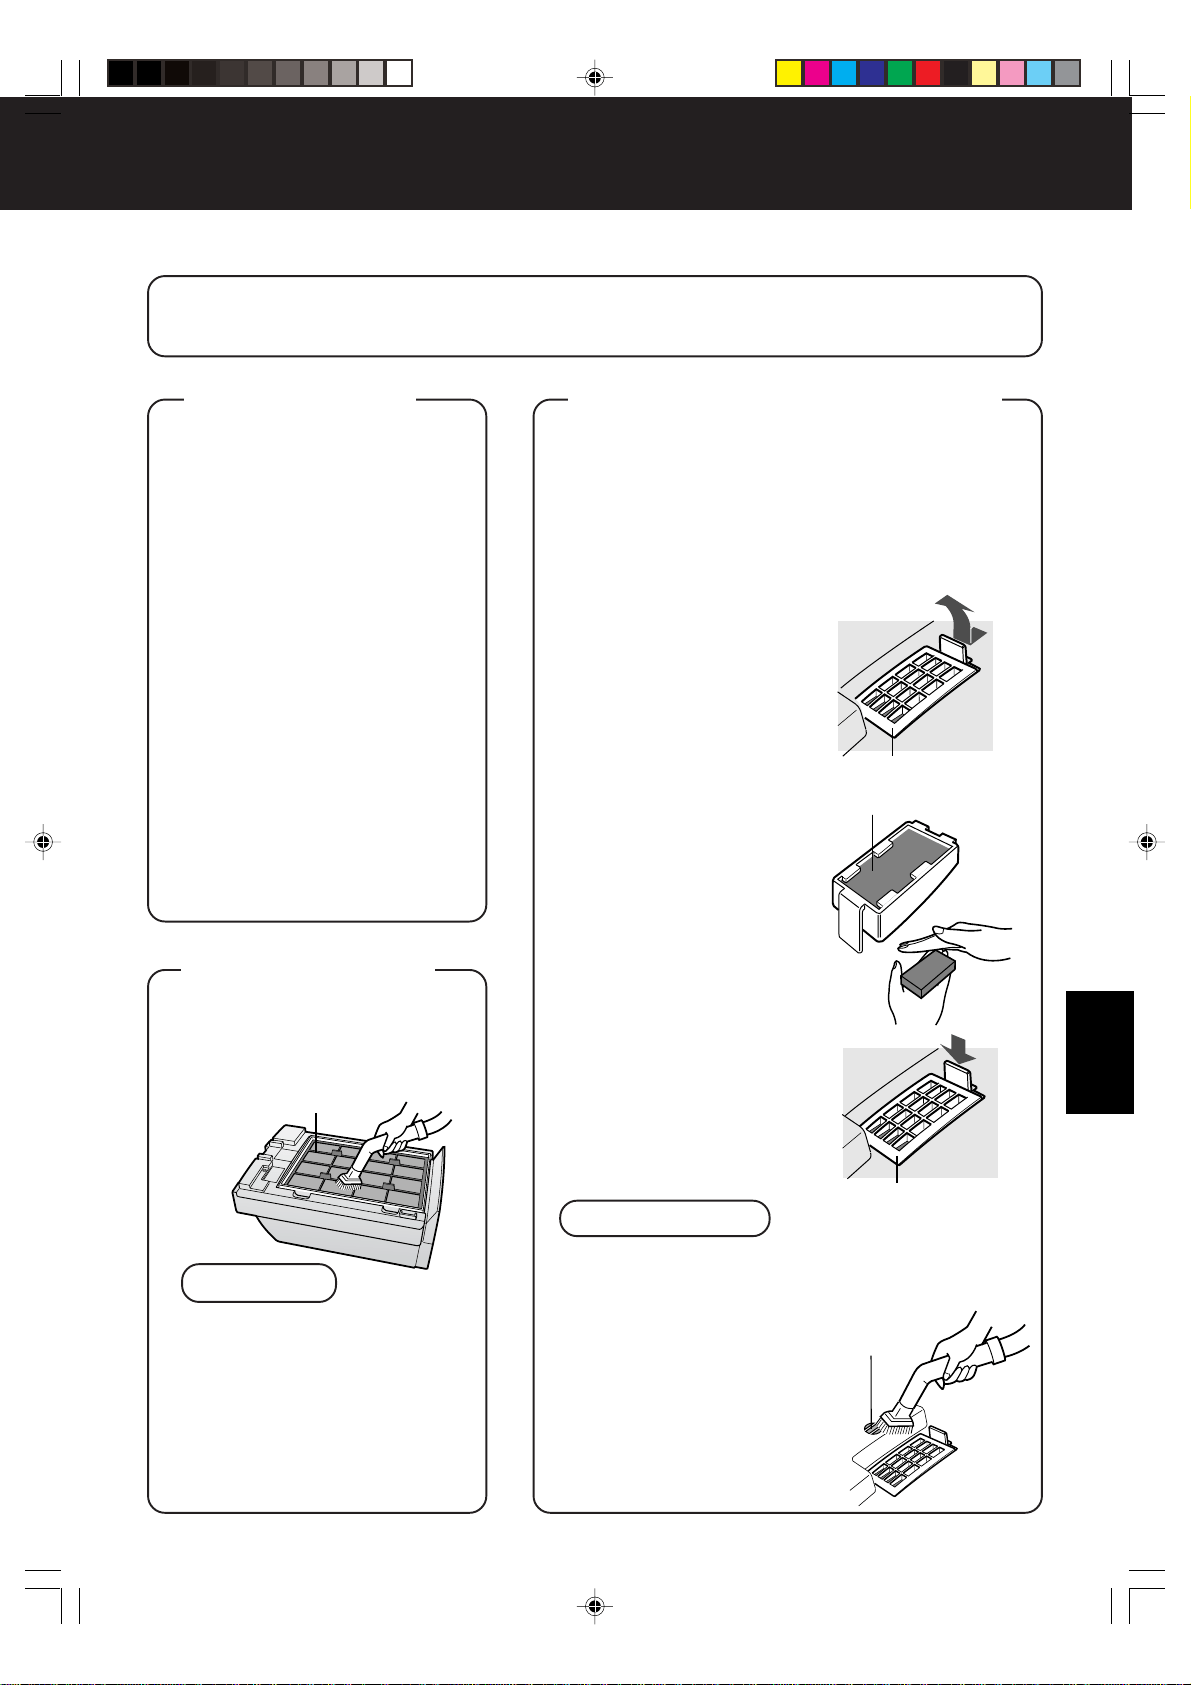
ESPAÑOL
CUIDADO Y MANTENIMIENTO
(Para mantener las altas prestaciones de este producto, limpie el aparato periódicamente.)
Al limpiar el aparato, asegúrese de desconectar la clavija de alimentación de la toma de corriente
mural. Asimismo, nunca manipule la clavija de alimentación con las manos mojadas.
De lo contrario, podrá sufrir descargas eléctricas y/o lesiones corporales.
UNIDAD
PRINCIPAL
Quite la suciedad de la unidad prin-
cipal y de la superficie de
instalación (suelo/mesa) lo antes
posible. La suciedad acumulada
puede ser difícil de eliminar.
Limpie el aparato con un
paño suave
En caso de suciedad rebelde,
moje un paño suave en agua fría
o agua caliente (máx. 40° C).
No use líquidos volátiles
Sustancias tales como el ben-
ceno, diluyente para pintura,
polvo de pulir, etc., pueden dañar
la superficie del aparato.
No use detergentes
Las sustancias contenidas en los
detergentes pueden dañar la
superficie del aparato.
No moje el aparato
Nunca moje el aparato con agua.
S-13
Cubierta del sensor
Filtro del sensor
Cubierta del sensor
LIMPIEZA DE
LOS FILTROS
Limpie la superficie superior del
prefiltro cuidadosamente utili-
zando una aspiradora.
NOTA
• El filtro HEPA se daña fá-
cilmente. Asegúrese de no
ponerlo en contacto directo
con la boquilla de una aspira-
dora. Asimismo, no lo lave
nunca con agua.
• El filtro HEPA y el filtro de
carbón activo no requieren
limpieza.
SENSOR DE POLVO
SENSOR DE OLORES
El intervalo de mantenimiento del SENSOR DE
OLORES y del SENSOR DE POLVO es una vez
cada tres meses.
La sensibilidad de los sensores se tornará inestable
si los sensores de olores y de polvo están sucios u
obstruidos. Limpie estos componentes como se
indica a continuación.
SENSOR DE POLVO
1
Desmonte el panel
delantero y retire el
filtro del sensor.
• Para desmontar del filtro
del sensor, tire de la
lengüeta en la cubierta
del sensor.
2
Quite el polvo del
filtro del sensor.
• Desmonte el filtro del
sensor y golpéelo ligera-
mente con la mano para
quitar el polvo.
Si está muy sucio, lávelo
con agua y permita que se
seque completamente.
3
Inserte el filtro del sen-
sor en la cubierta, ins-
tale la cubierta en el
aparato y luego monte
el panel delantero.
• El filtro del sensor puede
insertarse en cualquier
dirección.
PRECAUCIÓN
• No olvide instalar la cubierta del sensor antes de
poner el aparato en funcionamiento.
• No introduzca objetos
extraños (mondadientes,
etc.,) en el filtro. Esto
puede ocasionar daños al
aparato o mal
funcionamiento del mismo.
SENSOR DE OLORES
Retire el polvo de la superficie
de la abertura del sensor
utilizando una aspiradora.
Prefiltro
Abertura
del sensor
FU-55SE_Spa.6.5 03.7.17, 8:56 AM13
Downloaded from: http://www.usersmanualguide.com/
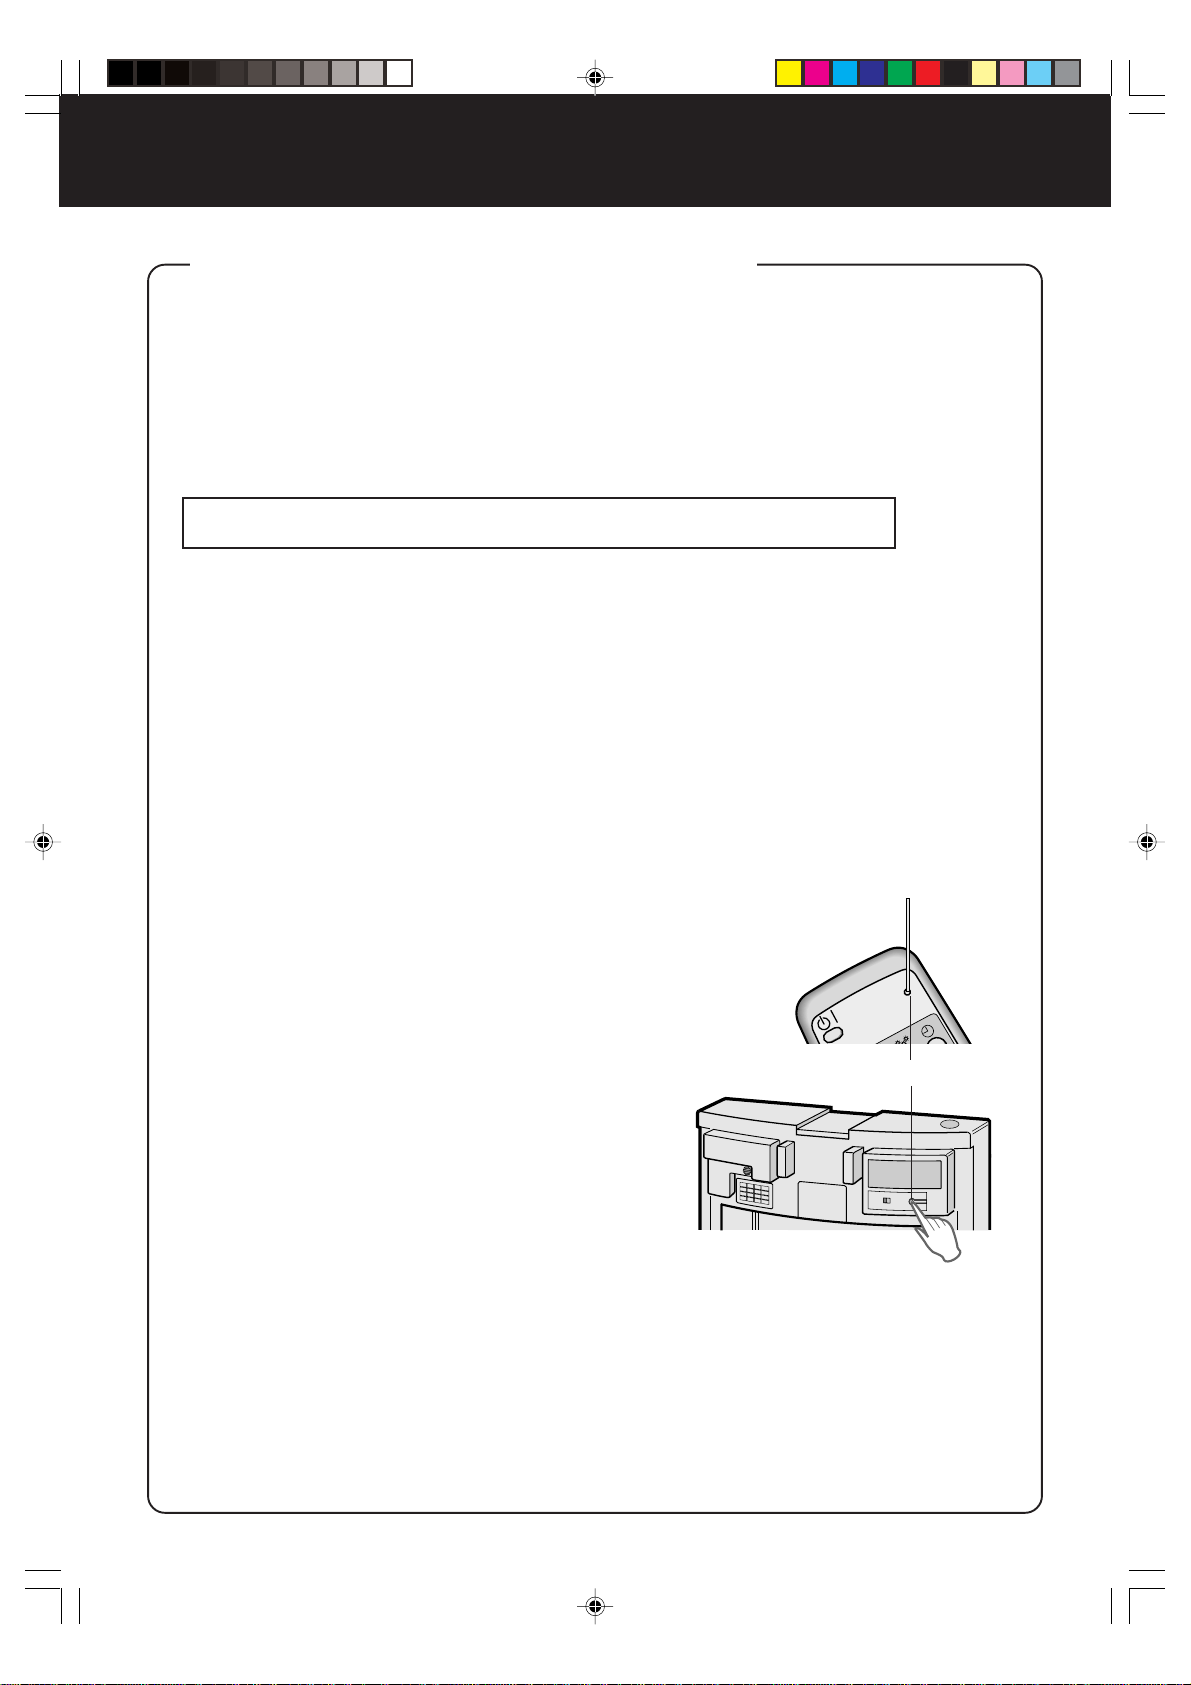
S-14
CUIDADO Y MANTENIMIENTO
DURACIÓN DE LOS FILTROS
El período de reemplazo de los filtros es indicado por la lámpara de filtro.
(La lámpara se encenderá al cabo de aproximadamente 5 años si se utiliza el aparato durante
12 horas diarias.)
• Las horas de funcionamiento del aparato permanecen almacenadas en la memoria incluso
cuando se desconecta la clavija de alimentación para trasladarlo a otra habitación, etc.
La lámpara de filtro sólo debe utilizarse como referencia.
Si el aparato no elimina el polvo y los olores con facilidad, reemplace los filtros.
Guía para el reemplazo de los filtros
• Filtro HEPA Aproximadamente 5 años después de la apertura
• Filtro de carbón activo Aproximadamente 5 años después de la apertura
Para el período de reemplazo se considera un consumo de 10 cigarrillos diarios y una reducción
a la mitad de la eficiencia de captación de polvo/desodorización en comparación con un filtro
nuevo.
El período de reemplazo varía según las horas de uso del aparato y el lugar de instalación del
mismo.
(JEM 1467, The Japan Electrical Manufacturers’ Association)
Dependiendo del ambiente en que se use el aparato, la salida de aire puede producir olor al
cabo de algunos meses. (Para más detalles acerca del producto, consulte la página S-1.)
REEMPLAZO DE LOS FILTROS
1
Para obtener detalles sobre el método de reemplazo, consulte la
sección “Instale el filtro” en la página S-8.
2
Anote la fecha en que comienza a usar los filtro nuevos en la
etiqueta de fecha.
3
Asegúrese de conectar la clavija
de alimentación a una toma de
corriente mural; luego, apunte el
mando a distancia hacia el recep-
tor del aparato y pulse el botón de
reajuste de filtro del mando a
distancia o pulse el botón de re-
ajuste de filtro del aparato.
(Consulte la página S-11.)
• El sonido “BEEP” indica que el tiempo de
funcionamiento almacenado se ha borrado.
• Si la lámpara de filtro está encendida en ese
momento, ésta se apagará.
• Pulse el botón de reajuste del aparato después
de retirar el panel delantero.
Filtros de reemplazo (Modelo: FZ-60SEF)
• Filtro HEPA: 1 unidad
• Filtro de carbón activo: 1 unidad
Solicite filtros de reemplazo al distribuidor al cual adquirió el aparato.
Precauciones a tomar al desechar los filtros
Deseche los filtros usados de acuerdo con las leyes y disposiciones vigentes.
Materiales del filtro HEPA: Materiales del filtro de carbón activo:
•Filtro: polipropileno •Desodorizante: carbón activado
•Bastidor: poliéster •Malla: polipropileno 60%, poliéster 40%
Botón de reajuste de filtro
RESET
FU-55SE_Spa.6.5 03.7.17, 8:56 AM14
Downloaded from: http://www.usersmanualguide.com/
ESPAÑOL
ANTES DE SOLICITAR REPARACIONES
Antes de solicitar reparaciones, compruebe los síntomas que se describen a continuación y su
posible solución, ya que el problema puede no deberse a un error de funcionamiento del aparato.
SÍNTOMA
SOLUCIÓN (cuando no hay ningún desperfecto)
El mando a distancia
no funciona.
• ¿Están agotadas las pilas?
• ¿Están instaladas correctamente las pilas?
• ¿Hay alguna luz fluorescente parpadeando en la habitación
(debido a que ha llegado al fin de su vida útil)? (Consulte las
páginas S-3 y S-7.)
No es posible eliminar olores
y humo fácilmente.
• ¿Están muy sucios los filtros? (Consulte la página S-14.)
El lámpara del SIGNO DE
LIMPIEZA se enciende de color
verde incluso cuando el aire
está sucio.
• ¿Está bloqueada la abertura del sensor de olores o está
obstruido el filtro del sensor? (Consulte la página S-13.)
• ¿Estaba el aire ya sucio en el momento de enchufar la clavija
de alimentación en la toma de corriente mural? (Consulte la
página S-5.)
El lámpara del SIGNO DE
LIMPIEZA se enciende de color
naranja o rojo incluso cuando el
aire está limpio.
• ¿Está el filtro del sensor sucio u obstruido?
La sensibilidad del sensor se torna inestable si la abertura del
sensor de polvo está sucia u obstruida.
Quite el polvo del filtro del sensor. (Consulte la página S-13.)
• Durante el modo de limpieza (de control de iones), el color de
la lámpara de iones agrupados no cambia.
El aparato
produce un
ruido.
Clic, clic
Tic, tic, tic
• Este es el ruido que el aparato produce cuando se encuentra
en el modo de control de iones.
Si el ruido es molesto, instale el aparato más lejos.
• Este es el ruido que el aparato produce mientras genera iones
agrupados.
Si el ruido es molesto (por ejemplo, al dormir, etc.), instale el
aparato más lejos.
El aparato produce en algunas
ocasiones un sonido “tic, tic,
tic”.
• El sonido puede a veces ser fuerte, otras bajo o no escucharse.
Sin embargo, el efecto de los iones agrupados es el mismo.
El aire expulsado huele.
• ¿Están muy sucios los filtros?
Reemplace los filtros. (Consulte la página S-14.)
• El ozono producido por el generador de iones agrupados puede
tener un olor. Sin embargo, la densidad del ozono generado
es muy baja, por lo que no constituye un peligro para la salud.
Además, el ozono se descompone rápidamente y no se
acumula en la habitación.
S-15
La lámpara de iones agrupados
permanece encendida de color
verde (azul) y no cambia.
El aparato no funciona, incluso
cuando alguien fuma cigarri-
llos.
• ¿Se encuentra el aparato instalado en un lugar donde a los
sensores les es difícil detectar el humo de cigarrillo?
• ¿Están bloqueadas u obstruidas las aberturas del sensor de
olores o del sensor polvo? (De ser así, limpie las aberturas.)
(Consulte la página S-13.)
La lámpara de filtro se enciende
incluso después de reemplazar
los filtros.
• Después de reemplazar los filtros, conecte la clavija de
alimentación a una toma de corriente mural y pulse el botón
de reajuste de filtro del aparato o del mando a distancia.
(Consulte la página S-14.)
La lámpara de iones agrupa-
dos o la lámpara del SIGNO DE
LIMPIEZA no se enciende.
• ¿Está seleccionado el modo de visualización desactivada?
• Pulse el botón de activación/desactivación de la visualización
del mando a distancia. (Consulte la página S-11.)
FU-55SE_Spa.6.5 03.7.17, 8:56 AM15
Downloaded from: http://www.usersmanualguide.com/

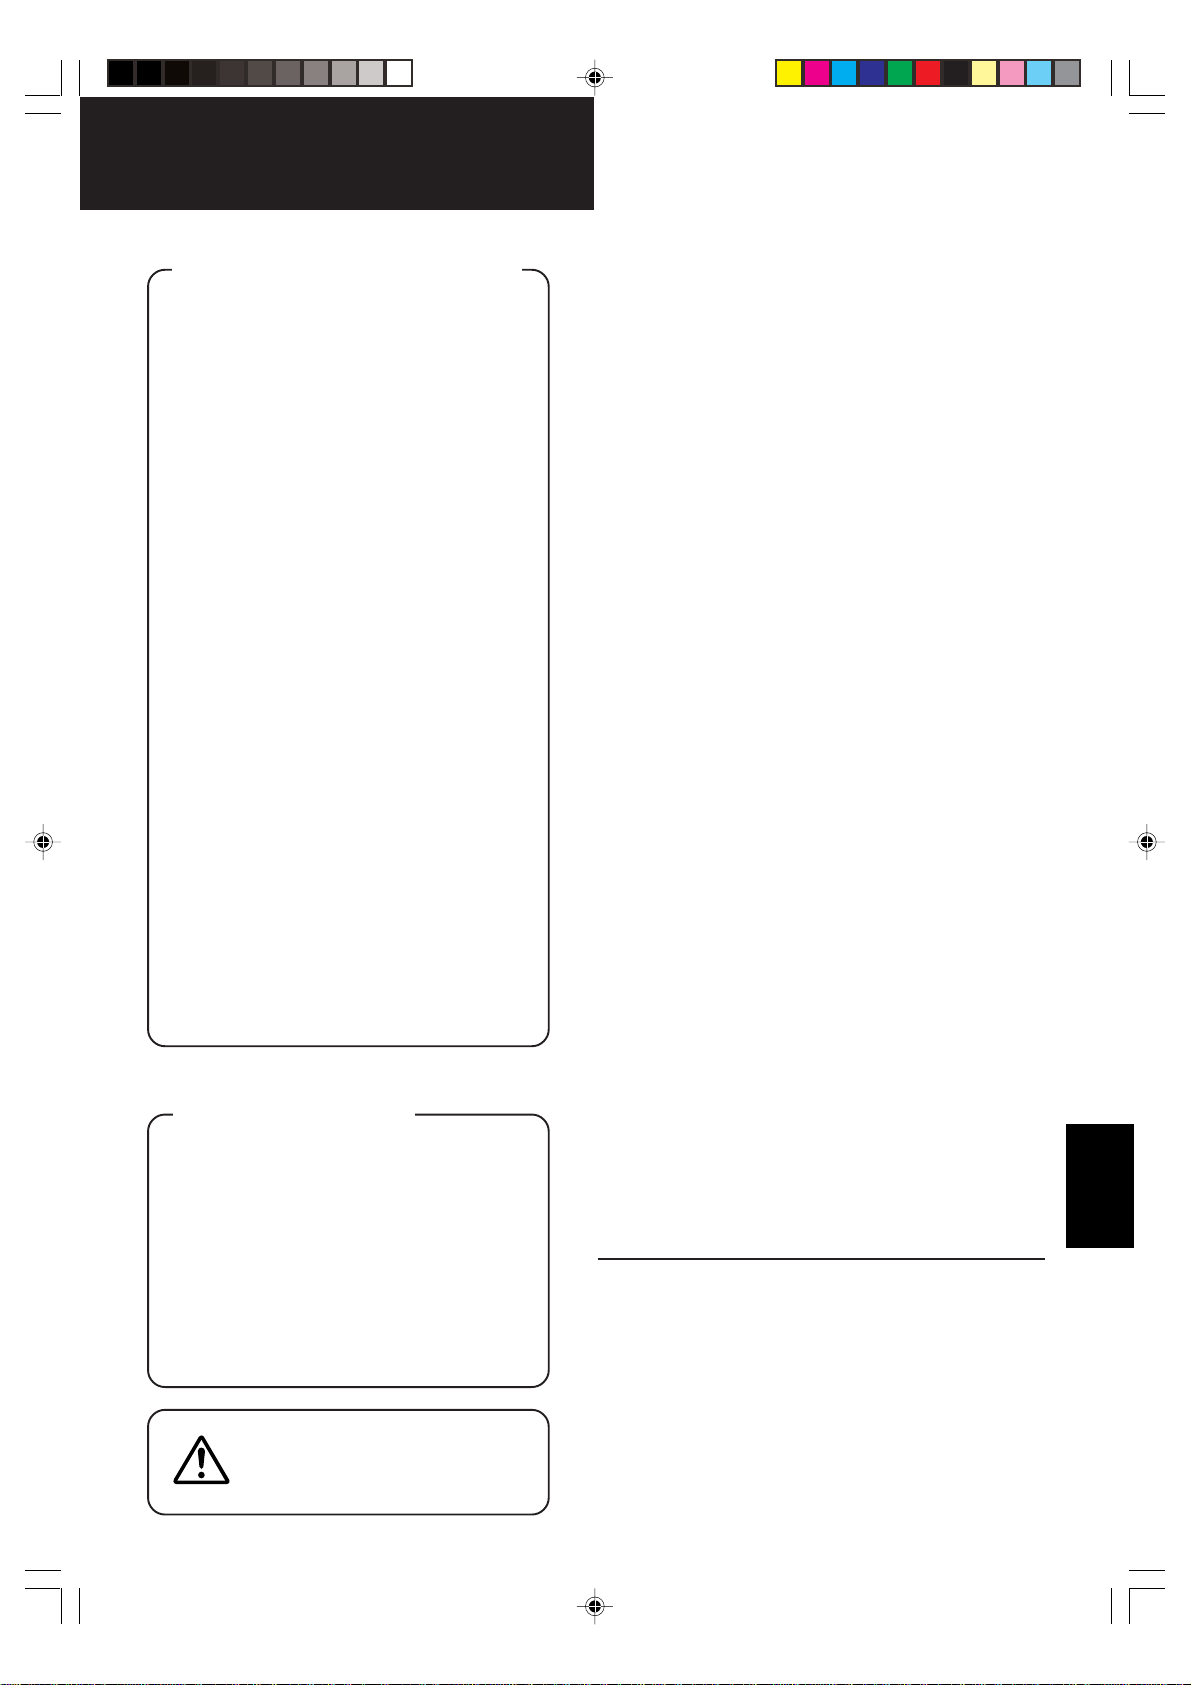
ITALIANO
CARATTERISTICHE
Controllo dell’equilibrio
degli insiemi di ioni
L’unità controlla il rapporto degli insiemi
di ioni negativi e positivi, a seconda delle
condizioni della stanza.
• Modo di pulizia
Vengono scaricate le stesse quantità di
ioni negativi e positivi. Questo metodo
risulta essere effettivo per la riduzione di
muffe aeree.
• Modo di controllo degli ioni
Si dice che ci sono molti ioni negativi in
luoghi quali cascate o foreste, in natura.
In questo modo operativo, gli ioni negativi
vengono emessi nell’aria ad alta velocità,
per regolare l’aria della stanza secondo
questa condizione.
• Modo automatico
dell’insieme di ioni
L’unità cambia automaticamente tra il
modo di pulizia e il modo di controllo degli
ioni a seconda della quantità di inqui-
namento dell’aria rivelato dal sensore
della polvere e dal sensore degli odori.
Filtro HEPA
• Raccolta polvere altamente
efficace
Filtro al carbone attivo
Effetto deodorante grazie a grosse
particelle di carbone colonnare.
INDICE
NORME DI SICUREZZA........................... I-2
•
PRECAUZIONI RIGUARDANTI IL
FUNZIONAMENTO DI QUESTO PRODOTTO ....
I-3
• PRECAUZIONI RIGUARDANTI
L’INSTALLAZIONE.........................................I-3
• INFOMAZIONI SUL FILTRO ..........................I-3
NOMENCLATURA.................................... I-4
• DISPLAY DELL’UNITA’ PRINCIPALE.............I-4
• DIAGRAMMA ESPLOSO ...............................I-4
• RETRO ..........................................................I-6
• ACCESSORI .................................................I-6
SPECIFICHE............................................. I-6
PREPARATIVI .......................................... I-7
• INSTALLAZIONE DELLE BATTERIE
NEL TELECOMANDO ...................................I-7
• USO DEL TELECOMANDO...........................I-7
• INSTALLAZIONE DEI FILTRI........................ I-8
FUNZIONAMENTO................................. I-10
• FUNZIONAMENTO DELL’UNITA’
PRINCIPALE ................................................I-10
• FUNZIONAMENTO
DEL TELECOMANDO ................................ I-11
GUIDA ALL’USO .................................... I-12
CURA E MANUTENZIONE..................... I-13
• UNITÀ PRINCIPALE ....................................I-13
• PULIZIA DEL FILTRO ..................................I-13
• SENSORE DELLA POLVERE,
SENSORE DEGLI ODORI...........................I-13
• GUIDA PER LA DURATA DEI FILTRI ......... I-14
LOCALIZZAZIONI DEI GUASTI............. I-15
Grazie per aver acquistato il modello FU-60SE
della SHARP. Leggete attentamente questo
manuale per un funzionamento corretto. Prima
di usare questo prodotto, assicuratevi di leggere
la sezione “Norme di sicurezza”.
Dopo aver letto questo manuale, conservate lo
stesso in un luogo comodo per ogni riferimento
futuro.
Questo prodotto è destinato solo all’uso privato.
I-1
PER CAPIRE
IL PRODOTTO
Alcuni degli agenti degli odori assorbiti
dal filtro vengono separati ed emessi
tramite l’uscita dell’aria come odori.
A seconda dell’ambiente d’utilizzo,
questo odore può diventare molto forte
per alcuni mesi e la porta di scarico
può emettere cattivi odori.
In tal caso, acquistate il filtro di ricam-
bio FZ-60SEF e sostituite i filtri.
Questo componente è conforme
ai requisiti delle direttive 89/336/
EEC e 73/23/EEC, modificato
dall’aggiunta 93/68/EEC.
ITALIANO
FU-55SE_Ita.6.5 03.7.17, 8:55 AM1
Downloaded from: http://www.usersmanualguide.com/

• Non usate l’unità se è danneggiato il cavo di alimentazioni oppure se la presa di corrente si
è allentata.
Altrimenti si possono verificare delle scosse elettriche, dei corto circuiti e/o incendi.
• Non danneggiate, rompete, rivestite, piegate, tirate, attorcigliate, legate, premete o posizionate
oggetti pesanti sul cavo di alimentazione.
Se il cavo di alimentazioni è danneggiato, si possono verificare incendi e/o scosse elettriche.
• Usate solo un’alimentazione CA 220-240 V.
Altrimenti si possono verificare incendi e/o scosse elettriche.
• Non effettuate modifiche. I lavori di riaprazione e smontaggio di questo prodotto vanno eseguite
solo da personale di servizio autorizzato.
Altrimenti si possono verificare incendi, scosse elettriche e/o lesioni alle persone.
Per i lavori di servizio, rivolgetevi al vostro rivenditore o al più vicino centro di servizio Sharp.
• Spolverate regolarmente la spina del cavo di alimentazione.
La polvere che si accumula sulla spina del cavo di alimentazioni può causare un cattivo isolamento
contro l’umidità, ecc.
Si possono verificare incendi e/o scosse elettriche.
• Quando pulite l’unità, assicuratevi di rimuovere la spina del cavo di alimentazioni dalla presa
murale.
Inoltre, non maneggiate mai la spina del cavo di alimentazioni con le mani bagnate.
Altrimenti si possono verificare scosse elettriche e/o lesioni personali.
• Non usate l’unità se ci sono degli ingredienti oleosi, ad esempio olio per cucinare, nell’aria.
Altrimenti la superficie dell’unità si può screpolare.
• Non strofinate l’unità con benzina o acquaragia. Inoltre, non usate degli spray insetticida per
pulire l’unità.
Altrimenti possono apparire delle screpolature, si possono verificare scosse elettriche e/o incendi.
• Non usate l’unità se usate degli spray insetticida che generano del fumo.
I prodotti chimici si possono accumulare all’interno dell’unità e poi venire emessi dalla porta di scarico
quando l’unità è operativa. Lo scaricare di tali prodotti chimici può essere dannoso per la vostra
salute.
• Non lasciate che l’unità aspiri gas infiammabili, scintille da sigarette accese, incenso, ecc.
Altrimenti, l’unità si può incendiare.
• Non usate l’unità in ambienti umidi, ad esempio il bagno, o in ambienti dove l’unità si può
bagnare.
Altrimenti si possono verificare scosse elettriche e/o malfunzionamenti.
• Non inserite le dita o oggetti estranei nella presa di aspirazione o nello sbocco dell’unità.
Altrimenti si possono verificare scosse elettriche e/o malfunzionamenti.
• Quando rimuovete la spina del cavo di alimentazione, agite per la spina, mai per il cavo stesso.
Altrimenti si possono verificare scosse elettriche e/o incendi da corto circuiti.
• Effettuate la ventilazione quando usate l’unità insieme ad un apparecchio di riscaldamento.
Altrimenti si può verificare l’avvelenamento da monossido di carbonio.
• Se non avete intenzione di usare l’unità staccate la spina del cavo di alimentazione.
Altrimenti si possono verificare scosse elettriche da un cattivo isolamento e/o incendi da corto circuiti.
• Se è danneggiato il cavo di alimentazione, bisogna farlo sostituire dal fabbricante, da un
concessionario o da una persona qualificata per evitare inutili pericoli.
• Le batterie devono essere rimosse dal dispositivo prima di smantellare lo stesso, e poi bisogna
gettarle negli appositi contenitori di raccolta batterie.
NORME DI SICUREZZA
I-2
FU-55SE_Ita.6.5 03.7.17, 8:55 AM2
Downloaded from: http://www.usersmanualguide.com/

ITALIANO
PRECAUZIONI RIGUARDANTI IL FUNZIONAMENTO DI QUESTO
PRODOTTO
• Non bloccate le porte di aspirazione e emissione.
• Non usate l’unità vicino o sopra oggetti caldi, ad esempio una stufa, ecc. Inoltre, non usate
l’unità in luoghi dove verrà in contatto con il vapore.
• Non usate l’unità lato dal lato.
Altrimenti si possono verificare deformazioni, malfunzionamenti e/o il surriscaldamento del motore.
• Non installate l’unità dove si potrebbe generare il nerofumo di lampada, ad esempio in cucina,
ecc.
• Non usate detergenti per pulire l’unità.
Altrimenti la superficie si può danneggiare o screpolare.
Inoltre, i sensori possono funzionare in modo errato.
• Non accendete l’unità senza il filtro installato.
Altrimenti, non sarà possibile ottenere l’effetto di purificazione. Inoltre, si possono verificare dei guasti.
• Non lavate e riutilizzate i filtri.
Il lavaggio non ha alcun effetto positivo, ma darà luogo a scosse elettriche ed altri problemi.
PRECAUZIONI RIGUARDANTI L’INSTALLAZIONE
NON USATE IL TELECOMANDO NEI SEGUENTI LUOGHI
• Luoghi dove ci sono dei componenti di illuminazioni ad invertitore o dei componenti di
illuminazioni spontanea.
Il telecomando può diventare inoperative. In tal caso, allontanate il telecomando dalle fonti luminose
o cambiate direzione.
• Ubicazioni esposte alla luce diretta del sole.
L’unità può non ricevere i segnali provenienti dal telecomando.
L’unità può non rispondere ai segnali del telecomando se le estremità della luce fluorescente diventano
nere o lampeggiano per via della fine della loro durata. Tuttavia, questo non è segno di
malfunzionamento del telecomando o dell’unità principale. In tal caso, sostituite l’illuminazioni con
nuovi tubi fluorescenti.
FATE ATTENZIONI AI SEGUENTI PUNTI DURANTE L’INSTALLAZIONE
• Lasciate uno spazio di almeno 2 m dai televisori, dalle radio e dagli orologi ad onde magnetiche.
Altrimenti si possono verificare delle interferenze elettriche.
• Lasciate uno spazio di almeno 60cm dal muro.
Altrimenti il motore si può surriscaldare, causando così dei malfunzionamenti.
• Evitate i luoghi dove i sensori vengono esposti al vento.
Altrimenti, l’unità può non funzionare correttamente.
• Evitate i luoghi dove tende, ecc., possono venire in contatto con la porta di aspirazione.
o con quella di emissione.
Altrimenti le tende, ecc., si possono sporcare o si possono verificare dei malfunzionamenti.
OPERAZIONE EFFICIENTE
• Posizionate l’unità su una superficie stabile con una circolazione d’aria sufficiente.
INFORMAZIONI SUL FILTRO
• Non lavate e riutilizzate il filtro HEPA o il filtro al carbone attivo. Il lavaggio non avrà alcun effetto
positivo, ma può causare scosse elettriche ed altri problemi.º
• Con il passare del tempo, la parete, ecc., si può sporcare dietro la porta di sbocco. Quando usate
l’unità per un lungo periodo nello stesso luogo, usate un foglio di vinile, ecc. per prevenire di sporcare
la parete. Inoltre, pulite la parete regolarmente, ecc.
I-3
FU-55SE_Ita.6.5 03.7.17, 8:55 AM3
Downloaded from: http://www.usersmanualguide.com/

I-4
NOMENCLATURA
DIAGRAMMA ESPLOSO
DISPLAY DELL’UNITA’ PRINCIPALE
Spie di visualizzazione
del timer di spegnimento
(effettuate l’impostazioni usando il telecomando)
Spia del filtro
Se la lampada del filtro è accesa, significa che è
stato raggiunto il periodo di sostituzione del filtro
Lampade del livello
del ventilatore
Spia del funzionamento
automatico
LAMPADA CON INSIEMI DI IONI
L’operazione di insiemi di ioni viene selezionata
usando il telecomando.
Luce blu
Quando l’operazione degli insiemi di ioni è nel modo di pulizia
o nel modo automatico e l’aria nella stanza è sporca, si
accende la spia e l’unità funziona nel modo di pulizia.
Spia verde
Quando l’operazione degli insiemi di ioni è nel modo di
controllo degli ioni o nel modo automatico e l’aria nella stanza
è pulita, si accende questa spia e l’unità funziona nel modo
di controllo degli ioni.
Spegnimento spie
Non vengono generati insiemi di ioni.
•
Potete spegnere le spie usando il tasto di
“accensione/spegnimento del display” sul teleco-
mando, anche se sono generati degli insiemi di ioni.
(Spegnete le spie se necessario.)
FU-55SE_Ita.6.5 03.7.17, 8:55 AM4
Downloaded from: http://www.usersmanualguide.com/
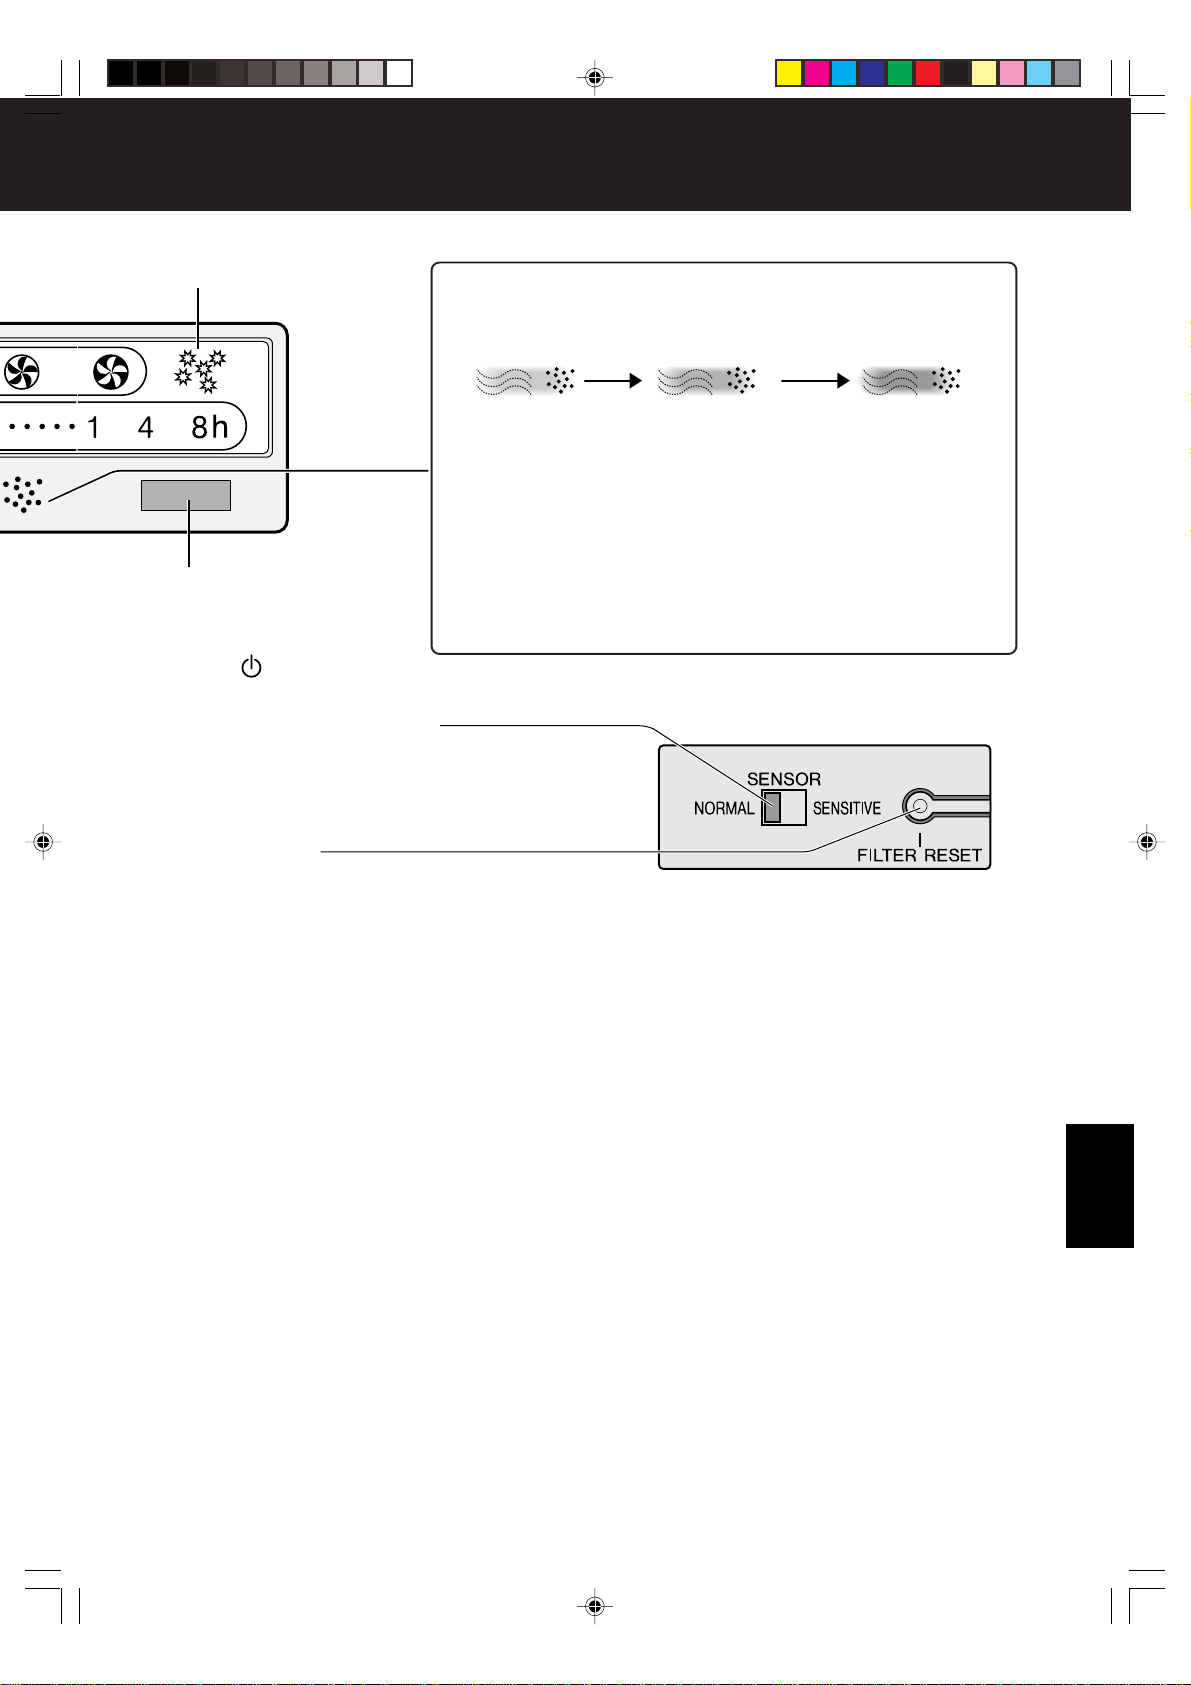
ITALIANO
I-5
Spia del modo operativo
del polline
Ricevitore con
telecomando
Segnalazione pulizia
Il colore cambia quando l’aria è sporca.
Pulito (verde) Leggermente sporco (arancione) Molto sporco (rosso)
INFORMAZIONI SUL SIMBOLO DI PULIZIA
• Il sensore visualizza una spia di segnalazione pulizia a seconda della
carica relativa dell’ambiente nel momento in cui viene inserita la spina del
cavo di alimentazione nella presa murale e successivamente.
• Quando l’aria è estremamente sporca dopo aver inserito la spina del cavo
di alimentazione, si può illuminare di verde spia di segnalazione pulizia,
poiché lo stato di inquinamento è l’ambiente su cui il sensore basa
il tasso di inquinamento. In questo caso, commutate manualmente al modo
operativo desiderato, poiché il modo automatico non funziona bene. Fate
riferimento alla pagina I-11.
• Potete spegnere la spia di segnalazione pulizia usando il tasto di
“accensione/spegnimento del display” sul telecomando. Fate riferimento
alla pagina I-11.
l livello
re
Tasto MODE/ Fate riferimento alla pagina I-10.
(Usato per selezionare i modi operativi o per spegnere l’unità)
Interruttore Sensor sensivity
Potete regolare la sensibilità della rivelazione degli odori
e della polvere.
L’impostazione di fabbrica è “Normal”. Normalmente, usate quest’
impostazione per l’unità. Impostate la sensibilità “High” se la sensi-
bilità sembra troppo bassa rispetto alle condizioni della stanza.
Tasto di ripristino
del filtro (Filter reset)
Sensore degli odori
Rivela odori quali il fumo di tabacco, incenso, animali domes-
tici, cosmetici, ecc.
Coprisensore
Sensore della polvere
Rivela polvere, fumo, polline, polvere domestica, ecc.
Fate riferimento alle pagine I-12, I-13.
Unità principale
Telaio del filtro
Filtro HEPA (bianco)
Fate riferimento alla pagina I-14.
(Filtro raccoglipolvere)
Filtro al carbone attivo (nero)
Fate riferimento alla pagina I-14.
(Filtro deodorante)
Separatore del filtro
Filtro iniziale
Pannello posteriore
Gancio
Telecomando
Fate riferimento alla pagina I-11.
*Prima di premere il tasto di ripristino
del filtro, assicuratevi di collegare la
spina del cavo di alimentazione alla
presa murale.
C’è anche un tasto di ripristino del filtro
sul telecomando.
Puntate il telecomando verso l’unità
principale prima di premere il tasto di
ripristino del filtro sullo stesso.
FU-55SE_Ita.6.5 03.7.17, 8:55 AM5
Downloaded from: http://www.usersmanualguide.com/
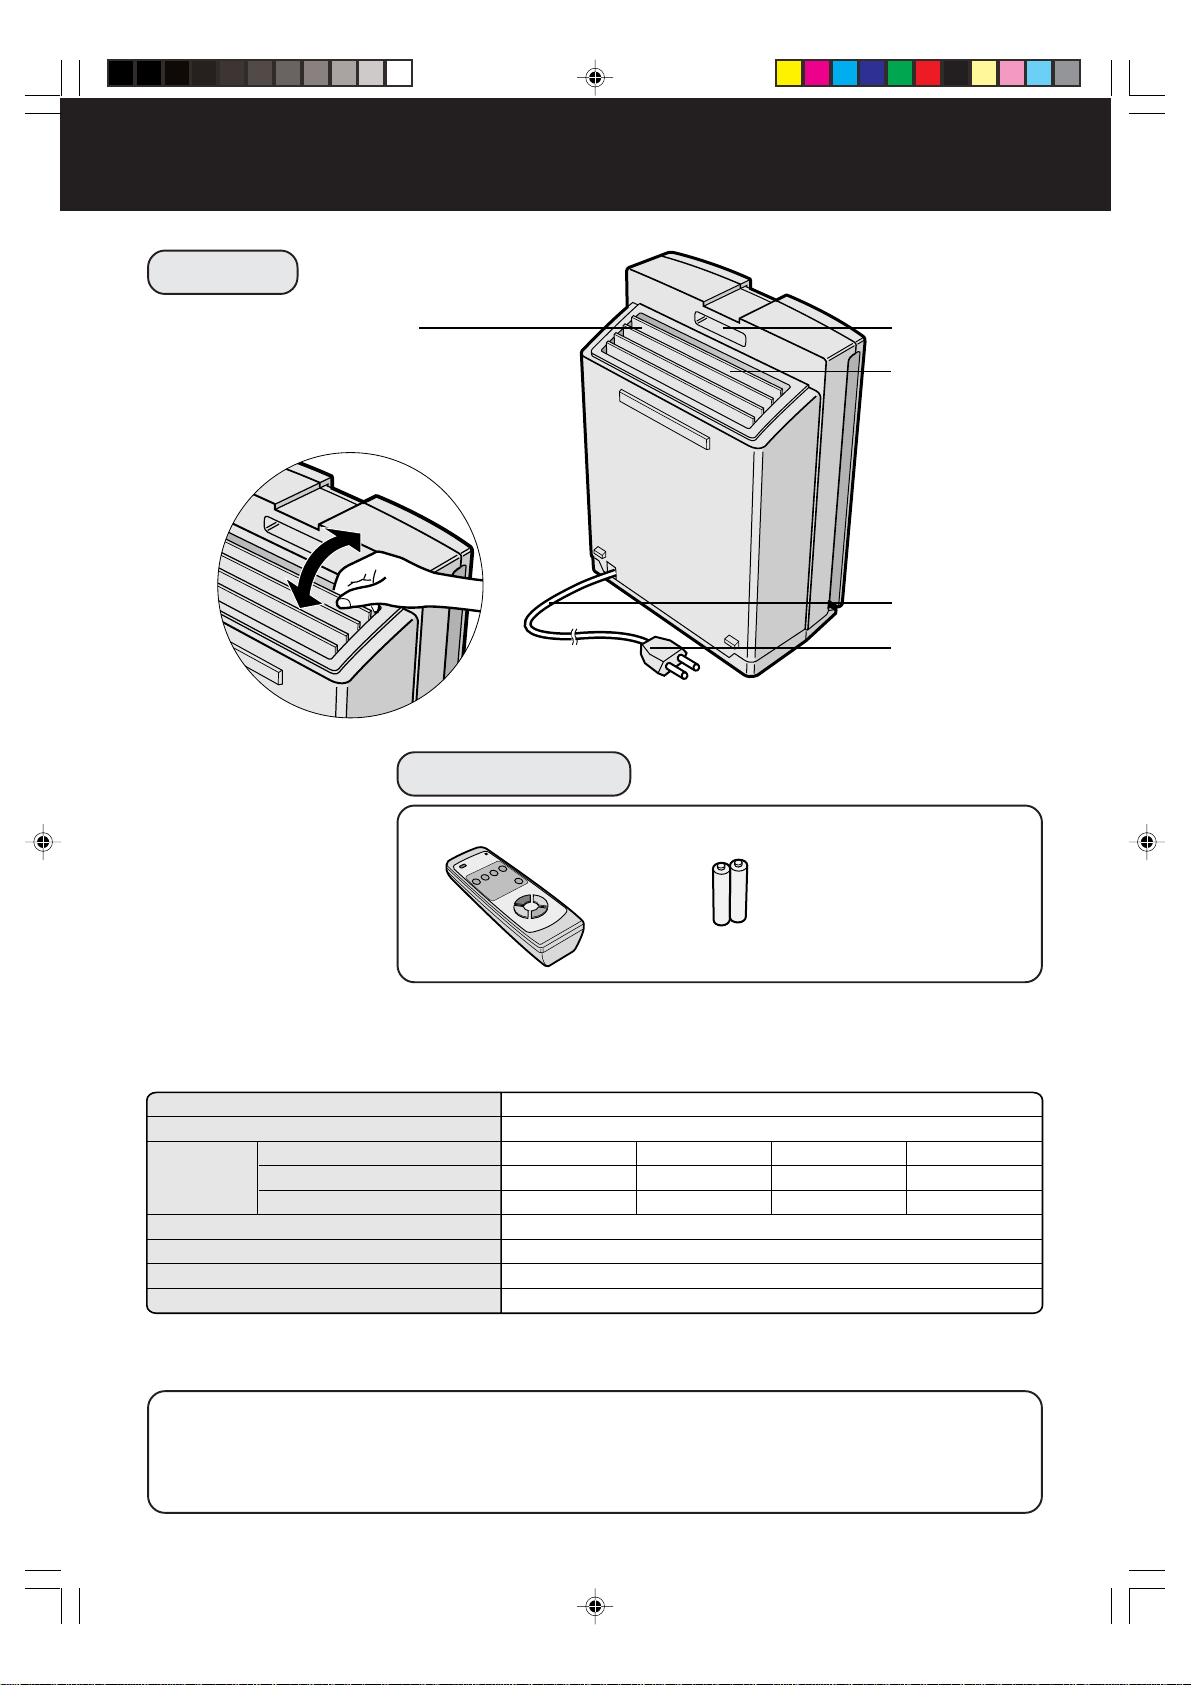
I-6
NOMENCLATURA
Maniglia
Sbocco
d’aria
Cavo di
alimentazione
Spina di
alimentazione
ACCESSORI
Telecomando (1 unità) Batteria (R6 (AA) batteria x 2)
Foglietto allegato
• Manuale operativo
SPECIFICHE
Modello
Alimentazioni
Regolazione del livello del ventilatore
Corrente nominale
Livello del ventilatore
Superficie del pavimento applicabile
Lunghezza del cavo
Dimensioni
Peso
Operazione
del livello
del ventilatore
FU-55SE
220-240 V/50 Hz
~42 m
2
*
2,5 m
415 mm (L) x 238 mm (P) x 572 mm (A)
9,3 kg
Massimo
43 W
330m
3
/ora
Alto
19 W
218m
3
/ora
Medio
6 W
95m
3
/ora
Silenzioso
4 W
43m
3
/ora
*L’area della superficie del pavimento è l’area su cui viene usata l’unità al livello massimo del ventilatore.
(JEM 1467, The Japan Electrical Manufacturers’ Association)
Sulla riduzioni della potenza nel modo di attesa
Per usare i circuiti elettrici quando la spina del cavo di alimentazioni è stata inserita nella presa
murale, questo prodotto consuma circa 0,9 W nel modo di attesa.
Per risparmiare l’energia, rimuovete la spina del cavo di alimentazioni quando non usate l’unità.
RETRO
Feritoie larghe per gli ioni
• La direzione di uscita dell’aria purificata può
essere cambiata alla direzione indicata
dalle frecce.
• Impostate la direzione di uscita nel modo
desiderato.
FU-55SE_Ita.6.5 03.7.17, 8:55 AM6
Downloaded from: http://www.usersmanualguide.com/
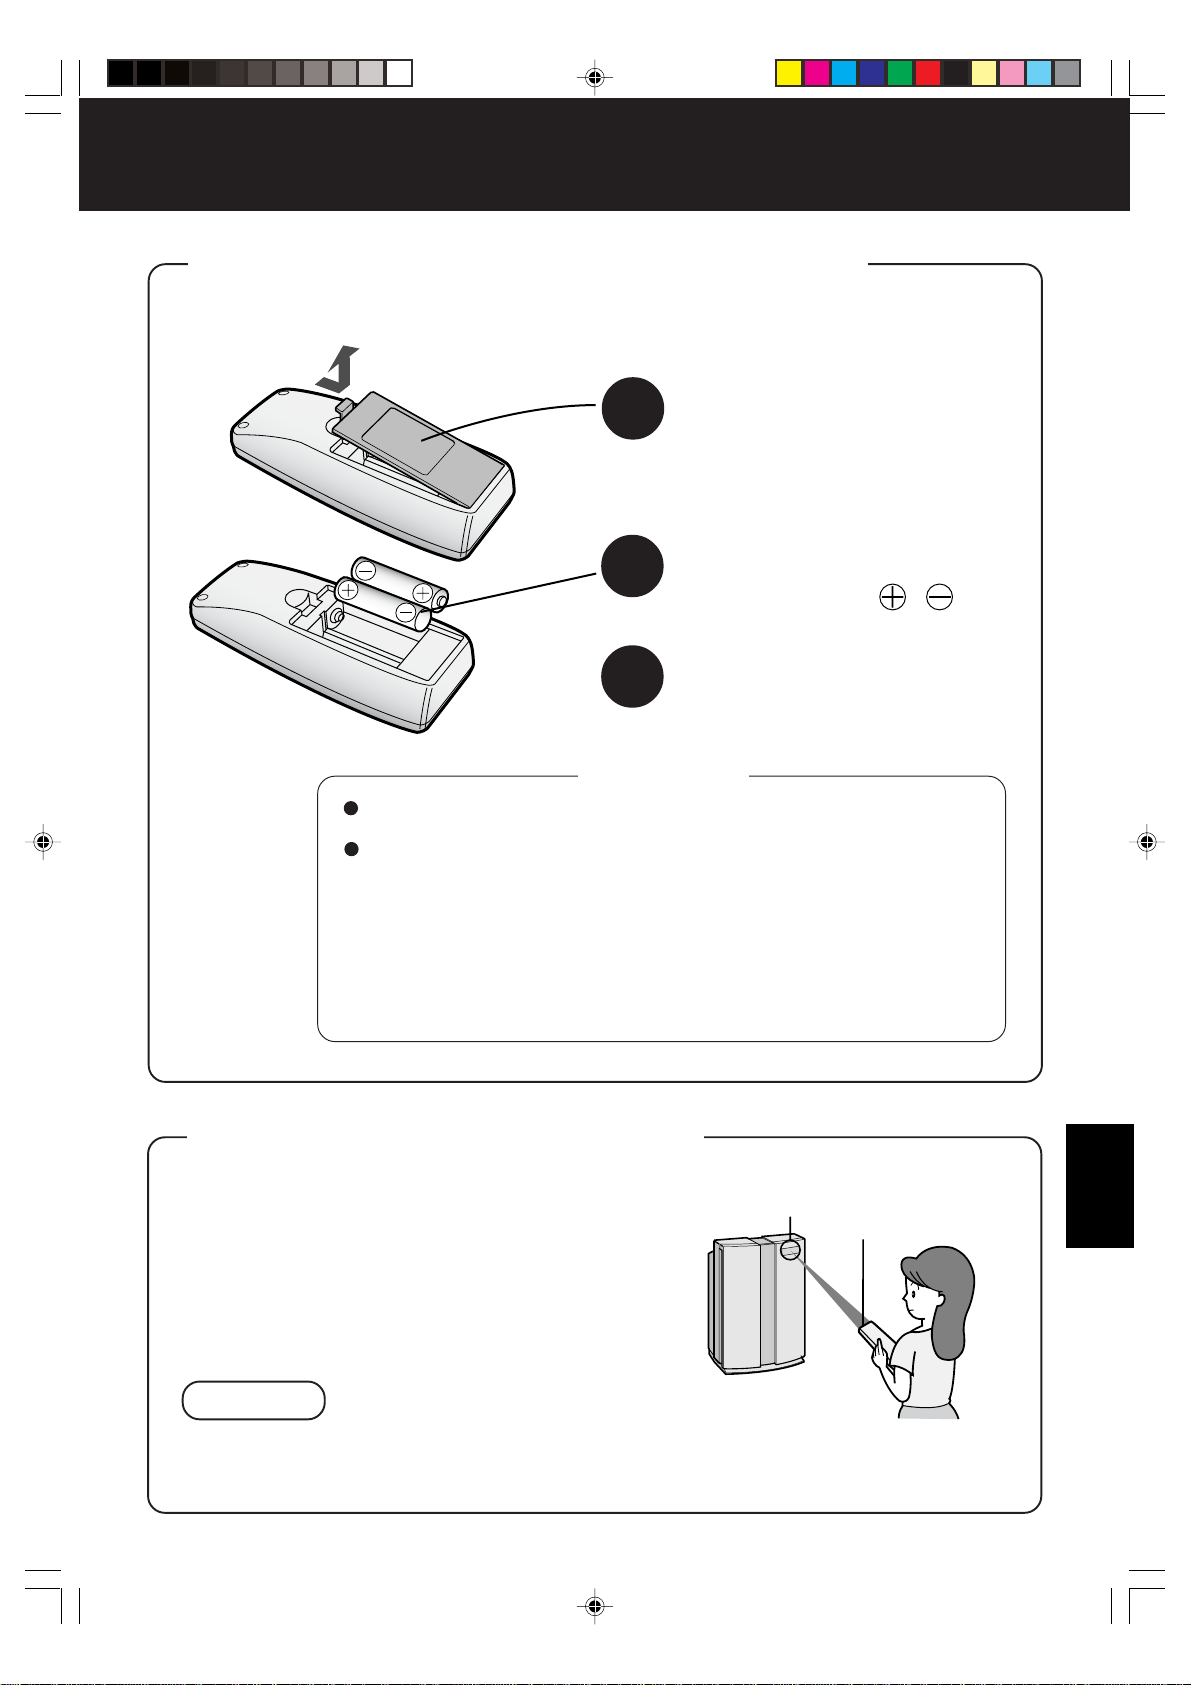
ITALIANO
I-7
INSTALLAZIONE DELLE BATTERIE
NEL TELECOMANDO
Sulle batterie
• La durata delle batterie è di circa 1 anno.
• Sostituite le batterie quando non è più possibile usare il telecomando.
• L’uso errato delle batterie può causare una perdita del liquido delle
batterie e/o danni. Fate attenzione ai seguenti punti durante il maneggio:
• Quando sostituite le batterie, sostituite ambedue le batterie con nuove batte-
rie dello stesso tipo. (Usate delle batterie manganese R6 (AA) (2 pz.).)
• Quando non usate l’unità o il telecomando per un lungo periodo,
rimuovete le batterie. Questo previene eventuali malfunzionamento
del telecomando per via della fuoriuscita del liquido delle batterie.
*Le batterie dell’accessorio servono solo per l’uso iniziale e si possono
scaricare entro 1 anno.
1
Rimuovete il coperchio posteriore
Premete e fate scorrere il coperchio
posteriore per rimuovere lo stesso.
2
Installate le batterie
Installate le batterie con
e come
nell’indicazione qui sotto.
3
Chiudete il coperchio posteriore
USO DEL TELECOMANDO
• Usate il telecomando rivolto verso l’unità princi-
pale (ricevitore).
• La gamma dei segnali è circa 7 m (anteriore).
• Assicuratevi che non ci siano degli oggetti a
bloccare il percorso del segnale.
NOTA
• Evitate un forte impatto sul telecomando. Inoltre, non bagnate il telecomando o non
posizionatelo sotto la luce diretta o nella vicinanza di una stufa, ecc. Altrimenti si possono
verificare dei malfunzionamenti.
Ricevitore
Trasmettitore
PREPARATIVI
FU-55SE_Ita.6.5 03.7.17, 8:55 AM7
Downloaded from: http://www.usersmanualguide.com/

I-8
PREPARATIVI
• Assicuratevi di rimuovere la spina del cavo di
alimentazione dalla presa murale.
1
1
1
2
2
Tavolo
Panno soffice
Pannello anteriore
Telaio del filtro
Separatore del filtro
Filtro al carbone attivo
Filtro HEPA
Telaio del filtro
INSTALLAZIONE DEI FILTRI
Per mantenere alta la qualità dei filtri, sono stati installati nell’unità principale all’interno
di buste in plastica. Assicuratevi di rimuovere i filtri dalle buste in plastica prima di
usare l’unità.
1
Rimuovete i filtri
1
Posizionate l’unità
a verso l’alto.
Posizionate l’unità su un tavolo,
ecc., assicurandovi di non schiac-
ciare il cavo di alimentazione sul
retro dell’unità.
2
Rimuovete il pannello
anteriore.
Premete il gancio posto in basso
sul pannello anteriore e solleva-
telo per rimuovere lo stesso.
3
Estraete il telaio del filtro
e togliete il prefiltro e il sepa-
ratore del filtro.
4
Togliete il filtro al carbone
attivo (nero) e il filtro HEPA
(bianco) dalla busta di
plastica.
Gancio
Prefiltro
FU-55SE_Ita.6.5 03.7.17, 8:55 AM8
Downloaded from: http://www.usersmanualguide.com/
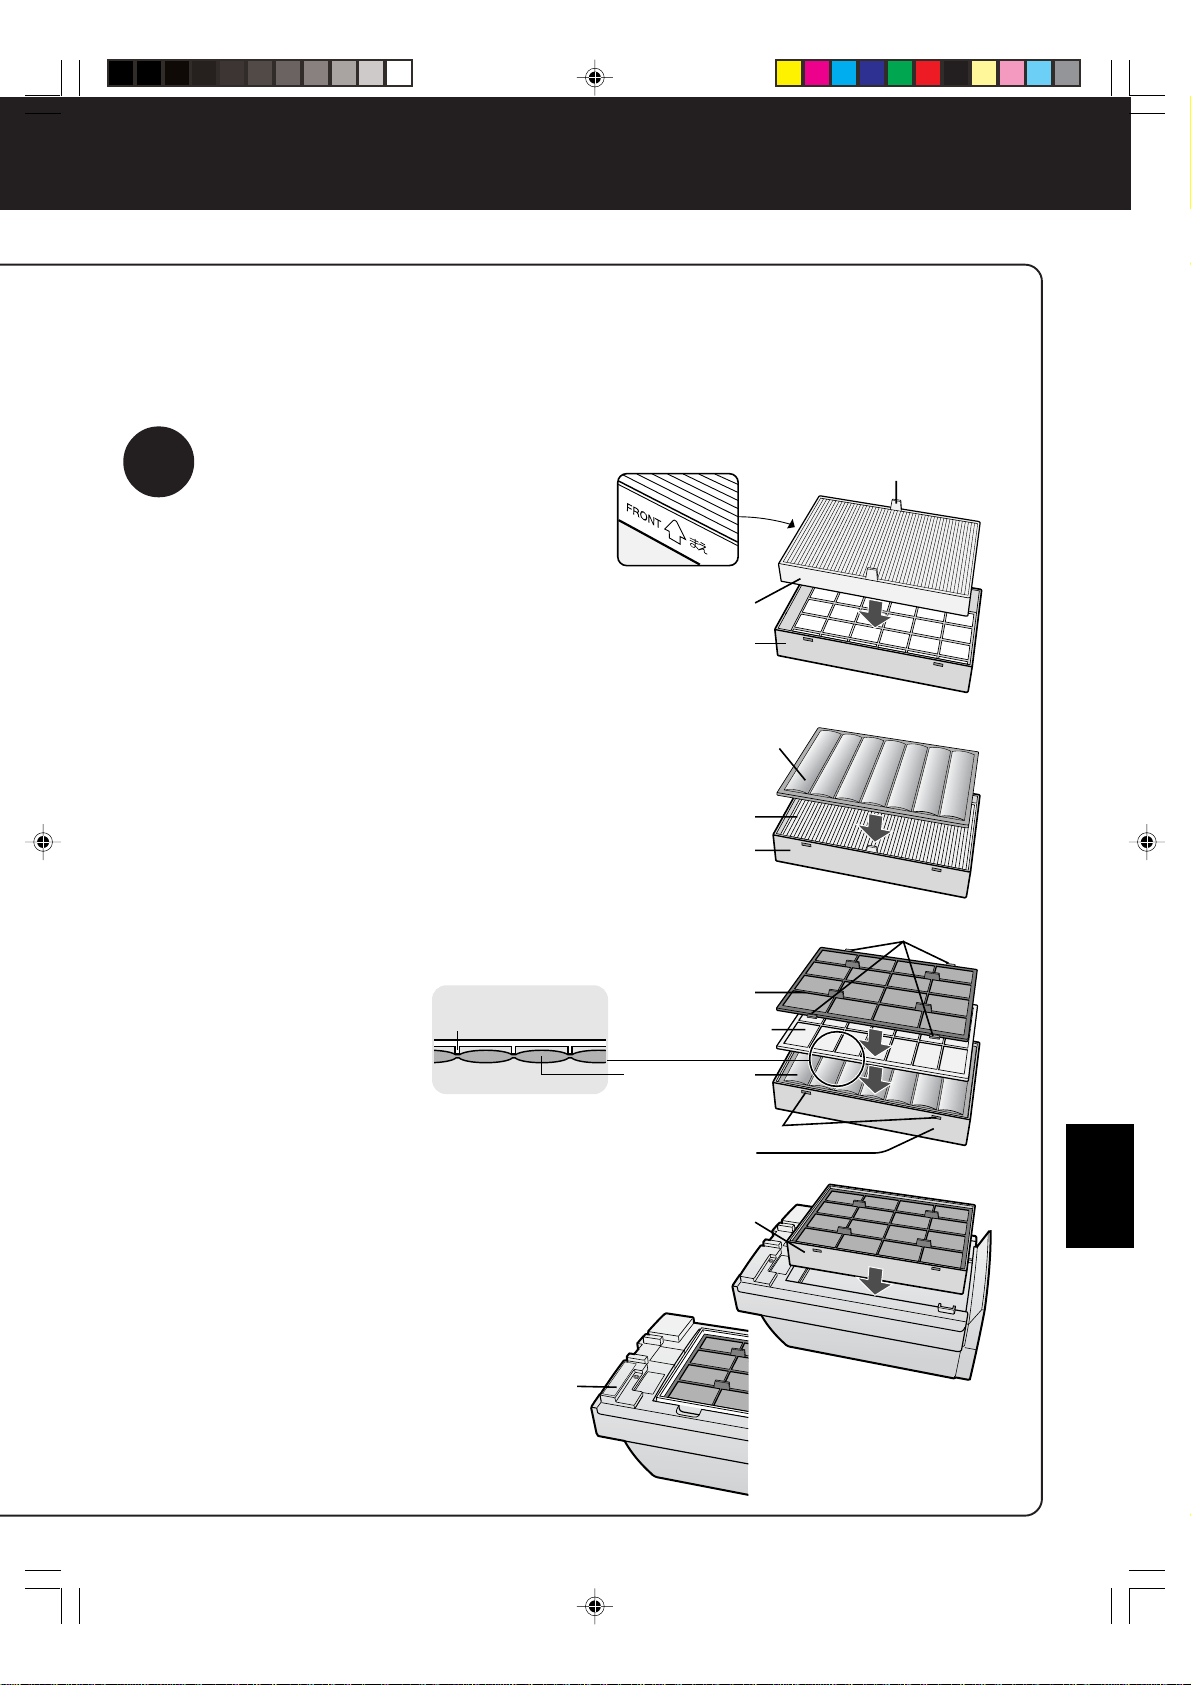
ITALIANO
I-9
2
Installate il filtro
1
Togliete il filtro HEPA dalla
busta di plastica ed installa-
telo nell’unità principale con il
segno anteriore “FRONT” ri-
volto verso l’alto.
Inserite il filtro in modo tale che le linguette
sul filtro HEPA siano rivolte verso di voi.
Non è possibile ottenere un corretto
funzionamento se installate il filtro al
rovescio.
2
Togliete il filtro al carbone attivo
dalla busta di plastica ed installa-
telo all’interno del telaio del filtro.
3
Installate il separatore del filtro
e il prefiltro con il telaio del filtro
nell’ordine giusto.
• Posizionate il sepa-
ratore del filtro in modo
tale che le astine siano
rivolte verso il basso
come nel diagramma
qui a destra.
• Inserite le linguette del
prefiltro (4 punti) nei
fori del telaio del filtro.
• Posizionate il telaio del filtro nell’unità
principale come nel diagramma qui
a destra (non c’è nessun orientamento
verticale).
4
Compilate la data di inizio uso
sull’etichetta dei dati fissata
sull’unità principale.
Usate la data come
guida per il periodo
di sostituzione del
filtro.
Linguette
Filtro HEPA
Telaio del
filtro
Filtro al carbone attivo
Filtro HEPA
Telaio del
filtro
Prefiltro
Linguette (4 punti)
Separatore
del filtro
Filtro al carbone
attivo
Fori
Telaio del
filtro
Telaio del
filtro
Etichetta
dei dati
Astina del
separatore del filtro
FU-55SE_Ita.6.5 03.7.17, 8:55 AM9
Downloaded from: http://www.usersmanualguide.com/
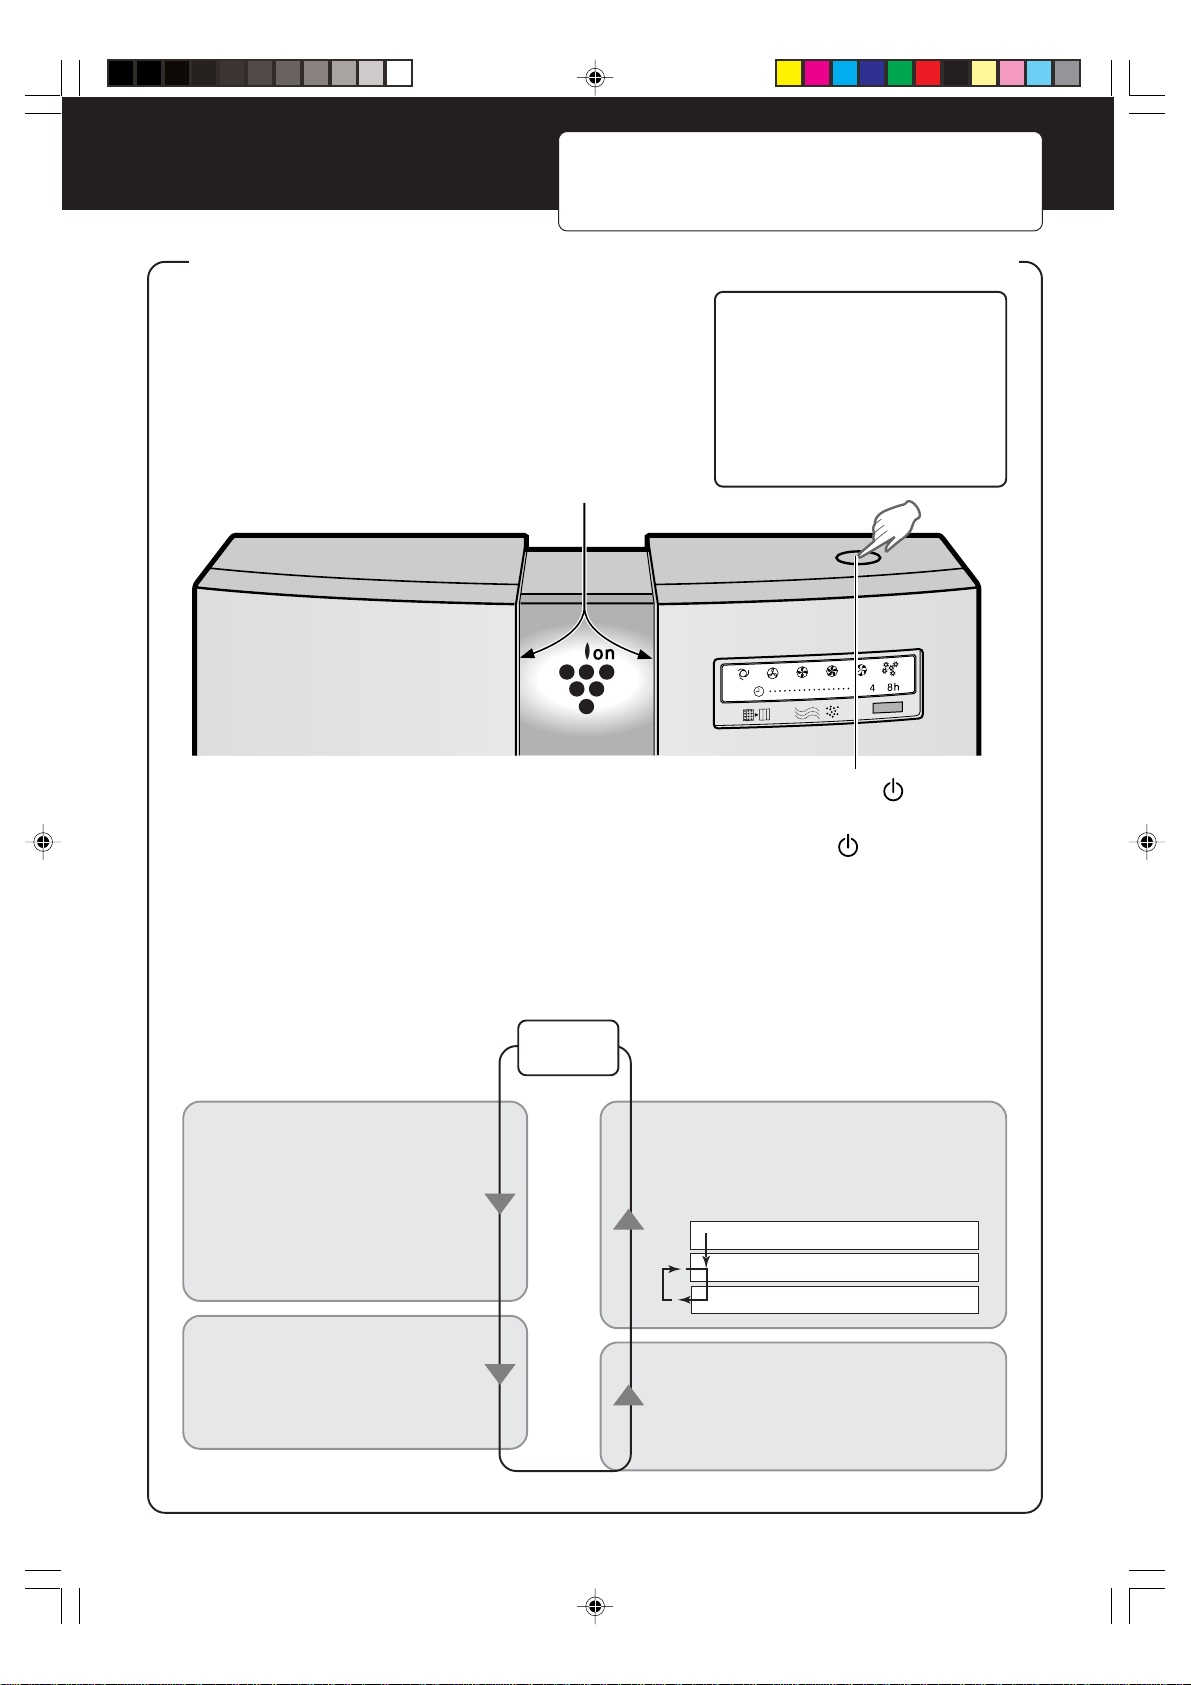
Plasmacluster
I-10
FUNZIONAMENTO
FUNZIONAMENTO DELL’UNITA’ PRINCIPALE
Operazioni disponibili con l’unità principale
•
Operazione automatica (livello del
ventilatore)
•
Operazione silenziosa (livello del
ventilatore)
•
Operazione media (livello del ventilatore)
•
Operazione alta (livello del ventilatore)
•
Operazione massima (livello del
ventilatore)
•
Modo operativo del polline
L’unità inizia l’operazione alla pressione del tasto MODE/ .
L’unità inizia l’operazione automatica (livello del ventilatore).
• Durante l’operazione, la spia dell’insieme degli ioni rimane illuminata.
Il modo operativo cambia come segue ad ogni pressione del tasto.
Si illumina la spia del modo operativo impostato.
Può essere impostato il modo operativo adatto a quella condizione di utilizzo.
Operazione automatica
Il livello del ventilatore cambia
automaticamente (alto, medio,
silenzioso) secondo la quantità
di polline nell’aria rivelato dal sen-
sore della polvere, per un’effici-
ente purificazione dell’aria.
Operazione silenziosa
L’unità funziona in modo si-
lenzioso usando una minima
aspirazione d’aria.
Modo operativo del polline
L’unità funziona al livello alto per 10
minuti, dopodiché alterna tra medio
ed alto.
Funzionamento dal livello
medio al livello massimo
L’unità funziona al livello medio, alto
o massimo al livello del ventilatore.
Durante i primi 30 secondi dopo aver inserito la spina del
cavo di alimentazione nella presa murale, l’unità controlla
le condizioni dell’aria. Se l’operazione viene impostato su
ON in questo momento, la spia di segnalazione pulizia
alternativamente in verde, arancione e rosso.
Lampada con insiemi di ioni
Tasto MODE/
10 minuti: Alto livello del ventilatore
20 minuti: Livello medio del ventilatore
20 minuti: Alto livello del ventilatore
Arresto
FU-55SE_Ita.6.5 03.7.17, 8:55 AM10
Downloaded from: http://www.usersmanualguide.com/

ITALIANO
Plasmacluster
AUTO
RESET
OFF
I-11
FUNZIONAMENTO DEL TELECOMANDO
Operazioni disponibili
con il telecomando
• Operazione automatica
(livello del ventilatore)
• Operazione manuale
(livello del ventilatore)
• Modo operativo del polline
• Impostazioni dello
spegnimento del timer
• Accensione/spegnimento del
display
•
Selezione del modo dell’insieme degli ioni
• Modo automatico
dell’insieme degli ioni
• Modo di pulizia
• Modo di controllo degli ioni
• Modo di spegnimento
dell’in-sieme degli ioni
•
Per iniziare l’operazione, premete il tasto di accensione/spegnimento.
Si sente un breve segnale acustico e l’operazione ha inizio nel
modo automatico (livello del ventilatore).
Il modo automatico dell’insieme degli ioni viene selezionato per
l’operazione dell’insieme degli ioni.
•
Per fermare l’operazione, premete nuovamente il tasto di accensione/spegnimento.
Si sente un lungo segnale acustico e si ferma l’operazione.
Tasto di accensione/
spegnimento
Usato per avviare l’operazione auto-
matica (cicalino breve) e l’opera-
zione di arresto (lungo cicalino).
Tasto AUTO (livello del ventilatore)
Il livello del ventilatore
cambia automaticamente a
seconda della quantità
dell’inquinamento dell’aria.
Tasto manuale
(livello del ventilatore)
Si può commutare il livello
del ventilatore tra silenzioso,
medio, alto e massimo.
Tasto di accensione/
spegnimento del display
Accende o spegne la spia
dell’insieme degli ioni e la
spia del segno di pulizia.
•
La spia dell’insieme degli ioni
si accende per 3 secondi
premendo il tasto di selezione
dell’insieme degli ioni (escluso
il tasto di spegnimento (OFF))
nel modo di “disattivazione del
display”.
Trasmettitore
Tasto di ripristino del filtro
Premete questo tasto dopo aver
sostituito i filtri.
Tasto operativo del modo del polline
L’unità funziona efficientemente
quando si sospetta la presenza di
polline nell’aria. Fate riferimento
alla pagina I-10.
Tasto di spegnimento del timer
Usato per impostare lo spegni-
mento del timer.
L’ora impostata cambia ogni qual-
volta premete il tasto come segue.
1 ora 4 ore
Cancella
8 ore
• Il tempo rimanente viene indi-
cato dalla spia man mano che
passa il tempo.
• L’unità ferma l’operazione
quando è terminato il tempo
impostato.
Tasto di selezioni degli insiemi di ioni
Tasto degli insiemi di ioni AUTO
L’unità cambia tra il modo di pulizia e il modo di
controllo degli ioni automaticamente a seconda
della quantità di inquinamento dell’aria rivelato
dal sensore della polvere e dai sensori degli
odori.
L’operazione del modo pulizia viene eseguita per 1
minuto circa quando inizia la prima operazione.
Tasto di controllo degli ioni
L’unità funziona costantemente nel modo di
controllo degli ioni.
L’equilibrio degli ioni rimane costante nella stanza
aumentando il rapporto degli insiemi di ioni
negativi. (Spia degli insiemi di ioni accesa
(verde).)
Tasto di pulizia
L’unità funziona costantemente nel
modo di pulizia. Il modo di pulizia è
effettivo per la riduzione di alcune
muffee aeree. (Lampada degli insiemi
di ioni (blu).)
Tasto di spegnimento
(OFF)
La generazioni delle ioni si ferma e
la spia si spegne.
Se la stanza puzza di muffa, attivate l’unità nel modo di pulizia.
FU-55SE_Ita.6.5 03.7.17, 8:55 AM11
Downloaded from: http://www.usersmanualguide.com/

GUIDA ALL’USO
GUIDA AL SENSORE DEGLI ODORI
• Oltre agli odori quale il fumo delle sigarette e degli animali domestici, il sensore degli odori
risponde anche a quanto segue.
• Insetticidi, cosmetici, spray, alcool.
• Improvvisi cambiamenti della temperatura o del tasso di umidità.
• Quando l’uintà si trova nel modo operativo automatico e si usano dei cosmetici o simili prodotti
in una stanza chiusa, è normale che il sensore risponda aumentando il flusso dell’aria. Se non
desiderate questo effetto, cambiate la sensibilità del sensore.
GUIDA AL SENSORE DELLA POLVERE
• Il sensore della polvere rivela le particelle della polvere nell’aria della stanza, ad esempio il
fumo delle sigarette e la polvere di casa.
• Rispetto al fumo delle sigarette, la quantità di polvere emessa quando fate il letto è talmente
piccola, che può non essere rivelata dal sensore della polvere. Per questo motivo, la quantità
di polvere vista ad l’occhio può essere diversa dall’indicazione della spia di pulizia.
GUIDA AL TASTO DI RIPRISTINO DEL FILTRO
• Dopo la sostituzione dei filtri, assicuratevi di collegare la spina del cavo di alimentazione alla
presa murale e premete il tasto di ripristino del filtro sull’unità principale o sul telecomando. Il
suono “BIP” indica che è stato azzerato il tempo operativo memorizzato.
Se è illuminata la spia del filtro, esso si spegne.
I-12
FU-55SE_Ita.6.5 03.7.17, 8:55 AM12
Downloaded from: http://www.usersmanualguide.com/
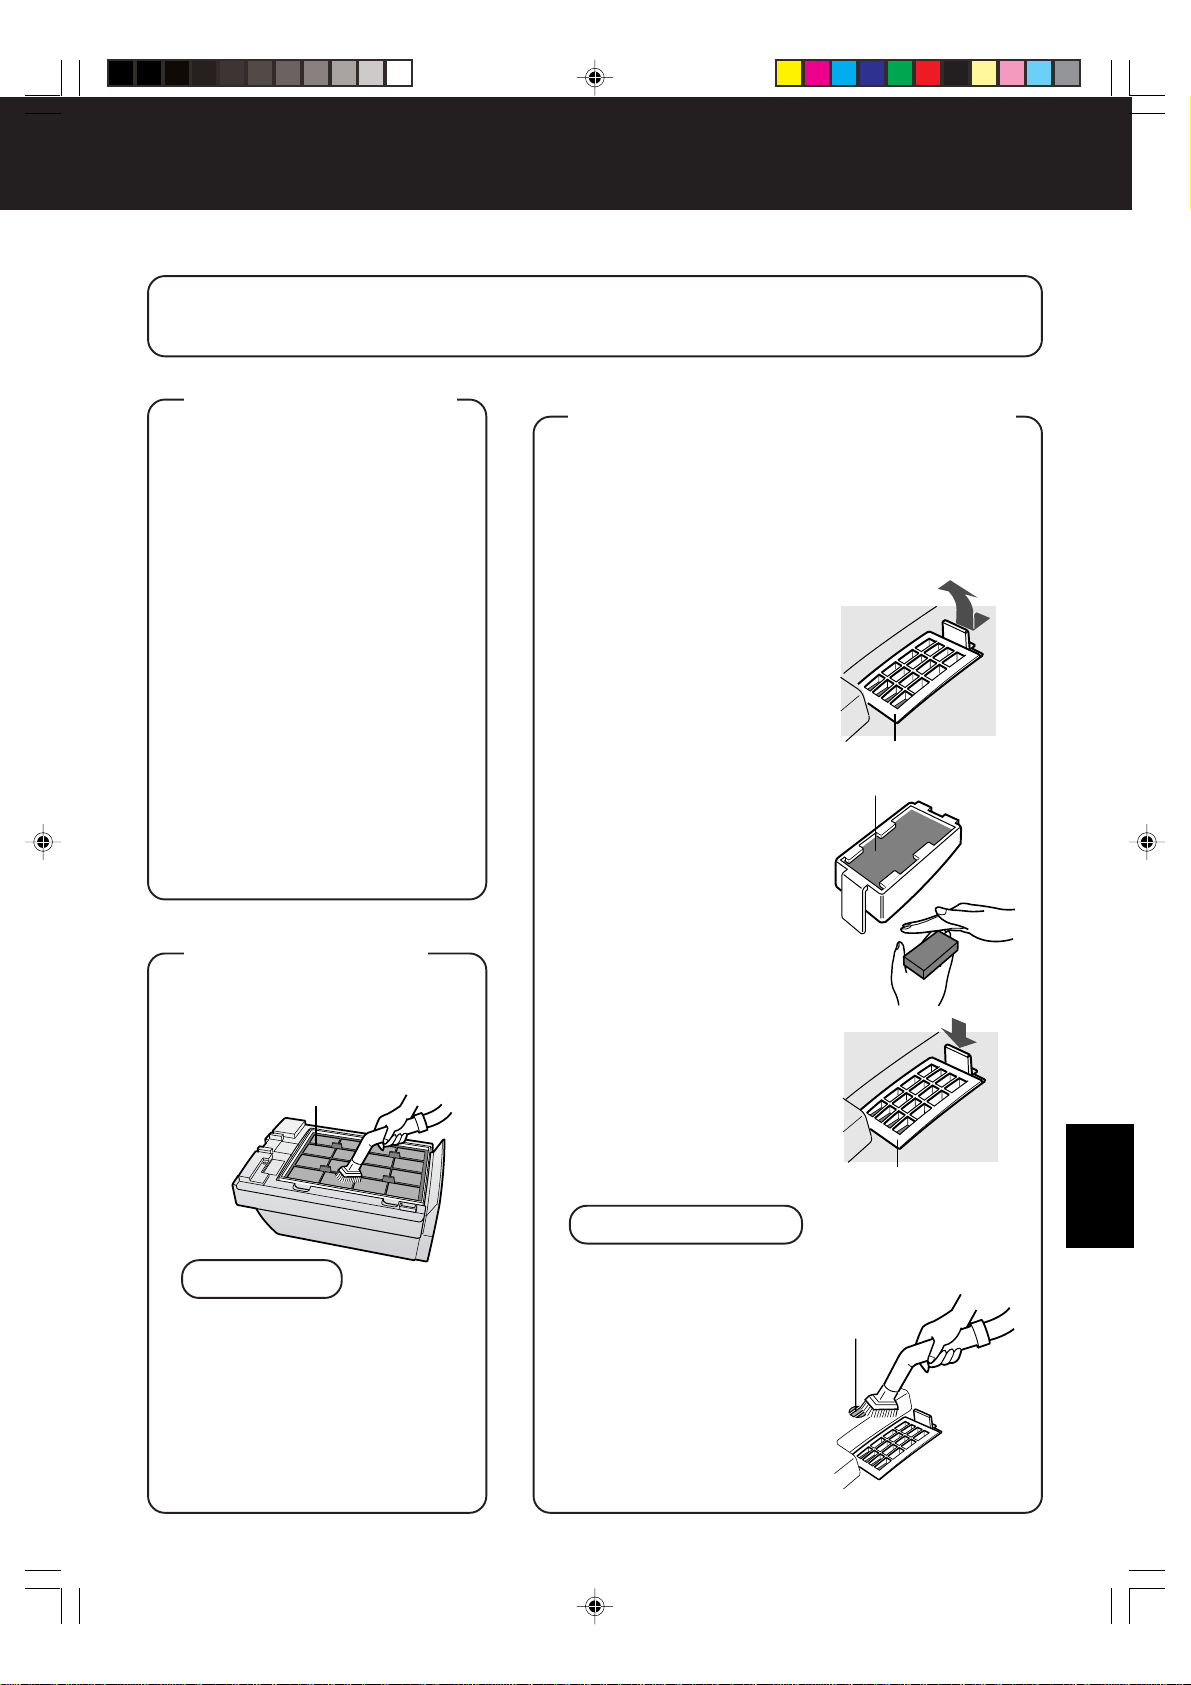
ITALIANO
CURA E MANUTENZIONE
(Per mantenere le migliori prestazioni di questo prodotto, pulite regolarmente l’unità.)
Quando pulite l’unità, assicuratevi di rimuovere la spina del cavo di alimentazioni dalla presa
murale. Inoltre, non maneggiate mai la spina del cavo di alimentazioni con le mani bagnate.
Altrimenti si possono verificare scosse elettriche e/o lesioni personali.
UNITÀ PRINCIPALE
Pulite l’unità principale e la super-
ficie installata sul pavimento/tavolo
appena possibile per rimuovere
la sporcizia. Può essere difficile
rimuovere la sporcizia profonda.
Strofinate l’unità con un
panno soffice
Per lo sporco difficile, usate un
panno soffice inumidito con acqua
o acqua calda, 40°C o meno.
Non usate dei liquidi volatili
Benzina, acquaragia, polvere per
pulizia, ecc. possono danneggiare
la superficie dell’unità.
Non usate detergenti
Gli ingredienti dei detergenti possono
danneggiare la superficie dell’unità.
Non bagnare
Non esporre mai l’unità all’acqua.
SENSORE DELLA POLVERE
SENSORE DEGLI ODORI
Il ciclo di manutenzione del SENSORE DEGLI
ODORI e del SENSORE DELLA POLVERE è di una
volta ogni tre mesi.
La sensibilità dei sensori sarà minore se è sporco o
bloccato il sensore degli odori o della polvere. Pulite
queste parti nel seguente modo.
SENSORE DELLA POLVERE
1
Togliete il pannello
anteriore e rimuovete
il filtro del sensore.
• Togliete il filtro del sensore
mentre tirate l’aletta del
coperchio del sensore.
2
Togliete il coperchio
parapolvere dal filtro
del sensore.
• Togliete il filtro del sensore
e bussate leggermente
con la mano sul filtro per
togliere la polvere.
Se è molto sporco, lavate
il filtro con acqua e poi
lasciatelo asciugare com-
pletamente.
3
Inserite il filtro del
sensore nel coperchio,
installatelo nell’unità
principale e fissate il
pannello anteriore.
• Potete inserire il filtro del
sensore in ambedue le
direzioni.
ATTENZIONE
• Non dimenticate di reinstallare il coprisensore
prima di riaccendere l’unità.
• Non inserite oggetti estra-
nei (stuzzicadenti, ecc.) nel
filtro. Altrimenti si possono
verificare dei danni o mal-
funzionamenti nell’unità.
SENSORE DEGLI ODORI
Asportate la polvere dalla
superficie dell’apertura del
sensore con un aspirapolvere.
I-13
Coprisensore
Filtro del sensore
Coprisensore
Apertura del
sensore
PULIZIA
DEL FILTRO
Pulite la superficie superiore del
prefiltro leggermente usando un
aspirapolvere.
NOTA
• Il filtro HEPA si danneggia
facilmente. Evitate il contatto
diretto tra il filtro e la bocchetta
dell’aspirapolvere.
Inoltre, assicuratevi di non
lavare mai il filtro con l’acqua.
• Non è necessario pulire il filtro
HEPA ed il filtro al carbone
attivo.
Prefiltro
FU-55SE_Ita.6.5 03.7.17, 8:55 AM13
Downloaded from: http://www.usersmanualguide.com/

I-14
CURA E MANUTENZIONE
GUIDA PER LA DURATA DEI FILTRI
Il periodo di sostituzione del filtro è indicato dalla spia del Filtro.
(La spia si illumina dopo 5 anni circa, se usate l’unità per 12 ore al giorno.)
• Le ore operative rimangono memorizzate, anche se scollegate la spina del cavo di
alimentazione per trasportare l’unità ad un’altra stanza, ecc.
La spia del Filtro va usata solo come guida.
Se è difficile rimuovere la polvere o gli odori dai filtri, sostituite gli stessi.
Guida per la sostituzione dei filtri
• Filtro HEPA Circa 5 anni dopo l’apertura del filtro
• Filtro al carbone attivo Circa 5 anni dopo l’apertura del filtro
Il periodo di sostituzione viene ridotto alla metà se I filtri sono soggetti al fumo di 10 sigarette al
giorno per della riduzione della capacità di raccolta della polvere/effetto deodorante.
Il periodo di sostituzione dipende dalle ore operative e dal luogo di installazione.
(JEM 1467, The Japan Electrical Manufacturers’ Association)
A seconda dell’ambiente di utilizzo, gli odori possono essere presenti nello sbocco dell’aria per
vari mesi. (Per una maggiore comprensione del prodotto, fate riferimento alla pagina I-1)
SOSTITUZIONE DEI FILTRI
1
Fate riferimento alla pagina I-8 “Installate il filtro” per ulteriori
informazioni sul metodo di sostituzione.
2
Compilate la data di inizio dell’utilizzo dei nuovi filtri sull’etichetta dei dati.
3
Assicuratevi di collegare la spina
del cavo di alimentazione alla presa
murale, puntate il telecomando
verso il ricevitore dell’unità
principale e premete il tasto di
ripristino del filtro con un oggetto
appuntito sul telecomando oppure
premete il tasto di ripristino del
filtro nell’unità principale.
(Fate riferimento alla pagina I-11.)
• Il suono “BIP” indica che è stato azzerato il
tempo operativo memorizzato.
• Se è illuminata la spia del filtro in quel momento,
esso si spegnerà.
• Premete il tasto di ripristino sull’unità principale
dopo aver rimosso il pannello anteriore.
Filtri di sostituzioni (Modello: FZ-60SEF)
• Filtro HEPA: 1 unità
• Filtro al carbone attivo: 1 unità
Richiedete dei filtri di sostituzioni presso il vostro rivenditore.
Precauzioni sul disfarsi dei filtri
Disfatevi dei filtri sostituiti in conformità con le norme locali.
Materiali dei filtri HEPA: Materiali del filtro al carbone attivo:
• Filtro: polipropilene • Prodotto deodorante: carbone attivo
• Telaio: poliestere • Netto: polipropilene 60%, poliestere 40%
Tasto di ripristino del filtro
RESET
FU-55SE_Ita.6.5 03.7.17, 8:55 AM14
Downloaded from: http://www.usersmanualguide.com/
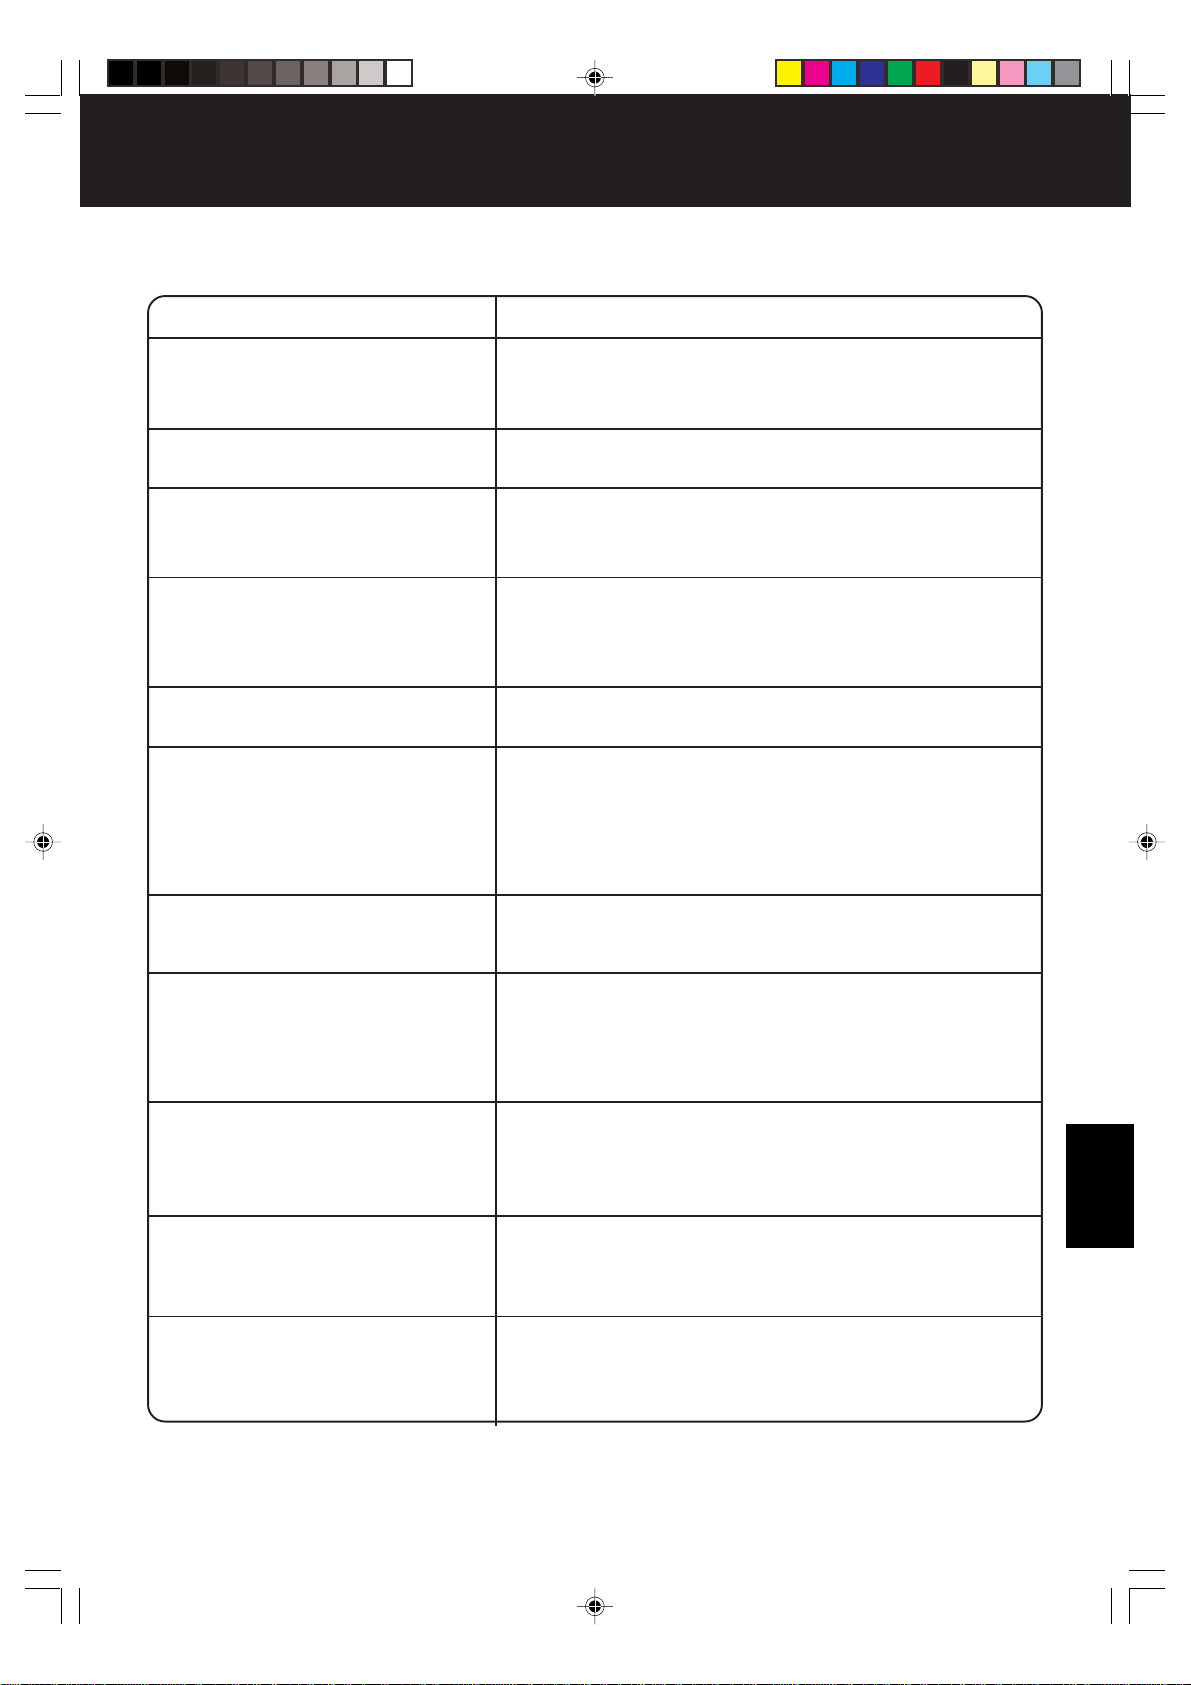
ITALIANO
LOCALIZZAZIONI DEI GUASTI
Prima di richiedere del servizio, controllate i sintomi qui sotto per scoprire eventuali rimedi, poiché
il problema può non essere un malfunzionamento dell’unità.
SINTOMO
RIMEDIO (non un malfunzionamento)
Il telecomando non funziona.
• Sono scariche le batterie?
• Le batterie sono state installate correttamente?
• Lampeggia la luce fluorescente nella stanza per via della lunga
durata di utilizzo? (Fate riferimento alla pagina I-3, I-7.)
Gli odori e la polvere sono diffi-
cile da rimuovere.
•Sono molto sporchi i filtri? (Fate riferimento alla pagina I-14.)
Si illumina di verde la spia di
segnala-zione pulizia anche
quando è sporca l’aria.
• E’ bloccata l’apertura del sensore degli odori oppure è otturato
il filtro del sensore? (Fate riferimento alla pagina I-13.)
• L’aria era già sporca quando avete inserito la spina del cavo di
alimentazione nella presa murale? (Fate riferimento alla pagina I-5.)
Si illumina di arancione o rosso
la spia di segnala-zione pulizia
quando l’aria è pulita.
• E’ sporco o otturato il filtro del sensore?
La sensibilità del sensore diventa poco stabile quando è sporca
o otturata l’apertura del sensore della polvere.
Togliete la polvere dal filtro del sensore. (Fate riferimento alla
pagina I-13.)
• Nel modo di pulizia (o nel modo di controllo degli ioni), non
cambia il colore della lampada dell’insieme degli ioni.
Si sente un
suono
nell’unità.
Clic, clic
Tic, tic, tic
• Questo è il suono emesso quando l’unità si trova nel modo di
controllo degli ioni.
Se il suono è irritante, allontanate l’unità.
• Questo è il suono che viene emesso quando l’unità genera
degli insiemi di ioni.
Se il suono è irritante, ad esempio quando dormite, allontanate
l’unità.
A volte viene emesso un suono
“tic, tic, tic” dall’unità, mentre
in altri casi non si sente nulla.
• A volte il suono è basso, a volte alto, mentre altre volte ancora
non si sente nessun suono. Ma l’effetto sull’insieme degli ioni
è sempre lo stesso.
L’aria di scarico puzza.
• Sono molto sporchi i filtri?
Sostituite i filtri. (Fate riferimento alla pagina I-14.)
• L’ozono generato dal generatore di ioni può avere un forte
odore. Tuttavia, la densità dell’ozono generato è molto bassa
e dannosa agli esseri umani. Inoltre, l’ozono si decompone
rapidamente e non si accumula nella stanza.
I-15
Rimane verde (blu) la spia degli
insiemi di ioni e non cambia.
L’unità non funziona anche
quando fumate le sigarette.
• L’unità è stata installata in un luogo dove è difficile per i sensori
rivelare il fumo delle sigarette?
• Le aperture dei sensori degli odori o della polvere sono bloccate
o otturate? (In tal caso, pulite le aperture.)
(Fate riferimento alla pagina I-13.)
La spia del filtro rimane illumi-
nata anche dopo aver sostituito
i filtri.
• Dopo aver sostituito i filtri, collegate il cavo di alimentazione
alla presa murale e premete il tasto di ripristino del filtro sull’unità
principale o sul telecomando. (Fate riferimento alla pagina
I-14.)
E’ spenta la spia dell’insieme
degli ioni o la spia di segnala-
zione pulizia.
• Avete selezionato il modo di spegnimento del display?
• Premete il tasto di accensione/spegnimento del display sul te-
lecomando.
(Fate riferimento alla pagina I-11.)
FU-55SE_Ita.6.5 03.7.17, 8:55 AM15
Downloaded from: http://www.usersmanualguide.com/

NEDERLANDS
KENMERKEN
Regeling van het
clusterionenevenwicht
Het toestel regelt de verhouding tussen
negatieve en positieve clusterionen
afhankelijk van de omstandigheden van
de kamer.
• Luchtreinigingsfunctie
Er wordt een ongeveer gelijk aantal
positieve en negatieve clusterionen
uitgevoerd. Deze functie is doeltreffend
om de aanwezigheid van schimmels in de
lucht te beperken.
• Ionenregelfunctie
Er wordt gezegd dat in de natuurlijke
omgeving van o.a. watervallen en bossen
veel negatieve ionen aanwezig zijn. In deze
bedieningsstand komen meer negatieve
ionen vrij zodat de luchttoestand in de
kamer deze natuurlijke toestand benadert.
• AUTOMATISCHE
clusterionenfunctie
Het toestel wisselt automatisch tussen de
luchtreinigingsfunctie en de ionenregelfunctie
afhankelijk van de graad van luchtvervuiling
die door de stof- en de geursensor wordt
gedetecteerd.
HEPA-filter
• Stofopvang met hoog rendement
Actieve-koolstoffilter
Krachtige ontgeuring door grote deeltjes
zuilvormige houtskool.
INHOUD
VOORZORGSMAATREGELEN
VOOR DE VEILIGHEID ...........................N-2
• VOORZORGSMAATREGELEN VOOR
HET GEBRUIK VAN DIT TOESTEL............. N-3
• VOORZORGSMAATREGELEN VOOR
DE INSTALLATIE ........................................ N-3
• OVER HET FILTER...................................... N-3
NAMEN VAN DE ONDERDELEN ...........N-4
• DISPLAY VAN HET HOOFDTOESTEL........N-4
• OPENGEWERKTE AFBEELDING............... N-4
• ACHTERKANT............................................. N-6
• ACCESSOIRES ..........................................N-6
SPECIFICATIES ......................................N-6
VOORBEREIDING...................................N-7
• PLAATSEN VAN DE BATTERIJEN
IN DE AFSTANDSBEDIENING ....................N-7
• GEBRUIK VAN
DE AFSTANDSBEDIENING......................... N-7
• INSTALLATIE VAN DE FILTERS ................ N-8
BEDIENING ...........................................N-10
• BEDIENING VAN HET HOOFDTOESTEL.... N-10
• AFSTANDSBEDIENING ...........................N-11
RICHTLIJN VOOR DE BEDIENING......N-12
BEHANDELING EN ONDERHOUD ......N-13
• HOOFDTOESTEL...................................... N-13
• REINIGING VAN HET FILTER ................... N-13
• STOFSENSOR, GEURSENSOR............... N-13
• RICHTLIJN VOOR DE LEVENSDUUR
VAN DE FILTERS ..................................... N-14
OPLOSSEN VAN PROBLEMEN...........N-15
Dank u voor de aankoop van de SHARP FU-
60SE. Lees deze gebruiksaanwijzing zorgvuldig
door voor een juist gebruik. Voordat u dit pro-
duct gebruikt, dient u de “Voorzorgsmaatregelen
voor de veiligheid” te lezen.
Houd na het lezen deze gebruiksaanwijzing bij de
hand om ze later opnieuw te kunnen raadplegen.
Dit toestel is uitsluitend geschikt voor huishoudelijk
gebruik.
N-1
UITLEG BIJ DIT TOESTEL
Sommige geurbestanddelen die de fil-
ters absorberen, worden gescheiden en
via de luchtuitlaat als geur afgevoerd.
Naargelang van de gebruiksomgeving
kan deze geur na enkele maanden
sterk worden en de luchtuitlaat
onaangenaam beginnen te ruiken.
In dit geval koopt u het optionele
vervangfilter FZ-60SEF en vervangt u
de filters.
Dit apparaat voldoet aan de
eisen van de Richtlijnen 89/336/
EEC en 73/23/EEC, zoals ge-
wijzigd door 93/68/EEC.
NEDERLANDS
FU-55SE_Dut.6.5 03.7.17, 8:54 AM1
Downloaded from: http://www.usersmanualguide.com/

• Gebruik dit toestel niet als het netsnoer of de stekker beschadigd is of als de aansluiting op
het stopcontact loszit.
Dit houdt gevaar in voor een elektrische schok, kortsluiting en/of brand.
• Vermijd het beschadigen, breken, bedekken, sterk buigen, trekken aan, draaien, samenbinden,
klemmen van het netsnoer en plaats er evenmin zware voorwerpen op.
Een beschadigd netsnoer houdt gevaar in voor brand en/of een elektrische schok.
• Gebruik uitsluitend een stopcontact van 220-240 V.
Zo niet bestaat er gevaar voor brand en/of een elektrische schok.
• Breng geen veranderingen aan. Het repareren en demonteren van dit toestel mag enkel
gebeuren door erkend onderhoudspersoneel.
Zo niet bestaat er gevaar voor brand, een elektrische schok en/of lichamelijk letsel.
Neem voor reparatie contact op met uw verkoper of de dichtstbijzijnde Sharp onderhoudsdienst.
• Verwijder geregeld het stof van de stekker.
Opgehoopt stof op de stekker kan slechte isolatie tegen vocht, enz. veroorzaken.
Dit houdt gevaar in voor brand en /of een elektrische schok.
• Trek het netsnoer uit het stopcontact alvorens het toestel te reinigen.
Raak bovendien de stekker nooit aan met natte handen.
Dit houdt gevaar in voor een elektrische schok en/of lichamelijk letsel.
• Gebruik het toestel niet als er oliebestanddelen, keukenolie enz., in de lucht aanwezig zijn.
Daardoor bestaat het gevaar dat het oppervlak van het toestel gaat barsten.
• Veeg het toestel niet af met benzeen of verfverdunner. Spuit evenmin insecticiden op het
toestel.
Dit houdt gevaar in voor barsten, een elektrische schok en/of brand.
• Gebruik het toestel niet in combinatie met insecticiden die binnenshuis rook veroorzaken.
Chemische bestanddelen kunnen zich opstapelen in het toestel en via de luchtuitlaat worden afgevoerd
wanneer het toestel in werking is. De afvoer van dergelijke chemicaliën kan ongezond zijn voor het
lichaam.
• Zorg ervoor dat in het toestel geen ontvlambare gassen, vonken van brandende sigaretten,
wierook enz. kunnen terechtkomen.
Daardoor kan het toestel vuur vatten.
• Gebruik het toestel niet in een vochtige omgeving, zoals een badkamer of op plaatsen waar
het toestel nat kan worden.
Dit houdt gevaar in voor een elektrische schok en/of storing.
• Steek geen vingers of vreemde voorwerpen in de inlaat of luchtuitlaat.
Dit houdt gevaar in voor een elektrische schok en/of storing.
• Houd bij het verwijderen van het netsnoer altijd de stekker vast en trek nooit aan het snoer.
Dit houdt gevaar in voor een elektrische schok en/of brand door kortsluiting.
• Zorg voor voldoende ventilatie als u het toestel gebruikt samen met een verwarmingselement.
Zo niet bestaat er gevaar voor koolstofmonoxidevergiftiging.
• Haal de stekker uit het stopcontact wanneer u het toestel niet gebruikt.
Zo niet bestaat er gevaar voor een elektrische schok door slechte isolatie en/of brand door kortsluiting.
• Als het netsnoer beschadigd is, moet het worden vervangen door de fabrikant of zijn verte-
genwoordiger of door een even bevoegd persoon om risico’s te vermijden.
• Voordat u het toestel wegdoet, verwijdert u de batterijen en gooit u deze veilig weg.
Bij dit produkt zijn batterijen geleverd.
Wanneer deze leeg zijn, moet u ze niet weggooien maar inleveren als KCA.
VOORZORGSMAATREGELEN VOOR DE VEILIGHEID
N-2
FU-55SE_Dut.6.5 03.7.17, 8:54 AM2
Downloaded from: http://www.usersmanualguide.com/

NEDERLANDS
VOORZORGSMAATREGELEN VOOR HET GEBRUIK VAN DIT
TOESTEL
• Blokkeer de inlaat en luchtuitlaat niet.
• Plaats het toestel niet in de nabijheid van of op warme voorwerpen zoals een kachel, enz.
Gebruik het toestel evenmin op plaatsen waar het in contact kan komen met stoom.
• Gebruik het toestel niet op zijn zijkant.
Dit houdt gevaar in voor vervorming, storing en/of oververhitting van de motor.
• Plaats het toestel niet in een omgeving waar vorming van lampzwart voorkomt, zoals in een
keuken enz.
• Gebruik voor het schoonmaken van het toestel geen detergent.
Daardoor kan het toesteloppervlak beschadigd worden of barsten.
Tevens bestaat er gevaar voor verstoring van de sensors.
• Gebruik het toestel niet zonder filter.
Het heeft dan geen zuiverend effect. Bovendien kan dit storingen tot gevolg hebben.
• Was en hergebruik de filters niet.
Dit heeft geen effect en kan de oorzaak zijn van een elektrische schok of storingen.
VOORZORGSMAATREGELEN VOOR DE INSTALLATIE
GEBRUIK DE AFSTANDSBEDIENING NIET OP DE VOLGENDE PLAATSEN
• Plaatsen waar inverter-verlichting of automatische elektronische verlichting gebruikt wordt.
De afstandsbediening kan daardoor onbruikbaar worden. In dat geval verwijdert u zich van dergelijke
verlichting of wijzigt u de richting.
• Plaatsen die blootstaan aan direct zonlicht.
Het toestel kan de signalen van de afstandsbediening mogelijk niet ontvangen.
Het toestel reageert mogelijk niet op de signalen van de afstandsbediening als de uiteinden van TL-
lampen zwart worden of als de lampen gaan flikkeren omwille van hun gevorderde levensduur; dit
betekent evenwel geen storing van de afstandsbediening of het hoofdtoestel. In dat geval vervangt u
de TL-lampen door nieuwe.
LET BIJ DE INSTALLATIE OP HET VOLGENDE
• Houd ten minste 2 m afstand van televisie- en radiotoestellen en golfklokken.
Zo niet kan elektrische interferentie optreden.
• Houd ten minste 60 cm afstand van de wand.
Zo niet kan de motor oververhitten en het toestel slecht werken.
• Vermijd plaatsen waar sensors blootstaan aan onmiddellijke tocht.
Zo niet kan het toestel mogelijk niet juist functioneren.
• Vermijd plaatsen waar gordijnen enz. in contact komen met de inlaat of de luchtuitlaat.
Zo niet kunnen gordijnen, enz. vuil worden of kan het toestel niet juist functioneren.
DOELTREFFEND GEBRUIK
• Plaats het toestel op een stabiel oppervlak met voldoende luchtcirculatie.
OVER HET FILTER
• Was en hergebruik het HEPA-filter en actieve-koolstoffilter niet. Dit heeft geen effect en kan een
elektrische schok en problemen tot gevolg hebben.
• De wand enz. achter de luchtuitlaat kan na verloop van tijd vuil worden. Als u het toestel voor een
langere periode op dezelfde plaats gebruikt, brengt u een vinyllaag, enz. aan om de wand tegen vuil
te beschermen. Reinig eveneens de wand enz. op regelmatige tijdstippen.
N-3
FU-55SE_Dut.6.5 03.7.17, 8:54 AM3
Downloaded from: http://www.usersmanualguide.com/
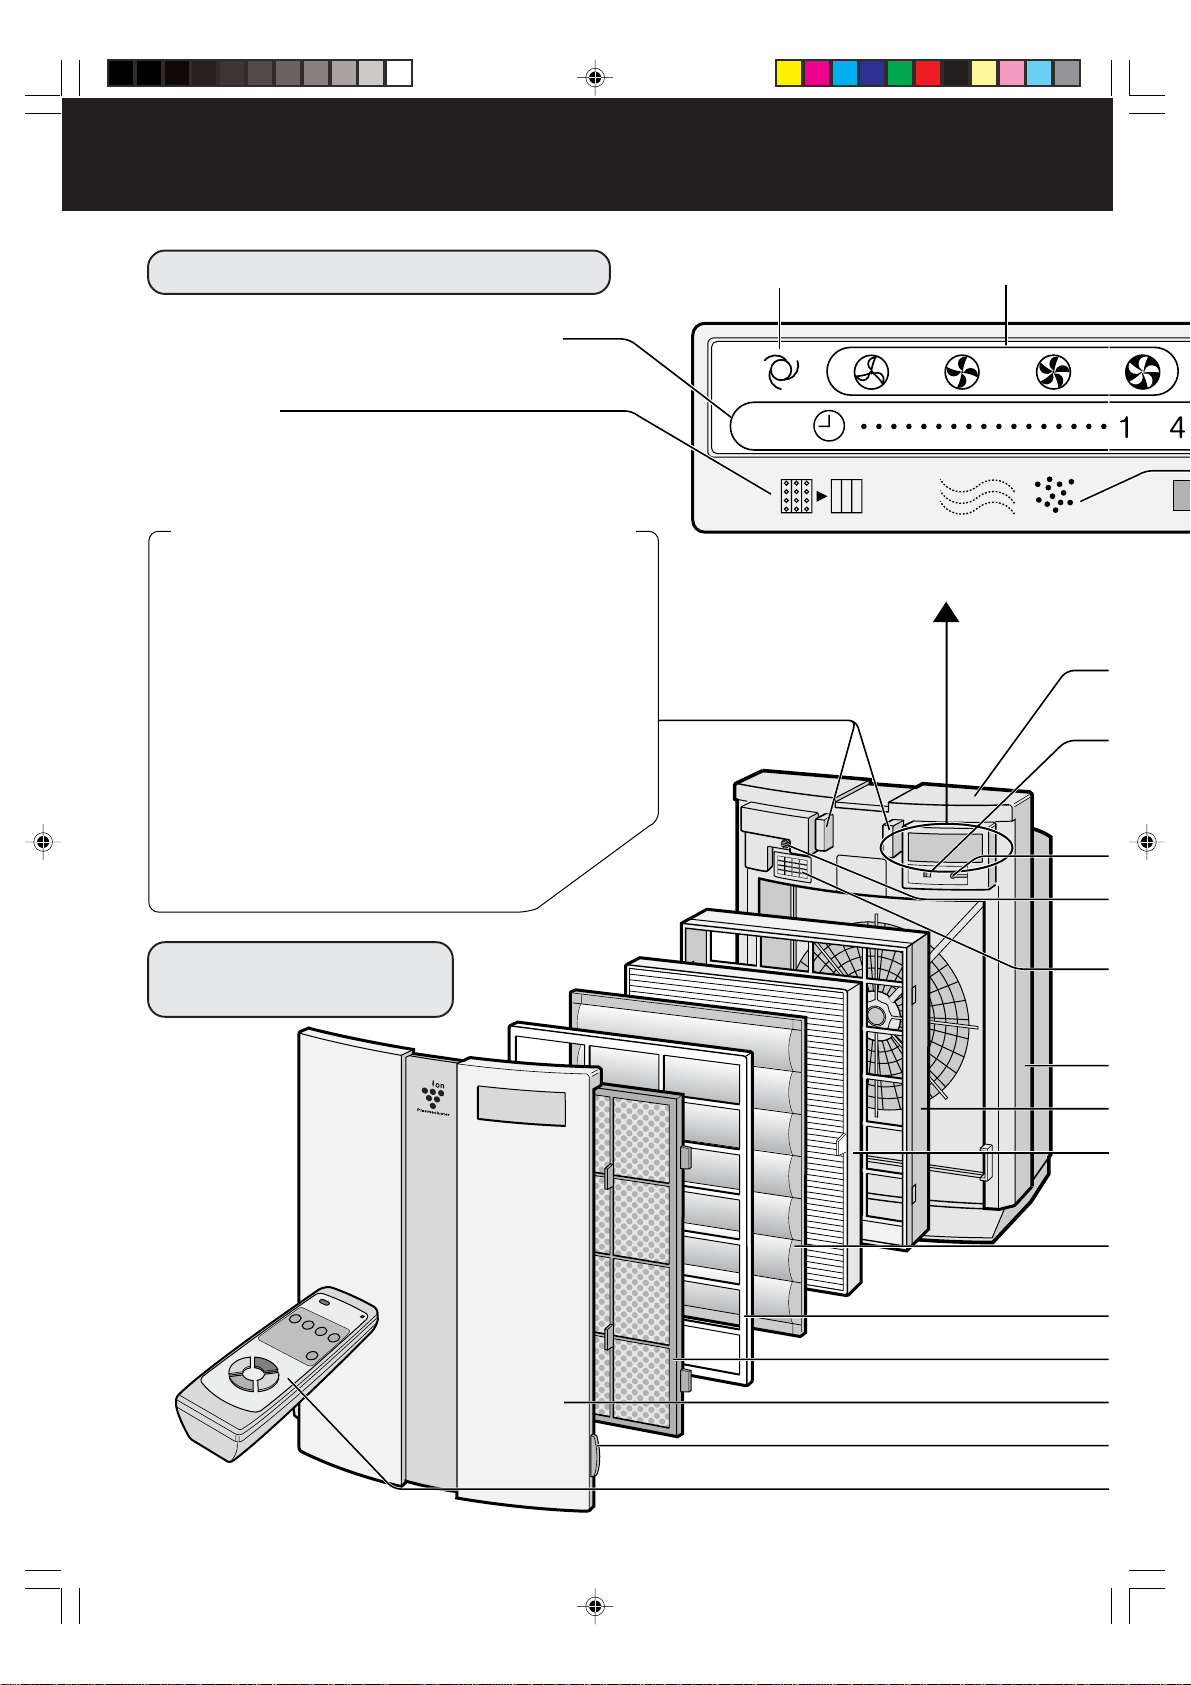
N-4
NAMEN VAN DE ONDERDELEN
Lampje voor
AUTOMATISCHE functie
Lampjes voor
ventilatieniveau
OPENGEWERKTE
AFBEELDING
DISPLAY VAN HET HOOFDTOESTEL
LAMPJE VAN CLUSTERIONENFUNCTIE
De clusterionenfunctie wordt gekozen met de afstandsbediening.
Blauw lampje
Wanneer de clusterionenfunctie in de luchtreinigingsfunctie
of in de AUTOMATISCHE functie staat en de lucht in de
kamer vuil is, gaat het lampje aan en werkt het toestel in
de luchtreinigingsfunctie.
Groen lampje
Wanneer de clusterionenfunctie in de ionregelfunctie of in
de AUTOMATISCHE functie staat en de lucht in de kamer
zuiver is, gaat dit lampje aan en werkt het toestel in de
ionenregelfunctie.
Lampje uit
Er worden geen clusterionen gevormd.
• U kunt het lampje uitschakelen met de toets
“DISPLAY AAN/UIT” op de afstandsbediening,
zelfs wannneer clusterionen worden gevormd.
(Schakel de lampjes uit indien niet vereist.)
Displaylampjes voor UIT-tijdschakelaar
(ingesteld met afstandsbediening)
Filterlampje
Een brandend filterlampje geeft aan dat
het filter moet worden vervangen.
FU-55SE_Dut.6.5 03.7.17, 8:54 AM4
Downloaded from: http://www.usersmanualguide.com/
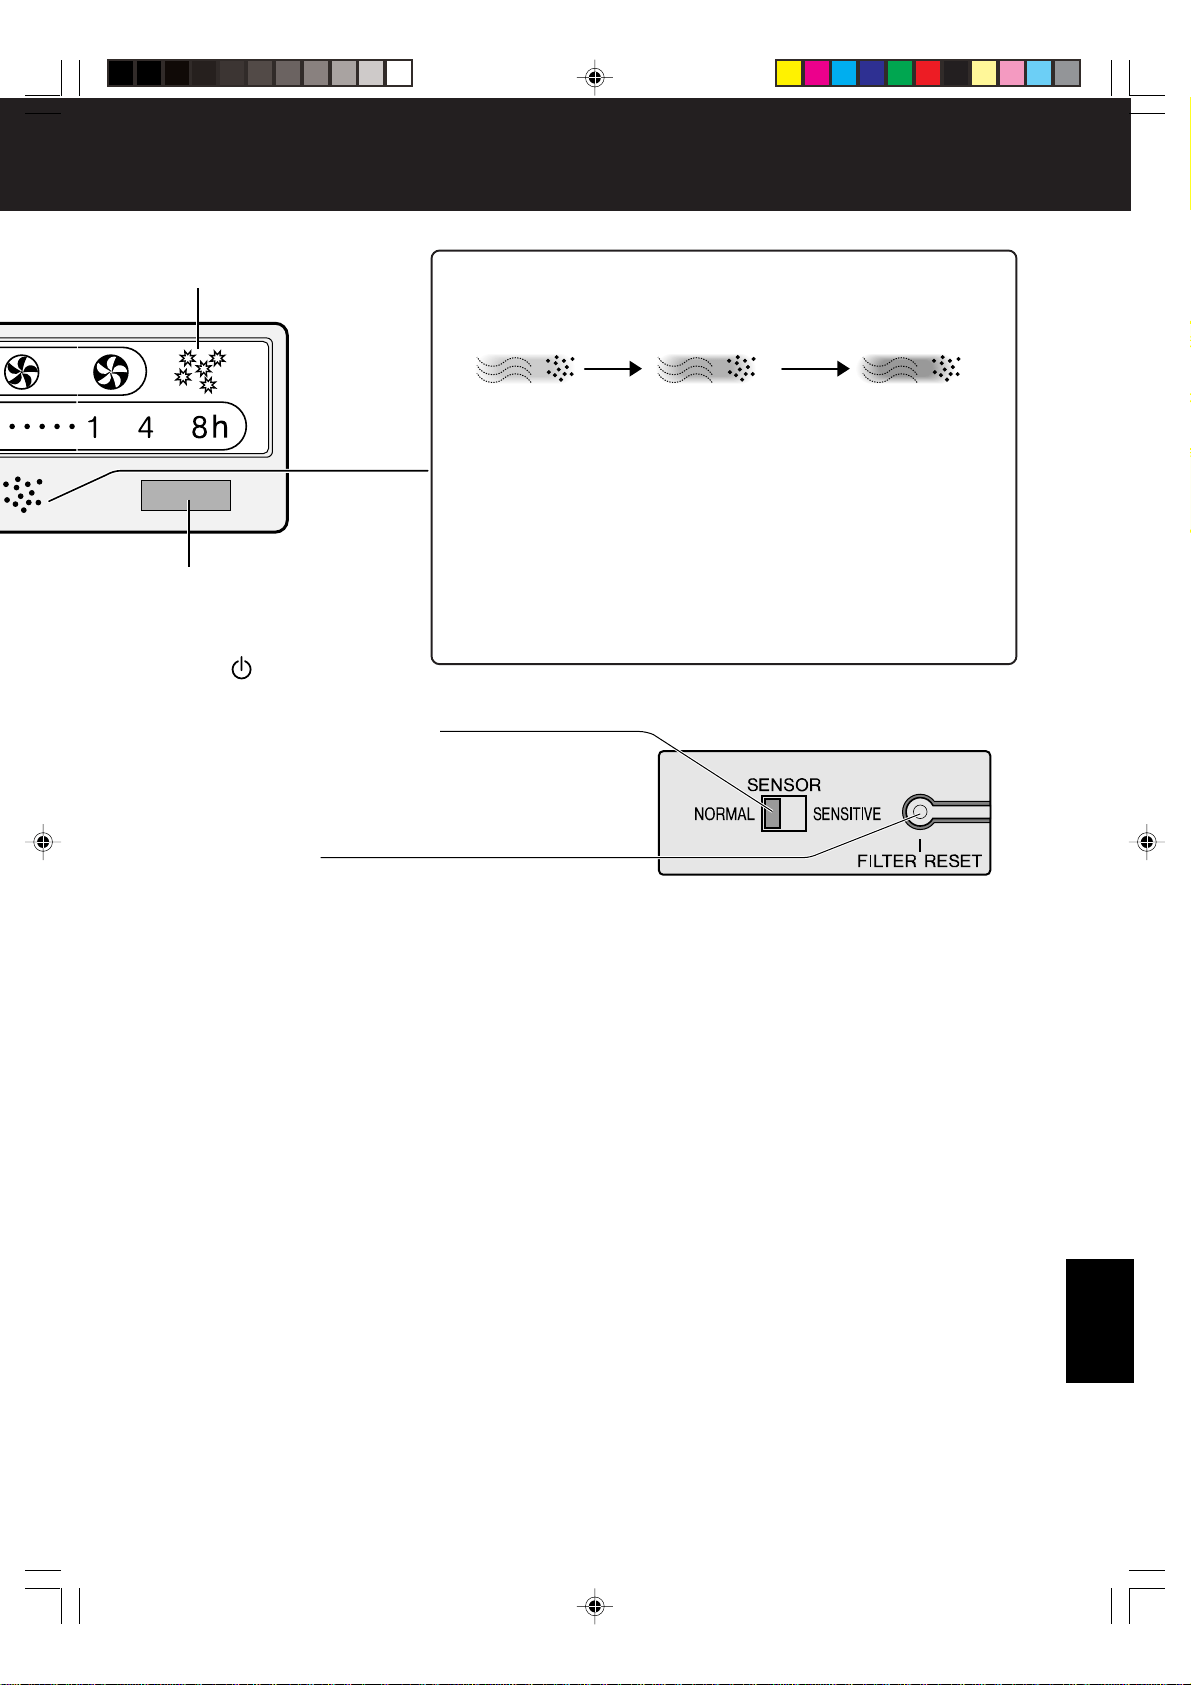
NEDERLANDS
N-5
Lampje voor
pollenfunctie
Ontvanger van de
afstandsbediening
REINIGINGSSYMBOOL
De kleur verandert als de lucht vuil is.
Zuiver (groen) Een beetje vuil (oranje) Erg vuil (rood)
OVER HET REINIGINGSSYMBOOL
• De sensor toont een REINIGINGSSYMBOOL afhankelijk van de
relatieve veranderingen in de omgeving op het ogenblik dat de stekker
in het stopcontact wordt gestoken en daarna.
• Wanneer de lucht erg vuil is op het ogenblik dat de stekker wordt
ingestoken, zal de zuiverheidsindicator mogelijk groen oplichten,
aangezien deze staat van vervuiling de omgeving is waarop de sen-
sor zich baseert voor de vervuilingsgraad.
In dit geval schakelt u het toestel handmatig in de gewenste
bedieningsfunctie; de automatische functie heeft hier immers geen
effect. Zie pagina N-11.
• Het lampje van het REINIGINGSSYMBOOL kan worden uitgescha-
keld met de toets “DISPLAY AAN/UIT” van de afstandsbediening.
Zie pagina N-11.
*Steek de stekker in een stopcontact
voordat u op de filterterugsteltoets drukt.
De afstandsbediening heeft ook een
filterterugsteltoets.
Richt de afstandsbediening naar het
hoofdtoestel voordat u de
filterterugsteltoets op de
afstandsbediening indrukt.
oor
iveau
Toets MODE/
Zie pagina N-10.
(Gebruikt om de bedieningsfuncties te kiezen of om het
toestel uit te schakelen)
Sensor sensitivity keuzeschakelaar
De gevoeligheid van de geur- en de stofdetectie kan worden
ingesteld.
De fabrieksinstelling is “Normal”. Gebruik het toestel met deze instelling
onder normale omstandigheden. Zet afhankelijk van de toestand in de
kamer de gevoeligheid op “High” als de gevoeligheid te laag blijkt te zijn.
Filterterugsteltoets
(Filter reset)
Geursensor
Spoort geuren op zoals tabaksrook, wierook, huisdieren,
cosmetica, enz.
Sensordeksel
Stofsensor
Spoort stof, rook, pollen, huisstof enz. op. Zie pagina N-12, N-13.
Hoofdtoestel
Filterframe
HEPA-filter (wit)
Zie pagina N-14.
(Stofopvangfilter)
Actieve-koolstoffilter (zwart) Zie pagina N-14.
(Ontgeuringsfilter)
Filterscheider
Voorfilter
Voorpaneel
Klepje
Afstandsbediening
Zie pagina N-11.
FU-55SE_Dut.6.5 03.7.17, 8:54 AM5
Downloaded from: http://www.usersmanualguide.com/
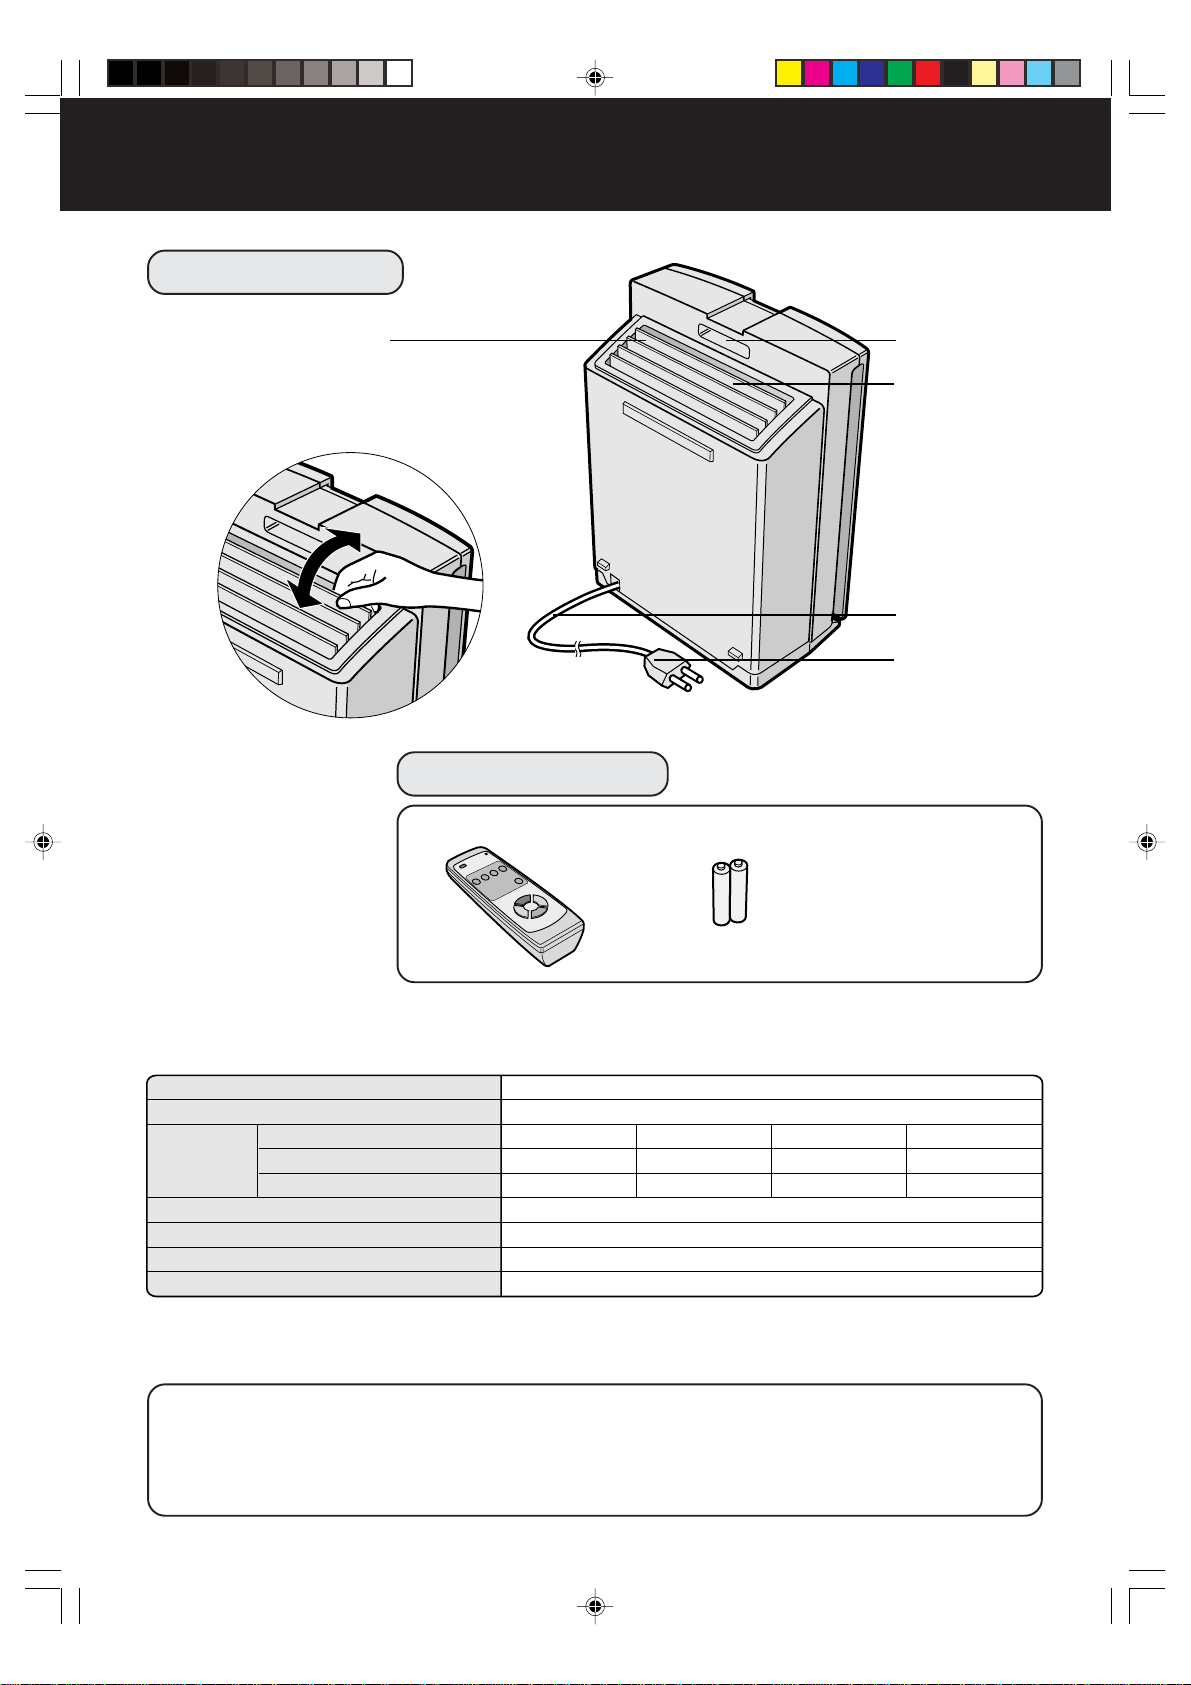
N-6
NAMEN VAN DE ONDERDELEN
Handvat
Luchtuitlaat
Netsnoer
Stekker
ACCESSOIRES
Afstandsbediening (1 stuk) Batterij (R6 (AA) batterij x 2)
Bijgevoegde folder
•Gebruiksaanwijzing
SPECIFICATIES
Model
Voeding
Instelling van het ventilatieniveau
Nominaal vermogen
Ventilatieniveau
Toepasbare vloeroppervlakte
Snoerlengte
Afmetingen
Gewicht
Ventilatie-
niveau-
functie
FU-55SE
220-240 V / 50 Hz
~42 m
2
*
2,5 m
415 mm (B) x 238 mm (D) x 572 mm (H)
9,3 kg
Maximum
43 W
330m
3
/uur
Hoog
19 W
218m
3
/uur
Gemiddeld
6 W
95m
3
/uur
Stil
4 W
43m
3
/uur
*De toepasbare vloeroppervlakte is de oppervlakte voor het toestel wanneer het werkt met het
maximale ventilatieniveau.
(JEM 1467, The Japan Electrical Manufacturers’ Association)
Meer over de verlaging van het stand-byvermogen
Om de elektriciteitscircuits te onderhouden terwijl het netsnoer in het stopcontact steekt, verbruikt
dit toestel een stand-byvermogen van ongeveer 0,9 W.
Om energie te besparen, verwijdert u het netsnoer uit het stopcontact wanneer u het toestel niet
gebruikt.
ACHTERKANT
Ionenuitstroomrooster
• De uitvoerrichting van de gezuiverde lucht
kan worden gewijzigd in de door de pijlen
aangeduide richtingen.
• Stel de gewenste uitvoerrichting in.
FU-55SE_Dut.6.5 03.7.17, 8:54 AM6
Downloaded from: http://www.usersmanualguide.com/
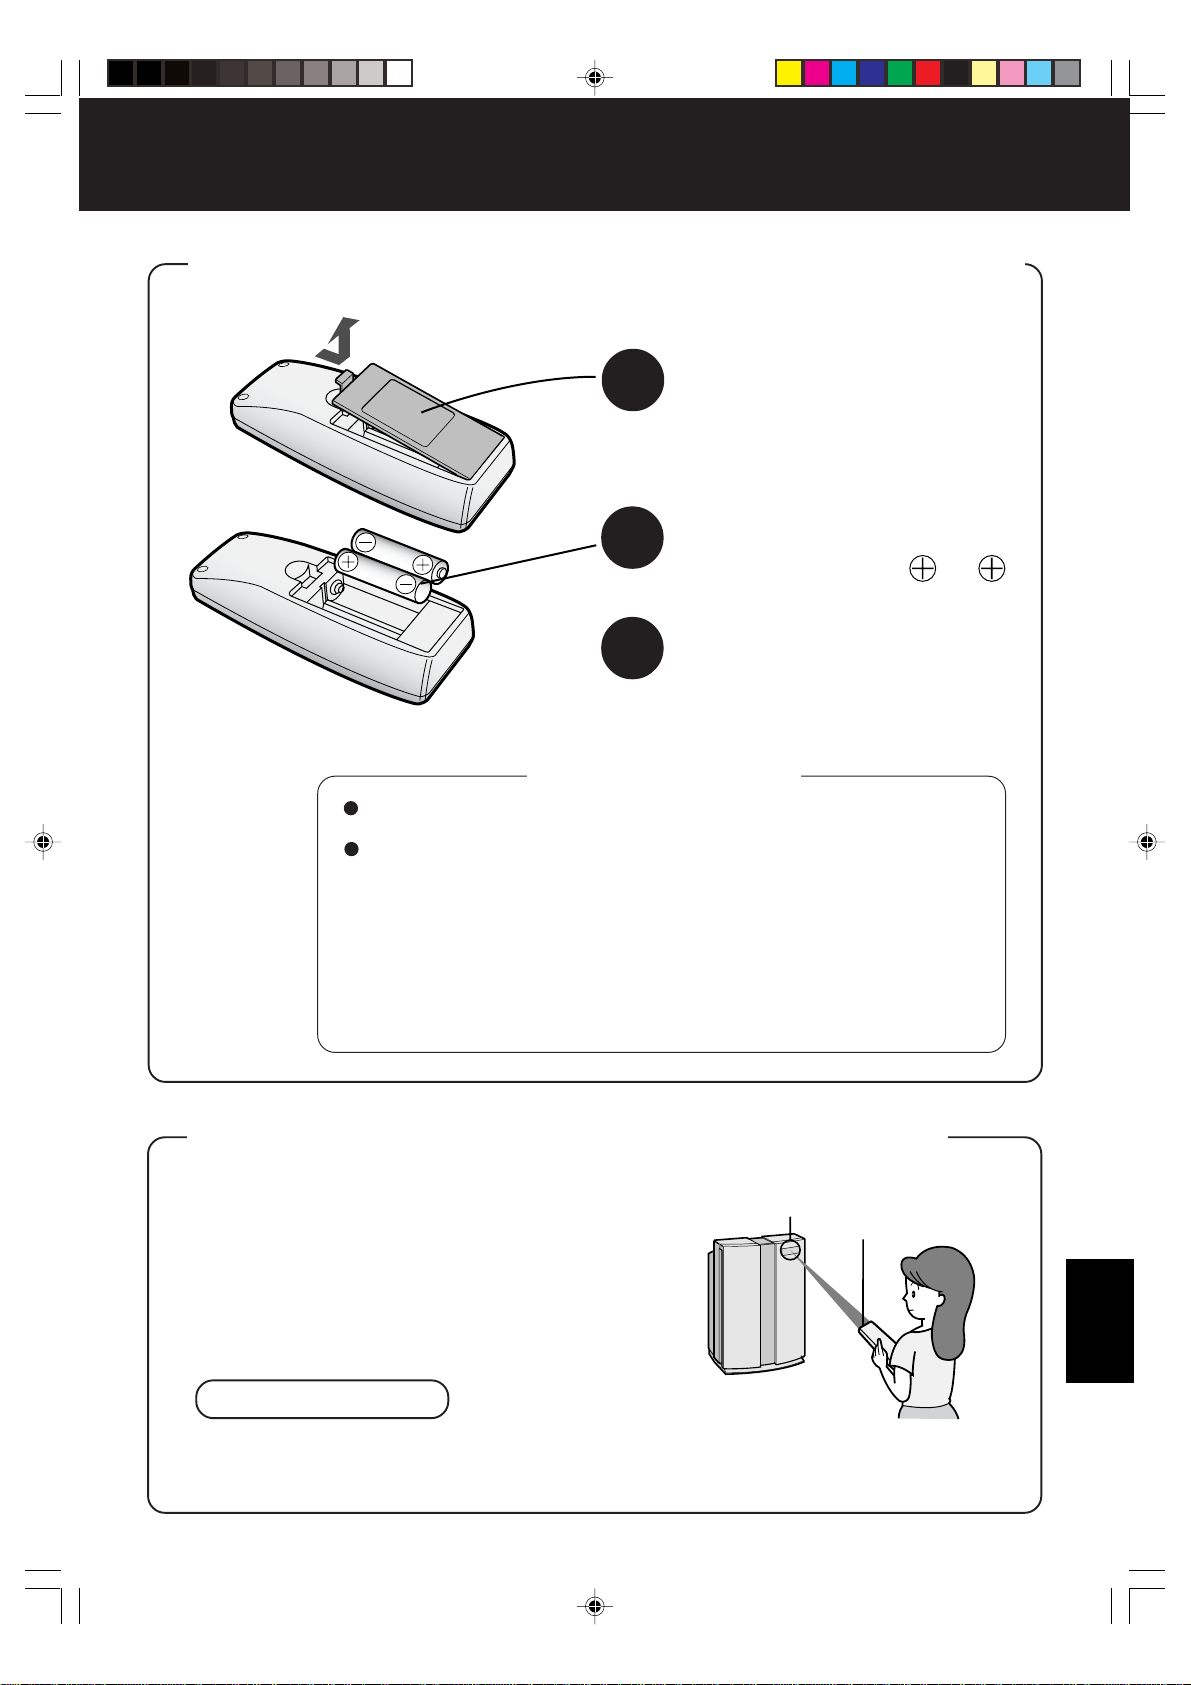
NEDERLANDS
N-7
PLAATSEN VAN DE BATTERIJEN IN DE AFSTANDSBEDIENING
Meer over de batterijen
• De levensduur van de batterijen bedraagt ongeveer 1 jaar.
• Vervang de batterijen als de afstandsbediening niet meer werkt.
• Door onjuist gebruik van de batterijen kan er batterijvloeistof vrijkomen
en beschadiging veroorzaakt worden. Neem bij het omgaan met de
batterijen het volgende in acht:
• Vervang beide batterijen door twee nieuwe van hetzelfde type.
(Gebruik R6 (AA) mangaanbatterijen (2 stuks).)
• Verwijder de batterijen wanneer u het toestel of de afstandsbediening
voor een langere periode niet gebruikt. Zo voorkomt u dat de afstands-
bediening door het lekken van batterijvloeistof niet goed zou werken.
*De batterijen zijn uitsluitend bedoeld voor het eerste gebruik en kunnen
binnen 1 jaar uitgeput zijn.
1
Verwijder het deksel aan de
achterkant
Druk op het deksel en schuif het eruit.
2
Plaats de batterijen
Plaats de batterijen met
en
zoals hieronder getoond.
3
Sluit het deksel aan
de achterkant
GEBRUIK VAN DE AFSTANDSBEDIENING
• Richt de afstandsbediening naar het hoofdtoestel
(ontvanger).
• Het signaalbereik bedraagt ongeveer 7 m (vooraan).
• Let erop dat voorwerpen de baan van het signaal
niet belemmeren.
OPMERKING
• Vermijd hevig schokken van de afstandsbediening. Zorg er eveneens voor dat de
afstandsbediening niet nat wordt, niet blootgesteld wordt aan direct zonlicht of niet in de
buurt van een kachel enz. wordt geplaatst; dit kan storingen veroorzaken.
Ontvanger
Zender
VOORBEREIDING
FU-55SE_Dut.6.5 03.7.17, 8:54 AM7
Downloaded from: http://www.usersmanualguide.com/
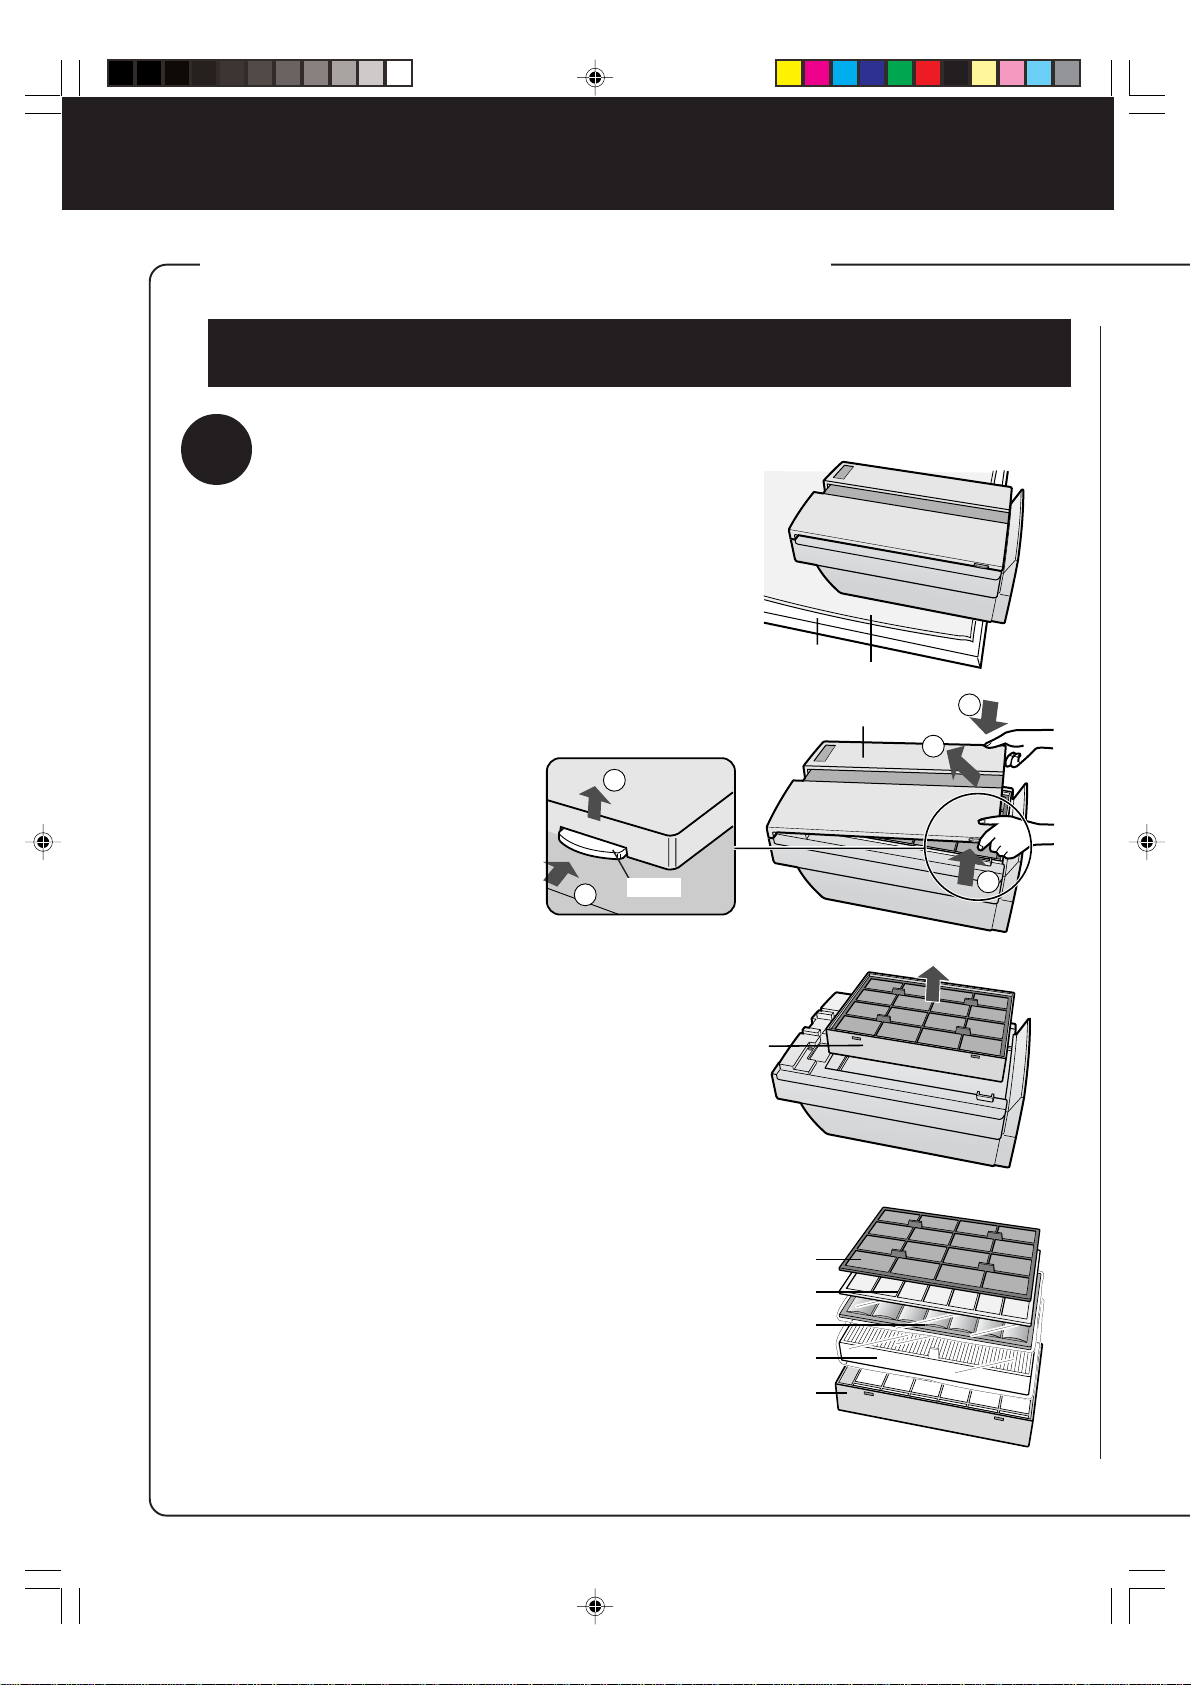
Trek de stekker uit het stopcontact.
N-8
VOORBEREIDING
• Trek de stekker uit het stopcontact.
1
1
1
2
2
Tafel
Zachte doek
Voorpaneel
Filterframe
Voorfilter
Filterscheider
Actieve-koolstoffilter
HEPA-filter
Filterframe
INSTALLATIE VAN DE FILTERS
Om de kwaliteit van de filters te vrijwaren, zitten ze in het hoofdtoestel verpakt in plastic
zakken. Haal de filters uit de plastic zakken alvorens het toestel te gebruiken.
1
Verwijderen van de filters
1
Plaats het toestel met
de voorkant naar boven.
Leg het toestel op een tafel of
iets dergelijks en let erop het
netsnoer aan de achterkant van
het toestel niet te klemmen.
2
Verwijder het voorpaneel.
Druk het klepje aan de onderkant
van het voorpaneel in en hef het
op om het te verwijderen.
3
Trek het filterframe naar bui-
ten en verwijder het voorfil-
ter en de filterafscheider.
4
Haal het actieve-koolstoffilter
(zwart) en het HEPA-filter (wit)
uit de plastic zak.
Haak
FU-55SE_Dut.6.5 03.7.17, 8:54 AM8
Downloaded from: http://www.usersmanualguide.com/
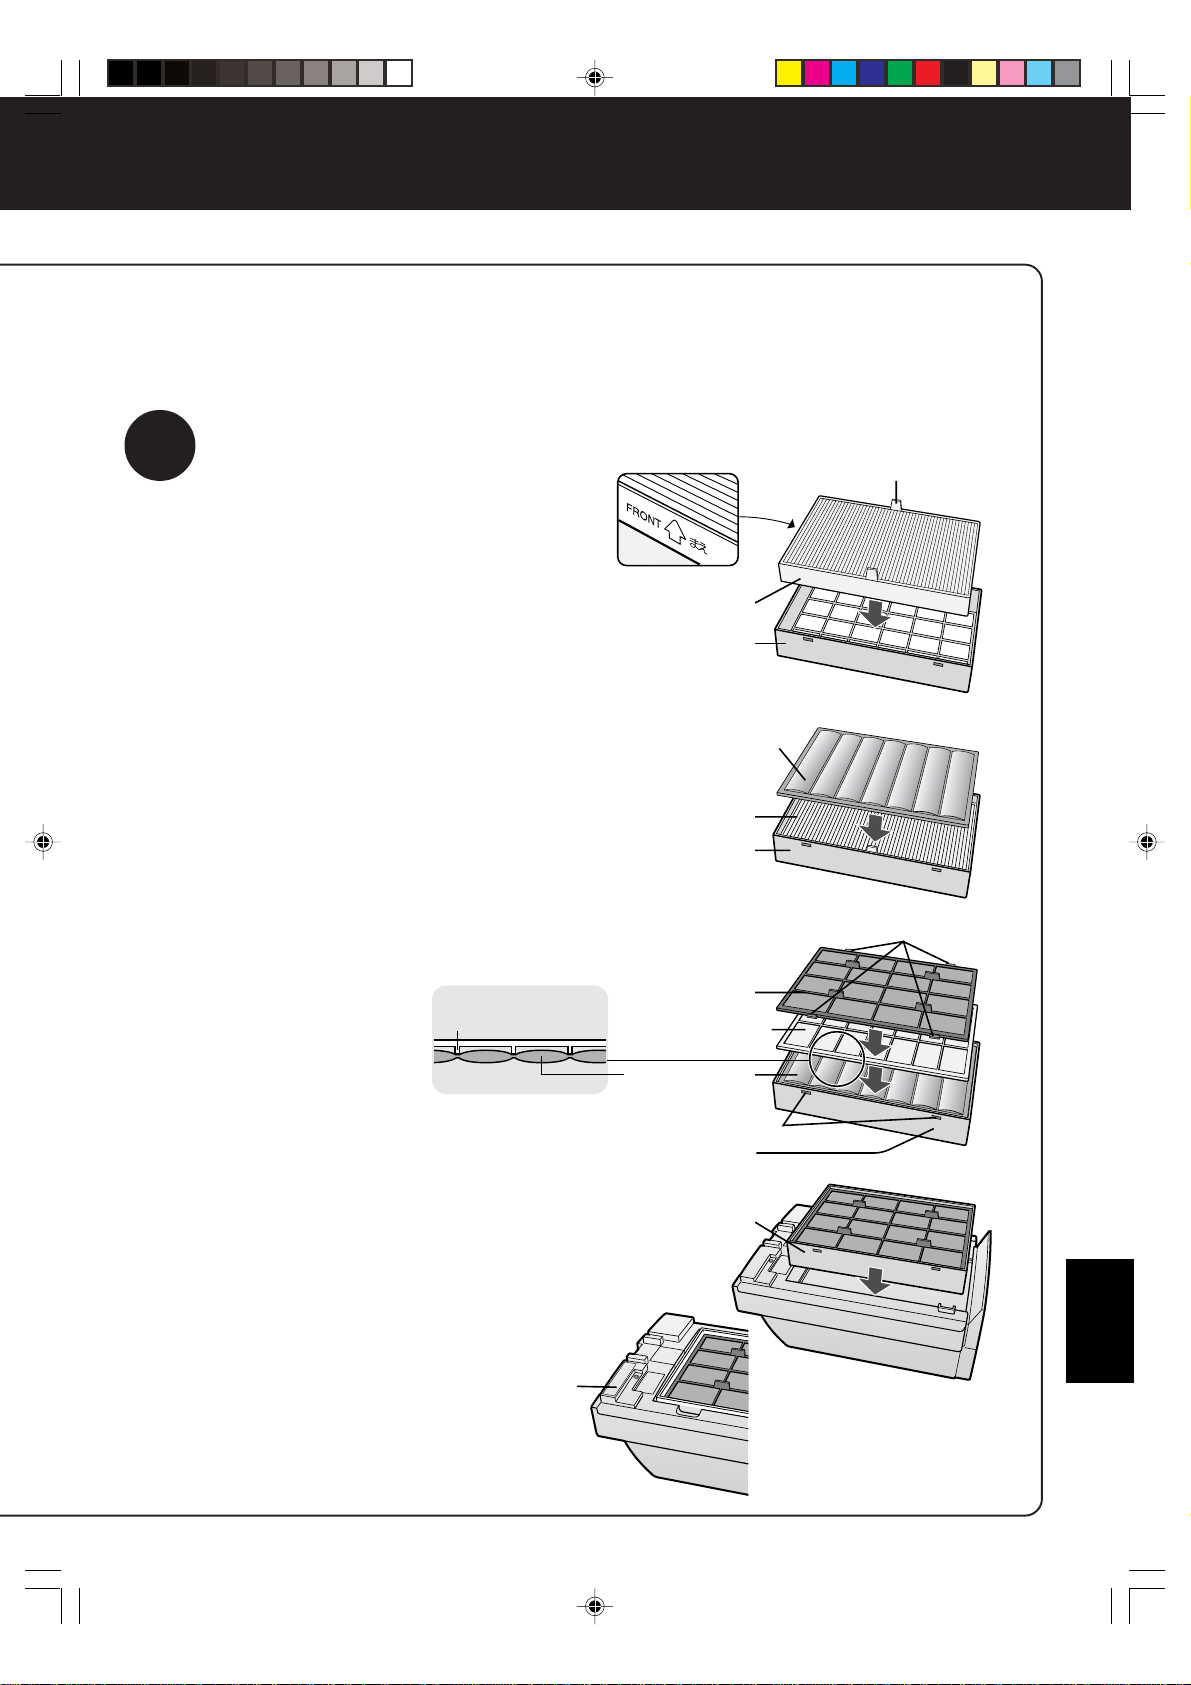
NEDERLANDS
N-9
2
Installeer het filter
1
Haal het HEPA-filter uit de plas-
tic zak en plaats het in het
filterframe met de aanduiding
“FRONT” naar boven gericht.
Breng de filter zo in dat de lipjes op de
HEPA-filter naar u gericht zijn.
Correcte bediening is niet mogelijk als de
filter omgekeerd geïnstalleerd wordt.
2
Haal het actieve-koolstoffilter
uit de plastic zak en plaats het
in het filterframe.
3
Bevestig de filterscheider en
het voorfilter in die volgorde in
het filterframe.
• Plaats de filterscheider
met de ribbels naar
onder zoals getoond op
de afbeelding rechts.
• Steek de lipjes van het
voorfilter (4 stuks) in
de openingen van het
filterframe.
• Plaats het filterframe op het hoofd-
toestel zoals getoond op de afbeelding
rechts (verticale oriëntatie is niet mo-
gelijk).
4
Vul de begindatum van het
gebruik in op het datumetiket
dat op het hoofdtoestel is
aangebracht.
Gebruik deze da-
tum als referentie
bij het bepalen van
het tijdstip voor
filtervervanging.
Lipjes
HEPA-filter
Filterframe
Actieve-koolstoffilter
HEPA-filter
Filterframe
Voorfilter
Lipjes (4 stuks)
Filterscheider
Actieve-koolstoffilter
Openingen
Filterframe
Filterframe
Datumetiket
Ribbel van filterscheider
FU-55SE_Dut.6.5 03.7.17, 8:54 AM9
Downloaded from: http://www.usersmanualguide.com/

Plasmacluster
N-10
BEDIENING
BEDIENING VAN HET HOOFDTOESTEL
Beschikbare functies met het hoofdtoestel
•
AUTOMATISCHE functie
(ventilatieniveau)
•
Stille werking (ventilatieniveau)
•
Gemiddelde werking
(ventilatieniveau)
•
Hoge werking (ventilatieniveau)
•
Maximale werking (ventilatieniveau)
•
Pollenfunctie
Het toestel treedt in werking wanneer de toets MODE/ wordt ingedrukt.
Het toestel start in de AUTOMATISCHE functie (ventilatieniveau).
• Tijdens de werking brandt het clusterionenlampje.
De bedieningsfunctie wijzigt als volgt telkens wanneer u op de toets drukt.
Het lampje van de ingestelde bedieningsfunctie licht op.
U kunt de bedieningsfunctie aanpassen aan de gebruiksomstandigheden.
Stop
AUTOMATISCHE functie
Er wordt automatisch gewisseld
tussen de ventilatieniveaus
(hoog, gemiddeld, laag) naar
gelang van de luchtvervuiling
die de sensor opspoort met
het oog op een doeltreffende
luchtreiniging.
Stille werking
Het toestel werkt stil met een
minimale invoer van lucht.
Pollenfunctie
Het toestel werkt met hoog ven-
tilatieniveau gedurende tien minuten
en wisselt vervolgens tussen gemid-
deld en hoog ventilatieniveau.
Gemiddelde tot
maximale werking
Het toestel werkt met een gemiddeld,
hoog of maximaal ventilatieniveau.
Gedurende de eerste dertig seconden nadat de stekker
in het stopcontact is gestoken, controleert het toestel de
toestand van de lucht. Als u op dit ogenblik de bediening
op AAN zet, zal de REINIGINGSSYMBOOL-lampje
afwisselend groen, oranje en rood knipperen.
Lampje van clusterionenfunctie
Toets MODE/
10 minuten: Hoog ventilatieniveau
20 minuten: Gemiddeld ventilatieniveau
20 minuten: Hoog ventilatieniveau
FU-55SE_Dut.6.5 03.7.17, 8:54 AM10
Downloaded from: http://www.usersmanualguide.com/

NEDERLANDS
Plasmacluster
AUTO
RESET
OFF
N-11
AFSTANDSBEDIENING
Beschikbare functies
met afstandsbediening
•
AUTOMATISCHE
bediening (ventilatieniveau)
•
HANDMATIGE bediening
(ventilatieniveau)
• Pollenfunctie
• Instelling UIT-tijdschakelaar
• DISPLAY AAN/UIT
•
Keuze van de clusterionenfunctie
•
AUTOMATISCHE
clusterionenfunctie
• Luchtreinigingsfunctie
• Ionenregelfunctie
•
Clusterionenfunctie UIT
• Om het toestel te starten, drukt u op de toets SPANNING AAN/UIT.
U hoort een korte pieptoon en de bediening start in de
AUTOMATISCHE functie (ventilatieniveau).
De AUTOMATISCHE clusterionenfunctie wordt gekozen als
clusterionenfunctie.
• Om de werking te beëindigen, drukt u nogmaals op de toets SPAN-
NING AAN/UIT.
U hoort een lange pieptoon en de werking stopt.
Toets SPANNING AAN/UIT
Gebruikt om de AUTOMA-
TISCHE functie te starten
(korte pieptoon) en stop te
zetten (lange pieptoon).
AUTOMATISCHE toets
(ventilatieniveau)
Het ventilatieniveau wisselt
automatisch naargelang van de
vervuilingsgraad van de lucht.
HANDMATIGE toets
(ventilatieniveau)
Het ventilatieniveau kan wisselen
tussen laag, gemiddeld, hoog en
maximum.
Toets DISPLAY AAN/UIT
Schakelt het Clusterionenlampje
en REINIGINGSSYMBOOL-
lampje AAN of UIT.
• Het clusterionenlampje wordt
gedurende 3 seconden
ingeschakeld door op de
toets voor clusterionenkeuze
te drukken (behalve de toets
OFF) in de functie “Display
UIT”.
Zender
Filterterugsteltoets
Druk op deze toets na het
vervangen van de filters.
Toets voor pollenfunctie
Het toestel werkt het meest
doeltreffend in deze functie
wanneer u de aanwezigheid van
pollen in de lucht vermoedt. Zie
pagina E-10.
UIT-tijdschakelaartoets
Gebruikt om de UIT-tijdscha-
kelaar in te stellen.
De insteltijd wisselt telkens
wanneer de toets ingedrukt
wordt zoals hieronder getoond.
1 uur 4 uur
Annuleren
8 uur
• De overblijvende tijd wordt door
het lampje aangeduid naar-
mate de tijd vordert.
• Het toestel stopt wanneer de
ingestelde tijd verstreken is.
Toets voor clusterionenkeuze
Toets voor AUTOMATISCHE clusterionenfunctie
Het toestel wisselt automatisch tussen de
luchtreinigingsfunctie en de ionenregelfunctie
afhankelijk van de graad van luchtvervuiling die
door de stof- en de geursensor wordt gedetecteerd.
Bij het begin van de werking wordt eerst de
“luchtreinigingsfunctie” uitgevoerd gedurende
ongeveer 1 minuut.
Ionenregeltoets
Het toestel werkt doorlopend in de ionenregel-
functie.
Het ionenevenwicht in de kamer wordt behou-
den door het aantal negatieve clusterionen te
verhogen. (Clusterionenlampje aan (groen).)
Schakelaar voor
luchtreiniging
Het toestel werkt doorlopend in de
luchtreinigingsfunctie.
De reinigingsfunctie is doeltreffend
om de aanwezigheid van
schimmels in de lucht te beperken.
(Clusterionenlam-pje aan (blauw).)
OFF-toets
De vorming van ionen stopt en het
clusterionenlampje gaat uit.
Als de kamer uitzonderlijk muf ruikt, zet u het toestel in de luchtreinigingsfunctie.
FU-55SE_Dut.6.5 03.7.17, 8:54 AM11
Downloaded from: http://www.usersmanualguide.com/

RICHTLIJN VOOR DE BEDIENING
RICHTLIJN VOOR DE GEURSENSOR
• De geursensor reageert op de geur van o.a. sigarettenrook en huisdieren en daarnaast ook
op het volgende.
• Insecticiden, cosmetica, sprays, alcohol.
• Plotse veranderingen in temperatuur of vochtigheid.
• Wanneer het toestel in de automatische bediening staat en in een gesloten kamer cosmetica
of dergelijke worden gebruikt, is het normaal dat de sensor hierop reageert door het verhogen
van de luchtstroom. Als dit niet wenselijk is, wijzigt u de gevoeligheid van de sensor.
RICHTLIJN VOOR DE STOFSENSOR
• De stofsensor detecteert stofdeeltjes in de kamerlucht, zoals sigarettenrook en huisstof.
• In vergelijking met sigarettenrook is de hoeveelheid stof die vrijkomt bij het opmaken van uw
bed zo klein dat ze niet door de stofsensor wordt gedetecteerd. Bijgevolg kan de hoeveelheid
stof die u met het blote oog ziet, afwijken van de aanduiding van het reinigingssymbool-lampje.
RICHTLIJN VOOR DE FILTERTERUGSTELTOETS
• Na het vervangen van de filters steekt u de stekker in een stopcontact en drukt u op de
filterterugsteltoets op het hoofdtoestel of op de afstandsbediening. De pieptoon geeft aan dat
de opgeslagen werkingstijd is teruggesteld.
Als het filterlampje op dat ogenblik brandt, zal het uitgaan.
N-12
FU-55SE_Dut.6.5 03.7.17, 8:54 AM12
Downloaded from: http://www.usersmanualguide.com/
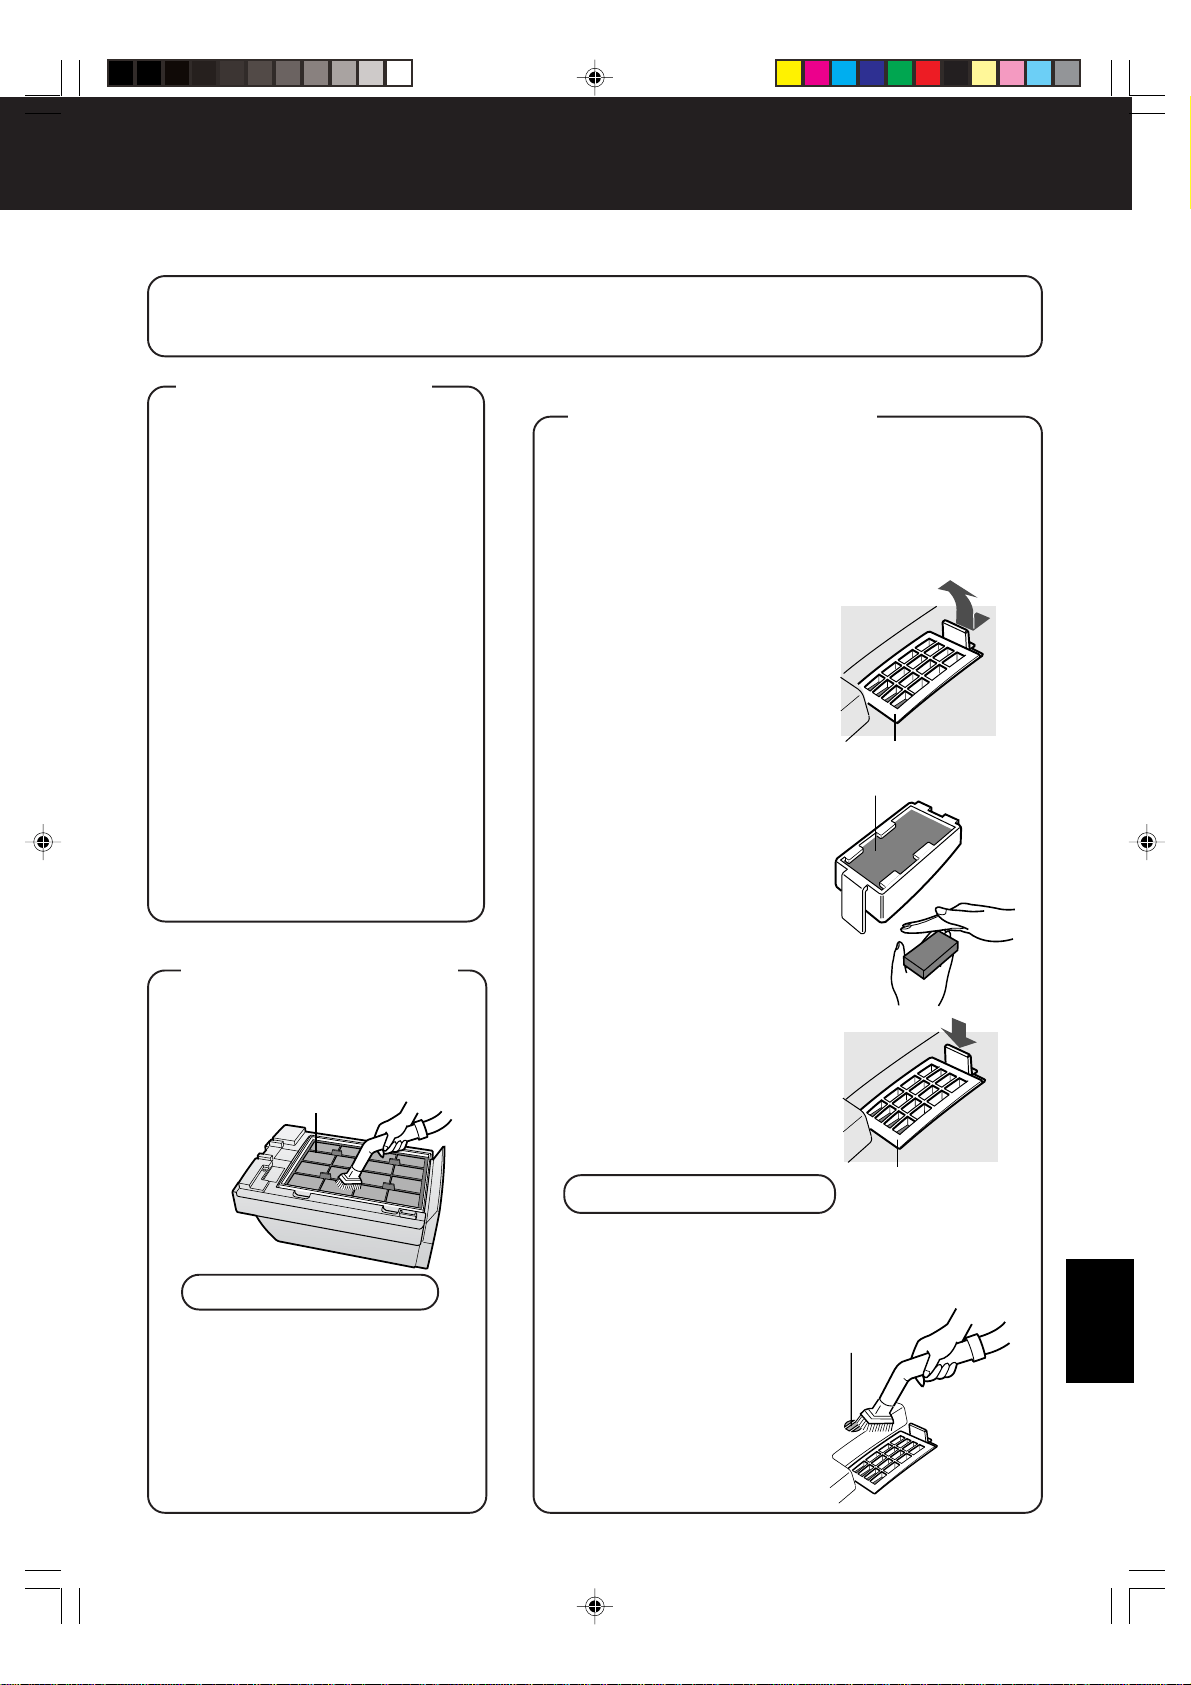
NEDERLANDS
BEHANDELING EN ONDERHOUD
(Om de optimale werking van dit toestel te vrijwaren, moet u dit toestel regelmatig schoonmaken.)
Zorg ervoor dat u voor het schoonmaken de stekker uit het stopcontact trekt. Raak tevens de
stekker nooit met natte handen aan.
Dit houdt gevaar in voor een elektrische schok en/of lichamelijk letsel.
HOOFDTOESTEL
Verwijder vuil op het hoofdtoestel
en het installatieoppervlak (vloer of
tafel) zo vlug mogelijk. Hardnekkig
vuil is soms moeilijk te verwijderen.
Veeg droog met een zachte doek
Voor het verwijderen van hard-
nekkig vuil gebruikt u een zachte
doek die u nat maakt met water
of warm water van maximum
40°C.
Gebruik geen vluchtige
vloeistoffen
Benzeen, verfverdunner, polijst-
poeder, enz. kunnen het opper-
vlak van het toestel beschadigen.
Gebruik geen detergenten
Detergentbestanddelen kunnen
het oppervlak van het toestel
beschadigen.
Maak het toestel niet nat
Gebruik nooit water op het toestel.
STOFSENSOR
GEURSENSOR
Het onderhoud van de GEURSENSOR en STOFSEN-
SOR dient eenmaal om de drie maanden te gebeuren.
De gevoeligheid van de sensors wordt onstabiel
wanneer de geur- of stofsensor vuil of geblokkeerd
is. Reinig deze onderdelen als volgt.
STOFSENSOR
1
Verwijder het voor-
paneel en maak het
sensorfilter los.
• Maak het sensorfilter los
terwijl u aan het lipje op
het sensordeksel trekt.
2
Verwijder het stof
van het sensorfilter.
• Maak het sensorfilter los
en tik er zachtjes tegen
met uw hand om het stof
te verwijderen.
Als het filter zeer vuil is,
wast u het af met water
en laat u het vervolgens
goed drogen.
3
Steek het sensorfilter
in het deksel, plaats
het in het hoofdtoestel
en bevestig het voor-
paneel.
• Het is om het even in
welke richting u het
sensorfilter insteekt.
WAARSCHUWING
• Vergeet niet het sensordeksel terug te plaatsen
voordat u het toestel opnieuw start.
• Steek geen vreemde
voorwerpen (tandenstokers
enz.)
in het filter. Dit kan
beschadiging of storing van
het toestel veroorzaken.
GEURSENSOR
Verwijder het stof van de
sensoropening met een
stofzuiger.
N-13
Sensordeksel
Sensorfilter
Sensordeksel
Sensor-
opening
REINIGING VAN
HET FILTER
Maak het bovenoppervlak van
het voorfilter voorzichtig schoon
met een stofzuiger.
OPMERKING
• Het HEPA-filter wordt gemakke-
lijk beschadigd. Breng het niet
rechtstreeks in contact met het
mondstuk van een stofzuiger.
Maak het ook nooit schoon met
water.
• Het HEPA-filter en het actieve-
koolstoffilter hoeven niet te
worden gereinigd.
Voorfilter
FU-55SE_Dut.6.5 03.7.17, 8:54 AM13
Downloaded from: http://www.usersmanualguide.com/

N-14
BEHANDELING EN ONDERHOUD
RICHTLIJN VOOR DE LEVENSDUUR VAN DE FILTERS
Het tijdstip voor filtervervanging wordt aangeduid door het filterlampje.
(Dit lampje zal oplichten na ongeveer 5 jaar, indien u het toestel 12 uur per dag gebruikt.)
• De werkingsuren worden opgeslagen in het geheugen, zelfs wanneer het netsnoer wordt
uitgetrokken voor verplaatsing van het toestel naar een andere kamer, enz.
Het filterlampje mag enkel als richtlijn worden gebruikt.
Vervang de filters als stof of geur niet gemakkelijk kunnen worden verwijderd.
Richtlijn voor het vervangen van de filters
• HEPA-filter Ongeveer 5 jaar na opening
• Actieve-koolstoffilter Ongeveer 5 jaar na opening
Het vervangingstijdstip wordt bepaald als het tijdstip waarop bij het roken van 10 sigaretten per
dag de stofopvang/ontgeuring verminderd is tot de helft in vergelijking met nieuwe filters.
Het vervangingstijdstip verschilt naargelang van het aantal werkingsuren en de plaats van de
installatie.
(JEM 1467, The Japan Electrical Manufacturers’ Association)
Naargelang van de gebruiksomgeving kan er na enkele maanden geur vrijkomen uit de
luchtuitlaat. (Voor uitleg over het product. Zie pagina N-1)
VERVANGING VAN DE FILTERS
1
Zie pagina N-8 “Installeer het filter” voor de vervangingsmethode.
2
Vul op het datumetiket de datum in waarop u de nieuwe filters
in gebruik neemt.
3
Steek de stekker in een stopcontact,
richt de afstandsbediening naar de
ontvanger op het hoofdtoestel en
druk met een puntig voorwerp
de filterterugsteltoets van de
afstandsbediening in of druk op de
filterterugsteltoets op het hoofd-
toestel.
(Zie pagina N-11.)
• De pieptoon geeft aan dat de opgeslagen
werkingstijd is teruggesteld.
• Als het filterlampje op dat ogenblik brandt, zal
het uitgaan.
• Druk op de terugsteltoets op het hoofdtoestel
nadat u het voorpaneel heeft verwijderd.
Vervangingsfilters (Model: FZ-60SEF)
• HEPA-filter: 1 stuk
• Actieve-koolstoffilter: 1 stuk
Voor vervangingsfilters gelieve zich te wenden tot uw verkoper.
Voorzorgsmaatregelen bij het wegwerpen van gebruikte filters
Gelieve de vervangen filters weg te werpen overeenkomstig de plaatselijke afvalwetgeving en
reglementen.
Materialen voor HEPA-filter: Materialen voor actieve-koolstoffilter:
• Filter: polypropyleen • Ontgeurder: geactiveerd houtskool
• Frame: polyester • Net: polypropyleen 60%, polyester 40%
Filterterugsteltoets
RESET
FU-55SE_Dut.6.5 03.7.17, 8:54 AM14
Downloaded from: http://www.usersmanualguide.com/
NEDERLANDS
OPLOSSEN VAN PROBLEMEN
Controleer de onderstaande symptomen alvorens hulp in te roepen voor reparatie. Het probleem is
mogelijk niet te wijten aan een storing van het toestel.
SYMPTOOM
OPLOSSING (geen storing)
De afstandsbediening werkt
niet.
• Zijn de batterijen leeg?
• Zijn de batterijen juist geplaatst?
• Is de TL-verlichting in de kamer aan het flikkeren omwille van
gevorderde levensduur? (Zie pagina N-3, N-7.)
Geur en stof kunnen niet ge-
makkelijk worden verwijderd.
• Zijn de filters erg vuil? (Zie pagina N-14.)
Het lampje voor zuiverheids-
aanduiding is groen terwijl de
lucht toch vuil is.
• Wordt de opening van de geursensor geblokkeerd of is het
sensorfilter verstopt? (Zie pagina N-13.)
• Was de lucht reeds vuil op het ogenblik dat het netsnoer in het
stopcontact werd gestoken? (Zie pagina N-5.)
Het lampje voor zuiverheids-
aanduiding is oranje of rood
terwijl de lucht toch zuiver is.
• Is het sensorfilter vuil of verstopt?
De gevoeligheid van de sensor wordt onstabiel als de ope-
ning van de stofsensor vuil of verstopt is.
Verwijder het stof van het sensorfilter. (Zie pagina N-13.)
• In de luchtreinigingsfunctie (of de ionenregelfunctie) blijft de
kleur van het clusterionenlampje onveranderd.
Het toestel
geeft een
geluid weer.
Klik, klik
Tik, tik, tik
• Dit is het geluid dat u hoort wanneer het toestel in de
ionenregelfunctie staat.
Als het geluid storend is, plaatst u het toestel verder van u
vandaan.
• Dit is het geluid dat u hoort als het toestel clusterionen vormt.
Als het geluid storend is, bv. wanneer u slaapt, plaatst u het
toestel verder van u vandaan.
Een “tik-tik-tik”-geluid van het
toestel wordt soms wel en soms
niet gehoord.
• Een geluid is soms stil of soms luid of wordt helemaal niet
gehoord. Maar het effect van het clusterion is hetzelfde.
De afgevoerde lucht ruikt onaan-
genaam.
• Zijn de filters erg vuil?
Vervang de filters. (Zie pagina N-14.)
• De ozon die wordt gevormd door de clusteriongenerator kan een
onaangename geur hebben. De ozondichtheid is echter zeer
beperkt en onschadelijk voor het menselijk lichaam. De ozon wordt
bovendien snel ontbonden en stapelt zich dus niet op in de kamer.
N-15
Het clusterionenlampje blijft
groen (blauw) en verandert niet.
Het toestel werkt niet zelfs
wanneer er gerookt wordt.
• Staat het toestel op een plaats waar de sensors de sigaret-
tenrook moeilijk kunnen opsporen?
• Worden de openingen van de geur- en de stofsensor
geblokkeerd of zijn ze verstopt? (In dat geval maakt u de
openingen schoon.)
(Zie pagina N-13.)
Het filterlampje brandt zelfs na
vervanging van de filters.
• Na het vervangen van de filters steekt u de stekker in een
stopcontact en drukt u op de filterterugsteltoets op het
hoofdtoestel of op de afstandsbediening. (Zie pagina N-14.)
Het clusterionenlampje of het
REINIGINGSSYMBOOL-lampje
licht niet op.
• Is de DISPLAY UIT-functie gekozen?
• Druk op de toets DISPLAY AAN/UIT op de afstandsbediening.
(Zie pagina N-11.)
FU-55SE_Dut.6.5 03.7.17, 8:54 AM15
Downloaded from: http://www.usersmanualguide.com/

`JN
!"#$%&'()*+,%
!"#!"$%&'(
!"#$%&' !"#
!"#
!"#$%&'!()
! !"#$
!"#$
!" UVLPPSLbb`
TPLOPLbb` VPLSUL
bb` !
!"#$ !"#$
!"#$ !"#$
!"#$
! !
! !
!
KKKKKKKKKKKKKKKKKKKKKKKKKKKKKKKKKKKKKKKKKKKKKKKKKKKKKKKKKKKKKKKKKKKKKKKKKKKKKKKKKKKKKKKKKKKKKK
KKKKKKKKKKKKKKKKKKKKKKKKKKKKKKKKKKKKKKKKKKKKKKKKKKKKKKKKKKKKKKKKKKKKKKKKKKKKKKKKKKKKKKKKKKKKKK
KKKKKKKKKKKKKKKKKKKKKKKKKKKKKKKKKKKKKKKKKKKKKKK `JQ
• ! KKKKKKKKKKKKKKKKKKKKKKKKKKKKKKKKKKKKKKKKKKKKKKKKKKKKKKKKKKKKKKKKKKKKKKKK `JQ
• KKKKKKKKKKKKKKKKKKKKKKKKKKKKKKKKKKKKKKKKKKKKKKKKKKKKKKKKKKKKKKKKKKKKKKKKKKKKK `JQ
• KKKKKKKKKKKKKKKKKKKKKKKKKKKKKKKKKKKKKKKKKKKKKKKKKKKKKKKKKKKKKKKKKKKKKKKKKKKKKKKKKK `JS
• KKKKKKKKKKKKKKKKKKKKKKKKKKKKKKKKKKKKKKKKKKKKKKKKKKKKKKKKKKKKKKKKKKKKKKKKKKKKKKKKKK `JS
KKKKKKKKKKKKKKKKKKKKKKKKKKKKKKKKKKKKKKKKKKKKKKKKKKKKKKKKKKKKKKKKKKKKKKKKKKKKKKKKKKKKKKKKKKKKKKKKKKKKKKKKKKKK
KKKKKKKKKKKKKKKKKKKKKKKKKKKKKKKKKKKKKKKKKKKKKKKKKKKKKKKKKKKKKKKKKKKKKKKKKKKKKKKKKKKKKKKKKKKKKKKKKKKKKKKKKKKK
KKKKKKKKKKKKKKKKKKKKKKKKKKKKKKKKKKKKKKKKKKKKKKKKKKKKKK `JS
! !
! !
!
KKKKKKKKKKKKKKKKKKKKKKKKKKKKKKKKKKKKKKKKKKKKKKKKKKKKKKKKKKKKKKKKKKKKKKKKKKKKKKKKKKKKKKKKKKKKKK
KKKKKKKKKKKKKKKKKKKKKKKKKKKKKKKKKKKKKKKKKKKKKKKKKKKKKKKKKKKKKKKKKKKKKKKKKKKKKKKKKKKKKKKKKKKKKK
KKKKKKKKKKKKKKKKKKKKKKKKKKKKKKKKKKKKKKKKKKKKKKK `JT
• !"#$% KKKKKKKKKKKKKKKKKKKKKKKKKKKKKKKKKKKKKKKKKKKKKKKKKKKKK `JT
• !"KKKKKKKKKKKKKKKKKKKKKKKKKKKKKKKKKKKKKKKKKKKKKKKKKKKKKKKKKKKKKKKKKKKK `JT
• !"KKKKKKKKKKKKKKKKKKKKKKKKKKKKKKKKKKKKKKKKKKKKKKKKKKKKKKKKKKKKKKKKKKKK `JU
KKKKKKKKKKKKKKKKKKKKKKKKKKKKKKKKKKKKKKKKKKKKKKKKKKKKKKKKKKKKKKKKKKKKKKKKKKKKKKKKKKKKKKKKKKKKKKKKKKKKKKKK
KKKKKKKKKKKKKKKKKKKKKKKKKKKKKKKKKKKKKKKKKKKKKKKKKKKKKKKKKKKKKKKKKKKKKKKKKKKKKKKKKKKKKKKKKKKKKKKKKKKKKKKK
KKKKKKKKKKKKKKKKKKKKKKKKKKKKKKKKKKKKKKKKKKKKKKKKKKKK `JNM
• ! KKKKKKKKKKKKKKKKKKKKKKKKKKKKKKKKKKKKKKKKKKKKKKKKKKKKKKKKKKKKKKKKKKKKKK `JNM
• !"KKKKKKKKKKKKKKKKKKKKKKKKKKKKKKKKKKKKKKKKKKKKKKKKKKKKKKKKKKKKKKKKKK `JNN
! !
! !
!
KKKKKKKKKKKKKKKKKKKKKKKKKKKKKKKKKKKKKKKKKKKKKKKKKKKKKKKKKKKKKKKKKKKKKKKKKKKKKKKKKKKKKKKKKK
KKKKKKKKKKKKKKKKKKKKKKKKKKKKKKKKKKKKKKKKKKKKKKKKKKKKKKKKKKKKKKKKKKKKKKKKKKKKKKKKKKKKKKKKKK
KKKKKKKKKKKKKKKKKKKKKKKKKKKKKKKKKKKKKKKKKKKKK `JNO
!" !"
!" !"
!"
KKKKKKKKKKKKKKKKKKKKKKKKKKKKKKKKKKKKKKKKKKKKKKKKKKKKKKKKKKKKKKKKKKKKKKKKKKKKKKKKKK
KKKKKKKKKKKKKKKKKKKKKKKKKKKKKKKKKKKKKKKKKKKKKKKKKKKKKKKKKKKKKKKKKKKKKKKKKKKKKKKKKK
KKKKKKKKKKKKKKKKKKKKKKKKKKKKKKKKKKKKKKKKK `JNP
• KKKKKKKKKKKKKKKKKKKKKKKKKKKKKKKKKKKKKKKKKKKKKKKKKKKKKKKKKKKKKKKKKKKKKKKKKKKKKKKK `JNP
• !"KKKKKKKKKKKKKKKKKKKKKKKKKKKKKKKKKKKKKKKKKKKKKKKKKKKKKKKKKKKKKKKKKK `JNP
• !"# !" KKKKKKKKKKKKKKKKKKKKKKKKKKKKKKKKKKKKK `JNP
• !"#$%&' KKKKKKKKKKKKKKKKKKKKKKKKKKKKKKKKKKKKKKKKKK `JNQ
! !
! !
!
KKKKKKKKKKKKKKKKKKKKKKKKKKKKKKKKKKKKKKKKKKKKKKKKKKKKKKKKKKKKKKKKKKKKKKKKKKKKKKKKKKKKKKKKKK
KKKKKKKKKKKKKKKKKKKKKKKKKKKKKKKKKKKKKKKKKKKKKKKKKKKKKKKKKKKKKKKKKKKKKKKKKKKKKKKKKKKKKKKKKK
KKKKKKKKKKKKKKKKKKKKKKKKKKKKKKKKKKKKKKKKKKKKK `JNR
!" pe^om=crJSMpbK= !"#$
!"#$ !"#$% !"#
!"# ! !"#$ !
!"#$
• !"#$%& KKKKKKKKKKKKKKKKKKKKKKKKKKKKKKKKKKKKKKK KKKKKKKKKK `JP
• !"#KKKKKKKKKKKKKKKKKKKKKKKKKKKKKKKKKKKKKKKKKKKKKKKKKKKKKKKKKKKKKKK`JP
•
`JP
!"KKKKKKKKKKKKKKKKKKKKKKKKKKKKKKKKKKKKKKKKKKKKKKKKKKKKKKKKKKKKKKKKKKKK
"
! !
! !
!
KKKKKKKKKKKKKKKKKKKKKKKKKKKKKKKKKKKKKKKKKKKKKKKKKKKKKKKKKKKKKKKKKKKKKKKKKKKKKKKKKKKKKKKKKKKKKK
KKKKKKKKKKKKKKKKKKKKKKKKKKKKKKKKKKKKKKKKKKKKKKKKKKKKKKKKKKKKKKKKKKKKKKKKKKKKKKKKKKKKKKKKKKKKKK
KKKKKKKKKKKKKKKKKKKKKKKKKKKKKKKKKKKKKKKKKKKKKKK `JO
!"#$ !"#$
!"#$ !"#$
!"#$
!"#$%&'()*+,-.*
!"#
•
! !
! !
!
!"# !$%&'()*+,-
!"#$%&'()*+,&-./
•
!"#$ !"#$
!"#$ !"#$
!"#$
!"I= !"#$%&'()*
!"#$K !"#$%&'(
!"#$%&'I= !"#$%
!"#$%&
•
!"#$ !"#$
!"#$ !"#$
!"#$
!"#$%&'()*+,-./
!"#$%I !"#$%&'
!"#$%
ebm^=ebm^=
ebm^=ebm^=
ebm^=
•
!"# !"#
!"# !"#
!"#
!"# !"#
!"# !"#
!"#
!"#$%&I= !"#$%&
!"#$%&
Downloaded from: http://www.usersmanualguide.com/

`JO
! !
! !
!
•
!"#$%&'( !"#$%&'(
!"#$%&'( !"#$%&'(
!"#$%&'(
!"#$%&'( !"#$%&'(
!"#$%&'( !"#$%&'(
!"#$%&'(
!"#$%& !"#$%&
!"#$%& !"#$%&
!"#$%&
!"#$%& !"#
•
!" !"
!" !"
!"
!" !"
!" !"
!"
!"# !"#
!"# !"#
!"#
!"#$%& !"#$%&
!"#$%& !"#$%&
!"#$%&
!"#$% !"# L !
•
! !
! !
!
^`=OOMJOQMs^`=OOMJOQMs
^`=OOMJOQMs^`=OOMJOQMs
^`=OOMJOQMs
!"#$% L !
•
!"#$ !"#$
!"#$ !"#$
!"#$
!"#$%&'()*+,-./012 !"#$%&'()*+,-./012
!"#$%&'()*+,-./012 !"#$%&'()*+,-./012
!"#$%&'()*+,-./012
!"#$% L !"#
!" !"#$%&'(")*+,-./
•
!"#$%&'()* !"#$%&'()*
!"#$%&'()* !"#$%&'()*
!"#$%&'()*
!"#$%&'()*+,-./012345678
!"# L !
•
!"#$ !"#$
!"#$ !"#$
!"#$
!"#$%&'() !"#$%&'()
!"#$%&'() !"#$%&'()
!"#$%&'()
!"#$%&'()*
!"#$% L !"#
•
!"#$% !"#$%
!"#$% !"#$%
!"#$%
!"#$%& !"#$%&
!"#$%& !"#$%&
!"#$%&
!"#$% !"#$%
!"#$% !"#$%
!"#$%
!"#$%&'()*+
•
!"#$%&'()*+, !"#$%&'()*+,
!"#$%&'()*+, !"#$%&'()*+,
!"#$%&'()*+,
!"#$%&'() !"#$%&'()
!"#$%&'() !"#$%&'()
!"#$%&'()
!"#$%& L !
•
!"#$%&'() !"#$%&'()
!"#$%&'() !"#$%&'()
!"#$%&'()
!"#$% !"#$%
!"#$% !"#$%
!"#$%
!"#$%&'()*+,-. !"#$%#$& !"#$%&'()*+
!
•
!"#$%&' !"#$%&'
!"#$%&' !"#$%&'
!"#$%&'
!"#$%&'( !"#$%&'(
!"#$%&'( !"#$%&'(
!"#$%&'(
!"#$%&'(
•
!"#$%&'()* !"#$%&'()*
!"#$%&'()* !"#$%&'()*
!"#$%&'()*
!"#$%&'()*+,- !"#$%&'()*+,-
!"#$%&'()*+,- !"#$%&'()*+,-
!"#$%&'()*+,-
!"#$% L !
•
!"#$%&'(')#*+), !"#$%&'(')#*+),
!"#$%&'(')#*+), !"#$%&'(')#*+),
!"#$%&'(')#*+),
!"#$% L !
•
!"#$ !"#$
!"#$ !"#$
!"#$
!"#$%&'()* !"#$%&'()*
!"#$%&'()* !"#$%&'()*
!"#$%&'()*
!"#$% L !"#$%&'
•
!"#$%&'()*+ !"#$%&'()*+
!"#$%&'()*+ !"#$%&'()*+
!"#$%&'()*+
!" !"
!" !"
!"
!"#$%&'()*
•
!"#$% !"#$%
!"#$% !"#$%
!"#$%
!"#$% !"#$%
!"#$% !"#$%
!"#$%
!"#$%&'()*+,-./$%01*+,234
•
!"#$% !"#$%
!"#$% !"#$%
!"#$%
!"#$%&'()*$+,&-./01234 !"#$%&'()*$+,&-./01234
!"#$%&'()*$+,&-./01234 !"#$%&'()*$+,&-./01234
!"#$%&'()*$+,&-./01234
!"# !"#
!"# !"#
!"#
•
!"#$% !"#$%
!"#$% !"#$%
!"#$%
!"#$%& !"#$%&
!"#$%& !"#$%&
!"#$%&
!"#$ !"#$
!"#$ !"#$
!"#$
Downloaded from: http://www.usersmanualguide.com/

`JP
!"#$%& !"#$%&
!"#$%& !"#$%&
!"#$%&
•
!"#$%&'()$* !"#$%&'()$*
!"#$%&'()$* !"#$%&'()$*
!"#$%&'()$*
•
!"# !"#
!"# !"#
!"#
!"#$%&'()*+, !"#$%&'()*+,
!"#$%&'()*+, !"#$%&'()*+,
!"#$%&'()*+,
!"#$%&'()*+,-./01 !"#$%&'()*+,-./01
!"#$%&'()*+,-./01 !"#$%&'()*+,-./01
!"#$%&'()*+,-./01
•
!"#$%&' !"#$%&'
!"#$%&' !"#$%&'
!"#$%&'
!"#$%&' L !"#
•
!"#$%&'()*+,- !"#$%&'()*+,-
!"#$%&'()*+,- !"#$%&'()*+,-
!"#$%&'()*+,-
!"# !"#
!"# !"#
!"#
•
!"#$%&'!()* !"#$%&'!()*
!"#$%&'!()* !"#$%&'!()*
!"#$%&'!()*
!"#$%&'()*+
!"#$%&'(
•
!"#$%&'()*+,-. !"#$%&'()*+,-.
!"#$%&'()*+,-. !"#$%&'()*+,-.
!"#$%&'()*+,-.
!"#$%&'() !"#$%
•
!"#$%&'()* !"#$%&'()*
!"#$%&'()* !"#$%&'()*
!"#$%&'()*
!"#$ !"#$%&'()*
!"# !"#
!"# !"#
!"#
!"#$!%&'() !"#$!%&'()
!"#$!%&'() !"#$!%&'()
!"#$!%&'()
•
!"#$%&'!(#$)*+, !"#$%&'!(#$)*+,
!"#$%&'!(#$)*+, !"#$%&'!(#$)*+,
!"#$%&'!(#$)*+,
!"#"$%& !"# !"#$%&'()*+
•
!"#$%&'() !"#$%&'()
!"#$%&'() !"#$%&'()
!"#$%&'()
!"!#$%&'()*+,-.
!"#$%&'() !"#$%&' !"!#$%&'() !"#$%&
!" !"# !"#$%
!"#$%&'( !"#$%&'(
!"#$%&'( !"#$%&'(
!"#$%&'(
•
!"# !"#
!"# !"#
!"#
! !
! !
!
!"#$ !"#$
!"#$ !"#$
!"#$
OO
OO
O
!"#$%&'(
•
!"# !"#
!"# !"#
!"#
SMSM
SMSM
SM
!"#$%&'()*+
•
!"#$%&'()*+, !"#$%&'()*+,
!"#$%&'()*+, !"#$%&'()*+,
!"#$%&'()*+,
!"#$#%&'()
•
!"# !"#
!"# !"#
!"#
!"#$%&'()*+,-.)/ !"#$%&'()*+,-.)/
!"#$%&'()*+,-.)/ !"#$%&'()*+,-.)/
!"#$%&'()*+,-.)/
!"#$%&'
!" !"
!" !"
!"
•
!"#$%&'()*(+,-. !"#$%&'()*(+,-.
!"#$%&'()*(+,-. !"#$%&'()*(+,-.
!"#$%&'()*(+,-.
!" !"
!" !"
!"
• !"#$%& ebm^ !"#$ % !"#$ !"#$%&'()*
• !"#$%&'()*+,-./01 !"#$%& !"#$%&'()*+,
!"#$%
Downloaded from: http://www.usersmanualguide.com/
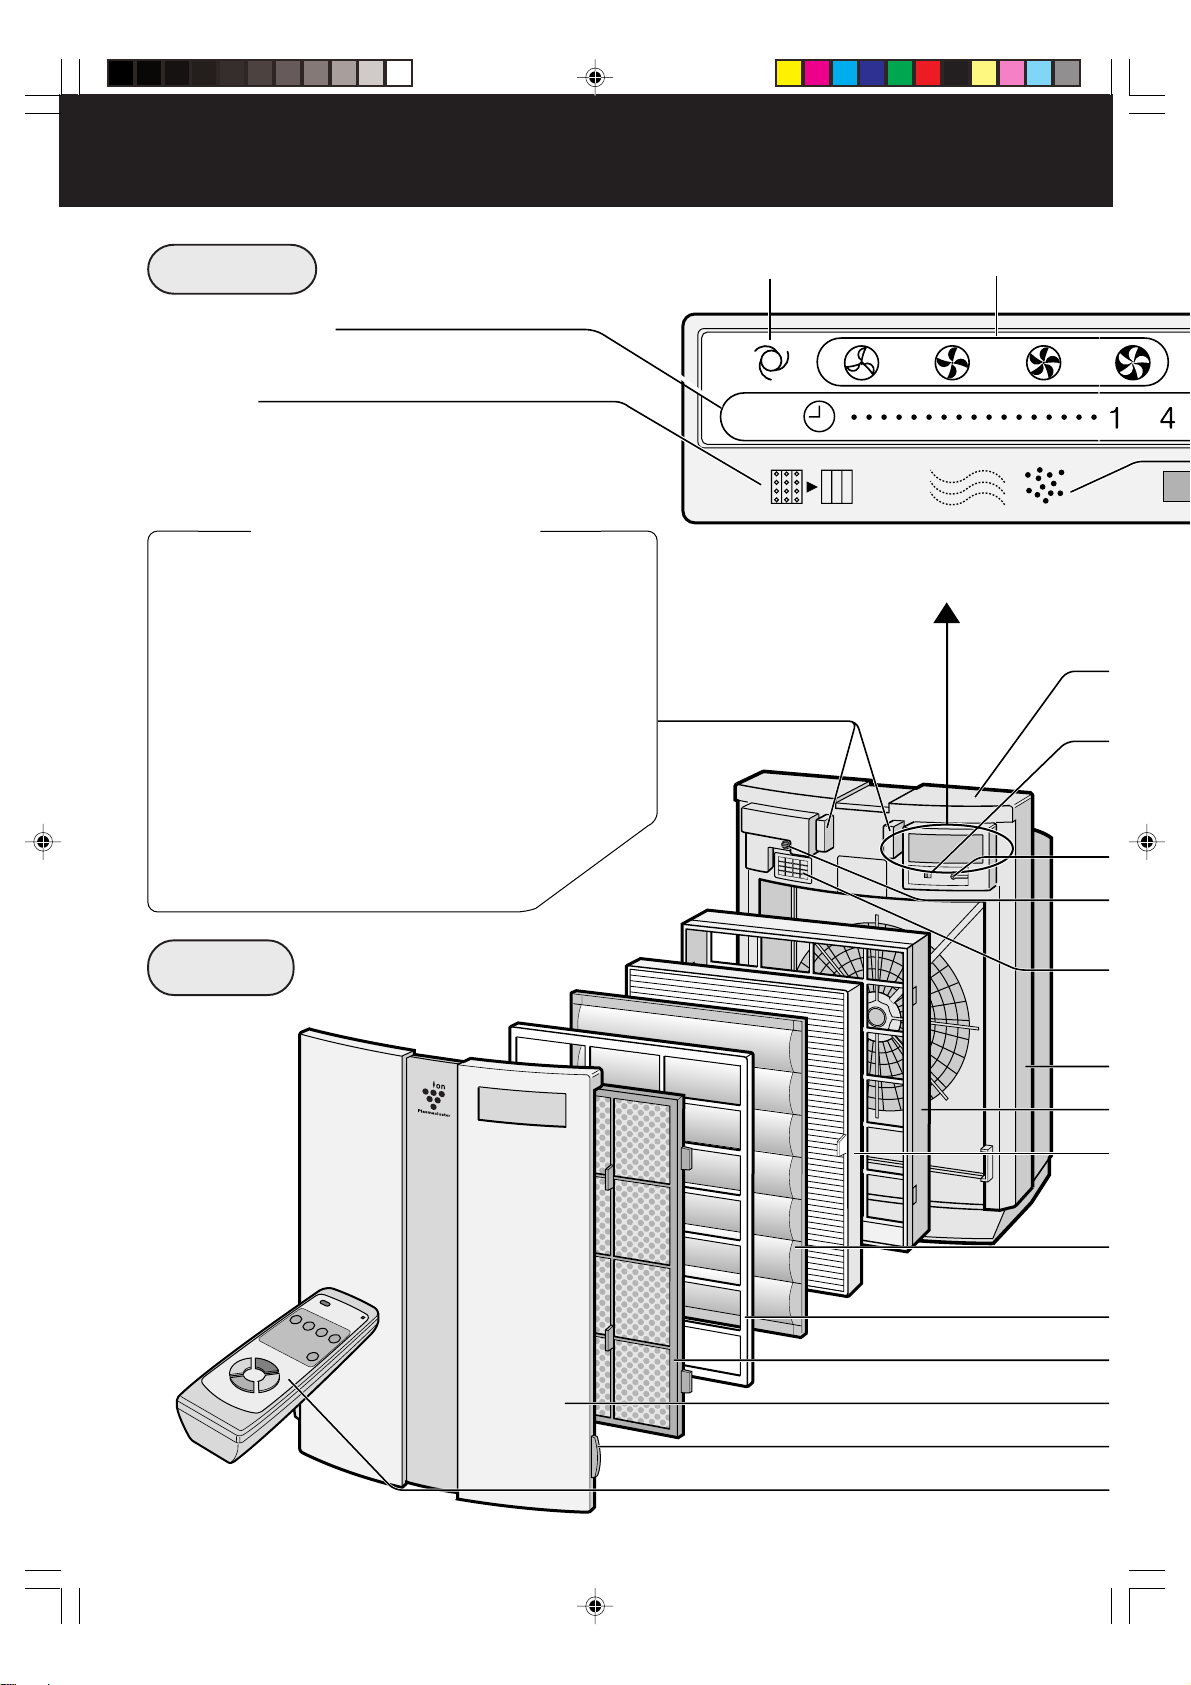
`JQ
! !
! !
!
! !
! !
!
!"#$ !"#$
!"#$ !"#$
!"#$
E !"#F
! !
! !
!
!"#$%& !"#$%&
!"#$%& !"#$%&
!"#$%&
!" !"
!" !"
!"
!"# !"#
!"# !"#
!"#
!"#$%&'()
!"#$%&'()*+,()-./0123
!"#$%&'()*+,-./0
!"#$%&'()*+,()-./0123
! !"#$%&'()*+,-./0
!"#$%&
• !"#$% ! L !"#
!"#$%&'
E !"#$%&'()F
Downloaded from: http://www.usersmanualguide.com/
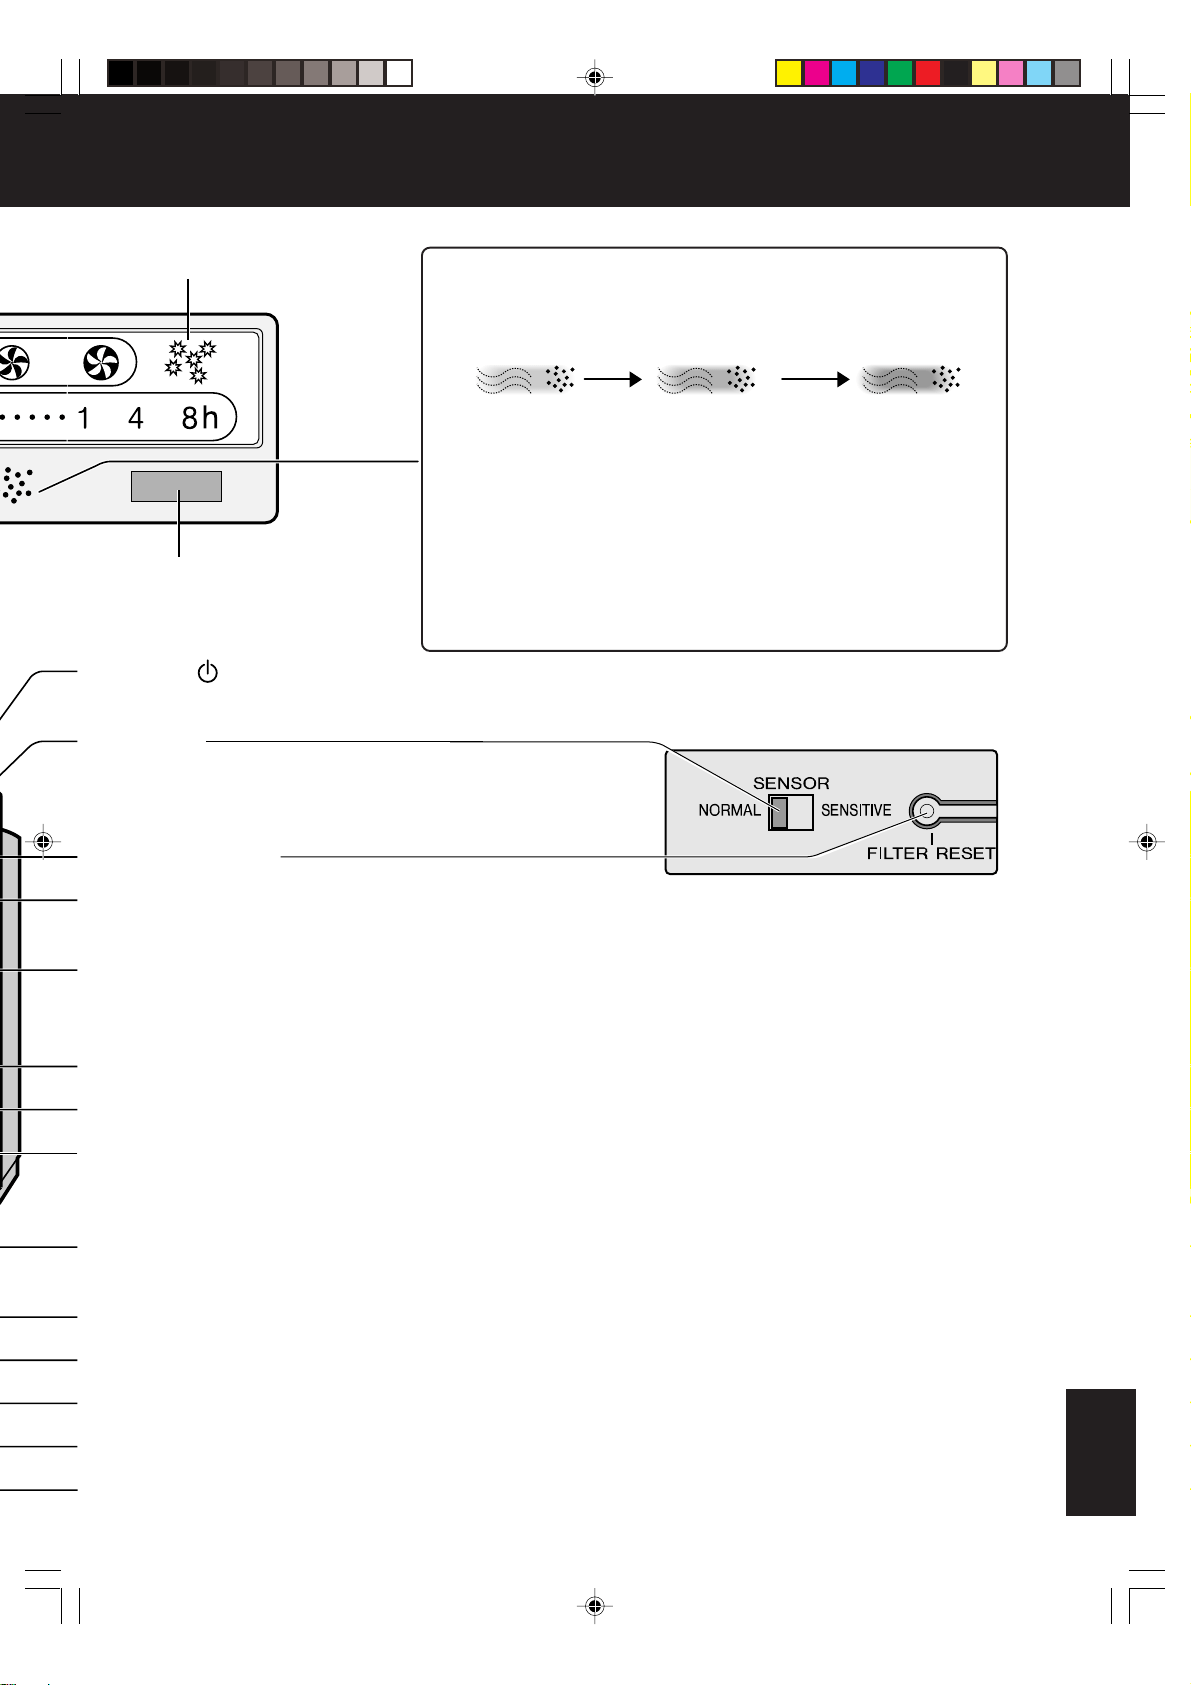
`JR
!"#$%& !"#$%&
!"#$%& !"#$%&
!"#$%&
!" !"
!" !"
!"
EE
EE
E
FF
FF
F
! !
! !
!
EE
EE
E
FF
FF
F
! !
! !
!
EE
EE
E
FF
FF
F
!"#$ !"#$
!"#$ !"#$
!"#$
!"#$%&'!()*+,-.
!"#$ !"#$
!"#$ !"#$
!"#$
• !"#$%&'()*+,-./0123456789:!
• !"#I !"#$% !"#$%&'()*+,
!"#$%&'()*+,$%&'-.#/
!"# !"#$%&'() !"#$%&'(
`JNN
• !"#$ ! L !"#$%&'()
`JNN
jlabL=jlabL=
jlabL=jlabL=
jlabL=
E !"#$%&'(F
!"#$%&'()*+ !"kçêã~ä
!"# !"#$%&' !"#$
!" !"eáÖÜ
!"#$ !"#$
!"#$ !"#$
!"#$
!" !"
!" !"
!"
!" ! "# !" !" !
!" !"
!" !"
!"
!" !"
!" !"
!"
!" !"# `JNOKNP
!" !"
!" !"
!"
ebm^ebm^
ebm^ebm^
ebm^
EE
EE
E
F=F=
F=F=
F= `JNQ
EE
EE
E
!" !"
!" !"
!"
FF
FF
F
!"# !"#
!"# !"#
!"#
EE
EE
E
F=F=
F=F=
F= `JNQ
EE
EE
E
!" !"
!" !"
!"
FF
FF
F
!"# !"#
!"# !"#
!"#
! !
! !
!
==
==
= `JNN
==
==
= `JNM
!
! !
!
!"#$%&'()*+,-.
!
!"#$%&'!()*+
G
!"#$#%#
!"#.
!"#$%&'!()*+
!
!
.
Downloaded from: http://www.usersmanualguide.com/
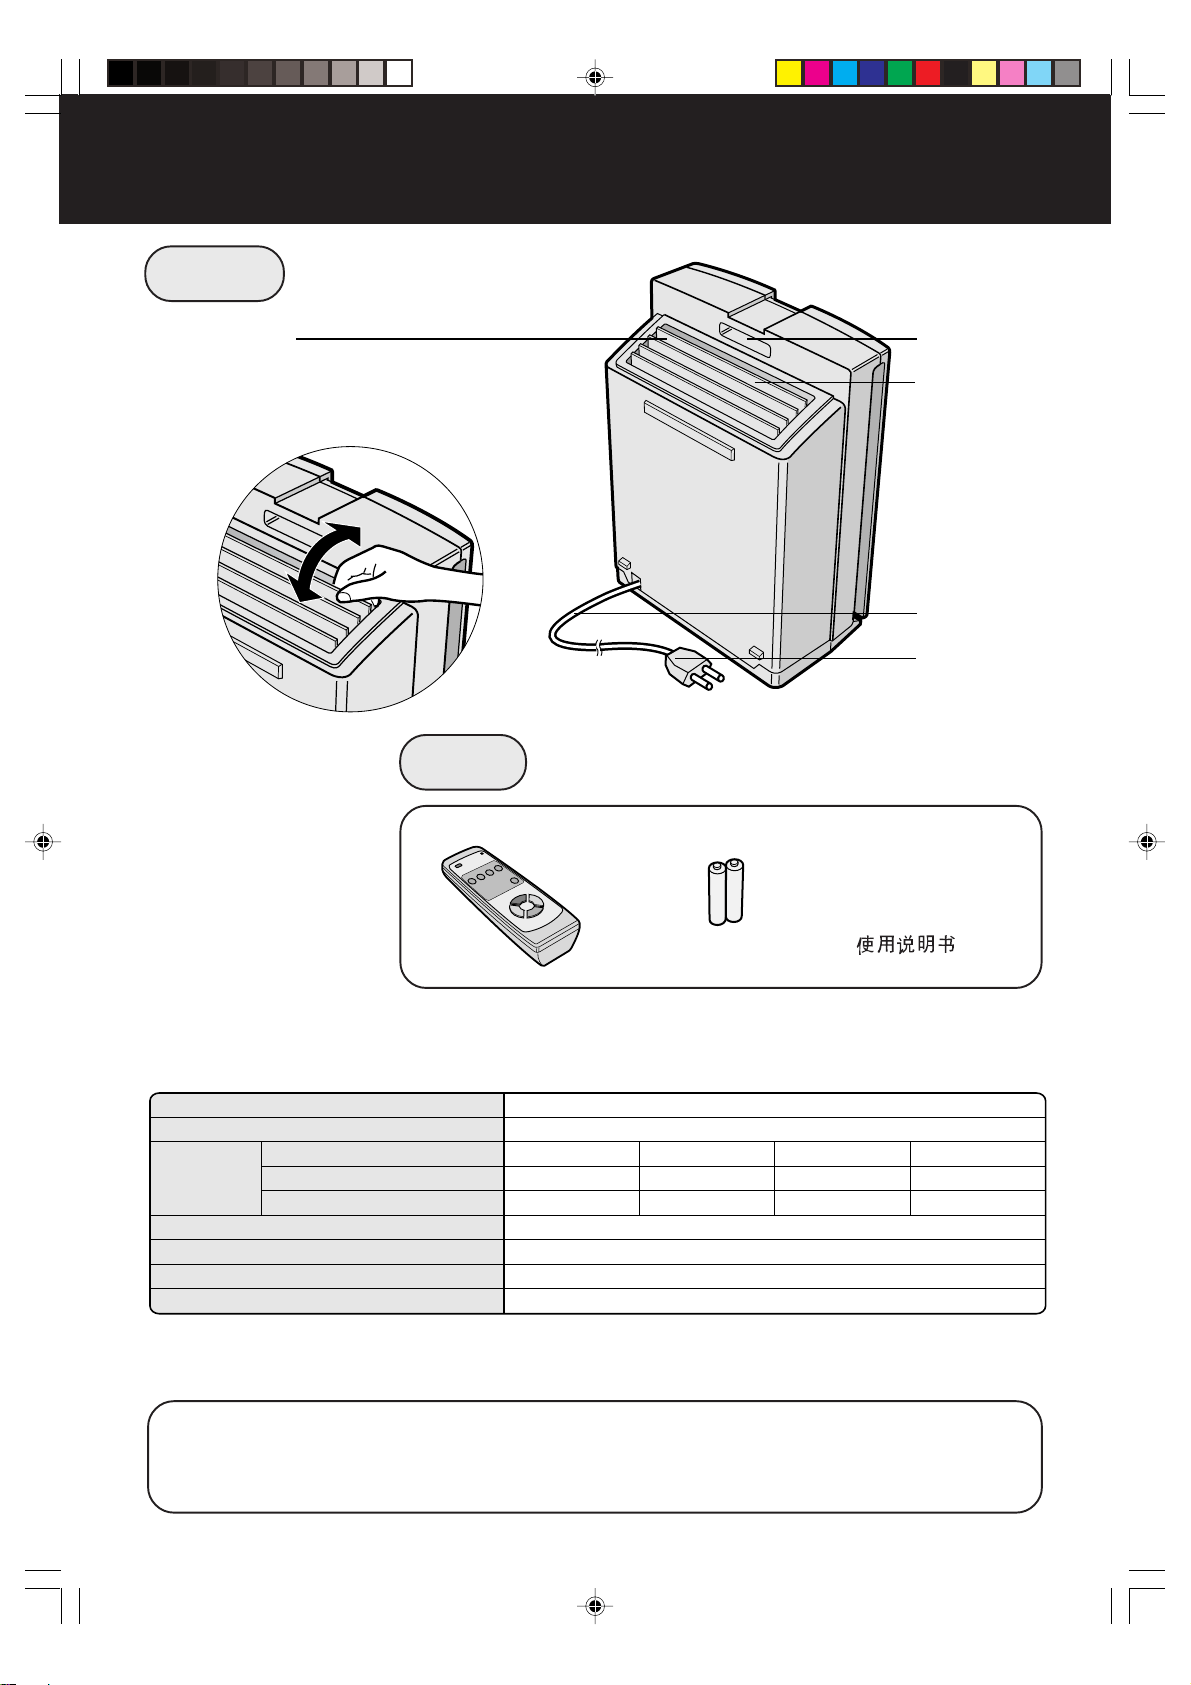
`JS
! !
! !
!
!" !"
!" !"
!"
!"# !"#
!"# !"#
!"#
• !"#$%&'()*+
!"#$%
• !"#$%&'
! !
! !
!
EF
EoSE^^FO F
•
!
!
!
!"
G !"#$%&'()*+,-./012 !3
E !"#$%&'()* gbjNQSTF
OOMJOQM=s=L=RM=eò
OKR=
QNR=EtFñ=OPU=EaFñ=RTO=EeF
!"#$%&' !"#$%&'
!"#$%&' !"#$%&'
!"#$%&'
!"!#!$%& !"#$%&'()*+$,
!"#$% !"#$% !"#
=t
V
MK
43 W
330m
3
/
19 W
218m
3
/
6 W
95m
3
/
4 W
43 m
3
/
=
9.3
FU-55SE
~42 m
2
*
Downloaded from: http://www.usersmanualguide.com/
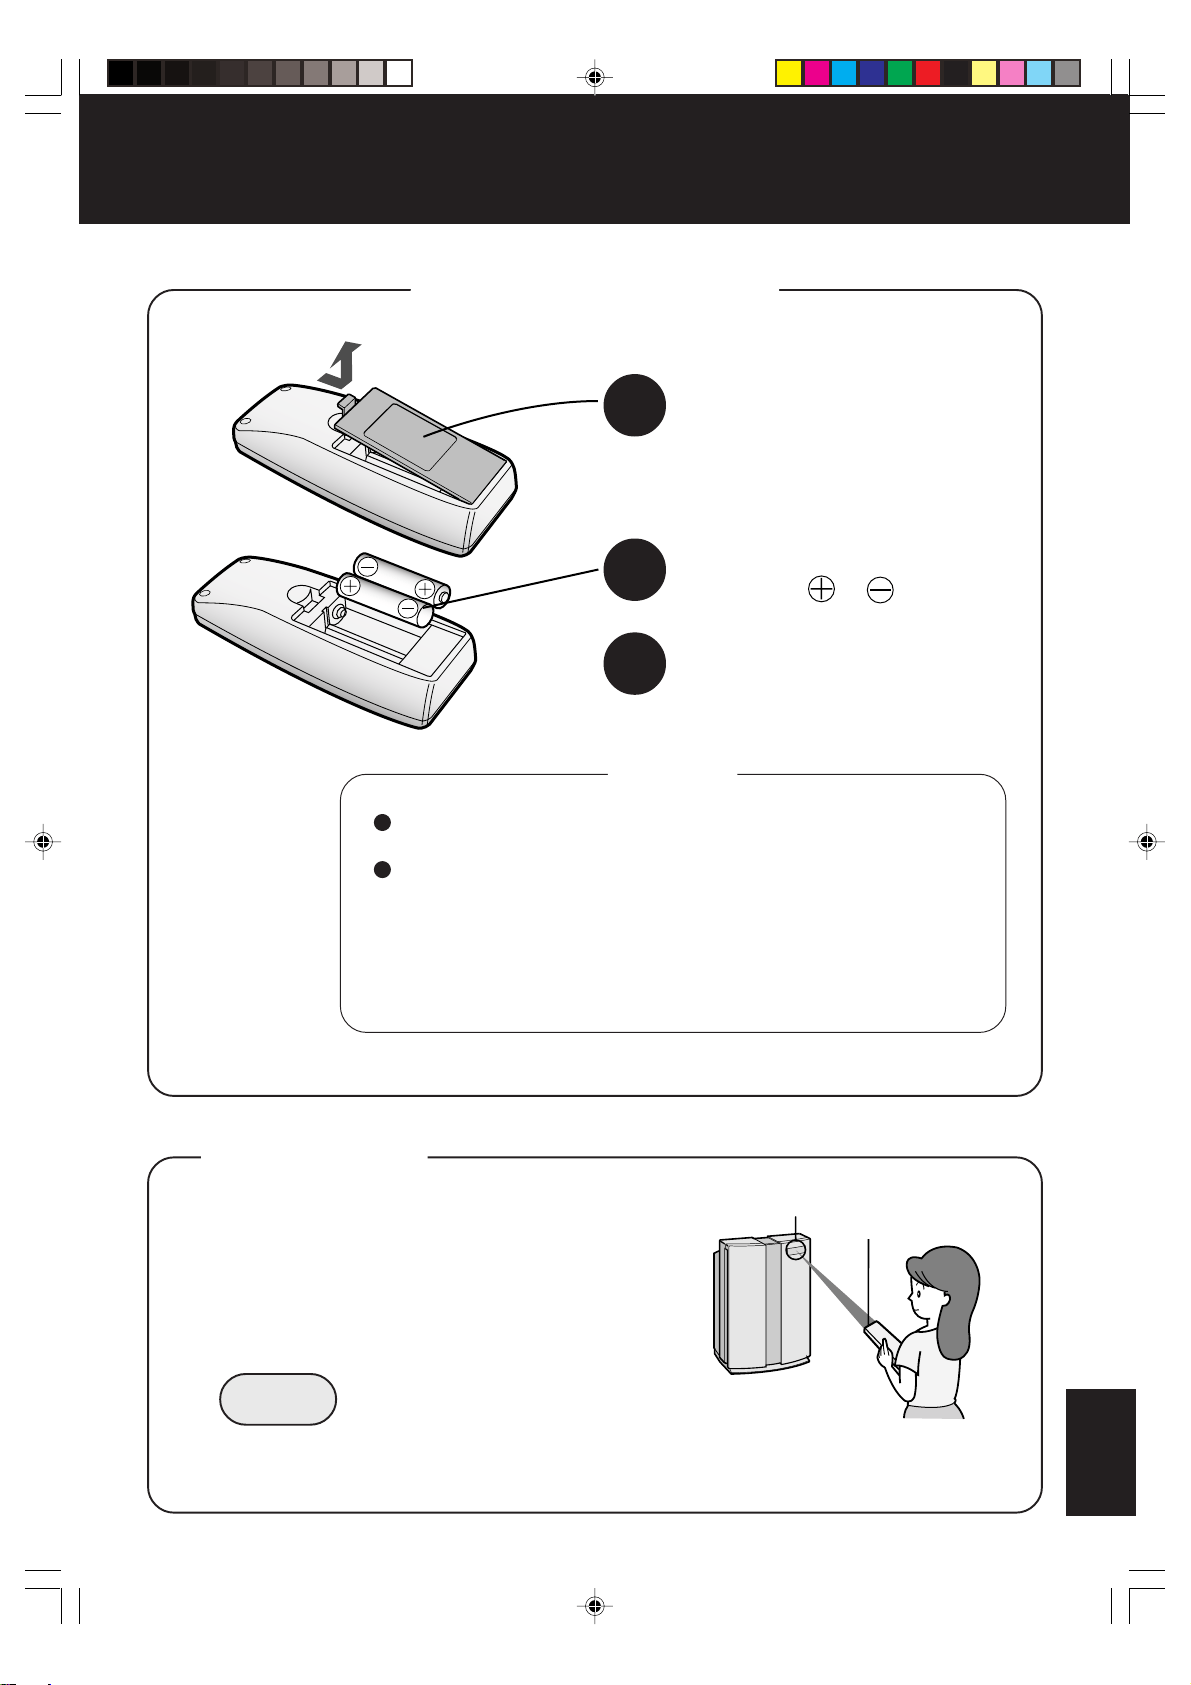
1
2
3
`JT
! !
! !
!
!"#$% !"#$%
!"#$% !"#$%
!"#$%
! !
! !
!
!"#$%&'()
! !
! !
!
!"#============ !"#
! !
! !
!
!"#$%&
• !"#$%& !"#
!"#$%&'()*+,-./ !"#$%&
• !"#$ !"#$%&'()*
E oSE^^F EO F
• !"#$%&'()* !" !"#$%&'
!"#$%&'(
* !"#$%&'()* !"#$%&'
! !
! !
!
!" !"
!" !"
!"
• !E F !"#
• !"#$% T
• !"#$%&'()*+,
• !"#$%&'( !"#$%&'()*+,-./%0123
! !"#$%
!
Downloaded from: http://www.usersmanualguide.com/
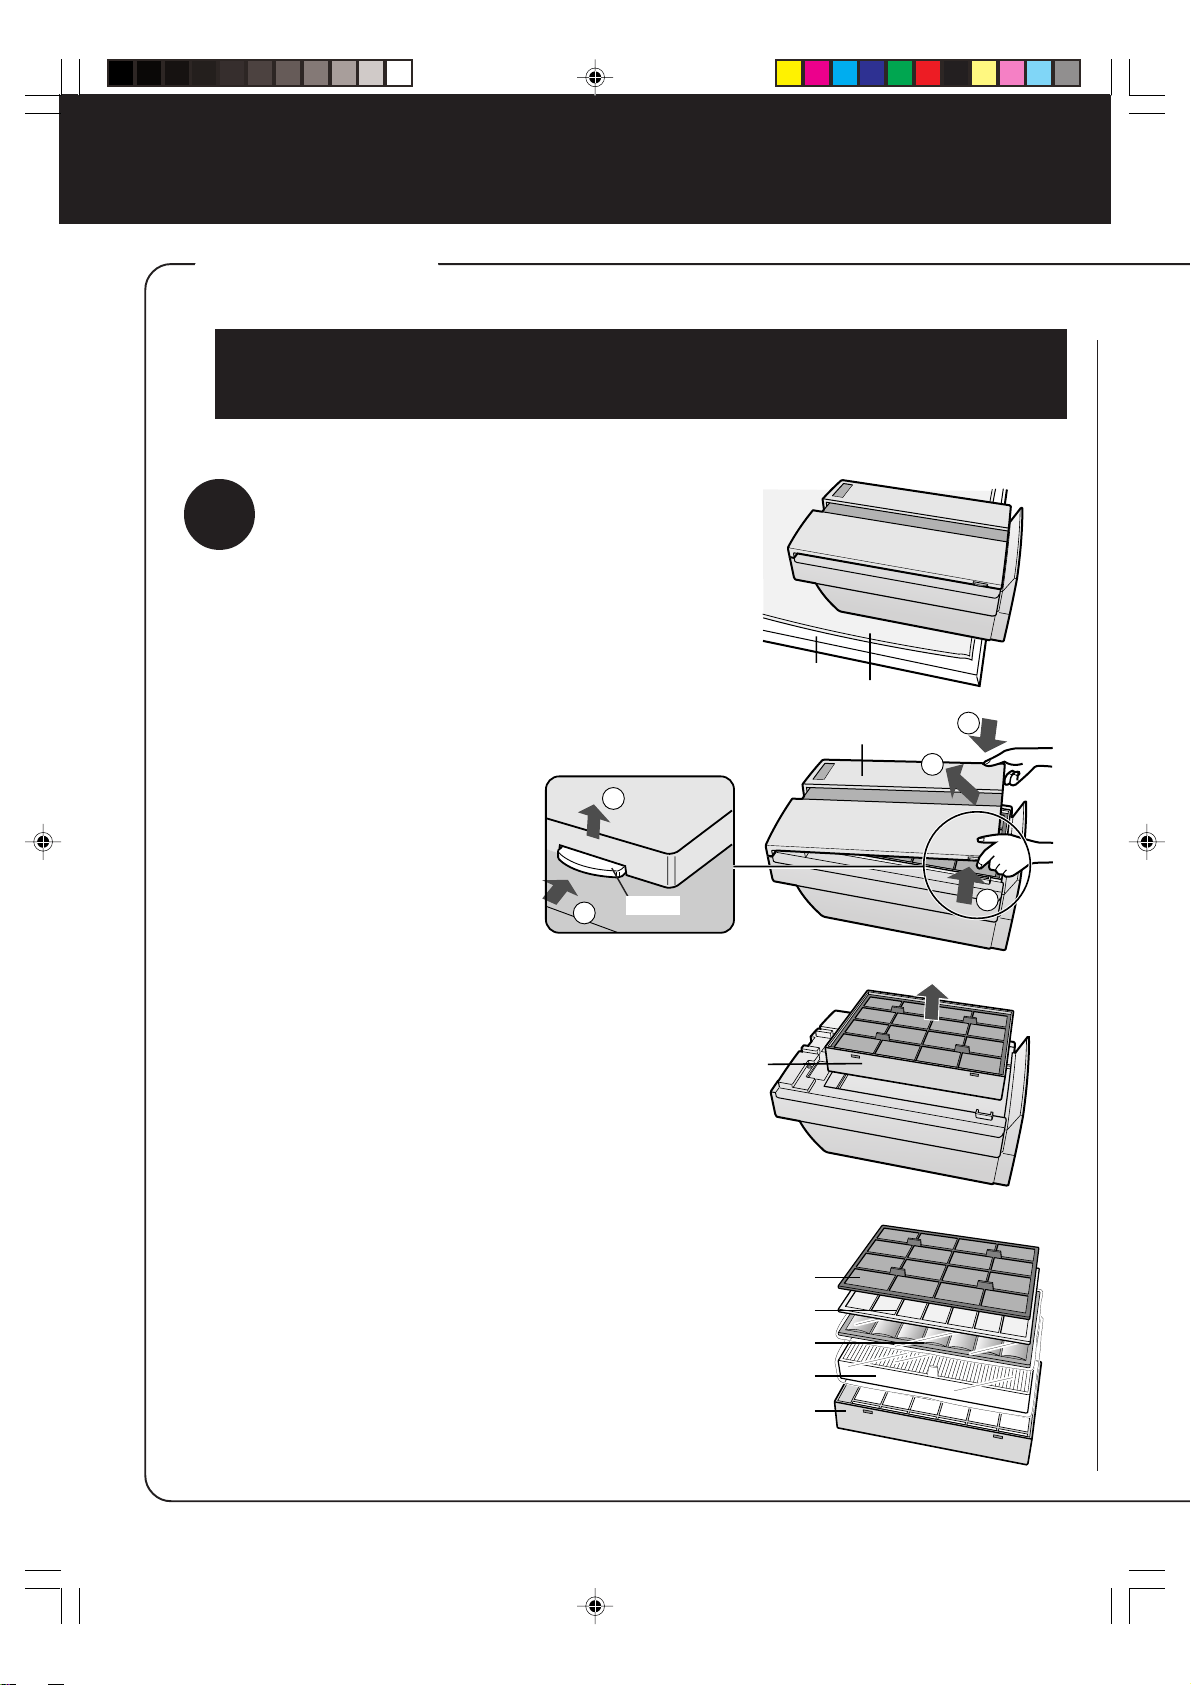
1
1
1
1
2
2
`JU
! !
! !
!
!" !"
!" !"
!"
!"#$% !"#$%&'()*+,-. !"#
!"#$%&'(
!" !"
!" !"
!"
NN
NN
N
!"#$%& !"#$%&
!"#$%& !"#$%&
!"#$%&
!"#$%& !"
!"#$%&'()
OO
OO
O
!"# !"#
!"# !"#
!"#
!"#$%&'()*
!"#$
PP
PP
P
!"#$%&' !"#$%&'
!"#$%&' !"#$%&'
!"#$%&'
! "#$ ! "#$
! "#$ ! "#$
! "#$
QQ
QQ
Q
!"#$%&'( !"#$%&'(
!"#$%&'( !"#$%&'(
!"#$%&'(
EE
EE
E
FF
FF
F
ebm^ebm^
ebm^ebm^
ebm^
EE
EE
E
FF
FF
F
!"
!
!"#
!"#
ebm^
!"
•
!"#$%&'()#*+ !"#$%&'()#*+
!"#$%&'()#*+ !"#$%&'()#*+
!"#$%&'()#*+
Downloaded from: http://www.usersmanualguide.com/

2
`JV
!" !"
!" !"
!"
NN
NN
N
!"#$ !"#$
!"#$ !"#$
!"#$
ebm^ebm^
ebm^ebm^
ebm^
!"#$%& !"#$%&
!"#$%& !"#$%&
!"#$%&
colkqcolkq
colkqcolkq
colkq
!ebm^ !"#$%
!"
!"#$% !"#
OO
OO
O
!"#$%&'( !"#$%&'(
!"#$%&'( !"#$%&'(
!"#$%&'(
!"#$%&' !"#$%&'
!"#$%&' !"#$%&'
!"#$%&'
PP
PP
P
!"#$%& !"#$%&
!"#$%& !"#$%&
!"#$%&
!"#$%&'( !"#$%&'(
!"#$%&'( !"#$%&'(
!"#$%&'(
!" !"
!" !"
!"
QQ
QQ
Q
!"#$%&!' !"#$%&!'
!"#$%&!' !"#$%&!'
!"#$%&!'
!"#$%& !"#$%&
!"#$%& !"#$%&
!"#$%&
!" !"#$%&'
• !"#$
!"#
!"#
• !"# Q
EQ
F !"
!"#$
Q !
• !"#$ !"#$%
E !"#F
!"
ebm^
!"
!"#
!
ebm^
!"
!
!"#
!"
!"
!"Q !
!"#
!"#$%&'
Downloaded from: http://www.usersmanualguide.com/
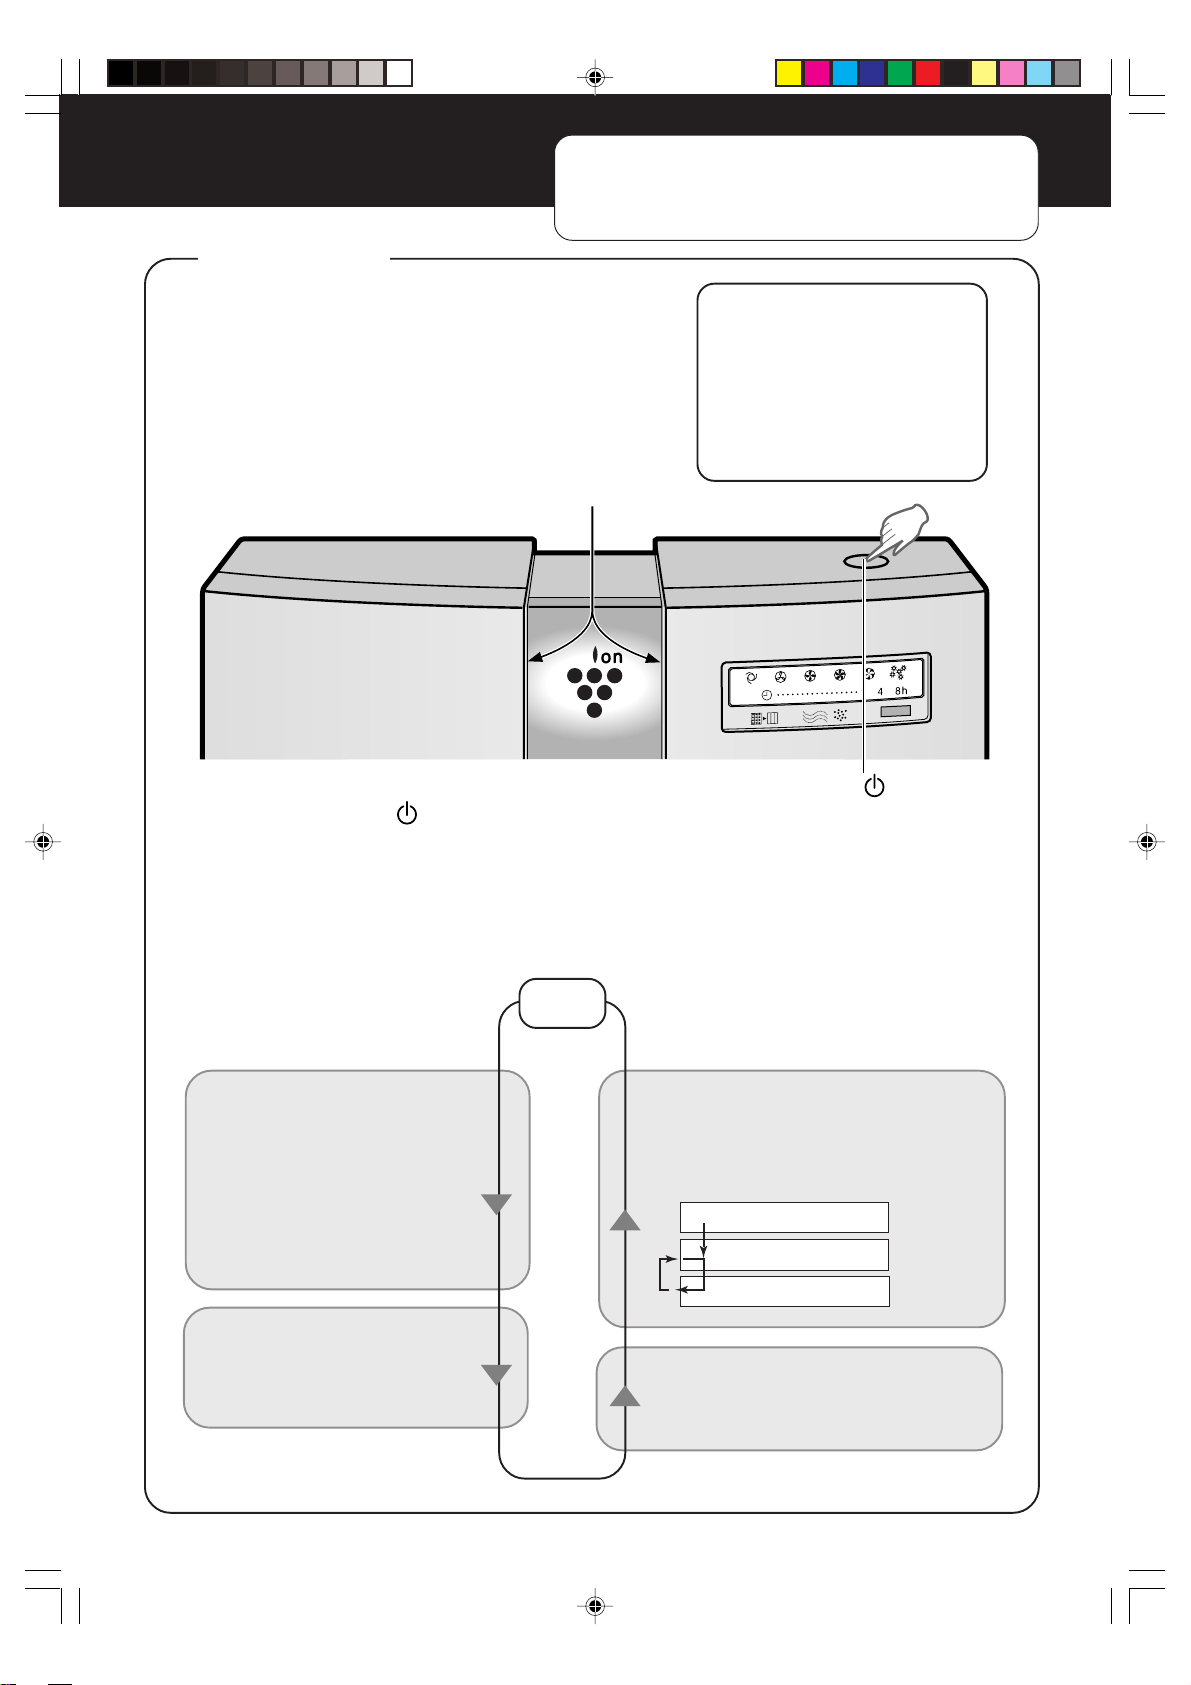
Plasmacluster
`JNM
! !
! !
!
!"#$%&'( !"#$%&'(
!"#$%&'( !"#$%&'(
!"#$%&'(
• !EF
• !EF
• EF
• EF
• !EF
• !"#
!"#
jlabL=
=jlabL=jlabL
=jlabL=jlabL=
=jlabL
!"#EF !"
• !" !"#$%&'
!" #$% !" #$%
!" #$% !" #$%
!" #$%
!"#$%&' !"#$%&'
!"#$%&' !"#$%&'
!"#$%&'
!"#$%&'()*
!"#$%&'()*+,-.
! !
! !
!
!"#$%&'()
!"#$%&'()
! !"#E
F
! !
! !
!
!"#$%&'
!"
!"# !"#
!"# !"#
!"#
!"#$%& NM
!"#$%&
NM =
OM =
OM =
!"# !"#
!"# !"#
!"#
!=== = !"
! !
!
!"#$ !"#$
!"#$
!"!# !$%&'%PM
!"#$%&' !"#$%&'()
!"#$%&'()*+)*,)-./01
Downloaded from: http://www.usersmanualguide.com/
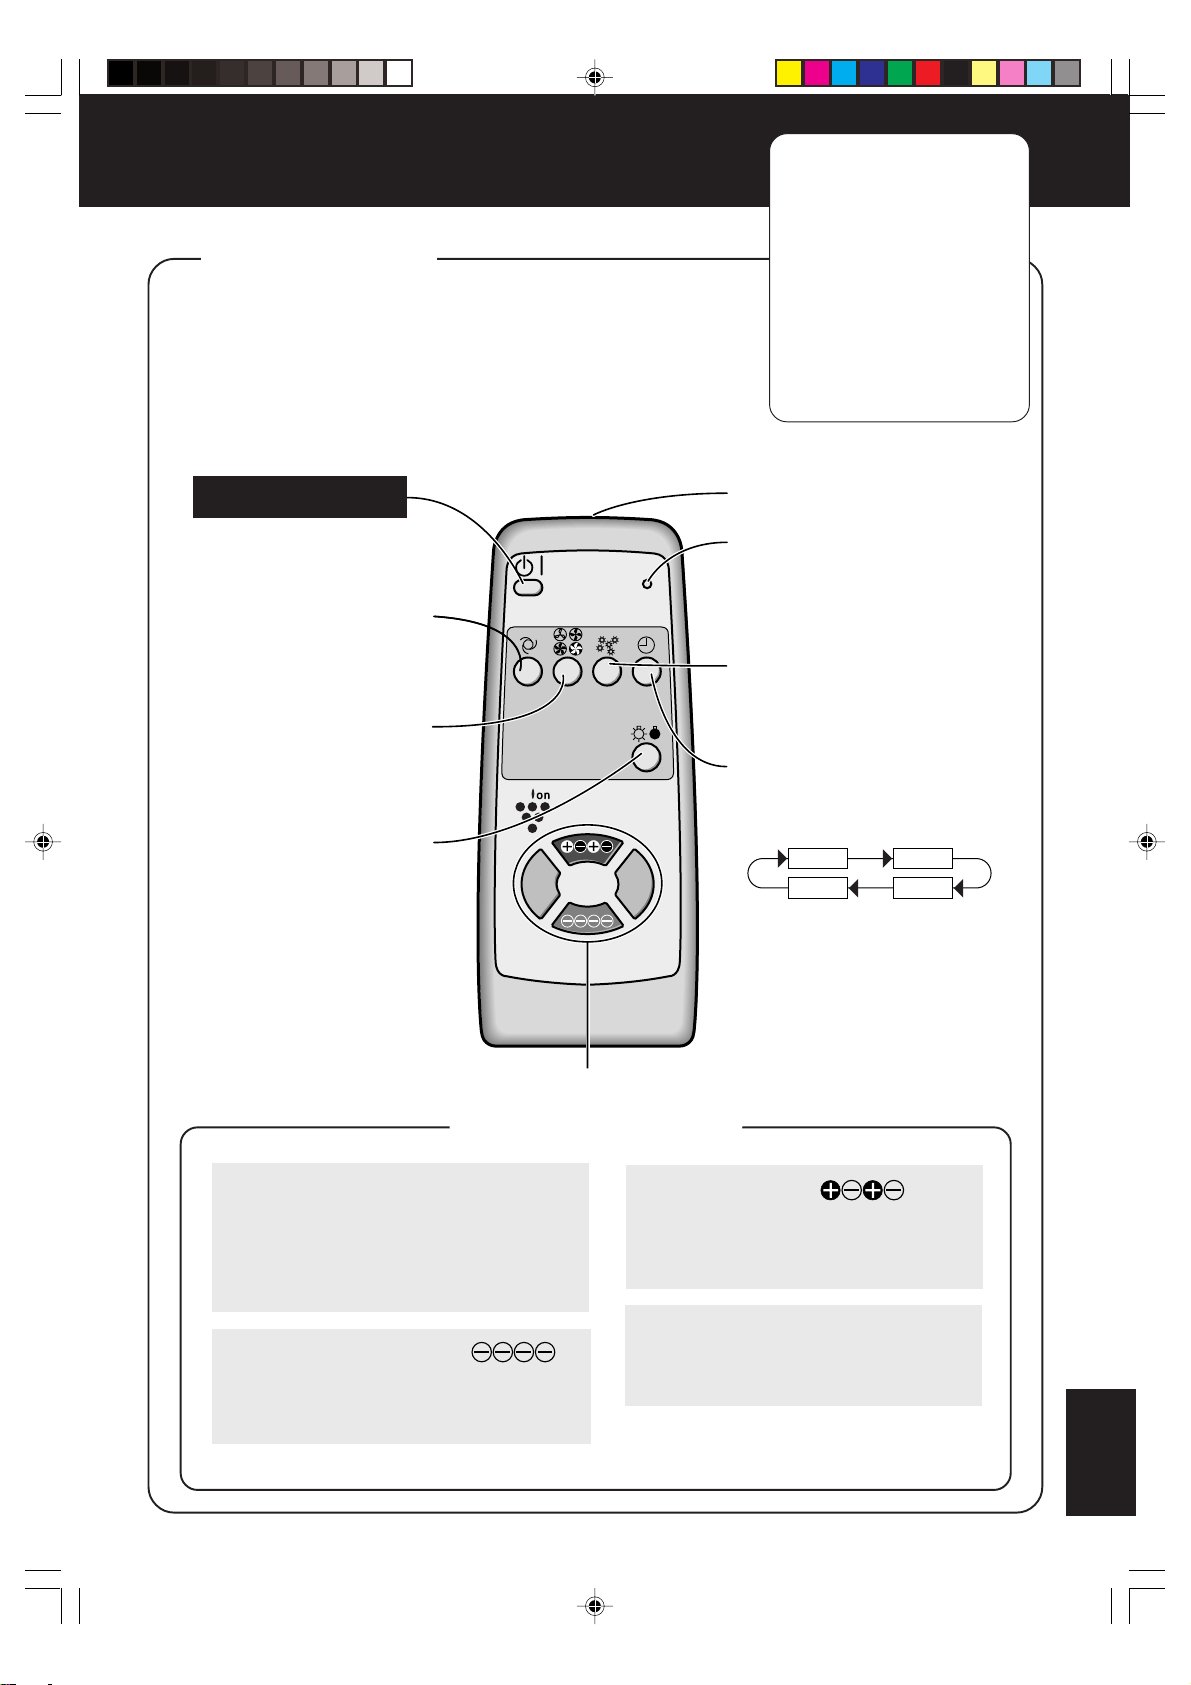
Plasmacluster
AUTO
RESET
OFF
`JNN
!" !"
!" !"
!"
!"#$%& !"#$%&
!"#$%& !"#$%&
!"#$%&
• !EF
• !EF
• !"#
• !"
• = L
• !"#$
•
==
==
= !"#$
•
==
==
= !
•
==
==
= !"#$
•
==
==
= !"#$
• == L = !"#$
!"#$% !"#EF !"
!"#$%&' !"(
• !== L = !"#$ !"#
!"#$
==
==
=
LL
LL
L
==
==
=
!"#$%&'(
E F !
!E F
EE
EE
E
FF
FF
F
!"#$%&'(
!"
EE
EE
E
FF
FF
F
!"#$%
!"#$
==
==
=
LL
LL
L
==
==
=
!" !"#
!"#$%
• = !
!"#$% P
!"#$
Elcc= !F
! !
! !
!
!"#$ !"#$
!"#$ !"#$
!"#$
!"#$ !"
!"#$% !"#$%
!"#$% !"#$%
!"#$%
!"#$%&'(
!"#$ `JNM
!"# !"#
!"# !"#
!"#
!"#!$%&
! !"#$%&
• !"#$%&
• !"!##$%
!"
N Q
U
!"#$ !"#$
!"#$ !"#$
!"#$
^rqlE^rqlE
^rqlE^rqlE
^rqlE
FF
FF
F
!"#$ !"#$
!"#$ !"#$
!"#$
!"#$%&'()*+,-+
!" !"#$%&'()
!"#
!" !"# !"#$
!"#$%& !"#$%&
!"#$%& !"#$%&
!"#$%&
!"#$%&'()*+,-
!"#$%&'()*+,#$
!"#$% !"!
lccElccE
lccElccE
lccE
F=F=
F=F=
F=
!"#$% !"#$
!
!"#$%&'( !"#$%&'()*
!"# !"#
!"# !"#
!"#
!"#$%&'()*
!"#$%&'()*$+
!"#$% !"!
Downloaded from: http://www.usersmanualguide.com/

`JNO
! !
! !
!
!"#$ !"#$
!"#$ !"#$
!"#$
• !"#$ !%&'&() !"#$ !"#$%&'
•
==
==
= ! ! !
•
==
==
= !"#$%&$'
• !"#$%&'()*+,-./012345+6 !"# !$% !
!"# !"#$%&' !"# !$%
!"#$ !"#$
!"#$ !"#$
!"#$
• !"#$%&'()*+,- ! "#$%!&'()
• ! "#$% !"#$%&'()* !"#$%&'()*
!"#$%&'()*+,!*+-./01
!"#$%& !"#$%&
!"#$%& !"#$%&
!"#$%&
• !"#$ !"#$#%#&' !"#$%&'()*+,-.
!"#$%&'()*+,-
!"#$%&'()*+,-.
Downloaded from: http://www.usersmanualguide.com/
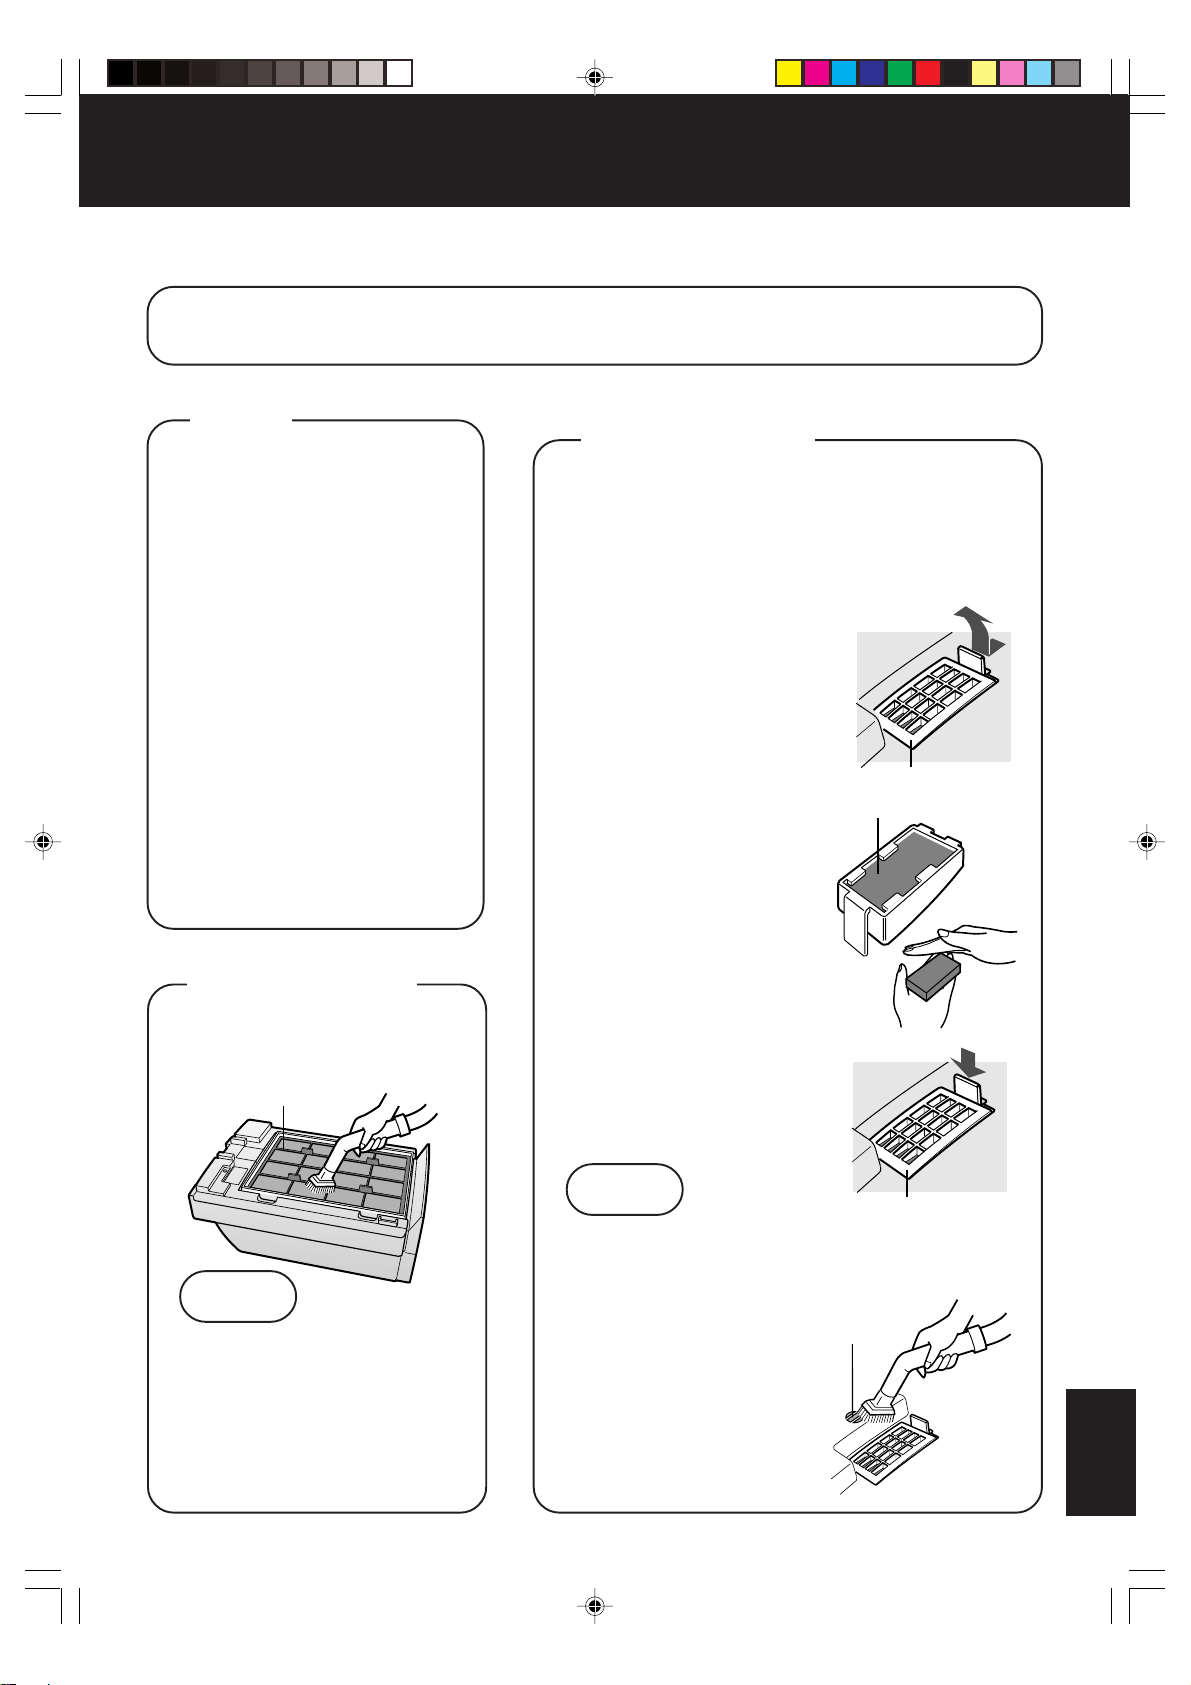
`JNP
!" !"
!" !"
!"
E !"#$%&'( !"#$%F
!" !"#$%&'!() !"#$%&'()
!"#$%&'()*+,
!"#$%&'(
!"#$%&#'(
!"#$%&'()*
!" !"
!" !"
!"
!"#$% !"
QM !"#$%&
!"#$%&' !"#$%&'
!"#$%&' !"#$%&'
!"#$%&'
!"# !"
!"#$%&'()*
!"#$ !"#$
!"#$ !"#$
!"#$
!"#$%&'()
! !
! !
!
!"#$%&
!" !"
!" !"
!"
!""#$%&'()
!
!
!" !"
!" !"
!"
!" !"
!" !"
!"
!"#$% !"&'() P
!"#$%&'()*"+,-. !
!"#$%&' !"#$%
!" !"
!" !"
!"
NN
NN
N
!"#$%& !"#$%&
!"#$%& !"#$%&
!"#$%&
!"# !"#
!"# !"#
!"#
• !"#$%&'(
!"#$%&
OO
OO
O
!"#$%& !"#$%&
!"#$%& !"#$%&
!"#$%&
• !"#$%&
!"#
!"# !
!"#$%&
PP
PP
P
!"#$%& !"#$%&
!"#$%& !"#$%&
!"#$%&
!"# !"#
!"# !"#
!"#
!"#$ !"#$
!"#$ !"#$
!"#$
• !"#$%&'(
!
• !"#$% !"#$%&'()
• !"#$%&'(E F !"
!"#$%&
!" !"
!" !"
!"
!"#$%!&'(
!"
!"
!"#
!"
!"
!"#$%&
• ebm^ !"#$%&
!"#$%"&'((
!"#$%&
• ebm^
!"#$
Downloaded from: http://www.usersmanualguide.com/
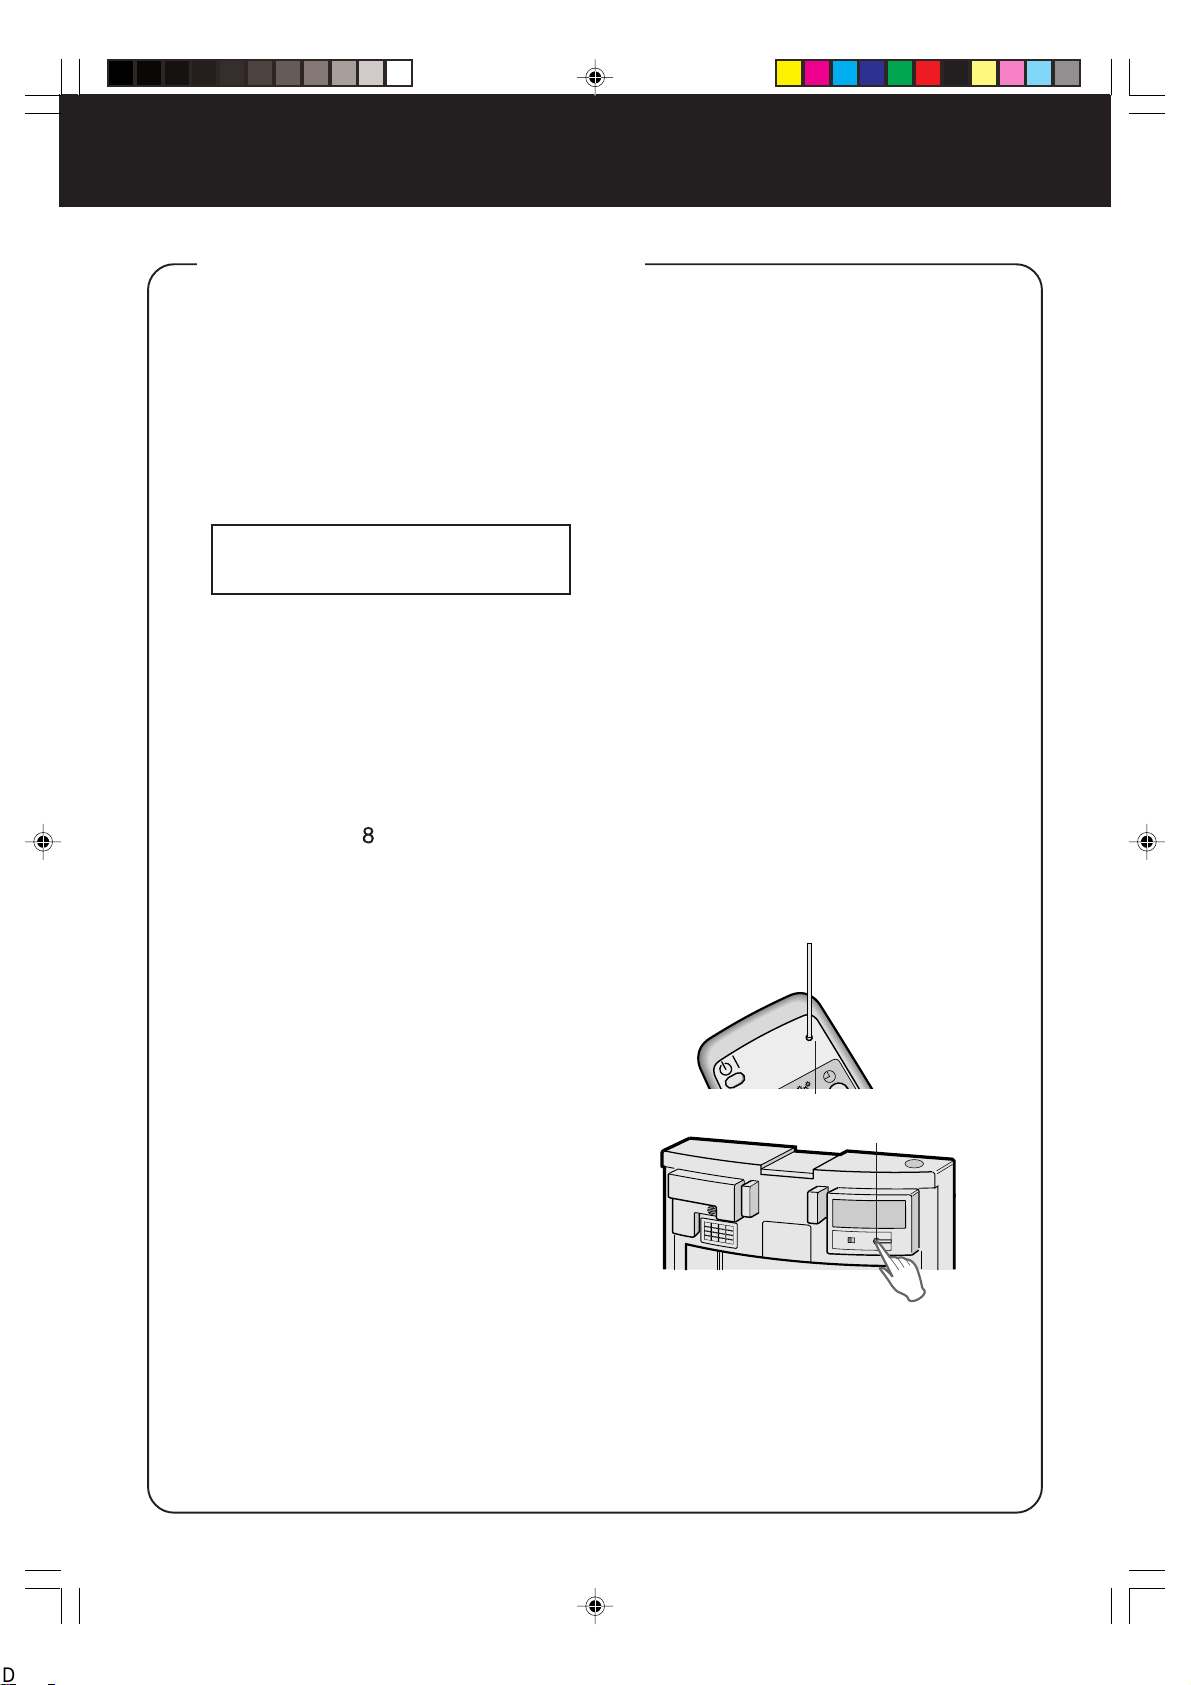
RESET
`JNQ
!" !"
!" !"
!"
!"#$%&' !"#$%&'
!"#$%&' !"#$%&'
!"#$%&'
!"#$% &'(& !"#$% &'(&
!"#$% &'(& !"#$% &'(&
!"#$% &'(&
E !" NO !"# !"#$%&'()*+,-F
• !"#$%&#'( !"#$%&'()*+,-./0123456
!"#$
!"#$%&' ()*+,-.
!"#$%&'()* !"#
!"#$ !"#$
!"#$ !"#$
!"#$
!" !"#$%&#'( gbjNQST !"#$ ! NM
!" L !"#$%&'()&*+,-
!"#$%&'()*+,-./'012
!"#$ !"#$%&'()#*+,-.
E !"# !"#$%F
• ebm^= ===== !" R
• !"#===== !" R
!" !"
!" !"
!"
OO
OO
O
!"#$#%&'()*+,-& . !"#$#%&'()*+,-& .
!"#$#%&'()*+,-& . !"#$#%&'()*+,-& .
!"#$#%&'()*+,-& .
PP
PP
P
!"#$%$&$'( !"#$%$&$'(
!"#$%$&$'( !"#$%$&$'(
!"#$%$&$'(
!"#$ !"#$
!"#$ !"#$
!"#$
!"#$% !"#$%
!"#$% !"#$%
!"#$%
!"#$%&'()*+ !"#$%&'()*+
!"#$%&'()*+ !"#$%&'()*+
!"#$%&'()*+
!"#$%&'() !"#$%&'()
!"#$%&'() !"#$%&'()
!"#$%&'()
! !
! !
!E `JNN F
• ! !"#$%&
!"#$%&'(
• !"#$%&'()* !"
• !"#$ !"#$
!"#$
!"# !"#
!"# !"#
!"#
• ebm^ N
• !"#N
!"#$%&'()*+!,-
!"#$%&'() !"#$%&'()
!"#$%&'() !"#$%&'()
!"#$%&'()
!"#$%&'()#*+,-./&'012
ebm^=ebm^=
ebm^=ebm^=
ebm^=
!" !"
!" !"
!"
!"#$% !"#$%
!"#$% !"#$%
!"#$%
•
==
==
= •
==
==
=
•
==
==
= •
==
==
=SMB !QMB
cwJSMpbc
NN
NN
N
`JV`JV
`JV`JV
`JV
!!
!!
!
""
""
"
##
##
#
$$
$$
$
!"#$ !"#$
!"#$ !"#$
!"#$
&
Downloaded from: http://www.usersmanualguide.com/
`JNR
! !
! !
!
!"#$% !"#$%&'()*+,- !"#$%&'()*+,-
EE
EE
E
!"#$ !"#$
!"#$ !"#$
!"#$
FF
FF
F
!"#$ !"#$
!"#$ !"#$
!"#$
!"#$%&'( !"#$%&'(
!"#$%&'( !"#$%&'(
!"#$%&'(
!"#$% !"#$%
!"#$% !"#$%
!"#$%
!"#$% !"#$%
!"#$% !"#$%
!"#$%
!"# !"#
!"# !"#
!"#
!"#$ !"#$
!"#$ !"#$
!"#$
!"#$%& !"#$%&
!"#$%& !"#$%&
!"#$%&
!"#!$ !"#!$
!"#!$ !"#!$
!"#!$
!"#$%&'( !"#$%&'(
!"#$%&'( !"#$%&'(
!"#$%&'(
EE
EE
E
FF
FF
F
!" !"
!" !"
!"
!"# !"#
!"# !"#
!"#
!"# !"#
!"# !"#
!"#
!"#$%&'()* !"#$%&'()*
!"#$%&'()* !"#$%&'()*
!"#$%&'()*
==
==
=
!!
!!
!
! !
! !
!
!"#$%$&' !"#$%$&'
!"#$%$&' !"#$%$&'
!"#$%$&'
!"#$ !"#$
!"#$ !"#$
!"#$
!"#$ !"#$
!"#$ !"#$
!"#$
!"#$%& !"#$%&
!"#$%& !"#$%&
!"#$%&
!"#$ !"#$
!"#$ !"#$
!"#$
! !
! !
!
!"#$%&'()!"#* !"#$%&'()!"#*
!"#$%&'()!"#* !"#$%&'()!"#*
!"#$%&'()!"#*
• !"#$%&
• !"#$%&
• !"#$%&'()*+,-./01E
`JP `JT F
• !"#$%E `JNQ F
• !"#$%&'()*+ !"#$%&
E `JNP F
• !"!#!$%& !"#$E
`JR F
• !"#$%&'(\
!"#$%&'()*+,-. !
!"#$%&'()*+,-./01E
`JNP F
• !"E !"#$%F !"#$
!"
• !"#$%&'()*+,-./012
!"#$%&'( !"#$%&'()*
• !"#$%&'()*+,-./01+,
!"#$%&'()*
• !"#$% ! !"#$%&'
• !"#$
!"#E `JNQ F
• !"#$%"&'()*+,-$%"&'(
!"#$%&'() !"#$
!"#$
• !"#$%&'()*+,-./012
• !"#$%&'()*+,- !"#$
!"#$%E `JNP F
• !"#$ !"!#!$% !"#
!"#$%&'()*+E `JNQ F
• !"#$==\
• !"#$== L !E `JNN F
=
==
Downloaded from: http://www.usersmanualguide.com/


This file has been downloaded from:
www.UsersManualGuide.com
User Manual and User Guide for many equipments like mobile phones, photo cameras, monther board, monitors, software, tv, dvd, and othes..
Manual users, user manuals, user guide manual, owners manual, instruction manual, manual owner, manual owner's, manual guide,
manual operation, operating manual, user's manual, operating instructions, manual operators, manual operator, manual product,
documentation manual, user maintenance, brochure, user reference, pdf manual
Downloaded from: http://www.usersmanualguide.com/