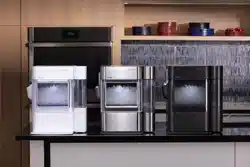
Use Guide Ice Maker
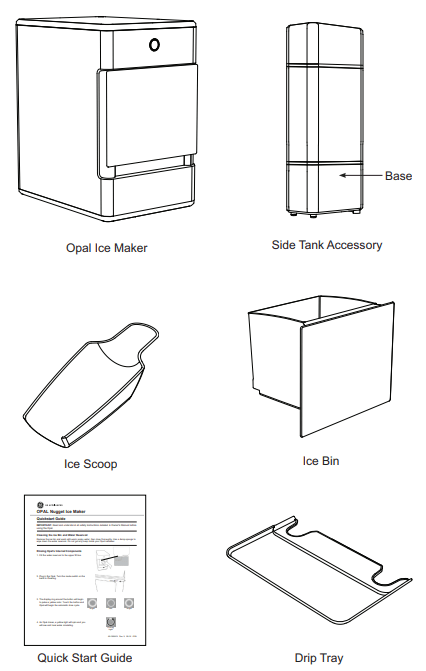
Parts Included
Getting Started
Installation Requirements
CAUTION Lifting Hazard: It is recommended to have two people move and install the ice maker in order to prevent injury.
- Product is designed to be installed indoors. Do not use your ice maker outdoors.
- Product must be installed upright on a flat, level surface that is able to support the total weight when full of water.
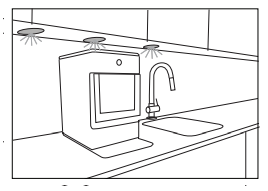
- Ensure a minimum of three inches (3") clearance around the side and back walls of the ice maker for proper air circulation.
- Install the product in a well-ventilated area with an ambient temperature between 55°F and 90°F.
- Do not place the product near heat sources such as ovens or cooktops.
- Do not place the product in direct sunlight.
Prepare Opal For Use
1. Carefully remove packing material. Do not use sharp tools that can damage the box contents.
2. Ensure all components are present. If any item is missing, please contact 1.866.907.6718.
3. Place the ice maker upright on a flat. level surface
4. Install drip tray by sliding it under the front edge of Opal. The tray slots should align with the front feet of Opal.
5. Rinse the ice maker with clean water for five minutes before first use. Start with step 4 of cleaning instructions on page 6. It is not necessary to use bleach for the first rinse.
NOTICE: Some types of under-cabinet lamps can be hot enough to cause damage to your Opal top's appearance.
Care and Cleaning
To keep your nuggest ice tasting fresh and your Opal looking great. we recommend cleaning/sanitizing your
Opal at least once per week.
To clean the exterior of the ice maker. unplug the product. then use a soft cloth dampened with soapy water to gently clean the exterior surfaces. Dry with a soft cloth.
The exterior stainless steel surfaces can be cleaned with commercially available stainless steel cleaner. Use only a liquid cleaner free of grit and rub in the direction of the brush lines with a damp. soft sponge. Do not use appliance wax, polish. solvents. or chemicals on the stainless steel. Do not use soap to clean the reservoir. Use a soft cloth moistened with water.
WARNING Chemical Exposure Hazard. when cleaning with bleach, use bleach in a well ventilated area and avoid mixing bleach with other household cleaners.
WARNING Unplug the product before cleaning by hand. and when not in use.
System Cleaning / Sanitizing Procedure
To clean Opal's'internal components, complete the following steps:
1. Unplug Opal.
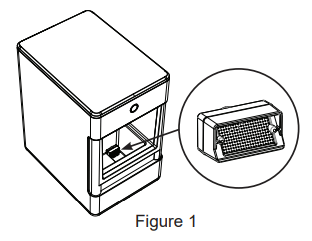
2. Remove water filter (if present), and replace with the reservoir's screened intake cap.
See Figure 1.
3. Drain Opal (see page 8 for detailed instructions).
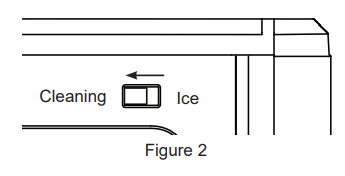
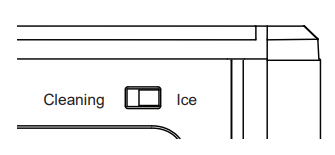
4. Plug in Opal and slide the rear switch to the "clean" position.
See figure 2.
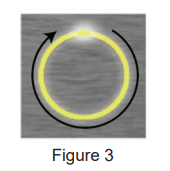
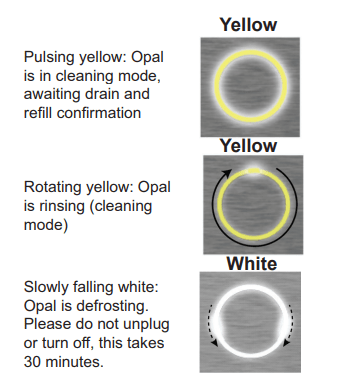
5. The display ring will light up yellow and pulse.
See figure 3.
NOTE: Do not use soap to clean the water reservoir.
6. Create a solution of five cups of water and one tsp household bleach. Skip to page 8 for further. instructions on how to remove hard mineral deposits.
7. Pour solution into water reservoir.
See figure 4.

8. Touch the display button to start the cleaning process, the light will start to spin and you will hear water circulating. After three minutes the water will stop and the light will begin to pulse again.
9. When the light pulses, drain Opal.
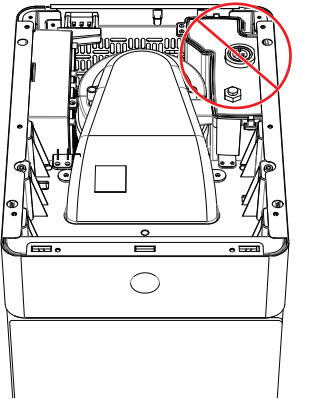
10. Unhook the top of the drain hoses at the back of the unit.
See figure 5.

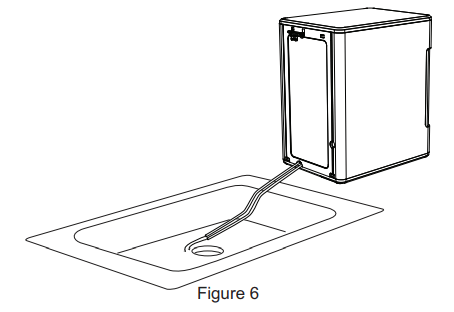
11. Then fay them down to drain into a sink or bucket that is below the level of the ice maker. See figure 6 and 7.
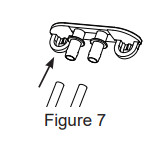
12. Remove the plugs and allow the water to completely drain. See figure 7.
13. Once water stops flowing, re-insert the drain plugs.
14. Add five cups of fresh water to the water reservoir. and touch the button. The light ring is divided into four sections to indicated each stage. Successive quarters of the ring will become brighter with each rinse cycle.
15. Rinse three times with fresh water. Repeat steps 8 through 14 two more times, adding fresh water to the reservoir each time. (You may continue to repeat the rinse cycle. for as many times as you like.
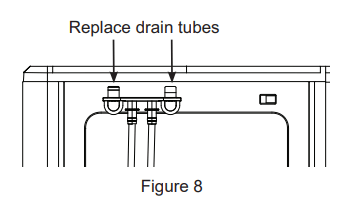
16 Replace drain tubes on back. See figure 8.
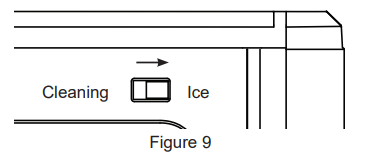
17. When complete. slide the rear switch back to "Ice" mode.
See figure 9.
Removal of Mineral Deposits
1. Fill the reservoir with vinegar to the max fill ine and run up to three cleaning cycles. Or purchase an Opal
Cleaning Kit and follow instructions inside.
2. If using vinegar. leave the vinegar in the unit for 18 hours and set a vinegar-soaked towel on the ice chute overnight to further dissolve any mineral buildup.
3. Clean the sensors with vinegar and wipe clean with water. After draining the vinegar, run three rinse cycles. using fresh water for each rinse.
Cleaning the Bin and Tray
To clean the ice bin. remove the ice bin from the ice maker and clean with a soft cloth dampened with soapy water. Rinse thoroughly. Dry with a soft cloth. Do not use solvents or chemicals.
The drip tray should be wiped dry. Water left in this area may leave deposits. To clean the drip tray, remove the tray from Opal and use a soft cloth dampened with mild soapy water to gently clean the surface. Dry with a soft cloth. Do not use solvents or chemical.
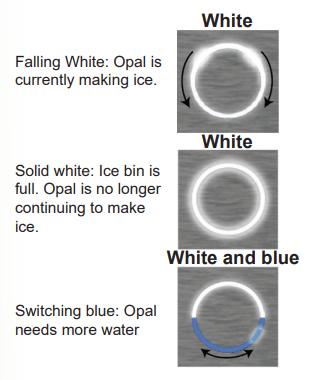
Understanding the display
Opal uses an innovative light ring to let you know what it is doing.
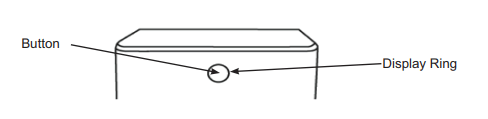
Button
Touch once to turn Opal ON or OFF
Touch and hold for 3 seconds to dim the interior lighting if desired.
Display Ring
Displays status of the Opal ice maker. See below for details.
Mode switch (located on back)
Switch in "Ice" position places Opal in ice making mode.
Switch in "Cleaning" position places Opal in cleaning mode.
Making Ice with Opal
Once Opal has been cleaned/sanitised, move the ice maker to its desired location and complete the following steps.
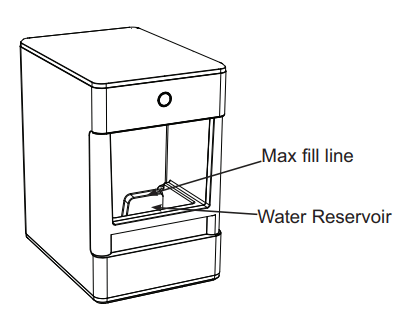
1. Remove ice bin.
2. Fill reservoir with potable (safe to drink) water up to. the "Max Fill" line. Water hardness must be less than 12 grains per gallon. Do not fill reservoir with any liquid except water. Using any liquid except potable water is misuse and will void your warranty.
3. Plug the ice maker into a grounded outlet.
4. Touch the display button to start the ice maker. The display will flash green to indicate the ice maker is ON. then transition to the falling white display.
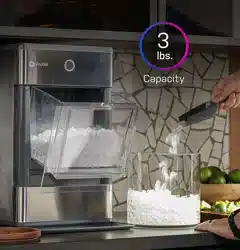
5. Opal will begin to produce ice in 15-30 minutes. It will continue to make ice until the bin is full. or it runs out of water. To continue making ice. just add more water.
Draining Opal
We recommend draining your Opal when:
1. You put it away or anytime it's being relocated.
2. You tum it off for more than a few days. (i.e. vacation)
3. You are not using much ice. Continous recirculation of meltwater may affect taste. For best results. drain your Opal.
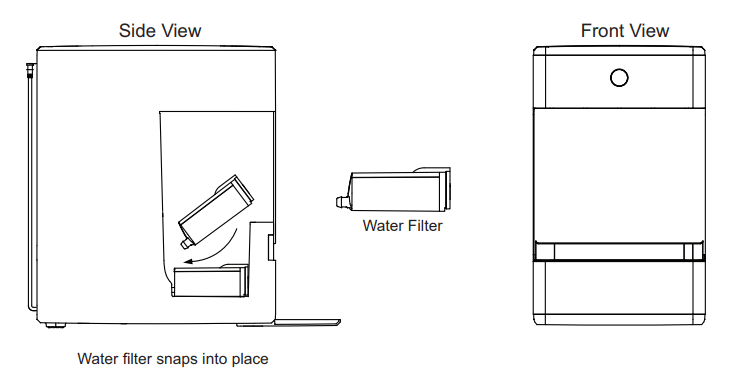
Water Filter
The Opal Water Filter. is available at GEAppliances and is the only water filter compatible with Opal. Please follow the installation instructions included with your filter.
NOTE: Remove your water filter (if installed) reinstall the screened intake cap prior to cleaning your Opal.
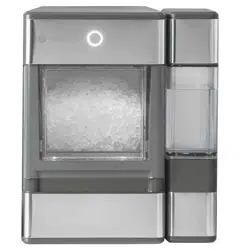
Side Tank Accessory
Side Tank Quick Start
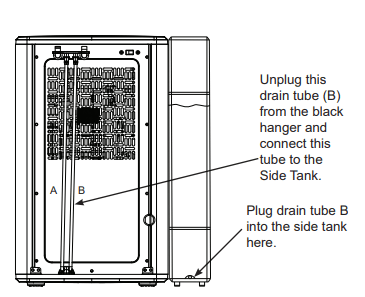
NOTE: There are two drain tubes located on the back of your Opal Nugget Ice Maker indicated as drain tube A and B in the illustration on page 12.
1. Hand Wash Only: Rinse and hand wash Opal Side Tank with warm water and a mild dish soap. Remove. Opal Side Tank’s cap and wash the cap and rubber valve with water and a mild dish soap. The Side Tank base can be washed by disconnecting the hose and adding a small amount of soapy water to it. Scrub as needed and rinse thoroughly. The rinse water should drain out the port in the back.
Rinse the cap. rubber valve. tank and the base well to. remove any residual soap (see illustration).
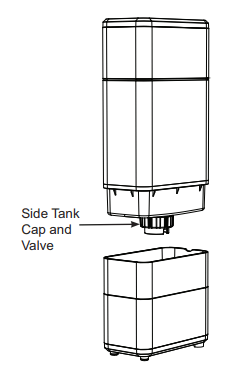
DO NOT WASH THE SIDE TANK IN THE DISHWASHER.
2. Unplug Opal Nugget Ice Maker. Unhook Opal's drain tubes and drain the water from the reservoir.
3. Connect drain tube. labeled B. to the back of Opal Side Tank’s base.
4. Make sure drain tube (A) is connected to the black hanger and installed on the back of Opal.
5. Make sure drain tube (B) connecting to the Side Tank is resting flat on the countertop.
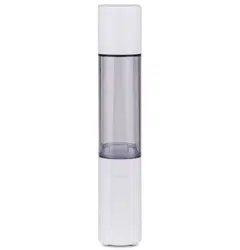
7. Remove Opal Side Tank's clear reservoir from its base.
8. Unscrew Opal Side Tank's cap from the reservoir. Fill the clear reservoir with water.
9. Replace Opal Side Tank’s cap. Ensure the cap is clean when installing.
10. Carefully flip over Opal Side Tank's reservoir and place in the base. Water should start flowing into the Opal
Nugget Ice Maker and bubbles in the Opal Side Tank will appear periodically during the time water is flowing to
the ice maker.
NOTE: If water does not appear to flow into the ice maker. please check for the following
- There may be bubbles in drain tube (B) connecting the Side Tank to the Opal
- Tube (B) is not lying flat.
If either of the above issues is present. adjust tube (B) to allow the water to flow.
11. Fill Opal Nugget Ice Maker's reservoir.
12. Plug in Opal Nugget Ice Maker. and begin making ice.
WARNING To reduce the risk of electrical shock or injury when using your Opal, follow these basic safety precautions:
- Unplug the product before cleaning by hand and when not in use.
- Do not use with water that is microbiologically unsafe or of unknown quality.
- Use caution when filing and installing Opal Side Tank, as filled unit may be heavy.
- Do not use this side tank for any liquid other than water.
- Children should not fill or install Opal Side Tank. as filled unit may be heavy.
- Make sure that Opal Nugget Ice Maker is unplugged when draining reservoir and installing Opal Side Tank.
- Ensure that Opal Side Tank is installed on a level surface that will be stable even when Opal Side Tank is full
- Make sure the cap of the Side Tank remains clean during filing and operation. Hands should be washed and clean prior to opening and closing the cap.
Use and Care
Cleaning the Side Tank
- Remove and drain the Side Tank.
- If there is residual water in Opal Side Tank base unit. lip Opal Side Tank's base to drait
- Remove and wash Opal Side Tank's cap and valve with dish soap and warm water as needed. Ensure the cap is clean after removing and re-installing by hand.
- Only remove drain tubes while near a sink or bucket. as removing drain tubes from Opal or Opal Side Tank will. drain any water in either unit.
Proper Installation and Location
The side tank should be installed flush to the front of the Opal Nugget Ice maker so that it does not block the jow vents on the Opal Nugget Ice maker. Opal Side Tank needs to sit on the same level surface as your Opal
Nugget Ice Maker. Do not elevate Opal Side Tank. or your Opal may overflow.
To Remove Mineral Deposits:
Mix two quarts of water with two quarts of vinegar. OR use the Opal Cleaning Kit.
Clean any visible mineral buildup or deposits with this. solution. If deposits are present in the tank. fill the tank with this solution and let soak. Be sure to drain and rinse the tank thoroughly after cleaning. Stubborn deposits may require more than one treatment.
Side Tank Troubleshooting
If water does not flow from the Side Tank to the Opal Ice Maker:
There may be bubbles in the tube connecting the side tank to the opal or it is not lying flat. Try adjusting the tut to allow the water to flow. Once water starts flowing it typically will not need further adjusting.
TROUBLESHOOTING
Normal Operating Sounds
Your new ice maker may make sounds that are not familiar. Most of these sounds are normal. Hard surfaces like the floor. walls. and countertops can amplify these sounds. The following describes the sounds that may be new to you and what may be creating them.
- WHIR - When Opal is first turned on. you may notice the condenser fan spinning.
- BUZZ - When the water pump first turns on. it may be dry and slightly noisy. Once it is filled with water. the noise reduces significantly.
- RATTLE - Rattling noises may be produced from the low of the refrigerant. These noises should reduce significantly once the refrigerant system has stabilized.
- GURGLE - When the refrigerant system shuts off. there may be a brief gurgle as the refrigerant stops flowing.
- HUM - The compressor is a motor. It produces a low-toned humming sound while it is running.
- CLICK - As nugget ice is produced. it drops into the ice drawer. The first nuggets produced are the loudest. as they impact the bottom of the ice bin. As the bin fill. this noise reduces significantly.
- SQUEAK — When Opal is in need of defrosting. it may start to squeak as ice starts to build up around the mechanisms. The defrost cycle is automatic. and may take 30-45 minutes. During this time. the front button won't respond.
Radio Frequency Interference
This product has been tested and found to comply with the limits set forth in Title 47 CFR Part 15 - Radio
Frequency Devices. Operation is subject to the following conditions: (1) This device may not cause harmful interference, and (2) this device must accept any interference received, including interference that may cause undesired operation. This product generates, uses. and can radiate radio frequency energy, and if not used in accordance with the instructions. may cause harmful interference to radio communications. If this product does cause harmful interference to radio or television reception. which can be determined by unplugging Opal. the user is encouraged to try to correct the interference by one or more of the following measures:
- Reorient or relocate the TV or radio antennas
- Increase the distance between the product and TV or radio
- Plug Opal into a separate outlet from a radio or TV.
The transmitter must not be co-located or operating in conjunction with other antennas or transmitters.
Ice Maker Product Specifications
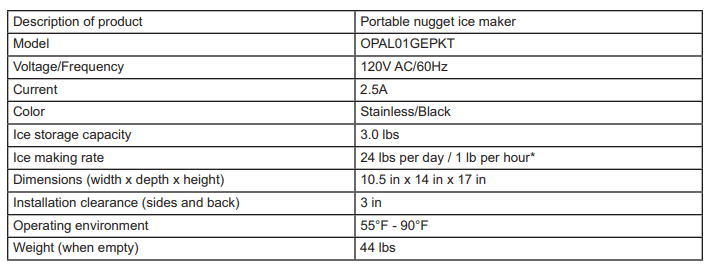
NOTE: Technical data and performance information provided for reference only.
Specifications are subject to change. Check the rating label for your maker for the most accurate information
* The actual quantity of ice produced will vary with environmental conditions.
Note: Products containing refrigerants
This product contains a refrigerant. which under Federal Law must be removed prior to product disposal. If you are disposing this. or any refrigeration product. check with your local waste company for guidance.
WARNING In order to avoid exposure to UV radiation. disconnect power to the ice maker before removing the external covers.
Do not Attempt to repair or replace the UV lamp