1. Plug the cord into a grounded outlet. Once plugged in, the display on your oven will show: PLEASE TOUCH CLOCK AND SET TIME OF DAY.
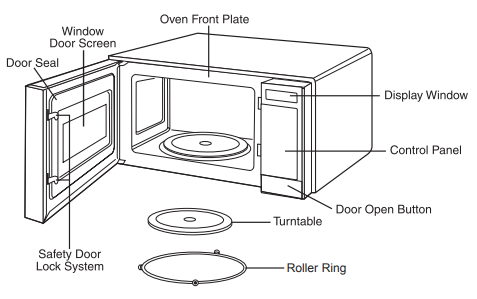
2. Open the oven door by pulling the handle on the right side of the door.
3. Wipe the inside of the oven with a damp cloth.
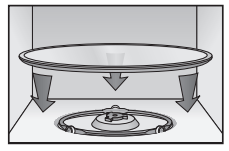
4. Place the pre-assembled ring in the indentation in the center of the oven.
5. Place the glass tray on top of the ring so that the three glass tabs in the center of the tray fit securely into the tabs on the floor of the oven.
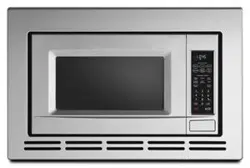
FEATURES
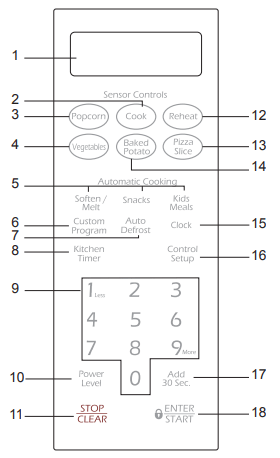
DISPLAY: The Display includes a clock and indicators to tell you time of day, cooking time settings and cooking functions selected.
COOK: Touch this pad to cook beverage, frozen dinner, frozen breakfast, chicken breast. The oven’s sensor will tell the oven how long to cook depending on the amount of humidity coming from the food. See page 13 for more information.
POPCORN: Touch this pad when popping popcorn in your microwave oven. The oven’s sensor will tell the oven how long to cook depending on the amount of humidity it detects from the popcorn. See page 12 for more information.
VEGETABLES: Touch this pad to cook fresh or frozen vegetables. The oven’s sensor will tell the oven how long to cook depending on the amount of humidity it detects from the vegetables. See page 13 for more information.
SOFTEN/MELT, SNACKS, KIDS MEALS: Touch this pad to cook specific food. See pages 15,16 and 17 for more information.
CUSTOM PROGRAM: Touch this pad to recall one cooking instruction previously programmed into memory. See page 10 for more information.
AUTO DEFROST: Touch this pad to defrost food by weight. See page 18 for more information.
KITCHEN TIMER: Touch this pad to set the kitchen timer. See page 9 for more information.
NUMBER: Touch number pads to enter cooking time, power level, quantities, or weights.
POWER LEVEL: Touch this pad to select a cooking power level.
STOP/CLEAR: Touch this pad to stop the oven or to clear all entries.
REHEAT: Touch this pad to reheat dinner plate, casserole, and pasta. The oven’s sensor will tell the oven how long to reheat depending on the amount of humidity coming from the food. See page 13 for more information.
PIZZA SLICE: Touch this pad to reheat pizza. The oven’s sensor will tell the oven how long to cook depending on the amount of humidity it detects. See page 12 for more information.
BAKED POTATO: Touch this pad to cook potatoes. The oven’s sensor will tell the oven how long to cook depending on the amount of humidity it detects from the potato. See page for more information.
CLOCK: Touch this pad to enter the time of day. See page 9 for more information.
CONTROL SETUP: Touch this pad to change the oven’s default settings. See page 9 for more information.
ADD 30 SEC: Touch this pad to set and start quickly at 100% power level. See page 9 for more information. NOTE: Add 30 sec pad can not be used with any sensor control pad or AUTO DEFROST.
ENTER/START: Touch this pad to start a function. If you open the door after oven begins to cook, close the door and touch ENTER/START again.
Operating Instructions
LEARN ABOUT YOUR MICROWAVE OVEN
This section introduces you to the basics you need to know to operate your microwave oven. Please read this information before use.
CLOCK
Example: To set 8:00 AM.
1. Touch CLOCK pad.
2. Enter the time by using the number pads.
3. Touch ENTER/ START pad.
4. Touch 1 for AM.
5. Touch ENTER/ START pad.
NOTE: Follow steps 1-3 above, when clock is set in the 24 hour clock mode.
KITCHEN TIMER
You can use your microwave oven as a timer. Use the Kitchen Timer for timing up to 99 minutes, 99 seconds.
Example: To set for 3 minutes.
1. Touch KITCHEN TIMER pad.
2. Enter the time by using the number pads.
3. Touch ENTER/ START pad.
When the time is over, you will hear beeps and END will display.
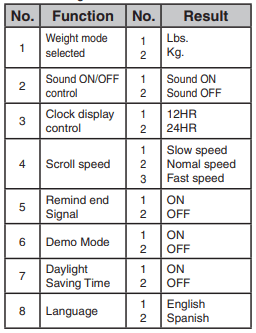
CONTROL SETUP
You can change the default values.
See following chart for more information.
Example: To change weight mode (from Lbs. to Kg).
1. Touch CONTROL SETUP pad.
2. Touch number 1 pad.
3. Touch number 2 pad.
CHILD LOCK
You may lock the control panel to prevent the microwave from being accidentally started or used by children.
The Child Lock feature is also useful when cleaning the control panel. Child Lock prevents accidental programming when wiping the control panel.
Example: To set the child lock.
1. Touch STOP/ CLEAR pad.
2. Touch and hold ENTER/START pad more than 3 seconds. CHILD LOCK ON will appear in the display window with two beeps.
Example: To cancel the child lock.
1. Touch and hold ENTER/START pad more than 3 seconds. LOCKED will disappear and you hear two beeps.
ADD 30 SEC.
A time-saving pad, this simplified control lets you quickly set and start microwave cooking without the need to touch the ENTER/ START pad.
Example: To set ADD 30 SEC. for 2 minutes.
Touch ADD 30 SEC. pad 4 times. The oven begins cooking and display shows time counting down.
CUSTOM PROGRAM
CUSTOM PROGRAM lets you recall one cooking instruction previously placed in memory and begin cooking automatically.
Example: Memory to cook for 2 minutes at 70% power.
1. Touch CUSTOM PROGRAM pad.
2. Enter the cook time.
3. Touch POWER LEVEL pad.
4. Enter the power level.
5. Touch ENTER/ START pad.
Example: To recall the custom program.
1. Touch CUSTOM PROGRAM pad.
2. Touch ENTER/ START pad.
When the cook time is over, you will hear four beeps and END will display.
MORE/LESS
By using the MORE(9) or LESS(1) pad, all of the pre-programmed cook and time cook features can be adjusted to cook food for a longer or shorter time.
1. Touching MORE(9) pad will add 10 seconds of cooking time each time you touch it.
2. Touching LESS(1) pad will subtract 10 seconds of cooking time each time you touch it.
COOKING AT HIGH POWER LEVELS
Example: To cook food for 8 minutes 30 seconds at 100% power.
1. Enter the cook time.
2. Touch ENTER/ START pad.
When the cook time is over, you will hear four beeps and END will display.
Note: If the oven is set to cook for more than 25 minutes, it will automatically adjust itself to 70 percent power after 25 minutes to avoid overcooking.
COOKING AT LOWER POWER LEVELS
HIGH power cooking does not always give you the best results with foods that need slower cooking, such as roasts, baked goods, or custards. Your oven has 9 power settings in addition to HIGH.
Example: To cook food for 7 minutes 30 seconds at 70% power.
1. Enter the cook time.
2. Touch POWER LEVEL pad.
3. Enter the power level.
4. Touch ENTER/ START pad.
When the cook time is over, you will hear four beeps and END will display.
See cooking guide for Power levels, page 11.
COOKING WITH MORE THAN ONE COOK CYCLE
For best results, some recipes call for one Power Level for a certain length of time, and another Power Level for another length of time.Your oven can be set to change from one to another automatically, for up to three cycles if the first cycle is defrost.
Example: To cook food for 3 minutes at 100% power and then 70% power for 7 minutes 30 seconds.
1. Enter the first cook time.
2. Touch POWER LEVEL pad.
3. Enter the power level.
4. Enter the second cook time.
5. Touch POWER LEVEL pad.
6. Enter the power level.
7. Touch ENTER/ START pad.
When the cook time is over, you will hear four beeps and END will display.
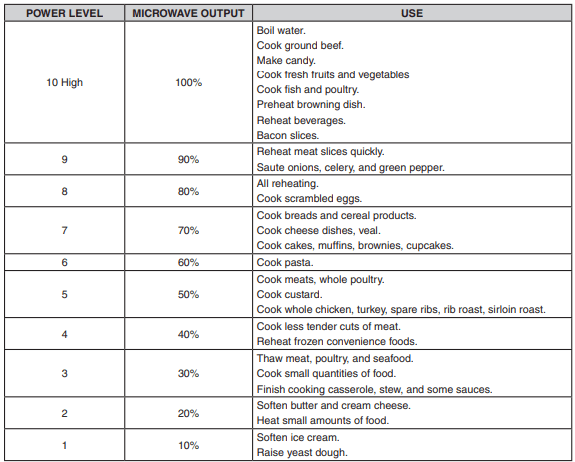
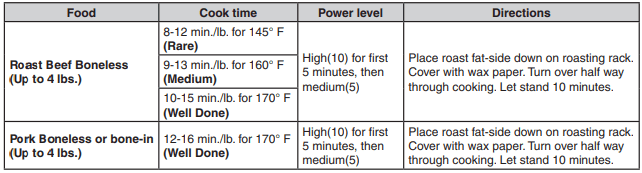
COOKING GUIDE FOR POWER LEVELS
The 10 power levels allow you to choose the best power level for the food you are cooking. Below are listed all the power levels, examples of foods best cooked at each level, and the amount of microwave power you are using.
SENSOR OPERATING INSTRUCTIONS
Sensor Cook allows you to cook most of your favorite foods without selecting cooking times and power levels. The display will indicate the sensing period by scrolling the name of the food. The oven automatically determines required cooking time for each food item. When the internal sensor detects a certain amount of humidity coming from the food, it will tell the oven how much longer to heat. The oven will beep and either turn off or the display will show the remaining heating time.
For best results for cooking by Sensor, follow these recommendations:
Food cooked with the sensor system should be at normal storage temperature.
Glass turntable and outside of container should be dry to assure best cooking results.
Most foods should always be covered loosely with microwavable plastic wrap, waxed paper, or a lid.See sensor tables on page 14.
Do not open the door or touch the STOP/CLEAR pad during the sensing time. When sensing time is over, the oven beeps once and the remaining cooking time will appear in the display window or the oven will turn off. At this time you can open the door to stir, turn, or rearrange the food.
IMPORTANT: When using sensor cook, the oven must cool for 5 minutes between uses or food will not cook properly
SENSOR COOKING GUIDE
Appropriate containers and coverings help assure good Sensor cooking results.
Always use microwavable containers and cover them with lids or vented plastic wrap.
Never use tight-sealing plastic covers. They can prevent steam from escaping and cause food to overcook.
Match the amount to the size of the container. Fill containers at least half full for best results.
Be sure the outside of the cooking container and the inside of the microwave oven are dry before placing food in the oven. Beads of moisture turning into steam can mislead the sensor.
ADDING OR SUBTRACTING COOK TIME
By using the MORE(9) or LESS(1) pad all of the sensor cook and time cook settings can be adjusted to cook food for a longer or shorter time.
POPCORN
POPCORN lets you pop commercially packaged microwave popcorn. Pop only one package at a time. For best results, use fresh bags of popcorn.
Example: To pop popcorn
Touch POPCORN pad.
When the cook time is over, you will hear four beeps and END will display.
● Recommended amounts: 3.0-3.5 ozs.
PIZZA SLICE
Reheating pizza with PIZZA SLICE lets you reheat one or several slices of pizza without selecting cooking times and power levels.
Example: To reheat 2 slices of pizza.
Touch PIZZA SLICE pad.
When the cook time is over, you will hear four beeps and END will display.
● Recommended amounts: 1-4 slices.
● After heating, let stand for 1-3 minutes
NOTE: If food is not thoroughly cooked or reheated when using the sensor feature, complete cooking using a power level and cooking time.
DO NOT continue using the sensor pad.
BAKED POTATO
The BAKED POTATO pad lets you bake one or several potatoes without selecting cooking times and power levels.
NOTES:
● Before baking, pierce potato with fork several times.
● After baking, let stand for 5 minutes.
Example: To cook 2 potatoes.
1. Touch BAKED POTATO pad.
When the cook time is over, you will hear four beeps and END will display.
● Recommended amounts: 1-6 potatoes.
● Let stand 5 minutes.
IMPORTANT: When using sensor cook, the oven must cool for 5 minutes between uses or food will not cook properly
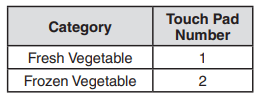
VEGETABLES
VEGETABLES have preset cook powers for 2 food categories: Fresh, Frozen.
Example: To cook Frozen Vegetables.
1. Touch VEGETABLES pad.
2. Choose food category.
When the cook time is over, you will hear four beeps and END will display.
● Recommended amounts :1-4 servings
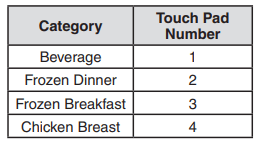
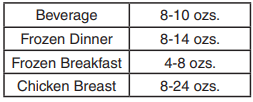
COOK
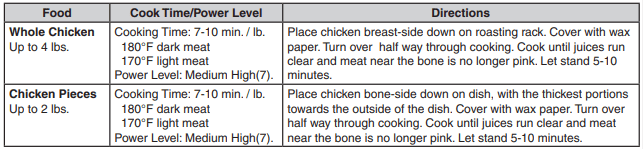
Using COOK lets you heat common microwave-prepared foods without needing to program cooking times and power levels. COOK has preset cooking times and power levels for 4 food categories: Beverage, Frozen Dinner, Frozen Breakfast, Chicken Breast.
Example: To cook Frozen Breakfast.
1. Touch COOK pad.
2. Choose food category.
When the cook time is over, you will hear four beeps and END will display
Recommended amounts:
● After cooking let stand for 1-3 minutes.
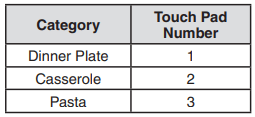
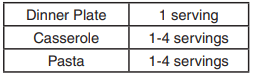
REHEAT
REHEAT lets you heat foods without needing to program cooking times and power levels. REHEAT has preset cooking times and power levels for 3 categories: Dinner Plate, Casserole, and Pasta.
Example: To reheat Casserole.
1. Touch REHEAT pad.
2. Choose food category
When the cook time is over, you will hear four beeps and END will display.
Recommended amounts:
● After reheating let stand for 1-3 minutes.
NOTE: If food is not thoroughly cooked or reheated when using the sensor feature, complete cooking using a power level and cooking time.
DO NOT continue using the sensor pad.
AUTO DEFROST
Defrost choices are preset in the oven. The defrost feature provides you with the best defrosting method for frozen foods, because the oven automatically sets the defrosting times according to the weight you enter. For added convenience, the AUTO DEFROST includes beeps to remind you to check or turn over the food during the defrost cycle.
After touching the AUTO DEFROST pad once, select the food weight. Available weight ranges are 0.1 to 6.0 lbs.
Example : To defrost 1.2 lbs of meat.
1. Touch AUTO DEFROST pad.
2. Enter the weight.
3. Touch ENTER/ START pad.
NOTES:
● After you touch ENTER/ START pad, the display counts down the defrost time. The oven will beep twice during the Defrost cycle. At this time, open the door and turn the food as needed. Remove any portions that have thawed then return frozen portions to the oven and touch ENTER/START pad to resume the defrost cycle.
● The oven will beep to signal you to check or turn over the food.
DEFROSTING GUIDE
● Follow the instructions below when defrosting different types of food.
Food
Standard Amount
Procedure
Roast Beef, Pork
2.5-6.0 lbs.
Start with the food placed fat side down. After each stage, turn the food over and shield any warm portions with narrow strips of aluminum foil. Let stand, covered, for 15 to 30 minutes.
Steaks, Chops, Fish
0.5-3.0 lbs.
After each stage, rearrange the food. If there are any warm or thawed portions of food, shield them with narrow flat pieces of aluminum foil. Remove any pieces of food that are nearly defrosted. Let stand, covered, for 5-10 minutes
Ground Meat
0.5-3.0 lbs.
After each stage, remove any pieces of food that are nearly defrosted. Let stand, covered with foil, for 5- 10 minutes.
Whole Chicken
2.5-6.0 lbs.
Remove giblets before freezing poulty. Start defrosting with the breast side down. After the first stage, turn the chicken over and shield any warm portions with narrow strips of aluminum foil. After the second stage, again shield any warm portions with narrow strips of aluminum foil. Let stand, covered for 30-60 minutes in the refrigerator.
Chicken Pieces
0.5-3.0 lbs.
After each stage, rearrange or remove any pieces of food that are nearly defrosted. Let stand for 10-20 minutes.
DEFROST TIPS
● When using AUTO DEFROST, the weight to be entered is the net weight in pounds and tenths of pounds (the weight of the food minus the container).
● Use AUTO DEFROST only for raw food. AUTO DEFROST gives best results when food to be thawed is a minimum of 0°F (taken directly from a true freezer). If food has been stored in a refrigerator-freezer that does not maintain a temperature of 5°F or below, always program a lower food weight (for a shorter defrosting time) to prevent cooking the food.
● If the food is stored outside the freezer for up to 20 minutes, enter a lower food weight.
● The shape of the package alters the defrosting time. Shallow rectangular packets defrost more quickly than a deep block.
● Separate pieces as they begin to defrost. Separated pieces defrost more easily.
● Shield areas of food with small pieces of foil if they start to become warm.
● You can use small pieces of aluminum foil to shield foods like chicken wings, leg tips, and fish tails, but the foil must not touch the side of the oven. Foil causes arcing, which can damage the oven lining.
● Let food stand covered for 15 to 30 minutes.
● Let Roasts or Whole poultry stand for 30 to 60 minutes.
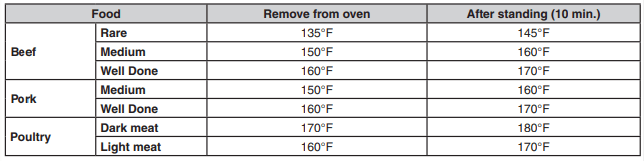
COOKING GUIDE
Guide for Cooking Meat in Your Microwave
● Place meat on a microwave-safe roasting rack in a microwave-safe dish.
● Start meat fat-side down. Use narrow strips of aluminum foil to shield any bone tips or thin meat areas.
● Check the temperature in several places before letting the meat stand the recommended time.
● The following temperatures are removal temperatures. The temperature of the food will rise during the standing time.
● Expect a 10°F rise in temperature during the standing time.
Guide for Cooking Poultry in Your Microwave
● Place poultry on a microwave-safe roasting rack in a microwave-safe dish.
● Cover poultry with wax paper to prevent spattering.
● Use aluminum foil to shield bone tips, thin meat areas, or areas that start to overcook.
● Check the temperature in several places before letting the poultry stand the recommended time.
Care and Cleaning
CARE AND CLEANING
For best performance and safety, keep the oven clean inside and out-side. Take special care to keep the inner door panel and the oven front frame free of food or grease build-up. Never use rough powder or pads. Wipe the microwave oven inside and out, including the hood bottom cover, with a soft cloth and a warm (not hot) mild detergent solution. Then rinse and wipe dry. Use a chrome cleaner and polish on chrome, metal and aluminum surfaces. Wipe spatters immediately with a wet paper towel, especially after cooking chicken or bacon. Clean your oven weekly or more often, if needed.
Follow these instructions to clean and care for your oven.
● Keep the inside of the oven clean. Food particles and spilled liquids can stick to the oven walls, causing the oven to work less efficiently.
● Wipe up spills immediately. Use a damp cloth and mild soap. Do not use harsh detergents or abrasives.
● To help loosen baked on food particles or liquids, heat two cups of water (add the juice of one lemon if you desire to keep the oven fresh) in a four-cup measuring glass at High power for five minutes or until boiling. Let stand in the oven for one or two minutes.
● Remove the glass tray from the oven when cleaning the oven or tray. To prevent the tray from breaking, handle it carefully and do not put it in water immediately after cooking. Wash the tray carefully in warm sudsy water or in the dishwasher.
● Clean the outside surface of the oven with soap and a damp cloth. Dry with a soft cloth. To prevent damage to the operating parts of the oven, don’t let water seep into the openings.
● Wash the door window with very mild soap and water. Be sure to use a soft cloth to avoid scratching.
● If steam accumulates inside or outside the oven door, wipe with a soft cloth. Steam can accumulate when operating the oven in high humidity and in no way indicates microwave leakage.
● Never operate the oven without food in it; this can damage the magnetron tube or glass tray. You may wish to leave a cup of water in the oven when it is not in use to prevent damage if the oven is accidentally turned on.
Cooking Utensils
Recommended Use
• Glass and glass-ceramic bowls and dishes — Use for heating or cooking.
• Microwave Browning dish — Use to brown the exterior of small items such as steaks, chops, or pancakes. Follow the directions provided with your Browning dish.
• Microwavable plastic wrap — Use to retain steam. Leave a small opening for some steam to escape and avoid placing it directly on the food.
• Wax paper — Use as a cover to prevent spattering.
• Paper towels and napkins — Use for short-term heating and covering; they absorb excess moisture and prevent spattering. Do not use recycled paper towels, which may contain metal and can catch fire.
• Paper plates and cups — Use for short-term heating at low temperatures. Do not use recycled paper, which may contain metal and can catch fire.
• Thermometers — Use only those labeled “Microwave Safe.” and follow all directions. Check the food in several places. Conventional thermometers may be used once the food has been removed from the oven.
Limited Use
• Aluminum foil — Use narrow strips of foil to prevent overcooking of exposed areas. Keep the foil no more than 1-2 inches long and 1 inch wide. Using too much foil can damage your oven, so be careful.
• Ceramic, porcelain, and stoneware — Use these if they are labeled “Microwave Safe.” If they are not labeled, test them to make sure they can be used safely. Never use dishes with metallic trim.
• Plastic — Use only if labeled “Microwave Safe.” Other plastics can melt.
• Straw, wicker, and wood — Use only for short-term heating, as they can be flammable.
Not Recommended
• Glass jars and bottles — Regular glass is too thin to be used in a microwave, and can shatter.
• Paper bags — These are a fire hazard, except for popcorn bags that are designed for microwave use.
• Styrofoam plates and cups — These can melt and leave an unhealthy residue on food.
• Plastic storage and food containers — Containers such as margarine tubs can melt in the microwave.
• Metal utensils — These can damage your oven. Remove all metal before cooking.
Testing Utensils
1. Fill a glass measuring cup with water and put it inside your oven, next to the dish you want to test.
2. Press the Add 30sec. button once to heat them for 30 seconds at High power.
The water should be warm and the dish you are testing should be cool. If the dish is warm, then it is absorbing microwave energy and is not acceptable for use in the microwave.
Troubleshooting
TROUBLESHOOTING GUIDE
Before you call a repair person for your oven, check this list of possible problems and solutions.
Neither the oven’s display nor the oven operate.
● Properly insert the plug into a grounded outlet.
● If the outlet is controlled by a wall switch, make sure the wall switch is turned on.
● Remove the plug from the outlet, wait ten seconds, then plug it in again.
● Reset the circuit breaker or replace any blown fuse.
● Plug another appliance into the outlet; if the other appliance doesn’t work, have a qualified electrician repair the outlet.
● Plug the oven into a different outlet.
The oven’s display works, but the power won’t come on.
● Make sure the door is closed securely.
● Check to see if packing material or other material is stuck to the door seal.
● Check for door damage.
● Touch STOP/CLEAR pad twice and re-enter all cooking instructions.
The power goes off before the set time has elapsed.
● If there has not been a power outage, remove the plug from the outlet, wait ten seconds, then plug it in again. If there was a power outage, the time indicator will display: PLEASE TOUCH CLOCK AND SET TIME OF DAY. Reset the clock and any cooking instructions.
● Reset the circuit breaker or replace any blown fuse.
The food is cooking too slowly.
● Make sure the oven is on its own 20 amp circuit line. Operating another appliance on the same circuit can cause a voltage drop. If necessary, move the oven to its own circuit.
You see sparks or arcing.
● Remove any metallic utensils, cookware, or metal ties. If using foil, use only narrow strips and allow at least one inch between the foil and interior oven walls.
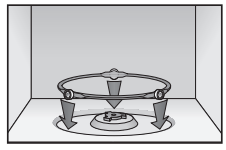
The turntable makes noises or sticks.
● Clean the turntable, roller ring and oven floor.
● Make sure the turntable and roller ring are positioned correctly.
Using your microwave causes TV or radio interference.
● This is similar to the interference caused by other small appliances, such as hair dryers. Move your microwave further away from other appliances, like your TV or radio.
NOTE: If the oven is set to cook for more than 25 minutes, it will automatically adjust itself to 70 percent power after 25 minutes to avoid overcooking
If you have a problem you cannot solve, please call our service line: 1-800-688-9900 U.S.A. 1-800-688-2002 Canada