User Manual Microwave Oven
Installation
Accessories
Depending on the model that you have purchased, you are supplied with several accessories that can be used in a variety of ways.
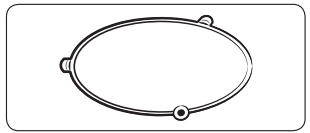
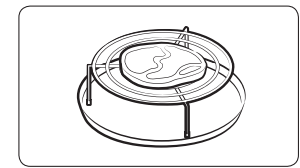
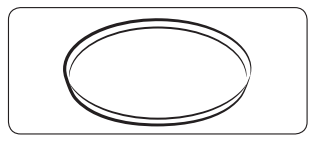
- Roller ring, to be placed in the centre of the oven. The roller ring supports the turntable.
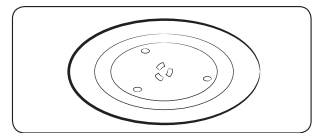
- Turntable, to be placed on the roller ring with the centre fitting on to the coupler. The turntable serves as the main cooking surface; it can be easily removed for cleaning.
- High rack, Low rack, to be placed on the turntable.
- The metal racks can be used to cook two dishes at the same time. A small dish may be placed on the turntable and a second dish on the rack. The metal racks can be used in grill, hot blast and combination cooking.
-

- Crusty plate, see page 27.
- The crusty plate is used to brown food better in the microwave or grill combination cooking modes. It helps keep pastry and pizza dough crisp.
-
CAUTION: DO NOT operate the microwave oven without the roller ring and turntable.
Installation site
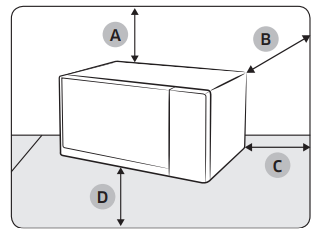
- A. 20 cm above
- B. 10 cm behind
- C. 10 cm on the side
- D. 85 cm of the floor
- Select a flat, level surface approx. 85 cm above the floor. The surface must support the weight of the oven.
- Secure room for ventilation, at least 10 cm from the rear wall and both sides, and 20 cm from above.
- Do not install the oven in hot or damp surroundings, such as next to other microwave ovens or radiators.
- Conform to the power supply specifications of this oven. Use only approved extension cables if you need to use.
- Wipe the interior and the door seal with a damp cloth before using your oven for the first time.
Turntable
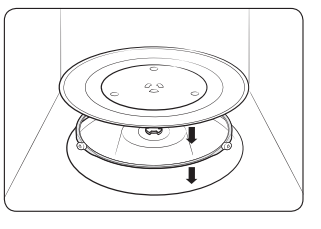
Remove all packing materials inside the oven. Install the roller ring and turntable. Check that the turntable rotates freely.
Maintenance
Cleaning
Clean the oven regularly to prevent impurities from building up on or inside the oven. Also pay special attention to the door, door sealing, and turntable and roller ring (applicable models only).
If the door won’t open or close smoothly, first check if the door seals have built up impurities. Use a soft cloth in soapy water to clean both the inner and outer sides of the oven. Rinse and dry well.
To remove stubborn impurities with bad smells from inside the oven
- With an empty oven, put a cup of diluted lemon juice on the centre of the turntable.
- Heat the oven for 10 minutes at max power.
- When the cycle is complete, wait until the oven cools down. Then, open the door and clean the cooking chamber.
To clean inside swing-heater models
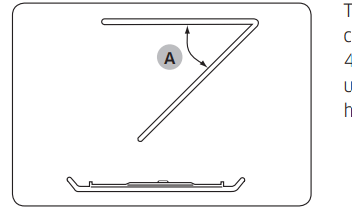
To clean the upper area of the cooking chamber, lower the top heating element by 45° (A) as shown. This will help clean the upper area. When done, reposition the top heating element.
CAUTION
- Keep the door and door sealing clean and ensure the door opens and closes smoothly. Otherwise, the oven’s lifecycle may be shortened.
- Take caution not to spill water into the oven vents.
- Do not use any abrasive or chemical substances for cleaning.
- After each use of the oven, use a mild detergent to clean the cooking chamber after waiting for the oven to cool down.
Replacement (repair)
WARNING
This oven has no user-removable parts inside. Do not try to replace or repair the oven yourself.
- If you encounter a problem with hinges, sealing, and/or the door, contact a qualified technician or a local Samsung service centre for technical assistance.
- If you want to replace the light bulb, contact a local Samsung service centre. Do not replace it yourself.
- If you encounter a problem with the outer housing of the oven, first unplug the power cord from the power source, and then contact a local Samsung service centre.
Care against an extended period of disuse
If you don’t use the oven for an extended period of time, unplug the power cord and move the oven to a dry, dust-free location. Dust and moisture that builds up inside the oven may affect the performance of the oven.
Oven features
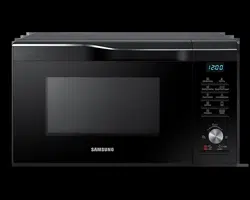
Oven
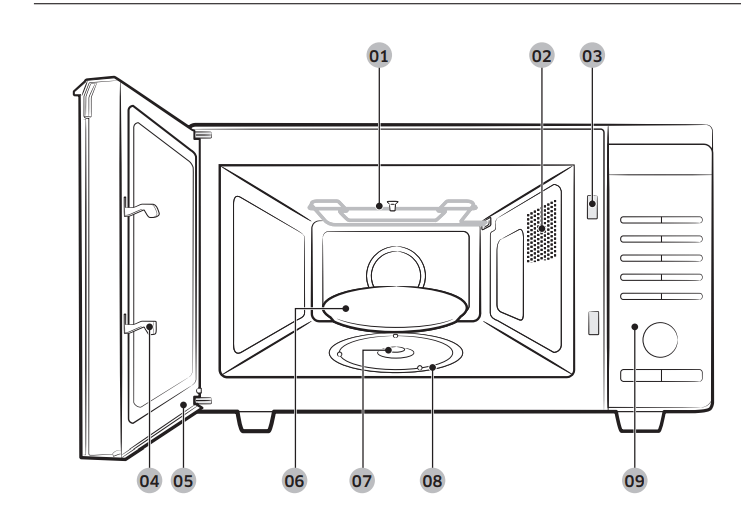
- Heating element
- Ventilation holes
- Safety interlock holes
- Door latches
- Door
- Turntable
- Coupler
- Roller ring
- Control panel
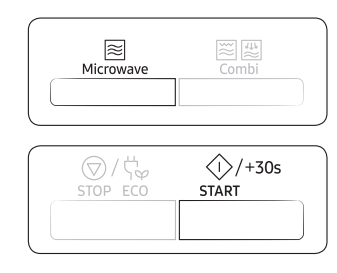
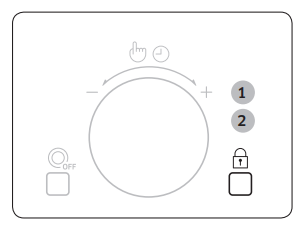
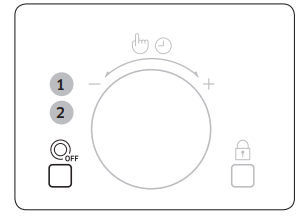
Control panel
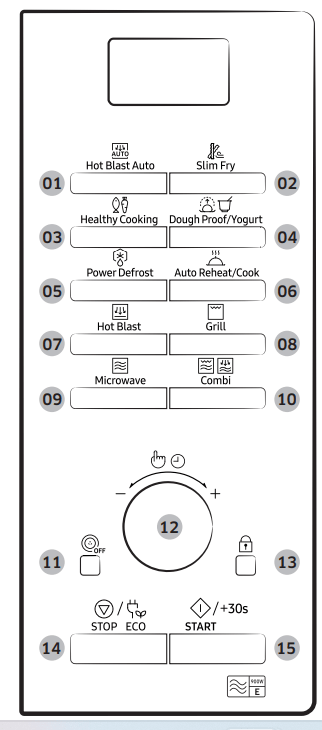
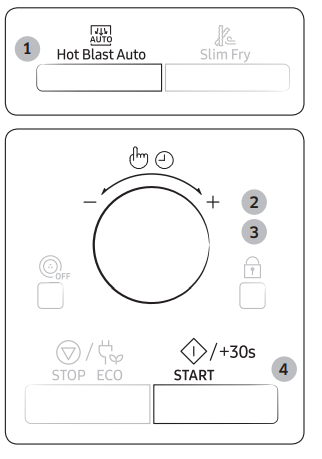
- Hot Blast Auto
- Slim Fry
- Healthy Cooking
- Dough Proof/Yogurt
- Power Defrost
- Auto Reheat/Cook
- Hot Blast
- Grill
- Microwave
- Combi
- Turntable On/Off
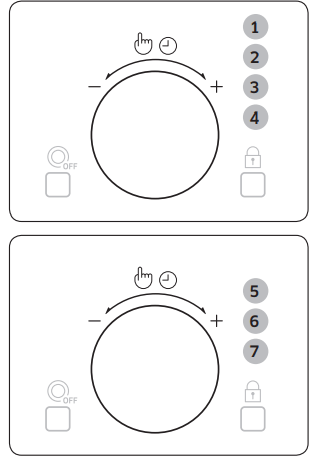
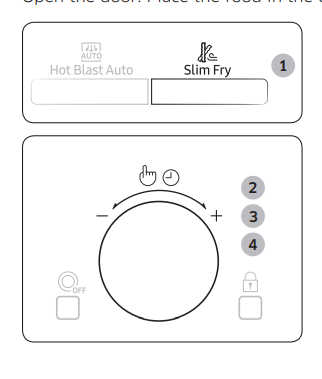
- Multi Function Selector Dial
- Child Lock
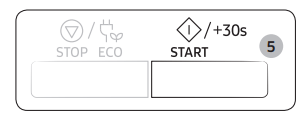
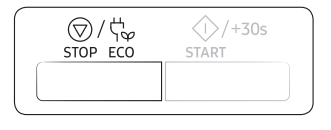
- STOP/ECO
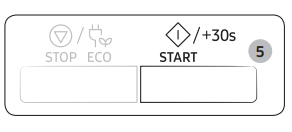
- START/+30s
How a microwave oven works
Microwaves are high-frequency electromagnetic waves; the energy released enables food to be cooked or reheated without changing either the form or the colour.
You can use your microwave oven to:
- Defrost
- Reheat
- Cook Cooking principle.
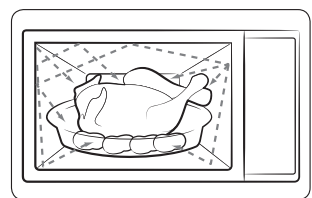
- The microwaves generated by the magnetron reflected at cavity and are distributed uniformly as the food rotates on the turntable. The food is thus cooked evenly.
- The microwaves are absorbed by the food up to a depth of about 1 inch (2.5 cm). Cooking then continues as the heat is dissipated within the food.
- Cooking times vary according to the container used and the properties of the food:
- Quantity and density
- Water content
- Initial temperature (refrigerated or not)
CAUTION: As the centre of the food is cooked by heat dissipation, cooking continues even when you have taken the food out of the oven. Standing times specified in recipes and in this booklet must therefore be respected to ensure:
- Even cooking of the food right to the centre.
- The same temperature throughout the food.
Checking that your oven is operating correctly
The following simple procedure enables you to check that your oven is working correctly at all times. If you are in doubt, refer to the section entitled “Troubleshooting” on the page 47.
NOTE:
The oven must be plugged into an appropriate wall socket. The turntable must be in position in the oven. If a power level other than the maximum (100 % - 900 W) is used, the water takes longer to boil.
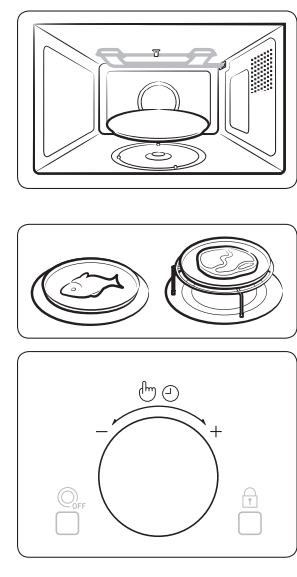
Open the oven door by pulling the handle on the upper side of the door. Place a glass of water on the turntable. Close the door.
Press the Microwave mode and set the time to 4 or 5 minutes by pressing the START/+30s button. The oven heats the water for 4 or 5 Oven use minutes. The water should then be boiling.
Setting the time
When power is supplied, “88:88” and then “12:00” is automatically displayed on the display. Please set the current time. The time can be displayed in either the 24-hour or 12- hour notation.
You must set the clock:
- When you first install your microwave oven
- After a power failure
NOTE: Do not forget to reset the clock when you switch to and from summer and winter time.
- Press the Multi Function Selector Dial.
- Turn the Multi Function Selector Dial to set time display type. (12H or 24H)
- Press the Multi Function Selector Dial to complete the setup.
- Turn the Multi Function Selector Dial to set the hour.
- Press the Multi Function Selector Dial.
- Turn the Multi Function Selector Dial to set the minute.
- When the right time is displayed, press the Multi Function Selector Dial to start the clock. The time is displayed whenever you are not using the microwave oven.
Cooking/Reheating
The following procedure explains how to cook or reheat food.
CAUTION ALWAYS check your cooking settings before leaving the oven unattended. Open the door. Place the food in the centre of the turntable. Close the door. Never switch the microwave oven on when it is empty.
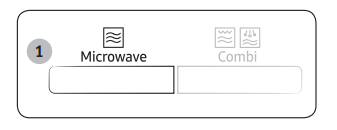
- Press the Microwave button. The following indications are displayed:
 (Microwave mode) 900 W (Output power)
- Turn the Multi Function Selector Dial until the appropriate power level is displayed. At that time, press the Multi Function Selector Dial to set the power level.
- If don’t set the power level within 5 seconds, automatically changes to the cooking time setting stage.
-
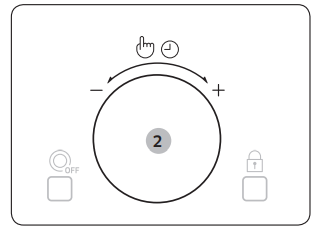
- Set the cooking time by turning the Multi Function Selector Dial. The cooking time is displayed.
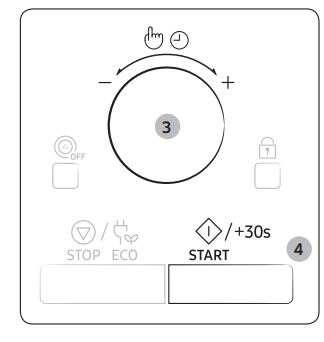
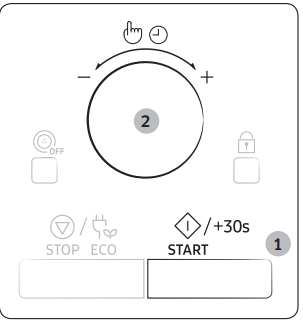
- Press the START/+30s button.
- The oven light comes on and the turntable starts rotating. Cooking starts. When it has finished.
- The oven beeps 4 times.
- The end reminder signal will beep 3 times (once every minute).
- The current time is displayed again.
-
Power levels and time variations
The power level function enables you to adapt the amount of energy dissipated and thus the time required to cook or reheat your food, according to its type and quantity. You can choose between six power levels.
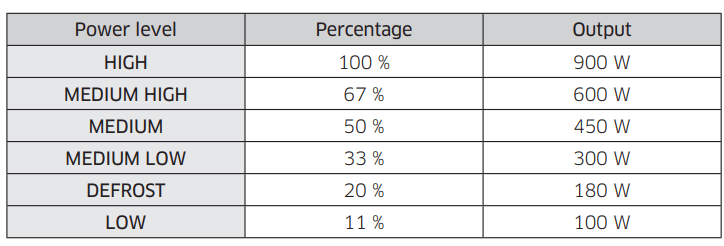
The cooking times given in recipes and in this booklet correspond to the specific power level indicated.

Adjusting the cooking time
You can increase the cooking time by pressing the START/+30s button once for each 30 seconds to be added.
- Check how cooking is progressing at any time simply by opening the door
- Increase the remaining cooking time
Method 1
To increase the cooking time of your food during cooking, press the START/+30s button once for each 30 seconds that you wish to add.
- Example: To add three minutes, press the START/+30s button six times.
Method 2
Just turning Multi Function Selector Dial to adjust cooking time.
- To increase cooking time, turn to right and to decrease cooking time, turn to left.
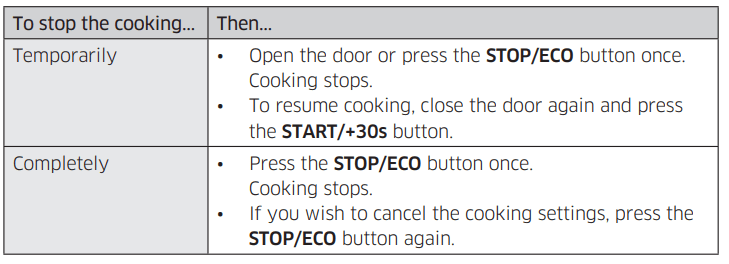
Stopping the cooking
You can stop cooking at any time so that you can:
- Check the food
- Turn the food over or stir it
- Leave it to stand
Setting the energy save mode
The oven has an energy save mode.
- Press the STOP/ECO button. Display off.
- To remove energy save mode, open the door or press the STOP/ECO button and then display shows current time. The oven is ready for use.
NOTE: Auto energy saving function
If you do not select any function when appliance is in the middle of setting or operating with temporary stop condition, function is canceled and clock will be displayed after 25 minutes. Oven Lamp will be turned off after 5 minutes with door open condition.
Using the hot blast auto features
The 10 Hot Blast Auto features include/provide pre-programmed cooking times. You do not need to set either the cooking times or the power level. You can adjust the size of the serving by turning the Multi Function Selector Dial.
CAUTION
- Use only recipients that are microwave-safe.
- Open the door. Place the food in the centre of the turntable. Close the door.
- Press the Hot Blast Auto button.
- Select the type of food that you are cooking by turning the Multi Function Selector Dial. Refer to the table on the following page for a description of the various preprogrammed settings. At that time, press the Multi Function Selector Dial to select the type of food.
- Select the size of the serving by turning the Multi Function Selector Dial.
- Press the START/+30s button. The food is cooked according to the preprogrammed setting selected.
- When it has finished.
- The oven beeps 4 times.
- The end reminder signal will beep 3 times (once every minute).
- The current time is displayed again.
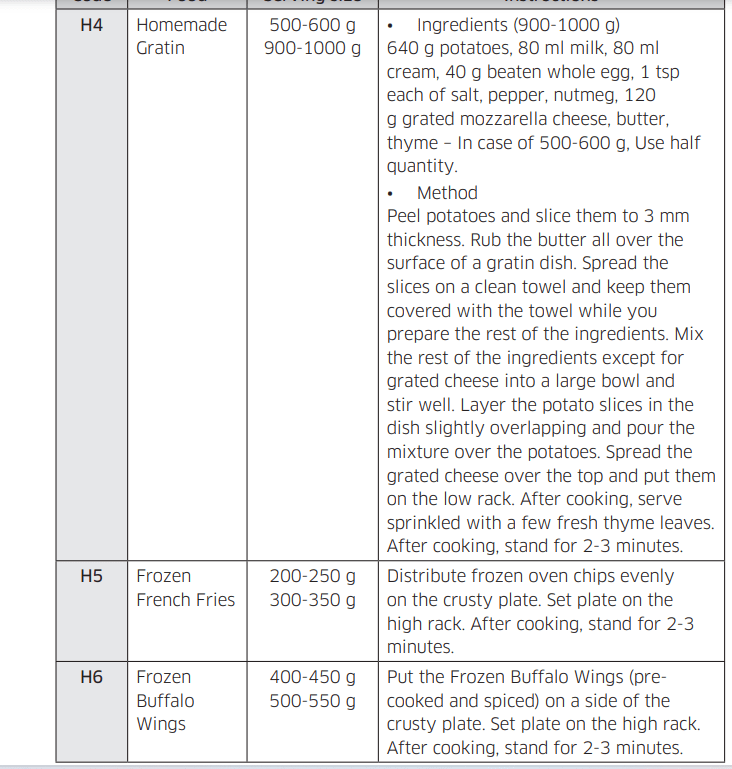
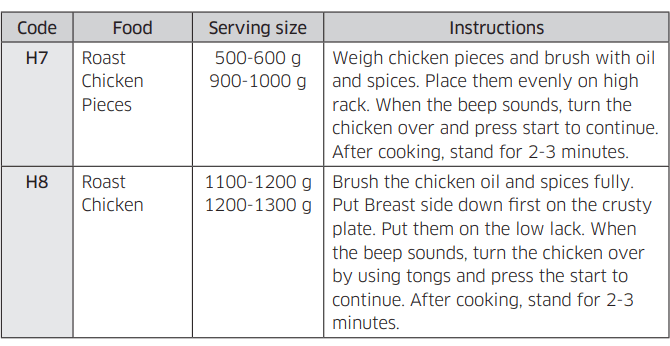
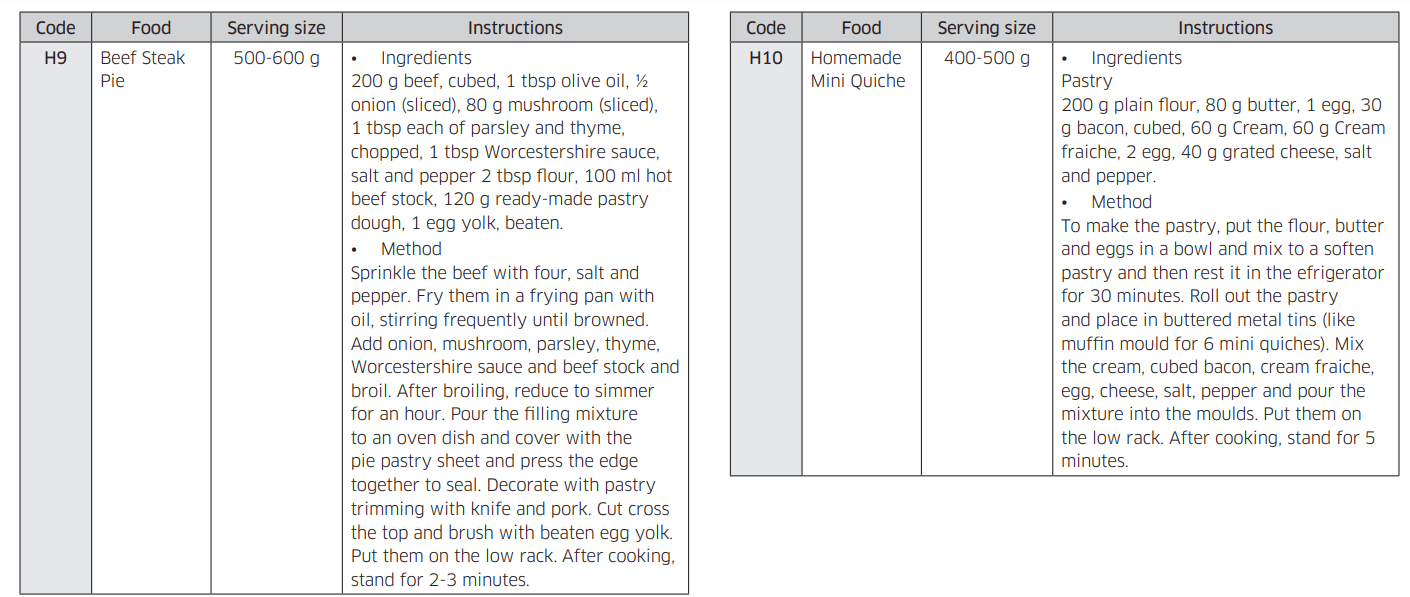
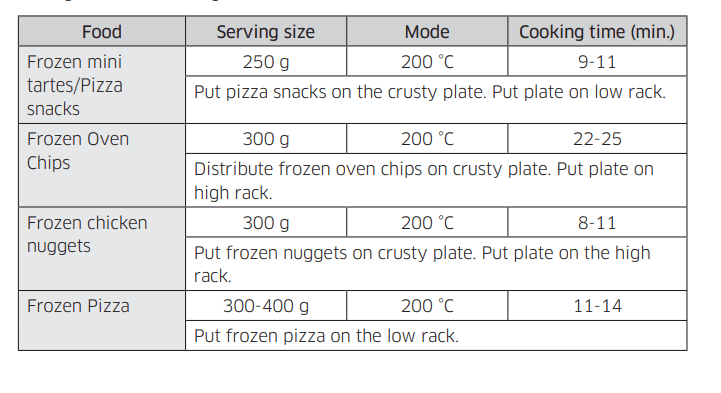
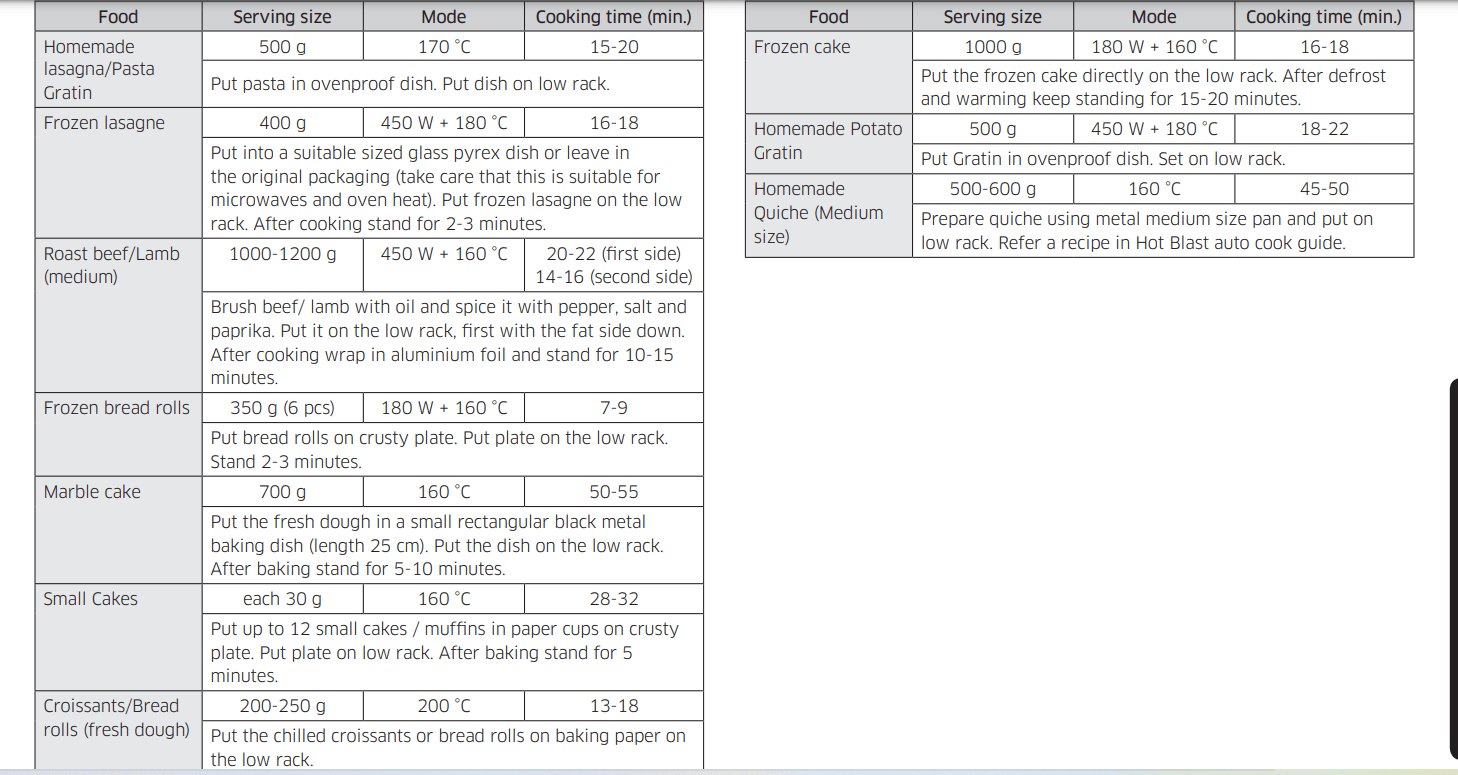
Hot blast auto guide
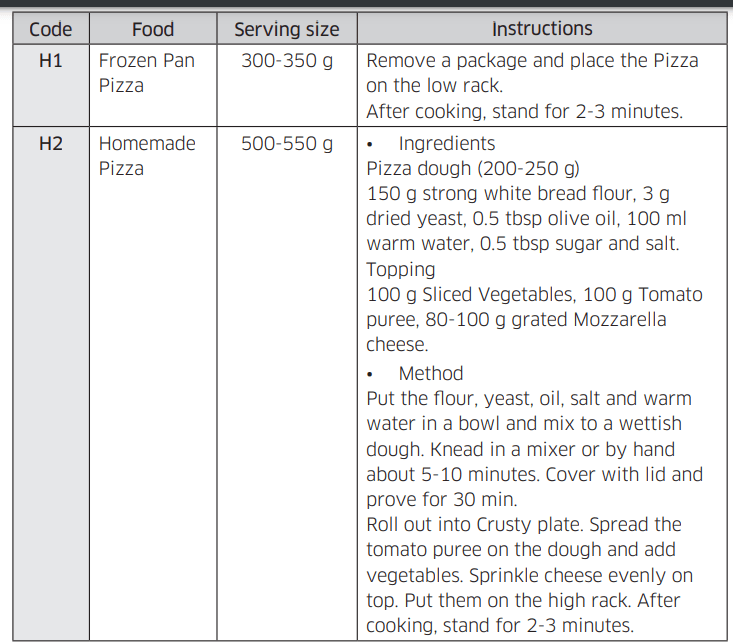
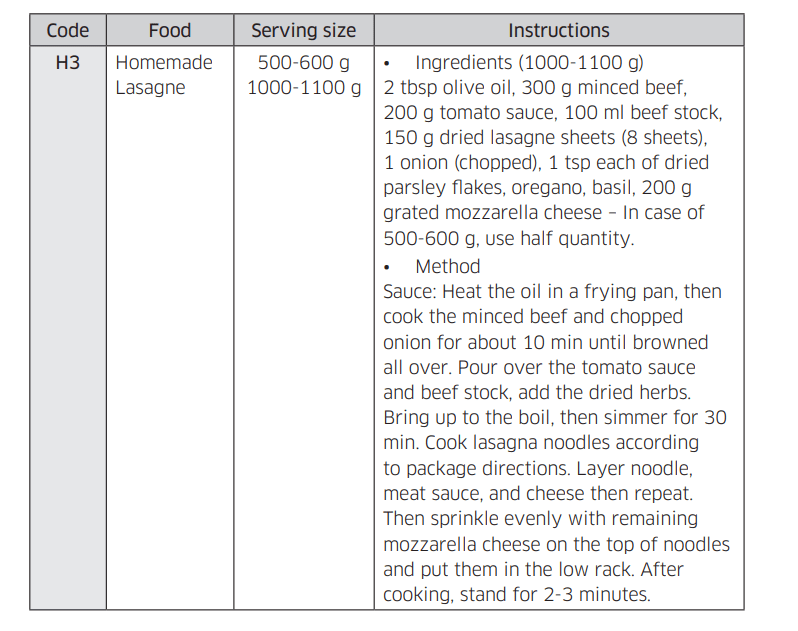
The following table presents 10 Hot Blast Auto programmes, quantities, standing times and appropriate recommendations. Those programmes are running with a combination of microwaves, grill and convection heater.
Using the slim fry features
The 11 Slim Fry features include/provide pre-programmed cooking times. You do not need to set either the cooking times or the power level. You can adjust the Slim Fry category by turning the Multi Function Selector Dial.
CAUTION
- Use only recipients that are microwave-safe.
- Open the door. Place the food in the centre of the turntable. Close the door.
- Press the Slim Fry button.
- . Turn the Multi Function Selector Dial to select cook category. At that time, press the Multi Function Selector Dial to select the cook category.
- Potatoes/Vegetables
- Seafood
- Chicken
- Select the type of food that you are cooking by turning the Multi Fuction Selector Dial. Refer to the table on the following page for a description of the various pre-programmed settings. At that time, press the Multi Fuction Selector Dial to select the type of food.
- Select the size of the serving by turning the Multi Function Selector Dial.
- Press the START/+30s button. The food is cooked according to the preprogrammed setting selected.
- When it has finished.
- The oven beeps 4 times.
- The end reminder signal will beep 3 times (once every minute).
- The current time is displayed again.
-
Slim fry guide
The following table presents the 11 Slim Fry auto programmes for frying. It contains its quantities and appropriate instructions. You will use less oil compared to frying with oil fryer, while you will get tasty results. Programmes are running with a combination of convection, top heater and microwave energy.
- Potatoes/Vegetables
- Seafood
- Chicken
Using the healthy cooking features
The 13 Healthy Cooking features provide pre-programmed cooking times. You do not need to set either the cooking times or the power level. You can adjust the size of the serving by turning the Multi Function Selector Dial.
CAUTION
- Use only recipients that are microwave-safe.
- Open the door. Place the food in the centre of the turntable. Close the door
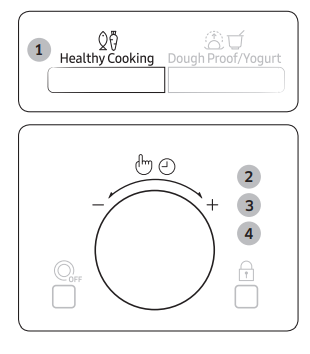
- Press the Healthy Cooking button.
- . Select the category of food by turning the Multi Function Selector Dial and press the Multi Function Selector Dial.
- Grain/Pasta
- Vegetables
- Poultry/Fish
- Select the type of food that you are cooking by turning the Multi Function Selector Dial. Refer to the table on the following page for a description of the various pre-programmed settings. At that time, press the Multi Function Selector Dial to select the type of food.
- Select the size of the serving by turning the Multi Function Selector Dial.
- Press the START/+30s button. The food is cooked according to the preprogrammed setting selected.
- The oven beeps 4 times.
- The end reminder signal will beep 3 times (once every minute).
- The current time is displayed again.
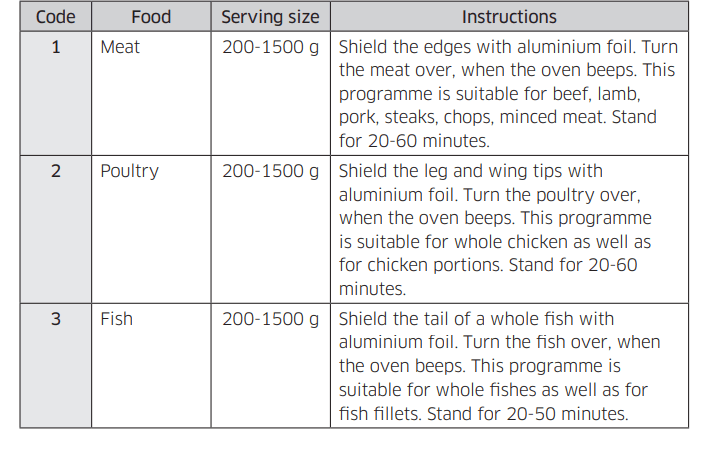
Healthy cooking guide
The following table presents quantities and appropriate instructions about 13 Healthy Cooking programmes.
- Grain/Pasta
- Vegetables
- Poultry/Fish
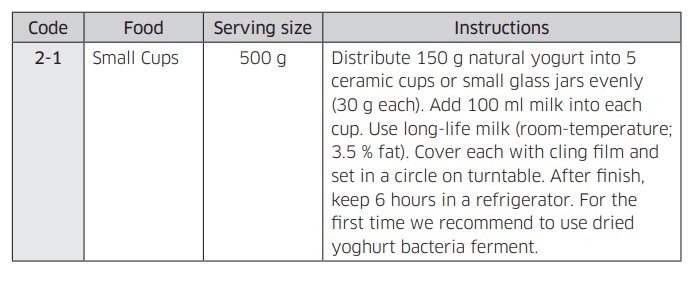
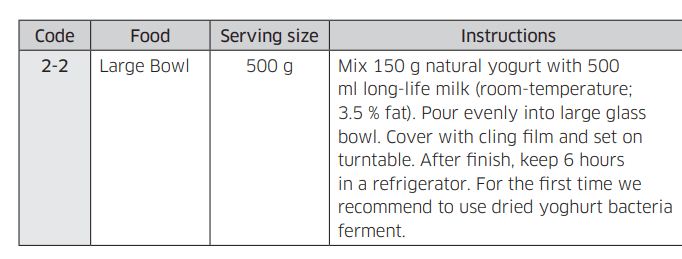
Using the dough proof/yogurt features
The 5 Dough Proof/Yogurt features include/provide pre-programmed cooking times. You do not need to set either the cooking times or the power level. You can adjust the Dough Proof/Yogurt category by turning the Multi Function Selector Dial after press the Dough Proof/Yogurt button.
First, place the food in the centre of the turntable and close the door
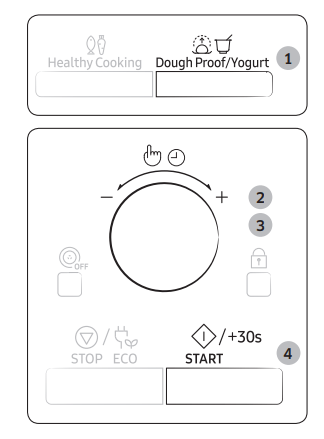
- Press the Dough Proof/Yogurt button.
- Select the Dough Proof or Homemade Yogurt and press the Multi Function Selector Dial.
- Dough Proof
- Homemade Yogurt
- Select the type of food that you are cooking by turning the Multi Function Selector Dial. Refer to the table on the following page for a description of the various pre-programmed settings.
- Press the START/+30s button. The food is cooked according to the preprogrammed setting selected. When it has finished.
- The oven beeps 4 times.
- The end reminder signal will beep 3 times (once every minute).
- The current time is displayed again.
CAUTION Turntable is not operating during yogurt cooking
Dough proof/yogurt guide
The following table presents how to use the auto programmes for rising yeast dough or homemade yogurt.
- Dough Proof
- Homemade Yogurt
Using the power defrost features
The Power Defrost features enable you to defrost meat, poultry, fish, bread, cake and fruit. The defrost time and power level are set automatically. You simply select the programme and the weight.
CAUTION
- Use only recipients that are microwave-safe.
- Open the door. Place the food in the centre of the turntable. Close the door

- Press the Power Defrost button.
- Select the type of food that you are cooking by turning the Multi Function Selector Dial. Refer to the table on the following page for a description of the various pre-programmed settings.
- At that time, press the Multi Function Selector Dial to select the type of food.
- Select the size of the serving by turning the Multi Function Selector Dial.
- Press the START/+30s button.
- Defrosting begins.
- The oven beeps through defrosting to remind you to turn the food over.
- Press the START/+30s button again to finish defrosting.
- When it has finished.
- The oven beeps 4 times.
- The end reminder signal will beep 3 times (once every minute).
- The current time is displayed again.
Power defrost guide
The following table presents the various Power Defrost programmes, quantities and appropriate instructions. Remove all kind of package material before defrosting. Place meat, poultry and fish on a flat glass plate or on a ceramic plate, arrange bread, cake and fruit on kitchen paper.

Using the auto reheat/cook features
The 5 Auto Reheat/Cook features include/provide pre-programmed cooking times. You do not need to set either the cooking times or the power level. You can adjust the size of the serving by turning the Multi Function Selector Dial.
CAUTION Use only recipients that are microwave-safe.
Open the door. Place the food in the centre of the turntable. Close the door.
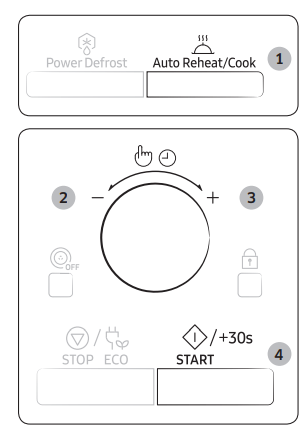
- Press the Auto Reheat/Cook button.
- Select the type of food that you are cooking by turning the Multi Function Selector Dial. Refer to the table on the following page for a description of the various pre-programmed settings. At that time, press the Multi Function Selector Dial to select the type of food.
- Select the size of the serving by turning the Multi Function Selector Dial.
- Press the START/+30s button. The food is cooked according to the preprogrammed setting selected.
- When it has finished.
- The oven beeps 4 times.
- The end reminder signal will beep 3 times (once every minute).
- The current time is displayed again.
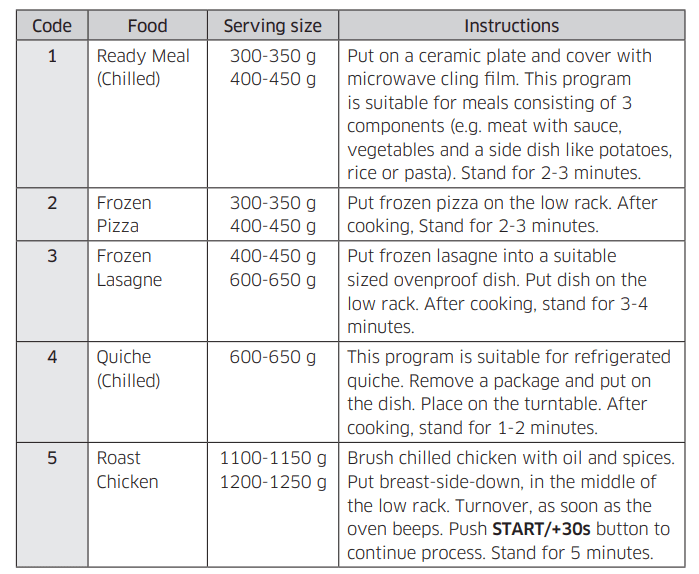
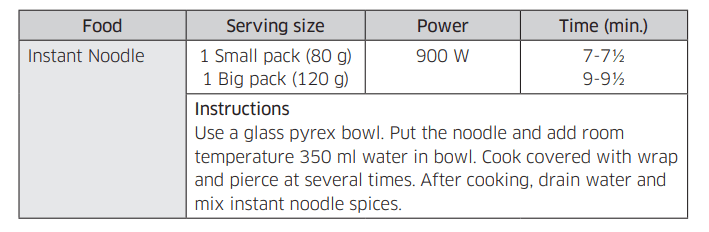
Auto reheat/cook guide
The following table presents quantities and appropriate instructions for auto reheat and cook.
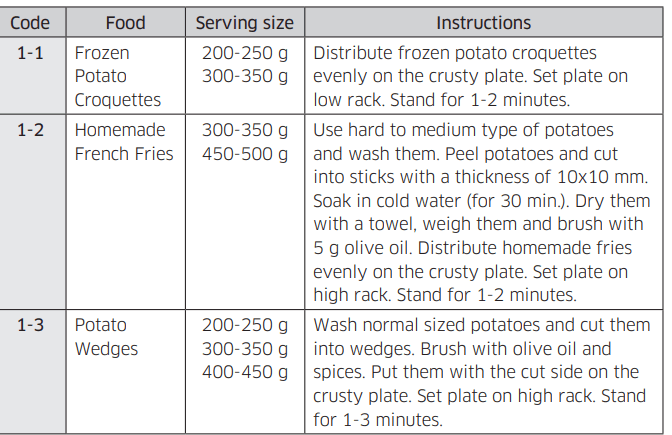
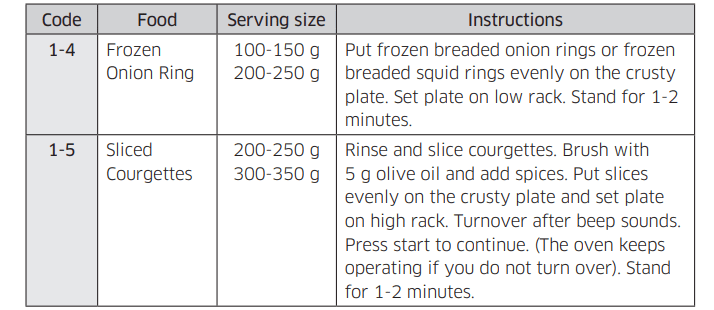
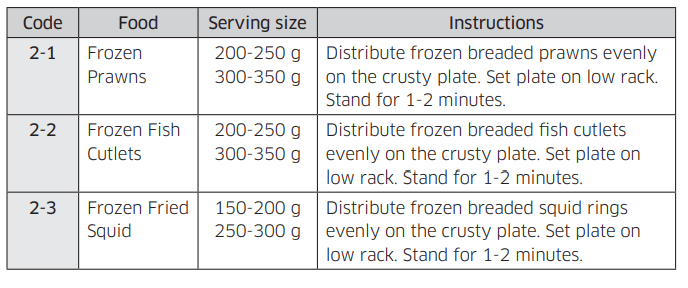
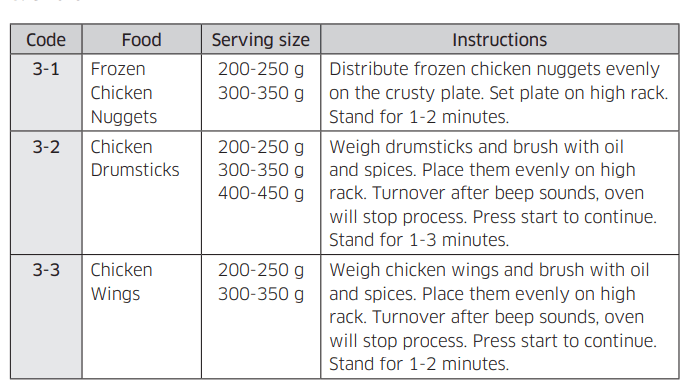
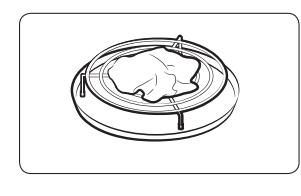
Using the crusty plate
This crusty plate allows you to brown food not only on the top with the grill, but also the bottom of the food turns crispy and brown due to the high temperature of the crusty plate. Several items which you can prepare on the crusty plate can be found in the chart (see next page). The crusty plate can also be used for bacon, eggs, sausages, etc.
- Place the crusty plate directly on the turntable and preheat it with highest Microwave-Grill-Combination [600 W + Grill] by following the times and instructions in the chart.
- Brush the plate with oil if you are cooking food, such as bacon and eggs, in order to brown the food nicely.
- Place the food on the crusty plate.
- Place the crusty plate on the metal rack (or turntable) in the microwave.
- Select the appropriate cooking time and power. (Refer to the table on the side)
CAUTION
- Always use oven gloves to take out the crusty plate, as will become very hot.
- Do not place any objects on the crusty plate that are not heat-resistant.
- Never place the crusty plate in the oven without turntable.
- Please note that the crust plate is not dish washer-safe.
NOTE
- Please note that the crusty plate has a teflon layer which is not scratchresistant. Do not use any sharp objects like a knife to cut on the crusty plate.
- Clean the crusty plate with warm water and detergent and rinse off with clean water.
- Do not use a scrubbing brush or a hard sponge otherwise the top layer will be damaged.
Hot Blast
Hot Blast mode is similar to traditional oven. The microwave mode is not used.
You can set the temperature, as required, in a range varying from 40 °C to 200 °C. The maximum cooking time is 60 minutes.
- Always use oven gloves when touching the recipients in the oven, as they will be very hot.
- You can get better cooking and browning, if you use the low rack.
Open the door and place the recipient on the low rack and set on turntable.
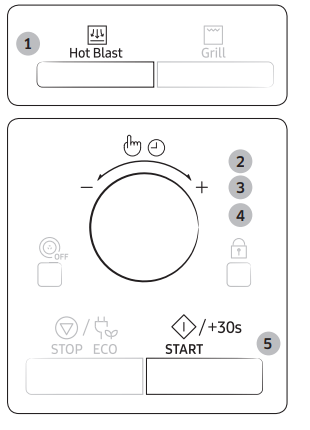
- The Hot Blast button.
- The following indications are displayed:
 (Hot blast mode) 180 °C (Temperature)
- Set the temperature by turning the Multi Function Selector Dial. (Temperature : 40-200 °C, 10 °C interval)
- If don’t set the temperature within 5 seconds, automatically changes to the cooking time setting stage.
- Press the Multi Function Selector Dial.
- Set the cooking time by turning the Multi Function Selector Dial.
- (If you want to preheat the oven, select “ : 0”)
- Press the START/+30s button. Cooking starts. When it has finished.
- The oven beeps 4 times.
- The end reminder signal will beep 3 times (once every minute).
- The current time is displayed again
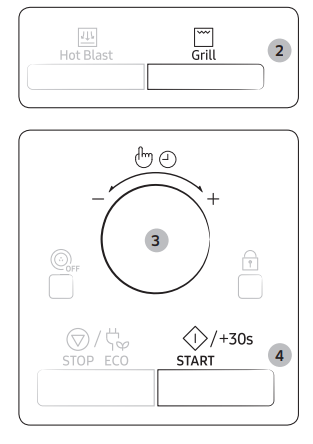
Grilling
The grill enables you to heat and brown food quickly, without using microwaves.
- Always use oven gloves when touching the recipients in the oven, as they will be very hot.
- You can get better cooking and grilling results, if you use the high rack.
- Open the door and place the food on the rack.
- Press the Grill button.
- The following indications are displayed:
 (Grill mode)
- You cannot set the temperature of the grill.
- Set the grilling time by turning the Multi Function Selector Dial.
- The maximum grilling time is 60 minutes.
- Press the START/+30s button. Grilling starts.
- When it has finished.
- The oven beeps 4 times.
- The end reminder signal will beep 3 times (once every minute).
- The current time is displayed again.
Choosing the accessories
Traditional oven cooking does require cookware. You should, however, use only cookware that you would use in your normal oven. Microwave-safe containers are not usually suitable for convection cooking; don’t use plastic containers, dishes, paper cups, towels, etc. If you wish to select a combined cooking mode (microwave and grill or hot blast), use only recipients that are microwave-safe and oven-proof.
CAUTION For further details on suitable cookware and utensils, refer to the Cookware guide on page 33.
Combining microwaves and grill
You can also combine microwave cooking with the grill, to cook quickly and brown at the same time.
CAUTION
- ALWAYS use microwave-safe and oven-proof cookware. Glass or ceramic dishes are ideal as they allow the microwaves to penetrate the food evenly.
- ALWAYS use oven gloves when touching the recipients in the oven, as they will be very hot. You can improve cooking and grilling, if you use the high rack.
Open the door. Place the food on the rack best suited to the type of food to be cooked. Place the rack on the turntable. Close the door.
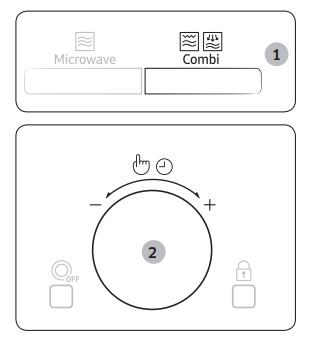
- Press the Combi button. The following indications are displayed: Cb-1 (Microwave + Grill)
- Make the display indicating Cb-1, and then press the Multi Function Selector Dial.
- The following indications are displayed:
 (Microwave & Grill combi mode) 600 W (Output power)
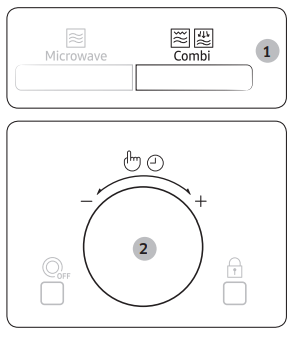
- Select the appropriate power level by turning the Multi Function Selector Dial until the corresponding output power is displayed (600, 450, 300 W). At that time, press the Multi Function Selector Dial to set the power level.
- You cannot set the temperature of the grill.
- If don’t set the temperature within 5 seconds, automatically changes to the cooking time setting stage.
- Set the cooking time by turning the Multi Function Selector Dial.
- The maximum cooking time is 60 minutes.
- Press the START/+30s button. Combination cooking starts.
- When it has finished.
- The oven beeps 4 times.
- The end reminder signal will beep 3 times (once every minute).
- The current time is displayed again.
Combining microwaves and hot blast
Combination cooking uses both microwave energy and hot blast heating. No preheating is required as the microwave energy is immediately available. Many foods can be cooked in combination mode, particularly:
- Roast meats and poultry
- Pies and cakes
- Egg and cheese dishes
CAUTION
- ALWAYS use microwave-safe and oven-proof cookware. Glass or ceramic dishes are ideal as they allow the microwaves to penetrate the food evenly.
- ALWAYS use oven gloves when touching the recipients in the oven, as they will be very hot. You can get better cooking and browning, if you use the low rack.
Open the door. Place the food on the turntable or on the low rack which should then be placed on the turntable. Close the door. The heating element must be in the horizontal position.
- Press the Combi button. The following indications are displayed: Cb-1 (Microwave + Grill)
- Make the display indicating Cb-2 (Microwave + Hot blast) by turning the Multi Function Selector Dial, and then press the Multi Function Selector Dial. The following indications are displayed:
 (Microwave & Hot blast combi mode) 600 W (Output power)
- Select the appropriate power level by turning the Multi Function Selector Dial until the corresponding output power is displayed (600, 450, 300, 180, 100 W). At that time, press the Multi Function Selector Dial to set the power level.
- If don’t set the power level within 5 seconds, automatically changes to the cooking time setting stage. (Default : 600 W) The following indications are displayed: (Microwave & Hot blast combi mode) 180 °C (Temperature)
- Select the appropriate temperature by turning the Multi Function Selector Dial (Temperature : 200-40 °C). At that time, press the Multi Function Selector Dial to set the power level.
- If don’t set the temperature within 5 seconds, automatically changes to the cooking time setting stage. (Default : 180 °C)
- Set the cooking time by turning the Multi Function Selector Dial.
- The maximum cooking time is 60 minutes.
- Press the START/+30s button. Combination cooking starts. The oven is heated to the required temperature and then microwave cooking continues until the cooking time is over.
- When it has finished.
- The oven beeps 4 times.
- The end reminder signal will beep 3 times (once every minute).
- The current time is displayed again.
Switching the beeper off
You can switch the beeper off whenever you want.
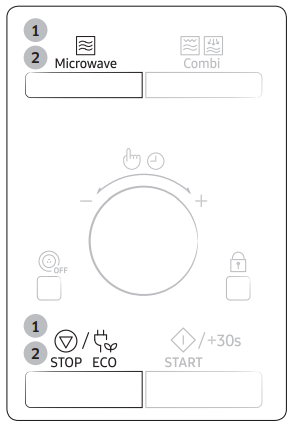
- Press the Microwave and STOP/ECO button at the same time.
- The oven does not beep to indicate the end of a function.
- The following indications are displayed:

- To switch the beeper back on, press the Microwave and STOP/ECO button again at the same time.
- The oven operates normally.
- The following indications are displayed:

Using the child lock features
Your microwave oven is fitted with a special child lock programme, which enables the oven to be “locked” so that children or anyone unfamiliar with it cannot operate it accidentally.
- Press the Child Lock button for 3 second.
- The oven is locked (no functions can be selected).
- The display shows “L”.

- To unlock the oven, press the Child Lock button for 3 second. The oven can be used normally.
Using the turntable on/off features
The Turntable On/Off button enables you to use large dishes which fill the whole oven by stopping the turntable from rotating (only manual cooking mode).
CAUTION The results will be less satisfactory in this case as the cooking is less even. We recommend that you turn the dish by hand halfway through the cooking process.
WARNING Never operate the turntable without food in the oven. This may cause fire or damage to the unit.
- Press the Turntable On/Off button during setting Microwave, Grill, Hot Blast, Preheat and Combi function.
- It is not available with preprogrammed function or before press the Microwave, Grill, Hot Blast, Preheat and Combi button. Turntable On/Off symbol appears on the display, the turntable will not rotate during the cooking.
-
 (Turntable off mode)
- To switch the turntable rotating back on, press the Turntable On/Off button again.
- Turntable On/Off symbol disappears on the display, the turntable will rotate.
NOTE This Turntable On/Off button is available only during cooking.
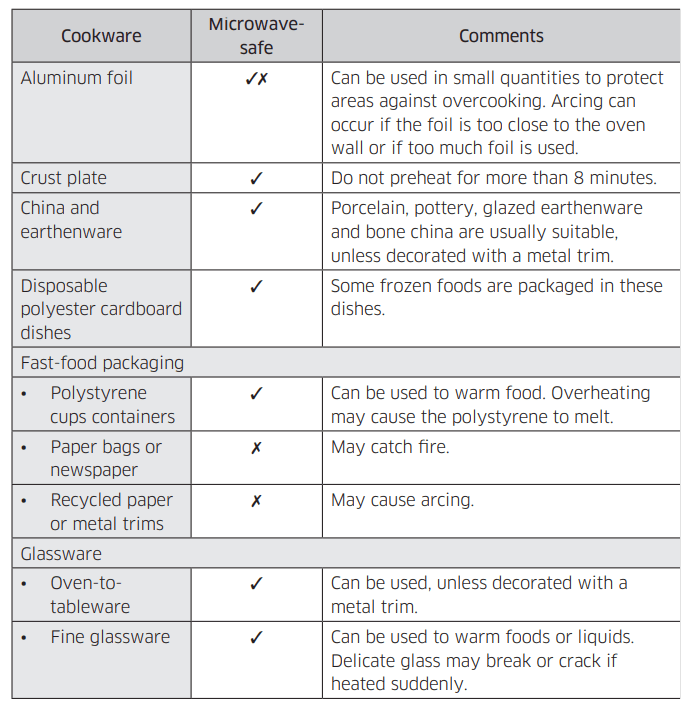
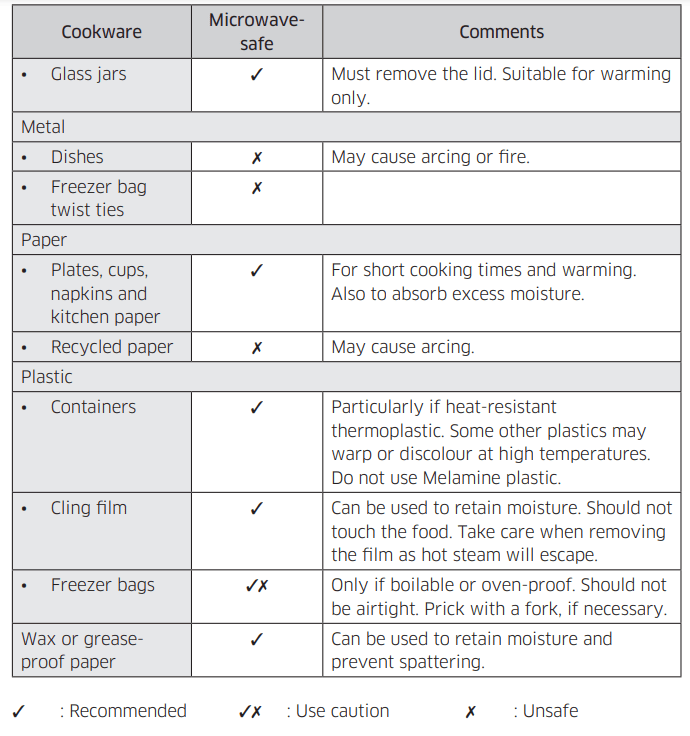
Cookware guide
To cook food in the microwave oven, the microwaves must be able to penetrate the food, without being reflected or absorbed by the dish used. Care must therefore be taken when choosing the cookware. If the cookware is marked microwave-safe, you do not need to worry.
The following table lists various types of cookware and indicates whether and how they should be used in a microwave oven.
Microwaves
Microwave energy actually penetrates food, attracted and absorbed by its water, fat and sugar content. The microwaves cause the molecules in the food to move rapidly. The rapid movement of these molecules creates friction and the resulting heat cooks the food.
Cooking
Cookware for microwave cooking:
Cookware must allow microwave energy to pass through it for maximum efficiency. Microwaves are reflected by metal, such as stainless steel, aluminium and copper, but they can penetrate through ceramic, glass, porcelain and plastic as well as paper and wood. So food must never be cooked in metal containers.
Food suitable for microwave cooking:
Many kinds of food are suitable for microwave cooking, including fresh or frozen vegetables, fruit, pasta, rice, grains, beans, fish, and meat. Sauces, custard, soups, steamed puddings, preserves, and chutneys can also be cooked in a microwave oven. Generally speaking, microwave cooking is ideal for any food that would normally be prepared on a hob. Melting butter or chocolate, for example (see the chapter with tips, techniques and hints).
Covering during cooking
To cover the food during cooking is very important, as the evaporated water rises as steam and contributes to cooking process. Food can be covered in different ways: e.g. with a ceramic plate, plastic cover or microwave suitable cling film.
Standing times
After cooking is over food the standing time is important to allow the temperature to even out within the food.
Cooking Guide for frozen vegetables
Use a suitable glass pyrex bowl with lid. Cook covered for the minimum time – see table. Continue cooking to get the result you prefer. Stir twice during cooking and once after cooking. Add salt, herbs or butter after cooking. Cover during standing time.

Cooking guide for fresh vegetables
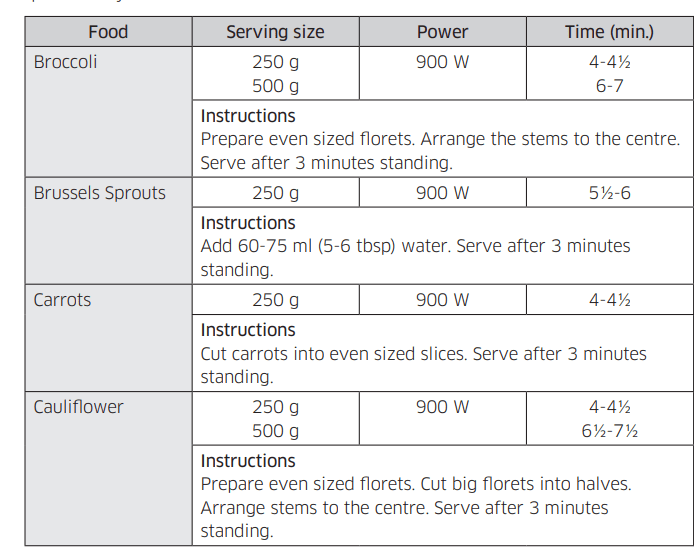
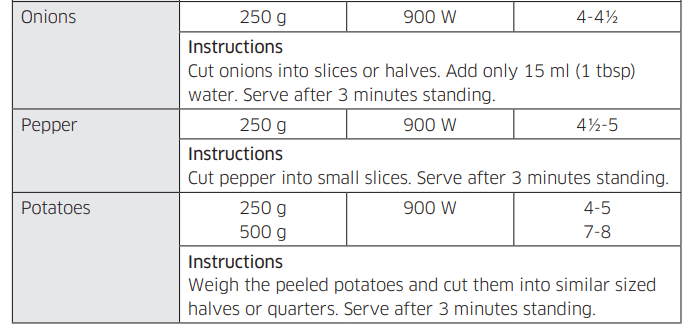
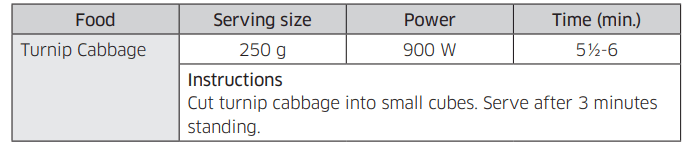
Use a suitable glass pyrex bowl with lid. Add 30-45 ml cold water (2-3 tbsp) for every 250 g unless another water quantity is recommended - see table. Cook covered for the minimum time - see table. Continue cooking to get the result you prefer. Stir once during and once after cooking. Add salt, herbs or butter after cooking. Cover during a standing time of 3 minutes.
NOTE Cut the fresh vegetables into even sized pieces. The smaller they are cut, the quicker they will cook.

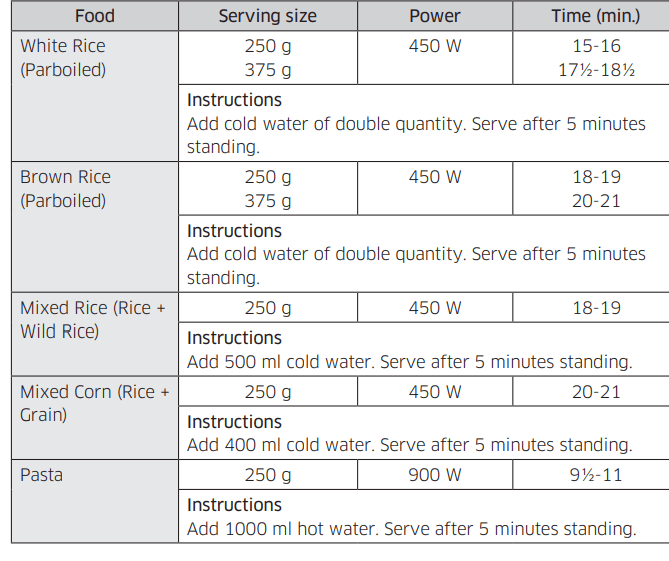
Cooking guide for rice and pasta
- Rice: Use a large glass pyrex bowl with lid - rice doubles in volume during cooking. Cook covered. After the cooking time is over, stir before standing time and salt or add herbs and butter. Remark: the rice may not have absorbed all water after the cooking time is finished.
- Pasta: Use a large glass pyrex bowl. Add boiling water, a pinch of salt and stir well. Cook uncovered. Stir occasionally during and after cooking. Cover during standing time and drain thoroughly afterwards.
Reheating
Your microwave oven will reheat food in a fraction of the time that conventional ovens hobs normally take. Use the power levels and reheating times in the following chart as a guide. The times in the chart consider liquids with a room temperature of about +18 to +20 °C or a chilled food with a temperature of about +5 to +7 °C.
Arranging and covering
Avoid reheating large items such as joint of meat - they tend to overcook and dry out before the centre is piping hot. Reheating small pieces will be more successful.
Power levels and stirring
Some foods can be reheated using 900 W power while others should be reheated using 600 W, 450 W or even 300 W. Check the tables for guidance. In general, it is better to reheat food using a lower power level, if the food is delicate, in large quantities, or if it is likely to heat up very quickly (mince pies, for example). Stir well or turn food over during reheating for best results. When possible, stir again before serving. Take particular care when heating liquids and baby foods. To prevent eruptive boiling of liquids and possible scalding, stir before, during and after heating. Keep them in the microwave oven during standing time. We recommend putting a plastic spoon or glass stick into the liquids. Avoid overheating (and therefore spoiling) the food. It is preferable to underestimate cooking time and add extra heating time, if necessary.
Heating and standing times
When reheating food for the first time, it is helpful to make a note of the time taken - for future reference. Always make sure that the reheated food is piping hot throughout. Allow food to stand for a short time after reheating - to let the temperature even out. The recommended standing time after reheating is 2-4 minutes, unless another time is recommended in the chart. Take particular care when heating liquids and baby food. See also the chapter with the safety precautions.
Reheating liquids
Always allow a standing time of at least 20 seconds after the oven has been switched off to allow the temperature to even out. Stir during heating, if necessary, and ALWAYS stir after heating. To prevent eruptive boiling and possible scalding, you should put a spoon or glass stick into the beverages and stir before, during and after heating.
Reheating baby food
Baby food: Empty into a deep ceramic plate. Cover with plastic lid. Stir well after reheating! Let stand for 2-3 minutes before serving. Stir again and check the temperature. Recommended serving temperature: between 30-40 °C.
Baby milk: Pour milk into a sterilised glass bottle. Reheat uncovered. Never heat a baby’s bottle with teat on, as the bottle may explode if overheated. Shake well before standing time and again before serving ! Always carefully check the temperature of baby milk or food before giving it to the baby. Recommended serving temperature: ca. 37 °C.
Remark:
Baby food particularly needs to be checked carefully before serving to prevent burns. Use the power levels and times in the next table as a guide lines for reheating.
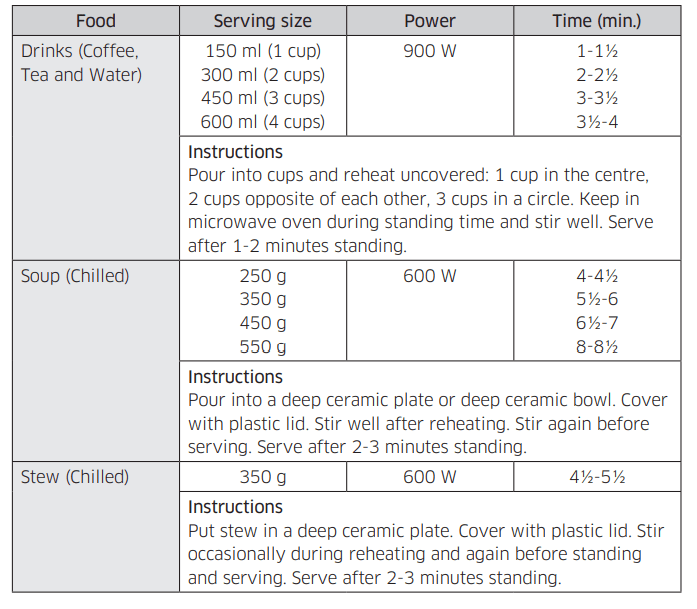
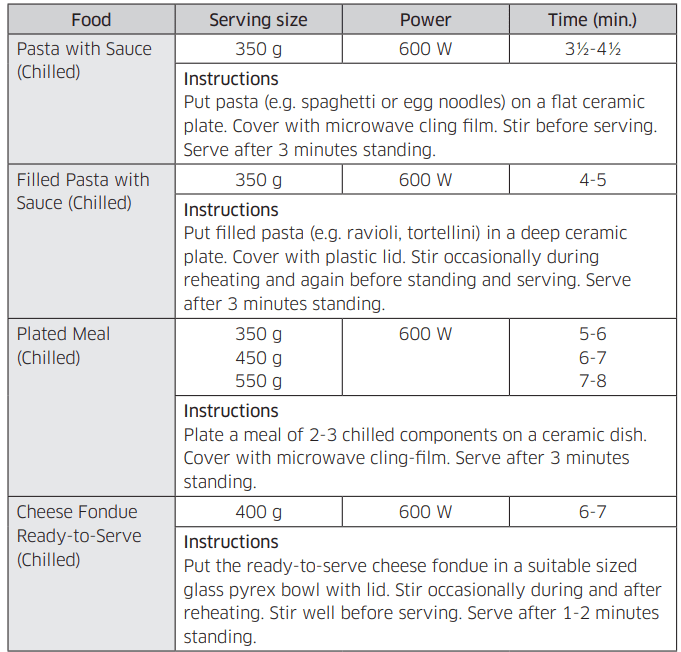
Reheating liquids and food
Use the power levels and times in this table as a guide lines for reheating.
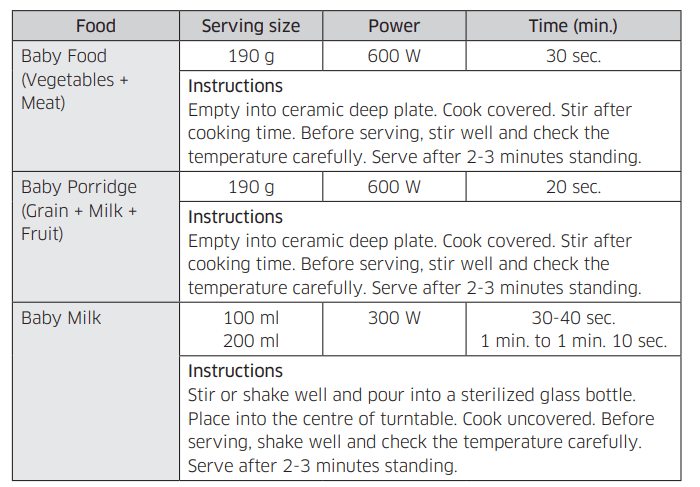
Reheating baby food and milk
Use the power levels and times in this table as guide lines for reheating.
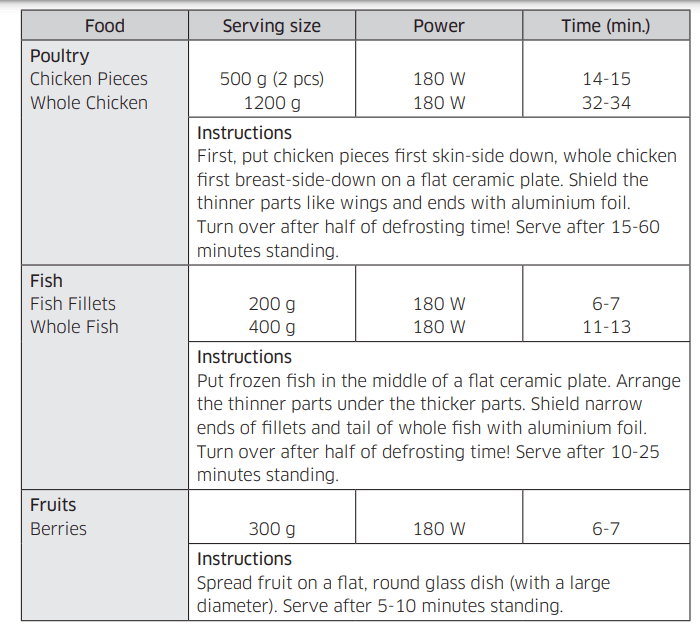
Defrosting
Microwaves are an excellent way of defrosting frozen food. Microwaves gently defrost frozen food in a short period of time. This can be of great advantage, if unexpected guests suddenly show up. Frozen poultry must be thoroughly thawed before cooking. Remove any metal ties and take it out of any wrapping to allow thawed liquid to drain away. Put the frozen food on a dish without cover. Turn over half way, drain off any liquid and remove any giblets as soon as possible. Check the food occasionally to make sure that it does not feel warm. If smaller and thinner parts of the frozen food start to warm up, they can be shield by wrapping very small strips of aluminium foil around them during defrosting. Should poultry start to warm up on the outer surface, stop thawing and allow it to stand for 20 minutes before continuing. Leave the fish, meat and poultry to stand in order to complete defrosting. The standing time for complete defrosting will vary depending on the quantity defrosted. Please refer to the table below.
NOTE Flat food defrosts better than thick and smaller quantities need less time than bigger ones. Remember this hint while freezing and defrosting food. For defrosting of frozen food with a temperature of about -18 to -20 °C, use the following table as a guide.

Grill
The grill-heating element is located underneath the ceiling of the cavity. It operates while the door is closed and the turntable is rotating. The turntable’s rotation makes the food brown more evenly. Preheating the grill for 3-5 minutes will make the food brown more quickly.
Cookware for grilling: Should be flameproof and may include metal. Do not use any type of plastic cookware, as it can melt.
Food suitable for grilling: Chops, sausages, steaks, hamburgers, bacon and gammon rashers, thin fish portions, sandwiches and all kinds of toast with toppings.
Important remark: Whenever the grill only mode is used, please remember that food must be placed on the high rack, unless another instruction is recommended.
Microwave + Grill
This cooking mode combines the radiant heat that is coming from the grill with the speed of microwave cooking. It operates only while the door is closed and the turntable is rotating. Due to the rotation of the turntable, the food browns evenly. Three combination modes are available with this model: 600 W + Grill, 450 W + Grill and 300 W + Grill.
Cookware for cooking with microwave + grill: Please use cookware that microwaves can pass through. Cookware should be flameproof. Do not use metal cookware with combination mode. Do not use any type of plastic cookware, as it can melt.
Food suitable for microwave + grill cooking: Food suitable for combination mode cooking include all kinds of cooked food which need reheating and browning (e.g. baked pasta), as well as foods which require a short cooking time to brown the top of the food. Also, this mode can be used for thick food portions that benefit from a browned and crispy top (e.g. chicken pieces, turning them over half way through cooking). Please refer to the grill table for further details.
Important remark: Whenever the combination mode (microwave + grill) is used, the food should be placed on the high rack, unless another instruction is recommended. Please refer to the instructions in the following chart. The food must be turned over, if it is to be browned on both sides.
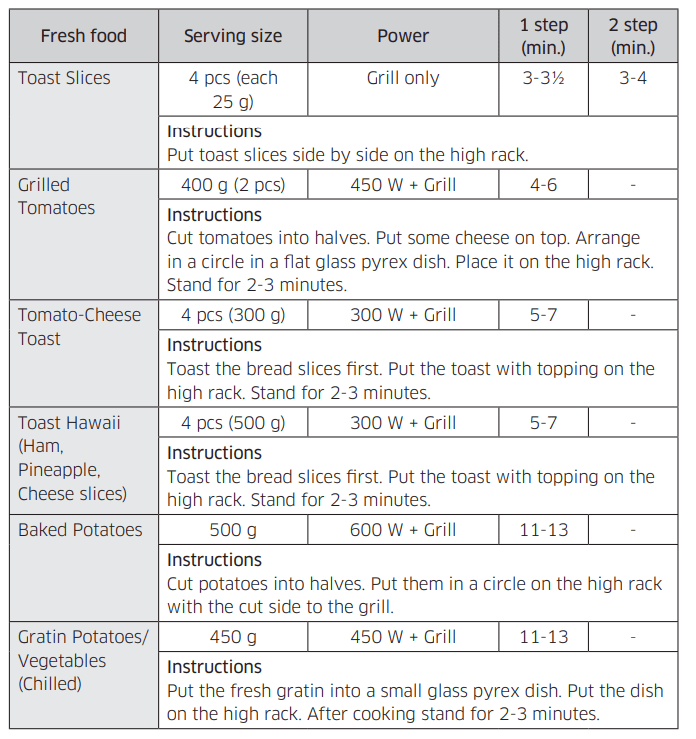
Grill guide for fresh food
Preheat the grill with the grill-function for 3-5 minutes. Use the power levels and times in this table as guide lines for grilling. Use oven gloves when taking out.
Hot blast
Cooking with Hot blast is powerful combination of the grill heater and the convection heater with fan. The hot air blows from the top of the cavity through holes into the oven. The heating element at top and back side and the fan at the back side-wall, keeps the hot air circulating evenly.
Cookware for Hot blast cooking: All conventional ovenproof cookware, baking tins and sheets - anything you would normally use in a traditional convection oven - can be used.
Food suitable for Hot blast cooking: Use this mode for biscuits, individual scones, rolls, and cakes as well as fruits cakes, choux, and souffles.
Microwave + Hot blast
This mode combines the microwave energy with the hot air and is therefore reducing the cooking time while giving the food a brown and crispy surface. Cooking with convection is the traditional and well known method of cooking food in an oven with hot air circulated by a fan on the back-wall.
Cookware for cooking with Microwave + Hot blast:
Should be able to let the microwaves pass through. Should be ovenproof (like glass, pottery or china without metal trims); similar to the cookware described under Microwave + Grill.
Food suitable for Microwave + Hot blast cooking: All kinds of meats and poultry as well as casseroles and gratin dishes, sponge cakes and light fruit cakes, pies and crumbles, roast vegetables, scones and breads.
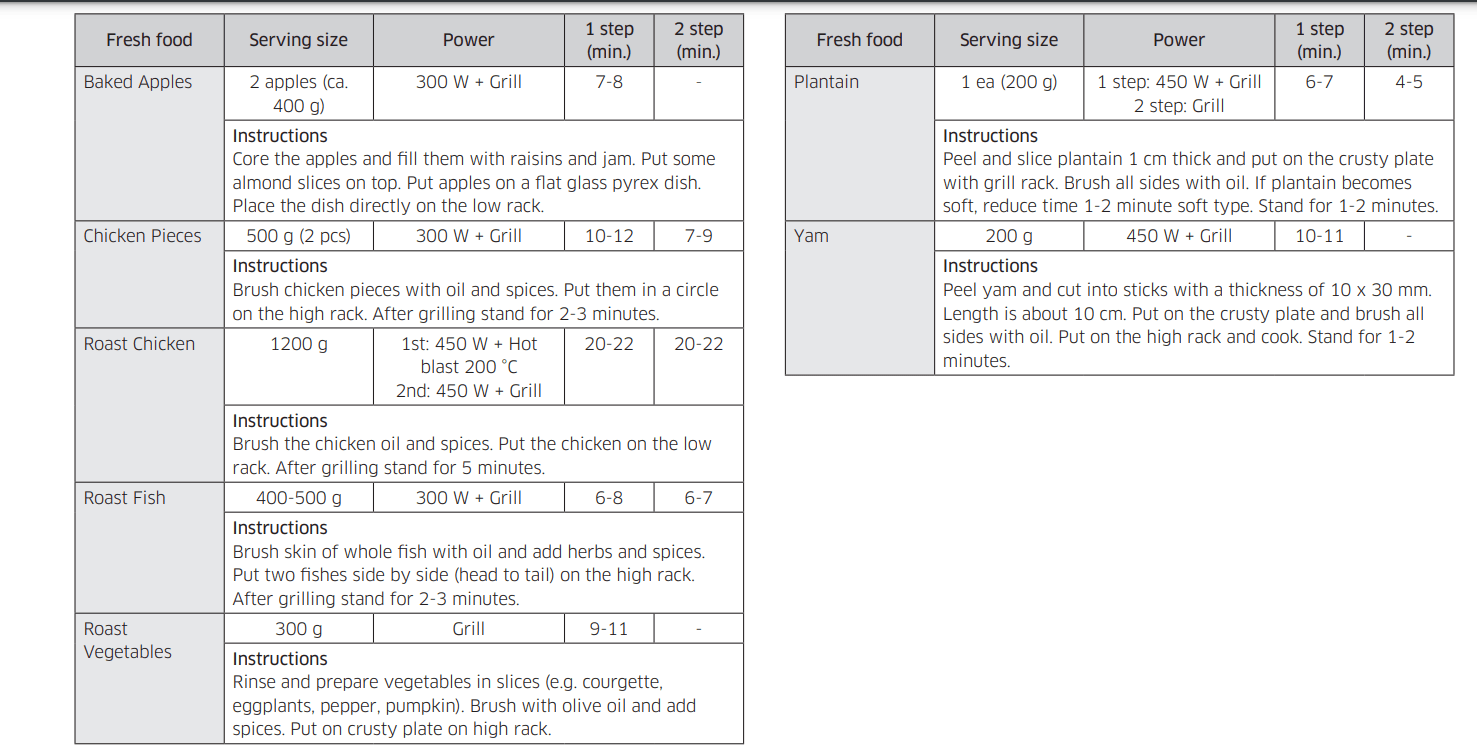
Hot blast guide for fresh and frozen food
Preheat the Hot blast with the Hot blast function to the desired temperature. Use the power levels and times in this table as guide lines for Hot blast cooking. Use oven gloves when taking out.
Troubleshooting
If you have any of the problems listed below try the solutions given.
General
- The buttons cannot be pressed properly.
- Foreign matter may be caught between the buttons.
- Remove the foreign matter and try again.
- For touch models: Moisture is on the exterior.
- Wipe the moisture from the exterior.
- Child lock is activated.
- The time is not displayed.
- The Eco (power-saving) function is set.
- Turn off the Eco function.
- The oven does not work.
- Power is not supplied.
- Make sure power is supplied.
- The door is open.
- Close the door and try again.
- The door open safety mechanisms are covered in foreign matter.
- Remove the foreign matter and try again.
- The oven stops while in operation.
- The user has opened the door to turn food over.
- After turning over the food, press the START/+30s button again to start operation.
- The power turns off during operation.
- The oven has been cooking for an extended period of time.
- After cooking for an extended period of time, let the oven cool.
- The cooling fan is not working.
- Listen for the sound of the cooling fan.
- Trying to operate the oven without food inside.
- There is not sufficient ventilation space for the oven.
- There are intake/exhaust outlets on the front and rear of the oven for ventilation. Keep the gaps specified in the product installation guide.
- Several power plugs are being used in the same socket.
- Designate only one socket to be used for the oven.
- There is a popping sound during operation, and the oven doesn't work.
- Cooking sealed food or using a container with a lid may causes popping sounds.
- Do not use sealed containers as they may burst during cooking due to expansion of the contents.
- The oven exterior is too hot during operation.
- There is not sufficient ventilation space for the oven.
- There are intake/exhaust outlets on the front and rear of the oven for ventilation. Keep the gaps specified in the product installation guide.
- Objects are on top of the oven.
- Remove all objects on the top of the oven.
- The door cannot be opened properly.
- Food residue is stuck between the door and oven interior.
- Clean the oven and then open the door.
- Heating including the Warm function does not work properly.
- The oven may not work, too much food is being cooked, or improper cookware is being used.
- Put one cup of water in a microwave-safe container and run the microwave for 1-2 minutes to check whether the water is heated. Reduce the amount of food and start the function again. Use a cooking container with a flat bottom.
- The thaw function does not work.
- Too much food is being cooked.
- Reduce the amount of food and start the function again.
- The interior light is dim or does not turn on.
- The door has been left open for a long time.
- The interior light may automatically turn off when the Eco function operates. Close and reopen the door or press the STOP/ECO button.
- The interior light is covered by foreign matter.
- Clean the inside of the oven and check again.
- A beeping sound occurs during cooking.
- If the Auto Cook function is being used, this beeping sound means it's time to turn over the food during thawing.
- After turning over the food, press the START/+30s button again to restart operation.
- The oven is not level.
- The oven is installed on an uneven surface.
- Make sure the oven is installed on flat, stable surface.
- There are sparks during cooking.
- Metal containers are used during the oven/thawing functions.
- Do not use metal containers.
- When power is connected, the oven immediately starts to work.
- The door is not properly closed.
- Close the door and check again.
- There is electricity coming from the oven.
- The power or power socket is not properly grounded.
- Make sure the power and power socket are properly grounded.
- 1. Water drips/2. Steam emits through a door crack/ 3. Water remains in the oven.
- There may be water or steam in some cases depending on the food. This is not an oven malfunction.
- Let the oven cool and then wipe with a dry dish towel.
- The brightness inside the oven varies.
- Brightness changes depending on power output changes according to function.
- Power output changes during cooking are not malfunctions. This is not an oven malfunction.
- Cooking is finished, but the cooling fan is still running.
- To ventilate the oven, the cooling fan continues to run for about 3 minutes after cooking is complete.
- This is not an oven malfunction.
Turntable
- While turning, the turntable comes out of place or stops turning.
- There is no roller ring, or the roller ring is not properly in place.
- Install the roller ring and then try again.
- The turn table drags while turning.
- The roller ring is not properly in place, there is too much food, or the container is too large and touches the inside of the microwave.
- Adjust the amount of food and do not use containers that are too large.
- The turn table rattles while turning and is noisy.
- Food residue is stuck to the bottom of the oven.
- Remove any food residue stuck to the bottom of the oven.
Grill
- Smoke comes out during operation.
- During initial operation, smoke may come from the heating elements when you first use the oven.
- This is not a malfunction, and if you run the oven 2-3 times, it should stop.
- Food is on the heating elements.
- Let the oven cool and then remove the food from the heating elements.
- Food is too close to the grill.
- Put the food a suitable distance away while cooking.
- Food is not properly prepared and/or arranged.
- Make sure food is properly prepared and arranged.
Oven
- The oven does not heat.
- The door is open.
- Close the door and try again.
- Smoke comes out during preheating.
- During initial operation, smoke may come from the heating elements when you first use the oven.
- This is not a malfunction, and if you run the oven 2-3 times, it should stop.
- Food is on the heating elements.
- Let the oven cool and then remove the food from the heating elements.
- There is a burning or plastic smell when using the oven.
- Plastic or non heatresistant cookware is used.
- Use glass cookware suitable for high temperatures.
- There is a bad smell coming from inside the oven.
- Food residue or plastic has melted and stuck to the interior.
- Use the steam function and then wipe with a dry cloth. You can put a lemon slice inside and run the oven to remove the odour more quickly.
- The oven does not cook properly.
- The oven door is frequently opened during cooking.
- If you open the door often, the interior temperature will be lowered and this may affect the results of your cooking.
- The oven controls are not correctly set.
- Correctly set the oven controls and try again.
- The grill or other accessories are not correctly inserted.
- Correctly insert the accessories.
- The wrong type or size of cookware is used.
- Use suitable cookware with flat bottoms.
Information code
- C-20
- Temperature sensor is needed to check.
- Press the STOP/ECO button and operate again. If it occurs again, turn off the microwave oven over 30 seconds and try setting again. If it appears again, call your local SAMSUNG Customer Care Centre.
- C-21
- Temperature sensor detect higher temperature than setting temperature.
- Turn off the microwave oven for cooling the product and then try setting again. If it appears again, call your local SAMSUNG Customer Care Centre.
- C-d0
- Control buttons are pressed over 10 seconds.
- Clean the keys and check if there is water on the surface around key. If it occurs again, turn off the microwave oven over 30 seconds and try setting again. If it appears again, call your local SAMSUNG Customer Care Centre.
NOTE For any codes not listed above, or if the suggested solution does not solve the problem, contact your local SAMSUNG Customer Care Centre.
Technical specifications
SAMSUNG strives to improve its products at all times. Both the design specifications and these user instructions are thus subject to change without notice.