Documents: Go to download!
User Manual
- User Manual - (English)
- OTHER - (English)
- TECHNICAL DRAWING (.dwg) - (English)
- OPERATION OF RANGE
- CLEANING THE RANGE
- TROUBLE SHOOTING GUIDE
Table of contents
USER MANUAL Gas Wall Oven
OPERATION OF RANGE
Using Your Range
The range may have only part of the features described within this manual. If your range has some features which are not covered in this manual, these features will be covered in other enclosed literature.
Top Burner Operation
Note: When boiling food, the highest temperature that can be reached is the boiling point. When the liquid starts to boil, decrease the size of the flame until you reach the minimum flame that will hold the boil. This will save gas. It will also lessen the possibility of burning food or boiling food over, and help to keep your kitchen cooler. Use stable utensils with flat bottoms and always place the utensil on the burner grate before lighting the burner. Unstable or rounded bottom utensils will not contact properly with the grate and will affect the cooking efficiency. Select utensils large enough to avoid spillovers, but remember, over-sized utensils (diameters exceeding 8 1/2'') can cause the range finish to discolor, craze or chip. Damage caused by oversized utensils, such as those sometimes used in canning, are not covered by the warranty. The finish has been manufactured to a commercially acceptable standard and its condition is dependent upon the care of the user.
Top Burner Valves
The top burner flame size should be adjusted so that is does not extend beyond the edge of the cooking utensil. As a matter of safety, it's urged that you comply with these instructions.
A high flame on a surface burner is both inefficient and unsafe. The flame should always be adjusted so that it is no larger than the bottom of the pan. Fluctuations in flame size could be caused by pressure variations, improperly positioned burners, damage or debris.
Preheating
Heat the oven to the desired temperature before placing the food in the oven. Preheat for 10 to 12 minutes.
Opening Oven Door
Let hot air or steam escape before removing or replacing food.
Arranging Oven Racks
The oven racks should be arranged before the oven is turned "ON." Place the racks so the food is centered in the oven..
Temperature Selection
It is important to select to proper temperature setting. Never set the dial to a higher degree than needed with the intention of lowering the setting at a later time. This will not speed up the action. It can cause the oven to cycle slower and cause the temperatures to vary so that cooking results may be unsatisfactory. Imagine that the control has three sections: Low Temperature, Bake and Broil.
Baking
When baking follow the recipe instructions. Use correct ingredients, measure them carefully, and use the correct type and size utensil suggested in the recipe. Remember to preheat properly. Avoid frequent opening of the oven door during preheating and baking.
When baking cakes in glass baking dishes, lower the oven temperature 25ºF to prevent browning of the bottom and sides before the top becomes brown.
Also when using glass bakeware it would be better to increase the preheat time to have exact stabilization of the oven’s temperature. To do so allow 20 minutes time for temperatures up to 350°F and 30 minutes for temperatures up to 425°F. Avoid opening the door as much as possible.
Hot Oven Restart
If you turn off the oven but then decide to turn it back on before it has cooled to room temperature. the burner may not light properly. This is due to the thermostat still sensing a heated oven and not allowing the maximum gas flow rate into the burner. Turn the control knob all the way to the “BROIL” position to relight the burner. After the burner lights. you may adjust the oven control to the desired temperature.
Oven Racks
The oven racks should be arranged before the oven knob is turned to an “ON” position. Place the racks so the food is centered in the oven. not the rack.
When more than one utensil is used. be sure to stagger them allowing space between each one. Do not allow the utensil to touch any part of the oven. especially the glass window. It is best to use two racks and place food so one utensil is not directly over another.
Rack Removal
Pull the oven rack forward and lift up on the front of the rack so it will clear the rack keeper.
To replace the oven rack. guide the angled rear portion of the rack under the rack keeper and slide the rack to the rear.
Never cover the oven racks with aluminum foil. Such practices will trap heat and cause intense heat in spots which usually give poor results. It can damage the porcelain finish as well as glass windows in oven doors (if equipped). 11-97
Removable Oven Bottom
First remove the racks from the oven. The oven bottom lifts from the rear. Grasp each side of the oven bottom and lift upward from the rear until the bottom is clear—lift it to remove from the front. NOTE: If the oven bottom is replaced incorrectly it may warp and cause undesirable baking results. The oven bottom has a porcelain enamel finish. To make cleaning easier. protect the oven bottom from excessive spillovers. This is particularly important when baking a fruit pie or other foods with high acid content. Hot fruit fillings or foods that are acidic in content. such as milk. tomato or sauerkraut. and sauces with vinegar or lemon juice. may cause pitting and damage to the porcelain enamel surface. | 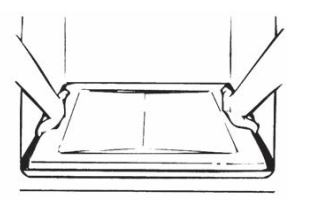 |
To protect the oven bottom surface, place a piece of aluminum foil slightly larger than the baking dish on the rack below to catch any boilovers. It should not completely cover the rack as this would cause uneven heat in the oven. Aluminum foil should not be placed on the oven bottom
If a spillover does occur on the oven bottom, allow the oven to cool first. You can clean the bottom with soap and water, a mild abrasive cleanser, soap-filler abrasive pads or an oven cleaner following package directions.
Broiler Compartment
The broiler pan is held in place by a wire broiler rack. To open the broiler, gently lift up and pull forward on the drop down broiler door. Pull the broiler pan forward. It will reach a temporary stop position. Continue to pull forward and the broiler pan will pull out to expose the entire broiler grill surface. Remove the broiler pan from the broiler rack by lifting up on the front of the broiler pan so it will clear the wire rack. Then pull forward slightly and use both hands to lift the pan free of the rack. To return the pan to the broiler rack, pull the wire rack out to the stop position. Insert the pan into the recessed section of the broiler rack. Slide the pan in place under the pan retainers. Push the pan to the rear of the broiler compartment. Close the broiler door | 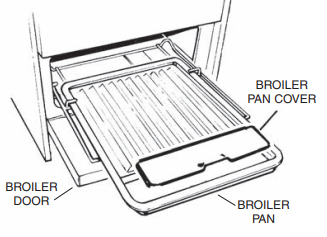 |
Economy Broiler
Your range may be equipped with this optional broiler. The outward appearance of the range will be the same. To open the broiler door, lift handle up slightly to release the door catch and then lower the door. In the broiler section there are two positions of stamped-in oven rack guides and a broiler pan and grill. When you want to broil, take one of the oven racks and insert it into the rack guide positions. Next, place the broiler pan and grill on the oven rack for broiling.
Broiling
Preheat the broiler area and broil pan for a few minutes. No definite time can be given for broiling meats because of varying thickness, amounts of fat, and personal taste. Be careful when handling hot broiler pans; be careful of the hot grease. Serious injury can result due to spillage of hot grease. Never leave a dirty broil pan in place, always clean it and return it to the broiler assembly. Unauthorized broil pan substitutes should never be used. Excess fat should be trimmed to reduce the possibility of flame up. The meat could be ruined or fire could occur causing loss of property and bodily injury.
When broiling fatty meats, the lowest broil must be used, however, we recommend the lowest positions at all times
Always broil with the oven door closed. When broiling is completed, turn the dial to OFF and remove the broil pan temporarily for cleaning.
Do not use the broiler area for storage of utensils
CLEANING THE RANGE
Always keep cleaning materials and chemicals in a safe place and away from children. Know what you are using. Make sure all parts of the range are COOL before cleaning. Be sure to replace the parts correctly
Knobs
Pull forward on the knobs to remove them. Wash in a water solution with a mild detergent mix. Do not use an abrasive cleaner or any abrasive action. Abrasive action will scratch away the knob markings.
If the knobs become loose on the valve stem, spread the valve stem slightly with a small screwdriver.
Using Commercial Oven Cleaners
Commercial oven cleaners may be used on porcelain lined ovens; however, many cleaners are very strong, and it’s essential to follow instructions carefully. Be sure to wear rubber gloves to protect your hands.
After using such cleaners, thoroughly rinse the oven with a solution of 1 tablespoon vinegar to 1 cup of water.
Oven cleaners can coat or damage the thermostat sensing device (the long tube in the oven) so that it will not respond to temperature accurately. If you use an oven cleaner, do not let it contact the sensing bulb, or any chrome, aluminum, or plastic part of the range. Do not apply or allow the cleaner to come in contact with any parts or surfaces other than the oven interior.
Grates, Main Tops, Surface Burners and Sealed Burners
The grates are made of porcelain coated steel. These materials can be cleaned at the sink with detergent or soap-filled scouring pads. Do not be alarmed when the grate loses its shining finish. The heat from the burners will cause the grates to lose their shining finish.
NOTE: Top burner grates must be seated in the proper position with the retainer lug in the hole provided for it. This will prevent the burner grate from rotating or tilting
To remove the range top on standard models, first remove the grates. Lift up the front of the main top, then grasp the top at each side and pull it toward you. On sealed burner models, you must first remove the burner grates and burner heads.
When removing the burner head/s, the ignitor wire must be disconnected and secured in some fashion, paper clip, tape, etc., to keep it from falling through the access hole in the main top. Never immerse the ignitor in water. This can cause ignition problems. Clean the burner head with a non-abrasive soap filled scouring pad, rinse thoroughly and dry completely before reassembling. Burner heads can be dried in the oven at about 350 degrees Fahrenheit or in the dishwasher on the dry cycle. If there is a need to remove the main top, remove the four (4) attachment screws shown on page 13. After adjustment or cleaning, replace all parts to their original position. Care should be taken when connecting the ignitor wire as the ceramic ignitor base could be damaged. See page 13 for instructions.
The porcelain finish top can be cleaned with detergent and warm water. A mild glass wax can be used to shine the top
Range tops finished in brushed chrome should be wiped clean of spatters or soiling after each use. Clean with a paper towel or a damp cloth. For heavy spatters, use a mild detergent and water. Wipe dry with a soft cloth.
A light coat of oil or thin cooking oil should be applied periodically to the chrome top surface and underside. This will help prevent moisture from penetrating the chrome surface.
Products of combustion from the top pilots as well as certain atmospheric conditions can create an oxidation reaction on the underside of the top. This will appear as rust or in the form of a reddish brown deposit. This will NOT AFFECT THE LIFE OF THE TOP in comparison to the general life expectancy of the range itself.
The grate and main top should be removed to gain access to the surface burners. Remove the burner and let it soak in hot sudsy water. Most stains will then wipe off; if not, scrub with a strong but non-abrasive cleaning pad. Rinse the burner thoroughly.
It is very important that the burner be dry before replacing it in the range. A wet burner will not allow the gas to ignite properly. This could result in a build-up of gas which could result in an explosion or fire.
Aluminum Foil in Oven and Broiler
Aluminum foil when used improperly is a cause of many range fires. Make certain that vents or air openings aren’t covered by the foil. If the vents located along the sides of the oven bottom are blocked, poor cooking will result.
Never cover a rack completely. A piece of foil slightly larger than the utensil can be placed on the rack beneath the utensil.
Remove and discard aluminum foil after each use. This will help prevent greases and spilled food from accumulating and becoming a fire hazard.
Cleaners and Cleaning Materials
Do not use harsh cleaners or degreasers on or around functional parts (valves, controls, etc., or aluminum tubing). This will damage or drastically reduce the life of the part.
Use only a mild solution of soap and water on backguards, aluminum control panels and painted surfaces. Never use harsh abrasives or cleaning powders that may scratch or mar the surface. Make sure the cleaners and cleaning materials are suitable for use on the area to be cleaned. Always keep cleaning materials in a safe place. Never use a sharp metal scraper to clean glass, porcelain, or painted surfaces.
Repair Parts
When repair parts are needed, contact the dealer from whom the range was purchased. In case your range was purchased from a source other than an appliance dealer you may prefer to contact the manufacturer at the address shown in this manual.
Moisture
During the initial heat-up of your range, the heat mixing with the cooler air in the oven cavity may produce fogging of the door glass or a collection of water on the door.
To prevent this, open the oven door for the first few seconds of initial oven heat-up. This will allow the moist air within the oven to escape without the forming of visible moisture on the range. The amount of moisture will depend upon the humidity of the air and water content of the food being cooked. Fogging and even dripping water will usually occur in geographic locations of high humidity
Lift-Off Oven Door (on some models)
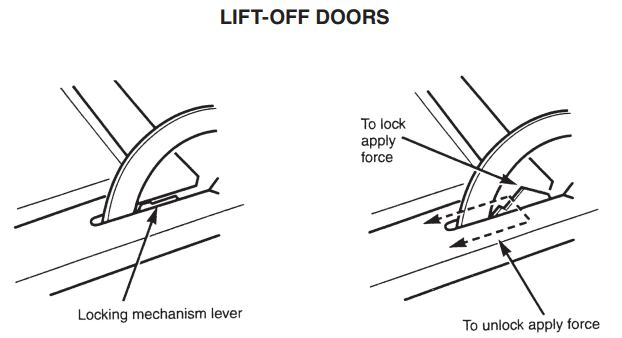
The oven door is removable (on some models) but it is heavy. You may need help removing and replacing the door.
To remove the door, open it to the full open position. Raise the locking mechanism by applying force to the locking mechanism lever. Close the door until it stops against the locking mechanism. Grasp firmly on each side and lift the door straight up and off the hinges.
To replace the door, position the slots in the bottom of the door squarely over the hinges. Then lower the door slowly and evenly over both hinges at the same time.
Open the door to the full open position and press the locking mechanism back into its original position.
DO NOT ATTEMPT TO CLOSE THE DOOR UNTIL THIS STEP IS COMPLETE. THE HINGE OR DOOR COULD BE DAMAGED.
TROUBLE SHOOTING GUIDE
| PROBLEM | CAUSE | CORRECTION |
| 1. Surface burner fails to light. | a. Pilot is out. | a. Relight pilot |
| b. Range not connected to power supply (Solid State Ignition. | b. Connect range to wall outlet, check circuit breaker or fuse box. | |
| c. Burner incorrectly rated | c. Have serviceman rate burner. | |
| d. Clogged burner ports. | d. Clean ports in proper position on valve and burner hanger. | |
| e. Top burner not properly positioned. | e. Reposition burner. | |
| 2. Uneven flame. | a. Clogged burner ports. | a. Clean ports with straight pin; |
| b. Uneven burner alignment. | b. Align burner. | |
3. Surface burner flames • Lifts of port. • Yellow in color. • Noisy when turned off. | a. Improper air gas mixture. | a. Have serviceman adjust burner -OR- Remove pan from burner. (Pan obstructs free air flow. Try again.) |
| 4 Pilot goes out. | a. Burner and/or pilot incorrectly adjusted. | a. Have a serviceman adjust burner. |
| 5. Oven does not light. | a. Pilot is out. | a. Relight pilot. |
| b. Range not connected to power supply (Solid State Ignition). | b. Connect range to wall outlet. Check circuit breaker or fuse box. | |
| c. Moisture build-up in ceramic sleeve or electrode. | c. See Moisture in ALIGNMENTS AND ADJUSTMENTS section. | |
| d. Gas selector screw incorrectly set. | d. Check selector screw. See step 4 in ALIGNMENTS AND ADJUSTMENTS section. | |
| e. Oven not set correctly. | e. Set indicator in MANUAL (MAN) or OFF position. | |
| f. Oven calibration or burner out of adjustment. | f. Have servicer adjust burner. | |
6. Oven Temperature seems inaccurate. • Food takes too long. • Food cooks too fast. • Food pale in color. • Over browning. • Over done on outside and underdone in center. | a. Oven was not preheated. | a. Preheat oven 10 minutes. |
| b. Incorrect rack position. | b. Refer to Use of Oven Section. | |
| c. Incorrect use of aluminum foil | c. Refer to section on aluminum foil. | |
| d. Oven bottom incorrectly in place. | d. Replace oven bottom correctly. | |
| e. Used incorrect type of utensil. | e. Use shiny pans for cakes, cookies and biscuits. Use dull or glass utensils for pies and breads. Dark pans absorb heat and cause over-browning. | |
| f. Oven Calibration or burner out of adjustment. | f. Have serviceman calibrate oven and adjust burner. | |
| 7. Range clock and/or lights do not work. | a. Range not connected to power supply. | a. Connect range to outlet, connect backguard plug, check circuit breaker or fuse box. |
| b. Burned out bulb. | b. Replace bulb. | |
| c. Defective switch, starter, or ballast. (Fluorescent bulb.) | c. Replace starter or ballast. Have serviceman replace switch. | |
| d. Clock defective, loose wiring or connection. | d. Have serviceman check clock assembly or loose connection. |
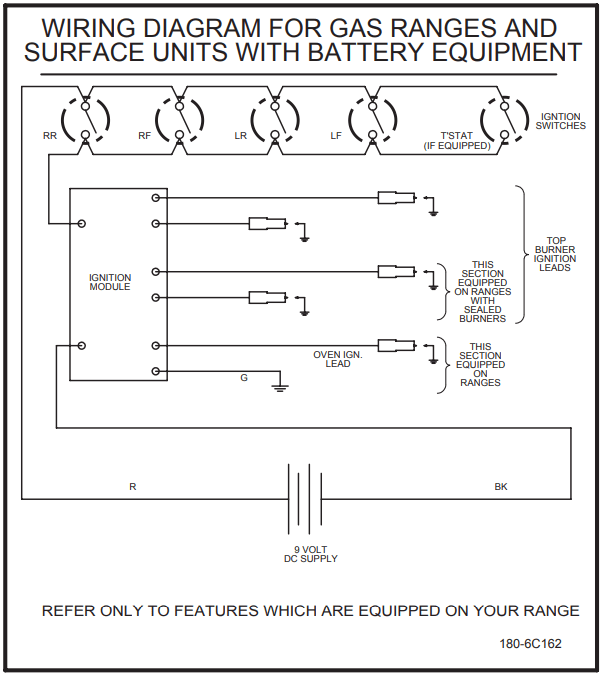
Refer to this diagram for ranges equipped with battery spark ignition.
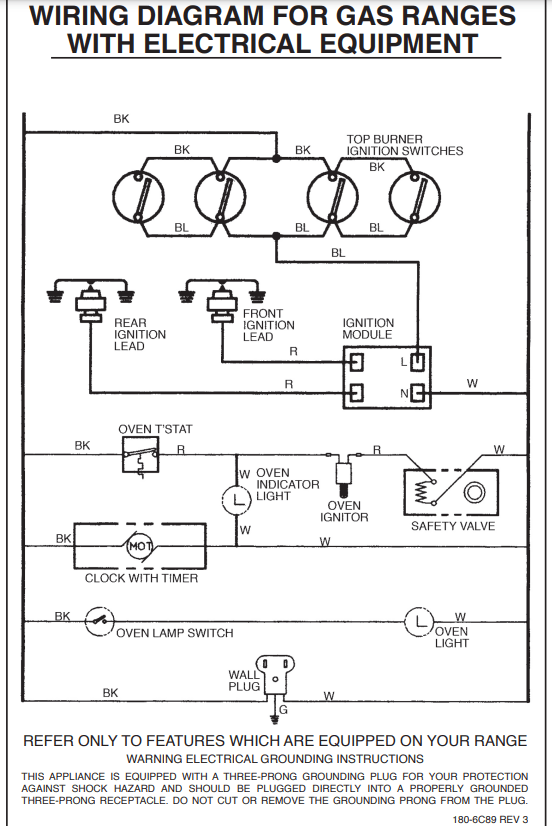
See other models: SBC635MBISSHH CR2220WH FF6LBISSHH SBC635MOS7 ACR1718RH
