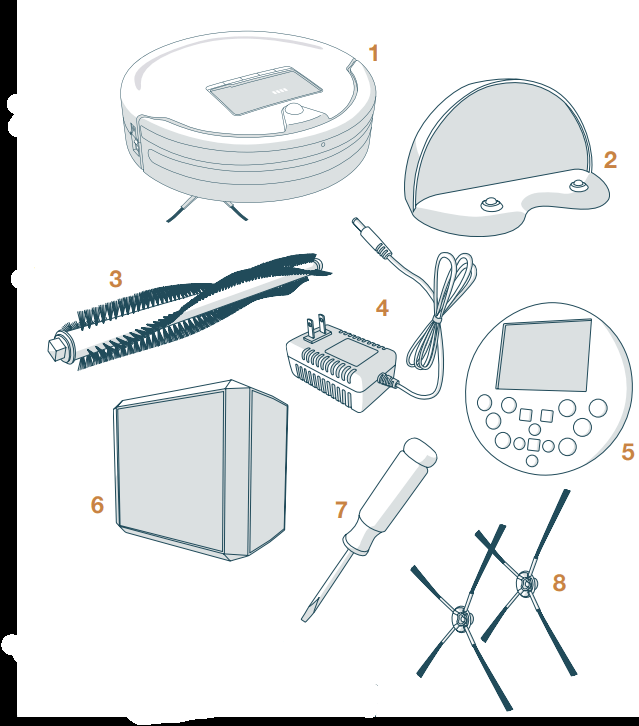
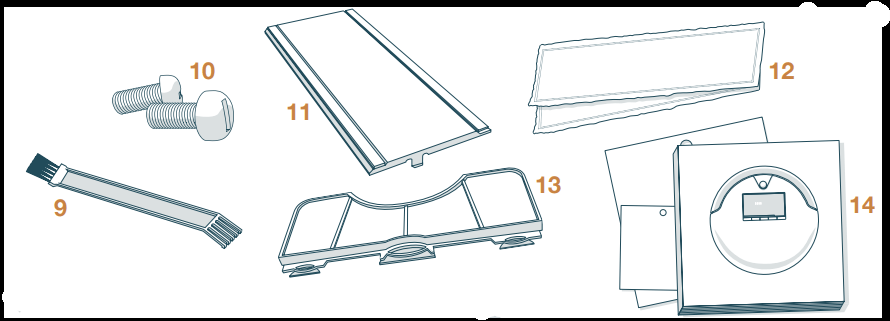
Owner’s Manual, Quick Start Guide, and Warranty Card
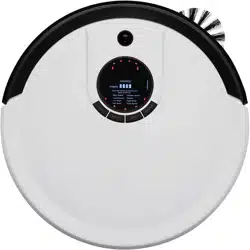
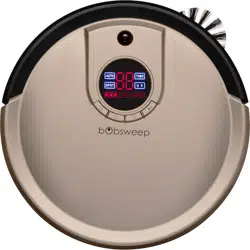
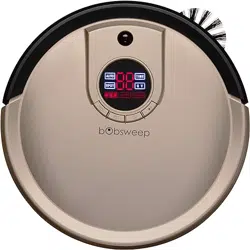
Anatomy
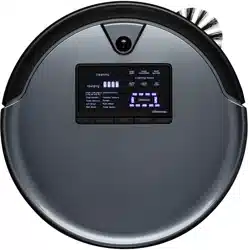
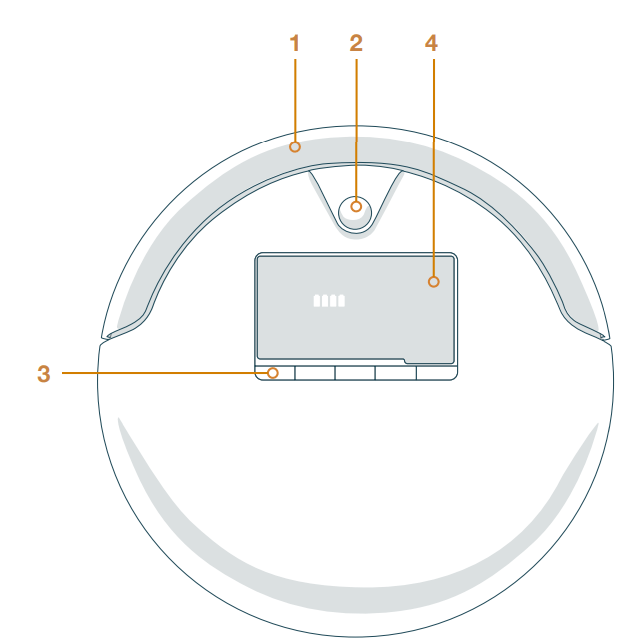
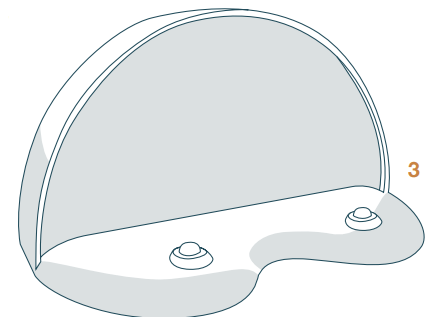
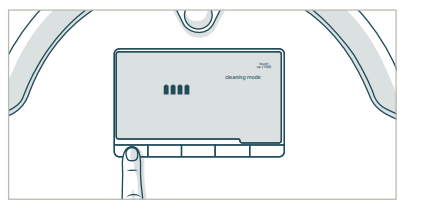
Top View
Bumper
Transmitter
Cover Buttons
Display Screen
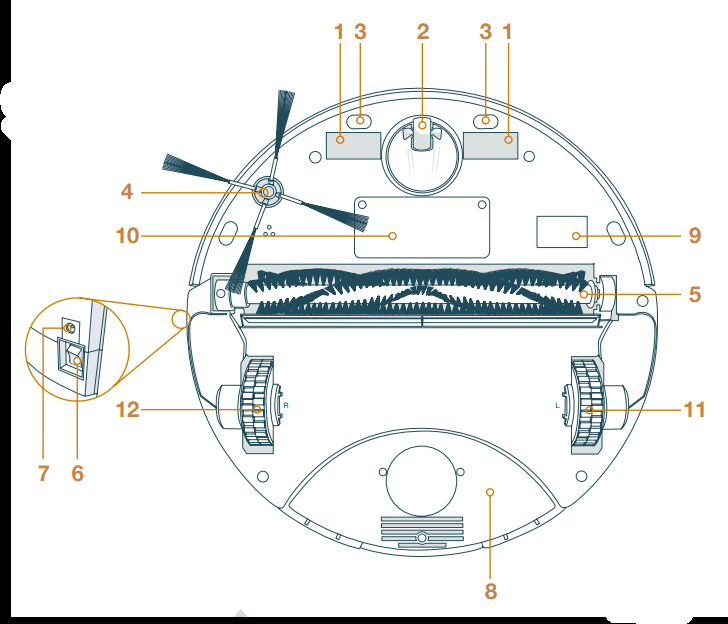
Bottom View
Charging Plates
Front Wheel
Edge Sensors
Side Brush
Main Brush
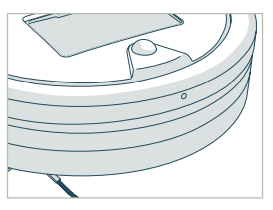
ON/OFF Switch (on side)
Charging Inlet (on side)
Dustbin
UV Lamp
Battery
Left Wheel
Right Wheel
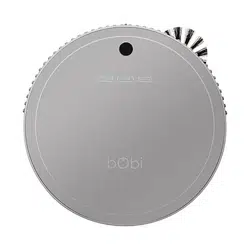
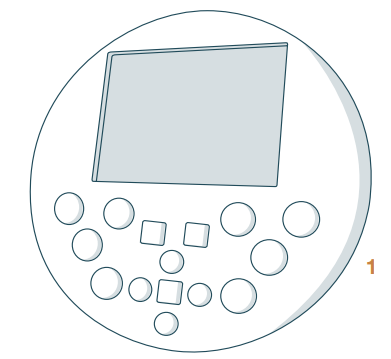
FullCommand™ Remote
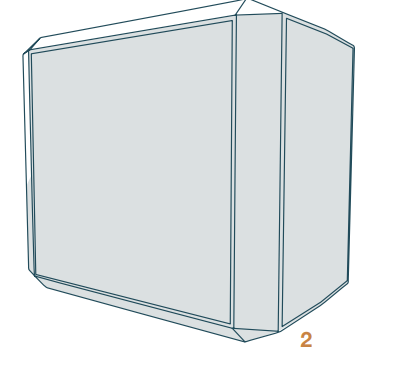
blOck Plus™
Charging Station
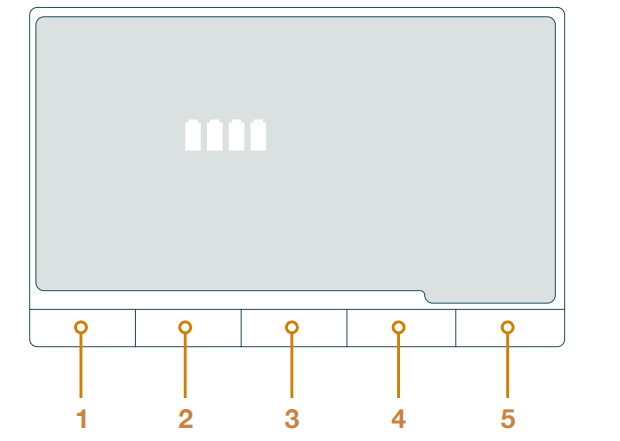
Cover Buttons
1 GO!
Bob will clean on his default setting
2 CLEANING MODE
Select Bob’s cleaning mode
3 CHARGE
Send Bob to his charging station
4 MUTE
Mutes and un-mutes the beeping sound Bob makes when entering and in standby mode
5 CHECKUP
Put Bob in checkup mode / Deactivate edge sensors (see page 56)
Get Bob Ready to Clean
Install Bob’s Side Brush
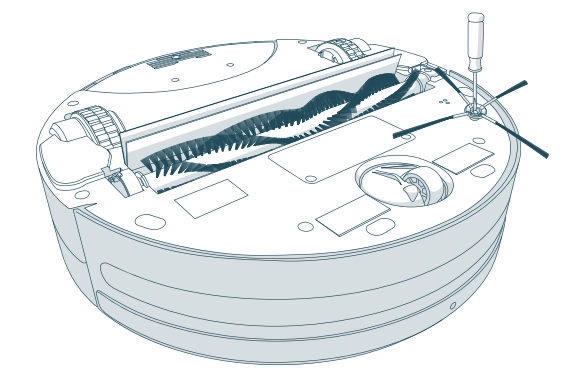
Before Bob’s first clean, you must install his side brush, which allows him to sweep along corners, walls, and other hard-to-reach places.
To do this, you will need the following materials, all of which are included inside Bob’s box: a side brush, a flat head screwdriver, and a short screw.
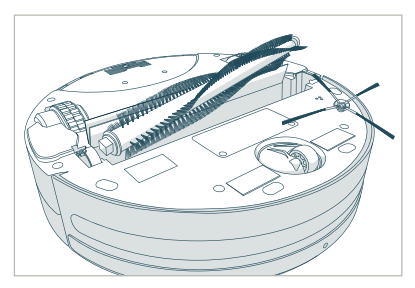
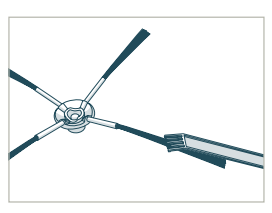
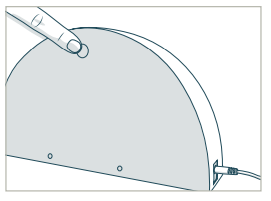
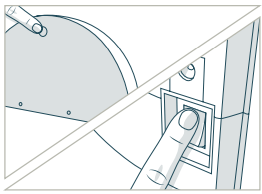
Flip Bob over onto a flat surface. Place the side brush over the empty socket on Bob’s underside.
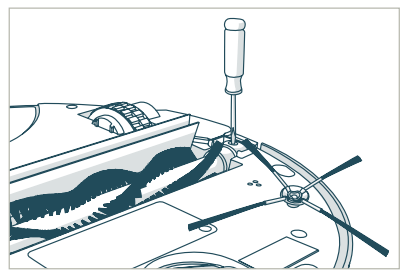
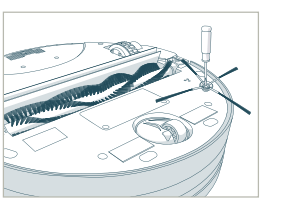
Secure Bob’s side brush onto the socket using the flat head screwdriver and short screw.
You may use the additional side brush and screw as spares.
Charge Bob
After installing Bob’s side brush, you must now set him to charge.After installing Bob’s side brush, you must now set him to charge.
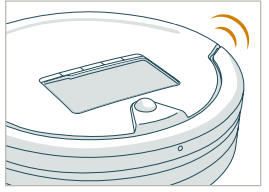
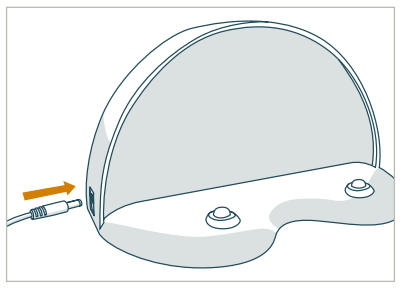
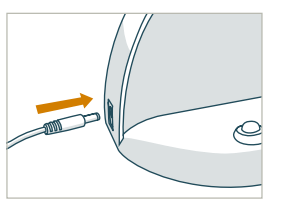
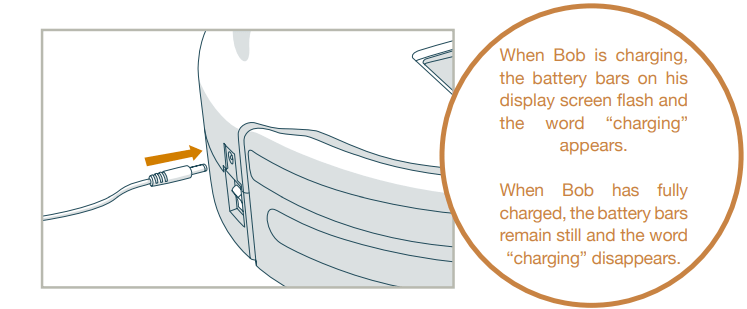
Plug the charging adapter into the side of the charging station. The station’s red power light will turn on.
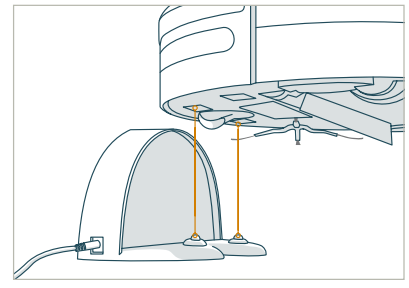
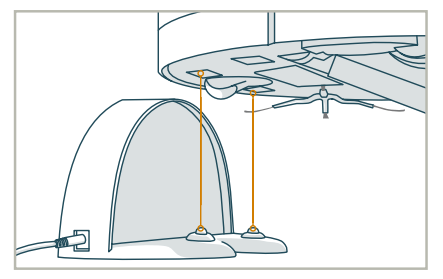
Place Bob on his charging station with the metal plates on his underside sitting on top of the nodes on his station.
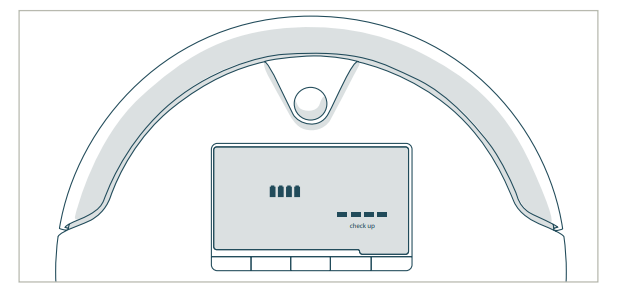
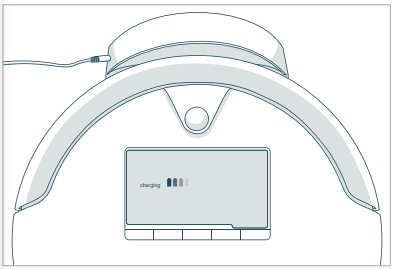
When Bob is charging, the battery bars on his display screen flash and the word “charging” lights up.
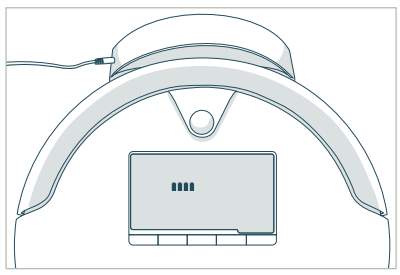
When Bob has fully charged, the battery bars remain still and the word “charging” disappears.
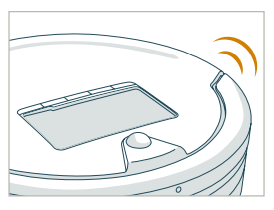
Sync Bob’s Charging Station
Bob will automatically return to his charging station when his battery reaches 15% capacity, but first you must sync him to it. You will only need to do this once.
To sync the charging station:
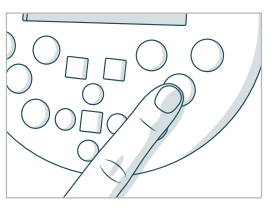
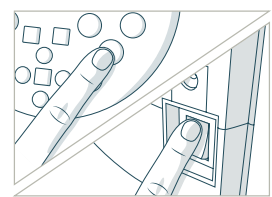
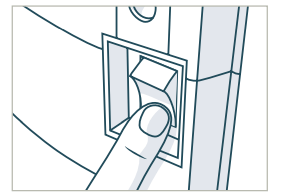
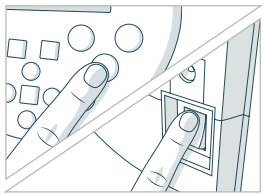
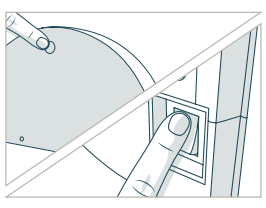
While the station is plugged in, hold down the SYNC button on the back of it.
While still holding down the SYNC button, flip Bob’s power switch ON.
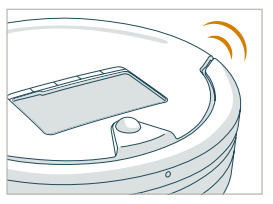
Bob will chirp twice to let you know the sync was successful.
Sync Bob’s Remote
Bob will also need to be synced with his FullCommand™ remote to respond to its commands.
To sync the remote:
Hold down the OK/SYNC button on Bob’s remote.
While still holding down the OK/SYNC button, flip Bob’s power switch ON.
Bob will chirp twice to let you know the sync was successful.
If Bob does not chirp, repeat the process.
Bob’s First Clean
Bob is now ready to clean!
Press the GO! button on his cover — or on his FullCommand™ remote — and he will clean on his default Deep Clean setting.
Charging Bob
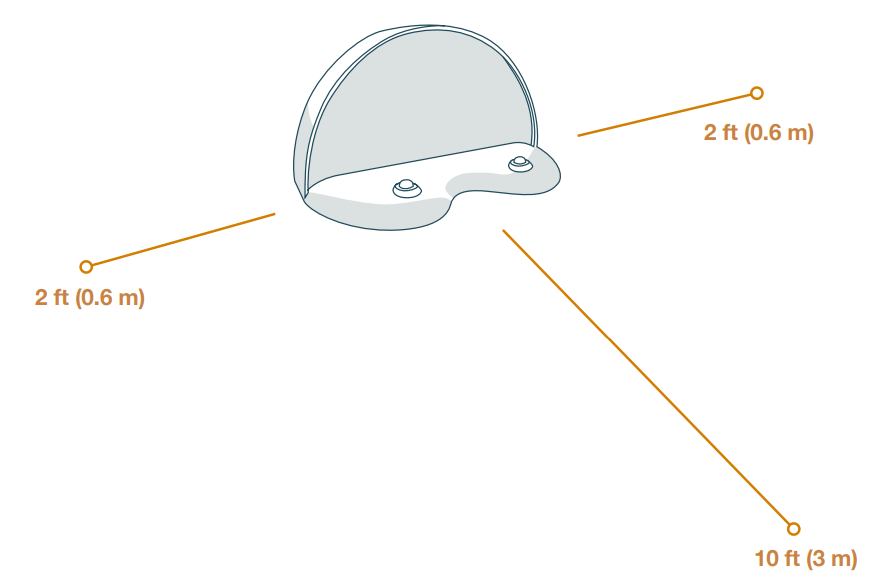
Charging Station Placement
Position the charging station against a wall on a hard, flat surface.
Make sure there is at least 10 feet (3 m) of open space to the front and 2 feet (0.6 m) to the sides.
Auto Charging
Bob is smart and will automatically search for his charging station when his battery reaches 15% capacity. You will need to sync the station if Bob is having trouble finding it.
To sync the charging station:
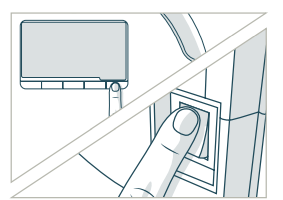
Plug the charging adapter into the charging station. The station’s red power light will turn on.
Hold down the SYNC button on the back of the charging station while at the same time flipping Bob’s power switch ON.
Bob will chirp twice to let you know the sync was successful.
You can also direct Bob to his charging station at any time by pressing the CHARGE button on his cover or on his FullCommand™ remote.
Manual Charging
Using the charging station:
• Place Bob directly onto his plugged-in charging station.
• Make sure his charging plates sit directly on top of the nodes on his station.
Using the adapter:
• Plug the charging adapter directly into the inlet on Bob’s side.
Conserving Bob’s Battery
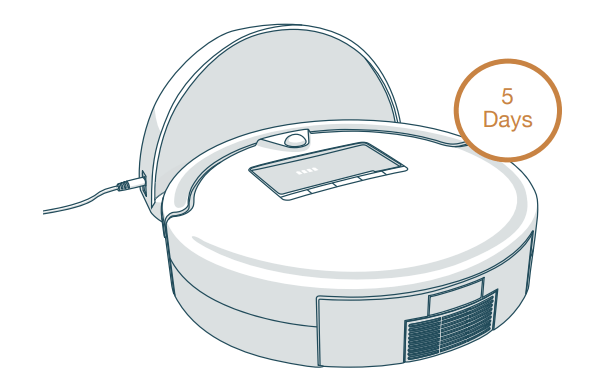
Bob should not sit on his charging station for more than 5 days. If you will not be using him at least once every 5 days, turn his side power switch OFF and remove him from the station to conserve his battery.
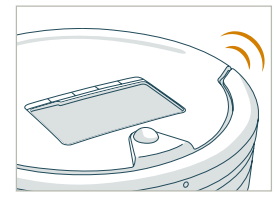
Standby mode
If Bob is left idling with his power switch ON, he will enter standby mode to conserve his battery. Once in standby mode, Bob’s screen goes blank and he beeps. He will also beep once every 2 minutes to let you know his battery is draining.
To mute the sound Bob makes during and when entering standby mode, press the MUTE button on his cover or remote.
Cleaning Modes
Cleaning Modes
Bob automatically returns to his charging station after he completes a cycle in each mode. Choose the mode that best suits your cleaning needs.
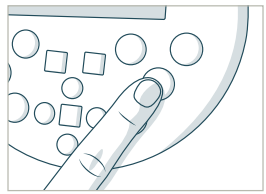
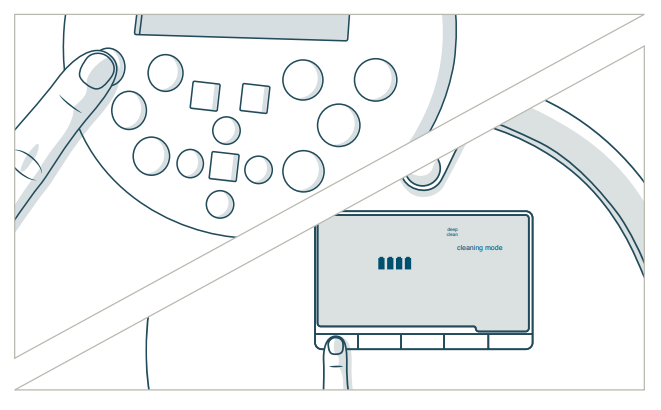
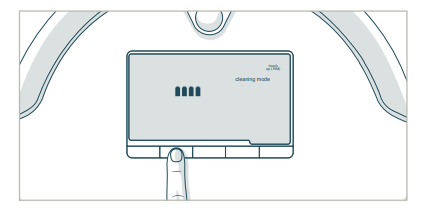
To select any of these cleaning modes:
Press the CLEANING MODE button on Bob’s cover until the mode you wish to select lights up on his screen.
Press the GO! button to confirm your selection
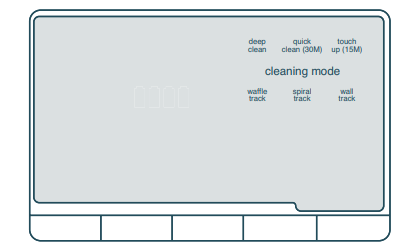
Bob is equipped with six cleaning modes:
Deep Clean
• Bob will thoroughly cover a large area for just over an hour Quick Clean (30 min)
• Bob will cover a medium-sized area for 30 minutes
Touch Up (15 min)
• Bob will cover a small area for 15 minutes
Waffle Track™
• Bob will target a 6 x 5 in (15 x 13 cm) spill zone by tracing a grid pattern
Spiral Track™
• Bob will target a 5 x 5 in (13 x 13 cm) spill zone by spiraling outward from the center and then reversing his movements
Wall Track™
• Bob will travel along the perimeter of your home
Full Command™ RemoteControl
FullCommand™ Remote
Schedule Bob’s cleaning schedule, adjust his speed, and control his movements all from his FullCommand™ remote.
1 GO!
2 Charge
3 Cleaning Mode
4 UV Light
5 Wake/Sleep
6 Mute
7 Navigational Buttons
8 OK/Sync
9 Thorough Lift™
10 Set Current Time
11 Set Cleaning Schedule
12 Stop
Bob’s remote requires 2 AAA batteries (not included). Remove the batteries if you are not using it on a regular basis. Keep the remote at room temperature.
GO!
• Bob will begin cleaning
Cleaning Mode
• Cycles through Bob’s cleaning modes
Charge
• Sends Bob to his charging station
UV Light
• Activates or deactivates UV light
Wake/Sleep
• Puts Bob in and out of standby mode
While in standby mode, Bob beeps every 2 minutes to let you know that he is not fully powered off. To conserve Bob’s battery, flip his power switch OFF, or press the MUTE button on his cover or remote to mute his beeping.
Mute
• Mutes Bob’s beeping while he is in standby mode
Navigational Buttons
• Guide Bob forward, backward, right, or left
OK/Sync
• Confirms time selection/Synchronizes remote
Thorough Lift™
• Slows Bob down for an intensive clean or speeds him up to his default speed
Set Current Time
• Sets the current time and date
Set Cleaning Schedule
• Sets Bob’s regular cleaning schedule
Stop
• Pauses or resumes Bob’s movements
Syncing Bob’s Remote
Bob must be synced to his FullCommand™ remote before he is able to obey its commands.
To sync Bob’s remote:
Hold down the OK/SYNC button on Bob’s remote.
While still holding down the OK/SYNC button, flip Bob’s power switch ON.
Bob will chirp twice to let you know the sync was successful.
Using the navigational arrows:
Hold down the remote’s navigational buttons to keep Bob moving in the desired direction. Release the button when you are done manually driving Bob.
Bob’s edge sensors are located along his front, not along his back. Do not reverse Bob towards edges, as he will fall.
Cleaning Schedule
Set Bob’s Cleaning Schedule
Bob can be programmed to start cleaning on the dates and times of your choice through his FullCommand™ remote.
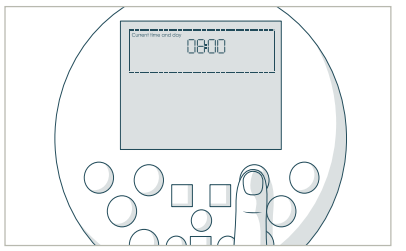
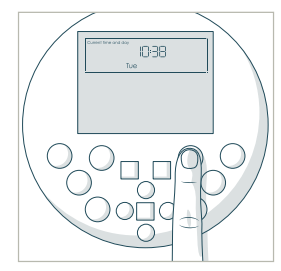
To set up Bob’s cleaning schedule, you must first set the current time and date on his remote. The remote works on a 24-hour clock, so adjust accordingly.
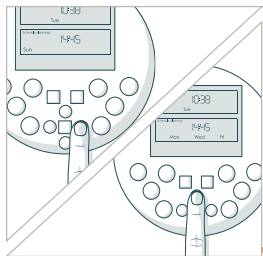
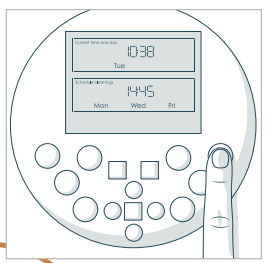
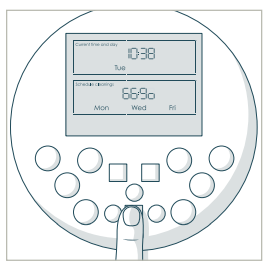
To set the current time and date:
Make sure Bob is ON and synced to his remote
The first hour digit will start flashing. Use the FWD and BACK buttons to adjust the first hour digit.
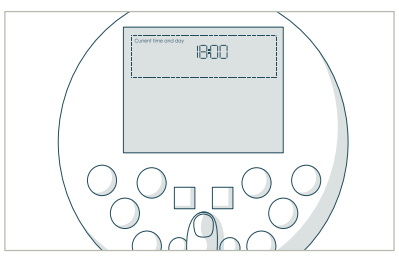
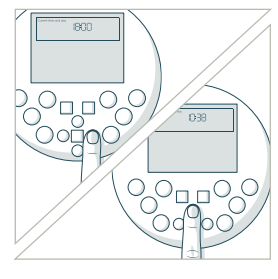
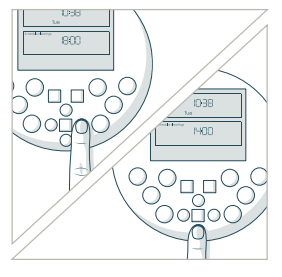
Press the RGHT button to move on to the next digits. Adjust the hour and minute digits using the FWD and BACK buttons.
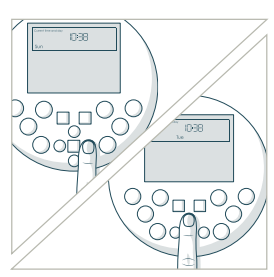
Press the RGHTbutton until “Sun” begins blinking. Use the FWD and BACK buttons to select the correct day.
When the right day is set, press the SET CURRENT TIME button again to save your settings. Bob will chirp once to let you know the current time is set.
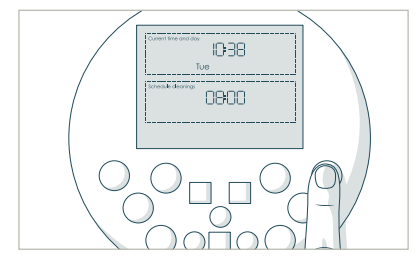
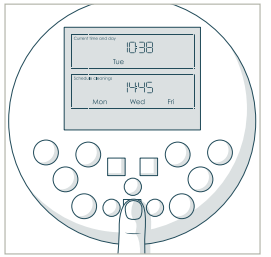
After setting the current time and day on Bob’s remote, you may set his cleaning schedule.
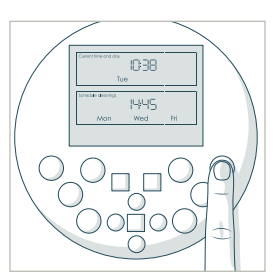
To set the cleaning time and day(s):
Press the SET CLEANING SCHEDULE button.
The first hour digit will start flashing. Use the FWD and BACK buttons to adjust the first hour digit.
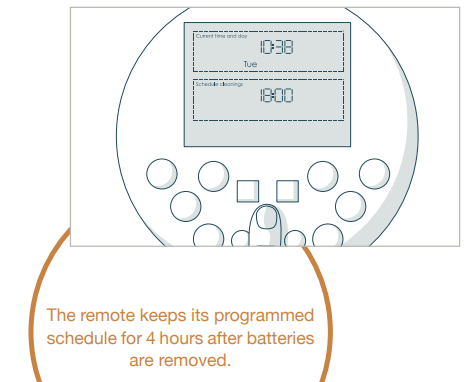
Press the RGHT button to move on to the next digits. Adjust the hour and minute digits using the FWD and BACK buttons.
Push the RGHT button until “Sun” begins blinking. Use the FWD and BACK buttons to move between the days of the week, and press the OK/SYNC button to select or deselect cleaning for that day.
When done, press the SET CLEANING SCHEDULE button again to save your settings. Bob will chirp once to let you know the scheduled time is set.
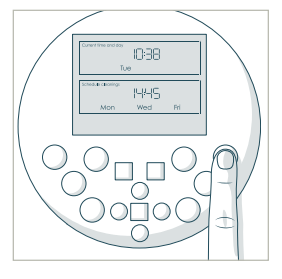
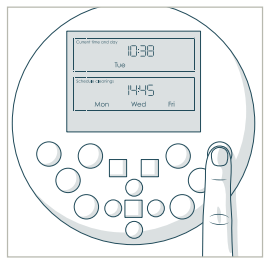
Auto-Resume
On auto-resume mode, Bob leaves his charging station EVERY TIME his battery is full to perform “back-to-back” cleaning cycles. Make sure Bob is ON and synced to the remote.
To enable auto-resume:
Press the SET CLEANING SCHEDULE button again to save your settings.
Press the SET CLEANING SCHEDULE button on Bob’s remote. The first digit under “Scheduled Cleanings” will start flashing.
Press the STOP button and “bbgo” (back-to-back go) will appear on the remote’s screen.
To disable auto-resume:
Press the SET CLEANING SCHEDULE button on the remote.
Press the STOP button and “bbgo” will reset to the last saved time.
Press the SET CLEANING SCHEDULE button again to save your settings.
Parts & Maintenance
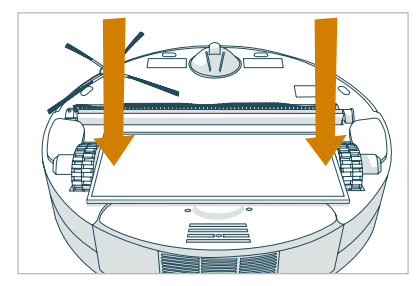
Mop
Bob’s microfiber mopping cloth can pick up dirt while both wet and dry. To use Bob’s mop attachment:
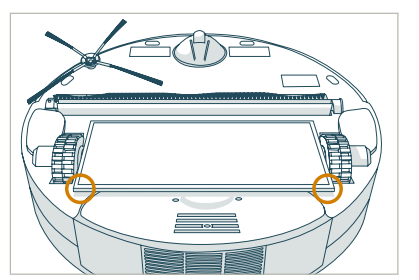
Hold the mop with the two prongs near the top. Align the prongs with their corresponding spaces between Bob’s left and right wheels.
Press down on the mop attachment until both sides are secured.
You may dampen Bob’s mopping cloth with water or cleaning liquid before placing it on his mop attachment.
Remove the mop attachment when Bob is cleaning carpets or rugs. Or, you may use blOck Plus™ to keep Bob away from carpet while he is mopping.
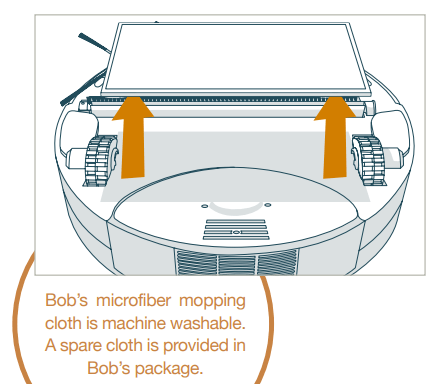
To remove Bob’s mop attachment:
Lift the mop attachment on the edge that sits on top of Bob’s dustbin.
Pull up until the mop detaches.
blOck Plus™
You can use blOck Plus™ to create digital barriers Bob will not cross. blOck Plus™ runs on 4 AA batteries (not included).
blOck Plus™ emits a barrier from its left side and another from its front. You may use one or both barriers depending on your preference.
As with Bob’s charging station and remote, you will need to sync blOck Plus™ before using it for the first time.
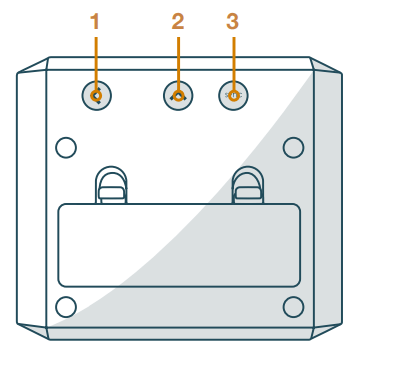
Located on the back of blOck Plus™ are three buttons:
1 Power button for the left barrier
2Power button for the front barrier
3SYNC button
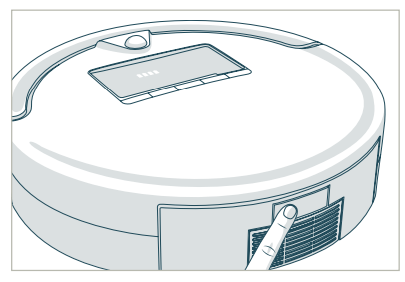
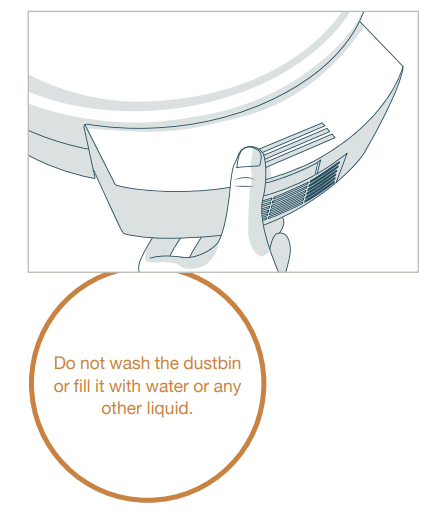
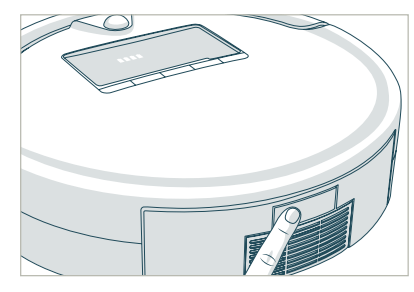
Dustbin
To empty the dustbin:
Push the center button on Bob’s back to release the dustbin. Then, slide the dustbin out.
Open the transparent gate to empty the bin.
You may wipe the dustbin with a dry brush it with the cleaning tool.
When done, replace the transparent gate cloth or and slide the dustbin back into Bob.
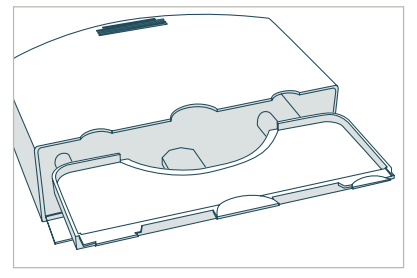
Filters
Three filters are located inside the dustbin’s ceiling. These filters capture fine particles and allergens, and prevent them from escaping the dustbin.
To remove the filters:
Eject the dustbin by pressing the button on Bob’s back.
Pull out the filter’s frame.
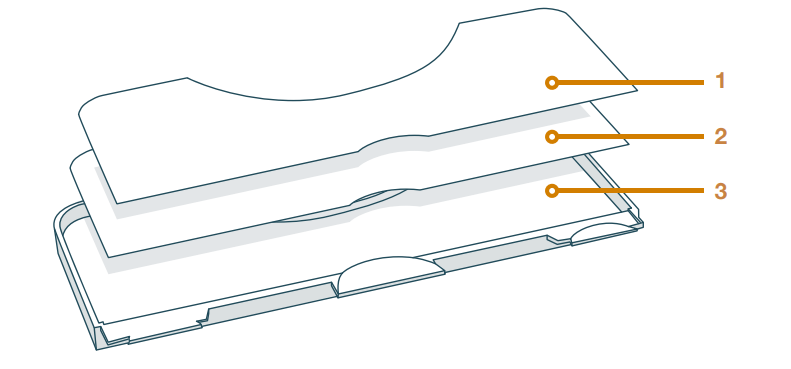
You will see three filter layers:
1 HEPA Filter
• For sub-micron particles
2 Electrostatic Filter
• For fine particles
3Mesh Filter
• For larger particles
Use the cleaning tool to brush dust off the filters. It is recommended that you change Bob’s filters about every 6 months.
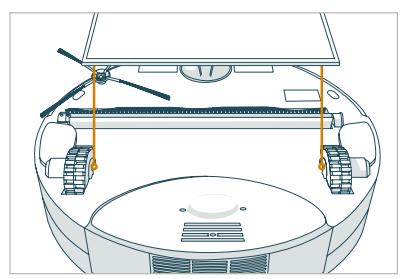
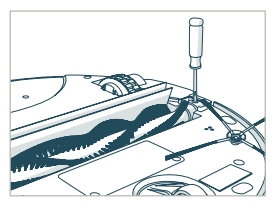
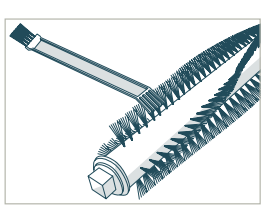
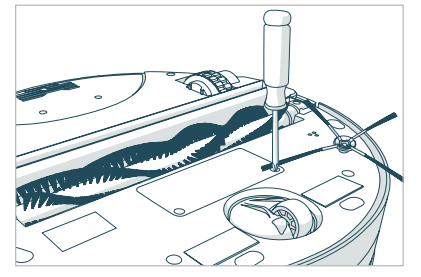
Main Brush
It is recommended that you remove and clean Bob’s main brush on a weekly basis.
To do so:
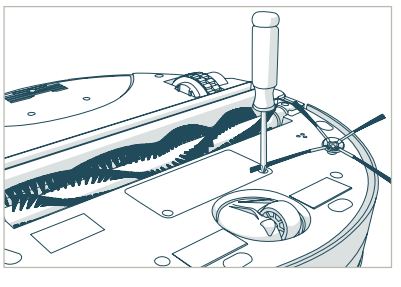
Remove the screw securing Bob’s main brush using a flat head screwdriver.
Use the cleaning tool to remove debris from both ends of the brush as well as Bob’s brush compartment.
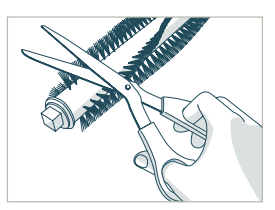
You may use a pair of scissors to cut away any hair or thread wrapped around the brush, or a pair of tweezers to remove congestion from the notches where the main brush is held.
To reinstall the brush:
Replace the brush cap and insert the opposite end of the brush into the square indentation inside Bob.
Lower the brush into place and re-tighten the screw.
Side Brush
Bob’s side brush extends his reach and allows him to sweep along corners and walls. When Bob is first delivered to you, his side brush is not installed.
To do so:
Use the flat head screwdriver and short screw included in Bob’s box to secure the side brush into the empty socket on Bob’s underside.
It is recommended that you remove and clean Bob’s side brush on a weekly basis.
To do so:
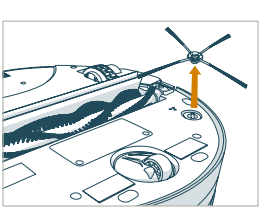
Remove the side brush using a flat head screwdriver.
Use the cleaning tool to brush off hair tangled around the side brush as well as the socket where the side brush is held.
Replace the side brush and re-tighten the screw.
Battery
To replace Bob’s battery:
■Remove the battery cover on Bob’s underside using a Phillips head screwdriver.
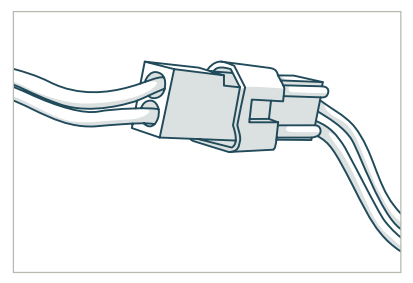
Lift the battery out of it’s compartment, and unplug the connecting wires.
Plug in the new battery and slide it into the empty compartment.
Re-tighten the screws on the battery cover.
Storing Bob
If you are not using Bob for an extended period of time, unplug his charging station, remove his battery, and store everything in a dry place at room temperature.
Do not leave Bob in direct sunlight.
Sensors
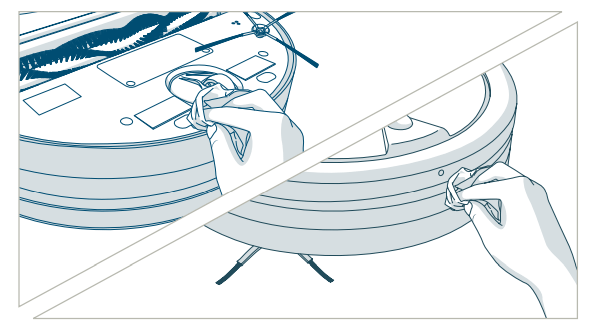
Cleaning Bob’s Sensors
Dirt and dust on Bob’s wall and edge sensors can reduce his performance. Bob’s wall sensors are located along his bumper, and his edge sensors are located on his underside. Regularly cleaning these sensors ensures that Bob keeps working at his best.
To do so:
Wipe the wall and edge sensors using a soft cloth slightly dampened with cold water or alcohol.
Deactivate Edge Sensors
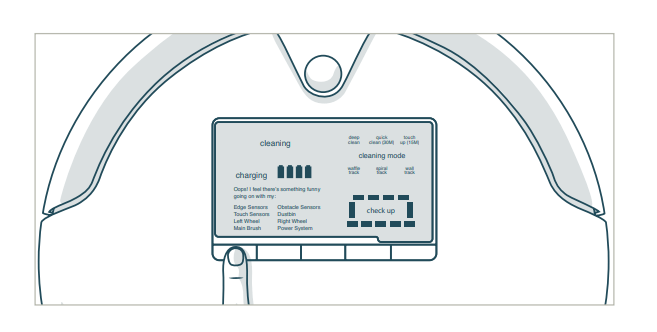
Dark-colored or patterned carpet may seem like empty space to Bob’s edge sensors. If Bob displays that he feels “something funny going on” with his edge sensors, then you may need to temporarily deactivate them.
To deactivate Bob’s edge sensors:
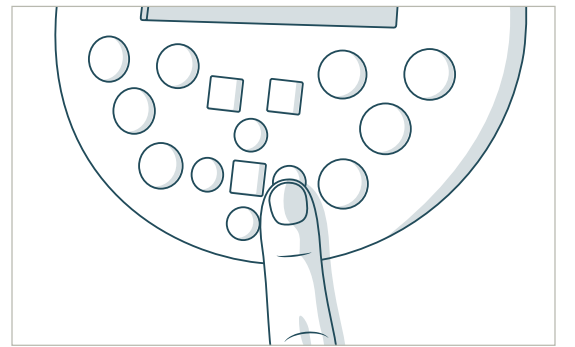
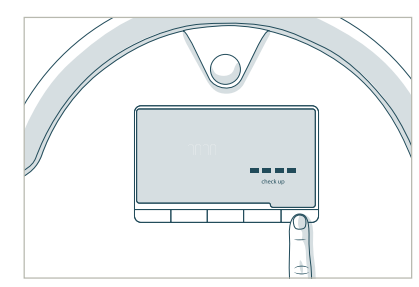
Flip Bob’s power switch ON. Hold down the CHECKUP button on Bob’s cover. The 4 bars above “Check Up” will begin to flash on Bob’s screen.
After the 4 bars flash 7 times and remain still, release the CHECKUP button. The 4 bars above “Check Up” will remain on. This means Bob’s edge sensors are deactivated.
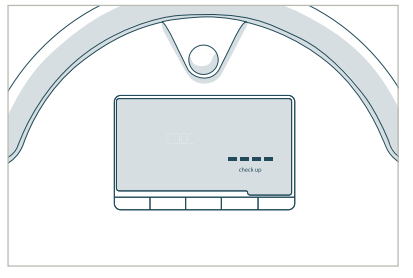
To reactivate Bob’s edge sensors:
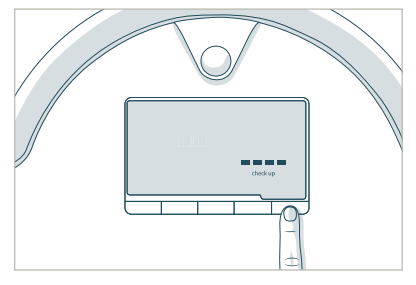
Hold down the CHECKUP button on Bob’s cover. The 4 bars above “Check Up” will begin to flash on his screen.
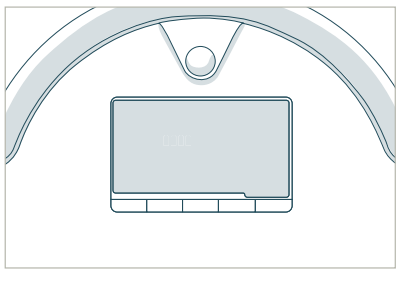
After the 4 bars stop flashing and disappear, release the CHECKUP button. Bob’s edge sensors are active again.
Troubleshooting &Home Checkup Test
Troubleshooting
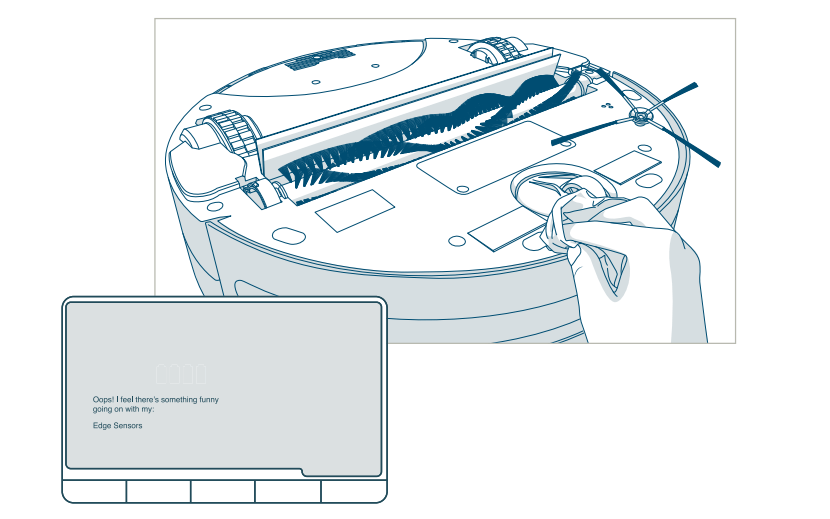
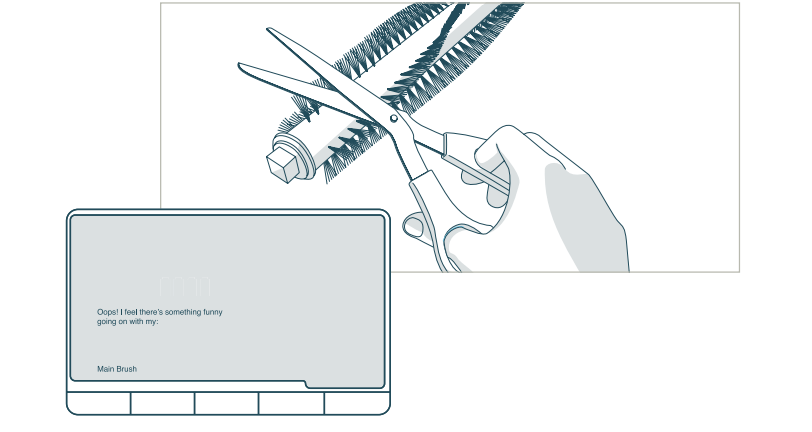
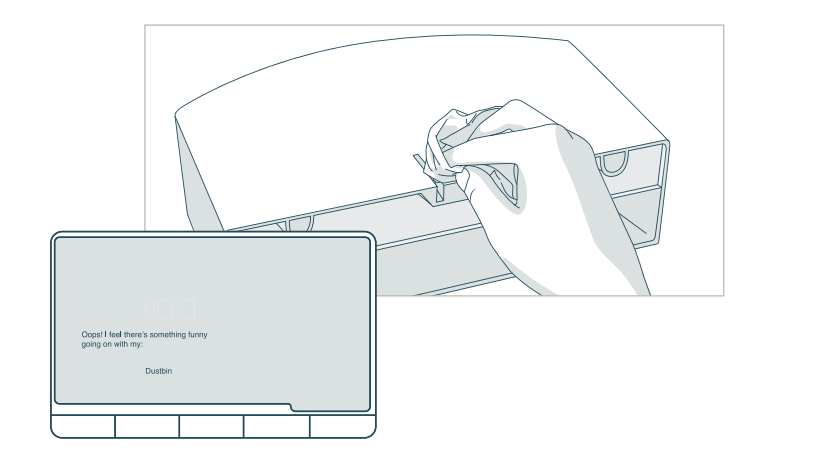
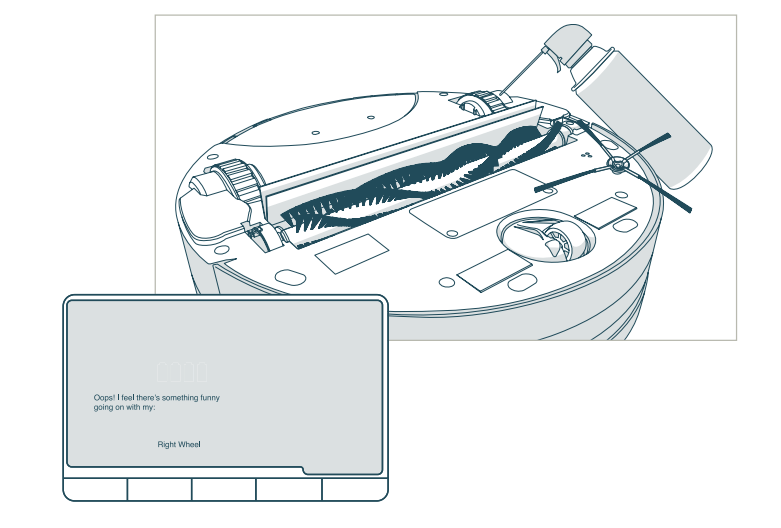
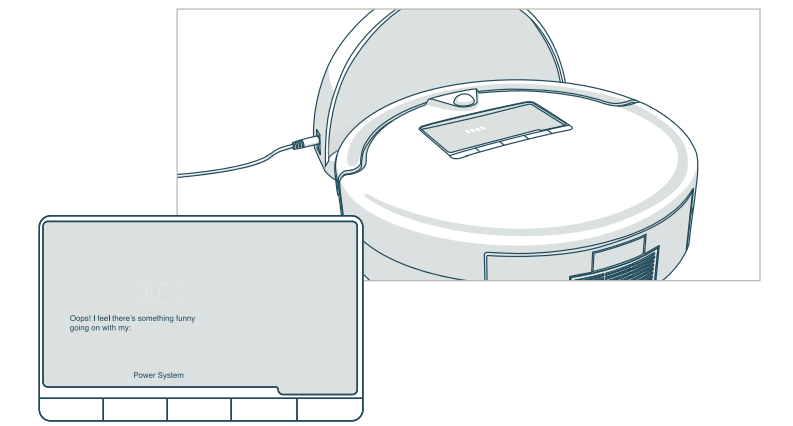
Oops! I feel there’s something funny going on with my:
Edge Sensors
Bob’s four, oval-shaped edge sensors are located on his underside, near his bumper. What to do:
• Clean the sensors using a clean, dry cloth or compressed air.
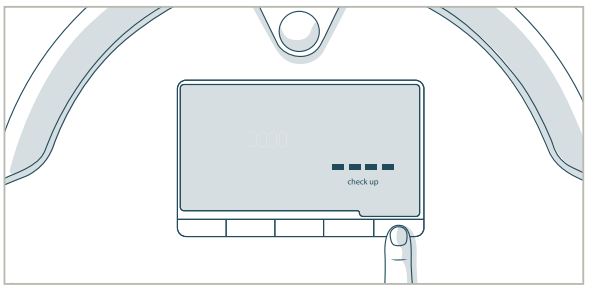
If Bob is continually having trouble with his edge sensors while working on dark-colored or patterned carpeting, you may need to deactivate them.
To deactivate Bob’s edge sensors:
• Hold down the CHECKUP button on Bob’s cover. The 4 bars above “Check Up” will begin to flash on Bob’s screen. After the bars flash 7 times and remain still, release the CHECKUP button (see page 56).
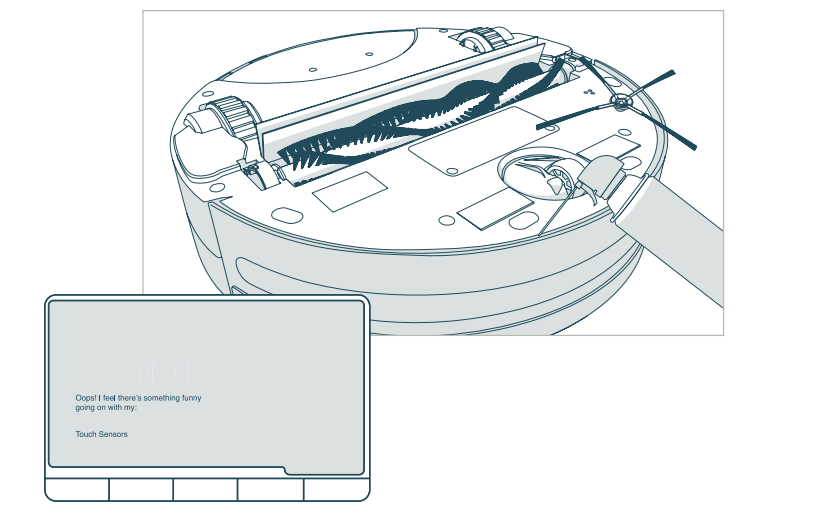
Touch Sensors
What to do:
• Gently tap on Bob’s bumper to clear out any obstructions.
• Use compressed air to clear out dust and debris trapped inside the bumper.
• Press on both ends of the bumper until you hear a tiny “click.” If the bumper is not clicking on its ends, the touch sensors may need to be replaced.
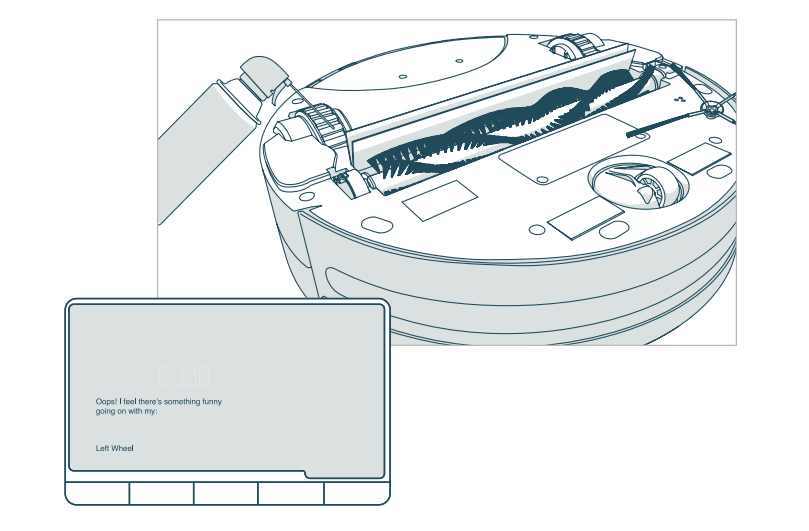
Left Wheel
What to do:
• Use the cleaning tool or compressed air to remove any dust or debris that may be jamming the left wheel.
• If that does not solve the problem, run a checkup test and see how the wheel performs.
Main Brush
What to do:
• Remove the main brush using a flat head screwdriver, and clean it thoroughly from end to end.
• You may use a pair of scissors to cut hair or thread wrapped around Bob’s brush, or a pair of tweezers to remove congestion from the notches where the main brush is held.
Bob’s main brush is not designed to clean shag carpet or rugs with long fibers or fringes. You may remove Bob’s main brush and allow him to vacuum without it, but he will not clean as effectively.
Wall Sensors
What to do:
• Use a clean, damp cloth to wipe away any debris from the strip on Bob’s bumper.
• Gently tap on the bumper and use compressed air to clear it of debris.
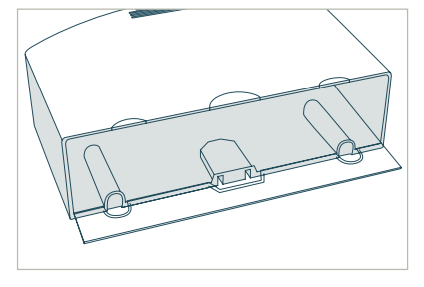
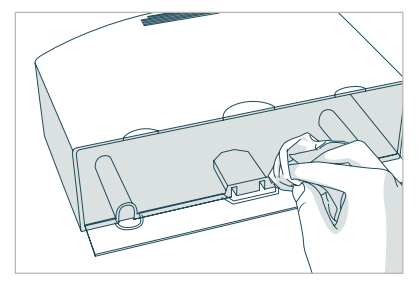
Dustbin
What to do:
• Remove Bob’s dustbin and empty it.
• Gently wipe the two metal connectors on the bottom of the dustbin with a dry cloth. If the two metal connectors seem damaged, they may need to be replaced.
• Lastly, clean the metal contact points inside Bob where the dustbin is inserted.
Right Wheel
What to do:
• Use the cleaning tool or compressed air to remove any dust or debris that may be jamming the right wheel.
• If this does not solve the problem, run a checkup test and see how the wheel performs.
Power System
If Bob stops working and displays this message, or if he displays this message while on his charging station, his battery may be below the threshold needed to properly function.
What to do:
• Make sure Bob is OFF. Open Bob’s battery compartment and unplug the battery. Wait 30 seconds, then reinstall the battery.
• Plug the charging adapter directly into the inlet above his power switch. Let him charge with his adapter overnight while his switch is still in OFF.
• If connecting the charging adapter to Bob fails to wake him, he likely needs a new one.
Home Checkup Test
If Bob is not performing as well as he should, you can diagnose the problem with a simple home checkup test.
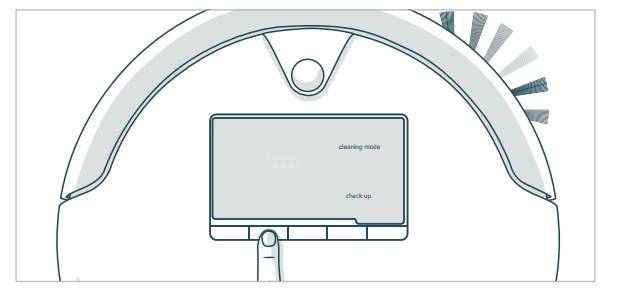
To put Bob in checkup mode:
Flip Bob’s power switch OFF.
While holding down the CHECKUP button on Bob’s cover, turn Bob’s power switch ON.
Bob will chirp three times to let you know he is now in checkup mode. You may release the CHECKUP button. Do not press any additional buttons.
While in checkup mode, the word “bObsweep” will flash on Bob’s screen.
Step One: Edge Sensors
The 4 bars above the word “Check Up” should be lit on Bob’s display.
• Lift Bob about 6 inches (15 cm) off the ground. You should see the 4 bars turn off.
• Place Bob back on the floor and continue on to the next step. Do not press any additional buttons.
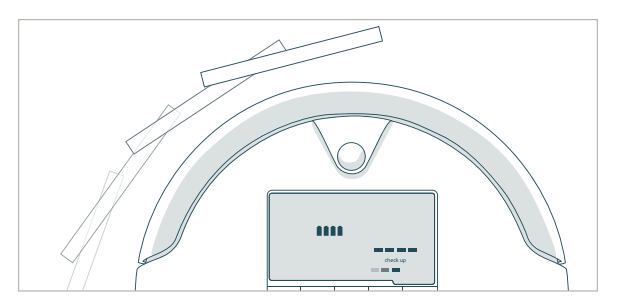
Step Two: Wall Sensors
• Use a thick, flat, and white surface to imitate a wall and drag it around Bob’s bumper.
• The 5 bars below the word “Check Up” should light up one at a time as you move your imitation wall from the left side of Bob’s bumper around to the right side. The far right sensor is less sensitive than the others.
You may move on to the next step of the checkup test.
Do not press any additional buttons.
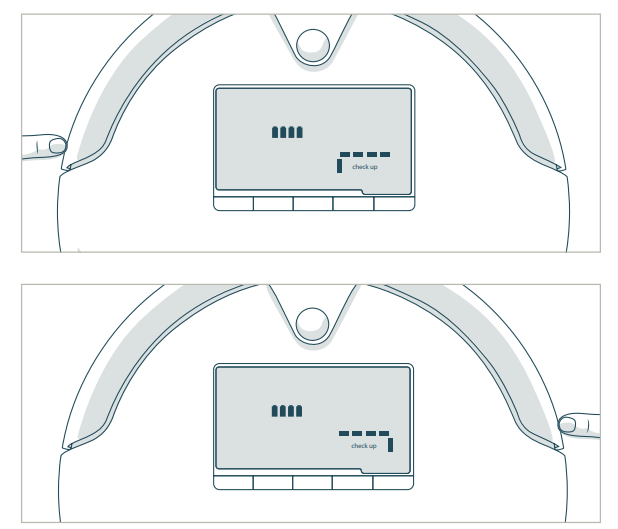
Step Three: Touch Sensors
• Press the left side of Bob’s bumper and the bar to the left of the word “Check Up” should light up; press the right side of the bumper and the bar to the right of “Check Up” should light up. Release the bumper and the bars should turn off.
• Press the center of the bumper and both bars on either side of the word “Check Up” should light up at the same time. Release and the bars should turn off.
You may move on to the next step of the checkup test.
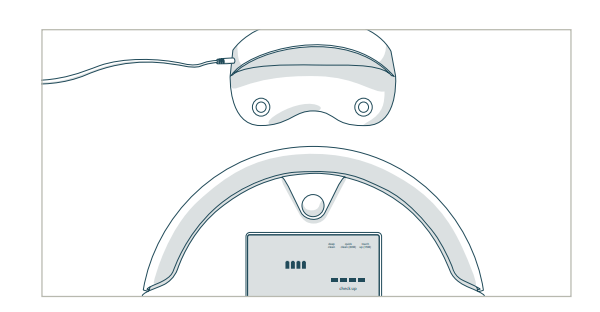
Step Four: Charging Station
The charging station must be synced and plugged in for this step of the checkup test.
• Press the GO! button on Bob’s cover.
• Place Bob with his front facing the red light on his charging station, about 1 foot (30 cm) away. Keep blOck Plus™ away from Bob so its signal does not interfere with the test.
• The words “Deep Clean,” “Quick Clean,” and “Touch Up” should be lit on Bob’s display.
• “Deep Clean” and “Touch Up” represent the station’s sensors. If either one of them fails to light up on Bob’s screen, then there is likely something wrong with Bob’s charging station.
• “Quick Clean” represents the signal on Bob’s bumper. If it fails to light up, then Boblikely needs a new bumper transmitter.
You may move on to the next step of the test.
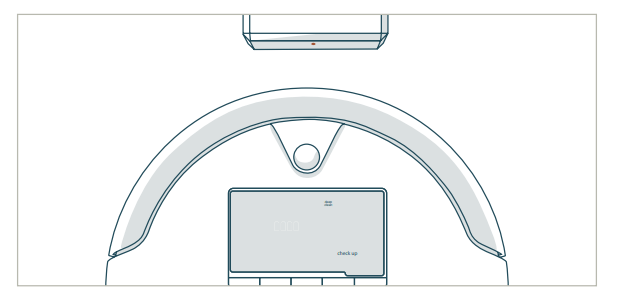
Step Five: blOck Plus
Both the front and left barriers of blOck Plus™ must be synced and turned ON for this step of the checkup test. Unplug the charging station so its signal does not interfere with this test.
• Place blOck Plus™ with its front beam directly facing Bob’s front. Turn blOck Plus™ so its left beam faces Bob front. The word “Deep Clean” should light up when it senses a signal from either side of blOck Plus™.
You may move on to the next step of the test.
Step Six: Display Screen
• Press the GO! button on Bob’s cover once more. Each icon on Bob’s screen should light up in a repeating rotation.
You may move on to the next step of the checkup test.
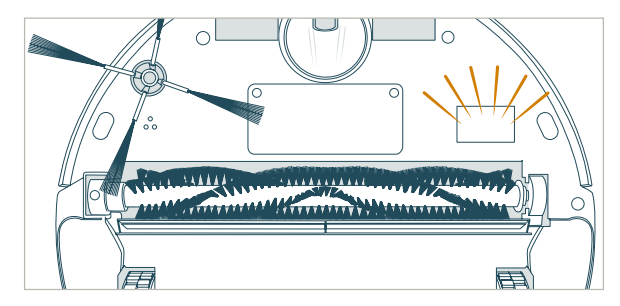
Step Seven: Brush and Suction Power
• Press the CLEANING MODE button on Bob’s cover.
• Both the side brush and the main brush should start rotating, and you should feel air flowing from the back of the dustbin.
• If Bob’s main brush is having difficulty moving, Bob will let you know by displaying
that there is “something funny going on” with his main brush.
• If Bob’s vacuum motor is behaving oddly or if his dustbin has been removed, he will display that there is “something funny going on” with his dustbin.
Move on to the next step of the checkup test.
Step Eight: UV Light and Wheels
• Lift Bob off the floor or place him on his side to keep him from running away! Next, press the CHARGE button and his wheels should drive forward.
• Flip Bob over and you should see his UV lamp lit. Do not look directly into the UV lamp.
• Press the CHARGE button once more. Bob’s wheels should drive backwards and his UV lamp should turn off.
If Bob is having difficulty rotating either one of his wheels, he will display that there is “something funny going on” with either one of them.
Bob’s Cleaning Behavior
Bob’s cleaning pattern may look quite different from the way a human would clean: he may spin in a gradually widening circle, follow along walls, or zigzag across a small area. Sometimes he may seem to be ignoring some spaces or spending too much time on others — but don’t worry! Rest assured, Bob will efficiently clean your home within the course of a full cycle — just check his dustbin for the evidence!
It is best to let Bob work in his own way, even if his movements appear odd. Moving him around, manipulating his movements, or picking him up may confuse him and disrupt his cycle.
If you wish to control Bob’s movements manually, you may use the navigational buttons on his FullCommand™ remote. If your rooms are divided by ledges higher than Bob is able to climb, you may block off the area using blOck Plus™.
Bob’s Challenges
Unique Furniture
Bob is designed to maneuver around furniture of most shapes and sizes, but certain configurations may confuse him temporarily. Bob may sometimes find it difficult to clean under chairs with narrow legs, or furniture that is too low for his bumper sensors to detect. Specialty furniture, such as desk chairs with wheels or stools with circular bases, may also confuse him for a moment — but don’t worry, Bob usually finds his way around with time.
Dark Carpet
Bob uses infrared light to detect edges and stairs; because dark-colored carpet absorbs most light, it may seem like empty space to Bob’s sensors. If Bob displays that there is “something funny going on” with his edge sensors, then you may need to temporarily deactivate them. To do so, simply hold down the CHECKUP button on Bob’s cover until the 4 bars above “Check Up” flash 7 times and remain lit on his screen (see page 56). Just remember that while Bob’s sensors are deactivated, he will not be able to detect edges or stairs!
Shag Carpet
Bob’s main brush is not designed to clean shag carpet or rugs with long fibers or fringes. You may remove Bob’s main brush and allow him to vacuum without it, but he will not clean as effectively.
Mop
Bob’s mop, which attaches to his underside, is designed to sit flat against the floor and leave behind a clean trail. Because of this, Bob may have a tough time climbing over elevated surfaces while mopping. Make sure to remove Bob’s mop when he is not cleaning smooth surfaces such as tile or hardwood.
Inclines
Sometimes Bob will attempt to drive up angled surfaces, get stuck for a few minutes, and then decide to clean somewhere else. This is because Bob wants to cover every spot in your home, and will try his hardest to overcome any obstacle!
As long as Bob does not display a trouble message on his screen, let him continue cleaning and find his own way around. Take note of the areas Bob finds the most challenging, and if possible spread or adjust some of your furniture accordingly.
The Solution: blOck Plus™
If Bob finds a part of your home challenging to clean for any of the above reasons, use blOck Plus™ to keep him away. blOck Plus™ emits 2 digital barriers: one from its left side, and the other from its front. You may use one or both, depending on your preference (see page 41).
FAQs
1.Where can I find Bob’s how-to videos?
Bob’s how-to videos can be found at Bob’s Owners’ Corner:
2. How long should Bob’s battery last?
The exact time depends on the age of the battery and the type of surface Bob is cleaning. Generally, the smoother the surface (e.g. hardwood or tile), the longer the battery will last. When fully charged, a new Bob PetHair Plus usually cleans for just over an hour.
3. How do I know that my Bob has fully charged and is ready to clean?
When Bob charges using the charging station or charging adapter, the battery bars on his display screen flash and the word “charging” lights up. When Bob has fully charged, the battery bars remain still and the word “charging” disappears.
4. How often should I empty the dustbin?
Bob’s dustbin has a 1000 mL capacity — three times larger than most robotic vacuum cleaners on the market! This means you may not need to empty the dustbin after every cleaning. Depending on the size of the room and the amount of debris piled up, Bob may be able to perform multiple cleaning cycles before he fills his dustbin. Simply remove the dustbin and check to see if emptying is necessary.
5.How often should I clean Bob’s brushes?
Bob’s brushes do a lot of the work picking up hair and debris, so it is recommended that you clean the main and side brushes about once a week. If you notice a thick covering of hair and debris on his brushes, remove and clean them. This ensures the brushes stay in peak condition for a long time. Remember to also clean the notches that hold the brushes in place.
6. My Bob won’t turn on no matter what I do.
If Bob does not start after flipping his power switch ON, his battery has likely drained too low to operate. To recharge him, place him on his charging station with the metal plates on his underside sitting on top of the nodes on his station. Alternatively, you can unplug the adapter from the charging station and plug it directly into the inlet above Bob’s power switch. When Bob charges, the battery bars on his display screen flash and the word “charging” lights up. Let Bob recharge fully before asking him to clean again. When Bob has fully charged, the battery bars remain still and the word “charging” disappears.
7. Why is Bob beeping?
Bob beeps as he is entering standby mode and once every 2 minutes while in standby mode. To conserve battery, turn his power switch OFF. You may also mute Bob’s beeping by pressing the MUTE button on his cover or FullCommand™ remote.
Bob also beeps when he encounters a problem and needs assistance. In addition to beeping, he will identify the source of the issue on his screen.
8. Bob is having trouble finding his charging station. Where is the best place to put his station?
After making sure the station is synced, place it in a central location with plenty of space around it, so that he may detect it from afar. To help Bob dock, place the charging station against a wall on a flat, level surface.
9.I am having problems removing Bob’s brush.
If after unscrewing the brushes you are still having trouble removing them, remove any debris clogging the areas where they attach. You may use scissors to cut away hair wrapped around the brushes, until you are able to remove them. You may need to gently pull the main brush up or down to reach the corners, but do not force the brush out as this can damage it. It is best to clean Bob’s brushes about once a week to prevent buildup.
10.Bob gets stuck under my furniture or travels over wires that tangle up his brush. How can I stop him from going into these areas?
If Bob maneuvers under a piece of furniture and there is only one open entrance, he may need a few minutes to find his way out. If Bob does need help, he’ll stop cleaning completely and start beeping.
If you would like Bob to avoid a certain area, such as an area with lots of wires, you may use blOck Plus™ to create one or two digital barriers.
11.Why does Bob start up when I did not tell him to clean?
Bob will start up on his own when he is 1) scheduled to clean, or 2) when he is on auto-resume mode.
First, make sure the “Current time and day” is set correctly on Bob’s remote. Remember, Bob works on a 24-hour clock. If the current time and date is incorrect, then Bob’s cleaning schedule will be out of sync. Consult the Scheduling section of this manual (page 32) for detailed instructions on how to set Bob’s cleaning schedule.
When Bob is on auto-resume mode, he displays “bbgo” on his remote, below “Scheduled Cleanings.” On auto-resume, Bob automatically begins cleaning after he has fully charged. To disable auto-resume, press the SET CLEANING SCHEDULE button on Bob’s remote. Then press STOP, “bbgo” will reset to the last time saved. Press SET CLEANING SCHEDULE again to save your settings.
12.When should I use the different cleaning modes?
Deep Clean is Bob’s default mode and gives him enough time to thoroughly cover a large area. If you would like to clean a smaller area, you may use Quick Clean mode, which lasts 30 minutes, or Touch Up mode, which lasts 15 minutes.
Waffle Track and Spiral Track are best used when cleaning a small spill. When Waffle Track is selected, Bob travels in a grid pattern; when Spiral Track is selected, Bob travels in a gradually widening circle. Select Wall Track to make Bob travel along the perimeter of your room.
13. Bob is telling me there’s “something funny going on” with one of his parts. How can I fix this?
Bob let’s you know the specific reason his work has been interrupted. If “something funny” is going on with one of Bob’s parts, consult the Troubleshooting section on page 59for solutions.
14. What is the best way to clean Bob’s wheels?
Use the cleaning tool or compressed air to clear the creases of the wheels. You may also wipe the sides and bottoms of the wheels as they spin during checkup mode (see page 70).For a more thorough clean, you may remove Bob’s wheels completely.
15. My Bob just stopped cleaning and his screen turned off. What do I do next?
It’s possible Bob is on standby mode. If this is the case, press any button on his cover or remote to wake him. If this doesn’t work, try flipping Bob’s power switch OFF and ON again. If this does not solve the problem, Bob might need a mainboard reset. To do so, flip his power switch OFF and plug the charging adapter directly into the inlet above his power switch. Let him charge for at least 2 hours to fully refresh his system.
16. I have a question and need to contact Bob’s support team. How do I do that?
You can reach us by phone or e-mail. Call us for toll-free for support in Canada and the United States at 1-888-549-8847, or e-mail us at [email protected]. Our hours are Monday - Friday 9 am - 5 pm, PST.
 Flip Bob over onto a flat surface. Place the side brush over the empty socket on Bob’s underside.
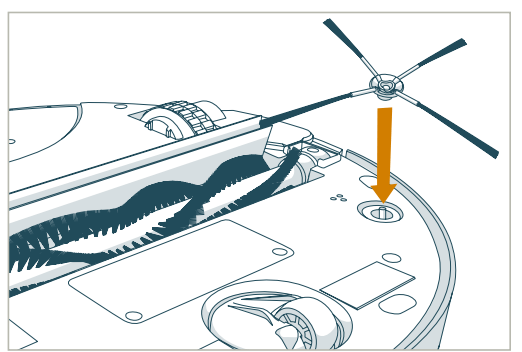
 Secure Bob’s side brush onto the socket using the flat head screwdriver and short screw.
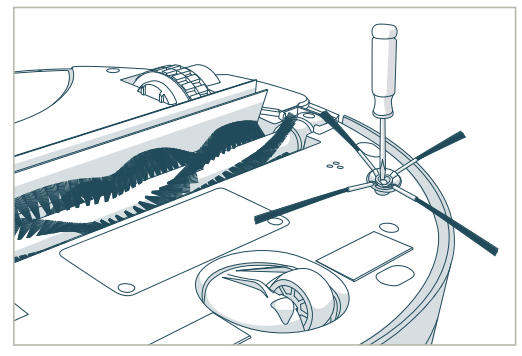
 Waffle Track™
 Spiral Track™
 Wall Track™