
OWNER’S MANUAL
How to employ your intelligent floor cleaner
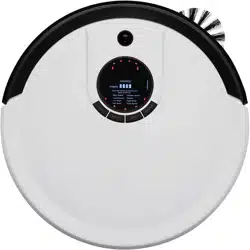
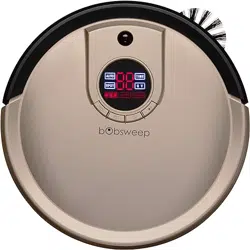
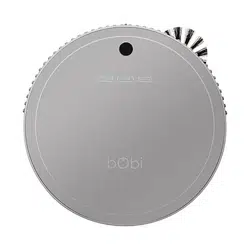
bObsweep Standard
Model No. WB4727546

Congratulations!
Congratulations on your new intelligent floor cleaner! Bob is now at your service. To
see Bob at his best, please read the Quick Start Guide and this manual thoroughly.
Welcome to the bObsweep family and happy cleaning!
If you have any questions or concerns, feel free to contact our helpful team at:
Getting Bob
Ready to Clean
Install Bob’s
Side Brush 16
Charge Bob 17
Bob’s First Clean 19
Standby Mode 20
Important Safety
Instructions
Parts &
Maintenance
Mop 54
Dustbin 56
Filters 58
Brushes 60
Battery 64
Storing Bob 65
Remote Control
What Comes in
Bob’s Box?
Cleaning
Modes
Auto 1: Robot Mode 37
Auto 2: Quick Clean 38
Auto 3: Touch up 39
Small-area Cleaning 40
UV Light 41
Bob’s Anatomy
Set Bob’s
Cleaning Schedule
Use Bob's
Charging Station 44
Set Current Time & Day 45
Set Bob's
Cleaning Schedule 48
Back-to-back Cleaning 51
Charging Bob
Charging Station
Placement 28
Auto Charging 29
Manual Charging 30
Charging Time 31
Conserving Battery 32
14
52
6
34
2622
10
44
8
Cleaning Behavior FAQsBob's Challenges
Troubleshooting
Error Codes 72
Home Checkup
Test 78
End User
Agreement
Warranty
Information
Sensors
Maintenance 68
Blindfold Stickers 69
89 92
86
90
70
98
66

6
Basic safety precautions should always be followed, including the following:
Read ALL instructions before use.
To protect against electrical shock, do not immerse any part of Bob — with the
exception of his mopping cloth — into water or other liquids.
Unplug Bob from outlet when not in use and before conducting maintenance.
Do not operate Bob or his charging station if they have been damaged in any way.
If Bob is not working as he should, or has been dropped, damaged, left outdoors,
or dropped in water, contact our customer care center at [email protected].
Do not handle Bob or his charging station with wet hands; use only on dry surfaces.
Do not use Bob outdoors.
Bob is not intended for use by persons (including children) with reduced physical
or mental capabilities, or lack of experience and knowledge, unless under the close
supervision of a person responsible for their safety.
Do not pull or carry the charging station by the cord, use the cord as a handle, close
a door on the cord, or pull the cord around sharp edges or corners. Keep the cord
away from heated surfaces. To unplug the cord, grasp the plug, not the cord itself.
Important Safety Instructions

7
Do not mutilate or incinerate the battery, as it will explode at high temperatures.
Do not attempt to open Bob’s charging station. Repairs on his station should only be
carried out by our qualified customer care center.
Do not expose Bob’s charging station to high temperatures or allow moisture or
humidity of any kind to come into contact with it.
Do not let Bob pick up toxic materials (chlorine bleach, ammonia, drain cleaner, etc.).
Do not let Bob pick up anything that is burning or smoking, such as cigarettes,
matches, or hot ashes. Do not use Bob to pick up flammable or combustible liquids
such as gasoline, nor use him in areas where they may be present.
Do not use Bob in an enclosed space filled with vapors given off by oil-based paint,
paint thinner, moth-proofing substances, flammable dust, or other explosive or toxic
vapors.
Leaks from battery cells can occur under extreme usage or temperature conditions. If
the liquid gets on skin, wash quickly with water. If the liquid gets into the eyes, flush
them immediately with clean water for a minimum of 10 minutes, and seek medical
attention.
Do not use Bob for anything other than his intended purpose, as specified in this
manual.

8
Bob, Your Intelligent Floor Cleaner 1
Charging Station 2
Blö Main Brush 3
Charging Adapter 4
Remote Control 5
Phillips head screwdriver 6
2 Side Brushes (1 Spare) 7
Cleaning Tool 8
Pack of Screws & Blindfold Stickers 9
Mop Attachment 10
2 Micro-Fiber Mopping Cloths 11
Filter Replacement 12
Owner’s Manual, Quick Start Guide & Warranty Card 13
Bumper Stickers 14
What Comes in Bob’s Box?
11
2
3
4
5
6
7
8
9
10
11
12
13
14
10
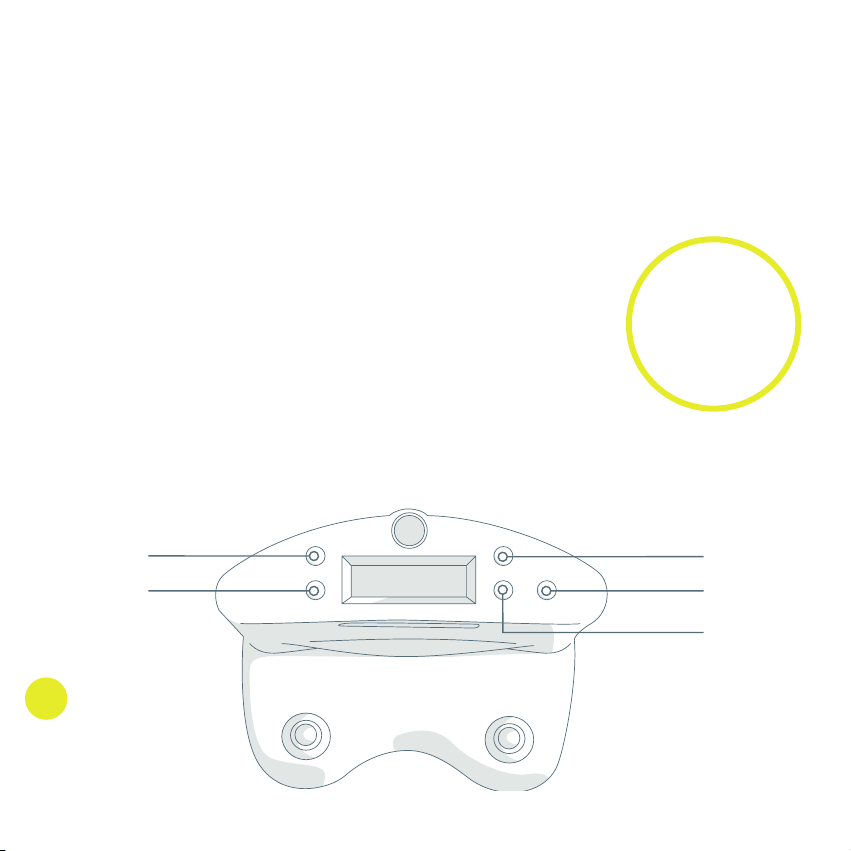
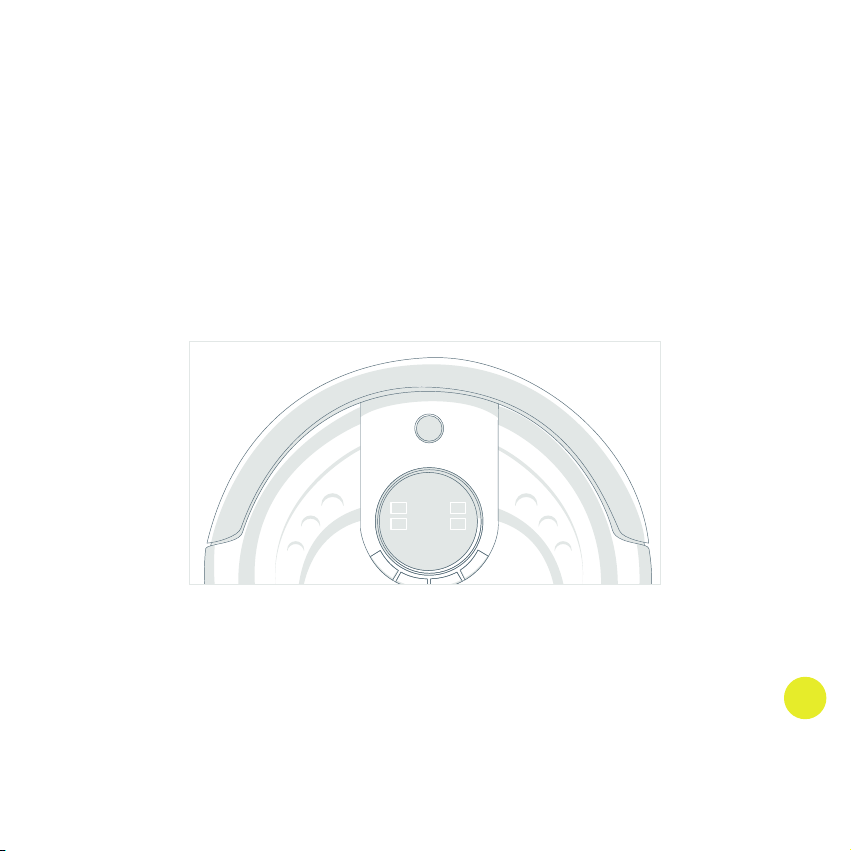
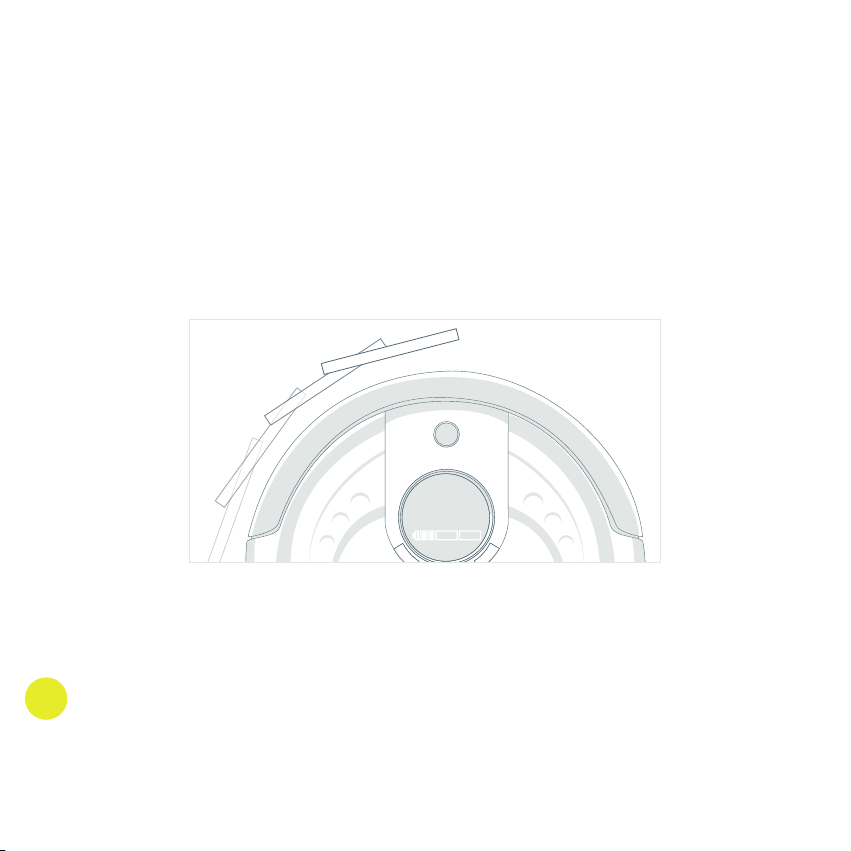
Top View
Bumper 1
Signal Transmitter 2
Cover Buttons 3
Display 4
Bob’s Anatomy
2
1
3
4
11
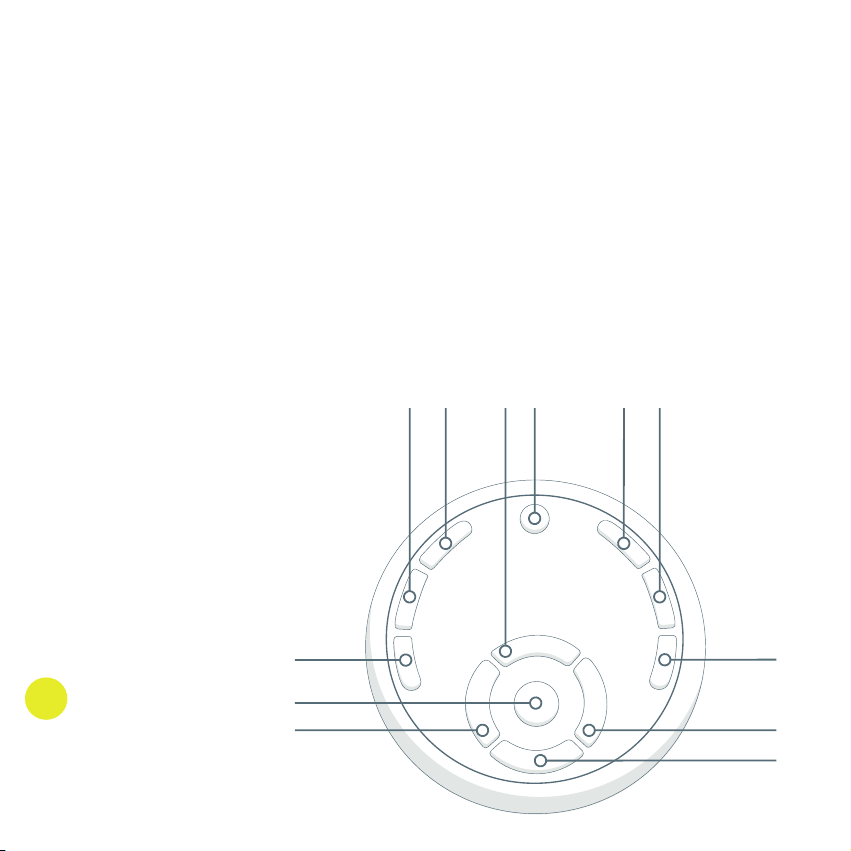
Bottom View
Charging Plates 1
Front Wheel 2
Side Brush 3
Main Brush 4
ON/OFF Switch 5
Dustbin 6
UV Lamp 7
Battery 8
Left and Right Wheels 9
1 2 4 7
3
5
8
9
9
6
1
12
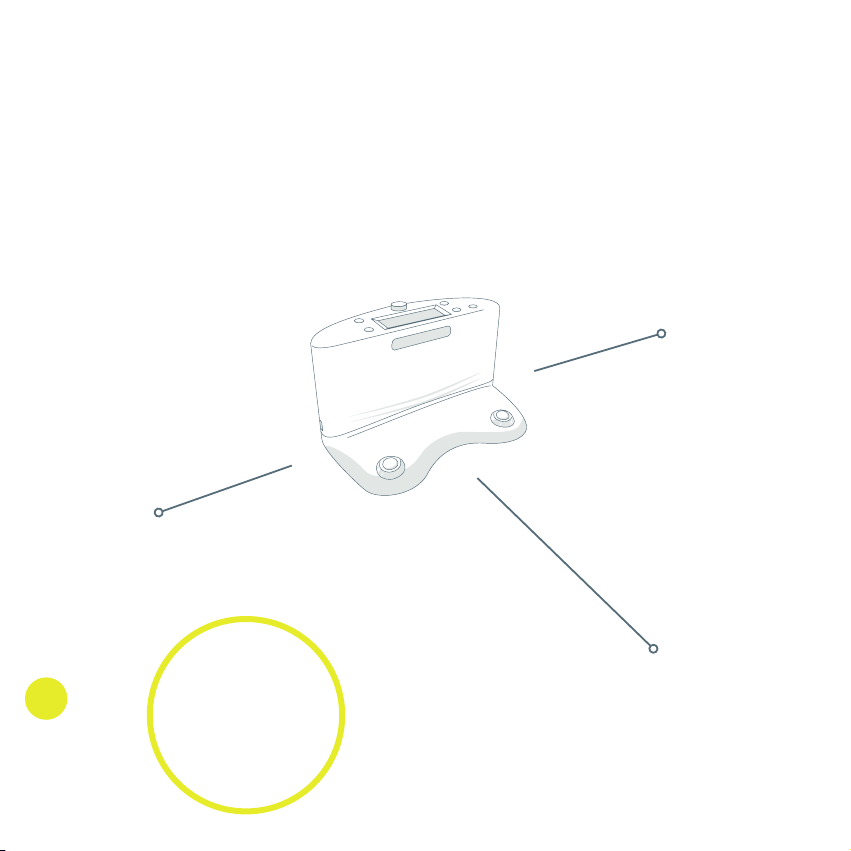
Remote 1
Charging Station 2
Display Screen 3
AUTO
SPOT
DIRTY ERROR
UV
TIME
1
3
2

13
Cover Buttons
1
Select Bob’s cleaning mode
2
Select Bob’s cleaning program
3
Turn UV lamp OFF/ON
4
Bob will start cleaning on his
default setting
AUTO
SPOT
DIRTY ERROR
UV
TIME
1 2 3 4


Getting Bob
Ready to Clean
16
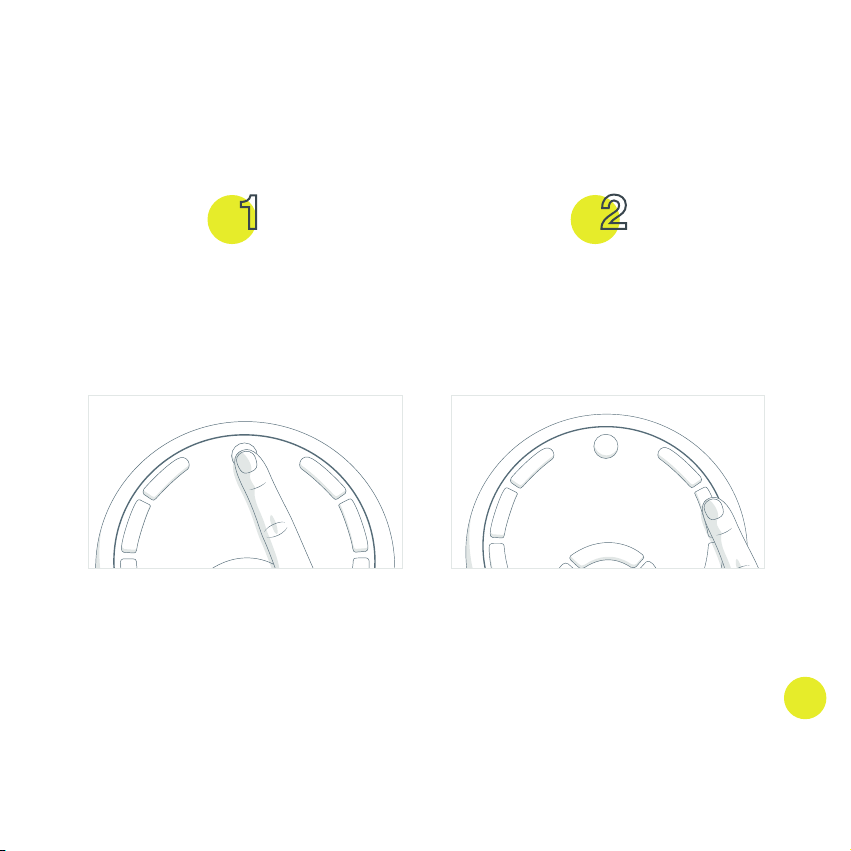
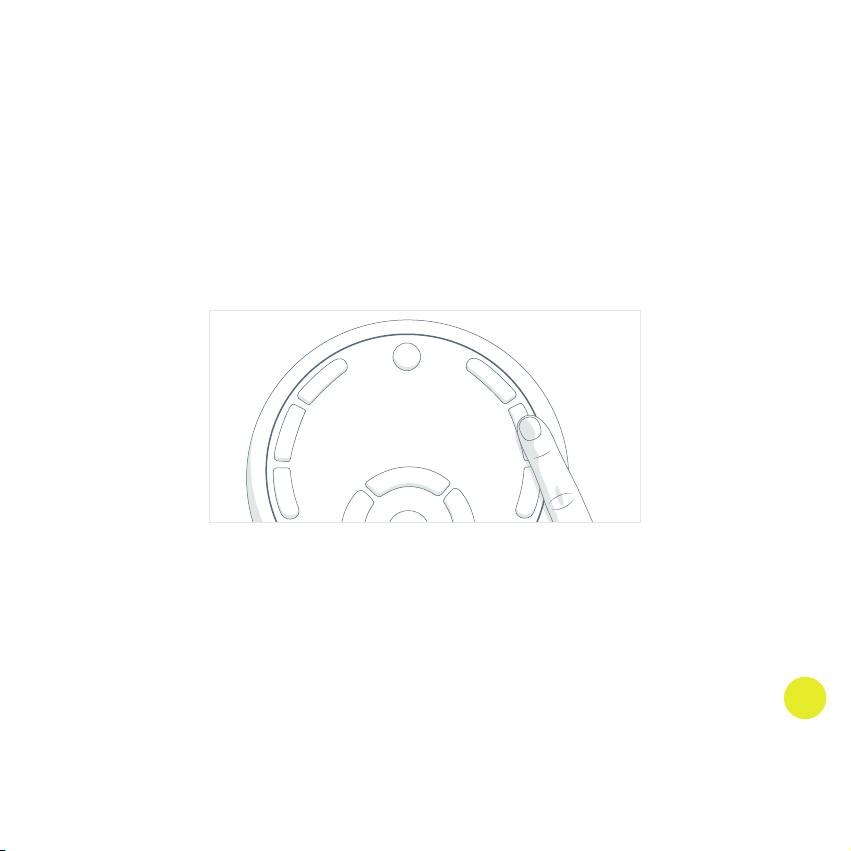
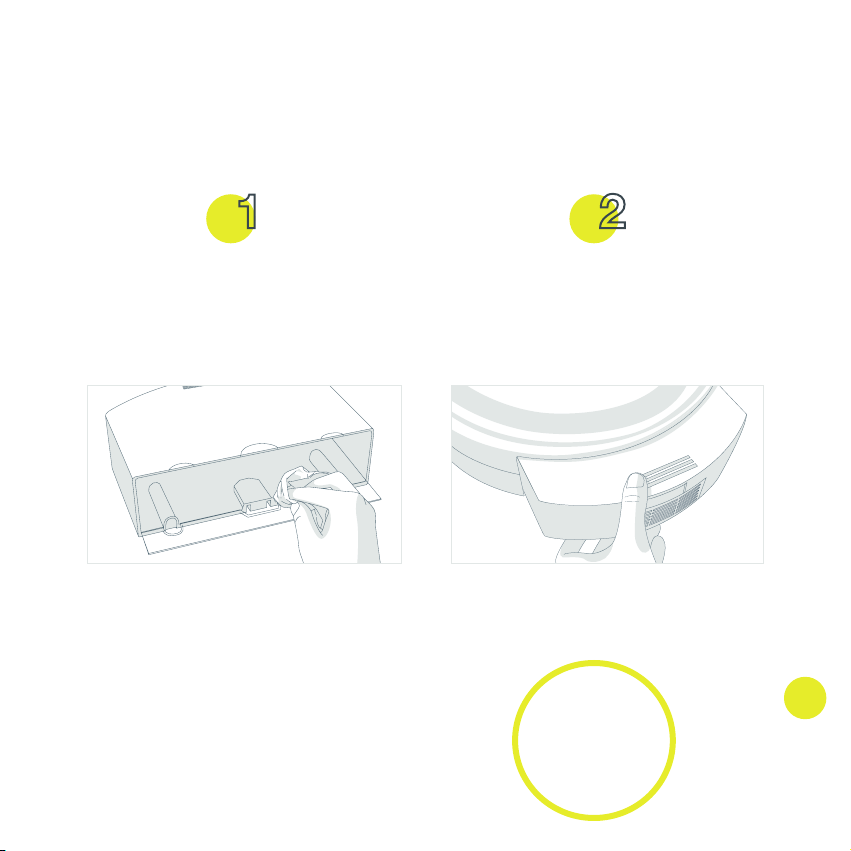
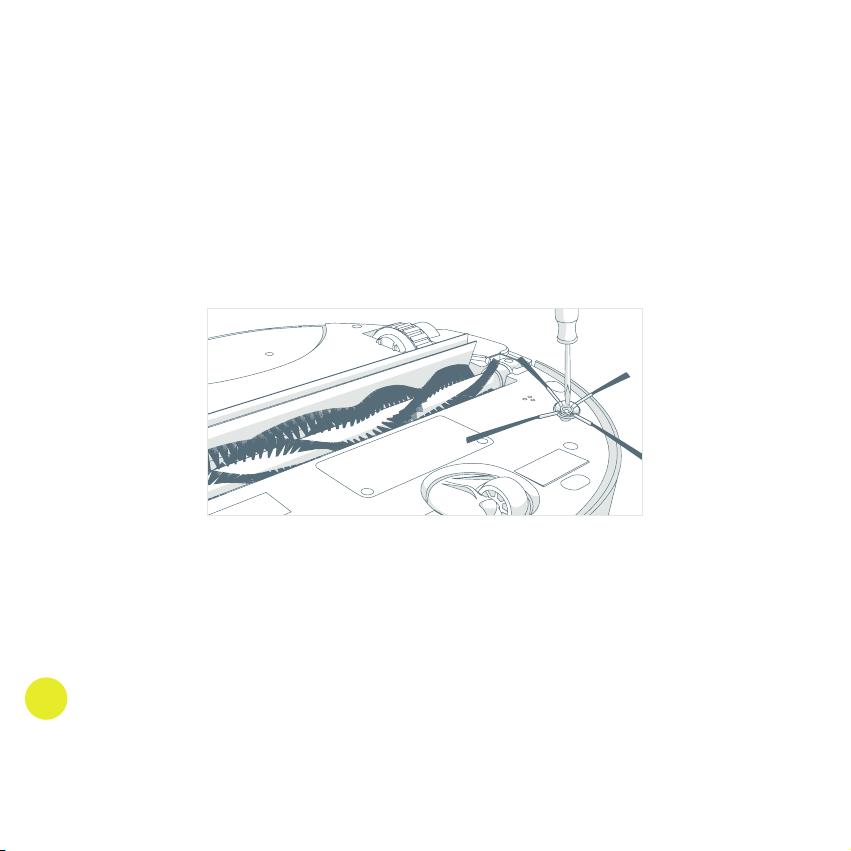
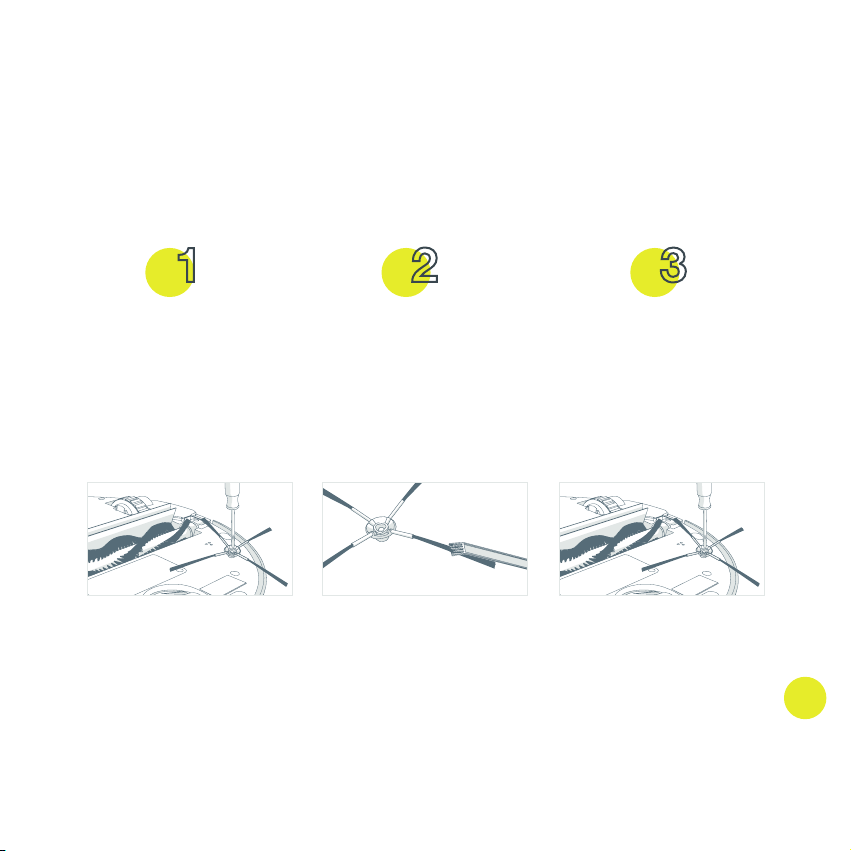
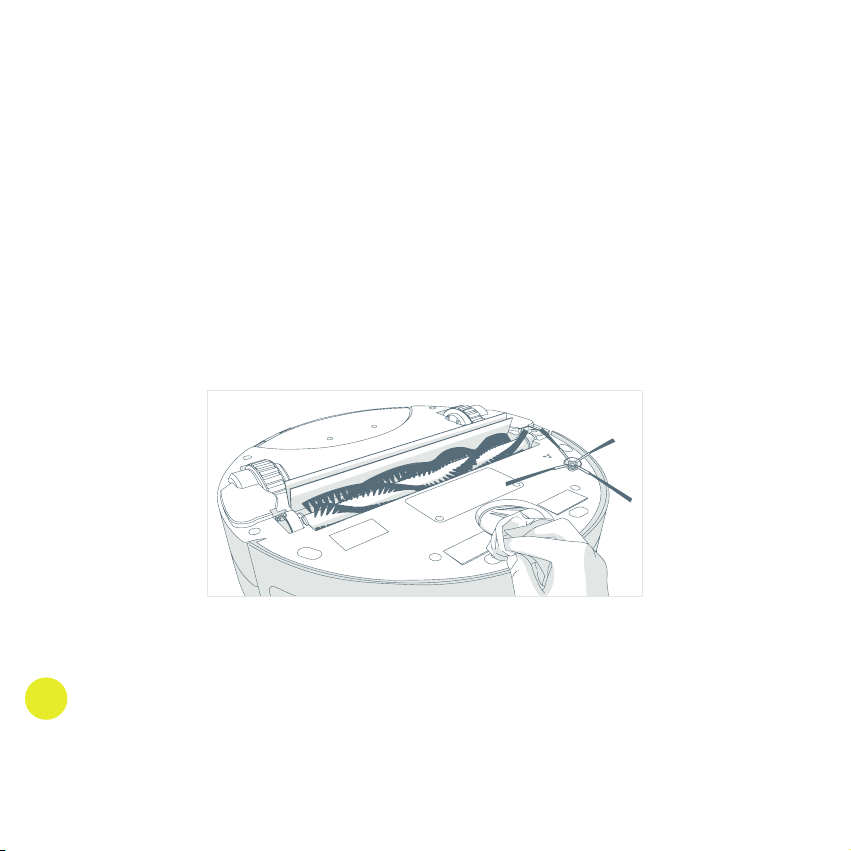
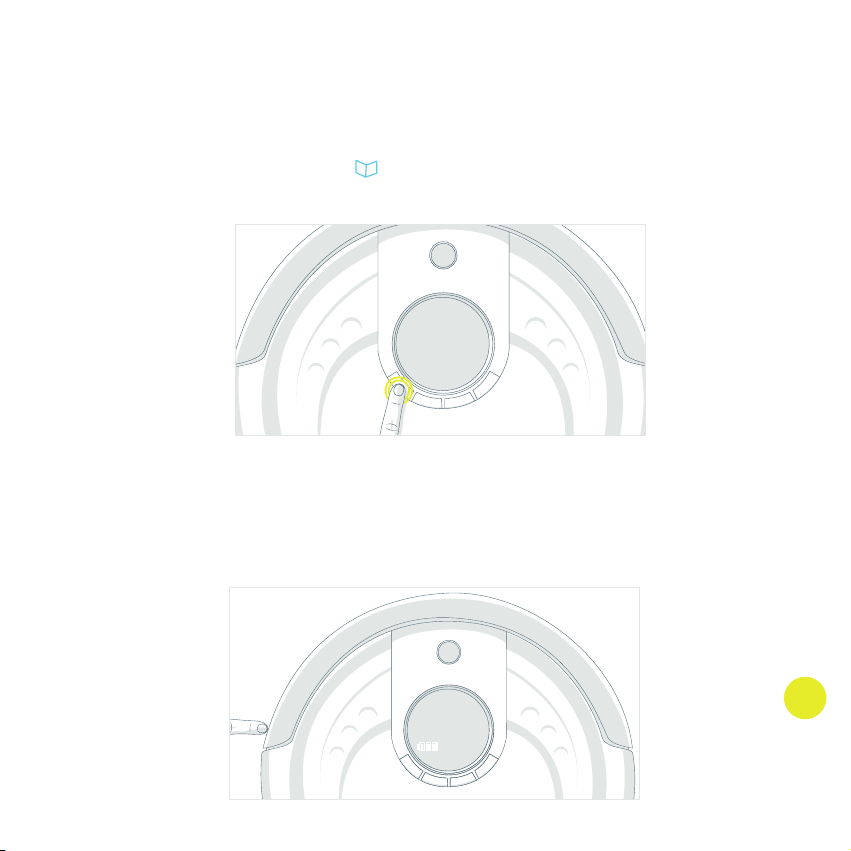
Before Bob’s first clean, you must install his side brush, which allows him to sweep
along corners, walls, and other hard-to-reach places.
To do this, you will need the following materials, all of which are included inside Bob’s
box: a side brush, a Phillips head screwdriver, and a short screw.
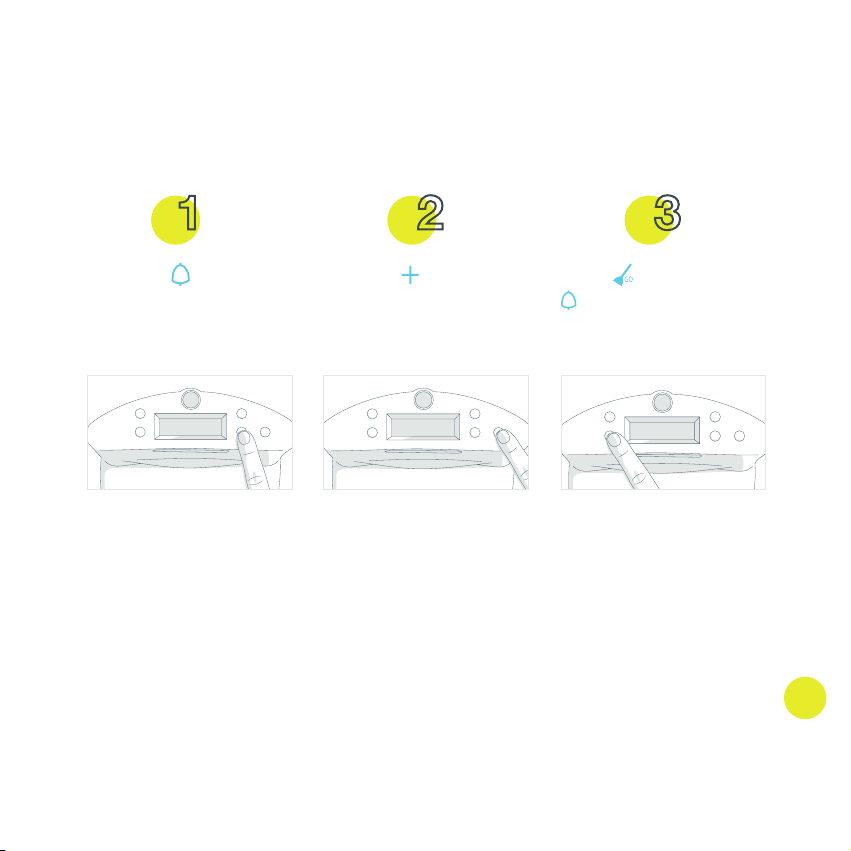
Flip Bob over onto a
flat surface. Place the
side brush over the
empty socket on Bob’s
underside.
Install Bob’s Side Brush
Secure Bob’s side brush
onto the socket using the
Phillips head screwdriver
and short screw.
You may use the additional
side brush and screws as
spares.
1 2 3

17
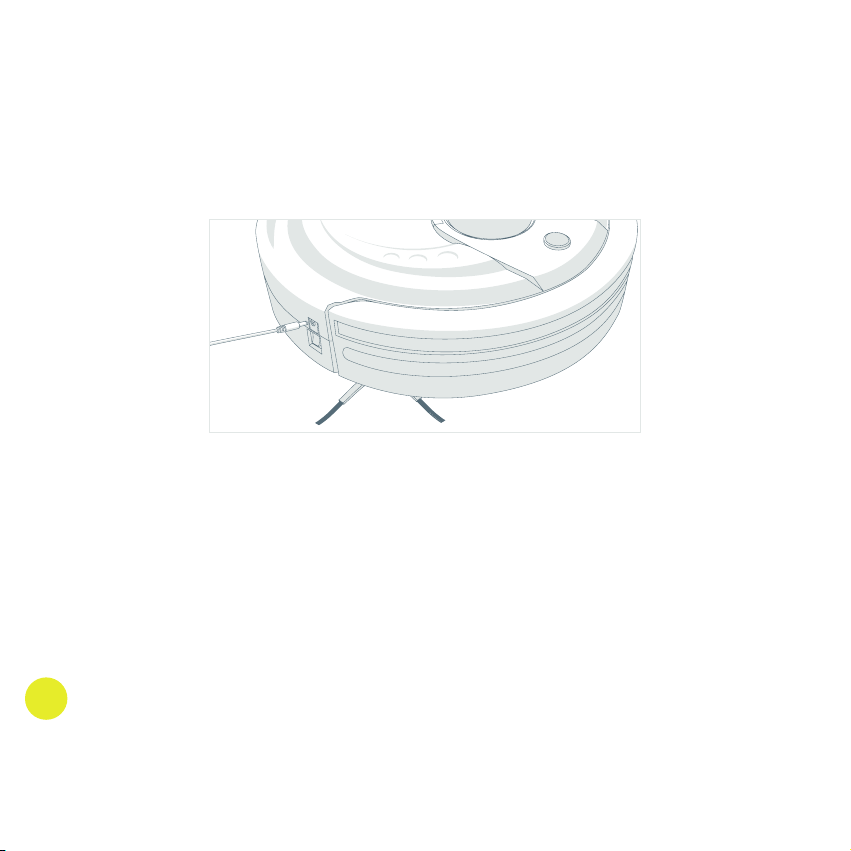
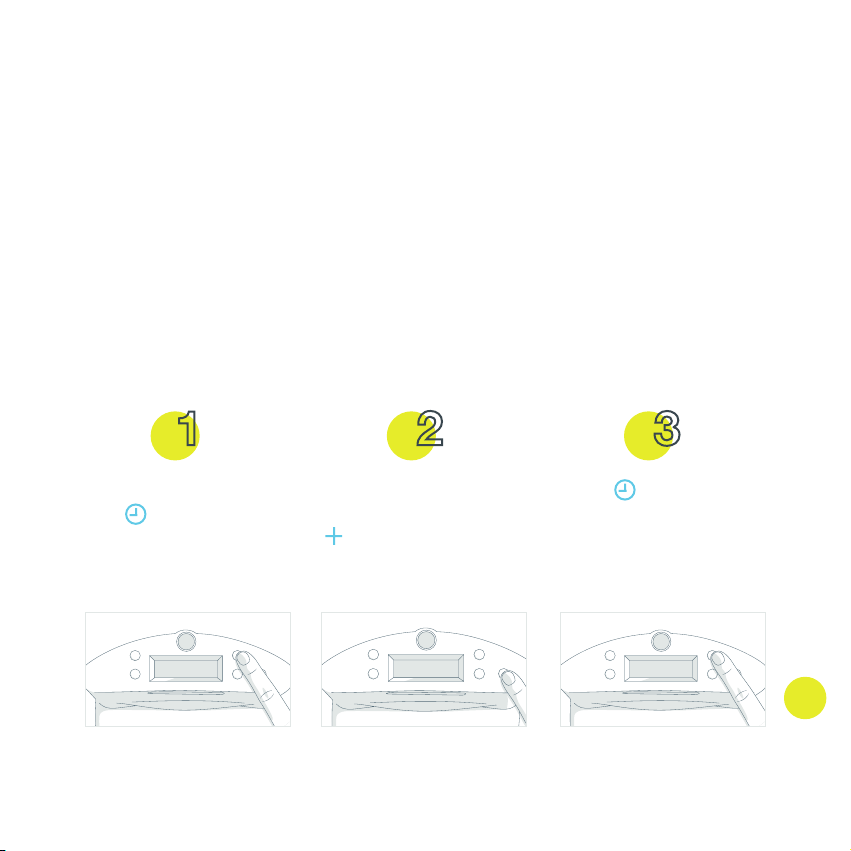
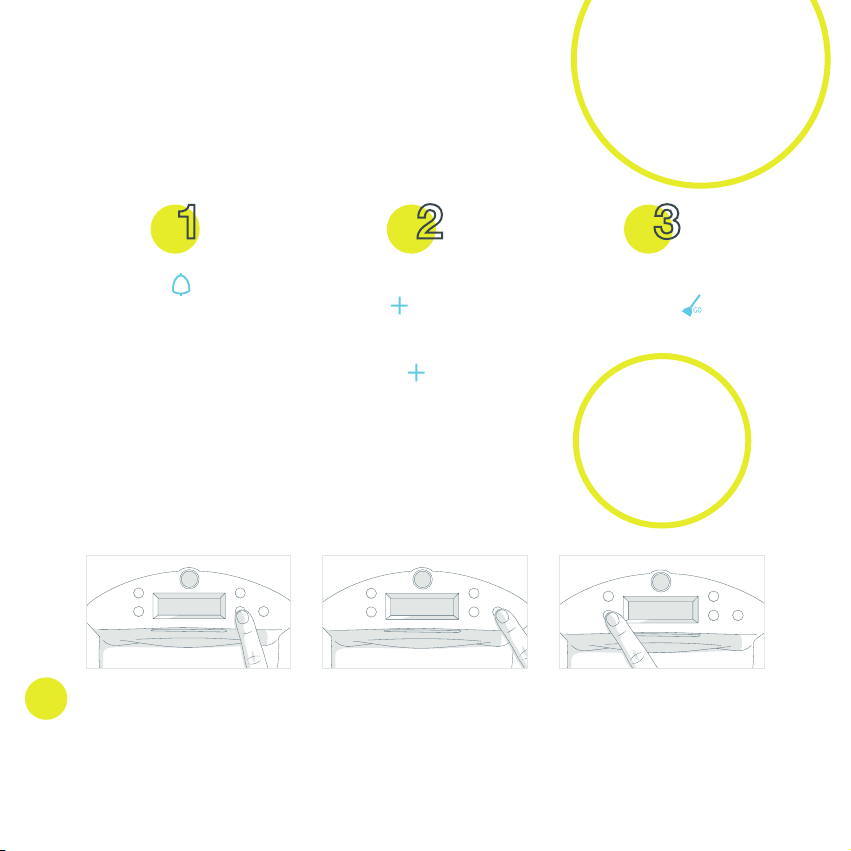
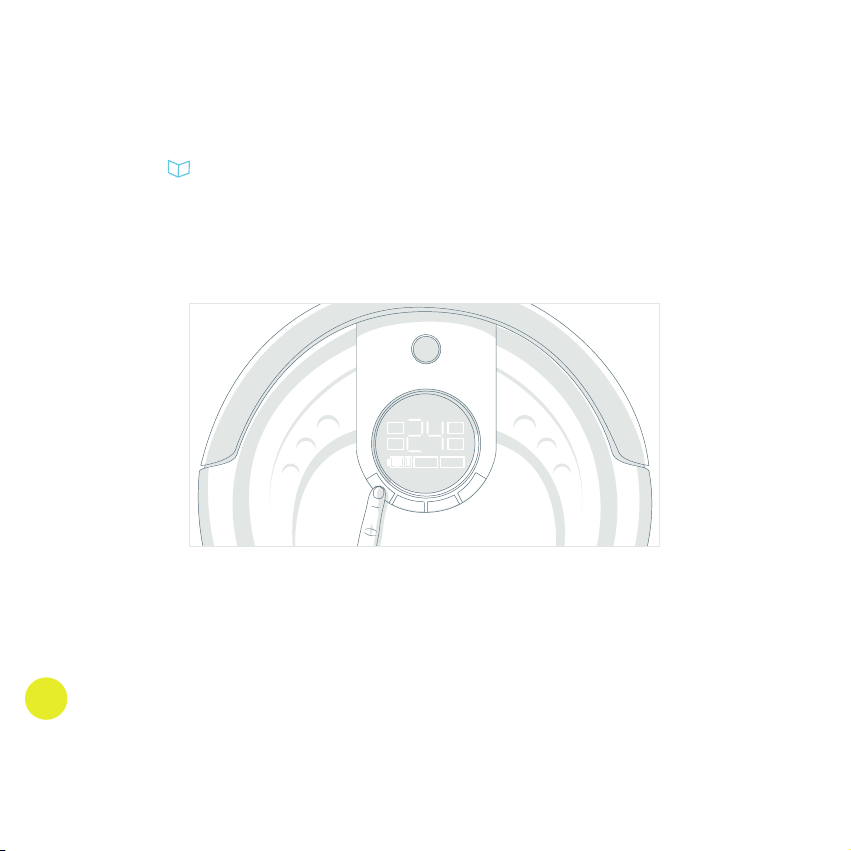
After installing Bob’s side brush, you must set him to charge.
To charge Bob:
Charge Bob
1 2
Turn Bob’s power switch ON. Bob’s
screen will light up. Plug the charging
adapter into the side of the charging
station. The station’s screen will turn on.
Place Bob on his charging station with
the metal plates on his underbelly sit-
ting on top of the nodes on his station.

18
The charging station’s memory can store the cleaning schedule and current time
for at least 8 hours without electricity. This will give you plenty of time to re-plug the
adapter back into the charging station after Bob comes to life.
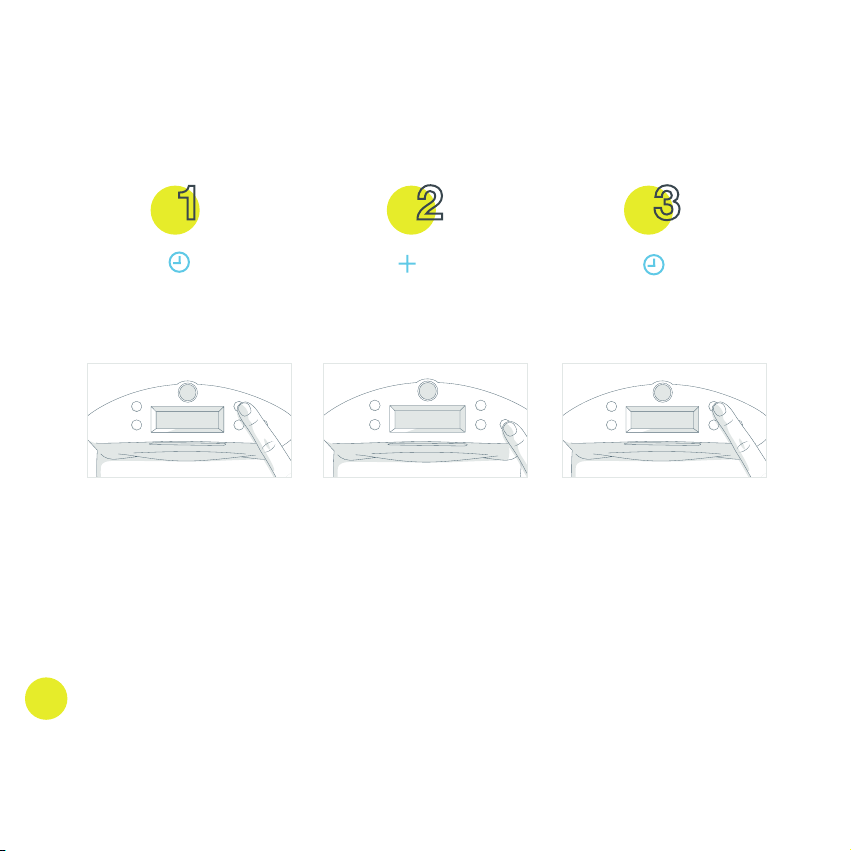
19
Bob is now ready to clean! Press the button on his cover twice — or the AUTO
button on his remote once — and he will clean on his default auto1 setting (Robot mode).
Bob’s First Clean
OR
20
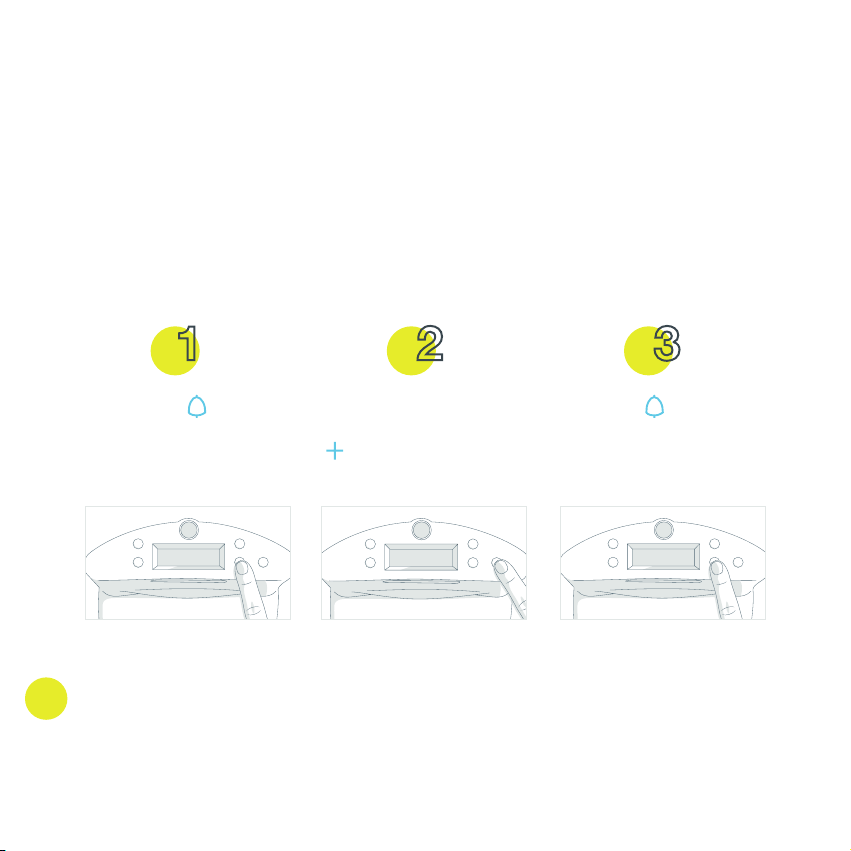
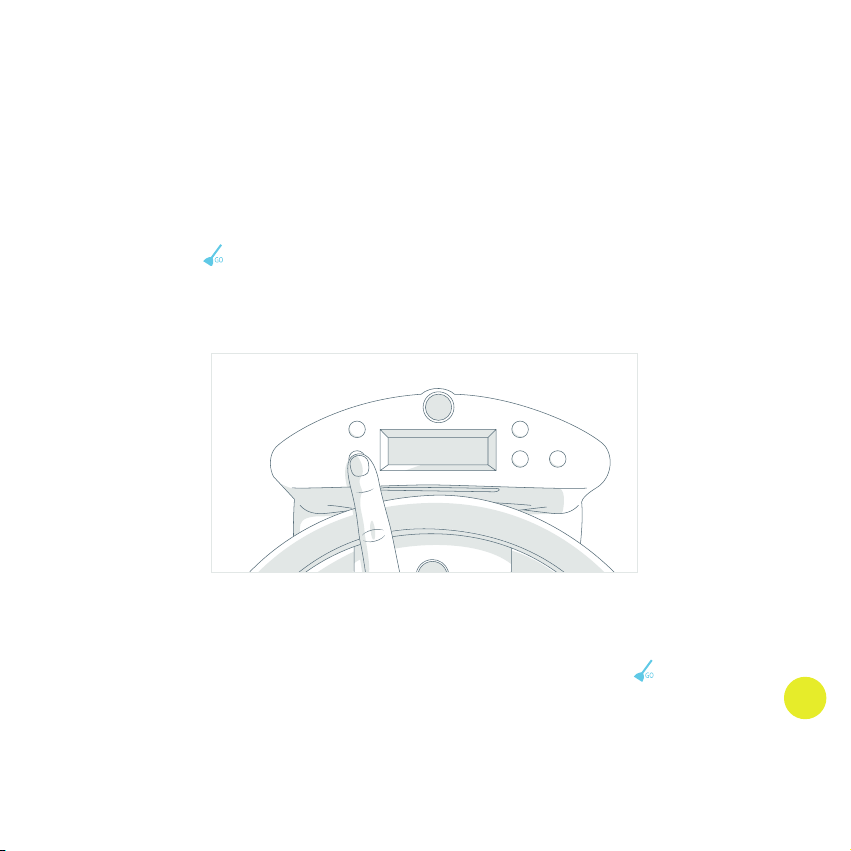
If Bob is left idle for more than a minute, he enters Standby Mode to preserve battery.
In this mode, Bob’s screen will turn off and he will sit quietly, awaiting your command
to either resume cleaning or go to charge.
To get Bob back to cleaning:
Standby Mode
Press on Bob’s cover twice. Press the ON/OFF button on Bob’s re-
mote to wake him up, then press AUTO
on the remote to send him back to work.
1 1
OR
21
To send Bob to his charging station:
Press the ON/OFF button on Bob’s
remote to wake him up.
Then press CHARGE.
1 2


Remote
Control
24
In order to change Bob’s movements, you may select his cleaning speed and patterns
using his remote control.
Bob’s remote control works at an average distance of 10 feet. It must be pointed directly
at Bob with no obstacle blocking its signal.
Bob’s remote has the following buttons:
Power 1
Auto 2
Corners 3
UV 4
Spot 5
Charge 6
Speed 7
Navigational Arrows 8
Pause 9
Remote Control
4
3 2 8 1 5 6
7
9
8
8
8
Power
• Wakes Bob or puts him in standby mode
Auto
• Bob will start cleaning on his default mode (Robot)
Corners
• Bob will start cleaning corners and alongside walls
UV
• Turns the UV light on and off while Bob is cleaning
Spot
• Activates Bob’s Spiral Track™
Charge
• Sends Bob to his charging station
Speed
• Sets Bob’s speed to slow or default
Navigational buttons
• Guides Bob forward, backward, right, or left
Pause
• Pauses or resumes Bob’s movements
Bob’s remote requires 2 AAA batteries (not included). Do not leave the batteries in the
remote if you are not using it on a regular basis. Keep the remote at a normal room
temperature.
To fully power Bob
off, Flip Bob’s power
switch OFF.
Hold down the navigational
buttons to keep Bob moving
in the desired direction.


Charging
Bob
28
• Position the charging station against a wall on a hard, flat surface.
• Make sure there is at least 10 feet (3 meters) of open space to the front and 2 feet
(0.5 meters) to the sides.
• Plug the charging adapter into the side of the charging station. The station’s screen
will turn on.
The transmitter on
Bob’s station should be
clean and free of dust.
Charging Station Placement
2-3 m (6-10 ft)
.5 m (2 ft)
.5 m (2 ft)
29
If you press any button while Bob is looking for his charging station, he will stop
searching and will enter standby mode. When in standby, Bob chirps every few
minutes to inform you of his idle position. Press charge on the remote to send Bob to
his charging station or place him on his station (see Manual Charging).
To send Bob to charge:
Bob is smart and will automatically search for his charging station when his battery falls
below 15%. You may also direct Bob to his charging station at any time by pressing the
CHARGE button on his remote.
Auto Charging
30
Plug the power adapter directly into the inlet on Bob’s side above his ON/OFF switch,
then plug the adapter to the wall.
Manual Charging
31
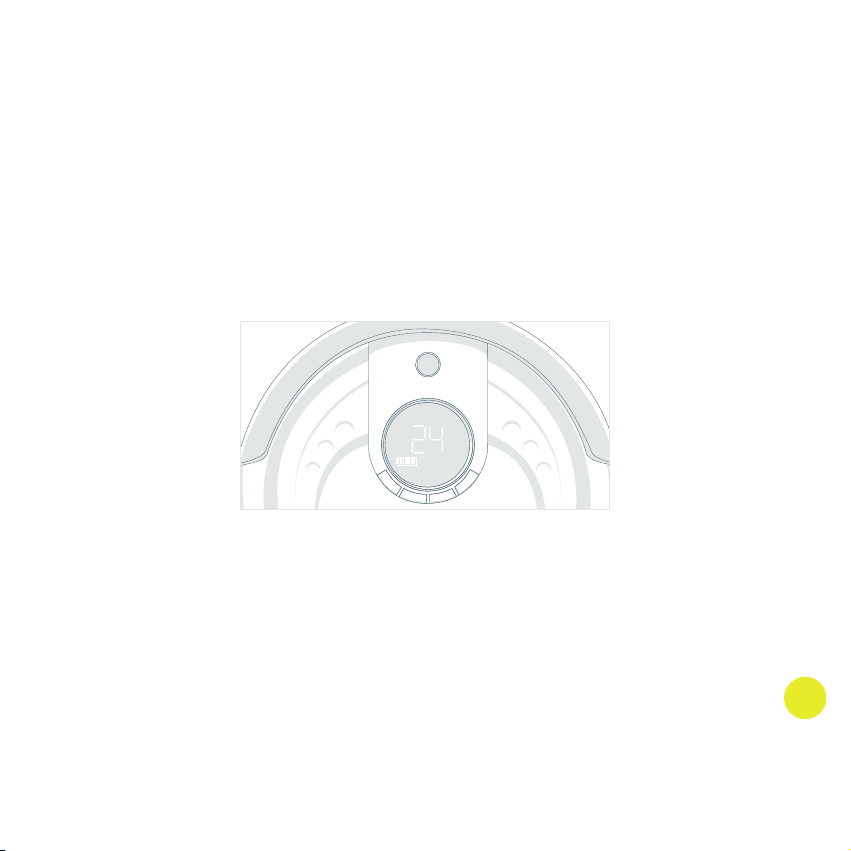
When Bob is charging, the two-digit number on his display screen indicates how long
his battery has been charging. You can calculate the number of minutes Bob has
spent charging by multiplying this number by 10. Note that the number starts from 0
every time Bob is put to charge, regardless of how full his battery is. For example, if
his screen shows the number 24, that means Bob has been sitting to charge for 240
consecutive minutes (4 hours).
Charging Time
32
Bob should not sit on his charging station for more than 5 days with his power swtich
turned ON. If you will not be using him at least once every 5 days, turn his side power
switch OFF to conserve his battery.
Conserving Bob’s Battery
To conserve Bob’s
battery, flip his power
switch OFF when
he is away from his
charging staion.
5
days


Cleaning
Modes

36
Auto Settings
Bob is equipped with three automatic cleaning modes:
• Auto 1: Robot
• Auto 2: Quick Clean (30 mins)
• Auto 3: Touch Up (15 mins)
On these settings, he will automatically maneuver around your home, cycling through
his different cleaning patterns: Spiral Track
™
, Waffle Track
™
, and Wall Track
™
. Choose
the setting that best suits your cleaning needs.
Cleaning Modes

37
Auto 1: Robot
Bob will thoroughly cover a large area for just over an hour.
To select this setting:
Turn Bob ON. Press AUTO on the remote or on
Bob.
1 2
38
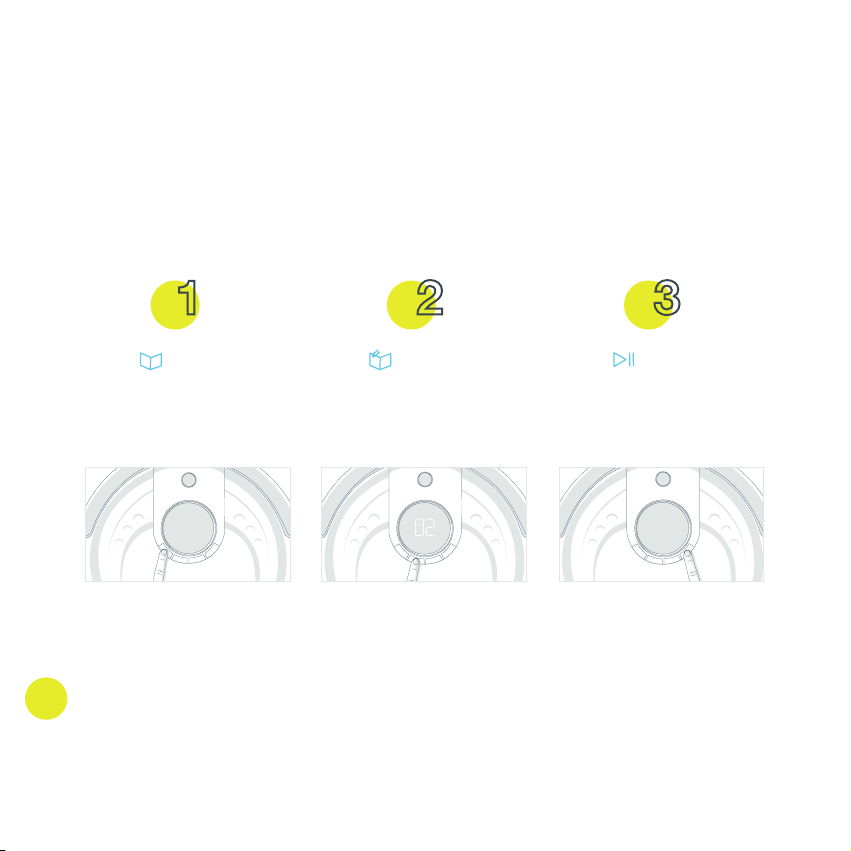
Auto 2: Quick Clean (30 mins)
Bob will quickly and efficiently clean a medium-sized area for 30 minutes.
To select this setting:
When Bob finishes cleaning, either place him on his charging station or turn his side
power switch OFF to conserve battery. If left unattended after his cycle is over, Bob
may chirp to draw attention to himself.
Press on Bob’s cover
until you see the word
AUTO on his screen.
Press until Bob displays
the number 02.
Press to confirm your
selection.
1 3 2
39
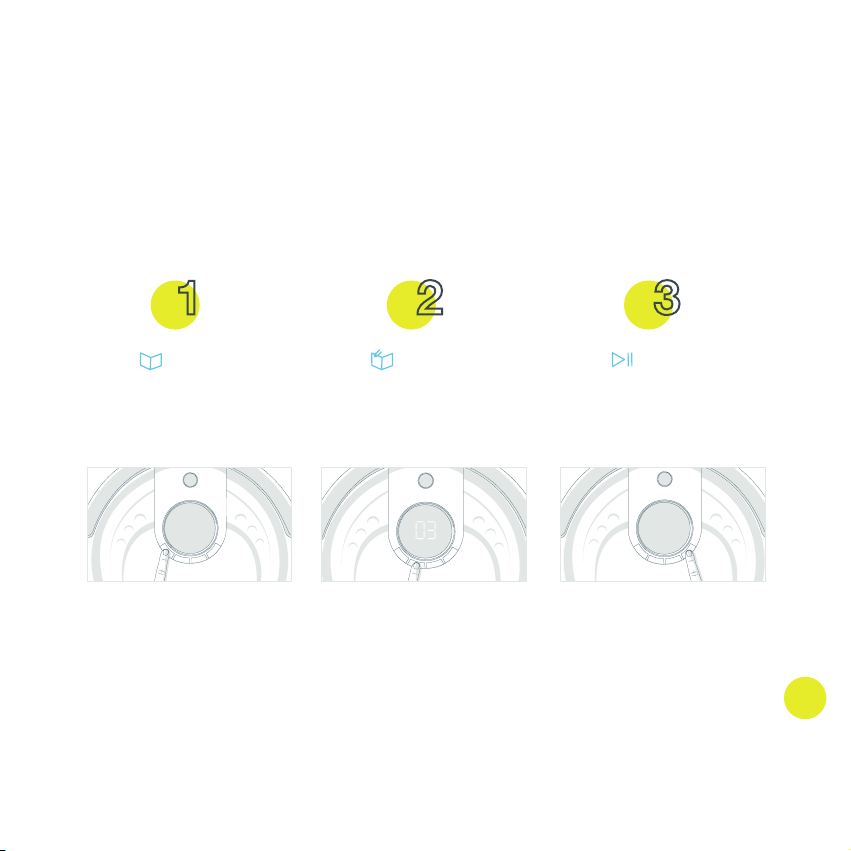
Auto 3: Touch Up (15 mins)
For when you are on-the-go, make Bob dash across a small area for 15 minutes.
To select this setting:
When Bob is done cleaning, either place him on his charging station or turn his side
power switch OFF to conserve battery. If left unattended after his cycle is over, Bob
may chirp to draw attention to himself.
Press on Bob’s cover
until you see the word
AUTO on his screen.
Press until Bob displays
the number 03.
Press to confirm your
selection.
1 3 2
40
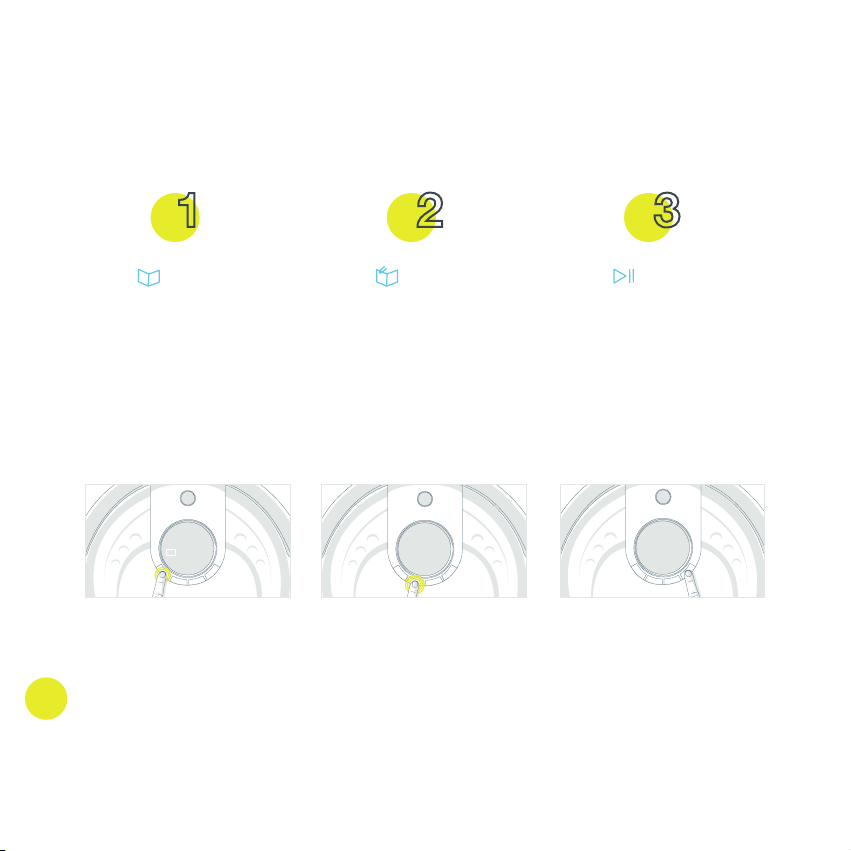
Small-area Cleaning: Select Bob’s targeted cleaning pattern
Press twice. The word
SPOT will appear on Bob’s
screen.
Press once, twice, or
three times to choose
Bob’s movement pattern.
1 indicates Spiral Track
™
2 indicates Waffle Track
™
3 indicates Wall Track
™
Press to confirm your
selection.
1 3 2
SPOT
UV Light
The UV light is turned ON by default every time you switch Bob ON. Press the UV
button to turn the UV light on or off while Bob is cleaning.
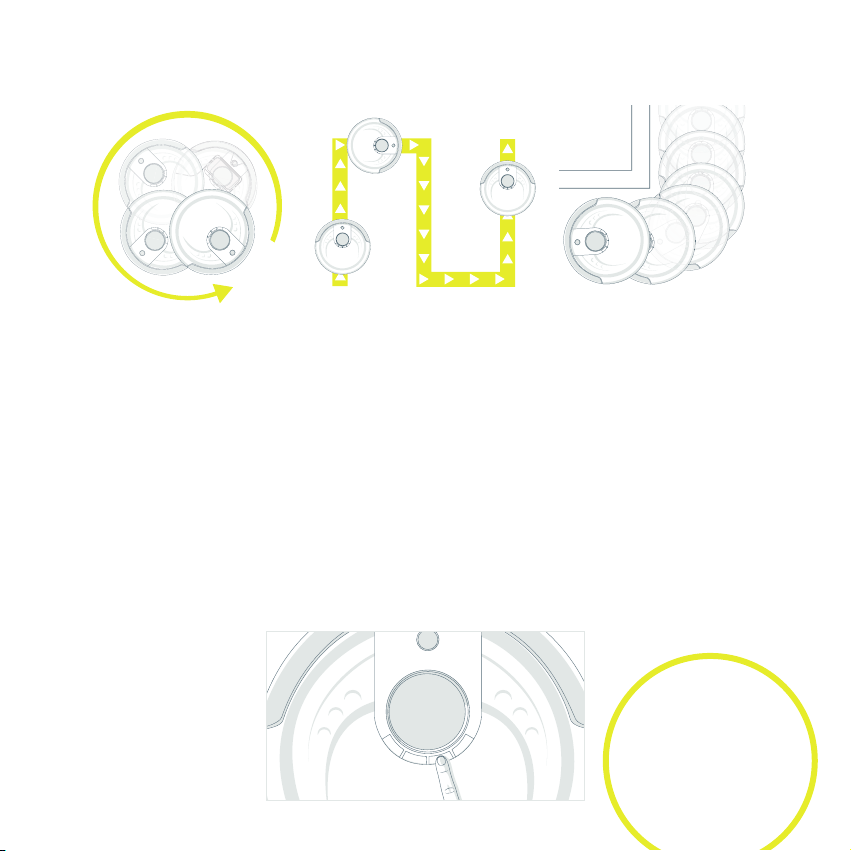
Spiral Track
™
(~4 mins)
Bob will target a 5’ x 5’
spill zone by spiraling
outward from the center
and then reversing his
movements.
Waffle Track
™
(~4 mins)
Bob will target a 6’ x 5’
spill zone by tracing a
grid pattern.
Wall Track
™
(~10 mins)
Bob will travel along the
perimeter of your home.
The UV light can't be
turned on or off when
Bob is standing still. To
turn the UV light off or
back on, do so while
Bob is cleaning.


Set Bob's
Cleaning
Schedule
44
Bob can be programmed to start cleaning on the time and days of your choosing
through his charging station.
There are 5 buttons on Bob’s charging station:
On/Off 1
OK/Cycle 2
Time/Clock 3
Schedule/Program 4
Select/Adjust 5
Use Bob’s Charging Station
These buttons are used
to program Bob’s daily
cleaning schedule.
1 3
2 4
5
45
Bob uses a 24-hour clock. If you want Bob to start cleaning at 8:00 AM set his
schedule time to 08:00. If you want him to start at 8:00 PM, set it to 20:00.
The charging station’s default time is 8.00 AM. The station displays 08:00 when it’s
plugged in for the first time, or after being unplugged for over 8 hours.
To set the current time and day on Bob’s charging station:
Set the minutes:
Set Current Time & Day
To set the minutes, press
the button once.
The two digits for minutes
will blink. Then press the
button to select current
minutes.
Press to move on to
the hour digits.
1 3 2
46
Press the button until
the digits for hours blink.
Use the button to
select the current hours.
Press the button again
to move on to the weekday.
1 3 2
Set the hours:

47
Weekdays are defined as:
Su= Sunday Mo= Monday Tu= Tuesday We= Wednesday
Th= Thursday Fr= Friday Sa= Saturday
Press the button until
a weekday symbol blinks.
Use the button to
select the current day.
Press OK to save each
setting within 30 seconds,
otherwise the operation
will quit without saving.
Press to save.
1 3 2
Set the weekday:
48
After setting the current time and day on Bob’s station, you can program Bob’s weekly
cleaning schedule.
To set Bob’s weekly schedule:
Set the minutes:
Set Bob’s Cleaning Schedule
Press the button. The digits for minutes
will blink. Use the adjust
button to select the
desired minutes.
Press the button again
to move to the hour digits.
1 3 2
49
Set the hours:
Press the button until
the digits for hours blink.
Use the button to
select the desired hours.
Press to save or press
again to move on to
selecting the weekdays.
1 3 2
50
Set the weekday(s) you want Bob to clean:
If Bob’s charging station is unplugged or turned off for more than 8 hours, his time
and schedule will reset to default.
Press the button until
the icon Su for the first
weekday blinks.
Each weekday blinks for 5
seconds and then remains
solid. This indicates that
the corresponding day has
been selected for cleaning.
To move between days,
use the button to move
on to the next day. If you
would like to skip a certain
day, press again while
the weekday icon is still
blinking.
To deselect a day, press the
power button while the day is
blinking.
When all desired days are
selected, press to save.
1 3 2
You can choose any and all weekdays
for cleaning. Bob starts his cleaning
at the selected time (e.g. 14:30) on all
programmed days (e.g. Mo, Tu, Th).
If Bob is scheduled to
clean, he will leave his
station even if he hasn’t
finished charging.
51
Bob’s back-to-back cleaning (auto-resume) mode is among the unique features that
set him apart from other robotic vacuum cleaners. Auto-resume enables Bob to get
back to work as soon as his battery is fully recharged.
To activate back-to-back cleaning cycles:
• Press the button on Bob’s charging station. A broom-shaped sign will light
up on station’s screen. This means that Bob is on back-to-back cycles mode and
will automatically resume cleaning when his battery reaches full charge.
While the broom sign is on, Bob leaves his charging station and begins cleaning
EVERY TIME his battery is full. To cancel this setting, press the button again
until the broom-shaped sign disappears. When activated, Bob’s back-to-back cycles
mode will stay in effect until it is turned off by you, or until the charging station is reset
after being unplugged for over 8 hours.
Back-to-back Cleaning Cycles


Parts &
Maintenance

54
Bob’s microfiber mopping cloth can pick up dirt while both wet and dry.
To install Bob’s mop attachment:
You may dampen Bob’s mopping cloth with water or cleaning liquid before placing it
on his mop attachment. With his mop installed, Bob can mop, sweep, and vacuum
simultaneously.
Mop
Press down on the mop attachment
until both sides are secured.
Align the two prongs of the mop at-
tachment to their corrisponding spaces
between Bob's left and right wheels.
1 2
55
Remove the mop attachment when Bob is cleaning carpets or rugs. To do so, gently
press the tails inward and lift the attachment up.
Bob’s microfiber mopping cloth
can be washed manually or in the
washing machine. A spare cloth is
provided in Bob’s package.

56
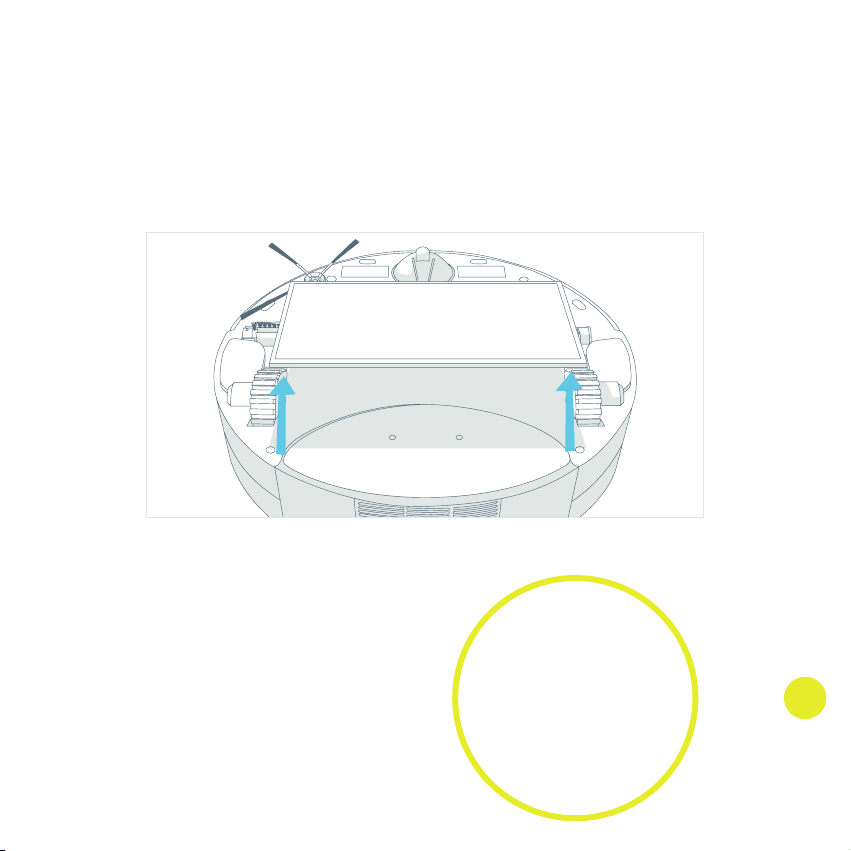
To empty the dustbin:
Dustbin
Push the center button on Bob’s back to
release the dustbin and pull.
Open the transparent gate to empty
the bin.
1 2
57
To clean the dustbin:
You may wipe the dustbin with a dry
cloth or brush it with the cleaning tool.
When done, replace the transparent gate
and slide the dustbin back into Bob.
1 2
Never wash the
dustbin nor fill
it with water or
any other fluid.

58
Three filters are located inside the dustbin’s ceiling. These filters capture fine particles
and allergens, and prevent them from escaping the dustbin.
To remove the filters:
Filters
First eject the dustbin. Then pull the filter’s frame towards you.
1 2
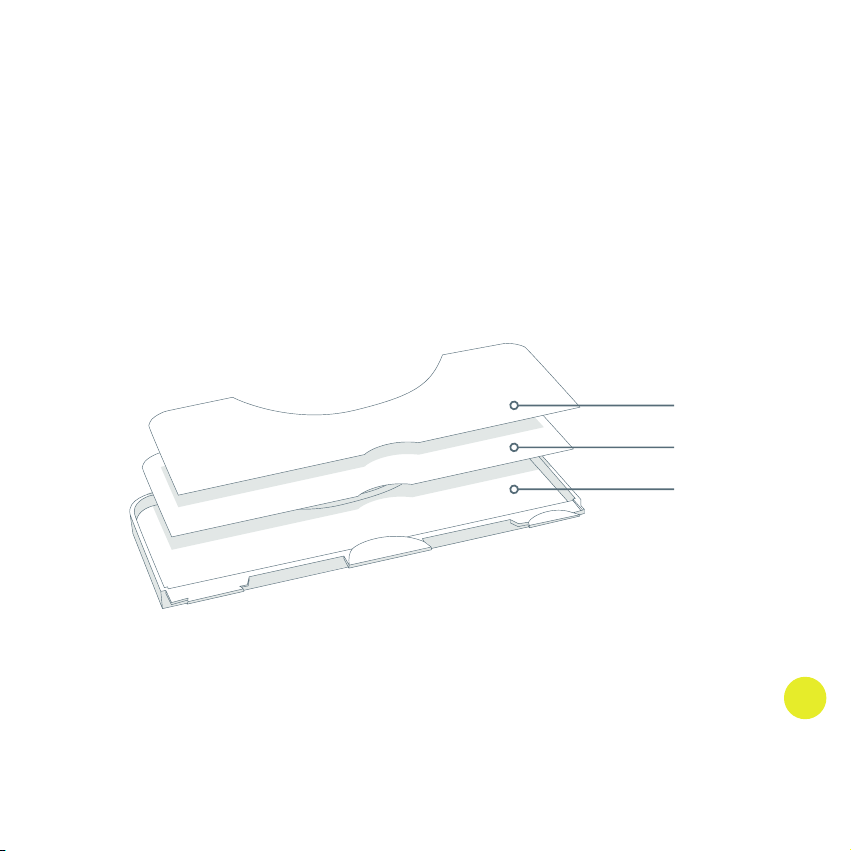
59
You will see three filter layers:
Mesh filter 1
for larger particles
Electrostatic filter 2
for fine particles
HEPA filter 3
for sub-micron particles
Use the cleaning tool to brush dust off the filters. It is recommended that you change
Bob’s filters every 6 months, depending on the frequency and intensity of his cleaning.
3
2
1
60
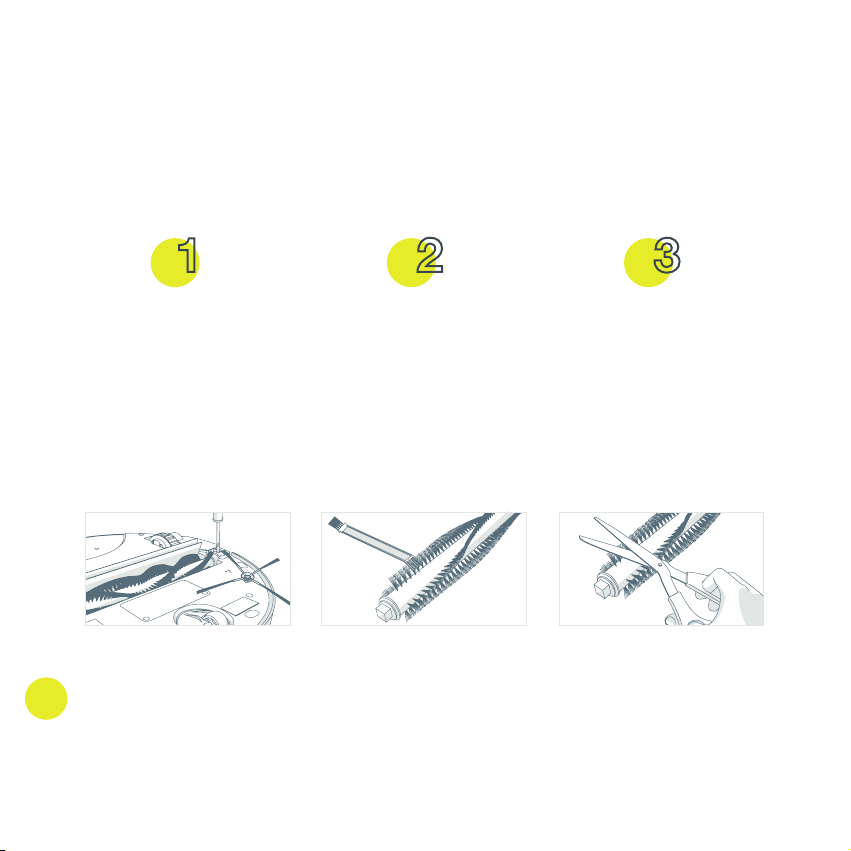
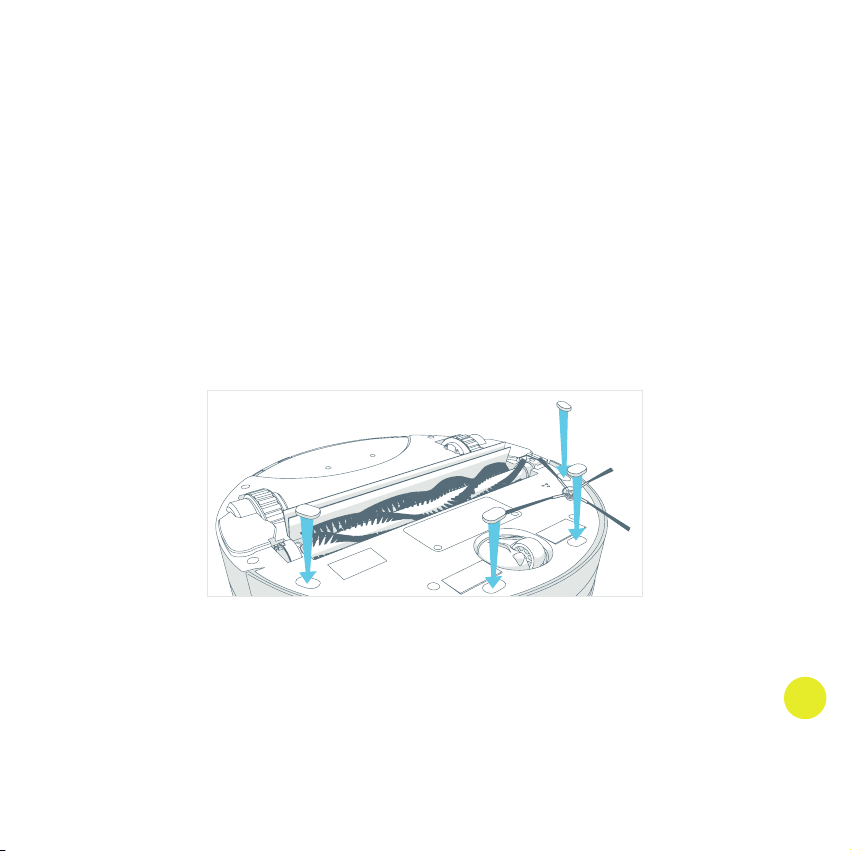
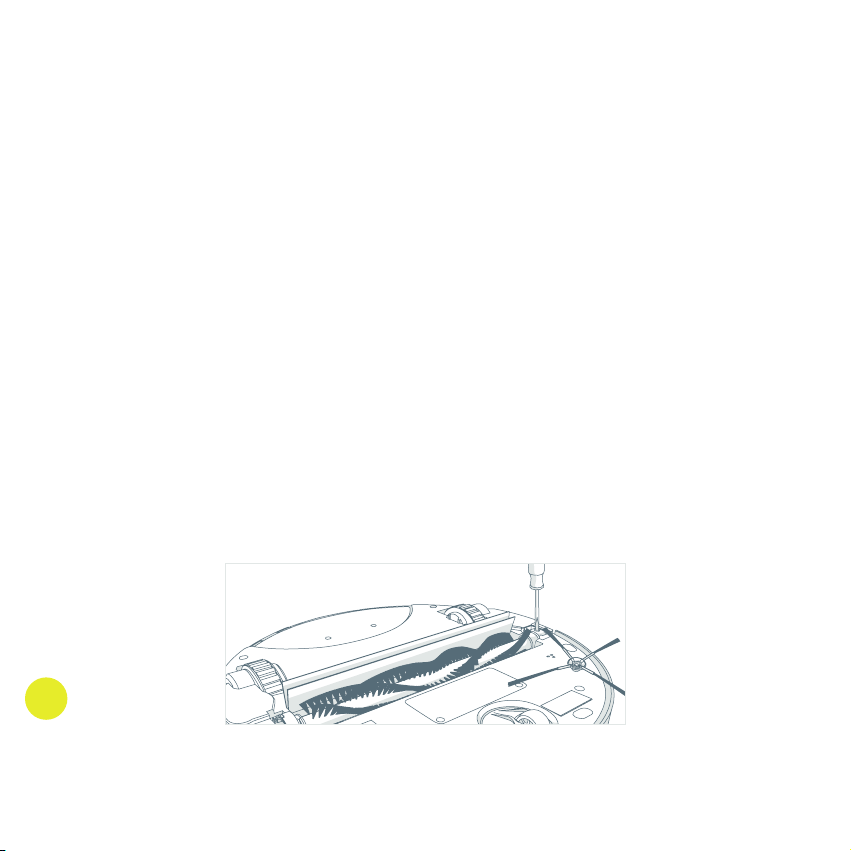
It is recommended that you remove and clean Bob’s main brush on a weekly basis.
To do so:
Main Brush
Remove the screw securing
Bob’s main brush using a
Phillips head screwdriver.
Use the cleaning tool to
remove hair and debris
from both ends of the
brush as well as the com-
partment inside Bob.
You may use a pair of
scissors to cut away any
hair or threads wrapped
around the brush, or a
pair of tweezers to re-
move congestion from the
notches where the main
brush is held.
1 3 2
61
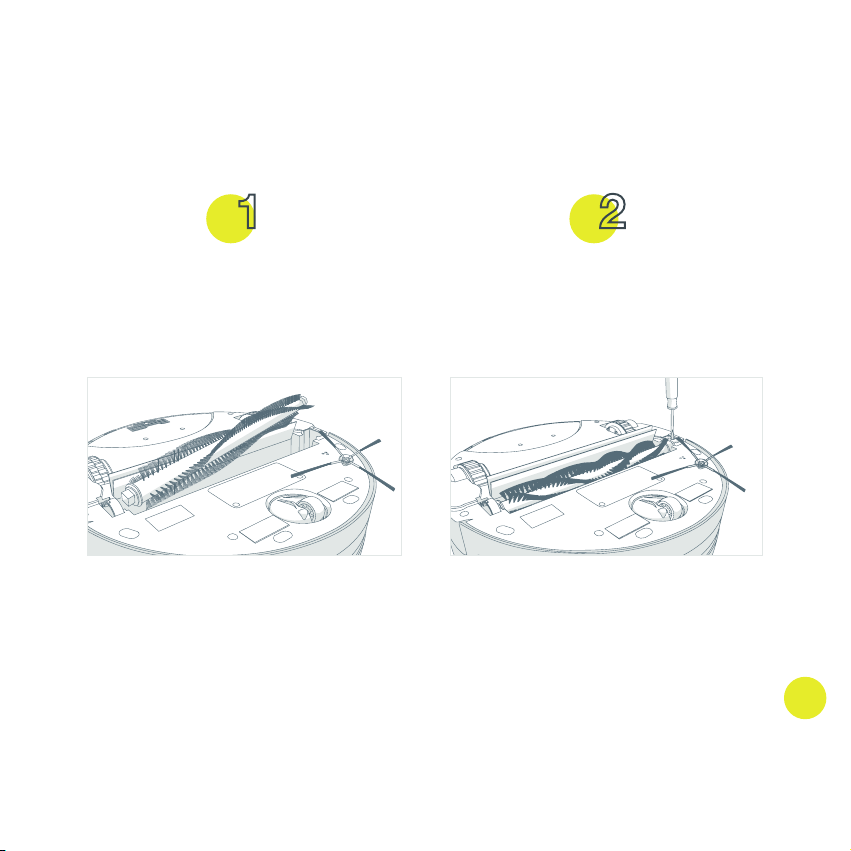
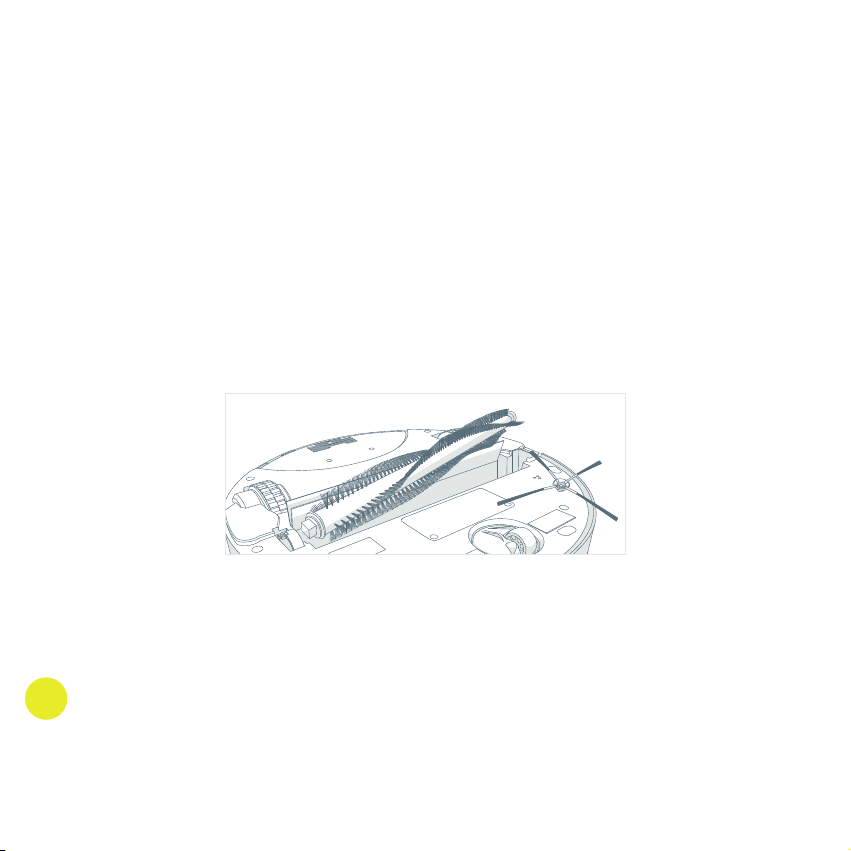
To reinstall the main brush:
Replace the end piece and insert the
opposite end of the brush into the square
indentation inside Bob.
Lastly, re-tighten the screw.
1 2
62
Bob’s side brush extends his reach and allows him to sweep along corners and walls.
When Bob is first delivered to you, his side brush is not installed.
To do so:
Use the Phillips head screwdriver and short screw included in Bob’s box to secure
the side brush into the empty socket on Bob’s underside.
Side Brush
63
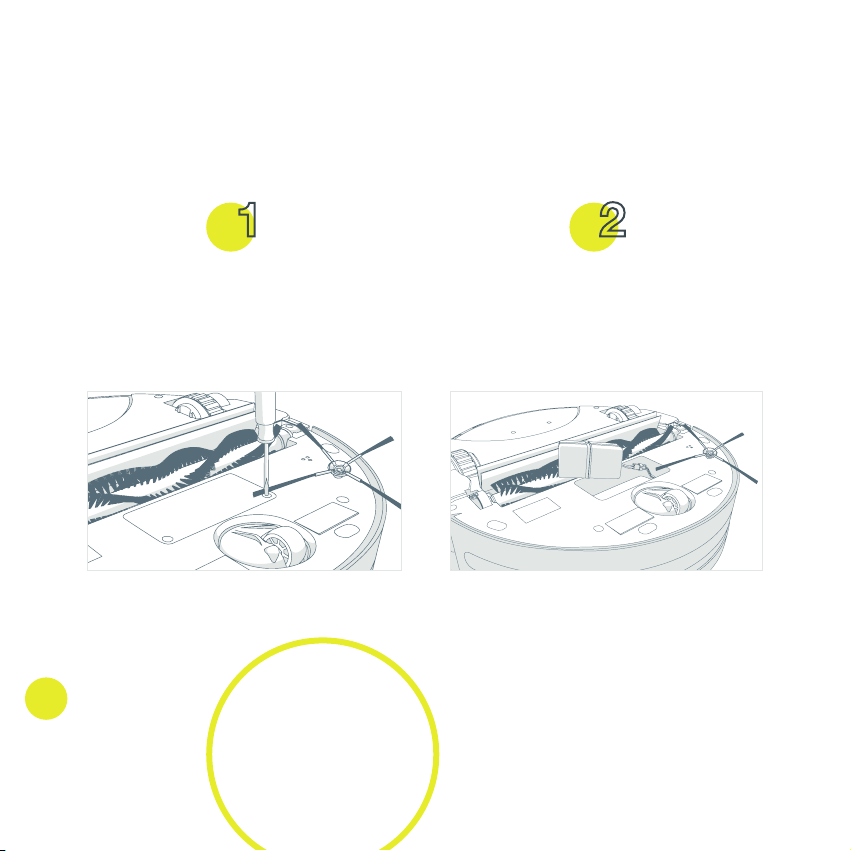
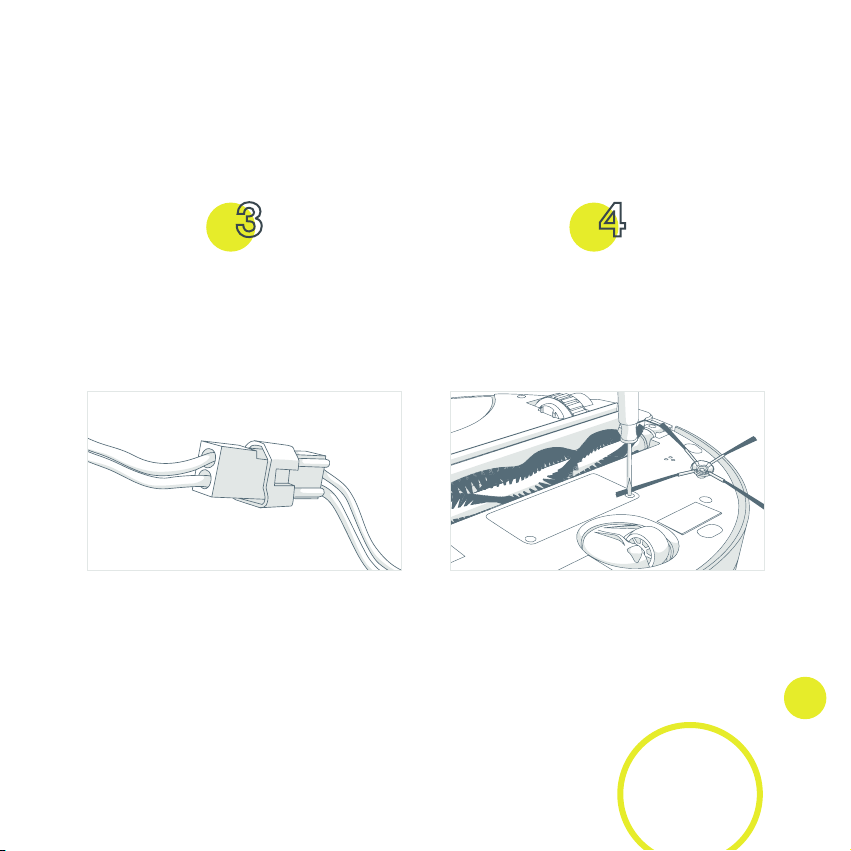
It is recommended that you remove and clean Bob’s side brush on a weekly basis.
To do so:
Remove the side brush
using a Phillips head
screwdriver.
Replace the side brush
and re-tighten the screw.
Use the cleaning tool to
brush off hair tangled
around the side brush as
well as the socket where
the side brush is held.
1 2 3
64
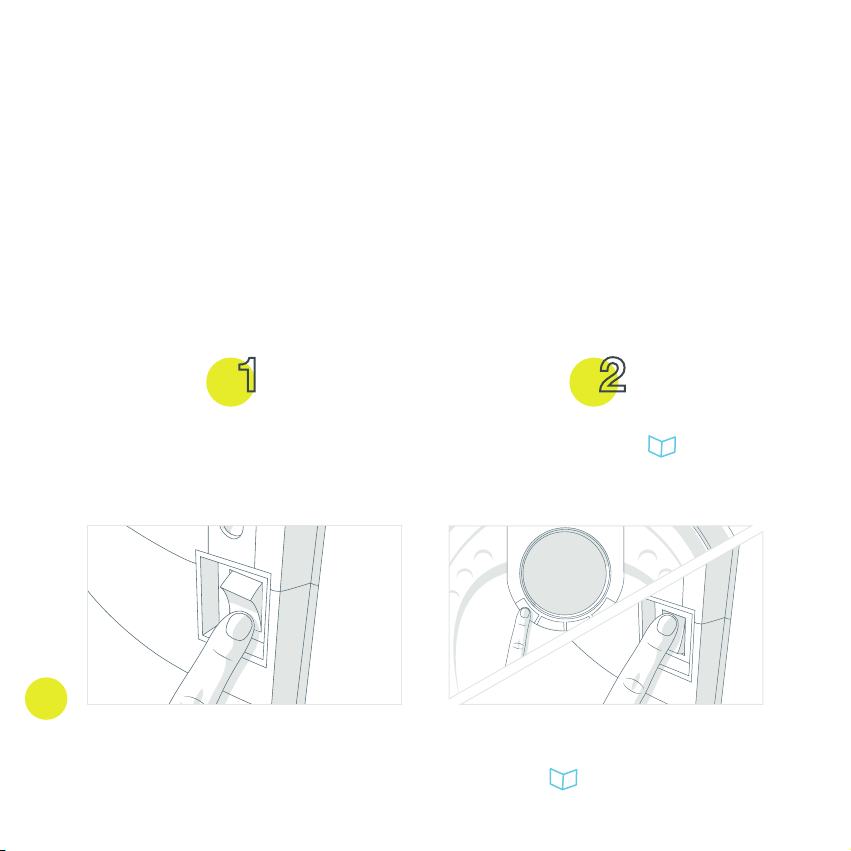
Replacing Bob’s Battery
Battery
Remove the battery cover on Bob’s
underside using a Phillips head screw-
driver.
Lift the battery out of its compartment,
and unplug the connecting wires.
1 2
Do not let Bob sit idly with his
power switch ON for more
than 5 days; switch him OFF
to conserve his battery.
65
Storing Bob
If you are not using Bob for an extended period of time, unplug his charging station,
remove his battery, and store everything in a dry place at room temperature.
Plug the new battery in and slide it into
the empty compartment.
Re-tighten the screws on the battery
cover.
3 4
Do not leave
Bob in direct
sunlight.


Sensors
68
Edge and wall sensors
Dirt and dust on Bob’s wall and edge sensors can reduce his performance. Regularly
cleaning these sensors ensures that Bob keeps working at his best.
To do so:
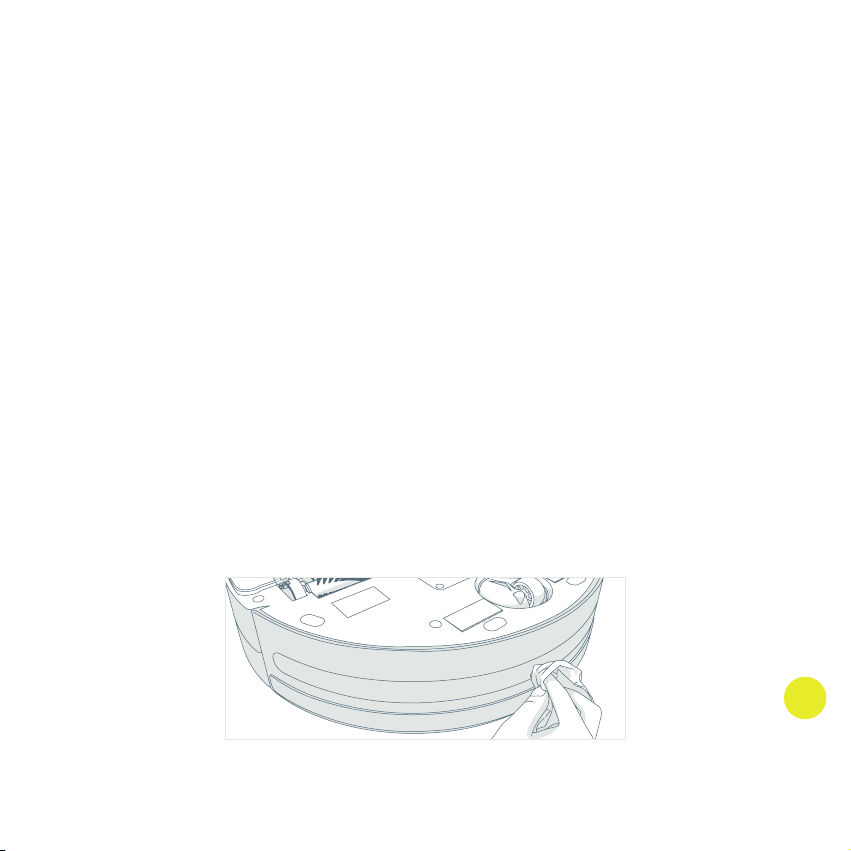
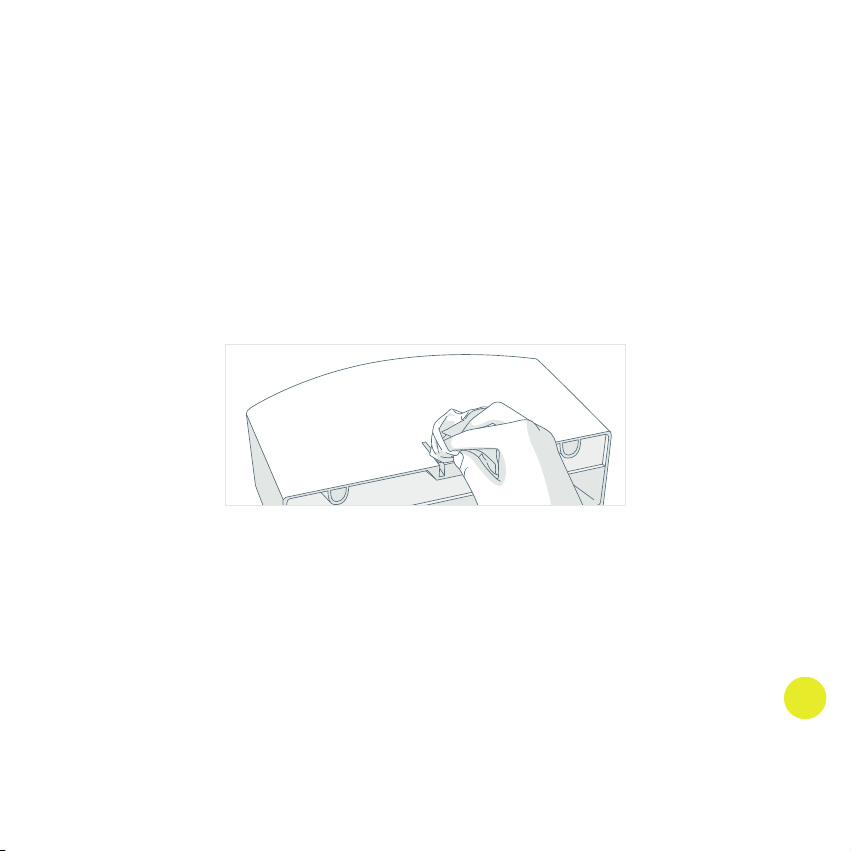
Use a soft cloth slightly moistened with cold water or alcohol to wipe the wall
sensors along Bob’s bumper and the oval-shaped edge sensors on his underside.
Dirt Sensors
For a more efficient clean, Bob is equipped with dirt detection sensors. If Bob
reaches a particularly dirty spot while cleaning, his dirt detection sensors will activate, the
word DIRTY will appear on his screen, and Bob will increase his cleaning intensity.
Cleaning Bob’s Sensors
69
Dark-colored carpeting and certain floor patterns may seem like edges to Bob’s ground
detection sensors. If you notice that Bob stops with ERROR 04 on your carpet, you
may need to “blindfold” Bob by covering his ground detection sensors.
Flip Bob over and use the blindfold stickers that came in Bob’s box to blindfold him.
Peel off the backs of each blindfold sticker and place one onto each of Bob's 4 sensors.
Make sure each sensor is fully covered. Remember, while Bob is blindfolded, he will
not be able to detect stairs or edges!
Blindfold Stickers


Troubleshooting
72
When Bob faces an uncomfortable situation, he will notify you by displaying ERROR,
coupled with a two-digit number on his screen. Each number corresponds to a certain
issue Bob is having.
If after attempting the suggested solutions Bob’s problem persists, you may want to
perform a home checkup test on him (see next section). You may also contact our
customer care center at [email protected].
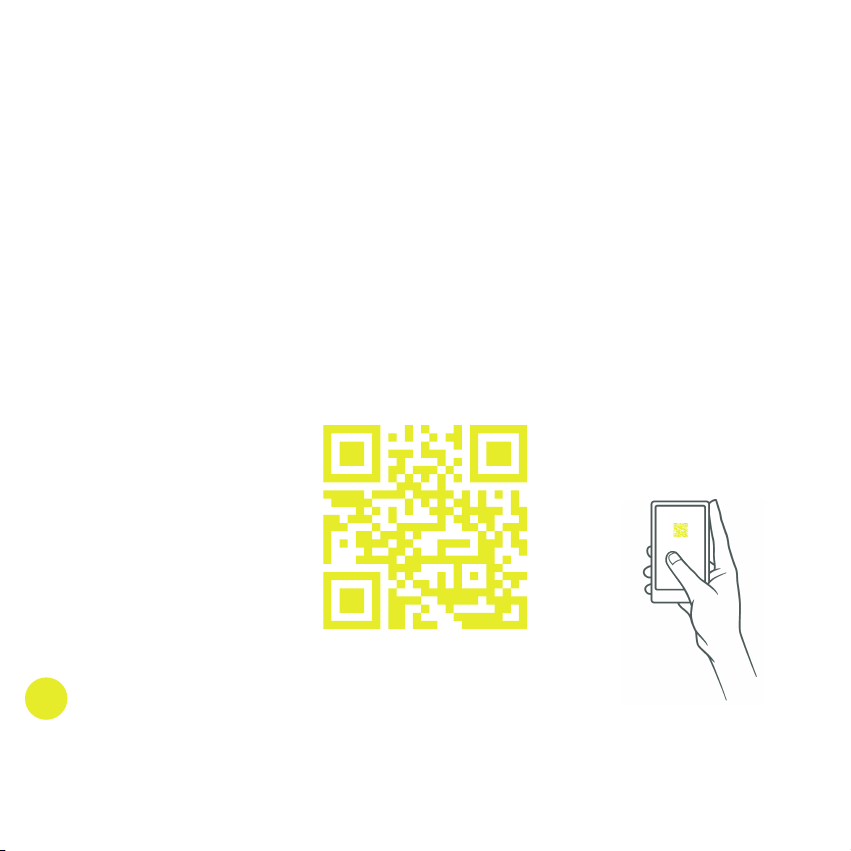
Not a fan of reading? Visit owners.bobsweep.com for handy video guides, or scan
this QR code:
Error Codes

73
Error Code 00: Left Wheel
Error Code 00 pertains to an issue with Bob’s left wheel.
What to do:
Start by checking the left wheel for jamming. Use the cleaning tool or
compressed air to remove any dust or debris that may be jamming the left
wheel. If this does not solve the problem and Bob still shows Error Code
00, perform a checkup test to see how the wheels respond to the test.
Error Code 01: Right Wheel
Error Code 01 pertains to an issue with Bob’s right wheel.
What to do:
Start by checking the left wheel for jamming. Use the cleaning tool or
compressed air to remove any dust or debris that may be jamming the left
wheel. If this does not solve the problem and Bob still shows Error Code
01, perform a checkup test to see how the wheels respond to the test.
74
Error Code 02: Main Brush
Error Code 02 means Bob’s main brush is unable to move freely.
What to do:
Remove the main brush using a Phillips head screwdriver, and clean it thoroughly
from end to end. You may use a pair of scissors to cut hair or thread wrapped
around Bob’s brush, or a pair of tweezers to remove congestion from the motor
area (the square metal indentation where the main brush is held). If Bob displays
Trouble Nr 02 while cleaning on a shag carpet or rug, you may remove his main
brush and allow him to vacuum without it.
Error Code 03: Front Wheel
Error Code 03 means Bob’s front wheel is unable to move freely.
What to do:
Remove debris congesting the front wheel using compressed air and the
cleaning tool. If the congestion is not removable from the outside, disconnect
the front wheel using a Phillips head screwdriver for leverage, and remove the
obstruction. For a comprehensive how-to video, visit owners.bobsweep.com.
75
Error Code 04: Ground Detection Sensors
Error Code 04 means Bob’s ground detection sensors are blocked or dirty. Bob’s four,
oval-shaped edge sensors are located on his bottom, near his bumper.
What to do:
Wipe the sensors using a clean, dry cloth or dust them using compressed air. If
Bob displays this Error Code while working on dark-colored carpet or
patterned flooring, you may need to blindfold him. See page 69 for instructions.
Error Code 05: Wall Sensors
Error Code 05 means Bob’s wall sensors are blocked or dirty.
What to do:
Do a visual check on the transparent stripe on Bob’s bumper. If it is too dirty
for you to see what is behind it, wipe it with a clean, damp cloth. To ensure
nothing is jammed under the bumper, gently tap it and use compressed air to
clear it of debris. If the issue persists, try running a checkup test on Bob.
76
Error Code 06: Touch Sensors
Error Code 06 pertains to Bob’s touch sensors. It is likely that a small piece of debris
is trapped under the bumper.
What to do:
Slowly and carefully tap on Bob’s bumper to clear out any obstructions. Use
compressed air to clear it of dust and debris. Press on both ends of the front
bumper until you hear a tiny ‘click’ sound. If the bumper is not clicking on its ends,
it is possible that one or more of Bob’s touch sensors has a broken arm and needs
to be replaced.
Error Code 07: Main Brush Installation
Error Code 07 means Bob’s main brush is not properly installed.
What to do:
Use a Phillips head screwdriver to remove the main brush and put it back in place.
Make sure the brush’s square metal end is well fitted into the corresponding square
metal part on the main brush holder.
77
Error Code 08: Dustbin
Error Code 08 means Bob’s dustbin is not properly installed, or his dustbin’s metal
contact points are dirty.
What to do:
Remove Bob’s dustbin and empty it. Turn the dustbin around and gently wipe the
two metal connectors on its bottom. Lastly, clean the metal contact points inside
Bob where the dustbin is inserted.
Error Code 09: Mainboard
Error Code 09 generally means Bob’s mainboard is malfunctioning and needs to be
replaced.
What to do:
Bob likely needs to visit the bObsweep hospital for treatment! But don’t worry, Bob’s
doctors are just an e-mail away. Send a short explanation to support@bobsweep.
com, and leave the rest to them!
78
If Bob is not performing as well as he used to, you can diagnose the problem with a
simple home checkup test.
If Bob fails any part of the checkup test, he may need a replacement part. In this case,
please call our customer care center at 1-888-549-8847 for toll-free support in the US
and Canada, or email us at [email protected].
Put Bob in checkup mode:
Bob will chirp three times to let you know he is now in checkup mode. The screen
will show a word or a number sign. You may release the button. Do not press
any additional buttons.
Home Checkup Test
Flip Bob's power switch OFF and place
him on a light-colored surface.
While holding down the button on
Bob’s cover, turn Bob’s power switch
ON.
1 2
79
Step One: Ground Detection Sensors
Right after Bob enters checkup mode and while Bob is on the floor, look at his screen.
You should see four lights indicating AUTO, TIME, SPOT, and UV lit on Bob’s display.
If all four lights do not turn on upon entering checkup mode, flip Bob over and wipe
his ground detection sensors with a clean cloth. Check again and see if all four lights
turn on. If the problem persists, Bob’s sensors may need to be replaced. In that case,
contact [email protected].
AUTO
SPOT UV
TIME
To test the ground detection sensors, lift Bob about 6 inches off the ground (more than
15 cm). You should see the four lights turn off.
If all four lights turn off while Bob is lifted, put Bob back on the floor and continue to
the next step without pressing any additional buttons.
80
Step Two: Wall Sensors
Use a thick, flat, and white surface to imitate a wall and drag it around Bob’s bumper.
The third battery bar, second battery bar, first battery bar, and the words DIRTY and
ERROR should light up one-by-one on Bob’s screen as you move your imitation wall
around his bumper.
You may now move on to the next step of the checkup test. Do not press any additional
buttons.
AUTO
SPOT
DIRTYERROR
UV
TIME
81
Step Three: Touch and Bumper Sensors
To move on to this test, press the button on Bob’s cover twice. Bob’s screen will
go blank.
Press on the left side of Bob’s bumper and the battery bars should light up on his
screen; press on the right side and the word ERROR should light up. If you press the
center of the bumper, both the battery bars and ERROR should appear at the same
time. If either icon fails to light up, it is likely that Bob needs a new bumper.
AUTO
SPOT
DIRTYERROR
UV
TIME
82
Step Four: Display Screen
Press the button one more time. Each word and icon on the screen should light up
in a repeating rotation.
AUTO
SPOT
DIRTYERROR
UV
TIME
83
Step Five: Brush and Suction Power
After the cycle has finished, press the button again. Now press the button.
In this mode, the brushes should start rotating and you will feel air flowing from the
back of the dustbin. Ignore the signs and numbers on the display in this test mode.
If you do not feel air flowing out of the dustbin, then Bob’s vacuum motor may need
to be replaced.
84
Step Six: UV Light and Wheels
The final step is to test Bob’s UV light and wheels. Lift Bob off the floor to keep him
from running away! Then press the button and his wheels will drive forward.
Next, flip Bob over and you will see his UV lamp light up. Press the button once
more. Bob’s wheels will drive backwards and his UV lamp will turn off.
Do not look
directly into the
UV lamp.
If Bob completes the checkup test without any issues, then his internal parts are
working properly! Contact [email protected] if you have any questions, as our
doctors at the bObsweep hospital are always ready to help!


Warranty
Information

88
A bObsweep product purchased from an authorized seller and used anywhere in the world
includes a 1-year limited warranty, 2-year warranty on the battery, five years of subsidized
replacement, and a lifetime of support. The warranty covers labor and all parts, except
brushes, filters, and mopping cloths. Postal charges are not covered by the warranty.
Additional coverage plans are available for purchase at www.bobsweep.com/coverageplan.
Even after Bob’s warranty is over, all his replacement parts and his visits to hospital are
subsidized between 25%-50% for five years from the date he was first adopted.
To activate Bob’s warranty, register him online and keep your original purchase receipt.
To register Bob, visit www.bobsweep.com/warranties.
Warranty Information

89
Bob’s cleaning pattern may look quite different from the way a human would clean:
he may spin in a gradually widening circle, follow along walls, or zigzag across a small
area. Sometimes he may seem to be ignoring some spaces or spending too much
time on others — but don’t worry! Bob’s dirt sensors tell him to pay more attention to
particularly dusty or soiled areas. Rest assured, Bob will efficiently clean your home
within the course of a full cycle — just check his dustbin for the evidence!
It is best to let Bob work in his own way, even if his movements appear odd. Moving
him around, manipulating his movements, or picking him up may confuse him and
disrupt his cycle.
If you wish to control Bob’s movements manually, you may use the navigational
buttons on his remote. If your rooms are divided by higher ledges than Bob is able
to climb.
Bob’s Cleaning Behavior

90
Unique Furniture
Bob is designed to maneuver around furniture of most shapes and sizes, but certain
configurations may confuse him temporarily. Bob may sometimes find it difficult to
clean under chairs with narrow legs, or furniture that is too low for his bumper sensors
to detect. Specialty furniture, such as desk chairs with wheels or stools with circular
bases, may also confuse him for a moment — but don’t worry, Bob usually finds his
way around with time.
Blindfold Stickers
Bob uses infrared light to detect edges and stairs; because dark-colored carpet ab-
sorbs most light, it may seem like an edge to Bob’s sensors. If Bob continually dis-
plays ERROR 04 on his screen while working on dark-colored carpet, simply cover
the four ground detection sensors on his underbelly with the blindfold stickers that
came in his box. Just remember that when Bob is “blindfolded” he will not be able to
detect edges or stairs!
Main Brush
Bob’s main brush, which is designed to reach deep into carpet, may also have trou-
ble turning on rugs with long fibers or fringes. You may remove Bob’s main brush and
allow him to vacuum without it when this happens.
Bob’s Challenges

91
Mop
Bob’s mop, which is attached to his bottom, is designed to sit flat against the floor
and leave behind a clean trail. Because of this, Bob may have a tough time climbing
over elevated surfaces while mopping. Make sure to remove Bob’s mop when he is
not cleaning smooth surfaces such as tile or hardwood.
Inclines
Sometimes Bob will attempt to drive up angled surfaces, getting stuck for a few min-
utes before deciding to clean somewhere else. This is because Bob wants to cover
every spot in your home and will try his hardest to overcome any obstacle!
As long as Bob does not indicate on his screen that there is a problem, let him find
his own way around your home and continue cleaning. Take note of the areas Bob
finds the most challenging, and if possible spread or adjust some of your furniture
accordingly.

92
1. Where can I find Bob’s training videos?
Bob’s “how-to” videos can be found at Bob’s owners’ corner:
owners.bobsweep.com.
2. How long should Bob’s battery last?
The exact time depends on the type of surface Bob is cleaning as well as the age of
the battery. Generally, the smoother the surface (hardwood or tile for example), the
longer the battery will last. When fully charged, a new Bob usually cleans between 45
to 90 minutes.
3. How do I know that Bob is fully charged and ready to clean?
When Bob charges using the wall adapter or charging station, the battery bars flash
on his display screen. As soon as Bob's battery is fully charged, these bars will
remain solid.
4. How often should I empty the dustbin?
Bob’s dustbin has a 1000 mL capacity — three times larger than most robot-
ic vacuum cleaners on the market today! This means you may not need to
empty the dustbin immediately after every cleaning. Depending on the size of
the room and the amount of particles piled up, Bob can perform up to around
six cleaning cycles before he fills his dustbin. Simply remove the dustbin and
check to see if emptying is necessary.
5. How often should I clean Bob’s brushes?
Bob’s brushes do a lot of the work picking up hair and larger debris, so it is
recommended that you clean the main and side brushes every 1 to 4 uses. If you
notice a thick covering of hair, dust, and debris on his brushes, remove and clean
them. Remember to clean the notches that hold Bob’s brushes in place on his
interior. This assures they stay in good condition for a long time.
FAQs

93
6. My Bob won’t turn on no matter what I do.
If Bob only charged for a short amount of time and does not start after using his
ON/OFF switch or his charging station, it’s likely that his battery has drained too
low to operate. To recharge him, unplug the adapter that normally attaches to the
charging station and plug it directly into the inlet on Bob’s side. Let Bob recharge
overnight before using again. After this procedure, you will be able to charge Bob
using the charging station. If you place Bob on his charging station, always make
sure to turn him ON first, to activate the charging plates on his bottom. When Bob
charges, the battery bars on his display screen blink.
7. Why is my Bob beeping?
If Bob is stationary and left ON without cleaning or charging, he will beep once
every five minutes to alert you that his battery is draining. Press the power but-
ton on the remote to put Bob in standby mode or turn him off completely with
his side power button. You will have to switch this button ON the next time you
want Bob to clean. Bob also beeps when he encounters a problem cleaning
and needs assistance. Along with his sounds, you will see an Error Code on the
digital display which lets you know why Bob has stopped. Consult this manu-
al’s Troubleshooting section to resolve Bob’s error messages.
8. Bob is having trouble finding his charging station. Where is the best place to put his
station?
For Bob to find his charging station, he needs to face it directly. Bob will find his
station more easily if it you place it near the perimeter of the room with plenty
of space in front of it, so that he may detect the station from afar. In order for
Bob to dock properly, place the charging station against the wall on a flat sur-
face like hardwood or tile flooring instead of carpet. To facilitate Bob’s work,
find a spot for the charging station where Bob has a higher chance of passing
through.

94
9. I am having problems removing Bob’s brush.
If the main or side brushes are difficult to remove, it is likely because hair, string,
or other debris have been caught in them and are clogging the areas where
they attach to bObsweep. You can use scissors to cut the hair wrapped around
either brush, until you are able to remove it. You may need to gently pull the
main brush up or down to reach the corners, but do not force the brushes out
as this can damage them.
10. Bob gets stuck under my furniture or travels over wires that tangle up his brush.
How can I stop him from going into these areas?
If Bob maneuvers under a piece of furniture and there is only one open
entrance, he may need a few minutes to figure out how to escape on his own.
You will not need to assist him when this happens, unless Bob stops cleaning
completely and starts beeping.
11. Why does Bob start cleaning when I did not tell him to clean?
Bob will start up on his own when he is scheduled to clean, or when his
auto-resume feature is enabled. Bob’s weekly cleaning schedule is displayed on
his charging station. Bob will automatically start cleaning on the time and days
of the week he is scheduled to clean. A bell shaped icon of Bob's station means
Bob has a scheduled cleaning coming up. Bob works on a 24 hour clock, so if he
is scheduled to clean at 01:00, then he will begin working at 1 am; if he is
scheduled to clean at 13:00, then he will begin working at 1 pm.

95
12. When should I use different cleaning modes?
Auto/Robot mode is Bob’s default mode and gives him enough time to
thoroughly cover a large area. If you would like to clean a smaller area, you may
use Quick Clean mode, which lasts 30 minutes, or Touch Up mode, which lasts
15 minutes.
Waffle Track
™
and Spiral Track
™
are best used when cleaning a small spill. When
Waffle Track
™
is selected, Bob travels in a grid pattern; when Spiral Track
™
is
selected, Bob travels in a gradually widening circle. Select Wall Track
™
to make
Bob travel along the edges of your room.
13. Bob is stopping and showing ERROR. on the screen. How can I fix this?
Bob’s Error Code notifies you of the specific reason his work has been
interrupted. This feature allows you to identify the source of the problem quickly.
A Error Code rarely signals a defect and can be solved with simple procedures.
Along with the word “ERROR” there will also be a two-digit number on the cen-
ter of Bob’s screen (where Bob’s cleaning minutes can be seen). The numbers
range from 00 to 10. Each number represents an issue with a specific mechan-
ical part on Bob. Refer to the Troubleshooting section of this manual (page 70)
for the cause of the problem as well as its solution.
14. What is the best way to clean Bob’s wheels?
Use the cleaning tool or compressed air to clear the creases of the wheels. For
a more thorough clean, wipe the sides and bottoms of the wheels as they spin
during checkup mode (see the Home Checkup Test section of this manual).

96
15. My Bob just stopped while cleaning and the screen went off. What do I do next?
Like other electronic devives with a CPU (computers, smartphones, etc.), Bob
may experience a momentary halt in his operating system. You can usually get
Bob back to work by simply turning his power switch OFF and ON again. If this
does not solve the issue, Bob might need a manual restart. You can restart him
by flipping his power switch OFF and plugging the charging adapter directly into
the inlet on his side. Leave him to charge overnight to fully refresh his system.
16. I have a question and need to contact Bob's support team. How do I do that?
Our devoted team is always eager to help you! You can reach us by phone or
e-mail.
Call us toll free 1-888-549-8847 for support in Canada and the United States,
or e-mail us at [email protected]. Our goal is to get back to you within a day.
To watch Bob's how-to, repair, and troubleshooting videos; order parts; and connect
with your extended bObsweep family members, visit owners.bobsweep.com.


IMPORTANT - READ BEFORE USING. Do not use the robot (“Bobsweep”) accompanying this license agreement (“Agreement”)
until you have carefully read and agreed to the following terms and conditions.
By using the Bobsweep, you agree to the terms of this End User License Agreement (“EULA”) and any amendment or addenda
accompanying this Agreement. If you do not agree to the terms of this EULA, you may not use the Bobsweep. The Bobsweep
contains an electronic and software interface that allows you to control or modify its behavior, and remotely monitor its sensors.
THIS IS A LEGAL AGREEMENT. BY ACCESSING AND USING THE PRODUCT AND PRODUCT SOFTWARE, YOU ARE AC-
CEPTING AND AGREEING TO THIS EULA ON BEHALF OF YOURSELF OR THE ENTITY YOU REPRESENT IN CONNECTION
WITH THE ACCESS. YOU REPRESENT AND WARRANT THAT YOU HAVE THE RIGHT, AUTHORITY, AND CAPACITY TO AC-
CEPT AND AGREE TO THIS EULA ON BEHALF OF YOURSELF OR THE ENTITY YOU REPRESENT. YOU REPRESENT THAT
YOU ARE OF SUFFICIENT LEGAL AGE IN YOURJURISDICTION OR RESIDENCE TO USE OR ACCESS THE PRODUCT SOFT-
WARE AND TO ENTER INTO THIS EULA. IF YOU DO NOT AGREE WITH ANY OF THE PROVISIONS OF THESE TERMS, YOU
SHOULD CEASE USING THE PRODUCT AND PRODUCT SOFTWARE. Terms and Conditions
LICENSE: Subject to all of the terms of this Agreement, Bobsweep Inc. (“Bobsweep”) grants to you one (1) revocable, roy-
alty-free, personal, non- exclusive, nontransferable, non-assignable, non-commercial intellectual property license to use the
Bobsweep software contained on the Bobsweep, including the protocol for communicating with the Bobsweep software con-
tained on the Bobsweep (“Bobsweep Software”), to use the Bobsweep.
NONCOMMERCIAL LICENSE: You may use the Bobsweep Software and the Bobsweep only for personal, noncommercial,
educational, and research purposes. The Bobsweep Software and the Bobsweep may not be used for any other purpose,
whether “for prot” or “not for prot.” Any work performed or produced using the Bobsweep, including Your Software, cannot
be performed or produced for the benet of other parties for a fee, compensation, or any other reimbursement or remuneration.
A separate license is required for each additional use and/or individual user in all other cases. If you are an entity, Bobsweep
grants you the right to designate one individual within your organization to have the sole right to use the Bobsweep Software and
the Bobsweep in the manner provided above. RESTRICTIONS: You agree not to: (i) use or copy the Bobsweep Software or the
Bobsweep except as provided in this Agreement; (ii) rent or lease the Bobsweep Software or the Bobsweep to any third party;
(iii) assign this Agreement or transfer the Bobsweep Software or the Bobsweep except as provided in this Agreement; (iv) modify,
adapt, or translate the Bobsweep Software or the Bobsweep in whole or in part except as expressly provided in this Agreement;
(v) reverse engineer, reverse compile, or disassemble the Bobsweep Software or the Bobsweep; or (vi) distribute, sublicense or
transfer the source code form of Your Software and derivatives thereof to any third party except as provided in this Agreement.
YOUR SOFTWARE : Use and distribution of any software that you create for your Bobsweep (“Your Software”) is also subject
to the following limitations: You (i) shall be solely responsible for any update or support obligation or other liability which may
arise from your use or distribution, (ii) shall not make any statement that Your Software is “certied,” or that its performance is
guaranteed, by Bobsweep, (iii) shall not use Bobsweep’s name or trademarks, (iv) shall prohibit disassembly and reverse engi-
neering of the Bobsweep Software and the Bobsweep, (v) shall not publish reviews of Bobsweep products designated as beta
without written permission from Bobsweep, and (vi) shall indemnify, hold harmless, and defend Bobsweep and its suppliers
from and against any claims or lawsuits, including attorney’s fees, that arise or result from Your Software, including your use
and your distribution. TITLE: Title to the Bobsweep Software remains with Bobsweep or its suppliers. The Bobsweep Software
is licensed, not sold. Except as expressly provided herein, Bobsweep does not grant any express or implied right to you under
Bobsweep patents, copyrights, trademarks, or trade secret information. You will not remove any copyright or patent notice from
the Bobsweep Software or the Bobsweep. ONE-TIME TRANSFER: The initial user of the Bobsweep Software and the Bobsweep
may make a one-time permanent transfer of this Agreement, the Bobsweep Software, and the Bobsweep to another end user,
provided that the initial user retains no copies of the Bobsweep Software and the Bobsweep.
End User License Agreement for Bobsweep Software and bObsweep

This transfer must include the Bobsweep Software, the Bobsweep, and all of the materials accompanying the Bobsweep (in-
cluding all component parts and printed materials, any upgrades, and this End User License Agreement document). The transfer
may not be an indirect transfer, such as a consignment. Prior to the transfer, the end user receiving the Bobsweep Software
and the Bobsweep must agree to all the terms of this Agreement. NO WARRANTY AND LIMITED REPLACEMENT: EXCEPT AS
STATED IN THE LIMITED WARRANTY TO THE ORIGINAL PURCHASER, THE BOBSWEEP SOFTWARE AND THE BOBSWEEP
ARE PROVIDED “AS IS” WITH NO WARRANTIES, EXPRESS OR IMPLIED, INCLUDING BUT NOT LIMITED TO ANY IMPLIED
WARRANTY OF MERCHANTABILITY, FITNESS FOR A PARTICULAR PURPOSE, NON-INFRINGEMENT OF INTELLECTUAL
PROPERTY RIGHTS, OR ANY WARRANTY OTHERWISE ARISING OUT OF ANY PROPOSAL, SPECIFICATION, OR SAMPLE.
NO ORAL OR WRITTEN INFORMATION OR ADVICE GIVEN BY BOBSWEEP OR ITS AGENTS SHALL CREATE A WARRANTY.
If the Bobsweep Software or the Bobsweep is found to be defective in material or workmanship under normal use for a period
of one (1) year from the date of receipt, Bobsweep’s entire liability and your exclusive remedy shall be the replacement of the
Bobsweep Software or the Bobsweep.
This offer is void if the defect results from accident, abuse, misapplication, or software that you developed for your Bobsweep.
Any updates or supplements to the Bobsweep Software or the Bobsweep provided to you after the expiration of the one (1)
year period are not covered by any warranty or condition, express, implied or statutory. SOME JURISDICTIONS DO NOT
ALLOW THE EXCLUSION OF IMPLIED WARRANTIES, SO THE ABOVE EXCLUSION MAY NOT APPLY TO YOU. LIMITATION
OF LIABILITY: THE ABOVE REPLACEMENT PROVISION IS THE ONLY WARRANTY OF ANY KIND. BOBSWEEP OFFERS NO
OTHER WARRANTY EITHER EXPRESS OR IMPLIED INCLUDING THOSE OF MERCHANTABILITY, NON INFRINGEMENT OF
THIRD- PARTY INTELLECTUAL PROPERTY OR FITNESS FOR A PARTICULAR PURPOSE. NEITHER BOBSWEEP NOR ITS
SUPPLIERS SHALL BE LIABLE FOR ANY DAMAGES WHATSOEVER (INCLUDING, WITHOUT LIMITATION, VICARIOUS LIABIL-
ITY, CONSEQUENTIAL DAMAGES, INCIDENTAL DAMAGES, DAMAGES FOR LOSS OF BUSINESS PROFITS, BUSINESS IN-
TERRUPTION, LOSS OF BUSINESS INFORMATION, OR OTHER LOSS) ARISING OUT OF THE USE OF OR INABILITY TO USE
THE BOBSWEEP SOFTWARE, THE BOBSWEEP, OR SOFTWARE THAT YOU DEVELOPED FOR YOUR BOBSWEEP, EVEN IF
BOBSWEEP HAS BEEN ADVISED OF THE POSSIBILITY OF SUCH DAMAGES. BECAUSE SOME JURISDICTIONS PROHIBIT
THE EXCLUSION OR LIMITATION OF LIABILITY FOR CONSEQUENTIAL OR INCIDENTAL DAMAGES, THE ABOVE LIMITATION
MAY NOT APPLY TO YOU UNAUTHORIZED USE: THE BOBSWEEP SOFTWARE AND THE BOBSWEEP ARE NOT DESIGNED,
INTENDED, OR AUTHORIZED FOR USE IN ANY AERONAUTICAL, NUCLEAR, MEDICAL, LIFE SAVING OR LIFE SUSTAINING
SYSTEMS, OR FOR ANY OTHER APPLICATION IN WHICH THE USE OF THE BOBSWEEP SOFTWARE OR THE BOBSWEEP
COULD CREATE A SITUATION WHERE PERSONAL INJURY OR DEATH MAY OCCUR. Should you use the Bobsweep Software
or Bobsweep for any such unintended or unauthorized use, you shall indemnify and hold harmless Bobsweep and its ocers,
subsidiaries and aliates against all claims, costs, damages, and expenses, and reasonable attorney fees arising out of, directly
or indirectly, any claim of product liability, personal injury or death associated with such unintended or unauthorized use,
even if such claim alleges that Bobsweep was negligent regarding the design or manufacture of the Bobsweep Software, the
Bobsweep, or any part or portion thereof.
USER SUBMISSIONS: You agree that any material, information or other communication, including all data, images, sounds,
text, and other things embodied therein, that you transmit or post to a Bobsweep website or provide to Bobsweep (“Commu-
nications”) will be considered non-condential. Bobsweep will have no condentiality obligations with respect to the Commu-
nications. You agree that Bobsweep and its designees will be free to copy, modify, create derivative works, publicly display,
disclose, distribute, license and sublicense through multiple tiers of distribution and licensees, incorporate and otherwise use
the Communications, including derivative works thereof, for any and all commercial or non-commercial purposes without the
payment of any royalty to you, and that such license will survive the termination of this Agreement.

TERMINATION: This Agreement becomes eective on the date you accept this Agreement and will continue until terminated as
provided for in this Agreement. You may terminate this Agreement voluntarily at any time. Bobsweep may terminate this Agree-
ment at any time if you are in breach of any of its terms and conditions, and may refuse to license the Bobsweep Software or the
Bobsweep to you after termination. Upon termination by either party, you will immediately return to Bobsweep or destroy the
Bobsweep Software and the Bobsweep and all your copies thereof. Articles 5 and 7 through 17 of this Agreement shall survive
such termination. U.S. GOVERNMENT RESTRICTED RIGHTS: The Bobsweep Software and the Bobsweep are provided with
“RESTRICTED RIGHTS.” Use, duplication or disclosure by the Government is subject to restrictions set forth in FAR52.227-14
and DFAR252.227-7013 et seq. or its successor. Use of the Bobsweep Software or the Bobsweep by the Government consti-
tutes acknowledgment of Bobsweep’s rights in them.
NO EXPORT: You may not export the Bobsweep Software or the Bobsweep in violation of applicable export laws.
INTERPRETAT ION: The provisions of this Agreement are severable. If any provision of this Agreement is held to be unenforce-
able, such provision shall be reformed only to the extent necessary to make it enforceable. Any law or regulation which provides
that the language of a contract shall be construed against the drafter shall not apply to this Agreement.
INTEGRATION: This Agreement represents the complete agreement concerning the subject matter hereof, and any and all un-
derstandings, conversations and communications, proposals, and counterproposals, oral and written (including any draft of this
Agreement) are merged into and superseded by this Agreement and shall be of no force or eect, except as expressly provided
herein. No such understandings, conversations, communications, proposals, counterproposals or drafts shall be referred to in
any proceeding concerning this Agreement. Further, no understanding contained in this Agreement shall be modied, altered or
amended, except by a writing signed by the party against whom enforcement is sought.
ARBITRATION: All disputes relating to this Agreement (excepting any dispute relating to intellectual property rights) shall be sub-
ject to nal and binding arbitration, with the losing party paying all costs of arbitration. Any arbitration relating to this Agreement
shall be held in California, under the auspices of an arbiter selected by Bobsweep. Any litigation relating to this Agreement shall
be subject to exclusive venue and jurisdiction in the federal and state courts of California, with the losing party responsible for
costs, including without limitation, court costs and reasonable attorneys fees and expenses.
APPLICABLE LAWS: Any claim arising under or relating to this Agreement shall be governed by the internal substantive laws
of the Commonwealth of California, without regard to its principles of conict of laws. The application of the United Nations
Convention on Contracts for the International Sale of Goods is expressly excluded.