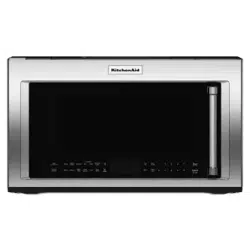
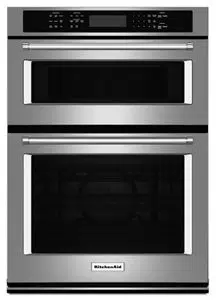
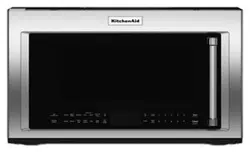
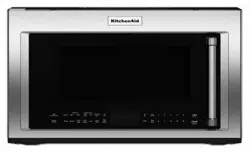
This manual may cover several different models. The model you have purchased may have some or all of the features shown here. The appearance of your particular model may differ slightly from the illustrations in this manual.
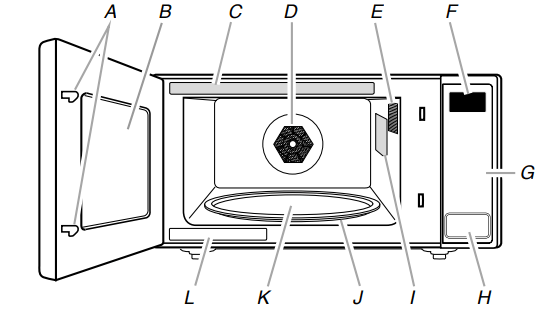
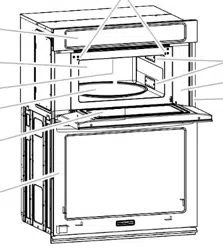
A. Door lock system
B. Window
C. Cooking guide label
D. Convection element and fan
E. Microwave oven light
F. Display
G. Control panel
H. Door open push button
I. Microwave inlet cover
J. Removable turntable support
K. Glass turntable
L. Model and serial number plate
Parts and Features
Not Shown:
Grill element (on cavity ceiling)
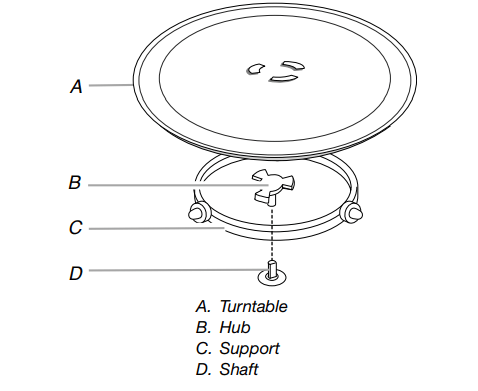
Turntable
The turntable can rotate in either direction to help cook food more evenly. For best cooking results, do not operate the microwave oven without having the turntable in place. See the “Assistance or Service” section to reorder any of the parts.
To Install:
Place the support on the microwave oven cavity bottom.
Place the turntable on the support. Fit the raised, curved wedges in the center of the turntable bottom between the 3 spokes of the hub. The rollers on the support should fit inside the turntable bottom ridge.
Grill Element
The microwave oven uses a calrod thermal element for grilling. The microwave oven cavity and door will become hot. The use of oven mitts is recommended.
Convection Element and Fan
The microwave oven’s convection system is composed of a convection element which heats in conjunction with the convection fan for true convection cooking. The convection system is embedded in the wall of the microwave oven cavity, behind the screen. See the “Parts and Features” section. The microwave oven cavity and door will become hot. The use of oven mitts is recommended.
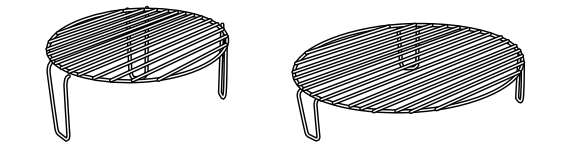
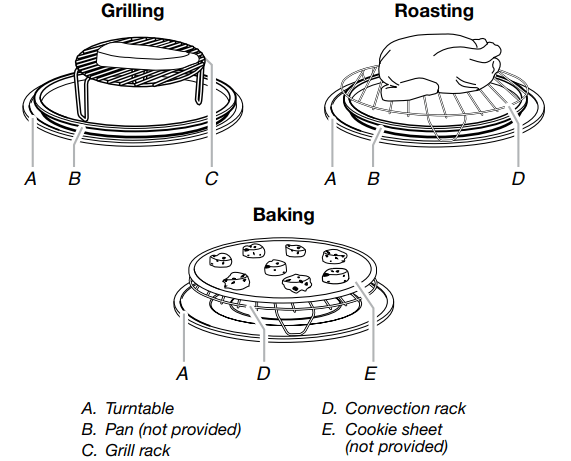
Grill and Convection Racks
The tall grill rack is designed for grilling in the microwave oven. See the “Grill” section. Place the grill rack securely on a pan, the pan on the turntable, and position food on grill rack. See the “Assistance or Service” section to order replacement parts. See the “General Cleaning” section for cleaning instructions.
The short convection rack is designed to be used with the convection element and fan for true convection cooking. See the “Convection Bake” and “Convection Roast” sections. Place the convection rack on the turntable and position dish with food on the rack. If food is placed directly on the rack, a pan may be placed under the rack to catch drippings. See the “Assistance or Service” section to order replacement parts. See the “General Cleaning” section for cleaning instructions.
Accessory Configurations
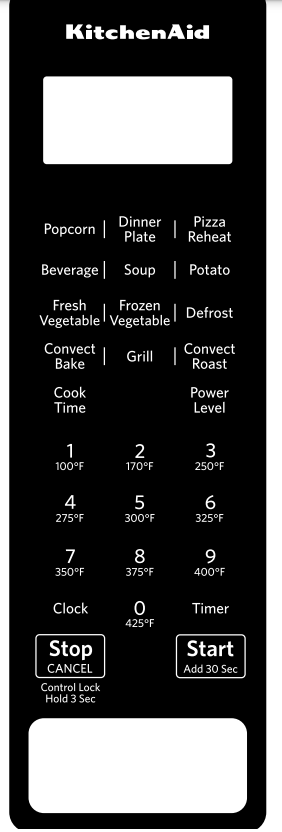
MICROWAVE OVEN CONTROL
Display
When power is first supplied to the microwave oven, “0:00” will appear in the display. If the “0:00” appears in the display at any other time, a power failure has occurred. Reset the clock if needed. See the “Clock” section.
When the microwave oven is in use, the display will show cook time remaining. When the microwave oven is not in use, the display will show the time of day (if the clock is set) or Timer countdown (if the Timer is set).
Start
The Start keypad begins any function. If non-sensor cooking is interrupted by opening the door, touching START will resume the cycle.
NOTE: To avoid unintentional operation of the microwave oven, a cooking function cannot be started if the microwave oven door has been closed for about 5 minutes. The word “door” will appear in the display until the door is opened and closed.
Add 30 Seconds
The Start Add 30 Sec keypad automatically starts the microwave oven at 100% power for 30 seconds and it adds 30 seconds of cook time with each additional touch of the keypad.
Time may be added to any manual cooking cycle in 30-second increments, at the current power level, by touching START ADD 30 SEC during cooking.
NOTE: To avoid unintentional operation of the microwave oven, a cooking function cannot be started if the microwave oven door has been closed for about 5 minutes. The word “door” will appear in the display until the door is opened and closed.
Stop Cancel
The Stop Cancel keypad clears any incorrect command and cancels any program during cooking. It will not erase the time of day.
The microwave oven will also turn off when the door is opened. Close the door and touch START to resume the cycle.
The Stop Cancel keypad is also used to lock and unlock the control panel. See the “Control Lock” section.
Tones
Tones are audible signals that may be turned off.
To Turn Off/On End-of-Cycle, End-of-Timer and Reminder Tones: With the microwave oven door open, touch and hold the number “3” keypad for about 3 seconds, until a tone sounds.
To Turn Off/On All Tones: With the microwave oven door open, touch and hold the number “2” keypad for about 3 seconds. These tones indicate the following:
One tone
■ Valid entry
■ Control Lock activated or deactivated
■ End of stage in multistage cooking
Two tones
■ End of Convection Bake preheat
Three tones
■ End of Timer countdown
Five tones
■ End of cooking cycle
■ Reminder, repeating each minute after the end-of-cycle and end-of-Timer tones
Clock
This is a standard 12-hour clock (1:00-12:59). The Clock cannot be erased. If the Clock is not set, “0:00” will remain in the display when the microwave oven is not in use.
To Set:
The microwave oven and Timer must be OFF.
Touch CLOCK.
Touch the number keypads to enter the correct time of day.
Touch CLOCK.
Timer
The Timer can be set in minutes and seconds, up to 99 minutes 99 seconds, and counts down the set time.
NOTE: The Timer does not start or stop the microwave oven.
Cook functions may be used while the Timer is counting down. When the cook function is active in the display, touch TIMER to see the Timer countdown for about 5 seconds.
To Set:
Touch TIMER.
Touch the number keypads to enter desired time.
Touch START. When the set time ends, “End” will appear in the display and the end-of-Timer tones will sound.
Touch STOP CANCEL while the Timer is active in the display to cancel the Timer.
Language
The default display language is English, but it may be set to French. Two display messages are affected: “End” (English) or “Fin” (French) and “door” (English) or “PrtE” (“porte” - French).
To Set Language to French: With the microwave oven door open, touch and hold the number “1” keypad for about 3 seconds, until a tone sounds. Repeat to change back to English. The language remains set after a power failure.
Weight Entry Mode
The default weight entry mode for Defrost is imperial (pounds) but may be set to metric (grams). This setting does not affect any other program besides Defrost. See the “Defrost” section.
To Set Weight Entry to Metric: With the microwave oven door open, touch and hold the number “0” keypad for about 3 seconds, until a tone sounds. Repeat to change back to imperial. The mode remains set after a power failure.
Control Lock
The Control Lock disables the control panel keypads to avoid unintended use of the microwave oven.
To Lock/Unlock Control: The microwave oven must be OFF. Touch and hold STOP CANCEL for about 3 seconds, until the tone sounds and the Control Lock icon appears in the display. Repeat to unlock.
If any keypad is touched while the control is locked, there will be no response from the control.
MICROWAVE OVEN USE
Manual Cooking
NOTE: To cook at 100% power, begin by touching the number keypads to enter cook time, then touch START.
To Use:
1. Place food on the turntable and close the door.
2. Touch COOK TIME.
“00:00” will appear in the display. Enter the length of time to cook. If cooking with 100% power, skip Step 3.
3. Touch POWER LEVEL.
The default power level PL10 will appear in the display. Enter the desired power level. See the “Microwave Cooking Power” section.
4. Touch START.
When the cycle ends, “End” will appear in the display and the end-of-cycle tones will sound.
5. Touch STOP CANCEL or open the door to clear the display
Cooking in Stages
The microwave oven can be set to cook at different cooking powers for various lengths of time, up to 2 stages, which may include a defrosting stage. See the “Defrost” section to set the defrosting stage.
NOTE: If a defrosting stage is programmed, it will cycle first.
To Cook in Stages:
1. Place food on the turntable and close the door.
2. Touch COOK TIME. “00:00” will appear in the display. Enter the length of time to cook during the first stage.
3. Touch POWER LEVEL, then enter the desired cooking power for the first stage. See the “Microwave Cooking Power” section.
4. Repeat steps 2 and 3 for the second stage.
5. Touch START.
One tone will sound between stages.
When the cycle ends, “End” will appear in the display and the end-of-cycle tones will sound.
6. Touch STOP CANCEL or open the door to clear the display. Cook time may be added in 30-second increments during the cycling stage by touching START ADD 30 SEC.
Grill
The Grill function uses a calrod thermal element that heats quickly to grill a variety of foods.
■ Use the grill rack to place food closer to the grill element for faster grilling.
■ Oven cavity and door will become very hot during grill element use. The use of oven mitts is recommended.
■ Use an ovenproof pan to catch drippings.
■ The grill rack and pan will become very hot. Use oven mitts to grasp pan for removal. To avoid damage, do not place hot pan directly on heat-sensitive surfaces.
■ The turntable must be in place when using the grill rack.
■ For best results, apply light amount of cooking oil to grill rack
To Use:
1. Place grill rack securely on pan and place both on the turntable. Then position food on rack and close the door.
2. Touch GRILL.
“00:00” will appear in the display. Enter the length of time to grill in minutes and seconds.
3. Touch START.
Grill time will count down in the display.
About halfway through the cycle, a tone will sound. This is a reminder to turn the food, if desired.
When the cycle ends, “End” will appear in the display and the end-of-cycle tones will sound.
4. Touch STOP CANCEL or open the door to clear the display.
Convection
The convection system circulates hot air through the microwave oven cavity with a fan. The constantly moving air surrounds the food to heat the outer portion quickly.
Convection Bake uses the convection system only.
Convection Roast uses the convection system in conjunction with microwaves to cook more quickly
■ The microwave oven cavity and door will become hot during the convection cycle. The use of oven mitts is recommended.
■ Use the provided convection (short) rack.
■ Do not cover turntable or convection rack with aluminum foil as it interferes with the circulation of hot air.
■ Do not use light plastic containers, plastic wrap, or paper products. All ovenproof cookware or metal utensils can be used with the Convection Bake function. (Round pizza pans are excellent cooking utensils for many convection-only items.) Metal utensils cannot be used with the Convection Roast function.
■ No special techniques are needed to adapt standard oven recipes to convection cooking, although some temperatures might need to be reduced and some cooking times might need to be shortened.
Convection Temperature Indicator
The 10 bars in the bottom of the display represent the microwave oven’s current and approaching temperature. Each bar corresponds to the temperature represented on each of the number keypads, 1 through 0 (10).
The bar corresponding to the desired set temperature will flash. As the microwave oven heats, each bar will light as its corresponding temperature is reached. When the desired temperature is reached, the flashing bar will become solid. If the temperature of the microwave oven drops below the set temperature, the bar will flash until the microwave oven heats to the set temperature again.
For example, if the desired temperature is set at 375ºF (191°C) (number “8” keypad), the eighth bar will flash. When the microwave oven reaches 100ºF (38°C), the first bar will light. When the microwave oven reaches 170ºF (77°C), the second bar will light, and so on, until the desired temperature is reached, and the eighth bar stops flashing and becomes solid.
MICROWAVE OVEN CARE
General Cleaning
IMPORTANT: Before cleaning, make sure all controls are OFF and the microwave oven is cool. Always follow label instructions on cleaning products.
Soap, water, and a soft cloth or sponge are suggested unless otherwise noted.
MICROWAVE OVEN CAVITY
To avoid damage to the microwave oven cavity, do not use soap-filled scouring pads, abrasive cleaners, steel-wool pads, gritty washcloths, or some recycled paper towels.
To avoid damage to stainless steel models, rub in direction of grain.
The area where the microwave oven door and frame touch when closed should be kept clean.
Average soil
■ Mild, nonabrasive soaps and detergents: Rinse with clean water and dry with soft, lint-free cloth.
Heavy soil
■ Mild, nonabrasive soaps and detergents: Heat 1 cup (250 mL) of water for 2 to 5 minutes in microwave oven. Steam will soften soil. Rinse with clean water and dry with soft, lint-free cloth.
Odors
■ Lemon juice or vinegar: Heat 1 cup (250 mL) of water with 1 tbs (15 mL) of either lemon juice or vinegar for 2 to 5 minutes in microwave oven.
Microwave Inlet Cover
To avoid arcing and microwave oven damage, the microwave inlet cover (see the “Parts and Features” section) should be kept clean.
■ Wipe with wet cloth.
MICROWAVE OVEN DOOR AND EXTERIOR
The area where the microwave oven door and frame touch when closed should be kept clean.
■ Mild, nonabrasive soaps and detergents: Rinse with clean water and dry with soft, lint-free cloth.
■ Glass cleaner and paper towels or nonabrasive plastic scrubbing pad: Apply glass cleaner to towel, not directly to surface.
Stainless Steel (on some models)
To avoid damage to microwave oven door and exterior, do not use soap-filled scouring pads, abrasive cleaners, steel-wool pads, gritty washcloths, or some paper towels. Rub in direction of grain.
■ Stainless steel cleaner (not included): See the “Assistance or Service” section to order.
■ Liquid detergent or all-purpose cleaner: Rinse with clean water and dry with soft, lint-free cloth.
■ Vinegar for hard water spots
CONTROL PANEL
■ Sponge or soft cloth and water: Dampen sponge with water and wipe panel. Dry with soft cloth.
■ To avoid damage to the control panel, do not use chemical or abrasive cleansers.
TURNTABLE
Replace turntable immediately after cleaning. Do not operate the microwave oven without the turntable in place.
■ Mild cleanser and scouring pad
■ Dishwasher
CONVECTION AND GRILL RACKS
Dishwasher cleaning is not recommended. To avoid damage to the convection and grill racks, do not use abrasive cleansers or scrubbers.
■ Mild soap, water, and washcloth.
TROUBLESHOOTING
If you experience
Recommended Solutions
Nothing will operate
Check the following:
■ Household fuse or circuit breaker: If a household fuse has blown or a circuit breaker has tripped, replace the fuse or reset the circuit breaker. If the problem continues, call an electrician.
■ Microwave wiring: See Installation Instructions provided with your microwave oven.
Microwave oven will not operate
Check the following:
■ Magnetron: Try to heat 1 cup (250 mL) of cold water for 2 minutes at 100% cooking power. If water does not heat, try the steps in the bullets below. If microwave oven still does not operate, call for service.
■ Door: Firmly close door. On some models, if a packaging spacer is attached to the inside of the door, remove it, then firmly close door. If a message about the door appears in the display, the door has been closed for 5 minutes or more without the microwave oven being started. This occurs to avoid unintended starting of the microwave oven. Open and close the door, then start the cycle.
■ Control: Make sure control is set properly. Make sure Control Lock is OFF. Make sure Demo mode (on some models) is OFF.
Microwave oven makes humming noise
■ This is normal and occurs when the power supply in the magnetron cycles on.
Microwave oven door looks wavy
■ This is normal and will not affect performance.
Turntable will not operate
Check the following:
■ Turntable: Make sure turntable is correct-side up and is sitting securely on the turntable support. See the “Turntable” section.
■ Turntable support: Remove turntable. Remove and clean turntable hub, support, and rollers. Replace hub, support, and turntable. Place 1 cup (250 mL) of water on the turntable, then restart microwave oven. If it still is not working, call for service. See the “Warranty” section. Do not operate the microwave oven without turntable and turntable support working properly
Turntable alternates rotation directions
■ This is normal and depends on motor rotation at the beginning of the cycle.
Display shows messages
■ A flashing “0:00” means there has been a power failure. Reset the clock.
Display shows time countdown, but the microwave oven is not operating
Check the following:
■ Timer: See the “Timer” section.
Tones are not sounding
Check the following:
■ Tones: See the “Tones” section.
Cooking times seem too long
Check the following:
■ Cooking power: See the “Microwave Cooking Power” section.
■ Amount of food: Larger amounts of food need longer cooking times.
■ Voltage: Have a qualified electrician check the electrical system in the home.
Odor coming from microwave oven during convection and/or grill cooking
■ This is normal for the first few convection and/or grill cycles. The odor will dissipate with repeated use.
Radio, TV, or cordless phone interference
Check the following:
■ Proximity: Move the receiver away from the microwave oven or adjust the radio or TV antenna. If the microwave oven is plugged into the same outlet, try a different outlet for the electronic device.
■ Soil: Make sure the microwave oven door and sealing surfaces are clean.
■ Frequency: Some 2.4 GHz-based cordless phones and home wireless networks may experience static or noise while microwave oven is ON. Use a corded phone, a different frequency cordless phone, or avoid using these items during microwave oven operation.