Omega DW2006X Dishwasher
Product's Documents
Below are documents related to this product, you can read online or download:
- User Manual - (English) Read Online | Download pdf
Owners' Guide Dishwashers
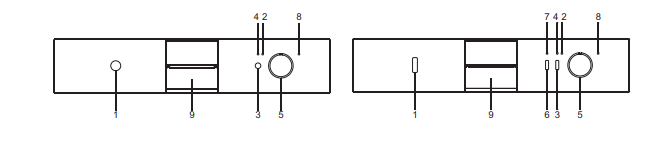
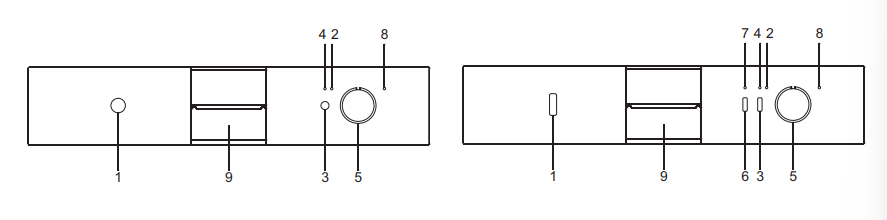
All the dishwasher control are grouped on the front panel. Programming and option selection are only possible with the door closed.
SETTING THE WASHING PROGRAM
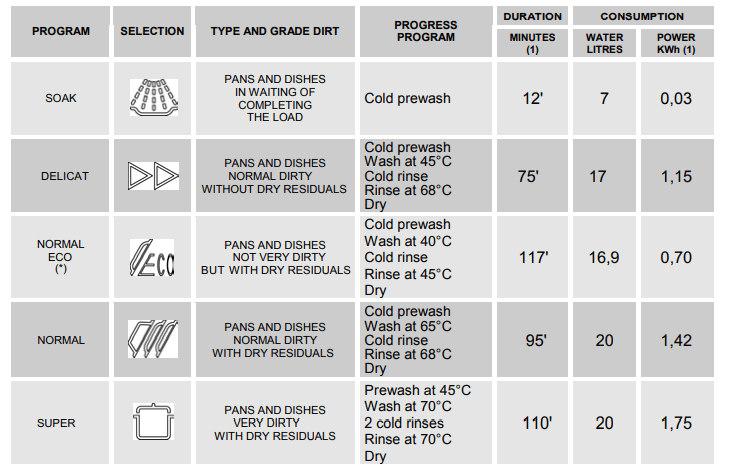
To select the most suitable program for the dishes to be washed refer to the table below, which indicates the most appropriate program according to dish type and degree of soiling.
Only run the soak program with half loads.
The HALF LOAD option (6) is available for all programs except the soak program.
(*) Reference program as AS/NZS 2007 (NORMAL ECO).
(1) The cycle duration and power consumption may vary according to the water and room temperatures, and the type and amount of dishes.
WARNING: The washing cycle will not take place if the dishwasher door is left open or not properly closed.
TABLE FOR CERTIFICATION BODIES
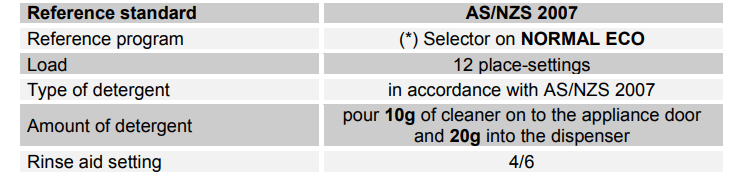
NOTE: The door can be opened at the end of the cycle approximately 50 mm for improved drying performance.
AS/NZS 2007 cycle test conditions:
The upper basket must be set in the low position.

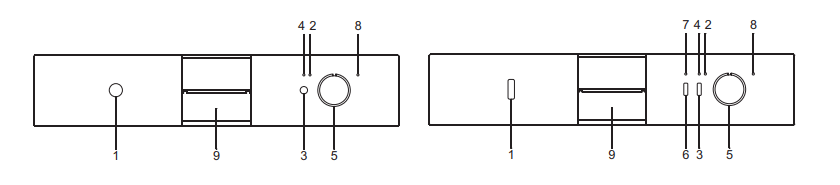
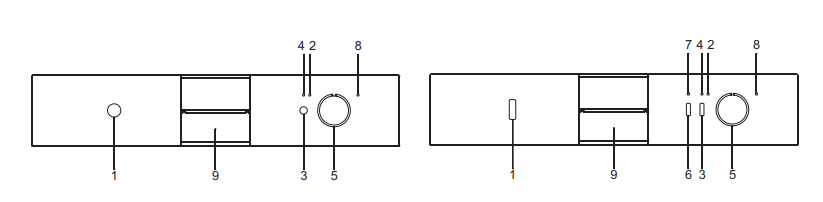
The dishwasher is equipped with a control panel, described in chapter "1. Description of the controls", from which it is possible to carry out all the power switch-on, switch-off and programming operations.
Before starting a washing program make sure that:
LIGHTING
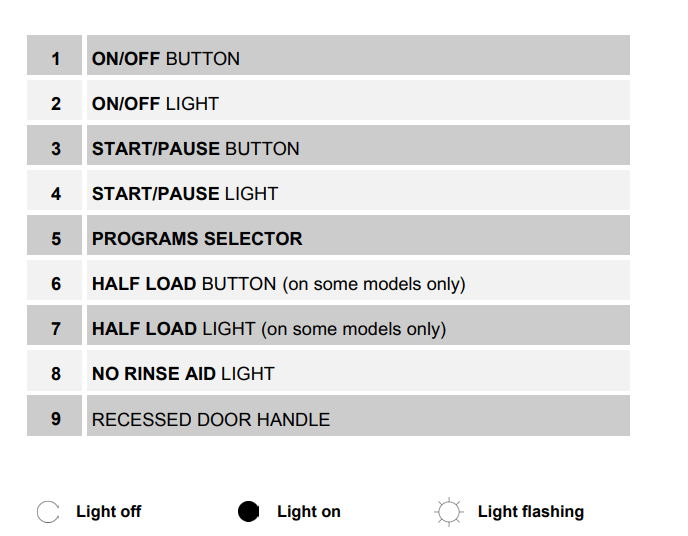
When the ON/OFF button (1) is pressed, the dishwasher switches on. The ON/OFF (2) and START/PAUSE (4) lights will indicate one of the following states:
 Program start
Dishwasher ready to execute a new program.
 Program end
Door closed and washing program over.
 Alarm
Alarm
Alarm state (see chapter "Troubleshooting")
PROGRAMMING
All programming operations are only possible with the door closed. To select a new program, the dishwasher must be in the "Program start" state described above. Turn the PROGRAM SELECTOR (5) to the program of your choice (see "PROGRAMS TABLE").
START PROGRAM
Press the START/PAUSE button (3) for a few seconds, until the START/PAUSE light (4) starts to flash. A beep confirms the operation.

PROGRAM SEQUENCE
For the entire duration of the program, ON/OFF (2) indicator light remains permanently on, whereas the START/PAUSE (4) indicator light flashes.

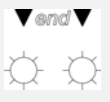
END PROGRAM
To indicate the end of the program, a short beep sounds and the ON/OFF (2) and START/PAUSE (4) lights illuminate simultaneously.

Before a new washing cycle can be selected the dishwasher must be in "Program start" state: press the START/PAUSE button (3) until the configuration of indicator lights (2) and (4) is as follows.

INTERRUPTION OF A PROGRAM
Press the START/PAUSE button (3) for a few seconds, until the configuration of the ON/OFF (2) and START/PAUSE (4) lights is as follows.

You may now restart ("START PROGRAM") or change the program which was interrupted.
TO CHANGE A PROGRAM
To change the running program it is necessary:
ANNULLING A PROGRAM
To annul the program in progress, it must first be interrupted (see “INTERRUPTION OF A PROGRAM”).
Turn the PROGRAM SELECTOR (5) to any point on the "empty" sector (with no symbols) on the left of the selector and start the dishwasher.
After the water has discharged from the tank, the ON/OFF (2) and START/PAUSE (4) lights will both remain on.

If the door is opened with the dishwasher in operation, the appliance switches to "Pause" state, indicated by a series of beeps and the following configuration of the ON/OFF (2) and START/PAUSE (4) lights.

Once the door has been closed again, the "START PROGRAM" procedure already described must be repeated. The washing cycle will restart from the point where it was interrupted.
In case that the tub temperature is higher than 50°C the program will start about 30 seconds later.
WARNING: If the dishwasher door is not properly closed, the washing cycle will not start.
HALF LOAD WASH FUNCTION (on some models only)
Pressing button ½ LOAD WASH (6) selects washing on the top basket only.
After selecting the program, proceed as follows:
The option is disabled at the end of the cycle.
WARNING: dishes and cutlery placed in the basket not selected will not be washed.
INDICATOR LIGHT CONFIGURATION FOR HALF-LOAD WASHING (7)
 Washing in top basket only.
 Washing in both baskets.
TO SAVE ON ENERGY! … AND PROTECT THE ENVIRONMENT
TO CUT DOWN ON DETERGENT CONSUMPTION! … AND PROTECT THE ENVIRONMENT
The phosphates contained in dishwasher detergents are harmful to the environment. To avoid using excessive amounts of detergent and to save on electricity, observe the following:
REMOVING THE DISHES
At the end of the washing program, wait at least 20 minutes before removing the dishes, to allow them to cool down. To prevent any water droplets on the upper basket from falling on the dishes in the lower basket, it is advisable to unload the lower basket first, and then the upper basket.
Once the dishwasher has been correctly installed, prepare for use as follows: • Add the rinse aid and detergent.
 ADDING THE RINSE AID
The rinse aid helps the dishes dry faster and prevents the formation of scale deposits and staining; it is automatically added to the water during the final rinse cycle, from the container situated on the inner side of the door.
To add rinse aid:
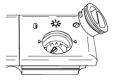
ADJUSTING THE RINSE AID DISPENSER SETTING
The dishwasher is factory set for medium water hardness. However it possible to change the setting by turning the dispenser’s selector to the desired position: the amount of rinse aid dispensed is proportional to the selector position.
ADDING THE DETERGENT
To open the detergent dispenser cap, lightly press the button P. Add the detergent and close the cap carefully.
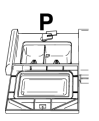
During the washing cycle, the dispenser will be opened automatically.
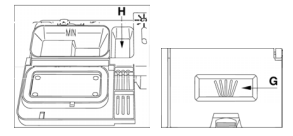
When a SUPER program is selected, in addition to the normal dose of detergent, it is necessary to add an additional amount inside compartment G or H.
WARNING: The introduction of detergent into the rinse aid dispenser, even in liquid form, will damage the dishwasher.
Before using the dishwasher for the first time, it is advisable to read the following recommendations concerning dish types to be washed and their loading. There are generally no constraints on the washing of domestic dishes, but in certain cases it is necessary to take their characteristics into account.
Before loading the dishes into the baskets it is necessary to:
If a small quantity of dishes has to be washed, use the “½ load wash” option; this saves electricity and water. Remember to load the upper basket only; the lower basket must be left empty.
There is no need to pre-wash the dishes under running water before loading them into the baskets since this only wastes water.
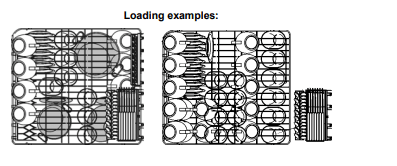
Correct loading of the dishes helps ensure optimal washing results.
WARNING!
MAKE SURE that the items being washed are dishwasher-safe.
Items which are not dishwasher-safe:
The dishwasher has a capacity of 12 place-settings, including serving dishes.
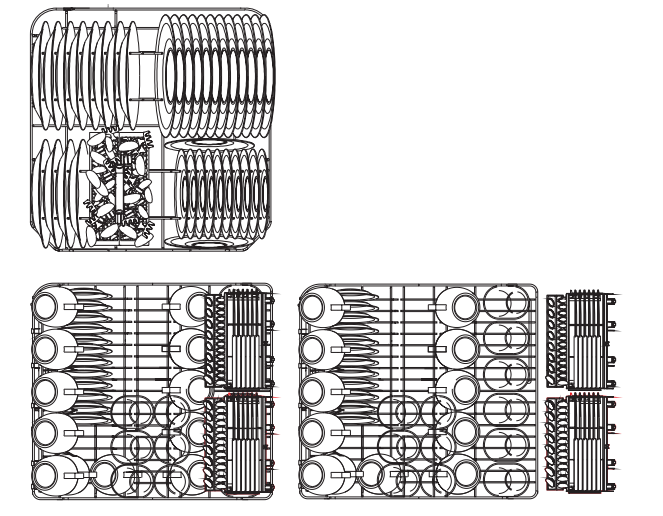
LOWER BASKET
The lower basket receives the full force of the lower spray arm, and should therefore be used for the “toughest” items with a heavier degree of soiling.
All types and combinations of loads are permitted, provided that the dishes, pots and pans are arranged with all the soiled surfaces exposed to the water jets coming from the bottom.
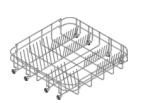
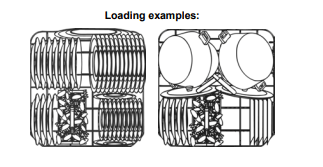
LOADING THE LOWER BASKET
Carefully load flat plates, soup plates, dessert and serving dishes, positioning them vertically. Pots, pans and their covers must be loaded upside down. When loading soup plates and dessert bowls, be sure to leave a gap between them.
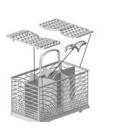
CUTLERY BASKET
The basket has removable top grids into which items of cutlery can be inserted to keep them properly spaced and allow water to pass between them effectively.
The function of the central lid is only a cover. Do not add cutlery.
The cutlery should be arranged in an orderly manner inside the basket, with the handles pointing downwards. Take care during loading to avoid injury from the knife blades. The basket is suitable for all types of cutlery, except those long enough to interfere with the upper spray arm. Ladles, wooden spoons and cooking knives can be placed in the upper basket, making sure that the knife blades do not protrude from the basket.
UPPER BASKET
It is recommended to load the upper basket with small- or medium-sized items such as glasses, small plates, tea or coffee cups, shallow bowls and light objects made from heat resistant plastic. If the upper basket is used in the lowermost position, it can also be loaded with serving dishes, provided they are only slightly soiled.
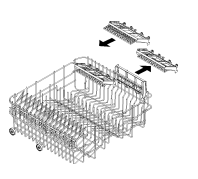
The top basket is fitted (on the left) with two plastic racks which can be raised to make room for tall glasses, such as stem glasses. On the right there are two cutlery racks designed to take knives and teaspoons; when not in use, they can be left vertical, attached to the basket. To use the space designed for teaspoons, remove the insert as shown in the illustrations.
LOADING THE UPPER BASKET
Load the dishes with the top side facing forwards; cups and concave containers should always be loaded with the opening facing down. The left side of the basket can be loaded with cups and glasses on two levels. In the centre section, plates and saucers can be loaded vertically into the supports provided.
ADJUSTING THE UPPER BASKET
The upper basket can be adjusted in two positions, according to the user’s needs and according to the height of the dishes in the lower basket.
Proceed as follows:

Before carrying out any work, always unplug the appliance from the electrical supply or switch off the all-pole disconnection device.
Avoid the use of acidic or abrasive detergents.
Clean the outer surfaces and door-lining of the dishwasher regularly using a soft cloth moistened with water or with a normal detergent suitable for painted surfaces. Clean the door gaskets with a damp sponge. Periodically (once or twice a year) it is advisable to clean the tank and gaskets, using a soft cloth and water to remove any deposits.
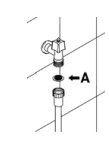
CLEANING THE WATER INTAKE FILTER
The water intake filter A located at the outlet of the water supply tap needs to be cleaned periodically.
After having closed the water supply tap, unscrew the end of the water intake hose, remove the filter A and clean it delicately under running water. Reassemble filter A in its seat and carefully screw the water intake hose back into position.
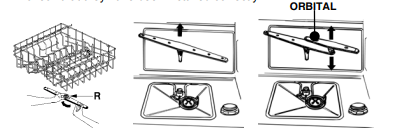
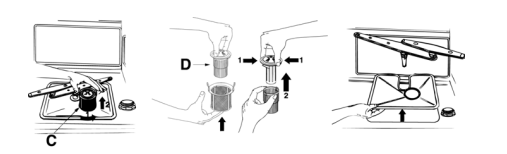
CLEANING THE SPRAY ARMS
The spray arms can be easily removed for periodic cleaning of the nozzles, to prevent possible clogging. Wash them under running water and carefully replace them in their seats, checking that their rotary movement is in no way impeded.
CLEANING THE FILTER UNIT
GENERAL WARNINGS AND RECOMMENDATIONS FOR CORRECT MAINTENANCE:
PROLONGED DISUSE:
BEFORE STARTING THE DISHWASHER AFTER PROLONGED DISUSE:
TROUBLESHOOTING MINOR PROBLEMS
In some cases it is possible to remedy minor problems by referring to the following instructions:
If the program fails to start, check that:
If water remains inside the dishwasher, check that:
If the dishes are not being cleaned properly, check that:
If the dishes fail to dry or remain dull, check that:
If the dishes show signs of streaking, staining, etc., check that:
If there are visible traces of rust inside the tank:
If after following the above troubleshooting instructions the problem persists, call the nearest After-Sales Centre.
WARNING: any operations performed on the appliance by unauthorised persons are not covered by the warranty and shall be paid for by the user.
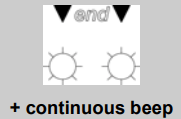
In case of a malfunction, the dishwasher will warn the user by flashing the ON/OFF (2) and START/PAUSE (4) lights, in some cases combined with a continuous beep.
| LIGHTS | DESCRIPTION |
 |
|
 |
|
In some cases, the alarm signal may indicate a temporary problem, so before contacting the after-sales service, proceed as follows.
If the problem persists, contact the after-sales service.
TECHNICAL DATA
| Width | 597 ÷ 599 mm |
| Depth measured flush with the outer edge of the control panel |
Free standing: 600 mm Semi-integrated: 570 mm |
| Height |
Free standing from 850 mm to 870 mm Semi-integrated from 820 mm to 870 mm |
| Capacity | 12 Standard place settings |
| Water supply pressure | min. 0,05 - max. 0,9 MPa (min. 0.5 – max. 9 bar) |
| Electrical characteristics | See rating plate |
Reference file: Omega DW2006X Dishwasher
Additionally, the document applies to other Omega models: DW2006