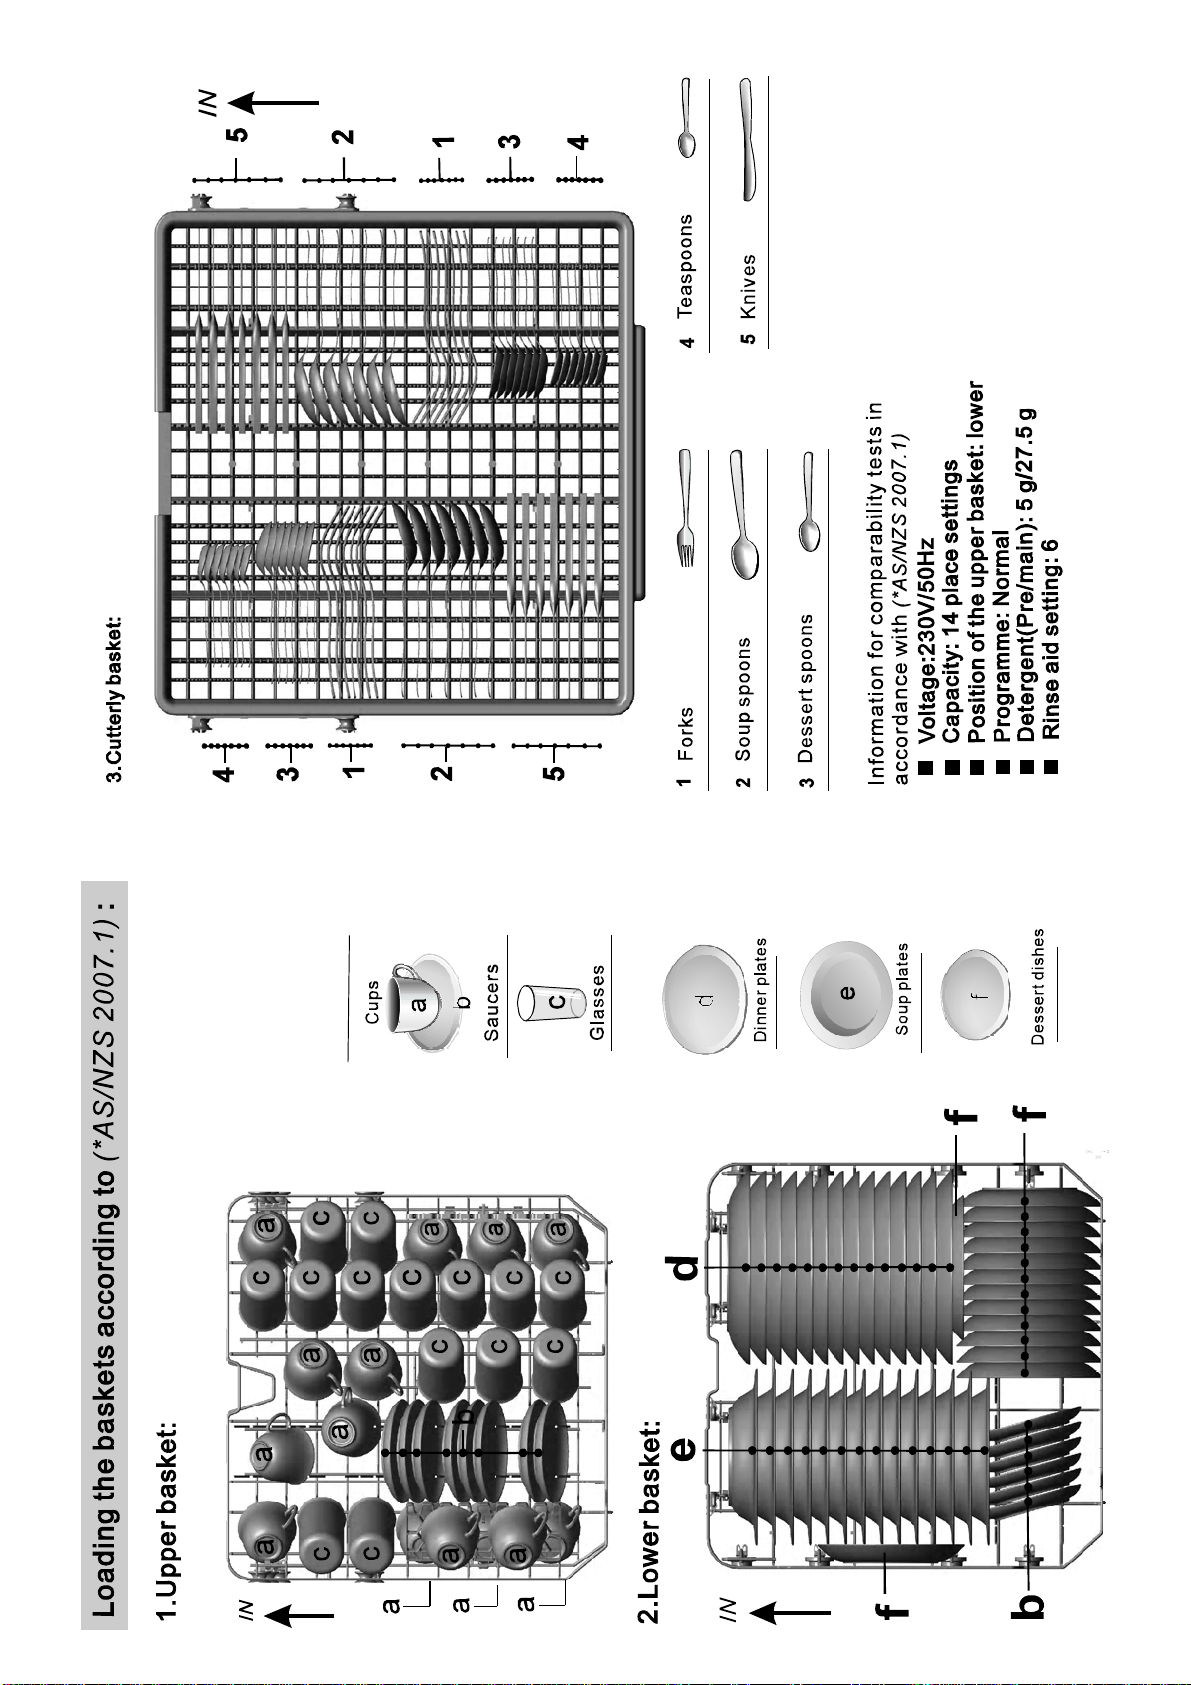
PL403A
14 place settings
half-load function
With each wash cycle.
Compartment
For programmes with pre-wash only.
(Follow the user instru ctions!)
Electric indic ator on control panel (if provided).
Check the rinse aid level
Load the baskets
Select a progra mme
Running the dishwasher
Fill the detergent dispenser
Scrape off any large amount of leftover food . Soften remnants of burnt food in pans,
then load the baskets. Refer to the dishwasher loading instructions.
Switchon thea pplian ce
Fordetailed operating method read thecorresponding content onthe instruction manual.
Switch off the appliance
Turn off the water tap,
unload the baskets
Warning: wait a few minutes (about 15 minutes) before unloading the d ishwasher to avoid handling
the dishes and utensils while they are stillhot and more susc eptible to brea k.
They will also dry better.Unload the appliance, starting from the lower basket.
Changing theprogramm e
Add forgottendish esin the
dishwasher.
When the working cycle has finish ed, the buzzer of the
dishwasher will sound 8 times, then stop.
Turn off the applianc e using the On/Off Button.
If the appliance is switched
o ff during a wash cycle.
O penth e doo r carefu lly.
H otsteam ma y escape
w hen t he d oor is ope n ed!
If the appliance is switched off during a wash cycle, whe n switched
on again, please re-select the washing cycle and operate the dishwasher
according to the original Power-on state ..
1. A running cycle can only be modified if it has been running for a short time. Otherwise th e detergent
may have already been released and the water already drained . If this is the case, the detergent
di spenser must be refilled.
2. Press the On /Off button to stop washing , Then press this button to reset .
3. T u rn t he sele ctor t o select a new programme.
4. Restart the dishwasher.
1.Press the Start/Pause Button to st o p the washing.
2.Open the door a little .
3.After the spra y arms stop working, you can open the door
co mpletely.
4.Add forgotten dishes.
5.Close the door
6.Press the Sta rt/Paus e Butt on, the dishwasher will run
after 10 second s .
Turn on the water tap and press the Start/Pause Button. The machine will start working
after ab out 10 seconds.
Close the door,turn the Washing Program Selector to select a desired progra mm e.
( See the section entitled Operating instructi on )“”
Press th e On/Off button to switch on the applianc e, Open the d o or.
A
B
C
To re vie w the section o ntroubl eshooting Tip s
willhelpyoutosolve somecommon problems
by yourse lf.
Dear Cu stom er,
Please carefully readthismanualbeforeusingthe
dishwasher,it willhelpy outouseand maintainthe
dishwasher properly.
Passit on toanysubseq uentowner of the appliance.
Thismanualcontains sectionson safetyInstructions,
Operating Instructions, Installat ionI nstructionsand
Trou bl es hoo tin g Tip s, et c.
The manufa ctu rer, following a pol icy of con stant
develo pmenta ndu pdating of the pr oduct ,may
make modi ficat ionsw itho ut gi ving prior notice .
K eep it as ar ef er in the later day s .
Ifyo ucan not solv ethe pr oblemsb yyo urself ,
please ask fo rt he helpo f profe ssiona l te chni cian s.
Th is a ppl i ance isin tended t ob e use din h ou s eho ld
andsimilarapplications suchas:
-s taff kitch ena reas ins hop s, off ice s and othe r
w orkin gen viro nme nts;
-farm hous es;
-b ycli ents inh otels ,mo tels and ot he rres iden tia l
t ype env i ro nme nt s;
-bedandbreakfast typeenvironments.
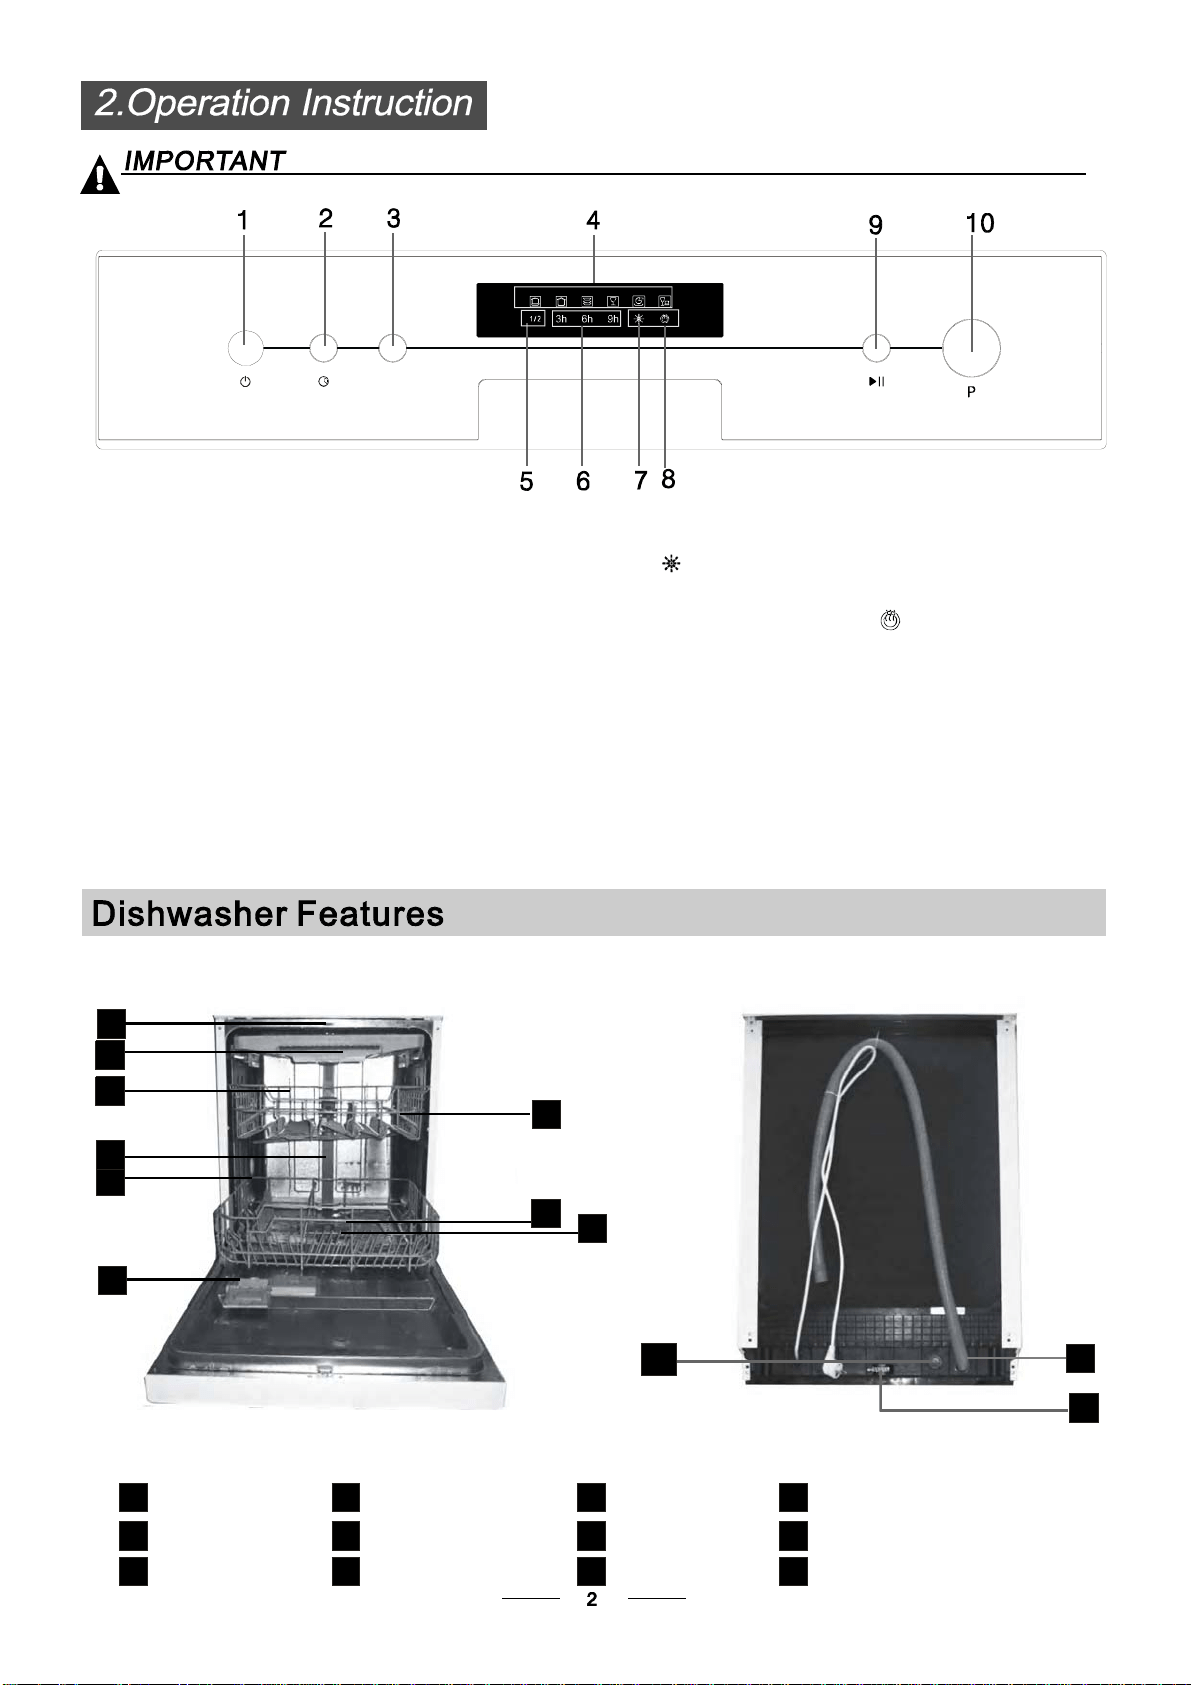
Dishw ash er Fe atures........................ ......... ... ...2
Attentionbeforeo rafter loading the Dishwasher
Baskets..........................................................6
FilteringSystem....... ..... ........................ .........11
Caring fort he Dishwasher..................... .........12.
A FilltheRinseAidDispenser............. .. ..3、 ..... .. .
B F un ct io n o f De te rg en t .. .. ... . ... .. . ... . ... ....4、 ........
...... ...... ..7
TheM ethod Loading Nor mal Dish ware
Max. Dish es . ...... ..... .......... ...... ...... ...... ...... .....8
WashCycleTable...........................................9
Turni ng on theAp pl ian ce .... .... . ... ... ... ... ... ... ... ..9
ChangetheProgramme....... ....... ................10....
AttheEnd of the Wash Cycle ......... ..................10
Beforecallingforservice........................... .....20.
Errorcodes.................................... ..............21.
Tech nicalinformation. ...... ....................... .....22..
Cont rol Panel.............. .....................................2
....... ......... ..................13Ins ta llat ion pre par ation
... 1 4Aesthet icpane l' sdim ension sand inst al la tion
...... ........16Tens ion adj us tmen t of t h edoor spr ing
..............................16C onnec tion of dra in h ose s
...................... ... 17D ish washe ri nstallation step s
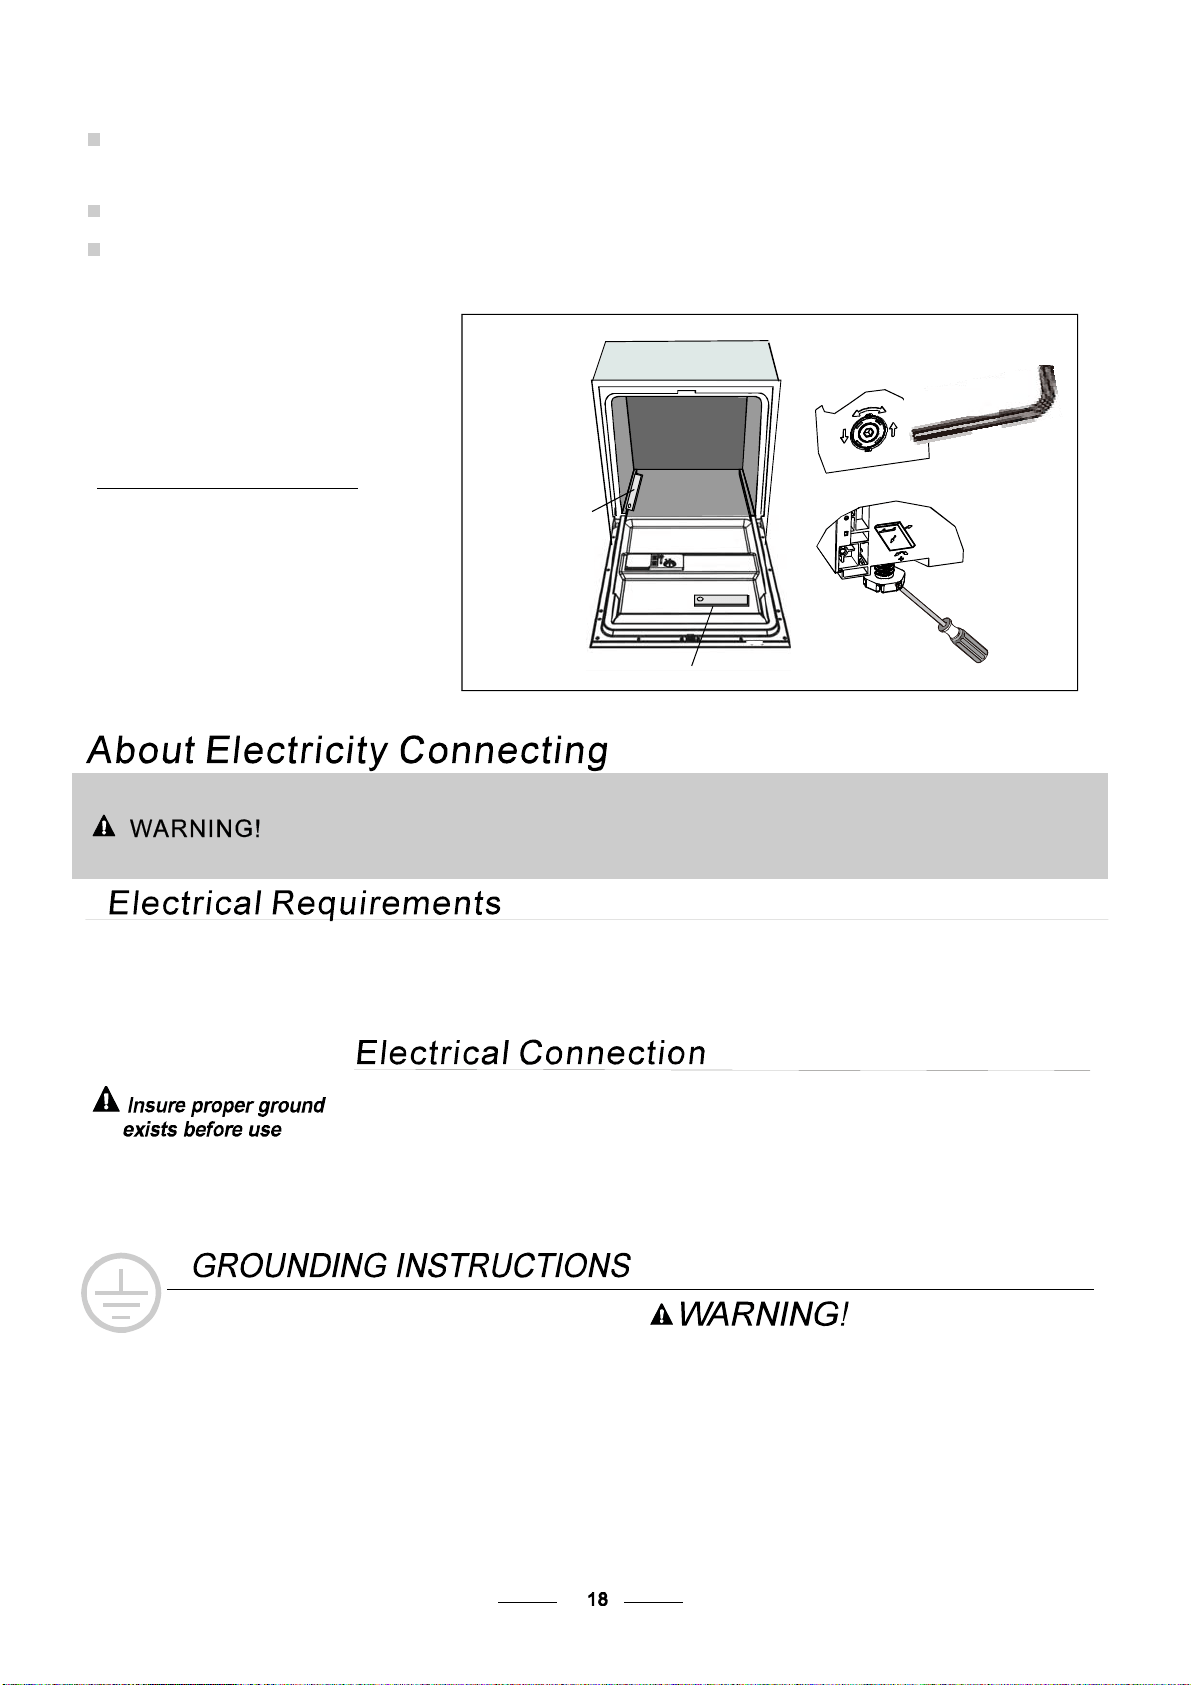
AboutE lectricity Connectin g...........................18
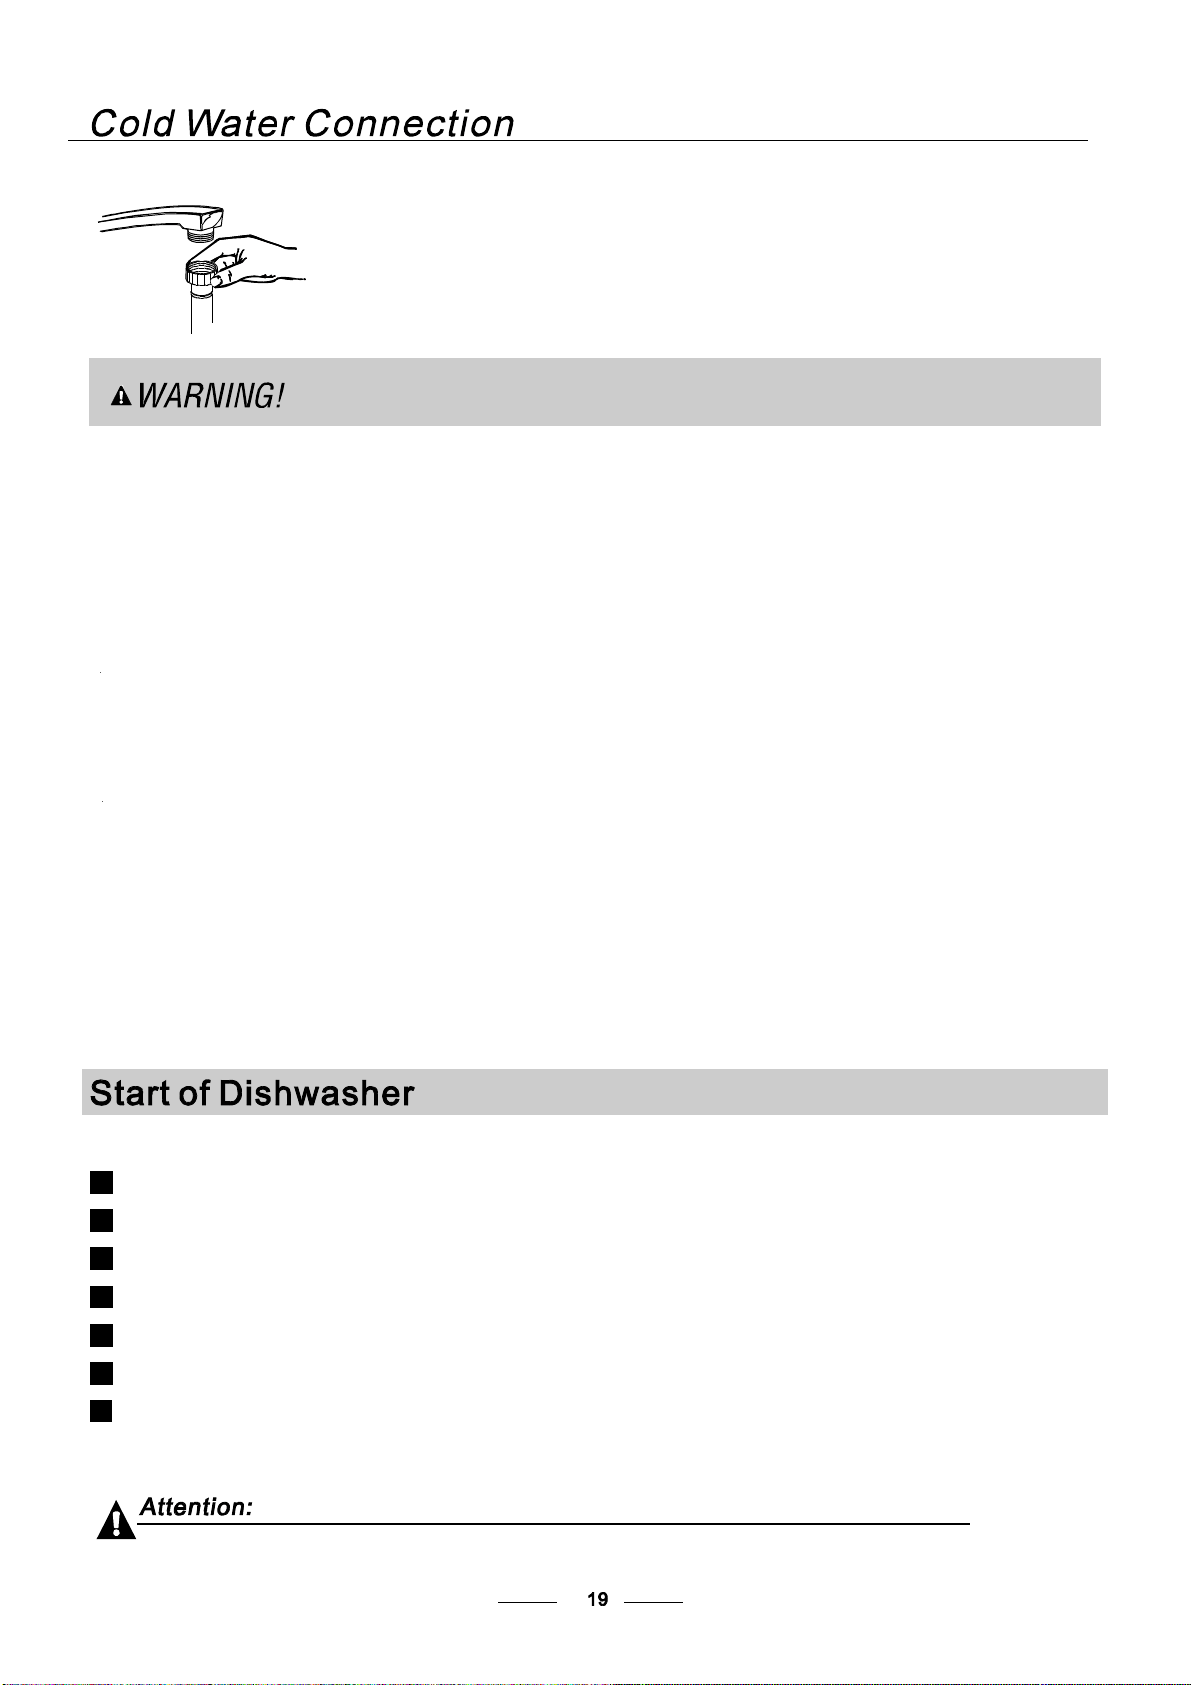
Cold Water Conne ction............................... ... 19
Start of dishwasher................................ ......19..
This appliance must be grounded. In the event of a
malfunction or breakdown, grounding will reduce
the risk of anelectric shock by providing a path of
least resistan ce of electric current. This appliance
is equipped with a cord having an equip ment-
grounding conductor and a grounding plug.
The plug must be plugged into an appropriate outlet
that is install ed and grounded in accordance with
all local codes and ordinances.
Keep children away from detergent and rinse aid,
keep child away from the open door of the
dishwasher, there could still be some detergent
left inside .
ren
Donotabuse,siton,orstandonthedoorordish
rack of the dishwasher.
Do not wash plastic items un less they are marked
dishwasher safe or the equivalent. For plastic items
n
ot so marked, check the manufact urer's
recommendations.
Use only deter gent and rinse addi tives
desi gned for ana utomat ic di shwa sher.
Never us eso ap, laun dryde te rgent ,or h and
washing detergent in you rdis hwa sher.Ke ep
t hes eproduc ts o utof the re ach of childr en.
During inst allat io n,the pow ersu pplymust n ot
be exces siv ely or d angerously be ntor fl atten ed.
Do not tamper with cont rols.
Do not place any heavy objects the
door wh en it is open. The appliance could tip
forward.
on or stand on
When loadi ng ite ms tobe w ashed :
1) Locate sharp it ems so that they are not likel y
to damage t he door seal;
2 Warni ng:K nives and other ute nsils with
shar p poin ts must be loade din the ba sket
with th eir poi ntsdo wn or place din a
horizontal position.
)
Ifthes upplycordisdamaged, itmustbereplaced
bythemanufactureroritsserviceagentora
simi la rly q uali fi ed pers on i n or der t oav oid a
ha zard.
Plea sed isp ose ofpack in gm at erials properly.
Use the dishwasher only for its intended function.
Remove the door to the washing compartment when
removing an old dishwasher from service or discard ing it.
Dishwash erde ter ge ntsare stro ngly al kaline, they
can be extrem el ydangerou sif swa ll ow ed.Avoi d
conta ctwit hskin and eyes and kee pchildren aw ay
fro m the dish washer when the door is ope n.
Check th atthe det ergent com parment is e mpty
after compl etion of th ewash cycle.
The appl iancei s tobe conn ected to the water
mains us ing new hose sets and th atold ho se-sets
should no tbe reu sed.
The maxi mumnu mber of place setting sto be
was hed i s14.
The maxim umpe rmi ssible inlet water pr essure is
1Mpa .
The minimum permissible inl etw ater pr essure is
0.04Mpa .
Children should be supervised to ensure that they do
not play with the appliance.
This appliance is not intended for use by persons
(including children with reduced physical, sensory or
mental capabilities, or lack of experience and
knowledge ,unless they have been given supervision
or instruction concerning use of the appliance by a
person responsible for their safety .
)
When usin g your dishw asher, fol low the precaut i ons listed below:
The door sh oul dn otbe left o pen,
since th is could increa sethe ris kof trip ping .
Improper connection of the equipment-grounding
conductor can result in the risk of an electric shock.
Check with a qualified electrician or service
representative if you are in doubt whether the
appliance is properly grounded. Do not modify the
plug provided with the appliance; If it does not fit
the outlet. Have a proper outlet installed by a
qualified electrician.
Do not operate your dishwasher unless all
enclosure panels are properly in place. Open
the door very carefully if the dishwasher is
operating, there is a risk of water squirting out.
beforeusingit for the first time.
Togetthe best performance fromyourdishwasher,read all operatinginstructions
1. On/OffButton:Toturnon/off the powersupply.
2. Delay Butto n:To Press t heb utto nto dela ythe wa shi ng time.
6. Delay in di ca to rs : t o s h ow t he d ela y t ime ( 3h/ 6h/9h )
9Start/PauseButton:Tostarttheselected
washingprogramorpausethewashingprogram
when t he machin ei s working.
3.
OptionButton:To selectHalfloadand Extradry functions,
these fun ction sca no nly be used with progr ammes
Intensive, Heavy, Normal ,Glass and 1 Hour.
4. Pr ogram indica tors: to show whic hp rogr am you havecho sen;
10 Washing Program Sel ector: To Turn the Se le cto r
to select approp riate P rogram.
7. Rinse aidw arning lights:Tosh ow
when the dispen serneed to be ref illed .
Option
5.Ha lf lo ad indi cat or : To show w hen you sel ect t he
half load functio n. If you have on ly abo utor le ss than half
of full load dishes ofthe dish was her, you can select the
half load functio nand your desired pro gra maccord ing to
the dishes con tam in ated degr ee.Aprogr am sel ect the
half load function, it can save t ime, energy, and water
compa re to the progra mhasn’t selec tt hehalf load functi on.
Afterthehalfloadfunctionisselected, all thesprayarms
are ru nning, y o uc an loa dal l the bask e ts .
8:
Ext ra dryi ng :An inc rea sed t emper at ure dur in gt he fi nal
rinsetoincreasedryingwell.Thereisaslightincrease
in t he e nergy consum pti on.
.Extra Dryingindicator
11
12
Back View
1
2
3
4
5
7
8
9
10
Front v i ew
Lowerbasket
Dispe nser
Cupshelf
Sp ra y arms
Fi lter assembl y
Inle tpipe conne ctor
Dra in pipe
Upper ba sket
Cutleryrack
Top spr ay ar m
1
Innerpipe
5
6
7
8
9
10
12
11
3
2
4
6
Adju ste r
Bef or e using you r di shw as her f or the fir st tim e:
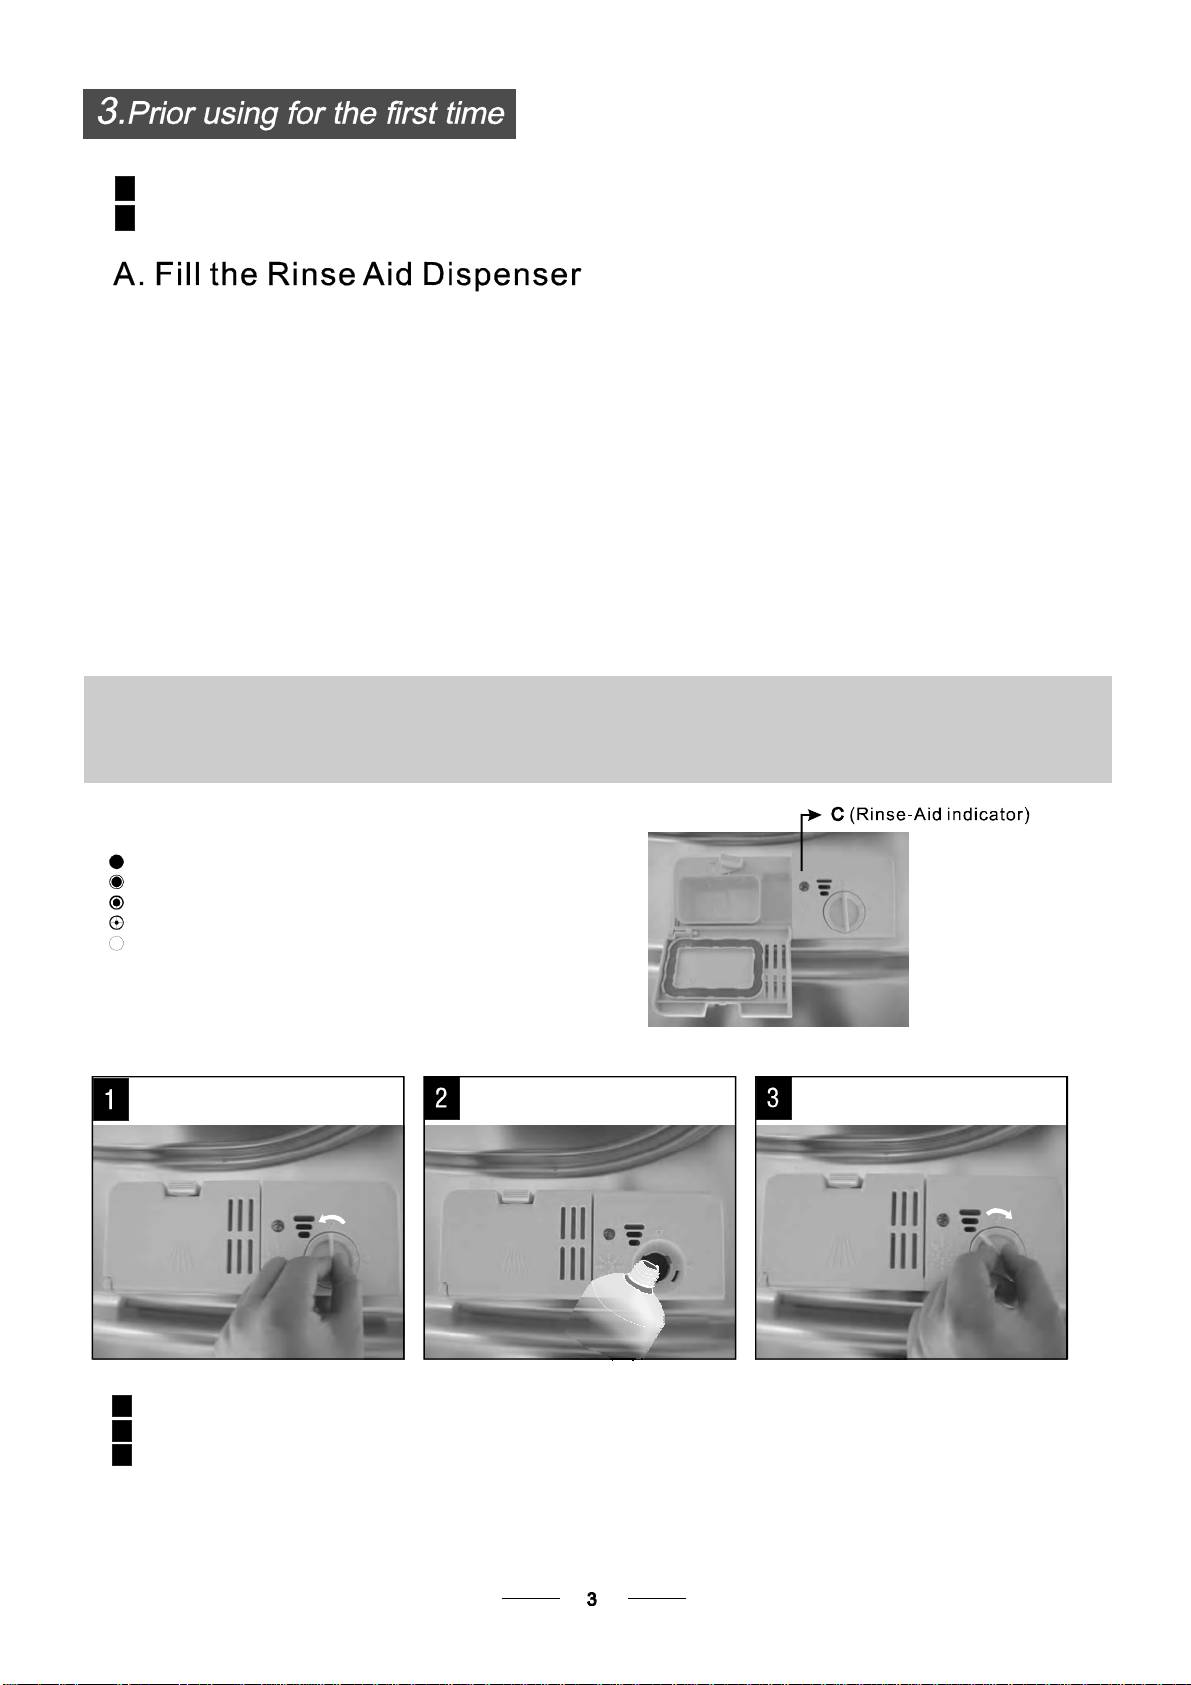
A. Filltherinse aiddispenser
B. F ill in de te rge nt
Therinse aid isrelea sedduri ngthe finalrinseto preventwaterfrom forming dropletsonyourdishes, which can
leave spotsand streaks. It also improvesdryingby allowing water to rolloff thedishes. Yourdishwasheris
designed to useliquidrinseaids.The rinseaiddispenserislocated insidethe door nextto thedetergent dispenser.
To fil lt he dispens er,o pen the ca pa nd pou rthe rinse aidi nto t he di spenser untilth e leve lindi cator turns compl etely
black.Thevolume ofthe rinseaidcontaineris about110ml.
RinseAi d Dispen ser
Function of RinseAid
Rin se aid is aut om atical ly adde d durin g the last rinse ,e nsuri ngth oro ug hr in si ng ,an ds po tand st rea kf ree dry ing.
Attention!
Onlyusebrandedrinse aid for dishwasher.Never fillthe rinseaiddispenserwithany othersubstances
(e. g. Di shwas her clea ning a gent, liqu id de te rgen t).Thi sw oul dd ama ge the ap pli ance .
As the rins eaid dim inishes, the size of the bl ac k dot
on the rinse ai dlev el indica tor change s, as illust rated be low.
Fu ll
3/4full
1/2full
1/4full-Shouldrefilltoeliminatespotting
Empty
If t here i sn orinse -aid warnin g light in the c ontrolp ane l,y ou can judge the amo un to f r inse-aid by t he col or oft he
optical level
indi cat or "C" locate d ne xt to t he cap. When th erin se-ai dcont ainer is ful l, thewh ole indi cator wil lbe da rk . As th e
rin se-aid
dim inis hes, th es ize o fth e dar k dot decre ases. You sho uld neve rlet t her inse aid get below 1/ 4 f ull.
When to Refill the RinseAid Dispenser
RINSEAIDDISPENSER
To o pen t hedi spens er, turn the cap t oth e "ope n" ( left) arrow and lif ti tout.
Po ur th er inse aid in to the di sp en se r, bei ng ca re fu l no tto over fil l.
Replace the capby insertingitalign edwith "open"arrow and turningittotheclosed(right) arrow.
Be caref ulno tto overf illth e di sp enser,b ecause this c ould cau se over sudsin g.Wipe aw ay any spil ls
witha damp cloth. Don'tforget toreplace thecap beforeyou close dishwasherdoor.
Attention!
Clean up any ri nse aid spilt duri ng fil lingw ith an absorbe ntclo th toav oide xcess fo amin g
during t he ne xtw ash.
1
2
3
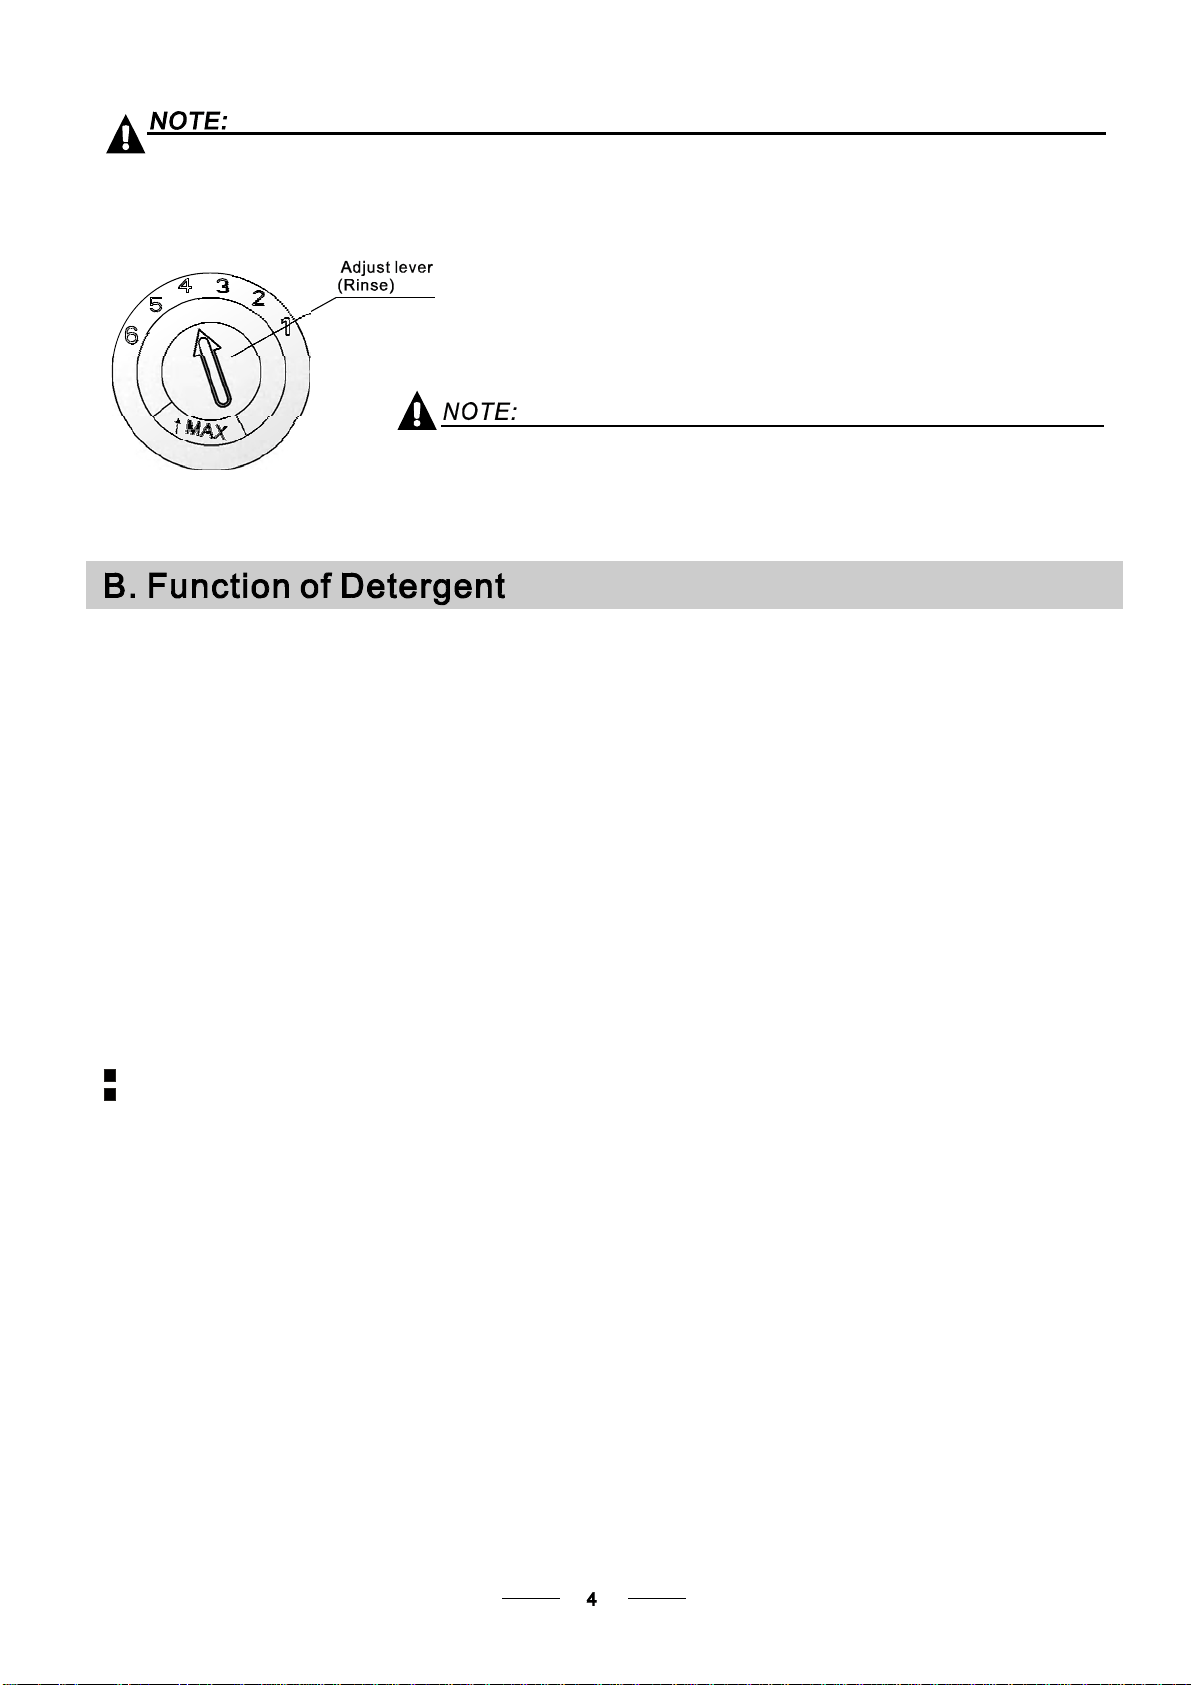
Adjusting RinseAid Dispenser
The ri nse aid di spen serh ass ix orf ours ettin gs .Always st art with th e dispens er
set on "4 ".If s po ts and poor dryi ngar ea pro ble m,i ncrease th eam ou nt of rinse
aiddispensedbyremoving thedispenserlidandrotatingthedialto"5".Ifthe
d is hes still are not dry ing p roperly or are show spots , adjust the di al to the next
h igher le veru ntil your d is hes are spot -free. T he recom mended setting is "4".
(Factory valueis "4" .)
Incr ease th e dose if ther eare drops ofw ate ro r li mesp ots on the dish es af ter washing .
Reduce i tif the re ar e s ti cky whitis hstai ns on your dish eso ra blu ish f il mon glas sware or
knifeblades.
during thenextwash.
Don' tf orgett orepla cet he cap before you close dis hwa sh erdoor.
Clea nup any rinse aid spil led w hile during fillin gwith an abso rbent cloth to avoid excess ive foam ing
Dete rge nt s wi th its chem ical ingredie nts a re ne cessary t orem ove dirt, cru shd irt an dtr ansport it out of the dishw asher.
Most o f th eco mmer cial qualit yde terge ntsa re suita blefo rt hisp urpose.
Detergents
Ther eare 3 sorts of det ergents
1.W ith phosphate and wi thc hlori ne
2.With phos phate and witho utc hlorine
3.W ithoutp hosphate and w ithout chlorine
Based on their chemicalcomposition,detergentscan be split intwo basic types:
De te rg ent t able ts o fdifferen tbrand sdisso lve at diffe rent spe eds. For this rea sonsom e
det erge ntt abl etsca nnotd issolve an dde velop their f ull c lean ingpow erd uring sho rt
pro gra ms. Ther efo replease use long progra mswh enusi ngd etergent tabl ets, to
ensurethe completeremovalofdetergentresiduals.
Thedispensermus tbe refilled before thestartofeachwash c yclefollowingtheinstructions
pro vided i nthe was hcy cle t able .Your d ishwash er uses l ess detergent an dr inse aid than
Co nven tion al d ishwash er.Gene rally,on lyon eta bles poo nof det ergent is need ed for
a normal wash load.Moreheavilysoiled itemsneed moredetergent.Alwaysaddthe
det erge ntj ustb efore st artin gth edis hwashe r,ot herw ise i tcoul dg etd am p and will not
dis solv e pr operly.
Concentrated Detergent
DetergentTablets
DetergentDispenser
conv enti onal, al kaline de tergent s with cau stic compon en ts
l ow alkal inec oncentr at ed det er gents with natura lenzy mes
N ormally new pulv eris edd eter gen t is witho utp hosph at e.T hust hew ater sof tene r fun ction of
phosp hate is notg iven. In this case we recomm end tofi ll sa lt in the salt c onta ine reven w hen
th eha rdn ess o fwat er isonl y6 dH. If d eterg ent swit hout phosphate are used in the c ase of ha rd w ater
of ten whit e sp ots appearo n di shes and glas ses. In th is case ple ase add m or e det erg entto re ach
bet ter r esu lts. Detergents with out chlor ine doo nlybl eac ha little. Strong a nd colo ure d sp ots will not
beremovedcompletely.Inthiscaseplease choose a programwithahigher temperature.
°
Amount ofDetergenttoUse
ProperUseofDetergent
Use only deter gent specific all yma defor the us ein d ish was her s. Ke ep your d et erge ntfr esh and dry.
Don't put powdere ddeter gent into the dispe ns eru ntily ou're ready to wash dish es.
Dishwasherdetergentis corrosive! Take care tokeepitoutofreachofchildren.
Alw ays add the dete rgen tj ustb efore star ting ea chw ash c ycle.
Only us ebr anded deterg en t aidf ord ish wash er.
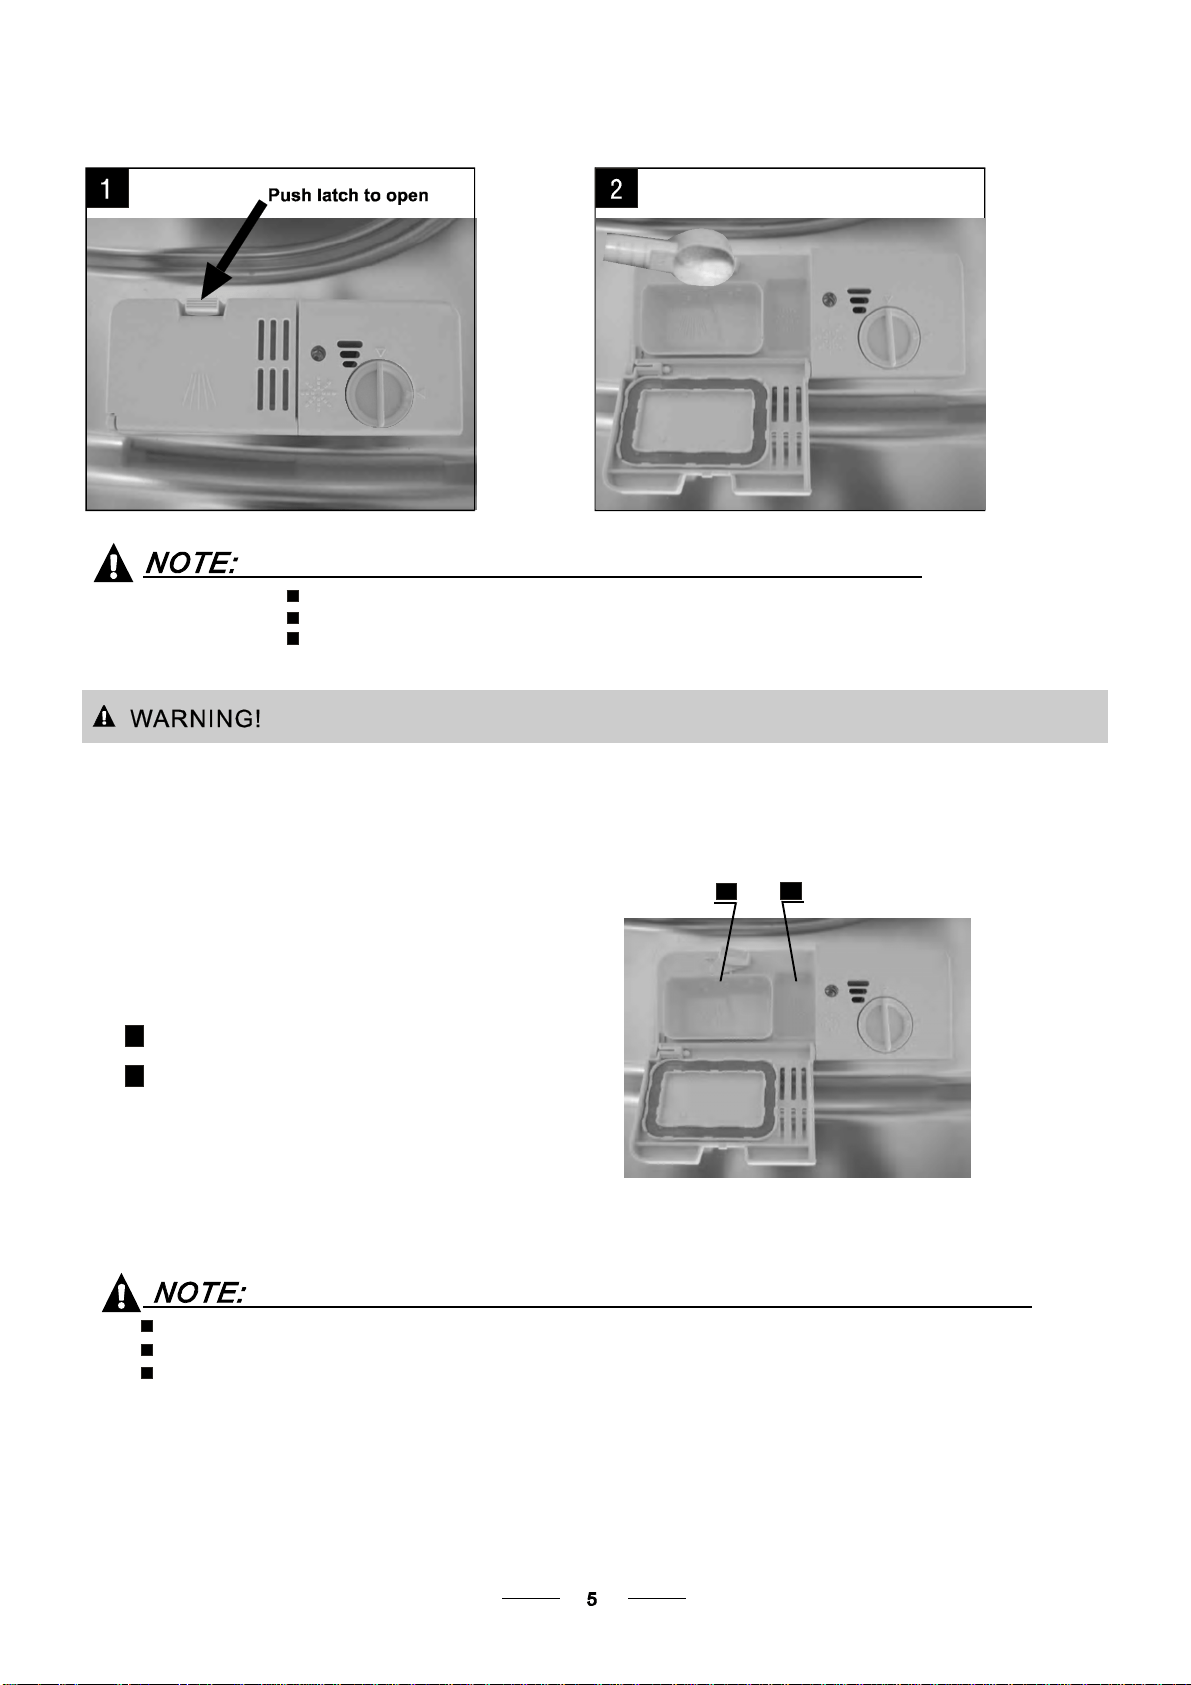
If theli d i s cl os ed: pr es s r e lease button . The l i d wi ll sprin g op en.
Fill the dete rge ntdi spen ser with dete rgent.
Themarkingindicatesthe dosinglevels ,as
illustratedontheright:
The pla ceof main wash cycle dete rgent place d.
The pla ceof pre- wa shcy cle deterge ntplaced .
Ple ase observe the man ufac ture rsdosin gan dst orag e
Recomme ndations as stated o n t he d et er gen t p ack agin g .
Closethe lidandpress until itlocks inplace.
Ifthedishesareheavily soiled, placeanadditional
deterge nt dose i nthe pr e-wa sh dete rgen t ch amber.T his deterge ntwi lltak ee ffect duri ng the p re-w ash phas e.
A
B
Fill in Detergent
You find infor ma tion abou tth ea mounto f d etergen tfor the sing lepr ogram me onthe las tpage.
Plea sea war e, th ataccor di ng tothe le vel s oiling and th especif icha rdn ess of w ater differen ce s are poss ible.
Plea seo bserve the m anufact urer 'sre commendati ons on the de tergent pac kagi ng.
A
B
Cutlerywithwooden,horn chinaor
mother -of-pearl han dle s
Plast ici te ms that ar enot h eat r esis tant
Older cut lery w ith glued parts t hat a ren ot
temperatureresistant
Bonded cut ler y i te m sor dish es
Pewter or coop er items
Crystal gla ss
Steel it em ssu bjec t t orust ing
Wooden p latte rs
Items madefromsynthetic fibres
So me ty pes ofg lasses can becom e
dull afte ra la rge number of washes
Silv er a nd a lumi num pa rts ha ve a
tendencytodiscolourduring washing
Glazed patterns mayfade ifmachine
washed freq uent ly
Are not suitable
Are of limited suitability
Dishesand itemsofcutlerymustnotlie ins ideoneanother, orcover each other.
Toav oidda mage to glasse s,th eym ust not touc h.
Lo ad larg e i te ms w hich are most di fficul tto clea nint othe lowe rbask et.
The uppe rbas ket i sdes ig nedto ho ld m ore delicate and light erd ishw are such as gl as ses, cof fee
andteacups
Lo ng bladed k nives st ored in an uprigh tpo sition are ap otent ial haza rd!
Lo ng and /or sharp item so f cut le ry such as carvi ng kniv esmust bep ositi oned
h orizon ta ll yi n the upper b aske t.
P lease do not ove rload yo ur dishwashe r. T his is import an t f orgoo dresu lts a ndf or
r easonab leconsu mption o f ener gy.
Load hollow ite mssuc has cup s,gl asse s, pans etc. With t he openi ng facing dow nwa rd ss o that
w a t er c ann o t co l l ect in the c ont a i n e r or a dee p base.
Consider buyingutensilswhichare identifiedasdishwasher-proof.
Usea mild detergentthatisdescribedas'kind todishes'.Ifnecessary,seek further
informationfromthedetergent manufacturers.
Forparticular items,select aprogramwithaslowatemperatureaspossible.
To prev ent da mage , d o not t ake gla ssandc utl ery out of the di shw ashe r i mmed iatel y
aft er the p rogr amm ehas e nde d.
(For best perfor mance of t he di shwasher, follow the seload inggu ide li nes.
Featu res and appear ance of baske ts and cut lery ba sket smay var y from your m odel.)
Scrape off any larg eamo untso f le ftover foo d. Soften remnan ts ofb urnt food in pans.
It is not necess ary tori nse t hed ishesu nder ru nning water.
Pl ac e objects i nthe dishwa sher i n fol lowing wa y:
1.Items su ch a scups, glasses, pots /pans, e tc. a re f aced dow nwa rds.
2.Curved item s,or ones wit hreces ses,sh ouldb eloade dasla nts oth at water can run off.
3.All utens ils are stacked secu rely and can not ti po ver.
4.All utens ils a re placed in t heway t hat the spray ar mscan r otate f reely d uring wa shin g.
Very sm all it em ss houldn otb ewashe din the di shwasher as they could ea sily fal lout of th e basket.
To pr event water drip pingfr omthe uppe r ba sket into the lo wer basket, we re commend tha tyou
empty the lowe rba sk etfirst an dthe nthe upp er ba sk et .
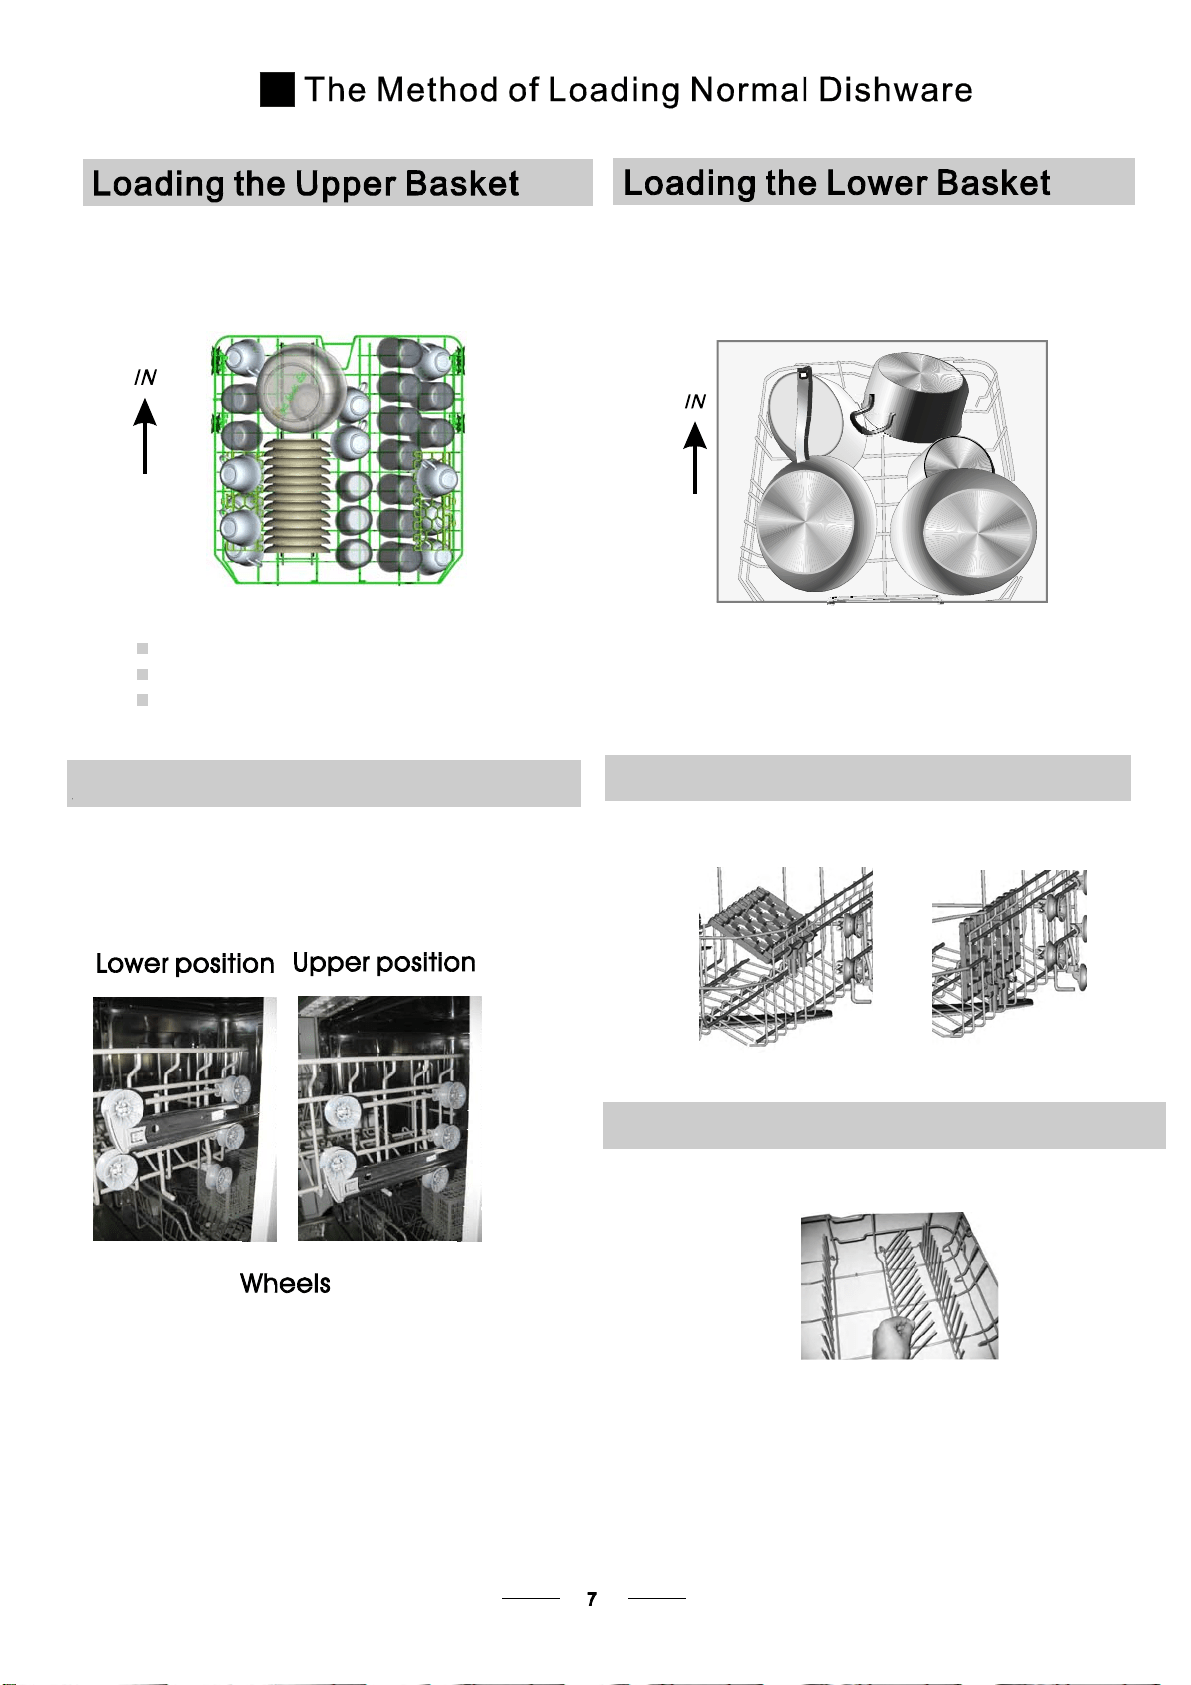
Th eupper basket is designed t oho ldm ore delic ate
and lighter d ishware such as gl asses, coffe e a nd
teacupsandsaucers,aswellasplates,smallbowls
andshallowpans (aslong astheyarenot toodirty).
Positionthed ishe sandco okw ares othatthey w ill
notgetmoved bythespray ofwater.
We sug gest tha t yo upl a ce l arge items a nd t hem ost diffi cu lt
to cleanitems into thelower basket: suchas pots,pans,lids,
servin g d ishes and bowl s, as show n in t hefi gur e be low.
It ispreferable toplace serving dishesandlidsonthesideof
the ra cksi n ord er t o avoid block ingthe r otat ionof the top
spray arm.
Pots,servingbowls,etc,mustalwaysbeplacedtopdown.
Dee p pot s should be slanted to allow w ater t o f low o ut.
Ple ase ber emi nded that:
T heB ottomB as k etf eatur es fo ldin g sp i kes so tha t larg er or mo re po ts an d p ans can be lo ade d.
Foldin g back the cup shelves
Fo r bet ters tack ing ofpo tsand pans ,
th e sp ik es can be folde d dow n as
showninthepictureright.
Adjusting the Upper Basket
Th e height ofth e up per bas ket c anb ead justedi n ord ert o
create mo re sp ace for large uten sils bot h for t he upp er
/lower b ask et. The heig hto f the upp er b asket ca nb e
adjusted byplacing the wheels ondifferent heightof the
ra ils. Lo ng i t ems , se r vi ng c ut lery, sal ad s erve rs a nd kniv e s
should beplacedon the shelfso thattheydo notobstruct
the rotation ofthespray arms..
Foldin g Spikes of Lower Basket
Fo rbetter stacki ng of pots and pans ,
the spi kescan be fol ded do wn a s
shown in the pictu rerig ht.
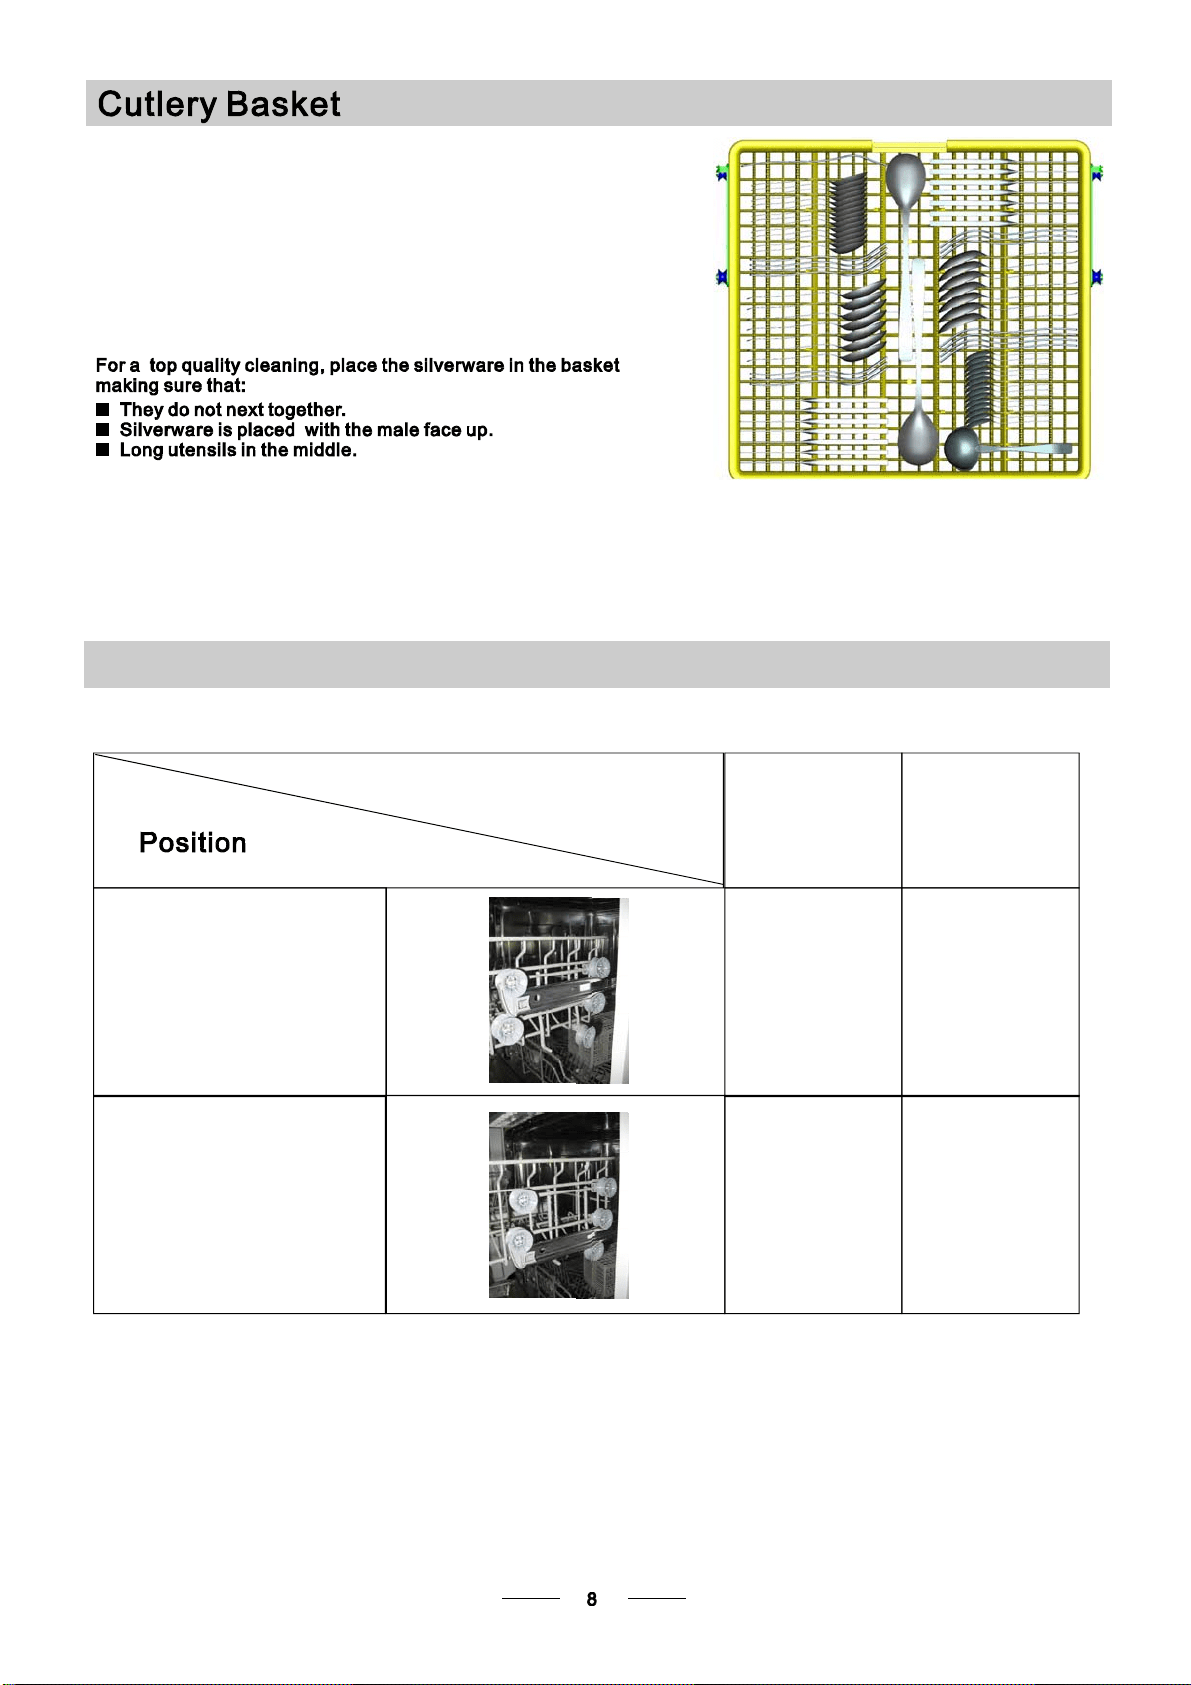
Cutler y should b eplaced in t he c utler y ra ckse paratel y
from ea ch o ther in t heappr opria te po sitions, and do
makesure theutensils d on otnest together,t his may
cau se b ad perfo rma nce.
Max. Dishes
Max. Dishes
To p baske t
Bottom basket
LowerPositionmax.Φ
Up p er P o si t io nm ax.Φ
19cm
25cm
14cm
30cm
NOTE:NOTE:
Turning On the ApplianceTurning On the Appliance
5.Starting a washing program5.Starting a washing program
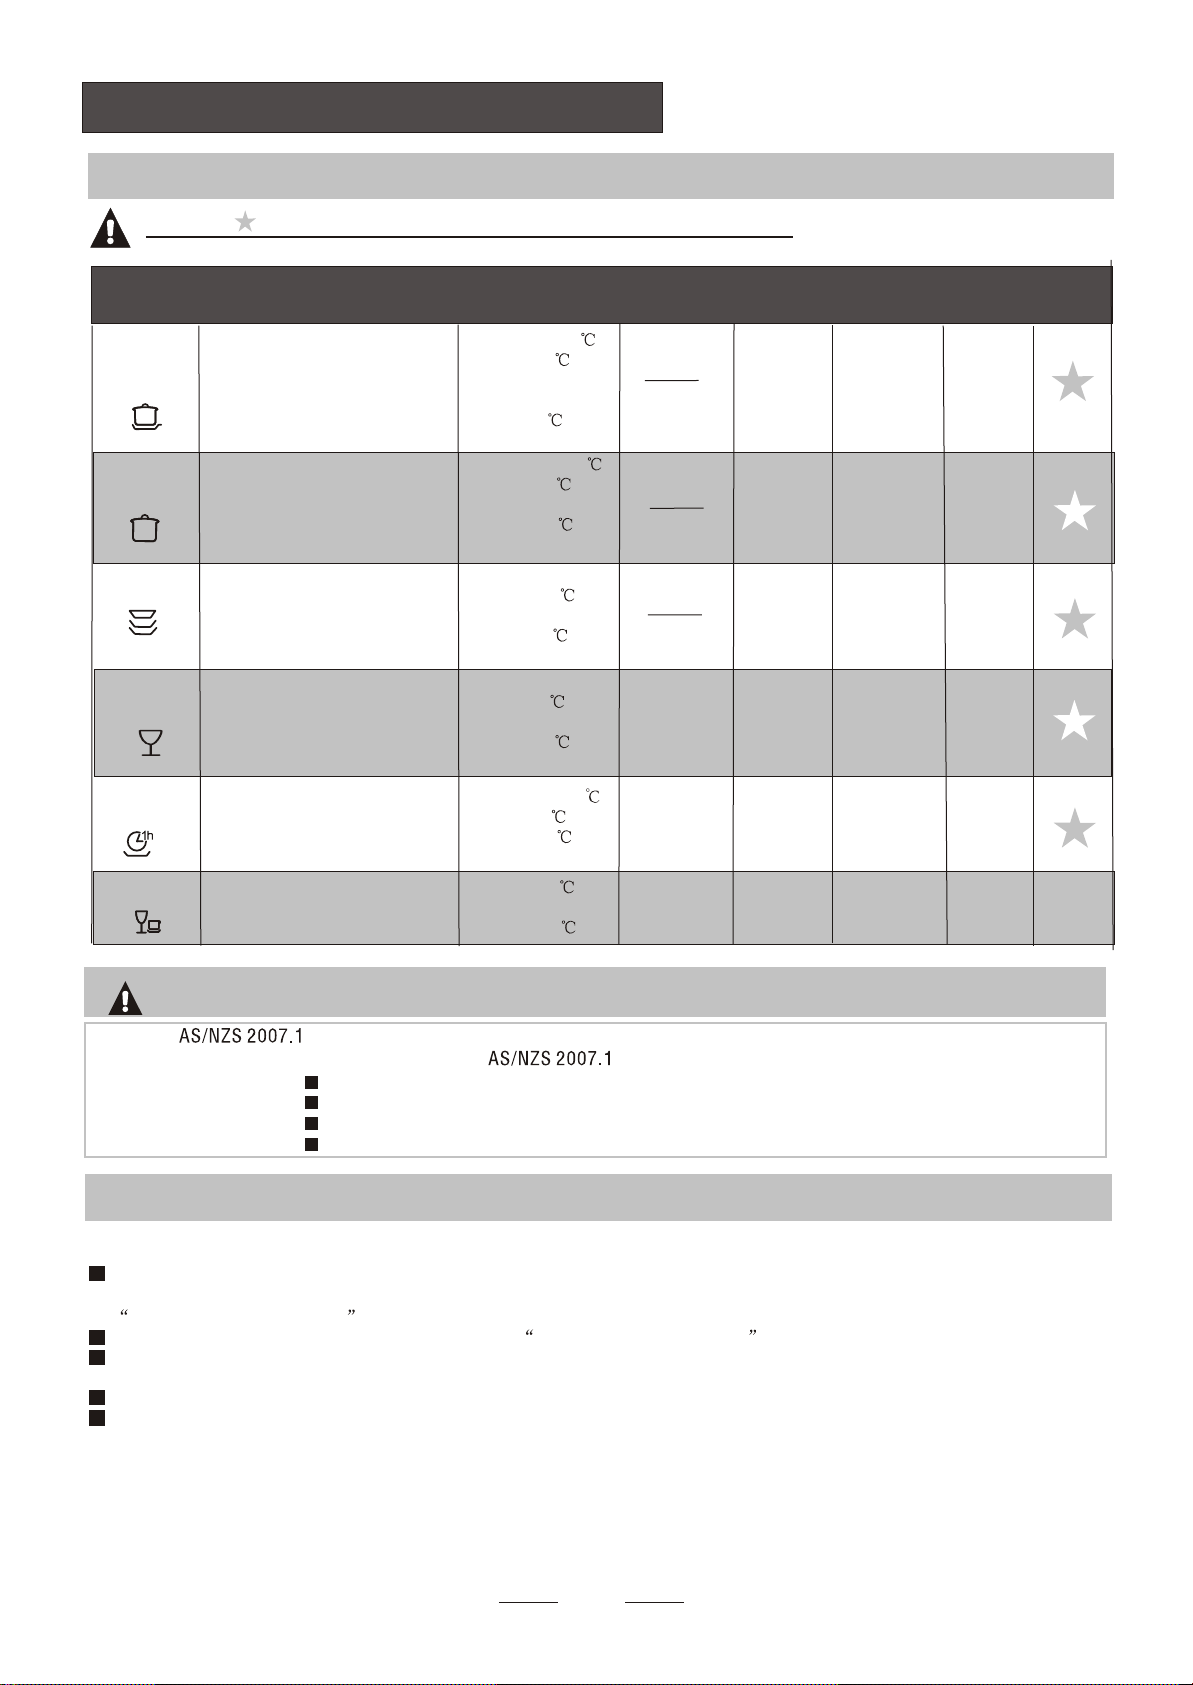
Wash Cycle TableWash Cycle Table
NOTE:NOTE:
Means: need to fill rinse into the Rinse-Aid Dispenser.
( )
99
* : This program is the test cycle. The information for comparability test
in accordance with , as follows:
Capacity: 14 setting
Position Upper basket: upper wheels on rails
Rinse aid setting: 6
Open the door slightly 50mm to assist in drying of the dishes after every wash
Starting a cycle wash
Draw out the lower and upper basket, load the dishes and push them back.
It is commended to load the lower basket first, then the upper one (see the section entitled
Loading the Dishwasher ).
Pour in the detergent (see the section entitled Detergent and Rinse Aid ).
Insert the plug into the socket. The power supply is 220-240 VAC /50 HZ, the specification
of the socket is 10A 250VAC. Make sure that the water supply is turned on to full pressure.
Close the door, press the ON/OFF Button, and the ON/OFF light will turn on.
Turn the program Selector clockwise , the wash program will be changed as follows direction:
Intensive->Heavy->Normal->Glass->1Hour->Quick;
If a program is selected, the response light will light. Press the Start/Pause button, the dishwasher
begins to start.
1
2
3
4
5
Glass
For lightly soiled loads,
such as glasses,
crystal and fine china.
20g
Pre-wash
wash(40 )
Rinse
Rinse(60 )
Drying
115
0.8
14.5
Detergent
pre/main
Detergent
pre/main
Cycle Selection
Information
Cycle Selection
Information
Normal
ProgramProgram
Intensive
Heavy
Running
time(min)
Running
time(min)
Water
(L)
Water
(L)
Energy
(Kwh)
Energy
(Kwh)
Rinse
Aid
Rinse
Aid
(Or All in1)
5/27.5g
5/27.5g
(Or All in1)
(Or All in1)
5/27.5g
For normally soiled loads,
such as pots, plates,glasses
and lightly soiled pans.
standard daily cycle.
For the heaviest soiled
loads, such as pots, pans,
casserole dishes and dishes
that have been sitting with
dried food on them for a
while.
A shorter wash for lightly
soiled loads that do not
need drying.
Quick
Pre-wash(50 )
Wash (65 )
Rinse
Rinse
Rinse(65 )
Drying
Pre-wash(45 )
Wash (55 )
Rinse
Rinse (60 )
Drying
Pre-wash
Wash (50 )
Rinse
Rinse(50 )
Drying
Wash (40 )
Rinse
Rinse (45 )
165
160
135
40
1.15
0.87
1.4
0.5
18
14.5
13.6
10.5
Description
of Cycle
Description
of Cycle
1 Hour
Pre-wash(50 )
Wash(60 )
Rinse (55 )
Drying
60
10
0.9
5/27.5g
20g
Daily wash in only 1 hour.
For lightly and normally
soiled plates and pans
for everyday.
(*AS/NZS 2007.1)
For heavily soiled loads,
such as pots, plates, glasses
and lightly soiled pans.
Ifyou open thedoor ,the machinewill pause. The program lightwill
stopblinking and the buzzerw illsound everymi nuteunlessyou closethe door.After
you c lo seth e doo r , the m achin e will ke epo n wor king af te r 10 s econ ds.
dur ing awashcycle
Premis e:
Acycl e that is underw ayca non lybe m odified if it has only been r unning for a s hort time. Ot herwis e, the
de tergent m ay have a lread ybe en re lea sed, a nd the applian ce m ay have alrea dy dr ain ed the w ash wa ter.
If t hi sis the case , th e detergent d isp enser mu st be refil led (see t he sectio nent itl ed "Load ing t he
Det ergent " ).
Pr ess the O n/Off but ton to stop wa shing , p resst his b utton to reset , T hen you can chan gethe pr og ra mto
the des ired cycle setti ng(se ethe se cti on entitled " Sta rting a wash cycl e. .." ).
Then
1
2
Wh e n yo u pr ess th e S t ar t /Pa us e but ton to pau s e dur in g was h ing , t h e wil l
stop blinkingand the d ishwasher willmooingeveryminute u nless youpressthe
Start/Pause buttontostart.
runningindicator
W h en t he wor kin g cy cle h as finis hed, the b u zzer of t h e di s hwa she r wi ll so u nd f or 8 secon d s, th en s t op . Tur n o ff
t he a ppl iance usi ng the O N/ OFF butto n, shut o ff th ewa te rs upp ly and op ent he door oft he di shw as her.
Wait for a few min utes bef ore unlo adi ng th edis hwa sh erto av oidha ndlin gth edi shes and ut ensils wh ile th ey
are s ti ll hot a ndm ore susc eptible to br eak age. The yw ill al sod rybe tter.
SwitchOff theDishwasher
The progr aml igh tis on but is n ot blinkin g,only in th is case the program meh ase nded .
1.Sw itch offt hedi shwasher by pre ssingt he O N/OFF butto n.
2.Turnoff thewatertap!
Openthedoor carefully.
Hot dishes are sensi tive to kn ocks. The di shes shou ld therefore be allow edto cool d ow n around 15 minutes
beforeremovingfromtheappliance.
Open the dish washer's door,leave i t aj arand w ait afew mi nutes before remov ing the dishes. In this way they
will be cooler an dthe dryi ng wi ll be impr oved .
Unloadingthedishwasher
Iti s normal that the dishw as her is wet insid e.
Empty th elower ba sketfir sta nd the nthe up pero ne. T his will avoid wat er dr ipp ing fro mt he upper Basket on to
the dishes in the low eron e.
Wash th earm s in soapy and war mwa ter a ndu sea sof tbr ush to
cleanthejets.Replace them afterrinsingthemthoroughly.
When following this procedure from step 1 to step 3, the filter system will be removed;
when foll owing it from Step 3 to Step 1, the f ilter system will be installed.
It is dan gerou s t o open the do or w hen was hi ng , bec a us e the hot wate r may s cald y ou .
Aforgotten dish can be added any time before the detergent cup opens.
Add forgotte n dishes.
Close the door
After the spray arms stop working, you can open the door
completely.
2
3
Open the door a little .
1
4
5
6
Press the Start/Pause Button to stop the washing.
Press the , the dishwasher will run
after 10 seconds.
Start/Pause Button
The f ilter pre vent sl arger remn ant sof food or ot her objects f rom get ting i nsi deth epu mp.
Theresidues may blockthefilter, inthis casethey mustbe removed.
The filter system consists of a coarse filter, a fl at (Main f ilter)
A n da mi c rofi lter( F i ne fi lte r ) .
Food and soil particles trapped inthisfilterarepulverizedbya
specia l jet on the l owe r spray ar ma ndw ash edd own t od rain.
Larg er it ems, s uc h as pi e c esof bone s or gl as s, t ha t coul d b lock
thedrainaretrappedinthe coarse filter.To removetheitems
caugh t by the filter, ge ntly sque eze the tap on th eto p of t his
filterandliftout.
Thisfilter holdssoiland foodresiduesinthe sumpareaand
preventsitfrom beingredepositonthe dishesduringwashcycle.
Main filter
1
Coarse filter
2
Fine filter
3
2
3
1
Filterassembly
Thefilter efficiently
For b est p erfo rm ance and res ults, the filte rmu stb e cleane dre gula rly. t hisr eason,i t isa goo di dea to
r emo ve th el arger fo od par ticl estr app edin the filte raft ere ach was h cy cleb yrin sing the sem icirc ular filte ran d
c up u nder r unnin gw ater. Tor emove thef il terd evice, pull th ec up handle in t he upwar dd irection.
re mo vesf ood particle sfro mt he wa shw ate r, allowin git t obe rec ycle dd uring the cycl e.
For
T he dish was her m us t n e ver be u sed without the filter s.
Imp ro per r epl ace mentof the f ilter may red uce the per formanc elevel o fthe applian ce
and damage dishesand utensils.
St ep 1 Turn t hefilter in ant i-clockwis edirect io n,:
St ep 2 lift the filter assy up:
When following this procedure from step 1 to step 2, the filter system will be removed;
when foll owing it from Step 2 to Step 1, the f ilter system will be installed.
1
2
Th e cont rol pane lc anbe clea ned by u sing a lig htly dam pened c loth.
Aft ercle an ing, m ake sureto dr yit tho roughly.
For the e xterior, use ago od a pp li ance po li s h wax .
Neveru ses harp objects, scouring pa ds o rh arsh clean ers ona ny part oft hedi shwasher.
ProtectAgainst Freezing
1.Cutoff the electricalpowerto thedishwasher.
2.Turn of fthe wat ersu ppl yan ddisco nnect the water inl etpi pe from the wate rval ve.
3.Drain the water from the inlet p ip e and water va lve. (U se a pan to gathe rthe wat er )
4.Reconnect the water inl etpi pe t othe wa te rval ve.
5.Remove the filter at the bott omo f the tub and use a sponge to soak up wate rin the sum p.
pl ease take frost protect io n meas ures ont he dishw asher in winter.Ev ery fter wa shingc ycle s,
pl ease operate as follow s
time a
:
Cleaning the Filter
CleaningThe Door
To cle an t h e co a rs e filt er and the f i n e fi l t e r, use a clean i n g brush . Reas se mbl e thefilt er par ts as sho wn in t h e f i gur es
on th ela st pa ge a nd r eins ert t he e ntire assem bly in the dis hwa sher,po sitio nin g it i n i tss eat and pres sing dow nwa rds.
Whenc le aning thefilters, don't knock onthem. Otherwise, thefilters couldbe
contorted andtheperformance ofthedishwashercouldbedecreased.
To cle an th ee dge around t hedoor, you sho ul duse only a sof twarm, d am pclot h.
To avoi d pene trat iono fwa te ri nto the door lock and elect rical co mponen ts,d o not
usea spr ay cleaner of any kind.
Never u sea spr ay c leaner t ocl ean t he d oor panel as it m ay dam age the door loc k
and electrical components.
Ab rasive ag entso r some paper towels s hou ldnot be u sed becau seo f t heris kof
sc r a t c hi ng or leavin g s pots on t he s tainles s stee l s ur fa ce.
Cleaning the SprayArms
I fyour dis hwa shercannot work because of t he ice,
pl ease con tact professi onal service person s.
It is n e ce ss ar y to cl e an th e s p ray a r ms reg ula r l y f or h ard
water chemicalswillclogthe sprayarmjetsandbearings.
- Ins pect the filter sfor blo ckin ga fter e ver ytime the dis hwa she rha sbeen used .
- By uns crewing t he c oar se fi lter, you can r em ove t he filter syst em . Re mov ea nyfoo dre mna nts and
cleanthefilters underrunningwater.
Remarks:
Theentire filter assembly shouldbe cleaned onceaweek.
Toremovethelowersprayarm,pulloutthe spray armupward.
To r e mov e th e upper spr a ya rm , h o ld t he n ut, r ota t e th e a rm
clockwise toremoveit.
Washthe arms in soap yan dwarm wat eran duse a soft brus hto
clean the jets. R eplac e th emaft erri nsingthe m th oroughly.
Itis recommendthatyouruna washcycle withthe
dish washer empt yan dthe nre mov eth eplu gf romthe
socket, turn offt he wa te r supply and le av e the door of
t he a pp lia nce sl ig htly open. Th is wil l h el p t h e doo r
sealstolastlongerandpreventodoursfromforming
withintheappliance.
If the app liance m ustbe move d,tr yto keep it in the
verticalposition. Ifabsolutelynecessary,itcanbe
positi oned on its back .
Oneofthefactorsthatcauseodourstoforminthe
dishwasher is foo dth atre main st rappe di n the s eals.
Periodic cle aning with a damp sponge wi llp rev entt his
f r o m occurr in g.
Befo re cleani ng or p erforming ma inten ance, always
remove the plug from the socket.
Tocleanthe exteriorand rubberparts ofthedishwasher,
donot use solventsorabrasivecleaningproducts.
O nly use acloth w ith w arm so apy wate r.
To r em ove sp ots o rs t ain s from the sur f ace of the
in teri or, u se a clo th da mpe ned wit hw a ter ana little
v inega r, o ra c lean ing pro duct mad es p eci fically fo r
dishwashers.
Remove the Plug
No Solvent s orA bras ive C leani ng
Mov ing theA ppli ance
Seals
Aft er ever ywa sh, t urn off t hew ater supp lyto th e
applia nce and l eav eth e doo rsli ght lyop en sot hat
m oisturea nd odours ar en ott ra pped i nside.
After Every Wash
Whennot inUsefor aLongTime
Th eins tal lati on oft he pipes
and ele ct ri cal e qu i pme nt s
should be done by p ro fessionals .
Ele ctrical Shock Haz ard
Disconnect electricalpower before
installingdishwasher.
Fai lur e t o d o so can r e s ult in deat h o r
el e ctri c al s hock.
The i nsta llati on p ositi ono fdis hwasher sho uld b ene art hee xisti ngin let a nd drain ho ses and
powercord.
One side of th eca binet sinkshould bechosen t ofacilitatethe connection of d rain hosesof
thedishwasher.
Installationpreparation
Note: please che ckthe acco mp anyi ng ins tall ati on acces sor ies( hook f ora esth etic pane l,screw)
●
Please carefully read the installation instruction.
● Illustrations of cabinet dimensions and installation position of the dishwasher
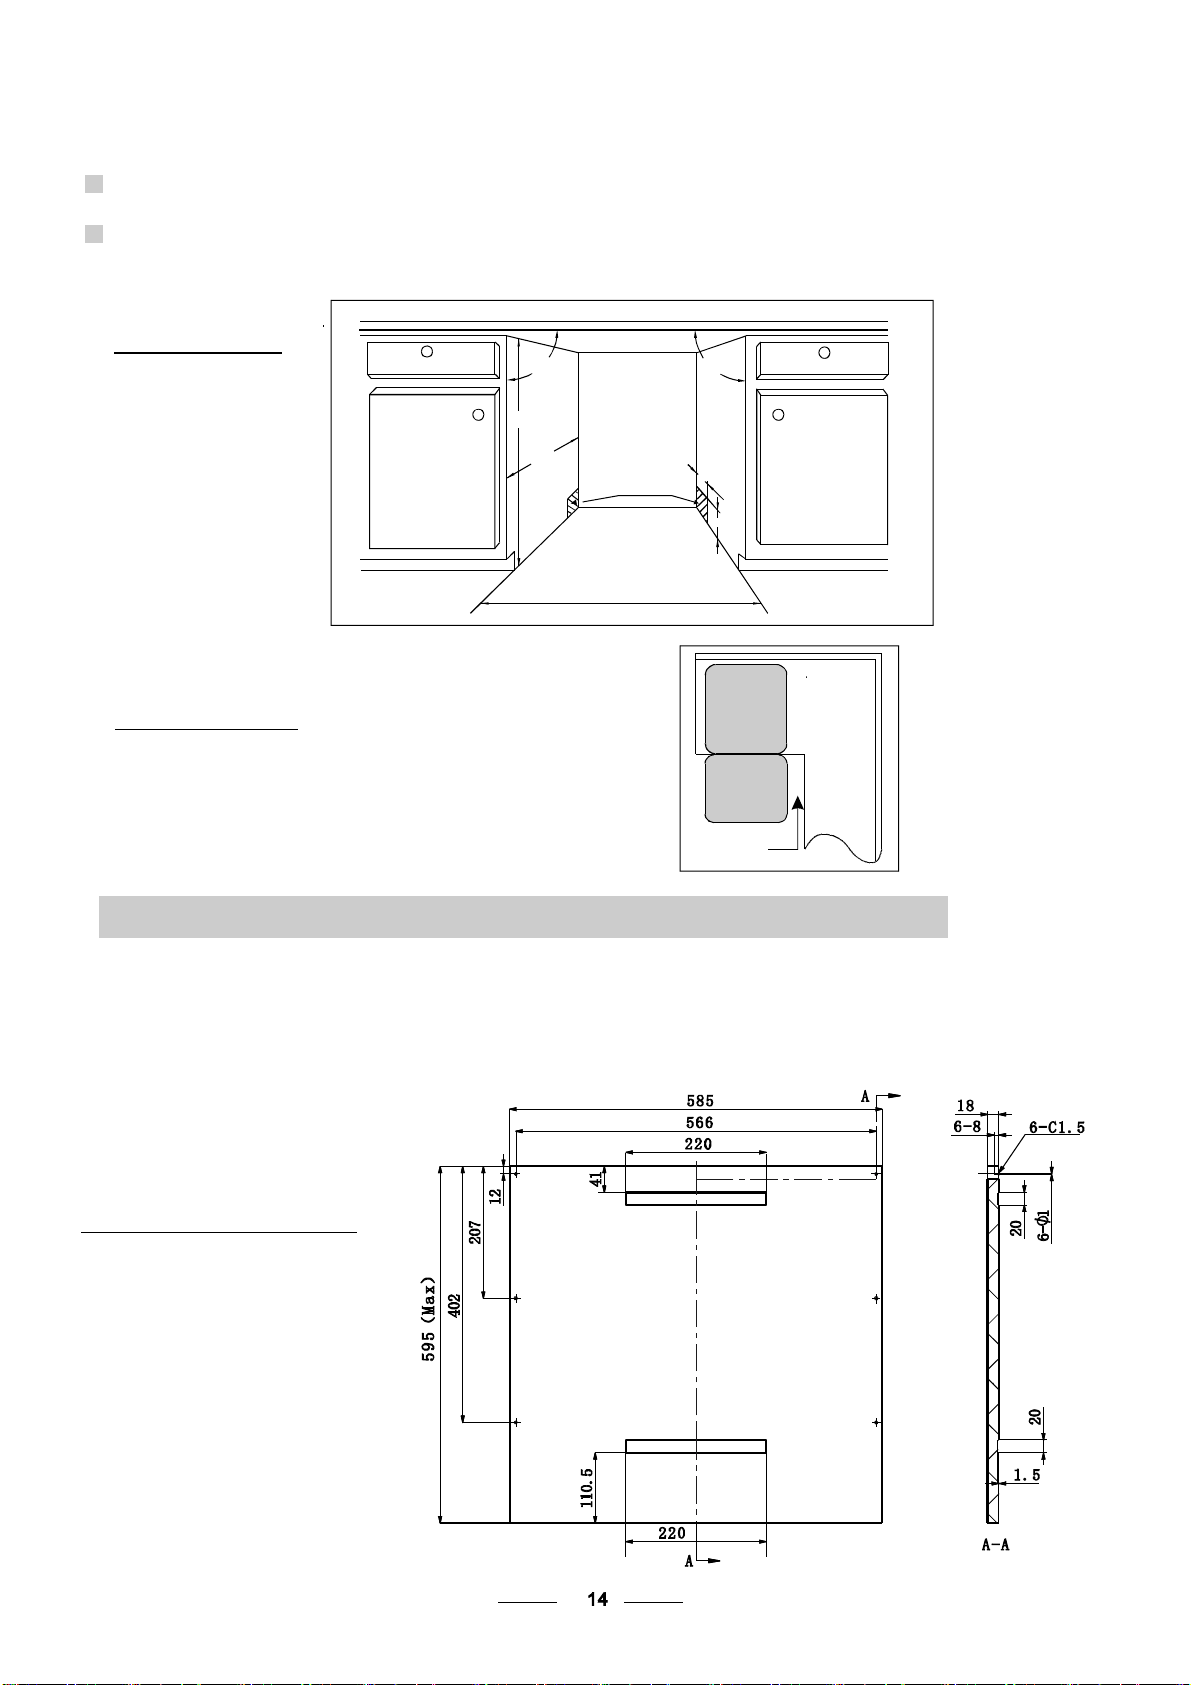
Preparations should be made before moving the dishwasher to the installation place.
Choose a place near the sink to facilitate the installation of inlet and drain hoses
(see figure 1).
If dishwasher is installed at the corner of the cabinet, there should be somespace
(illustrated in figure 2) when the door is opened.
2
1
Minimum space when
the door is opened
【Figure
2】
Cabinet dimensions
【Figure
1】
Cabinet
Dishwasher
Door of
dishwasher
Minimum space of 50mm
1
The aesthetic wooden panel could be processed according to the Figure 3.
The aesthetic panel should
be processed in accordance
with the illustrated dimensions
【Figure
3】
●
Aesthetic panel's dimensions and installation
Less than 5mm
between the top
of dishwasher and
cabinet and the
outer door aligned
to cabinet.
90 °
90 °
600 mm
820mm
100
580mm
80
Space between cabinet
bottom and floor
Electrical, drain and
water supply line
entrances
(Unit: mm)
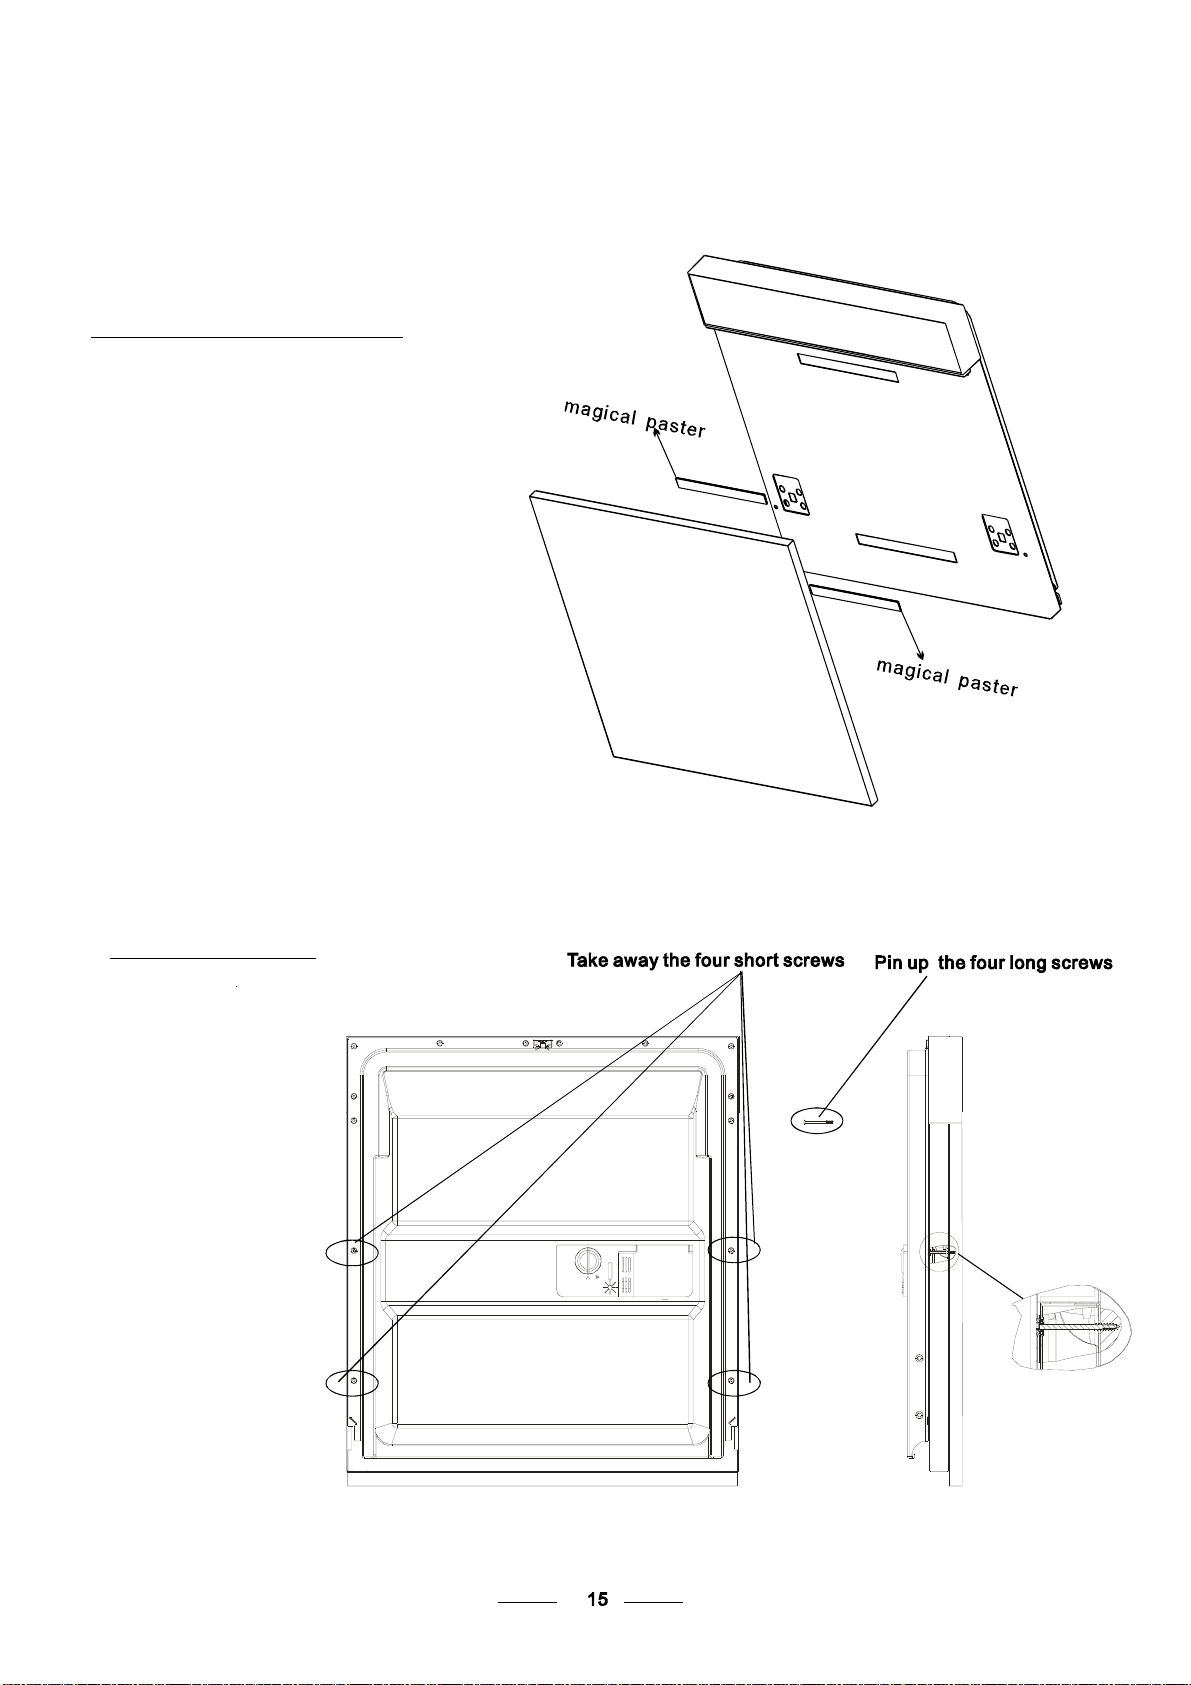
Installationof aesthetic panel
【】Figure 4a
2
magical paster Aand magical paster B bedisjoinedon,magical paster A on theaestheticwoodenpaneland
feltedmagical paster B of theo uterdoor of dishwasher(seef igure4a).Afterpositioning of the panel, fixthepanel
o nto the o u te r door by s cr ews an d bo lt s(S e e fi gu re 4 b)
Installationof aesthetic
woodenpanel
【】Figure4b
.take away the four
short scre ws
.pinupthefourlong
scre ws
1
2
Tension adjustment
ofthedoor spring
【】Figure5
Tensionadjustment of the door spring
●
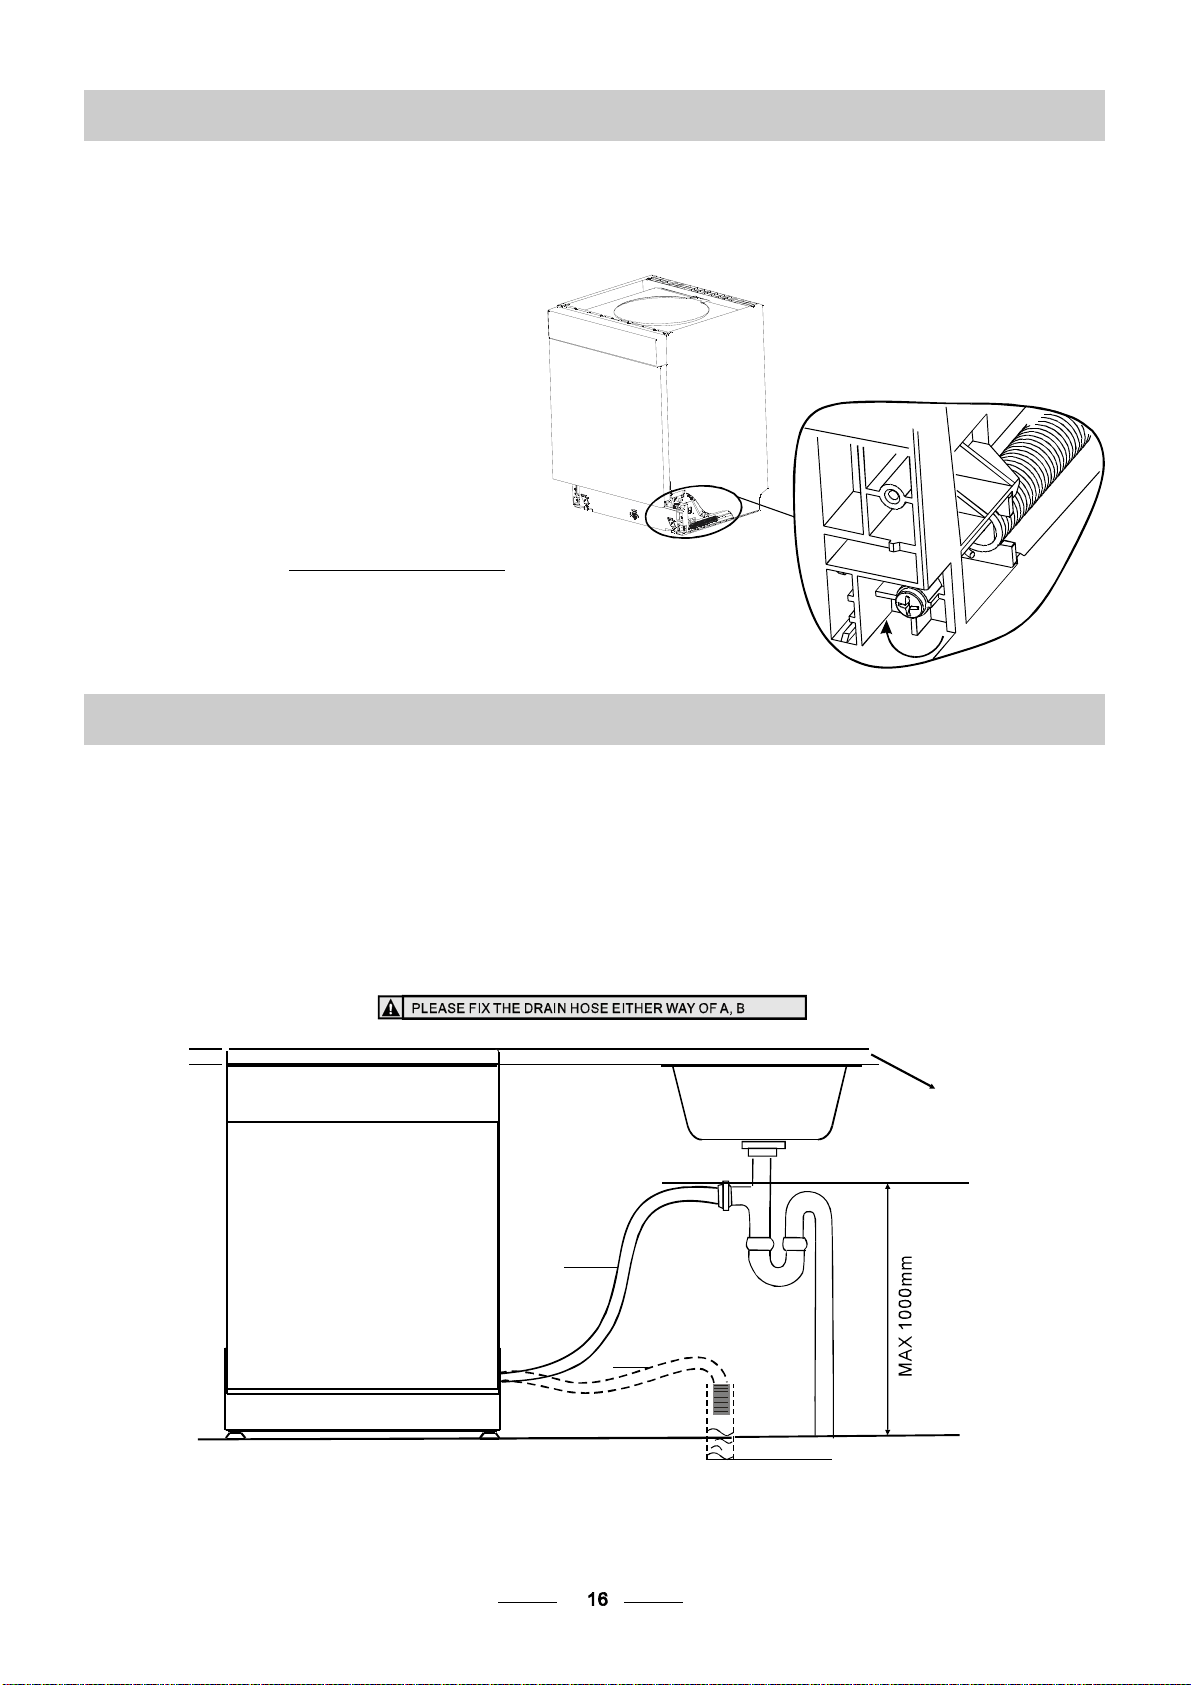
Connection of drainhoses
●
Thedoor springs areset atthe factoryto thepropertension forthe outerdoor.
If ae sth etic w oode n pa nel are ins tal led, y ou w ill ha ve to adj ust t he do or spring t ens ion.
Rotatethe adjusting screwtodrivethe adjustorto strainorrelax the steel cable
(seefigure5).
D oo r sp ri ng ten si on i sc orr ect wh en
the door remains horizontal inthe
fullyopenedposition yet rises
toaclosewiththeslightliftofa
finger.
,
Insert the dr ainh ose into ad rain p ipe with a minim umdiam eter of 4 0mm ,or l et i t run into thesink ,mak ing sur eto
avoidbendingorcrimping it.The topof the hosemust belessthan 1000mm.
A
Counter
Front
Drain pipe
NOTE
The top of the hose
must be l ess than
1000mm.
φ 40 mm
B
【Figure
7】
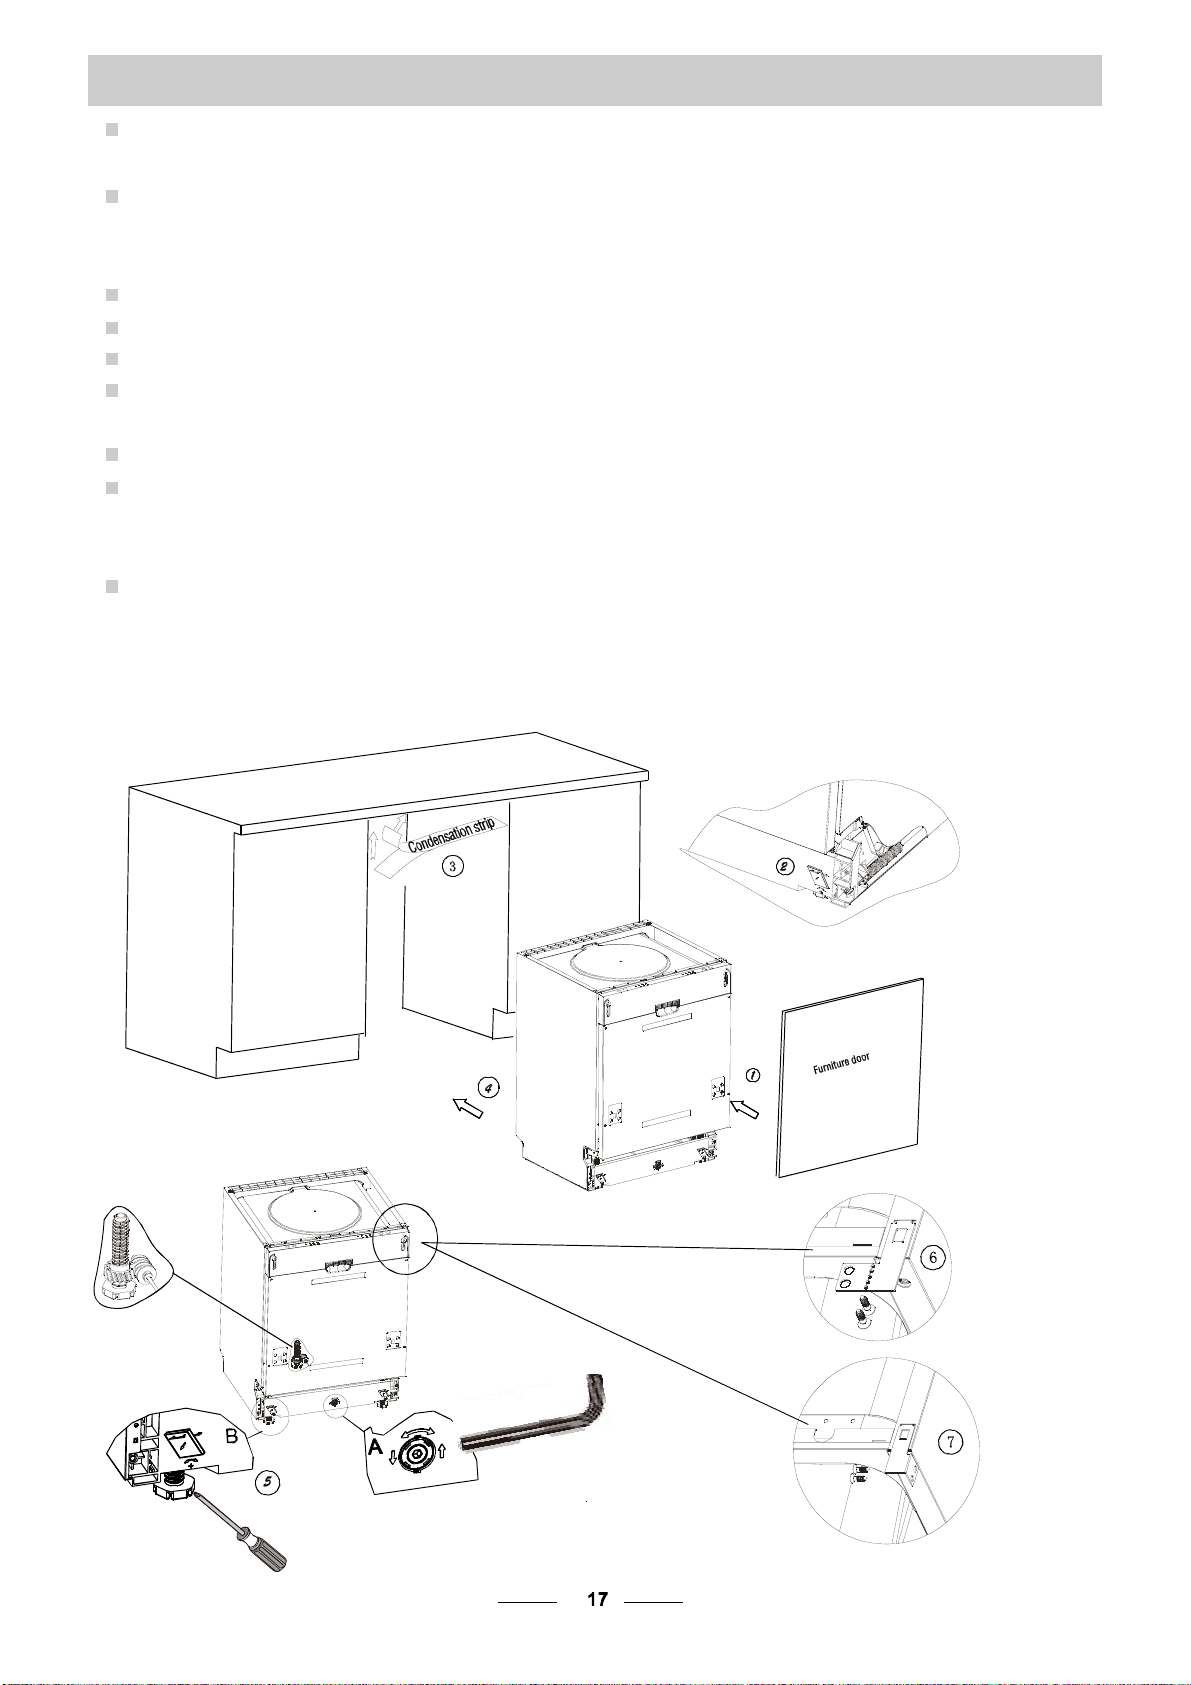
Dishwasher installation steps
●
1
2
.
3.
4.
5.
6
7
8
Install the furniture door to the outer door of the dishwasher using the brackets provided. Refer
to the template for positioning of the brackets.
Adjust the tension of the door springs by using an Allen key turning in a clockwise motion to
tighten the left and right door springs. Failure to do this could cause damage to your dishwasher
(Illustration 2)
Connect the inlet hose to the cold water supply
Connect the drain hose. Refer to diagram (Figure 6)
Connect the power cord
Affix the condensation strip under the work surface of cabinet. Please ensure the condensation
strip is flush with edge of work surface.
Place the dishwasher into position.(Illustration 4)
Level the dishwasher. The rear foot can be adjusted from the front of the dishwasher by turning
the Allen screw in the middle of the base of dishwasher use an Allen key (Illustration 5A). To adjust
the front feet, use a flat screw driver and turn the front feet until the dishwasher is level (Illustration 5B).
9 The dishwasher must be secured in place. There are two ways to do this:
A. Normal work surface:Put the right(left) installation hook into the slotoftheright(left)sideplaneand
secure it to the work surface with two woodscrews (Illustration 6).
B. Marble or granite work top:Bend the right(left) installation hook into right-angle,and put it into the
slot of the right(left) side plane and secure it to the work surface with two woodscrews s (Illustration 7)
.
Di shwa she rmus t be l evel fo r pr oper d ish ra ck op erat ion a nd wash p erfo rman ce.
Place a spirit levelondoor andrack trackinside the tubas shown to check thatthe
dishwasheris level.
levelthe dishwasherby adjusting the three levelling legs individually.
When levelthe dishwasher,please pay attentionnotto let thedishwashertip over.
1
2
3
I llus tration o ffeet adjus tment
【】Figure 8
NOTE:
Themaximum adjustment
heightofthefeet is50 mm.
This ap pliance must b ee arthed. In the e vent
of a malfunc tion or brea kdown, ear thing wil l
reduce t he risk of el ectrics hock by providing a
pathof leastresistance forthe electriccurrent.
This applian ce is eq uip ped with a cord ha vin ga n
equi pment-ea rthin g co nduct or a nd an ea rth ing
plug .T he plug must b eplu gged into an ap propriat e
out let t hati s in stalled and ear thed in accor dance
with al lloc als tanda rds a nd r equ iremen ts.
I mpr oper con necti on of th e equ ipme nt-
gro und ing con duc tor ca n re sul ti nth e ri sk
of an electric shock.C he ckwi th a q ualifi ed
electrician or servicer eprese ntativ eifyou
are i n d oubt w he ther t he app li an ce is pro p erl y
gro und ed. Do n ot mo di fy the pl ug p rov ided w ith
theappliance;Ifitisnotfit fortheoutlet.
Haveaproperoutlet installedbyaqualified
electrician.
Ensure thevoltageandfrequencyof thepower being correspondsto
thoseon the ratingplate. Onlyinsert thep lug into an electricalso cketwhichi searthed
prop erly. If th eel ectr ical sock et to w hich the a ppl iance m ust be conne cte dis not
appropriatefortheplug, replace thesocket, ratherthan usingaadaptorsorthe like as
th ey coul dca use ove rheating and bu rns.
Plea se look at th era ting label t o kno wth erat ingv olta ge a nd c onnect t hed ishwash erto t he app rop riate power s upp ly.
Use th er equi red fuse 10 am p, tim edelay fuse or c ircui tbre ak errec ommen ded and pr ov id e separate circ uit s erv ing
only this appl ianc e.
For personal safety:
DO NOTUSEANEXTENSION CORD ORANADAPTE RPLUG W ITHTHISAPPLIANCE.
DO N OT, UN DERANY CIRCUMS TANCES, CUTOR R EMOVET HE EART HING
CONNECTION FROM THE POWERCORD.
Check l evel si de to s ide
Spirit level
Check l eve l Fro nt to B ack
pleaseclosethehydrant afterusin g.
Positioning theAppliance
How to Drain Excess Water From Hoses
If the sink is 1000m m h igher f rom t he fl oor, the exce sswat eri nho ses cannot be dr aine ddi rect ly
into thesink.It willb enecessaryto drain excesswaterfromhosesintoa bowl orsuitable
conta iner th ati shel doutsi deand lo wer t hanthe sink.
Water Outlet
Connectthewaterdrain hose.Thedrain hose mustbecorrectlyfitted toavoid waterleaks.
En sure that the wat erin leth ose isno tki nked ors quashed .
Thefollowingthingsshouldbe checked before startingthe dishwasher.
Syphon Connection
Insert the dr ai n hose into ad rain pipe with a m ini mum di ameter o f 40mm, or l et it r un in toth esin k, m ak ing sure t o
av oid be n din g or c r im p ing it. Th e to p of t he hos e m u st be less than 10 00mm.
Thecontentofthis manual is veryhelpful to theusers.
After installation,please makesuretokeep thismanual.
Extension Hose
Ify oun eed adr ain hose exte nsi on,m ake sure to use a simil ar dra inho se.
Itm ust be no longer than 4 m etr es;o therwise the clea nin geff ect o fthe di shwashe rcou ldb ere duc ed.
1 Thedishwasher is level andfixedproperly
2 Theinletvalve is open
3 There is a leakage at theconnectionsof the conducts
4 Thewires aretightlyconnected
5 Thepowerisswitchedon
6 Theinlet and drain hosesare knotted
7 Allpackingmaterials andprintingsshouldbe takenout fromthe dishwasher
Connect the coldwater supply hose toathreaded3/4(inch) connectora ndmakesure
thatit is fas tened tigh tlyin place.
If thewater pipes arenew or have notbeen used for anextendedperiod oftime,letthe
water runto make sur e that the water is cl ear. Thisp recaution is needed to avoid the
riskofthe water inlet tobe blockedanddamagethe appliance.
Positi onthe app lianc ein the desi red loca tio n.T he back should rest against the wall behind i t, an dt hesi des,
along the adj acent cabin ets or wall s.The dish was heri s eq uipp edw ith wate r suppl y and drai nh oses th at can
bepositioned either tothe right orthe left sides to facilitatepro peri nstallation.
Fuse blown, or the
circuit breaker
has
been triggered
Replace fuse or reset circuit breaker. Remove any other
appliances sharing the same circuit with the dishwasher
Spil led rinse-aid
Always wipe up rinse-aid spills immediately.
Hard water minerals To clean the interior, use a damp sponge with
dishwasher detergent and wear rubber gloves.
Never use any other cleaner than dishwasher
detergent for the risk of foaming or suds.
Detergent with
colourant was used
Make sure that the detergent is the one without
colourant.
Improper detergent
Make sure the dishwasher is turned on and the door is
closed securely.
Check that the water supply is connected properly and
the water is turned on.
Make sure to close the door properly and latch it.
Make sure the power cord is properly plugged into the
wa ll socket.
Power supply is not
turned on
Water pressure is low
Door of dishwasher
not properly closed.
Kink in drain hose
Filt er clogged
Kitchen sink clogged
Check drai n hose.
Check coarse the filter
(see sectio n titled )" Cleaning The Filter "
Check the kitchen sink to make sure it is draining well.
If the prob lem is the kitchen sink not draining ,you may
need a plumber rather than a serviceman for dishwash ers.
Use only the special di shwasher detergen t to avoid suds.
If this occurs, open thedishwasher and let suds evaporate.
Add 1 gallon of cold water to the tub. Close and latch the
dishwasher, then select any cycle. Dishwasher will drain
outthe water at the first step.Open the door after draining
is stop and check if the suds has disappeared.
Repeat if necessary.
The affected items are
notcorrosion resistant.
Aspayarmis
knocking against
an item ina basket
r
Item s of crockery
are loose in the
wash cabinet
This may becaused
by o n-site ins t allati on
or the c ross-section of
the pipin g.
Interrupt the progra mme, and rearrange the items
wh ich are obstructing the sp ay arm.r
Interrupt the progra mme,
and rearrange the items of crockery.
This has no influence on the dishwasher function.
if in doubt, contact a suitably qualified plumber .
The items should be corrosion resistant.
The dishes were not
loaded correctly.
See notes in " Loading the Dishwasher Bask ets ".
Select a more intensive programme .
See" Wash Cycle Table ."
Use more detergent, or change your detergent.
Rearrange the items so that the sp ay can rotate freely.r
Clean and/or fit the filter combination correctly.
Clean the sp ay arm jets. See "Cleaning the Spray
Arms".
r
Use less detergent if you have soft water and select
a shortest cycle to wash the glassware and to get
them clean.
Use a mild abrasive cleaner to eliminate those marks.
Re-loading the dishes properly.
Load the dishwasher as suggested in the directions.
Increase the amount of rinse-aid/refill the rinse-aid
dispenser.
Do not empty your dishwasher immediately after
washing. Open the door slightl y so that the steam can
escape. Begin unloading the dishwasher only once t
he dishes are barely warm to the touch. Empty the lo w
basket first. This prevents water form dropping off
dishes in the upper basket.
In short program the washing temperature is lower.
This also lowers cleaning performance. Choose
a p rogram with a long washing time.
Water drainage is more d ifficult with these items.
Cutlery or dishes of this type are not suitable for
washing in the dishwasher.
The programme was
notpowerful enough.
Not eno ugh deter gent
was dispensed.
Items are blocking
the p ath of sp ay arms.r
The filter combination
inthebaseofwash
cabinet is not clean or
is not correctly fit t ed.
This may cause
the s p ay arm jets
to get blocke d.
r
Combination of soft
water and too much
detergent.
Aluminum utensils
have rubbed against
dishes.
Dishes block
detergent cups.
Improper loading
Too little rinse-aid
Dishes are removed
too s oon
Wrong program
has been selected
Use of cutlery with
a low-quality coating
Overflow.
Whe n s o me malfunctions come on, th e appliance will displ ay error code s to warn you:
Longer inlet time.
F a ucets is not opened, or water intake is
restricted,or water pressure is too low.
Some element of dishwasher leaks .
T heR a pid light fl ic ke r fle et ly
T he Gla ss l ig htf lic ke r fle et ly
If overflow occu rs, turn off the main water supply before calling a service.
If there is water in the base pan because of an overfill or small l eak,
the water should be removed before restarting the dishwasher .
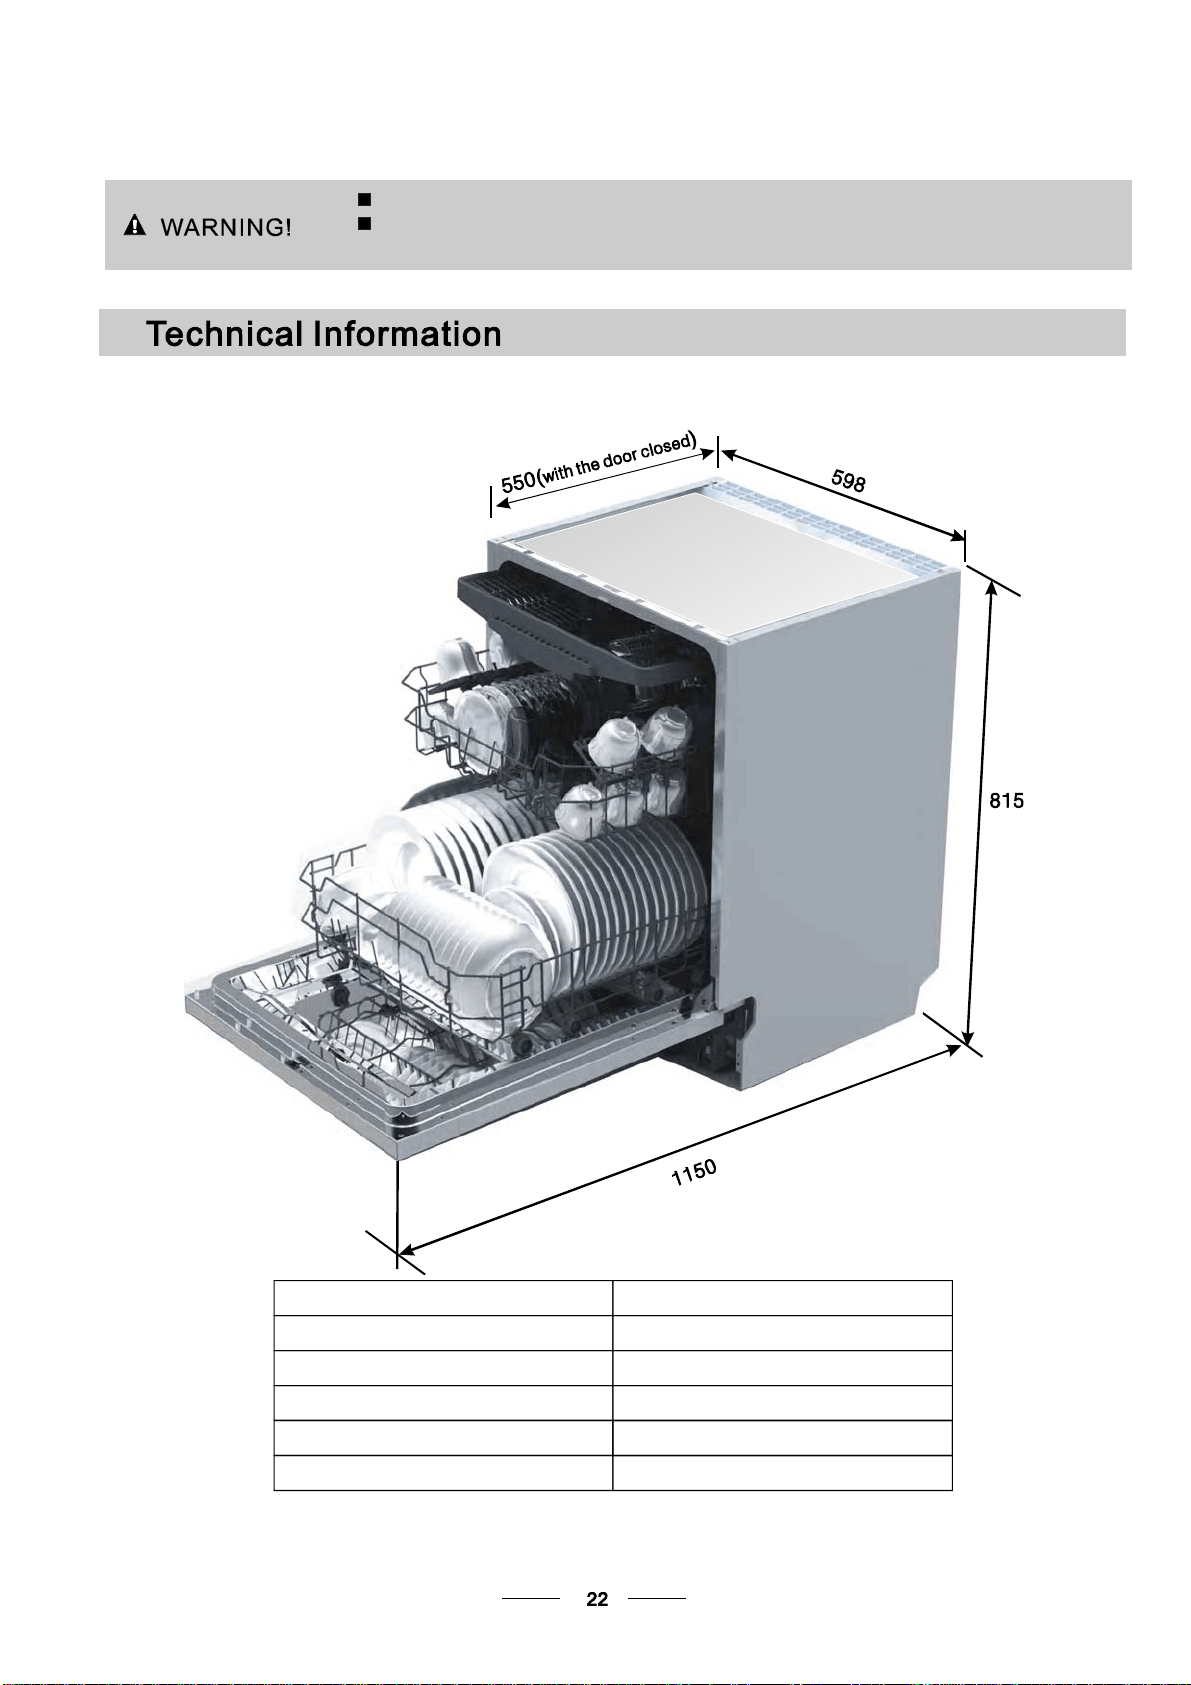
Height : 815mm
Width : 598mm
Depth : 550mm
()
with the door clo sed
Water pressure: 0.04-1.0MPa
Power supply: see rating label
Capacity: 14place settings