
www.lg.com
OWNER’S MANUAL
GAS RANGES
Please read this guide thoroughly before operating
and keep it handy for reference at all times.
LRG3093ST
LRG3093SB
LRG3093SW
MFL63261002 (REV.08 140522)
ENGLISH FRANÇAIS

INTRODUCTION
2
THANK YOU!
Congratulations on your purchase
and welcome to the LG family.
Your new LG Gas Range
combines precision cooking
features with simple operation and
stylish design. By following the
operating and care instructions
in this manual, your range will
provide you with many years of
reliable service.
Product Registration Information
Model:
Serial Number:
Date of Purchase:
IMPORTANT SAFETY INFORMATION
Important Safety Instructions. .........................................3
What to Do if You Smell Gas. .........................................3
Anti-Tip Device.............................................................3-4
Basic Safety Precautions.............................................4-8
OPERATING INSTRUCTIONS
Parts and Features..........................................................9
Using the Gas Surface Burners ..............................10-11
Control Panel—LRG3093S...........................................12
Using the Oven ......................................................13–16
Using the Clock and Timer............................................17
Using the Timed Baking Features...........................18–19
Setting the Warm Feature ............................................20
Setting the Proof Feature .............................................20
Special Features of Your Oven Control ..................21–22
Using the Self-Cleaning Oven.................................23–24
CARE AND CLEANING OF THE RANGE
Care and Cleaning ........................................................25
Burner Caps and Heads................................................26
Burner Grates................................................................27
Cooktop Surface ...........................................................27
Stainless Steel Surfaces ...............................................28
Oven Air Vents..............................................................28
Control Panel ................................................................28
Front Manifold Panel and Knobs...................................28
Oven Door.....................................................................29
Oven Bottom .................................................................30
Broiler Pan and Grid......................................................30
Oven Racks...................................................................31
Oven Light Replacement...............................................31
Removing & Replacing the storage drawer...................32
TROUBLESHOOTING
Before Calling for Service ........................................33-36
WARRANTY
Product Registration Information...................................37
IMPORTANT SAFETY INFORMATION
3
READ ALL INSTRUCTIONS BEFORE USE
WARNING
• ALL RANGES CAN TIP
• INJURY TO PERSONS
COULD RESULT
• INSTALL ANTI-TIP DEVICES
PACKED WITH RANGE
• SEE INSTALLATION
ANTI-TIP DEVICE
I
I
M
M
P
P
O
O
R
R
T
T
A
A
N
N
T
T
S
S
A
A
F
F
E
E
T
T
Y
Y
I
I
N
N
S
S
T
T
R
R
U
U
C
C
T
T
I
I
O
O
N
N
S
S
Read and follow all instructions before using your oven to prevent the risk of fire, electric shock, personal injury, or
damage when using the range. This guide do not cover all possible conditions that may occur. Always contact your
service agent or manufacturer about problems that you do not understand.
This symbol will alert you to hazards or unsafe practices which could cause serious bodily
harm or death.
This is the safety alert symbol. This symbol alerts you to potential hazards that can kill or hurt you and
others. All safety messages will follow the safety alert symbol and either the word “WARNING” or
“CAUTION”.
This symbol will alert you to hazards or unsafe practices which could cause bodily injury or
property damage.
WARNING
CAUTION
WHAT TO DO IF YOU SMELL GAS
• Open windows.
•
DO NOT
try to light any appliance.
•
DO NOT
touch any electrical switch.
•
DO NOT
use any phone in your building.
• Immediately call your gas supplier from a
neighbor’s phone. Follow the gas supplier’s
instructions.
• If you cannot reach your gas supplier, call the
fire department.
Installation and service must be performed
by a qualified installer, service agency or the
gas supplier.
WARNING:
If the information in this manual is not followed exactly, a fire or
explosion may result causing property damage, personal injury or death.
• DO NOT store or use gasoline or other flammable vapors and liquids in the vicinity of this or any
other appliance.
ENGLISH
4
IMPORTANT SAFETY INFORMATION
READ ALL INSTRUCTIONS BEFORE USE
IMPORTANT SAFETY NOTICE
Enforcement Act requires the Governor of California
to publish a list of substances known to the state to
cause birth defects or other reproductive harm, and
requires businesses to warn customers of potential
exposure to such substances.
Gas appliances can cause minor exposure to four of
these substances, namely benzene, carbon
monoxide, formaldehyde and soot, caused primarily
by the imperfect combustion of natural or LP gas.
Correctly adjusted burners, indicated by a bluish
rather than a yellow flame, will minimize imperfect
combustion. Exposure to these substances can be
minimized by opening windows or using a ventilation
fan or hood.
SAFETY PRECAUTIONS
Have the installer show you the location of the range gas shut-off valve and how to
shut it off if necessary.
• Make sure your range is properly installed and
grounded by a qualified installer, according to the
installation instructions. Any adjustment and service
should be performed only by qualified gas range
installers or service technicians.
• Plug your range into a 120-volt grounded outlet only.
Do not remove the round grounding prong from the
plug. If in doubt about the grounding of the home
electrical system, it is your personal responsibility
and obligation to have an ungrounded outlet
replaced with a properly grounded, three-prong
outlet in accordance with the National Electrical
Code. Do not use an extension cord with this range.
• DO NOT use an adapter plug, an extension cord, or
remove grounding prong from electrical power cord
to prevent fire hazard or electrical shock. Failure to
follow this warning can cause serious injury, fire or
death.
• To prevent poor air circulation, place the range out
of kitchen traffic path and out of drafty locations.
• DO NOT attempt to repair or replace any part of
your range unless it is specifically mentioned in this
manual. All other service should be referred to a
qualified technician.
• Make sure all packaging materials are removed from
the range before operating it to prevent fire or
smoke damage should the packaging material
ignite.
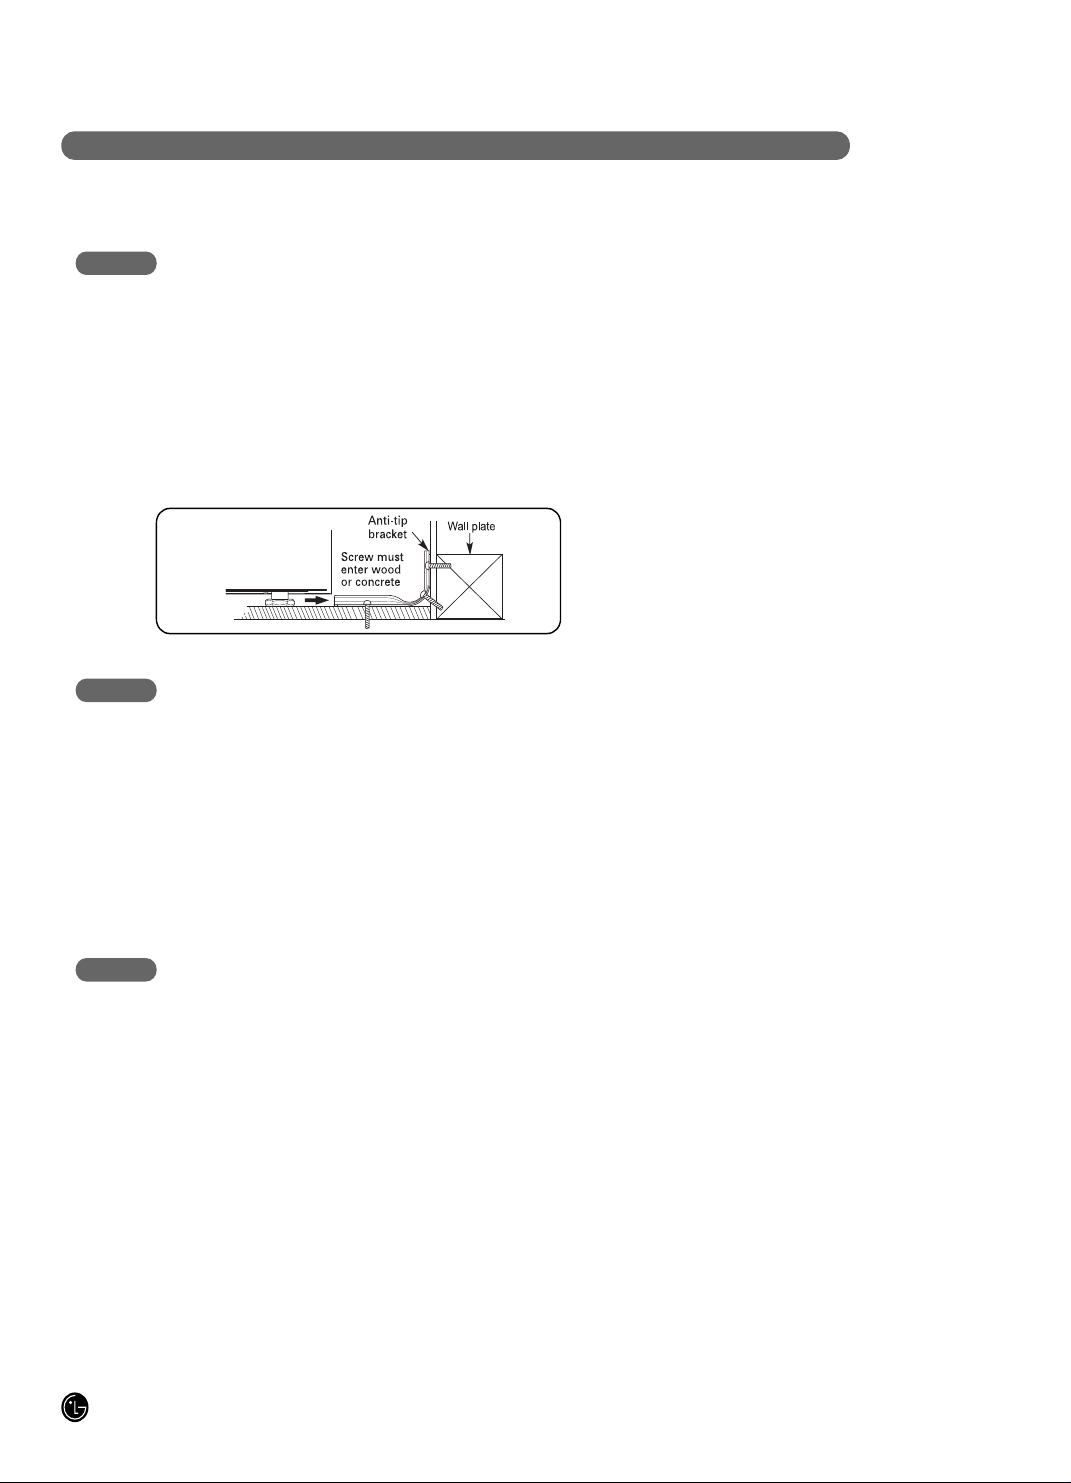
• DO NOT step or sit on the door. Install the Anti-
Tip Bracket packed with range.
- The range could be tipped and injury might result
from spilled hot liquid, food, or the range itself.
- If the range is pulled away from the wall for cleaning,
service, or any other reason, ensure that the Anti-Tip
Device is properly reengaged when the range is
pushed back against the wall.
• To reduce the risk of tipping of the range, the range
must be secured by properly installing anti-tip
devices.
• To check that the anti-tip bracket is properly installed:
Grasp the top rear edge of the range back guard and
carefully attempt to tilt it forward. Verify that the anti-
tip devices are engaged.
• Warming drawer or Storage drawer : Remove drawer
and visually inspect that the rear leveling leg is fully
inserted into the anti-tip bracket.
• Refer to the installation manual for proper anti-tip
bracket installation.
ANTI-TIP DEVICE
(continued)

• Make sure your range is properly adjusted by a
qualified service technician or installer for the type of
gas (natural or LP) that is to be used. Your range
can be converted for use with either type of gas.
See the installation instructions.
• After using your range for a long time, high floor
temperatures may result and many floor coverings
will not withstand this kind of use.
Never install the range over vinyl tile or linoleum that
cannot withstand such type of use. Never install it
directly over interior kitchen carpeting.
• DO NOT leave children alone or unattended where
a range is hot or in operation. They could be
seriously burned.
• DO NOT let anyone climb, stand or hang on the
oven door, warming drawer or cooktop. They could
damage the range and even tip it over, causing
severe personal injury.
• NEVER wear loose fitting or hanging garments while
using the appliance. Be careful when reaching for
items placed in cabinets over the range. Flammable
material could be ignited if brought in contact with
flame or hot oven surfaces and may cause severe
burns.
• DO NOT place flammable materials in an oven, a
warming drawer or near a cooktop.
• DO NOT place or use combustible materials such as
gasoline or other flammable vapors and liquids in
the vicinity of this or any other appliance.
• DO NOT allow cooking grease or other flammable
materials in or near the range.
• DO NOT use water on grease fires. Never touch a
flaming pan. Turn the controls off. Smother a flaming
pan on a surface burner by covering the pan
completely with a well-fitting lid, cookie sheet or flat
tray. Use a multi-purpose dry chemical or foam-type
fire extinguisher.
A grease fire can be put out by covering it with
baking soda or, if available, by using a multi-purpose
dry chemical or foam-type fire extinguisher.
Flame in the upper oven or lower oven drawer can
be smothered completely by closing the oven door
or drawer and turning the control to off or by using a
multi-purpose dry chemical or foam-type fire
extinguisher.
• DO NOT use the oven or the drawer for storage.
• Let the burner grates and other surfaces cool before
touching them.
• NEVER block the vents (air holes) of the range.
They provide the air inlet and outlet that are
necessary for the range to operate properly with
correct combustion. Air openings are located at the
rear of the cooktop, at the top and bottom of the
oven door, and at the bottom of the range under the
warming drawer.
• Large scratches or impacts to glass doors can lead
to broken or shattered glass.
• Stepping, leaning or sitting on the doors or drawers
of this range can result in serious injuries and also
cause damage to the range. Do not allow children to
climb or play around the range. The weight of a child
on an open door may cause the range to tip,
resulting in serious burns or other injury.
• Leak testing of the appliance shall be conducted
according to the manufacturer’s instructions.
IMPO RTANT SAFE TY INFORM AT I O N
5
SAFETY PRECAUTIONS
(continued)
WARNING:
NEVER use your
range as a space heater to heat or warm the room.
Doing so may result in carbon monoxide poisoning
and overheating of the oven.
CAUTION:
Items of interest to
children should not be placed in cabinets above a
range or on the backsplash of a range—children
climbing on the range to reach items could be
seriously injured.
READ ALL INSTRUCTIONS BEFORE USE
WARNING:
These adjustments
must be done by a qualified service technician
according to the manufacturer’s instructions and all
codes and requirements of the authority having
jurisdiction. Failure to follow these instructions
could result in serious injury or property damage.
The qualified agency performing this work
assumes responsibility for the conversion.
ENGLISH
6
IMPORTANT SAFETY INFORMATION
READ ALL INSTRUCTIONS BEFORE USE
SURFACE BURNERS
• NEVER leave the surface burners unattended at
high flame settings. Boilovers cause smoking and
greasy spillovers that may catch on fire.
• Always turn knob to the “LITE” position when
igniting the top burners and make sure the burners
have ignited.
• Control the top burner flame size so it does not
extend beyond the edge of the cookware. Excessive
flame is hazardous.
• Use only dry pot holders—moist or damp pot
holders on hot surfaces may result in burns from
steam. Do not let pot holders come near open
flames when lifting cookware. Do not use a towel or
other bulky cloth Instead of a pot holder.
• Using glass cookware—make sure it is designed for
top-of-range cooking.
• To prevent burns, ignition of flammable materials
and spillage, turn cookware handles toward the side
or back of the range without extending over adjacent
burners.
• NEVER place any items on the cooktop. The hot air
from the vent may ignite flammable items and will
increase pressure in closed containers, which may
cause them to burst.
• Carefully watch foods being fried at a high flame
setting.
• Always heat fat slowly, and watch as it heats.
• If frying combinations of oils and fats stir together
before heating.
• Use a deep fat thermometer if possible to prevent
overheating fat beyond the smoking point.
• Use the least possible amount of fat for effective
shallow or deep-fat frying. Filling the pan too full of
fat can cause spillovers when food is added.
• DO NOT flame foods on the cooktop.
• DO NOT use a wok on the surface burners if the
wok has a round metal ring that is placed over the
burner grate to support the wok. This ring acts as a
heat trap, which may damage the burner grate and
burner head. Also, it may cause the burner to work
improperly. This may cause a carbon monoxide
level above that allowed by current standards,
resulting in a health hazard.
• Foods for frying should be as dry as possible. Frost
or moisture on foods can cause hot fat to bubble up
and over the sides of the pan.
• NEVER try to move a pan of hot fat, especially a
deep fat fryer. Wait until the fat is cool.
• DO NOT place plastic items on the cooktop—they
may melt if left too close to the vent.
• Keep all plastics away from the surface burners.
• To prevent burns, always be sure that the controls
for all burners are at the “OFF” position and all
grates are cool before attempting to remove them.
• If you smell gas, turn off the gas to the range and
call a qualified service technician. Never use an
open flame to locate a leak.
• Always turn knob to the “OFF” position before
removing cookware.
• DO NOT lift the cooktop. Lifting the cooktop can
cause damage and improper operation of the range.
• If range is located near a window, do not hang long
curtains that could blow over the surface burners
and catch on fire.
WARNING:
• If the top burner flame goes out, gas is still flowing
to the burner until the knob is turned to the “OFF”
position. Do not leave the burners “ON”
unattended.
• Use proper pan size - DO NOT use pans that are
unstable or easily tipped. Select cookware having
flat bottoms large enough to cover burner grates.
To avoid spillovers, make sure cookware is large
enough to contain the food properly. This will both
save cleaning time and prevent hazardous
accumulations of food, since heavy spattering or
spillovers left on range can ignite. Use pans with
handles that can be easily grasped and remain
cool.

I M P O RTANT SAFETY I NFORMATION
7
READ ALL INSTRUCTIONS BEFORE USE
SELF-CLEANING OVEN
• Make sure to wipe off excess spillage before self-
cleaning operation.
• DO NOT use oven cleaners. No commercial oven
cleaner or oven liner protective coating of any kind
should be used in or around any part of the oven.
Residue from oven cleaners will damage the inside
of the oven when the self-clean cycle is used.
• Oven racks and accessories should be removed
from the oven before self clean is started. Also
remove any items placed in the bottom drawer
before starting a self clean cycle.
• Clean only parts listed in this manual.
• DO NOT clean the door gasket. The door gasket is
necessary for a good seal. Care should be taken not
to rub, damage or move the gasket.
• If the self-cleaning mode malfunctions, turn the
range off and disconnect the power supply. Let it
serviced by a qualified technician.
COOK MEAT AND POULTRY THOROUGHLY
Cook meat and poultry thoroughly—meat to at least
an INTERNAL temperature of 160°F and poultry to at
least an INTERNAL temperature of 180°F.
To protect against foodborne illness, cook them to
these temperatures.
ENGLISH

8
IMPORTANT SAFETY I NFOR M AT I O N
READ ALL INSTRUCTIONS BEFORE USE
OVEN
When opening the door of a hot oven, stand away from the range. The hot air and steam that
escape can cause burns to hands, face and eyes.
READ AND FOLLOW THIS SAFETY INFORMATION CAREFULLY.
SAVE THESE INSTRUCTIONS
• DO NOT heat closed food containers.
Pressure could increase and the container could
burst, causing an injury.
• DO NOT use aluminum foil anywhere in the oven
except as described in this manual.
Doing so could create a fire hazard or cause
damage to the range.
• DO NOT use the oven for a storage area.
Items stored in the oven can catch on fire.
• Keep the oven free from grease buildup.
• Insert the oven racks in the desired position while
the oven is cool.
• To prevent burns when removing food, slide racks
out until the stop engages, then remove food items.
It is also a precaution against burns from touching
hot surfaces of the door or oven walls.
• When placing or removing griddle always wear oven
mitts.
• When using cooking or roasting bags in the oven,
follow the manufacturer’s directions.
• Use only glass cookware that is recommended for
use in gas ovens.
• Always remove the broiler pan from the range after
you finish broiling. Grease left in the pan can catch
fire if oven is used without removing the grease from
the broiler pan.
• When broiling, if meat is too close to the flame, the
fat may ignite. To prevent excessive flare-ups, trim
excess fat.
• Make sure the broiler pan is in place correctly to
minimize the possibility of grease fires.
• If you should have a grease fire in the broiler pan,
press the “CLEAR OFF” pad, and keep the oven
door closed to contain fire until it burns out.
• For safety and better cooking performance, always
bake and broil with the oven door closed.
WARNING:
NEVER block any
slots, holes or passages in the oven bottom
or cover an entire rack with materials such as
aluminum foil. Doing so blocks air flow
through the oven and may cause carbon
monoxide poisoning. Aluminum foil linings
may also trap heat, causing a fire hazard.
NOTE: Open door baking or broiling can cause
damage to the knobs or valves.
DO NOT LEAVE THE OVEN DOOR OPEN DURING
COOKING OR COOL DOWN.

OPER AT I N G INS T RUCTI ONS
9
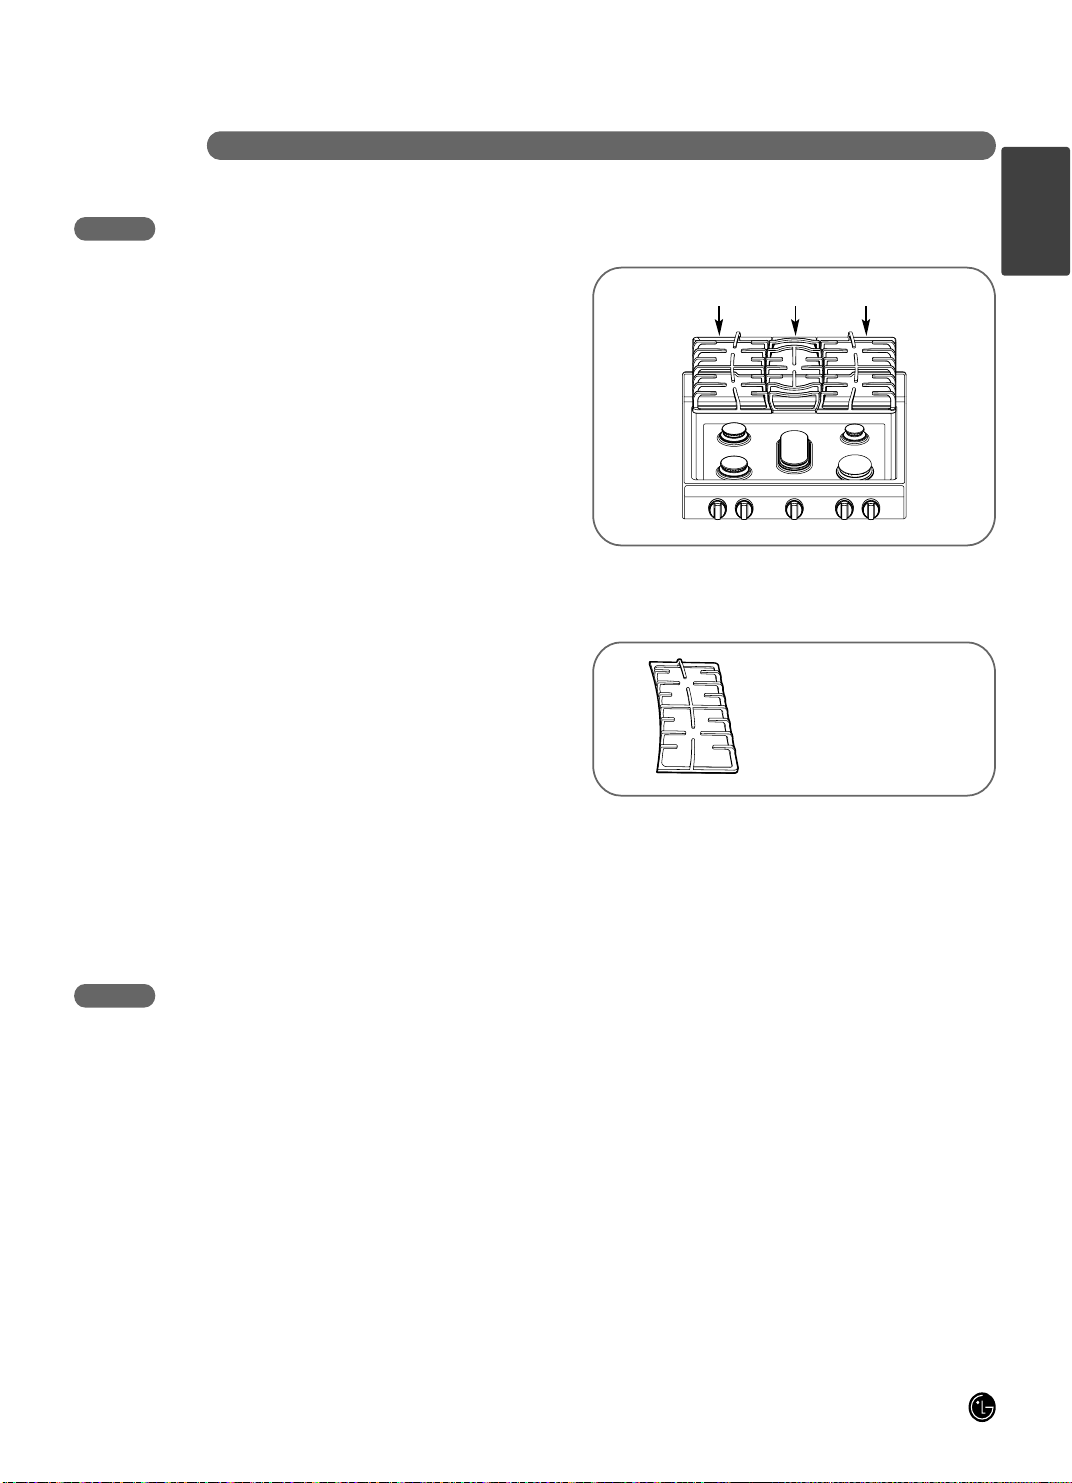
PARTS AND FEATURES
Oval burner
Medium burner
Large burner
Knobs (5 ea)
Broiler pan & Grid
Gasket
Anti-tip bracket
Model and serial
number plate
Storage door
Oven door
Oven vent
Grates
Small burner
Extra large burner
Automatic oven
light switch
Self clean latch
Standard racks
Standard racks
Template Anchors (6 ea)
pit-itnA )ae 6( swercS
nap reliorBdirG
Standard racks (2ea)
ENGLISH
10
OPERATING INSTRUCTIONS
USING THE GAS SURFACE BURNERS
Throughout this manual, features and appearance may vary from your model.
• Make sure all grates on the range are properly
placed before using any burner.
• Be sure the burners and grates are cooled down
before you place your hand, a pot holder, cleaning
cloths or other materials on them.
• Make sure all burners are in place.
• DO NOT operate the burner for an extended period
of time without cookware on the grate.
The finish on the grate may chip without cookware
to absorb the heat.
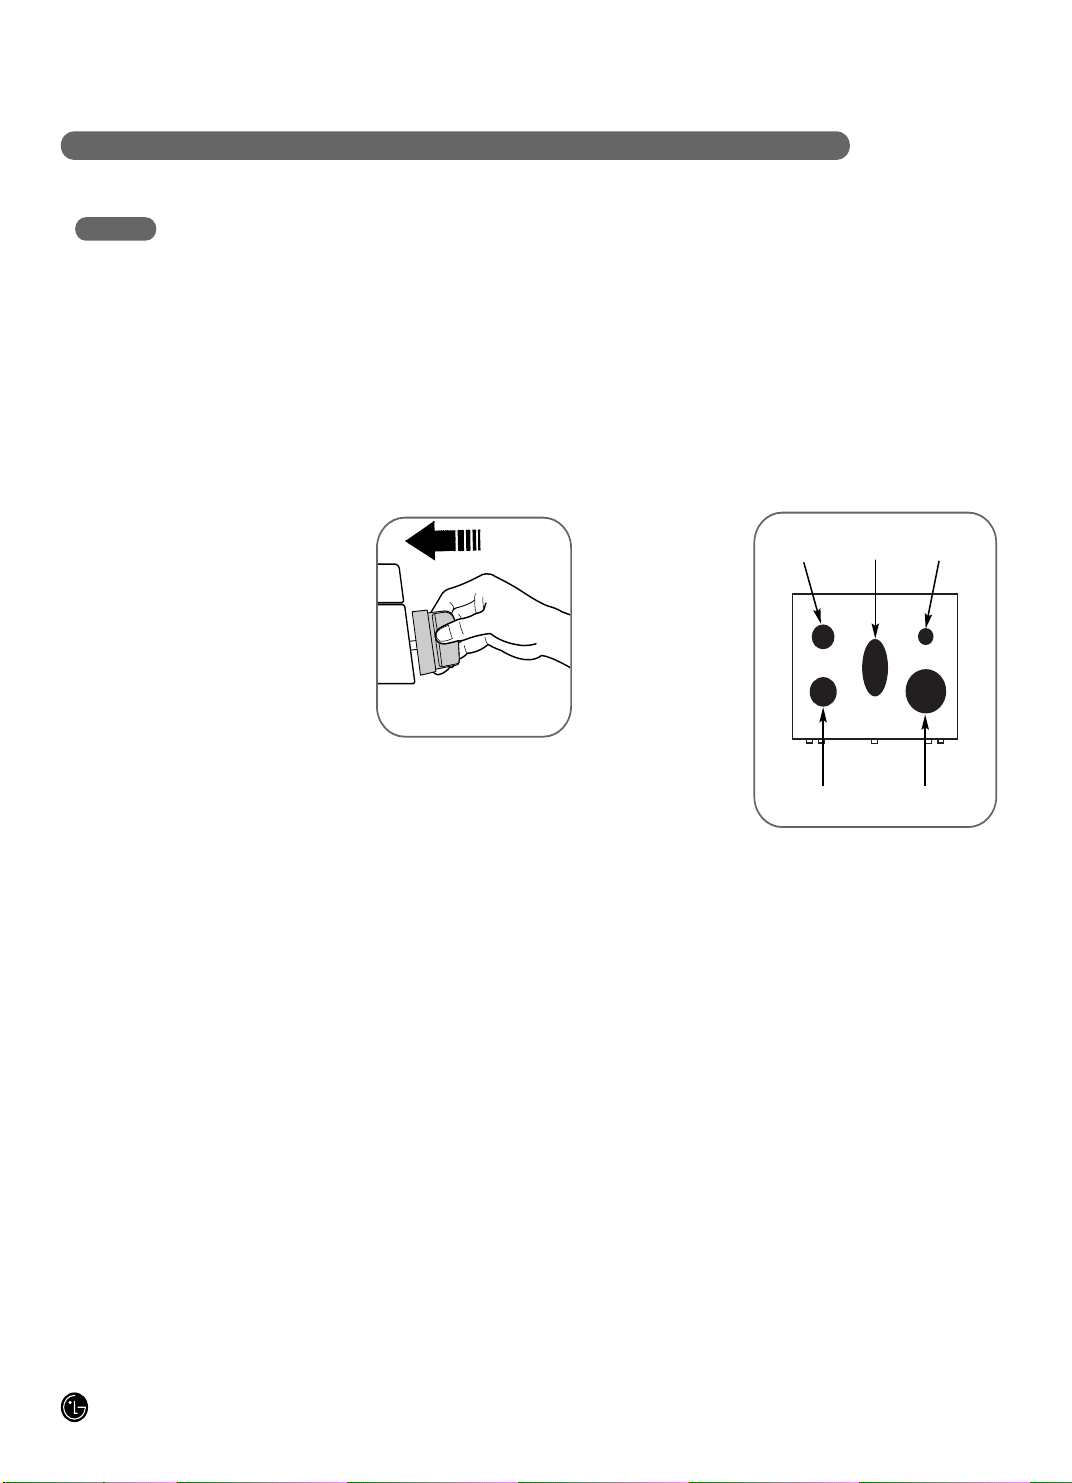
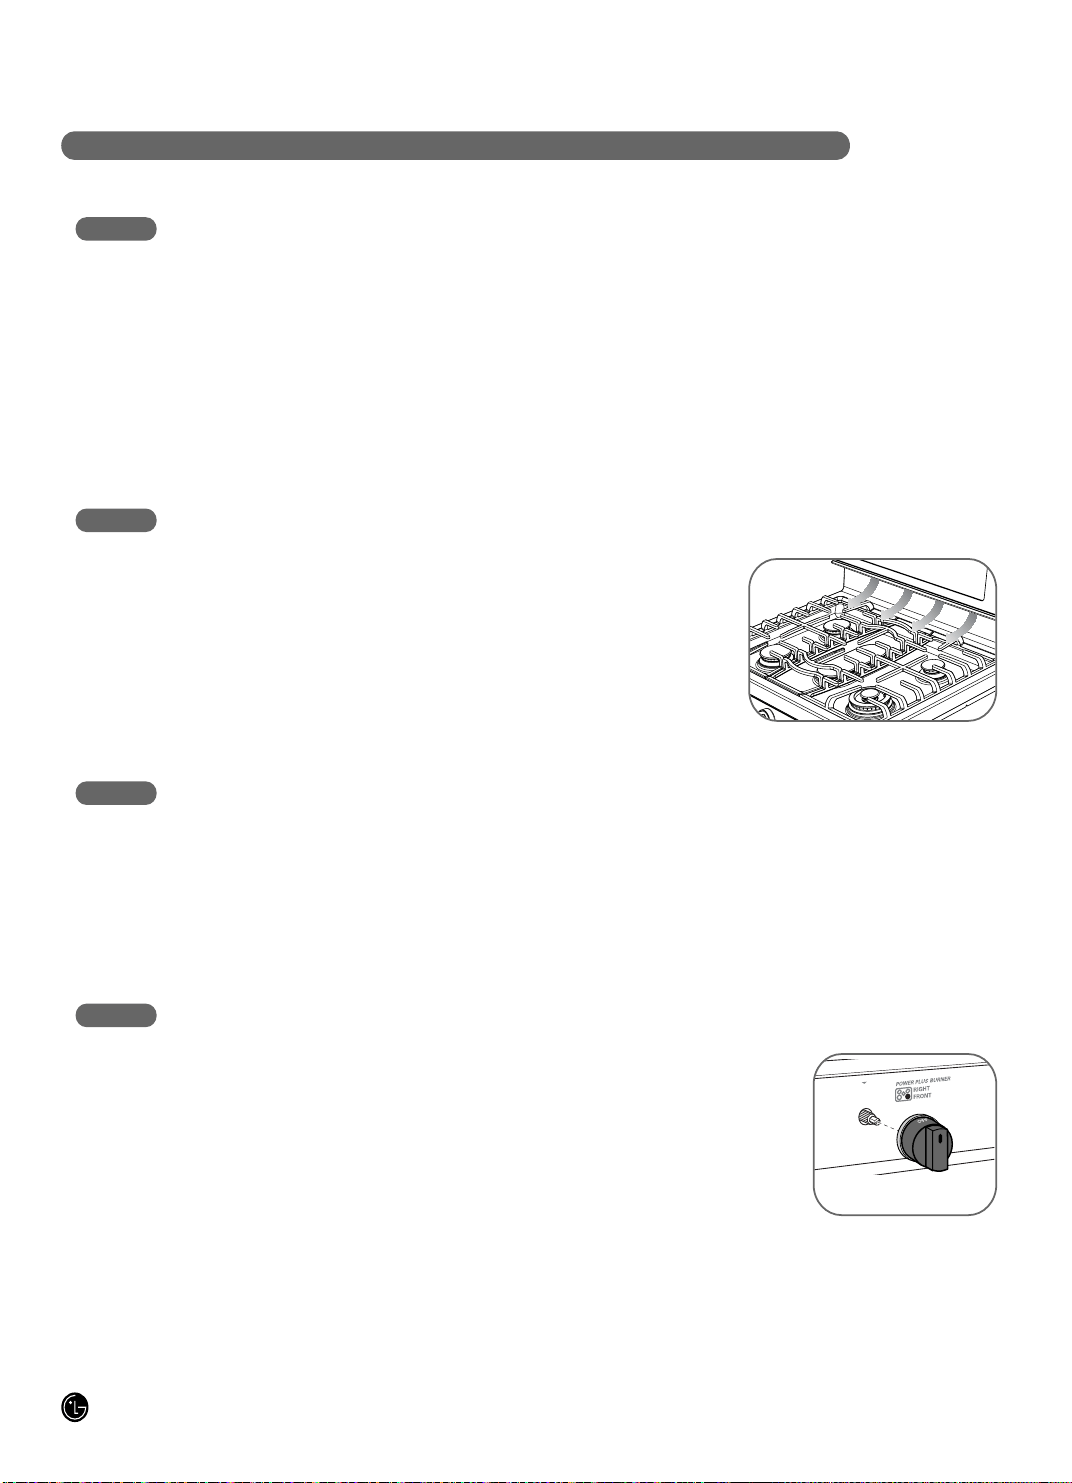
HOW TO LIGHT A GAS SURFACE BURNER
• Be sure all the surface
burners are placed in their
respective positions.
• Push the control knob in
and turn it to the “LITE”
position.
• You will hear a little
clicking noise— the
sound of the electric
spark igniting the burner.
• To control the flame size, turn the knob. If the knob
stays at “LITE”, it will continue to click.
• When turning a burner to “LITE”, all the burners
spark. Do not attempt to disassemble or clean
around any burner while another burner is on. An
electric shock may result, which could cause you to
knock over hot cookware.
IN CASE OF POWER FAILURE
In case of a power failure, you can light the gas
surface burners on your range with a match.
Hold a lit match to the burner, then push in and turn
the control knob to the “LITE” position. Use extreme
caution when lighting burners this way.
Surface burners in use when an electrical power
failure occurs will continue to operate normally.
SEALED GAS BURNERS
Your gas range
cooktop has five
sealed gas burners.
They offer
convenience,
cleanability and
flexibility to be used
in a wide range of
cooking applications.
The smallest burners
are in the right rear
position.
This burner can be
turned down to a low
simmer setting.
It provides precise cooking performance for delicate
foods such as sauces or foods that require low heat
for a long cooking time.
The medium (left rear) and the large (left front)
burners are the primary burners for most cooking.
These general-purpose burners can be turned down
from “HI” to “LO” to suit a wide range of cooking
needs.
The extra large burner (right front) is the maximum
output burner. Like the other four burners, it can be
turned down from “HI” to “LO” for a wide range of
cooking applications.
This burner is also designed to quickly bring large
amounts of liquid to a boil. It can be used with
cookware 10 inches or larger in diameter.
The oval burner (center) is for use with a griddle or
oval pots.
NOTE: The right front burner, by design, is raised up
from the cooktop. This is normal.
Push the control knob in and
turn it to the “LITE” position.
Medium
Large
Oval
Extra Large
Small
O P E R AT I N G IN S T RU CTIONS
11
USING THE GAS SURFACE BURNERS
HOW TO SELECT FLAME SIZE
NEVER let the flames extend up the sides of the
cookware for safe handling of cookware.
Watch the flame, not the knob, as you reduce heat.
When fast heating is desired, the flame size on a gas
burner should match the cookware you are using.
Flames larger than the
bottom of the cookware
will not result in faster
heating of the
cookware and could be
hazardous.
TOP-OF-RANGE COOKWARE
Aluminum: Medium-weight cookware is
recommended because it heats quickly and evenly.
Most of the foods brown evenly in an aluminum skillet.
Use saucepans with tightfitting lids when cooking with
minimum amounts of water.
Cast-Iron: If heated slowly, most skillets will give
satisfactory results.
Stainless Steel: This metal alone has poor heating
properties and is usually combined with copper,
aluminum or other metals for improved heat
distribution. Combination metal skillets usually work
satisfactorily if they are used with medium heat as the
manufacturer recommends.
Enamelware: Under some conditions, the enamel of
some cookware may melt. Follow cookware
manufacturer’s recommendations for cooking
methods.
Glass: There are two types of glass cookware—those
for oven use only and those for top-ofrange cooking
(saucepans, coffee and teapots). Glass conducts heat
very slowly.
Heatproof Glass Ceramic: Can be used for either
surface or oven cooking. It conducts heat very slowly
and cools very slowly. Check cookware
manufacturer’s directions to be sure it can be used on
gas ranges.
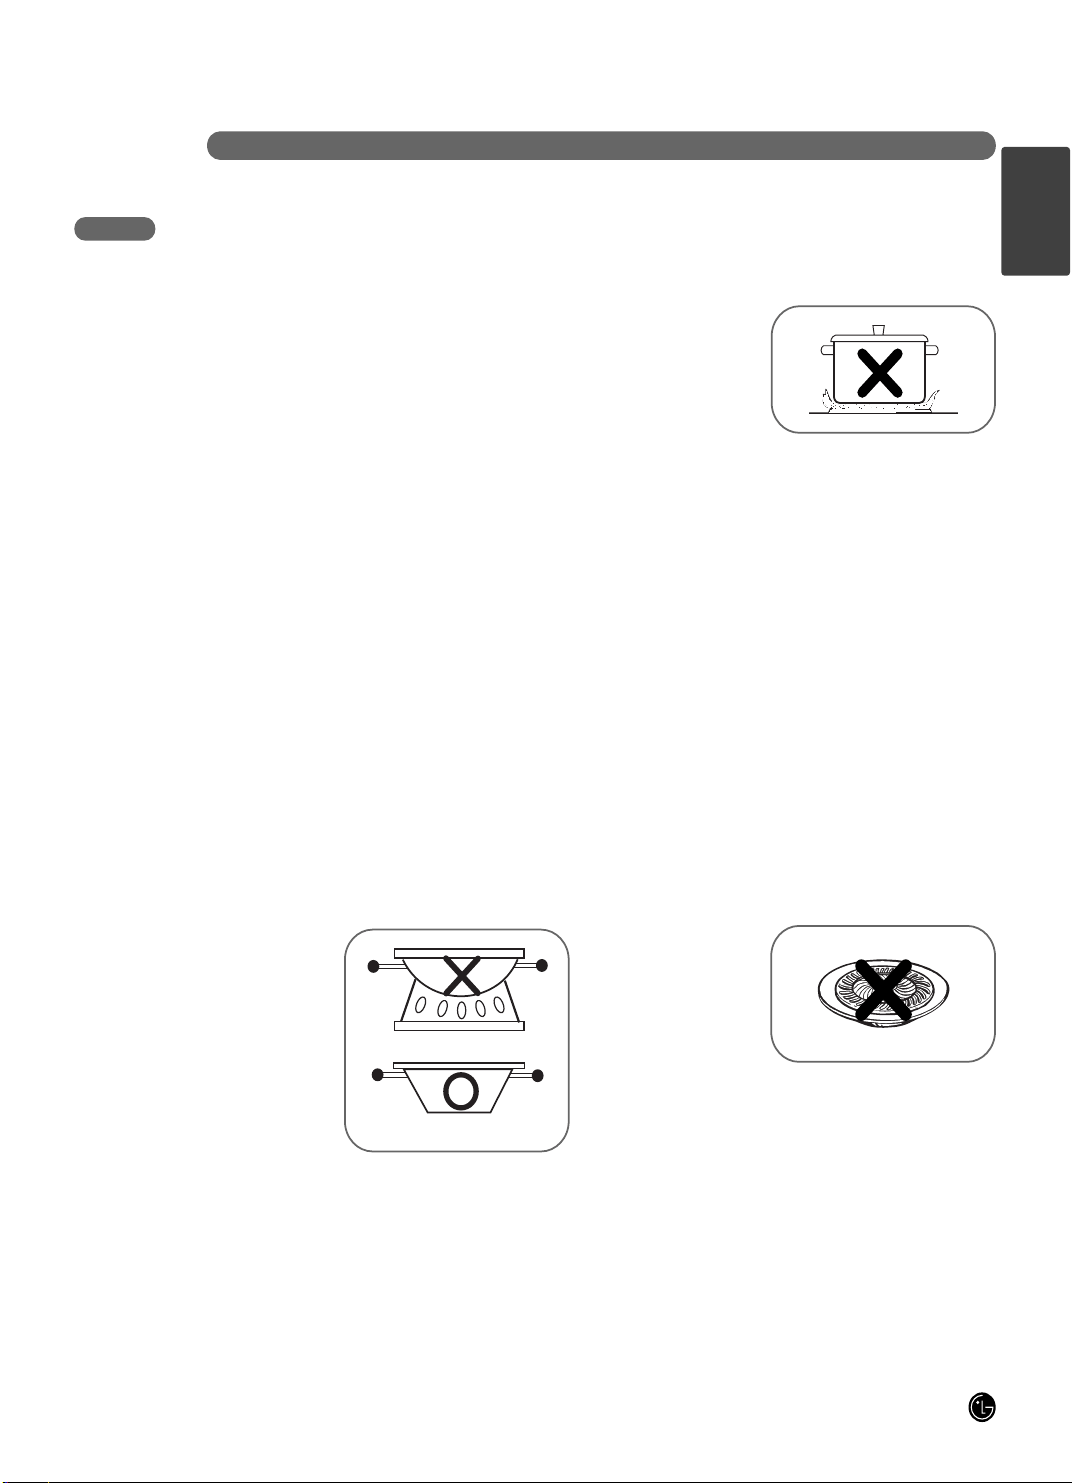
USING A WOK
DO NOT use a wok
support ring. Placing
the ring over the burner
or grate may cause the
burner to work
improperly, resulting in
carbon monoxide levels
above allowable
standards.
This can be hazardous
to your health.
Only a flat-bottomed wok should be used.
We recommend that you use a 14-inch or smaller
flatbottomed wok. Make sure the wok bottom sits flat
on the grate. They are available at your local retail
store.
STOVE-TOP GRILLS
DO NOT use stove top
grills on your surface
burners. If you use the
stove top grill on the
surface burner, it will
cause incomplete
combustion and can
result in exposure to carbon monoxide levels above
allowable current standards.
This can be hazardous to your health.
Use a flat-bottomed wok
ENGLISH
12
OPE R ATING INS T RUCTIONS
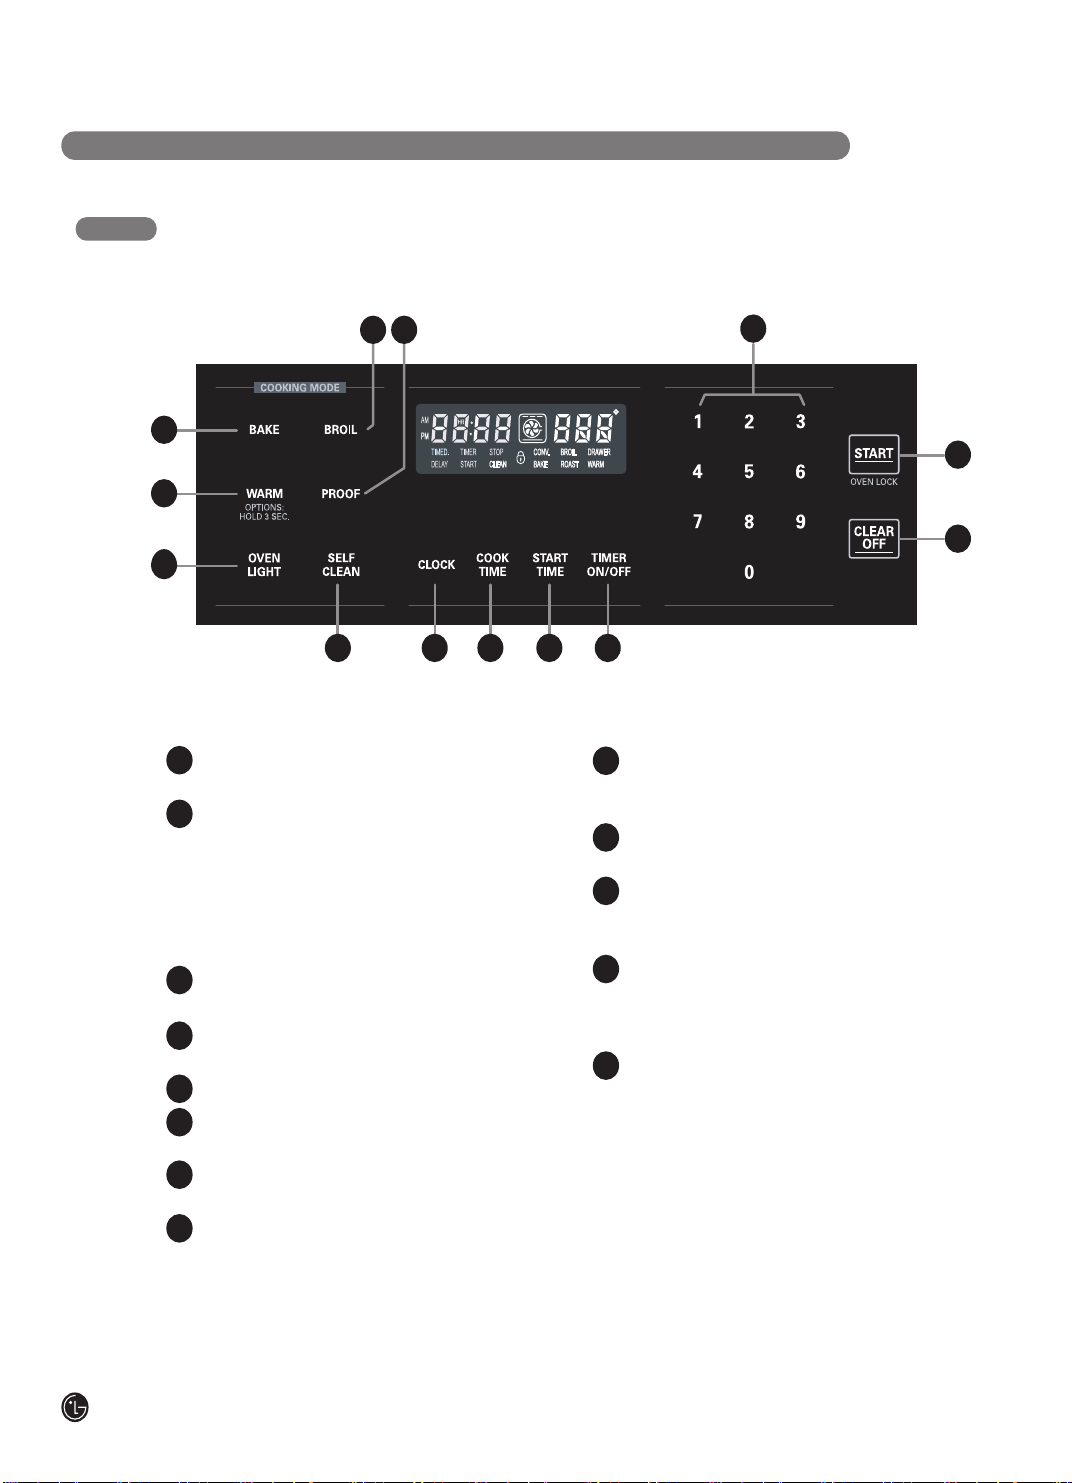
CONTROL PANEL—LRG3093S
Throughout this manual, features and appearance may vary from your model.
OVEN CONTROL, CLOCK, AND TIMER FEATURES
BAKE PAD – Press the pad to enter the normal
bake function.
WARM PAD / OPTIONS
– Press this pad to hold food warm in the oven.
– Press and hold the pad for 3 seconds to
change the special settings.
NOTE: Special settings can only be used if no
other function (Bake, Broil, Timer Ect.) of the
control panel is in use.
OVEN LIGHT PAD – Press the pad to turn the
oven light on or off.
BROIL PAD – Press the pad to select broil
function.
PROOF PAD – Press the pad to proof bread.
SELF CLEAN PAD – Press the pad to select
self-cleaning function.
CLOCK PAD – Press the pad to set the time of
day.
COOK TIME PAD – Press this pad and then
press the number pads to set the amount of time
you want your food to cook. The oven will shut off
when the cooking time has run out.
START TIME PAD – Press this pad and then
press the number pad to set delayed start time.
The oven will start at a time you set.
TIMER ON/OFF PAD – Press the pad to set or
cancel the timer function.
NUMBER PADS – Use to set any function
requiring numbers such as clock, timer or
temperature.
START PAD / OVEN LOCK
– Press the pad to start all oven features.
– Press and hold the pad for 3 seconds to
activate/deactivate the Oven Lockout function.
CLEAR OFF PAD – Press this pad to cancel ALL
oven operations except the timer settings.
1
2
3
4 5
7 9 1086
12
13
11
1
10
9
11
12
13
2
3
4
5
6
7
8
O P E R AT I N G IN S T RU C T I ONS
13
As your oven heats up, the temperature increase of
the air in the oven may cause water droplets to form
on the door glass. These droplets are harmless and
will evaporate as the oven continues to heat up.
ALUMINUM FOIL
NEVER cover the oven bottom with aluminum foil.
Aluminum foil may also be used to catch a spillover.
To do so, place a small sheet of foil on a lower rack
several inches below the food.
NEVER entirely cover a rack with aluminum foil. This
will disturb the heat circulation and result in poor
baking.
OVEN MOISTURE
USING THE OVEN
BEFORE YOU BEGIN
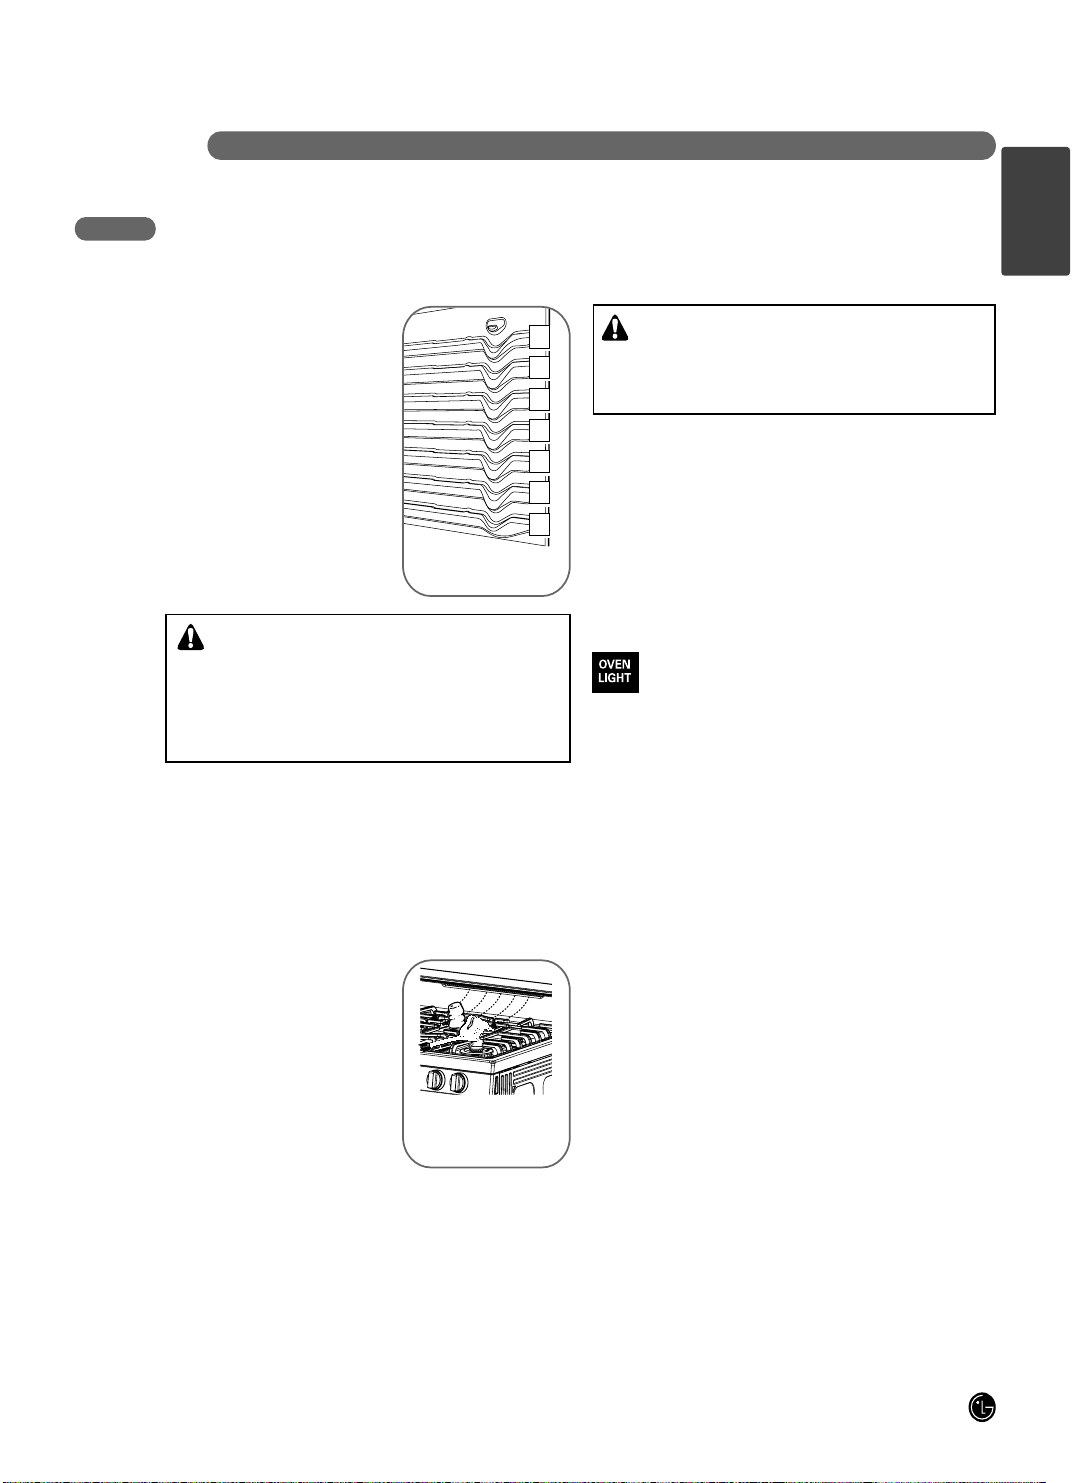
The oven has 7 rack positions
for various types of cooking.
To install a rack insert the
curved end of the rack into the
desired position and push all
the way back.
To remove a rack pull out until
the rack stops, then tilt up and
pull out.
POWER OUTAGE
CAUTION:
DO NOT attempt to operate the electric ignition
oven during an electrical power failure.
The oven or broiler can not be used during a power
outage.
If the oven is in use when a power failure occurs, the
oven burner shuts off and cannot be re-lit until power
is restored. Once power is restored you will need to
restart the oven or broil function.
OVEN LIGHT
The oven light automatically turns ON when
the door is opened. The oven light may also
be manually turned ON or OFF by pressing
the “OVEN LIGHT” pad.
NOTE :
• The oven light can not be turned on during a self
clean cycle. The oven light can not be turned on until
the oven temperature has cooled below
500˚F(260˚C) after a self clean cycle is complete.
A
B
C
D
E
F
G
The oven has 7 rack
positions.
OVEN VENT
Your oven is vented though ducts at the center above
the burner grate. Do not block the oven vent when
cooking to allow for proper air flow. Do not touch vent
openings or nearby surfaces during the use of any
cooking operation.
• DO NOT place plastic or
flammable items on the
cooktop—they may melt or
ignite if left too close to the
vent.
• DO NOT place closed
containers on the cooktop.
The pressure in closed
containers may increase,
which may cause them to burst.
• Metal items will become very hot if they are left on
the cooktop, and could cause burns.
• Handles of pots and pans on the cooktop may
become hot if left too close to the vent.
Plastic items on the
cooktop may melt if left
too close to the vent.
CAUTION:
Always use potholders
or oven mitts when removing food or adjusting
the oven racks. Wait until the oven has
completely cooled if possible. Oven racks may
be HOT and may cause burns.
ENGLISH
14
OPERATING INSTRUCTIONS
USING THE OVEN
To avoid possible burns, place the racks in the desired position before you turn the oven on.
PREHEATING AND PAN PLACEMENT
Preheat the oven if the recipe calls for it. To preheat,
set the oven at the correct temperature. Preheating is
necessary when convection baking and for good
results when baking cakes, cookies, pastry and
breads.
Baking results will be better if baking pans are
centered in the oven as much as possible. If baking
with more than one pan, place the pans so each has
at least 1” to 1-1/2” of air space around it.
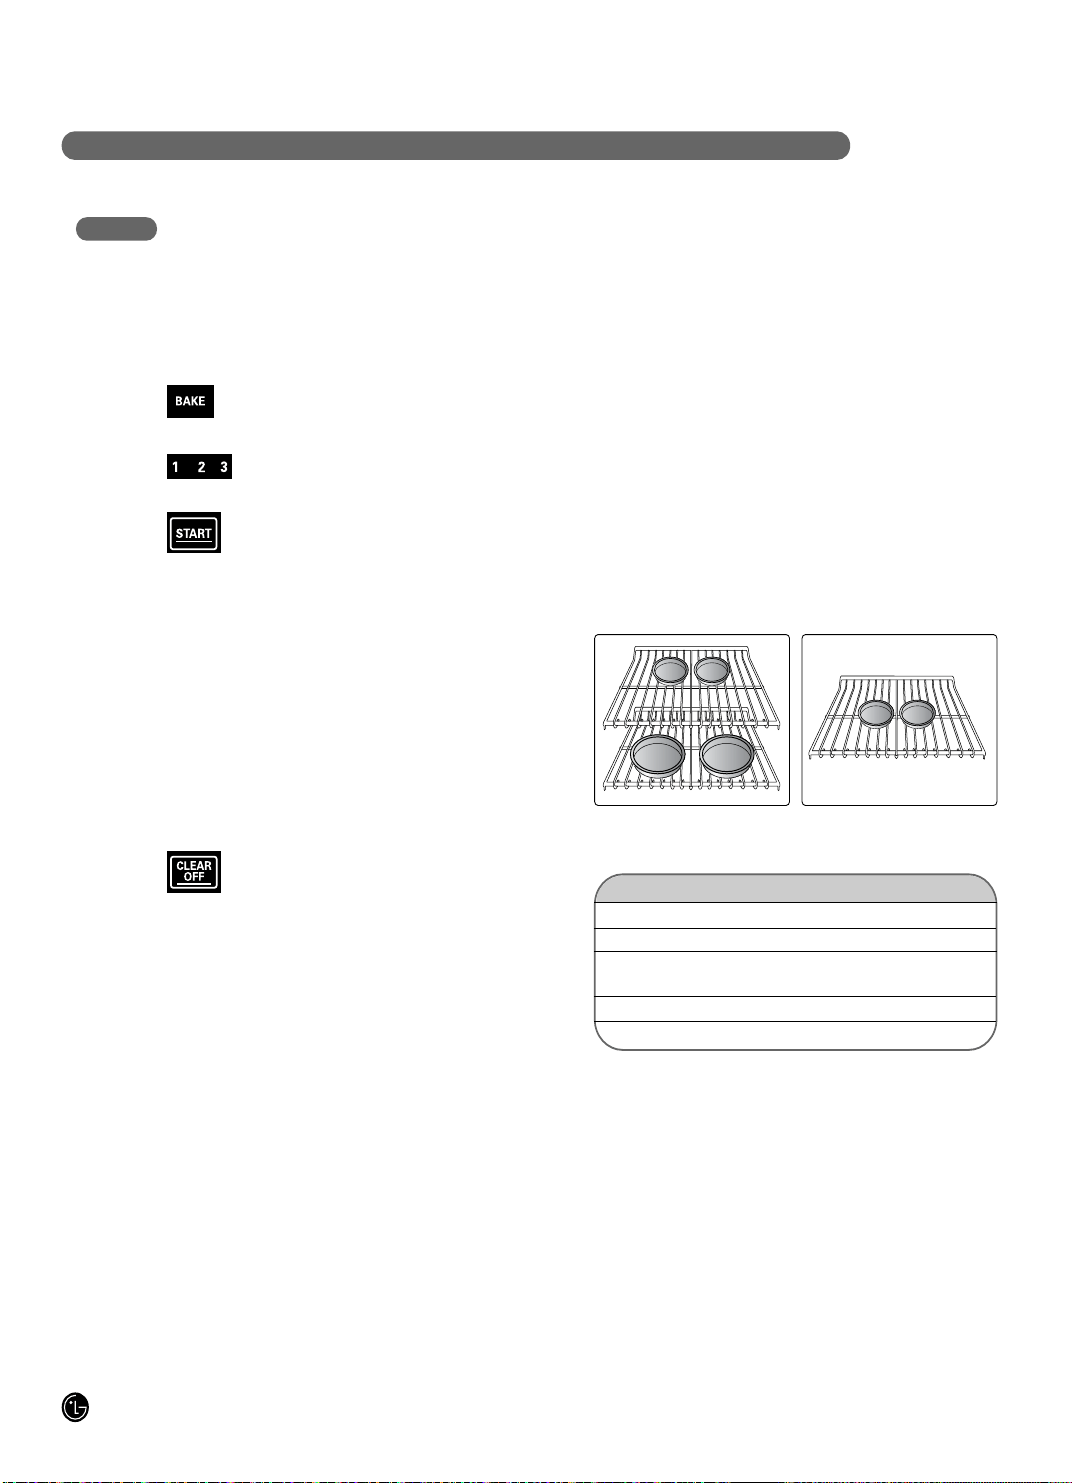
If cooking on multiple racks,place the oven racks in
positions C and E (For 2 racks) Place the cookware
as shown in Fig. 1, 2.
HOW TO SET THE OVEN FOR BAKING OR
ROASTING
Your oven is not designed for open-door cooking.
Press the “BAKE” pad.
Press the number pads to set the
desired temperature.
Press the “START” pad.
The word “BAKE” and 100° will be displayed. As the
oven heats up, the display will show the changing
temperature. After the oven has reached the desired
temperature, long beeps will sound 5 times and oven
lamp will flash.
To change the oven temperature during a BAKE
cycle, press the “BAKE” pad and then the number
pads to set the new temperature.
Check food for doneness at minimum
time on recipe. Cook longer if
necessary.
Press the “CLEAR OFF” pad when
cooking is complete.
Type of Food Rack Position
Frozen pies (on cookie sheet)
Angel food cake, bundt or pound cakes
Biscuits, muffins, brownies, cookies,
cupcakes, layer cakes, pies
Casseroles
Roasting
B or C
C
D
D
A
BAKING TIP
THE TYPE OF MARGARINE WILL AFFECT
BAKING PERFORMANCE
Most recipes for baking have been developed using
high fat products such as butter or margarine (80%
fat). To decrease the fat, the recipe may not give the
same results as with a higher fat product.
It can result in recipe failure if cakes, pies, pastries,
cookies or candies are made with low fat spreads.
The lower the fat content of a spread product, the
more noticeable these differences become.
Federal standards require products labeled
“margarine” to contain at least 80% fat by weight. Low
fat spreads, on the other hand, contain less fat and
more water. The high moisture content of these
spreads affects the texture and flavor of baked goods.
It can get best results with your old favorite recipes to
use margarine, butter or stick spreads containing at
least 70% vegetable oil.
Fig. 1 Fig. 2
OPERATING INS T RUCTIONS
15
Serve the food
immediately, and place
the pan outside the
oven to cool during the
meal for easiest
cleaning.
Use LO Broil to cook
foods such as poultry
or thick cuts of meat
thoroughly without
over-browning them.
NOTE :
• Some smoke may occur during broiling.
This is normal.
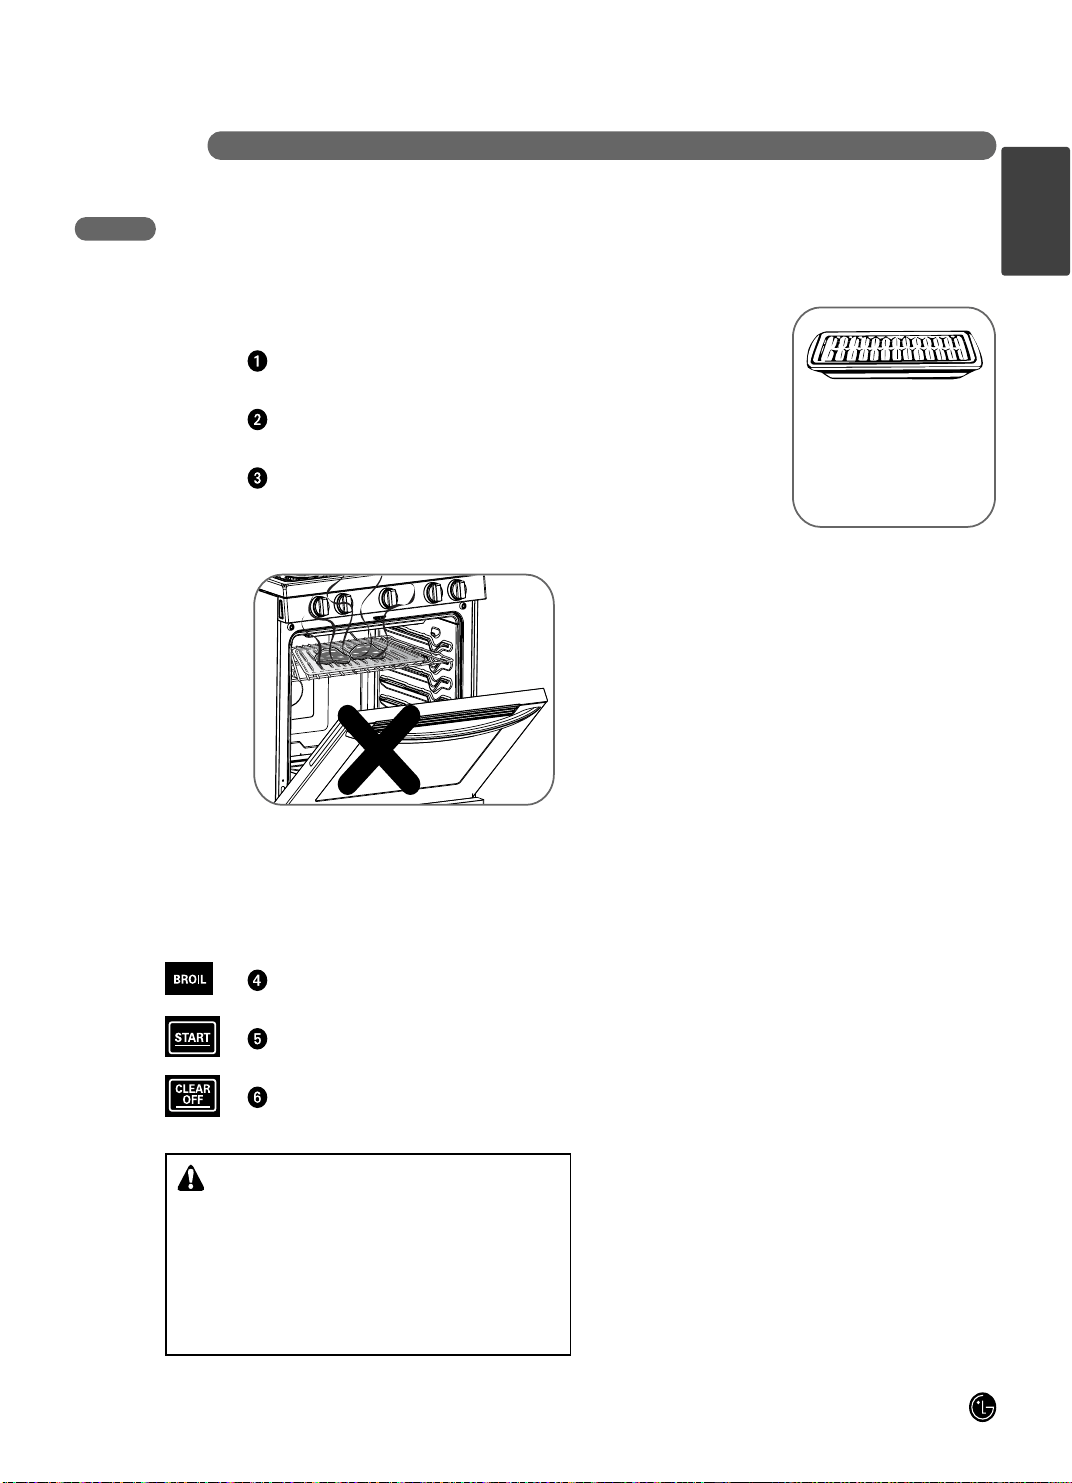
Always use the broiler pan
and grid that came with
your oven.
It is designed to minimize
smoking and spattering by
trapping juices in the shielded
lower part of the pan.
USING THE OVEN
HOW TO SET THE OVEN FOR BROILING
Your oven is designed for CLOSED DOOR broiling.
Place the food on the grid of the broiler
pan.
Follow suggested rack positions
in the Broiling Guide.
The oven door must be closed to begin
broiling.
The oven door must be closed during
broiling.
Press the “BROIL” pad once for “Hi”
and twice for “Lo”.
Press the “START” pad.
When broiling is finished, press
the “CLEAR OFF” pad.
NOTE: If the oven door remains open
for more than 15 seconds during broil
the burner will shut off. The broil burner
will automatically come back on once
the door is closed.
CAUTION:
• DO NOT use the broiler pan without the grid.
• DO NOT cover the broil pan or grid with aluminum
foil. Exposed grease could ignite.
• To prevent food from contacting the broil burner
and to prevent grease splattering, do not use the
roasting rack when broiling.
ENGLISH
16
O P E R ATING I NSTRU CTIONS
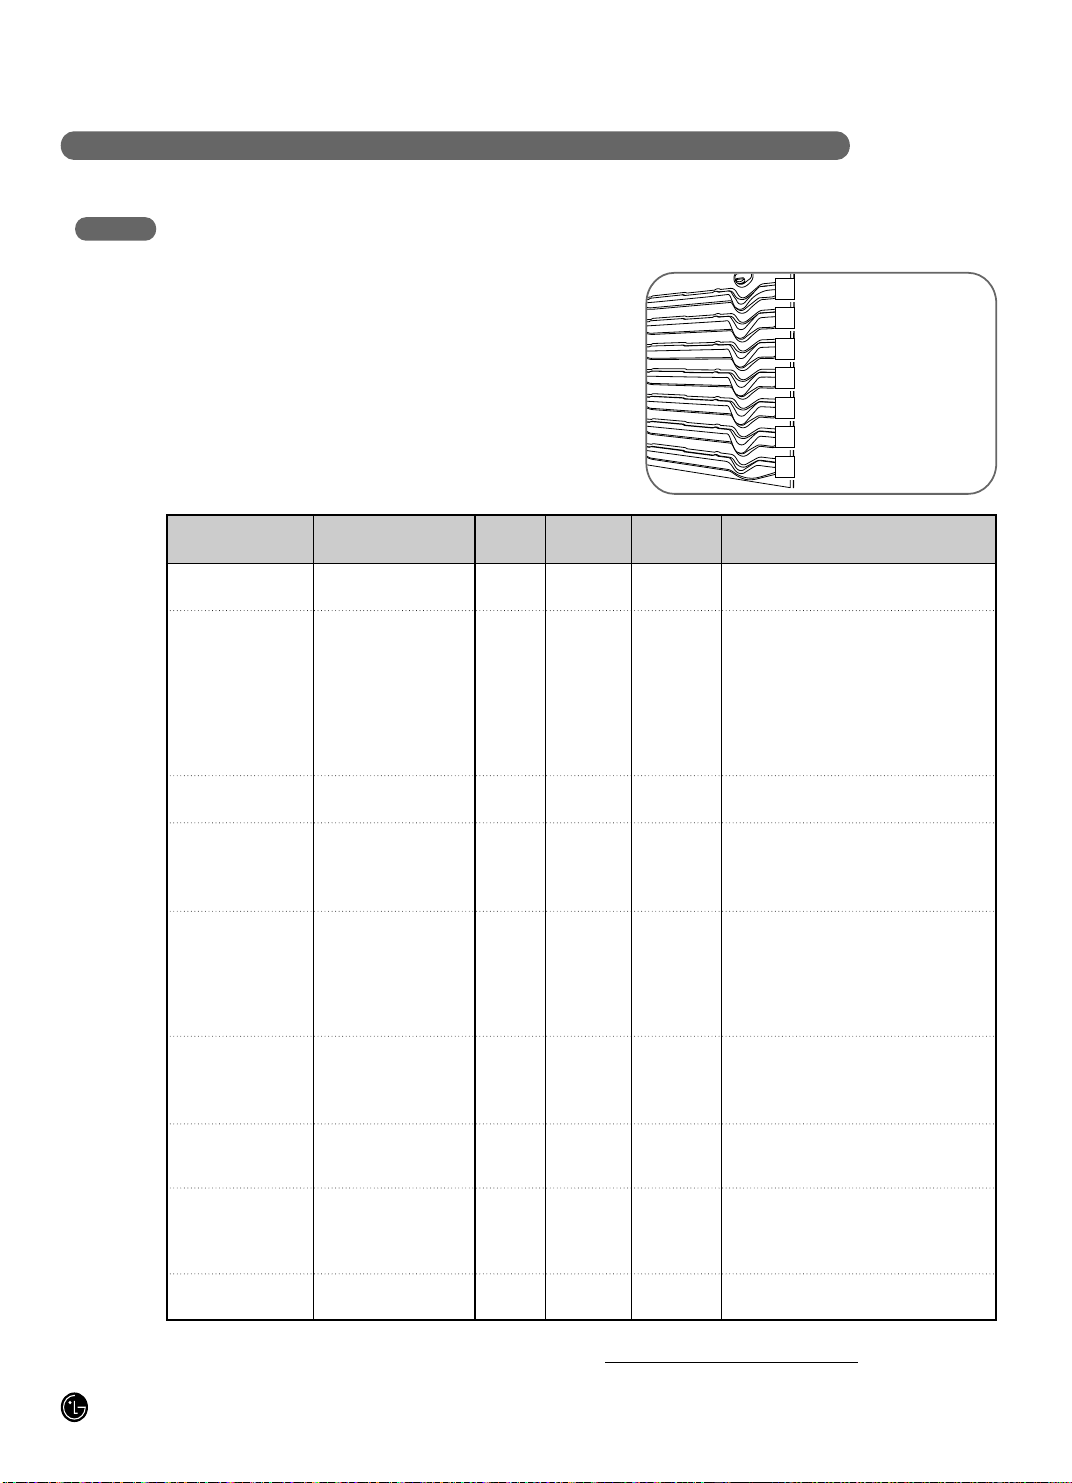
A
B
C
D
E
F
G
Your oven has 7 rack
positions.
USING THE OVEN
BROILING GUIDE
Broiling times will be affected by the size, weight, thickness,
starting temperature and your preference of doneness.
This guide is based on meats at refrigerated temperatures.
Food
Quantity and/or
Thickness
Rack
Position
First Side
Time (min.)
Second Side
Time (min.)
Comments
Ground Beef
Well Done
Beef Steaks
Rare
Medium
Well Done
Rare
Medium
Well Done
Bacon
Pork Chops
Well Done
Lamb Chops
Medium
Well Done
Medium
Well Done
Chicken
Lobster Tails
Fish Fillets
Ham Slices
(precooked)
Space evenly. Up to 8 patties may be
broiled at once.
Steaks less than 1” thick cook through
before browning.
Pan frying is recommended.
Slash fat.
Arrange in single layer.
Slash fat.
Slash fat.
Brush each side with melted butter.
Broil skin-side-down first.
Cut through back of shell. Spread
open. Brush with melted butter before
broiling and after half of broiling time.
Handle and turn very carefully. Brush
with lemon butter before and during
cooking, if desired. Preheat broiler to
increase browning.
Increase time 5 to 10 minutes per side
for 1
1
/2” thick or home-cured ham.
1 lb. (4 patties)
1
/
2
to
3
/
4
” thick
1” thick
1 to 1
1
/
2
lb.
1
1
/
2
” thick
2 to 2
1
/
2
lb.
1
/2 lb.
(about 8 thin slices)
2 (
1
/
2
” thick.)
2 (1” thick)
about 1 lb.
2 (1” thick) about
10 to 12 oz.
2 (1
1
/2” thick) about
1 lb
1 whole
2 to 2
1
/2 lbs.,
split lengthwise
4 bone-in breasts
2–4
6 to 8 oz. each
1
/4 to
1
/2” thick
1” thick
1
/2” thick
F
F
F
F
D
D
D
D
D
D
E
E
E
E
B
B
C
E
C
D
7~8
7
12
13
10
12-15
25
8
10
13
6
10
10
17
35-40
25-30
13–16
7~8
10
7
5-6
5
5-6
8-9
6-7
10-12
16–18
3
8
8~9
4–7
10
4-6
12-14
25
10-15
Do not turn
over.
6
5
4
† The U.S. Department of Agriculture says “Rare beef is popular, but you should know that cooking it to only 140˚F(60˚C).
means some food poisoning organisms may survive.” (Source: Safe Food Book, Your Kitchen Guide,
USDA Rev. June
1985.)
* See illustration for description of rack positions.
O PER AT I N G I N S T RU C T I O N S
17
USING THE CLOCK AND TIMER
HOW TO SET THE CLOCK
The clock should be set to the correct time of day for
the automatic oven timing functions to work properly.
The time of day cannot be changed during cooking or
self-clean mode.
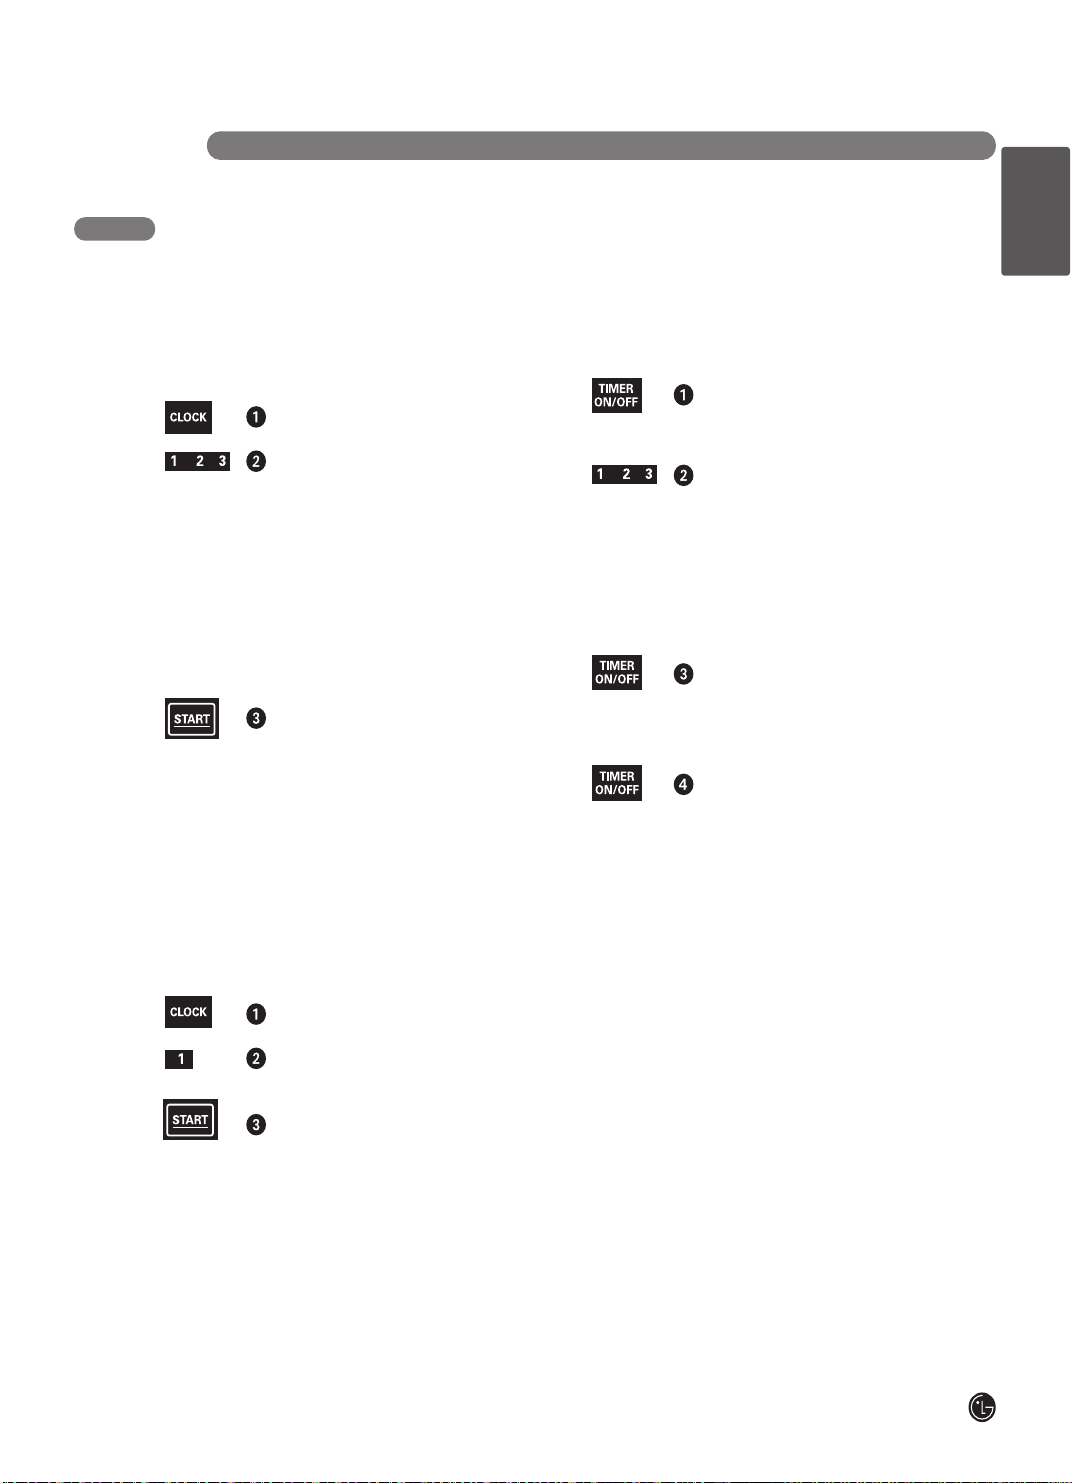
Press the “CLOCK” pad once to set.
Press the number pads to enter the
time. Press the number pads the same
way you read them. For example, to set
12:12, press the number pads 1, 2, 1,
and 2 in that order.
If number pads are not pressed within
30 seconds after you press the
“CLOCK” pad, the display reverts to
the original setting. If this happens,
press the “CLOCK” pad and reenter
the time of day.
Press the “START” pad.
To check the time of day when the display is showing
other information, simply press the “CLOCK” pad.
HOW TO CHANGE HOUR MODE ON CLOCK
(12HR OR 24HR)
Your control is set to use a 12-hour clock. If you
would prefer to have a 24-hour time clock, follow the
steps below.
Press the “CLOCK” pad for 3 seconds.
Press the number 1 pad once for 12hr
and twice for 24hr.
Press the “START” pad to accept the
desired change.
HOW TO SET THE TIMER
The timer does not control oven operations. The
maximum setting on the timer is 11 hours and 59
minutes.
Press the “TIMER ON/OFF” pad once
for minutes and seconds, press the pad
twice for hours and minutes.
Press the number pad to select the
desired time. A maximum of 99 minutes
can be set using the minutes and
seconds function. To set times longer
than 59 minutes use the hours and
minute function (press the pad twice).
NOTE: If you make a mistake, press the
“TIMER ON/OFF” pad and begin again.
Press the “TIMER ON/OFF” pad to start
the countdown.
NOTE: If “TIMER ON/OFF” is not pressed
the timer will return to the time of day.
When the timer reaches :00, “End” will
show in the display. The clock will sound
with 3 beeps every 15 seconds until
“TIMER ON/OFF” pad is pressed.
NOTE: If the remaining time is not in the display, recall
the remaining time by pressing the “TIMER ON/OFF”.
HOW TO CANCEL THE TIMER
Press the “TIMER ON/OFF” pad.
POWER OUTAGE
If a flashing time is in the display, you have
experienced a power failure. You will need to reset
the clock time.
Press the “CLOCK” pad once to reset. Enter the
correct time of day by pressing the appropriate
number pads. Press the “START” pad.
ENGLISH
18
OPE R AT I NG INSTRUCT I ONS
USING THE TIMED BAKING FEATURES
NOTE:
DO NOT
leave foods that spoil easily – such as
milk, eggs, fish, stuffings, poultry and pork – more than 1
hour before or after cooking. Room temperature
promotes the growth of harmful bacteria. Be sure that
the oven light is off because heat from the bulb will
speed harmful bacteria growth.
The oven will turn ON, and the display will show the
cooking time countdown and the changing
temperature starting at 100°F.
After the oven has reached the desired temperature,
long beeps will sound 5 times and oven lamp will
flash.
The oven will continue to cook for the set amount of
time, then turn off automatically, unless the WARM
feature was set.
See the “SETTING THE WARM
FEATURE” section.
After the oven turns off, the control will continue to beep
3 times every 1 minute until
“CLEAR OFF”
pad is
pressed.
Press the
“CLEAR OFF”
pad to clear
the display. Remove the food from the
oven. Remember, although the oven
turns off automatically, food left in the
oven will continue cooking after the oven
turns off.
HOW TO SET AN IMMEDIATE START
AND AUTOMATIC STOP
The oven will turn on immediately and cook for a
selected length of time. At the end of the cooking
time, the oven will turn off automatically.
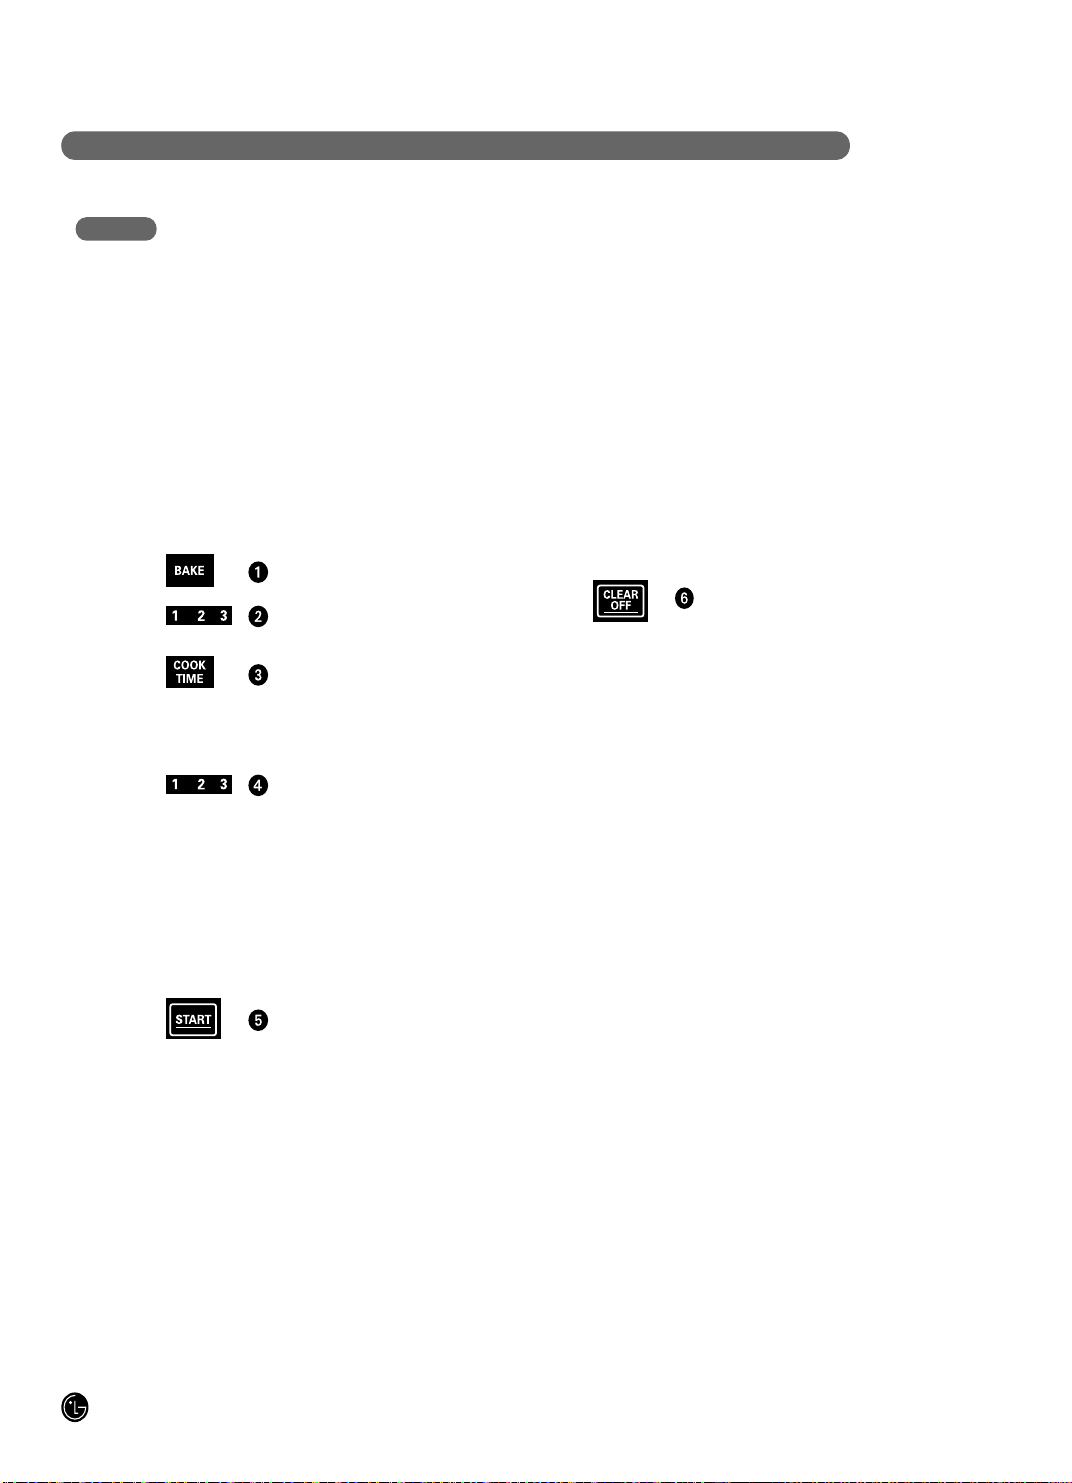
Press the “BAKE” pad.
Press the number pads to set the
desired oven temperature.
Press the “COOK TIME” pad.
NOTE: If your recipe requires preheating,
you may need to add additional time to the
length of the cooking time.
Press the number pads to set the
desired length of cooking time.
The cooking time you can set is
between 1 minute to 11 hours and
59minutes.
To enter a cooking time of 1 hr 30
minutes, press 1, 3, 0.
The entered oven temperature and the
cooking time will be shown in the
display.
Press the “START” pad.
O P E R AT I N G I N S T RU C T I O N S
19
USING THE TIMED BAKING FEATURES
(continued)
NOTE: If you would like to check the times you have
set, press the “START TIME” pad to check the start
time you have set or press the “COOK TIME” pad to
check the length of cooking time you have set.
The oven will turn ON, and the display will show the
cooking time countdown and the changing
temperature starting at 100°F.
After the oven has reached the desired temperature,
long beeps will sound 5 times and oven lamp will
flash.
The oven will continue to cook for the set amount of
time, then turn off automatically, unless the WARM
feature was set. See the “ SETTING THE WARM
FEATURE” section.
After the oven turns off, the end-of-cycle tone will
sound.
Press the “CLEAR OFF” pad to clear
the display. Remove the food from the
oven. Remember, although the oven
turns off automatically, food left in the
oven will continue cooking after the
oven turns off.
HOW TO SET A DELAYED START AND
AUTOMATIC STOP
The oven will turn on at the time of day you set, cook
for a specific length of time and then turn off
automatically.
Be sure the clock shows the correct time of day.
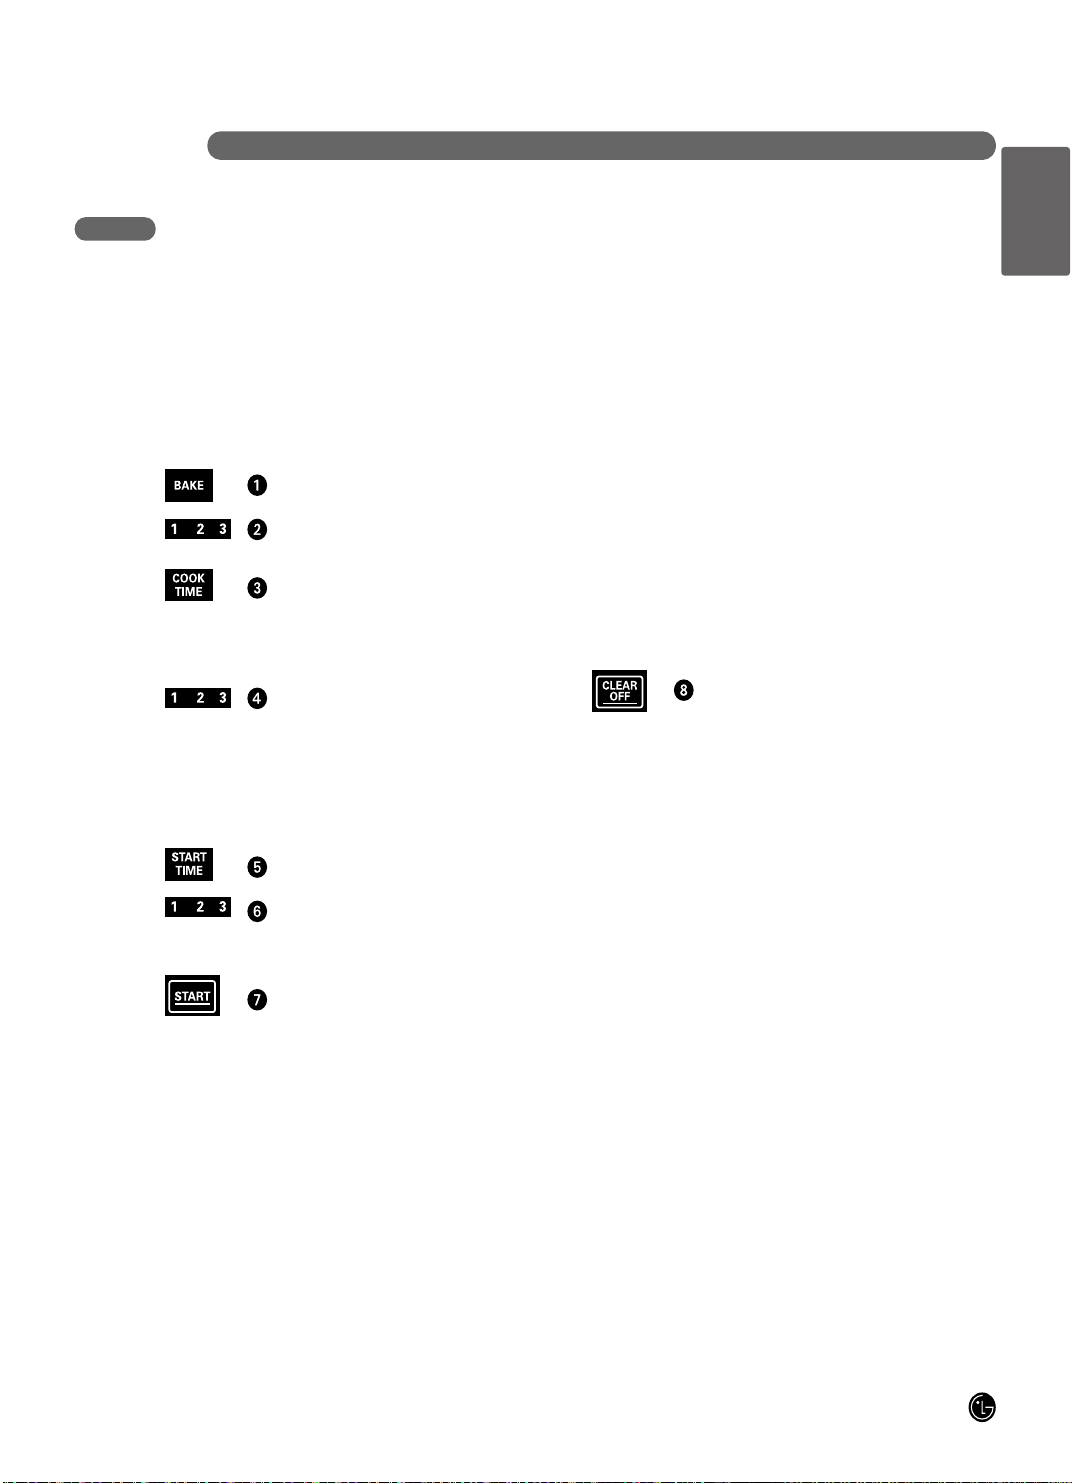
Press the “BAKE” pad.
Press the number pads to set the
desired oven temperature.
Press the “COOK TIME” pad.
NOTE: If your recipe requires preheating,
you may need to add additional time to the
length of the cooking time.
Press the number pads to set the
desired length of cooking time.
To enter a cooking time of 1 hr 30
minutes, press 1, 3, 0.
The entered oven temperature and the
cooking time will be shown in the
display.
Press the “START TIME” pad.
Press the number pads to set the time
of day you want the oven to turn on and
start cooking.
Press the “START” pad.
ENGLISH
20
OPE R ATING INS T RUCTIONS
SETTING THE PROOF FEATURE
To avoid lowering the oven temperature and
lengthening proofing time,do not open the oven door
unnecessarily. Check bread products early to avoid
over-proofing.
NOTES:
• DO NOT use the proofing mode for warming food or
keeping food hot. The proofing oven temperature is
not hot enough to hold foods at safe temperatures.
Use the WARM feature to keep food warm.
• Proofing will not operate when oven is above
125°F(52°C). Oven is Hot will show in the display.
The Proof feature maintains a warm environment for
rising yeast leavened products before baking.
Place the covered dough in a dish in
the oven on rack B or C.
NOTE: For best results, cover the dough
with a cloth or with plastic wrap (the plastic
may need to be anchored underneath the
container so the oven fan will not blow it
off).
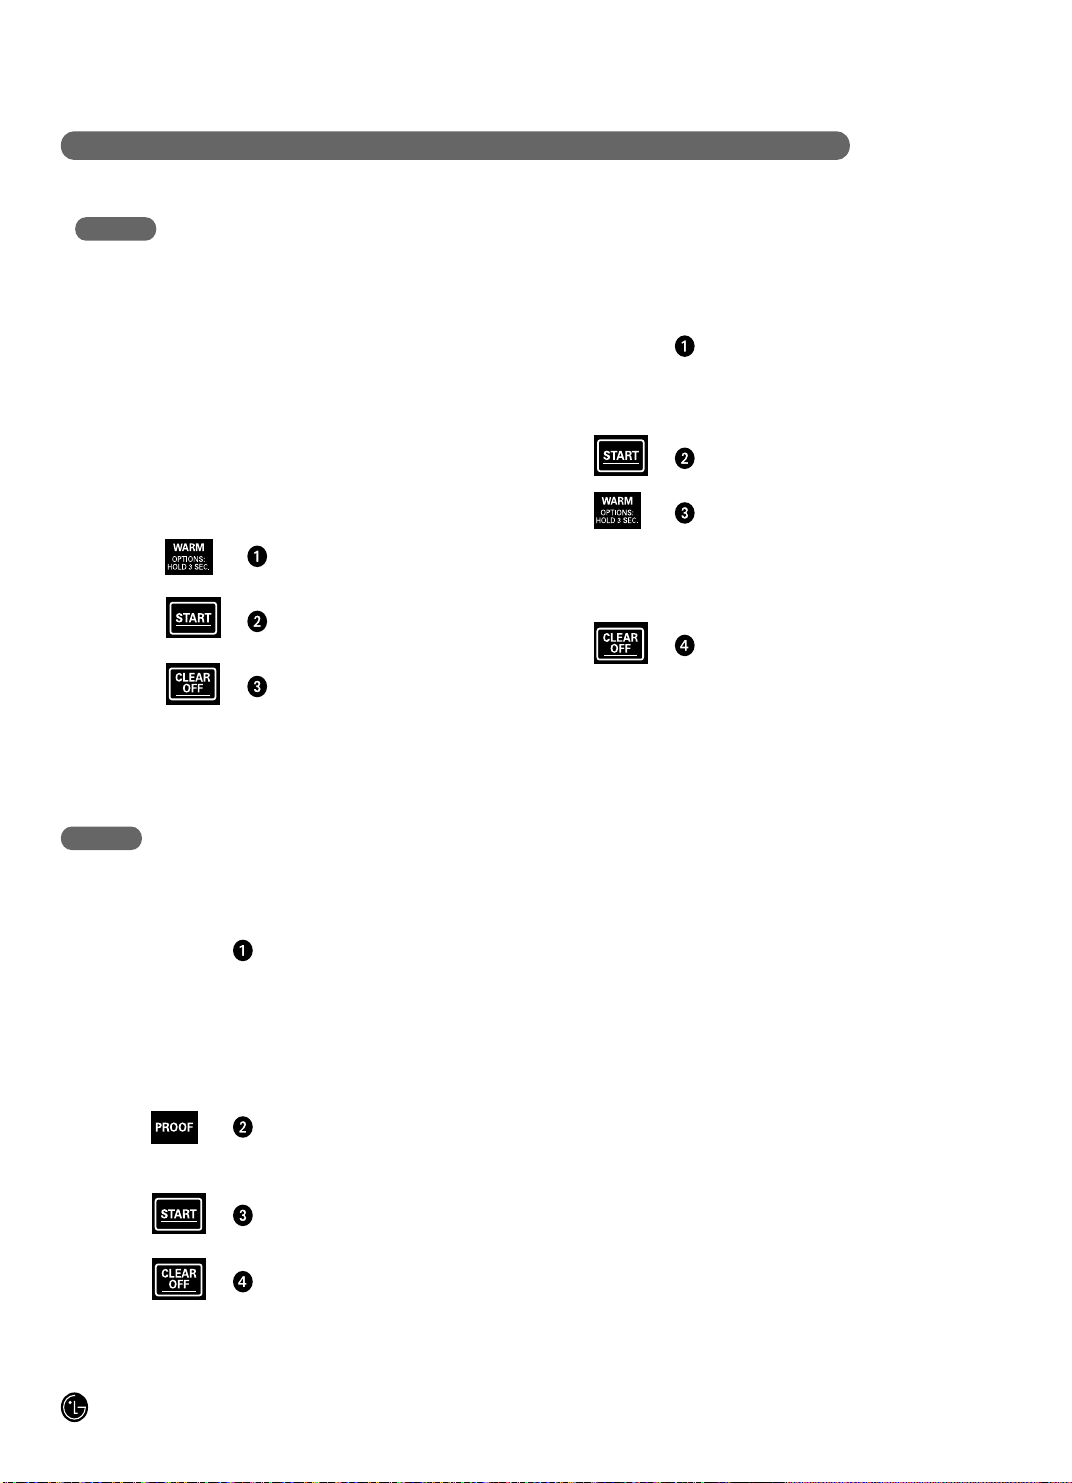
Press the “PROOF” pad.
PROOF will be displayed.
Press the “START” pad.
When proofing is finished, press the
“CLEAR OFF” pad.
SETTING THE WARM FEATURE
HOW TO SET WARM
Press the “WARM” pad.
Press the “START” pad.
To turn Warm off, press the
“CLEAR OFF” at any time.
The WARM feature will maintain an oven temperature
of 170°F(77°C). This feature should not be used to
reheat cold foods. The Warm feature will keep
cooked food warm for serving up to 3 hours after
cooking has finished. After 3 hours the WARM feature
will shut the oven OFF automatically. The Warm
feature may be used without any other cooking
operations or can be used after cooking has finished
using TIMED BAKE or DELAYED TIMED BAKE.
HOW TO SET WARM FEATURE WHEN
TIMED COOKING
Set the cooking feature that you want to
use: TIMED (BAKE), DELAY TIMED
(BAKE) refer to the relevant previous
page.
Press the “START” pad.
Press the “WARM” pad.
WARM mode is set to turn on
automatically after completing the
TIMED COOKING or DELAY TIMED
COOKING.
To turn Warm off at any time press the
“CLEAR OFF” pad.
NOTE: If “CLEAR OFF” is pressed prior to the delay
functions starting all settings will be canceled.

21
O P E R AT I N G I N S T RU C T I O N S
SPECIAL FEATURES OF YOUR OVEN CONTROL
Your new control has additional features that you may
choose to use. The following pages describe these
features and how you may activate them.
The special feature modes can only be activated
while the display is showing the time of day.
They remain in the control’s memory until the steps
are repeated.
When the display shows your choice, press the
“START” pad. The special features will remain in
memory after a power failure.
HOW TO ADJUST THE OVEN THERMOSTAT
You may find that your new oven cooks differently
than the one it replaced. Use your new oven for a few
weeks to become more familiar with it. If you still think
your new oven is too hot or too cold, you can adjust
the thermostat yourself.
DO NOT use thermometers, such as those found in
grocery stores, to check the temperature setting of
your oven. These thermometers may vary 20–40
degrees.
NOTE: This adjustment will not affect the broiling or
the self-cleaning temperatures. The adjustment will be
retained in memory after a power failure.
The oven temperature can be increased (+) or
decreased (-) as much as 35°F or 19°C.
To increase(+) temperature adjustment
Press and hold the “WARM” pad for 3
seconds and “Adj” will display.
Using the number pad, enter the
temperature amount you wish to
increase(+).
For example, to increase(+) the oven
temperature 15, press 1 and 5.
Press the “START” pad to set the
increased (+) temperature.
To decrease(-) temperature adjustment
Press and hold the “WARM” pad for 3
seconds “Adj” will display.
Using the number pad, enter the
temperature amount you wish to
decrease(-).
For example, to decrease(-) the oven
temperature 15, press 1 and 5.
Press the “WARM” pad again, the
decreased(-) temperature will appear in
the display.
Press the “START” pad to set the
increased (+) temperature.
NOTE: Once the temperature is increased or
decreased, the display will show the adjusted
temperature until it is readjusted.
NOTE: The thermostat adjustment will change the
temperature for bake.
ENGLISH
22
OPERATING INSTRUCTIONS
HOW TO SET PREHEATING ALARM LIGHT
ON/OFF
The interior oven light automatically turn on when the
oven door is opened.
When oven reaches set-temperature after preheat,
the oven notifies preheat-end by flashing oven lamp
until the door is opened.
You can activate or deactivate the smart oven light
feature. Default Setting is on.
Press and hold the “WARM” pad for 3
seconds. Then press the “WARM” pad
once and “PrE” will display.
Press the number 1 to switch between
ON and OFF.
Press the “START” pad to accept the
change.
HOW TO ADJUST BEEPER VOLUME
The beeper volume feature allows you to adjust the
volumes to a more acceptable volume. There are four
possible volume levels, Hi, Med, Lo and Off.
Press and hold the “WARM” pad for 3
seconds. Then press the “WARM” pad
twice and “BEEP” will display.
Press the number 1 Key pad to toggle
between the various beeper volumes.
Press the “START” pad to accept the
change.
NOTE:
When the display reads:
Hi or 3 = Highest volume
-- or 2 = Normal volume
Lo or 1 = Lowest volume
Off = Mute
HOW TO SELECT FAHRENHEIT OR CELSIUS
TEMPERATURE
Your oven control is set to use the Fahrenheit
temperature selections but you may change this to
use the Celsius selections.
Press and hold the “WARM” pad for 3
seconds. Then press the “WARM” pad
3 times and “Unit” will display.
Press the number 1 to switch between
the F and C.
Press the “START” pad to accept the
change.
SPECIAL FEATURES OF YOUR OVEN CONTROL
23
O P E R AT I N G I N S T RU C T I O N S
Press the “SELF CLEAN” pad once for
a 3 hour cycle, twice for a 2 hour cycle
or three times for a 4 hour cycle.
A 3-hour self-clean is recommended for
use when cleaning small, contained
spills. A SELF CLEAN time of 4 hours
is recommended for heavily soiled
ovens.
Press the “START” pad.
The door locks automatically. The display will show
the clean time remaining. It will not be possible to
open the oven door until the temperature drops below
the lock temperature and the DOOR LOCKED light
goes off.
The oven shuts off automatically when the clean cycle
is complete.
When the DOOR LOCKED light is off, the door will
unlock automatically.
• The words DOOR LOCKED will flash and the oven
control will signal if you set the clean cycle and
forget to close the oven door.
• To stop a clean cycle, press the “CLEAR OFF” pad.
When the DOOR LOCKED light goes off indicating
the oven has cooled below the locking temperature,
open the door.
HOW TO SET THE OVEN FOR CLEANING
USING THE SELF-CLEANING OVEN
BEFORE A CLEAN CYCLE
When running a self
clean cycle, it is
recommended that a
kitchen window be
opened or the use of
ventilation fan or hood
be used.
Remove the oven
racks, broiler pan,
broiler grid, all
cookware and any
aluminum foil from the oven—they cannot withstand
the high cleaning temperatures.
IMPORTANT: The health of some birds is extremely
sensitive to the fumes given off during the self-
cleaning cycle of any range. Move birds to another
well ventilated room.
NOTES:
• Soil on the front frame of the range and outside the
gasket on the door will need to be cleaned by hand.
Clean these areas with hot water, soap-filled
scouring pads or cleansers such as Soft Scrub.
Rinse well with clean water and dry.
• DO NOT clean the gasket. The fiberglass material of
the oven door gasket cannot withstand abrasion. It
is essential for the gasket to remain intact. If you
notice it becoming worn or frayed, replace it.
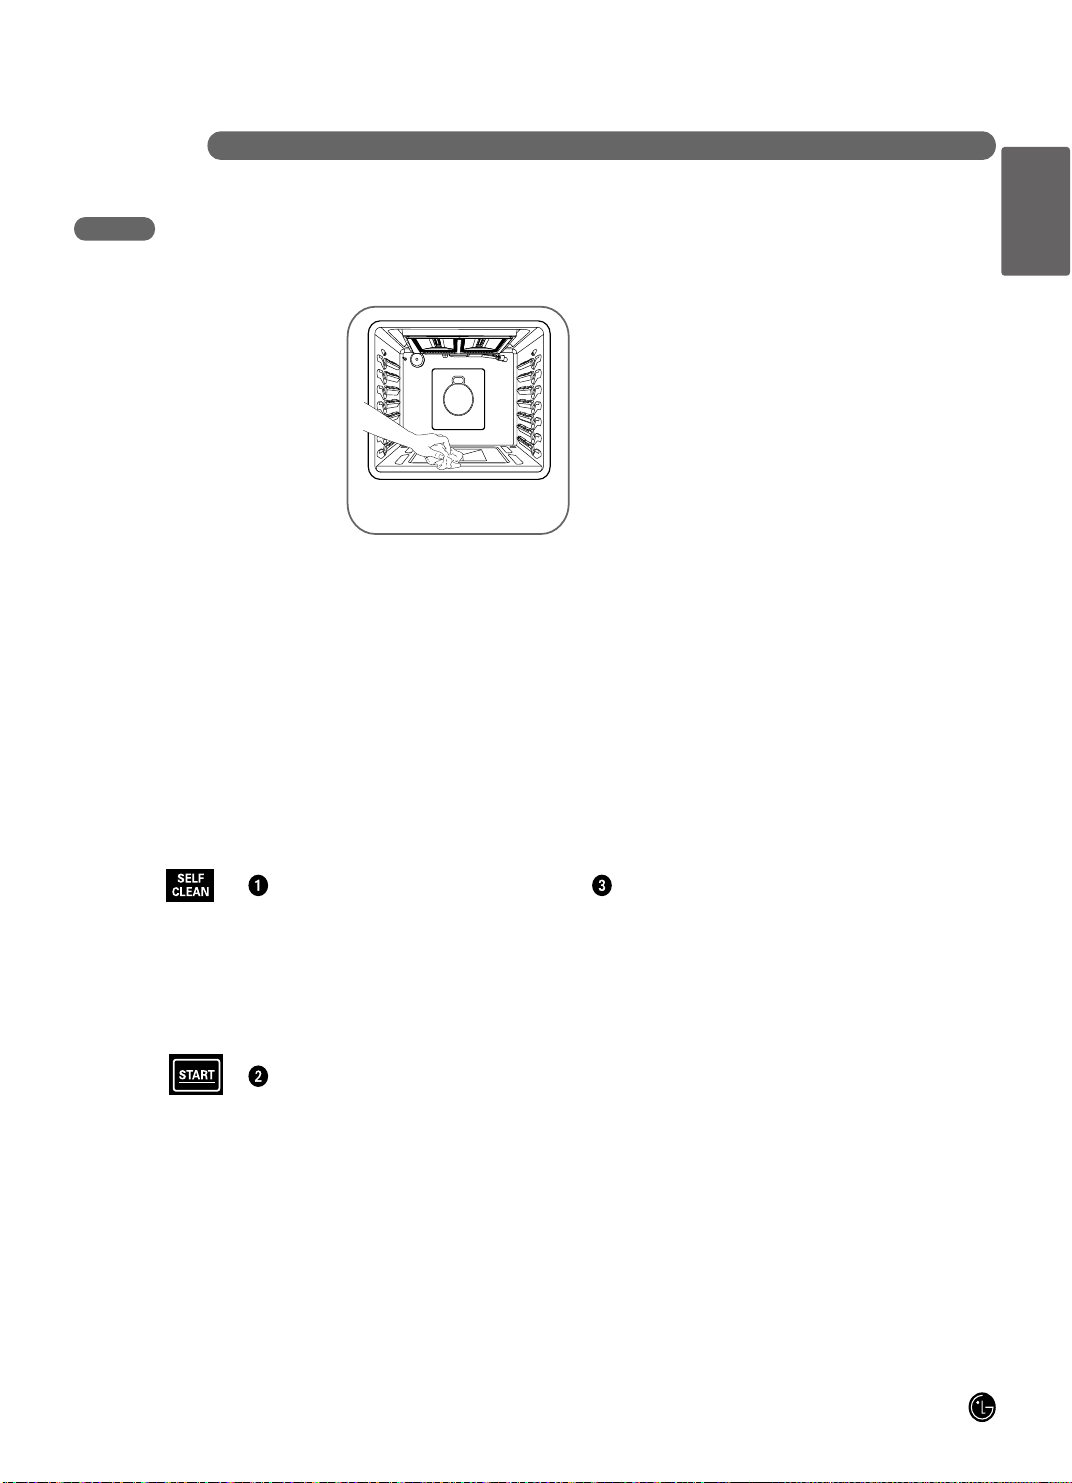
• Wipe up any heavy spillovers on the oven bottom.
• Make sure the oven light bulb cover is in place and
the oven light is off.
• Use caution when opening the oven after the self-
clean cycle has ended. The oven may still be hot.
Wipe up heavy soil on the
oven bottom.
ENGLISH

24
OPERATING INSTRUCTIONS
USING THE SELF-CLEANING OVEN
The oven shuts off automatically when the clean cycle
is complete.
• When the DOOR LOCKED light is off, the door will
unlock automatically.
• The words DOOR LOCKED will flash and the oven
control will signal if you set the clean cycle and
forget to close the oven door.
• To stop a clean cycle, press the “CLEAR OFF” pad.
When the DOOR LOCKED light goes off indicating
the oven has cooled below the locking temperature,
open the door.
HOW TO DELAY THE START OF CLEANING
Make sure the clock shows the correct time of day.
Press the “SELF CLEAN” pad.
Select the desired self clean time by
pressing the “SELF CLEAN” pad.
Press the “START TIME” pad.
Enter the desired Self-Clean starting
time of day using the number pads.
Press the “START” pad. "DELAY" and
"CLEAN" will remain on.
The door locks automatically. The display will show
the start time. Self-Cleaning cycle will turn on
automatically at the set time. At that time the icon
"DELAY" will go out. It will not be possible to open the
oven door until the temperature drops below the lock
temperature and the DOOR LOCKED light goes off.
AFTER A CLEAN CYCLE
• You may notice some white ash in the oven. Wipe it
up with a damp cloth after the oven cools.
• If white spots remain, remove them with a soap-filled
scouring pad and rinse thoroughly with a vinegar
and water mixture.
• These deposits are usually a salt residue that
cannot be removed by the clean cycle.
• If the oven is not clean after one clean cycle, repeat
the cycle.
• You cannot set the oven for cooking until the oven is
cool enough for the door to unlock.
• While the oven is self-cleaning, you can press the
CLOCK pad to display the time of day. To return to
the clean countdown, press the COOK TIME pad.
• If the racks become hard to slide, apply a small
amount of vegetable oil or cooking oil to a paper
towel and wipe the edges of the oven racks with the
paper towel.
The oven door must be closed and all controls set correctly for the cycle to work properly.
WARNING:
During the self-clean cycle, the outside of the
appliance can become very hot to the touch. Do not
leave small children unattended near the appliance.
CAUTION:
• DO NOT line the oven walls, oven racks, bottom
or any other part of the range with aluminum foil.
Doing so will stop heat distribution, produce poor
baking results and cause permanent damage to
the oven interior (aluminum foil will melt to the
interior surface of the oven).
• Use caution when opening the door after the self-
clean cycle is finished. The oven may still be
VERY HOT.
• The health of some birds is extremely sensitive to
the fumes given off during the self-cleaning cycle
of any range. Move birds to another well-
ventilated room.
25
C A R E A N D C L E A N I N G O F T H E R A N G E
CARE AND CLEANING
Make sure electrical power is off and all surfaces
are cool before cleaning any part of the range.
If your range is pulled away from the wall
for cleaning, servicing or any reason,
ensure that the anti-tip device is re-
engaged properly when the range is
pushed back against the wall.
Failure to take this precaution could result
in tipping of the range and cause injury.
The electrode of the spark igniter is exposed when
the burner head is removed. When turning a
burner to “LITE”, all the burners spark. Do not
attempt to disassemble or clean around any burner
while another burner is on. An electric shock may
result.
Turn all controls OFF before removing the burner
parts. The burner grates, caps, and burner heads can
be lifted off, making them easy to clean.
The electrodes are not removable.
Burner Grate
Burner Cap
Electrode
Cooktop
Burner Head
SEALED BURNER ASSEMBLIES
The oval burner assembly can be lifted off, making it
easy to clean. The burner electrode is not removable.
OVAL BURNER ASSEMBLY
Burner head and cap
assembly
Electrode
CAUTION:
• DO NOT remove any parts from the cooktop until
they have completely cooled and are safe to
handle.
• DO NOT operate the surface burners without all
burner parts and grates in place.
ENGLISH
26
C ARE AND CLEANING OF THE RANGE
BURNER CAPS AND HEADS
BURNER CAPS
Lift off when cool. Wash burner caps in hot, soapy
water and rinse with clean water. To remove burned
on food particles, you may scour with a plastic
scouring pad.
AFTER CLEANING
Before replacing the burner caps and burner heads
shake out excess water and then dry them
thoroughly.
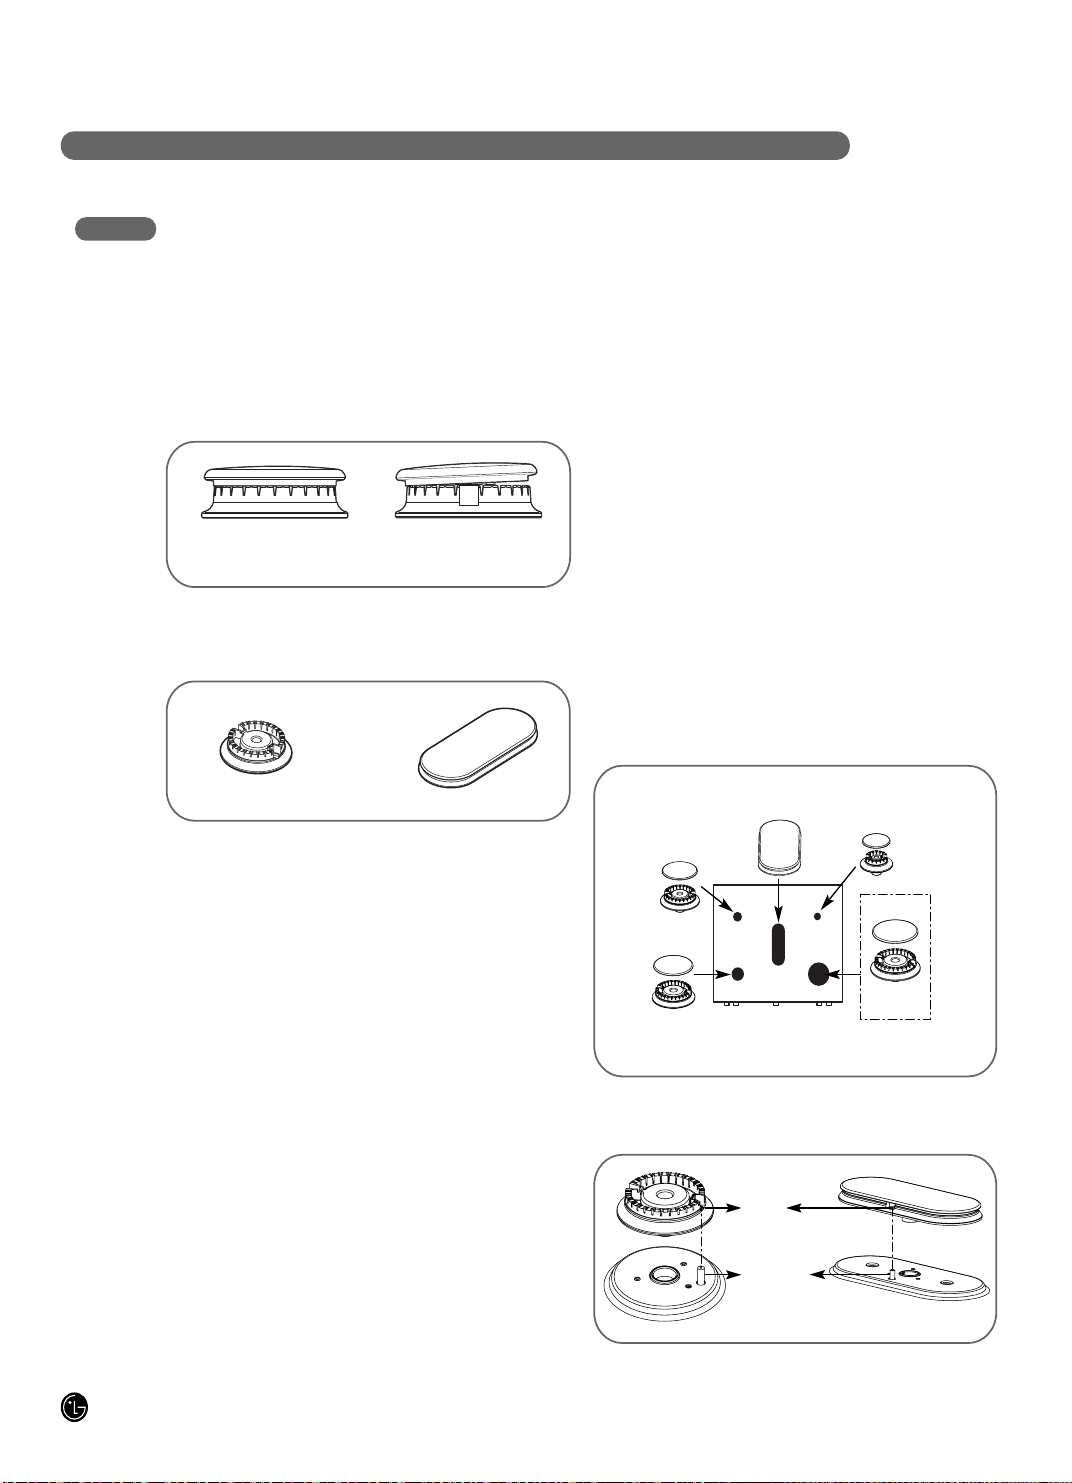
REPLACEMENT
Replace burner heads and caps over the electrodes
on the cooktop, in the correct locations according to
their size.
Burner cap is
properly seated.
Burner cap is NOT
properly seated.
BURNER HEADS AND OVAL (CENTER)
BURNER HEAD/CAP ASSEMBLY
The burner heads and the oval burner head/cap
assembly are removable. Simply lift them off the
range for cleaning. For even and unhampered flame,
the slits in the burner heads must be kept clean at all
times. Clogged or dirty burner ports or electrodes will
not allow the burner to operate properly.
Any spill on or around an electrode must be carefully
cleaned. Take care to not hit an electrode with
anything hard or it could be damaged.
You should clean the burner caps and heads
routinely, especially after bad spillovers which could
clog the openings. Lift them off when they are cool.
If you want to remove burned-on food, soak the
burner heads in a solution of mild liquid detergent and
hot water for 20–30 minutes. For more stubborn
stains, use a toothbrush.
NOTES:
• DO NOT use steel wool or scouring powders to
clean the burners.
• Burners will not light if the cap is removed.
• DO NOT use bleach on product to clean.
Oval (Center) Burner
Head/Cap Assembly
Make sure the hole in the burner head is positioned
over the electrode.
Hole
Medium burner
head and cap
Large burner
head and cap
Small burner
head and cap
Extra large burner
head and cap
Electrode
27
C ARE AND CLEANING OF THE R ANGE
BURNER GRATES
Your range has three professional-style grates.
For maximum stability, these grates should only be
used in their proper position; Two side grates can be
interchanged left to right and front to back. Center
grate can be also interchanged front to back.
DO NOT operate a burner for an extended period of
time without cookware on the grate. The finish on the
grate may chip without cookware to absorb the heat.
Although they are durable, the grates will gradually
lose their shine, regardless of the best care you can
give them.
COOKTOP SURFACE
To avoid damaging the porcelain enamel surface of
the cooktop and to prevent it from becoming dull,
clean up spills right away. Foods with a lot of acid
such as tomatoes, sauerkraut, fruit juices, etc. or
foods with high sugar content could cause a dull spot
if allowed to set. Wash and rinse when the surface
has cooled.
For other spills such as fat spatterings, etc., wash with
soap and water once the surface has cooled. Then
rinse and polish with a dry cloth.
NOTE: DO NOT lift the cooktop. Lifting the cooktop
can lead to damage and improper operation of the
range.
CLEANING
Lift the grates out when they have cooled. They
should be washed regularly and, of course, after
spillovers. Wash them in hot, soapy water and rinse
with clean water. When replacing the grates, be sure
they are positioned securely over the burners.
Replace the grates so that continuous arcs are
formed with the center ribs of all three grates. The
grates are dishwasher safe.
NOTE: DO NOT clean the grates in a self-cleaning
oven.
Appearance may vary. The
grates are dishwasher safe.
etarg edis etarg edisetarg retnec
ENGLISH
28
C ARE AND CLE ANING OF T H E RANGE
STAINLESS STEEL SURFACES
DO NOT use a steel wool pad; it will scratch the
surface.
To clean the stainless steel surface, use warm sudsy
water or a stainless steel cleaner or polish. Always
wipe the surface in the direction of the grain. Follow
the cleaner instructions for cleaning the stainless steel
surface.
To inquire about purchasing stainless steel appliance
cleaner or polish, or to find the location of a dealer
nearest you, please call our toll-free customer service
number:
1-888-542-2623
or visit our website at:
ca.lgservice.com
OVEN AIR VENTS
DO NOT block the vents and air openings of the
range. They provide the air inlet and outlet that are
necessary for the range to operate properly with
correct combustion.
Air openings are located at the rear of the cooktop, at
the top and bottom of the oven door, and at the
bottom of the range, under the warming drawer.
CONTROL PANEL
Clean up splatters with a damp cloth.
You may also use a glass cleaner.
Remove heavier soil with warm soapy water.
Do not use abrasives of any kind.
NOTE: To prevent activating the control panel during
cleaning, unplug the range.
FRONT MANIFOLD PANEL AND KNOBS
It’s better to clean the manifold panel after each use
of the oven. Use a damp cloth to clean or rinse. For
cleaning, use mild soap and water or a 50/50 solution
of vinegar and water. For rinsing, use clean water.
Polish dry with a soft cloth.
DO NOT use abrasive cleansers, strong liquid
cleaners, plastic scouring pads or oven cleaners on
the manifold panel—they will damage the finish.
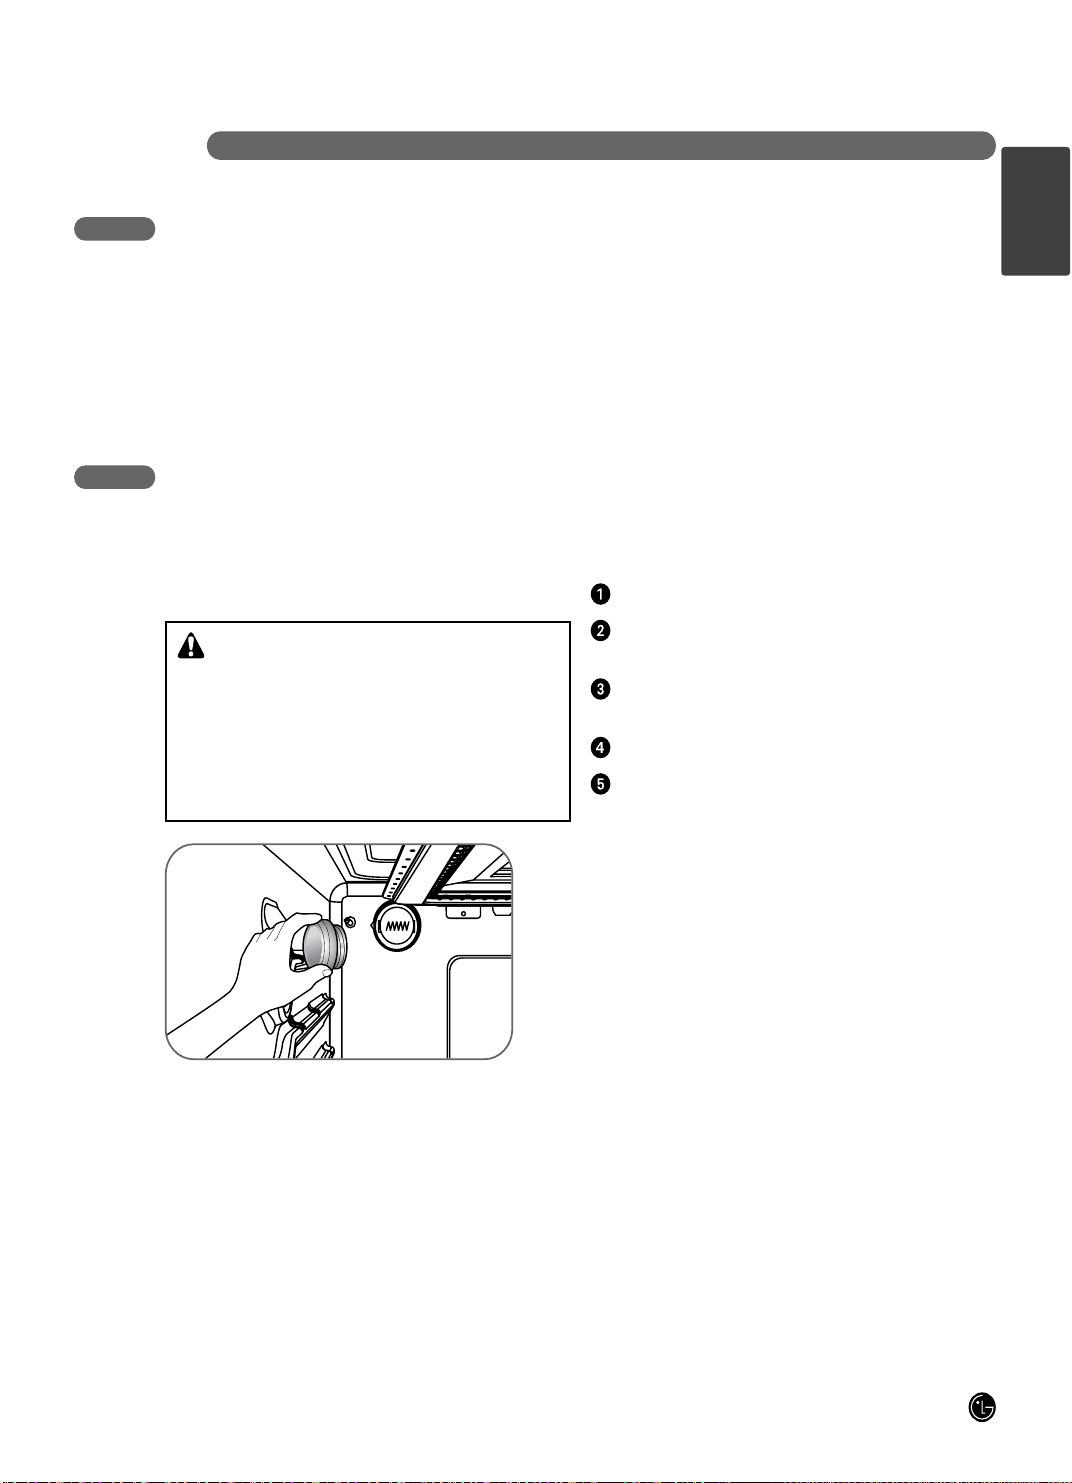
DO NOT try to bend knobs by pulling them up or
down or by hanging a towel or other such loads.
This can damage the gas valve shaft.
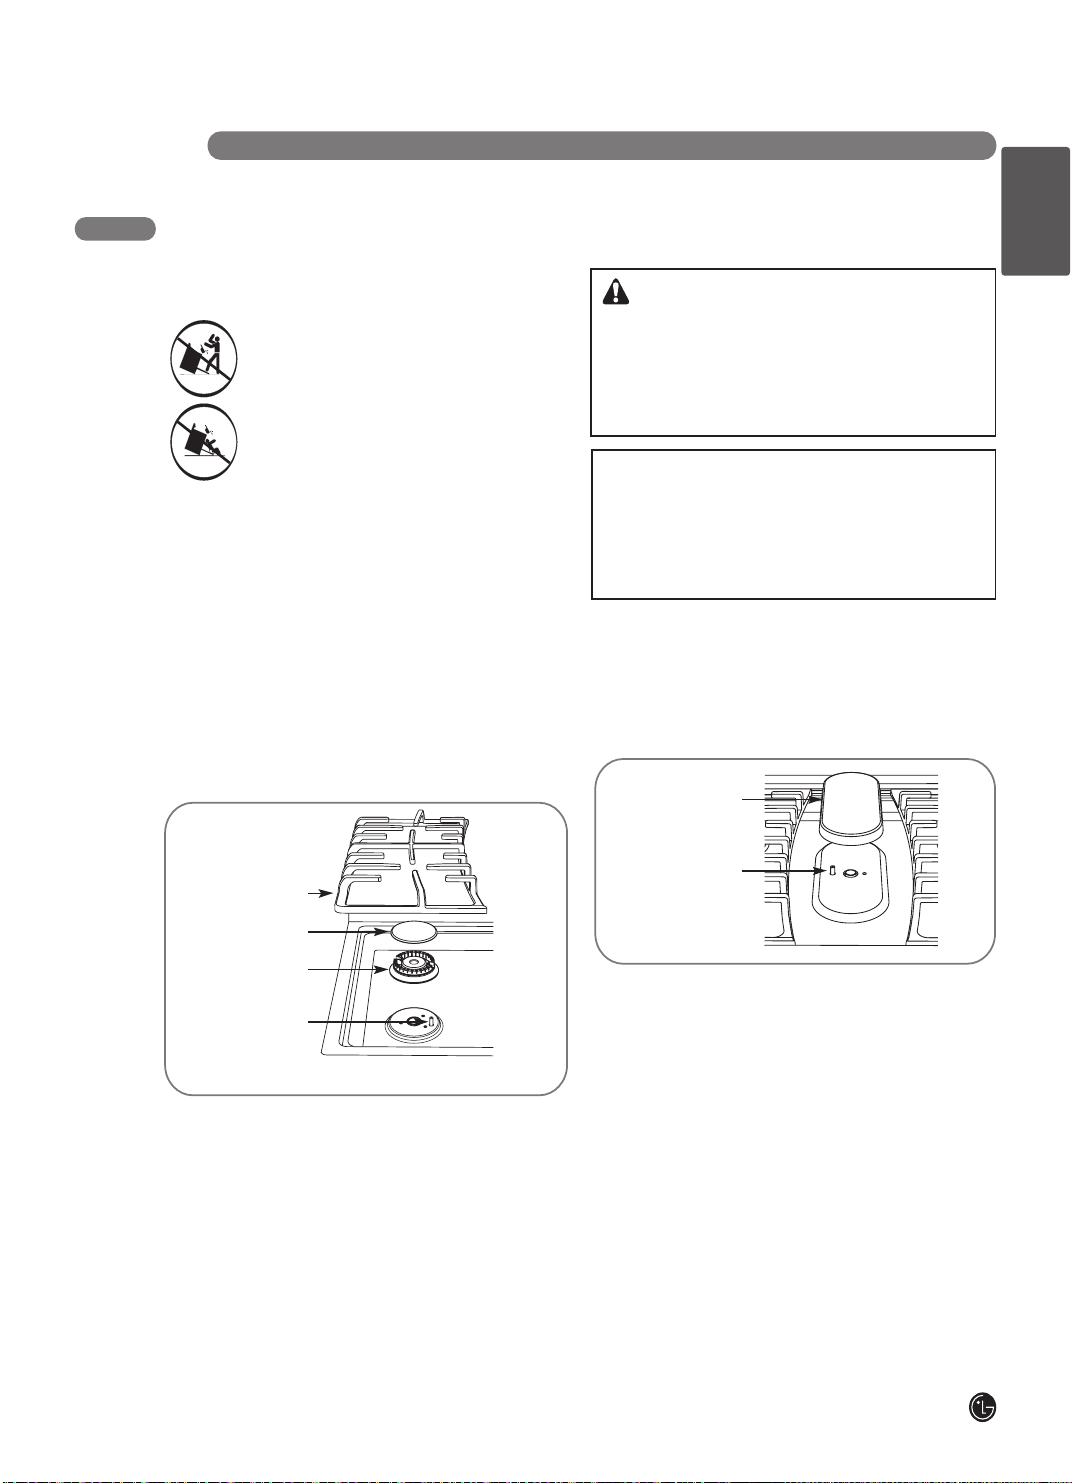
The control knobs may be
removed for easier cleaning.
Make sure the knobs are in
the “OFF” positions and pull
them straight off the stems
for cleaning.
To replace the knobs, make
sure the knob has the “OFF” position centered at the
top and slide the knob directly onto the stem.
Surface burner knob
29
C ARE AND C LEANI N G OF THE RANGE
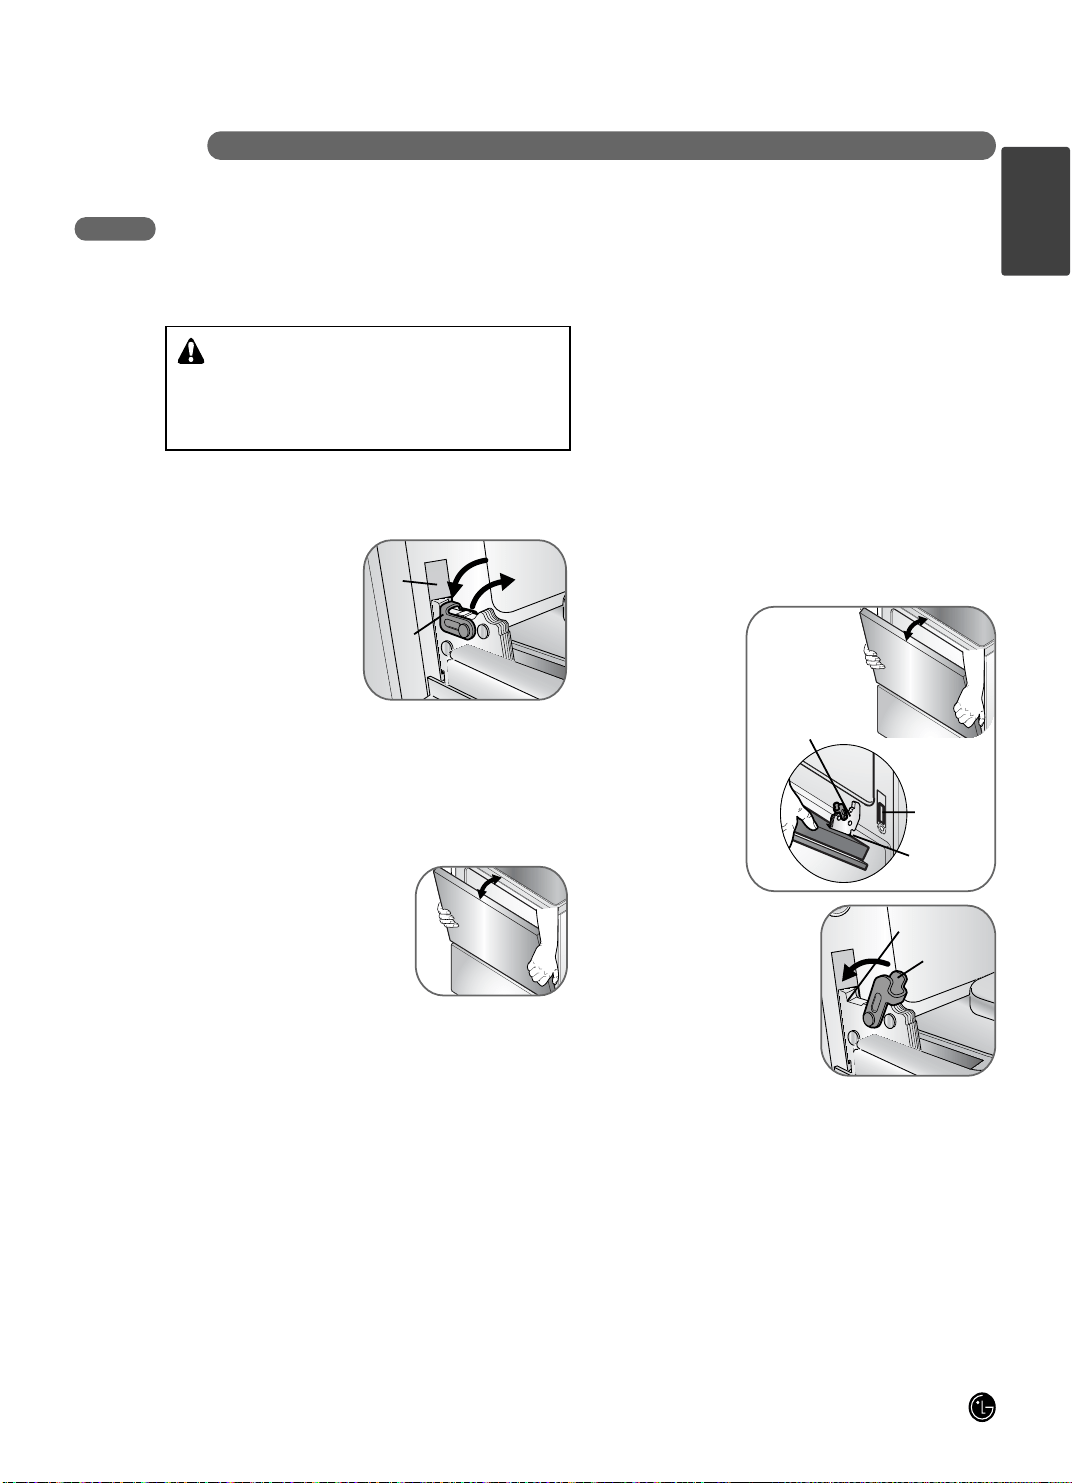
OVEN DOOR
TO REMOVE THE DOOR
Step. 1
Open the door fully.
Step. 2
Pull the hinge locks down
toward the door frame to
the unlocked position.
Step. 3
Firmly grasp both sides of the door at the top.
Step. 4
Close door to the door removal
position, which is approximately
5 degrees.
Step. 5
Lift door up and out until the hinge
arm is clear of the slot.
Step. 1
Firmly grasp both sides of the door at the top.
Step. 2
With the door at the same angle as the removal
position, seat the indentation of the hinge arm into the
bottom edge of the hinge slot. The notch in the hinge
arm must be fully seated into the bottom of the slot.
Step. 3
Open the door fully.
If the door will not
open fully, the
indentation is not
seated correctly in
the bottom edge of
the slot.
Step. 4
Push the hinge
locks up against the front
frame of the oven cavity to the
locked position.
Step. 5
Close the oven door.
The oven door is removable, but it is heavy. You may
need help removing and replacing the door.
TO CLEAN THE INSIDE OF THE DOOR
• DO NOT allow excess water to run into any holes or
slots in the door.
• Because the area inside the gasket in front of the
cavity is cleaned during the self clean cycle, you do
not need to clean this by hand.
• The area outside the gasket can be cleaned with a
soap-filled plastic scouring pad.
TO CLEAN THE OUTSIDE OF THE DOOR
• Use soap and water to thoroughly clean the top,
sides and front of the oven door. Rinse well. You
may also use a glass cleaner to clean the glass on
the outside of the door.
• Spillage of marinades, fruit juices, tomato sauces
and basting materials containing acids may cause
discoloration and should be wiped up immediately.
When the surface is cool, clean and rinse.
• DO NOT use oven cleaners, cleansing powders or
harsh abrasives on the outside of the door.
TO REPLACE THE DOOR
Slot
Hinge
lock
Lock
Unlock
about 5°
Hinge arm
Indentation
Bottom
edge of
slot
Hinge arm
Hinge lock
CAUTION:
• Be careful when removing and lifting the door.
• DO NOT lift the door by the handle.
- The door is very heavy.
about 5°
ENGLISH
30
C A R E AND C LEANI N G OF TH E RANGE
After broiling, remove the
broiler pan from the oven.
Remove the grid from the
pan. Carefully pour out
grease from the pan into a
proper container. Wash and
rinse the broiler pan and grid
in hot water with a soap-filled
or plastic scouring pad.
If food has been burned on the broiler pan or grid,
spray the pan and grid with a detergent and let them
soke. Use a paper towel or wash rag with warm water
to clean.
NOTES:
• The broiler pan and grid may be cleaned with a
commercial oven cleaner.
• Both the broiler pan and grid are dishwasher safe.
• DO NOT store a soiled broiler pan and grid
anywhere in the range.
• DO NOT clean the broiler pan or grid in a self-
cleaning oven.
Grid
Pan
BROILER PAN AND GRID
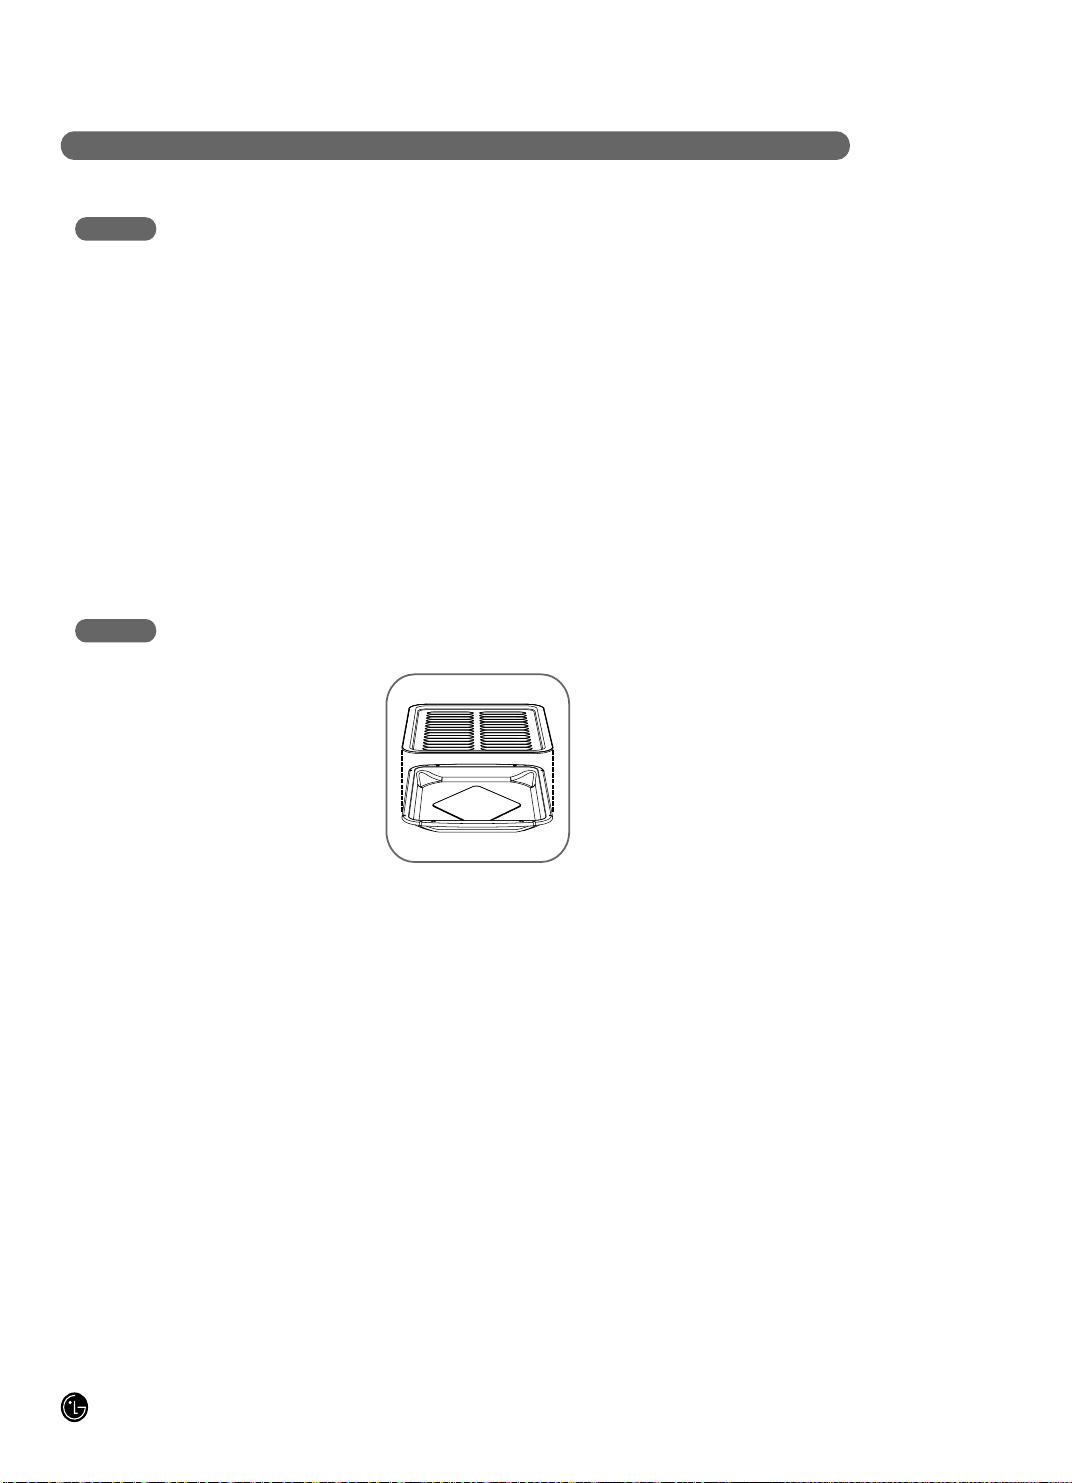
OVEN BOTTOM
The oven bottom has a porcelain enamel finish.
To make cleaning easier, protect the oven bottom
from excessive spillovers by placing a cookie sheet
on the rack below the rack you are cooking on. This is
especially important when baking a fruit pie or other
foods with a high acid content. Hot fruit fillings or
other foods with a lot of acid (tomatoes, sauerkraut,
sauces with vinegar or lemon juice) may cause pitting
and damage to the porcelain enamel surface and
should be wiped up right away.
DO NOT use aluminum foil on the bottom of the
range. It can damage the oven cavity and block the
air flow of the burner causing poor heat distribution.
To clean up spillovers, use soap and water, an
abrasive cleaner or soap-filled scouring pad. Rinse
well to remove any soap before self-cleaning.
31
C ARE AND CLE ANI NG OF T H E RANG E
OVEN RACKS
Your oven is equipped with nickel oven racks, remove
them from the oven before beginning the self-clean
cycle.
To clean the oven racks, use an abrasive cleanser.
After cleaning, rinse the racks with clean water and
dry with a clean cloth. If the racks ever become hard
to slide, wipe the rack edges or oven rack supports
with vegetable oil.
The oven light is a standard 40-watt appliance bulb. It
will come on when the oven door is open. When the
oven door is closed, thouch OVEN LIGHT to turn ON
or OFF. It will not work during the Self-Clean cycle.
OVEN LIGHT REPLACEMENT
WARNING
:
• Before replacing your oven light bulb,
DISCONNECT the electrical power to the range
at the main fuse or circuit breaker panel.
- Failure to do so can result in severe personal
injury,death or electrical shock.
• Make sure oven and bulb are cool completely.
TO REPLACE
• Make sure oven and bulb are cool.
Unplug range or disconnect power.
Turn the glass bulb cover in the back of the oven
counterclockwise to remove.
Turn bulb counterclockwise to remove from
socket.
Replace bulb and bulb cover by turning clockwise.
Plug in range or reconnect power.
ENGLISH
32
CARE AND CLEANING OF THE RANGE
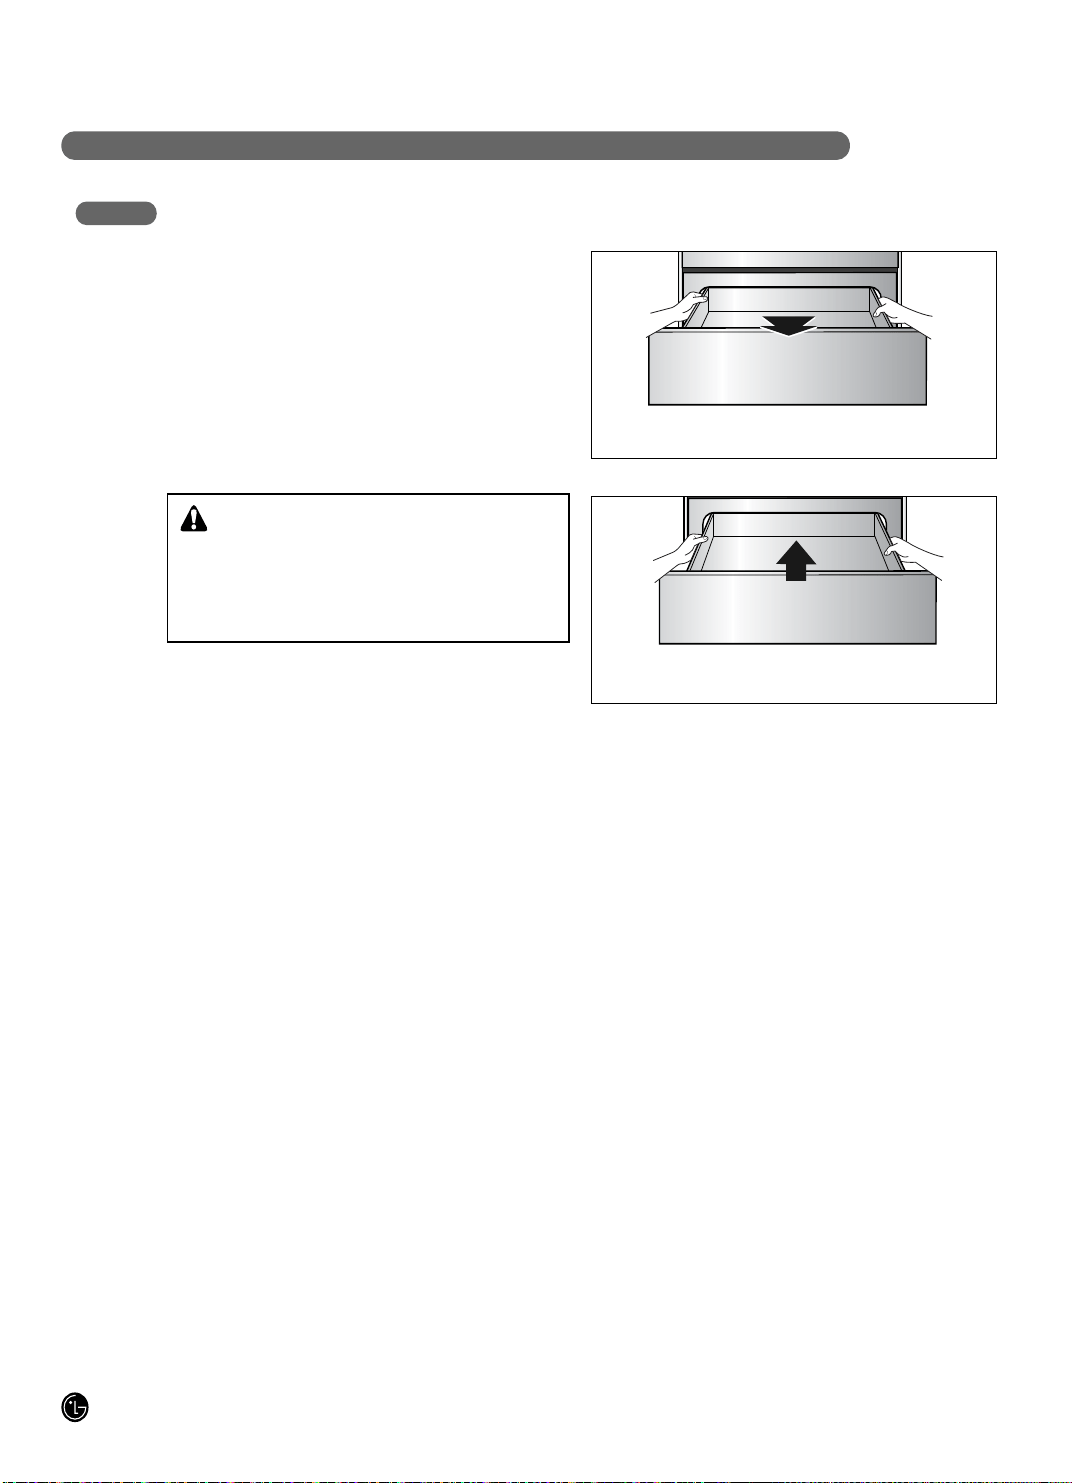
To Remove Storage Drawer:
CAUTION - Turn power OFF before removing the
storage drawer.
Pull the drawer out until it stops.
Lift the front of the drawer until the stops clear the
guides.
Remove the drawer.
To Replace the Storage Drawer:
Place the drawer rails on the guides.
Push the drawer back until it stops.
Lift the front of the drawer and push back until the
stops clear the guides.
Lower the front of the drawer and push back until
it closes.
REMOVING & REPLACING THE STORAGE DRAWER
Lift the front
Pull the drawer
• Turn POWER OFF before removing the
Warming Drawer.
- Failure to do so can result in severe personal
injury, death, or electrical shock.
WARNING
33
T RO U BLESHO OTING
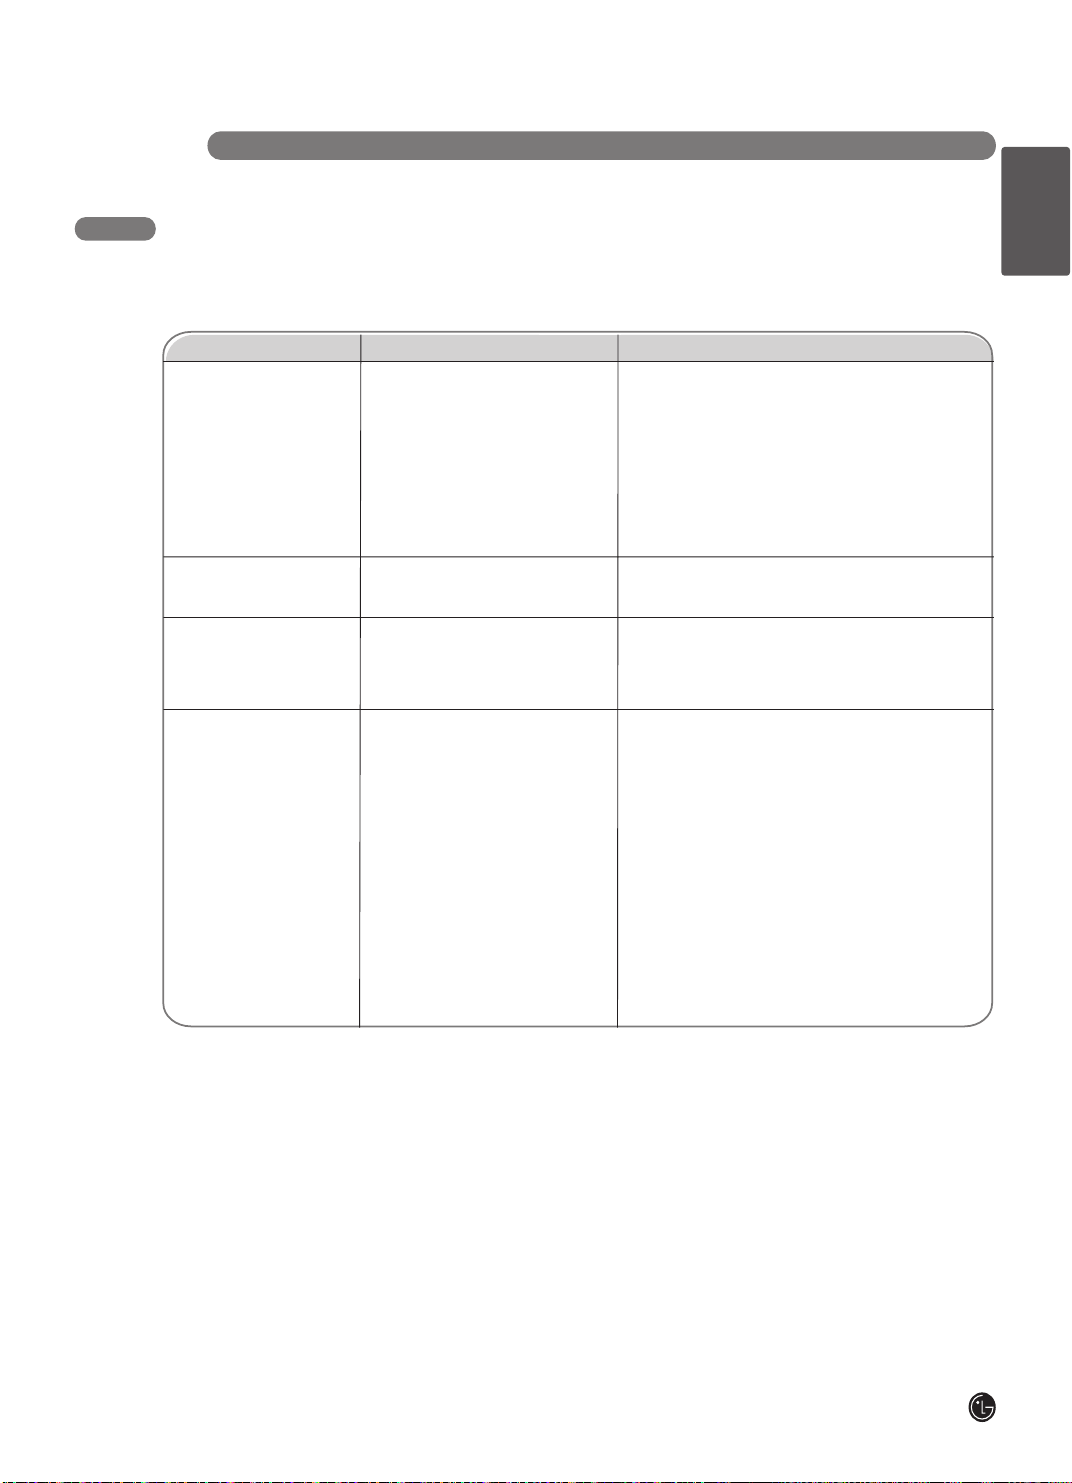
BEFORE CALLING FOR SERVICE
Before you call for service, review this list. It may save you time and expense. This list includes common
occurrences that are not the result of a defect in workmanship or materials.
open.
• Make sure that the oven gas shut-off valve is fully
snoituloSsesuaC elbissoPmelborP
Top burners do not
light or do not burn
evenly
Burner flames very
large or yellow
Surface burners light
but the oven does not
Food does not bake or
roast properly
• The plug on range is not completely
inserted in the electrical outlet.
• Burner slits on the side of the burner
may be clogged.
• Improper burner assembly.
• Improper air to gas proportion.
• The oven gas shut-off valve may
have accidentally been moved
during cleaning or moving.
• Improper oven controls setting.
• Incorrect rack position.
• Incorrect cookware or cookware of
improper size being used.
• Oven thermostat needs adjustment.
• Clock not set correctly.
• Aluminum foil used improperly in
the oven.
• Make sure the electrical plug is inserted into a live,
properly grounded outlet.
• Remove the burners and clean them. Check the
electrode area for burned-on food or grease. See the
“CARE AND CLEANING OF THE RANGE” section.
• Make sure the burner parts are installed correctly. See
the “CARE AND CLEANING OF THE RANGE” section.
• If range is connected to LP gas, contact the technician
who installed your range or made the conversion.
• See the “USING THE OVEN” section.
• See the “USING THE OVEN” section.
• See the “USING THE OVEN” section.
• See the “HOW TO ADJUST THE OVEN
THERMOSTAT” section.
• See the “USING THE CLOCK AND TIMER” section.
• See the “CARE AND CLEANING OF THE RANGE”
section.
ENGLISH

34
T ROUBLE SHOOT I N G
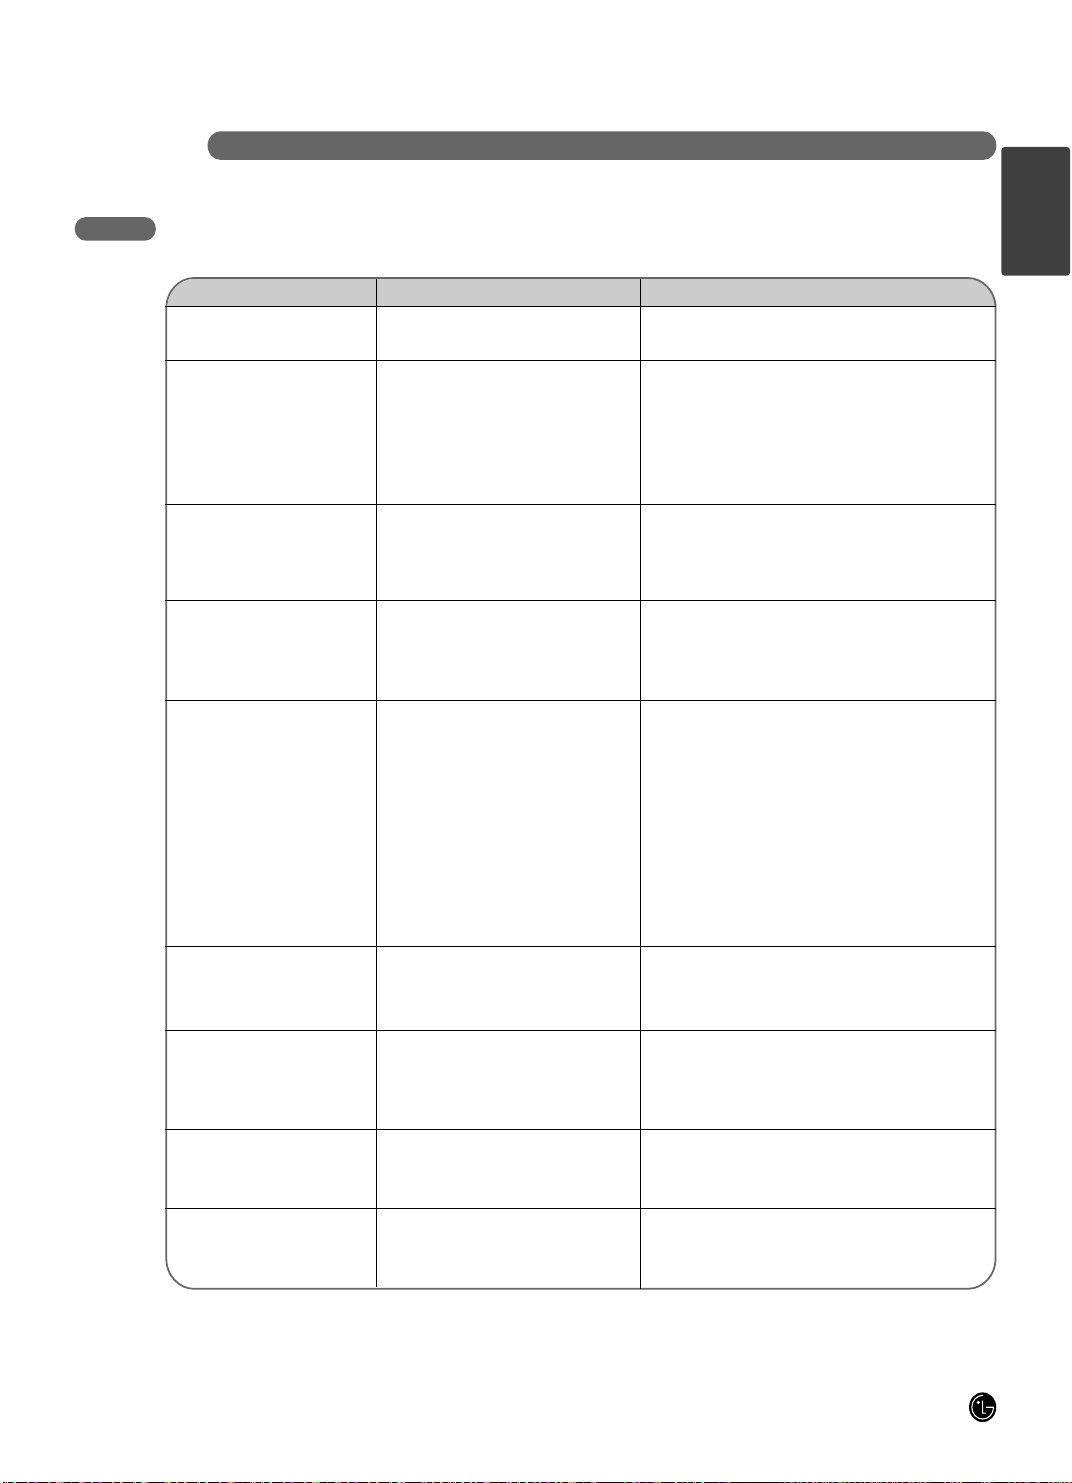
BEFORE CALLING FOR SERVICE
Problem Possible Causes Solutions
Food does not broil
properly in the oven
Oven temperature too
hot or too cold
Clock and timer does
not work
Oven light does not
work
Oven will not self-
clean
“Crackling” or
“popping” sound
Too much smoking
during a self clean
cycle.
• Improper oven controls setting.
• Oven door not closed.
• Incorrect rack position.
• Food being cooked in a hot pan.
• Cookware not suited for broiling.
• Aluminum foil used on the broiling
pan and grid has not been fitted
properly and slit as recommended.
• Oven thermostat needs adjustment.
• The plug on range is not completely
inserted in the electrical outlet.
• A fuse in your home may be blown
or the circuit breaker tripped.
• Improper oven controls setting.
• The light bulb is loose or defective.
• The plug on range is not completely
inserted in the electrical outlet.
• The oven temperature is too high to
set a self-clean operation.
• Improper oven controls setting.
• This is the sound of the metal
heating and cooling during both the
cooking and cleaning functions.
• Too much soil.
• Make sure you press the “BROIL HI/LO” pad.
• See the “USING THE OVEN” section.
• See the “BROILING GUIDE”.
• Use the broiling pan and grid that came with your
range. Make sure it is cool.
• Use the broiling pan and grid that came with your
range.
• See the “USING THE OVEN” section.
• See the “HOW TO ADJUST THE OVEN
THERMOSTAT” section.
• Make sure the electrical plug is inserted into a live,
properly grounded outlet.
• Replace the fuse or reset the circuit breaker.
• See the “USING THE CLOCK AND TIMER” section.
• Tighten or replace the bulb.
• Make sure the electrical plug is inserted into a live,
properly grounded outlet.
• Allow the range to cool to room temperature and
reset the controls.
• See the “USING THE SELF-CLEANING OVEN” section.
• This is normal.
• Press the “CLEAR OFF” pad. Open the windows to
get rid of smoke from the room. Wait until the DOOR
LOCKED light goes off. Wipe up the excess soil and
reset the clean cycle.
35
T RO U BLESHOOTING
BEFORE CALLING FOR SERVICE
snoituloSsesuaC elbissoPmelborP
Broil or self-clean
doesn’t work
Oven not clean after a
self-clean cycle
“CLOSE DOOR TO
CONTINUE BROILING”
or “DOOR OPENED”
appears in the display
“DOOR LOCKED” light
is on when you want to
cook
Oven control beeps
and displays any F
code error.
Oven racks are
difficult to slide
Power outage, clock
flashes
“Burning” or “oily”
odor emitting from the
vent
Strong odor
• The oven temperature is too high.
• Improper oven controls setting.
• The oven was heavily soiled.
• The broil or self-clean cycle has
been selected but the door is not
closed.
• The oven door is locked because the
temperature inside the oven has not
dropped below the locking
temperature.
• You have “F3”.
• You have “F11”.
• If the function code repeats.
• The oven racks were cleaned in a
self-clean cycle.
• Power outage or surge.
• This is normal in a new oven and
will disappear in time.
• An odor from the insulation around
the inside of the oven is normal for
the first few times the oven is used.
• Allow the oven to cool below locking temperature.
• This can take up to 1 hr after the cycle is complete.
• See the Using the “USING THE SELF-CLEANING
OVEN” section.
• Clean up heavy spillovers before beginning the
self- clean cycle. Heavily soiled ovens may need to
self-clean again or for a longer period of time.
• Close the oven door.
• Touch the “CLEAR OFF” pad. Allow the oven to
cool.
• Touch the “CLEAR OFF” pad. Allow the oven to
cool for one hour. Put the oven back into
operation.
• Check the main gas shut-off valve or the oven gas
shut-off valve(see “Surface burners light but oven
burner does not” column).
• Disconnect all power to the range for 5 minutes
and then reconnect power. If the function error
code repeats, call for service.
• Apply a small amount of vegetable oil to a paper
towel and wipe the edges of the oven racks with
the paper towel. Do not use lubricant sprays.
• Reset the clock. If the oven was in use, you must
reset it by touching the “CLEAR OFF” pad,
setting the clock and resetting any cooking
function.
• To speed the process, set a self-clean cycle for a
minimum of 3 hours. See the “USING THE SELF-
CLEANING OVEN” section.
• This is temporary.
ENGLISH
36
T ROUBLESH O OTING
BEFORE CALLING FOR SERVICE
Problem Possible Causes Solutions
Drawer does not slide
smoothly or drags
Excessive
condensation in the
drawer
• The drawer is out of alignment.
• Drawer is over-loaded or load is
unbalanced.
• Liquid in drawer.
• Uncovered foods.
• Fully extend the drawer and push it all the way in.
See the Care and Cleaning of the Range section.
• Reduce weight. Redistribute drawer contents.
• Remove liquid.
• Cover food with lid or aluminum foil.

37
LG ELECTRONICS CANADA, INC.
LG GAS OVEN LIMITED WARRANTY - Canada
WARRANTY: Should your LG Gas Oven (“Product”) fail due to a defect in material or workmanship under normal home use during the warranty period set forth below, LG
Canada will at its option repair or replace the Product upon receipt of proof of original retail purchase. This warranty is valid only to the original retail purchaser of the product
and applies only to a Product distributed in Canada by LG Canada or an authorized Canadian distributor thereof. The warranty only applies to Products located and used within
Canada.
Replacement products and parts are warranted for the remaining portion of the original warranty period or ninety (90) days, whichever is greater.
Replacement products and parts may be new or remanufactured.
LG Authorized Service Center warranties their repair work for thirty (30) days.
LG CANADA’S SOLE LIABILITY IS LIMITED TO THE WARRANTY SET OUT ABOVE. EXCEPT AS EXPRESSLY PROVIDED ABOVE, LG CANADA MAKES NO AND
HEREBY DISCLAIMS ALL OTHER WARRANTIES AND CONDITIONS RESPECTING THE PRODUCT, WHETHER EXPRESS OR IMPLIED, INCLUDING, BUT NOT
LIMITED TO, ANY IMPLIED WARRANTY OR CONDITION OF MERCHANTABILITY OR FITNESS FOR A PARTICULAR PURPOSE, AND NO REPRESENTATIONS
SHALL BE BINDING ON LG CANADA. LG CANADA DOES NOT AUTHORIZE ANY PERSON TO CREATE OR ASSUME FOR IT ANY OTHER WARRANTY
OBLIGATION OR LIABILITY IN CONNECTION WITH THE PRODUCT. TO THE EXTENT THAT ANY WARRANTY OR CONDITION IS IMPLIED BY LAW, IT IS LIMITED
TO THE EXPRESS WARRANTY PERIOD ABOVE.
LG CANADA, THE MANUFACTURER OR DISTRIBUTOR SHALL NOT BE LIABLE FOR ANY INCIDENTAL, CONSEQUENTIAL, SPECIAL, DIRECT OR INDIRECT
DAMAGES, LOSS OF GOODWILL, LOST PROFITS, PUNITIVE OR EXEMPLARY DAMAGES OR ANY OTHER DAMAGE, WHETHER ARISING DIRECTLY OR
INDIRECTLY FROM ANY CONTRACTUAL BREACH, FUNDAMENTAL OR OTHERWISE, OR FROM ANY ACTS OR OMISSIONS, TORT, OR OTHERWISE.
This warranty gives you specific legal rights. You may have other rights which may vary from province to province depending on applicable provincial laws. Any term of this
warranty that negates or varies any implied condition or warranty under provincial law is severable where it conflicts with provincial law without affecting the remainder of this
warranty’s terms.
THIS LIMITED WARRANTY DOES NOT COVER:
1. Service trips to deliver, pick up, or install the product; instructing a customer on operation of the product; repair or replacement of fuses or correction of wiring , or correction of
unauthorized repairs/installation.
2. Failure of the product to perform during power failures and interruptions or inadequate electrical service.
3. Damage caused by leaky or broken water pipes, frozen water pipes, restricted drain lines, inadequate or interrupted water supply or inadequate supply of air.
4. Damage resulting from operating the Product in a corrosive atmosphere or contrary to the instructions outlined in the Product owner’s manual.
5. Damage to the Product caused by accidents, pests and vermin, lightning, wind, fire, floods, or acts of God.
6. Damage resulting from the misuse, abuse, improper installation, repair, or maintenance of the Product. Improper repair includes use of parts not approved or specified by
LG Canada.
7. Damage or product failure caused by unauthorized modification or alteration, or use for other than its intended purpose, or resulting from any water leakage due to improper
installation.
8. Damage or Product failure caused by incorrect electrical current, voltage, commercial or industrial use, or use of accessories, components, or cleaning products that are not
approved by LG Canada.
9. Damage caused by transportation and handling, including scratches, dents, chips, and/or other damage to the finish of your product, unless such damage results from
defects in materials or workmanship and is reported within one (1) week of delivery.
10. Damage or missing items to any display, open box, discounted, or refurbished Product.
11. Products with original serial numbers that have been removed, altered, or cannot be readily determined. Model and Serial numbers, along with original retail sales
receipt,
are required for warranty validation.
12. Increases in utility costs and additional utility expenses.
13. Replacement of light bulbs, filters, or any consumable parts.
14. Repairs when your Product is used in other than normal and usual household use (including, without limitation, commercial use, in offices or recreational facilities) or
contrary to the instructions outlined in the Product owner’s manual.
15. Costs associated with removal of the Product from your home for repairs.
16. The removal and reinstallation of the Product if it is installed in an inaccessible location or is not installed in accordance with published installation instructions, including the
Product owner’s and installation manuals.
17. Accessories to the Product such as door bins, drawers, handles, shelves, etc.. Also excluded are parts besides those that were originally included with the Product.
All costs associated with the above excluded circumstances shall be borne by the consumer.
For complete warranty details and customer assistance,
please call or visit our website:
Call 1-888-542-2623 (24 hours a day, 365 days a year) and
select the appropriate option from the menu, or visit our website
at http://ca.lgservice.com
Write your warranty information below:
Product Registration Information:
Model:
Serial Number:
Date of Purchase:
Gas Oven
One (1) year from the date of original retail purchase
Parts and Labor (internal/functional parts only)
WARRANTY PERIOD: (Note: If the original date of purchase can not be verified, the warranty will begin
sixty (60) days from the date of manufacture).
ENGLISH

38
Memo

P/No.: MFL63261002
www.lg.com
MANUEL D'UTILISATION
CUISINIÈRE À GAZ
Veuillez lire ce manuel avec attention avant d'utiliser cet appareil et
gardez-le à portée de main pour toute référence en cas de besoin.
LRG3093ST
LRG3093SB
LRG3093SW
FRANÇAIS
INTRODUCTION
2
CONSIGNES DE SÉCURITÉ IMPORTANTES
Instructions de sécurité importantes. ..............................3
Que faire en cas d'odeur de gaz. ....................................4
Dispositif Anti-basculement..........................................3-4
Précautions de sécurité ...............................................4-8
CONSIGNES DE FONCTIONNEMENT
Description et pièces.......................................................9
Utilisation des brûleurs de surface ..........................10-11
Panneau de commande—LRG3093S...........................12
Utilisation du four ...................................................13–16
Utilisation de l'horloge et du minuteur ...........................17
Utilisation des fonctions de cuisson et de différés ..18–19
Réglage de la fonction warm (maintien au chaud)........20
Réglage de la fonction proof (levage) ..........................20
Fonctions spéciales des commandes du four.........21–22
Utilisation de l'auto-nettoyage .................................23–24
ENTRETIEN ET NETTOYAGE DE LA CUISINIÈRE
Entretien et nettoyage...................................................25
Couvercles et têtes des brûleurs...................................26
Grilles des brûleurs .......................................................27
Surface de la table de cuisson......................................27
Surfaces en acier inoxydable........................................28
Évents du four...............................................................28
Panneau de commande................................................28
Panneau avant et boutons ............................................28
Porte du four .................................................................29
Fond du four..................................................................30
Lèchefrite et grille..........................................................30
Grilles du four et du tiroir chauffe-plats .........................31
Remplacement de l'éclairage du four............................31
Tiroir chauffe-plats amovible.........................................32
DÉPANNAGE
Avant d'appeler un dépanneur.................................33-36
GARANTIE
Garantie pour les clients au canada..............................37
MERCI!
Félicitations pour votre achat et
bienvenue dans la famille LG. Votre
nouvelle cuisinière à gaz LG offre des
fonctions de cuisson de précision
simples à utiliser, avec un style
résolument élégant. Respectez les
consignes de fonctionnement et
d'entretien de ce guide et votre
cuisinière fonctionnera durant de
nombreuses années.
Informations d'enregistrement du produit
Modèle :
Numéro de série :
Date d'achat :
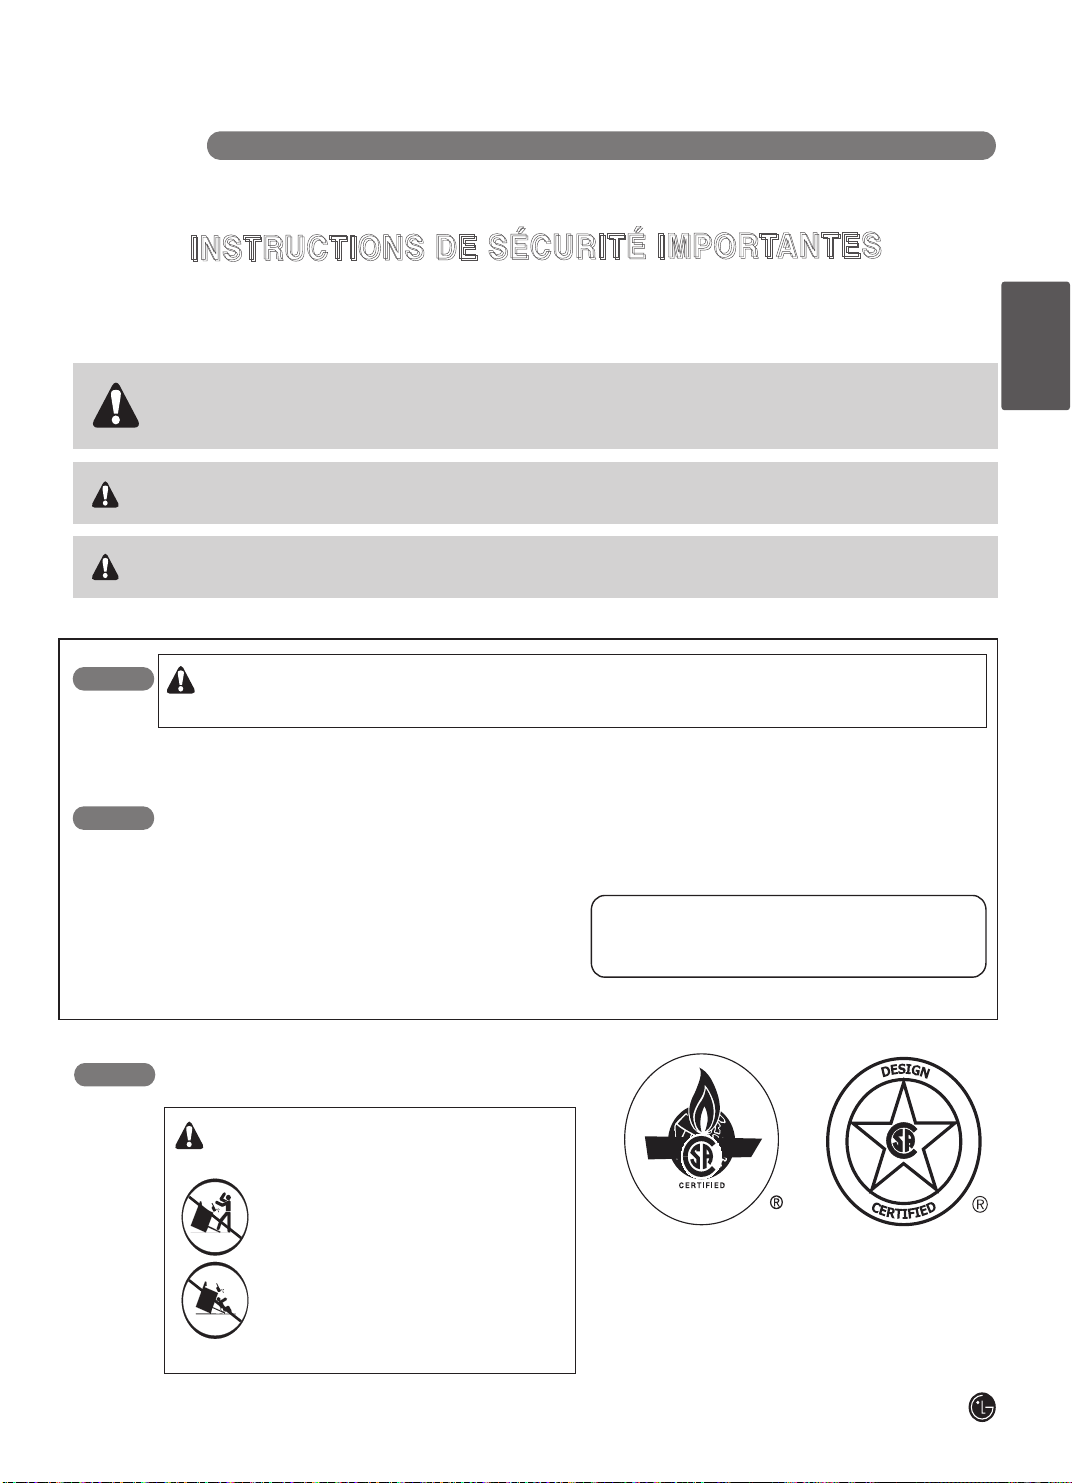
CONSIGNES DE S É C U R ITÉ I MPO RTANTE S
3
LISEZ TOUTES LES CONSIGNES AVANT D'UTILISER L'APPAREIL
DISPOSITIF ANTI-BASCULEMENT
I
I
N
N
S
S
T
T
R
R
U
U
C
C
T
T
I
I
O
O
N
N
S
S
D
D
E
E
S
S
É
É
C
C
U
U
R
R
I
I
T
T
É
É
I
I
M
M
P
P
O
O
R
R
T
T
A
A
N
N
T
T
E
E
S
S
Lisez et respectez toutes les consignes avant d'utiliser votre four pour éviter tout risque d'incendie, d'électrocution, de
blessure ou de dégât lors de l'utilisation de la cuisinière. Ce guide n'aborde pas toutes les situations pouvant se produire.
Contactez toujours un technicien ou le fabricant en cas de problème que vous ne parvenez pas à résoudre.
Ce symbole attire votre attention sur des dangers ou des pratiques dangereuses
qui pourraient provoquer des blessures graves ou le décès.
Ce symbole d'avertissement de sécurité attire votre attention sur les dangers potentiels qui peuvent
entraîner des blessures ou le décès. Tous les messages de sécurité reprennent ce symbole
d'avertissement ainsi que la mention AVERTISSEMENT ou ATTENTION.
Ce symbole attire votre attention sur des dangers ou des pratiques dangereuses qui
pourraient provoquer des blessures ou des dégâts.
AVERTISSEMENT
ATTENTION
AVERTISSEMENT
• TOUTES LES CUISINIÈRES
PEUVENT BASCULER
• CELA PEUT PROVOQUER DES BLESSURES
• INSTALLEZ LES DISPOSITIFS ANTI-
BASCULEMENT FOURNIS AVEC LA
CUISINIÈRE
• CONSULTEZ L'INSTALLATION
QUE FAIRE EN CAS D'ODEUR DE GAZ
• Ouvrez les fenêtres
• N'ALLUMEZ AUCUN appareil.
•
NE TOUCHEZ AUCUN interrupteur électrique
•
N'UTILISEZ AUCUN téléphone dans le bâtiment.
• Contactez immédiatement votre fournisseur de gaz à
partir du téléphone d'un voisin. Suivez ses
instructions.
• S'il est impossible de le contacter, appelez les
pompiers.
L'installation et l'entretien doivent être réalisés
par un installateur qualifié, un service de
dépannage ou le fournisseur de gaz
AVERTISSEMENT :
Si les informations de ce manuel ne sont pas exactement suivies,
cela peut provoquer un incendie ou une explosion pouvant entraîner des dégâts, des blessures ou le décès.
• N'utilisez et ne conservez pas de l'essence ou d'autres gaz et liquides inflammables à proximité de cet
appareil ou de tout autre appareil.
FRANÇAIS

4
CONSIGNES DE SÉCURITÉ IMPORTANTES
LISEZ TOUTES LES CONSIGNES AVANT D'UTILISER L'APPAREIL
REMARQUE DE SÉCURITÉ IMPORTANTE
La loi requiert que le gouverneur de la Californie publie une liste
des substances connues pour provoquer des malformations
congénitales ou d'autres atteintes à la reproduction. Elle
requiert également que les entreprises mettent en garde leurs
clients contre l'exposition à de telles substances.
Les appareils à gaz peuvent entraîner une exposition mineure à
quatre de ces substances, à savoir le benzène,
le monoxyde de carbone, le formaldéhyde et les suies, due
principalement à la combustion incomplète du gaz naturel ou
PL.
Le réglage correct des brûleurs, indiqué par une flamme tirant
sur le bleu plutôt que sur le jaune, réduit la combustion
incomplète.
L'exposition à ces substances peut être réduite en aérant, en
ouvrant une fenêtre ou à l'aide d'un ventilateur ou d'une hotte
d'aspiration.
PRÉCAUTIONS DE SÉCURITÉ
Demandez à l'installateur de vous montrer l'emplacement de la soupape d'arrêt de gaz de la
cuisinière, ainsi que la méthode de coupure si nécessaire.
• Faites installer et mettre à la terre votre cuisinière par un
installateur qualifié, conformément aux instructions
d'installation. Tous les réglages et les entretiens doivent être
réalisés uniquement par des installateurs de cuisinière à gaz
ou par des techniciens qualifiés.
• Branchez la cuisinière uniquement à une prise 120 V mise à la
terre. N'enlevez pas la broche ronde de mise à la terre de la
prise. Si vous avez des doutes concernant la mise à la terre du
système électrique domestique, il est de votre responsabilité
de remplacer la prise non mise à la terre par une prise à trois
broches correctement mise à la terre, conformément au Code
électrique national. N'utilisez pas de rallonge avec cet appareil.
• Évitez les incendies ou les électrocutions. N'UTILISEZ PAS de
fiche d'adaptation, une rallonge et NE RETIREZ PAS la fiche
de mise à la terre du cordon d'alimentation. Le non-respect de
cet avertissement peut provoquer des blessures graves, un
incendie ou le décès.
• Placez la cuisinière dans la cuisine en dehors du passage et à
l'abri des courants d'air pour éviter une mauvaise circulation de
l'air.
• N'ESSAYEZ PAS de réparer ou de remplacer des pièces de la
cuisinière, à moins que cela soit recommandé dans ce manuel.
Toutes les autres réparations doivent être effectuées par un
technicien qualifié.
• Assurez-vous que tous les matériaux d'emballage sont enlevés
avant d'utiliser la cuisinière, car ils pourraient s'enflammer et
causer des dommages d'incendie et de fumée.
• Assurez-vous qu'un technicien ou un installateur qualifié règle
bien la cuisinière pour le type de gaz (naturel ou PL) à utiliser.
La cuisinière peut être convertie pour utiliser les deux types de
gaz. Consultez les instructions d'installation.
• NE MONTEZ PAS ET NE VOUS ASSEYEZ PAS sur la
porte. Installez le support anti-basculement fourni avec la
cuisinière.
- La cuisinière pourrait basculer et entraîner des blessures en
raison de liquides ou d'aliments chauds renversés, ou de
l'appareil même.
- Si vous éloignez la cuisinière du mur pour la nettoyer, la
réparer ou pour toute autre raison, vérifiez que le dispositif
anti-basculement est correctement remis en place une fois la
cuisinière à nouveau poussée contre le mur.
• Pour limiter le risque de basculement de la cuisinière, veillez à
installer correctement les dispositifs anti-basculement.
• Pour vérifier que le support anti-basculement est correctement
installé : Agrippez le bord arrière supérieur de la cuisinière et
essayez doucement de la faire basculer vers l'avant. Vérifiez
que les dispositifs anti-basculement sont enclenchés.
• Tiroir chauffe-plats ou tiroir de rangement : Retirez le tiroir et
vérifiez que le pied de nivellement arrière est bien inséré dans
le support anti-basculement.
• Reportez-vous au manuel d'installation pour procéder à
l'installation correcte du support anti-basculement.
DISPOSITIF ANTI-BASCULEMENT
(suite)
Support anti-
basculement
La vis doit
pénétrer le bois
ou le béton
Plaque murale
• Une utilisation prolongée de la cuisinière peut provoquer
une élévation de la température du sol. Bon nombre de
revêtements de sols ne supportent pas ce type
d'utilisation. N'installez jamais la cuisinière sur des
carreaux vinyliques ou sur du linoléum qui ne supportent
pas ce type d'utilisation. Ne l'installez jamais directement
sur un tapis intérieur de la cuisine.
• NE LAISSEZ JAMAIS des enfants seuls ou sans
surveillance lorsque la cuisinière est chaude ou en
marche. Ils pourraient être gravement brûlés.
• NE LAISSEZ PERSONNE grimper, se reposer ou
s'accrocher à la porte du four, au tiroir chauffe-plats ou à
la table de cuisson. Cela pourrait endommager la
cuisinière ou la renverser, provoquant de graves
blessures.
• NE portez jamais de vêtements amples ou pendants lors
de l'utilisation de l'appareil. Faites attention lorsque vous
essayez d'atteindre des objets conservés dans les
placards situés au-dessus de la cuisinière.
Les matériaux inflammables peuvent prendre feu au
contact d'une flamme ou de surfaces chaudes. Cela peut
provoquer des brûlures graves.
• NE CONSERVEZ AUCUN matériau inflammable dans le
four, dans le tiroir chauffe-plats ou à proximité d'une table
de cuisson.
• N'UTILISEZ ET NE CONSERVEZ PAS de matière
combustible, de l'essence ou d'autres gaz et liquides
inflammables à proximité de cet appareil ou de tout autre
appareil.
• NE LAISSEZ PAS s'accumuler de la graisse de cuisson
ou d'autres matériaux inflammables sur la cuisinière ou à
proximité.
• N'UTILISEZ PAS d'eau sur les feux de graisses. Ne
saisissez jamais une casserole en flammes. Mettez les
commandes en position d'arrêt. Recouvrez complètement
la casserole en flammes avec un couvercle bien ajusté,
une tôle ou un plateau. Utilisez un extincteur à poudre ou
mousse chimique. Vous pouvez éteindre de la graisse en
flammes en dehors d'une casserole en la couvrant de
bicarbonate de soude ou, si possible, en utilisant un
extincteur à poudre ou mousse chimique.
• Les flammes dans le four ou le tiroir chauffe-plats peuvent
être étouffées complètement en fermant la porte du four
ou du tiroir et en mettant les commandes en position
d'arrêt ou en utilisant un extincteur à poudre ou mousse
chimique.
• N'UTILISEZ PAS le four ou le tiroir chauffe-plats comme
espace de stockage.
• Laissez les grilles du brûleur et les autres surfaces
refroidir avant de les toucher.
• NE BOUCHEZ JAMAIS les évents (bouches d'aération)
de la cuisinière. Elles permettent l'entrée et la sortie d'air
nécessaires au bon fonctionnement de la cuisinière et à la
combustion correcte. Les bouches d'aération se situent à
l'arrière de la table de cuisson, au niveau des parties
supérieure et inférieure de la porte du four et au niveau de
la partie inférieure de la cuisinière, sous le tiroir chauffe-
plats.
• De grandes rayures ou des impacts sur les portes vitrées
risquent de briser la vitre.
• Le fait de marcher, de s'appuyer ou de s'asseoir sur les
portes ou les tiroirs de la cuisinière peut provoquer des
blessures graves et des dégâts. Ne laissez pas les
enfants grimper ou jouer sur la cuisinière. Le poids d'un
enfant sur une porte ouverte peut provoquer le
basculement de la cuisinière, ce qui peut entraîner de
graves brûlures ou d'autres blessures.
• Le test de fuite de l'appareil doit être effectué
conformément aux consignes du fabricant.
CONSI GNE S DE S ÉCU RITÉ I MPORTANTE S
5
PRÉCAUTIONS DE SÉCURITÉ
(suite)
AVERTISSEMENT :
N'UTILISEZ JAMAIS cet appareil comme une
chaufferette ou pour chauffer la pièce. Il existe un risque
d'intoxication au monoxyde de carbone et de surchauffe
du four.
ATTENTION :
Les objets susceptibles
d'intéresser les enfants ne doivent pas être conservés
dans un placard situé au-dessus de la cuisinière ou sur
le dosseret : les enfants qui grimpent sur la cuisinière
pour atteindre ces objets peuvent être gravement
blessés.
LISEZ TOUTES LES CONSIGNES AVANT D'UTILISER L'APPAREIL
AVERTISSEMENT :
Ces
réglages doivent être effectués par un technicien
qualifié, conformément aux instructions du fabricant, à
tous les codes et exigences de l'autorité compétente. Le
non-respect de ces instructions peut provoquer des
blessures graves ou des dégâts. Le service qualifié
effectuant cette conversion en assume la responsabilité.
FRANÇAIS
6
CONSIGNES DE SÉCURITÉ IMPORTANTES
LISEZ TOUTES LES CONSIGNES AVANT D'UTILISER L'APPAREIL
BRÛLEURS DE SURFACE
• NE LAISSEZ JAMAIS un brûleur fonctionner à flamme
élevée, sans surveillance. Un débordement peut causer de
la fumée et des déversements graisseux pouvant
s’enflammer.
• Utilisez toujours la position LITE pour allumer les brûleurs
de la table de cuisson, et assurez-vous que les brûleurs
sont bien allumés.
• Ajustez la flamme d'un brûleur de façon à ce qu'elle ne
dépasse pas le rebord de l'ustensile. Une flamme
excessive peut être dangereuse.
• N'utilisez que des poignées sèches; des poignées humides
ou mouillées peuvent causer des brûlures par vapeur. Ne
laissez pas les poignées toucher une flamme nue quand
vous soulevez l'ustensile. N'utilisez pas une serviette ou un
gros chiffon à la place d'une poignée.
• Si vous utilisez des ustensiles en verre, assurez-vous
qu'elle est conçue pour l'utilisation sur une table de
cuisson.
• Afin de minimiser le risque de brûlures, d'inflammation des
matières inflammables ou de déversement, tournez les
poignées des ustensiles vers le côté ou l'arrière de la
cuisinière, en évitant de les laisser au-dessus des brûleurs
adjacents.
• NE LAISSEZ AUCUN article sur la table de cuisson. L'air
chaud de l'évent peut enflammer des articles inflammables
et augmenter la pression dans un contenant hermétique,
entraînant un éclatement.
• Chauffez toujours la graisse lentement et surveillez-la
pendant qu'elle chauffe.
• Suveillez bien les aliments pendant la friture à flamme
élevée.
• En cas de combinaisons de friture avec huiles et autres
matières grasses, mélangez-les avant de chauffer.
• Autant que possible, utilisez un thermomètre à friture pour
éviter le surchauffage des graisses au point de fumée.
• Utilisez le moins de graisse que possible pour une bonne
friture. Trop remplir la poêle de graisse peut causer des
déversements lors de l'ajout des aliments.
• NE FLAMBEZ PAS d'aliments sur la table de cuisson.
• N'UTILISEZ PAS un wok sur la table de cuisson si celui-ci
est muni d'un collier métallique qui se place sur la grille du
brûleur, comme support. Ce collier peut agir comme piège
à chaleur, ce qui endommagerait la grille et la tête du
brûleur. Le brûleur pourrait aussi ne pas bien fonctionner.
Le niveau d'oxyde de carbone pourrait alors surpasser les
limites admissibles, ce qui serait nuisible à la santé.
• Les aliments à frire devraient être aussi secs que possible.
Le gel sur les aliments surgelés ou l'humidité sur les
aliments frais peut faire bouillir le gras chaud et le faire
déborder.
• NE DÉPLACEZ JAMAIS une poêle remplie de graisse
chaude, surtout une friteuse. Attendez que la graisse
refroidisse.
• NE LAISSEZ AUCUN article en plastique sur la table de
cuisson, car il pourrait fondre s'il se trouve trop près de
l'évent.
• Gardez tous les plastiques loin des brûleurs de la table de
cuisson.
• Afin d'éviter le risque de brûlure, assurez-vous toujours que
les commandes des brûleurs sont en position d'arrêt (OFF)
et que les grilles ont refroidi avant de tenter de les enlever.
• Si vous sentez du gaz, coupez le gaz à la cuisinière et
contactez un technicien qualifié. N'utilisez jamais une
flamme nue pour détecter une fuite.
• Tournez toujours la commande du brûleur en position
d'arrêt avant d'enlever l'ustensile de cuisine.
• NE SOULEVEZ PAS la table de cuisson. Vour risqueriez
de l'endommager et de causer un mauvais fonctionnement
de la cuisinière.
• Si la cuisinière se trouve près d'une fenêtre, n'y suspendez
pas de rideaux longs qui pourraient être soufflés au-dessus
des brûleurs, créant ainsi un risque d'incendie.
AVERTISSEMENT :
• Si la flamme du brûleur supérieur s’éteint, du gaz
continue de s’échapper du brûleur jusqu’à ce que le
bouton soit placé à la position OFF (arrêt). Ne laissez
pas les brûleurs allumés sans surveillance.
• Utilisez des poêles de la taille appropriée; ÉVITEZ
d'utiliser des poêles instables ou qui basculent
facilement. Choisissez des ustensiles de cuisine à fond
plat assez grands pour couvrir les grilles des brûleurs.
Pour éviter les déversements, assurez-vous que les
ustensiles de cuisine sont assez grands pour contenir
tous les aliments. Cela réduira le temps de nettoyage et
empêchera l'accumulation dangereuse d'aliments, car
un gros bouillonnement ou un gros déversement
pourrait causer un incendie. Utilisez des poêles avec un
manche facile à saisir et qui ne retient pas la chaleur.

C ONSIGNES DE SÉ CURITÉ I M P O RTANTE S
7
LISEZ TOUTES LES CONSIGNES AVANT D'UTILISER L'APPAREIL
FOUR AUTO-NETTOYANT
• Assurez-vous d'essuyer tout gros déversement avant
d'utiliser l'auto-nettoyage.
• N'UTILISEZ PAS de nettoyants pour les fours. Aucun
nettoyant ni aucune doublure commerciale devrait être
utilisée dans le four ou autour du four. Les résidus de
nettoyants pour les fours endommageront l'intérieur du
four lors de l'utilisation de l'auto-nettoyage.
• Retirez les plateaux de cuisson et autres accessoires
du four avant de démarrer l'auto-nettoyage. Retirez
également tous les éléments rangés dans le tiroir du
bas avant de lancer le cycle d'auto-nettoyage.
• Ne nettoyez que les pièces indiquées dans le guide
d'utilisation.
• NE NETTOYEZ PAS le joint de la porte. Ce dernier est
essentiel pour assurer une bonne étanchéité. Assurez-
vous de ne pas frotter, endommager ou déplacer le
joint.
• Si l'auto-nettoyage ne fonctionne pas bien, éteignez le
four et déconnectez la cuisinière de la prise de courant.
Prenez alors contact avec un technicien qualifié.
BIEN CUIRE LA VIANDE ET LA VOLAILLE
Faites bien cuire la viande et la volaille. La température
INTERNE de la viande doit être d'au moins 71 °C (160
°F), et celle de la volaille, d'au moins 82 °C (180 °F).
Cuire les aliments à cette température protège
habituellement contre les maladies d'origine alimentaire.
FRANÇAIS
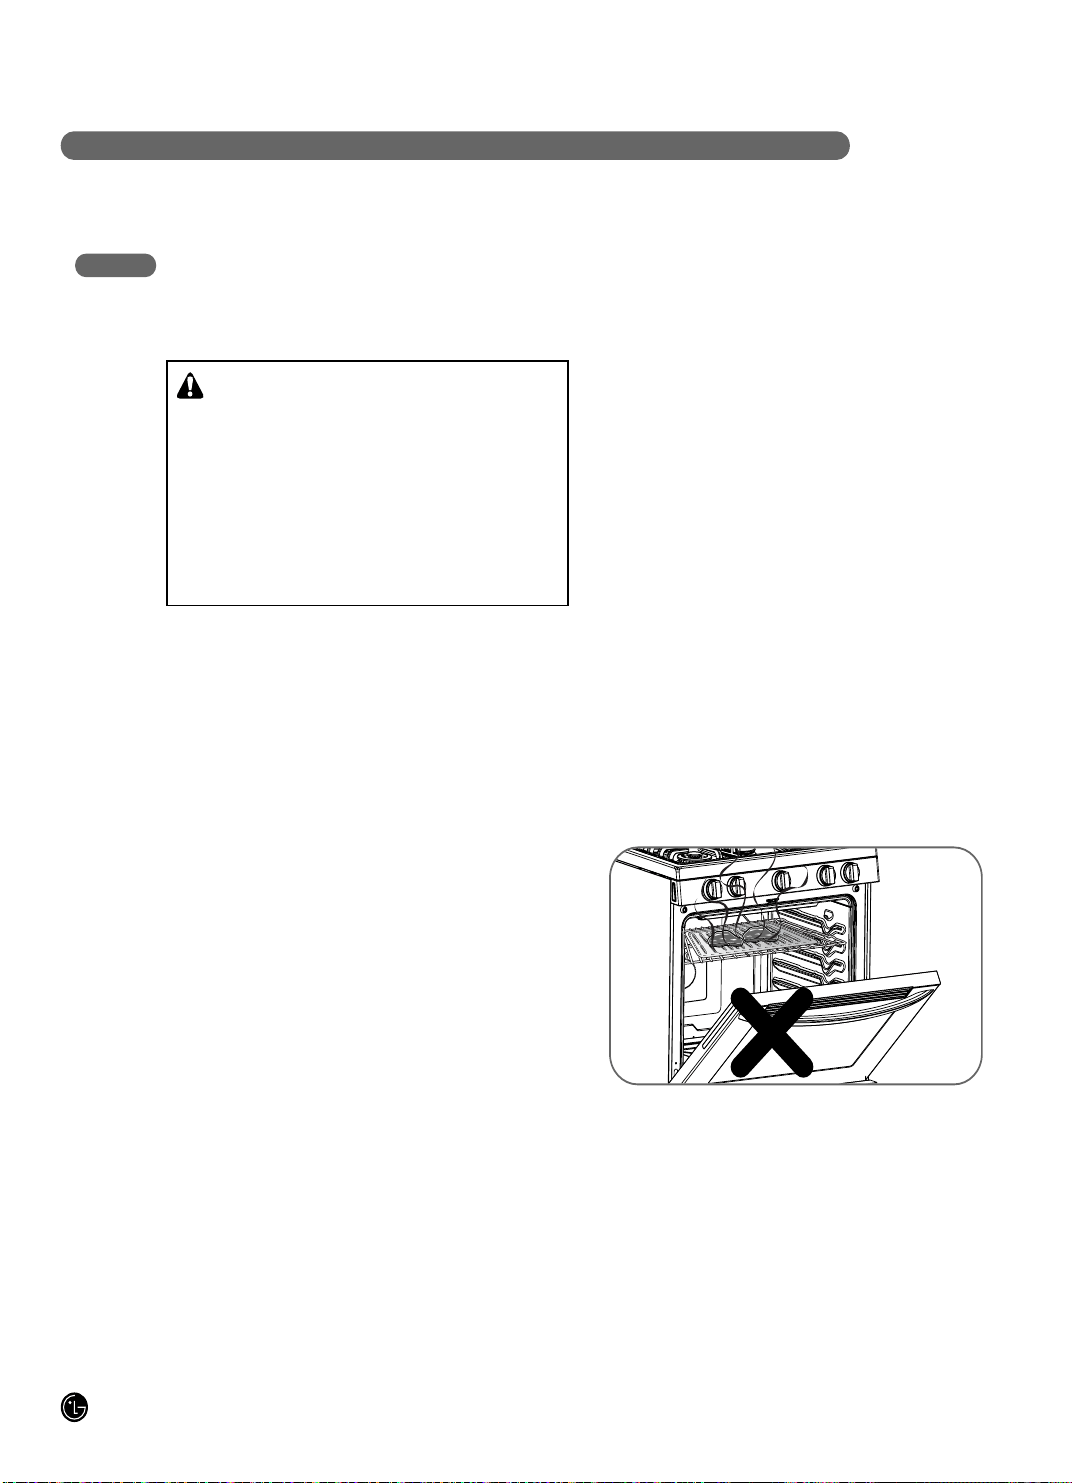
8
CONSIGNES DE SÉCURITÉ IMPORTANTES
LISEZ TOUTES LES CONSIGNES AVANT D'UTILISER L'APPAREIL
FOUR
Tenez-vous à distance de la cuisinière lorsque vous ouvrez la porte d'un four chaud.
L'air chaud et la vapeur peuvent provoquer des brûlures aux mains, au visage et aux yeux.
LISEZ ET SUIVEZ ATTENTIVEMENT CES CONSIGNES DE SÉCURITÉ.
ENREGISTREZ CES INSTRUCTIONS
• NE FAITES PAS chauffer des récipients fermés.
L'accumulation de la pression peut provoquer l'explosion
du récipient, ce qui peut entraîner des blessures.
• N'UTILISEZ du papier aluminium NULLE PART dans le
four, sauf indication contraire dans ce manuel.
Une mauvaise utilisation peut provoquer un incendie ou
endommager la cuisinière.
• N'UTILISEZ PAS le four comme espace de stockage. Les
objets conservés dans le four peuvent brûler.
• Retirez toute accumulation de graisse du four.
• Placez les grilles de cuisson dans la position souhaitée
lorsque le four est froid.
• Pour éviter les brûlures en retirant les aliments, sortez le
plateau en le faisant glissant jusqu'à la butée, puis retirez
le plat contenant les aliments. Il s'agit également d'une
précaution contre les brûlures provoquées par le contact
avec les surfaces chaudes de la porte ou des parois du
four.
• Lorsque vous placez ou retirez la plaque de cuisson,
portez toujours des maniques.
• Lors de l'utilisation d'un sac brunisseur ou d'un sac à rôtir
dans le four, suiviez les instructions du fabricant.
• Utilisez seulement les ustensiles en verre conçus pour
aller dans un four à gaz.
• Retirez toujours la lèchefrite de la cuisinière dès que vous
avez terminé d'utiliser le gril. Les résidus de graisse de la
lèchefrite peuvent prendre feu si le four est utilisé sans
avoir retiré la graisse de la lèchefrite.
• Lors de l'utilisation du gril, si de la viande se trouve trop
près de la flamme, le gras peut prendre feu. Retirez
l'excès de gras pour éviter les petits feux.
• Assurez-vous que la lèchefrite est bien en place pour
diminuer les possibilités de feux de graisses.
• En cas de feu de graisse dans la lèchefrite, appuyez sur la
touche CLEAR OFF, et laissez la porte du four fermée
pour contenir le feu jusqu'à ce qu'il s'éteigne.
• Pour des raisons de sécurité et de performances de
cuisson correctes, il est impératif de maintenir la porte du
four fermée lors de la cuisson et de l'utilisation du gril.
AVERTISSEMENT:
NE
COUVREZ JAMAIS les fentes, les orifices ou les
conduits de la partie inférieure du four, ni une grille
entière avec des matériaux comme du papier aluminium.
Cela provoque un risque de blocage de la circulation
d'air dans le four, ce qui peut entraîner une intoxication
au monoxyde de carbone. Le papier aluminium peut
également emprisonner la chaleur, ce qui pourrait
provoquer un incendie.
REMARQUE : L'ouverture de la porte lors de la cuisson ou
de l'utilisation du gril peut endommager les boutons ou les
soupapes.
NE LAISSEZ PAS LA PORTE DU FOUR OUVERTE LORS
DE LA CUISSON OU DU REFROIDISSEMENT.
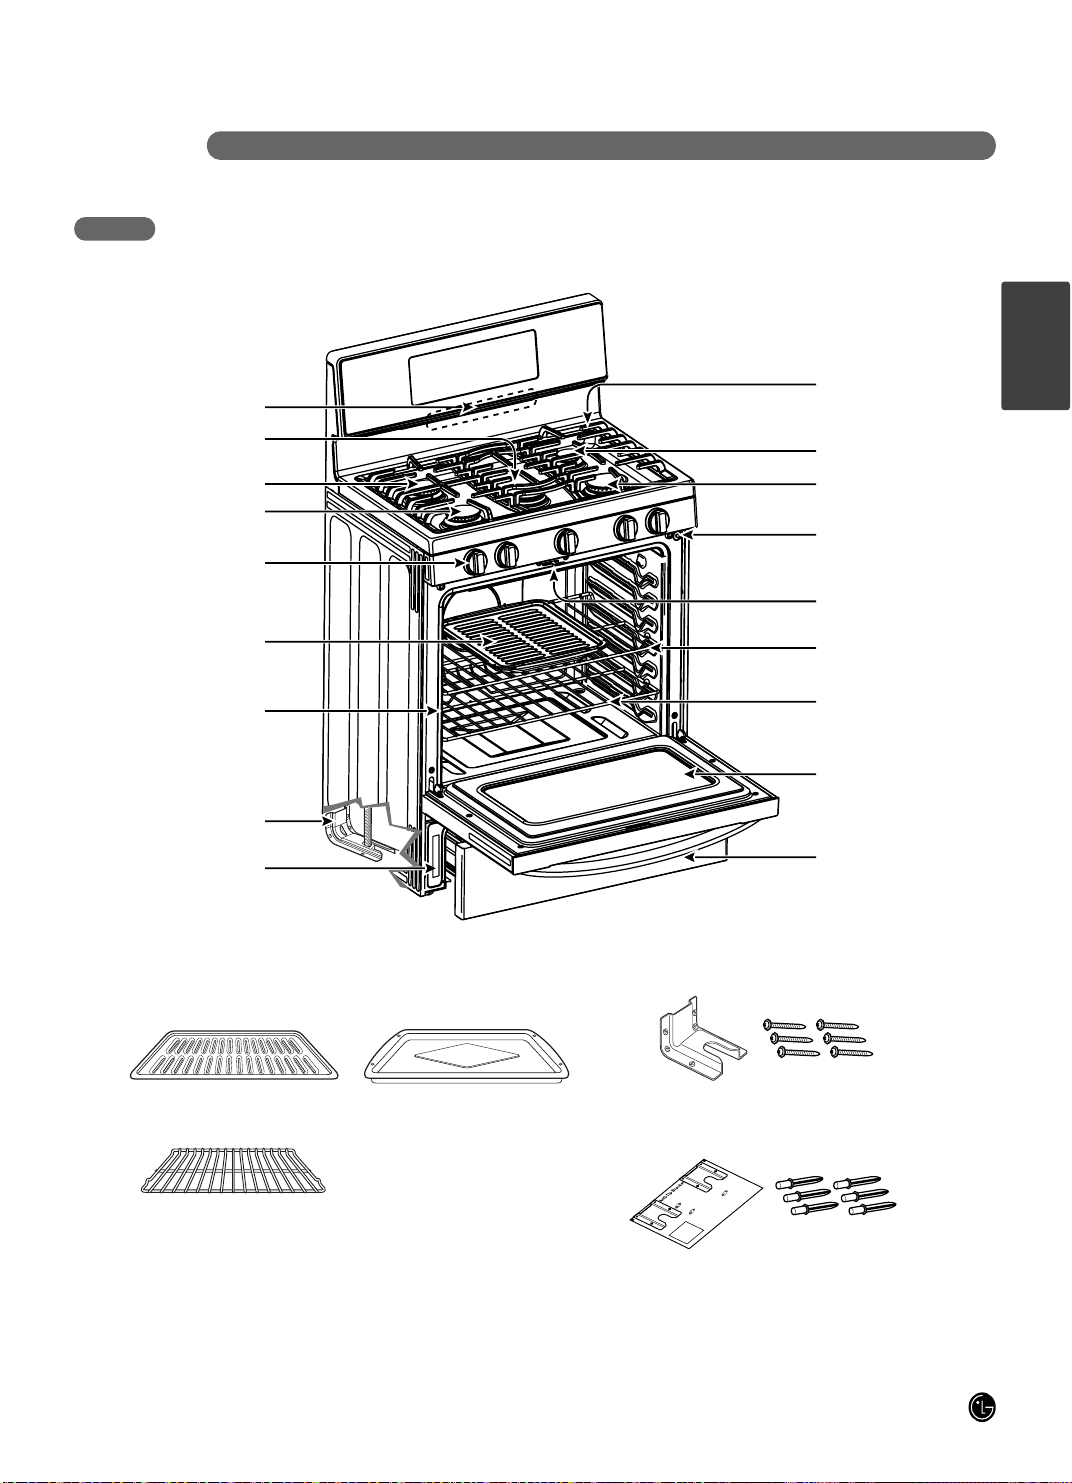
CONSIGNES DE FONC TIONNEMENT
9
DESCRIPTION ET PIÈCES
Brûleur ovale
Brûleur moyen
Grand brûleur
Commandes (5 ea)
Lèchefrite et grille
Joint d'étanchéité
Support anti-basculement
Référence modèle et
numéro de série
Tiroir de rangement
Porte du four
Ventilation du four
Grilles
Petit brûleur
Très grand brûleur
Bouton d'allumage
automatique de la
lumière du four
Loquet pour
l'auto-nettoyage
Grille standard
Grille standard
Grille de la lèchefrite Lèchefrite
Grille standard
(2 ea)
Gabarit Pièces d'ancrage
(6 ea)
Vis (6 ea)
Support anti-
basculement
FRANÇAIS
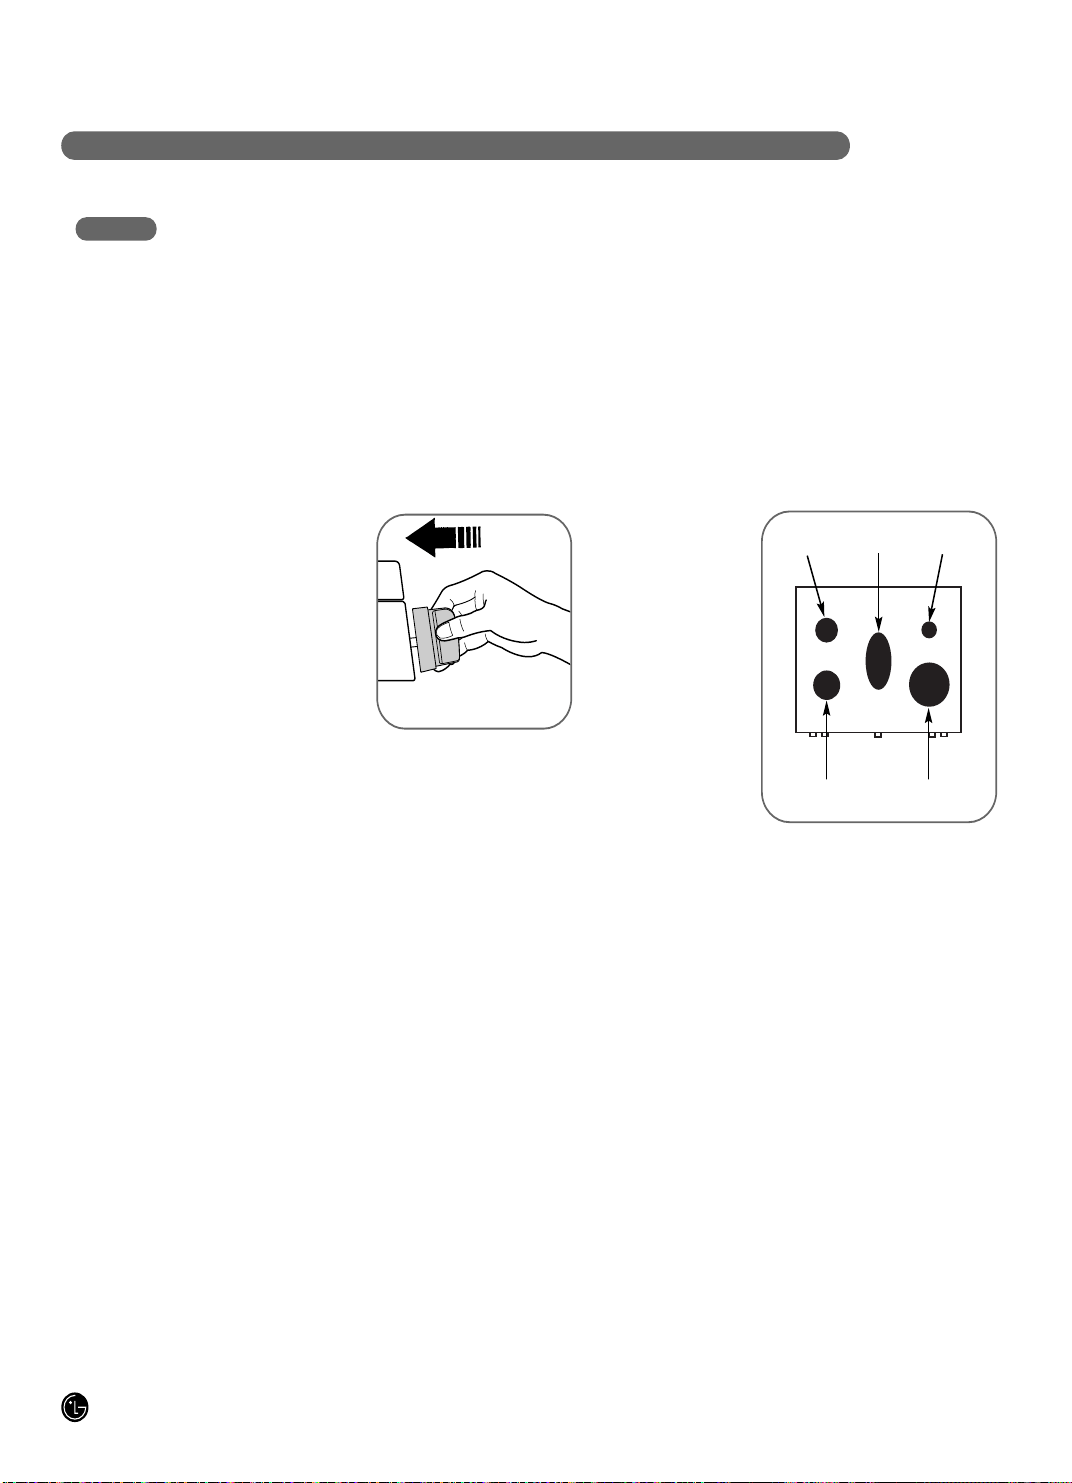
10
CONSIGNES DE FONCTIONNEMENT
UTILISATION DES BRÛLEURS DE SURFACE
Dans ce manuel, il est possible que les caractéristiques et l'apparence varient de ceux de votre modèle.
• Assurez-vous que toutes les grilles de la cuisinière sont
bien placées avant d'utiliser les brûleurs.
• Assurez-vous que les brûleurs et les grilles sont froids
avant d'y poser les mains, une manique, un chiffon ou tout
autre matériel.
• Assurez-vous que tous les brûleurs sont en place.
• N'UTILISEZ PAS un brûleur pendant une période
prolongée sans ustensile sur la grille. Les finitions de la
grille pourraient s'écailler en absence d'ustensile pour
absorber la chaleur.
ALLUMAGE D'UN BRÛLEUR
• Assurez-vous que tous les
brûleurs sont bien placés.
• Appuyez sur le bouton et
tournez-le en position LITE.
• Vous entendrez un petit
« clic », le son de l'étincelle
électrique qui allume le
brûleur.
• Tournez le bouton pour
régler la taille de la flamme. Si
le bouton reste à la position LITE, le son « clic »
continuera.
• Lorsqu'un brûleur est tourné en position LITE, tous les
brûleurs produisent des étincelles. N'essayez pas de
démonter ou de nettoyer un brûleur alors qu'un autre
brûleur est allumé. Cela peut provoquer un risque
d'électrocution, ce qui peut vous faire renverser un
ustensile chaud.
EN CAS DE COUPURE DE COURANT
En cas de coupure de courant, vous pouvez allumer les
brûleurs de la cuisinière à l'aide d'une allumette.
Tenez une allumette allumée contre le brûleur, puis
appuyez sur le bouton en le tournant en position LITE.
Faites très attention lorsque vous allumez les brûleurs de
cette manière.
En cas de coupure de courant, les brûleurs en cours
d'utilisation continuent à fonctionner normalement.
BRÛLEURS À GAZ SCELLÉS
La table de cuisson de la
cuisinière à gaz est
équipée de cinq
brûleurs à gaz scellés.
Leur utilisation est
pratique, hygiénique et
flexible pour une vaste
gamme d'applications
de cuisson.
Les brûleurs les plus
petits se trouvent dans
la partie arrière droite et
au centre.
Vous pouvez réduire ce
brûleur jusqu'au réglage mijotage doux.
Ils offrent des performances de cuisson précises pour les
préparations délicates comme les sauces ou celles qui
doivent mijoter pendant une longue durée.
Les brûleurs moyen (dans la partie arrière gauche) et grand
(dans la partie avant gauche) sont les brûleurs principaux
pour la plupart des cuissons. Ces brûleurs polyvalents
peuvent être réglés de la position HI à la position LO pour
répondre à une vaste gamme de besoins de cuisson.
Le très grand brûleur (dans la partie avant droite) fournit la
puissance maximale. Comme les quatre autres brûleurs, il
se règle de la position HI à LO pour une vaste gamme
d'applications de cuisson.
Ce brûleur a également été conçu pour qu'un volume élevé
de liquide entre rapidement en ébullition. Á utiliser avec une
batterie de cuisine de 25 cm ou plus de diamètre.
Le brûleur ovale (situé au centre) est à utiliser avec une
plaque chauffante ou des casseroles ovales.
REMARQUE : Par conception, le brûleur avant droit est
relevé de la table de cuisson. Cela est normal.
Appuyez sur le bouton et
tournez-le en position LITE.
Ovale
Moyen
Grand
Très grand
Petit
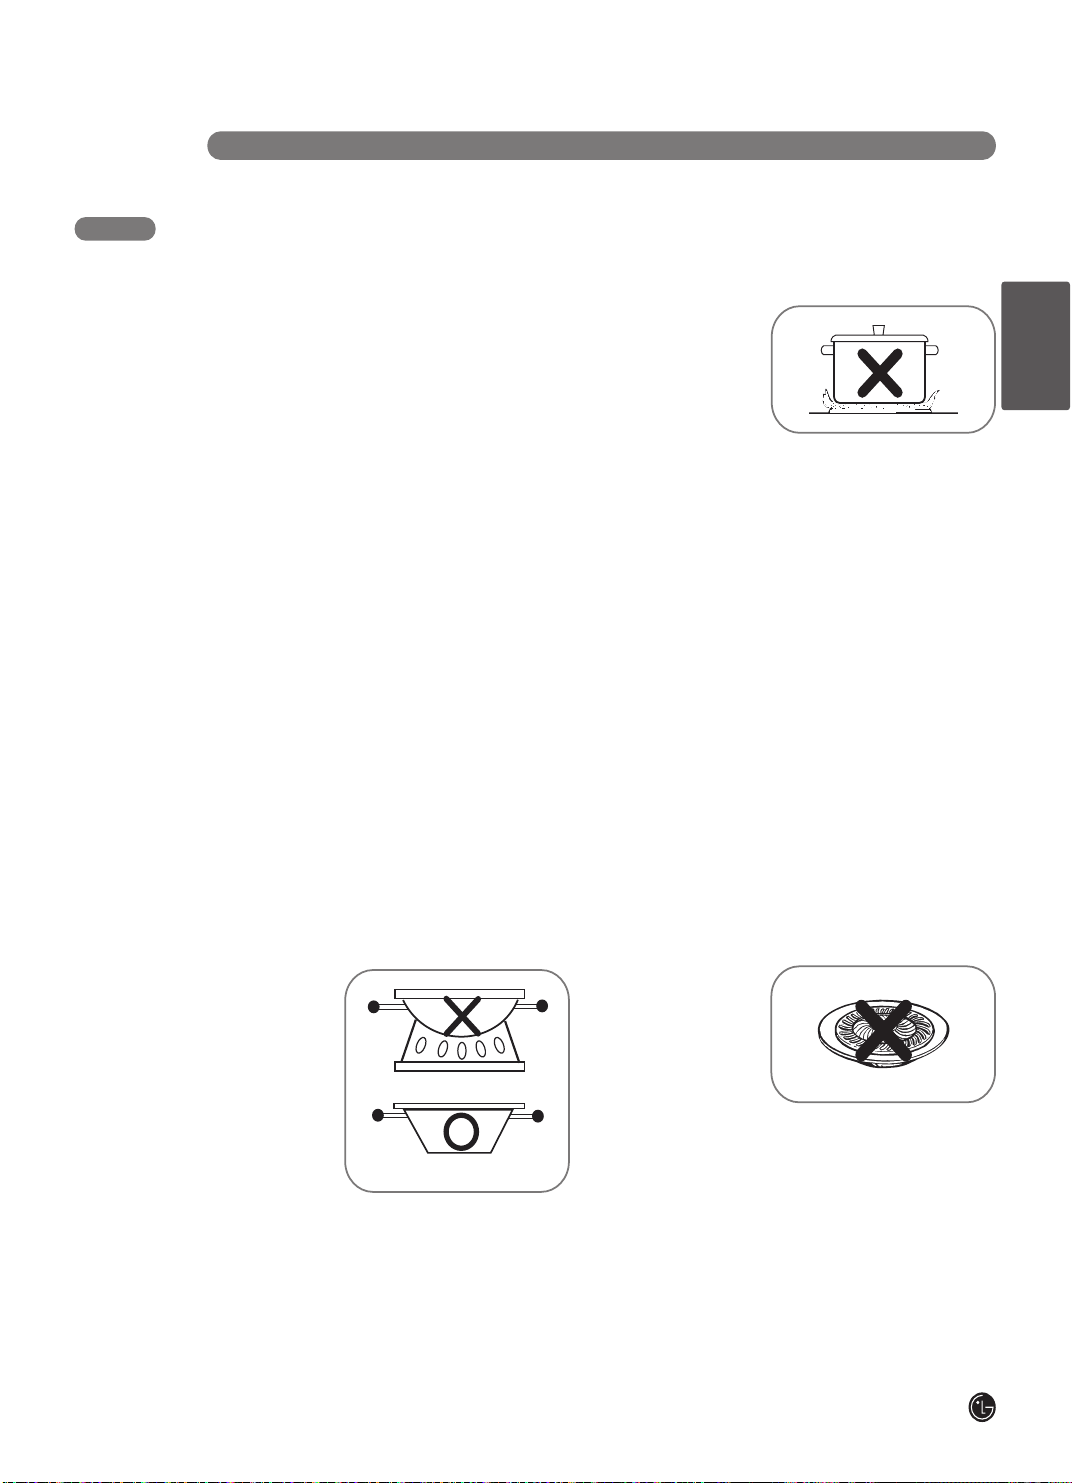
C ONSIGNES DE FONCTI ONNEMEN T
11
UTILISATION DES BRÛLEURS DE SURFACE
RÉGLAGE DE LA FLAMME
Afin d'assurer le maniement sûr des ustensiles, ne
laissez jamais la flamme lécher le rebord de
l'ustensile.
Surveillez la flamme, pas le bouton, quand vous
réduisez le feu. Pour un chauffage rapide, la hauteur de
la flamme devrait correspondre à la taille de l'ustensile
utilisé.
Une flamme qui lèche le
côté de l'ustensile ne le
chauffera pas plus vite
et pourrait être
dangereuse.
USTENSILES POUR LA TABLE DE CUISSON
Aluminium : Des ustensiles de poids moyen sont
recommandés, car ils chauffent rapidement et
uniformément. La plupart des aliments brûnissent
uniformément dans une poêle en aluminium. Utilisez des
casseroles avec des couvercles hermétiques pour cuire
avec une petite quantité d'eau.
Fonte : Chauffés lentement, la plupart des poêles
donneront de bons résultats.
Acier inoxydable : Ce métal est un mauvais conducteur
de la chaleur. On le combine habituellement au cuivre, à
l'aluminium ou à d'autres métaux pour améliorer la
distribution de la chaleur. Les poêles en métaux
combinés donnent normalement de bons résultats à feu
moyen, comme le recommande le fabricant.
Émail : Selon les conditions, l'émail de certains
ustensiles peut fondre. Suivez les recommandations du
fabricant concernant les méthodes de cuisson.
Verre : Il y a deux types d'ustensiles en verre : ceux qui
vont au four et ceux qui ne s'utilisent que sur la table de
cuisson (casseroles, cafetières, théières). Le verre
conduit la chaleur très lentement.
Céramique de verre à l'épreuve de la chaleur :
Convient à la table de cuisson comme au four. Elle
conduit la chaleur très lentement et se refroidit très
lentement. Consultez les directives du fabricant pour
savoir si vous pouvez l'utiliser sur une cuisinière à gaz.
UTILISATION D'UN WOK
N'utilisez pas le collier de
support. Placer le collier
sur le brûleur ou la grille
peut causer un mauvais
fonctionnement, causant
ainsi une production
d'oxyde de carbone au-
delà des niveaux
permissibles.
Ceci peut être dangereux
pour la santé.
Seul un wok à fond plat devrait être utilisé.
Nous recommandons l'utilisation d'un wok à fond plat de 14
po ou moins. Assurez-vous que son fond est plat sur la
grille. On les trouve dans les magasins de détail locaux.
GRILLES DE CUISSON
N'utilisez pas de grilles de
cuisson sur les brûleurs à
gaz scellés. Leur
utilisation peut causer une
combustion incomplète et
donc la production
d'oxyde de carbone à des
niveaux supérieurs aux limites permissibles.
Cela peut être dangereux pour la santé.
Utilisez un wok à fond plat
FRANÇAIS
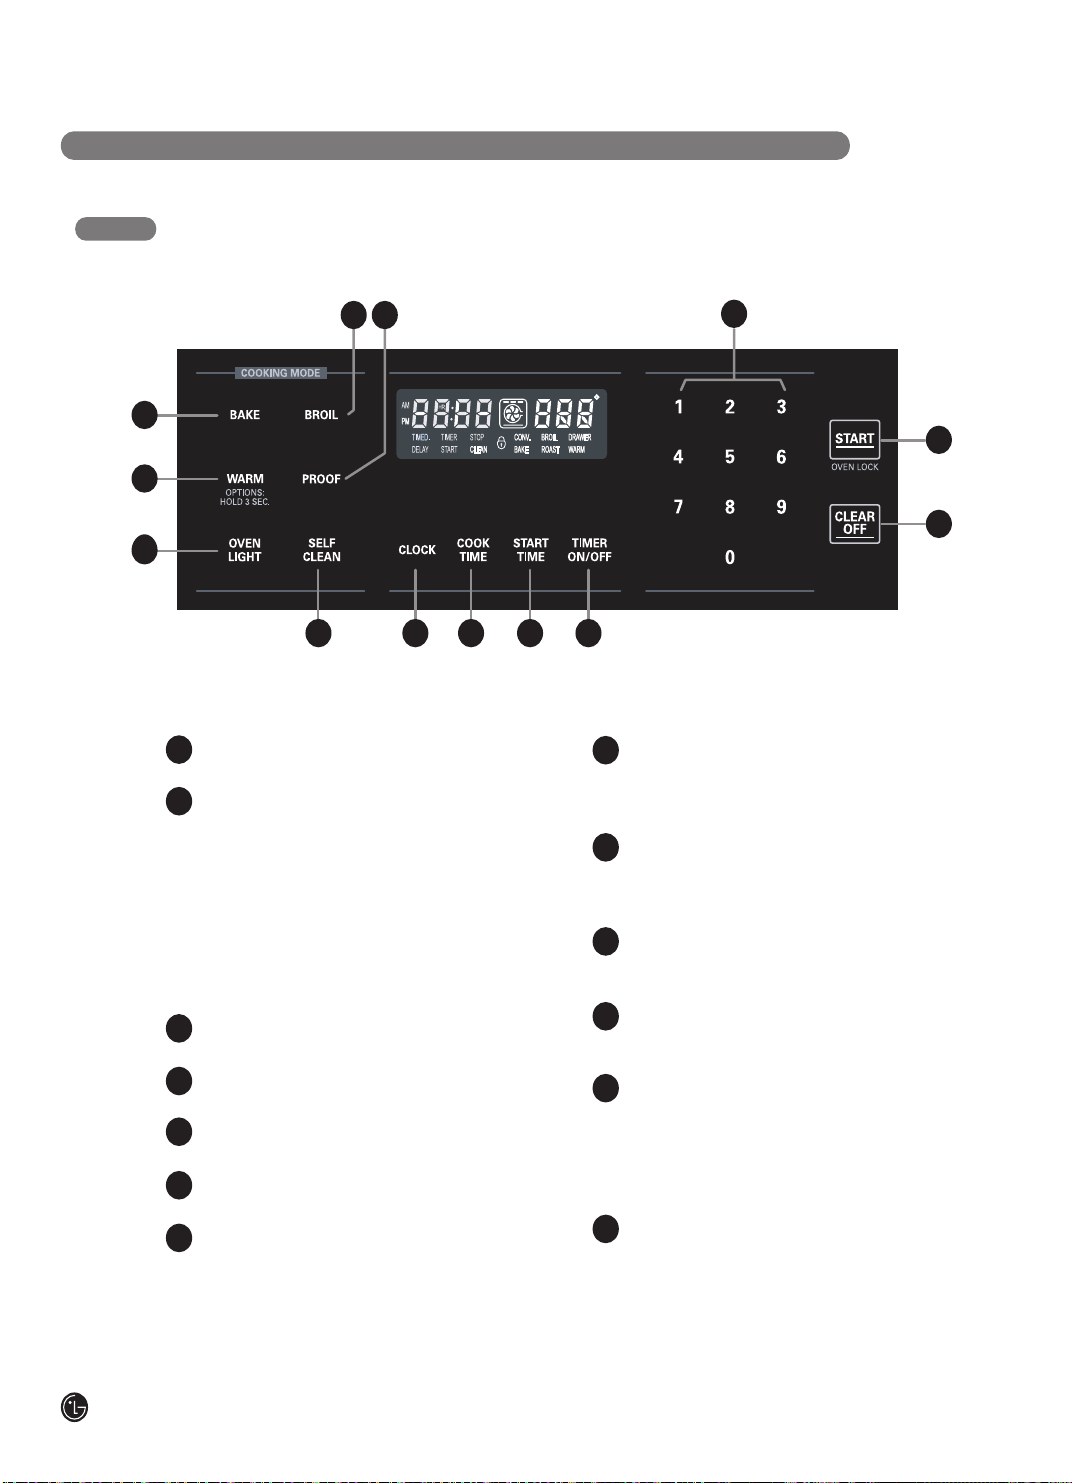
12
C ONS I G N E S DE FONCTIONNEMENT
PANNEAU DE COMMANDE—LRG3093S
Dans ce manuel, il est possible que les caractéristiques et l'apparence varient de ceux de votre modèle.
CARACTÉRISTIQUES DES COMMANDES DU FOUR, DE L'HORLOGE ET DU MINUTEUR
TOUCHE CUISSON – Appuyez sur cette touche pour
entrer dans la fonction de cuisson normale.
TOUCHE MAINTIEN AU CHAUD / OPTIONS
– Appuyez sur cette touche pour maintenir les aliments
au chaud dans le four.
– Appuyez sur cette touche et maintenez-la enfoncée
pendant 3 secondes pour modifier les réglages
spéciaux.
REMARQUE : Les réglages spéciaux ne peuvent être
utilisés que si aucune autre fonction (Bake (Cuisson), Broil
(Gril), Timer (Minuteur), etc.) du panneau de commande
n'est en cours d'utilisation.
TOUCHE ÉCLAIRAGE DU FOUR – Appuyez sur cette
touche pour allumer ou éteindre l'éclairage du four.
TOUCHE GRIL – Appuyez sur cette touche pour
sélectionner la fonction gril.
TOUCHE LEVAGE – Appuyez sur cette touche pour faire
lever le pain.
TOUCHE AUTO-NETTOYAGE – Appuyez sur cette
touche pour sélectionner la fonction d'auto-nettoyage
TOUCHE HORLOGE – Appuyez sur cette touche pour
régler l'heure.
TOUCHE TEMPS DE CUISSON – Appuyez sur cette
touche puis utilisez les touches numériques pour régler le
temps de cuisson. Le four s'éteindra une fois le temps de
cuisson écoulé.
TOUCHE HEURE DE DÉMARRAGE – Appuyez sur cette
touche puis utilisez les touches numériques pour régler
l'heure de démarrage différé. Le four se mettra en marche
à l'heure définie.
TOUCHE MARCHE/ARRÊT MINUTEUR – Appuyez sur
cette touche pour régler ou annuler la fonction du
minuteur.
TOUCHES NUMÉRIQUES – Utilisez ces touches pour
régler les fonctions qui nécessitent des chiffres comme
l'horloge, le minuteur ou la température.
TOUCHE MARCHE / VERROUILLAGE DU FOUR
– Appuyez sur cette touche pour pouvoir utiliser toutes les
fonctions du four.
– Appuyez sur cette touche et maintenez-la enfoncée
pendant 3 secondes pour activer/désactiver la fonction
Oven Lockout (Verrouillage du four).
TOUCHE ANNULER/EFFACER – Appuyez sur cette
touche pour annuler TOUTES
les opérations sauf les
réglages du minuteur.
1
2
3
4 5
7 9 1086
12
13
11
1
9
8
10
11
12
13
2
3
4
5
6
7
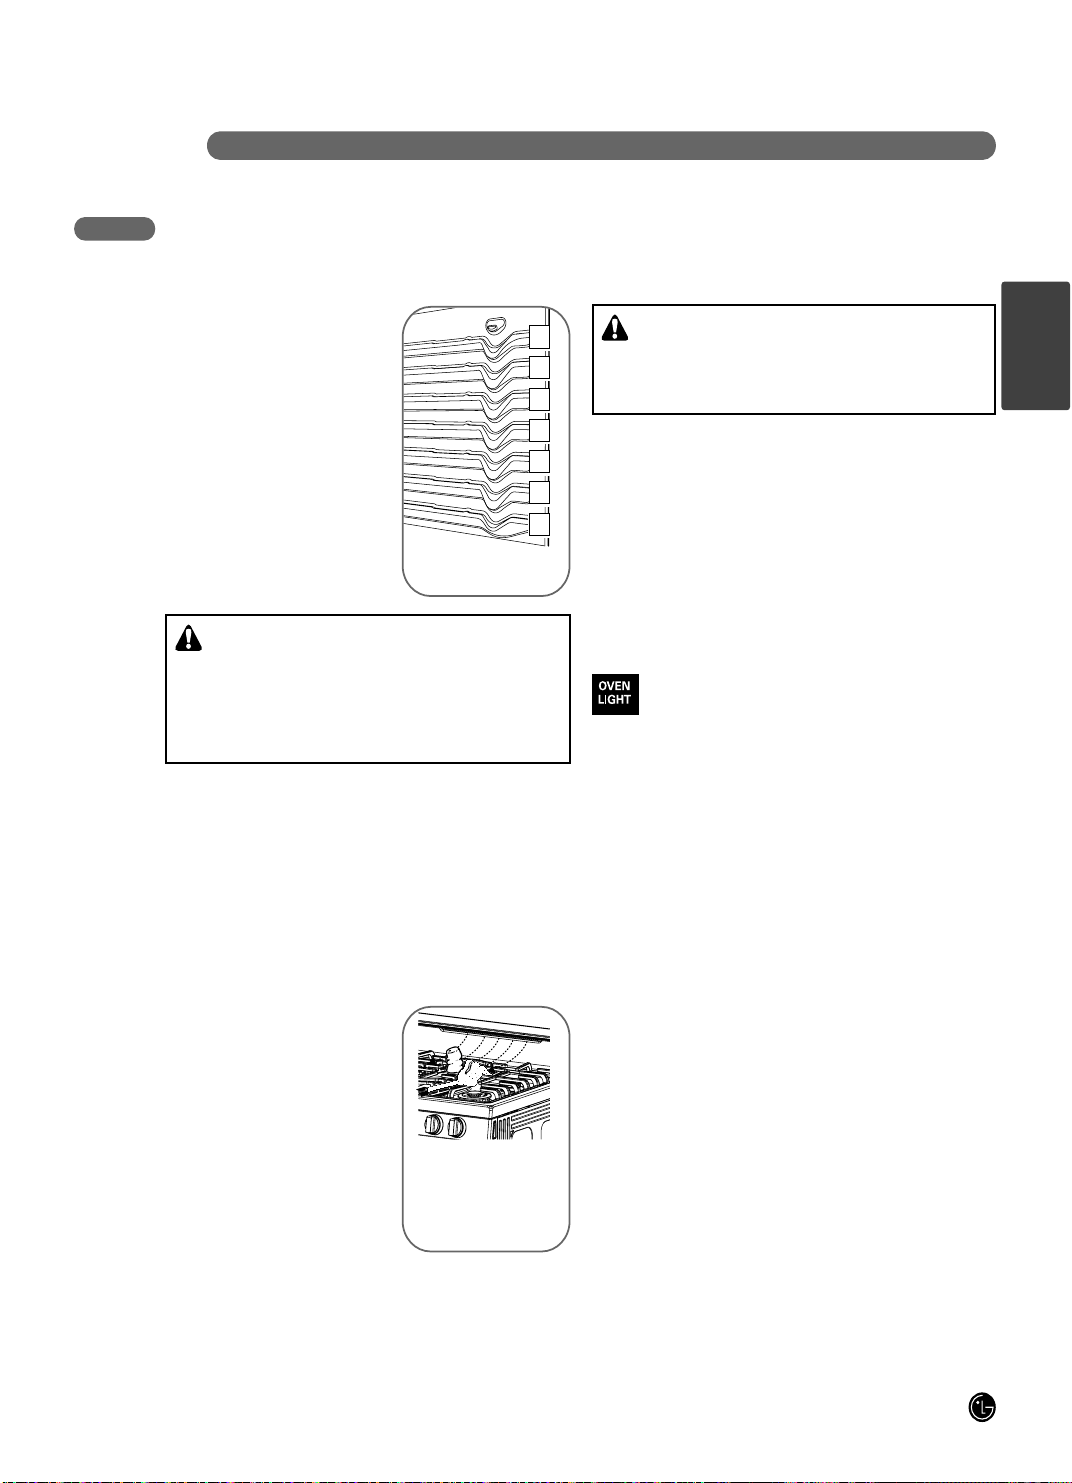
C ONS IGNES DE FONCTIONNEMENT
13
Lorsque le four chauffe, l'échauffement de l'air du four peut
provoquer la formation de gouttes d'eau sur la vitre de la
porte.
Ces gouttes sont inoffensives et s'évaporent lorsque le four
continue à chauffer.
PAPIER ALUMINIUM
NE RECOUVREZ JAMAIS LE FOND DU FOUR DE
PAPIER ALUMINIUM.
Le papier aluminium peut également être utilisé pour
récupérer les déversements. Pour ce faire, placez un peu
de papier aluminium sur une grille inférieure plusieurs
centimètres en dessous des aliments.
NE RECOUVREZ JAMAIS entièrement une grille de papier
aluminium. Cela gênerait la circulation de la chaleur et
empêcherait la cuisson.
HUMIDITÉ DU FOUR
UTILISATION DU FOUR
AVANT DE COMMENCER
Le four dispose de 7 positions de
plateau pour différents types de
cuisson.
Pour installer un plateau, insérez
le bord incurvé du plateau dans la
position désirée et poussez-le
complètement au fond.
Pour retirer un plateau, tirez-le
jusqu'à la butée, puis inclinez-le
vers le haut pour le sortir.
COUPURE DE COURANT
ATTENTION :
N'ESSAYEZ JAMAIS de faire fonctionner le four
électrique en cas de panne de courant.
Le four ou la rôtissoire n'est pas utilisable en cas de panne
de courant.
En cas d'utilisation du four lors d'une panne de courant, le
brûleur s'éteint et il est impossible de le rallumer jusqu'à ce
que le courant revienne. Une fois le courant rétabli, vous
devez redémarrer la fonction four ou rôtissoire.
ÉCLAIRAGE DU FOUR
L'éclairage du four s'allume automatiquement
lorsque la porte est ouverte. L'éclairage du four
peut également être allumé ou éteint
manuellement en appuyant sur la touche OVEN
LIGHT.
REMARQUE :
• Vous ne pouvez pas allumer l'éclairage du four durant un
cycle d'auto nettoyage. L'éclairage du four n'est pas
utilisable tant que la température du four n'est pas
descendue en dessous de 260 ˚C (500 ˚F), une fois le
cycle d'auto nettoyage terminé.
A
B
C
D
E
F
G
Le four offre 7 positions pour
les grilles.
ÉVENT DU FOUR
Votre four est ventilé par le biais de conduits situés au
centre au-dessus la grille du brûleur.
Ne bloquez pas la ventilation du four lors de son utilisation
afin de permettre une bonne circulation de l'air.
Ne touchez pas les bouches de ventilation ni les surfaces à
proximité pendant l'utilisation des éléments de cuisson.
• NE LAISSEZ PAS des objets en
plastique ou inflammables sur la
table de cuisson : ils peuvent
fondre ou prendre feu s'ils sont
trop proches de l'évent.
• NE LAISSEZ PAS de récipients
fermés sur la table de cuisson.
La pression à l'intérieur des
récipients fermés peut
augmenter et entraîner un risque
d'explosion.
• Les objets en métal deviendront
très chauds s'ils sont laissés sur la table de cuisson, ce
qui peut entraîner un risque de brûlure.
• Les poignées des récipients et des casseroles situés sur
la table de cuisson peuvent devenir chaudes s'ils sont trop
proches de l'évent.
Les objets en plastiques sur la
plaque de cuisson peuvent
fondre s'ils sont trop proches
de l'évent. L'apparence et
l'emplacement de l'évent
peuvent varier.
ATTENTION :
Utilisez toujours des
maniques lors du retrait des plats ou du réglage des
grilles. Patientez jusqu'au refroidissement complet
du four, si possible. Les grilles du four peuvent être
CHAUDES et entraîner un risque de brûlure.
FRANÇAIS
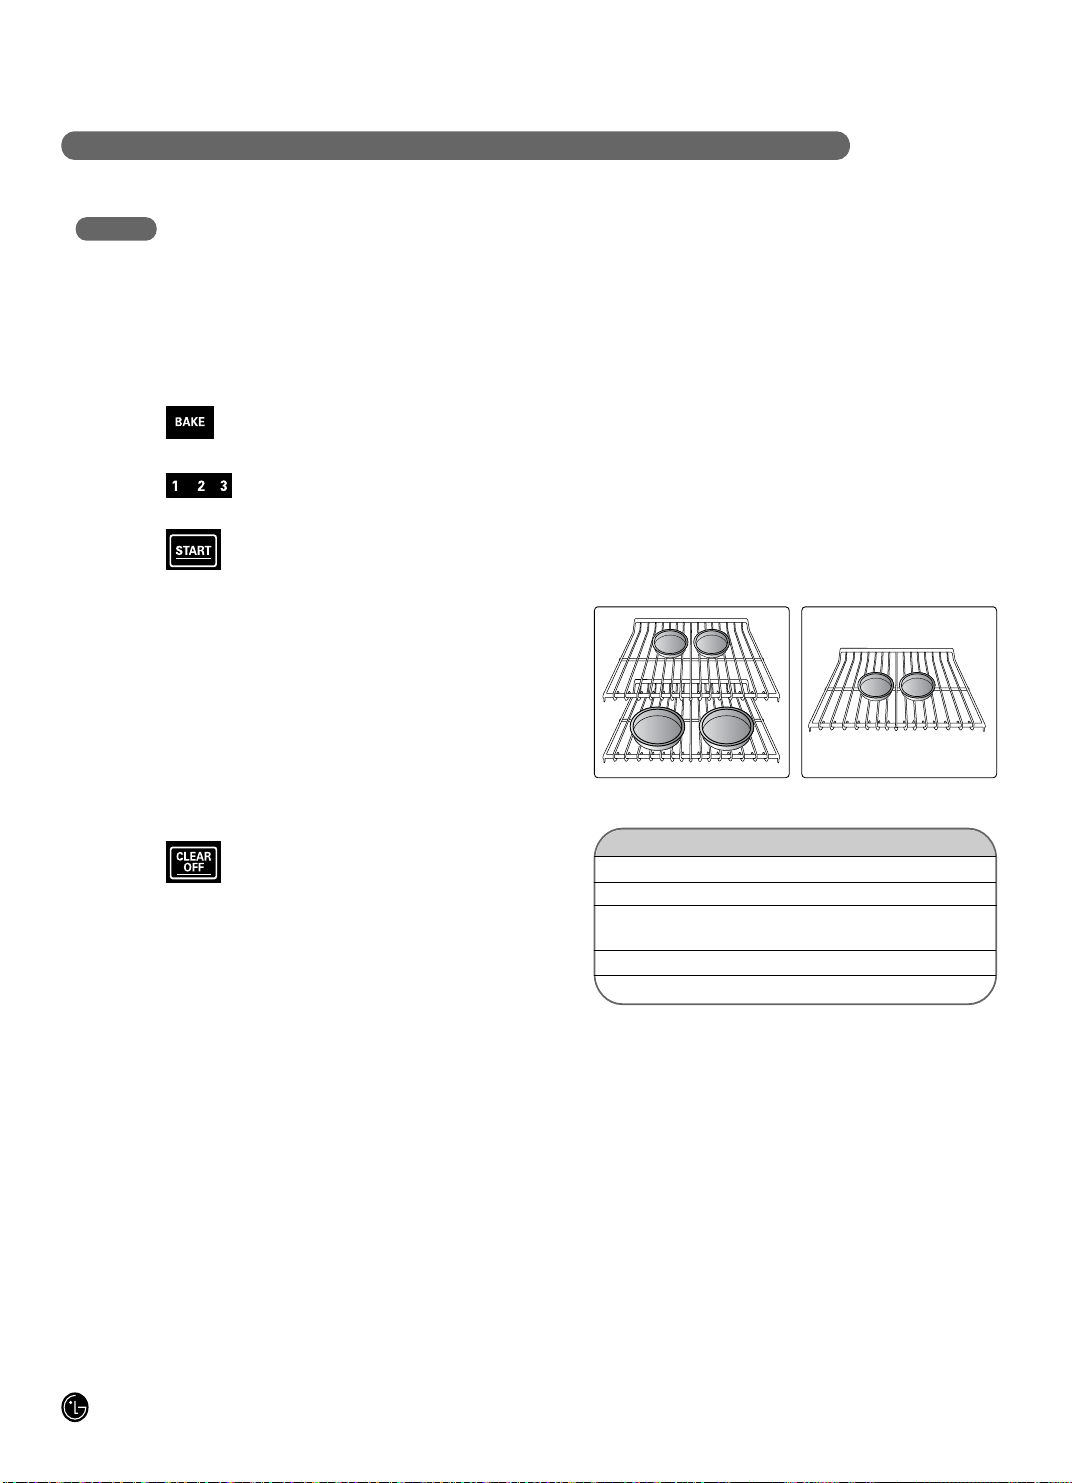
14
CONSIGNES DE FONCTIONNEMENT
UTILISATION DU FOUR
Pour éviter les brûlures éventuelles, placez les grilles dans les positions souhaitées avant d'allumer le four.
PRÉCHAUFFAGE ET POSITIONNEMENT DES PLATS
Préchauffez le four si la recette l'indique. Pour ce faire,
réglez le four à la température souhaitée. Le préchauffage
est nécessaire en cas de cuisson par convection et pour
obtenir de bons résultats lors de la cuisson de gâteaux, de
biscuits, de pâtisseries et de pains.
Vous obtiendrez de meilleurs résultats si les moules sont
centrés dans le four. Si vous utilisez plus d'un moule à la
fois, laissez un espace d'1 po (2,5 cm) à 1-1/2po (3,8 cm)
entre les moules. Si vous utilisez plusieurs grilles, placez
les grilles en positions C et E (pour 2 grilles). Placez les
moules comme indiqué sur les figures 1 et 2.
CONSEILS DE CUISSON
LE TYPE DE MARGARINE AFFECTE LES
PERFORMANCES DE CUISSON
La plupart des recettes ont été élaborées à l'aide de produits
riches en matière grasse, comme le beurre ou la margarine (80
% de matière grasse). Si vous diminuez la quantité de matière
grasse, le résultat de la recette ne sera pas identique à celui
obtenu avec un produit plus gras.
Il se peut que vous ne réussissiez pas votre recette si les
gâteaux, les tartes, les pâtisseries, les biscuits ou les bonbons
sont élaborés à partir de produits à tartiner allégés. Moins un
produit à tartiner est gras, plus les différences sont importantes.
Les normes fédérales requièrent que les produits portant la
mention « margarine » contiennent au moins 80 % de matière
grasse. D'autre part, les produits à tartiner allégés contiennent
moins de matière grasse et davantage d'eau.
La forte teneur en eau de ces produits à tartiner affecte la
texture et la saveur des aliments cuits. Pour obtenir de meilleurs
résultats avec vos recettes préférées, utilisez de la margarine,
du beurre ou des produits à tartiner en morceaux contenant au
moins 70 % d'huile végétale.
RÉGLAGE DU FOUR POUR LA CUISSON OU LE
RÔTISSAGE
Votre four n'a pas été conçu pour la cuisson avec la porte
ouverte.
Appuyez sur la touche BAKE.
Appuyez sur les touches numériques pour
régler la température souhaitée.
Appuyez sur la touche START.
Le mot BAKE et 100° s'affichent. Lorsque le four chauffe, le
changement de température s'affiche. Lorsque le four a
atteint la température désirée, 5 longs bips retentiront et la
lampe du four clignotera.
Pour modifier la température du four au cours du cycle de
CUISSON, appuyez sur la touche BAKE puis utilisez les
touches numériques pour régler la nouvelle température.
Vérifiez la cuisson des aliments à l'issu du
temps minimum indiqué dans la recette.
Cuisez plus longtemps si nécessaire.
Appuyez sur la touche CLEAR OFF lorsque
la cuisson est terminée.
Type d'aliment Position des grilles
Tartes surgelées (sur une tôle)
Gâteau des anges, Bundt ou quatre-quarts
Biscuits, muffins, carrés au chocolat, petits
gâteaux, gâteaux étagés, tartes
Ragoûts
Rôti
B ou C
C
D
D
A
Fig. 1 Fig. 2
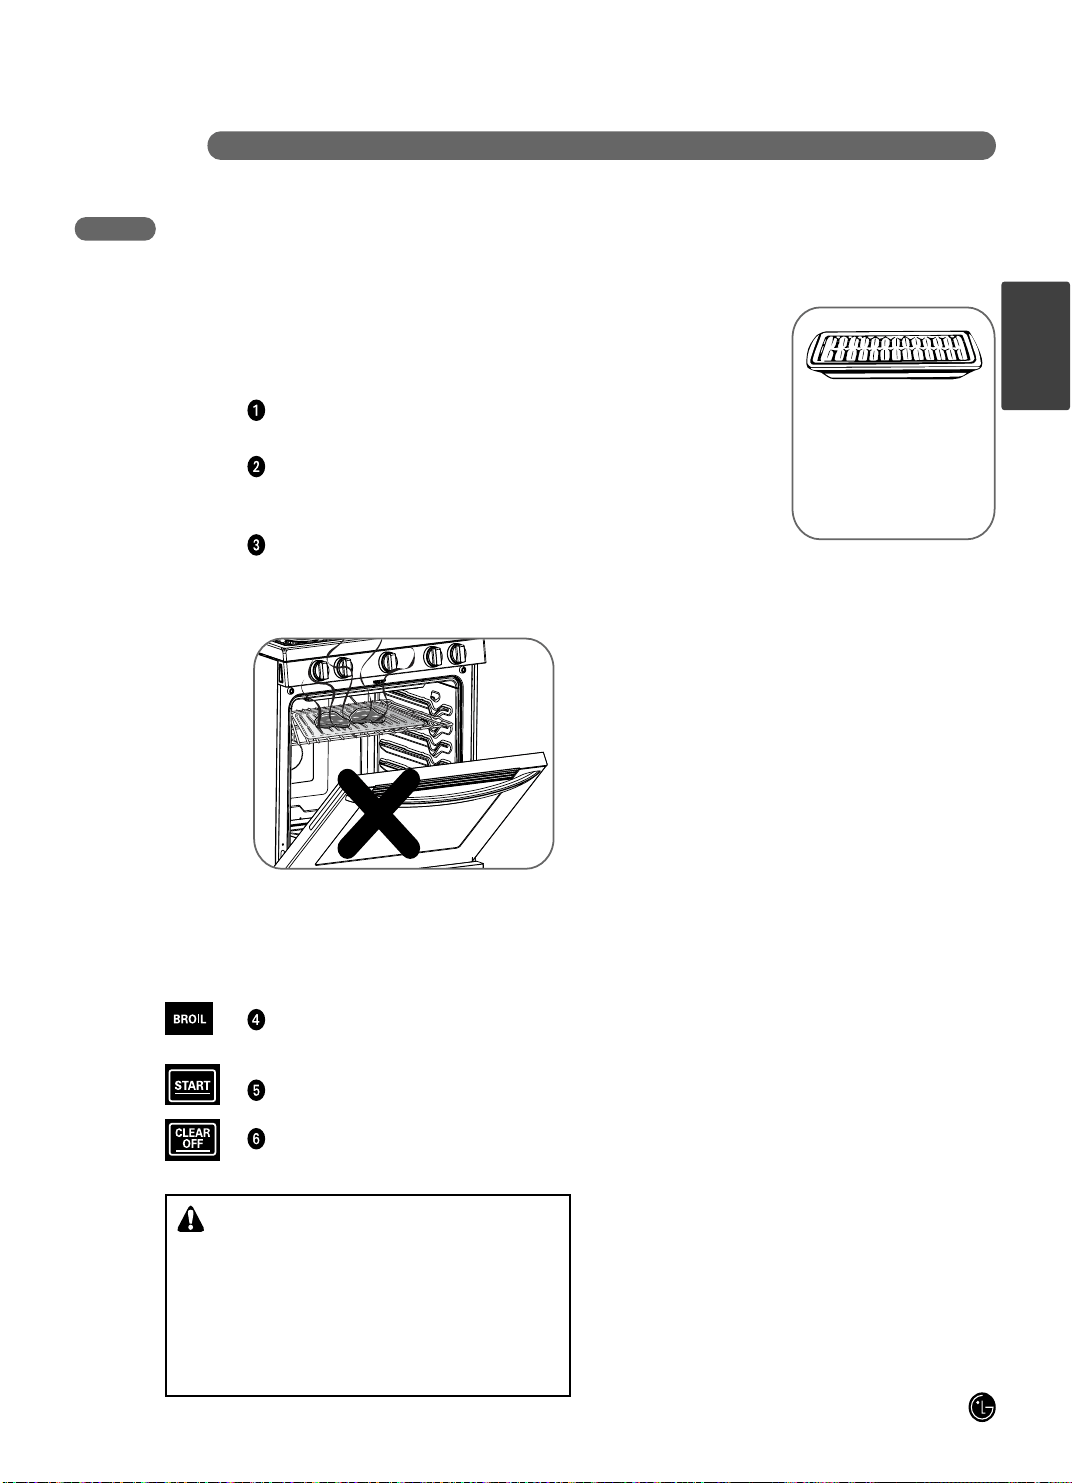
C ONSIGNES D E FONCTI ONNE M E N T
15
Servez la nourriture
immédiatement et laissez le
plat à l'extérieur du four
pendant le repas pour un
nettoyage plus aisé.
Utilisez la température
basse pour cuire des
aliments tels que des
volailles ou des morceaux de
viande épais sans les brûler.
REMARQUE :
• L'utilisation du gril peut produire de la fumée.
Cela est normal.
Utilisez toujours la lèchefrite et
la grille fournies avec votre
four. Ils sont conçus pour
minimiser les fumées et les
éclaboussures en
emprisonnant les jus dans la
partie inférieure protégée de la
lèchefrite.
UTILISATION DU FOUR
RÉGLAGE DU FOUR POUR L'UTILISATION DU
GRIL
Votre four a été conçu pour l'utilisation du gril avec la
PORTE FERMÉE.
Disposez les aliments sur la grille du
lèchefrite.
Suivez les recommandations dans le Guide
de l'utilisation du gril concernant la
position de la grille.
La porte du four doit être fermée pour
pouvoir utiliser le gril.
La porte du four doit être fermée au cours
de l'utilisation du gril.
Appuyez sur la touche BROIL une fois pour
Hi (élevé) et deux fois pour Lo.
Appuyez sur la touche START.
À la fin de l'utilisation du gril, appuyez sur la
touche CLEAR OFF.
REMARQUE : Si la porte du four reste
ouverte pendant plus de 15 secondes en
mode gril, le brûleur s'arrête. Le brûleur du
gril se remet automatiquement en
fonctionnement une fois la porte fermée.
ATTENTION :
• N'UTILISEZ PAS la lèchefrite sans la grille.
• NE COUVREZ PAS la lèchefrite grille avec feuille
d'aluminium. Une graisse exposée peut prendre feu.
• Pour éviter que la nourriture entre en contact avec le
brûleur du gril et que la graisse éclabousse, n'utilisez
pas la grille de rôtissage lors de l'utilisation du gril.
FRANÇAIS
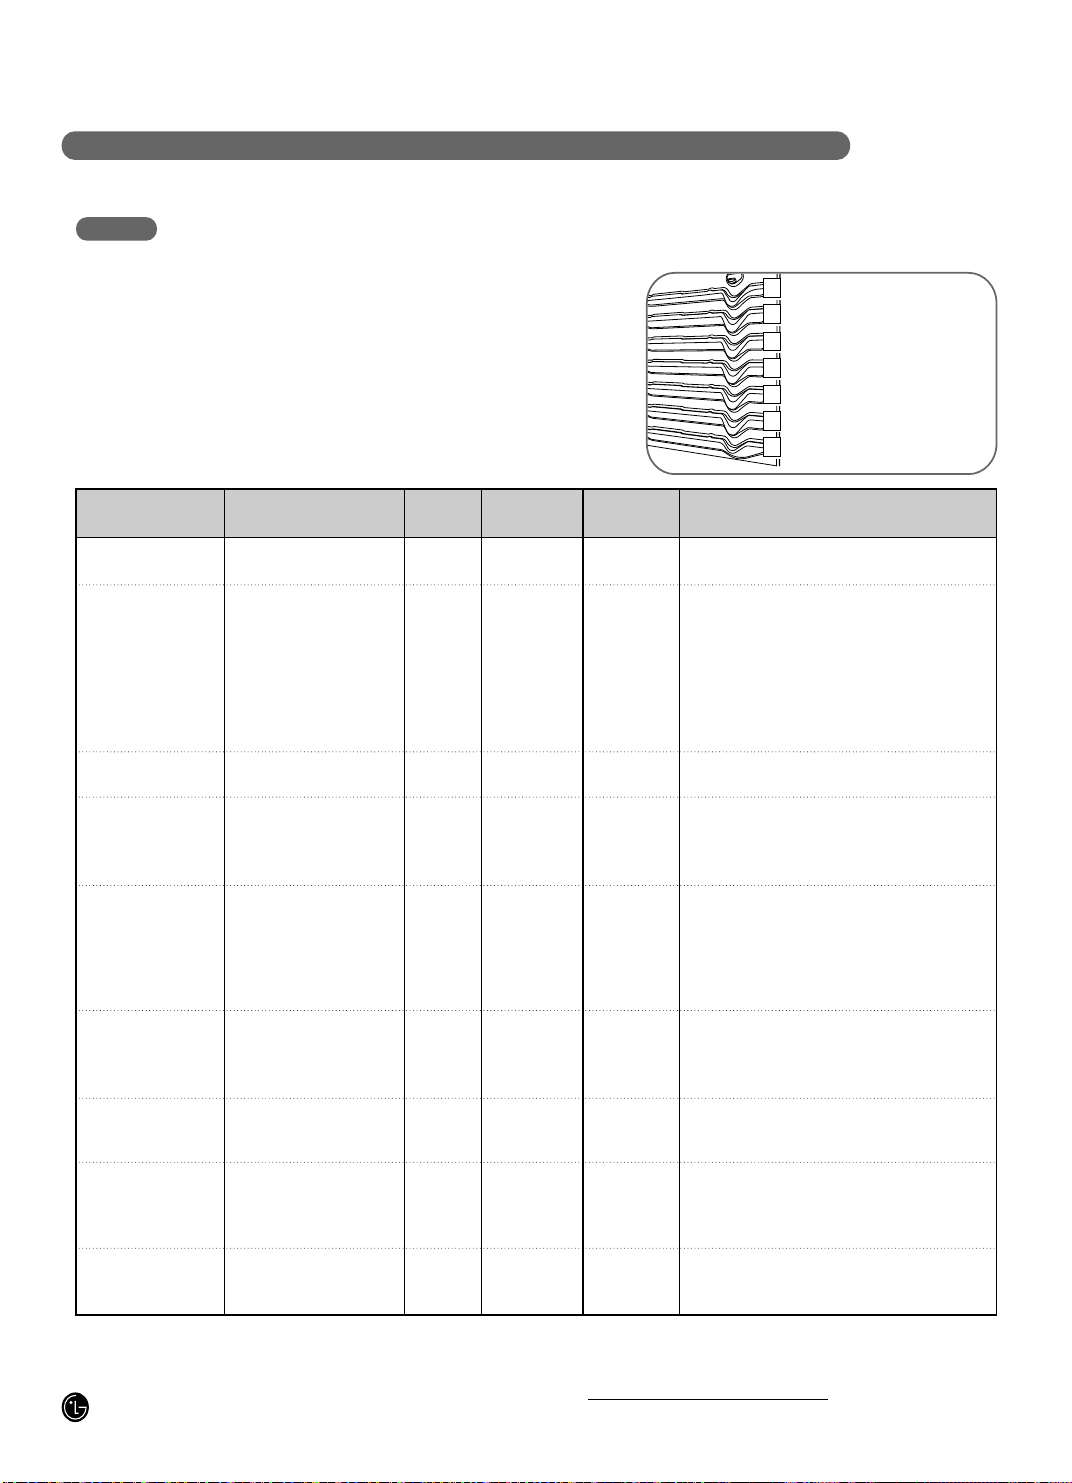
16
C ONS IGNES DE FONCTIONNEME N T
A
B
C
D
E
F
G
Le four offre 7 positions
pour les grilles.
UTILISATION DU FOUR
GUIDE D'UTILISATION DU GRIL
La taille, le poids, l'épaisseur, la température de départ et
votre préférence de cuisson ont un impact sur la durée
d'utilisation du gril.
Ces recommandations sont basées sur des viandes à la
températures réfrigérées.
Aliment
Quantité et/ou
épaisseur
Position*
de la grille
Premier côté
(temps en min)
Second côté
(temps en min)
Commentaires
Bœuf haché
Bien cuit
Bifteck
Saignant
À point
Bien cuit
Saignant
À point
Bien cuit
Bacon
Côtelettes de porc
Bien cuit
Côtelettes d'agneau
À point
Bien cuit
À point
Bien cuit
Poulet
Queues de
langouste
Filets de poisson
Tranches de
jambon (précuit)
Espacez de manière égale. Vous pouvez faire
griller jusqu'à 8 galettes simultanément.
Les biftecks de moins de 2,5 cm d'épaisseur
cuisent entièrement avant de brunir.
La cuisson à la poêle est recommandée.
Retirez la graisse.
Disposez en une seule couche.
Retirez la graisse.
Retirez la graisse.
Appliquez du beurre fondu au pinceau.
Grillez le côté peau en premier.
Coupez en deux dans le sens de la longueur.
Brunissez avec du beurre fondu avant de griller et
à la moitié du temps de cuisson.
Retournez délicatement. Brunissez avec du beurre
citronné avant et pendant la cuisson, si vous le
souhaitez. Préchauffez la lèchefrite pour brunir
davantage
.
Augmentez le temps de cuisson de 5 à 10 minutes
par côté si l'épaisseur est de 4 cm ou en présence
de jambon artisanal.
450 g (4 galettes)
1,5 à 2 cm d'épaisseur
2,5 cm d'épaisseur
450 g à 690 g
4 cm d'épaisseur
900 g à 1,2 kg
226 g
(environ 8 tranches fines)
2 (1,5 cm d'épaisseur)
2 (2,5 cm d'épaisseur)
environ 450 g
2 (2,5 cm d'épaisseur) environ
280 g à 340 g
2 (3,81 cm d'épaisseur) environ
450 g
1 entier
900 g à 1,2 kg
dans le sens de la longueur
4 poitrines non désossées
2–4
170 g à 226 g chacune
0,63 cm à 1,5 cm d'épaisseur
2,5 cm d'épaisseur
1,5 cm d'épaisseur
F
F
F
F
D
D
D
D
D
D
E
E
E
E
B
B
C
E
C
D
7~8
7
12
13
10
12-15
25
8
10
13
6
10
10
17
35-40
25-30
13–16
7~8
10
7
5-6
5
5-6
8-9
6-7
10-12
16–18
3
8
8~9
4–7
10
4-6
12-14
25
10-15
Ne retournez
pas.
6
5
4
* Les volailles farcies prennent généralement 30 à 45 minutes de plus à rôtir. Enveloppez les pattes et la poitrine d'une feuille
d'aluminium pour éviter de trop brûnir et assécher la peau.
† Le département de l'agriculture des É.-U. souligne que le bœuf saignant est populaire, mais ne le cuire qu'à 140°F(60°C) peut
ne pas éliminer certains organismes empoisonnants. *(Source : Safe Food Book, Tour Kitchen Guide,
USDA Rev. juin 1985)
* Consultez l'illustration pour obtenir une description des positions des grilles.
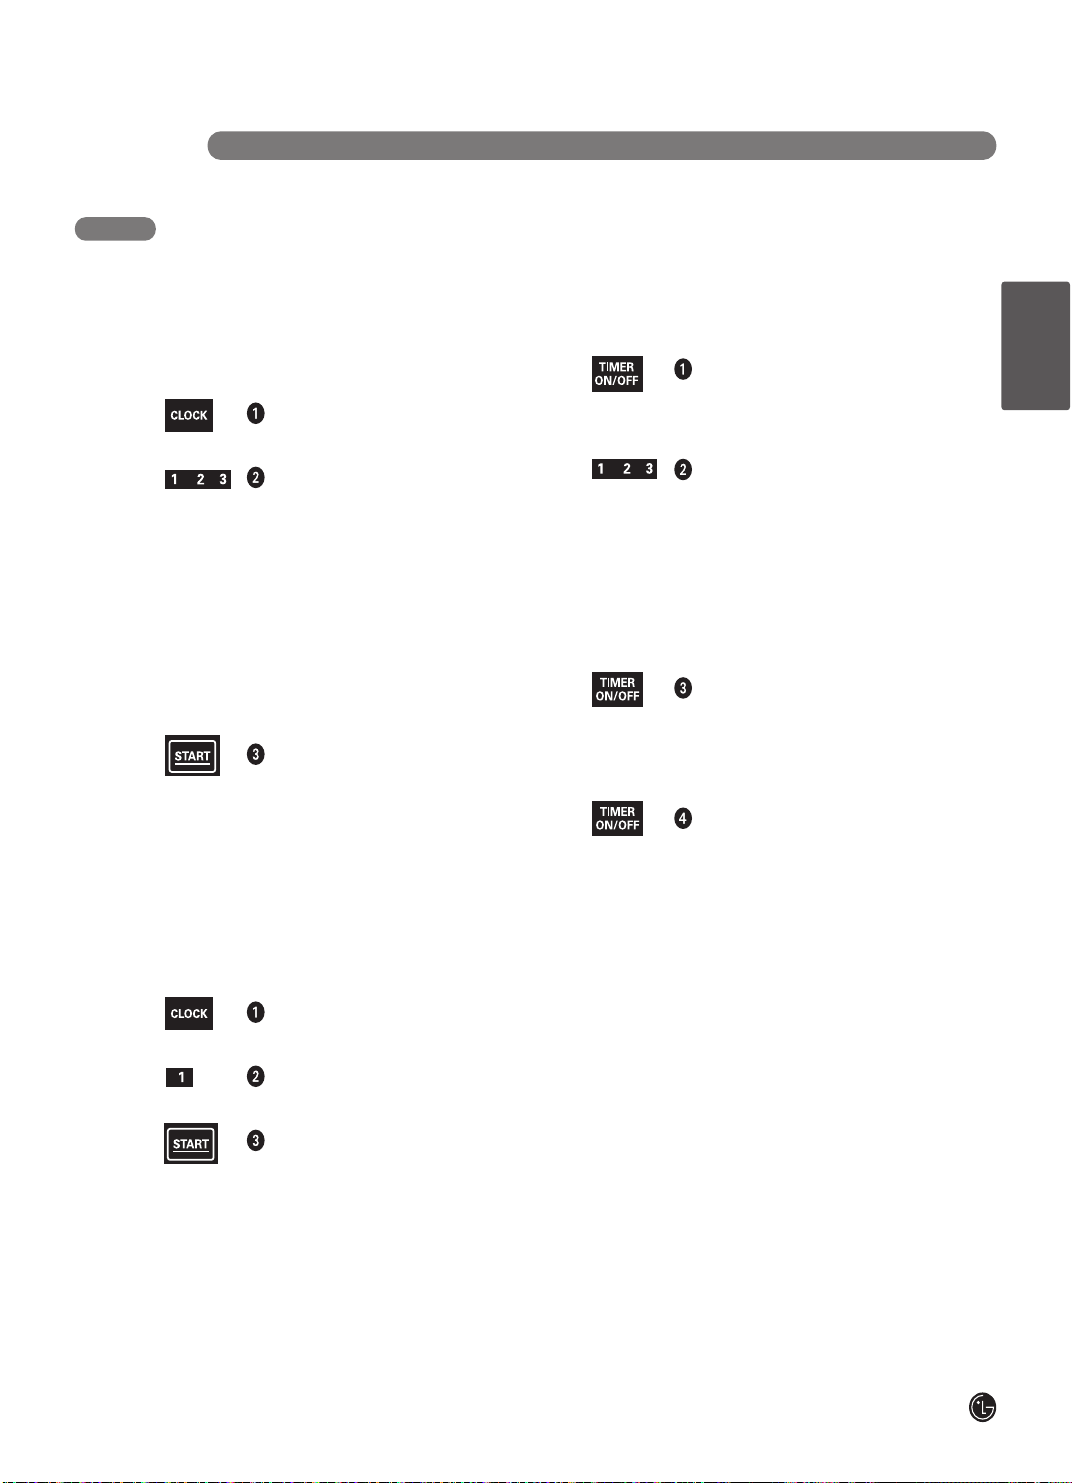
C O N S I G N E S D E F O N C T I O N N E M E N T
17
UTILISATION DE L'HORLOGE ET DU MINUTEUR
RÉGLAGE DE L'HORLOGE
L'horloge doit être réglée à l'heure exacte pour que les
fonctions de minuteur automatique du four fonctionnent
correctement. L'heure ne peut pas être modifiée au cours
d'une cuisson programmée ou du cycle d'auto-nettoyage.
Appuyez une fois sur la touche CLOCK
pour le réglage.
Appuyez sur les touches numériques pour
entrer l'heure. Appuyez sur les touches
numériques conformément à ce que vous
lisez. Par exemple, pour régler 12:12,
appuyez sur les touches numériques 1, 2, 1
et 2 dans cet ordre.
Si vous n'appuyez pas sur les touches
numériques pendant 30 secondes après
avoir appuyé sur la touche CLOCK,
l'affichage revient au paramètre d'origine.Si
cela se produit, appuyez sur la touche
CLOCK et entrez à nouveau l'heure.
Appuyez sur la touche START.
Pour consulter l'heure lorsque d'autres informations
s'affichent, appuyez sur la touche CLOCK.
MODIFICATION DU MODE DE L'HORLOGE
(12/24 h)
L'horloge a été réglée en mode 12 heures. Si vous préférez
le mode 24 heures, procédez comme suit.
Appuyez sur la touche CLOCK pendant 3
secondes.
Appuyez sur numériques 1 une fois pour
12hr et deux fois pour 24hr.
Appuyez sur la touche START pour accepter
la modification.
RÉGLAGE DU MINUTEUR
Le minuteur ne commande pas les opérations du four. Le
réglage maximal du minuteur est 11 heures et 59 minutes.
Appuyez sur la touche TIMER ON/OFF une
fois pour les minutes et les secondes,
appuyez sur la touche deux fois pour les
heures et minutes.
Appuyez sur le clavier numérique pour
sélectionner la durée désirée.
La fonction minutes et secondes permet un
réglage de 99 minutes maximum.
Pour régler un temps plus long que 59
minutes, utilisez la fonction heures et
minutes (appuyez sur la touche deux fois).
REMARQUE : En cas d'erreur, appuyez sur la
touche TIMER ON/OFF et recommencez.
Appuyez sur TIMER ON/OFF pour démarrer
le minuteur.
REMARQUE : Si vous n'appuyez pas sur la
touche TIMER ON/OFF, l'écran affiche à
nouveau l'heure.
Lorsque le minuteur atteint :00, End (FIN)
s'affiche. L'horloge sonnera trois fois toutes
les 15 secondes jusqu'à ce que vous
appuyiez sur le bouton “TIMER ON/OFF”
(activer/désactiver le minuteur).
REMARQUE : Si la durée restante n'est pas visible à
l'écran, affichez-la en appuyant sur TIMER ON/OFF.
ANNULATION DE LA FONCTION DU MINUTEUR
Appuyez sur la touche TIMER ON/OFF.
COUPURE DE COURANT
Si l'heure clignote à l'écran, vous avez subi une panne de
courant. Vous devez réinitialiser l'horloge.
Appuyez une fois sur la touche CLOCK pour régler à
nouveau. Entrez l'heure correcte en appuyant sur les
touches numériques appropriées. Appuyez sur la touche
START.
FRANÇAIS
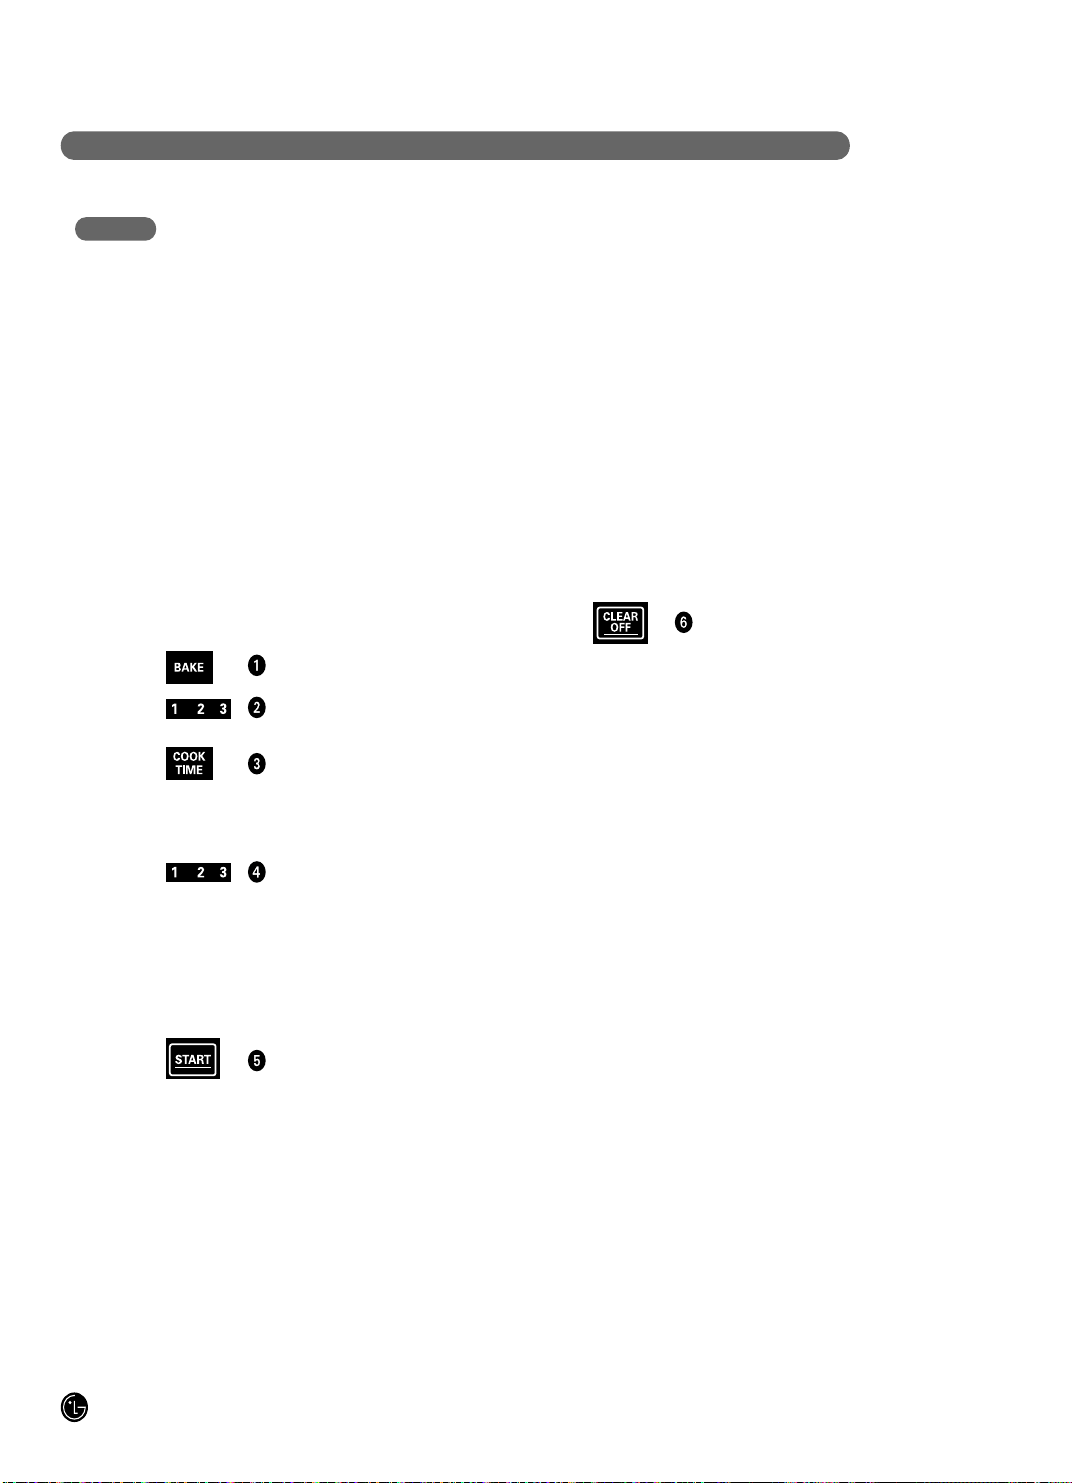
18
CONSI GNES DE FONCTIONNEMENT
UTILISATION DES FONCTIONS DE CUISSON ET DE
DIFFÉRÉS
REMARQUE : Les aliments qui se gâtent rapidement,
comme le lait, les œufs, le poisson, la farce, la volaille et le
porc NE DOIVENT PAS rester à la température ambiante
plus d'une heure avant et après la cuisson. La température
ambiante favorise le développement de bactéries
dangereuses. Assurez-vous que l'éclairage du four est
éteint car la chaleur de l'ampoule accélère le
développement de bactéries dangereuses.
Le four s'allume. Le décompte du temps de cuisson et le
changement de température (à partir de 100°F) s'affichent.
Lorsque le four a atteint la température désirée, 5 longs
bips retentiront et la lampe du four clignotera.
Le four continue la cuisson durant le temps défini, puis
s'éteint automatiquement. Consultez les RÉGLAGE DE LA
FONCTION WARM (MAINTIEN AU CHAUD).
Après l'arrêt du four, la commande continuera à sonner 3
fois toutes les minutes jusqu'à ce que vous appuyiez sur le
bouton “CLEAR OFF”.
Appuyez sur la touche CLEAR OFF pour
effacer l'écran. Retirez les aliments du four.
N'oubliez pas, même si le four s'éteint
automatiquement, les aliments laissés dans
le four continuent à cuire après son arrêt.
RÉGLAGE DU DÉMARRAGE IMMÉDIAT ET DE
L'ARRÊT AUTOMATIQUE
Le four s'allumera immédiatement et cuira pendant la durée
souhaitée. À la fin du temps de cuisson, le four s'éteindra
automatiquement.
Appuyez sur la touche BAKE.
Appuyez sur les touches numériques pour
régler la température souhaitée.
Appuyez sur la touche COOK TIME.
REMARQUE : Si votre recette nécessite un
préchauffage, vous devrez peut-être prolonger
le temps de cuisson.
Appuyez sur les touches numériques pour
régler le temps de cuisson.
Le temps de cuisson peut être réglé entre 1
minute et 11 heures et 59 minutes.
Pour entrer un temps de cuisson de 1 heure
et 30 minutes, appuyez sur 1, 3 et 0.
La température réglée et le temps de
cuisson s'affichent.
Appuyez sur la touche START.
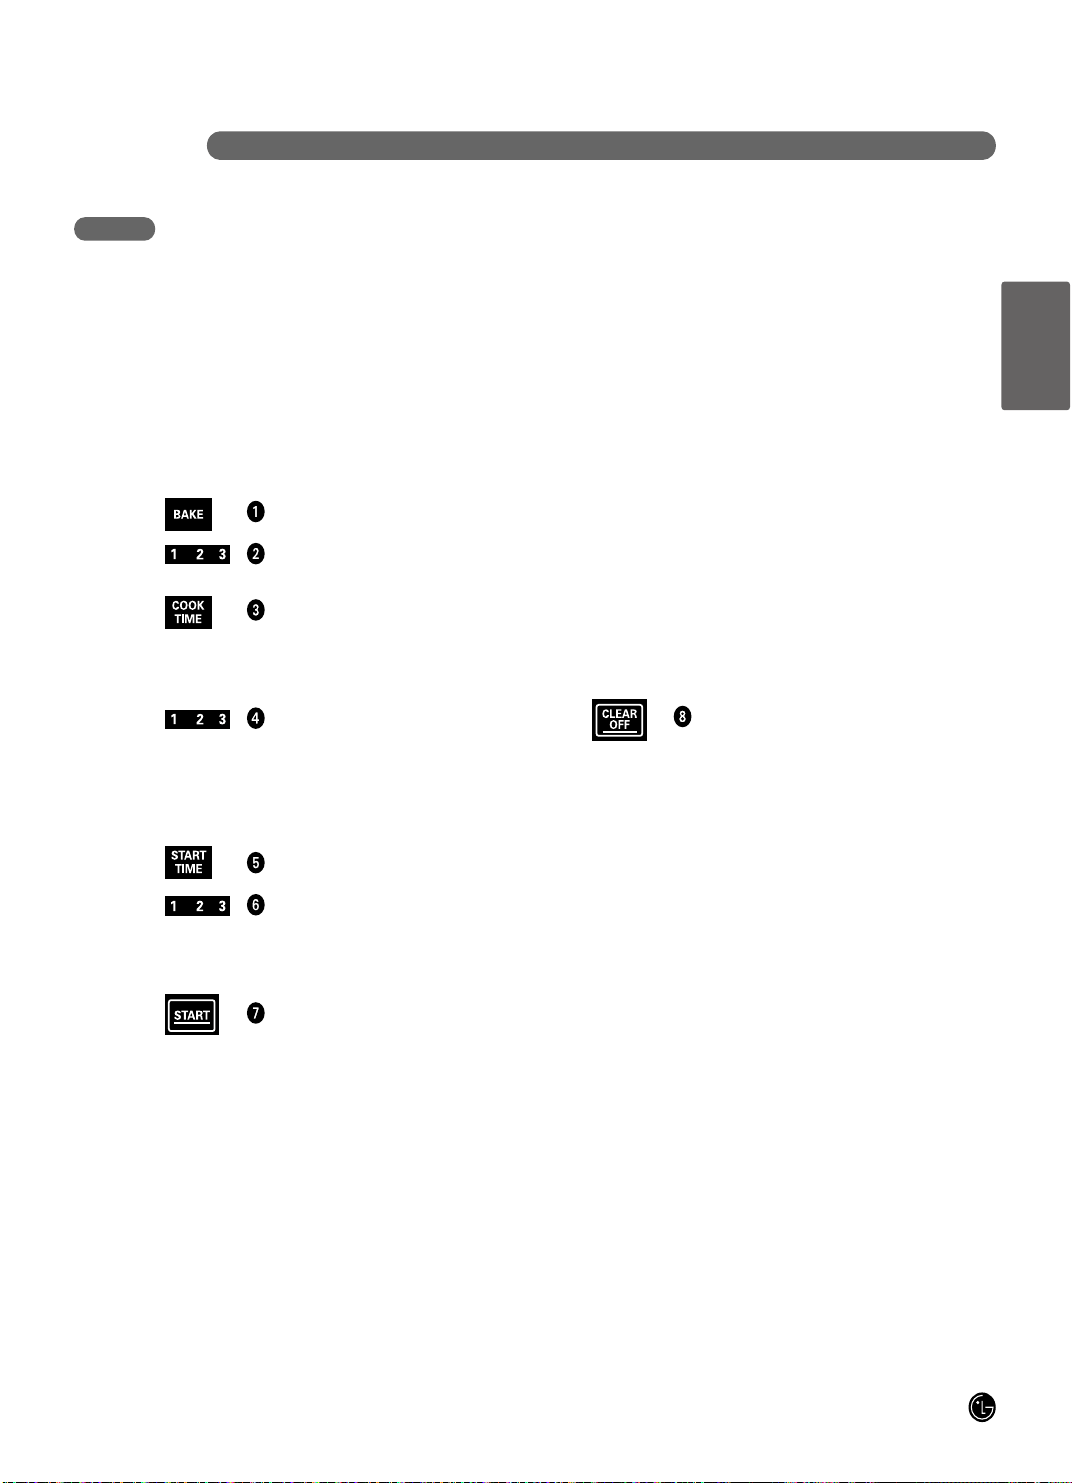
C O N S I G N E S D E F O N C T I O N N E M E N T
19
UTILISATION DES FONCTIONS DE CUISSON ET DE
DIFFÉRÉS
(suite)
REMARQUE : Si vous voulez vérifier les horaires que vous
avez définis, appuyez sur la touche START TIME pour
consulter l'heure de démarrage ou sur la touche COOK
TIME pour consulter le temps de cuisson défini.
Le four s'allume. Le décompte du temps de cuisson et le
changement de température (à partir de 100 °F)
s'affichent.
Lorsque le four a atteint la température désirée, 5 longs
bips retentiront et la lampe du four clignotera.
Le four continue la cuisson durant le temps défini, puis
s'éteint automatiquement, à moins que la fonction WARM
(MAINTIEN AU CHAUD) soit activée.
Consultez les RÉGLAGE DE LA FONCTION WARM
(MAINTIEN AU CHAUD).
Après l'arrêt du four, le son de fin de cycle retentit.
Appuyez sur la touche CLEAR OFF pour
effacer l'écran. Retirez les aliments du four.
N'oubliez pas, même si le four s'éteint
automatiquement, les aliments laissés dans
le four continuent à cuire après son arrêt.
RÉGLAGE DU DÉMARRAGE DIFFÉRÉ ET DE
L'ARRÊT AUTOMATIQUE
Le four se met en marche à l'heure définie, cuit durant une
un temps spécifique, puis s'éteint automatiquement.
Assurez-vous que l'horloge affiche l'heure correcte.
Appuyez sur la touche BAKE.
Appuyez sur les touches numériques pour
régler la température souhaitée.
Appuyez sur la touche COOK TIME.
REMARQUE : Si votre recette nécessite un
préchauffage, vous devrez peut-être prolonger
le temps de cuisson.
Appuyez sur les touches numériques pour
régler le temps de cuisson.
Pour entrer un temps de cuisson de 1 heure
et 30 minutes, appuyez sur 1, 3 et 0.
La température réglée et le temps de
cuisson s'affichent.
Appuyez sur la touche START TIME.
Appuyez sur les touches numériques pour
régler l'heure à laquelle vous souhaitez que
le four se mette en marche et commence la
cuisson.
Appuyez sur la touche START.
FRANÇAIS
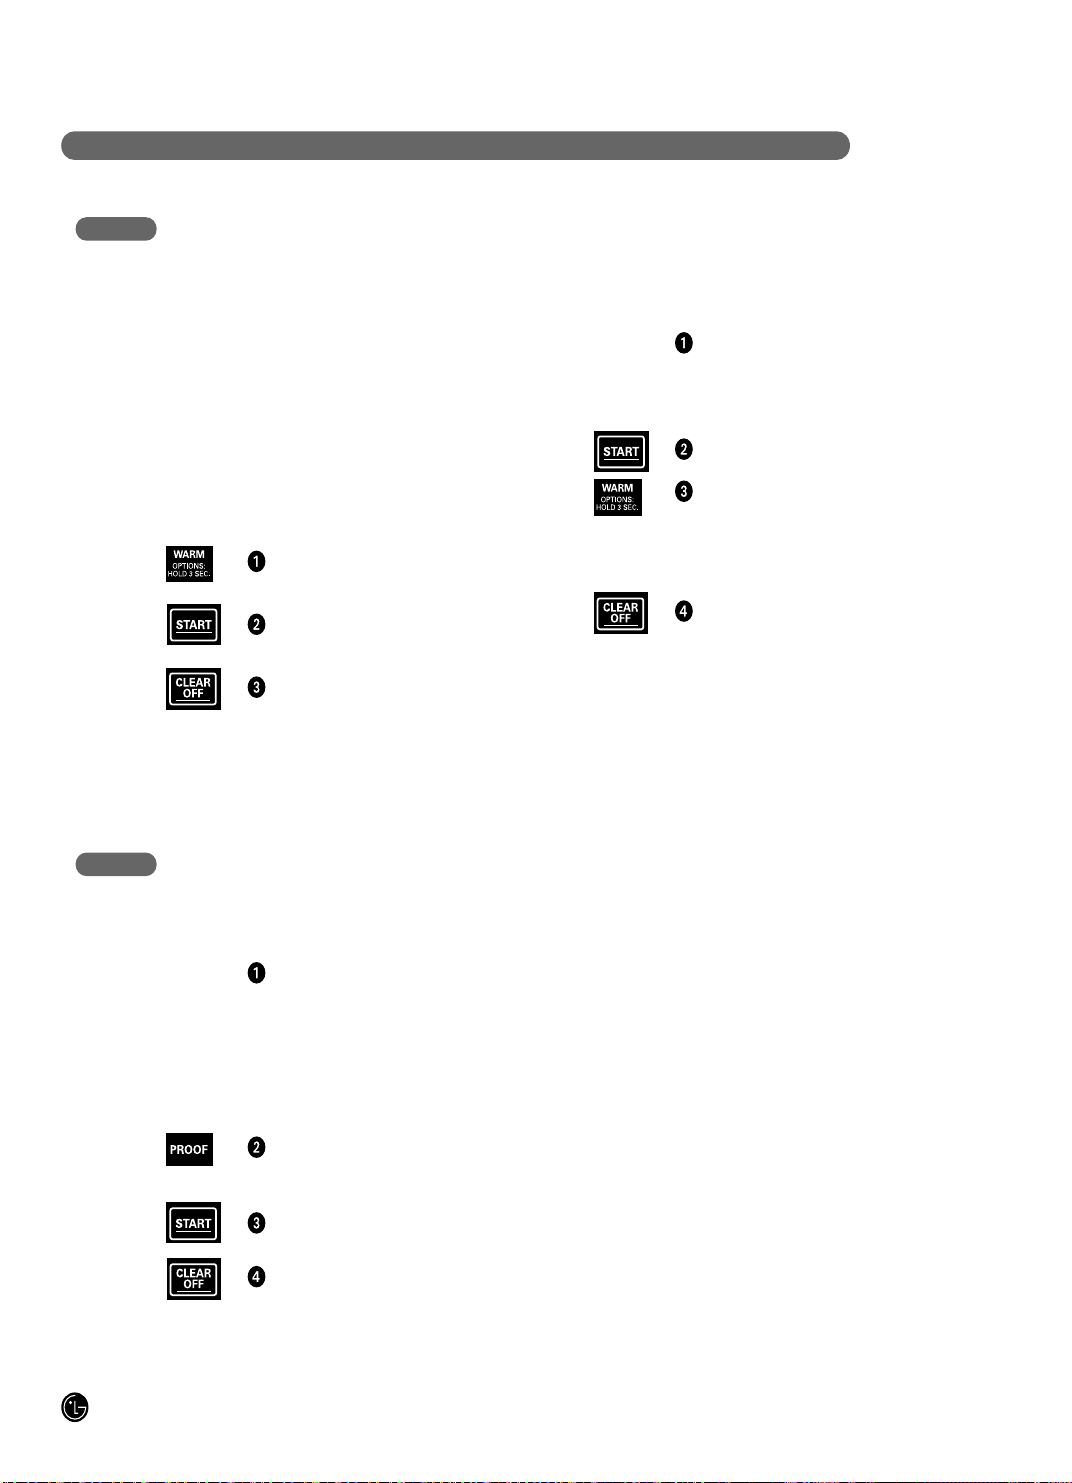
20
CONSIGN E S D E FONCTIONNEM ENT
RÉGLAGE DE LA FONCTION WARM (MAINTIEN AU CHAUD)
RÉGLAGE DU MAINTIEN AU CHAUD
Appuyez sur la touche WARM .
Appuyez sur la touche START.
Pour arrêter le maintien au chaud, appuyez
sur la touche CLEAR OFF à tout moment.
La fonction MAINTIEN AU CHAUD maintient la température à
170°F(77°C). Cette fonction n'est pas destinée à réchauffer les
aliments froids. La fonction Warm (Maintien au chaud)
maintient les aliments cuits au chaud jusqu'à 3 heures après la
fin de la cuisson. Après 3 heures, la fonction MAINTIEN AU
CHAUD arrête automatiquement le four.
La fonction Maintien au chaud peut être utilisée sans autre
opération de cuisson ou après la cuisson à l'aide de CUISSON
PROGRAMMÉE CUIRE ou CUISSON DIFFÉRÉE CUIRE.
RÉGLAGE DE LA FONCTION MAINTIEN AU CHAUD
EN CAS DE CUISSON PROGRAMMÉE
Définissez la fonction de cuisson souhaitée :
CUISSON PROGRAMMÉE (CUIRE) ou
CUISSON DIFFÉRÉE (CUIRE) consultez
la page précédente.
Appuyez sur la touche START.
Appuyez sur la touche WARM. Le mode
CUISSON ET MAINTIEN AU CHAUD est défini
pour se lancer automatiquement à la fin des
fonctions CUISSON PROGRAMMÉE ou
CUISSON DIFFÉRÉE.
Pour arrêter à tout moment le mode Maintien
au chaud, appuyez sur la touche CLEAR OFF.
Remarque : Si vous appuyez sur CLEAR OFF avant le délai
de démarrage des fonctions, tous les réglages sont annulés.
RÉGLAGE DE LA FONCTION PROOF (LEVAGE)
Pour éviter de faire baisser la température du four et de
rallonger le temps de levage, n'ouvrez pas la porte du four
sans raison. Évitez de trop faire lever les produits de
panification en les vérifiant de façon précoce.
REMARQUES :
• N'UTILISEZ PAS le mode de levage pour réchauffer les
aliments ou les maintenir au chaud. La température de
levage n'est pas suffisante pour conserver les aliments à
une température sûre. Utilisez la fonction MAINTIEN AU
CHAUD pour maintenir les aliments au chaud.
• Le levage ne fonctionne pas lorsque la température du
four est supérieure à 125°F(52°C). Oven is Hot (Le four
est chaud) s'affiche à l'écran.
La fonction Proof (Levage) maintient la chaleur pour faire
lever les produits avec de la levure avant la cuisson.
Placez la pâte couverte dans un plat sur une
grille en position B ou C.
REMARQUE : Pour obtenir de meilleurs
résultats, couvrez la pâte avec un linge ou un
film plastique (fixez le plastique sous le
récipient pour que le ventilateur du four ne le
fasse pas s'envoler).
Appuyez sur la touche PROOF.
PROOF sera affiché.
Appuyez sur la touche START.
À la fin du levage, appuyez sur la touche
CLEAR OFF.
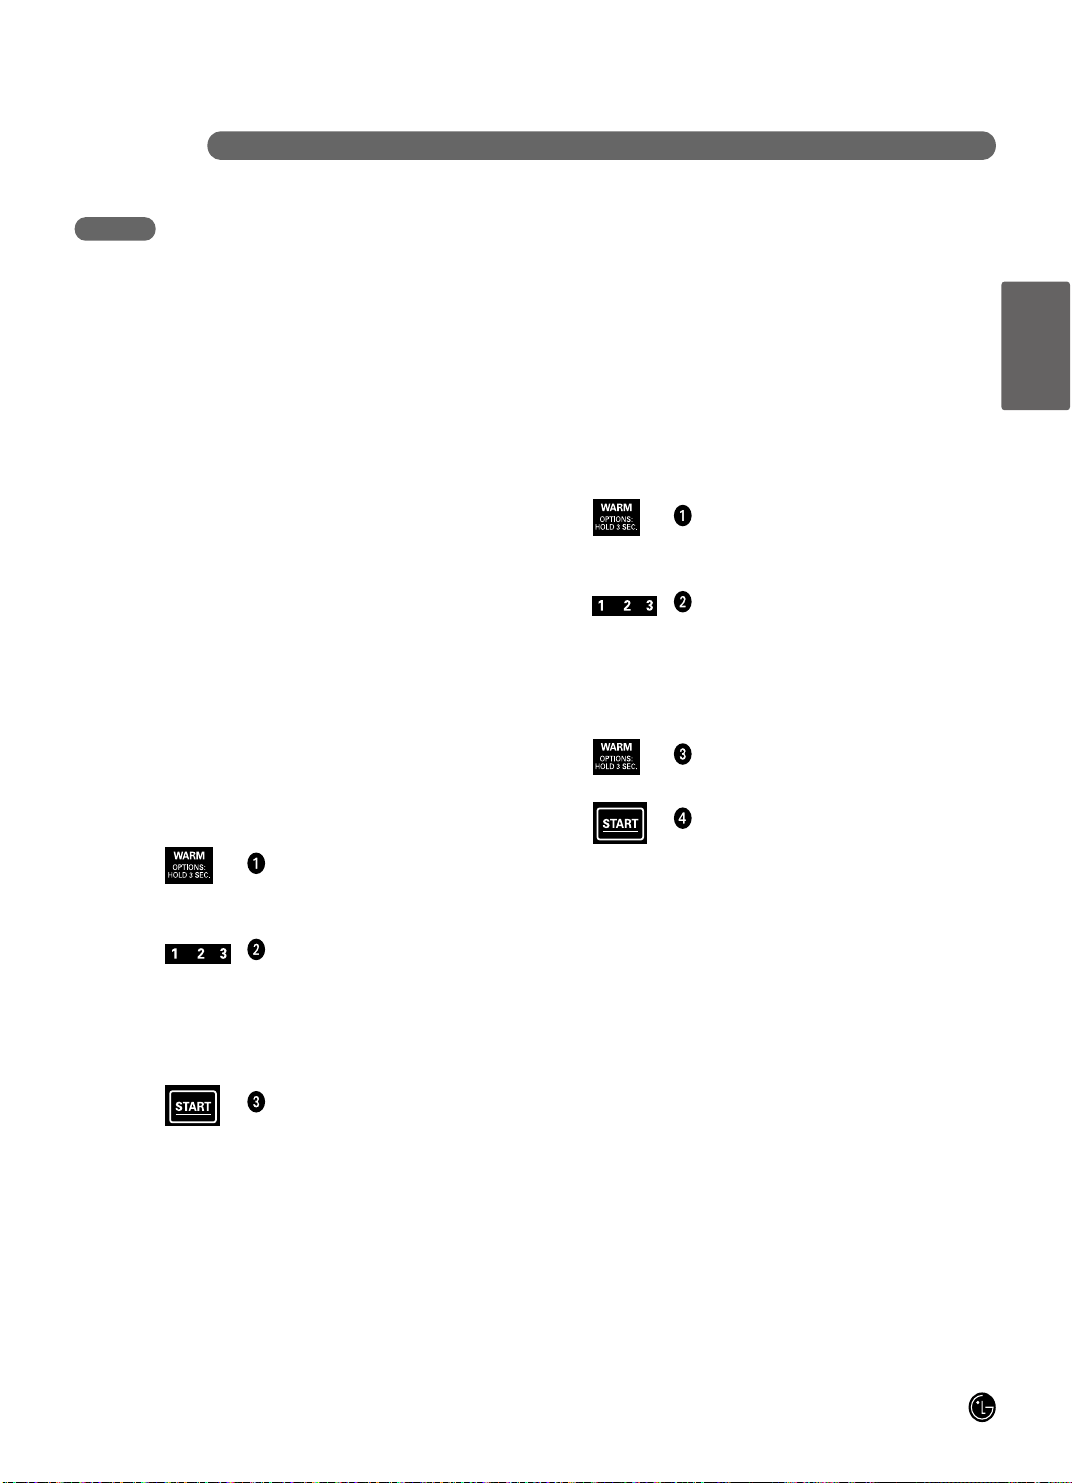
C O N S I G N E S D E F O N C T I O N N E M E N T
21
RÉGLAGE DU THERMOSTAT DU FOUR
Il se peut que vous trouviez que votre nouveau four cuise
différemment de l'ancien. Utilisez votre nouveau four
pendant quelques semaines pour vous y accoutumer. Si
vous pensez toujours que le nouveau four est trop chaud ou
ne chauffe pas assez, vous pouvez régler le thermostat
vous-même.
N'UTILISEZ PAS de thermomètres, comme ceux vendus
dans les épiceries, pour contrôler la température de votre
four. Ces thermomètres peuvent varier de 20 à 40 degrés.
REMARQUE : Ce réglage n'affecte pas les températures
du gril ou de l'auto-nettoyage. Le réglage est conservé en
mémoire à la suite d'une panne de courant.
La température du four peut être augmentée (+) ou
diminuée (-) de 35 ˚F ou 19 ˚C.
Pour augmenter (+) la température
Appuyez sur la touche WARM et maintenez-
la enfoncée pendant 3 secondes. Puis, et
« Adj » s'affiche.
À l'aide des touches numériques, entrez le
nombre de degrés selon lequel vous
souhaitez augmenter (+) la température.
Par exemple, pour augmenter (+) la
température du four de 15, appuyez sur 1 et
5.
Appuyez sur la touche START pour régler la
température augmentée (+).
Pour diminuer (-) la température
Appuyez sur la touche WARM et maintenez-
la enfoncée pendant 3 secondes. Puis, et
« Adj » s'affiche.
À l'aide des touches numériques, entrez le
nombre de degrés selon lequel vous
souhaitez diminuer (-) la température.
Par exemple, pour diminuer (-) la
température du four de 15, appuyez sur 1 et
5.
Appuyez à nouveau sur WARM, la
température diminuée (-) s'affiche à l'écran.
Appuyez sur la touche START pour régler la
température augmentée (+).
REMARQUE : Une fois que la température est augmentée
ou diminuée, l'écran affiche la température réglée jusqu'à
ce qu'elle soit réglée à nouveau.
REMARQUE : Le réglage du thermostat changera la
température de cuisson.
FONCTIONS SPÉCIALES DES COMMANDES DU FOUR
Les nouvelles commandes présentent des fonctions
supplémentaires que vous pouvez choisir d'utiliser. Les
pages suivantes décrivent ces fonctions et leur activation.
Les modes des fonctions spéciales peuvent être
uniquement activés lorsque l'écran affiche l'heure.
Ils sont conservés en mémoire jusqu'à ce que vous répétiez
ces étapes.
Lorsque votre choix s'affiche, appuyez sur la touche
START. Les fonctions spéciales sont conservées en
mémoire à la suite d'une panne de courant.
FRANÇAIS
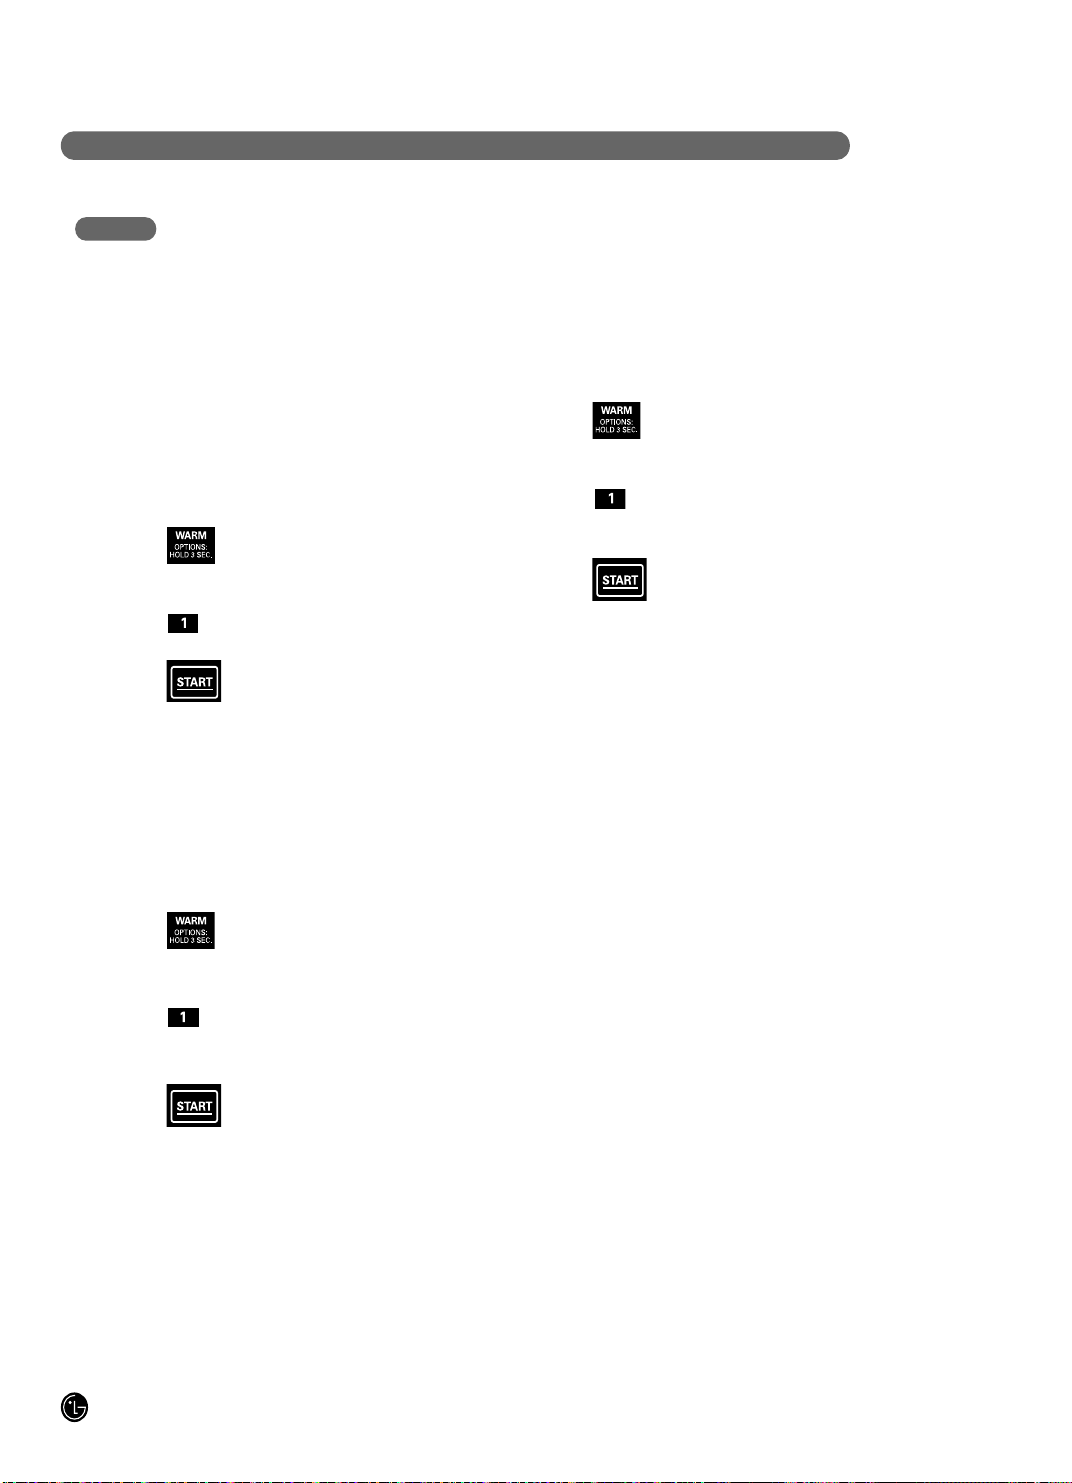
22
CONSIGNES DE FONCTIONNEMENT
RÉGLAGE MARCHE/ARRÊT DU VOYANT DE
PRÉCHAUFFAGE
L'éclairage intérieur du four s'allume automatiquement
lorsque la porte du four est ouverte.
Lorsque le four atteint une température définie à la fin du
préchauffage, le four en informe l'utilisateur en faisant
clignoter l'éclairage du four jusqu'à ce que la porte soit
ouverte.
Vous pouvez activer ou désactiver cette fonction
intelligente. Par défaut, cette fonction est activée.
Appuyez sur la touche WARM pendant 3
secondes. Puis, appuyez une fois sur la
touche WARM et « PrE » s'affiche.
Appuyez sur le bouton numéro 1 pour
activer (ON) ou désactiver (OFF).
Appuyez sur la touche START pour
accepter la modification.
RÉGLAGE DU VOLUME DE L'ALARME
La fonction de réglage du volume de l'alarme vous permet
de régler le volume à un niveau plus acceptable. Il existe
quatre niveaux de volume disponibles, Haut, Moy, Bas et
Arrêt.
Appuyez sur la touche WARM pendant 3
secondes. Puis, appuyez deux fois sur la
touche WARM et « BEEP » s'affiche.
Appuyez sur la touche 1 du clavier
numérique pour faire varier les volumes du
signal sonore.
Appuyez sur la touche START pour
accepter la modification.
REMARQUE:
Lorsque l'affichage indique:
Hi ou 3 = Volume le plus élevé
-- ou 3 = Volume normal
Lo ou 1 = Volume le plus bas
Off = Muet
CHOIX DE L'UNITÉ DE TEMPÉRATURE
(FAHRENHEIT OU CELSIUS)
Les commandes du four sont réglées pour afficher la
température en degrés Fahrenheit, mais vous pouvez
passer en degrés Celsius.
Appuyez sur la touche WARM pendant 3
secondes. Puis, appuyez trois fois sur la
touche WARM et « Unit » s'affiche.
Appuyez sur le bouton numéro 1 pour
sélectionner les degrés Celsius (C) ou
Fahrenheit (F).
Appuyez sur la touche START pour
accepter la modification.
FONCTIONS SPÉCIALES DES COMMANDES DU FOUR
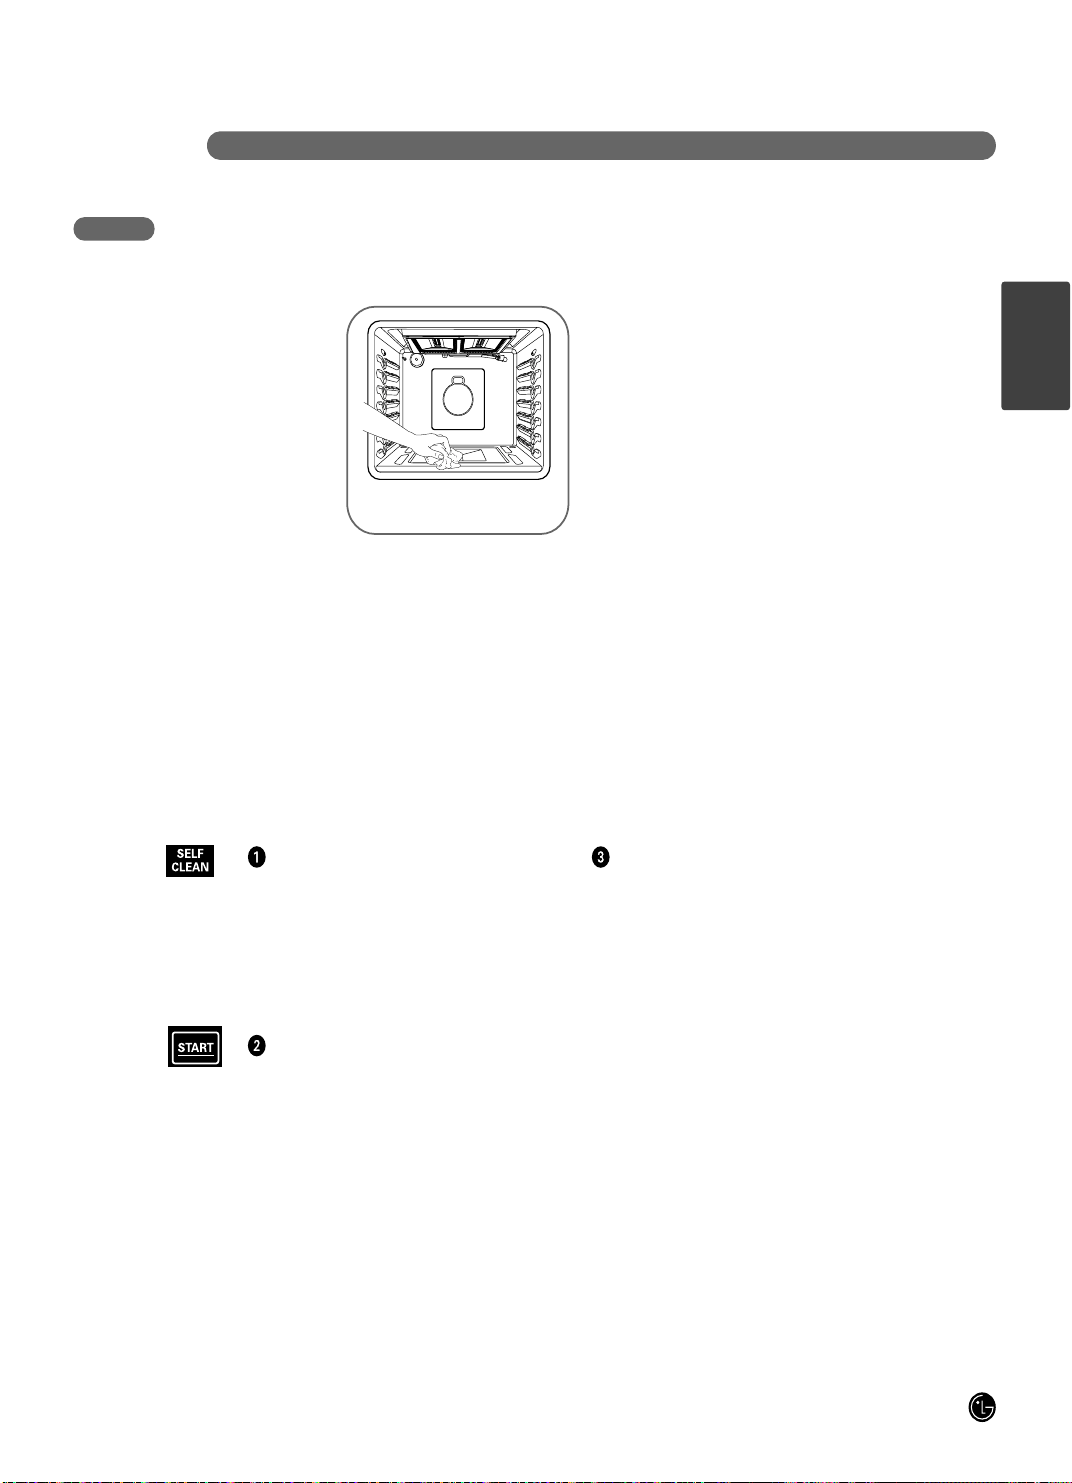
C ONSIGNES DE FONCTI ONNEMENT
23
Appuyez sur la touche SELF CLEAN une
fois pour un cycle de 3 heures, deux fois
pour un cycle de 2 heures et trois fois pour
un cycle de 4 heures. Un cycle d'auto-
nettoyage de 3 heures est recommandé
pour nettoyer de petites salissures. Un cycle
d'AUTO-NETTOYAGE de 4 heures est
recommandé pour les fours très sales.
Appuyez sur la touche START.
La porte se verrouille automatiquement. L'écran affiche le
temps de nettoyage restant. Il n'est pas possible d'ouvrir la
porte du four jusqu'à ce que la température chute en
dessous de celle de verrouillage et que l'icône DOOR
LOCKED s'éteigne.
Le four s'éteint automatiquement à la fin du cycle de
nettoyage.
Lorsque l'icône DOOR LOCKED s'éteint, la porte se
déverrouille automatiquement.
• Les mots DOOR LOCKED clignotent et les commandes
du four vous signalent si vous avez réglé le cycle de
nettoyage et oublié de fermer la porte du four.
• Pour interrompre un cycle de nettoyage, appuyez sur la
touche CLEAR OFF.
Lorsque l'icône DOOR LOCKED s'éteint, indiquant que la
température est inférieure à celle de verrouillage, ouvrez
la porte.
RÉGLAGE DU FOUR POUR LE NETTOYAGE
UTILISATION DE L'AUTO-NETTOYAGE
AVANT UN CYCLE DE NETTOYAGE
Lors du cycle d'auto
nettoyage, nous
recommandons d'ouvrir
une fenêtre de la cuisine,
d'utiliser un ventilateur ou
de faire fonctionner la
hotte aspirante.
Retirez les grilles du four,
la lèchefrite, la grille de la
lèchefrite, tous les
récipients, les thermomètres
et le papier aluminium du four. Ils ne supportent pas les
températures élevées du nettoyage.
IMPORTANT : Certains oiseaux sont extrêmement
sensibles aux vapeurs émanant de la cuisinière pendant le
cycle d'auto-nettoyage. Placez les oiseaux dans une autre
pièce bien ventilée.
REMARQUES :
• Il est nécessaire de nettoyer manuellement la saleté à
l'avant de la cuisinière et à l'extérieur du joint de la porte.
Nettoyez ces zones avec de l'eau chaude, un tampon à
récurer imbibé de savon ou un nettoyant tel que Soft
Scrub*. Rincez avec de l'eau propre et séchez.
• NE NETTOYEZ PAS le joint de la porte. Le matériau en
fibre de verre du joint de la porte du four ne supporte pas
l'abrasion. Il est essentiel que le joint reste intact. Si vous
remarquez qu'il se tord ou s'effiloche, remplacez-le.
• Essuyez les éventuelles salissures au fond du four.
• Assurez-vous que la protection de l'ampoule de l'éclairage
du four est en place et que l'éclairage est éteint.
• Soyez vigilant lors de l'ouverture du four à la fin du cycle
d'auto-nettoyage. Le four peut encore être chaud.
Essuyez les salissures au fond
du four.
FRANÇAIS
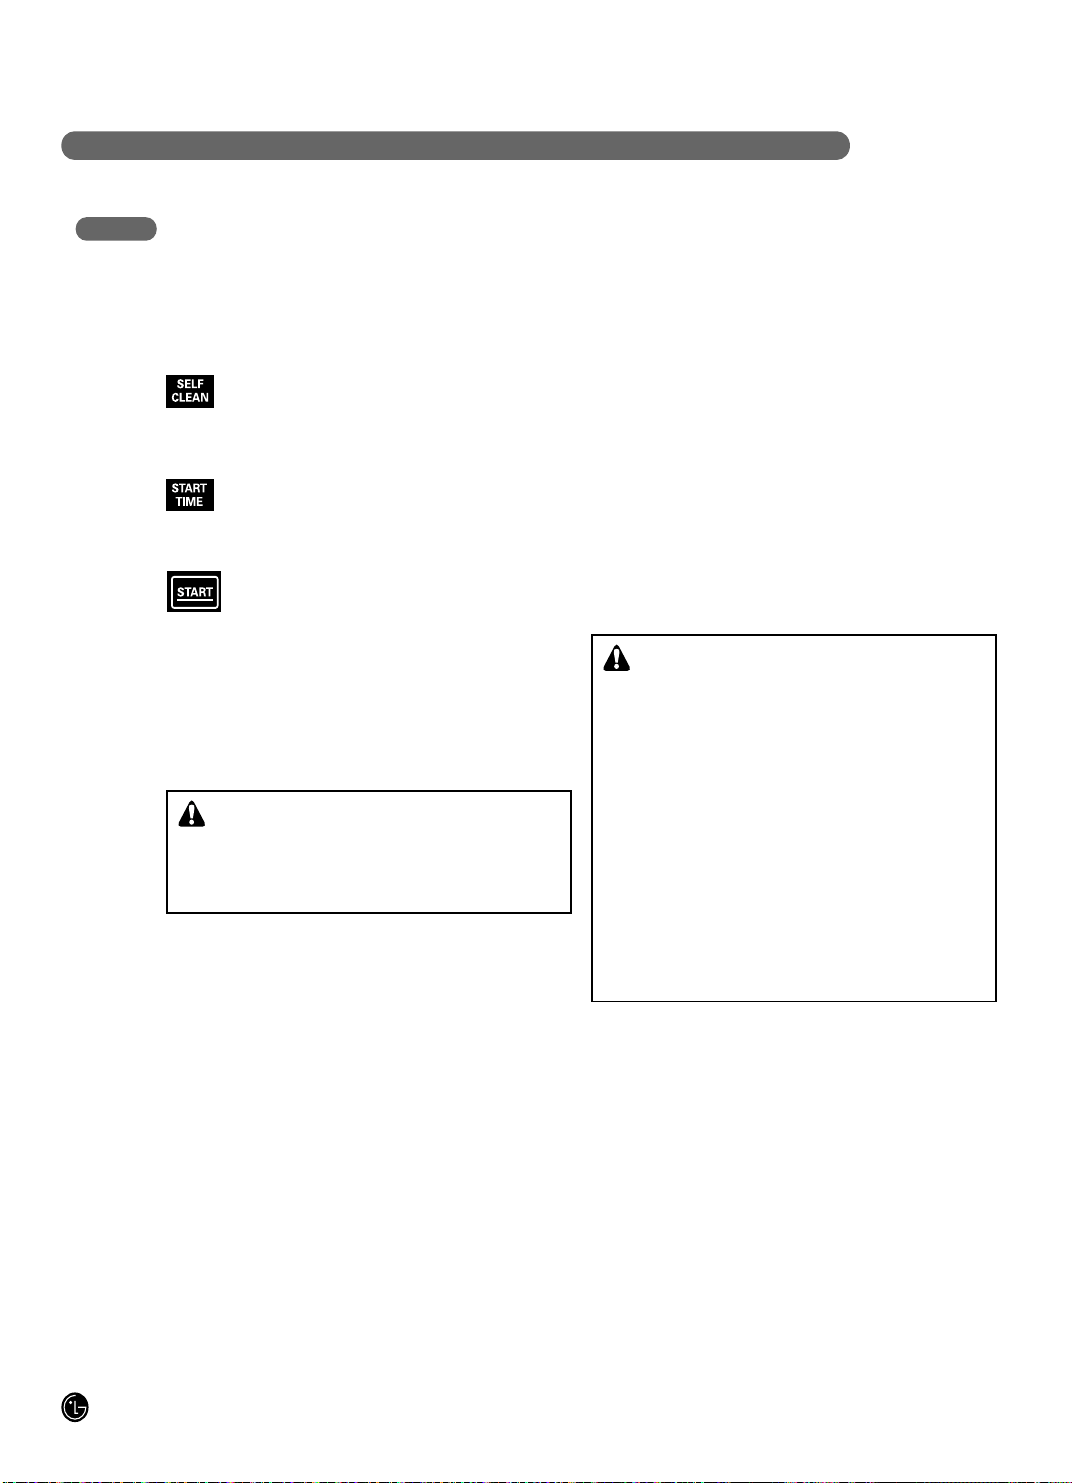
24
CONSIGNES DE FONCTIONNEMENT
UTILISATION DE L'AUTO-NETTOYAGE
Le four s'éteint automatiquement à la fin du cycle de
nettoyage.
• Lorsque l'icône DOOR LOCKED s'éteint, la porte se
déverrouille automatiquement.
• Les mots DOOR LOCKED clignotent et les commandes
du four vous signalent si vous avez réglé le cycle de
nettoyage et oublié de fermer la porte du four.
• Pour interrompre un cycle de nettoyage, appuyez sur la
touche CLEAR OFF. Lorsque l'icône DOOR LOCKED
s'éteint, indiquant que la température est inférieure à celle
de verrouillage, ouvrez la porte.
LANCEMENT DIFFÉRÉ DU NETTOYAGE
Assurez-vous que l'horloge affiche l'heure correcte.
Appuyez sur la touche SELF CLEAN.
Sélectionnez la durée souhaitée du cycle de
nettoyage en appuyant sur la touche SELF
CLEAN.
Appuyez sur la touche START TIME.
Entrez l'heure souhaitée de lancement de
l'auto-nettoyage à l'aide des touches
numériques.
Appuyez sur la touche START. DELAY et
CLEAN restent affichés.
La porte se verrouille automatiquement. L'écran affiche
l'heure de démarrage. Le cycle d'auto-nettoyage démarrera
automatiquement à l'heure définie. À ce moment, l'icône
DELAY s'éteint. Il est impossible d'ouvrir la porte du four
jusqu'à ce que la température chute en dessous de celle de
verrouillage.
APRÈS UN CYCLE DE NETTOYAGE
• Vous pouvez remarquer la présence de cendres blanches
dans le four. Essuyez-les à l'aide d'un chiffon humide
après le refroidissement du four.
• S'il reste des taches blanches, retirez-les à l'aide d'un
tampon à récurer imbibé de savon et rincez bien avec un
mélange de vinaigre et d'eau.
• Ces dépôts sont généralement des résidus de sel qui ne
peuvent être enlevés par le cycle d'auto-nettoyage.
• Si le four n'est pas propre après un cycle d'auto-
nettoyage, répétez l'opération.
• Vous ne pouvez pas régler le four pour la cuisson jusqu'à
ce que le four ait suffisamment refroidi et que la porte se
soit déverrouillée.
• Lors du cycle d'auto-nettoyage du four, vous pouvez
appuyer sur la touche CLOCK pour afficher l'heure. Pour
revenir au décompte du nettoyage, appuyez sur la touche
COOK TIME.
• Si les grilles glissent avec peine, appliquez un peu d'huile
végétale ou de cuisson sur une feuille d'essuie-tout et
frottez les bords des grilles avec cette feuille.
La porte du four doit être fermée et toutes les commandes bien réglées pour que le cycle s'effectue correctement.
AVERTISSEMENT :
Pendant le cycle d'auto-nettoyage, l'extérieur du four
peut devenir très chaud au toucher. Ne pas laisser les
petits enfants sans surveillance à proximité de l'appareil.
AVERTISSEMENT :
• NE PAS GARNIR les parois, les grilles, le fond ou toute
autre partie de la cuisinière de papier aluminium. Sinon,
vous risquez d'arrêter la distribution de la chaleur,
d'obtenir de mauvais résultats de cuisson et de causer
des dégâts permanents à l'intérieur du four (le papier
aluminium fond sur la surface intérieure du four).
• Soyez vigilant lors de l'ouverture de la porte à la fin du
cycle d'auto-nettoyage. Le four peut encore être TRÈS
CHAUD.
• Certains oiseaux sont extrêmement sensibles aux
vapeurs émanant de la cuisinière pendant le cycle
d'auto-nettoyage. Placez les oiseaux dans une autre
pièce bien ventilée.
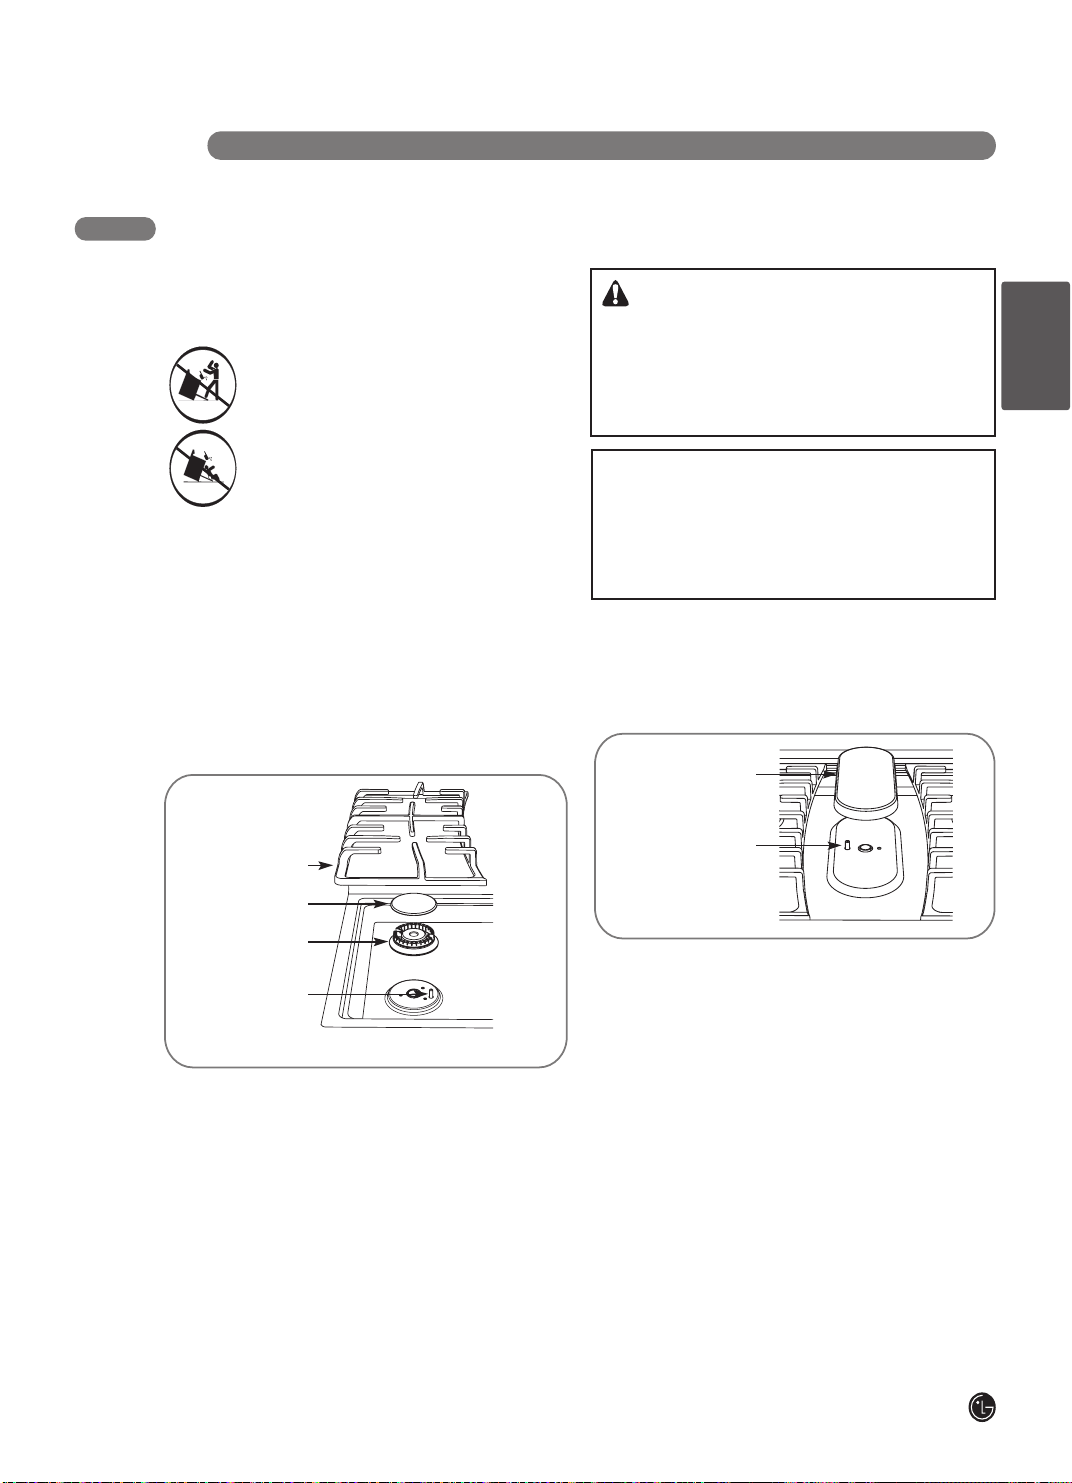
ENTRE T IEN ET NETTOYAG E DE LA CUIS I NIÈR E
25
ENTRETIEN ET NETTOYAGE
Assurez-vous que le courant est coupé et que toutes
les surfaces sont froides avant de nettoyer toute partie
de la cuisinière.
Si vous déplacez la cuisinière pour la nettoyer,
la réparer ou pour toute raison, assurez-vous
que le dispositif anti-basculement est
correctement enclenché lorsque vous la
replacez.
Le non-respect de cette précaution peut
entraîner le basculement de la cuisinière et des
blessures.
L'électrode de l'allumeur électrique est exposée en cas
de retrait de la tête du brûleur. Lorsqu'un brûleur est
réglé en position LITE, tous les brûleurs produisent des
étincelles. N'essayez pas de démonter ou de nettoyer un
brûleur alors qu'un autre brûleur est allumé. Il existe un
risque d'électrocution.
Éteignez toutes les commandes avant de retirer les pièces
du brûleur. Les grilles, les couvercles et les têtes de brûleur
peuvent être ôtées, ce qui facilite leur nettoyage.
Les électrodes ne sont pas amovibles.
Grille du brûleur
Couvercle du brûleur
Électrode
Table de cuisson
Tête du brûleur
ASSEMBLAGES DES BRÛLEURS SCELLÉS
L'assemblage du brûleur ovale peut être ôté, ce qui facilite
son nettoyage. L'électrode du brûleur n'est pas amovible.
ASSEMBLAGE DU BRÛLEUR OVALE
Tête et couvercle du
brûleur
Électrode
ATTENTION:
• NE RETIREZ AUCUNE pièce de la table de cuisson
jusqu'à ce qu'elles aient complètement refroidi et
qu'elles puissent être manipulées en toute sécurité.
• NE FAITES PAS fonctionner les brûleurs de surface
sans que toutes les pièces et les grilles soient en place.
FRANÇAIS
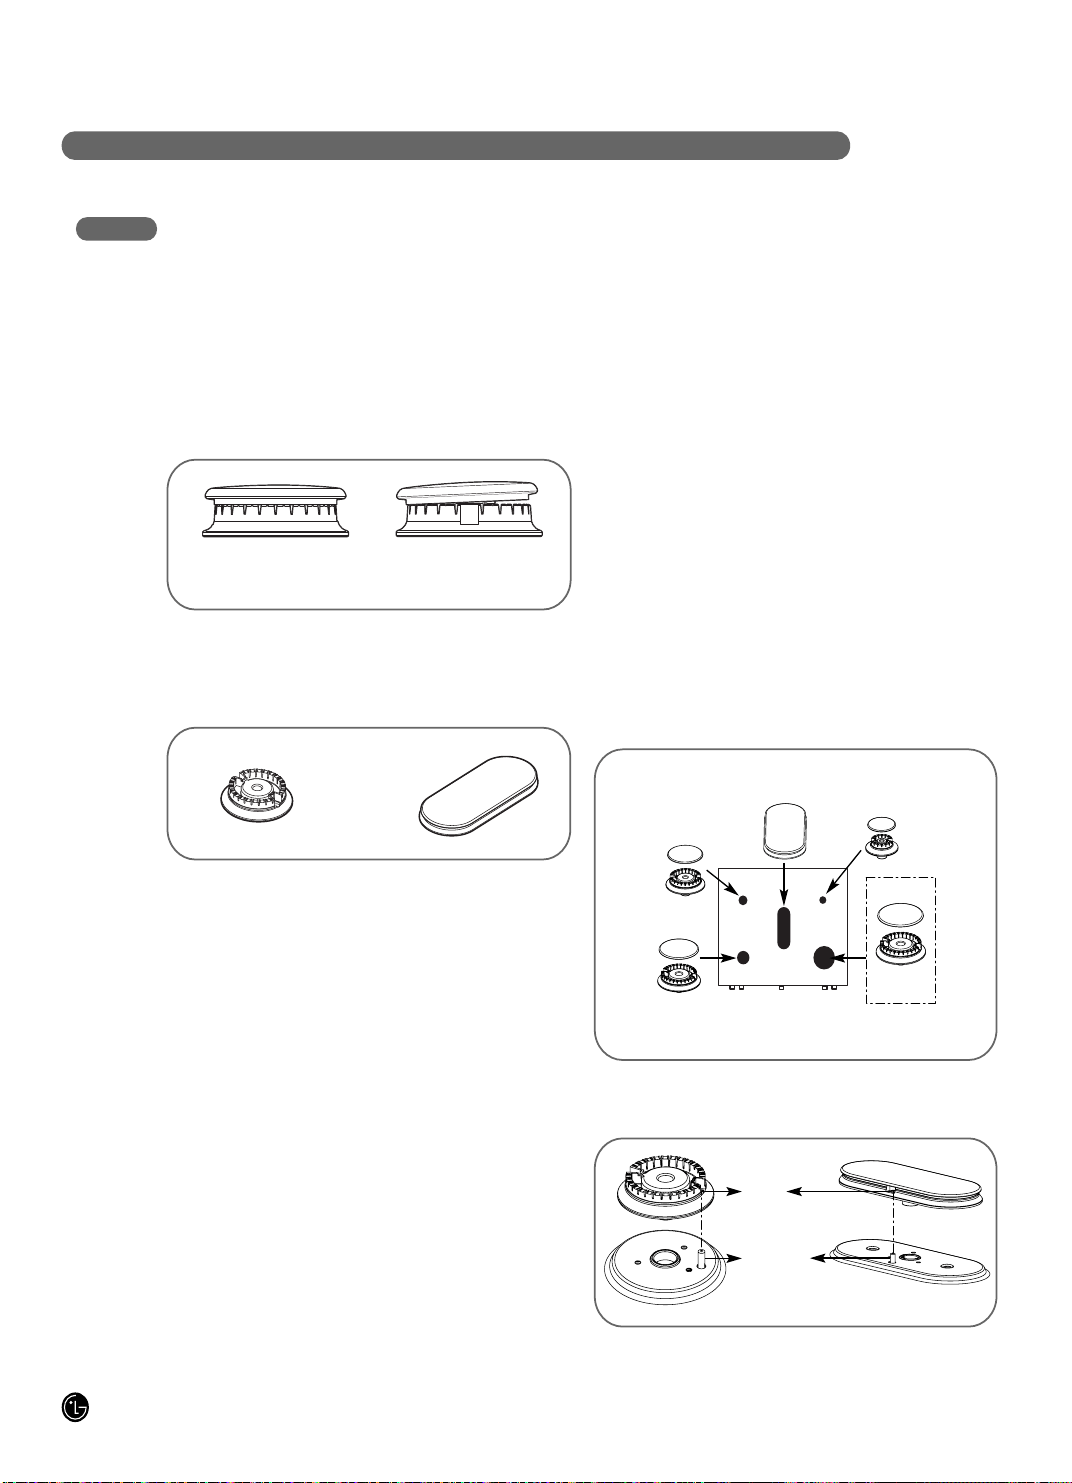
26
E N T R E T I E N E T N E T TOYAG E D E L A C U I S I N I È R E
COUVERCLES ET TÊTES DES BRÛLEURS
COUVERCLES DES BRÛLEURS
Ôtez-les lorsqu'ils ont refroidi. Lavez les couvercles des
brûleurs dans de l'eau chaude et savonneuse, puis rincez-
les à l'eau claire. Vous devez récurer avec un tampon à
récurer en plastique pour retirer les particules d'aliments
brûlés.
APRÈS LE NETTOYAGE
Avant de replacer les couvercles et les têtes des brûleurs,
secouez-les pour retirer les restes d'eau et séchez-les bien.
REMISE EN PLACE
Remettez en place les têtes et les couvercles des brûleurs
sur les électrodes de la table de cuisson, aux
emplacements corrects, en fonction de leur taille.
Le couvercle du brûleur est
correctement placé.
Le couvercle du brûleur N'est
PAS correctement placé.
TÊTES DES BRÛLEURS ET ASSEMBLAGE DE
TÊTE/COUVERCLE DU BRÛLEUR OVALE
Les têtes des brûleurs et l'assemblage de tête/couvercle du
brûleur ovale sont amovibles. Ôtez-les simplement de la
cuisinière pour les nettoyer. Les fentes des têtes des
brûleurs doivent toujours être maintenues propres pour
disposer d'une flamme régulière et libre. Des orifices ou des
électrodes obstrués ou encrassés empêchent le brûleur de
fonctionner correctement.
Toute projection à proximité de l'électrode doit être
soigneusement nettoyée. Prenez garde à ne pas cogner une
électrode avec un objet dur car cela pourrait l'endommager.
Vous pouvez nettoyer les couvercles ou les têtes des
brûleurs systématiquement, en particulier après importants
déversements ayant pu obstruer les ouvertures. Ôtez-les
lorsqu'ils ont refroidi.
Pour retirer les aliments brûlés, faites tremper les têtes des
brûleurs dans un mélange d'eau chaude et de détergent
liquide doux pendant 20 à 30 minutes. En présence de
taches plus résistantes, utilisez une brosse à dents.
REMARQUES :
• N'UTILISEZ PAS de l'aine d'acier ou des poudres à
récurer pour nettoyer les brûleurs.
• Les brûleurs ne s'allumeront pas si le couvercle est ôté.
• NE NETTOYEZ PAS le produit avec de l'eau de Javel.
Assemblage de tête/couvercle du
brûleur ovale (centre)
Assurez-vous que l'orifice de la tête du brûleur est
positionnée au-dessus de l'électrode.
Orifice
Tête et couvercle
du brûleur moyen
Tête et couvercle
du grand brûleur
Tête et
couvercle du
petit brûleur
Tête et couvercle du
très grand brûleur
Électrode
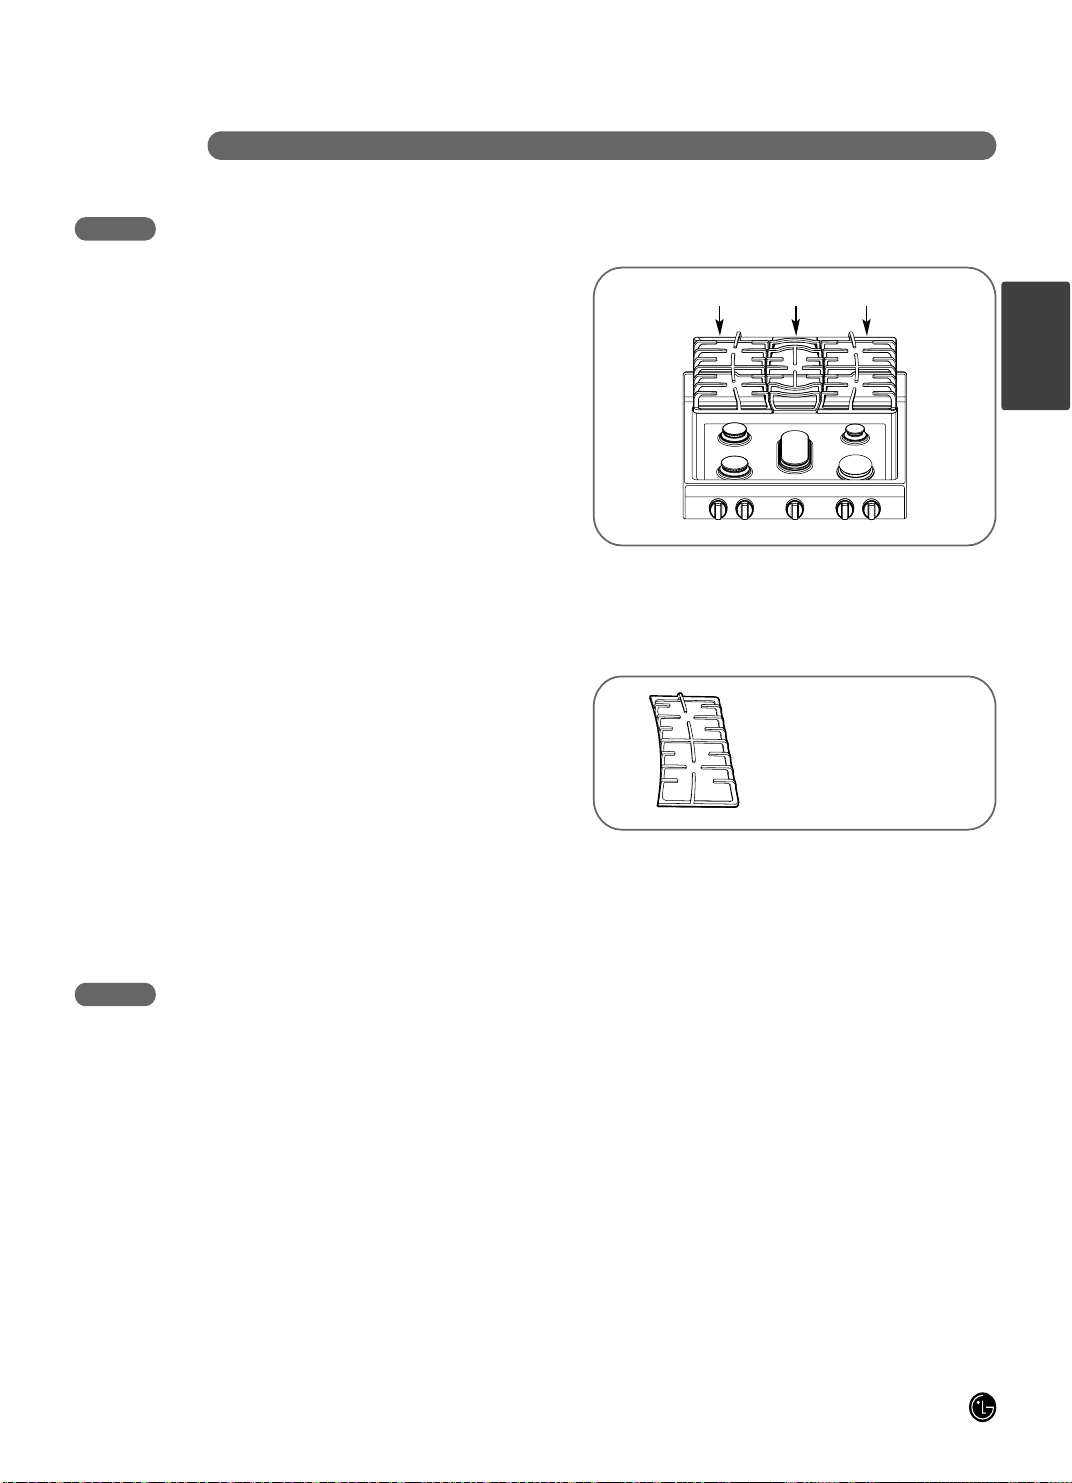
ENTR ETIE N ET NETTOYAG E DE LA CUISI NIÈRE
27
GRILLES DES BRÛLEURS
Votre cuisinière dispose de trois grilles.
Pour une stabilité maximale, ces grilles doivent être
uniquement utilisées dans leur position correcte; deux
grilles latérales peuvent être interverties de la gauche à la
droite et de l'avant à l'arrière.
N'UTILISEZ PAS un brûleur pendant une période
prolongée sans ustensile sur la grille. Les finitions de la
grille pourraient s'écailler en absence d'ustensile pour
absorber la chaleur.
Bien qu'elles soient solides, les grilles perdront
progressivement leur brillance, même si vous les entretenez
au mieux.
SURFACE DE LA TABLE DE CUISSON
Pour éviter d'endommager la surface en émail vitrifié de la
table de cuisson et qu'elle ternisse, nettoyez les salissures
immédiatement. Les aliments très acides (tomates, la
choucroute, les jus de fruits, etc.) ou les aliments très
sucrés peuvent ternir cette surface s'ils y sont laissés.
Lorsque la surface a refroidi, lavez et rincez.
En présence d'autres salissures comme la graisse, etc.,
lavez avec de l'eau savonneuse une fois que la surface a
refroidi. Puis, rincez et essuyez avec un chiffon sec.
REMARQUE : NE SOULEVEZ PAS la table de cuisson.
Cela pourrait endommager la cuisinière et entraîner son
mauvais fonctionnement.
NETTOYAGE
Ôtez-les lorsqu'elles ont refroidi. Les grilles doivent être
nettoyées régulièrement et, bien entendu, après les
déversements. Lavez-les dans de l'eau chaude et
savonneuse, puis rincez-les à l'eau claire. Lorsque vous les
remettez en place, assurez-vous qu'elles sont bien
positionnées au-dessus des brûleurs. Remettez-les en
place pour former des arcs continus avec les cannelures
centrales des trois grilles. Les grilles sont lavables au lave-
vaisselle.
REMARQUE : NE NETTOYEZ PAS les grilles dans un four
à auto-nettoyage.
L'aspect peut varier.
Les grilles sont lavables au lave-
vaisselle.
elarétal ellirg elarétal ellirg elartnec ellirg
FRANÇAIS
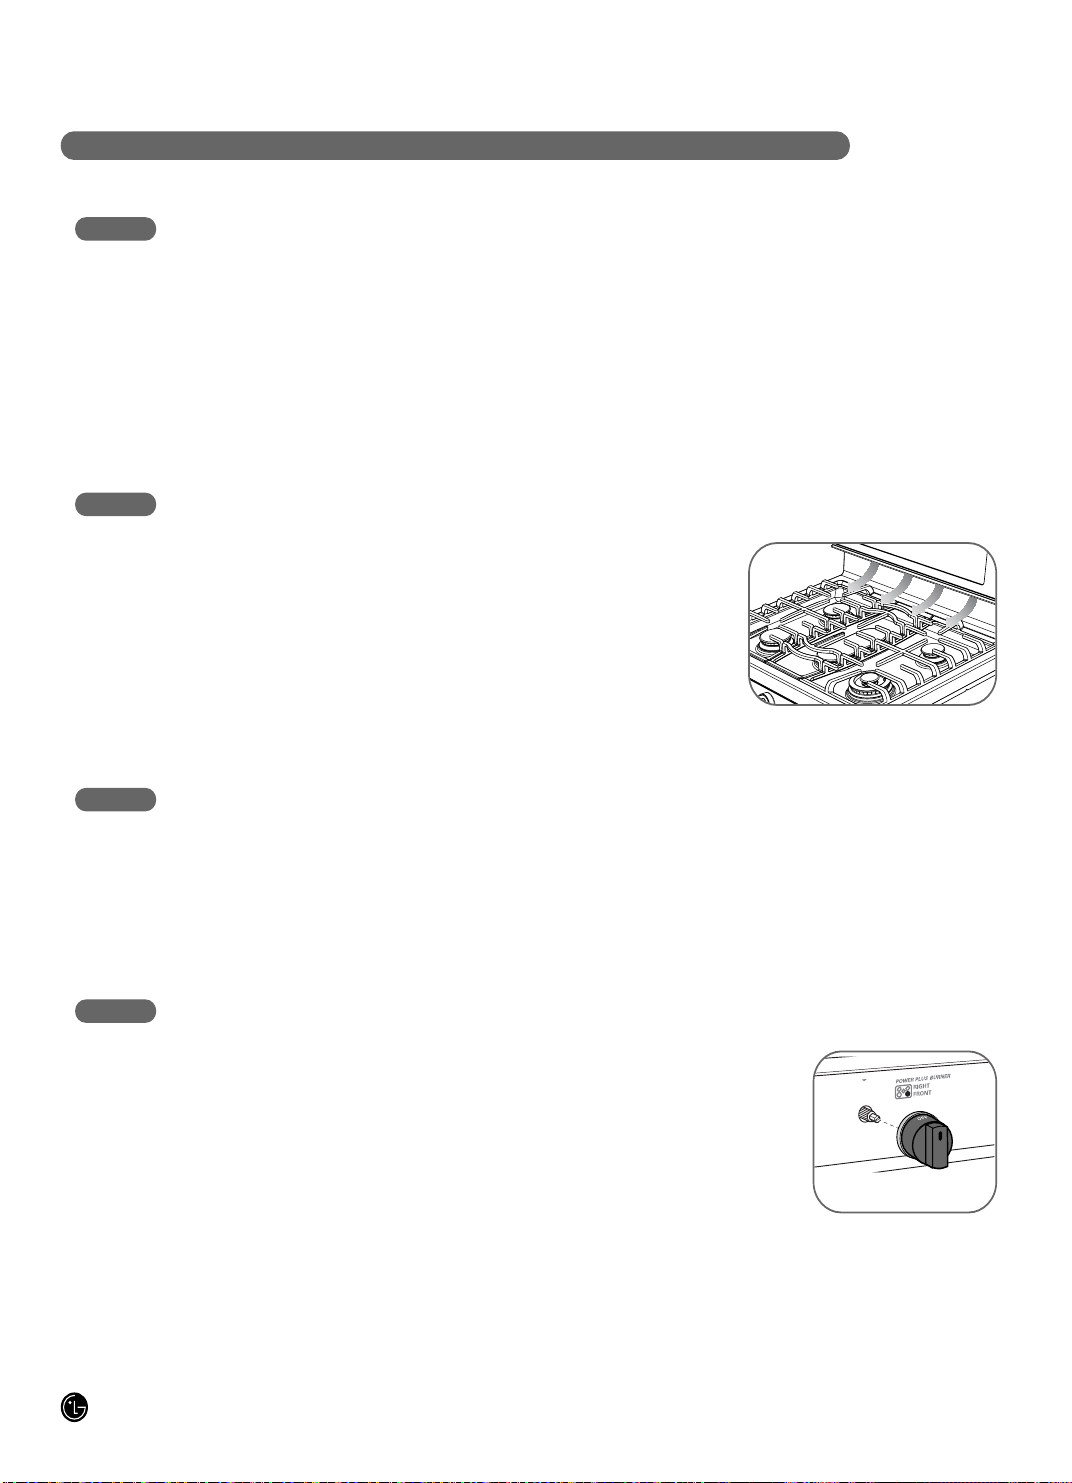
28
ENTRETIEN ET NETTOYAGE DE LA CUISINIÈRE
SURFACES EN ACIER INOXYDABLE
N'UTILISEZ PAS de tampons de l'aine d'acier; ils
rayeront de rayer la surface.
Pour nettoyer la surface en acier inoxydable, utilisez de
l'eau chaude et savonneuse ou un nettoyant ou produit de
polissage pour acier inoxydable. Essuyez toujours la
surface en direction du grain. Suivez les instructions de
nettoyage de la surface en acier inoxydable.
Pour vous renseigner sur l'achat du nettoyant ou produit de
polissage pour acier inoxydable, ou pour trouver
l'emplacement d'un revendeur à proximité de votre domicile,
appelez notre numéro sans frais de service après-vente :
1-888-542-2623
ou visitez notre site Internet à l'adresse suivante :
ca.lgservice.com
ÉVENTS DU FOUR
NE BOUCHEZ JAMAIS les évents (bouches d'aération) de
la cuisinière. Elles permettent l'entrée et la sortie d'air
nécessaires au bon fonctionnement de la cuisinière et à la
combustion correcte.
Les bouches d'aération se situent à l'arrière de la table de
cuisson, au niveau des parties supérieure et inférieure de la
porte du four et au niveau de la partie inférieure de la
cuisinière, sous le tiroir chauffe-plats.
PANNEAU DE COMMANDE
Nettoyez les éclaboussures à l'aide d'un chiffon humide.
Vous pouvez également utiliser un nettoyant pour vitres.
Retirez les grosses salissures à l'aide d'eau chaude
savonneuse.
N'utilisez pas d'abrasifs.
REMARQUE : Pour éviter d'activer le panneau de
commande au cours du nettoyage, débranchez la
cuisinière.
PANNEAU AVANT ET BOUTONS
IL est recommandé d'essuyer le panneau avantz après
toute utilisation du four. Utilisez un chiffon humide pour
nettoyer ou rincer. Pour le nettoyage, utilisez de l'eau
savonneuse ou une solution 50/50 d'eau et de vinaigre.
Pour le rinçage, utilisez de l'eau claire. Essuyez avec un
chiffon doux.
N'UTILISEZ PAS de nettoyants abrasifs, de nettoyants
liquides puissants, des tampons à récurer en plastique ou
des nettoyants pour four sur le panneau avant : ils
pourraient endommager les finitions.
N'ESSAYEZ PAS de plier les boutons en les tirant ou en
pendant une serviette ou d'autres charges similaires.
Cela pourrait endommager la tige de soupape de gaz.
Les boutons peuvent être retirés
pour un nettoyage plus facile.
Assurez-vous que les boutons
sont en position d'arrêt et tirez-
les vers vous pour le nettoyage.
Pour remettre les boutons en
place, assurez-vous que la
position d'arrêt est centrée au niveau du haut et faites
glisser le bouton directement sur la tige.
Bouton du brûleur de surface
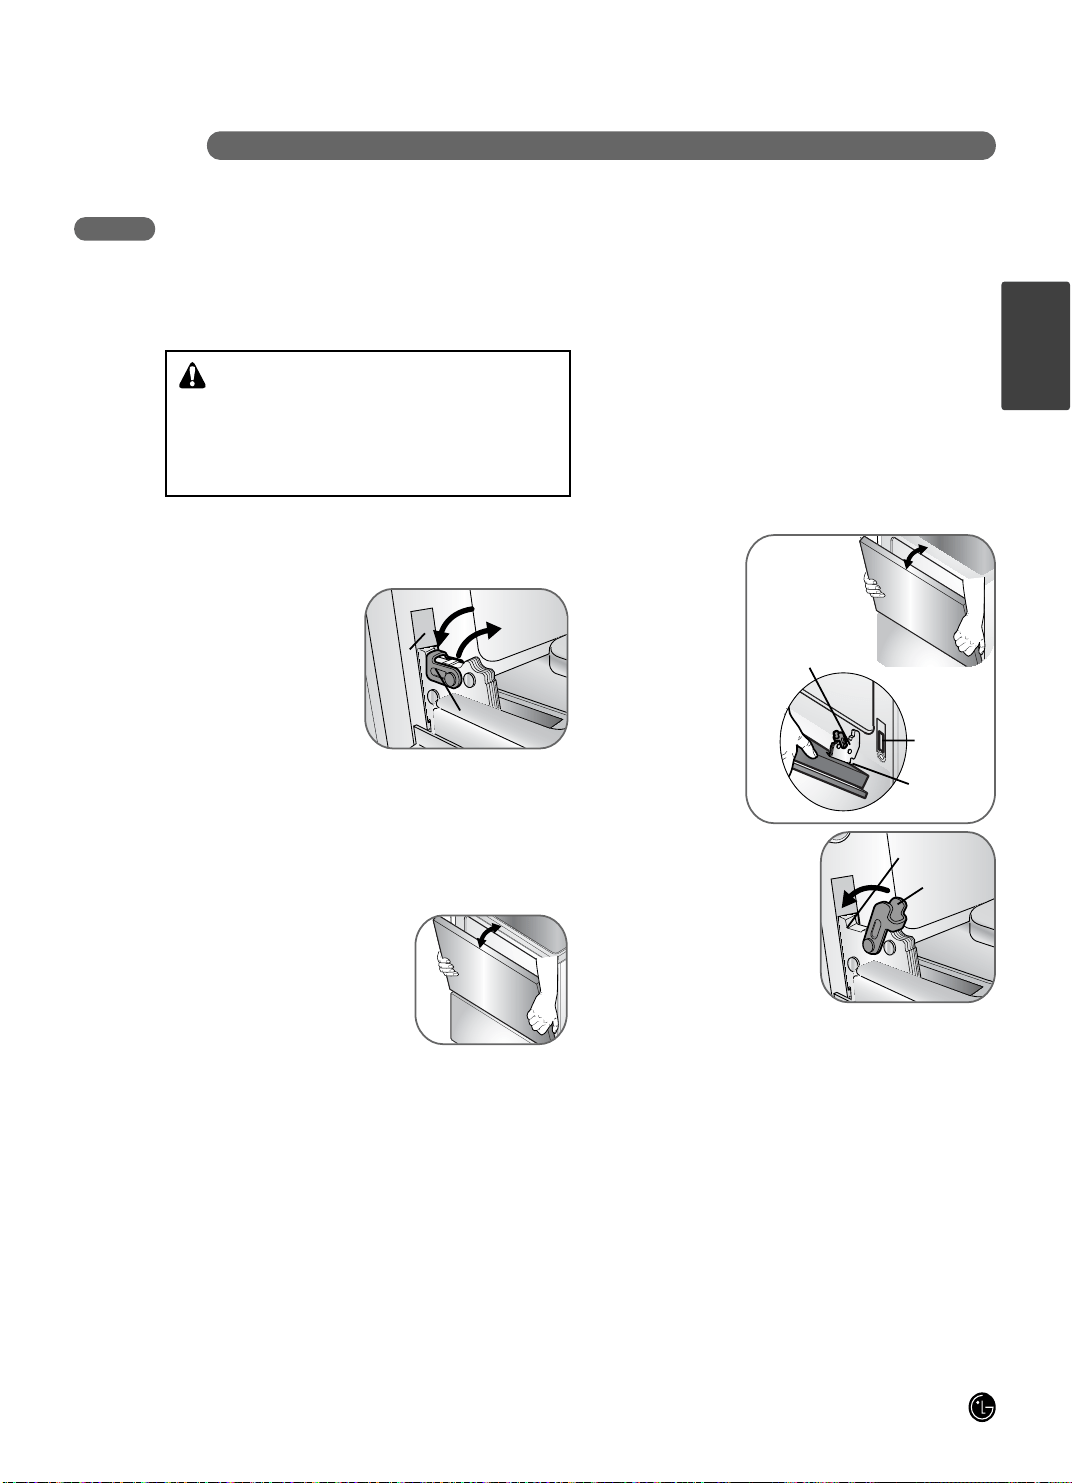
E NTRE TIE N E T NETTOYAGE DE LA CU I SINI ÈRE
29
environ 5°
PORTE DU FOUR
RETRAIT DE LA PORTE
Étape 1
Ouvrez complètement la
porte.
Étape 2
Abaissez les verrous des
charnières vers le cadre de
la porte en position
déverrouillée.
Étape 3
Agrippez fermement les deux côtés de la porte par le haut.
Étape 4
Fermez la porte en position de
retrait, c'est-à-dire à un angle
d'environ 5 degrés.
Étape 5
Levez la porte et sortez-la jusqu'à ce que la charnière sorte
de la fente.
Étape 1
Agrippez fermement les deux côtés de la porte par le haut.
Étape 2
En tenant la porte au même angle que dans la position de
retrait, placez l'échancrure de la charnière dans la fente
prévue à cet effet. L'échancrure de la charnière doit être
complètement insérée dans la fente.
Étape 3
Ouvrez complètement
la porte. Si la porte ne
s'ouvre pas
complètement,
l'échancrure n'est pas
correctement insérée
dans la fente.
Étape 4
Levez les verrous des
charnières le long du
cadre de la cavité du
four en position verrouillée.
Étape 5
Fermez la porte du four.
La porte du four est amovible, mais elle est lourde. Il se
peut que vous ayez besoin d'aide lors du retrait et de la
remise en place de la porte.
NETTOYAGE DE L'INTÉRIEUR DE LA PORTE
• NE LAISSEZ PAS trop d'eau entrer dans les orifices ou
les fentes de la porte.
• La zone située à l'intérieur du joint à l'avant de la cavité
étant nettoyée au cours du cycle d'auto-nettoyage, il n'est
pas nécessaire que vous la laviez à la main.
• La zone située à l'extérieur du joint peut être nettoyée à
l'aide d'un tampon à récurer en plastique imbibé de savon.
NETTOYAGE DE L'EXTÉRIEUR DE LA PORTE
• Utilisez du savon et de l'eau pour nettoyer minutieusement
le dessus, les côtés et l'avant de la porte du four. Rincez
bien. Vous pouvez également utiliser un nettoyant pour
vitres pour nettoyer la vitre de l'extérieur de la porte.
• Les éclaboussures de marinades, de jus de fruits, de
sauces tomate et des ustensiles contenant des acides
peuvent entraîner une décoloration et doivent être
essuyées immédiatement. Lorsque la surface a refroidi,
nettoyez et rincez.
• N'UTILISEZ PAS de nettoyants pour four, de poudres de
nettoyage ou des nettoyants abrasifs sur l'extérieur de la
porte.
REMISE EN PLACE DE LA PORTE
Encoche
Verrouillage de la
charnière
Verrouiller
Déverrouillage
environ 5°
Bras de la
charnière
Profondeur
Bord
inférieur de
la fente
Bras de la
charnière
Verrouilla-
ge de la
charnière
ATTENTION :
• Soyez vigilant lorsque que vous retirez et soulevez
la porte.
• NE SOULEVEZ PAS la porte par la poignée.
- La porte est très lourde.
FRANÇAIS

30
ENTRETIEN ET NETTOYAGE DE LA CUISINIÈRE
Une fois la cuisson terminée,
sortez la lèchefrite du four.
Retirez la grille de la lèchefrite.
Versez soigneusement la
graisse de la lèchefrite dans un
récipient adapté. Nettoyez et
rincez la lèchefrite et la grille
avec de l'eau chaude
savonneuse ou un tampon à
récurer en plastique.
Si des aliments ont été brûlés sur la lèchefrite ou la grille,
vaporisez du détergent dessus et laisser agir. Pour nettoyer
utilisez du papier de ménage ou un chiffon de lavage avec
l'eau chaude.
REMARQUES :
• La lèchefrite et la grille peuvent être nettoyées avec un
nettoyant pour four commercial.
• Elle sont lavables au lave-vaisselle.
• NE RANGEZ PAS une lèchefrite et une grille sales dans
la cuisinière.
• NE NETTOYEZ PAS la lèchefrite ou la grille dans un four
à auto-nettoyage.
Grille
Lèchefrite
LÈCHEFRITE ET GRILLE
FOND DU FOUR
Le fond du four présente des finitions en émail vitrifié.
Pour faciliter le nettoyage, protégez le fond du four des
éclaboussures en plaçant une tôle sur la grille au-dessous
de celle que vous utilisez. Cela est particulièrement
important lorsque vous cuisez une tarte aux fruits ou
d'autres aliments acides. Les garnitures chaudes de fruits
ou les autres aliments fortement acides (comme les
tomates, la choucroute et les sauces à base de vinaigre ou
de jus de citron) peuvent provoquer des trous et
endommager la surface en émail vitrifié. Ils doivent être
essuyés immédiatement.
N'UTILISEZ PAS de papier aluminium sur le fond de la
cuisinière. Cela peut endommager la cavité du four. Cela
peut également bloquer la circulation de l'air du brûleur, ce
qui gêne la distribution de chaleur.
Pour nettoyer les salissures, utilisez de l'eau savonneuse,
un nettoyant abrasif ou un tampon à récurer. Rincez bien
pour retirer tout le savon avant l'auto-nettoyage.
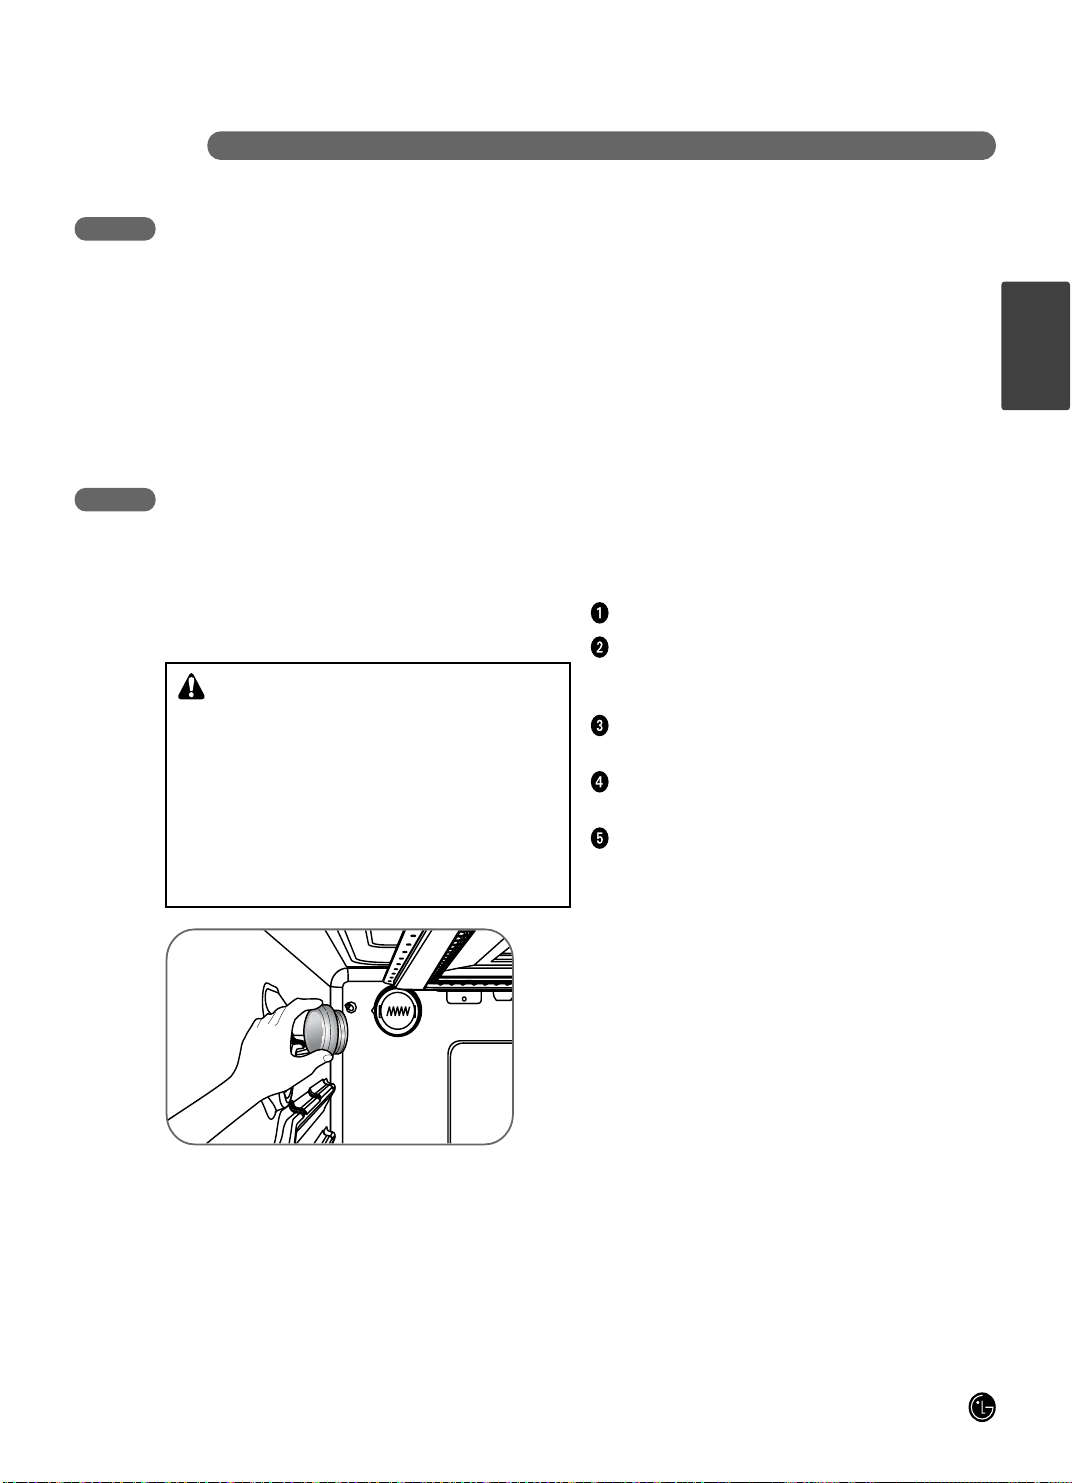
E NTRE TIE N E T NETTOYAGE DE LA CUIS I N I È R E
31
GRILLES DU FOUR
Votre four est équipé de grilles en nickel, retirez-les avant le
début du cycle d'auto-nettoyage.
Pour nettoyer les grilles en nickel, utilisez un nettoyant
abrasif. Après le nettoyage, rincez les grilles à l'eau claire et
séchez-les avec un chiffon propre. S'il est plus difficile de
faire glisser les grilles, frottez les bords ou les supports des
grilles avec de l'huile végétale.
L'ampoule du four est une ampoule standard de 40 watts.
Elle s'allume lorsque la porte du four est ouverte. Lorsque la
porte est fermée, appuyez sur ÉCLAIRAGE DU FOUR pour
l'allumer ou l'éteindre. L'éclairage ne fonctionne pas
pendant le cycle d'auto-nettoyage.
REMPLACEMENT DE L'ÉCLAIRAGE DU FOUR
AVERTISSEMENT
:
• Avant de remplacer l'ampoule de l'éclairage du four,
COUPEZ l'alimentation électrique de la cuisinière au
fusible principal ou depuis le tableau à
disjoncteurs.
- Sinon, il existe un risque de blessure grave, de danger
de mort ou d'électrocution.
• Vérifiez que le four et l'ampoule ont complètement
refroidi.
REMPLACEMENT
• Vérifiez que le four et l'ampoule ont refroidi.
Débranchez la cuisinière ou coupez le courant.
Tournez la protection en verre de l'ampoule à l'arrière du
four dans le sens contraire des aiguilles d'une montre
pour la retirer.
Tournez l'ampoule dans le sens inverse des aiguilles
d'une montre pour la retirer de la douille.
Remettez l'ampoule et la protection en les tournant dans
le sens des aiguilles d'une montre.
Rebranchez la cuisinière ou remettez le courant.
FRANÇAIS
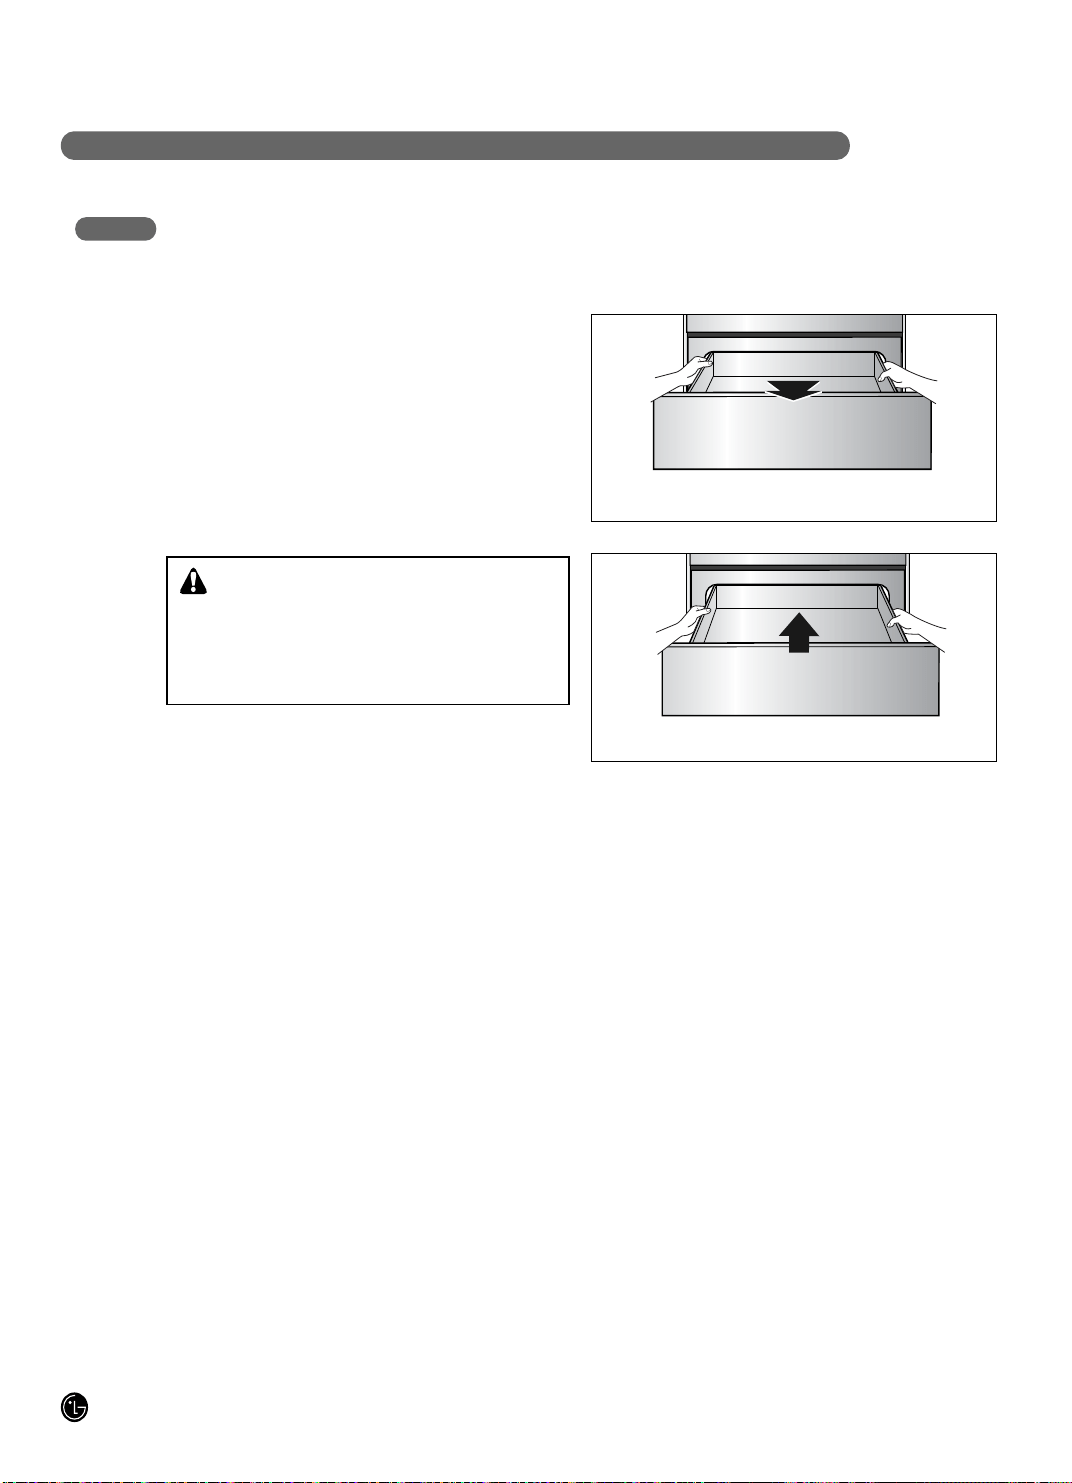
32
ENTRETIEN ET NETTOYAGE DE LA CUISINIÈRE
Pour retirer le tiroir de rangement :
ATTENTION - Coupez le courant avant de retirer
le tiroir de rangement.
Tirez le tiroir vers vous jusqu'à ce qu'il bloque.
Levez l'avant du tiroir jusqu'à ce que les butoirs
sortent des guides.
Retirez le tiroir.
Pour remplacer le tiroir de rangement:
Placez les rails du tiroir sur les guides.
Poussez le tiroir vers le fond jusqu'à ce qu'il
bloque.
Levez l'avant du tiroir et poussez jusqu'à ce que
les butoirs sortent des guides.
Abaissez l'avant du tiroir et poussez jusqu'à ce
RETRAIT ET REMISE EN PLACE DU TIROIR DE
RANGEMENT
Levez l'avant
Tirez le tiroir
• COUPEZ LE COURANT avant de retirer le
tiroir chauffe-plats.
- Sinon, il existe un risque de blessure grave,
d'électrocution ou de décès.
AVERTISSEMENT
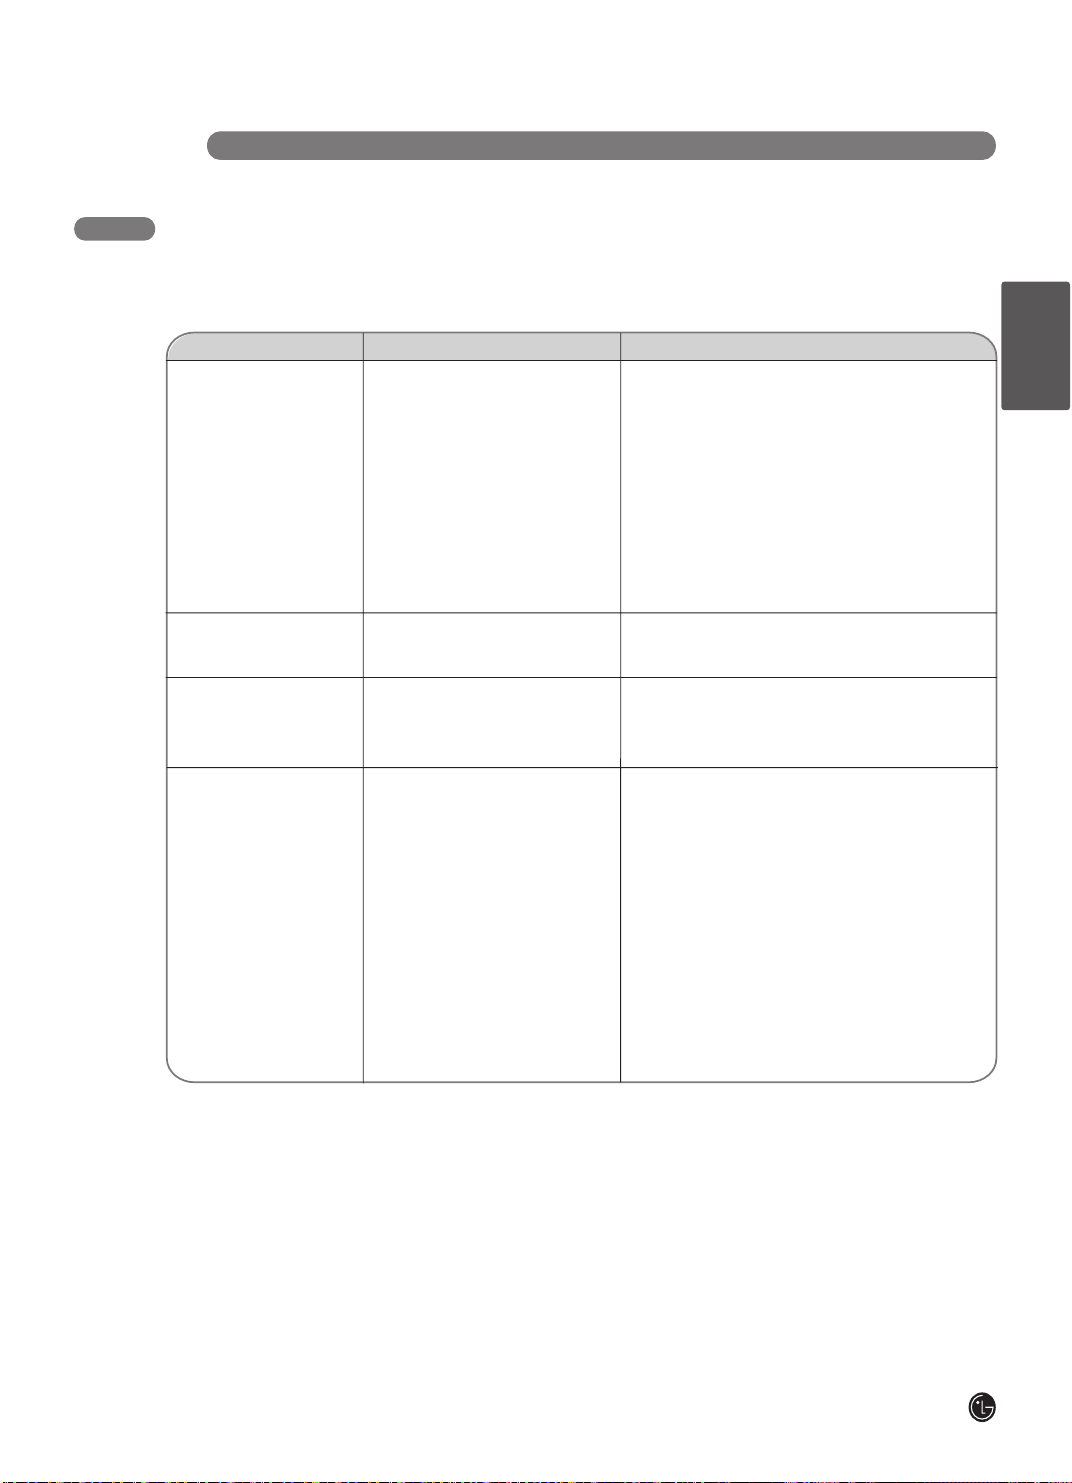
DÉPANNAG E
33
AVANT D'APPELER UN DÉPANNEUR
Avant d'appeler un dépanneur, consultez les pages suivantes. Cela peut vous faire gagner du temps et de l'argent. Vous y
trouverez la liste des incidents fréquents qui ne sont pas le résultat d'un défaut de fabrication ou de matériau.
ed reivel el zehcrehc ,zag ed têrra'd tenibor el reifirév ruoP •
ce robinet à l'arrière du fourneau.
snoituloSselbissop sesuaCemèlborP
Les brûleurs du dessus
ne s'allument pas ou ne
produisent pas une
flamme régulière.
Les flammes sont très
grandes ou jaunes
Les brûleurs s'allument
mais pas le four
Les aliments ne cuisent
ou ne rôtissent pas
correctement
• La fiche de la cuisinière n'est pas
complètement insérée dans la prise
électrique.
• Les fentes situées sur le côté des
brûleurs peuvent être obstruées.
• Mauvais assemblage des brûleurs.
• Mauvais rapport air/gaz.
• La soupape d'arrêt de gaz du four a pu
être accidentellement déplacée au cours
du nettoyage ou du déplacement.
• Commandes du four mal réglées.
• La position de la grille est incorrecte.
• Utilisation de récipients inadaptés ou de
taille inadaptée.
• Le thermostat du four doit être réglé.
• L'horloge n'est pas réglée correctement.
• Du papier aluminium a été utilisé de
manière incorrecte dans le four.
• Vérifiez que la fiche est branchée sur une prise qui
fonctionne et qui est bien mise à la terre.
• Retirez les brûleurs et nettoyez-les. Vérifiez s'il y a des
aliments brûlés ou de la graisse dans la zone des électrodes.
Consultez la section ENTRETIEN ET NETTOYAGE DE LA
CUISINIÈRE
• Assurez-vous que les pièces des brûleurs sont bien
installées. Consultez la section ENTRETIEN ET NETTOYAGE
DE LA CUISINIÈRE
• Si la cuisinière fonctionne au gaz PL, contactez l'installateur
ou la personne ayant réalisé la conversion.
• Consultez la section UTILISATION DU FOUR.
• Consultez la section UTILISATION DU FOUR.
• Consultez la section UTILISATION DU FOUR.
• Consultez la section RÉGLAGE DU THERMOSTAT DU FOUR
• Consultez la section UTILISATION DE L'HORLOGE ET DU
MINUTEUR
• Consultez la ENTRETIEN ET NETTOYAGE DE LA CUISINIÈRE
FRANÇAIS
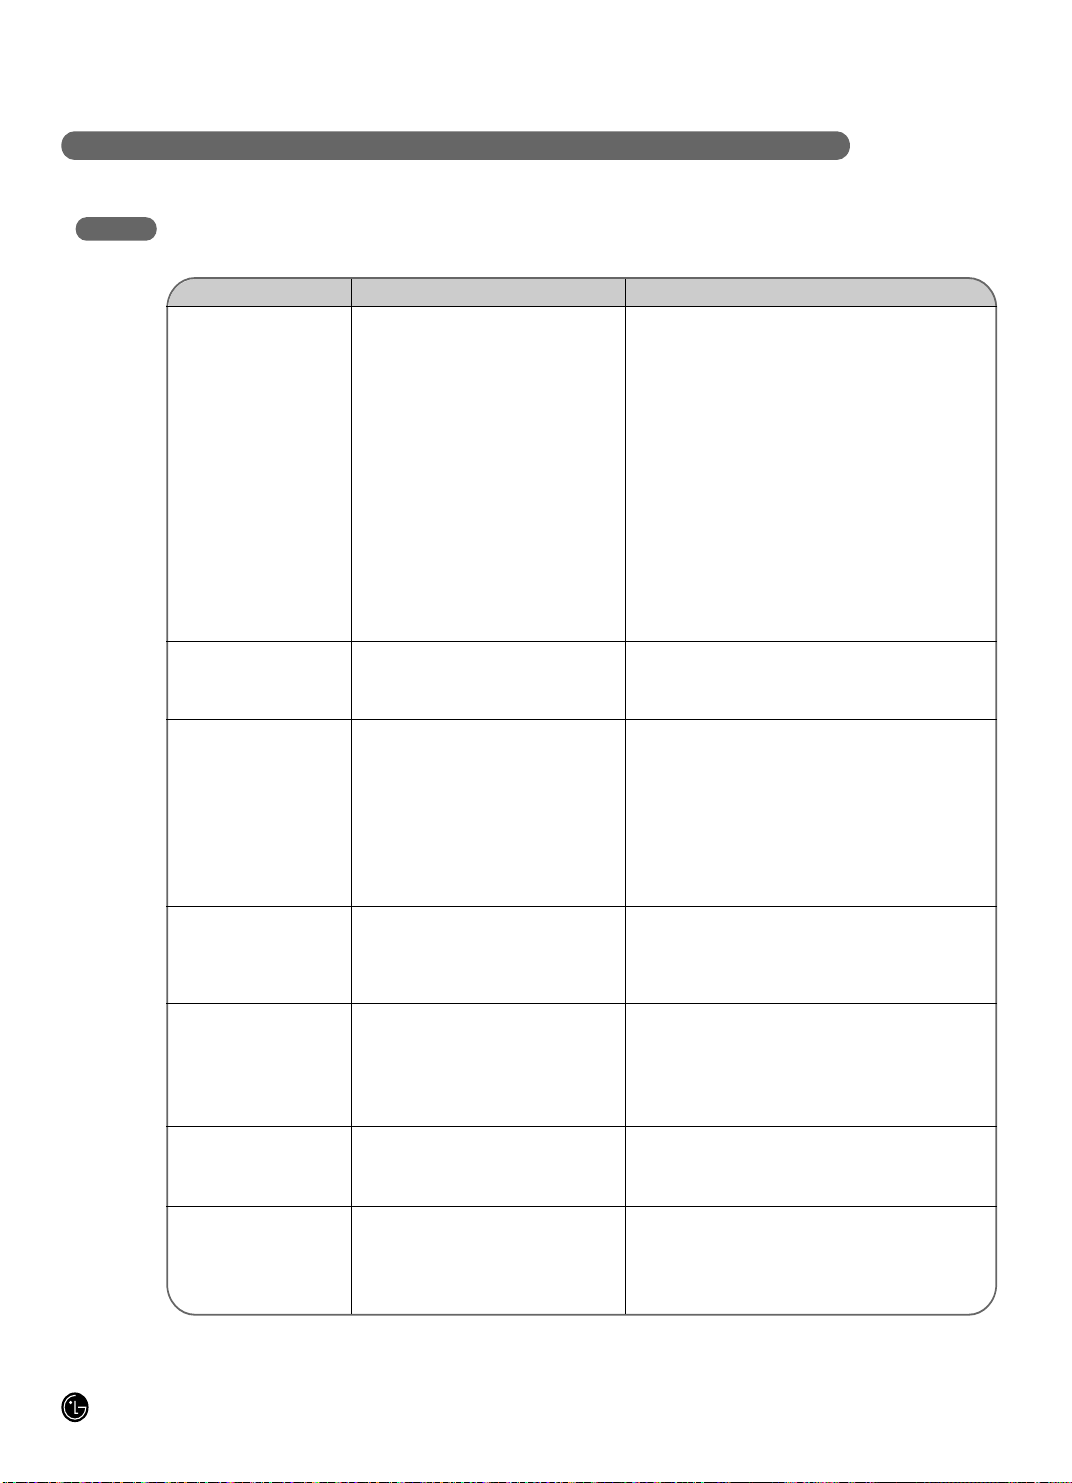
34
DÉPANNAGE
AVANT D'APPELER UN DÉPANNEUR
Problème Causes possibles Solutions
Les aliments ne
grillent pas bien
dans le four.
La température du
four est trop ou pas
assez élevée
L'horloge et le
minuteur ne
fonctionnent pas
La lampe du four ne
fonctionne pas
L'auto-nettoyage du
four ne fonctionne
pas
Son de grésillement,
d'éclatement
Fumée excessive
durant un cycle
d'auto nettoyage.
• Les commandes du four sont mal
réglées
• La porte du four n'est pas fermée.
• La grille n'est pas à la bonne position.
• On fait cuire les aliments dans un plat
chaud.
• L'ustensile de cuisine ne convient pas à
l'utilisation du gril.
• La feuille d'aluminium utilisée sur le
lèchefrite et la grille n'est pas bien
ajustée et fendue tel que recommandé.
• Le thermostat du four doit être ajusté.
• La fiche de la cuisinière n'est pas bien
enfoncée dans la prise de courant.
• Le fusible dans la maison a sauté ou un
disjoncteur s’est déclenché.
• Les commandes du four ne sont pas
bien réglées.
• L'ampoule est dévissée ou défectueuse.
• La fiche de la cuisinière n'est pas bien
enfoncée dans la prise de courant.
• La température du four est trop élevée
pour régler l'auto-nettoyage.
• Les commandes du four ne sont pas
bien réglées
• Il s'agit du son du métal qui chauffe ou
se refroidit lors de la cuisson ou de
l'auto-nettoyage.
• Saletés excessives.
• Assurez-vous d'appuyer sur BROIL HI/LO.
• Consultez la section UTILISATION DU FOUR.
• Consultez la section GUIDE D'UTILISATION DU GRIL.
• Utilisez le lèchefrite et la grille fournis avec la cuisinière.
Assurez-vous qu'ils ont refroidi.
• Utilisez le lèchefrite et la grille fournis avec la cuisinière.
• Consultez la section UTILISATION DU FOUR.
• Consultez la section UTILISATION DE L'HORLOGE ET DU
MINUTEUR.
• Assurez-vous que la fiche est bien enfoncée dans une
prise de courant sous tension et mise à la terre.
• Remplacez le fusible ou réenclenchez le disjoncteur.
• Consultez la section UTILISATION DE L'HORLOGE ET DU
MINUTEUR.
• Resserrez ou remplacez l'ampoule.
• Assurez-vous que la fiche est bien enfoncée dans une
prise de courant sous tension et mise à la terre.
• Laissez la cuisinière refroidir à la température de la pièce
et réglez les commandes de nouveau.
• Consultez la section UTILISATION DE L'AUTO-
NETTOYAGE.
• Cela est normal.
• Appuyez sur CLEAR OFF. Ouvrez les fenêtres pour aérer
la pièce. Attendez que le témoin LOCKED DOOR
s'éteigne. Essuyez la saleté excédentaire et refaites
l'auto-nettoyage.
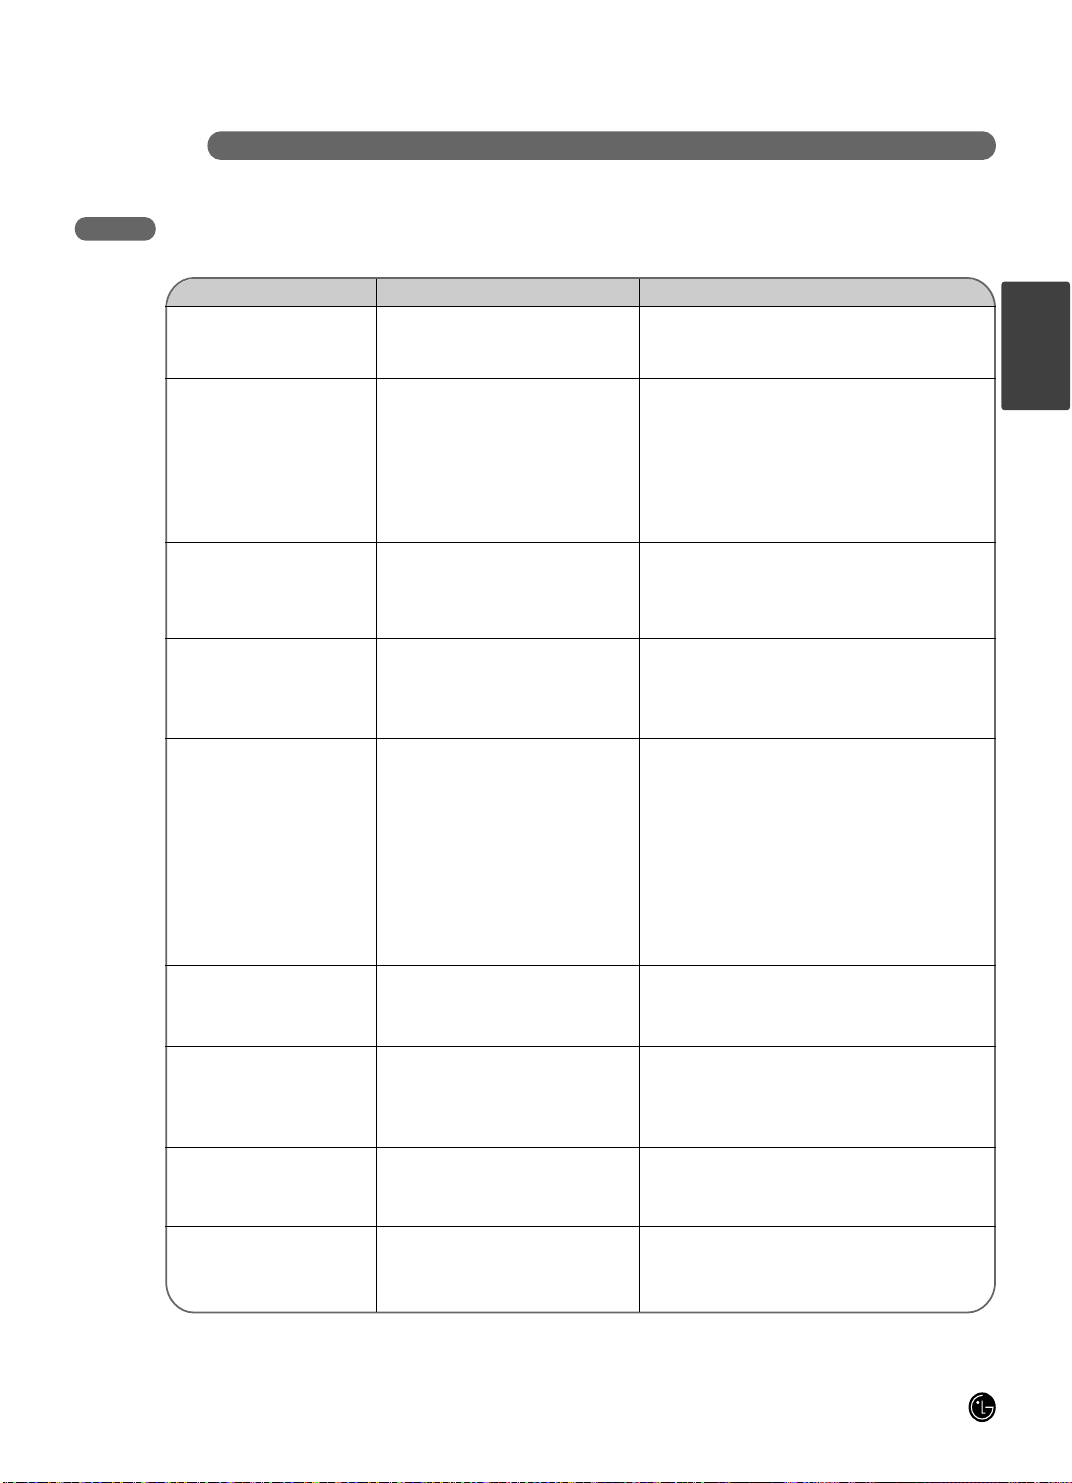
DÉPANNAG E
35
AVANT D'APPELER UN DÉPANNEUR
snoituloSselbissop sesuaCemèlborP
Le gril ou la pyrolyse ne
fonctionne pas.
Le four n'est pas propre
après un cycle de
nettoyage
« CLOSE DOOR TO
CONTINUE BROILING »
ou « DOOR OPENED »
s'affiche à l'écran
L'icône « DOOR
LOCKED » s'allume
lorsque vous souhaitez
cuire
« F-et un nombre ou une
lettre » clignote à
l'écran
Les grilles du four
glissent difficilement
Coupure de courant,
l'horloge clignote
Odeur de brûlé ou de
gras émanant de l'évent
Odeur forte
• Le four est trop chaud.
• Commandes du four mal réglées.
• Le four est très sale.
• Le gril ou le cycle d'auto-nettoyage a été
sélectionné mais la porte n'est pas fermée.
• La porte du four est verrouillée parce que la
température à l'intérieur du four n'a pas
baissé au-dessous de la température de
verrouillage.
• Vous voyez « F3 ».
• Vous voyez « F11 ».
• En cas de répétition du code de
fonctionnement.
• Les grilles en nickel (le cas échéant) ont été
nettoyées lors d'un cycle d'auto-nettoyage.
• Coupure de courant ou surtension.
• C'est un phénomène normal dans un four
neuf qui s'atténuera avec le temps.
• Une odeur provenant de l'isolation s
ituée
autour de l'intérieur du four est normale lors
des premières utilisations du four.
• Laisser le four refroidir en dessous de la température de
verrouillage.
• Ceci peut prendre jusqu'à une heure une fois le cycle achevé.
• Consultez la section UTILISATION DE L'AUTO-NETTOYAGE
DU FOUR.
• Nettoyer les salissures importantes avant de lancer le cycle
d'auto-nettoyage. En cas de four très sale, il peut être est
nécessaire de renouveler l'auto-nettoyage ou de prolonger le
cycle.
• Fermez la porte du four.
• Appuyez sur la touche CLEAR OFF. Laissez le four refroidir.
• Appuyez sur la touche CLEAR OFF. Laissez le four refroidir
pendant une heure. Remettez le four en marche.
• Vérifiez la soupape d'arrêt du gaz au niveau du four ou de
l'alimentation principale (reportez-vous à la section « Les
brûleurs s'allument mais pas le four »).
• Débranchez la cuisinière pendant 5 minutes, puis rebranchez-
la. En cas de répétition du code d'erreur, appelez un
dépanneur.
• Appliquez un
e petite quantité d'huile végétale sur une feuille
d'essuie-tout et essuyer les bords des grilles.
N'utilisez pas sprays lubrifiants.
• Réglez l'horloge à nouveau. Si le four était en cours
d'utilisation, vous devez le régler à nouveau en appuyant sur
la touche CLEAR OFF, ainsi que l'horloge et toutes les
fonctions de cuisson.
• Pour accélérer le processus, lancer un cycle d'auto-nettoyage
d'au moins 3 heures. Consultez la section UTILISATION DE
L'AUTO-NETTOYAGE DU FOUR.
• Cela est temporaire.
FRANÇAIS

36
DÉPANNAG E
AVANT D'APPELER UN DÉPANNEUR
Problème Causes possibles Solutions
Le tiroir chauffe-plats
ne glisse plus
facilement ou traîne
Présence d'une
condensation
excessive dans le tiroir
chauffe-plats
• Le tiroir chauffe-plats n'est pas aligné.
• Le tiroir chauffe-plats est trop chargé ou la
charge n'est pas équilibrée.
• Présence de liquide dans le tiroir chauffe-
plats.
• Aliments non couverts.
• Ouvrez complètement le trois chauffe-plats et poussez-
le complètement. Consultez la section Entretien et
nettoyage de la cuisinière.
• Réduisez le poids. Répartissez le contenu du tiroir
chauffe-plats.
• Retirez le liquide.
• Couvrez les aliments avec un couvercle ou du papier
aluminium.
37
LG ELECTRONICS CANADA, INC.
GARANTIE LIMITÉE DU FOUR GAZ LG – Canada
GARANTIE: Si votre four Gaz LG (le «produit») s’avère défectueux en raison d’un défaut de matériau ou de fabrication lors d’une utilisation normale, pendant la période de
garantie spécifiée ci-après, LG Canada réparera ou remplacera à sa discrétion le produit sur réception de la preuve d’achat originale fournie par le détaillant. Cette garantie
n’est offerte qu’à l’acheteur original du produit chez un détaillant et ne s’applique qu’à un produit distribué au Canada par LG Canada ou par un distributeur canadien autorisé.
La garantie ne s’applique qu’aux produits situés et utilisés au Canada.
Les produits et pièces de remplacement sont garantis pour la portion restante de la période de garantie originale ou quatre-vingt-dix (90) jours, selon la période la plus longue.
Les produits et pièces de remplacement peuvent être neufs ou remanufacturés.
Le centre de service autorisé LG garantit les réparations pendant trente (30) jours.
LA RESPONSABILITÉ DE LG CANADA SE LIMITE À LA GARANTIE CI-DESSUS. SAUF TEL QU'IL EST EXPLICITEMENT INDIQUÉ CI-DESSUS, LG CANADA NE FOURNIT
AUCUNE AUTRE GARANTIE ET REJETTE TOUTES LES AUTRES GARANTIES ET CONDITIONS EXPLICITES OU IMPLICITES À L'ÉGARD DU PRODUIT, CE QUI INCLUT,
SANS TOUTEFOIS S'Y LIMITER, TOUTE GARANTIE ET CONDITION IMPLICITE DE QUALITÉ MARCHANDE OU DE CONVENANCE À UN USAGE PARTICULIER ET
AUCUNE DÉCLARATION NE LIERA LG CANADA. LG CANADA N'AUTORISE PERSONNE À CRÉER NI À ASSUMER AUCUNE AUTR
E PROVISION POUR GARANTIES EN
RELATION AVEC CE PRODUIT. SI UNE GARANTIE OU CONDITION IMPLICITE EST REQUISE PAR LA LOI, SA PÉRIODE SE LIMITE À CELLE DE LA GARANTIE EXPLICITE
SUSMENTIONNÉE. LG CANADA, LE FABRICANT ET LE DISTRIBUTEUR NE POURRONT ÊTRE TENUS RESPONSABLES D'AUCUN DOMMAGE ACCESSOIRE,
CONSÉCUTIF, SPÉCIAL, DIRECT OU INDIRECT, D'AUCUNE PERTE D'ACHALANDAGE OU DE PROFITS, D'AUCUN DOMMAGE PUNITIF, EXEMPLAIRE OU AUTRE,
DIRECTEMENT OU INDIRECTEMENT ATTRIBUABLE À TOUTE VIOLATION CONTRACTUELLE, FONDAMENTALE OU AUTRE, OU À UNE ACTION, UNE OMISSIO
N, UN
DÉLIT OU TOUTE AUTRE CHOSE.
La présente garantie vous confère des droits légaux spécifiques. Vous pourriez disposer d'autres droits, suivant les lois provinciales applicables. Toute clause de la présente garantie qui
invalide ou modifie une condition ou garantie implicite aux termes d'une loi provinciale est dissociable si elle entre en conflit avec la loi provinciale, et ce, sans affecter les autres clauses
de la garantie.
LA PRÉSENTE GARANTIE LIMITÉE NE COUVRE PAS CE QUI SUIT :
1. Un appel de service pour livrer, ramasser ou installer le produit; renseigner un client sur le fonctionnement du produit; réparer ou remplacer des fusibles ou rectifier le câblage; ou
corriger une réparation ou installation non autorisée.
2. La défaillance du produit durant une panne ou interruption de courant ou en raison d'un service électrique inadéquat.
3. Des dommages occasionnés par la fuite ou le bris de conduites d'eau, le gel de conduites d'eau, des tuyaux de drainage restreints, une alimentation en eau inadéquate ou
interrompue ou une alimentation en air inadéquate.
4. Des dommages attribuables à l'utilisation du produit dans une atmosphère corrosive ou contraire aux instru
ctions spécifiées dans le manuel d'utilisation du produit.
5. Des dommages au produit causés par un accident, des animaux nuisibles ou des vermines, la foudre, le vent, un incendie, une inondation ou une catastrophe naturelle.
6. Les dommages attribuables à une mauvaise utilisation, une utilisation abusive ou à une installation, une réparation ou un entretien inapproprié du produit. Les réparations
inappropriées incluent l'utilisation de pièces ni approuvées ni recommandées par LG Canada.
7. La détérioration ou la défaillance du produit causée par une modification ou un changement non autorisé ou une utilisation autre que celle prévue, ou résultant d'une fuite d'eau
occasionnée par une mauv
aise installation.
8. La détérioration ou la défaillance du produit causée par un courant ou un voltage électrique incorrect, une utilisation commerciale ou industrielle, ou l'utilisation d'accessoires,
d'éléments ou de produits nettoyants non approuvés par LG Canada.
9. Les dommages causés par le transport et la manipulation, notamment les égratignures, les bosses, les écaillures et/ou tout autre dommage à la finition du produit, à moins que ces
dommages ne soient attribuables à des défauts de matériaux ou de fabrication et qu'ils ne soient signalés dans un délai d'une (1) semaine de la livraison.
10. Des dommages ou des pièces manqua
ntes à tout produit exposé, déballé, soldé ou remis à neuf.
11. Des produits dont le numéro de série original a été retiré, modifié ou ne peut être facilement déterminé. Le modèle et le numéro de série, ainsi que le reçu de vente original du
détaillant, sont requis pour valider la garantie.
12. L'augmentation des coûts et de la consommation des services publics.
13. Le remplacement des ampoules électriques, des filtres et de toute pièce non durable.
14. Les réparations requises si le produit ne sert pas à une utilisation domestique normale et habituelle (y compris, sans toutefois s'y limiter, une utilisation commerciale, dans un bureau
ou un centre
récréatif) ou est utilisé contrairement aux instructions spécifiées dans le manuel d'utilisation du produit.
15. Les coûts associés à l'enlèvement du produit de votre résidence aux fins de réparation.
16. L'enlèvement et la réinstallation du produit, s'il est installé à un endroit inaccessible ou contrairement aux instructions d'installation publiées, y compris dans le manuel d'utilisation et le
manuel d'installation du produit.
17. Les accessoires du produit, tels que les balconnets, les tiroirs, les poignées, les tablettes, etc. Sont également exclues les pièces non incluses initialement avec le produit.
Tous les coûts associés aux circonstanc
es exclues ci-dessus seront assumés par le consommateur.
Pour obtenir tous les détails sur la garantie et accéder au service à
la clientèle, téléphonez-nous ou visitez notre site Web :
Composez le 1-888-542-2623 (24 h sur 24, 365 jours par année) et
sélectionnez l'option de menu appropriée, ou visitez notre site Web au
http://ca.lgservice.com
Écrivez vos renseignements de garantie ci-dessous :
Renseignements sur l'enregistrement du produit :
Modèle:
Numéro de série :
Date d'achat :
Four Gaz
Un (1) an à compter de la date d’achat initiale
Pièces et main-d’œuvre (pièces internes fonctionnelles seulement)
PÉRIODE DE GARANTIE : (Remarque : Si la date d’achat originale ne peut être vérifiée, la garantie
débutera soixante (60) jours suivant la date de fabrication.)
FRANÇAIS

Printed in Mexico
www.lg.com
Register your product Online!
LG Customer Information Center
1-800-243-0000
1-888-542-2623
USA, Consumer User
CANADA