ECH89181 / ECH89186 / ECH89187
FAUTEUIL DE DIRECTION
EN CUIR ECO
INSTRUCTIONS DE MONTAGE
ECH89181 / ECH89186 / ECH89187
EXECUTIVE ECO LEATHER CHAIR
OPERATING INSTRUCTIONS
WARNING
1. Use this product only one person at a time.
2. Do not use this chair unless all bolts screws and
knobs are securely tightened.
3. Check that all bolts screws and knobs are tight every
three months or as needed.
4. Do not overturn back tilt knob when decreasing
tension.
5. Dispose of packing material properly. Do not use
plastic cover as head covering. It may cause
suffocation.
6. Do not use chair as a stepladder.
7. Use this chair for its intended purpose only.
8. Use mild detergent only for cleaning.
FEATURES
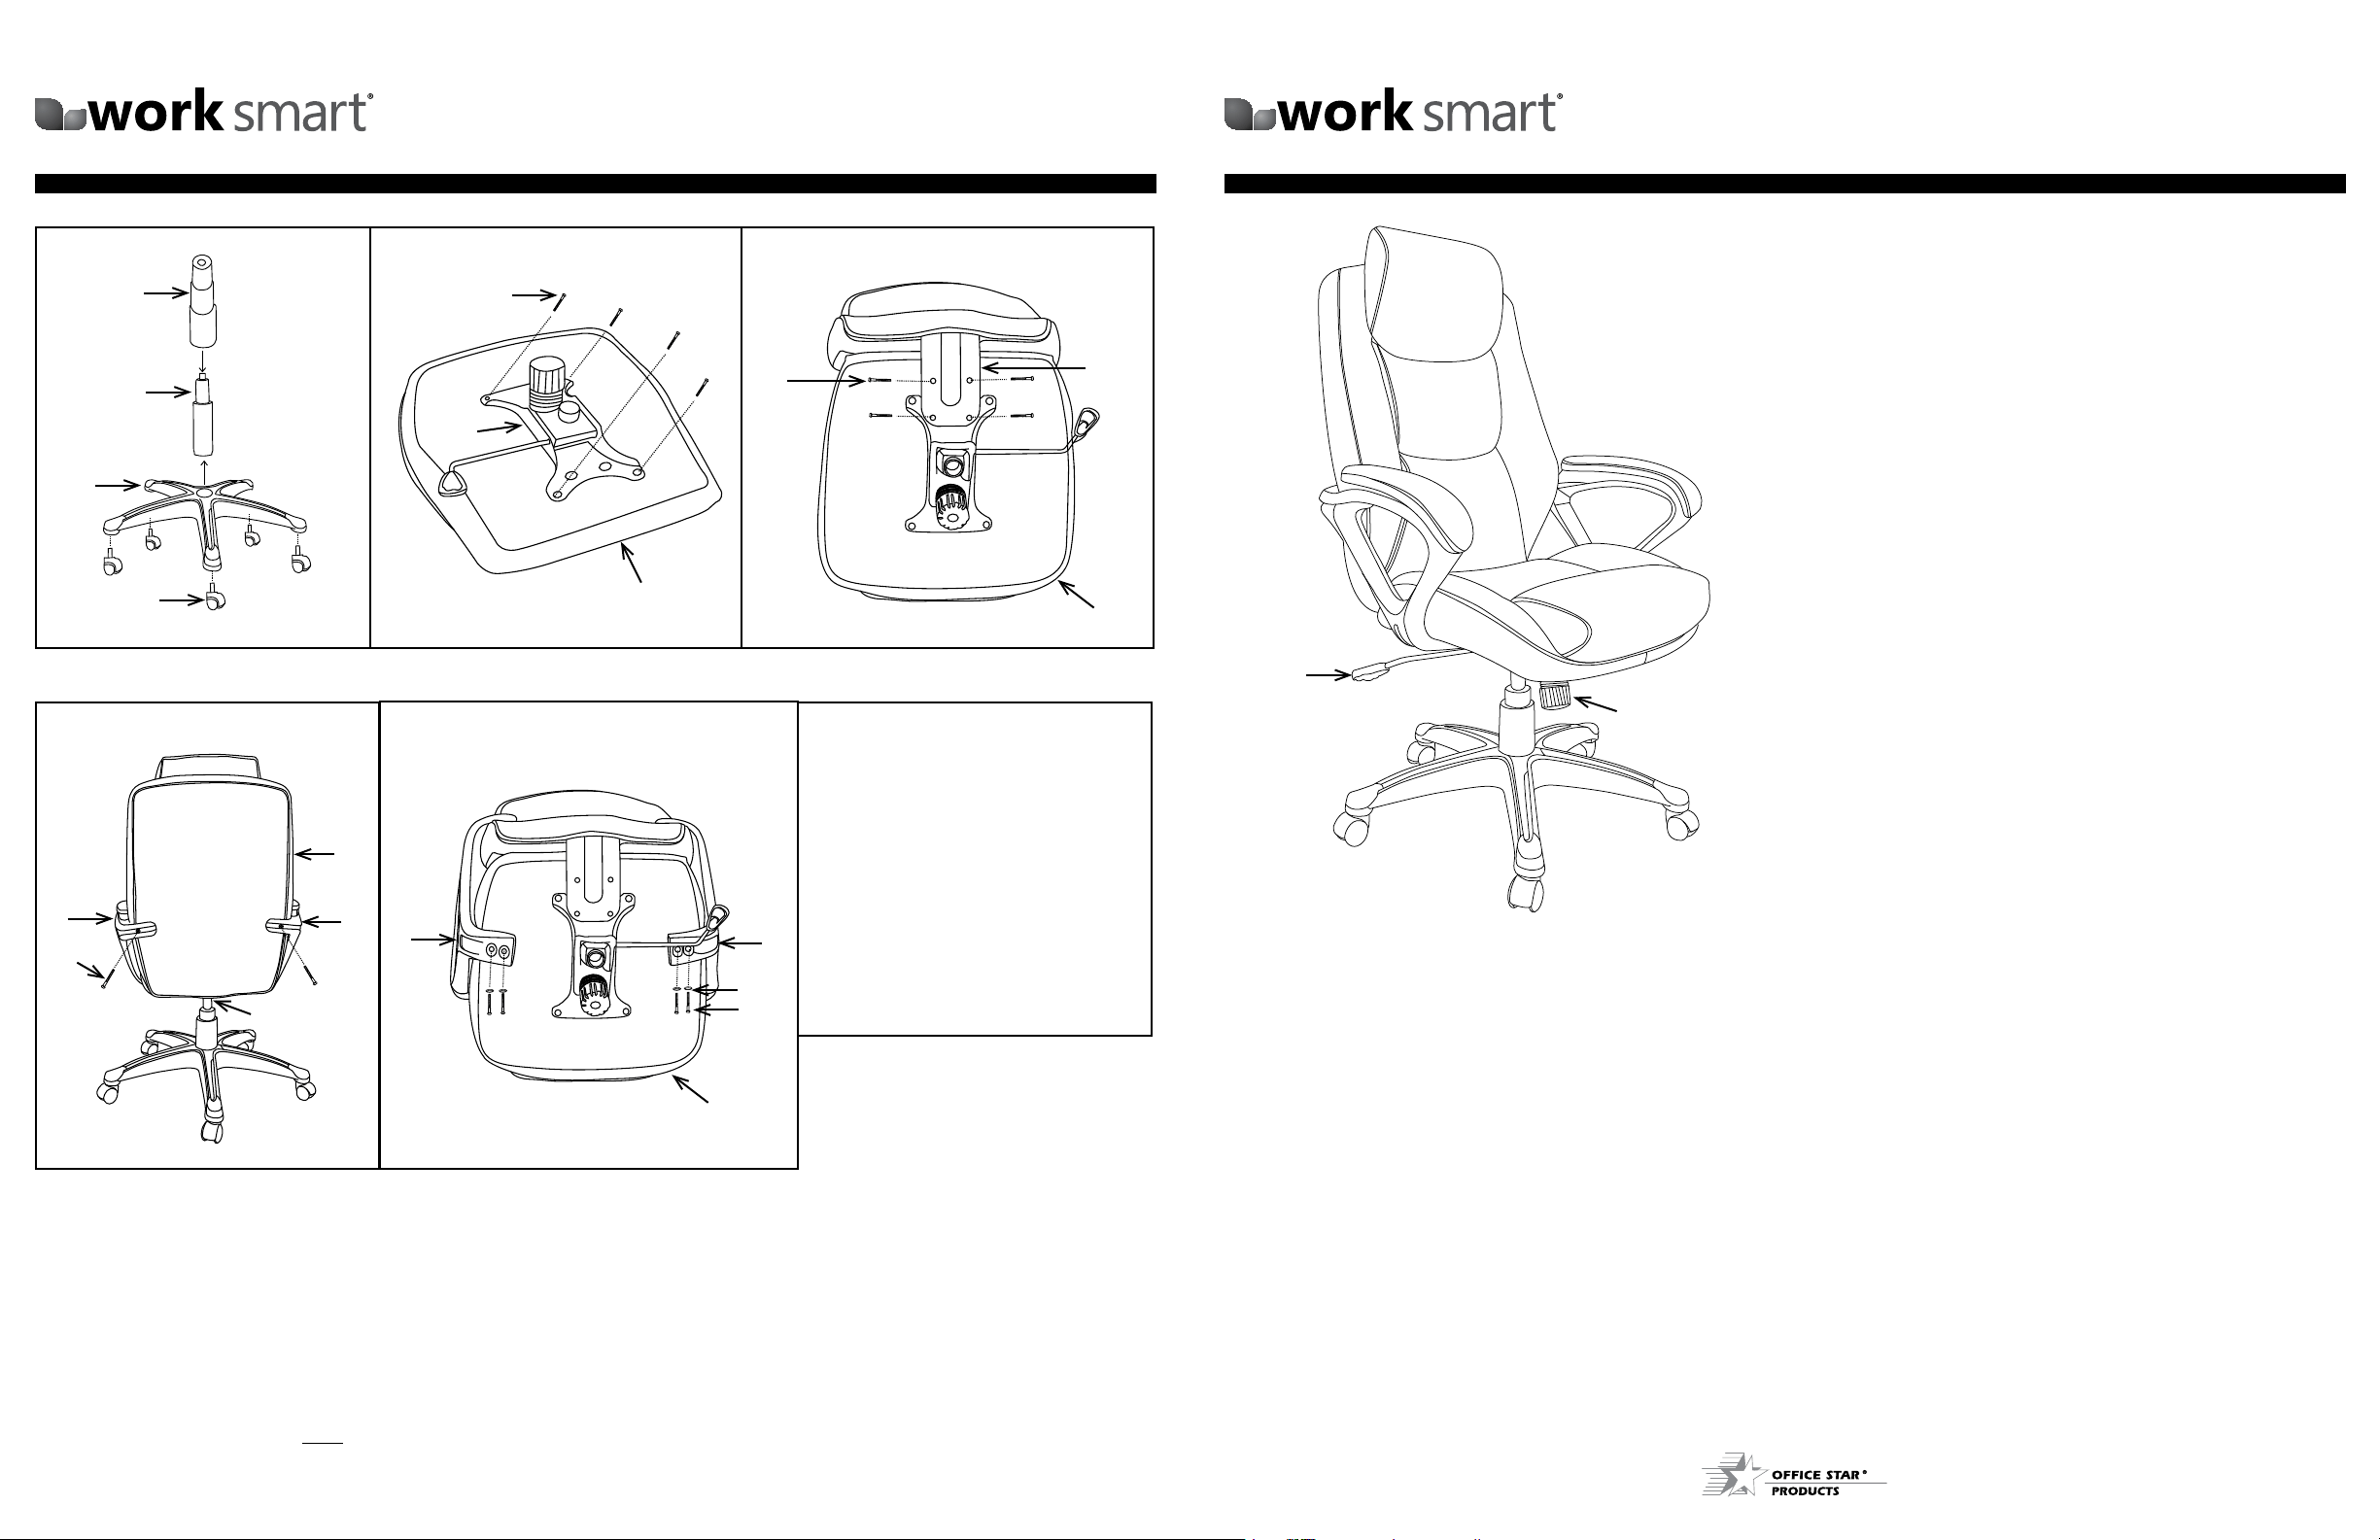
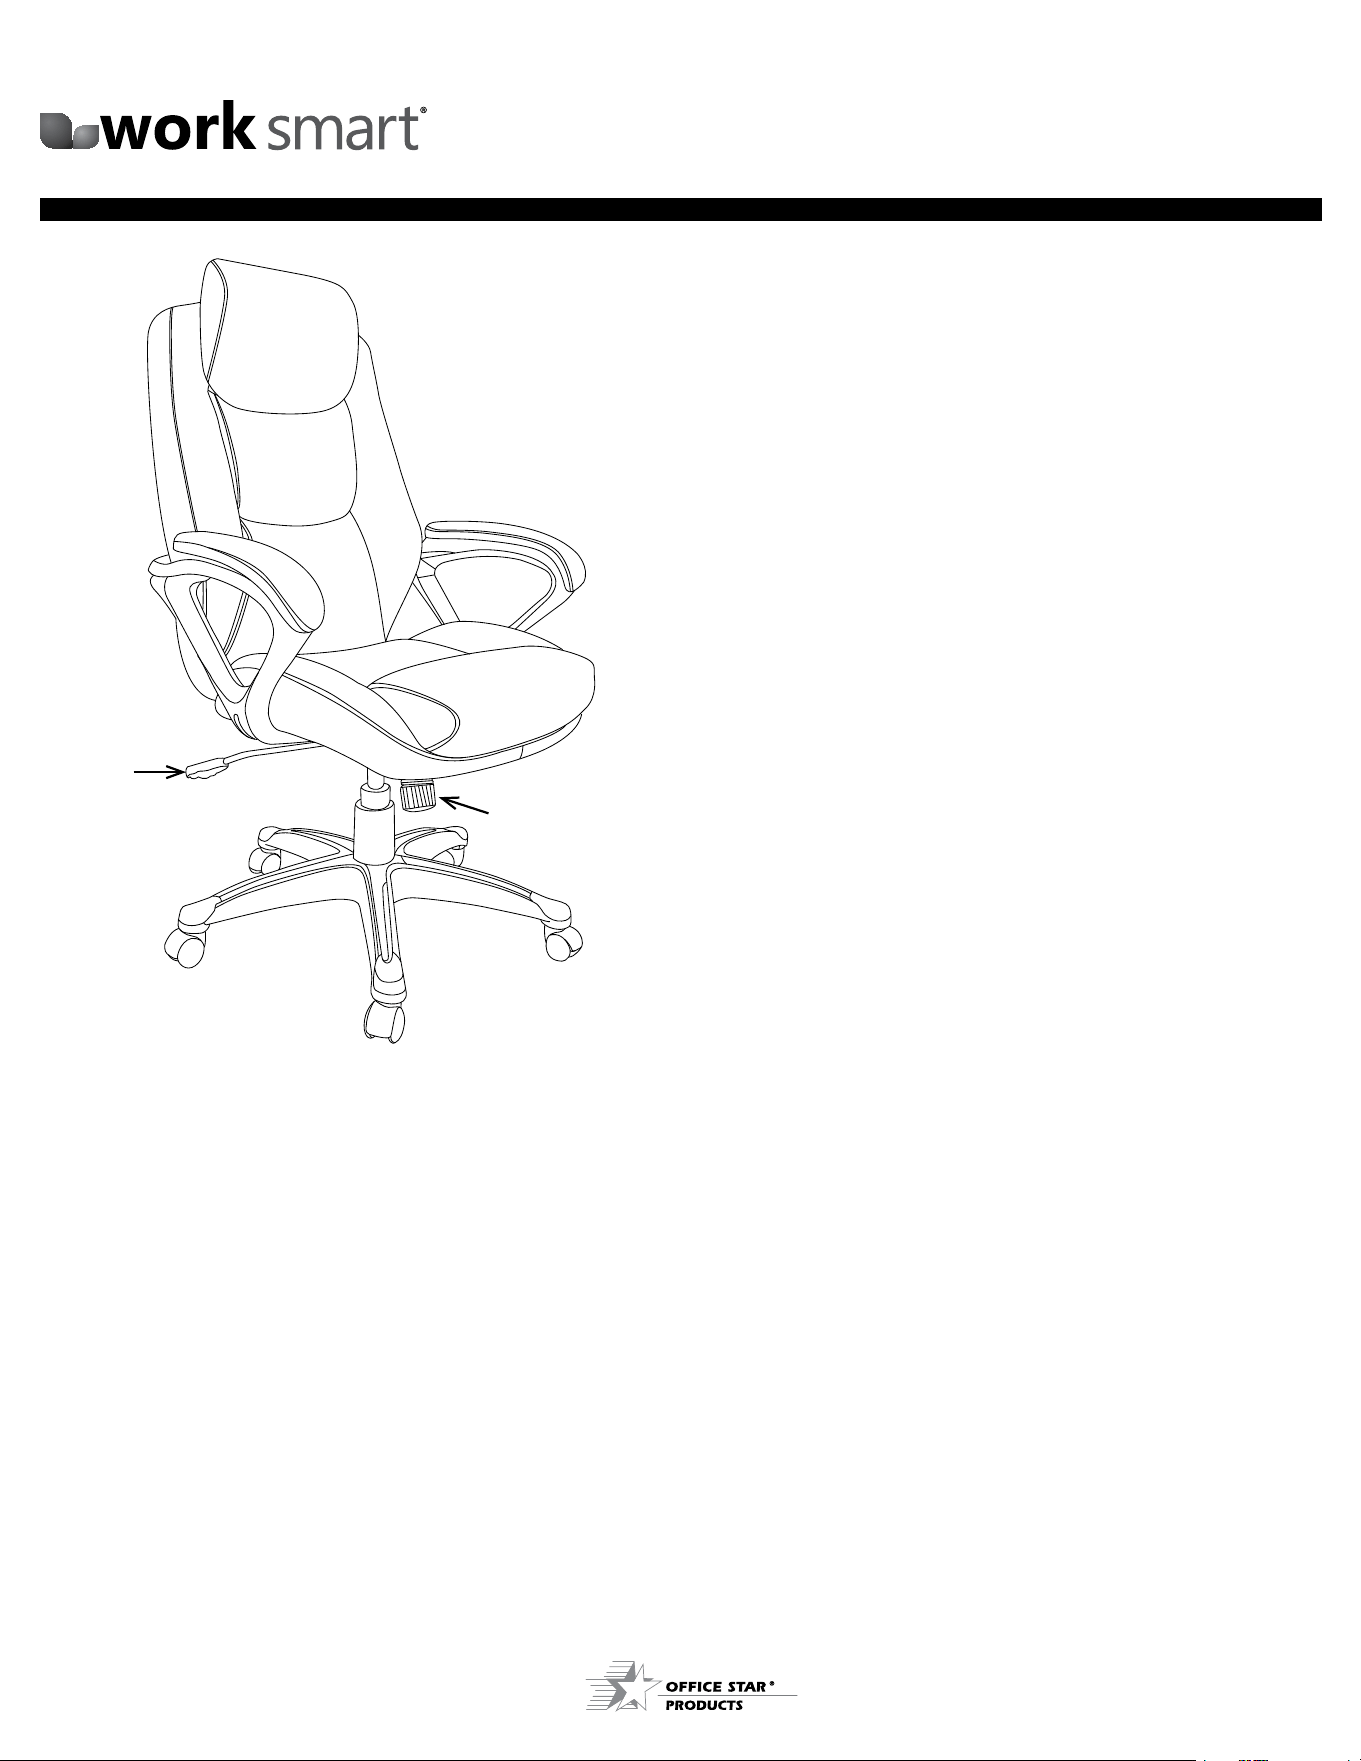
• PNEUMATIC SEAT HEIGHT ADJUSTMENT
To raise seat remove pressure from seat and lift lever (1).
To lower seat height sit on chair and lift lever (1).
NOTE: It is normal for chair to slightly lower under
body weight.
• LOCKING TILT ADJUSTMENT
For individual comfort, this chair has been equipped with
an adjustment that will allow the user to change the tension
of the tilting feature. Turn knob (2) clockwise to increase
tension and counter-clockwise to decrease or ease the
tension. To lock return chair to the upright position and push
lever (1) in. To unlock pull lever (1) out.
NOTE: Be careful not to loosen the back tilt adjustment knob
completely.
1
2
LIMITED WARRANTy
Work Smart chairs are warranted from the date of purchase against failure due to material and workmanship as follows:
• 15 Years on all non-moving metal parts.
• 5 Years on component parts including Control mechanisms, pneumatic cylinders, wood, plastic parts, base and casters.
• 3 Years on upholstery fabric and foam against wear and deterioration.
• We cannot warrant leather against routine scratching and scuffing, as all leather is subject to minor blemishes in use.
To make a warranty claim, contact Parts Department. Provide model number, proof of purchase, description of the problem and
obtain return authorization. At it’s option Office Star Products will:
(a) Supply compatible components of current manufacture.
(b) Repair the customer’s component. The customer must prepay freight on any components returned to the factory. Return
freight on components still in warranty will be paid by Office Star Products.
*All warranties are limited to the original purchaser for normal commercial usage defined as a standard forty hour work week by persons weighing 350 lbs. or
less. This warranty will not cover labor, freight or damage from misuse, abuse, negligence, alteration, accident, vandalism, rusting, acts of nature or any other
event beyond the control of Office Star Products. The warranty does not cover cosmetic damage that may result from normal use. Liability for incidental or
consequential damages is excluded. The user assumes all risk of injury resulting from use of this product. When usage is more than 40 hours per week, a two
year warranty on all parts applies. Fabric and foam is warranted for one year. This warranty gives you specific legal rights, and you may also have other rights
which vary from state to state.
Our quality standards are among the highest in the industry. Sometimes, no matter how hard we try, there are times when parts
are damaged or missing. Our Parts Department will do everything possible to promptly remedy the problem. Contact us via e-mail
parts@officestar.net, by Fax 1-909-930-5629, or toll free parts number 1-800-950-7262, Monday through Friday 8:00 a.m. - 5:00
p.m. Pacific Time.
© Office Star Products Mai 2013
1
13
2
3
4
10
ÉTAPE 1
ÉTAPE 4 ÉTAPE 5
ÉTAPE 2
ÉTAPE 3
10
6
5
6
PIÈCE QTÉ
1. Base .......................1
2. Roulettes ....................5
3. Vérin pneumatique ............1
4. Soufflet .....................1
5. Plaque du siège ...............1
6. Coussin du siège ..............1
7. Coussin du dossier ............1
8. Bras (8R et 8L) ...............2
9. Rondelles ....................4
10. Vis courtes ..................8
11. Vis moyennes ...............4
12. Vis longues .................2
13. Support du dossier (pré-installé) .1
14. Clé allen (non montré) .........1
12
8L
8R
3
7
8L
8R
9
11
6
Enlever toutes les pièces du carton, les organiser selon les numéros de pièce indiqués sur la liste et
vérifier les quantités des pièces.
ÉTAPE 1 Insérer les cinq Roulettes (2) dans la Base (1). Pousser fermement jusqu’à ce que les Roulettes (2) s’encliquettent. Insérer le Vérin
pneumatique (3) dans la Base (1), et glisser le Soufflet (4) sur le vérin pneumatique (3).
ÉTAPE 2 Fixez la Plaque du siège (5) au Coussin du siège (6) avec la flèche vers l’avant de la chaise avec quatre Vis courtes (10). SERREZ
TOUTES LES VIS AVEC LA CLÉ ALLEN (14).
ÉTAPE 3 Fixer le Support du dossier (13) au Coussin du siège (6) sur la Plaque du siège (5) avec quatre Vis courtes (10). SERREZ
TOUTES LES VIS AVEC LA CLÉ ALLEN (14).
ÉTAPE 4 Placer le siège assemblé sur le dessus du vérin pneumatique (3) et pousser vers le bas. Fixez les Bras (8L et 8R) au Coussin du
dossier (7) avec une Vis longue (12) pour chaque Bras (8). NE PAS SERRER LES VIS.
ÉTAPE 5 Fixez les Bras (8L et 8R) au Coussin du siège (6) avec deux Rondelles (9) et deux Vis moyennes pour chaque Bras (8). SERREZ
TOUTES LES VIS AVEC LA CLÉ ALLEN (14).
ATTENTION: AVANT D’UTILISER LE FAUTEUIL, S’ASSURER D’AVOIR SERRÉ COMPLÈTEMENT
TOUTES LES VIS.
ECH89181 / ECH89186 / ECH89187
EXECUTIVE ECO LEATHER CHAIR
ASSEMBLY INSTRUCTIONS
1
13
2
3
4
10
STEP 1
STEP 4 STEP 5
STEP 2
STEP 3
10
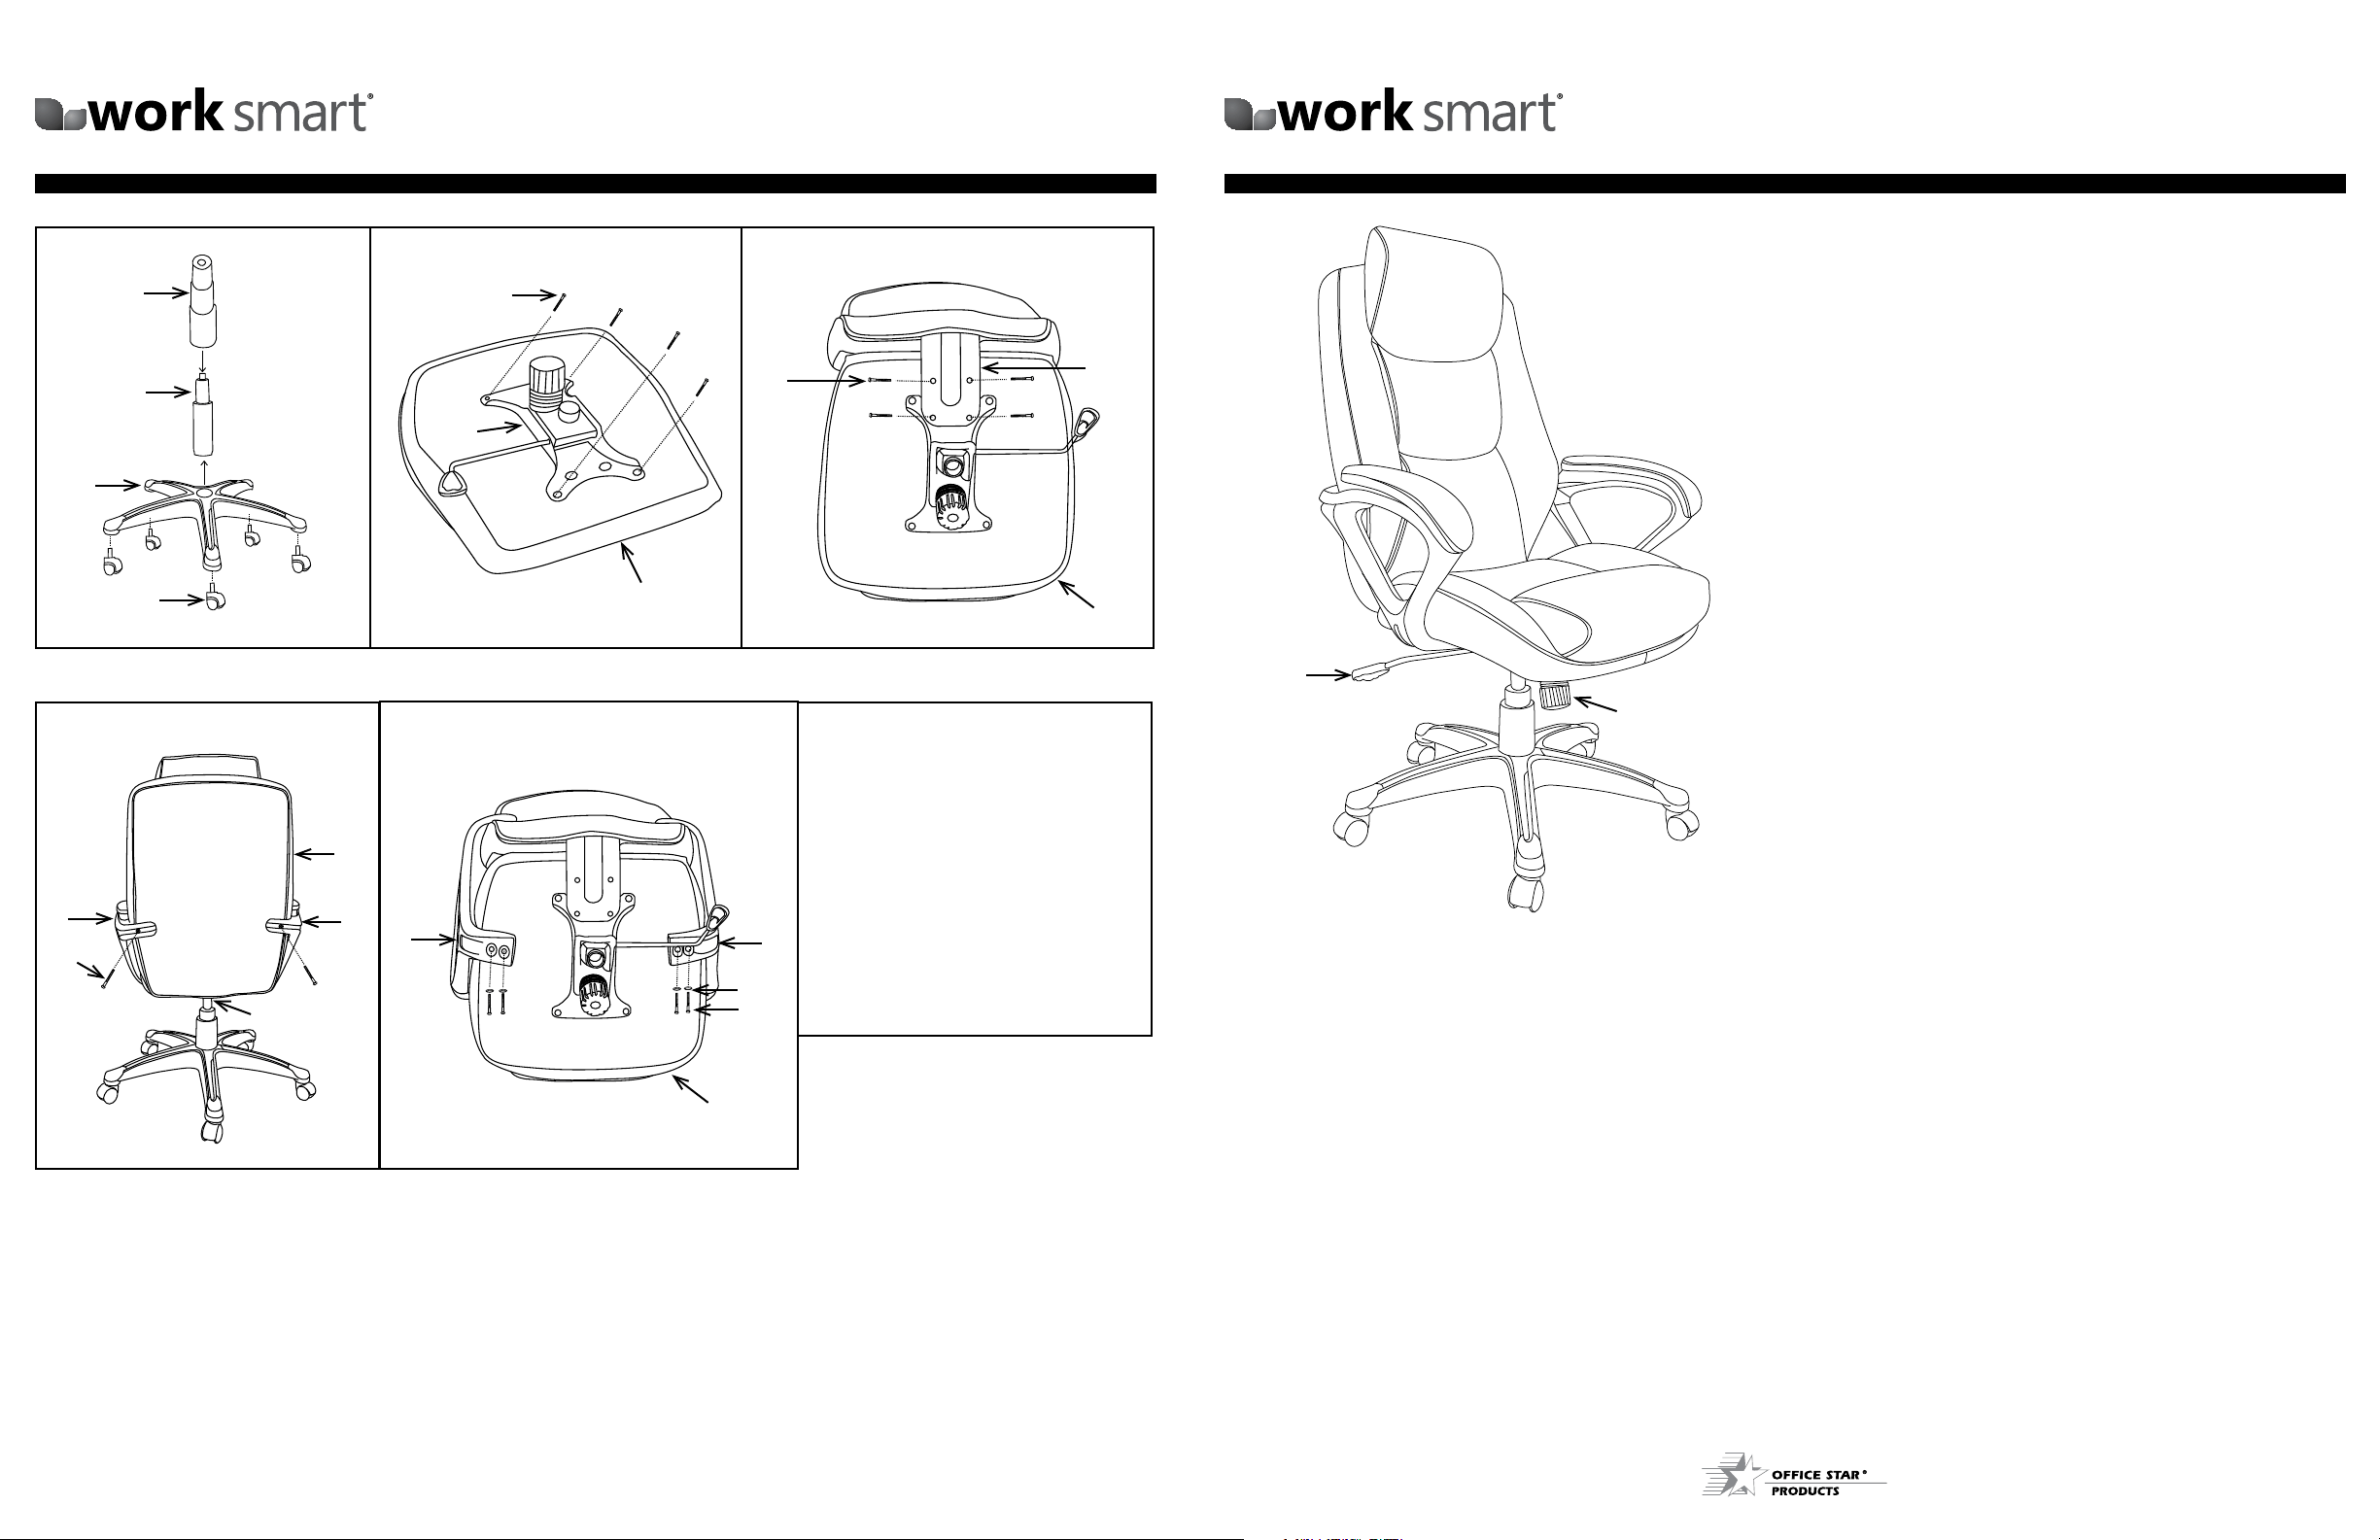
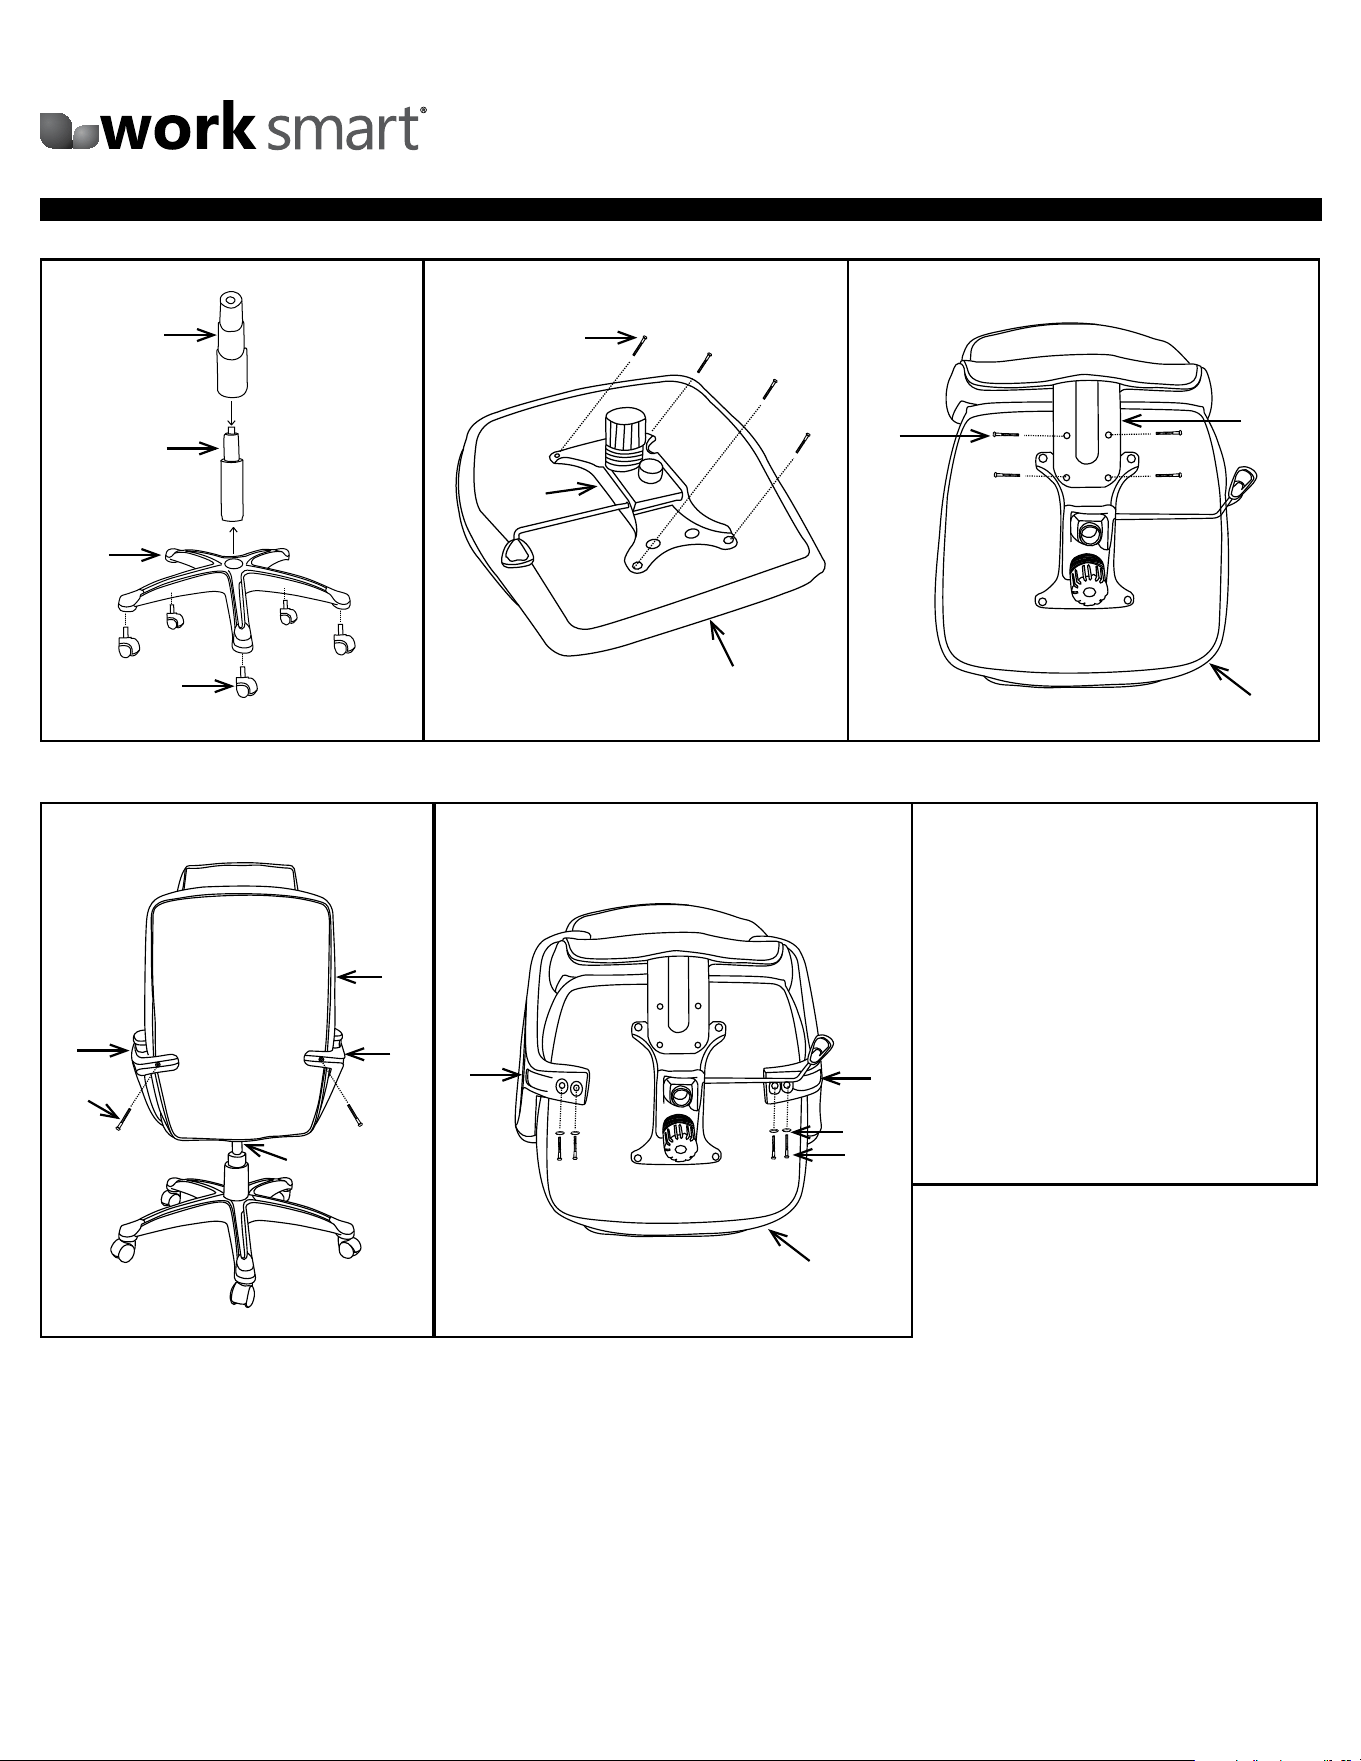
Remove all parts from carton, separate by part numbers indicated on parts list, and verify part quantities.
STEP 1 Insert five Casters (2) into Base (1), push hard until you feel or hear the Caster (2) snap into place. Insert Pneumatic Cylinder (3)
into Base (1) and slip Bellows (4) over Pneumatic Cylinder (3).
STEP 2 Attach Seat Plate (5) to Seat Cushion (6) with the arrow towards the front of the chair using four Short Screws (10).
FULLY TIGHTEN ALL SHORT SCREWS (10) USING ALLEN WRENCH (14).
STEP 3 Attach Back Support (13) to Seat Cushion (6) and over Seat Plate (5) using four Short Screws (10). DO NOT FULLY
TIGHTEN SCREWS.
STEP 4 Place assembled seat on top of Pneumatic Cylinder (3) and apply downward pressure. Secure Arms (8L & 8R) to Back
Cushion (7) using one Long Screw (12) for each Arm (8). DO NOT FULLY TIGHTEN SCREWS.
STEP 5 Attach Arms (8L & 8R) to Seat Cushion (6) using two Lock Washers (9) and two Medium Screws (11) for each Arm (8R & 8L). FULLY
TIGHTEN ALL SCREWS USING ALLEN WRENCH (14).
ATTENTION: MAKE SURE ALL SCREWS ARE FULLY TIGHTENED BEFORE USING CHAIR.
PART QTY
1. Base .......................1
2. Casters .....................5
3. Pneumatic Cylinder ............1
4. Bellows .....................1
5. Seat Plate ...................1
6. Seat Cushion .................1
7. Back Cushion ................1
8. Arms (8R & 8L) ...............2
9. Lock Washers ................4
10. Short Screws ................8
11. Medium Screws ..............4
12. Long Screws ................2
13. Back Support (pre-installed) ....1
14. Allen Wrench (not shown) ......1
12
6
5
8L
8R
6
3
7
8L
8R
9
11
6
© Office Star Products May 2013
GARANTIE LIMITÉE
Les fauteuils Work Smart sont garantis* à compter de la date d’achat contre les défaillances entraînées par des vices de matériaux et de fabrication
comme suit:
• Garantie de 15 ans sur toutes les pièces métalliques non mobiles.
• Garantie de 5 ans sur les pièces, dont le mécanisme de commande, le vérin pneumatique, le bois, les pièces en
plastique, la base et les roulettes.
• Garantie de 3 an sur le tissu d’ameublement et la mousse contre l’usure et la détérioration.
• Nous ne pouvons pas garantir le cuir contre les égratignures et l’usure par frottement, car tout cuir est sujet à de petites marques produites par
l’usage normal.
Pour faire une réclamation de garantie, contacter le service des pièces. Fournir le numéro de modèle, une preuve de paiement, une description du
problème et obtenir une autorisation de retour.. À sa discrétion, Office Star Products :
(a) fournira des pièces compatibles de produits courants
(b) réparera la pièce du client. Le client doit payer d’avance les frais de transport de toute pièce retournée à l’usine. Les frais de transport de retour
pour des pièces encore sous garantie seront payés par Office Star Products.
*Toutes les garanties sont limitées à l’acheteur original et à l’usage commercial normal défini comme l’usage pendant une semaine de travail standard de quarante heures par des
personnes pesant 250 lb ou moins. Cette garantie ne couvre pas la main-d’œuvre, le transport ou les dégâts entraînés par la mauvaise utilisation, la négligence, la modification,
les accidents, le vandalisme, la rouille, les catastrophes naturelles ou tout autre événement indépendant de la volonté d’Office Star Products. La garantie ne couvre pas des dégâts
superficiels qui pourraient se produire au cours de l’utilisation normale. La responsabilité de dommages indirects ou accessoires est exclue. L’utilisateur accepte tout risque de
blessure résultant de l’utilisation de ce produit. Si l’usage dépasse 40 heures par semaine, une garantie de deux ans sur toutes les pièces est applicable. Le tissu et la mousse sont
garantis pendant un an. Cette garantie vous accorde des droits spécifiques reconnus par la loi, et vous pouvez avoir d’autres droits qui varient d’un état
et d’une province à l’autre.
Nos normes de qualité sont parmi les plus élevées de l’industrie. De temps en temps, malgré nos efforts, il arrive que des pièces soient
endommagées ou manquantes. Notre service de pièces fera tout son possible pour régler le problème promptement. Contactez-nous par courriel
à parts@officestar.net, par télécopie à 1-909-930-5629 ou à notre numéro sans frais pour le service des pièces à
1-800-950-7262, du lundi au
vendredi de 8 h à 17 h, heure du Pacifique.
AVERTISSEMENT
1. Seule une personne à la fois peut utiliser ce produit.
2. Ne pas utiliser ce fauteuil à moins que toutes les vis et tous les
boulons et boutons soient resserrés.
3. Vérifier à tous les trois mois ou au besoin que toutes les vis et
tous les boulons et boutons sont resserrés.
4. Ne pas trop tourner le bouton d’inclinaison du dossier lors de la
diminution de la tension.
5. Éliminer les matériaux de conditionnement d’une manière
convenable. Ne pas utiliser la couverture en plastique pour
couvrir la tête à cause du risque d’étouffement.
6. Ne pas utiliser le fauteuil comme un escabeau.
7. Ce fauteuil ne doit servir qu’à l’usage pour lequel il a été conçu.
8. N’utiliser qu’un détergent liquide doux pour le nettoyage.
CARACTÉRISTIQUES
• RÉGLAGE DE LA HAUTEUR DU SIÈGE PNEUMATIQUE
Pour élever le siège, enlever toute pression du siège et lever le
levier (1). Pour baisser le siège, s’asseoir sur le fauteuil et lever
le levier (1).
NOTE: C’est normal que le fauteuil descend un peu lorsqu’on
s’assied.
• RÉGLAGE DE L’INCLINAISON VERROUILLABLE
Pour assurer le confort de l’individu, ce fauteuil est muni
d’un réglage permettant à l’utilisateur de modifier la tension
d’inclinaison. Tourner le bouton (2) dans le sens des aiguilles
d’une montre pour augmenter la tension et dans le sens inverse
des aiguilles d’une montre pour diminuer la tension. Pour
verrouiller, remettre le fauteuil en position verticale et pousser le
levier (1) vers l’intérieur. Pour déverrouiller, tirer le levier (1).
NOTE: Prendre garde à ne pas complètement desserrer le bouton de
réglage de l’inclinaison du dossier.
1
2
ECH89181 / ECH89186 / ECH89187
FAUTEUIL DE DIRECTION
EN CUIR ECO
MODE D’EMPLOI
ECH89181 / ECH89186 / ECH89187
EXECUTIVE ECO LEATHER CHAIR
ASSEMBLY INSTRUCTIONS
1
13
2
3
4
10
STEP 1
STEP 4 STEP 5
STEP 2
STEP 3
10
Remove all parts from carton, separate by part numbers indicated on parts list, and verify part quantities.
STEP 1 Insert five Casters (2) into Base (1), push hard until you feel or hear the Caster (2) snap into place. Insert Pneumatic Cylinder (3)
into Base (1) and slip Bellows (4) over Pneumatic Cylinder (3).
STEP 2 Attach Seat Plate (5) to Seat Cushion (6) with the arrow towards the front of the chair using four Short Screws (10).
FULLY TIGHTEN ALL SHORT SCREWS (10) USING ALLEN WRENCH (14).
STEP 3 Attach Back Support (13) to Seat Cushion (6) and over Seat Plate (5) using four Short Screws (10). DO NOT FULLY
TIGHTEN SCREWS.
STEP 4 Place assembled seat on top of Pneumatic Cylinder (3) and apply downward pressure. Secure Arms (8L & 8R) to Back
Cushion (7) using one Long Screw (12) for each Arm (8). DO NOT FULLY TIGHTEN SCREWS.
STEP 5 Attach Arms (8L & 8R) to Seat Cushion (6) using two Lock Washers (9) and two Medium Screws (11) for each Arm (8R & 8L). FULLY
TIGHTEN ALL SCREWS USING ALLEN WRENCH (14).
ATTENTION: MAKE SURE ALL SCREWS ARE FULLY TIGHTENED BEFORE USING CHAIR.
PART QTY
1. Base .......................1
2. Casters .....................5
3. Pneumatic Cylinder ............1
4. Bellows .....................1
5. Seat Plate ...................1
6. Seat Cushion .................1
7. Back Cushion ................1
8. Arms (8R & 8L) ...............2
9. Lock Washers ................4
10. Short Screws ................8
11. Medium Screws ..............4
12. Long Screws ................2
13. Back Support (pre-installed) ....1
14. Allen Wrench (not shown) ......1
12
6
5
8L
8R
6
3
7
8L
8R
9
11
6
© Office Star Products May 2013
GARANTIE LIMITÉE
Les fauteuils Work Smart sont garantis* à compter de la date d’achat contre les défaillances entraînées par des vices de matériaux et de fabrication
comme suit:
• Garantie de 15 ans sur toutes les pièces métalliques non mobiles.
• Garantie de 5 ans sur les pièces, dont le mécanisme de commande, le vérin pneumatique, le bois, les pièces en
plastique, la base et les roulettes.
• Garantie de 3 an sur le tissu d’ameublement et la mousse contre l’usure et la détérioration.
• Nous ne pouvons pas garantir le cuir contre les égratignures et l’usure par frottement, car tout cuir est sujet à de petites marques produites par
l’usage normal.
Pour faire une réclamation de garantie, contacter le service des pièces. Fournir le numéro de modèle, une preuve de paiement, une description du
problème et obtenir une autorisation de retour.. À sa discrétion, Office Star Products :
(a) fournira des pièces compatibles de produits courants
(b) réparera la pièce du client. Le client doit payer d’avance les frais de transport de toute pièce retournée à l’usine. Les frais de transport de retour
pour des pièces encore sous garantie seront payés par Office Star Products.
*Toutes les garanties sont limitées à l’acheteur original et à l’usage commercial normal défini comme l’usage pendant une semaine de travail standard de quarante heures par des
personnes pesant 250 lb ou moins. Cette garantie ne couvre pas la main-d’œuvre, le transport ou les dégâts entraînés par la mauvaise utilisation, la négligence, la modification,
les accidents, le vandalisme, la rouille, les catastrophes naturelles ou tout autre événement indépendant de la volonté d’Office Star Products. La garantie ne couvre pas des dégâts
superficiels qui pourraient se produire au cours de l’utilisation normale. La responsabilité de dommages indirects ou accessoires est exclue. L’utilisateur accepte tout risque de
blessure résultant de l’utilisation de ce produit. Si l’usage dépasse 40 heures par semaine, une garantie de deux ans sur toutes les pièces est applicable. Le tissu et la mousse sont
garantis pendant un an. Cette garantie vous accorde des droits spécifiques reconnus par la loi, et vous pouvez avoir d’autres droits qui varient d’un état
et d’une province à l’autre.
Nos normes de qualité sont parmi les plus élevées de l’industrie. De temps en temps, malgré nos efforts, il arrive que des pièces soient
endommagées ou manquantes. Notre service de pièces fera tout son possible pour régler le problème promptement. Contactez-nous par courriel
à parts@officestar.net, par télécopie à 1-909-930-5629 ou à notre numéro sans frais pour le service des pièces à
1-800-950-7262, du lundi au
vendredi de 8 h à 17 h, heure du Pacifique.
AVERTISSEMENT
1. Seule une personne à la fois peut utiliser ce produit.
2. Ne pas utiliser ce fauteuil à moins que toutes les vis et tous les
boulons et boutons soient resserrés.
3. Vérifier à tous les trois mois ou au besoin que toutes les vis et
tous les boulons et boutons sont resserrés.
4. Ne pas trop tourner le bouton d’inclinaison du dossier lors de la
diminution de la tension.
5. Éliminer les matériaux de conditionnement d’une manière
convenable. Ne pas utiliser la couverture en plastique pour
couvrir la tête à cause du risque d’étouffement.
6. Ne pas utiliser le fauteuil comme un escabeau.
7. Ce fauteuil ne doit servir qu’à l’usage pour lequel il a été conçu.
8. N’utiliser qu’un détergent liquide doux pour le nettoyage.
CARACTÉRISTIQUES
• RÉGLAGE DE LA HAUTEUR DU SIÈGE PNEUMATIQUE
Pour élever le siège, enlever toute pression du siège et lever le
levier (1). Pour baisser le siège, s’asseoir sur le fauteuil et lever
le levier (1).
NOTE: C’est normal que le fauteuil descend un peu lorsqu’on
s’assied.
• RÉGLAGE DE L’INCLINAISON VERROUILLABLE
Pour assurer le confort de l’individu, ce fauteuil est muni
d’un réglage permettant à l’utilisateur de modifier la tension
d’inclinaison. Tourner le bouton (2) dans le sens des aiguilles
d’une montre pour augmenter la tension et dans le sens inverse
des aiguilles d’une montre pour diminuer la tension. Pour
verrouiller, remettre le fauteuil en position verticale et pousser le
levier (1) vers l’intérieur. Pour déverrouiller, tirer le levier (1).
NOTE: Prendre garde à ne pas complètement desserrer le bouton de
réglage de l’inclinaison du dossier.
1
2
ECH89181 / ECH89186 / ECH89187
FAUTEUIL DE DIRECTION
EN CUIR ECO
MODE D’EMPLOI
ECH89181 / ECH89186 / ECH89187
FAUTEUIL DE DIRECTION
EN CUIR ECO
INSTRUCTIONS DE MONTAGE
ECH89181 / ECH89186 / ECH89187
EXECUTIVE ECO LEATHER CHAIR
OPERATING INSTRUCTIONS
WARNING
1. Use this product only one person at a time.
2. Do not use this chair unless all bolts screws and
knobs are securely tightened.
3. Check that all bolts screws and knobs are tight every
three months or as needed.
4. Do not overturn back tilt knob when decreasing
tension.
5. Dispose of packing material properly. Do not use
plastic cover as head covering. It may cause
suffocation.
6. Do not use chair as a stepladder.
7. Use this chair for its intended purpose only.
8. Use mild detergent only for cleaning.
FEATURES
• PNEUMATIC SEAT HEIGHT ADJUSTMENT
To raise seat remove pressure from seat and lift lever (1).
To lower seat height sit on chair and lift lever (1).
NOTE: It is normal for chair to slightly lower under
body weight.
• LOCKING TILT ADJUSTMENT
For individual comfort, this chair has been equipped with
an adjustment that will allow the user to change the tension
of the tilting feature. Turn knob (2) clockwise to increase
tension and counter-clockwise to decrease or ease the
tension. To lock return chair to the upright position and push
lever (1) in. To unlock pull lever (1) out.
NOTE: Be careful not to loosen the back tilt adjustment knob
completely.
1
2
LIMITED WARRANTy
Work Smart chairs are warranted from the date of purchase against failure due to material and workmanship as follows:
• 15 Years on all non-moving metal parts.
• 5 Years on component parts including Control mechanisms, pneumatic cylinders, wood, plastic parts, base and casters.
• 3 Years on upholstery fabric and foam against wear and deterioration.
• We cannot warrant leather against routine scratching and scuffing, as all leather is subject to minor blemishes in use.
To make a warranty claim, contact Parts Department. Provide model number, proof of purchase, description of the problem and
obtain return authorization. At it’s option Office Star Products will:
(a) Supply compatible components of current manufacture.
(b) Repair the customer’s component. The customer must prepay freight on any components returned to the factory. Return
freight on components still in warranty will be paid by Office Star Products.
*All warranties are limited to the original purchaser for normal commercial usage defined as a standard forty hour work week by persons weighing 350 lbs. or
less. This warranty will not cover labor, freight or damage from misuse, abuse, negligence, alteration, accident, vandalism, rusting, acts of nature or any other
event beyond the control of Office Star Products. The warranty does not cover cosmetic damage that may result from normal use. Liability for incidental or
consequential damages is excluded. The user assumes all risk of injury resulting from use of this product. When usage is more than 40 hours per week, a two
year warranty on all parts applies. Fabric and foam is warranted for one year. This warranty gives you specific legal rights, and you may also have other rights
which vary from state to state.
Our quality standards are among the highest in the industry. Sometimes, no matter how hard we try, there are times when parts
are damaged or missing. Our Parts Department will do everything possible to promptly remedy the problem. Contact us via e-mail
parts@officestar.net, by Fax 1-909-930-5629, or toll free parts number 1-800-950-7262, Monday through Friday 8:00 a.m. - 5:00
p.m. Pacific Time.
© Office Star Products Mai 2013
1
13
2
3
4
10
ÉTAPE 1
ÉTAPE 4 ÉTAPE 5
ÉTAPE 2
ÉTAPE 3
10
6
5
6
PIÈCE QTÉ
1. Base .......................1
2. Roulettes ....................5
3. Vérin pneumatique ............1
4. Soufflet .....................1
5. Plaque du siège ...............1
6. Coussin du siège ..............1
7. Coussin du dossier ............1
8. Bras (8R et 8L) ...............2
9. Rondelles ....................4
10. Vis courtes ..................8
11. Vis moyennes ...............4
12. Vis longues .................2
13. Support du dossier (pré-installé) .1
14. Clé allen (non montré) .........1
12
8L
8R
3
7
8L
8R
9
11
6
Enlever toutes les pièces du carton, les organiser selon les numéros de pièce indiqués sur la liste et
vérifier les quantités des pièces.
ÉTAPE 1 Insérer les cinq Roulettes (2) dans la Base (1). Pousser fermement jusqu’à ce que les Roulettes (2) s’encliquettent. Insérer le Vérin
pneumatique (3) dans la Base (1), et glisser le Soufflet (4) sur le vérin pneumatique (3).
ÉTAPE 2 Fixez la Plaque du siège (5) au Coussin du siège (6) avec la flèche vers l’avant de la chaise avec quatre Vis courtes (10). SERREZ
TOUTES LES VIS AVEC LA CLÉ ALLEN (14).
ÉTAPE 3 Fixer le Support du dossier (13) au Coussin du siège (6) sur la Plaque du siège (5) avec quatre Vis courtes (10). SERREZ
TOUTES LES VIS AVEC LA CLÉ ALLEN (14).
ÉTAPE 4 Placer le siège assemblé sur le dessus du vérin pneumatique (3) et pousser vers le bas. Fixez les Bras (8L et 8R) au Coussin du
dossier (7) avec une Vis longue (12) pour chaque Bras (8). NE PAS SERRER LES VIS.
ÉTAPE 5 Fixez les Bras (8L et 8R) au Coussin du siège (6) avec deux Rondelles (9) et deux Vis moyennes pour chaque Bras (8). SERREZ
TOUTES LES VIS AVEC LA CLÉ ALLEN (14).
ATTENTION: AVANT D’UTILISER LE FAUTEUIL, S’ASSURER D’AVOIR SERRÉ COMPLÈTEMENT
TOUTES LES VIS.