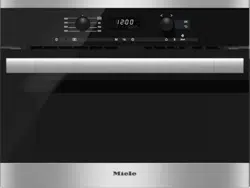
Miele M6040SC Built-in microwave oven
Product's Documents
Below are documents related to this product, you can read online or download:
- Owner's manual - (English) Read Online | Download pdf
Owners' Guide Microwaves
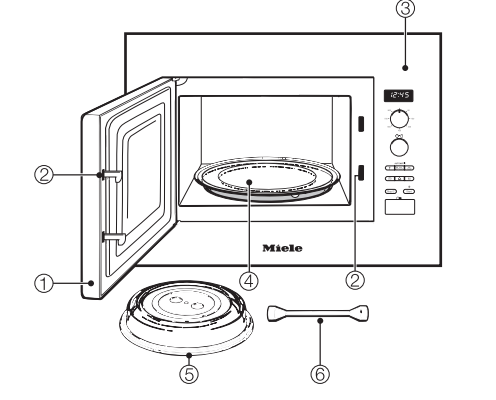
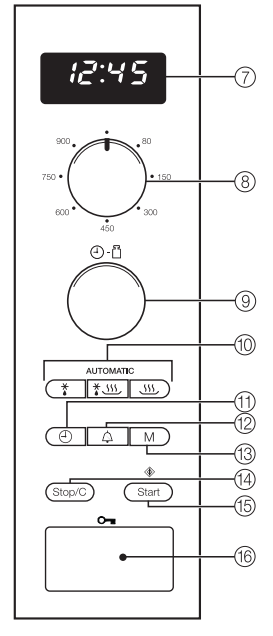


Plate cover
The cover supplied must only be used in the Microwave Solo mode.
It prevents food from drying out and the oven interior from becoming dirty, and it accelerates the heating process.
Boiling stick
When heating liquids, the boiling stick should always be placed in the container. It helps heat liquids evenly.
These products and other useful accessories can be ordered via the Miele website or from your Miele dealer.
Allow the microwave to sit unpacked for approx. 2 hours after transport before using it for the first time.
During this time, the temperature of the appliance can equalize with the room temperature. This is important for the correct electronic functioning of the appliance.
WARNING: Danger of suffocation! Ensure that any plastic wrapping, bags, etc. are disposed of safely and kept out of the reach of children.
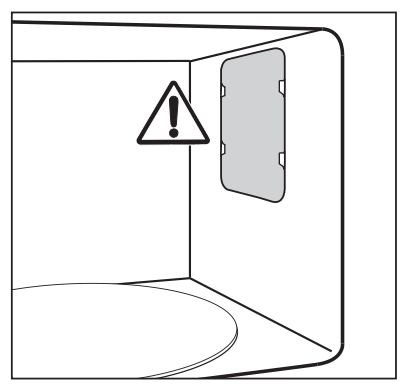
WARNING: The microwave oven may not be operated until it has been properly installed in a cabinet.
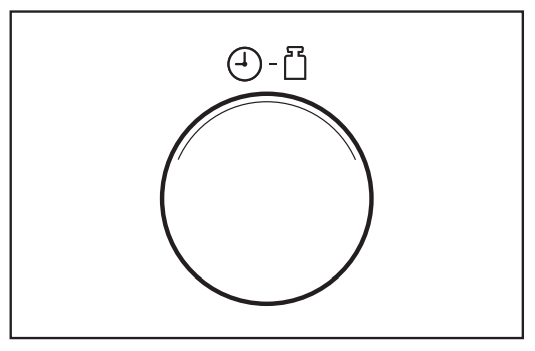
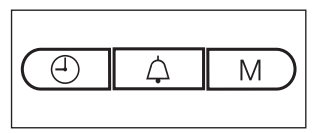
 symbol will flash in the display until the current time of day is set. Until then, the clock counts upwards from 12:00, since it starts as soon as the appliance is connected to the power supply.
 button
 button to confirm the selection, or wait a few seconds. The new time setting is then applied. The colon between hours and minutes will flash.
 button. The
  symbol will flash in the display and the current hour will light up for a few seconds.
 button to confirm the selection, or wait a few seconds. The
  symbol will flash and the current minute setting will light up for a few seconds.
 button to confirm the selection, or wait a few seconds.
 button until the display goes dark.
 button again to display the clock again.
 button to open the door.
If the microwave oven is in use, opening the door will interrupt the current program.
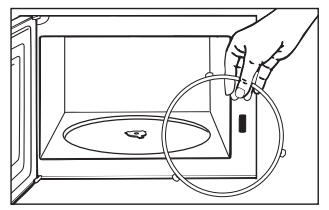
Ideally, the dish should be placed in the middle of the oven interior.
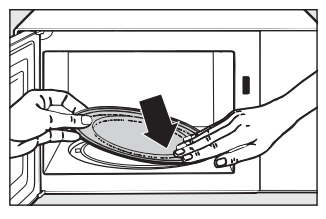
Turntable
The turntable helps the food to cook, reheat or defrost evenly.
Do not operate the microwave without the turntable in place.
The turntable begins turning automatically when a program is started.
Do not cook, reheat or defrost food directly on the turntable. Check that the dish is not larger in size than the turntable.
Turn or stir food during cooking, or turn the dish, so that it heats up evenly.
The appliance will not start again if the door has not been closed properly.
Use the appropriate selector to choose the microwave power level and the cooking time.
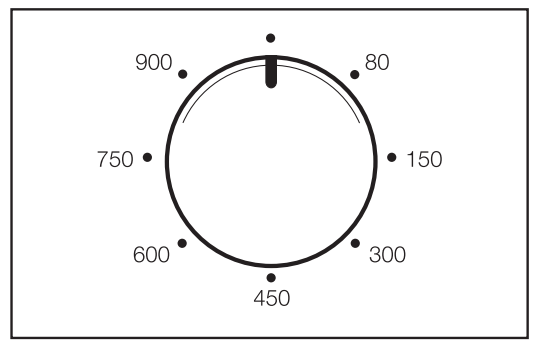
Use the power selector to choose the desired power level.
The  symbol and the power level selected will appear in the display. "0:00" will flash.
You can choose from 7 different power levels. The higher the power level, the more microwaves reach the food.
When heating up foods that cannot be stirred or turned during cooking, or foods with very different consistencies, it is best to use a lower microwave power level.
This ensures the heat is distributed evenly. Heat for long enough to cook the food properly.
You can choose any length of time between 10 seconds and 90 minutes. Exception: If the maximum power level is selected, you can set a time of up to 15 minutes. If you continue to cook at full power, the machine will automatically decrease to a 600 W power level to protect from overheating (indicated in the display).
The time required depends on:
– The initial temperature of the food. Food taken from the refrigerator will need longer to reheat, cook, etc. than food already at room temperature.
– The type and texture of the food. Fresh vegetables contain more water and cook more quickly than stored vegetables.
– The frequency with which the food is stirred or turned. Frequent stirring or turning heats the food more evenly, and it is therefore ready in less time.
– The amount of food.
As a general rule: Double the quantity = nearly twice the time
For a smaller quantity of food, the cook time decreases proportionately.
– The shape and material of the dishware.
A program can only be started if the door is closed.
"Door" message
The "Door" message in the display is a reminder that the appliance cannot be used without food inside it.
Operating the microwave without food can damage the appliance.
If the door has been closed for 20 minutes or longer when the Start button is pressed, the word door will appear in the display to remind you to open the door and make sure there is food in the appliance before you press Start. You cannot start a program until you do this.
At any time you can...
... interrupt a program:
The time stops counting down.
... resume a program:
After starting the program, if you determine that...
. . . the microwave power level is too high or too low:
. . . the time entered is too short or too long:
or alternatively:
An signal will sound when the cooking program is complete. The oven interior lighting goes out.
As a reminder, the signal will sound briefly every 5 minutes for 20 minutes once the program is complete.
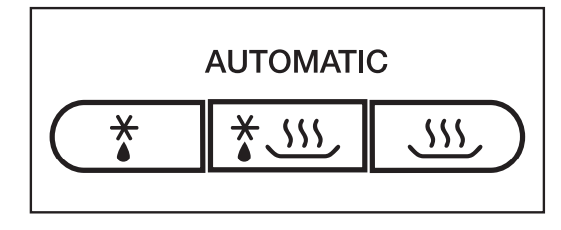
The automatic keep-warm function will turn on automatically at 80 W for a maximum of 15 minutes approx. 2 minutes after the end of a cooking program that was run at a power level of least 450 W, provided that the door remains closed and no buttons are pressed.
 80 W and H:H will appear in the display.
Opening the door or operating one of the buttons or selectors while the automatic keep-warm function is in progress will cancel the function.
The automatic keep-warm function cannot be set as a separate function.
Pressing the "Start / " button is sufficient to start the appliance operating at maximum power. Three cooking times are stored in the memory:
 " once
 " twice
 " three times
Pressing "Start / " four times in a row will return you to the first saved time, etc.
The cooking time can be increased during operation by pressing the "Start" button. Each time the "Start" button is pressed, the duration is increased by another 30 seconds.
Reprogramming saved times
You can change the saved cooking times.
Use the "Start / " button to select the time you wish to reprogram (press once, twice or three times) and hold the "Start /
 " button.
While holding the "Start" button, change the time using the selector knob (max. 15 minutes). The modified program will run when the "Start / " button is released.
If there is a loss of power, the reprogrammed times will no longer be saved and must be reset.
The system lock prevents unauthorized operation of the appliance.
To activate the system lock

The key symbol will go out after a short time.
The key symbol will reappear whenever a button is pressed or a selector is turned.
If there is a power outage, the system lock will need to be reactivated.
To deactivate the system lock
The timer can be used to keep track of other activities in the kitchen, e.g. boiling eggs. The time set counts down in one-second increments.
 button. "00:00" flashes in the display and the
  symbol appears.
 symbol flashes.
 symbol disappears.
Reprogramming the timer
Timer + Cooking Program
The timer can be used at the same time as a cooking program and will count down in the background.
 button while the program is in progress. "00:00" flashes in the display and the
  symbol appears.
 symbol indicates that the time is counting down in the background.
Do not press the "Start" button to start the timer in this case. This will increase the duration of the current cooking program by one minute.
Remaining time
 button. The remaining time on the timer will show in the display
All automatic programs are weight dependent.
The weight can be displayed in either pounds (lb) or grams (g), see "Settings".
Once a program is selected, enter the weight of the food. The microwave then automatically calculated the time according to the weight entered.
When cooking is complete, allow the food to stand at room temperature for the suggested "standing time" to allow the heat to distribute evenly throughout the food.
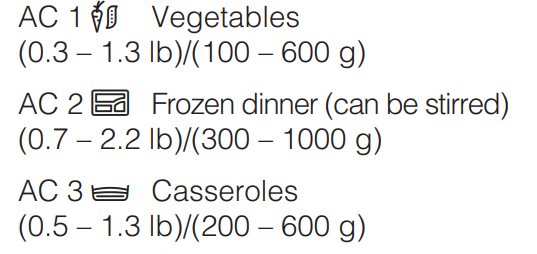
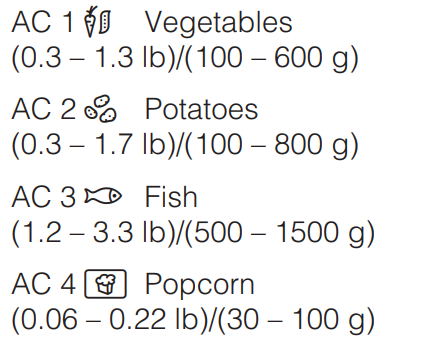
Five programs are available for defrosting different types of food  .
.
The recommended "standing time" for Ad 3 is up to 30 minutes depending on the weight. Approx. 10 minutes is recommended for the remaining programs.

Three programs are available for frozen and fresh food.
The recommended "standing time" for these programs is approx. 2 minutes.
Cooking frozen food 
Cooking fresh food 
 (defrosting chicken) press "
 " three times.
lb or g will flash in the display, and the selected program will light up along with the Microwave symbol " ".
".
The cooking duration, which was calculated according to the weight entered, will being to count down and the Microwave symbol  will light up.
A signal will sound halfway through the cooking time.
If desired the time can be extended by a few minutes during operating by pressing the "Start" button repeatedly until the desired time shows in the display.
It is only possible to extend the time by a few minutes.
A signal will sound when the program is complete, and the interior lighting of the microwave will go out.
Popcorn 
This automatic programme is suitable for making microwave popcorn.
The programme is not suitable for making popcorn from kernals. Only use this automatic programme for popcorn which is specifically labelled as microwave popcorn.
Ensure that the bag can inflate freely. A build-up of heat could be caused by the bag touching the interior wall and becoming stuck.
The bag will be very hot. Remove it with care.
Select the following microwave power levels to reheat food and drinks:
Drinks . . . . . . . . . . . . . . . . . . . . . 900 W
Food . . . . . . . . . . . . . . . . . . . . . . 600 W
Food for babies and toddlers . . . 450 W
WARNING: Be sure that baby/toddler food does not become too hot. Heat for only 1/2 to 1 minute at 450 W.
Tips for reheating
Always use a lid or plate cover for reheating food, except when a drier finish is desired, e.g. breaded poultry/ meat.
WARNING:
Always remove the lids from jars, especially jars of baby food. Remove the screw cap and nipple before warming baby bottles.
When reheating liquids, place the boiling stick supplied with the appliance into the cup or glass.
Never reheat hard boiled eggs in a microwave oven, even without the shell. The eggs can explode.
Food taken straight from the refrigerator will take longer to reheat than food stored at room temperature. The cooking time required depends on the texture of the food, its initial temperature and the amount to be cooked.
Always ensure that food is sufficiently reheated.
If you are unsure whether a sufficiently high temperature has been reached, continue reheating a little longer.
Larger amounts of food should be stirred or turned from time to time during cooking. Stir the food from the outside towards the middle, as food heats more quickly from the outside.
After reheating
Be careful when removing dishes from the appliance. They may be hot.
Although heat is not normally produced in the cookware itself by the microwaves (apart from stoneware), heat is transferred from the food to the container, which can cause the container to become hot.
Allow food to stand at room temperature for a few minutes after reheating so that the heat can spread evenly throughout the food and so that a consistent temperature is reached.
WARNING: After reheating food/drinks, especially for babies and small children, stir it or shake the container and check that the temperature does not pose any danger.
Place the food in microwave-safe cookware and cover it.
When cooking, it is recommended to initially select a power level of 900 W and then, when the food is hot, reduce the power level to 450 W for a more gentle continued cooking.
For dishes such as rice or pudding, first select a power level of 900 W, and then reduce it to 150 W for simmering.
Tips for cooking
The cooking time for vegetables depends on their texture. Fresh vegetables contain more water than vegetables which have been stored and usually cook more quickly. Add a little water to vegetables which have been kept stored.
Food taken straight from the refrigerator will take longer to cook than food which has been kept at room temperature.
Stir or turn food from time to time during cooking to help it cook more evenly.
Ensure that foods which spoil quickly, such as fish, are thoroughly cooked for an appropriate length of time.
Food with a thick skin or peel, such as tomatoes, sausages, potatoes (cooked in their skins) and eggplant, should be pierced or the skin cut in several places before cooking to allow steam to escape and prevent the food from bursting.
When cooking eggs in their shells in the microwave oven, you must use a specially designed egg boiler. Otherwise, the eggs will explode, even after being removed from the oven interior.
Eggs can be cooked without their shells in the microwave oven only if the yolk membrane has been punctured several times first. The pressure could otherwise cause the egg yolk to explode.
After cooking
Be careful when removing dishes from the appliance. They may be hot.
Although heat is not normally produced in the cookware itself by the microwaves (apart from stoneware), heat is transferred from the food to the container, which can cause the cookware to become hot.
Allow food to stand at room temperature for a few minutes (standing time) after cooking so that the heat can spread evenly throughout the food and so that a consistent temperature is reached.
Do not refreeze partially or fully defrosted food. Consume defrosted food as soon as possible, as it will lose its nutritional value and spoil if left for too long. Defrosted food may only be refrozen after it has been cooked.
Select the following microwave power settings to defrost food:
– 80 W for defrosting very delicate food, such as cream, butter, cream cakes and cheese.
– 150 W for defrosting all other foods.
Remove the frozen food from its packaging and place in a microwavesafe container. Do not cover. Turn, stir or separate the food about halfway through the defrosting time.
To defrost meat, unpack the frozen meat and place it on an overturned plate in a glass or porcelain container so that the meat juice can drip off and be collected. Turn from time to time during defrosting.
When defrosting poultry, be sure to strictly observe food hygiene rules. Do not use the liquid from the defrosted poultry.
Risk of salmonella poisoning! Always follow USDA guidelines on food safety.
Deep-frozen food can be defrosted and immediately reheated or cooked.
After defrosting, select 900 W and then 450 W.
Remove the food from its packaging and place in a covered microwave-safe container for defrosting and reheating or cooking. Exception: Ground beef should be left uncovered while cooking.
Foods containing large amounts of liquid, such as soups and vegetables, should be stirred several times during the process. Carefully separate and turn slices of meat halfway through. Turn pieces of fish at the halfway mark.
After defrosting followed by reheating or cooking
Allow the food to stand at room temperature for a few minutes so that the heat can spread evenly throughout the food.
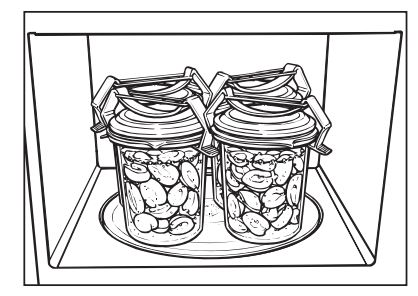
You can use the microwave to can small amounts of fruit, vegetables and meat in glass jars. Prepare the items as you normally would.
Do not fill the jars more than 1" (2.5 cm) below the rim.
Only use clear adhesive tape or microwave-safe clips to close the jars.
Never use metal clips or jars with screw-on lids.
Do not use metal cans. When cans are used, excess pressure is produced which may cause the cans to explode. Risk of injury and damage!
For best results, use no more than four 1 pint (1/2 - -liter) jars at a time when canning. Place the jars on the turntable.
Set the power level to 900 W and bring the jar contents to a boil. The amount of time required for this depends on:
– The initial temperature of the contents.
– The number of jars.
The amount of time required for the contents in all jars to start bubbling evenly is as follows:
1 jar. . . . . . . . . . . . . . approx. 3 minutes
2 jars ............. approx. 6 minutes
3 jars ............. approx. 9 minutes
4 jars ............ approx. 12 minutes
This is enough time for canning fruit and cucumbers.
For vegetables, reduce the power to 450 W once the contents start bubbling.
Cook
- Carrots for approx. 15 minutes
- Peas for approx. 25 minutes.
After canning
Remove jars from the oven interior, cover with a towel and leave to set in a location protected from drafts for approx. 24 hours.
Remove the clips or the adhesive tape and make sure that all glasses are sealed properly
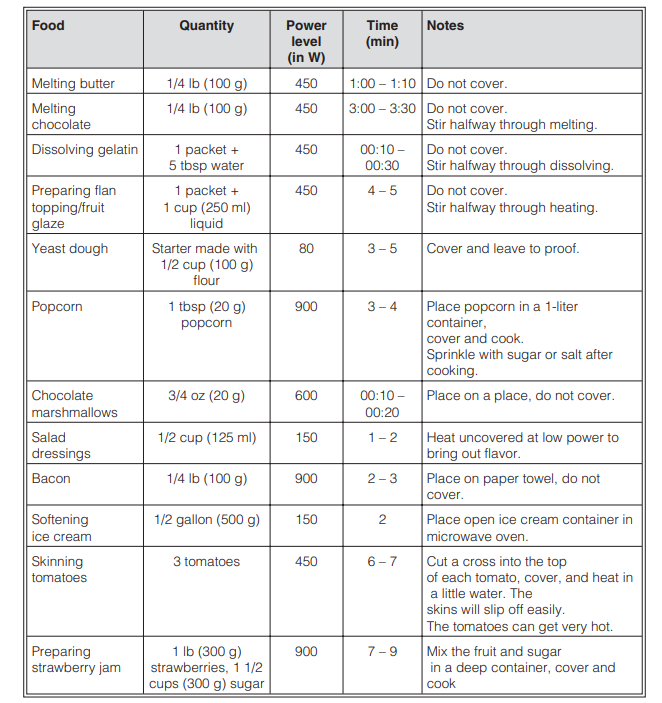
The information provided in this chart is intended as a guide only.
One favorite program can be saved into memory. This program can be used for your most frequently cooked recipe. The program can have up to 3 stages (for example: 2 minutes at 600 W, followed by 10 minutes at 450 W, and finally 3 minutes at 300 W).
(The example given is for a three-stage program.)
After the third step, you can use the "M" button to scroll through your entry and check it.
If there is no food in the appliance, press the Stop/C button twice as soon as you have started the program to prevent the appliance from being damaged.
One- and two-stage programs can be saved in the same way. The programming process is completed by moving the power selector to the 12 o'clock position and then pressing the Start button. Pressing the M button shows the next stage.
Changing an entry
Using the favorite program
If there is a loss of power, the program will no longer be saved and must be reentered.
Some of the appliance's factory default settings can be changed if desired.
See the chart on the following page for the different options available. The original factory settings are marked in the chart with a star*.
To change a setting, proceed as follows:
 and "M" buttons at the same time until
  and
and  appear in the display. Then release them. If you press them for too long, the time of day will appear again in the display.
 to
to  and
and  ). Turn it until the desired setting shows in the display.
 and
and  , press and hold the "M" button for approx. 4 seconds).
The change is then saved to the memory.  will appear in the display again, together with the number for the setting.
The other settings can be changed in the same way.
Changes to the settings remain saved during a power outage.

Do not use a steam-cleaner to clean the microwave oven.
Steam can reach the live electrical components of the appliance and cause a short circuit.
WARNING: The oven interior can get hot during use. Burn hazard! Clean the appliance interior as soon as the microwave has cooled down. Waiting too long can make cleaning unnecessarily difficult and, in extreme cases, impossible. Under certain conditions, heavy grease and grime can damage the appliance and even be dangerous. Fire hazard!
The oven interior and inside of the door can be cleaned using a damp cloth with a mild cleaner or liquid dish soap mixed with water. Wipe dry with a soft cloth.
For grease and grime, heat a glass of water for 2 to 3 minutes until the water begins to boil. The steam will collect on the walls and soften the buildup. The oven interior can now be wiped clean (with a liquid dish soap if necessary).
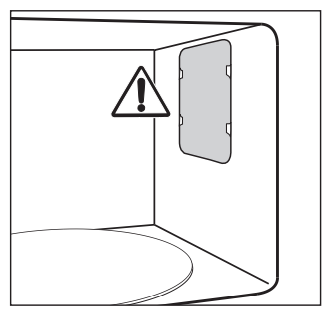
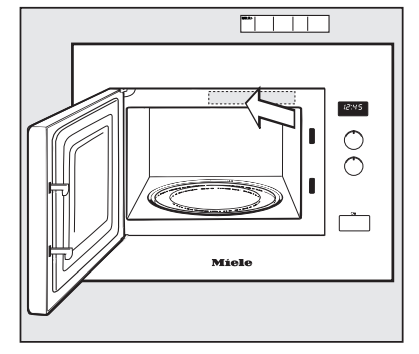
Do not remove the plate cover to the microwave outlet in the oven interior or the film that covers the inside of the door.
Do not let water or any objects penetrate the vents in the appliance.
Wring out cloths before using them to wipe out the oven interior to prevent moisture from getting into the openings.
Do not use abrasive cleaners, since these will scratch the appliance surfaces.
To neutralize odors in the microwave oven, put a cup of water with some lemon juice in the oven interior and heat for a few minutes, or until boiling.
The door should be kept clean at all times and checked at regular intervals for any signs of damage.
WARNING: If you notice any damage to the door, do not use the appliance until the defect has been repaired by a Miele authorized technician.
To clean the oven interior:
Do not turn the support manually, as this could damage the drive motor.
Do not let water or any object get into or block the air vents in the door frame.
It is best to remove any grease and grime on the appliance front immediately.
If it remains on the surface for a longer period of time, it may become impossible to remove, causing the surfaces to discolor or change.
Clean the front with a clean sponge and a solution of hot water and dish soap. After cleaning, dry the front with a soft cloth.
A clean, damp microfiber cloth can also be used without cleaner.
All of the appliance surfaces are easily scratched. Scratches on glass surfaces may even lead to breakage under certain conditions. Contact with unsuitable cleaners can alter or discolor the surfaces.
To avoid damaging the surfaces when cleaning, do not use any of the following:
– Cleaning products containing soda, ammonia, acid or chloride
– Lime removers
– Abrasive cleaning products, such as scouring powder, scouring liquid, or pumice stones
– Cleaners containing solvents
– Stainless steel cleaners
– Dishwasher cleaner
– Oven sprays
– Glass cleaners
– Hard, abrasive sponges and brushes, such as pot scrubbers
– Eraser sponges
– Sharp metal scrapers
Boiling stick
The boiling stick is dishwasher safe.
Plate cover
Wash and dry the plate cover after each use.
The plate cover can be washed in a dishwasher. However, discoloration caused by natural dyes, e.g. from carrots, tomatoes or ketchup, may occur.
This discoloration is permanent but will not affect the stability of the cover.