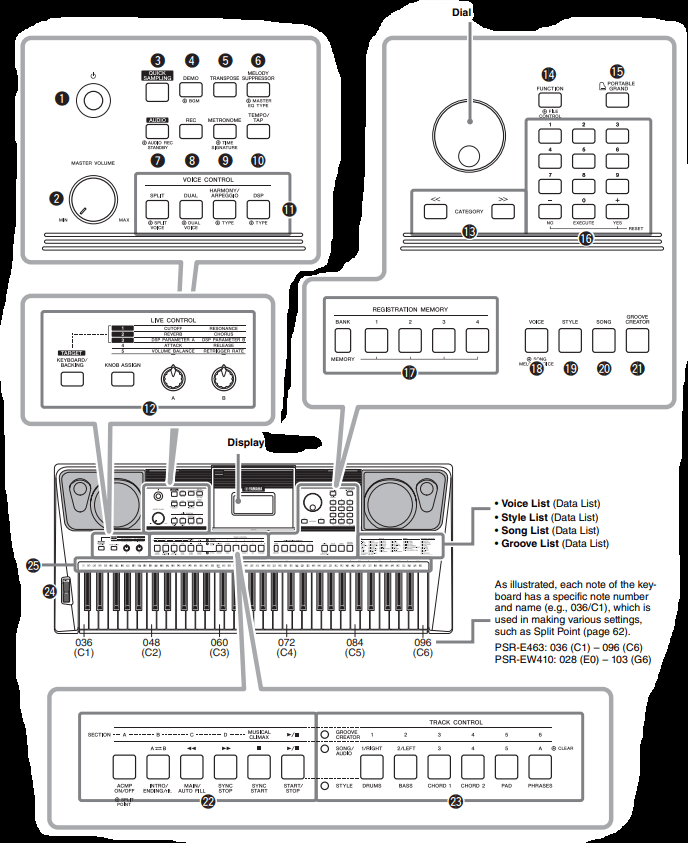
These indicate the drum or percussion instrument assigned to the corresponding keys (in the case of “Standard Kit 1,” shown in the Drum/SFX Kit List of the online material Data List).
Rear Panel
26. OUTPUT [L/L+R]/[R] jacks (PSR-EW410)
27. [SUSTAIN] jack
28. [PHONES/OUTPUT] jack (PSR-E463), [PHONES] jack (PSR-EW410)
29. [AUX IN] jack
30. [USB TO DEVICE] terminal, [USB TO HOST] terminal
31. DC IN jack
Panel Setup (Panel Settings)
By using the controls on the panel, you can make various settings as described here. These settings of the instrument are together referred to as “panel setup” or “panel settings” in this manual.
BASIC OPERATION AND DISPLAY ITEMS
Basic Operation
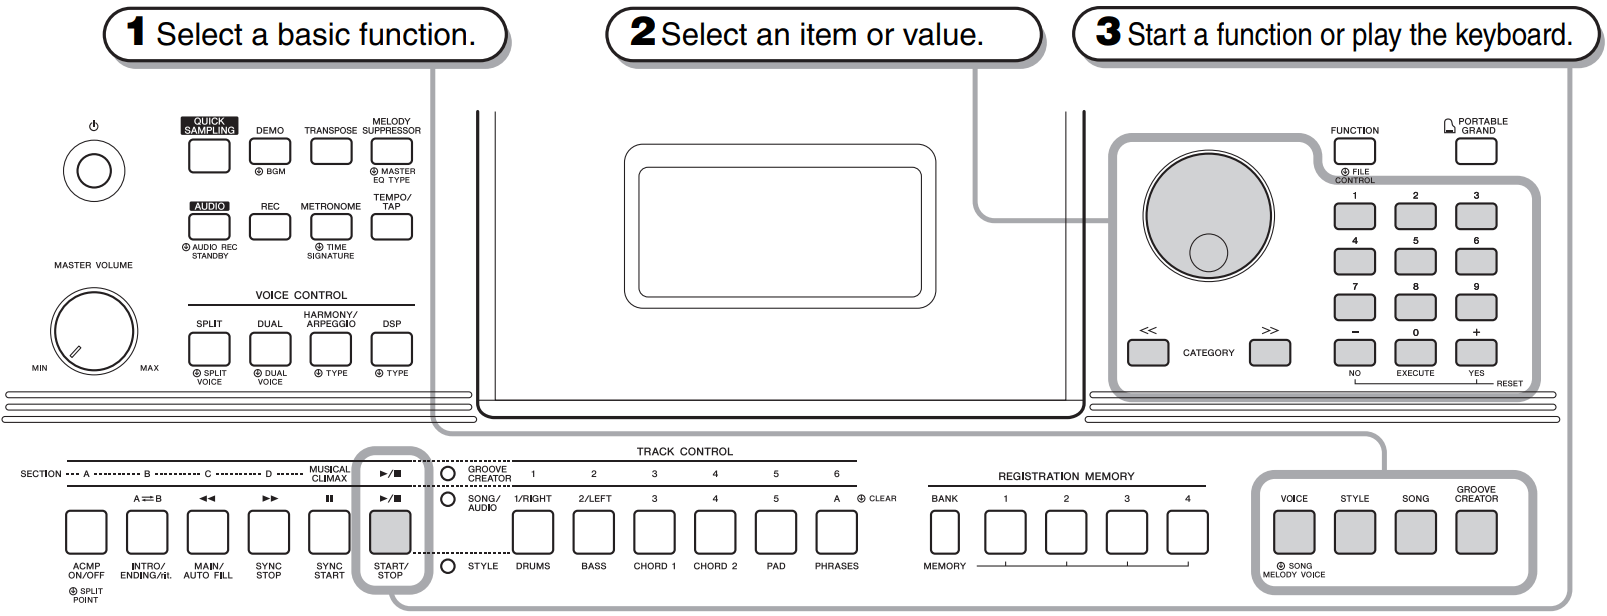
This instrument features four basic functions: Voice, Style, Song and Groove Creator. To use this instrument, select a basic function first, and then make various settings.
Select a basic function.
Select an item or value.
Start a function or play the keyboard.
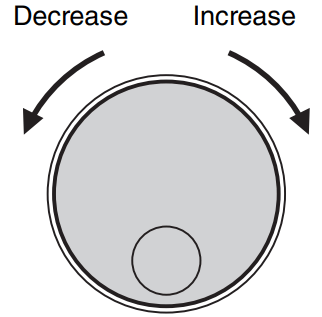
Dial
Rotate the dial clockwise to increase the value of the selected item, or counter-clockwise to decrease it’s value.
* In most procedures described throughout this manual, the dial is used for selecting items or changing values. Note however, that in most cases in which the dial can be used to change values, the [+/YES] and [-/NO] buttons can also be used.
CATEGORY [<<], [>>] buttons
When selecting a Voice, Style, Groove, Song, etc., you can use these buttons to jump to the first item in the next or previous cate- Jumps to gory.
These buttons can also be used to select function items sequentially after pressing the [FUNC- TION] button.
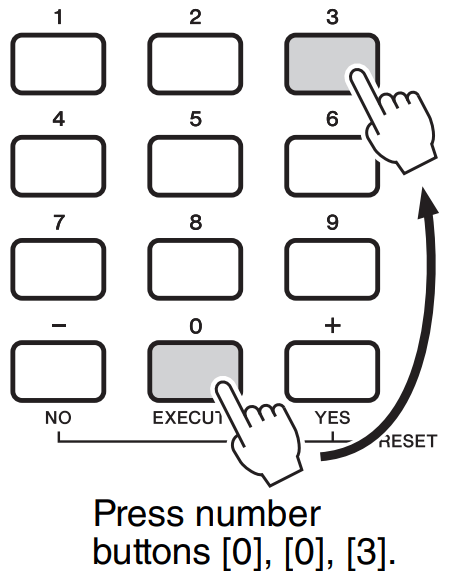
Number buttons [0]–[9]
Use these buttons to directly enter the desired Style/ Voice number etc, or a parameter value.
Example: Selecting Voice 003, Bright Piano.
[+/YES], [-/NO] buttons
Press the [+/YES] button briefly to increase the value by 1, or press the [-/NO] button briefly to decrease the value by 1. Press and hold either button to continuously increase or decrease the value in the corresponding direction.
Pressing both buttons simultaneously lets you reset a parameter to the default value.
Depending on the basic function selected in step 1, you can use the different functions as printed on the panel. Song functions are printed above the buttons, Groove Creator functions are printed further above, and Style functions are printed below.
The “Press & Hold” Symbol
Buttons having this indication can be used to call up an alternate function when the relevant
button is pressed and held. Hold down this button until the function calls up.
Display Items
Power source status.
Indicates the source from which this instrument obtains power: AC adaptor or batteries
USB connection status
Appears when a USB flash drive is connected to this instrument
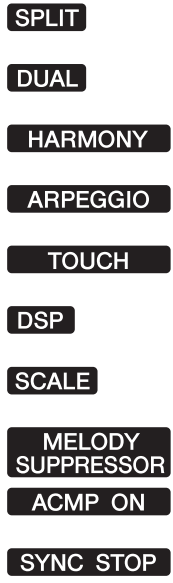
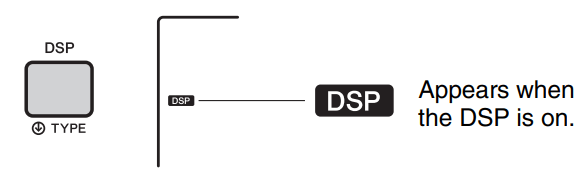
On/off status
This area indicates the on/off status of each function. Each indication is shown when the corresponding function is turned on.
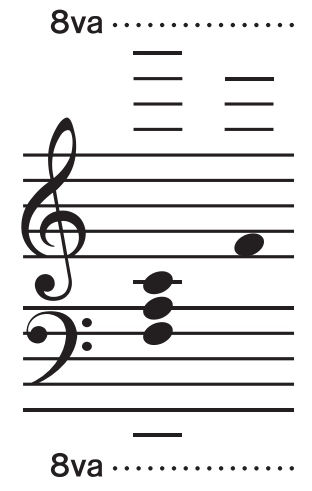
Notation
Normally this indicates the notes you play.
NOTE
Any notes occurring below or above the staff are indicated by “8va.”
For a few specific chords, not all notes may be shown, due to space limitations in the display.
Mode
Indicates that Audio Mode is enabled, allowing you to play back or record audio files from/to a USB flash drive.
Indicates that the Quick Sampling mode is enabled, allowing you to sample sounds from an external audio device.
Sample Zone status
Indicates the assign status of the Sample feature. When a Sample type is set to Loop, () is displayed.
Beat
Indicates the current beat of playback
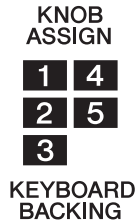
Knob assignment
Indicates the parameters and target currently assigned to the knobs
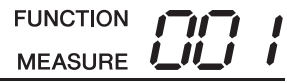
FUNCTION and MEASURE
Indicates the Function number when the [FUNC- TION] button is pressed, or the current Measure number during playback of a Song, Style or Groove.
Chord
Indicates the chord which is being played in the Auto Accompaniment range or specified via Song playback.
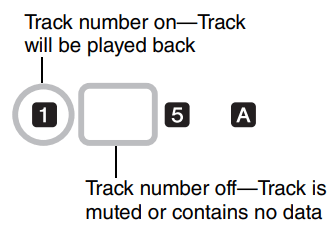
Track status
Indicates the on/off status of the current Song, Style or Groove
PLAYING A VARIETY OF INSTRUMENT VOICES
This instrument features various instrumental Voices including piano. Not only can you play just one single Voice (Main Voice), but you can also layer a different Voice (Dual Voice) to the Main Voice, or play a different Voice (Split Voice) in the left-hand area of the keyboard from the right-hand area.
Selecting a Main Voice
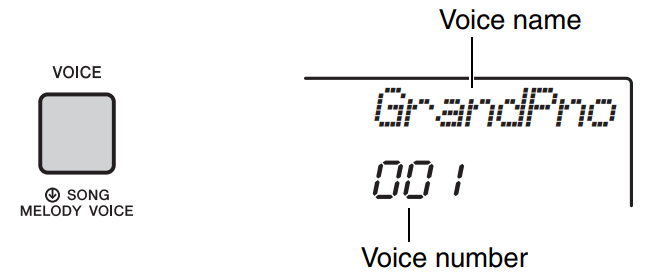
1. Press the [VOICE] button
The Voice number and name will be shown. For a list of available Voices, refer to the Voice List in the separate Data List.
NOTE •Voice number 001 on the PSR-EW410 is “Live! Grand Piano.”
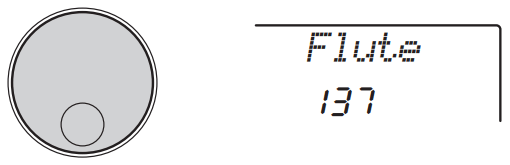
2. Use the dial to select the desired Voice
3. Play the keyboard
Preset Voice Type
001–237
Instrument Voices.
238–261
(Drum/SFX Kit)
Various drum/percussion or SFX sounds are assigned to individual keys. Details on assigning instruments to keys are provided in the Drum/ SFX Kit List of the separate Data List.
262–301
Used for Arpeggio performance
302–758
XGlite Voices.
759
Sample Voice.
000
Selecting this automatically calls up the most suitable Voice and panel setups for the current Style, Song or Groove. This function is called OTS.
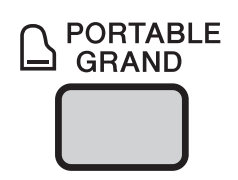
Playing the “Grand Piano”
When you want to reset various settings to their defaults and simply play a Piano sound, press the [PORTABLE GRAND] button.
The Voice for the entire keyboard will be set to 001 “Grand Piano” (PSR-E463)/ or “Live! Grand Piano” (PSR-EW410).
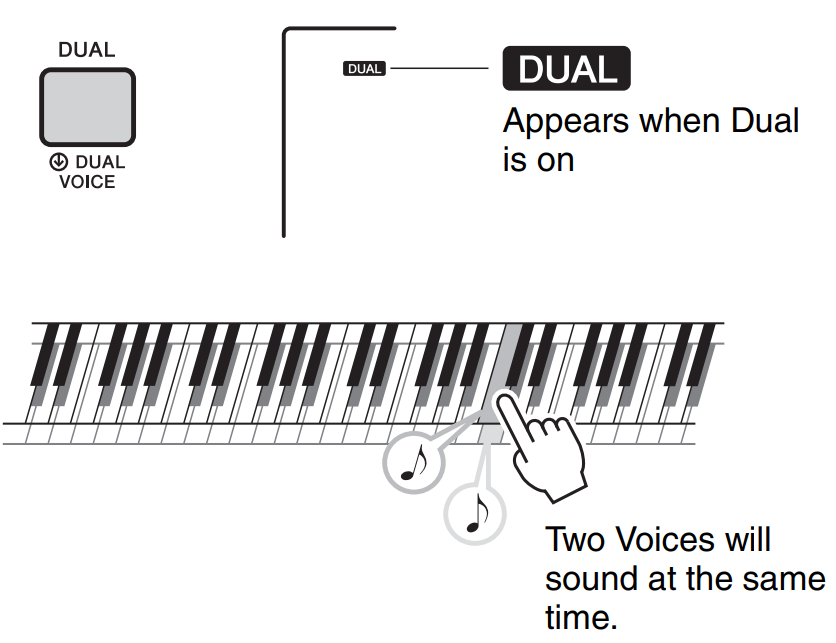
Layering a Dual Voice
In addition to the Main Voice, you can layer a second, different Voice over the entire keyboard as a “Dual Voice.”
1. Press the [DUAL] button to turn Dual on
2. Press the [DUAL] button again to exit from Dual.
Although turning on Dual will select a Dual Voice suitable for the current Main Voice, you can also select a different Dual Voice.
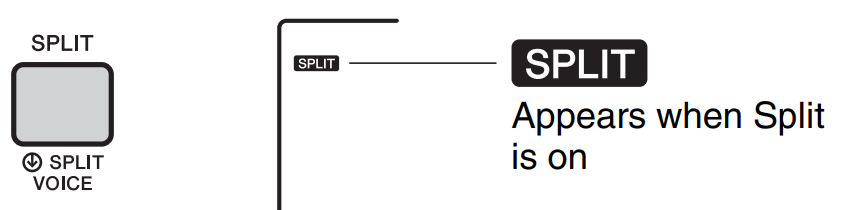
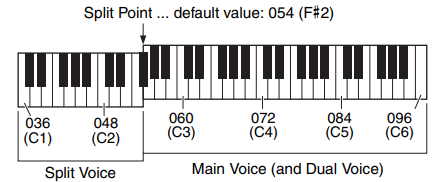
Playing a Split Voice in the Left Hand area
By dividing the keyboard into two separate areas, you can play a different Voice between the Left hand and Right hand areas.
1. Press the [SPLIT] button to turn Split on.
The keyboard is divided into left and right-hand area at the Split Point. You can play a Split Voice on the left hand area while playing a Main Voice and Dual Voice on the right hand area of the keyboard .
The Split Voice and the Split Point can be changed as desired.
2. Press the [SPLIT] button again to exit from Split.
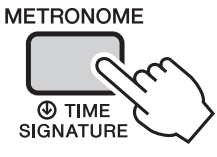
Using the Metronome
This instrument features a built-in metronome which can be used when practicing.
1. Press the [METRONOME] button to start the metronome.
2. Press the [METRONOME] button again to stop the metronome.
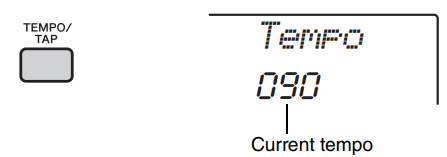
Adjusting the Metronome Tempo
This operation lets you adjust not only the metronome tempo, but also the tempo of Style, Song and Groove.
1. Press the [TEMPO/TAP] button to call up “Tempo.”
The current tempo is shown on the display.
2. Adjust the tempo by rotating the dial
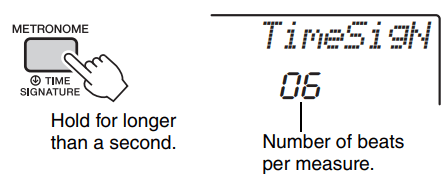
Setting the Time Signature
This operation lets you change the time signature from the default value. In this example, we’ll set a time signature of 6/8.
1. Hold down the [METRONOME] button for longer than a second to call up “Time- SigN” (Time Signature Numerator).
The number of beats per measure is shown on the display.
2. Rotate the dial to select the number of beats per measure.
A chime will sound on the first beat of each measure while a click sounds the other beats. If “0” is selected, a click sounds for all beats with no chime accent. Select 6 for this example.
NOTE
•This parameter cannot be set during playback of a Style, Song or Groove.
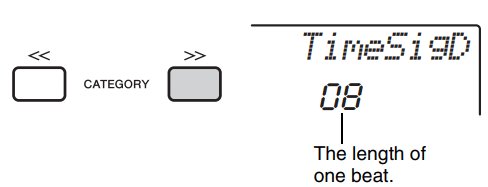
3. Press the CATEGORY [>>] button once to call up “TimeSigD” (Time Signature Denominator).
The length of one beat is shown on the display.
4. Rotate the dial to select the length of one beat, from 2nd, 4th, 8th and 16th note values.
Select “08” (8th note) for this example.
5. Confirm the setting by playing the Metronome.
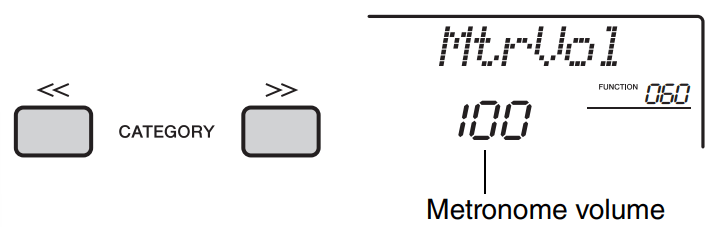
Setting the Metronome Volume
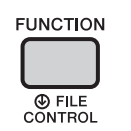
1. Press the [FUNCTION] button
2. Use the CATEGORY [<<] and [>>] buttons to call up “MtrVol” (Function 060).
3. Rotate the dial to set the volume.
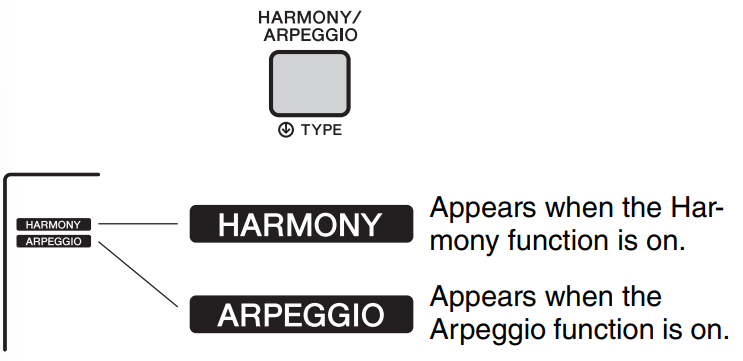
Adding Harmony/Triggering Arpeggios
You can add effects such as Harmony, Tremolo and Echo to the Main Voice. For a list of the effects, refer to the Harmony Type List in the online material Data List.
1. Press the [HARMONY/AGPEGGIO] button to turn Harmony or Arpeggios on. The HARMONY or ARPEGGIO icon appears on the display and the Harmony effect or the Arpeggio function are turned on.
Although turning on the Harmony or the Arpeggio will select a Harmony type or an Arpeggio type suitable for the current Main Voice, you can select a different Harmony type or Arpeggio type.
2. Press a note or notes to add a Harmony or trigger an Arpeggio.
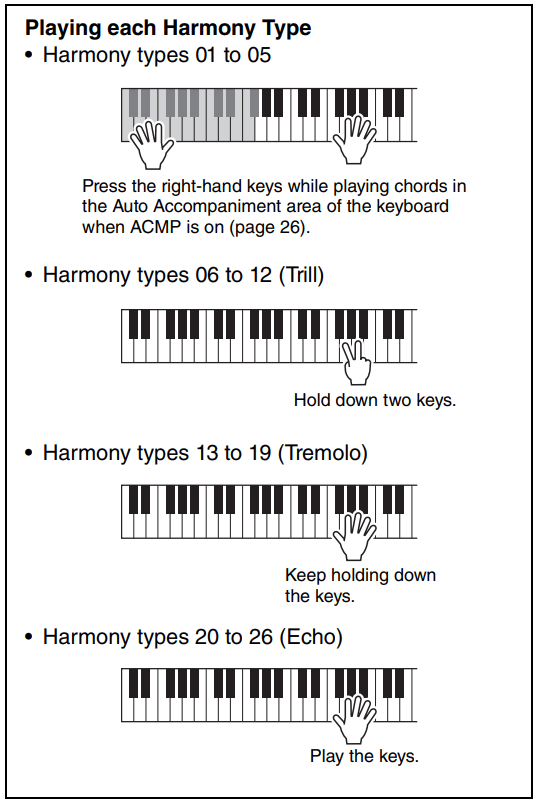
The operation differs depending on the Harmony type. Try playing the keyboard by referring to “Playing each Harmony Type” (see next page), and the Harmony Type List on online material Data List.
The Arpeggio phrase differs depending on the number of pressed notes and the area of the keyboard.
3. Press the [HARMONY/ARPEGGIO] button again to turn the Harmony or Arpeggio off.
NOTE
When Split is on, Arpeggio is applied only to the Split Voice. When Split is off, Arpeggio is applied to the Main and Dual Voices. Arpeggio cannot be applied to the Split and Main/Dual Voices simultaneously.
Selecting a Voice number between 292 and 301 will turn on Split automatically, as well as Arpeggio. When one of those Voices is selected, Arpeggio is applied only to the Split Voice and is triggered only by playing a key to the left of the Split Point.
By assigning the Arpeggio Hold function to the foot- switch, the Arpeggio will continue to play after the note is released
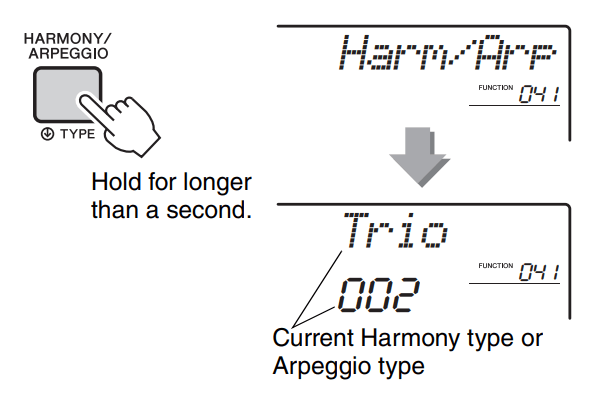
Changing the Harmony and Arpeggio types
1. Hold down the [HARMONY/ARPEGGIO] button for longer than a second.
After “Harm/Arp” (Function 041) appears on the display, the current Harmony type or Arpeggio type appears.
2. Rotate the dial to select the desired Harmony type or Arpeggio type.
NOTE
001 to 026 are Harmony types. 027 to 176 are Arpeggio types. Refer to the Harmony Type List / Arpeggio Type List on web material Data List.
When playing one of the Arpeggio types 143 or later, select a Drum Kit (Voice No.238–261) as the Main Voice.
Adjusting the Harmony Volume
You can adjust the Harmony volume in the Function Settings (Function 042).
Adjusting the Arpeggio Velocity
You can adjust the Arpeggio velocity in the Function Setting (Function 043).
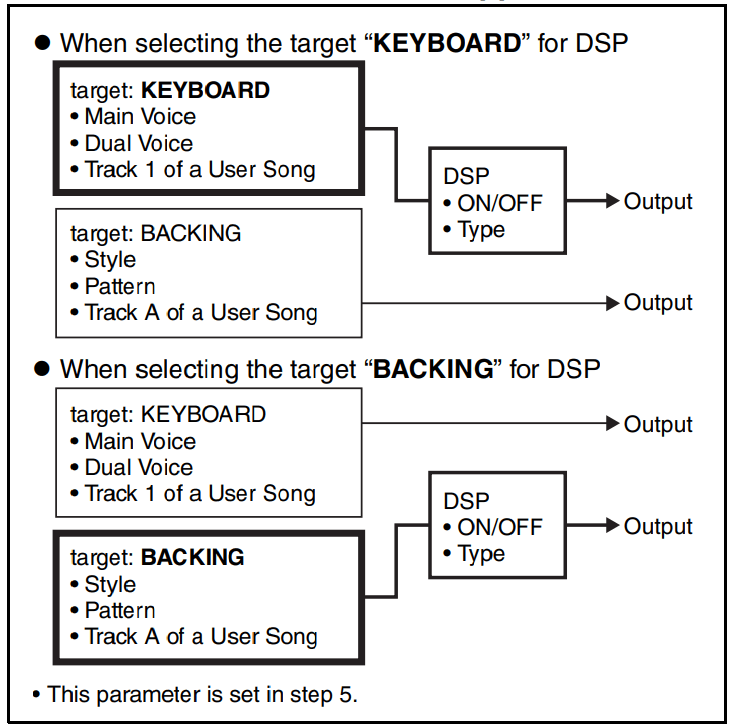
Adding DSP Effects
DSP is an abbreviation for Digital Signal Processor, and provides effects that enhance the sound. DSP effects are applied only to a specified target as described below.
Parts to which DSP effects are applied
1. Press the [DSP] button to turn DSP on.
Although turning on DSP will select a DSP type suitable for the current panel setting, you can select a different DSP type as described in the following steps.
2. Hold down the [DSP] button for longer than a second to call up “DSP Type” (Function 040).
After a few seconds, the current DSP type appears.
3. Rotate the dial to select a DSP type. For information about the available DSP types, refer to the Effect Type List in the Data List.
4. Press [KNOB ASSING] button to select
5. Press the [TARGET] button and select the target.
When KEYBOARD is selected, the DSP affects the Main Voice, Dual Voice or track 1 of a User Song. When BACKING is selected, it affects the Style, Groove Creator or track A of a User Song.
6. Press the [DSP] button again to turn DSP off
Limitations when recording a Song
DSP effects can be recorded only to Tracks 1 and A.
The DSP type and target cannot be changed while recording.
When recording to an existing User Song, if the target to which the DSP effects are applied differs from the recording tracks, DSP-related setting data (DSP target, type, parameter A/B) will not be recorded or overwritten.
The DSP effects may not be applied as expected when a User Song is being played back. This is because the DSP effects are affected by the data recorded to the User Song.
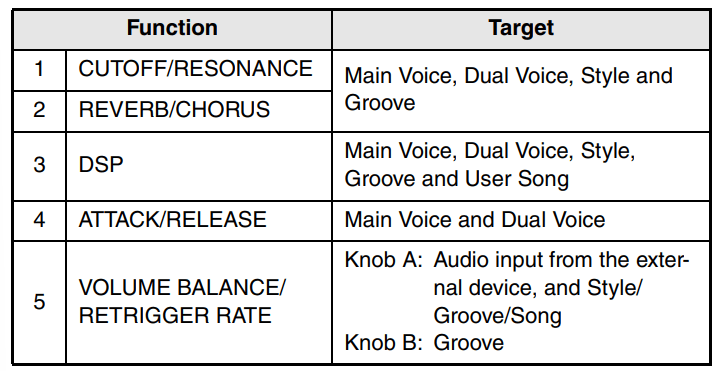
CREATING ORIGINAL SOUNDS VIA THE KNOBS
Assigning Functions to the Knobs
Repeatedly press the [KNOB ASSIGN] button to sequentially assign the function combinations pro- vided: … etc. The current combination is shown in the display.
The target differs depending on the selected number.
NOTE
Only selecting a function combination will not affect the sound even if the knob arrow is not at the center position. The selected function only works when the knob is moved.
Depending on the panel settings or how you move the knob, you may not notice any change to the parameter value, or you may hear a noise, or the knob may not work properly, even if you rotate it.
Switching the Target
Press the [TARGET] button to switch the target controlled with the knobs. The current target is shown in the display.
KEYBOARD: Main Voice, Dual Voice and User Song (only Function 3)
BACKING: Style, Groove and User Song (only Function 3)
NOTE
The target differs depending on the selected function.
The target is memorized for each function.
Using the Knobs
Here is an example of how to use the knobs. For some other ideas for using the knobs, refer to page 58.
Select the desired Main Voice.
Here, select Voice No.156 “SquareLD” (Square Lead) as a synth-lead type Voice.
Press the [KNOB ASSIGN] button several times until appears in the display.
Press the [TARGET] button to switch the target to KEYBOARD.
Rotate knob B all the way to the right (maximum), then play the keyboard with your right hand while operating the knob A with your left.
NOTICE
After selecting by pressing the [KNOB ASSIGN] button, changing the Voice will replace the settings created via the knobs with the default settings of the new Voice.
If you want to keep the settings you have created, make sure to memorize it to Registration Memory before selecting a different Voice.
NOTE Rotating a knob to the right while the volume is set to a high level may result in distortion. If this occurs, reduce the volume level.
PLAYING STYLES
This instrument includes an Auto Accompaniment feature that plays appropriate “Styles” (rhythm + bass + chord accompaniment). You can select from a huge variety of Styles covering a wide range of musical genres.
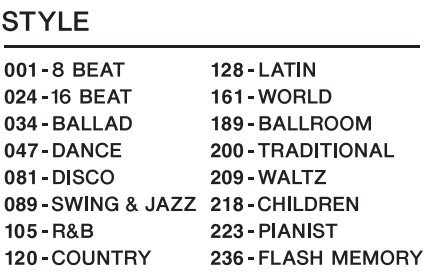
1. Press the [STYLE] button, then use the dial to select the desired Style.
For the Style List, refer to the online material Data List.
NOTE •Press the CATEGORY [<<][>>]button to change the musical genre. Refer to the Style List at the top of the panel.
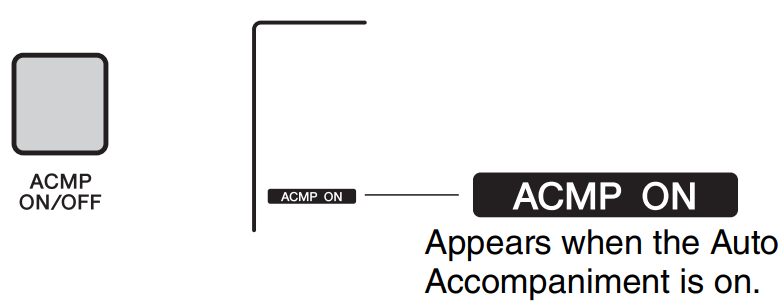
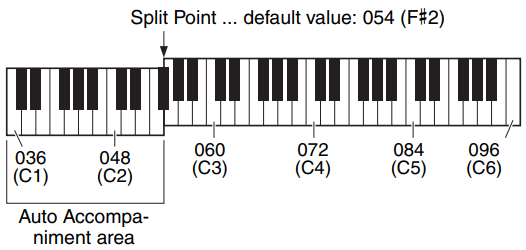
2. Press the [ACMP ON/OFF] button to turn on the Auto Accompaniment (ACMP).
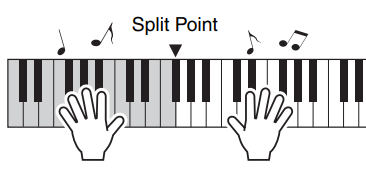
With this operation, the area of the keyboard to the left of the Split Point becomes the “Auto Accompaniment area” and is used only for specifying the chords. The rhythm part as well as the bass and chord accompaniment play back when you play chords.
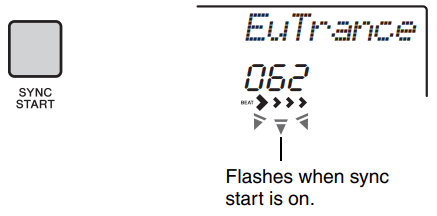
This puts the Style playback in “standby” and Style starts playing back when you play the keyboard.
3. Press the [SYNC START] button to turn Synchro Start on.
4. Play a chord in the Auto Accompaniment area to start playback.
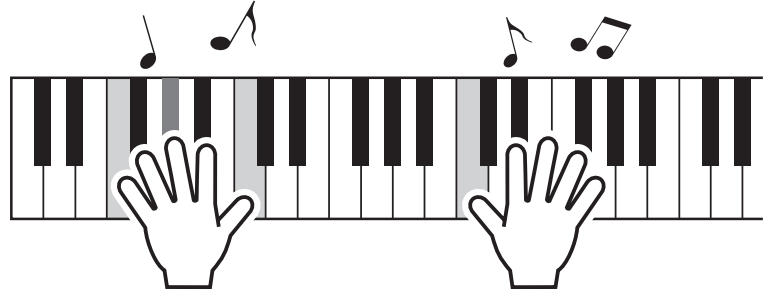
Play a melody with the right hand and chords with the left hand.
5. Press the [START/STOP] button to stop playback.
You can easily add variations to your performance by changing the section of the Style. For details.
PLAYING SONGS
This instrument can play Preset Songs, Songs you recorded on this instrument, or commercially available Songs. In addition to listening to these Songs, you can play the keyboard along with the Song as it plays back.
MIDI Data
A MIDI Song is comprised of your keyboard performance information and is not a recording of the actual sound
itself. The performance information refers to which keys are played, at what timing, and at what strength—just as in a musical score. Based on the recorded performance information, the tone generator (of the Clavinova, etc.) outputs the corresponding sound. A MIDI Song uses a small amount of data capacity in comparison to an Audio song, and allows you to easily change aspects of the sound, such as Voices used, etc.
NOTE For details on Audio playback and recording.
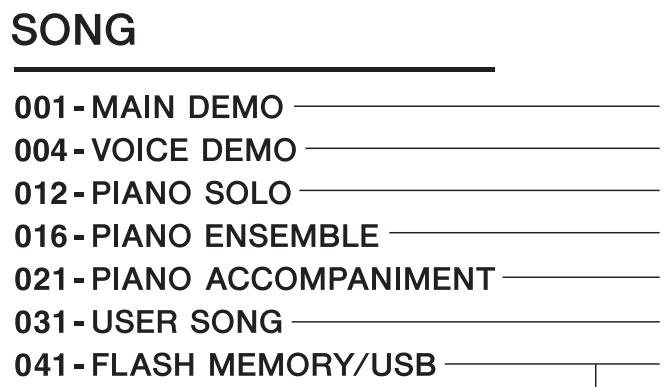
Song Category
The Songs are organized by category as listed below.
Gives you an idea of the advanced capabilities of this instrument.
Demonstrates many useful Voices of this instrument.
Enjoyable piano solo performances.
These songs are piano ensemble pieces. Enjoy the sound of piano and orchestra.
Enjoyable piano accompaniment in a variety of genres.
Songs you’ve record yourself.
FLASH MEMORY: Songs transferred from a computer.
USB: Songs in the USB flash drive.
NOTE
In addition to the 30 preset Songs in this instrument, you can enjoy extra Songs downloadable from the Yamaha website.
For instructions on transferring Songs from a computer to this instrument, refer to the online PDF manual “Computer-related Operations.”
The numbers are generally assigned to the Songs in the following sequence: Songs transferred from a computer, Songs in the USB flash drive. When you transfer a Song from a computer while the USB flash drive is connected to the instrument, the transferred Song will be inserted before the first USB Song number, moving all USB Song numbers later in the sequence.
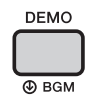
Listening to a Demo Song
Press the [DEMO] button to play Demo Songs 001–003 in sequence. Playback will repeat continuously, starting again from the first Song (001).
To stop playback, press the [DEMO] or [] (Start/ Stop) button.
Hold down the [DEMO] button for longer than a second to use the instrument as a background music source.
Selecting and Playing Back a Song
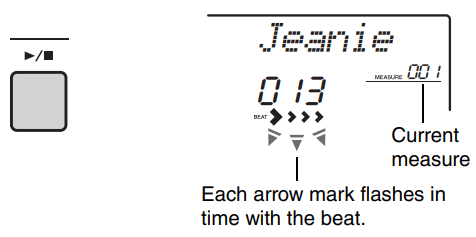
1. Press the [SONG] button, then rotate the dial to select the desired Song.
For a list of available Songs, refer to the Song List in the separate Data List.
You can select User Songs, Songs transferred from a computer, and Songs in the USB flash drive in the same way as above.
NOTE •The selectable Songs are number 4 and later. When selecting the number 1 to 3, press [DEMO] button.
2. Press the [DEMO] or [] (Start/ Stop) button to start playback.
NOTE
External MIDI Songs containing Portamento Control and Scale Tune settings may not be played correctly.
If playback of a Song in the USB flash drive or a Song transferred from a computer produces distorted sound, decrease the Song volume to reduce the distortion, and then adjust the master volume.
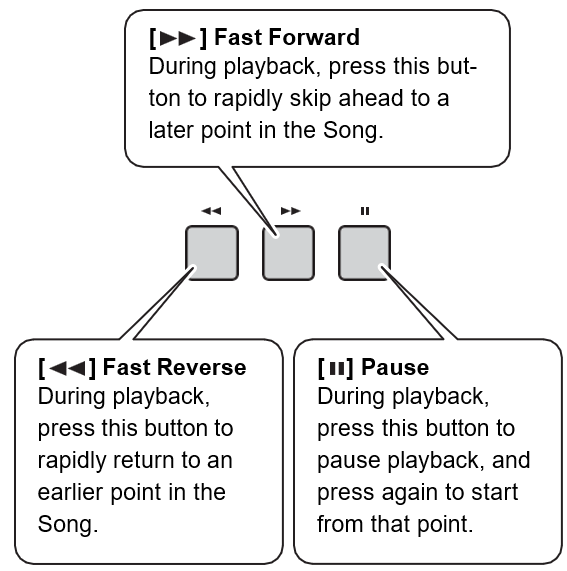
Song Fast Forward, Fast Reverse, and Pause
NOTE
When the A-B repeat is specified, the Fast Reverse and Fast Forward will only work within the range between A and B.
The [], [] and [] buttons cannot be used for Demo Song playback started by using the [DEMO] button.
Playing a Specified Section of a Song Repeatedly (A-B Repeat)
You can play back only a specific section of a Song repeatedly by setting the A point (start point) and B point (end point) in one-measure increments.
1. Start playback of the Song
2. When playback reaches to the point you want to specify as the start point, press the [] (A-B REPEAT) button to set the A point.
3. When playback reaches to the point you want to specify as the end point, press the [] (A-B REPEAT) button again to set the B point.
The specified A-B section of the Song will now play repeatedly.
4. To cancel repeat playback, press the [] (A-B REPEAT) button again.
To stop playback, press the [] (Start/Stop) button.
NOTE
If you want to set start point “A” to the top of the Song, press the [ ] (A-B REPEAT) button before starting playback.
If you want to set end point “B” to the end of the Song, specify only the A point and playback the Song to the end.
Turning Each Track On/Off
Each “track” of a Song plays a different part--melody, percussion, accompaniment, etc. Each of the tracks can be muted so that you can play the muted part yourself. Pressing the desired Track button repeatedly will toggle the on/off status.
The status of each track is shown in the display.
NOTE •Up to two Track buttons can be pressed simultaneously for turning on or off.
AUDIO PLAYBACK AND RECORDING
This instrument allows you to play back audio files and record your performances in audio format. The recorded performance can be saved to a USB flash memory as an audio file.
Audio file
An audio file is a recording of the performed sound itself. This data is recorded in the same way as that used in recording with voice recorders, etc. This data can be played with a portable music player, etc., allowing you to easily let other people hear your performance.
NOTE •This instrument can record or play 44.1kHz/16-bit stereo WAV files.
Playing back an Audio File in a USB Flash Drive
You can playback audio files in a USB flash drive in the Audio mode.
While in the Audio mode, some operations cannot be executed. When you are not playing back or recording audio files, exit from the Audio mode.
NOTE •Do not disconnect the USB flash drive or turn off the power to the instrument during playback. Otherwise, damage to the data may occur.
1. Connect a USB flash drive to the [USB TO DEVICE] terminal.
For details, refer to “Connecting a USB Flash Drive”
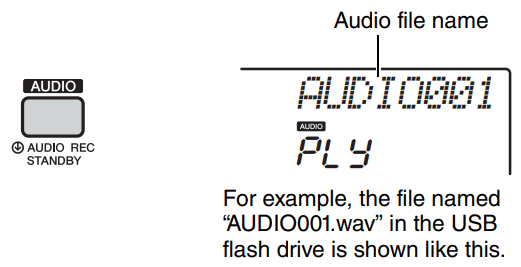
2. Press the [AUDIO] button to enter the Audio mode.
The audio file name, AUDIO icon and “PLY” appear on the display
NOTE •To exit from the Audio mode, press the [AUDIO] button again.
3. Rotate the dial to select the desired audio file.
You can also use the CATEGORY [<<][>>] but- tons, or the [+/YES][-/NO] buttons. To instantly jump to the first audio file, press the [+/YES] and [-/NO] buttons simultaneously.
4. Press the [] ] (Start/Stop) button to start playback of the audio file.
During playback, the time elapsed is shown on the display. To stop playback, press the [] (Start/Stop) button again.
NOTE The following operations cannot be executed for audio playback.
Changing the Voice
A-B Repeat
Turning off “tracks”
Changing the tempo
5. Press the [AUDIO] button to exit from the Audio mode.
Message list
Message
Description
No USB
No USB flash drive is connected.
no file
There is no audio file in the USB flash drive.
Err Load
Cannot load the audio file because the for- mat is not compatible with this instrument.
USB Err
The USB flash drive may have a problem.
Refer to “Compatible USB Device List for PSR-E463/EW410” on the Yamaha website.
Format the USB Flash Drive.
Recording/Saving Audio Files to a USB Flash Drive
You can record your performance and save it as an audio file to the USB flash drive.
IMPORTANT Connect an AC adaptor to use this function.
NOTICE Do not disconnect the USB flash drive or turn off the power to the instrument during recording. Otherwise, damage to the data may occur.
1. Connect a USB flash drive to the [USB TO DEVICE] terminal.
2. Make the desired settings of your performance. Depending on the selected function, the data that can be recorded differs as follows.
When a Style is selected: Style, keyboard performance, audio input from the [AUX IN] jack
When a Song is selected: Keyboard performance, audio input from the [AUX IN] jack
when a Groove Creator is selected: Groove, keyboard performance, audio input from the [AUX IN] jack
NOTE•Data that cannot be recorded includes: the metronome click, Songs, and audio input from the [USB TO HOST] terminal.
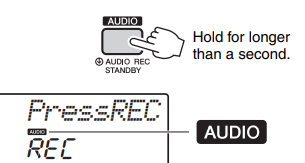
3. Hold the [AUDIO] button for longer than a second to enter the Audio mode (recording standby).
“PressREC” and the AUDIO icon appear on the display. Hold for longer than a second.
NOTE o exit from the Audio mode, press the [AUDIO] button again.
4. Press the [REC] button to start recording.
The elapsed time is shown on the display during recording.
The maximum recording time is 80 minutes or until the memory of the USB flash drive becomes full.
When stopping Style or Groove, press the [] (Start/Stop) button.
5. Press the [REC] button to stop recording.
“Writing!” appears indicating that the recorded data is being stored. After storing, “Complet.” appears, and then the recorded audio file name will be shown as “AUDIO****” (****: number).
NOTICE Never attempt to turn the power off when “Writing!” is shown in the display. Doing so can result in a loss of data.
6.Press the [] (Start/Stop) button to play back the recorded audio file.
.7 Press the [AUDIO] button to exit from the Audio mode.
Message
Description
No USB
No USB flash drive is connected.
UseAdpt
No power is being drawn from batteries. Connect the AC adaptor.
File Ful
The total number of files in the USB flash drive exceeds the capacity. Delete unnecessary data or use another USB flash drive.
Unformat
The USB flash drive is unformatted. Format it
Protect
The USB flash drive is protected. Set write-protect to off and try again.
Time Up
The recording time exceeds 80 minutes. The recording automatically stops and the audio file will be saved.
Disk Ful
Memory has become full. The recording is stopped and the audio file will be saved.
USB Err
The USB flash drive may have a problem.
Refer to “Compatible USB Device List for PSR-E463/EW410” on the Yamaha web- site.
Format the USB Flash Drive.
Deleting Audio Files from the USB Flash Drive
1. Connect a USB flash drive to the [USB TO DEVICE] terminal.
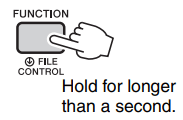
2. Hold the [FUNCTION] button for longer than a second to call up the File Control display.
If the instrument is in the Audio mode, press the [AUDIO] button to exit from the Audio mode, and then execute this operation.
3. Use the CATEGORY [<<] and [>>] buttons to call up “DelAUDIO.”
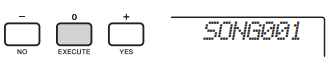
4. Press the [0/EXECUTE] button.
Audio file names in the USB flash drive appear on the display as “AUDIO****” (****: number). Use the dial or the [+/YES][-/NO] button to select a different audio file.
5. Press the [0/EXECUTE] button again. A confirmation message will appear. To cancel the operation, press the [-/NO] button.
6.Press the [0/EXECUTE] button again, or the [+/YES] button to execute the Delete operation.
After a while, a message indicating completion of the operation appears.
NOTICE The Delete operation cannot be canceled during execution. Never turn off the power or disconnect the USB flash drive during the operation. Doing so may result in data loss.
7. Press the [FUNCTION] button to exit from the File Control display.
USB FLASH DRIVE OPERATION
By connecting a USB flash drive (sold separately) to the [USB TO DEVICE] terminal, you can save the data created on this instrument, such as User Song and parameter settings. The saved data can be recalled to this instrument again for future use.
IMPORTANT
•You should use an AC adaptor when executing USB flash drive operations, since battery power may not be reliable enough to last through these crucial operations. When you try executing certain functions, the “UseAdpt” indication may appear and the selected function cannot be executed.
Precautions when using the [USB TO DEVICE] terminal
This instrument features a built-in [USB TO DEVICE] terminal. When connecting a USB device to the terminal, be sure to handle the USB device with care. Follow the important precautions below.
NOTE •For more information about the handling of USB devices, refer to the owner’s manual of the USB device.
Compatible USB devices
USB flash drive
Other USB devices such as a USB hub, computer keyboard or mouse cannot be used.
The instrument does not necessarily support all commercially available USB devices. Yamaha cannot guarantee operation of USB devices that you purchase.
Before purchasing a USB device for use with this instrument, please visit the following web page:https://download.yamaha.com/
Although USB devices 1.1 to 3.0 can be used on this instrument, the amount of time for saving to or loading from the USB device may differ depending on the type of data or the status of the instrument.
NOTE •The rating of the [USB TO DEVICE] terminal is a maximum of 5V/500mA. Do not connect USB devices having a rating above this, since this can cause damage to the instrument itself.
Connecting a USB device
When connecting a USB device to the [USB TO DEVICE] terminal, make sure that the connector on the device is appropriate and that it is connected in the proper direction.
NOTICE
Avoid connecting or disconnecting the USB device while executing playback/recording and file management operations (such as Save, Delete and Format), or when accessing the USB device. Failure to observe this may result in “freezing” of the operation of the instrument or corruption of the USB device and the data.
When connecting then disconnecting the USB device (and vice versa), make sure to wait a few seconds between the two operations.
NOTE
When connecting a USB cable, make sure that the length is less than 3 meters. Do not connect an extension cable.
Using a USB Flash Drive
By connecting the instrument to a USB flash drive, you can save data you’ve created to the connected device, as well as read data from the connected device.
Number of USB flash drives that can be used
Only one USB flash drive can be connected to the [USB TO DEVICE] terminal.
Formatting a USB flash drive
You should format the USB flash drive only with this instrument. A USB flash drive formatted on another device may not operate properly.
NOTICE
The format operation overwrites any previously exist- ing data. Make sure that the USB flash drive you are formatting does not contain important data.
To protect your data (write-protect)
To prevent important data from being inadvertently erased, apply the write-protect provided with each USB flash drive. If you are saving data to the USB flash drive, make sure to disable write-protect.
Turning off the instrument
When turning off the instrument, make sure that the instrument is NOT accessing the USB flash drive by playback/recording or file management (such as during Save, Delete and Format operations). Failure to do so may corrupt the USB flash drive and the data.
Connecting a USB Flash Drive
NOTE
Before using a USB flash drive, be sure to read “Precautions when using the [USB TO DEVICE] terminal”.
Messages may appear on the display during File Control procedures to aid in operation. Refer to the Message List for details.
1. Connect a USB flash drive to the [USB TO DEVICE] terminal, and wait until “USB” appears on the left corner of the display.
The “USB” indication confirms that the connected USB flash drive has been mounted or recognized.
2. Hold down the [FUNCTION] button for longer than a second to call up the File Control display.
If “UnFormat” followed by “Format?” appears:
This indicates that the connected USB flash drive requires formatting. Execute the Format operation by following the instructions starting with step 2.
NOTE The File Control display cannot be called up in the follow- ing situations.
During playback of Style, Groove, Song, Quick Sampling Mode, or Audio mode.
When “USB” does not appear even if you have connected a USB flash drive to the [USB TO DEVICE] terminal.
No sound will be produced if the keyboard is played while the File Control display is showing, and only but- tons related to File Control operations will be active.
3. Use the CATEGORY [<<] and [>>] buttons to call up the desired File Control function, then execute it.
For details, refer to the table on the right.
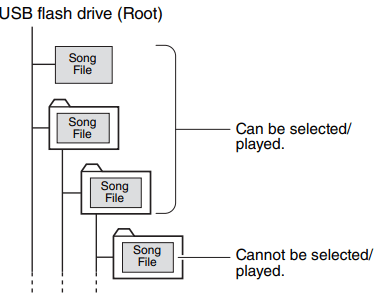
Valid file locations in the USB flash drive for Song playback
IMPORTANT
If you manage the Song files in the USB flash drive by using a computer, etc., make sure to store the data either in the USB flash drive’s root directory or a first-level/second-level folder in the root directory. Data stored in third-level-folders created inside a second-level folder cannot be selected and played by this instrument.
Song title display language
File names containing Japanese katakana characters will only be properly displayed if the instrument’s display language is set to “Japanese.” All display information other than file names will be displayed in English even if “Japanese” is selected. For details, refer to page 69 Function 065 (PSR-E463)/Function 066 (PSR-EW410).
Formatting a USB Flash Drive
The Format operation lets you prepare commercially available USB flash drives for use with this instrument.
NOTICE •The format operation overwrites any previously existing data. Make sure that the USB flash drive you are formatting does not contain important data.
1. Hold the [FUNCTION] button for longer than a second to call up the File Control display.
2. Use the CATEGORY [<<] and [>>] buttons to call up the “Format?” message.
3. Press the [0/EXECUTE] button. A confirmation message will appear. To cancel the operation, press the [-/NO] button.
4. Press the [0/EXECUTE] button again or the [+/YES] button to execute the Format operation.
After a while, a message indicating completion of the operation appears, and the “USER FILES” folder will be created in the USB flash drive.
NOTICE The Format operation cannot be canceled during execution. Never turn off the power or disconnect the USB flash drive during the operation. Doing so may result in data loss.
5. Press the [FUNCTION] button to exit from the File Control display.
Saving User Data to a USB Flash Drive
User data is comprised of the following items.
All 10 User Songs
Styles which have been transferred from a computer and then loaded to Style numbers 221– 230
All Registration Memory settings
The User data can be saved as a single “User File” (.usr) to a USB flash drive.
NOTE
For detail on saving Sample.
The extension (.usr) of the User File will not be shown on the display of this instrument. Confirm the extension on the computer display when connecting the USB flash drive to a computer.
1 Hold the [FUNCTION] button for longer than a second to call up the File Control display.
2. Use the CATEGORY [<<] and [>>] buttons to call up “Save USR.”
3. Press the [0/EXECUTE] button. Target User file names appear on the display as “USER***” (***: number). If desired, rotate the dial to select a different file name from “USER001”– “USER100.”
4. Press the [0/EXECUTE] button again. A confirmation message will appear. To cancel the operation, press the [-/NO] button.
Overwriting existing files
If a file that already contains data is selected as the target user file, “OverWr?” will appear on the display.
5. Press the [0/EXECUTE] button again, or the [+/YES] button to execute the Save operation.
After a while, a message indicating completion of the operation appears, and a User file (.usr) will be saved in a “USER FILES” folder which will automatically be created on the USB flash drive.
NOTICE The Save operation cannot be canceled during execution. Never turn off the power or disconnect the USB flash drive during the operation. Doing so may result in data loss.
NOTE The amount of time required for this operation may vary depending on the condition of the USB flash drive.
6. Press the [FUNCTION] button to exit from the File Control display.
NOTE If you want to recall the User file (.usr) to this instrument again, execute the Load operation.
Saving a User Song as SMF to a USB Flash Drive
A User Song can be converted to SMF (Standard MIDI File) format 0 and saved to a USB flash drive.
SMF (Standard MIDI File) format
With this format, various events via the keyboard performance such as note on/off and Voice selection will be recorded as MIDI data. The SMF Format 0 and Format 1 are available. A large number of MIDI devices are compatible with SMF Format 0, and most commercially available Song files (MIDI files) are provided in SMF Format 0.
NOTE
If the size of a converted SMF is too large, such as a User Song recorded with Groove data, it cannot be played back on this instrument. We recommend using Audio recording.
The DSP effect cannot be converted to SMF format.
The Transpose setting on this instrument is not included in the data.
1. Hold the [FUNCTION] button for longer than a second to call up the File Control display.
2. Use the CATEGORY [<<] and [>>] buttons to call up “Save SMF.”
3. Press the [0/EXECUTE] button.
Target User Song names appear on the display as “USER**” (**: number 1–10). If desired, rotate the dial to select a different User Song from “USER01”–“USER10” then press the [0/EXECUTE] button.
4. Press the [0/EXECUTE] button again.
Target file names on the USB flash drive appear on the display as “USER***” (***: number 1–100). If desired, rotate the dial to select the different file.
5. Press the [0/EXECUTE] button again. A confirmation message will appear. To cancel the operation, press the [-/NO] button.
Overwriting existing files
If a file that already contains data is selected, an overwrite confirmation message will appear.
6. Press the [0/EXECUTE] button again, or the [+/YES] button to execute the Save operation.
After a while, a message indicating completion of the operation appears, and a User Song will be saved (in SMF format 0) to a “USER FILES” folder, automatically created on the USB flash drive.
NOTICE The Save operation cannot be canceled during execution. Never turn off the power or disconnect the USB flash drive during the operation. Doing so may result in data loss.
NOTE
The amount of time required for this operation may vary depending on the condition of the USB flash drive.
If a Groove has been recorded to the User Song, the Save operation cannot be executed by pressing the [0/ EXECUTE] button or the [+/YES] button, and “Can’tUse” appears on the display.
7. Press the [FUNCTION] button to exit from the File Control display.
Loading User Data from a USB Flash Drive
A User data saved as a User file (.usr) to the USB flash drive can be loaded to this instrument.
NOTICE
Loading a User file will overwrite and erase the existing data, including all 10 User Songs, Style data loaded to the Style numbers 236–245, and all the Registration Memory settings. Save important data you want to keep to a separate USB flash drive before loading a User file.
IMPORTANT Note that User files should be saved in the “USER FILES” folder on the USB flash drive. Files saved outside this folder cannot be recognized.
1. Hold the [FUNCTION] button for longer than a second to call up the File Control display.
2. Use the CATEGORY [<<] and [>>] buttons to call up “Load USR.”
3. Press the [0/EXECUTE] button.
User file names on the USB flash drive appear on the display as “USER***” (***: number). As desired, rotate the dial to select a different User file.
4. Press the [0/EXECUTE] button again. A confirmation message will appear. To cancel the operation, press the [-/NO] button.
5. Press the [0/EXECUTE] button again, or the [+/YES] button to execute the Load operation.
After a while, a message indicating completion of the operation appears.
NOTICE
The Load operation cannot be canceled during execution. Never turn off the power or disconnect the USB flash drive during the operation. Doing so may result in data loss.
6. Press the [FUNCTION] button to exit
7. Confirm that the data has been properly loaded by calling up the User Song, one of the Styles 236–245, and/or the Registration Memory settings.
Loading a Style File
Style data created on another instrument or a computer can be loaded to the Style numbers 236–245, and you can play them in the same way as the internal preset Styles. The following two Load operations are available.
Loading of a Style file (.sty) saved on the root directory on the USB flash drive
Loading of a Style file (.sty) transferred from a computer via the Musicsoft Downloader and stored in the internal memory of this instrument
NOTE For instructions on transferring a Style file from a computer via the Musicsoft Downloader, refer to the online PDF manual “Computer-related Operations.” After data transfer, load the Style data to one of the Style numbers 236–245 to enable playback.
NOTICE Loading a Style file will overwrite and erase the existing data of the destination number. Save important data you want to keep to a separate USB flash drive before loading.
1. Hold the [FUNCTION] button for longer than a second to call up the File Control display.
2. Use the CATEGORY [<<] and [>>] buttons to call up the “Load STY” message.
3. Press the [0/EXECUTE] button.
The name of a Style file in the USB flash drive or internal memory of this instrument will appear on the display. If desired, rotate the dial to select a different Style file.
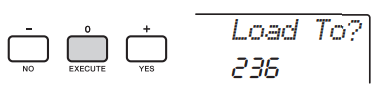
4. Press the [0/EXECUTE] button again.
“Load To? ***” (***: 236–245) appears on the di play as the Load destination. If desired, rotate the dial to select a different number.
5. Press the [0/EXECUTE] button again.
A confirmation message will appear. To cancel the operation, press the [-/NO] button.
6. Press the [0/EXECUTE] button again, or the [+/YES] button to execute the Load operation.
After a while, a message indicating completion of the operation appears.
NOTICE The Load operation cannot be canceled during execution. Never turn off the power or disconnect the USB flash drive during the operation. Doing so may result in data loss.
7. Press the [STYLE] button, rotate the dial to select a Style from 236–245, and then try playing it back.
Deleting a User File in the USB Flash Drive
User Files (.usr) in the root directory of the USB flash drive can be deleted.
IMPORTANT Only User files (.usr) saved in the “USER FILES” folder on the USB flash drive can be deleted. Files outside this folder cannot be recognized.
1. Hold the [FUNCTION] button for longer than a second to call up the File Control display.
2. Use the CATEGORY [<<] and [>>] buttons to call up the “Del USR” message.
3. Press the [0/EXECUTE] button. User file names in the USB flash drive appear on the display as “USER****” (****: number). If desired, rotate the dial to select a different User file.
4. Press the [0/EXECUTE] button again.
A confirmation message will appear. To cancel the operation, press the [-/NO] button.
5. Press the [0/EXECUTE] button again, or the [+/YES] button to execute the Delete operation.
After a while, a message indicating completion of the operation appears.
NOTICE The Delete operation cannot be canceled during execution. Never turn off the power or disconnect the USB flash drive during the operation. Doing so may result in data loss.
6. Press the [FUNCTION] button to exit from the File Control display.
Deleting an SMF File in the USB Flash Drive
You can delete a SMF file that has been saved in the USB flash drive via the Save SMF operation.
IMPORTANT Only SMF files (.mid) saved in the “USER FILES” folder on the USB flash drive can be deleted. Files outside this folder cannot be recognized. This operation applies only to file names having the format “SONG***” (***: 001–100).
1. Hold the [FUNCTION] button for longer than a second to call up the File Control display.
2. Use the CATEGORY [<<] and [>>] buttons to call up “Del SMF.”
3. Press the [0/EXECUTE] button. SMF file names in the USB flash drive appear on the display as “SONG****” (****: number). If desired, rotate the dial to select a different SMF file.
4. Press the [0/EXECUTE] button again. A confirmation message will appear. To cancel the operation, press the [-/NO] button.
5. Press the [0/EXECUTE] button again, or the [+/YES] button to execute the Delete operation.
After a while, a message indicating completion of the operation appears.
NOTICE The Delete operation cannot be canceled during execution. Never turn off the power or disconnect the USB flash drive during the operation. Doing so may result in data loss.
6. Press the [FUNCTION] button to exit from the File Control display.
Exiting from a File Control Display
To exit from the File Control display, press the [FUNCTION], [VOICE], [STYLE], [SONG] or [GROOVE CREATOR] button.
You can also exit from the File Control function mode as follows:
1. Use the CATEGORY [<<] and [>>] buttons to call up the “Exit?” message.
2. Press the [0/EXECUTE] button to exit from the File Control display
Message List
Message
Comment
Can’tUse
Indicates that the file control function is currently unavailable since the USB flash drive is being accessed.
Complet.
Indicates completion of the corresponding operation, such as data saving or transmission.
Data Err
Displayed when the user song contains invalid data.
Disk Ful
Displayed when saving data cannot be executed since the memory has become full. Delete any unnecessary data or use another USB flash drive.
Error
Displayed when a file error or operational error occurs.
File Ful
Displayed when saving of data cannot be executed because the total number of files exceeds the capacity. Delete any unnecessary data or use another USB flash drive.
no data
There is no data in the memory.
no file
There is no file in the memory.
Ovr (Flashes)
Communication with the USB flash drive has been shut down because of overcurrent to the USB flash drive. Disconnect the USB flash drive from the [USB TO DEVICE] terminal, then turn on the power of the instrument.
Protect
Displayed when trying to save or delete data on a protected USB flash drive, or formatting a protected USB flash drive. Set protect to off and try again.
UnFormat
Displayed when connecting an unformat- ted USB flash drive.
UseAdpt
USB flash drive save, delete, and format operations cannot be performed when the instrument is being powered from battery. Use an AC adaptor.
TROUBLESHOOTING
Problem
Possible Cause and Solution
When the instrument is turned on or off, a popping sound is temporarily produced.
This is normal and indicates that the instrument is receiving electrical power.
When the instrument is turned on, power is turned off suddenly and unexpectedly.
This is normal. If an AC adaptor other than the one specified is used, power may be turned off suddenly and unexpectedly.
When using a mobile phone, noise is produced
Using a mobile phone in close proximity to the instrument may produce interference. To prevent this, turn off the mobile phone or use it further away from the instrument
The instrument is automatically turned off even if no operation is done.
This is normal. This occurs due to the Auto Power Off function
The volume is too soft.
The sound quality is poor.
The Style/Groove/Song/Arpeggio stops unexpectedly or will not play.
The recorded data of the song, etc. does not play correctly.
The LCD display suddenly goes dark, and all panel settings are reset.
The instrument turns off when a USB flash drive is connected.
The batteries are low or dead. Replace all six batteries with completely new ones or completely recharged ones, or use the AC adaptor.
No sound is produced even when the keyboard is played, or a Song, Style, or Groove is being played back.
Check whether a set of headphones or an audio cable is connected to the [PHONES/OUTPUT], or not. When such a connection is made, no sound is output from the speaker of this instrument.
(PSR-EW410) Check the on/off status of the Speaker Mute setting. Make sure to set to OFF.
Check the on/off status of the Local Control (page 68). Normally, set this parameter to ON.
The footswitch (for sustain) seems to produce the opposite effect. For example, pressing the footswitch cuts off the sound and releasing it sustains the sounds.
The polarity of the footswitch is reversed. Make sure that the foot-switch plug is properly connected to the SUSTAIN jack before turning on the power.
Not all of the Voices seem to sound, or the sound seems to be cut off, when playing the keyboard, Arpeggio, Style or Song or Groove Creator.
Yo u have exceeded 48 simultaneous notes, which is the maximum polyphony (the maximum amount of notes that can be played simultaneously) of this instrument. If the Main, Dual, and Split Voices are being used along with playback of Arpeggio, Style, Groove or Song, some notes/sounds may be omitted (or “stolen”).
The sound of the Voice changes from note to note.
This is normal. The tone generation method uses multiple recordings (samples) of an instrument across the range of the keyboard; thus, the actual sound of the Voice may be slightly different from note to note.
The keyboard performance and playback of Style/Song/ Groove Creator produces an unexpected or inappropriate sound, and cannot be restored to the normal status.
Using the Knobs can produce dramatic changes in the sound, but may also produce unexpected or undesired sounds. If you want to restore the original, normal sound before being changed by the Knobs, press the [DSP] button to turn DSP off, change the Voice, Style, Groove or Song, or press the [PORTABLE GRAND] button to reset the panel settings.
The Style, Song or Groove Creator does not start even when the [START/STOP] button is pressed. The Arpeggio does not start even when the note is pressed with the Arpeggio turned on.
Check the on/off status of the External Clock Normally, set this parameter to OFF.
The volume of the Style, Song or Groove Creator is too low.
Check the volume setting in the Functions
The chords played in the left hand area cannot be recognized even when ACMP is turned on.
Check the Split Point setting. Set this to an appropriate value.
Style parts other than the Rhythm part produce no sound.
Check the on/off status of the ACMP. Make sure to turn ACMP on.
The ACMP indicator does not appear on the display when the [ACMP ON/OFF] button is pressed.
Check the on/off status of the [STYLE] lamp. When using a Style, press the [STYLE] button to turn on the [STYLE] lamp.
YES , the manual of this E463 keyboard clearly states that it supports EASY CHORD mode (which is what others call Single Fingered) All Yamaha keyboard support EASY CHORD without the need for any setup (CASIO keyboard need setup for this).
#3 Does this keyboard have a Play Along feature, where you can connect an external music source and play with that track?
Yes, it has a 3.5mm aux in jack where you can connect an external audio source to play along with.
 ] (Standby/On) switch
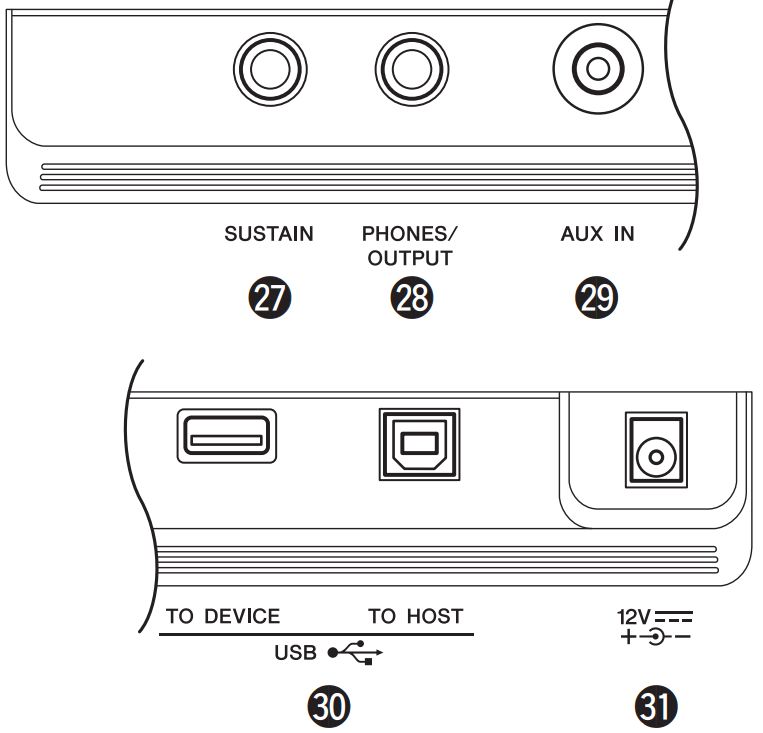


 Buttons having this indication can be used to call up an alternate function when the relevant


 ) is displayed.


 … etc. The current combination is shown in the display.
 appears in the display.
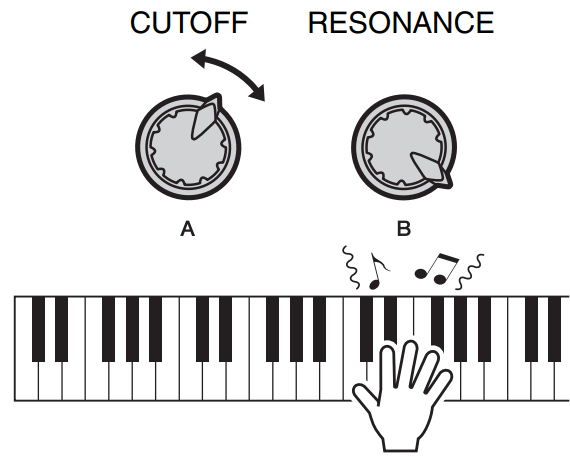
 by pressing the [KNOB ASSIGN] button, changing the Voice will replace the settings created via the knobs with the default settings of the new Voice.
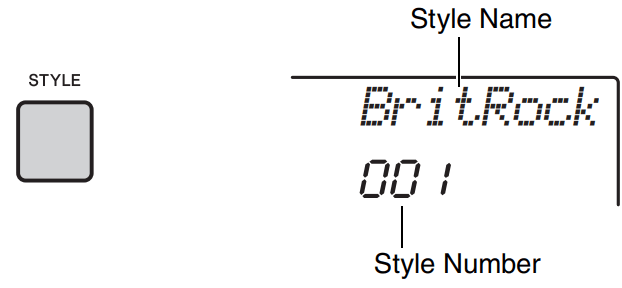

 ] (Start/ Stop) button.
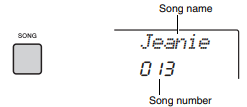
 ], [
], [ ] and [
 ] buttons cannot be used for Demo Song playback started by using the [DEMO] button.
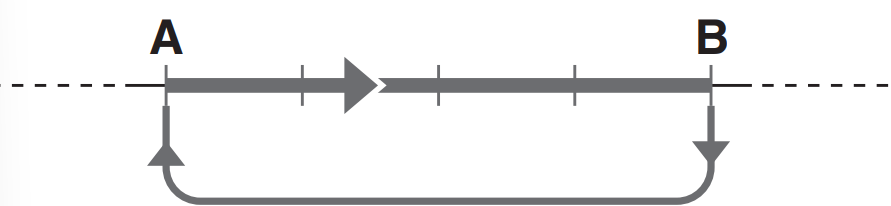
 ] (A-B REPEAT) button to set the A point.
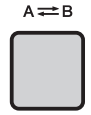
 ] (Start/Stop) button.
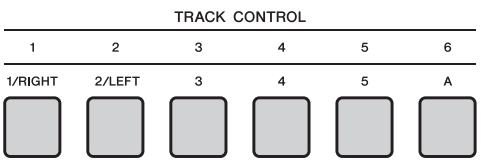

 ] (Start/Stop) button.