Use and care manual 2L CAPACITY AIR FRYER
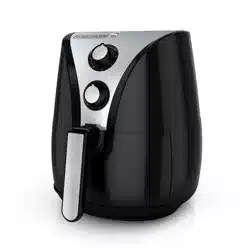
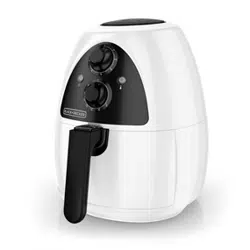
FEATURES
Product may vary slightly from what is illustrated.
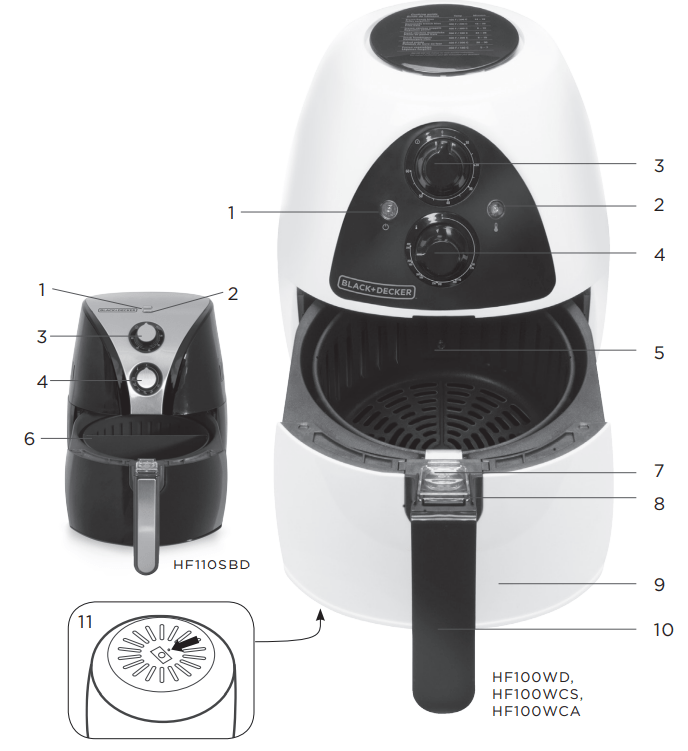
- Power indicator light
- Preheat indicator light
- 60-minute Timer (Part# HF100-04 White / Part# HF110-04 Black )
- Temperature control knob (Part# HF100-05 White / Part# HF110-05 Black )
- 2L capacity basket (Part# HF100WD-02 White / Part# HF110SBD-02 Black)
- Basket separator (Part# HF100-03)
- Basket release button
- Release button cover
- Pan (Part# HF100WD-01 White / Part# HF110SBD-01 Black)
- Cool-touch handle
- Reset button
IMPORTANT SAFEGUARDS.
- Read all instructions before using.
- Never touch the inside of the appliance or other hot surfaces during operation.
- To protect against electrical shock, never immerse the housing in water, rinse housing under the tap, or let other liquids enter the appliance.
- Only operate the appliance on a flat, even and stable surface.
- Always put the foods to be fried in the basket to prevent them from coming in direct contact with the heating elements.
- Do not cover the air inlet and the air outlet openings while the appliance is operating.
- Do not fill the pan with oil as this many cause a fire hazard.
- Turn the unit off (O) and unplug from outlet when not in use and before cleaning. Allow approx. 30 minutes to cool before putting on or taking off parts.
- Do not operate any appliance with a damaged cord or plug, or after the appliance malfunctions or has been damaged in any manner. Contact the consumer support number listed in this manual.
- The use of any other accessory attachments or containers is not recommended by the appliance manufacturer and may cause injuries.
- Do not use outdoors.
- Do not plug in the appliance or operate the control panel with wet hands.
- Do not let cord hang over edge of the table or counter, or touch hot surfaces.
- Do not place on or near hot gas or electric burner, or in a heated oven.
- Extreme caution must be used when moving an appliance containing hot oil or other hot liquids.
- To disconnect, turn timer to off (O), then unplug from wall outlet.
- Do not use appliance for other than intended use.
- Do not let the appliance operate unattended.
- Use extreme caution when removing basket or disposing of hot grease. • Do not clean with metal scouring pads. Pieces can break off the pad and touch electrical parts, creating risk of electric shock.
- Oversize foods and metal utensils must not be inserted into the machine, as they may create a fire or risk of electric shock.
- A fire may occur if the appliance is covered or touching flammable materials including curtains, draperies, walls and the like, when in operation. Do not store any item on top of or touching the unit when in operation. Leave at least 4 inches (10 cm) free space on the back and sides of the appliance.
- Do not store any material, other than the manufacturer’s recommended accessories, in this appliance when not in use.
- Do not place any of the following materials in the appliance: paper, cardboard, plastic, and the like.
- Do not cover any part of this appliance with metal foil. This will cause overheating of the appliance.
- During hot air frying, hot steam is released through the air outlet openings. Keep hands and face at a safe distance from the steam and from the air outlet openings. Also, be careful of hot steam and air when you remove the pan from the appliance.
- Immediately turn the timer to off (O) and unplug the appliance if you see dark smoke coming out of the appliance. Wait for the smoke emissions to stop before you remove the pan from the appliance.
- Do not leave the appliance unattended when in operation. Food ignition may occur. If this happens, turn the timer to off (O) and unplug the unit but DO NOT open it. To reduce the risk of fire, keep oven interior completely clean and free of food residues, oil, grease and any other combustible materials.
- Condensation may form at the bottom of the appliance during the cooking process. Only operate on surfaces that are water resistant.”
- This appliance is not intended for use by persons (including children) with reduced physical, sensory or mental capabilities, or lack of experience and knowledge, unless they have been given supervision or instruction concerning use of the appliance by a person responsible for their safety.
- Children should be supervised to ensure that they do not play with the appliance.
- The appliance is not intended to be operated by means of an external timer or separate remotecontrol system.
OVERHEATING PROTECTION
This appliance is equipped with an overheating protection system. If the inner temperature control system malfunctions, the overheating protection system is automatically turned on and the appliance cannot be used. After this occurs, unplug the appliance, remove the food, and allow at least 30 minutes for the appliance to cool
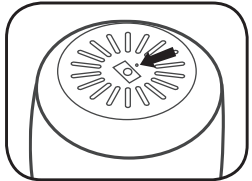
Only after the appliance has been left to cool down completely, while on a stable surface, carefully turn the appliance on its side to access the bottom. Locate the “RESET” button on the bottom (see image) and using a pointed object, press the “RESET” button and hold two seconds to return to normal operation. After this is done, the air fryer is operational again.
AUTOMATIC OFF-SWITCH
- This appliance is equipped with a timer. Once the timer has counted down to off (O), a bell will sound and the appliance will turn off automatically. To turn the appliance off manually, simply turn the timer knob counterclockwise to off (O) until you hear the bell sound.
- As a safety feature, this appliance will shut off power if the pan is removed, even partially, during cooking. The timer will continue to count down but the cooking functions will not operate. To resume cooking, insert the pan back into the appliance. Rapid heat technology instantly reheats the appliance if you open it, so pulling the pan out briefly will not drastically disturb the process.
POLARIZED PLUG (120V models only)
- This appliance has a polarized plug (one blade is wider than the other). To reduce the risk of electric shock, this plug is intended to fit into a polarized outlet only one way. If the plug does not fit fully into the outlet, reverse the plug. If it still does not fit, contact a qualified electrician. Do not attempt to modify the plug in any way.
TAMPER-RESISTANT SCREW
- Warning: This appliance is equipped with a tamper-resistant screw to prevent removal of the outer cover. To reduce the risk of fire or electric shock, do not attempt to remove the outer cover. There are no user-serviceable parts inside. Repair should be done only by authorized service personnel.
ELECTRICAL CORD
- A short power-supply cord is provided to reduce the risk resulting from becoming entangled in or tripping over a longer cord.
- If a long detachable power-supply cord or extension cord is used,
- The marked electrical rating of the extension cord should be at least as great as the electrical rating of the appliance,
- The appliance is of the grounded type, the extension cord should be a grounding-type 3-wire cord, and
- The longer cord should be arranged so that it will not drape over the countertop or tabletop where it can be pulled on by children or tripped over unintentionally. Note: If the power cord is damaged, please contact the warranty department listed in these instructions.
BEFORE FIRST USE & PREPARING FOR USE
- Remove all packaging materials.
- Remove any stickers or labels from the appliance.
- Please visit www.prodprotect.com/applica to register the appliance.
- Wash all removable parts as instructed in care and cleaning section.
- Choose a location appropriate for the device. Make sure there is enough space around the appliance to prevent heat damage to cabinets or counters.
- Always place on a stable, flat and level surface.
- Slide the pan into the machine until it clicks into place. The appliance will not work unless the pan is properly inserted.
- Plug the unit into electrical outlet.
USING THE APPLIANCE
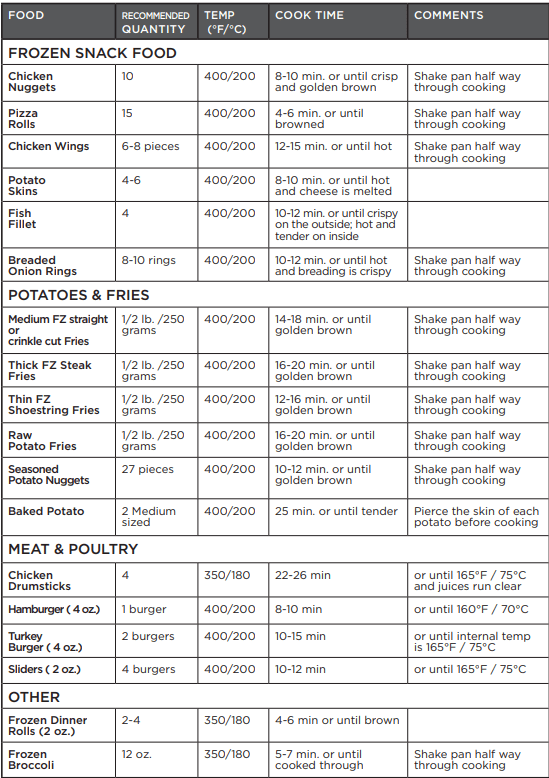
The air fryer can prepare a large range of foods, please refer to the “Cooking Guide” table for additional cooking instructions.
- Plug the appliance into an electrical outlet.
- Turn the temperature control knob to the required temperature.
- To switch the appliance on, turn the timer knob to 20 (twenty) and then to desired cooking time, plus an additional 3-5 minutes for preheat. The power and heating lights will illuminate.
- Once the heating light is not longer illuminated, the appliance is preheated to the set temperature.
- To remove the pan, carefully push the release button cover on the handle forward with your thumb while pulling the handle back to remove the basket.
- Once the basket is out, make sure to cover the Basket Release button by pulling the release button cover back over it to prevent accidental release of the basket from the pan.
- Place the food in the basket and slide the pan back into the air fryer properly. You will hear a click when the pan locks into place. If the pan is not inserted properly, the appliance will not operate.
- Some foods require shaking halfway through the cooking process. To shake foods, pull the pan out of the appliance by the handle and gently shake. Then slide the pan back into the air fryer and continue to cook. Do not press the Release Button on the handle while shaking the pan.
- When you hear the timer bell, the set cooking time has finished. Pull the pan out of the appliance and place it on a heat resistant surface and check if the foods are ready. If not, simply put back into the appliance and set the time for a few extra minutes.
- When the food is ready, push the clear tab forward on the handle, press the basket release button and lift the basket out of the pan. Empty basket of food into serving bowl or plate. For larger or fragile items, use tongs to lift the food out of the basket.
- Once the food has been removed from the appliance, the fryer is ready for another batch.
- If you want to cook two items at the same time, place the basket separator in the center of the basket to divide foods and prevent the flavors from mixing.
COOKING TIPS
- To reduce the weight, you can remove the basket from the pan and shake the basket only. To do so, pull the pan out of the appliance, place it on a heat-resistant surface and press the Release Button on the handle to release the basket.
- If you set the timer to half the preparation time, you then will hear the timer bell when you have to shake the food. Then just set the time again for the remaining cook time
- You can pull out the pan at any time to check on the food. The power will automatically shut off while the pan is out and resume when the pan is placed back in. The timer will continue to countdown while the pan is out. Rapid heat technology instantly reheats the appliance if you open it, so pulling the pan out briefly will not drastically disturb the process.
- Smaller ingredients usually require a slightly shorter cook time than larger items.
- A larger amount of food only requires a slightly longer cook time, a smaller amount only requires slightly less.
- Shaking smaller ingredients halfway through the cooking process will optimize the end result and help prevent unevenly fried food.
- Add some oil to lightly coat fresh potatoes for crispy results. Fry your food in the air fryer within a few minute after you’ve added the oil.
- Do not prepare extremely greasy food such as sausages in the air fryer.
- Snacks that can be prepared in an oven can also be prepared in the air fryer.
- The optimal amount for preparing crispy fries is 250 grams (8 oz.).
- You can also use the air fryer for reheating food. Place food in basket and set the temperature to 150˚C (300˚F) for up to 10 minutes.
- Visit foodsafty.gov for more information on safe internal cooking temperatures.
COOKING GUIDE
RECIPES
KALE CHIPS
- 6 cups fresh kale leaves, torn into bite size pieces
- 1/2 Tbsp. olive oil
- 3 grinds of sea salt
- Toss kale with olive oil and salt. Preheat Air Fryer to 160°C (320°F). Place kale in basket. Cook 3-4 min., or until crisp, shaking basket halfway through cooking.
BUFFALO TURKEY BURGERS
- 1 lb, ground turkey
- ¼ cup bread crumbs
- 3-4 green onions, thinly sliced
- ¼ cup Buffalo Wing sauce
- 2 Tbs. crumbled blue cheese In large bowl, mix all ingredients until well blended. Shape into 4 (3.5 inch diameter) patties. Preheat Air Fryer to 200/400°F Place 2 patties into basket; cook 10-15 minutes or until an internal temperature of 165°F Let stand a few minutes before serving. Repeat with remaining patties. Makes 4 servings
TIPS:
- No need to turn patties during cooking
- Serve on buns with lettuce, tomato and mayonnaise or blue cheese dressing if desired.
- For sliders, shape turkey mixture into eight (2 oz.) balls. Flatten slightly. Place four patties in a single layer in fryer basket. Cook at 200/400°F 10-12 min. or until 165°F.
MAKING HOMEMADE FRIES
- Peel the potatoes and cut them into sticks.
- Rinse the potato sticks thoroughly and dry them with paper towel.
- Pour ½ tablespoon of olive oil in a large bowl, put the sticks on top and mix the sticks until they are coated with oil.
- Remove the sticks from the bowl so that excess oil stays in the bowl, and place them in the air fryer basket. Note: Do not pour the bowl with the oil and potato sticks into the basket. This prevents excess oil from ending up on the bottom of the pan.
- Fry the potato sticks according to the instructions in the Cooking Guide Table
CARE AND CLEANING
This product contains no user serviceable parts. Refer service to qualified service personnel. Important: Before cleaning any part, be sure that the appliance is off, unplugged, and cool. Removing the pan after use helps the air fryer cool down more quickly.
- Turn the unit off, unplug the appliance and allow time for the appliance to cool.
- Wipe the outside of the appliance with a moist cloth.
- Clean the pan and the basket with hot soapy water, using a non-abrasive sponge. Note: The basket and separator are dishwasher-safe.
Tip: If residue sticks to the basket or the bottom of the pan, fill the pan with hot water and a small amount of soap. Put the basket in the pan and let them soak for approximately 10 minutes.
- Clean the inside of the appliance with hot water and a non-abrasive sponge.
- Clean the heating element with a non-abrasive sponge to remove any food residues.
NEED HELP?
For service, repair or any questions regarding your appliance, call the appropriate 800 number listed within this section. Please DO NOT return the product to the place of purchase. Also, please DO NOT mail product back to manufacturer, nor bring it to a service center. You may also want to consult the website listed on the cover of this manual.
Two-Year Limited Warranty (Applies only in the United States and Canada)
What does it cover?
- Any defect in material or workmanship provided; however, Spectrum Brands, Inc.’s liability will not exceed the purchase price of product.
For how long?
- Two years from the date of original purchase with proof of purchase.
What will we do to help you?
- Provide you with a reasonably similar replacement product that is either new or factory refurbished.
How do you get service?
- Save your receipt as proof of date of sale.
- Visit the online service website at www.prodprotect.com/applica, or call toll-free 1-800-231-9786, for general warranty service.
- If you need parts or accessories, please call 1-800-738-0245.
What does your warranty not cover?
- Damage from commercial use
- Damage from misuse, abuse or neglect
- Products that have been modified in any way
- Products used or serviced outside the country of purchase
- Glass parts and other accessory items that are packed with the unit
- Shipping and handling costs associated with the replacement of the unit
- Consequential or incidental damages (Please note, however, that some states do not allow the exclusion or limitation of consequential or incidental damages, so this limitation may not apply to you.)
How does state law relate to this warranty?
- This warranty gives you specific legal rights. You may also have other rights that vary from state to state or province to province.