Connect to the Internet to monitor and control your heating/cooling system
View and change your heating/cooling system settings
View and set temperature and schedules
Receive alerts via email and get automatic upgrades
Your new thermostat provides:
Smart Response Technology
Compressor protection
Heat/cool auto changeover
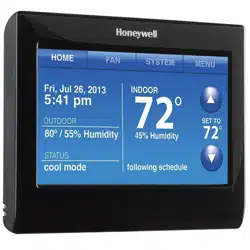
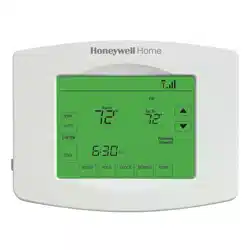
Home screen quick reference
Once your Wi-Fi thermostat is installed, it will display the home screen. Portions of this display will change depending on how you are viewing it. To change settings, simply press the appropriate area lightly with your finger.
Unless you change the lighting function, the screen is always lit at low intensity. When you touch the screen, the screen brightens.
Preset energy-saving schedules
This thermostat is pre-set with energy-saving program settings for four time periods. Using the default settings can reduce your heating/cooling expenses if used as directed. Savings may vary depending on geographic region and usage.
To change the settings, see pages 16–17.
Setting up your thermostat
Setting up your Wi-Fi programmable touchscreen thermostat is easy. It is preprogrammed and ready to go as soon as it is installed and registered.
Install your thermostat.
Connect it to your home wireless network.
Register online for remote access.
Before you begin, you may want to watch a brief installation video. Use the QR Code® at the front of this guide, or go to wifithermostat.com/support
Installation
Installing your thermostat
You might need the following tools to install this thermostat:
No. 2 Phillips screwdriver
Small pocket screwdriver
Pencil
Level (optional)
Drill and bits (3/16” for drywall, 7/32” for plaster) (optional)
Hammer (optional)
Electrical tape (optional)
1. Switch OFF power to your heating/cooling system.
Important! To protect your equipment, switch OFF the power to your heating/ cooling system at the breaker box or the system switch.
2. Remove old thermostat faceplate and leave wires connected.
2a. Take a picture of the wire connections for later reference.
2b. If no wire is connected to a terminal labeled C or no C terminal exists on the old thermostat, view the Alternate Wiring videos at wifithermostat.com/videos
Important! C wire is required and is the primary power source for your thermostat. Without a C wire, your thermostat will not power up
If you have an older thermostat with a sealed mercury tube, turn to page ii for proper disposal instructions.
3. Label wires.
Do not label by wire color. Use the supplied sticky tags to label each wire as you disconnect it. Label wires according to the old thermostat terminal designations, not by wire color.
Note: If no tag matches a terminal designation, write the appropriate letter on a blank sticky tag.
4. Remove wallplate.
Remove the old wallplate from the wall after all wires have been labeled and disconnected.
5. Separate Wi-Fi thermostat and its wallplate.
On your new thermostat, grasp the finger holds on the top and bottom of the wallplate with one hand and the thermostat (front) with the other hand. Pull pieces apart
6. Mount wallplate for Wi-Fi thermostat.
Mount your new wallplate using screws and anchors included with the thermostat.
If necessary:
Drill 3/16-in holes for drywall.
Drill 7/32-in holes for plaster.
Note: You may be able to use your existing wall anchors. Hold the wallplate up to the existing anchors to check for alignment.
Important! The Wi-Fi thermostat requires a C wire to operate. The C, or common, wire brings 24 VAC power to the thermostat. Many older mechanical or battery operated thermostats do not require a C wire. If you don’t have a C wire, try:
Looking for an unused wire that is pushed into the wall. Connect that wire to C and check that it is connected to the 24 VAC common at your heating/cooling system. Check the video section at wifithermostat.com
Note: Not all heating/cooling systems label the 24 VAC common C. Check your system manual or contact the manufacturer to find out which terminal is the 24 VAC common.
View the Alternate Wiring videos at wifithermostat.com/videos
Wiring
For conventional heating/cooling systems (natural gas, oil or electric furnace, air conditioner), see page 6. See “Glossary” on page 27 for further definition.
For a heat pump system, see page 7. See “Glossary” on page 27 for further definition.
Wiring (conventional system)
7A. Wire the Wi-Fi thermostat to your conventional system.
Starting with the C Wire, match the sticky tag on the wire to the terminal labels. You must have a C wire. See page 6.
Loosen screw, insert wire on inside edge of terminal, then tighten screw.
Verify wire is firmly secured by gently pulling on wire.
Repeat steps a–c for all other wires.
Push any excess wire back into the wall opening after all wires are installed.
Continue to page 9.
Labels don’t match? See alternate wiring key on page 7.
7B. Wire Wi-Fi thermostat to your heat pump.
Starting with the C Wire, match the sticky tag on the wire to the terminal labels. You must have a C wire. See page 6.
Loosen screw, insert wire on inside edge of terminal, then tighten screw.
Verify wire is firmly secured by gently pulling on wire.
Repeat steps a–c for all other wires.
Push any excess wire back into the wall opening after all wires are installed.
Continue to page 9
Note: If old thermostat has separate wires on AUX and E, place both wires into the E/AUX terminal. If old thermostat has wire on AUX with a jumper to E, place wire on E/AUX terminal. No jumper is required.
Note: The wiring for your application might be different than the wiring from above.
Alternate wiring (conventional system)
Use this if your wire labels don’t match the terminal labels.
Note: You must have a C wire or equivalent. See page 6.
Alternate wiring key (conventional system)
Remove metal jumper connecting R and RC only if you must connect both R and RC.
If your old thermostat had both R and RH wires, remove metal jumper. Connect the R wire to the RC terminal, and the RH wire to the R terminal.
Do not use K terminal. For future use
Alternate wiring (heat pump system only)
Use this if your wire labels don’t match the terminal labels.
Alternate wiring key (heat pump system only)
Leave metal jumper between R and RC terminals in place.
If your old thermostat had both V and VR wires, check wifithermostat.com for help.
If your old thermostat had separate O and B wires, attach the B wire to the C terminal. If another wire is attached to the C terminal, check wifithermostat.com for help. Attach the O wire to the O/B terminal. Set System Function 0190 to 0 (see page 22). If your old thermostat had an O wire and not a B wire, attach the O wire to the O/B terminal.
If your old thermostat had separate Y1, W1 and W2 wires, check wifithermostat.com for help.
This is the system monitor. If the monitor finds a problem, you will see a red light in the upper right corner of the thermostat (shines through the cover).
If old thermostat has separate wires on AUX and E, place both wires into the E/AUX terminal. If old thermostat has wire on AUX with a jumper to E, place wire on E/AUX terminal. No jumper is required.
Do not use K terminal. For future use.
8. Install battery.
Insert the coin cell battery (included), observing the correct polarity.
Note: A correctly inserted battery will extend about halfway out of the battery slot on the thermostat, allowing for easier removal.
This battery maintains time and date during power outages. It does not power the thermostat (C wire required).
9. Attach thermostat to wallplate.
Align the thermostat to the wallplate and then snap into place.
10. Switch heating/cooling system ON.
Important!
10a. Verify that the C wire is connected at the thermostat and at the heating/cooling system.
10b. Make sure the heating/ cooling system door is firmly secured.
10c. Switch power back ON for your heating/cooling system at the breaker box or its power switch.
11. Set date and time.
Touch or buttons to change displayed time and date.
Press and hold a button to quickly change a setting.
Note:This thermostat will automatically update for daylight saving time (if observed in your area) and all date/time information is stored. If the thermostat is connected to Wi-Fi and registered to Total Connect Comfort, the current time is updated from the internet.
12. Determine your heating/cooling system type.
Important! Heating/cooling system type must be set so that your thermostat operates properly and does not damage your system
12a. If you have a traditional system (natural gas forced air with A/C), your hermostat is set up by default to control this system.
12b. If your system is:
Conventional multistage heat and cool
Any type of heat pump
Hydronic
Other
If you are not sure of your heating/cooling system type or have other questions, go to wifithermostat.com
You MUST change the system type by setting system function 0170. See page 22 to match your thermostat to your system type.
You MUST change the system type by setting system function 0170. See page 22 to match your thermostat to your system type.
13. Test your thermostat.
13a. Press the SYSTEM button to change to heating or cooling and begin operation.
13b. For remote access to your thermostat, continue to “Connecting to your Wi-Fi network” on page 11.
Heating/cooling system not turning on? Refer to page 26 or FAQ at wifithermostat.com/support
Connecting to your Wi-Fi network
To complete this process, you must have a wireless device connected to your home wireless network. Any of these device types will work:
Tablet (recommended)
Laptop (recommended)
Smartphone
If you get stuck... at any point in this procedure, restart the thermostat by removing the thermostat from the wallplate, wait for 5 seconds, and snap it back onto the wallplate. Return to Step 1 in this procedure, which starts on page 11.
View the Wi-Fi Enrollment video at wifithermostat.com/videos
1. Connect to your thermostat.
1a. Make sure the thermostat message center displays Wi-Fi SETUP.
1b. On the wireless device (laptop, tablet, smartphone), view the list of available Wi-Fi networks
1c. Connect to the network called NewThermostat_123456 (the number will vary).
Note: If you are asked to specify a home, public, or office network, select Home Network.
2. Join your home network.
2a. Open your web browser to access the Thermostat Wi-Fi Setup page. The browser should automatically direct you to the correct page; if it does not, go to http://192.168.1.1
2b. Find the name of your home network on this page and select it.
Note: Some routers have enhanced features such as guest networks; use your home network
2c. Complete the instructions for joining your Wi-Fi network and click on the Connect button. (Depending on your network setup, you may see an instruction such as Enter Password for your home network.)
Note: If you did not correctly connect to the thermostat, you may see your home router page. If so, return to Step 1.
Note: If your Wi-Fi network does not appear in the list on the Thermostat Wi-Fi Setup page:
Try performing a network rescan by pressing the Rescan button. This is helpful in areas with a lot of networks.
If you are connecting to a hidden network, then enter the network SSID in the textbox, select the encryption type from the drop down menu, and click on the Add button. This manually adds the network to the top of the list. Click on the new network in the list and enter the password if necessary. Click on Connect to join the network.
3. Make sure your thermostat is connected.
The message center on your thermostat will now display CONNECTING… for up to 30 seconds.
Look at the thermostat display. Verify that the message center displays one of the following: CONNECTION SUCCESSFUL JOINED: [WI-FI NETWORK NAME] YOU ARE ALMOST DONE REGISTER AT TOTAL CONNECT
If you see one of these messages, continue on page 12.
Note: If you see CONNECTION FAILURE or Wi-Fi SETUP in the message center, confirm you correctly entered your home network password in step 2c. If correct, refer to the FAQ at wifithermostat.com/support
Registering your thermostat online
To view and set your Wi-Fi thermostat remotely, you must have a Total Connect Comfort account. Use the following steps.
1. Open the Total Connect Comfort web site. Go to mytotalconnectcomfort.com
View the Wi-Fi Thermostat Registration video at wifithermostat.com/videos
2. Login or create an account.
If you have an account, click Login – or – click Create An Account
2a. Follow the instructions on the screen.
2b. Check your email for an activation message from My Total Connect Comfort. This may take several minutes.
Note: If you do not receive a response, check your junk mailbox or use an alternate e-mail address.
2c. Follow activation instructions in the email.
2d. Log in
3. Register your Wi-Fi thermostat.
After you are logged in to your Total Connect Comfort account, register your thermostat.
3a. Follow the instructions on the screen. After adding your thermostat location, you must enter the thermostat’s unique identifiers:
MAC ID
MAC CRC
Note: These IDs are listed on the Thermostat ID Card included in the thermostat package. The IDs are not case sensitive.
3b. When the thermostat is successfully registered, the Total Connect Comfort registration screen will display a SUCCESS message.
In the thermostat message center you will see: CONGRATULATIONS SETUP COMPLETE!
Your thermostat will display wireless signal strength.
You can now control your thermostat from anywhere through your laptop, tablet, or smartphone.
Total Connect Comfort free app is available for Apple® iPhone® , iPad® and iPod touch® devices at iTunes® or at Google Play® for all Android™ devices.
Operation
Setting the clock
Press CLOCK to display setting arrows.
Press or to adjust the time. (You can advance the time more quickly by holding the or buttons.)
Press DONE to save and exit (or press CANCEL to exit without changing the time).
Note: This thermostat will automatically update for daylight saving time (if observed in your area) and all date/time information is stored. If the thermostat is connected to Wi-Fi and registered to Total Connect Comfort, the current time is updated from the internet.
Note: To change the current week day format, see “Schedule Options” on page 21.
Setting the fan
Press FAN to select fan operation.
Press FAN again to select ON or AUTO (toggle to re-select). The selected option blinks.
Press DONE to save setting. Your selection appears under FAN.
ON: Fan is always on.
AUTO: Fan runs only when the heating or cooling system is on.
Selecting system mode
Press SYSTEM to display options.
Press SYSTEM again to select an option. You may need to press two or three times to make a selection—the selected option blinks.
Press DONE to save setting. Possible system modes:
HEAT: Controls only the heating system.
COOL: Controls only the cooling system.
OFF: Heating/cooling systems are off.
AUTO: Selects heating or cooling depending on the indoor temperature.
EM HEAT (heat pumps with aux. heat): Controls auxiliary/emergency heat. Compressor is locked out.
Adjusting program schedules
Press SCHED, then EDIT. Screen displays day buttons at top.
Press day buttons (MON–SUN) to select days.
Press or to set Wake time for selected day(s).
Press or to set Heat and Cool temperature for this time period.
Press another period (LEAVE, RETURN, SLEEP) and set time and temperatures for each.
Press DONE to save and exit (or press CANCEL to exit without saving changes).
Note: You can press CANCEL PERIOD to eliminate any unwanted time period.
Overriding schedules temporarily
On the home screen, press s or t to immediately adjust the temperature.
Adjust the time to when you want the hold to end (the default is the end of the current period). The new setting will be maintained until the time shown under Hold Until. When the timer expires, the schedule will resume, and the temperature will return to the setting for the current time period.
To cancel the temporary setting at any time, press CANCEL (or SCHED). The program schedule will resume.
Overriding schedules permanently
Press HOLD to permanently adjust the temperature. This will turn off the program schedule.
Whatever temperature you set will be maintained 24 hours a day until you manually change it or press CANCEL (or SCHED) to cancel “Hold” and resume the program schedule.
Setting vacation hold
Use this function to suspend the program schedule while you are away for an extended period.
Press or to set the temperature.
Press or to set the time of day you want the schedule to resume on the day you return.
Press HOLD twice. Hold Until appears.
Press or to select the number of days.
The selected temperature will be maintained 24 hours a day for the number of days you select. After the selected number of days has elapsed, the previously programmed schedule will resume at the time you set.
Note: You can press CANCEL (or SCHED) to resume normal schedule.
Setting filter reminder intervals
If activated during installation, the filter reminder alerts you with a message above the time when it is time to replace your filter.
Press RESET after changing the filter, to restart the timer.
To change the reminder interval:
Press MORE, then EDIT.
Press or to select the desired interval (in days), then press DONE.
Press RESET.
Press DONE to save and exit.
Note: System setting function 0500 governs the filter interval. See “Filter Change Reminder” on page 23.
Cleaning the screen
Press SCREEN to lock the screen for cleaning. The screen will remain locked for 30 seconds so you can clean the screen without changing any settings.
After 30 seconds, press DONE to resume normal operation, or press SCREEN again if you require more time for cleaning.
Note: Do not spray any liquid directly on the thermostat. Spray liquid onto a cloth, then use the damp cloth to clean the screen. Use water or household glass cleaner. Avoid abrasive cleansers.
Unregistering thermostat
If you remove the thermostat from your Total Connect Comfort website account (for example, you’re moving and leaving the thermostat behind), the message center will scroll UNREGISTERED FROM TOTAL CONNECT for 3 minutes.
After that, it will alternate displaying REGISTER AT TOTAL CONNECT, the MAC ID and the MAC CRC.
Disconnecting Wi-Fi
Replacing your router
If you disconnect the thermostat from your Wi-Fi network:
Enter system setup (see page 20).
Change setting 900 to 0 (see page 23).
The Message Center will display Wi-Fi DISCONNECTED for 1 minute. After that it will display Wi-Fi SETUP.
Re-connect to a Wi-Fi network by following the steps on page 11.
Turning Wi-Fi off
If you do not plan to control the thermostat remotely, you can remove the Wi-Fi SETUP message from the screen:
Enter system setup (see page 20).
Change setting 890 to 0 (see page 23). Wi-Fi SETUP will be removed from the screen. If you want to connect to the Wi-Fi network later, change setting 890 back to 1.
Software updates
Honeywell periodically issues updates to the software for this thermostat. The updates occur automatically through your Wi-Fi connection. All your settings are saved, so you will not need to make any changes after the update occurs.
While the update is taking place, your thermostat screen goes blank and the message center shows UPDATING and the percentage of the update that has occurred. When the update is complete, your home screen will appear as usual.
Note: If you are not connected to Wi-Fi or registered at Total Connect Comfort, you will not get automatic updates.
Smart Response Technology
This feature allows the thermostat to “learn” how long the heating/cooling system takes to reach programmed temperature settings, so the temperature is reached at the time you set.
For example: Set the Wake time to 6:00 am, and the temperature to 70°. The heat will come on before 6:00 am, so the temperature is 70° by 6:00 am.
Note: System setting function 0530 controls Smart Response Technology. See “Smart Response Technology” on page 23.
Compressor protection
This feature forces the compressor to wait a few minutes before restarting, to prevent equipment damage.
Auto changeover
This feature is used in climates where both air conditioning and heating are used on the same day.
When the system is set to AUTO, the thermostat automatically selects heating or cooling depending on the indoor temperature.
Heat and cool settings must be at least 3 degrees apart. The thermostat will automatically adjust settings to maintain this 3-degree separation.
Note: System setting function 0300 controls Auto changeover. See “Manual/Auto Changeover” on page 22
Setting functions and options
You can change options for a number of system functions. Available functions depend on the type of system you have. The functions, designated with four-digit numbers, along with available options are described on pages 21–23.
This thermostat is pre-set for a single-stage heating/cooling system. Setting function 0170 for a heat pump will adjust the default settings.
Press SYSTEM. You’ll see several blank buttons on the bottom of the display.
Press and hold the center blank button until the screen changes (approximately 5 seconds).
Cycle through the functions, press next to the four digit number on the left.
As needed, change options for any function by pressing next to the number on the right.
When you have made all changes, press DONE to save and exit.
System setup
How do I set my thermostat name? (See page 20 for instructions.)
How do I change time and date settings? (See page 20 for instructions.)
Note: If thermostat is connected to Wi-Fi and registered to Total Connect Comfort, the current time and date is updated from the internet. If you live in an area that observes daylight saving time, the time is also automatically updated.
How do I set my heating/cooling system type? (See page 20 for instructions.)
How do I customize my heating/cooling system? (See page 20 for instructions.)
What other functions can I change? (See page 20 for instructions.)
How do I change my Wi-Fi settings? (See page 20 for instructions.)
Appendices
Frequently asked questions
QQ: Will my thermostat still work if I lose my Wi-Fi connection?
AA: Yes, the thermostat will operate your heating and/or cooling system with or without Wi-Fi.
QQ: How do I find the password to my router?
AA: Contact the manufacturer of the router or check the router documentation.
QQ: Why am I not seeing my Wi-Fi setup page?
AA: You are probably connected only to your router, not to your thermostat. Try connecting to the thermostat again.
QQ: Why isn’t my thermostat connecting to my Wi-Fi router even though it is very close to the thermostat?
AA: Verify that the password entered for the Wi-Fi router is correct.
QQ: Where can I find my MAC ID and MAC CRC codes?
AA: The MAC ID and MAC CRC will show in the message center of the thermostat. The numbers are also included on a card packed with the thermostat or on the back of the thermostat (visible when removed from wallplate). Each thermostat has a unique MAC ID and MAC CRC.
QQ: My thermostat is unable to register to the Total Connect Comfort website.
AA: Verify that the thermostat is correctly enrolled on your homeWi-Fi network. The message center will display “CONNECTION SUCCESSFUL” or “REGISTER AT TOTAL CONNECT.” You might also see the Wi-Fi Signal strength icon. Verify that the Wi-Fi router has a good internet connection. On your computer, verify that you can open the site at mytotalconnectcomfort.com If you cannot open the site, switch off the internet modem for a few seconds, then power it back on.
QQ: I registered on the Total Connect Comfort website but was unable to login using my new account.
AA: Check your email and ensure that you received an activation email. Follow the instructions to activate your account and then login to the website.
QQ: I have signed up on Total Connect Comfort website and have not received a confirmation email.
AA: Check for the email in your Junk or Deleted folder.
QQ: Is there a way to extend the signal strength?
AA: Most standard routers can be set up to be a repeater. You can also purchase and install a Wi-Fi repeater.
Message center messages
The Message Center at the top of the screen communicates Wi-Fi connection and registration status. It also displays the MAC ID and MAC CRC for registering the thermostat at mytotalconnectcomfort.com
Displayed before you begin Wi-Fi setup.
Displayed while connecting to the Wi-Fi network.
Displayed after connecting to the Wi-Fi network.
[Wi-Fi network name]
Displayed when connected to the Wi-Fi network
Displayed when Wi-Fi connection is complete
Displayed when the thermostat fails to establish a connection to the Wi-Fi network.
[Found on your ID card]
[Found on your ID card]
Displayed when the thermostat is connected to the Wi-Fi network but not registered at mytotalconnectcomfort.com
Displays the thermostat’s MAC ID and MAC CRC for registering at mytotalconnectcomfort.com
Displayed when the thermostat is registered at mytotalconnectcomfort.com
Displayed when the thermostat is removed from your Total Connect Comfort account.
Wi-Fi signal strength. Displayed when the thermostat is connected to the Wi-Fi network and registered at mytotalconnectcomfort.com
Displayed if there is no Wi-Fi signal. Check another device to be sure Wi-Fi is working in your home; if not, call your Internet Service Provider.
Move the router.
Restart the thermostat: remove it from the wallplate, wait 5 seconds, and snap it back onto the wallplate. Return to Step 1 of Connecting to your Wi-Fi network.
Displayed if the home Wi-Fi password is entered incorrectly.
Re-enter password for your home Wi-Fi network.
Repeat setup process and confirm your password for your home Wi-Fi network.
Displayed if no IP Address is supplied by the router.
Wait for 30 minutes, connection can take several minutes. If still no connection, remove thermostat from wallplate, wait 5 seconds, and snap it back onto the wallplate.
Verify your router is correctly setup to automatically give IP addresses.
Displayed if there is no Wi-Fi signal.
Make sure the Internet cable is plugged in.
Reboot the router.
Troubleshooting
If you have difficulty with your thermostat, please try the following suggestions. Most problems can be corrected quickly and easily
1. Display is blank
Check circuit breaker and reset if necessary.
Make sure power switch at heating and cooling system is on.
Make sure furnace door is closed securely.
Make sure C wire is connected (see page 6).
2. Cannot change system setting to Cool
Check Function 0170: System Type to make sure it is set to match your heating and cooling equipment (see page 22).
3. Fan does not turn on when heat is required
Check Function 0180: Heating Fan Control to make sure it is set to match your heating equipment (see page 22).
4. “Wait” appears on the screen
Compressor protection feature is engaged. Wait 5 minutes for the system to restart safely, without damage to the compressor.
5. Heat pump issues cool air in heat mode, or warm air in cool mode
Check Function 0190: Heat Pump Changeover Valve to make sure it is properly configured for your system (see page 22).
6. Button on lower right of screen is blank
This button will remain blank unless the furnace filter change reminder is activated (see page 17).
7. Red light is on
If thermostat is in Emergency Heat mode the red light is normal. It shows that the thermostat is in emergency heat mode.
If thermostat is not in Emergency Heat mode, contact a qualified service contractor for repair.
8. Heating or cooling system does not respond
Press SYSTEM to set system to Heat. Make sure the temperature is set higher than the Inside temperature.
Press SYSTEM to set system to Cool. Make sure the temperature is set lower than the Inside temperature.
Check circuit breaker and reset if necessary.
Make sure power switch at heating & cooling system is on.
Make sure furnace door is closed securely.
If “Wait” is displayed, the compressor protection timer is on. Wait 5 minutes for the system to restart safely, without damaging the compressor (see page 19).
9. Heating system is running in cool mode
Check Function 0170: System Type to make sure it is set to match your heating and cooling equipment (see page 22).


 Before you begin, you may want to watch a brief installation video. Use the QR Code® at the front of this guide, or go to wifithermostat.com/support
 2a. Take a picture of the wire connections for later reference.
 2b. If no wire is connected to a terminal labeled C or no C terminal exists on the old thermostat, view the Alternate Wiring videos at wifithermostat.com/videos


 View the Alternate Wiring videos at wifithermostat.com/videos


 or
or  buttons to change displayed time and date.

 View the Wi-Fi Enrollment video at wifithermostat.com/videos


 Total Connect Comfort free app is available for Apple® iPhone® , iPad® and iPod touch® devices at iTunes® or at Google Play® for all Android™ devices.


 or
or  to adjust the time. (You can advance the time more quickly by holding the


 next to the four digit number on the left.


 [Wi-Fi network name]