Documents: Go to download!
User Manual
- Owner's manual - (English)
- Warranty - (English)
- SETTING UP YOUR OVEN
- SPECIFICATIONS
- CONTROL PANEL
- OPERATION
- MAINTENANCE
Table of contents
USER MANUAL MICROWAVE OVEN
SETTING UP YOUR OVEN
Names of Oven Parts and Accessories
Remove the oven and all materials from the carton and oven cavity. Your oven comes with the following accessories:
Glass tray: 1
Turntable ring assembly: 1
Instruction Manual: 1
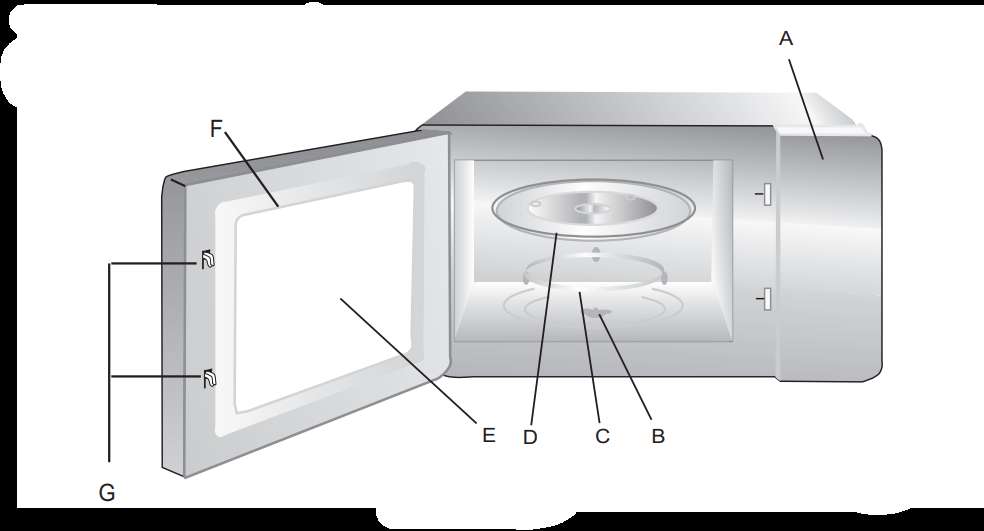
A) Control panel
B) Turntable shaft
C) Turntable ring assembly
D) Glass tray
E) Observation window
F) Door assembly
G) Safety interlock system
Turntable Installation
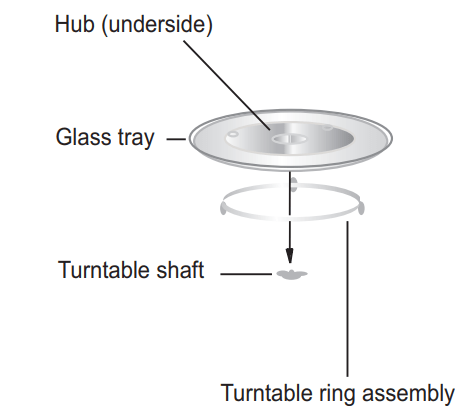
a. Never place the glass tray upside down. The glass tray should never be restricted.
b. Both glass tray and turntable ring assembly must always be used during cooking.
c. All food and containers of food are always placed on the glass tray for cooking.
d. If glass tray or turntable ring assembly cracks or breaks, contact your nearest authorized service center.
Counter-top Installation
Remove all packing material and accessories. Examine the oven for any damage such as dents or broken door. Do not install if oven is damaged.
Cabinet: Remove any protective film found on the microwave oven cabinet surface. Do not remove the light brown Mica cover that is attached to the oven cavity to protect the magnetron.
1. Select a level surface that provide enough open space for the intake and/or outlet vents.
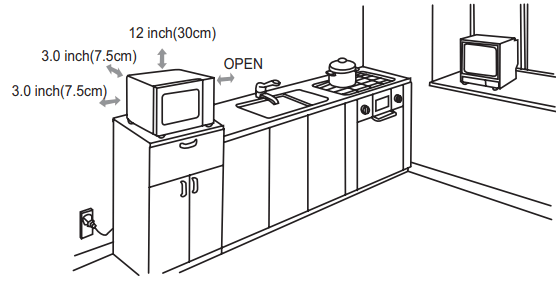
A minimum clearance of 3.0 inches (7.5cm) is required between the oven and any adjacent walls. One side must be open.
(1) Leave a minimum clearance of 12 inches (30cm) above the oven.
(2) Do not remove the legs from the bottom of the oven.
(3) Blocking the intake and/or outlet openings can damage the oven.
(4) Place the oven as far away from radios and TV as possible. Operation of microwave oven may cause interference to your radio or TV reception.
2. Plug your oven into a standard household outlet. Be sure the voltage and the frequency is the same as the voltage and the frequency on the rating label.
WARNING – Do not install oven over a range cook-top or other heat-producing appliance. If installed near or over a heat source, the oven could be damaged and the warranty would be void.
SPECIFICATIONS
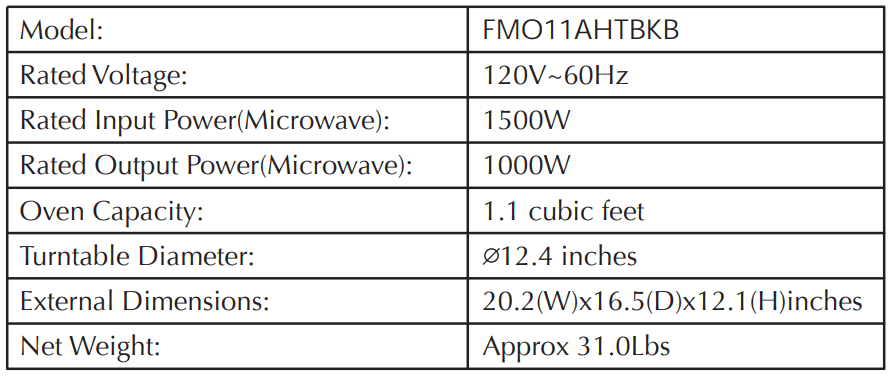
CONTROL PANEL
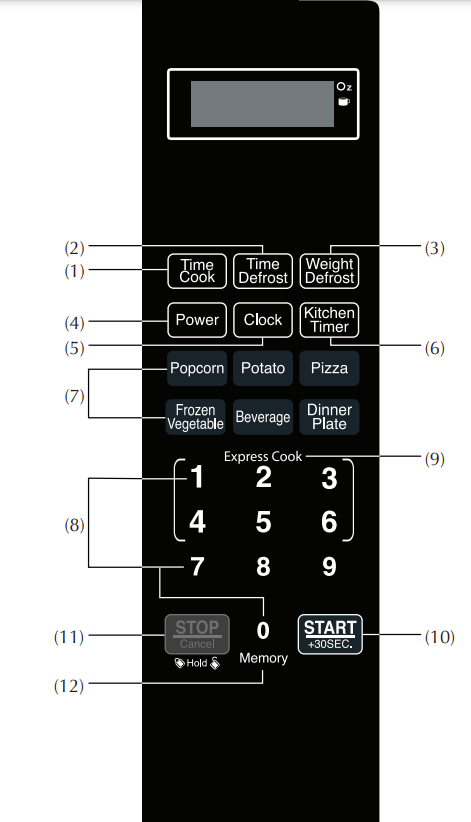
(1) Time Cook
(2) Time Defrost
(3) Weight Defrost
(4) Power (11 power levels available)
(5) Clock
(6) Kitchen Timer
(7) Auto Cook Menu (Popcorn, Potato, Pizza, Frozen Vegetable, Beverage, Dinner Plate)
(8) Number Pad (0-9)
(9) Express Cook (Number Pad 1-6)
(10) START/ADD 30 SEC (Begin cooking time or add time to cooking)
(11) Stop/CANCEL (Before cooking starts, press to clear all previous settings; during cooking, press once to stop oven; press twice to stop oven and clear all settings.
(12) Memory function
OPERATION
1. POWER LEVEL
11 power levels are available.

2. CLOCK SETTING
(1) Press “Clock“ , “00:00” will display.
(2) Press the number keys and enter the current time. For example, time is 10:12 now, please press “1,0,1,2” in turn.
(3) Press “Clock“ to finish clock setting. “:” will flash and the clock will be lighted.
(4) If the numbers input are not within the range of 1:00--12:59, the setting will be invalid until valid numbers are input.
Note:
- In the process of clock setting, if the “STOP/CANCEL“ button is pressed or if there is no operation within 1 minute, the oven will go back to the former setting automatically.
- If the clock need to be reset, please repeat step 1 to step 3.
3. MICROWAVE COOK
(1) Press “TIMECOOK” once, the screen will display “00:00”.
(2) Press number keys to input the cooking time; the maximum cooking time is 99 minutes and 99 seconds.
(3) Press “POWER“ once, screen will display “PL10”. The default power is 100% power. Now you can press number keys to adjust the power level.
(4) Press “START/ADD 30sec“ to start cooking.
Example: To cook the food with 50% microwave power for 15 minutes.
a. Press “TIMECOOK” once.”00:00” displays.
b. Press “1”,”5”,”0”,”0” in order.
c. Press “POWER”once,then press “5” to select 50% microwave power.
d. Press “START/ADD 30sec“ to start cooking.
Note:
- In the process of setting, if the “STOP/CANCEL“ button is pressed or if there is no operation within 1 minute, the oven will go back to the former setting automatically.
- You can skip the step of “c” and cook at 100% microwave power.
4. KITCHEN TIMER
(1) Press “Kitchen Timer“ once, the screen will display 00:00.
(2) Press the number keys and enter the timer time. (The maximum cooking time is 99 minutes and 99 seconds.)
(3) Press “START/ADD 30sec“ to confirm setting
(4) When the timer time arrives, the buzzer will ring 3 times, screen display the correct time.
Note:
- The kitchen time is differ from 12-hour system, Kitchen Timer is a timer
- Kitchen Timer and cooking (including microwave, defrosting, Auto menu) are independent, all the cooking for functions can be set during running Kitchen Timer, Kitchen Timer can be set during running other cooking functions.
Example: When oven is cooking with 50% microwave power for 15 minutes, screen display countdown cooking time, you want to set timer 10 minutes.
a. Press “Kitchen Timer“ once, the screen will display 00:00
b. Press the number keys and enter the timer time. If no entering timer in 10 seconds, timer set is canceled and oven return to countdown cooking time.
c. Press “START/ADD 30sec“, timer is operated. If no press “START/ADD 30sec“ in 10 seconds , timer set is canceled and oven return to countdown cooking time.
5. EXPRESS COOKING
(1) In waiting state, instant cooking at 100% power level with 30 seconds’ cooking time can be started by pressing “START/ADD 30sec“. Each press on the same button will increase cooking time by 30 seconds. The maximum cooking time is 99 minutes and 99 seconds.
(2) If not ready cooking, press number pads 1-6 to quickly cook from 1-6 minutes at 100% power. Press " to increase the cooking time; the maximum cooking time is 99 minutes “START/ADD 30sec“ and 99 seconds.
Note: During microwave cooking, time defrost and auto menu, time can be added by pressing “START/ADD 30sec“ button.
6. CANCEL QUICKLY
(1) During setting or running procedure, only pressing “STOP/CANCEL“ can stop current states and turn back to the waiting states.
7. WEIGHT DEFROST FUNCTION
(1) Press “Weight Defrost“ once, screen will display “dEF1”;
(2) Press numerical buttons to input weight to be defrosted. Input the weight ranged between 4~100Oz.Z If the weight input is not within 4~100, the input will be invalid.
(3) Press “START/ADD 30sec“ to start defrosting and the cooking time remained will be displayed.
8. TIME DEFROST FUNCTION
(1) Press “Time Defrost“ once, screen will display “dEF2”.
(2) Press number pads to input defrosting time. The effective time range is 00:01~99:99.
(3) The default microwave power is power level 3 and it cannot be changed.
(4) Press “START/ADD 30sec“ to start defrosting. The remained cooking time will be displayed.
9. POPCORN
(1) Press “POPCORN“ repeatedly until the number you wish appears in the display, “1.75”,”3.0”,”3.5” Oz will display in order. For example, press “POPCORN” once, “1.75” appears.
(2) Press “START/ADD 30sec“ to cook, buzzer sounds once. When cooking finish, buzzer sounds five times and screen will display the correct time.
10. BEVERAGE
(1) Press “BEVERAGE“ repeatedly until the number you wish appears in the display, “1”,”2” cup will display in order. One cup is about 8 Oz. For example, press “BEVERAGE” once, “1” appears.
(2) Press “START/ADD 30sec“ to cook, buzzer sounds once. When cooking finish, buzzer sounds five times and screen will display the correct time.
11. PIZZA REHEAT
(1) Press “PIZZA“ repeatedly until the number you wish appears in the display, “4.0”,”8.0”,”14.0” will display in order.
For example, press “PIZZA“ once, “4.0” appears.
(2) Press “START/ADD 30sec“ to cook, buzzer sounds once. When cooking finish, buzzer sounds five times and screen will display the correct time.
12. POTATO
(1) Press “POTATO“ repeatedly until the number you wish appears in the display, “1”,”2”,”3” will display in order. For example, press “POTATO” once, “1” appears.
(2) Press “START/ADD 30sec“ to cook, buzzer sounds once. When cooking finish, buzzer sounds five times and screen will display the correct time.
13. FROZEN VEGETABLE
(1) Press “ FR VEGETABLE “ repeatedly until the number you wish appears in the display, “4.0”,”8.0”,”16.0” will display in order. For example, press “FR VEGETABLE” once, “4.0” appears.
(2) Press “START/ADD 30sec“ to cook, buzzer sounds once. When cooking finish, buzzer sounds five times and screen will display the correct time.
14. DINNER PLATE
(1) Press “DINNER PLATE “ repeatedly until the number you wish appears in the display, “9.0”,”12.0”,”18.0” Oz will display in order.
(2) Press “START/ADD 30sec“ to cook, buzzer sounds once. When cooking finish, buzzer sounds five times and screen will display the correct time.
15. MEMORY FUNCTION
(1) Press “0/MEMORY” to choose memory 1-3 procedure. The screen will display 1,2,3.
(2) If the procedure has been set, press “ START/ADD 30sec “ to use it. If not, continue to set the procedure. Only one or two stages can be set.
(3) If the procedure has not been set, after finishing the setting, press “Favorite” once to save the procedure and turn back to the waiting states. If press “START/ADD 30sec“ it will start cooking at once and save the procedure too.
Example: To set the following procedure as the second memory, that is memory 2. To cook the food with 80% microwave power for 3minutes and 20 seconds.
The steps are as follow:
a. In waiting states, press “0/MEMORY” twice, stop pressing until the screen displays “2”.
b. Press “ TIME COOK “ once,then press “3”,”2”,”0” in order.
c. Press “POWER“ once, ”PL10” display, then press “8” and “PL8” displays.
d. Press “Favorite” to save the setting. Buzzer sounds once then turn back to waiting states. If you press “START/ADD 30sec” again, the procedure will be saved as the memory 2 and operated.
e. If the electricity is not cut off, the procedure will be saved all the time. If it is, the procedure need to reset.
f. When you want to run the saved procedure, in waiting states, press “Favorite” twice, screen displays “2”, then press “ START/ADD 30sec “ to start cooking.
Note: Auto menu can not be set in memory function.
16. MULTI-STAGE COOKING
At most 2 stages can be set for cooking. In multi-stage cooking, if one stage is defrosting, then defrosting shall be placed at the first stage automatically.
Note: Auto menu cannot work in the multi-stage cooking.
Example: If you want to cook with 80% microwave power for 5 minutes + 60% microwave power for 10 minutes. The cooking steps are as following:
a. Press “ TIME COOK “ once,then press “5”,”0”,”0” to set the cooking time;
b. Press “POWER“ once,then press “8” to select 80% microwave power.
c. Press “ TIME COOK “ once,then press “1”,”0”,”0”,”0” to set the cooking time;
d. Press “POWER“ once,then press “6” to select 60% microwave power.
e. Press “START/ADD 30sec“ to start cooking.
17. INQUIRING FUNCTION
In the microwave cooking state, press “POWER“ to inquire microwave power level, and the current microwave power will be displayed. After three seconds, the oven will turn back to the previous state. In multi-stage state, the inquiring way can be done by the same way as above.
18. LOCK FUNCTION FOR CHILDREN
Lock: In waiting state, press “STOP/CANCEL“ for 3 seconds, there will be a long “beep” denoting the entering into the children-lock state, and the lock indicator will light. The screen will display the current time or “0:00”.
Unlock: In locked state, press “STOP/CANCELl“ for 3 seconds, there will be a long “beep” denoting that lock is released.
19. COOKING END REMINDING FUNCTION
When the cooking is over, the buzzer will sound 5 “beep” to alert user the cooking is finished.
20. OTHER SPECIFICATIONS
(1) In standby state, if the set clock digital tube displays current time, the icon “:“ would flash; otherwise, it shows “0:00“.
(2) In setting function state, the screen displays corresponding setting.
(3) In working or pause state, the screen displays surplus cooking time.
(4) When the cooking is finish, the screen will display the correct time. Opening the door or pressing “STOP/CANCEL“ can make the oven enter waiting state.
MAINTENANCE
Troubleshooting
Check your problem by using the chart below and try the solutions for each problem. If the microwave oven still does not work properly, contact the nearest authorized service center.
| Trouble | Possible Cause | Possible Remedy |
| Oven will not start | a. Electrical cord for oven is not plugged in. | a. Plug into the outlet. |
| b. Door is open. | b. Close the door and try again. | |
| c. Wrong operation is set. | c. Check instructions. | |
| Arcing or sparking | a. Materials to be avoided in microwave oven were used. | a. Use microwave-safe cookware only. |
| b. The oven is operated when empty. | b. Do not operate with oven empty. | |
| c. Spilled food remains in the cavity. | c. Clean cavity with wet towel. | |
| Unevenly cooked foods | a. Materials to be avoided in microwave oven were used. | a. Use microwave-safe cookware only. |
| b. Food is not defrosted completely. | b. Completely defrost food. | |
| c. Cooking time, power level is not suitable. | c. Use correct cooking time, power level. | |
| d. Food is not turned or stirred. | d. Turn or stir food. | |
| Overcooked foods | Cooking time, power level is not suitable. | Use correct cooking time, power level. |
| Undercooked foods | a. Materials to be avoided in microwave oven were used. | a. Use microwave-safe cookware only. |
| b. Food is not defrosted completely. | b. Completely defrost food. | |
| c. Oven ventilation ports are restricted. | c. Check to see that oven ventilation ports are not restricted. | |
| d. Cooking time, power level is not suitable. | d. Use correct cooking time, power level. | |
| Improper defrosting | a. Materials to be avoided in microwave oven were used. | a. Use microwave-safe cookware only. |
| b. Cooking time, power level is not suitable. | b. Use correct cooking time, power level. | |
| c. Food is not turned or stirred. | c. Turn or stir food. |
See other models: FMO11AHTBSB FMO13AHTBSE
