
EN UserManual
ES ManualdelUsuario
FR Manueld’Utilisation
Registeryourproductandgetsupportat
www.philips.com/support
EN: Forfurtherassistance,callthecustomersupportserviceinyourcountry.
•
Toobtainassistance,contactPhilipsCustomerCareCenter;
IntheU.S.A.,Canada,PuertoRico,ortheU.S.VirginIslands18663090843
MéxicoD.F.andÁreaMetropolitana;58879736
InteriordelaRepublica;018008391989
ES: Paraobtenermásinformación,llamealserviciodesoportealclientedesu
país.
•
Paraobtenerasistencia,comuníqueseconCentrodeatenciónalclientedePhilips;
EnlosEstadosUnidos,enCanadá,PuertoRicooenlasIslasVírgenesdelosEstadosUnidos;
18663090843
MéxicoD.F.yÁreaMetropolitana;58879736
InteriordelaRepublica;018008391989
FR: Pourobtenirdel’aidesupplémentaire,communiquezaveclecentredeservice
àlaclientèledevotrepays.
•
Pourobtenirdel’aide,communiquezaveclecentredeserviceàlaclientèlePhilipsau;
DansleÉtats-Unis,auCanada,àPuertoRicoouauxÎlesViergesaméricaines;18663090843
MéxicoD.F.etÁreaMetropolitana;58879736
InteriordelaRepublica;018008391989
32PFL4507
26PFL4507
22PFL4507

English
2
Contents
1 Notice 5
2 Important 6
PositioningtheTV 6
Regulatorynotices 6
Environmentalcare 6
3 Getstarted 7
Features 7
Suppliedaccessories 7
SymbolsusedinthisUserManual 7
Attachingthebase 8
Mountingtheunitonyourfurniture 8
Managingcables 8
Installingtheremotecontrolbatteries 8
Remotecontrol 9
Controlpanel 10
Terminals 10
Connectingtheantennaorthecable 11
PluggingintheACpowercord 11
Initialsetup 12
4 UseyourTV 14
SwitchingonyourTVandputtingitinstandbymode 14
Adjustingvolume 14
Switchingchannels 14
Watchingchannelsfromanexternaldevice 15
Usingautomode 15
Sleeptimer 15
Freezemode 15
Switchingaudiomode 16
Changingpictureformat 16
TVscreeninformation 17
5 UsemoreofyourTV 18
Displayingthemainmenu 18
Picture 19
Sound 20
Setup 20
Autoprogram 20
Channellist 21
Addchannels 21
Antennaconrmation 21
Features 22
Captionsettings 22
Childandratingslock 23
PCsettings 25
EasyLink 26
Settingyourlocationtohome 27
E-sticker 27
Language 27
USB 28
6 UpgradeyourTVsoftware 29
Checkingyourcurrentsoftwareversion 29
Upgradingthesoftware 29
7 Connectingdevices 30
Selectingyourconnectionquality 30
Connectingyourdevices 30
8 Usefultips 33
FAQ 33
Troubleshooting 33
9 Information 35
Glossary 35
Maintenance 35
10Specications 36
11Warranty 37

English
3
Know these safety symbols
The lightning flash with arrowhead symbol, within an equilateral
triangle, is intended to alert the user to the presence of
uninsulated “dangerous voltage” within the apparatus’s enclosure
that may be of sufficient magnitude to constitute a risk of
electric shock to persons.
The exclamation point within an equilateral triangle is intended to
alert the user to the presence of important operating and
maintenance (servicing) instructions in the literature accompanying
the apparatus.
WARNING: To reduce the risk of fire or electric shock, do not expose this apparatus to rain or moisture. Apparatus shall
not be exposed to dripping or splashing and no objects filled with liquids, such as vases, shall be placed on the
apparatus.
CAUTION: To prevent electric shock, match wide blade of plug to wide slot, fully insert.
ATTENTION
: Pour éviter les choc électriques,introduire la lame la plus large de la fiche dans la borne correspondante de la
prise et pousser jusqu’au fond.
CAUTION: TO REDUCE THE RISK OF ELECTRIC SHOCK, DO NOT
REMOVE COVER (OR BACK). NO USER-SERVICEABLE PARTS
INSIDE. REFER SERVICING TO QUALIFIED SERVICE PERSONNEL.
RISK OF ELECTRIC SHOCK
DO NOT OPEN
The caution marking is located on the rear or bottom of the cabinet.
CAUTION
*Product Safety Notification *Additional Benefits
By registering your product, you'll receive notification -
directly from the manufacturer - in the rare case of a
product recall or safety defect.
Registering your product guarantees that you'll receive
all of the privileges to which you're entitled, including
special money-saving offers.
Registering your model with Philips makes you eligible for all of the valuable benefits listed below, so don't miss out.
Complete and return your Product Registration Card at once or visit at www.philips.com/support to ensure:
Visit our World Wide Web Site at www.philips.com/support
Return your Product Registration Card or visit at
http://www.productrecords.com/philips/ today to get the very most from your purchase.
www.CE.org/safety
English
4
Important Safety Instructions
1. Readtheseinstructions.
2. Keeptheseinstructions.
3. Heedallwarnings.
4. Followallinstructions.
5. Donotusethisapparatusnearwater.
6. Cleanonlywithdrycloth.
7. Donotblockanyventilationopenings.Installinaccordancewiththe
manufacturer’sinstructions.
8. Donotinstallnearanyheatsourcessuchasradiators,heatregisters,
stoves,orotherapparatus(includingampliers)thatproduceheat.
9. Donotdefeatthesafetypurposeofthepolarizedorgrounding-
typeplug.Apolarizedplughastwobladeswithonewiderthanthe
other.Agroundingtypeplughastwobladesandathirdgrounding
prong.Thewidebladeorthethirdprongareprovidedforyour
safety.Iftheprovidedplugdoesnottintoyouroutlet,consultan
electricianforreplacementoftheobsoleteoutlet.
10.Protectthepowercordfrombeingwalkedonorpinched
particularlyatplugs,conveniencereceptacles,andthepointwhere
theyexitfromtheapparatus.
11.Onlyuseattachments/accessoriesspeciedbythemanufacturer.
12.Useonlywiththecart,stand,tripod,bracket,or
tablespeciedbythemanufacturer,orsoldwiththe
apparatus.Whenacartisused,usecautionwhen
movingthecart/apparatuscombinationtoavoidinjury
fromtip-over.
13.Unplugthisapparatusduringlightningstormsorwhenunusedfor
longperiodsoftime.
14.Referallservicingtoqualiedservicepersonnel.Servicingis
requiredwhentheapparatushasbeendamagedinanyway,such
aspower-supplycordorplugisdamaged,liquidhasbeenspilled
orobjectshavefallenintotheapparatus,theapparatushasbeen
exposedtorainormoisture,doesnotoperatenormally,orhas
beendropped.
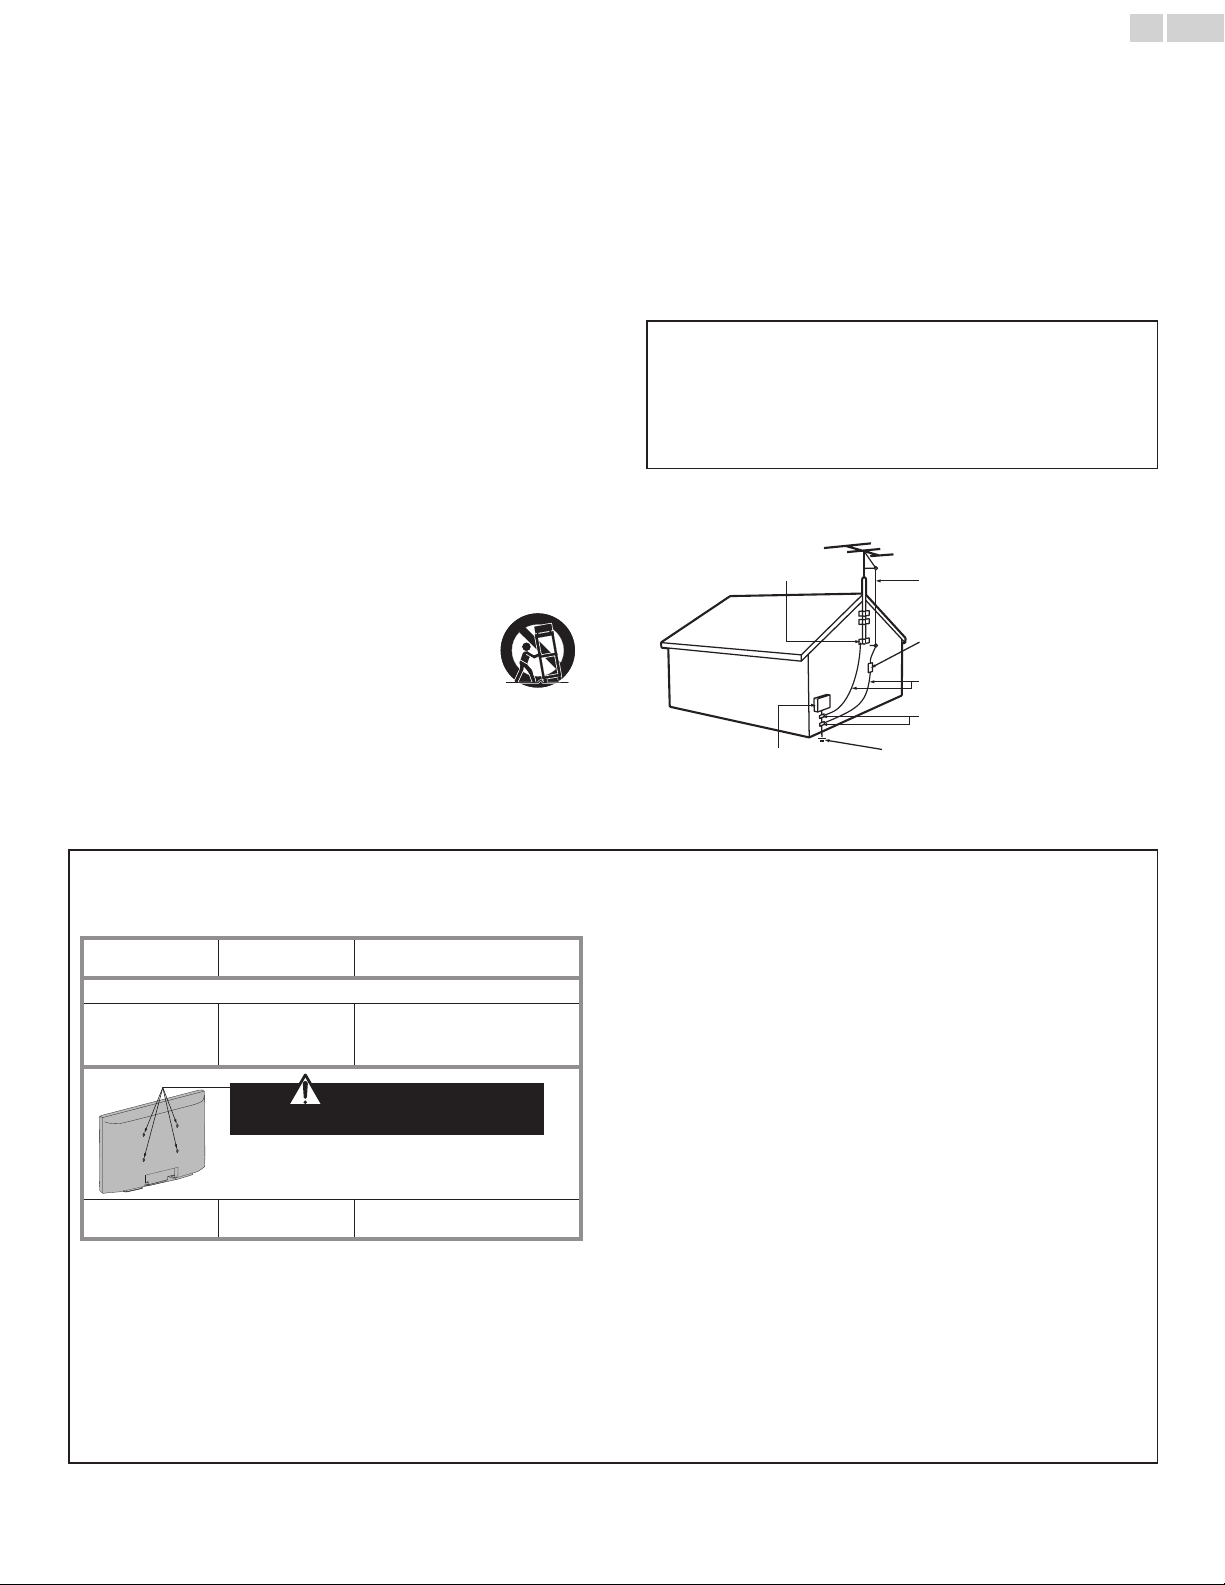
NotetotheCATVsysteminstaller:
ThisreminderisprovidedtocalltheCATVsysteminstaller’s
attentiontoArticle820-40oftheNECthatprovidesguidelinesfor
propergroundingand,inparticular,speciesthatthecableground
shallbeconnectedtothegroundingsystemofthebuilding,asclose
tothepointofcableentryaspractical.
ExampleofAntennaGroundingasperNEC−National
ElectricCode
ANTENNADISCHARGE
UNIT(NECSECTION810-20)
GROUNDINGCONDUCTORS
(NECSECTION810-21)
POWERSERVICEGROUNDING
ELECTRODESYSTEM
(NECART250,PARTH)
ANTENNALEADINWIRE
GROUNDCLAMPS
ELECTRICSERVICE
EQUIPMENT
GROUNDCLAMP
WallMountBracketKit
Brand: SANUS
Model # Screw dimension
22PFL4507 SAN10b M4x0.472”(12mm)
For26inchTVs,screwsw/washersarerequired.(soldseparately)
26PFL4507
SAN213b
M4x0.472”(12mm)
+
Washer0.039”(T1mm)
Do NOT use screws
packed with Wall Mount Bracket Kit
For32inchTVs,youneedtopurchasescrews
separatelywithdimensionsdescribedbelow.
32PFL4507 VM200s M4x0.472”(12mm)
• TherecommendedWallMountBracketKit(soldseparately)
allowsthemountingoftheTVonthewall.
• Fordetailedinformationoninstallingthewallmount,refertothe
WallMountInstructionBook.
• P&FUSAisnotresponsibleforanydamagetotheproductor
injurytoyourselforothersifyouelecttoinstalltheTVWall
MountBracketormounttheTVontotheBracketonyourown.
• TheWallMountBracketmustbeinstalledbyexperts.
P&FUSAisnotliableforthesetypesofaccidentsorinjurynoted
below.
• InstalltheWallMountBracketonasturdyverticalwall.
• Ifinstalledontoaceilingorslantedwall,theTVandWallMount
Bracketmayfallwhichcouldresultinasevereinjury.
• Donotusescrewsthatarelongerorshorterthantheirspecied
length.Ifscrewstoolongareusedthismaycausemechanicalor
electricaldamageinsidetheTVset.Ifscrewstooshortareused
thismaycausetheTVsettofall.
• Donotfastenthescrewsbyexcessiveforce.Thismaydamage
theproductorcausetheproducttofall,leadingtoaninjury.
• Forsafetyreasonsuse2peopletomounttheTVontoaWall
MountingBracket.
• DonotmounttheTVontotheWallMountingBracketwhile
yourTVispluggedinorTurnedOn.Itmayresultinanelectrical
shockinjury.
Wheninstallingtheunitonthewall,allowthismuchspace.
Top: 11.8inches (30cm)
Leftandrightside: 5.9inches (15cm)
Bottom: 3.9inches (10cm)

English
5
1 Notice
TrademarksarethepropertyofKoninklijkePhilipsElectronicsN.V.or
theirrespectiveowners.
P&FUSAreservestherighttochangeproductsatanytimewithout
beingobligedtoadjustearliersuppliesaccordingly.
ThematerialinthisUserManualisbelievedadequatefortheintended
useofthesystem.Iftheproductoritsindividualmodulesorprocedures
areusedforpurposesotherthanthosespeciedherein,conrmation
oftheirvalidityandsuitabilitymustbeobtained.P&FUSAwarrants
thatthematerialitselfdoesnotinfringeanyUnitedStatespatents.No
furtherwarrantyisexpressedorimplied.
P&FUSAcannotbeheldresponsibleneitherforanyerrorsinthe
contentofthisdocumentnorforanyproblemsasaresultofthe
contentinthisdocument.ErrorsreportedtoP&FUSAwillbeadapted
andpublishedontheP&FUSAsupportwebsiteassoonaspossible.
Pixelcharacteristics
ThisLCDproducthasahighnumberofcolorpixels.Althoughithas
effectivepixelsof99.999%ormore,blackdotsorbrightpointsoflight
(red,greenorblue)mayappearconstantlyonthescreen.Thisisa
structuralpropertyofthedisplay(withincommonindustrystandards)
andisnotamalfunction.
Warranty
Nocomponentsareuserserviceable.Donotopenorremovecovers
totheinsideoftheproduct.RepairsmayonlybedonebyService
Centersandofcialrepairshops.Failuretodososhallvoidany
warranty,statedorimplied.
AnyoperationexpresslyprohibitedinthisUserManual,anyadjustments
orassemblyproceduresnotrecommendedorauthorizedinthis
UserManualshallvoidthewarranty.
FederalCommunicationsCommissionNotice
Thisequipmenthasbeentestedandfoundtocomplywiththelimits
foraClassBDigitaldevice,pursuanttopart15oftheFCCRules.
Theselimitsaredesignedtoprovidereasonableprotectionagainst
harmfulinterferenceinaresidentialinstallation.Thisequipment
generates,usesandcanradiateradiofrequencyenergyand,ifnot
installedandusedinaccordancewiththeinstructions,maycause
harmfulinterferencetoradiocommunications.However,thereisno
guaranteethatinterferencewillnotoccurinaparticularinstallation.If
thisequipmentdoescauseharmfulinterferencetoradioortelevision
reception,whichcanbedeterminedbyturningtheequipmentoffand
on,theuserisencouragedtotrytocorrecttheinterferencebyone
ormoreofthefollowingmeasures:
• Reorientorrelocatethereceivingantenna.
• Increasetheseparationbetweentheequipmentandthereceiver.
• Connecttheequipmentintoanoutletonacircuitdifferentfrom
thattowhichthereceiverisconnected.
• Consultthedealeroranexperiencedradioortelevisiontechnician
forhelp.
DeclarationofConformity
TradeName: PHILIPS
ResponsibleParty: P&FUSA,Inc.
Model: 32PFL4507,26PFL4507,22PFL4507
Address: POBox2248,Alpharetta,GA30023-2248
U.S.A.
TelephoneNumber: 18663090843
Modications
Thisapparatusmaygenerateoruseradiofrequencyenergy.Changesor
modicationstothisapparatusmaycauseharmfulinterferenceunless
themodicationsareexpresslyapprovedintheUserManual.Theuser
couldlosetheauthoritytooperatethisapparatusifanunauthorized
changeormodicationismade.
Cables
Connectionstothisdevicemustbemadewithshieldedcableswith
metallicRFI/EMIconnectorhoodstomaintaincompliancewithFCC
RulesandRegulations.
Canadiannotice
ThisClassBDigitalapparatuscomplieswithCanadianICES-003.
StandardTelevisionReceivingApparatus,CanadaBETS-7/NTMR-7.
Copyright
Allotherregisteredandunregisteredtrademarksarethepropertyof
theirrespectiveowners.
ThetermsHDMIandHDMIHigh-Denition
MultimediaInterface,andtheHDMILogoare
trademarksorregisteredtrademarksofHDMI
LicensingLLCintheUnitedStatesandother
countries.
ManufacturedunderlicensefromDolby
Laboratories.Dolbyandthedouble-Dsymbol
aretrademarksofDolbyLaboratories.
isatrademarkofSRSLabs,Inc.
TruSurroundXTtechnologyisincorporated
underlicensefromSRSLabs,Inc.
SRSTruSurroundXT
®
createsatruly
immersivesurroundsoundexperiencewith
richbassandcleardialogfromonlytwo
speakers.
ENERGYSTAR
®
isajointprogramoftheU.S.
EnvironmentalProtectionAgencyandthe
U.S.DepartmentofEnergyhelpingusallsave
moneyandprotecttheenvironmentthrough
energyefcientproductsandpractices.
ConsumerNotice:
ThisTVhasbeensettomaximizeenergyefciencywhiledeliveringthe
bestpossiblepictureusingthefactoryinstalledhomemodesettings.
ChangingorenablingotherfeaturesinthisTV(e.g.brightened
backlighting)willpossiblyincreaseenergyconsumptionbeyondthe
originalENERGYSTAR
®
qualiedlimits.
Portionsofthissoftwarearecopyright©TheFreeTypeProject
(www.freetype.org).
TheAmericanAcademyofPediatricsdiscouragestelevisionviewing
forchildrenyoungerthantwoyearsofage.

English
6
2 Important
PositioningtheTV
• LargescreenTVsareheavy.2peoplearerequiredtocarryand
handlealargescreenTV.
• Makesuretoholdtheupperandbottom
framesoftheunitrmlyasillustrated.
• Installtheunitinahorizontalandstable
position.
• Donotinstalltheunitindirectsunlight
orinaplacesubjecttodustorstrong
vibration.
• Dependingontheenvironment,thetemperatureofthisunitmay
increaseslightly.Thisisnotamalfunction.
• Avoidaplacewithdrastictemperaturechanges.
• Donotplaceanythingdirectlyontoporbottomoftheunit.
• Dependingonyourexternaldevices,noiseordisturbanceofthe
pictureand/orsoundmaybegeneratediftheunitisplacedtoo
closetothem.Inthiscase,pleaseensureenoughspacebetween
theexternaldevicesandtheunit.
• DonotinserttheACpowercordintothepowersocketoutlet
beforealltheconnectionsaremade.
• EnsurethatyoualwayshaveeasyaccesstotheACpowercordor
plugtodisconnecttheTVfromthepower.
• BeforeyoumovetheTV,disconnectattachedcablestoprevent
damagetoconnectors.
• BesuretounplugtheACpowercordfromtheACoutletbefore
movingorcarryingtheunit.
Regulatorynotices
Donotplacetheunitonthefurniturethatiscapableofbeingtilted
byachildandanadultleaning,pulling,standingorclimbingonit.
Afallingunitcancauseseriousinjuryorevendeath.
Thisapparatusshouldnotbeplacedinabuilt-ininstallationsuchasa
bookcaseorrackunlessproperventilationisprovided.
Makesuretoleaveaspaceof4inches(10cm)ormorearoundthis
apparatus.
Press
toturntheunitonandgointostandbymode.
TocompletelyturnOfftheunit,youmustunplugtheACpowercord.
DisconnecttheACplugtoshuttheunitoffwhentroubleisfoundor
notinuse.TheACplugshallremainreadilyavailable.
NeveruseagasdusteronthisTV.
Thegastrappedinsideofthisunitmaycauseignitionandexplosion.
CAUTION: Dangerofexplosionifbatteryisincorrectlyreplaced.
Replaceonlywiththesameorequivalenttype.
WARNING: Batteries(batterypackorbatteryinstalled)shallnotbe
exposedtoexcessiveheatsuchassunshine,reorthe
like.
WARNING: Topreventinjury,thisapparatusmustbesecurely
attachedtothefurniture/wallinaccordancewiththe
instructions.Tipping,shaking,orrockingtheunitmay
causeinjury/death.
Environmentalcare
Thepackagingofthisproductisintendedtoberecycled.
Contactyourlocalauthoritiesforinformationabouthowtorecyclethe
packaging.
Forproductrecyclinginformation,pleasevisit-www.recycle.philips.com
Endoflifedirectives
Philipspaysalotofattentiontoproduceenvironment-friendlyproducts
ingreenfocalareas.YournewTVcontainsmaterialswhichcanbe
recycledandreused.Attheendofitslife,specializedcompaniescan
dismantlethediscardedTVtoconcentratethereusablematerialsandto
minimizetheamountofmaterialstobedisposedof.Pleaseensureyou
disposeofyouroldTVaccordingtolocalregulations.
Disposalofusedbatteries
Thebatteriessupplieddonotcontaintheheavymetalsmercuryand
cadmium.Nevertheless,inmanyareasbatteriesmaynotbedisposed
ofwithyourhouseholdwaste.Pleaseensureyoudisposeofbatteries
accordingtolocalregulations.
English
7
3 Getstarted
Features
• DTV/AnalogTV/CATV
Youcanuseyourremotecontroltoselectchannelswhicharebroadcastin
DigitalformatandconventionalAnalogformat.Also,cablesubscriberscan
accesstheircableTVchannels.
• Informationdisplay
Youcandisplaythetitle,contents(DTVonly)andotherinformationofthe
currentprogramontheTVscreen.
• Autoprogram
Thisunitautomaticallyscansandmemorizeschannelsavailableinyourarea,
eliminatingdifcultsetupprocedures.
• Childlock
Thisfeatureallowsyoutoblockchildren’saccesstoinappropriate
programs.
• ClosedCaptiondecoder
Built-inClosedCaptiondecoderdisplaystextforClosedCaption
supportedprograms.
• MTS/SAPtuner
Audiocanbeselectedfromtheremotecontrol.
• AutoStandby
IfthereisnoInputsignalandnooperationfor15minutes,theunitwillgo
intoStandbymodeautomatically.
• Sleeptimer
YoucansettheunittogointoStandbymodeafteraspecicamountof
time.
• Choicesforon-screenlanguage
Selectyouron-screenlanguage:English,SpanishorFrench.
• Stereosoundfunction
• PLLfrequencysynthesizedtuning
Providesfreeandeasychannelselectionandletsyoutunedirectlytoany
channelusingthenumberanddecimalpoint“•”buttonsontheremote
control.
• Variousadjustmentforpictureandsound
Customizesimagequalitysuitableforyourroomandsetsyoursound
preference.
• EasyLinkviaHDMIlink
EasyLinkallowsyourotherHDMIlinkdevicestobecontrolledbythe
HDMIcableconnectedtoyourTV.
• HDMIInput
• HDMI-DVIInput
IfyourvideodevicehasDVIOutputjack,useanHDMI-DVIconversion
cabletoconnecttheunit.
• ComponentVideoInput
• PCInput
• AVInput
• USBterminal
Thepicture(JPEG)andvideo(MotionJPEG)lesstoredonaUSBMemory
Stickcanbeplayedbackonthisunit.
• DigitalAudioOutput
• HeadphoneAudioOutput
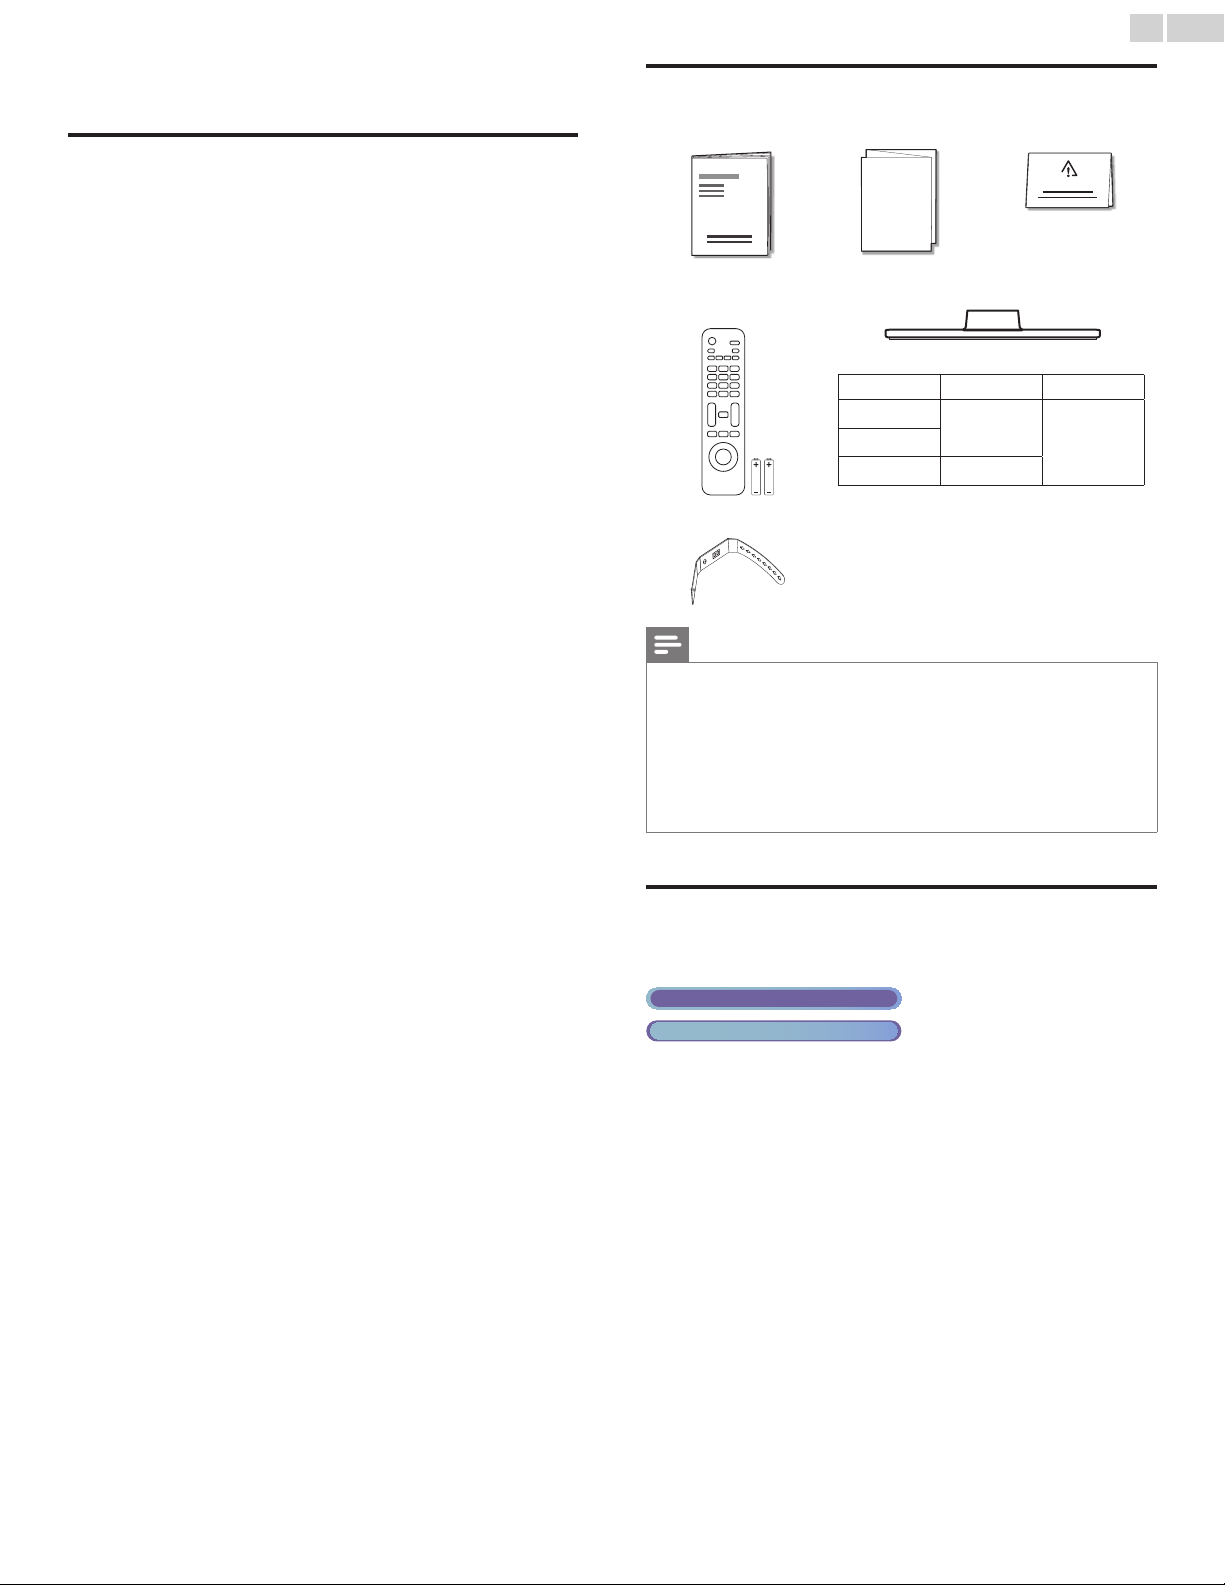
Suppliedaccessories
UserManual QuickStartguide
Quick
Star t
Registrationcard
IMPORTANT
RemoteControland
batteries(AAA,1.5Vx2)
AAA
AAA
TVbaseandscrews
Screwspackedwiththisunit:
Model Quantity Size
32PFL4507
3
M4x14
26PFL4507
22PFL4507
2
Cablemanagementtie
Note
• Ifyoulosethescrews,pleasepurchasetheabove-mentionedPhillipsheadscrewsat
yourlocalstore.
• Ifyouneedtoreplacetheseaccessories,pleaserefertothepartnameorNo.with
theillustrationsandcallourtollfreecustomersupportlinefoundonthecoverofthis
UserManual.
Whenusingauniversalremotecontroltooperatethisunit.
• Makesurethecomponentcodeonyouruniversalremotecontrolissettoourbrand.
Refertotheinstructionbookaccompanyingyourremotecontrolformoredetails.
• Wedonotguarantee100%interoperabilitywithalluniversalremotecontrols.
SymbolsusedinthisUserManual
Thefollowingisthedescriptionforthesymbolsusedinthis
UserManual.Descriptionrefersto:
Digital TV operation
Analog/Cable TV operation
• Ifneithersymbolappears,theoperationisapplicabletoboth.
English
8
Attachingthebase
Youmustattachthebasetotheunittohaveitasatabletopunit.
Besurethefrontandrearofthebasematchtheproperdirection.
ForlargescreenTVs,atleast2peoplearerequiredforthesesteps.
1
2
1
1
2
2
2
1
1
2
22”×2
26”–32”×3
Note
• Makesuretouseatablewhichcansupporttheweightofthisunitandislargerthan
thisunit.
• Makesurethetableisinastablelocation.
• Whenattachingthebase,ensurethat“FRONT”with“arrow”writtenonthebottomof
thebaseisdownward.Ifit’snotdownward,the2hooksdon’ttintothebase.
• Whenattachingthebase,ensurethatallscrewsaretightlyfastened.Ifthebaseisnot
properlyattached,itcouldcausetheunittofall,resultingininjuriesaswellasdamage
totheunit.
• Toremovethebasefromthisunit,unscrewthePhillipsheadscrewsinstep2.
Becarefulnottodropthebasewhenyouremoveit.
Mountingtheunitonyourfurniture
Screwthisunitonyourfurnituretightlyusingwoodscrew(notsupplied)
intheholeatthebackofthebaseasshown.
• Recommendedscrewdimension:3/16x3/4inches(5.1x20mm)
screwhole
rearofthisunit
Note
• WhenyouremovethisunitmakesuretounscrewthewoodscrewfromyourWood
Stand,Furnitureandotherwooditem.
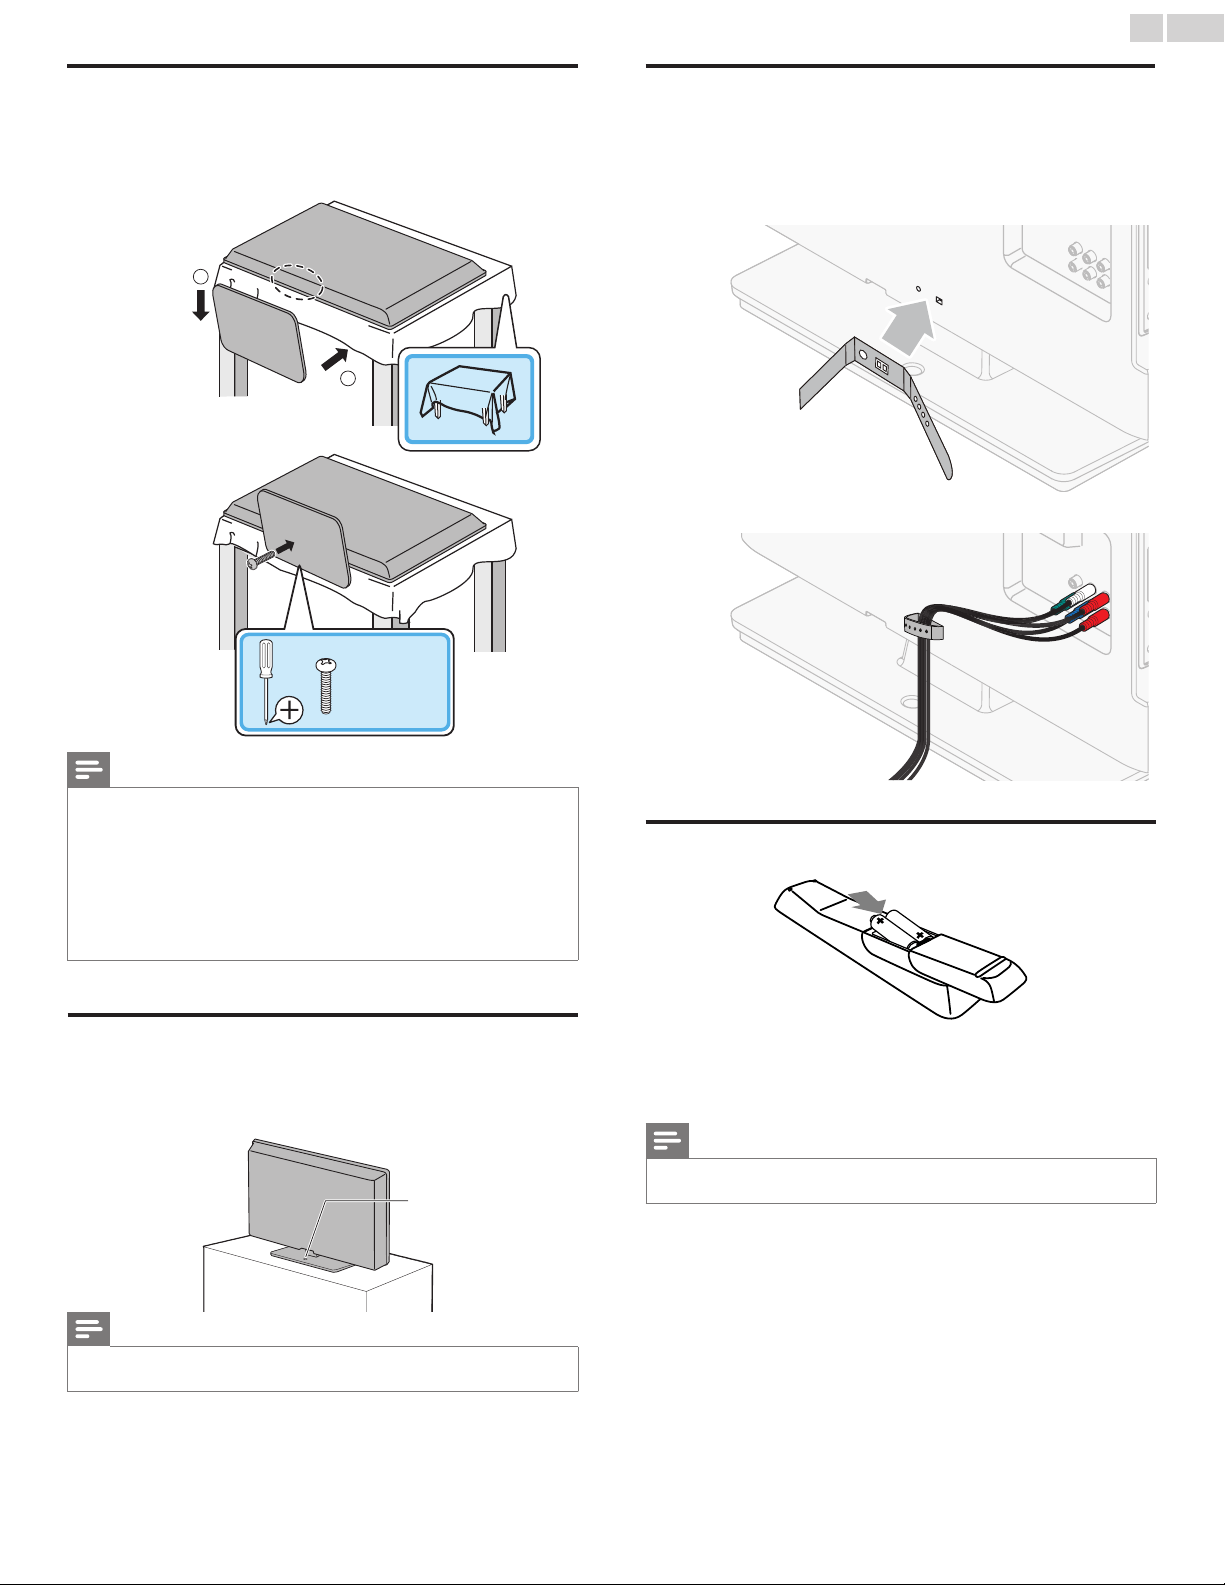
Managingcables
Routeyourantennacableandallothercablesthroughthecable
managementtieatthebackoftheTV.
Theholderhelpskeepyourcablestidyandeasilymanageable.
1 Attachthecablemanagementtieasillustratedbelow.
2 Passcablesthroughthecablemanagementtietoavoidtangles.
Installingtheremotecontrolbatteries
1 Slidethebatterycoveroffthebackoftheremotecontrol.
2 Insertthe2suppliedbatteries(AAA,1.5V).Besurethe+and−
endsofthebatterieslineupwiththemarkingsinsidethecase.
3 Slidethecoverbackintoposition.
Note
• Removethebatteriesifnotusingtheremotecontrolforanextendedperiodoftime.
English
9
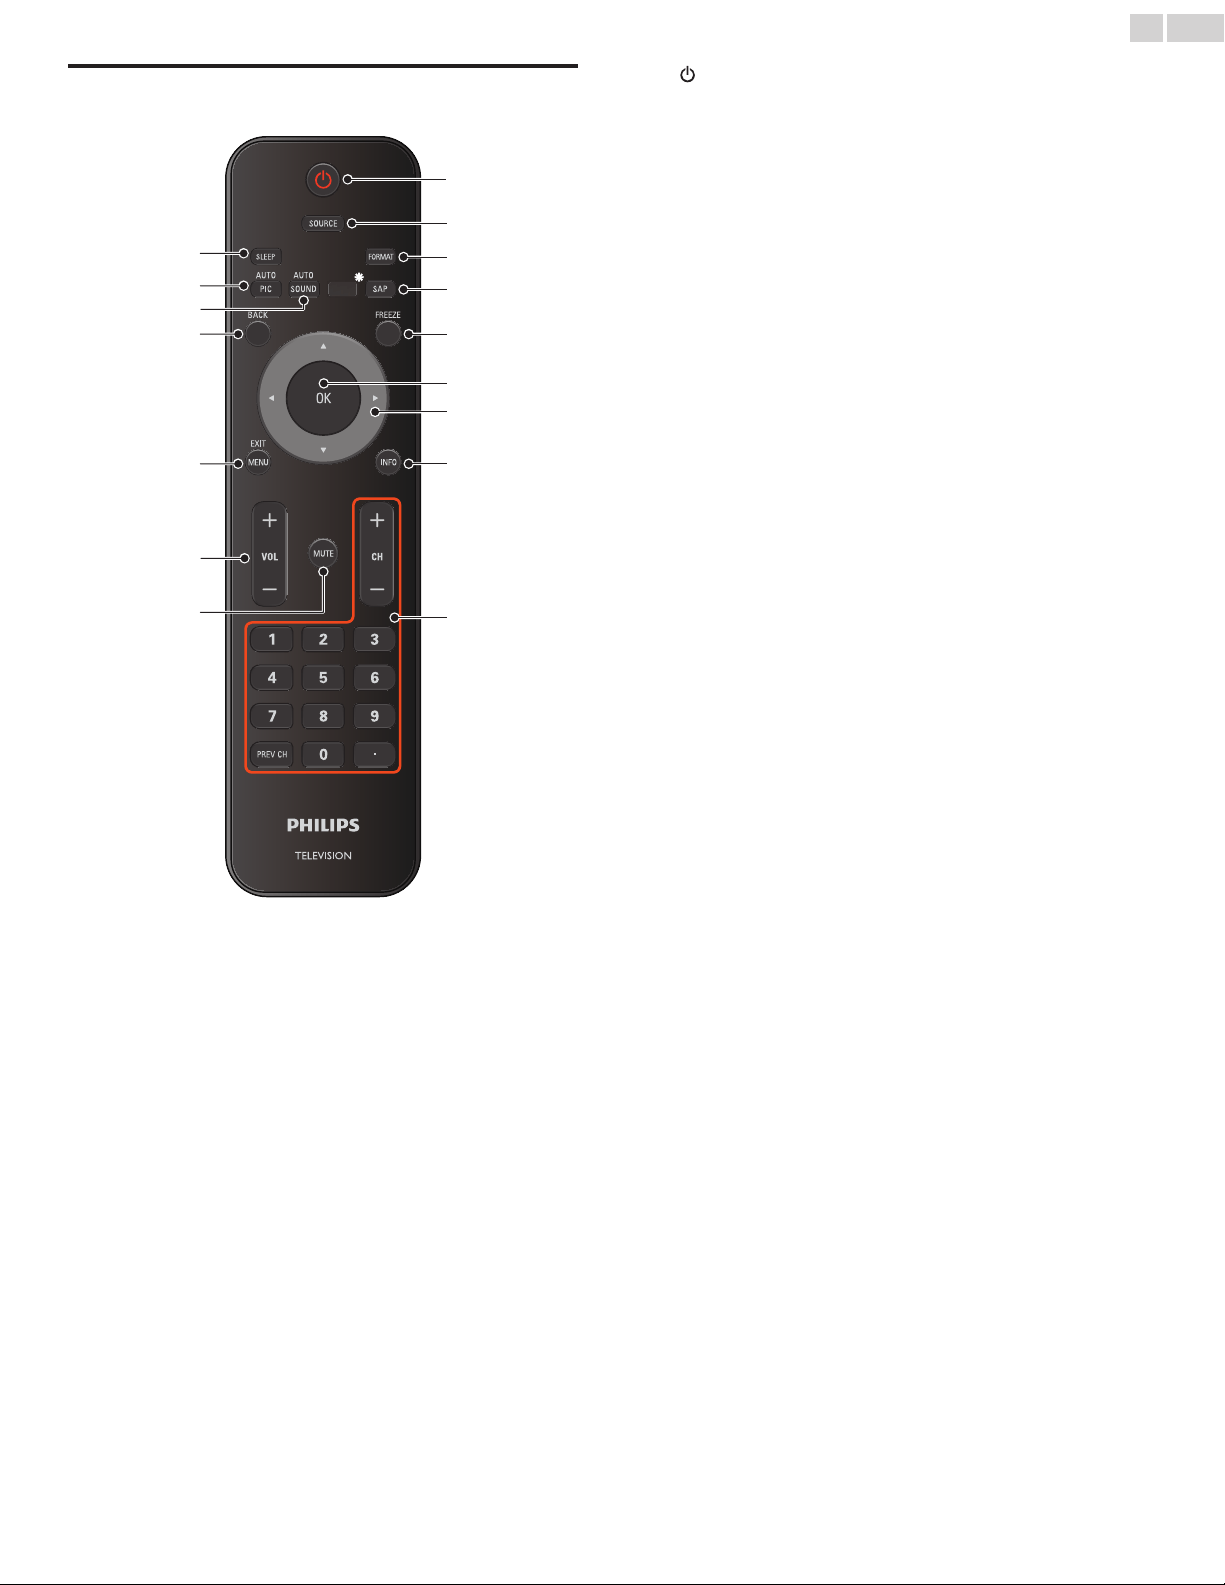
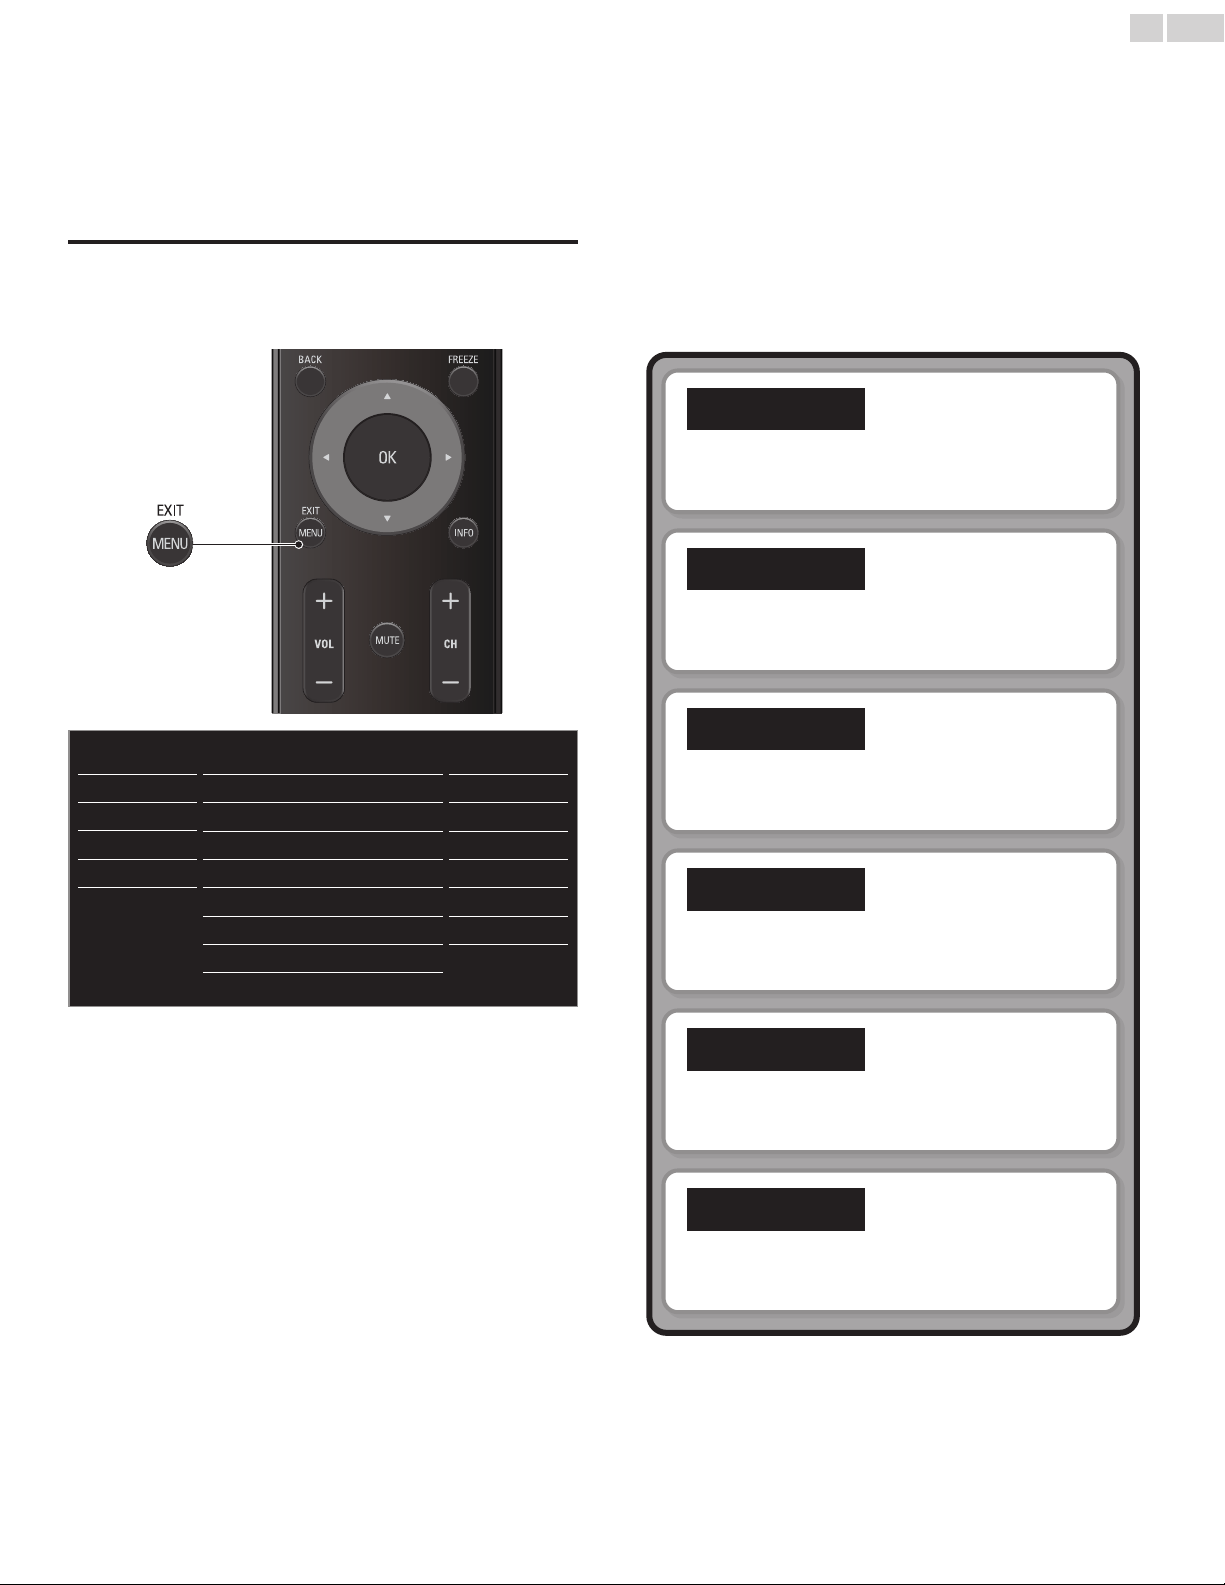
Remotecontrol
*
b
c
a
d
e
h
i
g
f
l
m
o
n
p
j
k
*
*Thisbuttondoesnotfunctiononthisunit.
a (POWER-ON/STANDBY-ON)
PresstoturntheunitOnandgointoStandbymode.Tocompletely
TurnOfftheunit,youmustunplugtheACpowercord.
b SOURCE
Toggleandselectconnecteddevices.
c FORMAT
Selectsapictureformat.
d SAP
DigitalMode(DTV):PresstoselecttheAudiolanguage.
AnalogMode(AnalogTV):PresstoselecttheAudiomode.
e FREEZE
Presstofreezescreenimage.
f OK
Presstodecidethecommandofsettingwhenthemainmenuis
displayed.
g ▲▼◄►(NAVIGATIONbuttons)
Presstomoveleft/right/up/downthroughtheitems.
h INFO
DisplaysinformationabouttheTVchanneloraccessorydevice.
i CH+/− Presstoselectchannels.
0−9(NUMBERbuttons)
Presstoselectchannels.
•(DOT) Presstoshiftthesubchannelfromthemainchannel.
PREVCH Presstoreturntothepreviouslyviewedchannel.
j MUTE
PresstoturnthesoundOnandOff.
k VOL+/−
Presstoadjustthevolume.
l MENU/EXIT
Presstodisplaythemainmenu.
m BACK
Presstoreturntothepreviousmenuoperation.
n AUTOSOUND
Cyclesthroughpresetsoundsettings.
o AUTOPIC
Cyclesthroughpresetpicturesettings.
p SLEEP
Presstoactivatethesleeptimer.
English
10
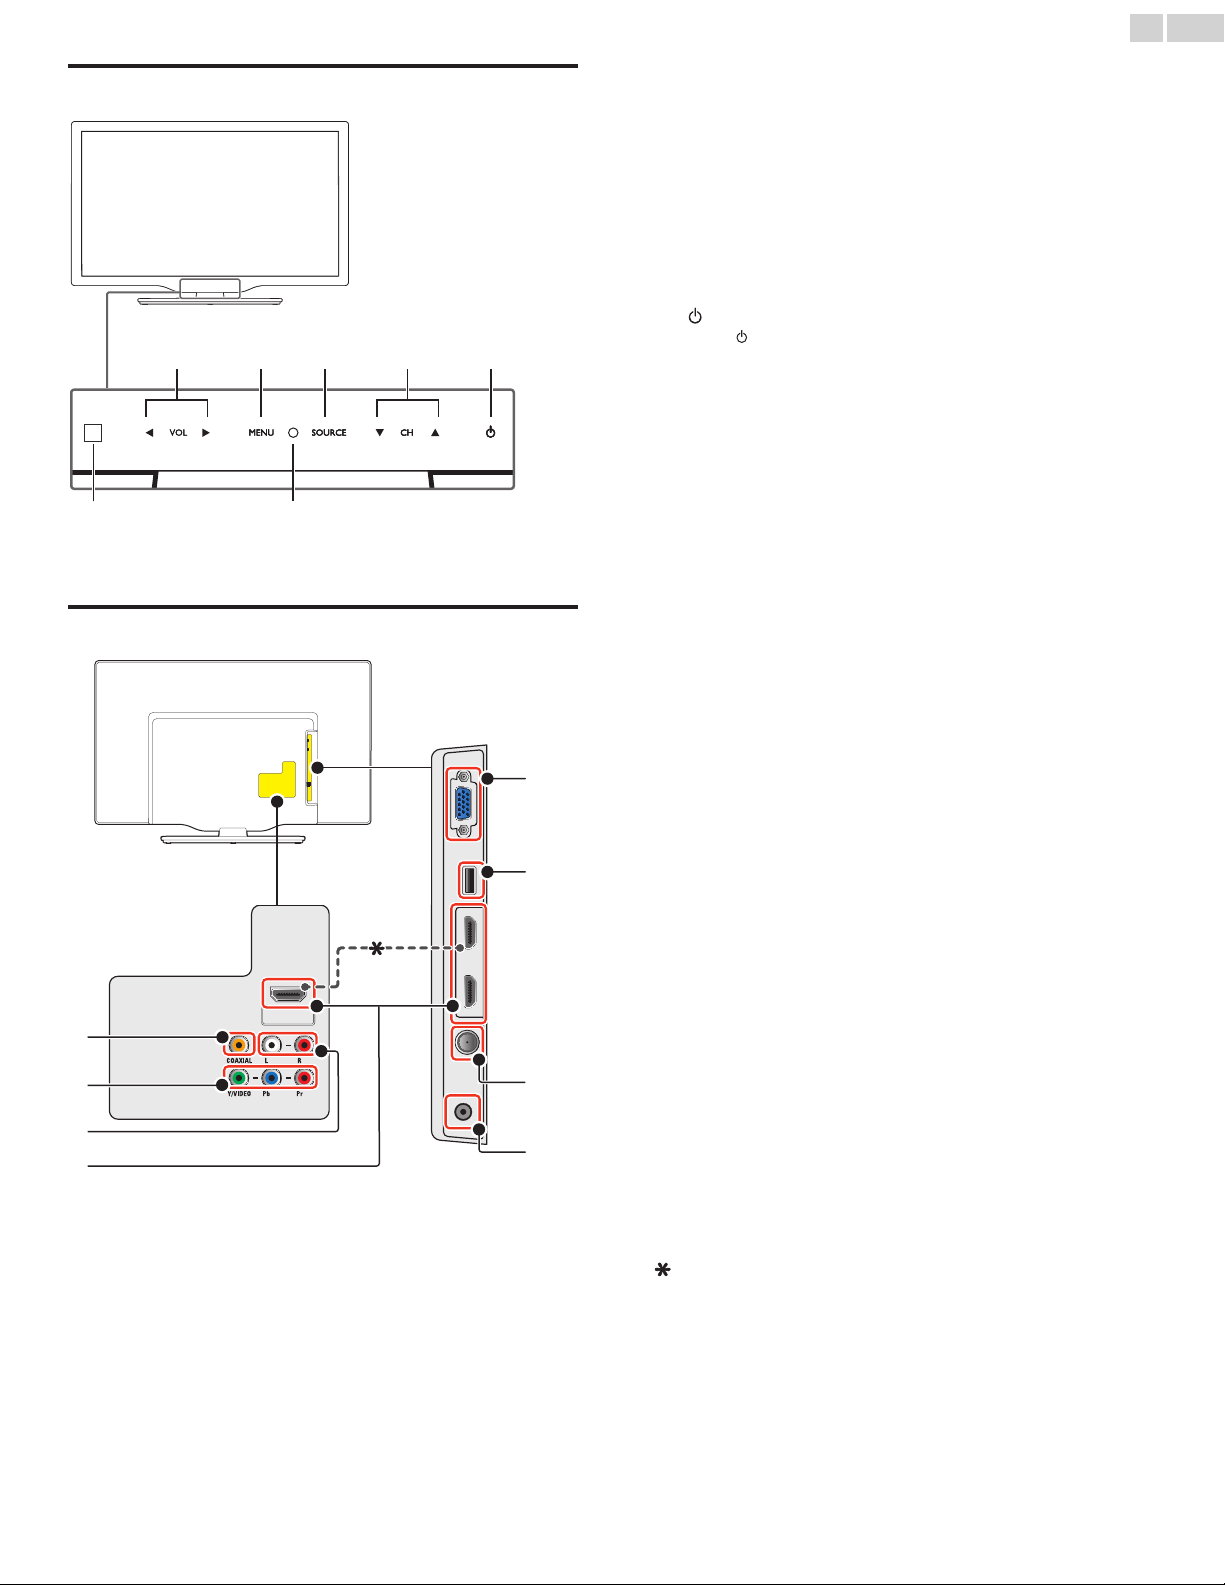
Controlpanel
a VOL◄/►
Touchtoadjustvolumedown(◄)/up(►)ortomove
left(◄)/right(►)whenselectingmenuitems.
b MENU
Touchtodisplaythemainmenu.
c SOURCE
Touchtoselecttheconnecteddevices.
d CH▲/▼
Touchtoselectchannelsortomoveup(▲)/down(▼)when
selectingmenuitems.
e (POWER-ON/STANDBY-ON)
Touch
toTurntheunitOnandgointoStandbymode.
TocompletelyTurnOfftheunit,youmustunplugtheACpower
cord.
f PowerOnindicator
LightsupwhitewhentheunitisturnedOnandasheswhilethe
unitisturningOn.
g
Infraredsensor
ReceivesIRsignalsfromremotecontrol.
a db c e
fg
Terminals
h DigitalAudioOutputjack
DigitalAudio(S/PDIF)OutputtohometheatersandotherDigital
Audiosystems.
i Component(Y/Pb/Pr)/CompositeVideo(VIDEO)Inputjacksfor
VIDEO
CompositeVideoInput(VIDEO)jackissharedjackwith
ComponentVideoInput(Y)jack.
j AnalogAudio(L/R)Inputjacks
ConnectAnalogAudiosignalsfrom;
-HDMI-DVI/AnalogAudio(L/R)jackssignal
-ComponentVideo/AnalogAudio(L/R)jackssignal
-CompositeVideo/AnalogAudio(L/R)jackssignal
-PCConnection/AnalogAudio(L/R)jackssignalwithStereo
mini3.5mmplugAudiocableonPC
k HDMIInputjack(s)
DigitalaudioandvideoInputfromhighdenitionDigitaldevices
suchasBlu-raydiscplayers,cableboxesandsatelliteset-top
boxes.
l PCInputjack
VGAcableconnectionforPC.
m USBterminal
DataInputfromUSBMemoryStickonly.
Donotconnectanydevicetothisterminalsuchas;Digital
camera,keyboard,mouse,etc.
n 75ohmCable/Antennaconnection
SignalInputfromanantenna,cableorsatellite.
o HeadphoneAudioOutputjack
Headphone3.5mmstereojackforpersonallistening.
TheseHDMIInputsareavailableon26inchandlargerscreensize
TVs.
h
l
n
m
o
i
j
k
English
11
Connectingtheantennaorthecable
Besureyourantennaorotherdeviceisconnectedproperlybefore
pluggingintheACpowercord.
IfyouconnecttoanantennathroughRFcable
AnyDTVprogramsthatarebroadcastedinyourareacanbereceived
forfreethroughanantennaconnection.
ININ
OUT
antenna
RFcable
cable
Ifyouconnectaset-topboxthroughRFcable
IftheTVisconnectedtoacableboxorsatelliteset-topboxviaa
coaxialconnection,settheTVtochannel3,4orthechannelspecied
bytheserviceprovider.
IN
ININ
OUT
set-topbox
RFcable
antenna
RFcable
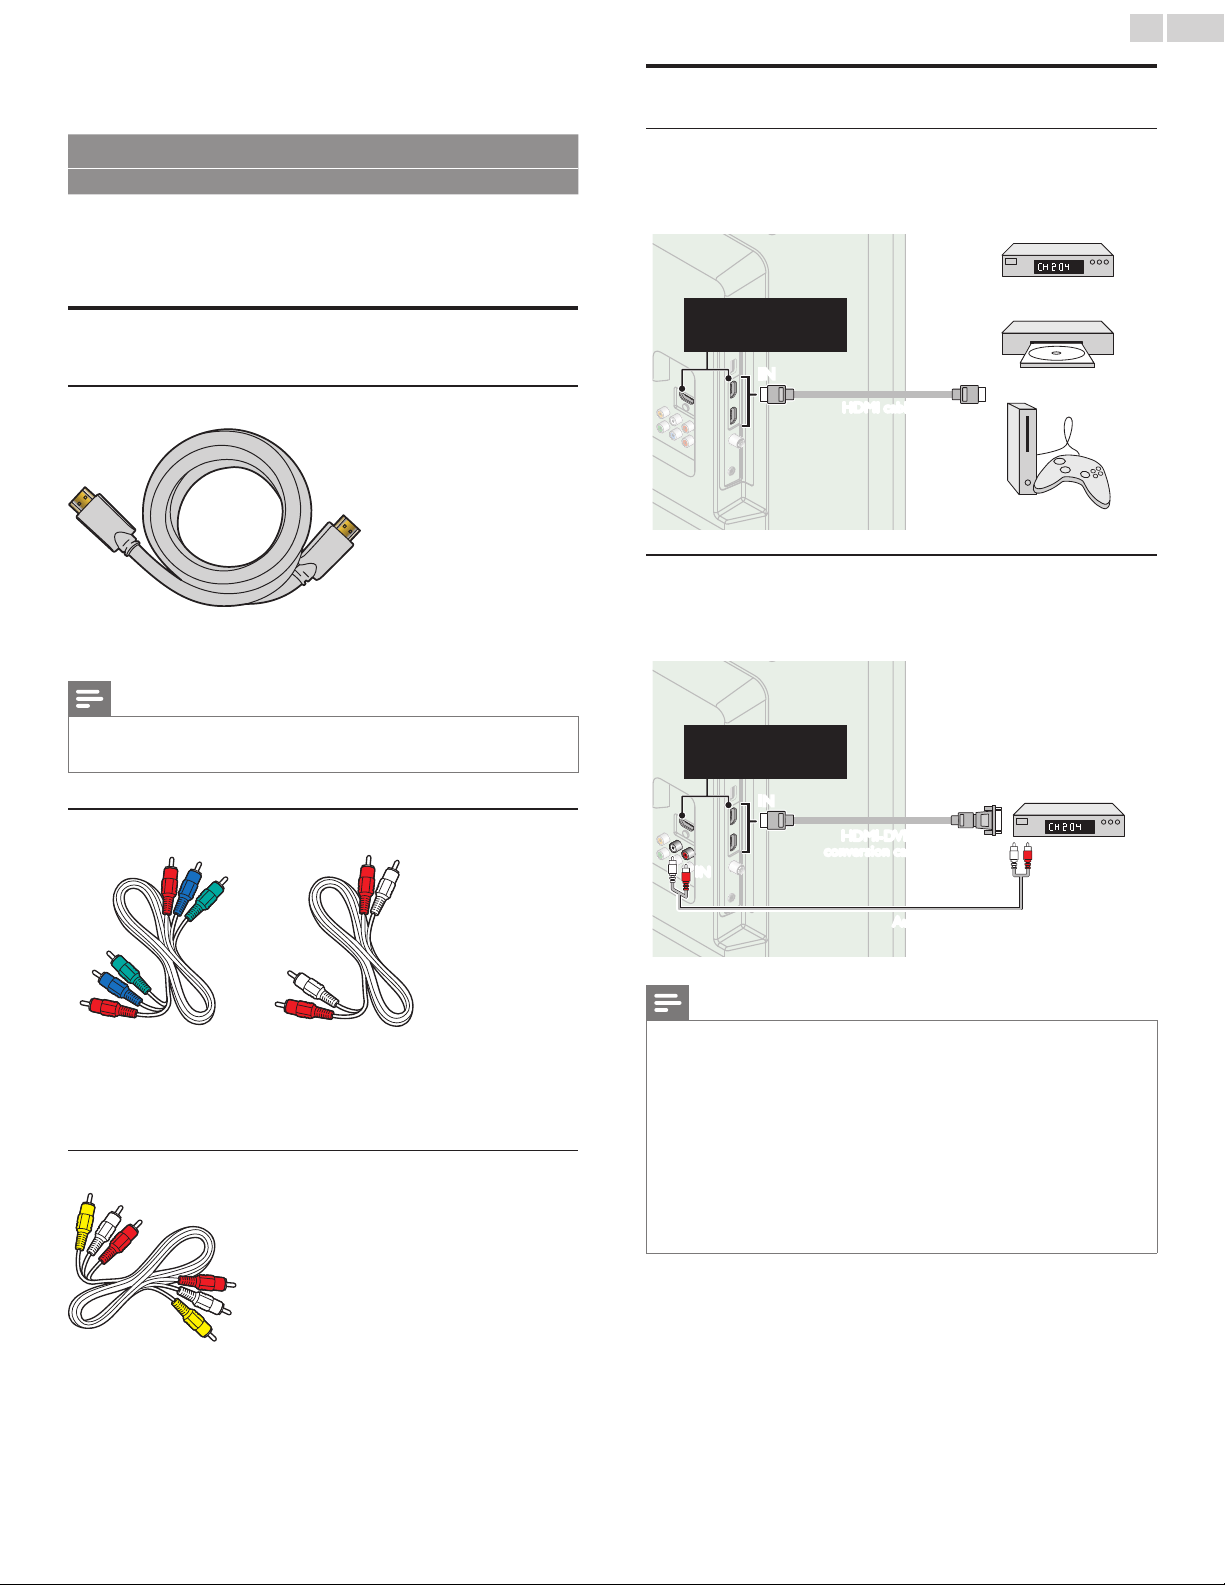
Ifyouconnectaset-topboxthroughHDMI
IftheTVisconnectedtoacableboxorsatelliteset-topboxviaHDMI,
makesureyouselectthecorrectSourcebyusingSOURCE.
IN
ININ OUT
set-topbox
HDMIcable
RFcable
TheseHDMIInputsare
availableon26inchand
largerscreensizeTVs.
Ifyouconnectaset-topboxthroughComponentVideoInput
IftheTVisconnectedtoacableboxorsatelliteset-topboxvia
ComponentVideoInput,makesureyouselectthecorrectComponent
VideoSourcebyusingSOURCE.
IN
OUTOUT
IN
IN
IN
IN
OUT
OUT
set-topbox
RFcable
Audio(L/R)cables
Component(Y/Pb/Pr)videocables
Connectingaset-topbox,Blu-raydisc/DVDrecorder
viacompositeconnectorsandAnalogAudio
Donotplaceyourrecordertooclosetothescreenbecausesome
recorderscanbesusceptibletosignals.
ININ
OUT
OUT
OUT
OUT
OUT
IN
IN
IN
OUT
IN
RFcable
RFcable
cable
set-topbox
Blu-raydisc/DVDrecorder
Audio(L/R)+Videocables
Audio(L/R)+
Videocables
Note
• IfyouhaveanyquestionabouttheDTV’santenna,visitwww.antennaweb.org forfurther
information.
• Dependingonyourantennasystem,youmayneeddifferenttypesofcombiners
(mixers)orseparators(splitters)forHDTVsignal.TheminimumRFbandpassonthese
devicesis2,000MHzor2GHz.
• Foryoursafetyandtoavoiddamagetothisunit,pleaseunplugtheRFcoaxialcable
fromtheantennaInputjackbeforemovingtheunit.
• IfyoudiduseanantennatoreceiveAnalogTV,itshouldalsoworkforDTVreception.
Outdoororatticantennaswillbemoreeffectivethanaset-topboxorinsideantenna.
• ToTurnOnyourreceptionsourceeasilybetweenantennaandcable,installanantenna
selector.
• Ifyouarenotreceivingasignalfromyourcableservice,contacttheCableprovider.
• Onlytheleftloudspeakerreproducessoundformonoequipment.Useamonoto
stereoadapter(notsupplied)forsoundreproductionviaallinternalloudspeakers.
PluggingintheACpowercord
MakesurethattheACpowercordmustbepluggedtoanACoutlet
afterallthenecessaryconnectionsaremade.
Caution
• DonotconnecttheACpowercordtoapowersupplyoutsidetheindicatedvoltageof
thisunit(AC120V).
• ConnectingtheACpowercordtoapowersupplyoutsideofthisrangemayresultin
reorelectricalshocks.
Note
• EachtimeyouplugintheACpowercord,nooperationswillbeperformedforafew
seconds.Thisisnotamalfunction.

English
12
These operations are accessible by remote control.
Some may also be accessible by control panel on the main unit.
Initialsetup
Thissectionwillguideyouthroughtheunit’sinitialsettingwhich
includesselectingalanguageforyouron-screenmenuandautoprogram,
whichautomaticallyscansandmemorizesviewablechannels.
Before you begin:
Makesuretheunitisconnectedtoantennaorcable.
1 Aftermakingallthenecessaryconnections,press toTurnOnthe
unit.
• ItmaytakeafewmomentstoTurnOntheunitforthersttime.
• InitialsetupmenuappearsautomaticallyaftertheunitisTurned
On.
2 Use▲▼toselecttheon-screenlanguagefromthechoices
(English/Español/Français)ontherightsideoftheTVscreen,then
pressOK.
3 Use▲▼toselectAntennaforTVchannelsorCableforCATV
channels,thenpressOK.
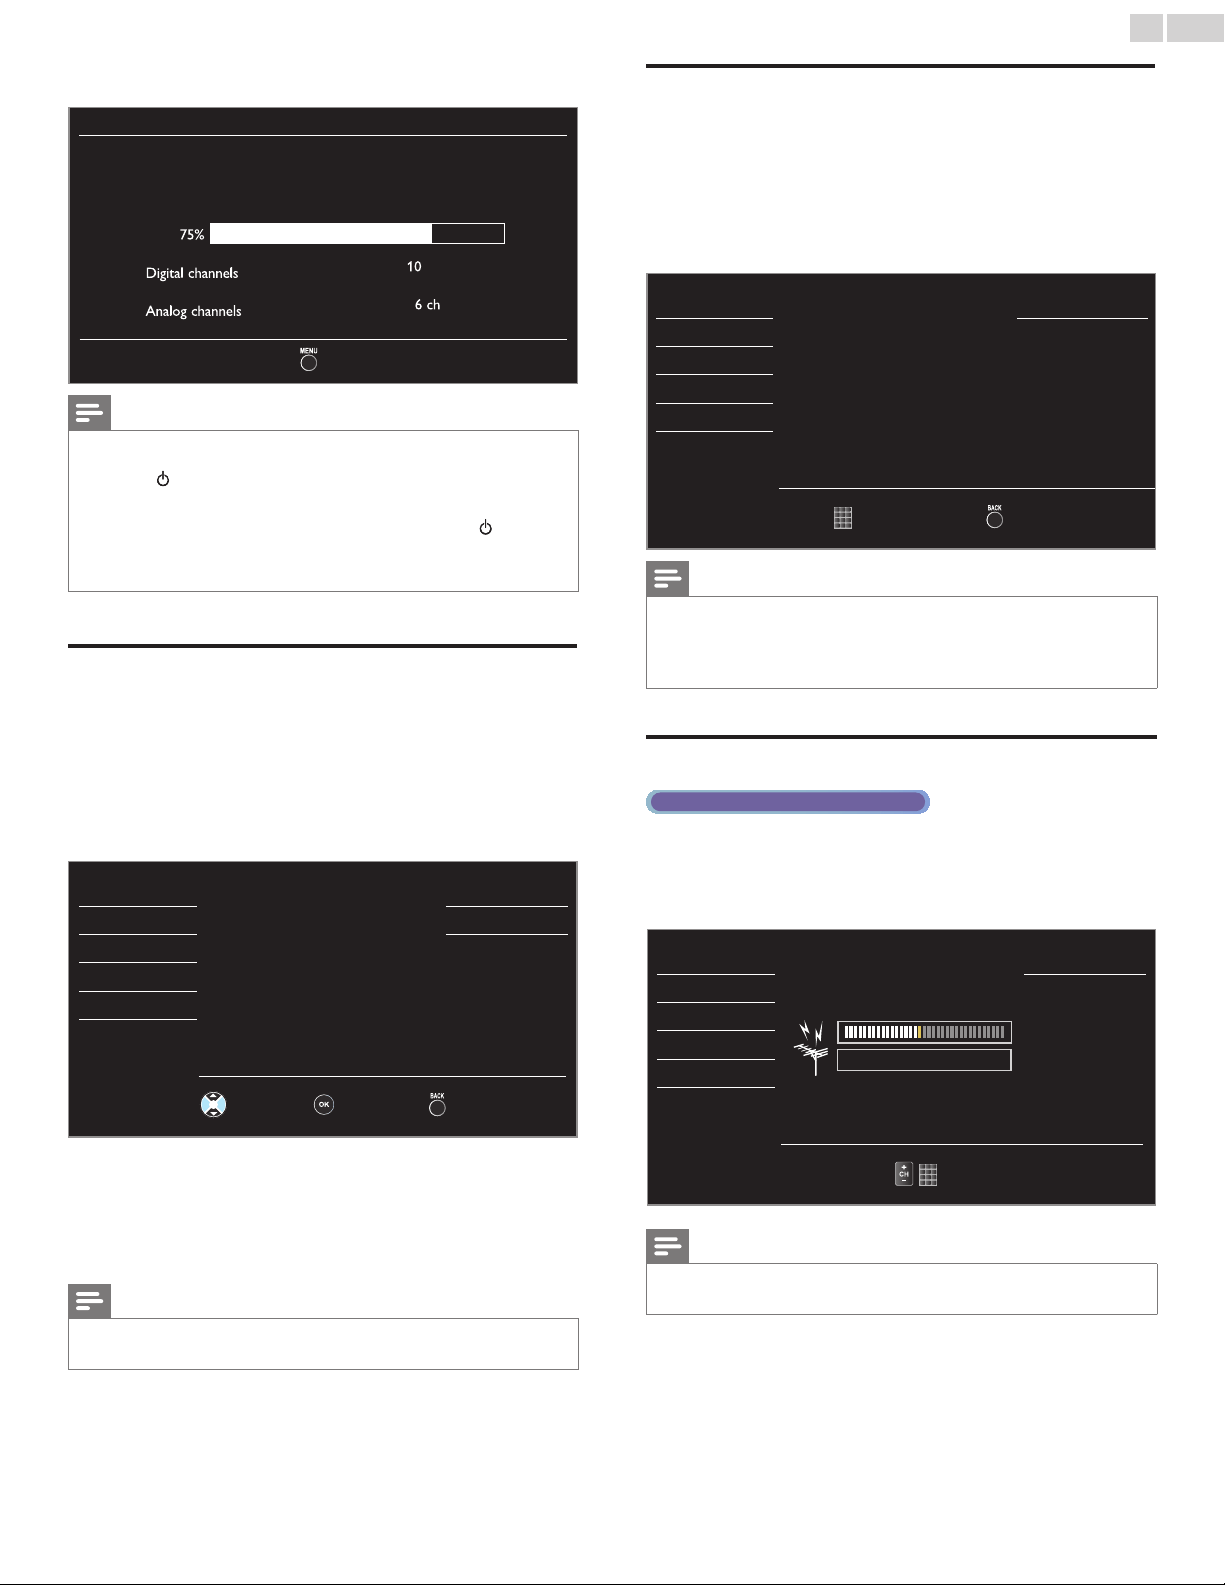
Initialsetup
Makesuretheantennaisconnectedto‘’ANTENNAIN’’jack.
Selectyoursignalsource.
Antenna
Cable
Antenna
Cable
Or
ANTENNAIN
Skip
Select OK Back Skip
– WhenAntennaisselected,theTVdetectsantennasignals.It
searchesforDTVandAnalogTVchannelsavailableinyourarea.
– WhenCableisselected,theTVdetectssignalssuppliedbycable.It
searchesforDTV,AnalogTVandCablechannelsavailableinyour
area.
• Autoprogramwillbegin.
Initialsetup
Pleasewaitwhilethesystemisscanningforchannels.
Autoprogrammingmaytakemorethan20minutesto
complete.
0%
Digital channels
0ch
Analog channels
0ch
Skip
4 Use▲▼toselectthedesiredlocationsetting,thenpressOK.
HomeisENERGYSTAR
®
qualiedsetting.
Initialsetup
LocationHomeisrecommendedfornormalhomeuse
andisENERGYSTARqualified.
IntheRetailStoremode,allsettingsarefixed.
Retail
Home
Select OK
• SelectRetail,theunitwillbesetupwithpredenedsetting
forretaildisplays.Inthissetting,thepowerconsumptionmay
possiblyexceedthelimitedrequirementoftheENERGYSTAR
®
qualication.
• SelectHome,theunitissettomaximizetheenergyefciency
forhomesettinganditcanbeadjustedthroughachoiceof
pictureandsoundqualityaccordingtoyourpreference.Usethis
settingtoremovetheE-stickerifvisiblefromthedisplay.
➠
p.27
5 WhenyouselectHome,pressOKtobeginSettingsassistant.
Settingsassistant
Settingsassistanthelpsyoucustomizepicturesettings.
Youwillseeaseriesoftestpictureswheretherightsideand
leftsidediffer.Selectthesidethatismostpleasingtoyou
withtheLeft/Rightkeys.
Next Back Exit
6 Press
Í
or
Æ
3timestoselectthesideofthepicturesthatisthe
mostpleasingtoyou,thenpressOK.
Leftside Rightside
1/3Selectthepicturesettingthatyouprefer.
Select Next Back Exit
7 PressOKtonishSettingsassistant.
Settingsassistant
Youhavesetupyourviewingpreferences.
Store Back Exit
• Whentheinitialsetupiscompleted,thelowestmemorized
channelwiththeconrmationmessageofthelocationsetting
willbedisplayedontheTVscreen.
• YoumustsetHomeinstep4.Otherwise,PictureandSound
settingsyouadjustedwillnotbememorizedaftertheunitgoes
intoStandbymode.
Continued on next page.

English
13
Note
• Ifyouarenotreceivingasignalfromyourcableservice,contacttheCableprovider.
• Ifyoupress orMENU/EXITduringautoprogram,thissetupofTVchannelswillbe
canceled.
• TheinitialautoprogramfunctioncanbeexecutedforeitherAntennaorCableonly
once.Whenyouchangetheconnection(Antenna/Cable),setAutoprogramagain.
➠
p.20
• IfthereisnosignalInputfromtheantennaterminalandnooperationforseveral
secondsafteryouTurnOntheunit,helpfulhintsappears.Followtheinstructionslisted
ontheTVscreen.
Initialsetup
Nochannelisregistered.
TryAutoprogramagain?
Verifythatyouhaveacableconnectedtothe“ANTENNAIN”jack
onthebackoftheTV,thechannelinstallationprocess
searchesthisconnection.Ifyouareusingacableorsatellite
box,pleaseconfirmtheinputwhichyouhaveconnectedto
theboxandpress“SOURCE”keyontheremotecontrolto
selecttheappropriatesourceinput.
Retry
Later
Select OK Skip
After an initial setup is completed...
• Ifyouwanttoscanthechannelsautomaticallyagain.
Autoprogram
➠
p.20
• YoucanaddthedesiredcableandAnalogchannels
unmemorizedbyautoprogram.
Addchannels
➠
p.21
• Ifyouwanttochangetoanotherlanguage.
Language
➠
p.27
• Ifyouwanttochangethelocationsetting.
Location
➠
p.27
• Ifyouwanttorestorethepicturesetting.
Settingsassistant
➠
p.19

English
14
4 UseyourTV
SwitchingonyourTVandputtingitinstandby
mode
ToTurnPowerOnortoTurnStandbyOn
• Touchorpress
.
onthefrontpanelortheremotecontrol.
Note
• Energyconsumptioncontributestoairandwaterpollution.WhentheACpower
cordispluggedin,yourTVconsumesenergy.YourTVhasverylowstandbypower
consumption.
Adjustingvolume
Toincreaseordecreasevolume
• TouchVOL◄(down)/►(up)onthefrontpanelorpress
VOL+/−ontheremotecontrol.
Tomuteorunmutesound
• PressMUTEontheremotecontroltomutethesound.
• PressMUTEagainorVOL+/−torecovertheoriginalsound.
Switchingchannels
ToselectChannelsbyusingCH▲/▼orCH+/−
• TouchCH▲(up)/▼(down)onthefrontpanelorpressCH+/−
ontheremotecontrol.
ToselectChannelsbyusingtheNUMBERbuttons
Digital TV operation
• ForDigitalchannels,pressanumberfollowedbyadot“•”andthe
correspondingsubchannelnumber.
– WhenselectingDigitalchannel11.1
Besuretopress•beforeenteringthesubchannelnumber.
Analog/Cable TV operation
– WhenselectingcableorAnalogchannel11
PressPREVCHtoreturntothepreviouslyviewedchannel.
Note
• Toselectthenon-memorizedchannels,usetheNUMBERbuttons.
• NoSignalwillappearontheTVscreenafterthesubchannelbroadcastisover.
• AudioonlyprogrammessagewillappearontheTVscreen,whenyoureceiveonly
soundsignal.

English
15
Watchingchannelsfromanexternaldevice
SwitchingEachInputModecaneasilyswitchwiththeremotecontrol
betweenTV(DTVorAnalogTV)andexternaldeviceswhentheyare
connectedtotheunit.
1 TurnOnaset-topboxortheconnecteddevice.
• Thepicturefromyourset-topboxortheconnecteddevice
mightappearautomaticallyontheTVscreen.
If the picture does not appear
PressSOURCErepeatedlytoselecttheset-topboxorthe
connecteddeviceandwaitafewsecondstillthepictureappears.
e.g.)
Source
TV
HDMI1
HDMI2
HDMI3
Video
PC
11.1 HDMI1 HDMI2
DTV/AnalogTV
channel
Video
or
Component
PC HDMI3
• Pressing▲reversesthedirectionoftheInputmodes.
• Theaboveimageisanexamplefor26inchandlargerscreen
sizeTVs.Itmaydifferdependingonwhatproductyoupurchased.
2 Usetheremotecontroloftheset-topboxortheconnecteddevice
toselectchannels.
Usingautomode
1
PressAUTOPICorAUTOSOUNDtosetyourTVtoa
predenedpictureandsoundsetting.
2 Use▲▼toselectoneofthefollowingsettings:
Autopicture Autosound Description
Personal
Thecustomizedsettingsyoudenedusing
thePictureandSoundmenu
Standard
FornormalTVviewing
Vivid
Enhancedpicturecontrast,sharpnessand
soundforviewinginawell-litroom
Sports
Brilliantpicturesettingsandclearsoundfor
highaction
Movie
Deeppictureandpowerfulsoundsettings
foracinematicexperience
Game -
OptimizedforPCsandgameconsoles
Eco -
EcoTVsettingsforlowpower
consumption
- Music
Optimizedformusicplayback
- News
Controlspicturetoneandsettheanchor's
voiceatacomfortablevolume
Sleeptimer
SleepTimercansettheunittogointoStandbymodeafteran
incrementalperiodoftime.
PressSLEEPrepeatedlytochangetheamountof
time(increasesthetimeby30minutesupto120
minutes).
Sleep 120min.
PressSLEEPoncetocallupthedisplayforcheckingtheremainingtime.
• Tocancelsleeptimer,pressSLEEPrepeatedlyuntilOffisdisplayed.
Freezemode
FreezeModecanfreezetheimageshownontheTVscreenfor5
minutes.
PressFREEZEtofreezetheimage.
Freeze
• ThesoundOutputwillnotbepaused.
• Tocancelfreezemode,pressanybuttonsexcept
.
English
16
Switchingaudiomode
Digital TV operation
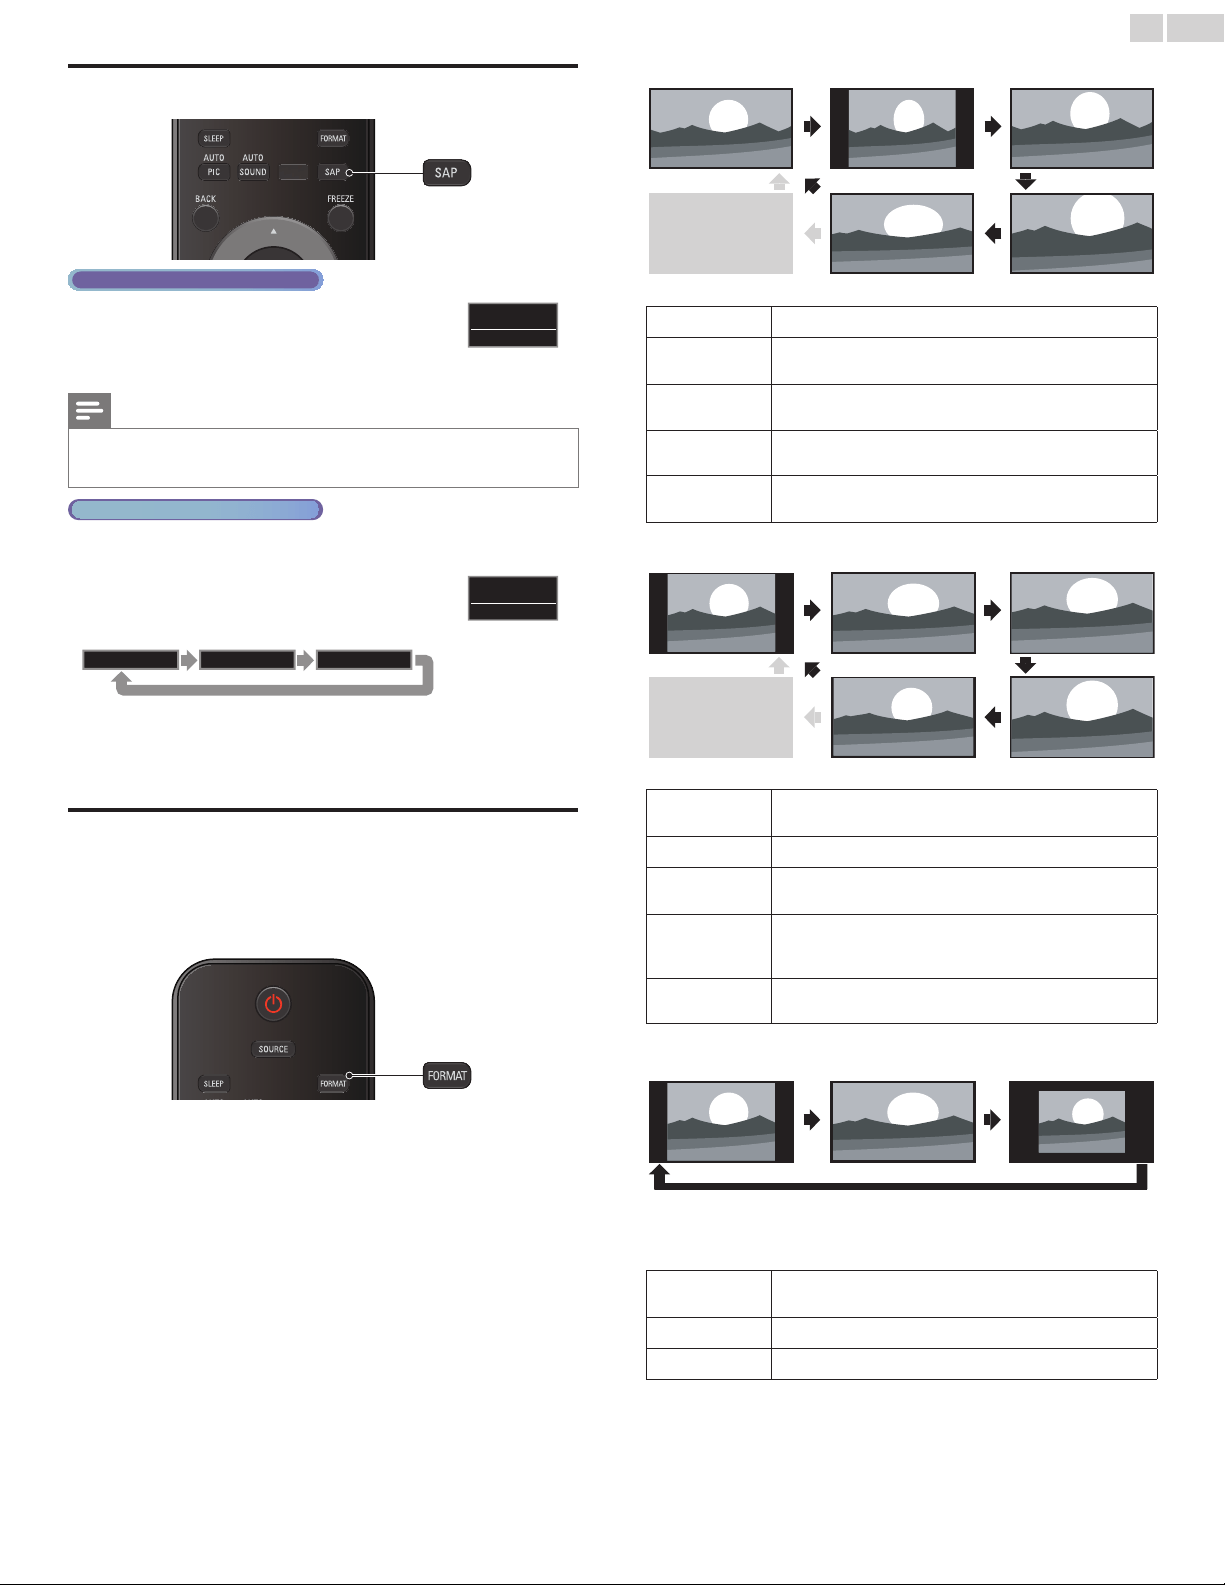
1 PressSAPtodisplaythecurrentlyselected
languageandthenumberofavailablelanguages.
11.1
English1/3
2 PressSAPrepeatedlytocyclethroughtheavailableaudiolanguages.
Note
• Availablelanguagesdifferdependingonthebroadcast.
• Otherisdisplayedwhentheaudiolanguagecannotbeacquiredortheacquired
languagesareotherthanEnglish,FrenchorSpanish.
Analog/Cable TV operation
1 PressSAPtodisplaythecurrentlyselectedaudiomode.
2 WhilereceivinganMTSbroadcast,press
repeatedlytocyclethroughtheavailableaudio
channels.
11
SAP/STEREO
e.g.)Whenallaudioareavailable
SAP/STEREO SAP/MONO SAP/STEREO
STEREO:Outputsstereo-audio
SAP :Outputssecondaudioprogram
MONO :Outputsmono-audio
Changingpictureformat
DisplaymodescanbeselectedwhenyourTVreceivesa16:9or4:3
videosignal.
ThreetypesofdisplaymodescanbeselectedforaPCInputsignal.
PressFORMATrepeatedlytoswitchtheTVaspectratio.
For16:9videosignal
Normal Movieexpand4:3
Wide Zoom
Fullcanalsobeselected
afterWideifanHDMI
deviceisselected.This
pictureformatsimilarly
displayslikeNormal.
Full
(HDMIdeviceonly)
Normal
Originalsize.
4:3
Shortenedhorizontally.
Sidebarsappearonbothedgesofthescreen.
Movieexpand
Verticallystretchedtollthescreen.
Thisonlycropsoutthetopofthepicture.
Zoom
Maximumsizewithoutchangingitshorizontalandvertical
ratio.
Wide
Horizontallystretchedpicture.
Thiscropsouttheleftandrightsidesofthepicture.
For4:3videosignal
Full
(HDMIdeviceonly)
Normal Movieexpand
16:9
Wide Zoom
Fullcanalsobeselected
afterWideifanHDMI
deviceisselected.This
pictureformatsimilarly
displayslike16:9.
Normal
Originalsize.
Sidebarsappearonbothedgesofthescreen.
16:9
Stretchedhorizontallytollthescreen.
Movieexpand
Stretchedmoreverticallyatthetopofthescreen.
Thiscropsoutthetopofthepicture.
Zoom
Maximumsizethatismoreverticallystretchedtollthe
screen.
Thiscropsoutthetopandbottomofthepicture.
Wide
Originalsizeandtheedgesstretchedhorizontallytollthe
screen.
ForPCInputsignal
Normal
Unscaled
Full
•
ThisunitcanalsobeconnectedtoyourPCthathasaDVIterminal.UseanHDMI-DVI
conversioncableforthisVideoconnectionanditrequiresStereomini3.5mmplugAudio
cableforAnalogAudiosignalaswell.
• Referto16:9videosignalonthispageifPChasHDMIOutput.
Normal
Proportionatelystretchedpicture.
Sidebarsappearonbothedgesofthescreen.
Full
Stretchedoutofproportiontollthescreen.
Unscaled
Originalsize.

English
17
TVscreeninformation
Youcandisplaythecurrentlyselectedchannelorotherinformation
suchastheaspectratioontheTVscreen.
IntheDigitalmode,thedetailedbroadcastinginformationforthe
currentofftheairchannelsuchasprogramtitleandprogramguidesare
displayed.
1 PressINFO.
Digital TV operation
11.1
TV: TV-14
1080i 16:9HD
CC
KABC
a b c d
f
e
g
h
ADayofMemories
Aquarter-centuryago,whichmaynowqualifyasthe
goodolddaysofnewspapering,run-of-papersales
accountedfor80percentoftheindustry'sadvertising
revenues.Departmentstoresandsupermarketwere
English1/2
Rating
a programtitle
b programguide
(Theprogramguideaddedtobroadcastinginformationis
displayedtoamaximumof4lines.)
c broadcaststation
Analog/Cable TV operation
11
480i 4:3SD
CC
TV-PG DLSV
d
f
e
g
h
SAP/STEREO
d channelnumber
Switchingchannels
➠
p.14
e audiolanguage(DTV)/audiomode(AnalogTV)
Switchingaudiomode
➠
p.16
f program’simageaspectratio
Changingpictureformat
➠
p.16
g CC(notavailableifClosedCaptionissettoOff)
Captionsettings
➠
p.22
h childlockrating
Childandratingslock
➠
p.23
2 PressINFOtohidetheinformation.
Note
• Whentheprogramguideconsistsofmorethan4lines,use▲▼toscrolltothe
next/previouslines.
• Nodescriptionprovided.isdisplayedwhentheprogramguideisnotprovided.
• Whiletheprogramguideisdisplayed,theClosedCaptionfunctionisinterrupted.
• InexternalInputmode,thefollowingscreenisdisplayed;
e.g.)WhenanexternaldeviceisconnectedtoVideoInputjack.
TV-PG DLSV
480i 4:3SD
CC
Video
• Theinformationdisplaywillautomaticallydisappearin5seconds.
English
18
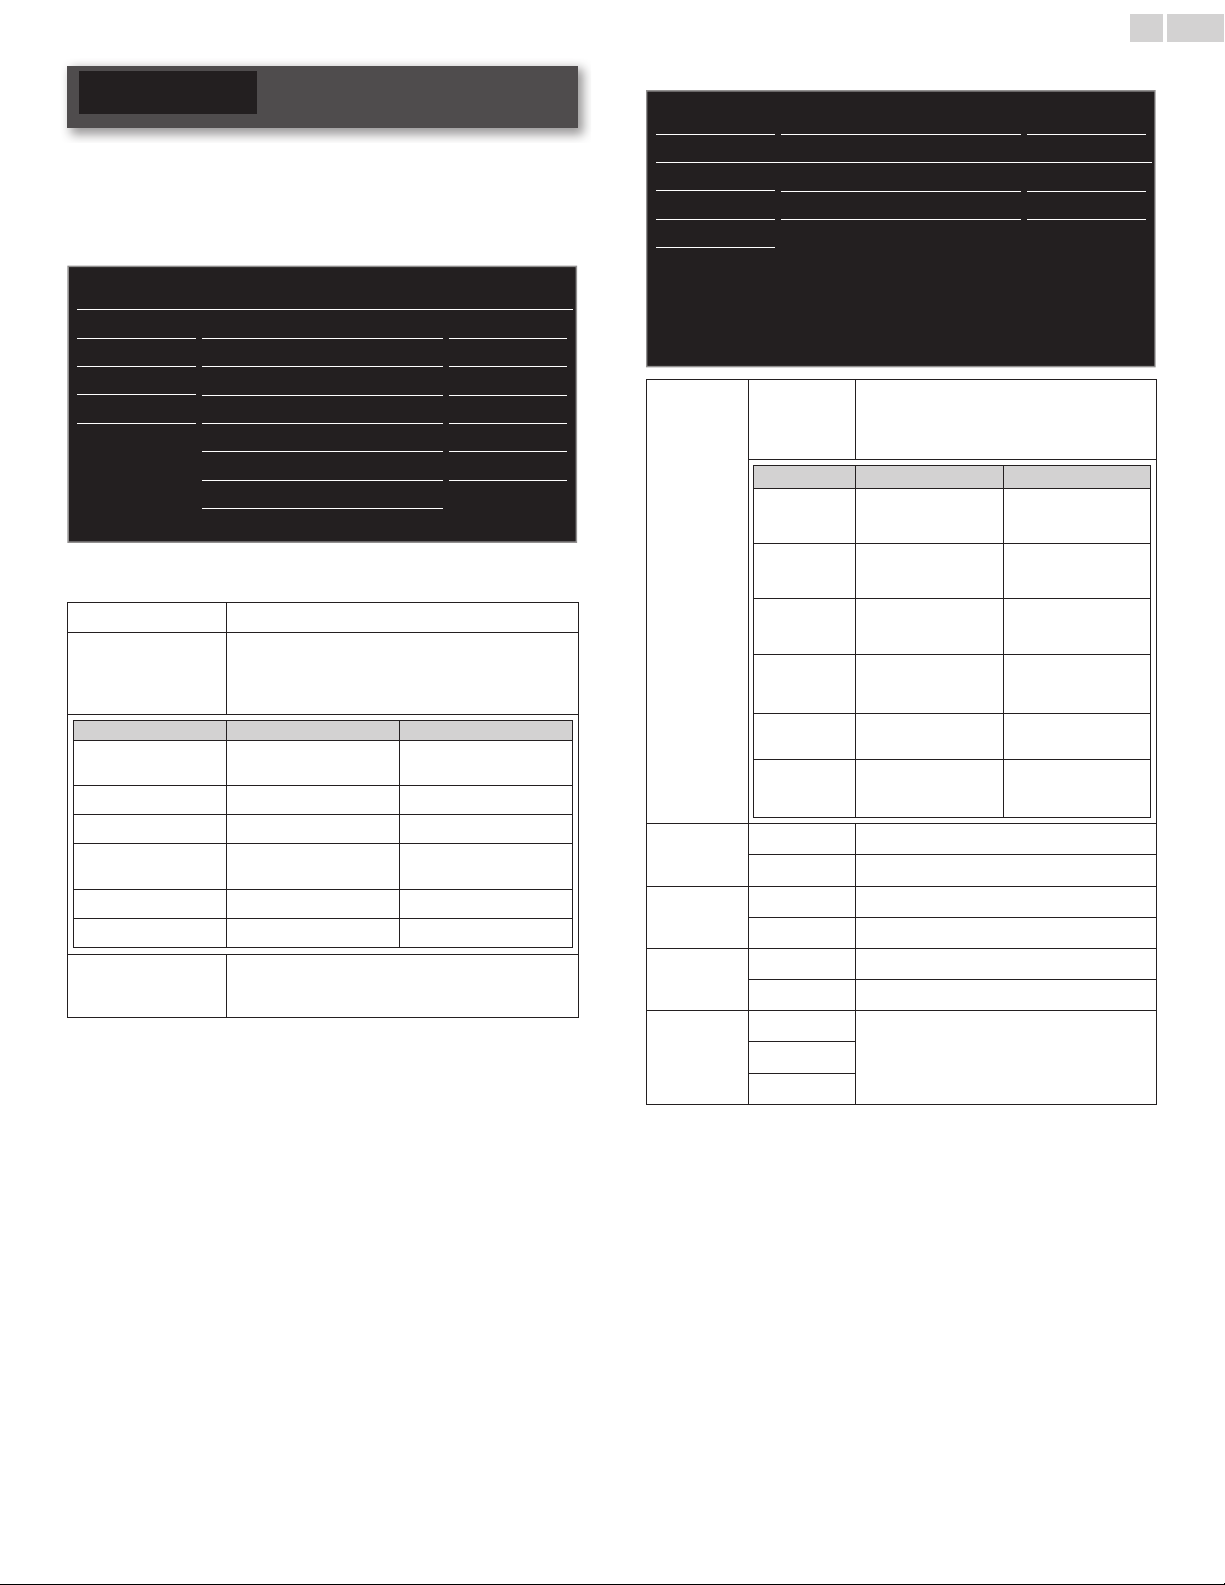
5 UsemoreofyourTV
Thissectiondescribestheoverviewofthemainmenudisplayedwhen
youpressMENU/EXIT.
Themainmenuconsistsofthefunctionsettingitemsbelow.
Displayingthemainmenu
1
PressMENU/EXITtodisplaythemainmenu.
2 Use▲▼toselectthedesiredmenuandanitem,thenpressOK
oruse▲▼◄►todeterminethesetting.
Picture
Sound
Setup
Features
Language
USB
Settingsassistant
Autopicture
Backlight
Contrast
Brightness
Color
Tint
Sharpness
Advancedsettings
Personal
18
50
30
30
0
2
Picture
➠
p.19
Adjustingthepicturemodeorcustomizethepicture
qualityasyourpreference.
Sound
➠
p.20
Adjustingthesoundmode,equalizerandsomeother
soundfunctions.
Setup
➠
p.20
Scanningthechannelsavailableinyourareaandseewhat
theantennalevelsare.
Features
➠
p.22
AdjustingtheClosedCaption,parentalguideandsome
otherusefulfunctions.
Language
➠
p.27
YoucanchooseEnglish,SpanishorFrenchasyour
on-screenlanguage.
USB
➠
p.28
Youcanviewpicture(JPEG)andvideo(MotionJPEG)les
storedonaUSBMemoryStick.
3 Whenthesettingiscompleted,pressMENU/EXITorBACKto
exit.
English
19
Picture
Before you begin:
YoumustsetHomeinLocation.
➠
p.27
Otherwise,personalizedpictureandsoundsettingswillnotbe
memorizedaftertheunitgoesintoStandbymode.
1 PressMENU/EXITanduse▲▼toselectPicturethenpressOK.
Picture
Sound
Setup
Features
Language
USB
Settingsassistant
Autopicture
Backlight
Contrast
Brightness
Color
Tint
Sharpness
Advancedsettings
Personal
18
50
30
30
0
2
2 Use▲▼◄►toselecttheitemyouwanttoadjust,thenpress
OK.
Settingsassistant
toguideyouthroughthebestpicturesetting
Autopicture
toselectthedesiredsetting,thenpressOK
(Personal,Standard,Vivid,Sports,Movie,GameandEco)
Whenyouadjustthefollowingsettings,Personalwill
besetautomatically.
Cursor◄ Cursor►
Backlight
toreducepower
consumption
tosetthebacklight
brighter
Contrast
todecreasecontrast toincreasecontrast
Brightness
todecreasebrightness toincreasebrightness
Color
todecreasecolor
intensity
toincreasecolorintensity
Tint
toaddred toaddgreen
Sharpness
tosoften tosharpen
* Advancedsettings
toselectthedesiredsetting,thenpressOK
(Coloralignment,Noisereduction,Blackstretch,
DynamiccontrastandGamma)
*You can set a particular about picture quality in Advanced settings.
Picture
Sound
Setup
Features
Language
USB
Coloralignment
Noisereduction
Blackstretch
Dynamiccontrast
Gamma
Normal
On
On
On
Gamma2
Color
alignment
Color
temperature
mode
tosetthecolortemperaturetoPersonal,
Cool,NormalandWarm
Whenyouadjustthefollowingsettings,
Personalwillbesetautomatically.
Cursor◄ Cursor►
Redgain
todecreasecontrast
withred
toincreasecontrast
withred
Greengain
todecreasecontrast
withgreen
toincreasecontrast
withgreen
Bluegain
todecreasecontrast
withblue
toincreasecontrast
withblue
Redoffset
todecrease
brightnesswithred
toincreasebrightness
withred
Greenoffset
todecrease
brightnesswithgreen
toincreasebrightness
withgreen
Blueoffset
todecrease
brightnesswithblue
toincreasebrightness
withblue
Noise
reduction
Off
tosetnoisereductiontoOff
On
toreducenoiseinanimage
Black
stretch
Off
tosetblackstretchtoOff
On
toenhanceblackcolor
Dynamic
contrast
Off
tosetdynamiccontrasttoOff
On
toenhancecontrastinanimageautomatically
Gamma
Gamma1
tochangethegammasetting
Gamma2
Gamma3
English
20
Sound
Before you begin:
YoumustsetHomeinLocation.
➠
p.27
Otherwise,personalizedpictureandsoundsettingswillnotbe
memorizedaftertheunitgoesintoStandbymode.
1 PressMENU/EXITanduse▲▼toselectSound,thenpressOK.
Picture Autosound Standard
Sound Equalizer
Setup SRSTruSurroundXT On
Features Autovolumeleveling Off
Language TVspeakers On
USB
AudioSetting
Stereo
2 Use▲▼◄►toselecttheitemyouwanttoadjust,thenpress
OK.
Autosound
toselectthedesiredsetting,thenpressOK.
(Personal,Standard,Vivid,Sports,Movie,Musicand
News)
Whenyouadjustthefollowingsettings(Equalizer,
SRSTruSurroundXTandAutovolumeleveling),
Personalwillbesetautomatically.
Adjustthetonalqualityforeachfrequency.
Equalizer
Cursor◄ Cursor►
toadjusttheeachleveloftonalquality
PressBACKtogobacktothepreviousmenu.
Thisselectssoundmodesformorespatialorsurroundsound
reproduction.
SRSTruSurroundXT
Off
tosetSRSTruSurroundXT
®
toOff
On
tosetSRSTruSurroundXT
®
toOn
ThisfunctionkeepsaconstantloudnessdifferentialbetweentheTV
commercialsandtheprograms.
Autovolume
leveling
Off
toremovetheautovolumeleveling
On
toreducevolumedifferencesbetween
theTVcommercialsandtheprograms
YoucanselecttheAudioOutputfromtheunit’sspeakersornot.Ifyour
amplierisHDMIlinkfunctioncompatibleandconnectedbyanHDMI
cabletothisunit,somesoundoperationssuchasvolumeupcanbe
changedbyusingthisunit’sremotecontrol.MakesureMasterEasyLink
issettoOn.
➠
p.26
TVspeakers
On
tooutputsoundfromtheunit’s
speakers
Off
nottooutputsoundfromtheunit’s
speakers
Speakers
EasyLink
tocontrolAudioOutputfromyour
connectedEasyLinkCompliantDevices
withVOL+/−byusingthisunit's
remotecontrol.
Youcansettheoutputmodeasadefaultforthesoundmode(AnalogTVonly).
Thissettingisnotinterlockedwhenyouchangetheoutputmodeby
pressingSAP.RefertoSwitchingaudiomode.
➠
p.16
AudioSetting
Stereo
tooutputstereo-audio
Mono
tooutputmono-audio
SAP
tooutputsecondaudioprogram
Setup
Before you begin:
Makesuretheunitisconnectedtoantennaorcable.
1 PressMENU/EXITanduse▲▼toselectSetup,thenpressOK.
Picture Autoprogram
Sound Channellist
Setup Addchannels
Features
Antenna
Language
USB
2 Adjustthefollowingitems.
Autoprogram
BesuretheRFcableiscorrectlyconnectedtothisunitandyouare
registeredwithyourcableTVproviderwhenyouinstallCablechannels.
1 Use▲▼toselectAutoprogram,thenpressOK.
• IfyourunAutoprogramwhenyouhavelockedchannels,a
messageappearsaskingtoenteryourPIN.EnteryourPINin
ordertocompletetheinstallation.Youneedtosetthechannel
lockagainaftertheinstallation.
2 Use▲▼toselectanappropriateoption,thenpressOK.
– WhenAntennaisselected,theTVdetectsantennasignals.
ItsearchesforDTVandAnalogTVchannelsavailableinyour
area.
– WhenCableisselected,theTVdetectssignalssuppliedbycable.It
searchesforDTV,AnalogTVandCablechannelsavailableinyour
area.
Picture
Autoprogramwillrescanallchannels.
Autoprogrammingmaytakemorethan20
minutestocomplete.
Selectyoursignalsource.
Back
Sound Antenna
Setup
Cable
Features
Language
Antenna
Cable
Or
ANTENNAIN
USB
Continued on next page.
English
21
• Whenthescanningandmemorizingarecompleted,thelowest
memorizedchannelwillbedisplayed.
Autoprogram
Pleasewaitwhilethesystemisscanningforchannels.
Autoprogrammingmaytakemorethan20minutesto
complete.
75%
Digital channels
10 ch
Analog channels
6ch
Exit
Note
• AftersettingAutoprogram,usingCH+/−skipsunavailableprogramsautomatically.
• Ifyouarenotreceivingasignalfromyourcableservice,contacttheCableprovider.
• Ifyoupress orMENU/EXITduringautoprogram,thesetupofTVchannelswillbe
canceled.
• EvenifAutoprogramiscompleted,thechannelsettingwillbelostiftheACpower
cordisunpluggedbeforetheunitgoesintoStandbymodebypressing
.
• ThePINCodewillberequiredonceyousetaPINcodeintheChildandratingslock.
➠
p.23
• IfyouwanttochangeyourPINcode,followtheinstructionofChangePIN.
➠
p.25
Channellist
Thechannelsselectedherecanbeskippedwhenselectingthechannels
usingCH+/−.
ThosechannelscanstillbeselectedwiththeNUMBERbuttons.
1 Use▲▼toselectChannellist,thenpressOK.
2 Use▲▼toselectthechannelyouwanttoremove,thenpress
OK.
Picture DTV 11.1
Sound
Highlightchannelsfor
ChUp/Downkeyselection.
DTV 11.2
Setup
DTV 11.3
Features
Language
USB
ChSelect Watch/Skip Back
• Thechanneldisplayfortheremovedchanneldarkens.Youwill
notbeabletoselectthechannelagainusingCH+/−.
• Toreactivatearemovedchannel,use▲▼andpressOK.The
registeredchannelsarehighlighted.
• Whenyouremoveamainchannel,itssubchannelsareremoved
aswell.
Note
• ThechannelwithDTVindicatedonthedisplayisATSC.Otherwisethechannelis
AnalogTV.
Addchannels
ThisfunctionletsyouaddtheofftheairAnalogTVorAnalogCable
channelsthatwerenotaddedbytheautoprogramduetoreception
conditionsduringtheinitialsetting.
1 Use▲▼toselectAddchannels,thenpressOK.
2 UsetheNUMBERbuttonstoenterthenumberofthechannelyou
wanttoadd,thenpressOK.
Picture Addchannels
Sound
Foranalogchannels,selecta
channeltobeaddedusing
numberkeys.
Fordigitalchannels,youmust
performAutoprogramfunction.
Setup
Features
Language
USB
ChChange Back
Note
• Ifsetupcompletessuccessfully,Addedtothechannellist.isdisplayed.
• IfexternalInputisused,itisnotpossibletoregisterthechannelandUnavailablewillbe
displayedontheTVscreen.
• SomechannelscannotbeselectedbyCH+/−.UsetheNUMBERbuttonstoselect
thememorizedchannels.
Antennaconrmation
Digital TV operation
ThisfunctionletsyouchecktheDigitalsignalstrengthofeachchannel.
1 Use▲▼toselectAntenna,thenpressOK.
2 UsetheNUMBERbuttonsorCH+/−toselectthechannelfor
whichyouwanttochecktheDigitalsignalstrength.
Picture
Back
Sound
Setup
Current 50
Max 50
Features
Language
USB
ChChange
Note
• IfthechannelissettoAnalogchannelorexternalInput,youcannotconrmthe
antennacondition.
English
22
Features
1 PressMENU/EXITanduse▲▼toselectFeatures,thenpressOK.
Picture Captionsettings
Sound Childlock
Setup PCsettings
Features EasyLink
Language Location Home
USB
E-sticker
--
Softwareupgrade
2 Adjustthefollowingitems.
Captionsettings
ClosedCaptioningdisplaystheaudioportionofprogrammingastext
superimposedoverthevideo.
1 Use▲▼toselectCaptionsettings,thenpressOK.
Picture Captionservice Off
Sound Digitalcaptionservice
Off
Setup
Captionstyle
Features
Language
USB
2 Use▲▼◄►toselecttheitemyouwanttoadjust,thenpress
OK.
Digital TV operation
InadditiontothebasicClosedCaption,DTVhasitsownClosed
CaptioncalledDigitalcaptionservice.Usethismenutochangethe
settingsforDigitalcaptionservice.
Digitalcaptionservice
Off
SelectsifyoudonotwantDigital
captionservice.
CS-1to
CS-6
Selectsoneofthesebeforechanging
anyotheriteminCaptionsettings
menu.ChooseCS-1undernormal
circumstances.
Analog/Cable TV operation
Captionservice
Off
Selectifyoudonotwantcaptionservice.
CC-1
and
T-1
Theprimarycaptionandtextservices.The
captioningortextisdisplayedinthesame
languageastheprogram’sdialog(upto4
linesofscriptontheTVscreen).
CC-3
and
T-3
Serveasthepreferreddatachannels.
Thecaptioningortextisoftenasecondary
language.
CC-2,
CC-4,
T-2
and
T-4
Rarelyavailableandbroadcastersusethem
onlyinspecialconditions,suchaswhenCC-1
andCC-3orT-1andT-3arenotavailable.
• Thereare3displaymodesaccordingtoprograms:
Paint-on
DisplaysinputcharactersontheTVscreenimmediately.
Pop-on
Oncecharactersarestoredinmemory,theyaredisplayed
allatonce.
Roll-up
Displaysthecharacterscontinuouslybyscrolling(max.4
lines).
Youcanchoosethesize,font,color,backgroundandother
characteristicsofthecaptiontext.
Captionstyle
Font
Fontstyle
ClosedCaptioningfont
style,size,colorand
transparencycanbe
changed.
Fontsize
Fontcolor
Fontopacity
Background
Background
color
Backgroundcolorand
transparencyofthe
displayedcaptioncanbe
switched.
Background
opacity
Edge
Edgecolor
Edgecolorandtypeof
thedisplayedcaptioncan
beswitched.
Edgetype
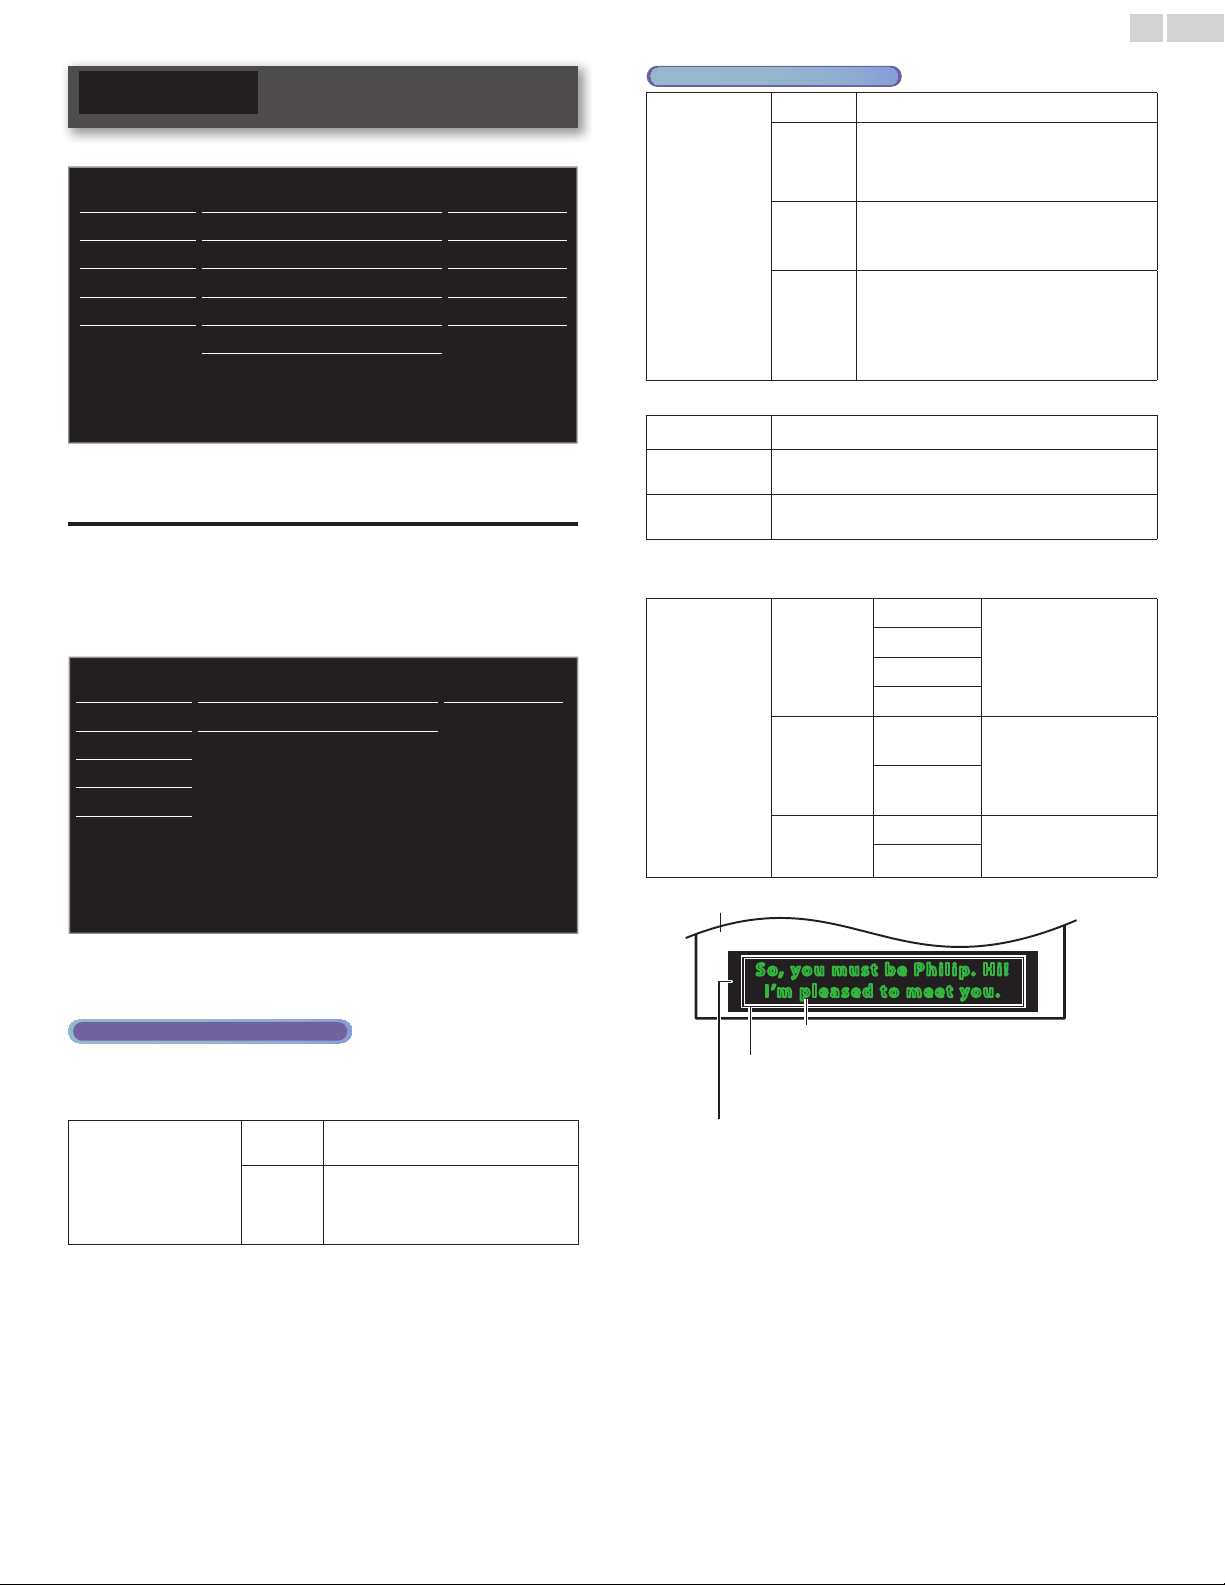
So, yo u m u s t b e P h i l i p. H i !
I’m p l e a sed to meet yo u .
So, yo u m u s t b e P h i l i p. H i !
I’m p l e a sed to meet yo u .
Background
(BackgroundcolorandBackgroundopacity)
Picturedisplay
Font
(Fontstyle,Fontsize,FontcolorandFontopacity)
Edge
(EdgecolorandEdgetype)
• Reviewyoursettingchoicemadebelowbylookingintheupper
rightcornerofthedisplayedsettingbox(notallselectionsshow
thedifferencesselected).
Continued on next page.
English
23
Note
• Digitalcaptionservicethatyoucanswitchdiffersdependingonthebroadcast
description.
• CaptionstylewillnoteffectiftheUsersettingissettoOff.
• ClosedCaptioningservicemaynotbecontrolledbythisunit’smenuoptionsifyouare
watchingtelevisionthroughanexternalcableorsatelliteset-topbox.Inwhichcase
youwillneedtousethemenuoptionsontheexternalset-topboxtocontrolClosed
Captioning.
• Thecaptionsdonotalwaysusecorrectspellingandgrammar.
• NotallTVprogramsandproductcommercialsincludeClosedCaptioninformation.
RefertoyourareaTVprogramlistingsfortheTVchannelsandtimesofClosedCaption
shows.ThecaptionedprogramsareusuallynotedintheTVlistingswithservicemarks
suchasCC.
• NotallcaptioningservicesareusedbyaTVchannelduringthetransmissionofa
ClosedCaptionprogram.
• ClosedCaptionwillNOTbedisplayedwhenyouareusinganHDMIconnection.
• ToshowtheClosedCaptiononyourTVscreen,broadcastsignalmustcontainthe
ClosedCaptiondata.
• NotallTVprogramsandcommercialshavetheClosedCaptionoralltypesofthe
ClosedCaption.
• CaptionsandtextsmaynotexactlymatchtheTVvoice.
• ChangingchannelsmaydelaytheClosedCaptionforafewseconds.
• AdjustingormutingthevolumemaydelaytheClosedCaptionforafewseconds.
• Abbreviations,symbolsandothergrammaticalshortcutsmaybeusedinordertokeep
pacewiththeon-screenaction.Thisisnotamalfunction.
• Thecaptionortextcharacterswillnotbedisplayedwhilethemainmenuorfunctions
displayisshown.
• IfablackboxappearsontheTVscreen,thismeansthattheClosedCaptionissetto
thetextmode.Toclearthebox,selectCC-1,CC-2,CC-3,CC-4orOff.
• Iftheunitreceivespoorqualitytelevisionsignals,thecaptionsmaycontainerrorsor
theremightbenocaptionsatall.Somepossiblecausesofpoorqualitysignalsare:
-Automobileignitionnoise
-Electricmotornoise
-Weaksignalreception
-Multiplexsignalreception(ghostsorscreenutter)
-DatadropoutandPixelation(forDTVonly)
• TheunitretainstheClosedCaptionsettingifthepowerfails.
• Whentheunitreceivesspecialeffectsplaybacksignal(e.g.Search,SlowandStill)froma
VCR’svideoOutputchannel(ch3orch4),theunitmaynotdisplaythecorrectcaption
ortext.
• TheEUTsettingthatsatises§79.102(e)isasfollows:
Font:Mono-font
Charactersize:Large
Childandratingslock
Youcanpreventyourchildrenfromwatchingcertainprogramsor
certainchannelsbylockingtheTVcontrolsandbyusingratings.
1 Use▲▼toselectChildlock,thenpressOK.
Picture Captionsettings
Sound Childlock
Setup PCsettings
Features EasyLink
Language Location Home
USB
E-sticker
--
Softwareupgrade
2 UsetheNUMBERbuttonstoenterthe4-digitnumbersforyour
PINcode.
• WhenyouhavenotsetupyourPINcode,enter0,0,0,0.
• WhenthePINcodeiscorrect,Childlockmenuisdisplayed.
Seethefollowingdescriptionforsettingeachitem.
Picture Channellock
USmovieratingslock
USTVratingslock
CanadianEnglishrating
CanadianFrenchrating
Regionratingslock
ChangePIN
Sound
Setup
Features
Language
USB
Note
• Whenyouselectaratingandsetitto or ,thehigherratingswillbeblocked
automatically.Thelowerratingswillbeavailableforviewing.
• Whenyousetthehighestratingto ,allratingsturnto automatically.
• Toblockanyinappropriateprograms,setyourlimitsinUSmovieratingslock,
USTVratingslockandRegionratingslock.
• Thechildlocksettingwillberetainedafterapowerfailureorafterthepoweris
removedforlongerthan10seconds(exceptthePINcoderevertsto0000).
Childandratingslock
➠
p.23
• RegionratingslockwillbeavailablewhentheunitreceivesaDigitalbroadcastusing
thenewratingsystem.
• FortheUnitedStates,theunitmaydownloadtheRegionRatingsLockTable,ifrequired.
• TheCanadianratingsystemsonthisunitarebasedonCEA-766-AandCRTCpolicy.
Channellock
ParticularchannelsorexternalInputmodescanbeinvisibleinthis
function.
3 Use▲▼toselectChannellock,thenpressOK.
4 Use▲▼toselecttheparticularchannelsorexternalInput,then
pressOKrepeatedlytoswitchbetweenviewandblock.
• indicatesthatthechannelorInputSourceislocked.
• indicatesthatthechannelorInputSourceisnotlocked.
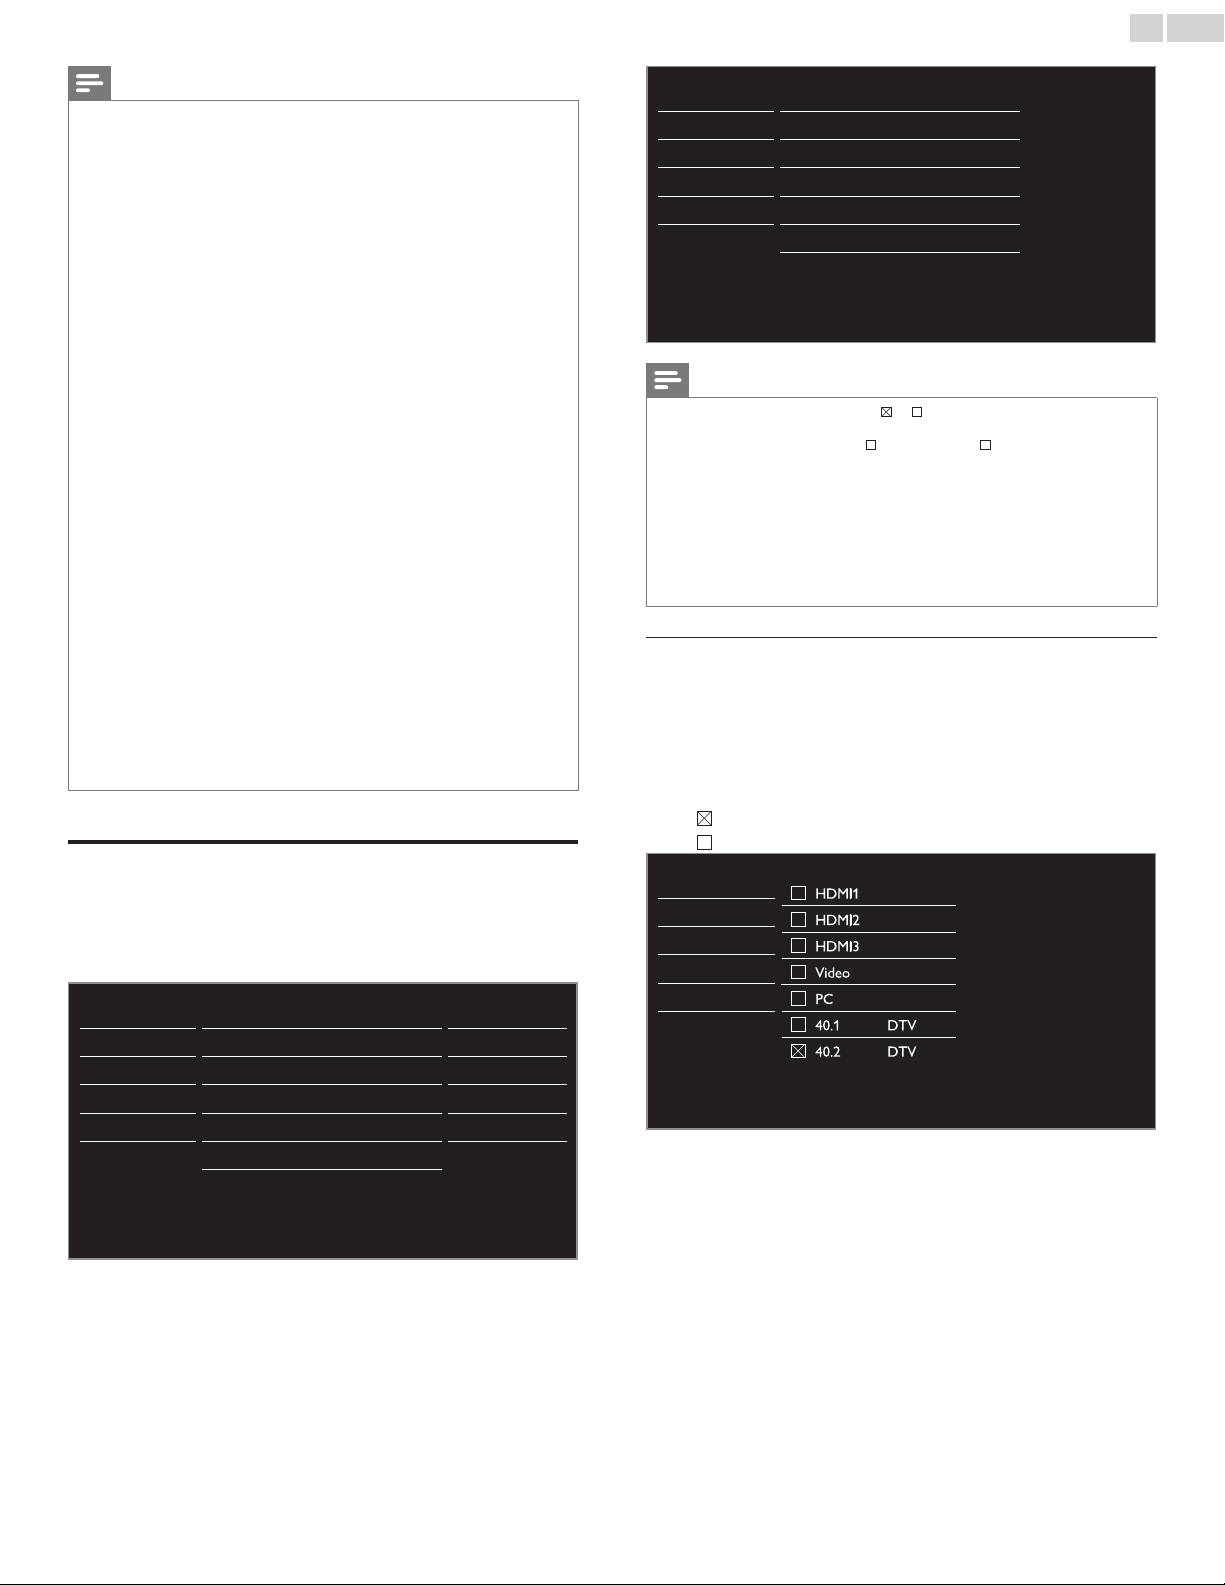
Picture
HDMI1
HDMI2
HDMI3
Video
PC
40.1 DTV
40.2 DTV
Sound
Setup
Features
Language
USB
• Theaboveimageisanexamplefor26inchandlargerscreensize
TVs.Itmaydifferdependingonwhatproductyoupurchased.

English
24
SettingUSmovieandTVratings
USmovieratingslockistheratingsystemcreatedbyMPAA.
USTVratingslockhascontrolledaccesstoindividualprogramsbased
ontheirageratingsandcontentrating.
3 Use▲▼toselectUSmovieratingslockorUSTVratingslock,
thenpressOK.
4 Use▲▼toselectthedesiredrating,thenpressOKrepeatedlyto
switchbetweenviewandblock.
• ForUSTVratings,youcanfurthersetthesubratingstoblock
specicelementsofprogramming.
• or indicatesthattheratingislocked.
• indicatesthattheratingisnotlocked.
USmovieratingslock
Picture
All
NR
G
PG
PG-13
R
NC-17
X
Sound
Setup
Features
Language
USB
USTVratingslock
Picture
All
None
TV-Y
TV-Y7
TV-G
TV-PG
TV-14
TV-MA
Sound
Setup
Features
Language
USB
USmovie
ratings
USTVratings Description
All
Allratingslockedincludingnorating
NR None
Norating
− TV-Y
Appropriateforallchildren
− TV-Y7
Appropriateforallchildren7andolder
G TV-G
Generalaudience
PG TV-PG
Parentalguidancesuggested
PG-13 −
Unsuitableforchildrenunder13
− TV-14
Unsuitableforchildrenunder14
R −
Restrictedunder17requiresaccompanying
parentoradultguardian
NC-17 −
Nooneunder17admitted
X TV-MA
Matureaudienceonly
To set the sub ratings
AsforTV-Y7,TV-PG,TV-14orTV-MA,youcanfurthersetthesub
ratingstoblockspecicelementsofprogramming.Tosetthesubratings,
followthestepbelow.
Use▲▼◄►toselectthedesiredrating,thenpressOKrepeatedly
toswitchbetween
and .
Picture
All
None
TV-Y
TV-Y7
TV-G
TV-PG
TV-14
TV-MA
(FV)FantasyViolence
Sound
Setup
Features
Language
USB
USTVratings SubRating
TV-Y7
(FV)FantasyViolence
TV-PG
(D)Dialog
(L)Language
(S)Sex
(V)Violence
TV-14
TV-MA
(L)Language
(S)Sex
(V)Violence
Note
• BlockedsubratingwillappearbesidethemainratingcategoryinUSTVratingslock
menu.
• Youcannotblockasubratingifthemainratingissetto .
• Changingthecategoryto or automaticallychangesallitssubratingstothesame
(
or ).

English
25
CanadianEnglishorCanadianFrenchratings
YoucanselecttheratingforCanadianEnglishorCanadianFrench
broadcasting.
3 Use▲▼toselectCanadianEnglishratingor
CanadianFrenchrating,thenpressOK.
4 Use▲▼toselectthedesiredrating,thenpressOKrepeatedlyto
switchbetweenviewandblock.
• indicatesthattheratingislocked.
• indicatesthattheratingisnotlocked.
Canadian
Englishrating
Canadian
Frenchrating
Description
All
Lockedallratings
E
Exemptprogram
C −
Forallchildren
C8+ −
Forchildrenover8
G
Generalaudience
− 8ans+
Unsuitableforagesunder8
PG −
Parentalguidancesuggested
− 13ans+
Unsuitableforagesunder13
14+ −
Unsuitableforagesunder14
− 16ans+
Unsuitableforagesunder16
18+ 18ans+
Adultaudienceonly
Note
• TheV-Chipcanblocknonratedprogramsasper“CEA-608-Esec.L.3”.Iftheoptionto
blockNR,NoneorEprogramsisusedinUSmovieratingslock,USTVratingslock,
CanadianEnglishratingorCanadianFrenchratingaccordingly“unusualresults
mayoccurandtheunitmaynotreceiveemergencybulletinsorothertypesof
programming:”/EmergencyBulletins(SuchasEASmessages,weatherwarnings
andothers)/Locallyoriginatedprogramming/News/Political/PublicService
Announcements/Religious/Sports/Weather.
ChangePIN
AlthoughthedefaultPINcode(0000)issuppliedwiththeunit,youcan
setyourownPINcode.
3 Use▲▼toselectChangePIN,thenpressOK.
4 PresstheNUMBERbuttonstoenterthenew4-digitPINcode.
• EnterPINcodeagaininConrmPIN.entryeld.
Picture
EnterPIN.
- - - -
ConfirmPIN.
- - - -
Sound
Setup
Features
Language
USB
PINCode Back
Note
• MakesurenewPINcodeandconrmPINcodemustbeexactlythesame.Iftheyare
different,thespaceisclearedforreentering.
• YourPINcodewillbeerasedandreturnstothedefaultPINcode(0000)whena
powerfailureoccurs.
• IfyouforgetthePINcode,unplugtheACpowercordthenwaitfor10secondstoplug
theACpowercordinagain.
TheunitwillrestorethePINcodeto0000asthefactorydefault.
PCsettings
ThisfunctionletsyouadjustthePCscreenposition,clockandphase
duringPCInput.
Use◄►toadjustClocksettingtostabilizethePCscreenandPhase
settingtoimprovetheclarityofthePCscreen.
1 Use▲▼toselectPCsettings,thenpressOK.
Picture Autoadjustment
Sound
Setup Horizontalposition 0
Features Verticalposition 0
Language Clock 0
USB Phase 0
2 Use▲▼toselecttheitemyouwanttoadjust,thenpressOK.
• Thehorizontal/verticalposition,clockandphaseofthePC
screenareautomaticallyadjusted.
Autoadjustment
Selectifyouwanttoadjustautomatically.
Cursor◄ Cursor►
Horizontalposition
tomovePCscreenleft tomovePCscreenright
Verticalposition
tomovePCscreendown tomovePCscreenup
Clock
todecreasesettingvalue toincreasesettingvalue
Phase
Note
• YoumaynotobtainanappropriatescreenwithAutoadjustmentforsomesignals.In
thiscase,adjustthesettingsmanually.
•
AdjustPhasesettingafterClocksettinghasbeenproperlyadjusted.
English
26
EasyLink
Thisfunctionallowsyoutooperatethelinkedfunctionsbetweenour
branddeviceswithaEasyLinkfeatureandthisunitconnectingthrough
anHDMIcable.YoumustconnectthisunittoourbrandEasyLink
devicesandbesureitsEasyLinksettingisalsosettoOn.
1 Use▲▼toselectEasyLink,thenpressOK.
Picture MasterEasyLink
Autodeviceoff
AutoTVon
Devicelist
On
On
On
Sound
Setup
Features
Language
USB
2 Use▲▼◄►toselecttheitemyouwanttoadjust,thenpress
OK.
SettheMasterEasyLinkOnorOff.Thefollowingadditionalsettingswill
begrayedoutwhenyousettoOff.
MasterEasyLink
Off
DisablesallEasyLink.
On
Selectsifyouhaveconnectedan
externaldevicethatiscompatiblewith
theEasyLinkfunction.
YoucansetyourdevicetoTurnOffbyinterlockingfromthisunit’s
power.
Autodeviceoff
Off
YourconnectedEasyLinkdevicestayson
eveniftheunitgoesintoStandbymode.
On
YourconnectedEasyLinkdeviceTurns
Offautomaticallywhentheunitgoes
intoStandbymode.
ThisunitwillTurnOnwhenthePowerOnsignalissentfromyour
connectedEasyLinkdevice.
AutoTVon
Off
ThisunitstaysinStandbymodeevenif
youTurnOnyourconnectedEasyLink
device.
On
ThisunitTurnsonautomaticallywhen
youTurnOnyourconnectedEasyLink
device.
Devicelist
Thisfunctionletsyouseetheproductmodelnumberornameof
connecteddevices.
Use▲▼toselectthedesiredEasyLinkdeviceslistedontheTVscreen,
thenpressOK.
YourconnectedEasyLinkdevicewillbeTurnedOnifthedeviceisin
Standbymode.
Picture
Sound
HDMI1 DVDrecorder
HDMI2 Blu-raydiscplayer
HDMI3 Hometheatersystem
Setup
Features
Language
USB
InputChange Refresh Back
• Theaboveimageisanexamplefor26inchandlargerscreen
sizeTVs.Itmaydifferdependingonwhatdeviceyouconnected.
English
27
Settingyourlocationtohome
YoucansetthelocationofyourTVtoHomeorRetail.ChoosingHome
givesyoufullexibilitytochangepredenedsettingsforpictureandsound.
1 Use▲▼toselectLocation,thenpressOK.
Picture
Captionsettings
Sound Childlock
Setup PCsettings
Features EasyLink
Language Location Home
USB
E-sticker
--
Softwareupgrade
2 Use▲▼toselectHomeorRetail,thenpressOK.
Retail
Theunitwillbesetupwithpredenedsettingsfor
retaildisplays.Inthissetting,thepowerconsumption
maypossiblyexceedthelimitrequirementofthe
ENERGYSTAR
®
qualication.
Home
ThissettingisENERGYSTAR
®
qualied.
Theunitissettomaximizetheenergyefciencyforhome
settinganditcanbeadjustedthroughachoiceofpicture
andsoundqualityaccordingtoyourpreference.
Note
• YoumustsetHome.Otherwise,personalizedpictureandsoundsettingswillnotbe
memorizedaftertheunitgoesintoStandbymode.
E-sticker
WhenyousetLocationtoRetailstore,E-sticker(ElectronicSticker)is
displayed.E-stickercanbeTurnedOffusingprocedurebelow.
1 Use▲▼toselectE-sticker,thenpressOK.
2 Use▲▼toselectOff,thenpressOK.
Off
YoucanTurnOffE-sticker.
Top
E-stickerisdisplayedontopoftheTVscreen.
Bottom
E-stickerisdisplayedonbottomoftheTVscreen.
Note
• IfyouselectHome,E-stickerwillnotbedisplayed.
Language
1 PressMENU/EXITanduse▲▼toselectLanguage,thenpressOK.
Picture
Sound
Selectyourmenulanguage.
English
Setup
Features
Seleccioneelidiomaparaelmenú.
Español
Language
USB
Sélectionnezlalanguedumenu.
Français
2 Use▲▼toselectEnglish,EspañolorFrançais,thenpressOK.
Note
• IfyouneedtheEnglishmenuinsteadoftheSpanishorFrenchmenu’s,pressMENU/EXIT.
Use▲▼toselectIdiomaorLangue,thenpressOK.
Use▲▼toselectEnglishthenpressOK.
PressMENU/EXITtoexitthemainmenu.
English
28
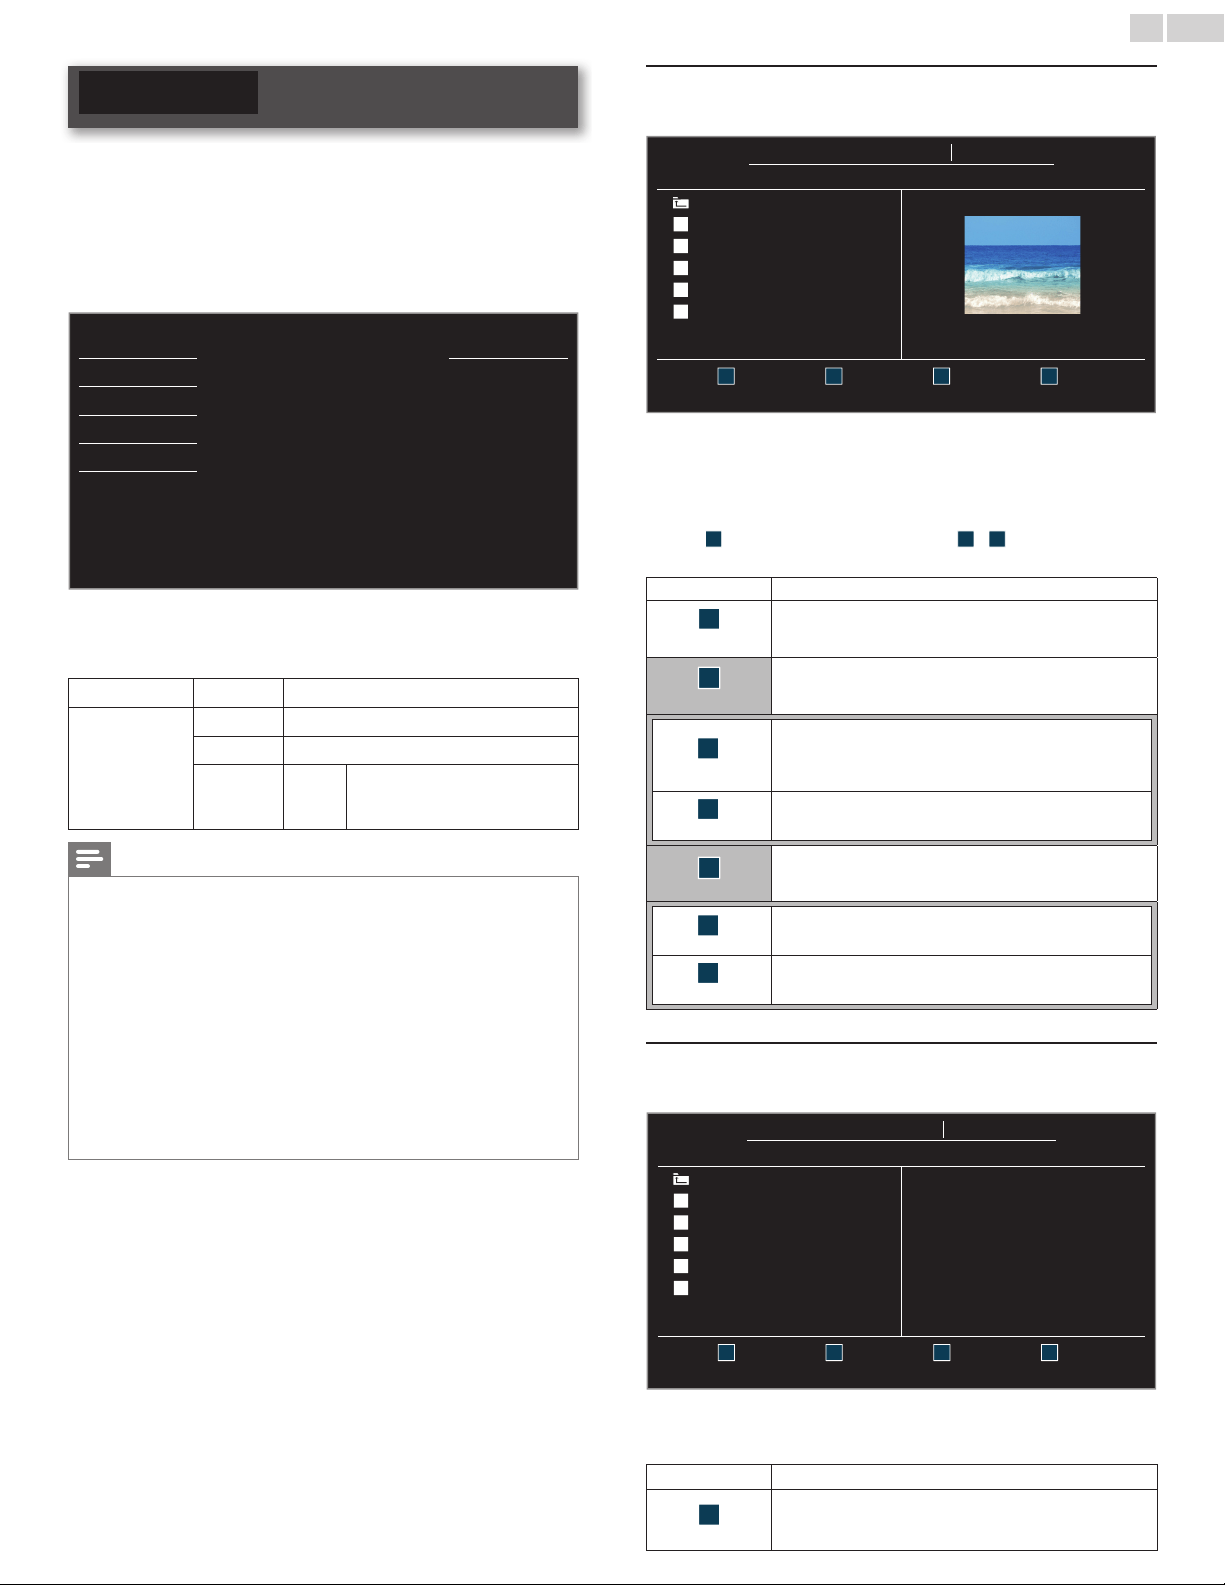
USB
YourTVisttedwithaUSBconnectionthatenablesyoutoview
photosorwatchMotionJPEGlesstoredonaUSBMemoryStick.
1 ConnecttheUSBMemorySticktotheUSBterminalonthesideof
yourTV.
2 PressMENU/EXITanduse▲▼toselectUSB,thenpressOK.
• ThehighlightedtextwillmovetothenameofyourUSB
MemoryStick,thenpressOKagain.
\
Picture
YourUSB
Sound
Thismenuallowsyoutoenjoy
yourpicturesandvideosvia
yourUSBdevice.
Setup
Features
Language
USB
3 Use▲▼toselectthePictureorVideo,thenpressOK.
• Thelesrecordedunderthefollowingspecicationsare
required.
Picture(JPEG)
Upperlimit 24Mpixel
Video
(MotionJPEG)
Size 320x240(QVGA)
Framerate 30fps
Audiotype LPCM
Samplingfrequency
(32kHz,44.1kHzor48kHz)
Quantizationbitrate(16bit)
Note
• Upto2GB(FAT16)or8GB(FAT32)capacitycanbesupported.
• Upto10,000lesor1,000folderswith19hierarchiescanberecognized.
• Upto255Englishcharacterscanberecognized.
• ThisunitdoesnotsupportMTP(MediaTransferProtocol).
• ThisunitsupportsFAT16andFAT32lesystems.
• Iftheleisnotsupported,anerrormessageappears.
• WhentheUSBMemoryStickisnotrecognized,tryreconnectingitagain.
• WecannotbeheldresponsibleifyourUSBMemoryStickisnotsupported,norwillwe
acceptanyliabilityfordamageorlossofstoreddata.
• Alenameexceeding128charactersorcontainsadotcharacterisnotsupportedon
thisTV.
• ProgressiveJPEGlesarenotsupported.
• OnlyaMotionJPEGlewithan“.avi”extensionissupported.Anextension“.mov”is
notsupported.
• DuringMotionJPEGplayback,“Pause”,“Forward”and“Reverse”donotworkonthis
unit.
Picture(JPEG)
1 Use▲▼toselectthedesiredle,thenpressOK.
YourUSB
Picture Picture
Picture
Image1.jpg
..
Image1.jpg
Image2.jpg
Image3.jpg
Image4.jpg
Image5.jpg
Image1.jpg
1200:900
2009:04:0217:42:06
1 2
Thumbnails
3 4
Press“OK”keytoplay/pause
• TotogglebetweenListandThumbnailspress
theNUMBER2buttoneachtime.
• TheunitgoestotheSlideshowautomatically.
Topause/playtheSlideshow,pressOK.
• UsetheNUMBERbuttons(1through4
)toseetheledetail
(
1
)orchangethefollowingsettings(
2
~
4
).
Seethedescriptiononthetopofthenextcolumn.
Item Detail
1
MoreDetail
Press1todisplayledetailsbelow.
Name,Album,Date,SizeandNext.
Press1againtoremoveledetails.
4
Startshow
Press4orOKtostarttheSlideshow.
WhiletheSlideshowison,thefollowing2settingswillbe
displayed.
2
Transitions
Press2,thenuse▲▼toselectthetransitionmode
choosingfrom;
None,Dissolve,Wiperight,Wipeleft,Wipeup,
Wipedown,BoxinandBoxout.
3
Slidetime
Press3,thenuse▲▼tochangethedisplaytime
choosingfrom;Short,MediumandLong.
4
Stopshow
Press4orOKtostoptheSlideshow.
WhiletheSlideshowisOff,thefollowing2settingswillbe
displayed.
2
Rotate
Everypresson2willturnthepictureclockwiseby90
degrees.
3
Zoom
Press3,thenuse▲▼toselectthezoomfactor(1x,2x
or4x).PressOKtosetthezoomfactor.
Video(MotionJPEG)
1 Use▲▼toselectthedesiredle,thenpressOK.
YourUSB
Video Video
Video
MOVIE1.avi
..
MOVIE1.avi
MOVIE2.avi
MOVIE3.avi
MOVIE4.avi
MOVIE5.avi
Title: MOVIE1.avi
Director:
Date: 2009/04/02
Duration: 00:06:37
1 2 3 4
Supportedformat:motionjpeg,320x240,30FPS
• Tostopplaybackandreturntothelelist,press
BACK,OKorCH+.
• PressCH−toplaybackfromthebeginning.
Item Detail
1
MoreDetail
Press1todisplayledetailsbelow.
Title,Director,DateandDuration.
Press1againtoremoveledetails.
English
29
6 UpgradeyourTVsoftware
Philipscontinuouslytriestoimproveitsproductsandwestrongly
recommendthatyouupgradetheTVsoftwarewhenupgradesare
available.
Newsoftwarecanbedownloadedfromourwebsiteat
www.philips.com/support
usingthemodelnumberofyourTVtondinformation.
Checkingyourcurrentsoftwareversion
1
PressMENU/EXITanduse▲▼toselectFeatures,thenpressOK.
2 Use▲▼toselectSoftwareupgrade,thenpressOK.
Picture
Currentsoftwareinfo
Sound
Upgrade
Setup
Features
Language
USB
3 Use▲▼toselectCurrentsoftwareinfo,thenpressOK.
• Theversionandadescriptionofthecurrentsoftwareis
displayed.
Picture
Back
Sound
ReleaseVersion:
XXXXXXX_XX_XX_XXXX_XX
Setup
Features
Language
USB
Upgradingthesoftware
YoucanupgradethesoftwarebyusingUSBMemoryStick.
Preparingforthesoftwareupgrade
Yourequirethefollowingequipment:
• APCwithwebbrowsingcapability.
• AnarchiveutilitythatsupportstheZIP-format
(e.g.WinZipforWindowsorStuffItforMacOS).
• AnemptycleanformattedUSBMemoryStick.
Note
• OnlyFAT/DOS-formattedportablememoryissupported.
• UseonlysoftwareupgradesthatcanbefoundonthePhilipswebsite.
Warning
• Whenthesoftwareupgradeisrunning,don’tpressanybuttons.
• DonotremovetheUSBMemoryStickduringthesoftwareupgrade.
• Ifanerroroccursduringtheupgrade,retrytheprocedureorforfurtherassistance,
pleasecontactCallCenter.
Downloadingthesoftware
FindinformationandsoftwarerelatedtoyourTVanddownloadthe
latestsoftwareupgradeletoyourPC.
1 OnyourPC,openawebbrowserandgoto
www.philips.com/support
2 Enterthemodelnumberinthe“TypetheModelNumber...”eld.
3 Clickthedesiredsoftwaretobedownloaded.
• DecompresstheZIP-le.
4 CopytheupgradeletotherootdirectoryoftheUSBMemory
Stick.
Startingthesoftwareupgrade
1 ConnectyourUSBMemoryStickwiththeupgradeletotheUSB
terminalonthesideofyourTV.
2 PressMENU/EXITanduse▲▼toselectFeatures,thenpressOK.
3 Use▲▼toselectSoftwareupgrade,thenpressOK.
4 Use▲▼
toselectUpgrade,thenpressOK.
5 Readtheon-screeninstructionsandconrmthatyouwantto
continuewiththeinstallation.
Picture
Wouldyouliketoupgradethe
software?
Startnow
Sound
Setup
Features
Language
USB
6 Whenthesoftwareupgradeiscompleted,press tosettheunit
togointoStandbymode,thenremovetheUSBMemoryStickand
thenpress
againtoTurntheunitOn.
• TheTVstartsupwiththenewsoftware.
Forfurtherassistance,pleasecontactCallCenter.
English
30
7 Connectingdevices
No supplied cables are used with these connections:
• Pleasepurchasethenecessarycablesatyourlocalstore.
Before you connect AC power cord:
BesureotherdevicesareconnectedproperlybeforepluggingintheAC
powercord.
Selectingyourconnectionquality
HDMI-Highestquality
Supportshigh-denitionDigitalsignalsandgiveshighestpictureand
soundquality.Videoandaudiosignalsarecombinedinonecable.You
mustuseHDMIforfullhigh-denitionvideoandtoenableEasyLink.
Note
• PhilipsHDMIsupportsHDCP(High-bandwidthDigitalContentsProtection).HDCP
isaformofDigitalRightsManagementthatprotectshighdenitioncontentinBlu-ray
discsorDVDs.
Component(YPbPr)-Highquality
Supportshigh-denitionAnalogsignalsbutgiveslowerpicturequalitythan
HDMI.Component(Y/Pb/Pr)Videocablescombinered/green/blue
videocableswithred/whiteaudio(L/R)cables.Matchthecablecolors
whenyouconnecttotheTV.
Composite-Basicquality
Foranalogconnections.CompositeVideo/AudioAnalogcableusually
combineayellowvideocablewithred/whiteaudio(L/R)cables.With
thisunit,yellowcablemustbeconnectedtoY(green)ofComponent
VideoInputjacks.
Connectingyourdevices
HDMIDigitalconnection
HDMIconnectionoffersthehighestpicturequality.
HDMI(High-DenitionMultimediaInterface)transportshighdenition
Digitalvideoandmulti-channelDigitalAudiothroughasinglecable.
ININ OUT
set-topbox
or
Blu-raydiscplayer
or
HDgameconsole
HDMIcable
TheseHDMIInputsare
availableon26inchand
largerscreensizeTVs.
HDMI-DVIconnection
ThisunitcanbeconnectedtoyourdevicethathasaDVIterminal.
UseanHDMI-DVIconversioncableforthisconnectionanditrequires
audiocableforAnalogAudiosignalaswell.
ININ OUT
IN
IN
OUT
HDMI-DVI
conversioncable
Audio(L/R)cables
cablereceiveror
satelliteboxwiththe
DVIOutputjack
TheseHDMIInputsare
availableon26inchand
largerscreensizeTVs.
Note
• UseanHDMIcablewiththeHDMIlogo(acertiedHDMIcable).HighSpeedHDMI
cableisrecommendedforthebettercompatibility.
ForHDMIconnection
• Theunitaccepts480i/480p/720p/1080i,1080p24/30/60Hzofvideosignals,32kHz
/44.1kHzand48kHzofaudiosignals.
• Thisunitaccepts5.1channelaudiosignal(DolbyDigital)and2channelaudiosignal
(LPCM).
• ThisunitacceptsonlysignalsincompliancewithEIA861.
ForHDMI-DVIconnection
• Theunitaccepts480i,480p,720p,1080iand1080pvideosignals.
• HDMI-DVIconnectionrequiresseparateaudioconnectionsaswellandtheaudio
signalsareoutputasAnalog(L/R)Audio.
• DVIdoesnotdisplay480iimagewhichisnotincompliancewithEIA/CEA-861/861B.
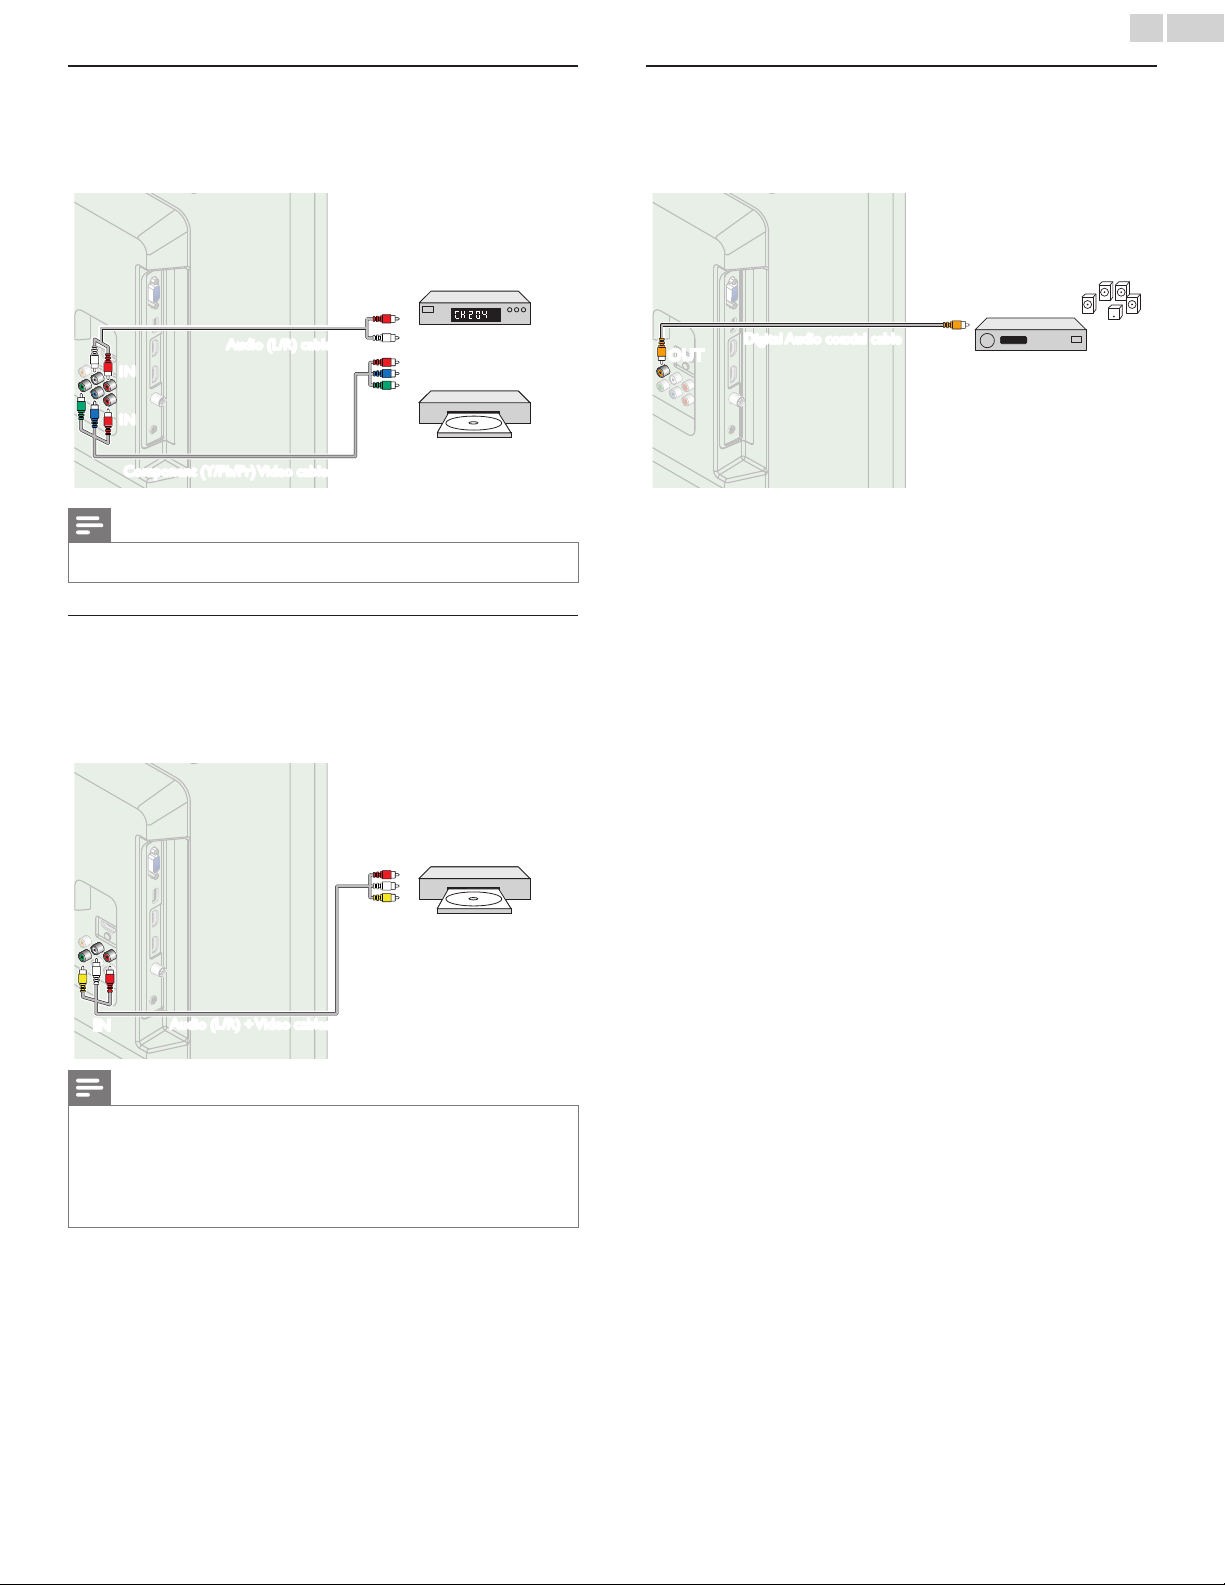
English
31
ComponentAnalogVideoConnection
ComponentAnalogVideoconnectionoffersbetterpicturequalityfor
videodevicesconnectedtotheunit.
Ifyouconnecttotheunit’sComponentVideo(Y/Pb/Pr)Inputjacks,
connectAnalogAudiocablestotheAnalogAudio(L/R)Inputjacks.
OUTOUT
IN
IN
IN
IN
OUT
OUT
Component(Y/Pb/Pr)Videocables
Audio(L/R)cables
set-topbox
or
Blu-raydisc/DVDrecorder
Note
• Theunitaccepts480i/480p/720pand1080iofvideosignalsforthisconnection.
CompositeAnalogVideoConnection
CompositeAnalogVideoconnectionoffersstandardpicturequalityfor
videodevicesconnectedtotheunit.
Ifyouconnecttotheunit’sCompositeVideo(Y/VIDEO)Inputjack,
connectaudiocablestotheAudio(L/R)Inputjacks.WhentheAudiois
monaural,thenonlyconnecttotheAudioLInputjack.
OUTOUT
IN
IN
DVDplayer
Audio(L/R)+Videocables
Note
• Withthisunit,yellowcablemustbeconnectedtoY(green)ofComponentVideoInput
jacks.
• WheneveryouconnecttotheCompositeVideoInputjack(Y/VIDEO),youmust
disconnecttheComponentVideoInputjacks(PbandPr).Ifyouleavethosejacks
connected,itmaycauseofunstablepicture.
• Onlytheleftloudspeakerreproducessoundformonoequipment.Useamonoto
stereoadapter(notsupplied)forsoundreproductionviaallinternalloudspeakers.
DigitalAudioOutputConnection
IfyouconnectthisunittoanexternalDigitalAudiodevice,youcan
enjoymulti-channelaudiolike5.1chDigitalbroadcastingsound.
UseaDigitalAudiocoaxialcabletoconnecttheunittoexternalDigital
Audiodevices.
ININ
OUT
OUT
Digitalhometheater
amplier
DigitalAudiocoaxialcable
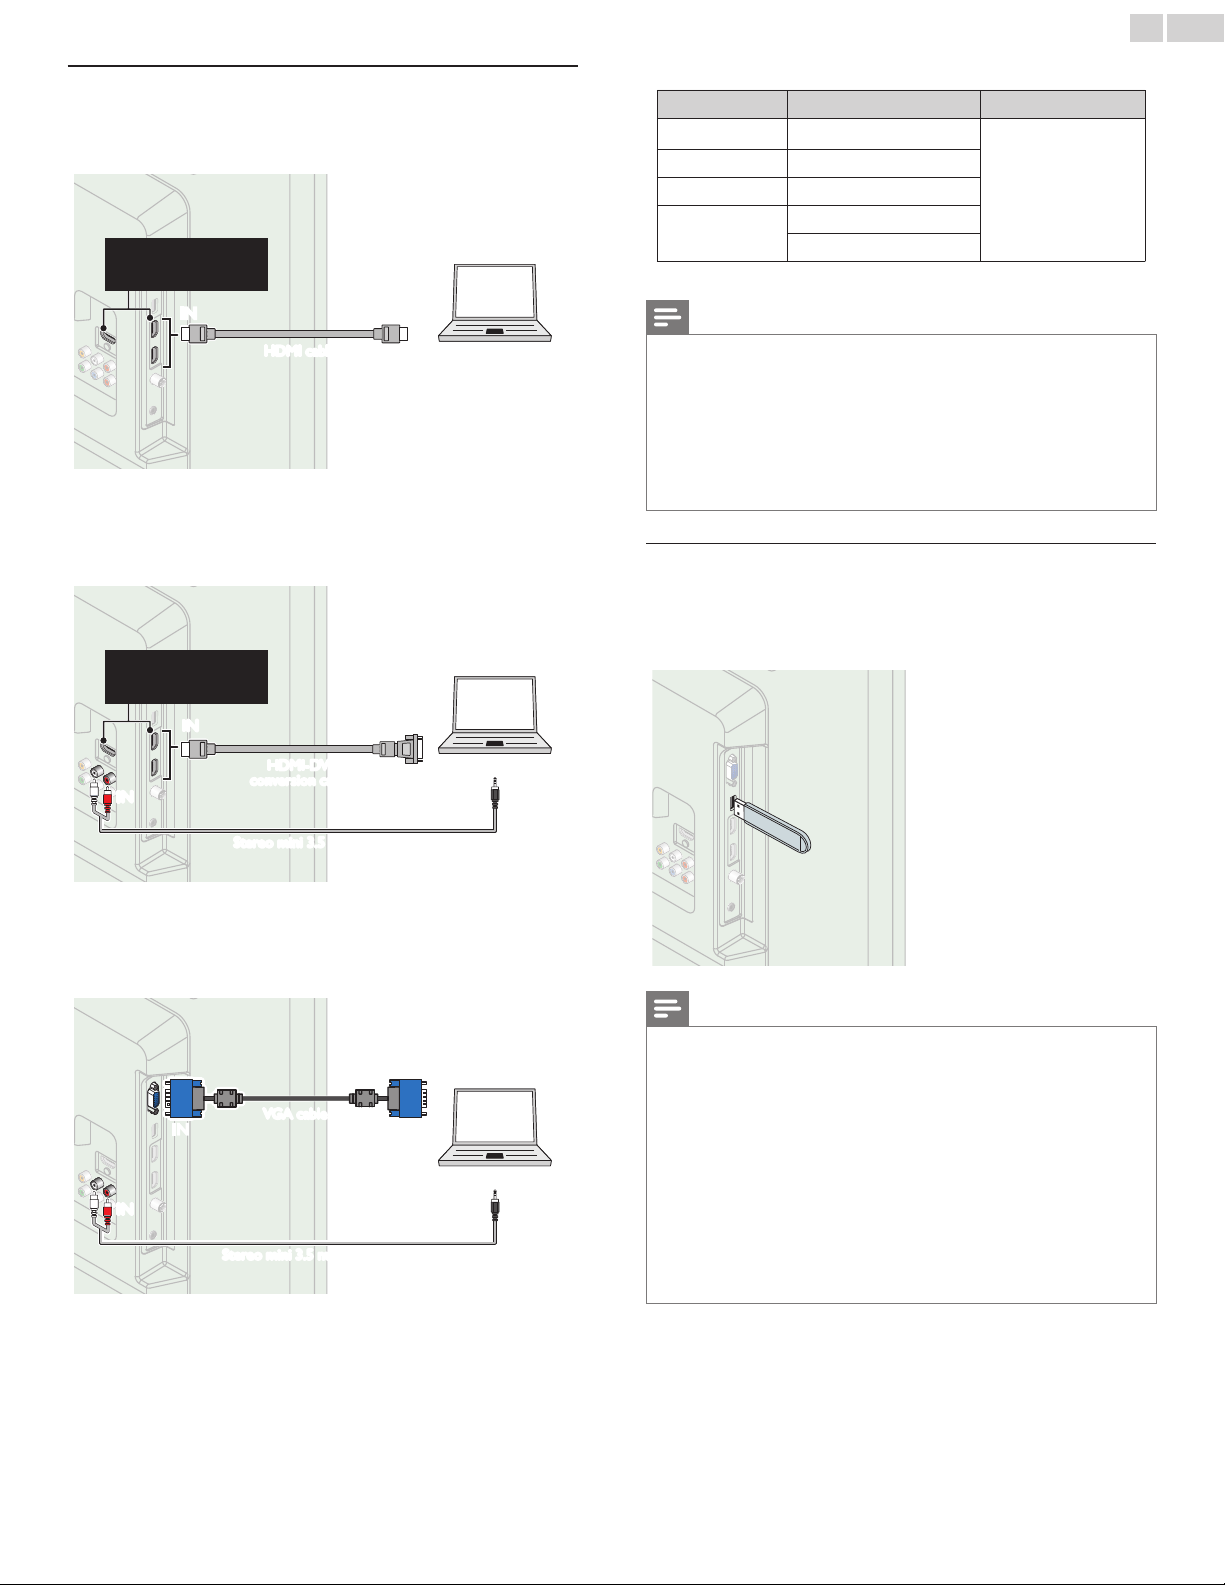
English
32
PCconnection
HDMI connection
ThisunitcanbeconnectedtoyourPCthathasaHDMIterminal.Use
anHDMIcableforthisDigitalconnection.
ININ OUT
PC
HDMIcable
TheseHDMIInputsare
availableon26inchand
largerscreensizeTVs.
HDMI-DVI connection
ThisunitcanbeconnectedtoyourPCthathasaDVIterminal.Use
anHDMI-DVIconversioncableforthisVideoDigitalconnectionandit
requiresStereomini3.5mmplugAudiocableforAnalogAudiosignalas
well.
OUT
IN
IN
OUT
ININ
PC
Stereomini3.5mmplugAudiocable
HDMI-DVI
conversioncable
TheseHDMIInputsare
availableon26inchand
largerscreensizeTVs.
VGA connection
ThisunitisequippedwithaPCInputjack.Ifyouconnectthisunitto
yourPC,youcanusethisunitasaPCmonitor.
UseaVGAcableforthisVideoconnectionanditrequiresaStereomini
3.5mmplugAudiocableforAnalogAudiosignalaswell.
OUTIN
IN
IN
IN
OUT
PC
VGAcable
Stereomini3.5mmplugAudiocable
Thefollowingvideosignalscanbedisplayed:
Format Resolution Refreshrate
VGA 640 x 480
SVGA 800 x 600
XGA 1,024 x 768
WXGA
1,280 x 768
1,360 x 768
60Hz
Otherformatsornon-standardsignalswillnotbedisplayedcorrectly.
Note
• PleasepurchasetheVGAcableorHDMI-DVIconversioncablethathasaferritecore.
• Thefollowingoperationsmayreducenoise.
-AttachaferritecoretotheACpowercordofyourPC.
-UnplugtheACpowercordandusethebuilt-inbatteryofyourPC.
• UseanHDMIcablewiththeHDMIlogo(acertiedHDMIcable).HighSpeedHDMI
cableisrecommendedforthebettercompatibility.
• Theunitaccepts480i,480p,720p,1080iand1080pvideosignals.
• HDMI-DVIconnectionrequiresseparateaudioconnectionsaswellandtheaudio
signalsareoutputasAnalog(L/R)Audio.
• DVIdoesnotdisplay480iimagewhichisnotincompliancewithEIA/CEA-861/861B.
USBMemoryStick
Thisunitofferseasyplaybackofpicture(JPEG)andvideo
(MotionJPEG)les.
InserttheUSBMemoryStickintotheUSBterminalshownbelow.
USB
➠
p.28
Note
• TheunitrecognizesonlyaUSBMemoryStick.
• DonotuseaUSBhuboranextensioncabletoconnectanexternalharddiskdriveto
theunit.(Notsupported.)
• AUSBMemoryStickisalwaysinsertedtothisunitdirectly.
• AUSBMemoryStickisnotsuppliedwiththisunit.
• WedonotguaranteethatallUSBMemoryStickscanbesupportedbythisunit.
• Besuretokeepabackupcopyoftheoriginallesonyourdevicebeforeyouplaythem
backonthisunit.Wehavenoresponsibilitiesfordamageorlossofyourstoreddata.
• ToprotectyourUSBMemorySticklesfrombeingerasedplacethewriteprotect
slidingtabintheprotectposition.
• WhenyouarereadytoremoveaUSBMemoryStick,settheunittogointoStandby
modetoavoidanydamagetoyourdataandtheunit.
• AUSBMemoryStickthatrequiresitsowndriverorthedevicewithaspecialsystem
suchasngerprintrecognitionarenotsupported.
• ThisunitisnotallowedtousetheUSBMemoryStickwhichrequiresanexternal
powersupply(500mAormore).

English
33
8 Usefultips
FAQ
Question Answer
Myremotecontroldoesnot
work.
WhatshouldIdo?
• Checktheantennaorcableconnectiontothemainunit.
• Checkthebatteriesoftheremotecontrol.
• Checkifthereisanobstaclebetweentheinfraredsensorwindowandtheremotecontrol.
• TestthesignalOutputuseIRSignalCheck.
➠
p.35
Ifokay,thenpossibleinfraredsensortrouble.
• Aimtheremotecontroldirectlyattheinfraredsensorwindowonthefrontoftheunit.
• Reducethedistancetotheunit.
• Re-insertthebatterieswiththeirpolarities(+/–)asindicated.
• Whenthereisaninfrared-equippeddevicesuchasPCnearthisunit,itmayinterrupttheremotecontrolsignalofthisunit.Move
theinfrared-equippeddeviceawayfromthisunit,changetheangleoftheinfraredsensororTurnOfftheinfraredcommunication
function.
HowcometheInitialsetup
appearseverytimeITurnOn
thisunit?
• ConnecttheRFcoaxialcabletotheunitdirectlyandruntheinitialsetup.
• MakesuretocompletetheinitialsetupbeforetheunitgoesintoStandbymode.
WhycanInotwatchsomeRF
signalTVprograms.
• Autoprogrammustbecompletedwhenyousetuptheunitforthersttimeormoveittoalocationwherepreviouslyunavailable
channelsarebroadcast.
• MakesureAutoprogramhasbeencompleted.
➠
p.20
• Theselectedchannelmaynotbebroadcasting.
• WhenAutoprogramisinterruptedandnotcompleted,somechannelswillnotbereceived.Makesuretocompletethe
Autoprogram.
➠
p.20
• TheselectedchannelcannotbeviewedbytheChildandratingslocksetting.
➠
p.23
• TheunitrequiressomekindofantennaInput.Anindoorantenna(DigitalorVHF/UHF),anexternalantenna(DigitalorVHF/UHF)
oranRFcoaxialcablefromyourwallcable/satelliteboxneedstobepluggedintotheunit.
Howcomethereisnoimage
fromtheconnectedexternal
devices?
• CheckifthecorrectInputmodeisselectedbypressingSOURCEorusingCH+/−.RefertoWatchingchannelsfromanexternal
device.
➠
p.15
• Checktheantenna,cableorotherInputconnectiontotheunit.
• WhenusingtheComponentVideoconnectioncheckthattheGreen(Y),Blue(Pb/Cb)andRed(Pr/Cr)connectorsareconnected
totheircorrespondingcoloredjacksontheunit.
WhenIenterachannelnumber,
itchangesautomatically.
• ManyDigitalchannelshavealternatechannelnumbers.Theunitchangesthenumbersautomaticallytotheonessignifyingthe
broadcastingstationchannelnumber.ThesebasicnumbersusedforpreviousAnalogbroadcasts.(e.g.,Inputch#30automatically
changestoch#6.1)
Whyarecaptionsnotdisplayed
entirely?Or,captionsare
delayedbehindthedialog.
• Captionsthataredelayedafewsecondsbehindtheactualdialogarecommonforlivebroadcasts.Mostcaptioningproduction
companiescandisplayadialogtomaximumof220wordsperminute.Ifadialogexceedsthatrate,selectiveeditingisusedto
insurethatthecaptionsremainup-todatewiththecurrentTVscreendialog.
HowcanIsettheclock? • Thereisnoclockfunctiononthisunit.
IcannotchangetheChildlock
settingbecausemyPINcodeno
longerworks.
• IfaPowerfailureoccursforlongerthan10secondsthechildlocksettingisretained,butthePINcodeisresettothedefaultcode
0000.RefertoChildandratingslock.
➠
p.23
Troubleshooting
IftheunitdoesnotperformproperlywhenoperatedasinstructedinthisUserManual,
checkthefollowingchartandallconnectionsoncebeforecallingforservice.
Symptom Remedy
Nopower • MakesuretheACpowercordispluggedin.
• MakesurethattheACoutletsuppliesthepropervoltage,pluganotherelectricalapplianceintotheACoutlettoensurethattheAC
outletoperatesnormally.
• Ifapowerfailureoccurs,unplugtheACpowercordfor1minutetoallowtheunittoresetitself.
Controlbuttonsdonotwork. • Pressonlyonebuttonatatime.DoNOTpressmorethanonebuttonatthesametime.
• Ensurethatnobuttonsontheremotecontrolaredepressedandmovefreely.
Continued on next page.

English
34
Symptom Remedy
PowerisONbutnoscreen
image.
• Checkwhethertheconnectionoftheantenna,cablereceiverorsatelliteboxisconnectedcorrectly.
• CheckwhetherallthecablestotheunitareconnectedtothecorrectOutputjackofyourdevicelikeBlu-raydisc/DVDrecorder.
• MakesurethattheselectedInputmodeisconnectedtotheworkingInputjack.
• CheckifyourcomputerisNOTinsleepmodewhentheInputmodeofthisunitisinPCmode.Tapanykeyonthekeyboardto
wakeupyourcomputer.
Nopictureorsound • CheckifthePowerison.
• CheckwhetherallthecablestotheunitareconnectedtothecorrectOutputjackofyourdevicelikeBlu-ray/DVDrecorder.
• ViewotherTVchannels.Theproblemmightbelimitedtothebroadcastingstationorweaksignalstrength.
• UnplugtheACpowercordandwaitforabout1minute,thenplugtheACpowercordandTurnOntheunitagain.
• Checkwhethertheconnectionoftheantenna,cablereceiverorsatelliteboxisconnectedcorrectly.
• MakesurethattheselectedInputmodeisconnectedtotheworkingInputjack.
• CheckifyourcomputerisNOTinsleepmodewhentheInputmodeofthisunitisinPCmode.Tapanykeyonthekeyboardto
wakeupyourcomputer.
• Makesurethatthesoundisnotmuted.PressMUTEsothatthevolumebarandcurrentvolumelevelwillappearontheTVscreen.
• MakesurethatthevolumeisNOTsetto0or
.Ifso,useVOL+/−toadjusttothedesiredvolume.
Nocolor • ViewotherTVchannels.Theproblemmightbelimitedtothebroadcastingstationorweaksignalstrength.
• AdjustColorinPicturesettings.
➠
p.19
Nosound,distortedsoundor
incorrectAudioSoundisheard
whenusingtheHDMI-DVI
connections.
• MakesurethattheAnalogAudiosignalsfromtheHDMI-DVIdeviceareconnectedtotheAnalogAudio(L/R)Inputjacks.
• WhenusingComponentAnalogVideo,CompositeAnalogVideoorPCVGAVideomakesurethattheAnalogAudio(L/R)
connectorsaremountedintotheAudio(L/R)Inputjacks.
AdjustedPictureorSound
settingsarenoteffectiveevery
timetheunitisTurnedOn.
• YoumustsetHomeinLocation.
➠
p.27
Otherwise,thesettingsyouadjustedwillnotbememorizedaftertheunitgoesintoStandbymode.
SoundOK,picturepoor • Electricalinterferencefromnearbyappliancesmayaffectpicturequality.
• AdjustContrastandBrightnessinPicturesettings.
➠
p.19
• ViewotherTVchannels.Theproblemmightbelimitedtothebroadcastingstationorweaksignalstrength.
• Forthebestpicturequality,watchHighDenitionwidescreenprograms.
IftheHDcontentisnotavailable,watchStandardDenitionprogramsinstead.
PictureOK,soundpoor • ViewotherTVchannels.Theproblemmightbelimitedtothebroadcastingstationorweaksignalstrength.
• Checkiftheaudiocableisconnectedintotheunitcorrectly.
Youseeadistortedpictureor
hearanunusualsound.
• Youmaybegettinginterferencefromelectricalappliances,automobiles,motorcyclesoruorescentlights.
• Trymovingtheunittoanotherlocationtoseeifthisisthecauseoftheproblem.
Ghosts,linesorstreaksinpicture • Electricalinterferencefromnearbyappliancesmayaffectpicturequality.
• ViewotherTVchannels.Theproblemmightbelimitedtothebroadcastingstationorweaksignalstrength.
Youseenoiseortrashonthe
screen.
• WhenthecapabilitiesoftheunitexceedthecapabilitiesoftheDigitalbroadcasting,thesignalwillbeincreasedtomatchthe
capabilitiesofthedisplayoftheunit.Thismaycausenoiseortrash.
DifferentcolormarksontheTV
screen
• ViewotherTVchannels.Theproblemmightbelimitedtothebroadcastingstation,missingdataorpixelation.
YouswitchtoadifferentInput
andthevolumechanges.
• Thisunitwillmemorizethevolumelevelfromthelasttimeyouadjustedit.
• Ifthevolumeofthesoundfromanotherdeviceishigherorlower,thentheloudnesswillchange.
• MakesureAutovolumelevelingissettoOn.
➠
p.20
YouswitchtoadifferentInput
andthescreensizechanges.
• ThisunitwillmemorizetheviewingmodefromthelasttimeyouusedtheparticularInputmodes.
Thedisplayimagedoesnot
covertheentirescreen.
• IfyouareusingtheunitasaPCmonitor,makesurethatHorizontalpositionandVerticalpositioninPCsettingsaresetcorrectly.
• IfyouarewatchingTVorusingtheCompositeVideo,ComponentVideoorHDMIwith480iInput,pressFORMATrepeatedlyto
switchvariousscreenmodes.
Captionsaredisplayedasawhite
box.Nocaptionisdisplayedin
theClosedCaption-supported
program.
• InterferencefrombuildingsorweatherconditionsmaycausecaptioningtobeincompleteifwatchingAnalogTVsignals.
• Broadcastingstationmayshortentheprogramtoinsertadvertisements.
• TheClosedCaptiondecodercannotreadtheinformationoftheshortenedprogram.
BlackboxisdisplayedontheTV
screen.
• ThetextmodeisSelected.Forcaption,selectCC-1,CC-2,CC-3,CC-4orOff.
Note
• TheLCDscreenismanufacturedtoprovidemanyyearsofusefullife.Occasionallyafewnonactivepixelsmayappearasaxedpointofblue,greenorred.
ThisisnottobeconsideredadefectintheLCDscreen.
• Somefunctionsarenotavailableinspecicmodes,butthisisnotamalfunction.ReadthedescriptioninthisUserManualformoredetailsoncorrectoperations.
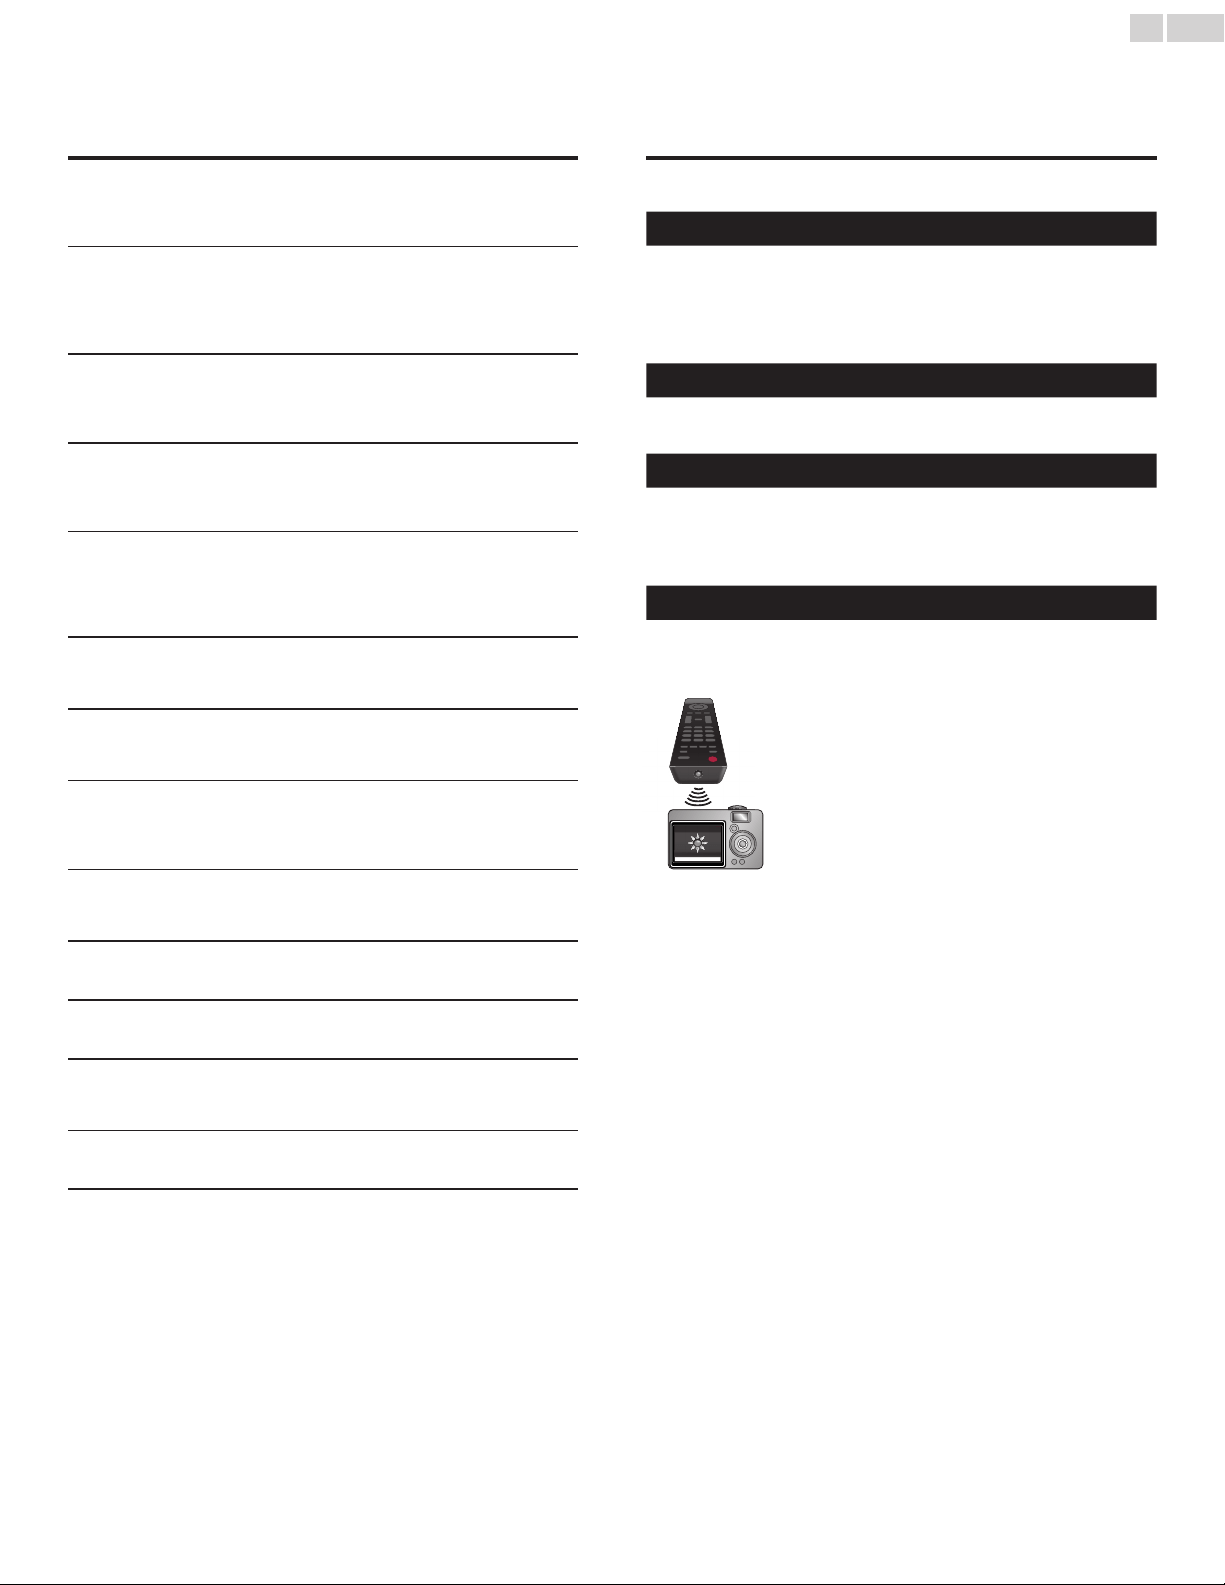
English
35
9 Information
Glossary
AnalogTV(NTSC)
AcronymthatstandsforNationalTelevisionSystemsCommitteeandthename
ofAnalogbroadcastingstandards.
OfftheairAnalogTVsignalsarenolongerbeingsentbymajorbroadcasting
stationsintheUSA.
Aspectratio
ThewidthofaTVscreenrelativetoitsheight.ConventionalTVsare4:3(inother
words,theTVscreenisalmostsquare);widescreenmodelsare16:9(theTV
screenisalmosttwiceaswideasitsheight).
CEC(ConsumerElectronicsControl)
Thisallowsyoutooperatethelinkedfunctionsbetweenourbranddeviceswith
CECfeatureandthisunit.Wedonotguarantee100%interoperabilitywithother
brandsofCECcompliantdevices.
ComponentVideo
Thisisavideosignalformatthatconveyseachof3principalcolorsoflight
(red,blueandgreen)throughdifferentsignallines.Thisallowstheviewersto
experiencepicturecolorsasoriginalasitis.Thereareseveralsignalformats,
includingY/Pb/PrandY/Cb/Cr.
DolbyDigital
ThesystemdevelopedbyDolbyLaboratoriestocompressDigitalsound.Itoffers
stereosound(2ch)ormulti-channelaudio.
DTV(ATSC)
InitialismthatstandsforAdvancedTelevisionSystemsCommitteeandthename
oftheDigitalbroadcastingstandards.
E-sticker
E-stickerisshowingsetfeatures,technicalinformation,etconthisTVset
thatisdisplayedontheTVscreenmainlyusedbyTVretailers.Previouslythe
informationwasonaprintedstickerthatwasputonthedisplay.
HDMI(High-DenitionMultimediaInterface)
Interfacethatsupportsalluncompressed,DigitalAudio/Videoformatsincluding
set-topbox,Blu-ray/DVDrecorderorDigitaltelevision,overasinglecable.
HDTV(HighDenitionTV)
UltimateDigitalformatthatproduceshighresolutionandhighpicturequality.
PINcode
Astored4-digitnumberthatallowsaccesstoparentalcontrolfeatures.
SAP(SecondaryAudioProgram)
Second-audiochanneldeliveredseparatelyfrommain-audiochannel.Thisaudio
channelisusedasanalternateinbilingualbroadcasting.
SDTV(StandardDenitionTV)
StandardDigitalformatthatissimilartotheAnalogTVpicturequality.
SRSTruSurroundXT
®
Createsatrulyimmersivesurroundsoundexperiencewithrichbassandclear
dialogfromonlytwospeakers.
Maintenance
CabinetCleaning
• Wipethefrontpanelandotherexteriorsurfacesoftheunitwith
asoftcloth.
• Neveruseasolventoralcohol.Donotsprayinsecticideliquidnear
theunit.Suchchemicalsmaycausedamageanddiscolorationto
theexposedsurfaces.
PanelCleaning
Wipethepaneloftheunitwithasoftcloth.Beforecleaningthepanel,
disconnecttheACpowercord.
Servicing
Shouldyourunitbecomeinoperative,donottrytocorrectthe
problemyourself.Therearenouserserviceablepartsinside.Callour
tollfreecustomersupportlinefoundonthecoverofthisUserManual
tolocateanauthorizedservicecenter.
IRSignalCheck
Iftheremotecontrolisnotworkingproperly,youcanuseaDigital
camera(includingacellularphonewithbuilt-incamera)toseeifitis
sendingoutaninfraredsignal.
WithaDigitalcamera
(includingbuilt-incellphonecameras):
PointtheDigitalCameratowardstheremotecontrol
infrareddiodeatthefrontoftheremotecontrol.
Pressanybuttonontheremotecontrolandlook
throughthecameradisplay.Iftheinfraredpulsating
lightappearsthroughthecamera,theremotecontrol
issendingoutanIRsignal.

English
36
10Specifications
Model#
32PFL4507 26PFL4507 22PFL4507
Picture
Type WXGA(1366x768pixels60Hz)
Aspectratio 16:9
Viewingangles
170°(V)by170°(H) 150°(V)by160°(H) 160°(V)by170°(H)
Built-inDigitaltuner ATSC/NTSC
Sound
Mono/Stereo Mono,Stereo,SRSTruSurroundXT
®
PowerOutput(RMSwatts)
8Wx2 2Wx2
Equalizer 5band
Ease of use
Pictureformat
SD(4:3Source) :
HD(16:9Source) :
HDMIAV(4:3Source) :
HDMIAV(16:9Source) :
PCSource :
Normal/16:9/Movieexpand/Zoom/Wide
Normal/4:3/Movieexpand/Zoom/Wide
Normal/16:9/Movieexpand/Zoom/Wide/Full
Normal/4:3/Movieexpand/Zoom/Wide/Full
Normal/Full/Unscaled
(RefertoHDMIAV(16:9Source)aboveifPChasHDMIOutput.)
Photoslideshow JPEGlesonly
Videoplayback MotionJPEG320x240,30fpsandleextension“.avi”only
Connectivity
ComponentVideoInput(Y/Pb/Pr)
1
supportingvideosignals:480i/p,720p,1080i60Hz
CompositeVideoInput
(sharedterminalwithYofcomponents)
1
HDMIInput
3 1
supportingvideosignals:
480i/p,720p,1080i/p,24Hz-60Hz
PC-InputsignaluptoWXGA(1360x768)
AudioL/RInput 1
PCInput viaVGA,HDMIandHDMI-DVI+AnalogAudioL/R
USB 1
DigitalAudioOutput
1
supportingDolbyDigital
HeadphoneOutput
1
1/8inches(3.5mm)
Power
Powerrequirements 120V~AC+/−10%,60Hz+/−0.5%
Temperature
Operatingtemperature 41°F(5°C)to104°F(40°C)
• Specicationsaresubjecttochangewithoutpriornotice.

English
37
11Warranty
P&F USA, Inc. PO Box 2248, Alpharetta, GA 30023-2248
LIMITED WARRANTY
ONE
(
1
)
YEAR
WARRANTY COVERAGE:
This warranty obligation is limited to the terms as set forth
below.
WHO IS COVERED:
This product warranty is issued to the original purchaser or the
person receiving the product as a gift against defects in materials
and workmanship as based on the date of original purchase
(“Warranty Period”) from an Authorized Dealer. The original
sales receipt showing the product name and the purchase date
from an authorized retailer is considered such proof.
WHAT IS COVERED:
This warranty covers new products if a defect in material or
workmanship occurs and a valid claim is received within the
Warranty Period. At its option, the company will either (1)
repair the product at no charge, using new or refurbished
replacement parts, or (2) exchange the product with a product
that is new or which has been manufactured from new, or ser-
viceable used parts and is at least functionally equivalent or most
comparable to the original product in current inventory, or (3)
refund the original purchase price of the product.
Replacement products or parts provided under this warranty are
covered against defects in materials and workmanship from the
date of the replacement or repair for ninety (90) days or for the
remaining portion of the original product’s
warranty,
whichever
provides longer coverage for you. When a product or part is
exchanged, any replacement item becomes your property and the
replaced item becomes company property. When a refund is
given, your product becomes company property.
Note: Any product sold and identified as refurbished or
renewed carries a ninety (90) day limited warranty.
Replacement product can only be sent if all warranty
requirements are met. Failure to follow all requirements
can result in delay.
WHAT IS NOT COVERED - EXCLUSIONS AND LIMI-
TATIONS:
This Limited Warranty applies only to new company manufac-
tured products that can be identified by the trademark, trade
name, or logo affixed to it. This Limited Warranty does not apply
to any hardware product or any software, even if packaged or
sold with the product, as manufacturers, suppliers, or publishers
may provide a separate warranty for their own products pack-
aged with the bundled product.
The company is not liable for any damage to or loss of any pro-
grams, data, or other information stored on any media contained
within the product, or other additional product or part not cov-
ered by this warranty. Recovery or reinstallation of programs,
data or other information is not covered under this Limited
Warranty.
This warranty does not apply (a) to
damage caused
by accident,
abuse, misuse, neglect, misapplication, or non-supplied product,
(b) to damage caused by service performed by anyone other than
company approved Authorized Service Location, (c) to a product
or a part that has been modified without written company per-
mission, or (d) if any serial number has been removed or defaced,
or (e) product, accessories or consumables sold “AS IS” without
warranty of any kind by including refurbished product sold “AS
IS” by some retailers.
This Limited Warranty does not cover:
• Shipping charges to return defective product.
• Labor charges for installation or setup of the product, adjust-
ment of customer controls on the product, and installation or
repair of antenna/signal source systems outside of the product.
• Product repair and/or part replacement because of improper
installation or maintenance, connections to improper voltage
supply, power line surge, lightning damage, retained images or
screen markings resulting from viewing fixed stationary con-
tent for extended periods, product cosmetic appearance items
due to normal wear and tear, unauthorized repair or other
cause not within the control of the company.
• Damage or claims for products not being available for use, or
for lost data or lost software.
• Damage from mishandled shipments or transit accidents when
returning product.
• A product that requires modification or
adaptation
to enable
it to operate in any country other than the country for which
it was designed, manufactured, approved and/or authorized, or
repair of products damaged by these modifications.
• A product used for commercial or institutional purposes
(including but not limited to rental purposes).
• Product lost in shipment and no signature verification receipt
can be provided.
• Failure to operate per Owner’s Manual.
TO OBTAIN ASSISTANCE…
Contact the Customer Care Center at:
1 866 309 0843
REPAIR OR REPLACEMENT AS PROVIDED UNDER THIS
WARRANTY IS THE EXCLUSIVE REMEDY FOR THE CON-
SUMER, WITH THE ISSUING COMPANY NOT LIABLE FOR
ANY INCIDENTAL OR CONSEQUENTIAL DAMAGES FOR
BREACH OF ANY EXPRESS OR IMPLIED WARRANTY ON
THIS PRODUCT. EXCEPT TO THE EXTENT PROHIBITED BY
APPLICABLE LAW, ANY IMPLIED WARRANTY OF MER-
CHANTABILITY OR FITNESS FOR A PARTICULAR PURPOSE
ON THIS PRODUCT IS LIMITED IN DURATION TO THE
DURATION OF THIS WARRANTY.
Some states do not allow the exclusions or limitation of inciden-
tal or consequential damages, or allow limitations on how long an
implied warranty lasts, so the above limitations or exclusions may
not apply to you.
This warranty gives you specific legal rights. You may have other rights which vary from state/province to state/province.
061708

A21F5UH/A21A5UH/A2176UT
★★★★
PhilipsandPhilipsShieldareusedunderlicenseof
KoninklijkePhilipsElectronicsN.V.
P&F USA, Inc.
PO Box 2248, Alpharetta, GA 30023-2248
P&F Mexicana, S.A. de C.V.
Av. La Palma No. 6, Col. San Fernando La Herradura.
Huixquilucan, Edo. de México. C.P. 52787