Loading ...
Loading ...
Loading ...
18
11.10 Cleaning the milk container
To keep the frother ecient, every two days clean the milk con-
tainer (D) as described below:
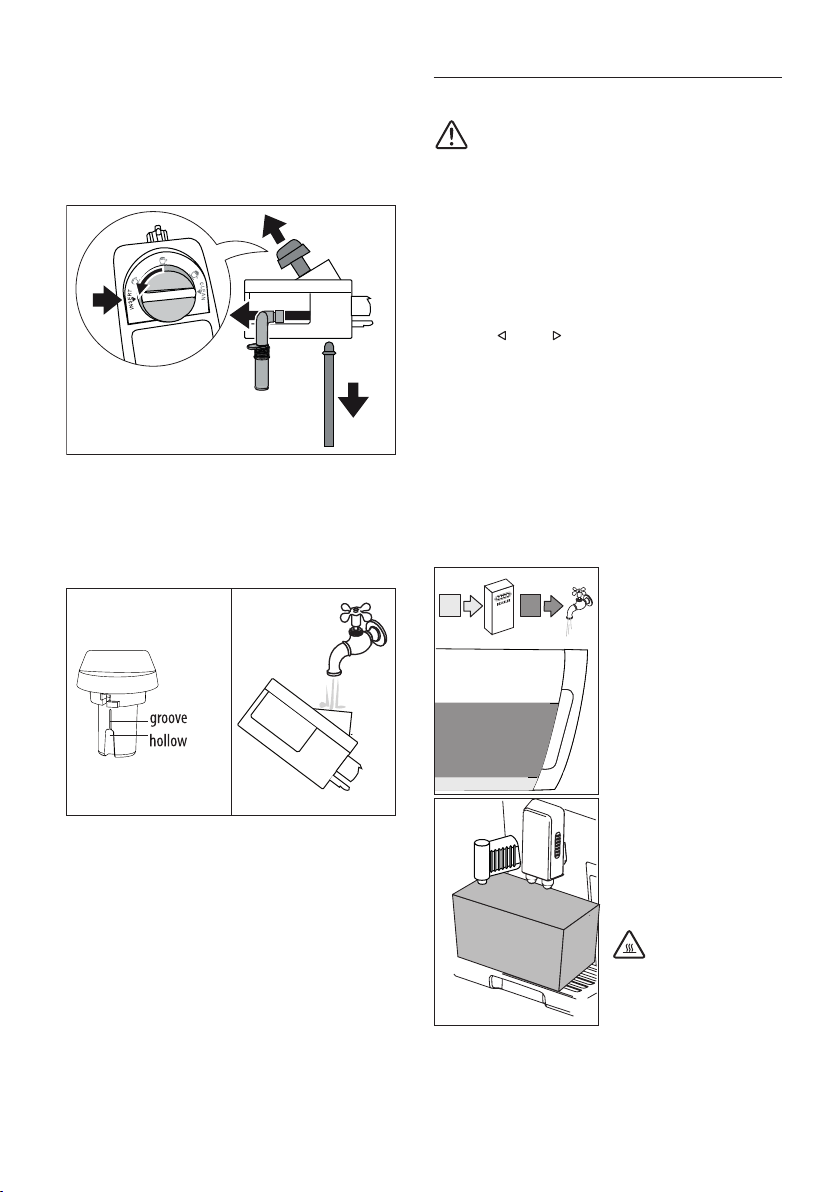
1. Remove the lid (D2);
2. Remove the milk spout (D5) and intake tube (D4) (g. 37);
3. Turn the froth adjustment dial (D1) anticlockwise to the
“INSERT” position (g. 37) and pull it o upwards;
37
4. Wash all the components thoroughly with hot water and
mild washing-up liquid. All components are dishwasher
safe, placing them in the top basket of the dishwasher.
Make sure there are no milk residues on the hollow and
groove under the dial (g. 38). If necessary, scrape the
groove with a toothpick;
38 39
5. Rinse inside the froth adjustment dial seat with running
water (g. 39);
6. Check that the intake tube and spout are not clogged with
milk residues;
7. Replace the dial (in correspondence to the word “INSERT”),
spout and milk intake tube;
8. Place the lid back on the milk container (D3).
11.11 Cleaning the hot water connection nozzle
Each time you prepare milk, clean the connection nozzle (A8)
with a sponge to remove milk residues from the gaskets (g.
26).
12. DESCALING
Descale the machine when the message “DESCALE” ashes on
the display (B4).
Important!
• Before use, read the instructions and the labelling on the
descaler pack.
• You should use De’Longhi descaler only. Using unsuitable
descaler and/or performing descaling incorrectly may re-
sult in faults not covered by the manufacturer’s guarantee.
1. Turn the appliance on and wait until it is ready for use;
2. Press the MENU/ESC button (B2) to access the menu;
3. Press (B9) or (B10) (g. 6) until “Descale” appears on
the display;
4. Select by pressing the OK button (B3-g. 7). The message
“Descaling Conrm?” is displayed;
5. Press the OK button again to conrm. “EMPTY DRIP TRAY”
is displayed, alternating with “REMOVE FILTER” (if the lter
is present) and “Add descaler, Press OK”;
6. Empty the water tank (A16) completely and remove the
water softener lter (C4), if present. Empty the drip tray
(A12) (g. 27) and grounds container (A10), then put them
back in the appliance;
B
A
A B
40
7. Pour the descaler (C3) into
the tank up to level A
(corresponding to a 3,38
.oz/100 ml pack) marked
on the inner surface of the
tank (g. 40), then add a
litre of water up to level B
(g. 40) and put the water
tank back in the
appliance;
41
2 l
8. Place an empty container
with a minimum capacity
of 67.63 .oz/ 2.0 litres
under the coee spouts
(A7) and hot water spout
(C6) (g. 41);
Important! Danger
of burns
Hot water containing acid
ows out of the coee spouts
and hot water spout. Take care
to avoid contact with splashes of this solution.
9. Press the OK button to conrm that you have added the
descaler solution. The message “Descale underway” is dis-
played and the descaling procedure begins. The descaler
Loading ...
Loading ...
Loading ...