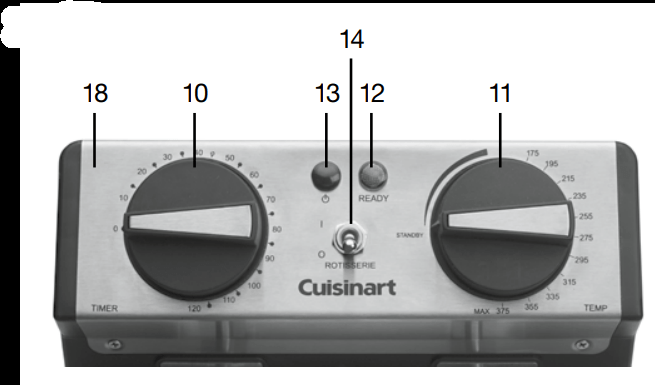
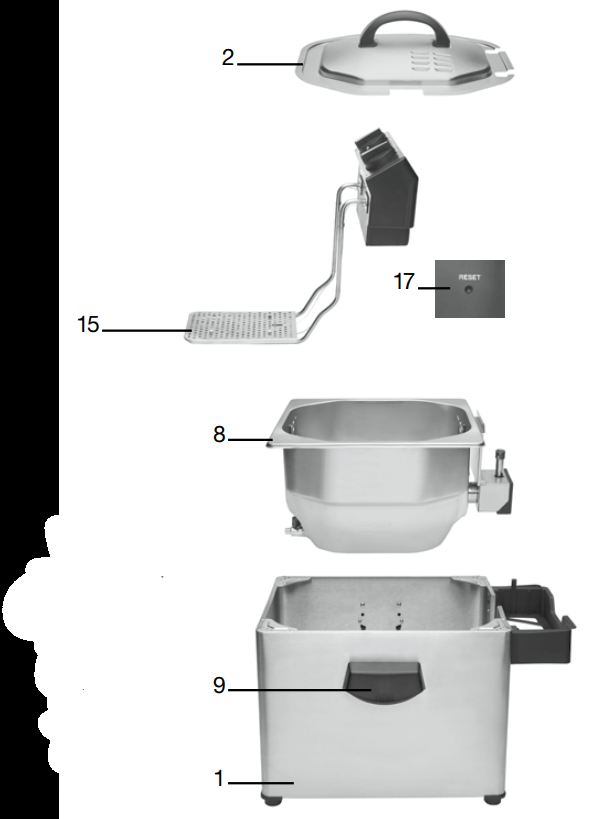
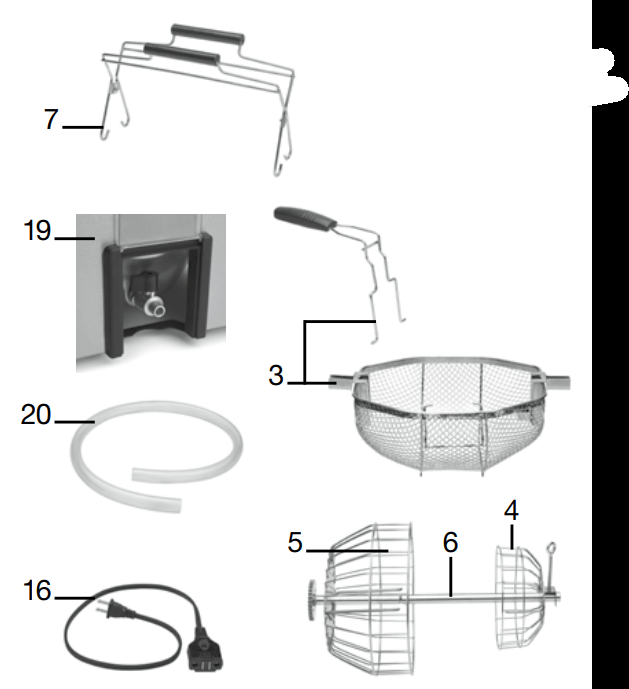
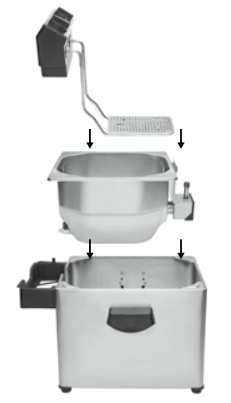
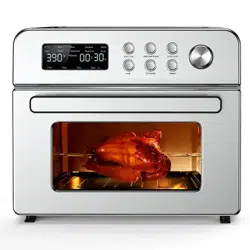
1. Stainless steel housing 2. Vented Lid with handle 3. Mesh Basket with handle 4. Small cage 5. Large cage 6. Spit rod 7. Double lifting handle 8. Oil container 9. Side handles 10. Timer control knob 11. Temperature control knob 12. Ready indicator light 13. Power On indicator light 14. Toggle switch ON/OFF 15. Heating element 16. Breakaway cord 17. Reset button 18. Control panel 19. Spigot 20. Drain hose
Before the First Use
Remove all packaging and any promotional labels or stickers from your deep fryer. Be sure that all parts (listed in Parts and Features) of your new deep fryer have been included before discarding any packing materials. You may want to keep the box and packing materials for use at a later date.
Before using your Cuisinart® Extra-Large Rotisserie Fryer and Steamer for the first time, remove any dust from shipping by wiping the base with a moist cloth. Thoroughly clean the oil container, lid and basket. The lid and basket are dishwasher safe. Never immerse the appliance in water; water must not be allowed to penetrate the interior of the appliance.
Operating Instructions
This appliance is designed for household use only. It is not intended for commercial use.
1. Before your Rotisserie Fryer/Steamer is used for the first time, remove all packing materials and be sure all parts are fully dry after cleaning and before use. See complete cleaning instructions on page 9.
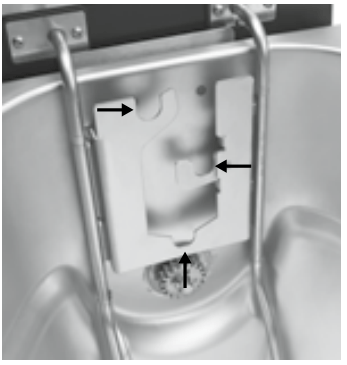
2. Place heating element/control panel in the unit. Please make sure that the heating element/control panel is properly inserted into the housing. This unit is equipped with an interlock feature that will prevent it from turning on until the heating element/ control panel is in place.
3. Be sure that the oil draining spigot is in the closed position before adding oil. Turn clockwise until secure.
4. Pour approximately 5 liters of good-quality corn, canola, soybean, or peanut oil into reservoir until it reaches between the MIN and MAX marks inside container.
OIL WARNING
DO NOT OVER- OR UNDER-FILL. DO NOT MIX OILS. DO NOT USE EXTRA VIRGIN OLIVE OIL, SOLID/HYDROGENATED OIL, SHORTENING, GRAPESEED OIL OR LARD IN THIS FRYER. USE GOOD-QUALITY OIL THAT HAS A SMOKE POINT OF 420ºF OR HIGHER. TO PRESERVE OIL QUALITY, DO NOT ADD SALT OR SPICES TO THE FOOD UNTIL AFTER IT HAS BEEN REMOVED FROM THE FRYER.
5. Do not operate unit near open burners on stove.
6. Make sure the toggle switch is in the OFF position and the temperature control knob is in the standby location.
7. To turn on your fryer, attach breakaway cord to back of the appliance, then plug into outlet.
8. The power ON light will glow to show that the unit is on.
9. Set the temperature control knob to the desired temperature. The ready light will turn green once the oil has reached the desired temperature. It will take approximately 20–30 minutes for 5 liters of good quality oil to reach the desired temperature.
10. Place lid onto unit to shorten heat–up time.
11. While the oil is heating, prepare the food to be fried using Rotisserie or in a Frying Basket.
ROTISSERIE FRYING
As previously noted, pour 5 liters of goodquality vegetable, corn, canola, soybean or peanut oil into the reservoir. Do not mix oils. Then preheat while following the steps below. Set temperature control knob to 375ºF.
1. Prepare food to be fried. If frying a whole turkey, remove the neck and giblets. Make sure the turkey is thawed completely and 7 contains no ice crystals.
NOTE: If your turkey came with a plastic piece holding the legs together, remove this piece before putting the turkey on the rotisserie spit. Additionally, remove plastic pop-up timer.
2. Dry the food well with paper towels.
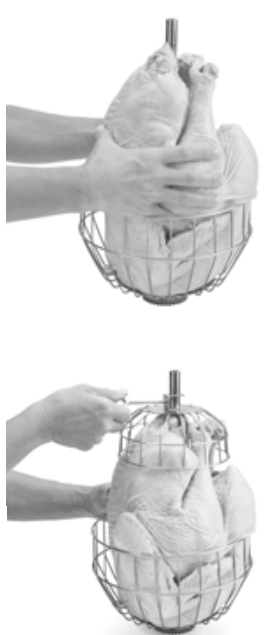
3. Prep the spit. Attach the spit rod to the base of large cage. Align button on spit rod to securely lock into large cage rod.
4. Place large cage on a flat surface with spit and spit rod pointing upward. Slowly guide the whole turkey, shoulders first, down the spit through the turkey’s cavity. Pierce the shoulders into the tines inside the large cage to secure turkey to the cage.
5. Attach the small cage. Hold the turkey legs together and place cage over the rear portion of the turkey. Attach the cage to the spit, with the rear portion of the turkey inside cage, using the screw to tighten cage to secure at marked location.
NOTE: No trussing is required. Turkey should be enclosed at both ends with cages.
6. Lift and place turkey in resting position.
7. When the oil is hot and green READY indicator light is on, use the double lifting handle to lift turkey. Handle will act in a scissor motion. Attach both hooks, one at a time, on each side of the assembled rotisserie spit, outside the cages.
8. Using both hands, one on each handle, lift the assembled rotisserie spit over the unit and guide the assembled rotisserie spit through the interior labyrinth. First left, then right, down to the bottom lowest position.
9. Turn the toggle switch to the Rotisserie On position.
10. Watch the rotisserie turn and check that the turkey rotates completely without touching the sides of the oil container.
11. Place the lid on the unit.
12. Set timer to the desired cooking time. (Periodically check to see if the turkey is still rotating.)
13. Timer will ring when the food is ready.
WARNING: THE TIMER DOES NOT SWITCH THE APPLIANCE OFF.
14. To check for turkey doneness:
WARNING: Turn toggle switch from ON to OFF position. Lift and place turkey in resting position (top right notch of the labyrinth.) and insert thermometer into the thickest part of the turkey thigh. Do not let it touch the bone. Turkey is done when the thigh reaches 170°F and the breast reaches 165°F. Check for desired doneness. REMOVE THERMOMETER FROM TURKEY. If needed, turn rotisserie to ON to complete frying until desired temperature is reached.
15. When the turkey is done, use the double lifting handle, and attach it to both ends of the spit using the same technique as described for lowering the turkey.
16. Lift the assembled rotisserie spit straight up, no need to navigate through the labyrinth, and place in the top resting position. See below.
17. When cooking is finished, shut down the fryer by turning temperature control knob to STANDBY and unplugging the breakaway cord from the wall outlet.
18. Allow oil to cool to room temperature before cleaning. 19. Rest turkey for 20–25 minutes. DO NOT TENT WITH FOIL.
20. After the oil has cooled, and the turkey has rested, using oven mitts, remove the assembled rotisserie spit from unit and place on a flat surface.
21. Remove cages. Remove small cage first, using screw to loosen and detach. Then remove larger cage by guiding the shoulders off the tines and removing the spit through the cavity. Spit rod can now be removed from larger cage for cleaning.
BASKET FRYING
1. Preheat 5 liters of good-quality vegetable, corn, canola, soybean or peanut oil to the temperature indicated in your recipe. Do not mix oils.
2. Prepare food to be fried per recipe directions.
3. Dry wet foods with paper towels. Remove excess ice crystals from frozen foods.
4. Place food to be fried into the basket (maximum of 2 pounds).
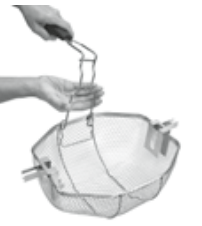
5. Attach the basket handle.
6. When the oil is hot and the green READY indicator light is on, remove the lid and place the basket on the unit over the oil reservoir: Lift the basket over the unit and guide the basket through the interior labyrinth. First left, then right, down to the bottom lowest position.
7. Place the lid on the unit.
8. Set timer to the desired cooking time. (Periodically check for doneness.)
9. Timer will ring when the food is ready. WARNING: The timer does not switch the appliance off.
10. Raise the basket. If the food is done, carefully lift basket, straight up, no need to navigate through the labyrinth, and place basket in the top resting position.
11. After the food has drained, remove the basket and place cooked food onto absorbent paper towels.
12. When cooking is finished, shut down the fryer by turning temperature control knob to STANDBY and unplugging the breakaway cord from the wall outlet.
13. Allow oil to cool to room temperature before cleaning.
STEAMING
You can easily steam lobsters, oysters, clams and vegetables using the Cuisinart® Extra-Large Rotisserie Fryer and Steamer.
For steaming: Add approximately 8 cups of water to the oil reservoir.
1. Prepare food to be steamed.
2. Remove the turkey rotisserie and basket from the unit.
3. Set to the maximum temperature and bring water to a boil. Once a rolling boil is reached, turn temperature down to 235°F.
▶NOTE: Monitor water level and add more water if necessary; heating element must be covered at all times.
4. Fill basket with food to be steamed (maximum of 2 pounds).
5. Place the basket on the unit over the water reservoir: Lift the basket over the unit and guide the basket through the interior labyrinth. First left, then right, down to the bottom lowest position.
6. Place the lid on the unit.
7. Steam to desired doneness.
⁕⁕⁕WARNING: The timer does not switch the appliance off.
8. Raise the basket. If the food is done, carefully lift basket, with lifting handle. Lift the basket straight up, no need to navigate through the labyrinth, and place basket in the top resting position.
9. After the food has drained, remove the basket.
10. When cooking is finished, shut down the steamer by turning temperature control knob to STANDBY and unplugging the breakaway cord from the wall outlet.
11. Allow water to cool to room temperature before cleaning.
Cleaning, Care and Maintenance
Always unplug appliance first, detach the breakaway cord and let the oil or water cool down to room temperature before cleaning.
Remove lid.
Lift out basket.
Raise control panel/heater assembly and allow oil to drain into the oil container.
The control panel should never be immersed in water or other liquids. Before first use, clean the outer surface of the heating element with a damp cloth containing mild soap solution or clean water.
Carefully remove oil or water using the oil draining spigot located on the bottom of the front housing. Place a container underneath the spigot, attach the drain hose and turn counterclockwise until the oil is fully drained. Then, turn the spigot clockwise until it is fully closed.
Once the oil has cooled, line a sieve with cheesecloth. Grasp each side of the removable oil container and lift upward. Pour the oil through the sieve and strain the used oil through it to remove food particles, crumbs and impurities. Clean the outer surface of the heating element with a damp cloth containing mild soap solution or clean water.
Lid and mesh basket are dishwasher safe. Dry parts thoroughly after cleaning and before assembling.
The stainless steel housing is not submersible and should be washed by hand with warm, soapy water.
Ensure that both the lid and the oil container are completely dry after washing and before use.
After cleaning, reassemble oil container, heating element, basket and lid onto deep fryer. The heating element must be seated properly or appliance will not operate.
Warning: When cleaning, use care – under-edge of deep fryer is sharp.
Tip: For ease in cleaning, wipe control panel with damp microfiber cloth. Microfiber cloths are available in most kitchenware stores. NOTE: Oil staining on the heating element and oil container can be easily cleaned with a plastic scrubbing pad.
IF DEEP FRYING DIRECTLY AFTER STEAMING, REMOVE ALL MOISTURE FROM INTERIOR OF UNIT.
Maintenance: Any other servicing should be performed by an authorized service representative.
Tips and Hints
When cooking foods dipped in fresh batter, first lower basket into hot oil. Using tongs, add food directly to oil. Use basket to lift out food when finished cooking.
Do not exceed the MAX fill line in the basket.
Sort or cut food into pieces of uniform size. All the food will then be cooked in the same amount of time. To reduce splattering, remove excess moisture or ice from food.
The oil does not need to be changed after each use.
Pour the oil through the sieve lined with cheesecloth and strain the used oil through it to remove food particles, crumbs and impurities. This process is safe to repeat three or four times without the oil deteriorating.
It is important to follow the temperature recommendation for every recipe. If the temperature is too low, the fried food absorbs oil. If the temperature is too high, a crust quickly forms on the outside while the inside remains uncooked. For best results, drop freshly sliced food into basket one piece at a time using tongs. The rotisserie should never be used to fry frozen foods or food that is partially frozen, Partially frozen food will cook unevenly and will result in areas that are undercooked or overcooked.
RYING FROZEN FOODS
Due to their extremely low temperature, frozen foods inevitably lower the temperature of the oil. For best results, do not overload the basket with food.
Follow the instructions on the frozen food package for cooking time and temperature.
Frozen foods are frequently covered with a coating of ice crystals, which should be removed before frying. Lower the basket very slowly into the oil.
Follow all instructions for removal of moisture/ ice and thawing before cooking.
FILTERING AND CHANGING THE OIL
WARNING: Always remove the plug from wall socket before cleaning. Allow the Cuisinart® Extra-Large Rotisserie Fryer and Steamer and the oil to cool completely (approximately 2 hours) before cleaning or storing. Never immerse the control panel, cord or plug in water or any other liquids.
The oil can be reused after your first frying session. In general, the oil will be tainted rather quickly when frying food containing a lot of protein (such as poultry, meat or fish). When oil is mainly used to fry potatoes and it is filtered after each use, it can be used an additional 3 to 4 times.
Used oil can be successfully stored in a cool, dark place for up to a month in a clean, airtight container. Refrigeration or freezing increases the oil’s lifespan by several months. However, do not use the oil for longer than 6 months.
DO NOT STORE THE OIL IN THE DEEP FRYER. Add a little fresh oil each time you reuse the oil.
Tips for Frying
Heat oil to 375°F unless recipe specifies otherwise. A cube of bread should brown in approximately 60 seconds.
Correct temperature is extremely important. If the temperature is too high, bread will brown before the inside has cooked; if it is too low, the bread will absorb the fat and become soggy and greasy.
Cook only as much as will float easily in the oil. Too much added to the Cuisinart® ExtraLarge Deep Fryer and Steamer will cause the temperature to drop, and the food will be difficult to turn. Turn bread when it rises to the top of the oil, taking care not to pierce it. Lift cooked breads from the fryer; allow them to drain for a moment, then place on paper towels to drain.
#1 Can I use crisco oil. the kind that hardens when it's not hot? and if so, how many times should i use it before i change the oil/lard?
I have no idea because I use peanut oil for my cooking and the fryer requires a lot more than a gallon to cook well. However, the peanut oil can be used over and over a lot. It is not really good for small batches because of the oil required but great on medium and larger tasks.
Fairly easy. Had to soak the basket once after cheese sticks exploded, but for the most part, easy.
#3 Can I fill over the max line with oil as long as it doesn't spill over the top?
If you put the right amount of food in the basket filling the oil up to the max line should all you need to to fill. If it was me I would not feel over the max line.
#4 Is the temperature dial loose? I don't feel any traction when I turn it.
I do not think the dial is disconected that is just the way it is. You can check by watching the temperature light when you set the temperature. If it cycles between amber and green when you turn the dial that means the thermostat is working.
#5 Why does the reviews on this keep saying warring? isn’t this a cuisinart? i’m trying to figure out if it’s cheaply made or if the temp doesnt rise.
I can only speculate that Warring and Cuisinart are made by the same manufacturer resulting in some stamped Warring and some, Cuisinart. Mine is stamped Cuisinart and that is what I ordered. I really like mine and recommend it highly.
I pour the oil back into its original container for later use, or throw it away I've used it 5-6 times or so. Wash the electric heating element and control panel by hand. You can wash the remaining items in the dishwasher if they fit, or wash them by hand if you prefer.