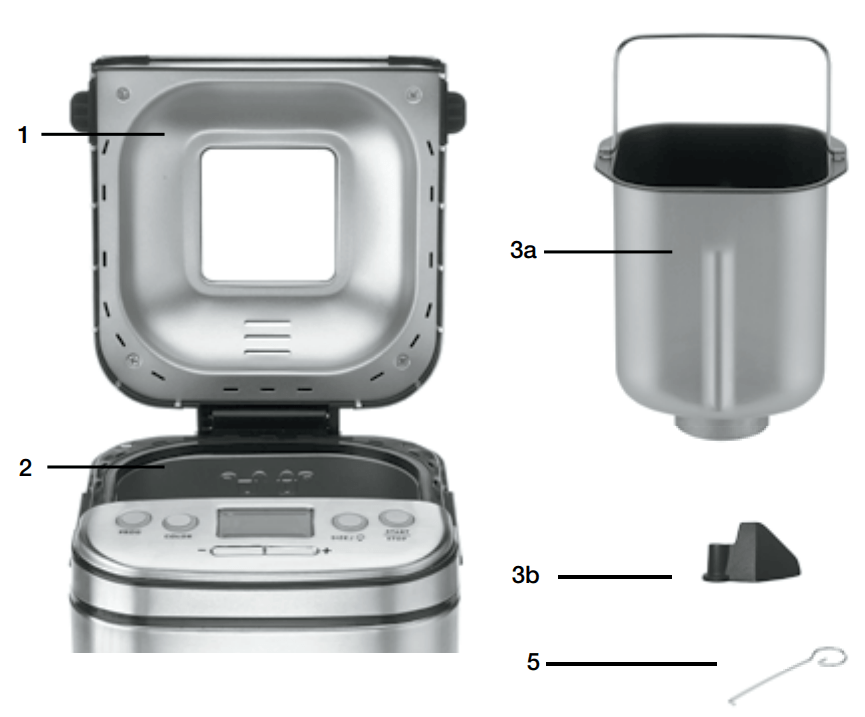
Removable bread pan with handle Vertical loaf, nonstick coating
Kneading paddle Removable, nonstick paddle
Heating element (not shown)
Power cord (not shown)
Pan hook Helpful tool for lifting bread pan handle
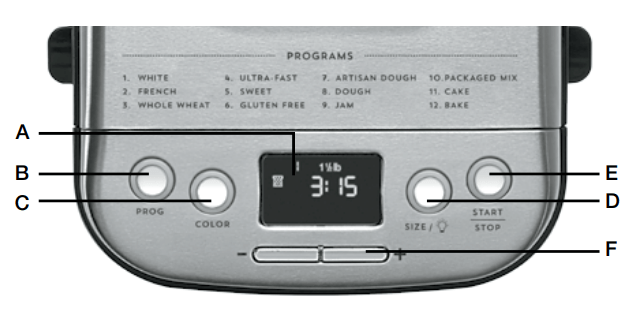
Control Panel
A. LCD Display – Displays program, crust color and loaf size selections.
Also view cycle and delay start timing.
B. PROG Button – Selects program; refer to the program list above display panel for options.
C. COLOR Button
Selects a light, medium or dark crust.
D. SIZE / –
a. Select a 1-lb., 1½-lb. or 2-lb. loaf.
b. Enables internal chamber light.
E. START/STOP Button – Starts and stops the bread-making process. Also controls Pause function.
F -/+ Buttons – Adjust time for bake program and delay start timer.
NOTE: Some program selections are limited to certain crust colors and loaf sizes. The LCD will display accordingly.
Operating Instructions
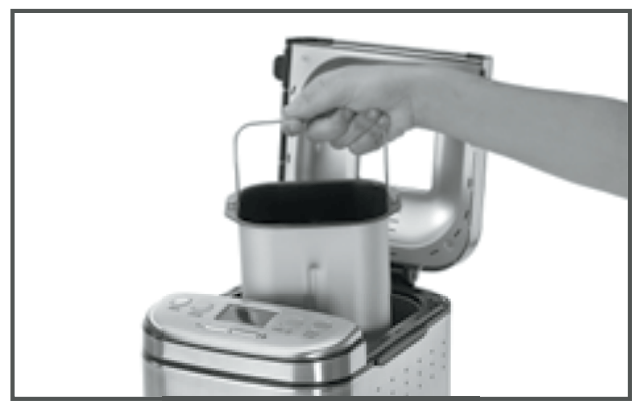
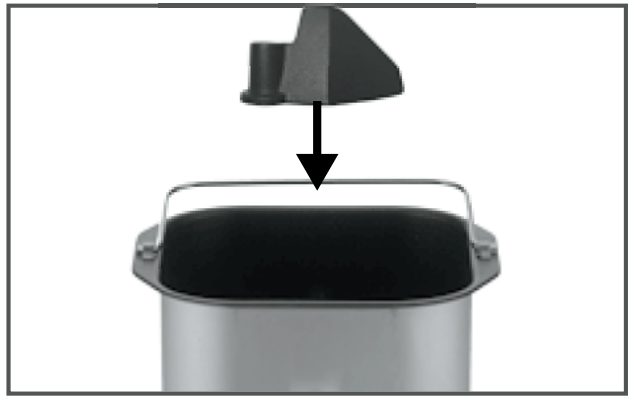
Remove bread pan from baking chamber by grasping the handle, turning the pan counterclockwise and lifting up. It may be helpful to first lift the handle of the bread pan by using the pan hook (see figure 1a). To properly attach the kneading paddle, insert onto shaft with wide base facing down (see figure 1b).
Properly measure all ingredients and put into the bread pan in the exact order they are listed. Always put the liquids in first, the dry ingredients in next, and the yeast last. Yeast should not touch wet ingredients. Please refer to the Measuring and Loading Ingredients sections (page 11) for instructions.
Insert the bread pan back into the baking chamber, turning clockwise to lock in place.
Close the lid and connect power cord to a standard electrical outlet.
Select your program by pressing the PROG button.
Select your crust color (light, medium or dark) by pressing the COLOR button. If no crust color is selected, the unit will automatically default to dark crust.
Select your loaf size (1-lb., 1½-lb. or 2-lb.) by pressing the SIZE/ button. If no loaf size is selected, the unit will automatically default to a lb. loaf size.
If you would like the bread-making process to start immediately, press the START/STOP button now, the indicator will light to show that the bread maker is on.
To cancel the process at any time, press and hold the START/STOP button for 3 seconds.
Delay Start Timer
The Cuisinart® Compact Automatic Bread Maker can be programmed up to hours in advance. For example, you can program your bread maker at p.m. to finish baking at 9 a.m. Be sure to set your timer based on when you would like your bread to be complete.
NOTE: Do not use perishable ingredients such as milk, eggs, cheese and yogurt with the Delay Start function.
To set the Delay Start Timer:
Add ingredients.
Select program, crust color and loaf size.
Set the number of hours ahead that you want the loaf to finish. By pressing the + or – buttons you can set time for completion up to hours later. Press to increase or decrease by 10-minute increments or hold button down to scroll faster.
Press the START/STOP button to begin the delay start countdown.
During Bread Making
The Process
Once you start a program, the unit will automatically take care of each step of the process until the loaf is done. An indicator on the LCD will show the current function: Knead, Rise, Bake, or Keep Warm.
Knead – Most bread types use 2 Knead cycles. The first Knead cycle quickly mixes the main ingredients. The second Knead cycle is longer, and continues the mixing process. The dough is “punched down” before the longer cycle begins, prior to removing the kneading paddle.
Rise – Rise cycles help to ensure the perfect consistency of all yeast breads.
During the Rise cycles, your bread maker will appear to be inactive.
The display will show it is actually in Rise mode.
Bake – This bread maker will consistently regulate both baking time and temperature according to the recipe you select.
Keep Warm – Allows you to leave the finished bread in the machine to serve warm for up to 60 minutes. It also helps to keep the crust from becoming soggy if bread is not removed from the machine immediately after baking.
Some crusts will darken slightly in Keep Warm.
Options:
Light: Press and hold SIZE/ for 3 seconds to turn on the internal chamber light at any time. The light will automatically turn off after 30 seconds, or press and hold again to turn off.
Pause: You can pause the process for up to 10 minutes at any time by pressing the START/STOP button while the unit is on. The time and power light will flash while the program is paused. Press START/STOP to resume the program.
Add-ins: An audible signal of 4 sets of 5 long beeps each will sound to remind you to add any additional ingredients your recipe requires. To do so, open the lid and add additional ingredients. Be sure to close the lid, once finished. This typically occurs during the second knead. The display will show “add-in” for a few minutes during the Knead cycle in case you miss the initial beeps.
Removing kneading paddle: After mixing/kneading is complete, there will be an audible signal of 10 short beeps before the last Rise cycle, indicating the point at which the mixing/kneading is complete (the display will show “paddle” for one minute in case you miss the initial beeps). At this point in the bread-making process, you have the option of removing the kneading paddle,
a. Press START/STOP to pause the program. b. Open the lid and remove the bread pan by the handle. c. Take the dough from the pan and remove the kneading paddle. d. Form the dough into a neat ball and place in the center of the bread pan. e. Replace the bread pan into the machine and turn clockwise to lock the bread pan into the unit. Close the lid. f. Press START/STOP to resume the program.
NOTE: If you plan to remove the dough and reshape it in another pan for baking in your conventional oven, this is the time to do so. Be sure to press and hold the START/STOP button to reset the machine, so it does not automatically resume the bread-making process after 10 minutes.
After Bread Making
There will be 10 beeps to signal the end of the Baking cycle; the LCD display window will read 00:00. Your bread will be kept warm for 60 minutes in the keep warm cycle. There will be one long beep at the end of the Keep
Warm cycle and then unit will shut off. For optimal results, we recommend removing the loaf as soon as the Baking cycle is complete and letting it cool on a wire rack.
To remove bread from the pan:
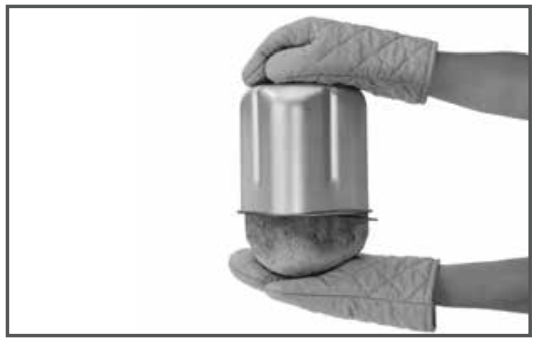
a. Open the lid and use pan hook to lift the bread pan handle. Using oven mitts, remove the bread pan by turning counterclockwise.
b. Still using the oven mitts, hold the bottom of the bread pan, move the handle aside, and shake until the bread is released.
c. For best results, allow the loaf to cool on a wire rack for 20 to 30 minutes prior to slicing. NOTE: If you have not removed the kneading paddle before baking, be sure to remove the kneading paddle from the finished loaf. Use caution; the kneading paddle will be extremely hot.
Power Failure Backup
This unit is equipped with a power failure backup system. In case of any disruption of the power supply, the unit will store in memory the stage of bread-making cycle and resume once power is restored. The power backup feature can maintain memory for a power failure up to 15 minutes.
Types of Breads and Programs
White – The White program uses primarily all-purpose or bread flour.
French – French breads require special timing and temperatures to achieve that wonderful, crispy crust. Because they traditionally lack sugars or large amounts of fat, they tend to be lighter in color.
Whole Wheat – Whole-wheat bread is a yeast bread that is made with a significant portion of whole-wheat flour (50% or more), rather than with 100% all-purpose or white bread flour. Breads made from whole-wheat flour are more nutritious because the flour is milled from the entire wheat berry (including the bran and the germ). Using wholewheat flour produces a bread that is brown to dark brown in color, and the breads are more flavorful and healthful than breads made with refined white flours (even though “lost” nutrients are added back into white flours). Many times they are denser than 100% white breads.
Ultra-Fast – The Ultra-Fast program must be used with a recipe using rapid rise yeast, or the bread will not rise and bake properly. Almost any recipe can be modified by replacing standard yeast with an equal or larger amount of rapid rise yeast. NOTE: This program cannot be used with the gluten-free recipes.
Sweet – The Sweet bread program is specifically designed to bake breads with high amounts of sugar, fats and proteins. These added ingredients tend to increase the height and browning of the finished loaves.
Gluten-Free – Since gluten is found in most flours used in traditional bread baking, the ingredients to create gluten-free breads are unique.
While they are “yeast breads,” the doughs are generally wet and often have a batter-like consistency. It is also important not to over-mix or over-knead gluten-free doughs. NOTE: For list of Gluten-Free ingredients, refer to pages 15–16.
Artisan Dough – This program allows the preparation of artisan doughs. There are several long, slow, cool rises that will enhance the development of texture, taste and crust in the final shaped and baked bread. This is a dough ONLY program. The dough can be baked using the Bake program, or shaped and baked in a conventional oven.
Dough – There are two ways to prepare dough in the bread maker if you wish to bake it in a conventional oven. One way is by using our
Dough program. It mixes ingredients, kneads and takes the dough through the two rises. It is appropriate for almost any dough recipe except gluten free) and ideal for pizza dough. It is intended that the dough will be removed and shaped by hand and allowed to rise 1 or more times out of the bread maker. Alternatively, you can choose a specific bread program from the menu options, and remove the dough when the Remove Paddle signal tones. This will take you through two rise cycles. This method is suitable for any alternative loaf shape, dinner rolls, braided challah bread, and so on. Last rise will take place outside the bread maker.
Jam – The bread maker is a great cooking environment for homemade jams and compotes. The paddle automatically keeps the ingredients stirring through the process. The heating element is placed in a way that the contents will not get burned. The program starts in a heating phase so it will appear to be inactive. It will start mixing about 10 minutes into the program. We provide recipes to get you started. They make a wonderful complement to freshly baked bread!
Packaged Mix – This program is meant for prepackaged yeast bread mixes intended for the bread machines. Mixes for 1½ and 2 lbs. work best.
Cake – Cake-like in texture, and often referred to as "quick breads," recipes for this program are usually baked in a shaped pan such as a loaf pan or muffin tin. They are a batter-type bread rather than a yeast dough, and get their leavening from baking powder, baking soda and eggs.
Add-ins must be added at the very beginning of the cycle with other basic ingredients. If the finished bread is a little moist on top when baking is complete (moisture will depend on ingredients of the cake), leave it in the bread maker on Keep Warm for 10 to 15 minutes, and it will continue baking – this is called “after cooking.”
Bake – This program activates the bread maker for Bake function only. You can use this setting if you want the finished loaf to have a darker crust color (this will only require a few extra minutes, so keep your eye on the loaf). Only the Bake function should be used to bake store-purchased doughs.
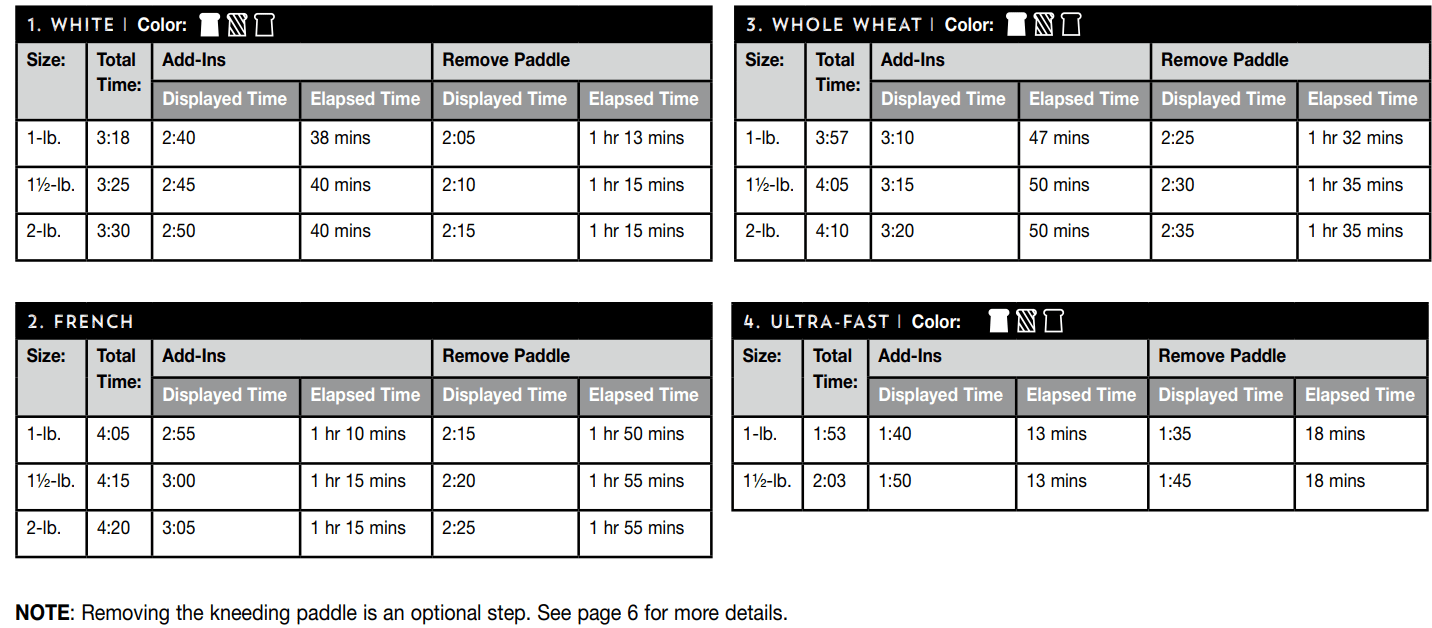
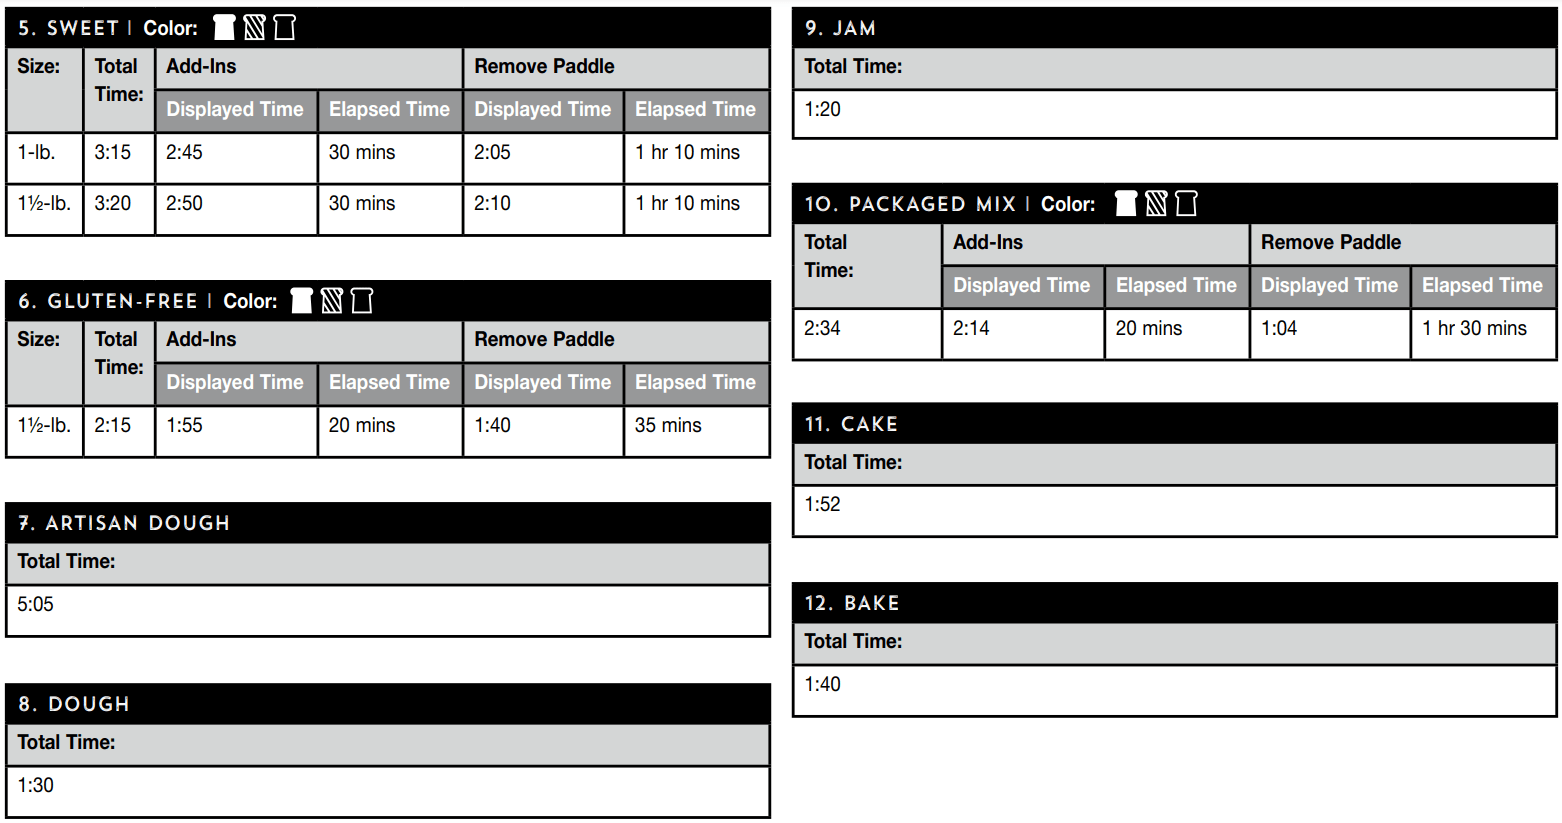
Programs and Timing
For each program, there are two times listed under ADD-INS and under REMOVE PADDLE. The Displayed Time is what you will see in the countdown timer window. The Elapsed Time under ADD-INS and REMOVE PADDLE is the number of minutes that have passed since you pressed start. Elapsed Times are listed to let you know when you should return.
Measuring Ingredients
Important Note: The MOST important rule of making bread: Use exact measurements. This is the key to successful bread baking.
When measuring wet ingredients, use only liquid measuring cups with the cups/ounces marked clearly on the side. After filling the measuring cup, place it on a flat surface and view it at eye level to make sure the amount of liquid is exact. Most recipes require liquids to be at room temperature.
When measuring dry ingredients, fill a dry measuring cup with a spoon and then level off the measurement with the back of a knife or a spatula to make sure the measurement is exact. Never use the cup to scoop the ingredients directly from container (for example, flour). By scooping, you could add up to one tablespoon of extra ingredients. Do not pack down, unless otherwise noted.
Loading Ingredients into the Bread Pan
Important Note: The SECOND MOST important rule of making bread:
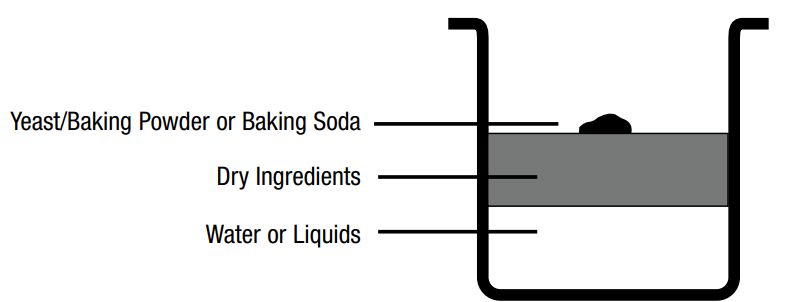
Put the ingredients into the bread maker in the EXACT order given in the recipe. This means, in most cases:
FIRST, liquid ingredients
SECOND, dry ingredients
LAST, yeast – Yeast must be separate from wet ingredients and salt.
Create a small crater in dry ingredients using your finger or a spoon, and place yeast within the crater. Make sure yeast is fresh.
Also, make sure ALL ingredients are at room temperature, unless otherwise noted (that is, between 75˚F– 90˚F). Temperatures too cool or too warm can affect the way the bread rises and bakes. NOTE: Water should not be hot, or it will affect rising.
Last, it is a good idea to start with fresh ingredients. Fresh flour and fresh yeast are critical.
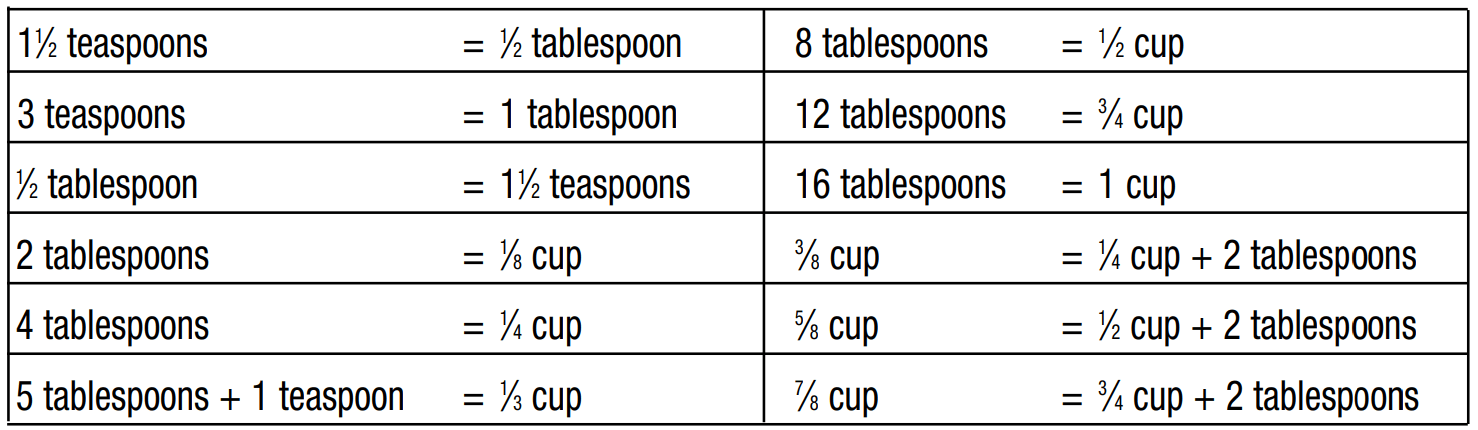
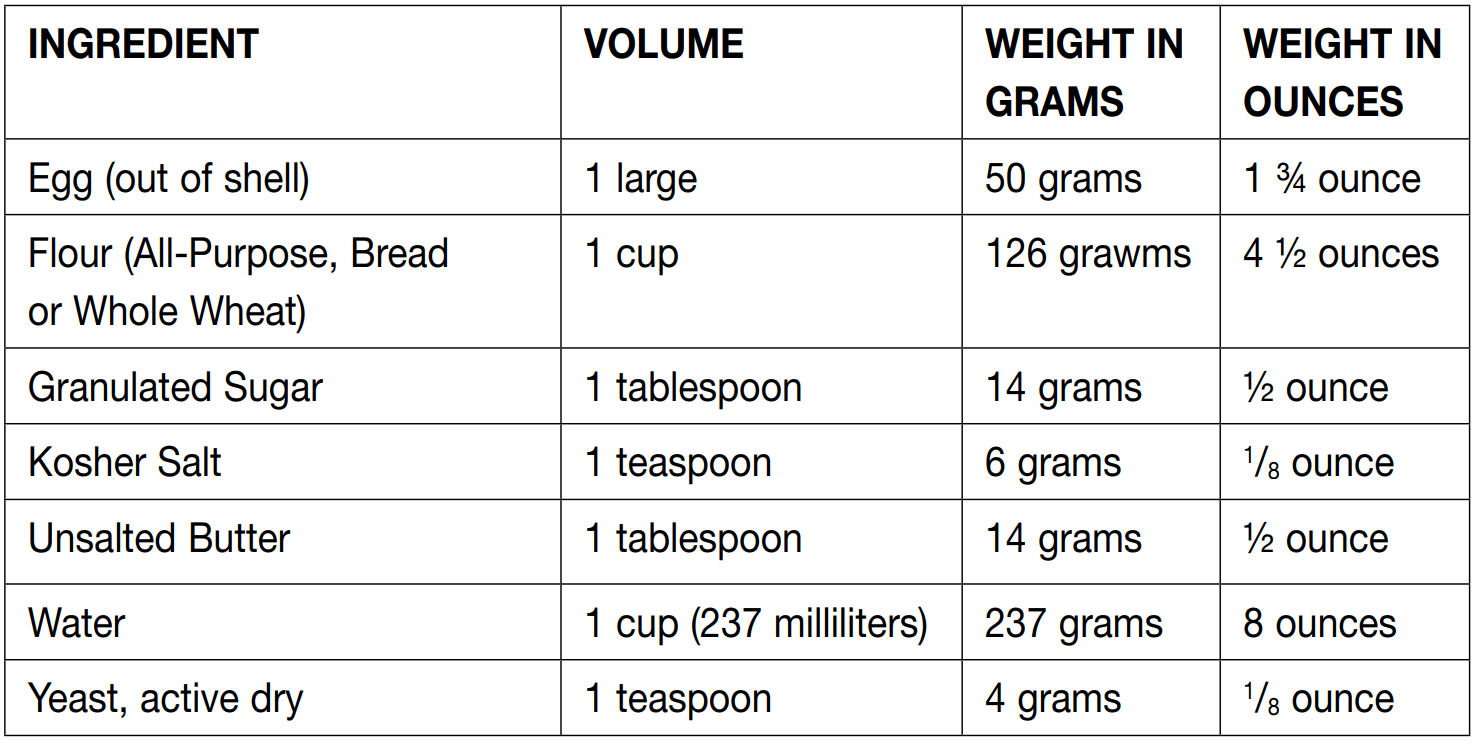
Measurement/Conversion Chart
INGREDIENT CONVERSION CHART
Cleaning and Care
Caution: Unplug machine before cleaning. Do not put the bread maker in water or in a dishwasher. Do not use scrubbing brushes or chemical cleansers, as these will damage the machine. Use only a mild, nonabrasive cleanser to clean the outside of the bread maker.
Bread pan and kneading paddle – Pan and kneading paddle should be hand-washed with warm water and soap. Do not use metal utensils as they will damage the nonstick surface.
Baking chamber – Remove all bread crumbs by wiping them away with a slightly damp cloth or clean pastry brush. DO NOT bend the heating element, which is located on the inside of the bread maker.
Lid – Wipe inside of lid with sponge or damp cloth. Lid should not be immersed in water.
Outer housing – Use only a mild, nonabrasive cleanser to clean the outside of the bread maker.
Control panel – Wipe with a slightly damp cloth as necessary. Take care not to allow water or cleaning fluids under buttons of control panel.
Maintenance – Any other servicing should be performed by an authorized service representative.
Keep your bread maker clean at all times.
Don’t worry if the color of the exterior of the baking pan changes over time.
The color change is a result of steam and other moisture and does not affect the machine’s performance.
If you have trouble removing the kneading paddle from bread pan, put warm, soapy water in the bread pan for 10 to 15 minutes – this will loosen the paddle.
Troubleshooting
Question
Answer
Why did my dough/bread not rise well?
There are a number of factors that could result in a short rise. Be sure that the yeast is fresh and that all ingredients are room temperature (75ºF to 90°F). If the liquids are too warm or too cold, they will not activate the yeast properly. Be sure the ingredients are put into the baking pan in the correct order. The salt should be as far away from the yeast as possible. Note that not all breads rise as much as others. Whole-wheat or whole-grain breads tend to be shorter than white breads. Also, breads with more sugar or sweeteners, and ones that are enriched with eggs, will be taller than regular white breads.
Why is my bread sunken/uneven on the top?
Humidity and room temperature can greatly affect the results of baked yeast breads. Keep the bread maker away from direct sunlight. If the humidity is especially high, add an additional teaspoon per cup of flour used in the recipe.
Why does my yeast bread have an under-baked/gummy texture?
The dough was too wet, or possibly does not have enough white flour (for gluten development). Add a bit more flour, 1 tablespoon per cup, or reduce the amount of whole-wheat/grain flours in the recipe and substitute white flour.
Why does the interior of my yeast bread have excessive holes?
This would happen if either the bread is too wet or if too much yeast was used. Double-check the recipe and, if necessary, make changes by either adding a small amount of flour or reducing the yeast slightly.
Why is my yeast bread heavy and dense?
This could be one of a few different issues. The mixture may be too dry as a result of not enough liquid or because lower fat substitutes were used. Another reason may be not using enough yeast. If this is occurring in whole-wheat/grain bread, you may need to use vital wheat gluten to help with the structure of the finished bread.
Why are the corners/edges of the bread full of extra flour/not evenly mixed?
Sometimes ingredients will stick to the corners of the pan, most commonly in the cake/quick bread or gluten-free bread (both have more batter-like consistencies than a dough). Check the bread about 10 minutes into the kneading/mixing time and pause to scrape down if necessary. Lightly coating the bread pan with nonstick cooking spray will help to prevent this from happening as well.
How do I get the kneading paddle out of the loaf?
There are two options. In most programs you can remove the paddle after you hear the Remove Paddle signal (prior to the final rise).
If this is not an option, or you were not present to remove it, wait until the bread is cooled and then, carefully take out the paddle use caution because it may be hot).
Why is the unit smoking/producing a burning smell?
Most likely this is from ingredients that fell into the bottom of the bread machine or onto the heating element. If it is excessive, unplug the unit and once cool, clean the interior of the unit. Plug the unit back in and resume the program (the program will be stored in memory for a maximum of 15 minutes). In most cases, the smoke/odor will be minimal and it will dissipate.
What do the error codes mean? The display shows “HHH” (accompanied by beeps): The unit’s internal temperature is too high. This usually occurs when trying to make two successive loaves. Open the lid and allow the unit to cool 10–20 minutes. The display shows “LLL” (accompanied by beeps): The unit’s internal temperature is too low to bake bread. Stop the beeps by pressing the START/STOP button. The display shows “EEO” or “EEI” (accompanied by beeps): Unplug the unit and contact your nearby service center.
Yes, it has rubber feet. However, mine bounces about quite a bit when kneading. It's not great.
#2 Can you bake the bread without removing the paddle before baking?
You don't have to remove the paddle. But the difference is a large rip/hole spread over several slices of bread from removing the paddle after baking. Or a "bread bellybutton" - a small hole no bigger than the shaft the paddle sits on affecting only 1 slice if you remove it before baking.
I have only had mine since just before Christmas. Mine sinks if I use yeast from a jar that is stored in the fridge. If I use the shelf stable packets it does not sink. There are lots of stifles that says sinking bread is from high humidity but can also be not correct temp of water used. I read one article that says use room temp yeast. So I am trial by error till it works.
#4 Does this machine have a kneading cycle for making cinnamon rolls?
Yes. It has an automatic stop point to remove kneaded doug, add on the cinnamon and sugar, etc. and then transfer to a baking pan. In the enclosed instruction and recipe booklet, p.37, is a cinnamon roll recipe and all the necessary directions. Very clear/easy. Enjoy!
Not really a cake, but you can make a huge assortment of quick breads and coffee cakes. In some instances you have to transfer the dough and complete baking in a regular oven. Not an inconvenience at all.
The plate on the bottom of the unit lists the watts as 550 with 110 current. Hope this helps. We have had our unit for about six weeks and are very pleased with its performance.
Anything you can do by hand, you can do in this bread maker. IF in doubt, go online and ask google, it will take you to many, many recipes if it can be done.

 –
–