Loading ...
Loading ...
Loading ...
Stainless steel blade
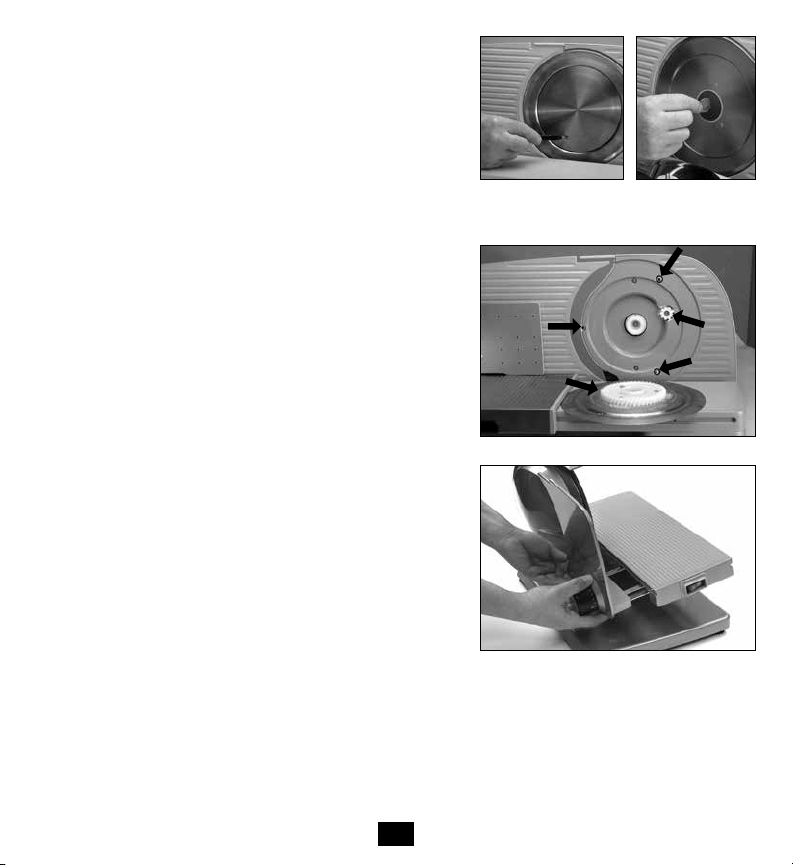
To remove the cutting blade (12), a writing pen or other small round
device (preferably plastic) must be inserted into the metal blade
cover (12a) removal hole as shown in Fig. 7. Carefully rotate the
metal blade cover (12a) CLOCKWISE to unscrew the metal blade
cover (12a) from the blade fastening screw (11). When the blade
cover is removed, set it aside in a safe location. Next, insert a coin
into the slot of blade fastening screw (11) as shown in Figure 8 and
rotate the blade fastening screw CLOCKWISE. Carefully lift the blade
off. Do not touch the blade edge. Clean the cutting blade and the
motor housing behind it with a clean damp cloth. Lubricate the
blade support posts and the drive gear with Vaseline. To replace,
carefully align the blade on its hub so the blade and drive gears fully
engage. Reinsert the blade fastening screw (11) and rotate the blade
fastening screw COUNTERCLOCKWISE to tighten. Place the metal
blade cover (12a) centered over the blade (12) and insert the blade
cover securing stud inside the blade fastening screw (11). Rotate the
metal blade cover COUNTERCLOCKWISE carefully insuring to not
cross thread the stud. Do not overtighten. Careful! Sharp Blade!
Thickness guide plate
You can, if you wish, remove the thickness guide plate for cleaning.
Note: To reduce the risk of injury, always remove the blade
before removing the thickness guide plate.
To remove the thickness guide plate, turn the thickness control knob
counterclockwise, past “0” to the “PLATE RELEASE” position. Pull
the thickness guide plate off the slicer (Fig. 10). After cleaning this
plate, lightly lubricate the two steel rods with Vaseline.
To reattach the thickness guide plate, insert the two steel rods into
the holes provided on the carriage track. Make sure the thickness
control knob is aligned with the “PLATE RELEASE” position. Now
push the guide plate fully into its position and turn the knob
clockwise to the “0” position.
Rubber Feet
Clean with grease-removing cleaner, such as alcohol.
Slice deflector
The Model 665 is equipped with a detachable slice deflector (item #9, see page 4) to insure smooth deflection of
each slice onto the tray. This can be removed for cleaning. Always first remove the slicer blade and thickness control
plate as shown in Figures 7, 8 and 9, before removing deflector. Grasp the blade deflector with thumb and forefinger
and pull it out. It should snap out easily. Always reinstall before installing the blade or thickness control plate.
7
Figure 9. Key areas to lubricate.
Figure 7.
Figure 10. Removing the thickness
guide plate.
Figure 8. Turn the
screw CLOCKWISE
for blade removal.
Loading ...