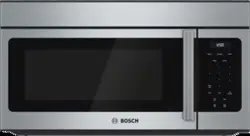
Documents: Go to download!
- Owner's manual - (English, Spanish)
- Getting started
- Operation
- Cleaning and Maintenance
- Troubleshooting
Table of contents
Microwave Manual
Getting started
Parts
Front view
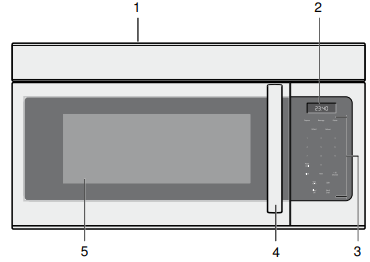
Bottom view

- Top vent grill
- Display
- Control panel
- Door handle
- Window
- Surface lights
- Ventilation filters
Cooling Fan
The cooling fan runs during all cooking modes. The fan can be heard when it is running, and warm air may be felt as it is released from the oven vent. The fan may also run after the oven is off.
Oven Vent
The oven vent is located at the top of the unit. Warm air may be released from the vent before, during and after cooking. It is normal to see steam escaping from the vent, and condensation may collect in this area. This area may be warm when the oven is in use. Do not block the vent, since it is important for air circulation.
Oven specifications

Control panel
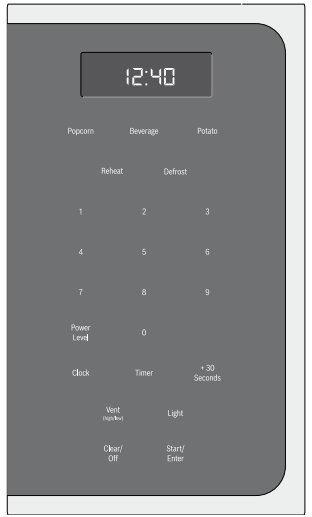
Touch keys You can activate a function by briefly touching the corresponding touch key. Each time you touch a key a short beep will sound. A long beep will tell you that you have made an invalid input.
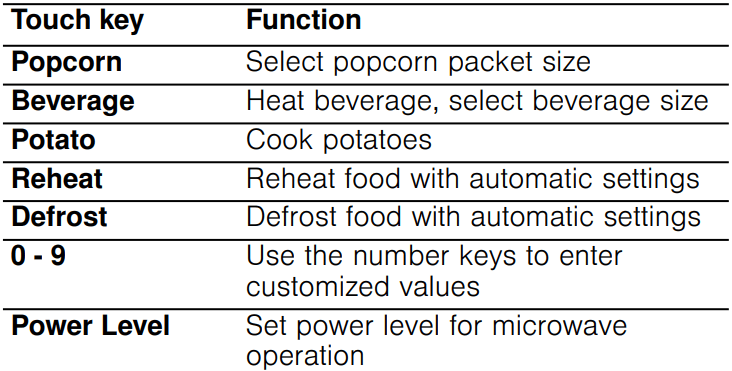

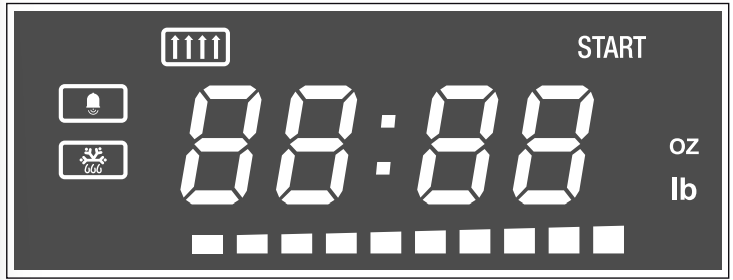
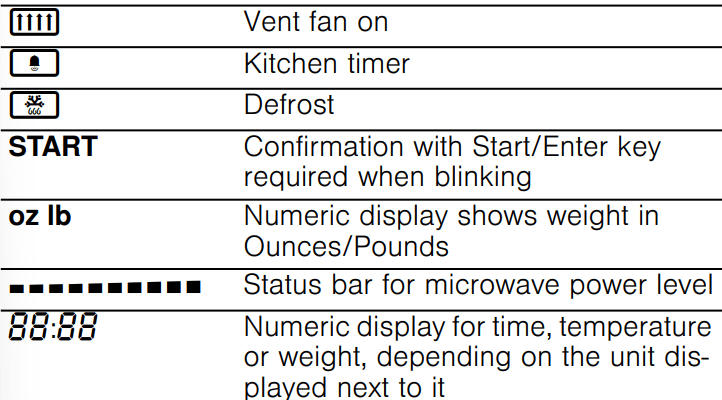
Display elements The display gives you information on the current settings of your appliance. Blinking display symbols indicate that an input is required.
Operation
Setting the clock
The clock can be set in 12-hour mode.
- Touch Clock once.
- Enter the time using the number keys. Example: To set the clock to 12:41 type in 1 2 4 1.
- Touch Clock to confirm.
The time of day is displayed.
Setting the Timer
The Timer feature can be used as a kitchen timer. The maximum timer value is 99:99 (minutes : seconds).
- Touch Timer once.
- Enter the desired time using the number keys.
- Touch Timer to confirm.
The Timer starts counting down.
Once the set time has elapsed,  appears in the display and an intermittent beep indicating that the timer has run out.
To stop the beep, touch Timer.
Operating the Ventilation Fan
The Vent feature moves steam and other cooking vapors from the cooking surface of the range below the microwave oven.
- Touch Vent (high/low) once. The ventilation symbol
 lights up on the display and the fan operates at the highest setting.
 - Touch Vent (high/low) again to choose the low speed setting and a third time to turn the ventilation fan off.
Note: If the temperature gets too hot around the microwave oven, the fan of the vent feature will automatically turn on at the lowest setting to cool the oven. The fan will automatically turn off when the internal parts are cool. When this occurs, the vent cannot be turned off.
Turning the Light on/off
Touch Light once to turn on a cooking surface light.
Touch the key again to turn the light off.
Operating the microwave
The appliance must be turned off.
1. Enter the desired cooking duration with the number keys. The timer display will fill in from right to left.
Example: To set a microwave cooking time of minutes and 30 seconds, enter the numbers 2 0 3 0. START is blinking.
2. You can start microwave operation with the default power level 10 by touching Start/Enter, or - you can adjust the power level. Touch Power Level.
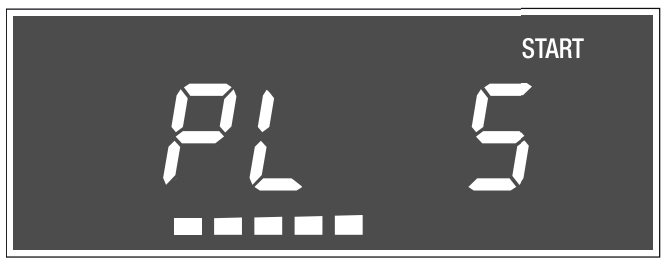
The default power level  is blinking. The segments in the bar underneath the number display also indicate the power level.
3. Enter the desired power level using the number keys.  and the selected power level and START are blinking in the display.
4. Touch Start/Enter to start microwave operation.
The microwave timer will start to count down.
The microwave timer can be changed during operation by touching +30 Seconds.
The power level can be changed during operation. To display the set power level, touch Power Level.
Once the microwave time has run out, four beeps will sound. The appliance turns off and the clock is displayed.
Opening appliance door during operation
Opening the appliance door during operation will interrupt the current mode. Close the appliance door and then touch Start/Enter to resume operation.
Cancel operation
Touch Clear/Off to cancel the active oven mode. The appliance turns off and the clock is displayed.
The cooling fans may continue to run for a while and then switch off automatically.
Microwave power levels
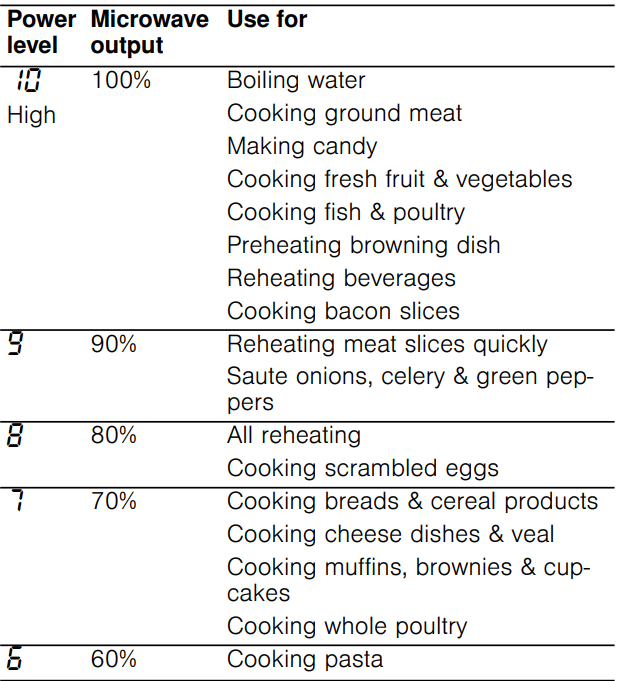
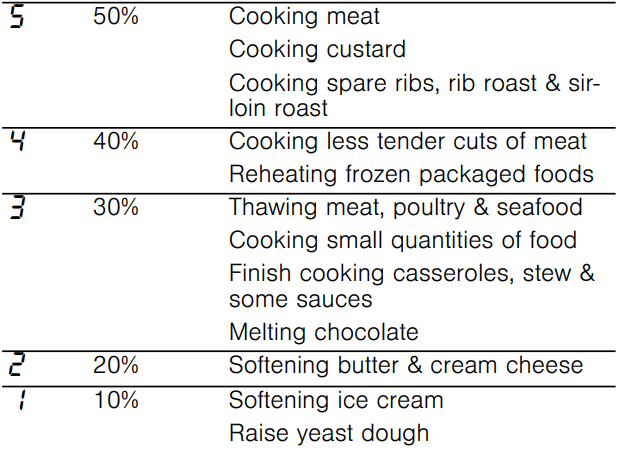
The 10 power levels available with this microwave will help you to adjust to the power output best suited for the food type you are preparing. As with any food preparation in the microwave, it is best to follow the microwave instructions that are printed on the food packaging.
The table below provides suggested power levels for various types of food that can be prepared in the microwave.
Suggestions for best results
To help you achieve the best possible results from your microwave oven, read the following suggestions below:
- Storage temperature
Foods taken from the freezer or refrigerator take longer to cook than the same foods would at room temperature.
- Size
Small pieces of food cook faster than large ones.
Pieces similar in size and shape will cook more evenly when cooked together. For more even results, reduce the power levels when cooking large pieces of food.
- Natural moisture
Very moist foods cook more evenly because microwave energy heats water molecules very efficiently
- Stirring
Stir foods such as casseroles and vegetable from the outside to the center to distribute the heat more evenly. This will allow the food to cook faster. Constant stirring is not necessary.
- Turn over items
Turn over foods such as pork chops, roasts or whole cauliflower halfway through the cook time. This will help to expose all sides equally to microwave energy.
- Food placement
Place delicate areas of food items, such as asparagus tips, toward the center of the turntable tray.
- Food arrangement
Arrange unevenly shaped foods, such as chicken pieces or salmon, with the thicker or meatier parts toward the outside of the turntable tray.
- Let food stand
After removing the food from the microwave, cover the food with foil or a casserole lid and let it stand to finish cooking. This will help the food finish cooking in the center and avoids overcooking the outer edges. The length of stand time depends on the density and surface area of the food items.
- Wrapping in paper towels or wax paper
Sandwiches and many other food types containing pre-baked bread should be wrapped prior to placing in the microwave to help prevent the food items from drying out while heating.
Adding cook time (+30 Seconds)
This time-saving feature will let you quickly add seconds to any cook time. +30 Seconds will also start the microwave with 30 seconds at 100% power level.
Each time you touch the +30 Seconds key, 30 seconds will be added to the cook time.
Defrost
You can set the Defrost mode by entering a time, or a specific weight.
Note: The power level cannot be changed in either defrost mode, as this would adversely affect defrost performance.
Setting Defrost by weight
You can set a weight range between 0.1 and 6.0 lbs.
Example: Defrost 1 lbs. (450 g) of food with the default power level and cook time determined automatically.
- Touch Defrost once.
 lb and the defrost symbol
  light up on the display.
 - Use the number keys to enter the weight of the food to defrost in pounds (10 = 1 lb).
- Touch Start/Enter.
The calculated cook time is displayed and begins to count down.
When defrosting has finished, 4 beeps will sound. The appliance turns off and the clock is displayed.
Note: The entered weight must be within the allowed weight range for this feature to start.
Note: A beep sounds during defrosting for all food programs to turn food over or separate pieces.
Setting Defrost by time
You can set a time value up to 99 minutes and seconds.
- Touch Defrost twice.
 and the
  symbol light up on the display.
 - Use the number keys to enter the desired defrost time.
- Touch Start/Enter.
The defrost time starts to count down.
When defrosting has finished, 4 beeps will sound. The appliance turns off and the clock is displayed.
Note: A beep sounds during defrosting for all food programs to turn food over or separate pieces.
Opening appliance door during operation
Opening the appliance door during operation will interrupt the current mode. Close the appliance door and then touch Start/Enter to resume operation.
Cancel operation
Touch Clear/Off to cancel the active oven mode. The appliance turns off and the clock is displayed.
The cooling fans may continue to run for a while and then switch off automatically.
Tips for defrosting
WARNING
HEALTH RISK
Liquid will be produced when defrosting meat or poultry. Drain off this liquid when turning meat and poultry, and under no circumstances, use it for other purposes, or allow it to come into contact with other foods.
- Always enter the weight in lbs when using the defrost by weight feature (0.1 to 6.0 lbs).
- Use the defrost mode for raw food items only.
- Defrosting gives best results when food to be thawed is a minimum of 0° F (taken directly from a freezer). If the food has been stored in a refrigerator-freezer that does not maintain a temperature of 5° F or below, always program a lower food weight or lower cook time to prevent cooking the food.
- If the frozen food is stored outside the freezer for up to minutes, enter a reduced cook time or weight.
- The shape of the package will alter the defrosting time.
Shallow rectangular food packets defrost more quickly than a deep frozen block of food.
- Separate pieces as they begin to defrost. Separated frozen pieces of food defrost better.
- Shield warm areas of food with small pieces of aluminum foil, if they start to heat up.
Use small pieces of aluminum foil to shield food items like chicken wings, leg tips and fish tails.
Do not allow aluminum foil to touch the oven cavity when defrosting.
Defrosting suggestions for meat
For best results, please read these suggestions when defrosting meat.

Reheat
For your cooking convenience, the reheat feature provides 3 quick preset settings based on serving size to reheat food.
Example: Reheat 32 ounces of food.
- Touch Reheat 3 times to reheat 32 oz. of food. oz will appear in the display (see reheat category table).
- Touch Start/Enter.

Notes
- Cover with vented plastic wrap or wax paper.
- Reheat food on a microwaveable dinner plate.
Opening appliance door during operation
Opening the appliance door during operation will interrupt the current mode. Close the appliance door and then touch Start/Enter to resume operation.
Cancel operation
Touch Clear/Off to cancel the active oven mode. The appliance turns off and the clock is displayed.
The cooling fans may continue to run for a while and then switch off automatically.
Reheat cooking suggestions
| Food | Directions | Quantity |
|---|---|---|
| Dinner plate | Use only pre-cooked, refrigerated foods. Cover plate with vented plastic wrap or waxed paper, tucked under plate. If food is not hot enough after heating with the Reheat feature, continue heating using manual time and power level setting. Contents:
| 1 serving (1 plate) |
| Casserole, Pasta | Cover plate with lid or vented plastic wrap. If food is not hot enough after heating with the Reheat feature, continue heating using manual time and power level setting. Stir foods once before serving. Contents:
| 1 to 4 servings |
Cleaning and Maintenance
WARNING
Be sure the entire appliance (including the grease filters and light bulbs) has cooled and grease has solidified before attempting to clean any part of the appliance.
WARNING
Make sure the appliance and lights are cool and power to the appliance has been turned off before replacing the light bulb(s). Failure to do so could result in electrical shock or burns.The lenses (if equipped) must be in place when using the appliance.The lenses (if equipped) serve to protect the light bulb from breaking.The lenses (if equipped) are made of glass. Handle carefully to avoid breaking. Broken glass can cause an injury.
WARNING
Light socket is live when door is open if main power supply is not turned off.
Cleaning
Cleaning Guide
- For best performance and for safety reasons, keep the oven clean inside and outside. Take special care to keep the inner door panel and oven front frame free of food and grease build–up.
- Never use abrasive scouring powder or pads on the microwave. Wipe the microwave oven inside and out with a soft cloth and and warm (not hot) mild detergent solution. Then rinse and wipe completely dry.
- Wipe spatters immediately with a wet paper towel, especially after cooking greasy foods like chicken or bacon.
- Clean your microwave oven weekly or more often, if needed.
- Never operate the oven without food in the oven cavity; this can damage the magnetron tube or glass tray.
- You may wish to leave a cup of water standing inside the oven when it is not in use to prevent damage if the oven is accidentally turned on.
| Part | Recommendations |
|---|---|
Oven cavity | Keep inside (cavity) of the oven clean. Food particles and spilled liquids can stick to the oven walls, causing the oven to work less efficiently. Wipe up spills immediately. Use a damp, clean cloth and mild soap. DO NOT use harsh detergents or abrasive cleaners. To help loosen baked-on food particles or liquids, heat 2 cups of water (add the juice of 1 lemon if you desire to keep the oven fresh smelling) in a 4 cup microwave-safe dish at High power for 5 minutes or until boiling. Let stand in oven cavity for 1 or 2 minutes. |
Wire rack | Wash with soapy water. Rinse thoroughly and dry, or gently rub with cleansing powder or soap-filled pads as directed. |
Glass turntable tray | Remove glass turntable tray from the oven when cleaning the oven cavity and tray. NOTICE: : To prevent the glass turntable from breaking, handle with care and do not put it in water immediately after cooking. Wash the glass turntable tray in warm soapy water or in the dishwasher. |
Turntable roller rest | Clean with warm, soapy water. Rinse thoroughly and dry. |
Door glass | Wash with soap and water or glass cleaner. Use Fantastik® or Formula 409® on a clean sponge or paper towel and wipe clean. Avoid using abrasive cleaners, like powder cleaning agents, steel wool pads and oven cleaners. If steam accumulates inside or outside the oven door, wipe with a soft cloth. Steam can accumulate when operating the oven in high humidity and in no way indicates microwave leakage. |
Painted surfaces | Clean with hot soapy water or apply Fantastik® or Formula 409® to a clean sponge or paper towel and wipe clean. Avoid using abrasive cleaners, like powder cleaning agents, steel wool pads and oven cleaners. |
Stainless steel sur- | Always wipe or rub in the direction of the grain. Clean with a soapy sponge, then rinse and |
faces | dry, or wipe with Fantastik® sprayed on a paper towel. Protect and polish with Stainless Steel Magic® and a soft cloth. Remove water spots with a cloth dampened with white vinegar. Do not use any cleanser that contains chlorine as these may rust the stainless steel |
Plastic & Controls | When cool, clean with soapy water, rinse and dry. |
Printed areas (words & numbers) | Do not use abrasive cleaners or petroleum based solvents. |
Cleaning the oven vent filters
The oven ventilation filters should be removed and cleaned often; generally at least once every month.
CAUTION
To avoid risk of personal injury or property damage, do not operate oven vent without filters properly in place.
1. To remove the ventilation filters, slide the filter to the rear. Then pull filter downward and push to the other side. The filter will drop out. Repeat for the 2nd filter.
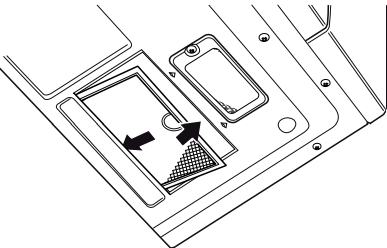
2. Soak the ventilation filters in hot water using a mild detergent. Rinse well and shake to dry. Do not use ammonia or wash in a dishwasher. The aluminum on the filter will corrode and darken.
3.To reinstall the ventilation filter, slide it into the side slot, then push up and toward oven to lock. Reinstall the 2nd filter using the same procedure.
Maintenance
Surface light replacement
CAUTION
To avoid risk of personal injury or property damange, wear gloves when replacing the light bulbs.
1. Unplug the microwave oven or turn off power at the main circuit breaker.
2. Remove the bulb cover mounting screws at both light positions under the microwave.
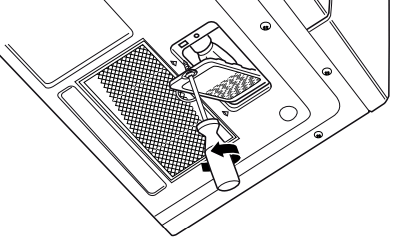
3. Replace bulb with 30 watt appliance bulb.
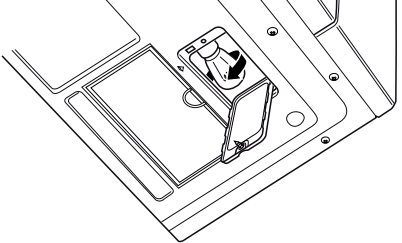
4. Replace bulb cover and mounting screw.
5. Plug the microwave back into the power supply or turn the power back on at the main circuit breaker.
Oven light replacement
- To replace light bulb, first disconnect power to the microwave oven at the circuit breaker panel or by unplugging.
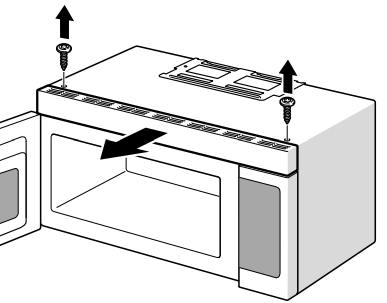
- Remove the vent grill mounting screws.
- Pull the vent grill away from the unit.
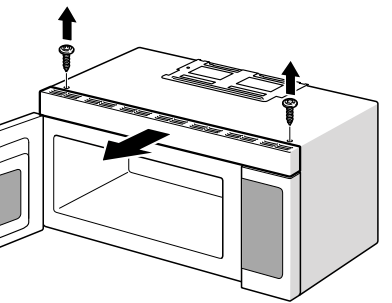
4. Remove the charcoal filter by pushing it inwards, then turn and pull it away from the unit.
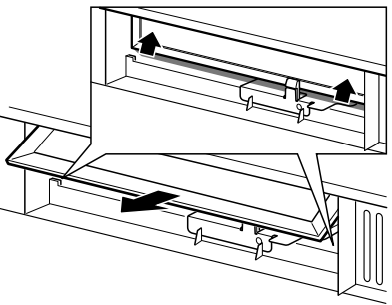
5. Open light cover located behind filter mounting by carefully pulling up on the front edge.
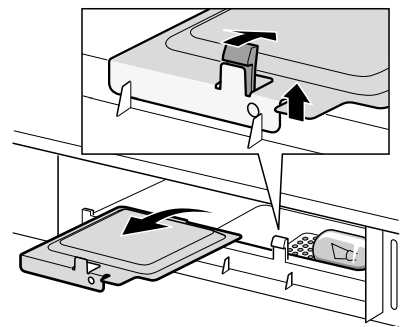
6. Remove old light bulb and replace only with equivalent watt bulb available from parts distributor. Bulbs are also available at most hardware stores or lighting centers.
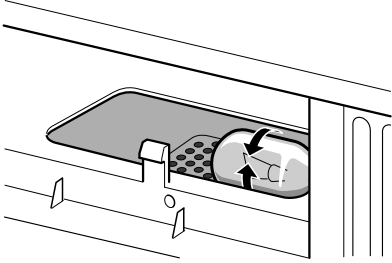
Note: DO NOT USE BULB LARGER THAN 30 WATTS.
7. Replace the microwave oven light cover by carefully pushing into place. Replace the charcoal filter. Push the vent grill back into place (engaging both the bottom and top tabs) and replace the vent grill mounting screws
Charcoal filter replacement
The charcoal filter, which was enclosed with your microwave oven, is used for nonvented, recirculated installation (Room Venting). The filter should be changed every 6 to 12 months depending on use.
- Disconnect power to the microwave oven at the circuit breaker panel or by unplugging.
- Remove the vent grill mounting screws.
- Pull the vent grill away from the unit.
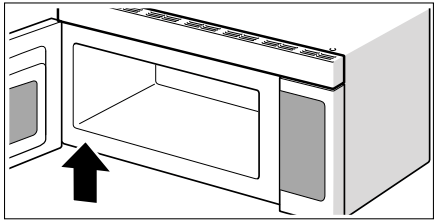
4. Change the charcoal filter.
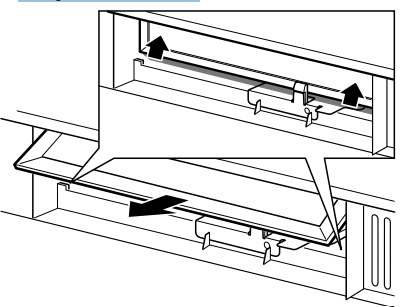
5. Carefully push the vent grill back into place and replace the screws removed in Step 2.
Note: If no charcoal filter is installed, it is not possible to bind the odorous substances in the cooking vapours.
Troubleshooting
If you encounter a problem, it often will merely be something minor. Before you call customer service, consider the suggestions and instructions below: | |
Problem | Suggestion |
Neither the microwave’s display nor oven operates. | Properly insert the plug into a grounded power outlet. • Remove the plug from the outlet, wait 10 seconds, then plug the microwave in again. • Reset the household circuit breaker or replace any blown fuses. • Plug a different appliance into the power outlet. If the other appliance will not operate, have a qualified electrician repair the outlet. • Plug the microwave into a different power outlet. |
Oven display works, but the oven will not operate. | Make sure the oven door is closed securely and completely. • Check to see if packing material or other materials are stuck to the door seal. • Check for damage to the oven door. • Press the Clear/Off key twice and attempt to re-enter cooking instructions. |
Power goes off before the cook time has elapsed. | If there has been a power interruption, remove the plug from the outlet; wait 10 seconds, then plug the microwave in again. If there was a power outage, the time indicator in the display will show 00:00. • Reset the clock and any cooking instructions. • Reset the household circuit breaker or replace any blown fuses. • Press the Clear/Off key twice and attempt to re-enter cooking instructions. • Plug a different appliance into the power outlet. If the other appliance will not operate, have a qualified electrician repair the outlet. • Plug the microwave into a different power outlet. |
Food is cooking too slowly. | Make sure the oven is on a separate 20 amp circuit line. Operating another appliance on the same circuit can cause a voltage drop. If necessary, move the microwave to its own circuit. |
Microwave is sparking, arcing occurs. | Remove any metallic utensils, cookware or metal ties from the oven cavity. If using aluminum foil, use only narrow strips and allow at least one inch between the foil and the interior oven walls. |
Turntable makes noises or sticks. | Clean the turntable, roller ring and oven cavity bottom. • Make sure the turntable and roller ring are positioned correctly. |
Using the microwave causes TV or radio interference. | This is similar to the interference caused by other small appliances, such as hair dryers. Move your microwave further away from other appliances, like your TV or radio. |
Note: If the oven is set to cook for more than 30 minutes at 100% power level, it will automatically adjust itself to a 80% power level after 30 minutes to avoid overcooking.
Bosch® Support
Before Calling Service
See the Use and Care Manual for troubleshooting information. Refer to the Warranty in the Use and Care Manual.
To reach a service representative, see the contact information at the front of the manual. Please be prepared with the information printed on your product data plate when calling.
Data Plate
The data plate shows the model and serial number. Refer to the data plate on the appliance when requesting service.
The data plate can be found on the inside of the appliance.

To avoid having to search for each piece of information when calling, you can enter the four items needed in the spaces provided below.
Keep your invoice or escrow papers for warranty validation if service is needed.
Service
We realize that you have made a considerable investment in your kitchen. We are dedicated to supporting you and your appliance so that you have many years of creative cooking.
Please don’t hesitate to contact our Customer Support
Department if you have any questions or in the unlikely event that your Bosch® appliance needs service. Our service team is ready to assist you.
USA 800-944-2904 www.bosch-home.com/us/support
Canada 800-944-2904 www.bosch-home.ca/en/support
Parts and Accessories
Parts, filters, descalers, stainless steel cleaners and more can be purchased in the Bosch® eShop or by phone.
USA www.bosch-home.com/us/store
Canada Marcone 800-482-6022 or Reliable Parts 800-941-9217
See other models: SHX5AV52UC/22 SHP53TL5UC/02 SHX9ER55UC/55 NIT8065UC/20 HBL5460UC/09
