Reference Guide
Brief explanations for routine operations
MFC-J5945DW
Brother recommends keeping this guide next to your Brother machine for quick reference.
Online User's Guide
For more advanced instructions, information, and
product specifications, see the Online User's
Guide at support.brother.com/manuals
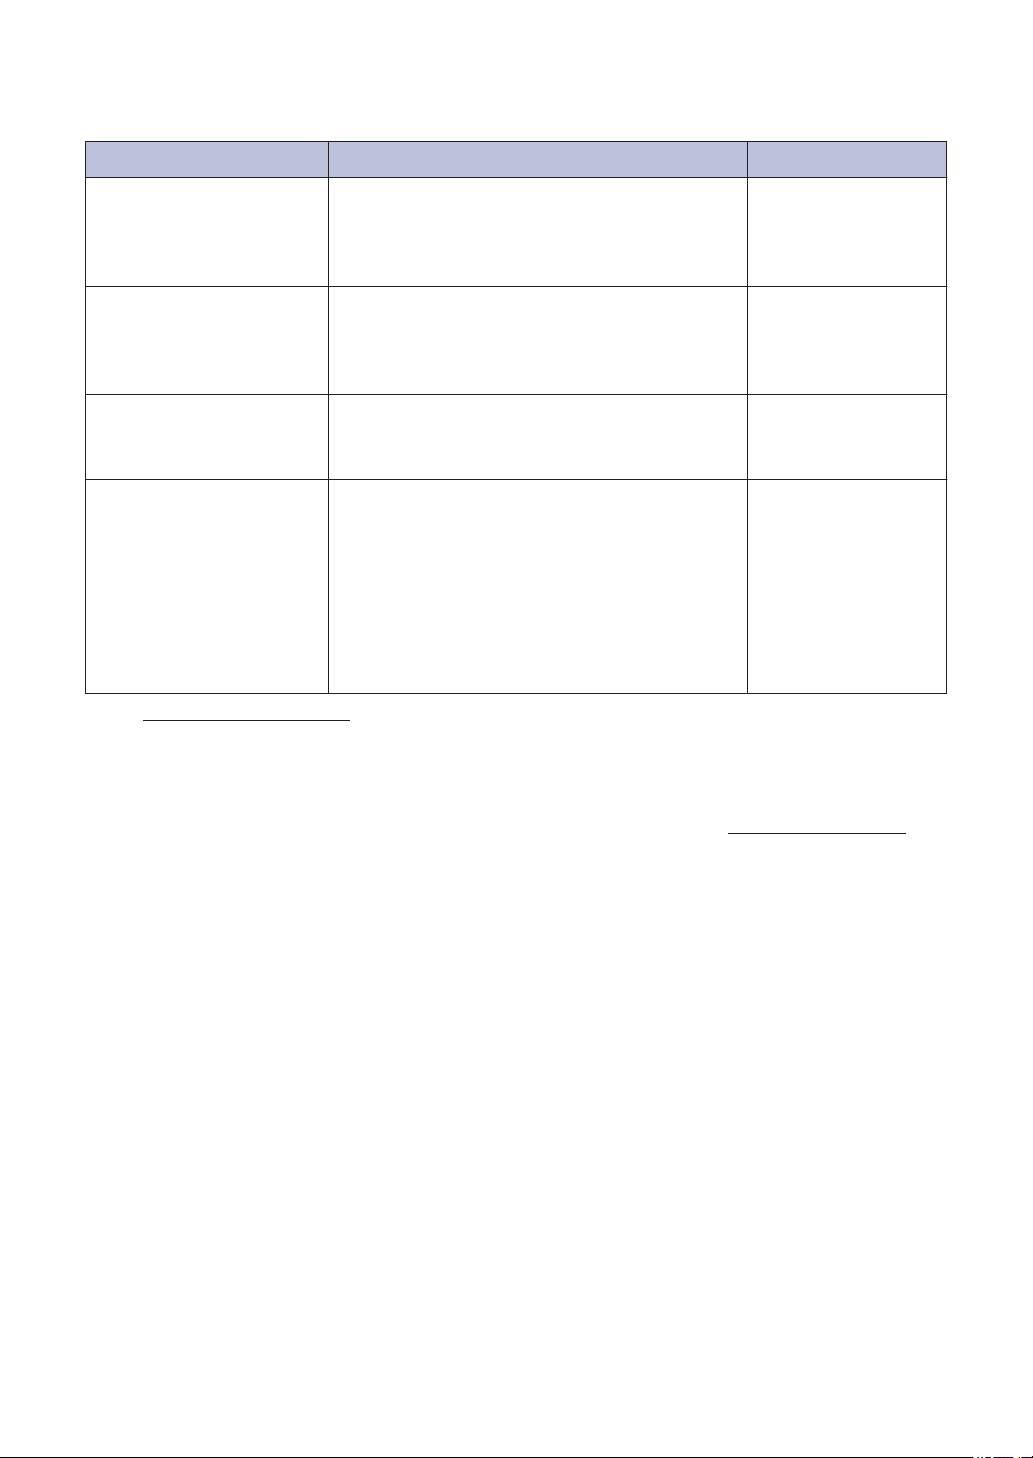
User's Guides and Where to Find Them
Which Guide? What's in It? Where Is It?
Product Safety Guide Read this guide first. Please read the Safety
Instructions before you set up your machine.
See this guide for trademarks and legal
limitations.
Printed / In the box
Quick Setup Guide Follow the instructions for setting up your
machine, and installing the Full Driver &
Software Package for the operating system
and connection type you are using.
Printed / In the box
Reference Guide Learn the basic PC-Print, Direct Print, Scan,
Copy and Fax operations and basic machine
maintenance. See troubleshooting tips.
Printed or on Brother
Installation Disc / In
the box
Online User's Guide This guide includes the additional contents of
the Reference Guide.
In addition to information about the PC-Print,
Direct Print, Scan, Copy, Fax, Internet
services, Mobile functions and Brother
ControlCenter operations, useful information
is included about using the machine on a
network.
Brother Solutions
Center
1
1
Visit support.brother.com/manuals.
For the Latest Driver Updates
Go to your model's Downloads page on the Brother Solutions Center at
support.brother.com to
download drivers. To keep your machine’s performance up-to-date, check there for the latest
firmware upgrades.
©2018 Brother Industries, Ltd. All rights reserved.
1

Questions or Problems? Take a Look at our FAQs,
Solutions, and Videos Online.
Go to your model's FAQs & Troubleshooting page on the Brother Solutions Center at
support.brother.com.
• Provides several ways to search
• Displays related questions for more information
• Receives regular updates based on customer feedback
2
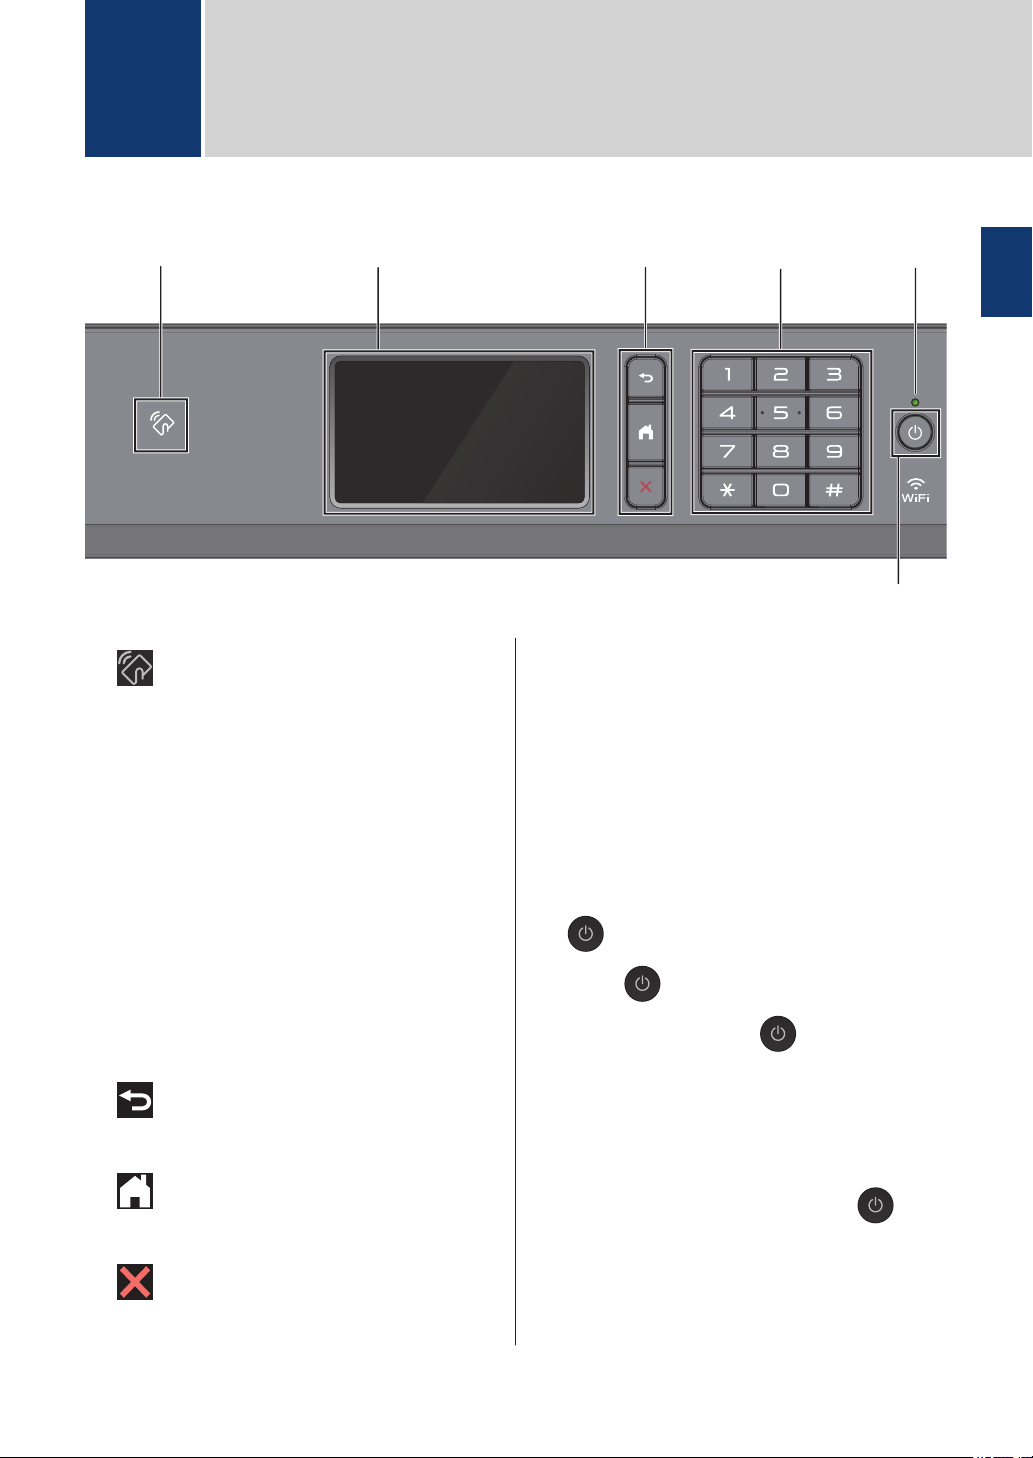
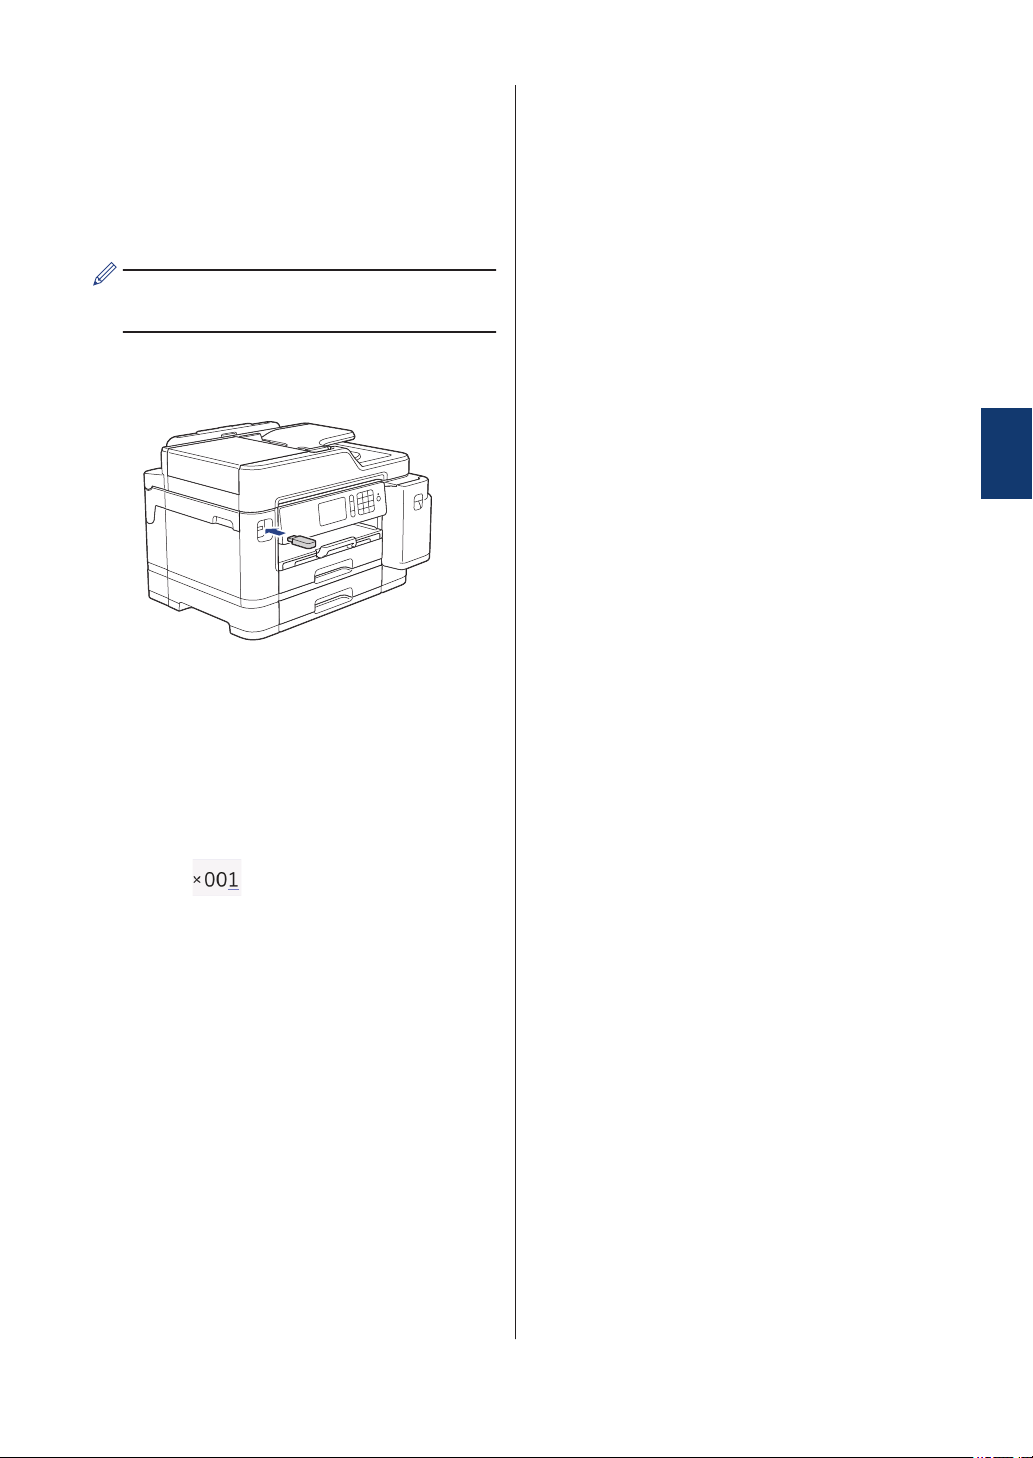
Control Panel Overview
32
5
6
4
1
1. NFC (Near Field Communication)
symbol
You can use card authentication by
touching the IC card to the NFC symbol on
the control panel.
If your Android
™
device supports the NFC
feature, you can print from your device or
scan documents to your device in the
same way.
2. Touchscreen Liquid Crystal Display
(LCD)
Access menus and options by pressing
them on the touchscreen.
3. Menu buttons
(Back)
Press to go back to the previous menu.
(Home)
Press to return to the Home screen.
(Cancel)
Press to cancel an operation.
4. Dial Pad
Press the numbers to dial telephone or fax
numbers and to enter the number of
copies.
5. LED Power Indicator
The LED lights up depending on the
machine’s power status.
When the machine is in Sleep Mode, the
LED blinks.
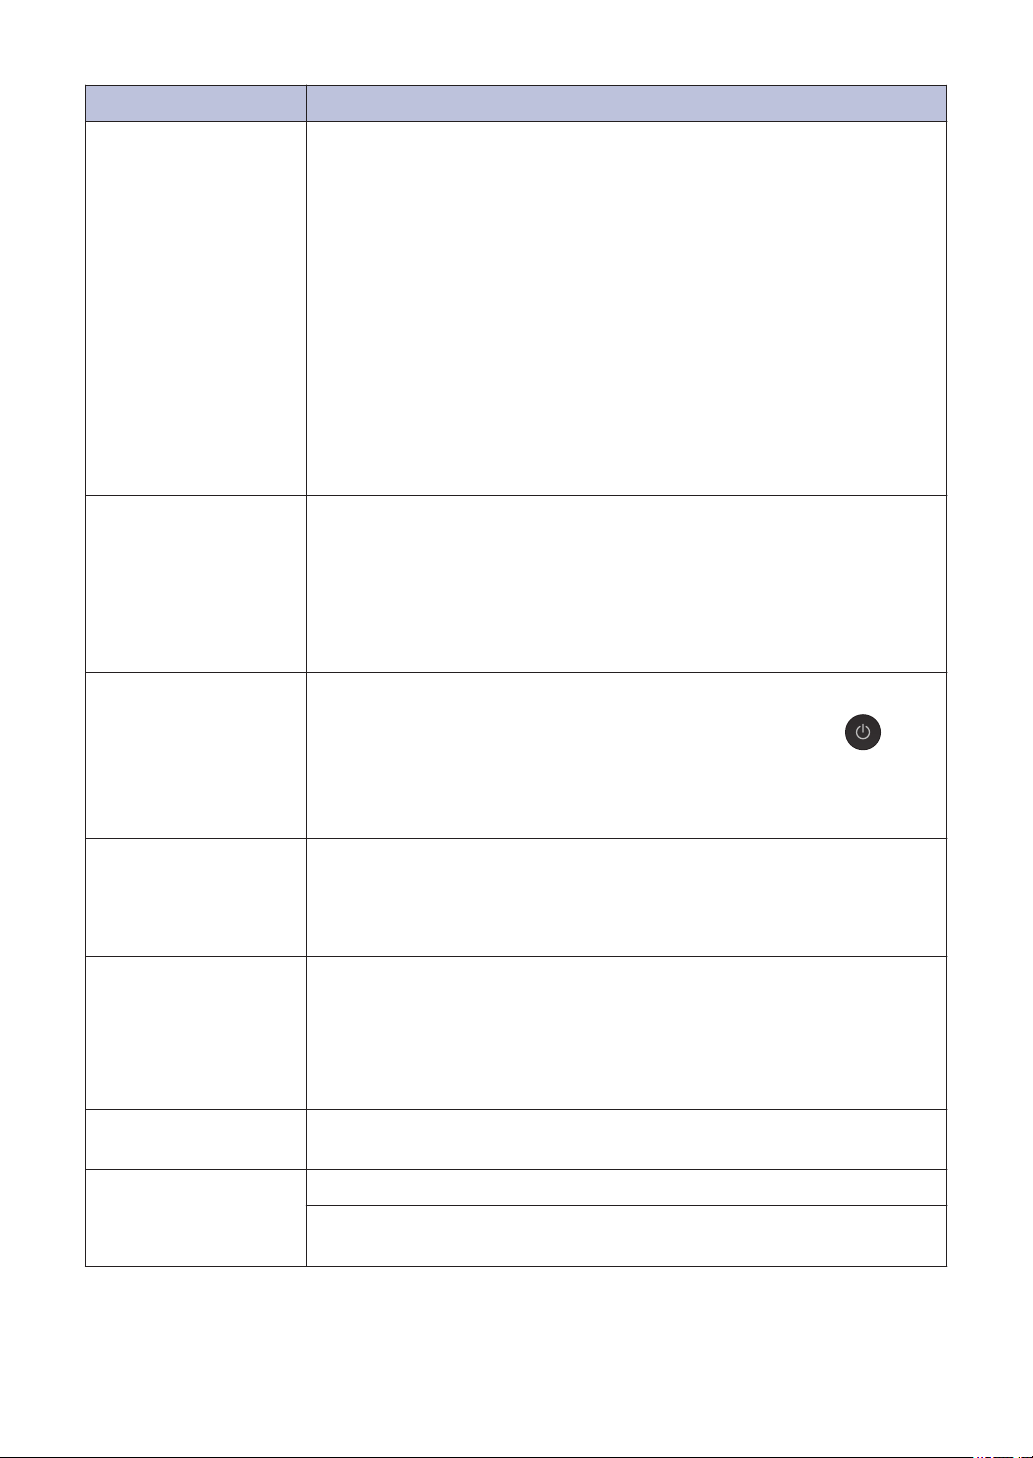
6. Power On/Off
Press to turn the machine on.
Press and hold down to turn the
machine off. The touchscreen will display
[Shutting Down] and will stay on for a
few seconds before turning itself off. If you
have connected an external telephone or
TAD, it is always available.
If you turn the machine off using , it
will still clean the print head periodically to
maintain print quality. To prolong print
head life, provide better ink efficiency, and
maintain print quality, keep your machine
connected to a power source at all times.
1
General Information
1
General Information
3

Touchscreen LCD
Overview
You can switch Home screens by swiping left
or right or pressing d or c.
From the Home screens, you can access
Shortcuts, Wi‑Fi
®
setup, Settings and Ink
levels screens.
Home Screen
2
7
1
5
3 4
6
This screen shows the machine’s status when
the machine is idle. When displayed, it
indicates that your machine is ready for the
next command.
1. Date & Time
Displays the date and time set on the
machine.
2. Quiet Mode
This icon appears when the [Quiet
Mode] setting is set to [On].
The Quiet Mode setting can reduce
printing noise. When Quiet Mode is turned
on, the print speed becomes slower.
3. [Shortcuts]
Create Shortcuts for frequently-used
operations, such as sending a fax,
copying, scanning, Web Connect and
Apps services.
• Three Shortcuts tabs are available with
six Shortcuts on each tab.
• Press , displayed at the
bottom of the screen to access the
Home Screens.
4. Wireless Status
Each icon in the following table shows the
wireless network status:
Your machine is not connected to
the wireless access point/router.
Press this button to configure
wireless settings. For more
detailed information, see the Quick
Setup Guide.
The wireless network is connected.
A three-level indicator in each of
the Home screens displays the
current wireless signal strength.
The wireless access point/router
cannot be detected.
The wireless setting is disabled.
You can configure wireless settings by
pressing the Wireless Status button.
5. [Settings]
Press to access the [Settings] menu.
6. [Ink]
Displays the approximate available ink
volume. Press to access the [Ink] menu.
When an ink cartridge is near the end of
its life or having a problem, an error icon is
displayed on the ink colour.
4
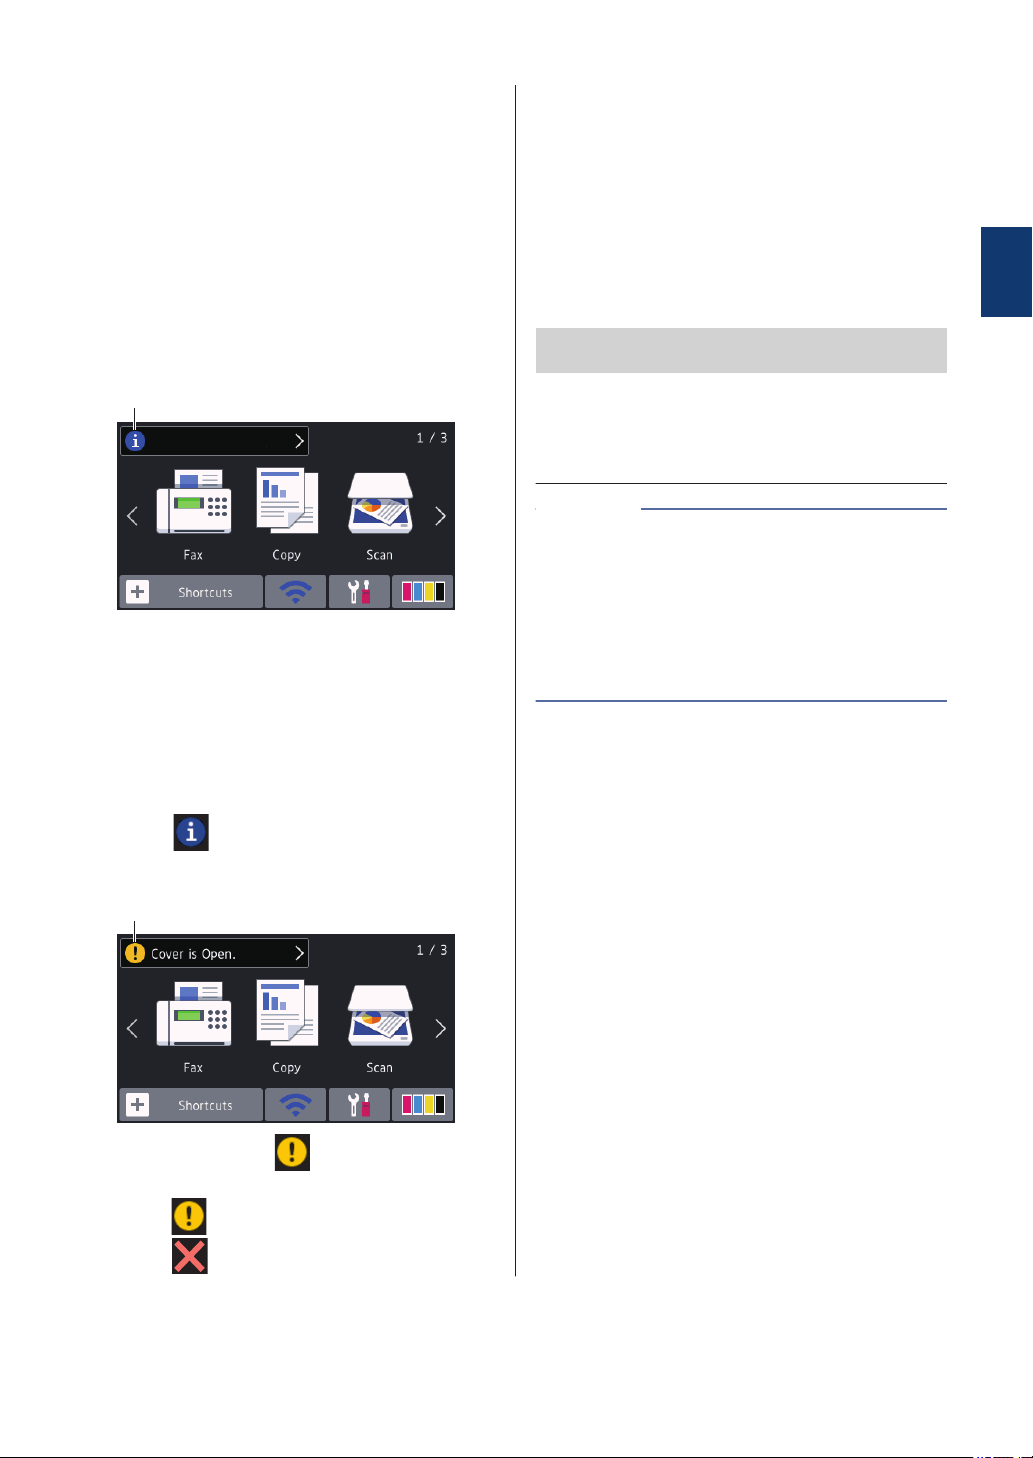
7. Modes:
Press to switch to each mode.
[Fax] / [Copy] / [Scan] / [Secure
Print] / [Web] / [Apps] / [USB] / [A3
Copy Shortcuts] / [Download
Software] (available only for some
countries)
For more information on [Web] and
[Apps], see the Online User's Guide.
8. Information icon
8
New information from Brother appears in
the information bar when the notification
settings such as [Message from
Brother] and [Firmware Auto
Check] are set to [On].
(Internet connection is needed, and data
rates may apply.)
Press
to view the details.
9. Warning icon
9
The warning icon appears when there
is an error or maintenance message;
press to view the details, and then
press to return to the Home screen.
Navigate the
Touchscreen
Press your finger on the LCD to operate it. To
display and access all the options, swipe left,
right, up, down or press d c or a b on the LCD
to scroll through them.
IMPORTANT
DO NOT press the LCD with a sharp object
such as a pen or stylus. It may damage the
machine.
• This product adopts the font of ARPHIC
TECHNOLOGY CO., LTD.
• DO NOT touch the LCD immediately after
plugging in the power cord or turning on
the machine. Doing this may cause an
error.
NOTE
1
General Information
5
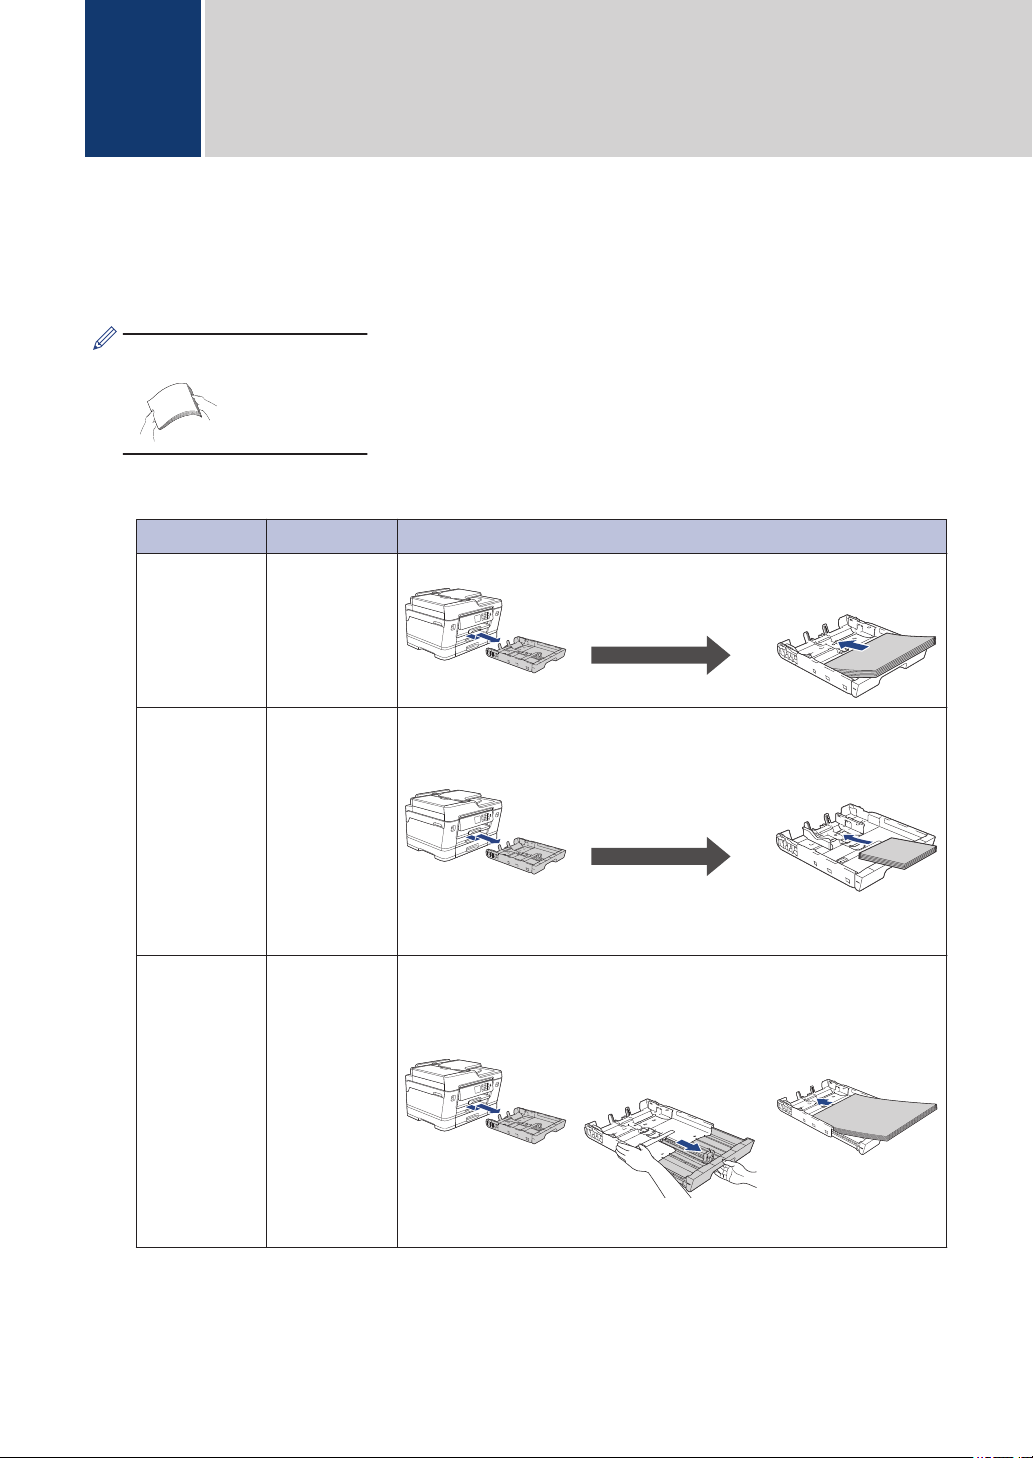
Load Paper
1
Load the paper in the paper tray as follows.
Fan the stack of paper well.
The paper size determines the orientation when loading paper.
Tray #1 Tray #2 How to Load Paper
A4
Letter
Executive
B5 (JIS) ♦
A4
Letter
(Plain paper
and Recycled
paper only)
Adjust the paper
guides.
Landscape
orientation
A5
A6
Photo
Photo L
Photo 2L
B6 (JIS) ♦
Index card
Envelopes
-
Adjust the paper
guides.
Portrait orientation
A3
Ledger
B4 (JIS) ♦
Legal
Folio
Mexico Legal
India Legal
(Glossy photo
paper is not
available.)
A3
Ledger
B4 (JIS) ♦
Legal
Folio
Mexico Legal
India Legal
(Plain paper
and Recycled
paper only)
Extend the tray using
the green slider, then
adjust the paper
guides.
Portrait orientation
2
Paper Handling
6
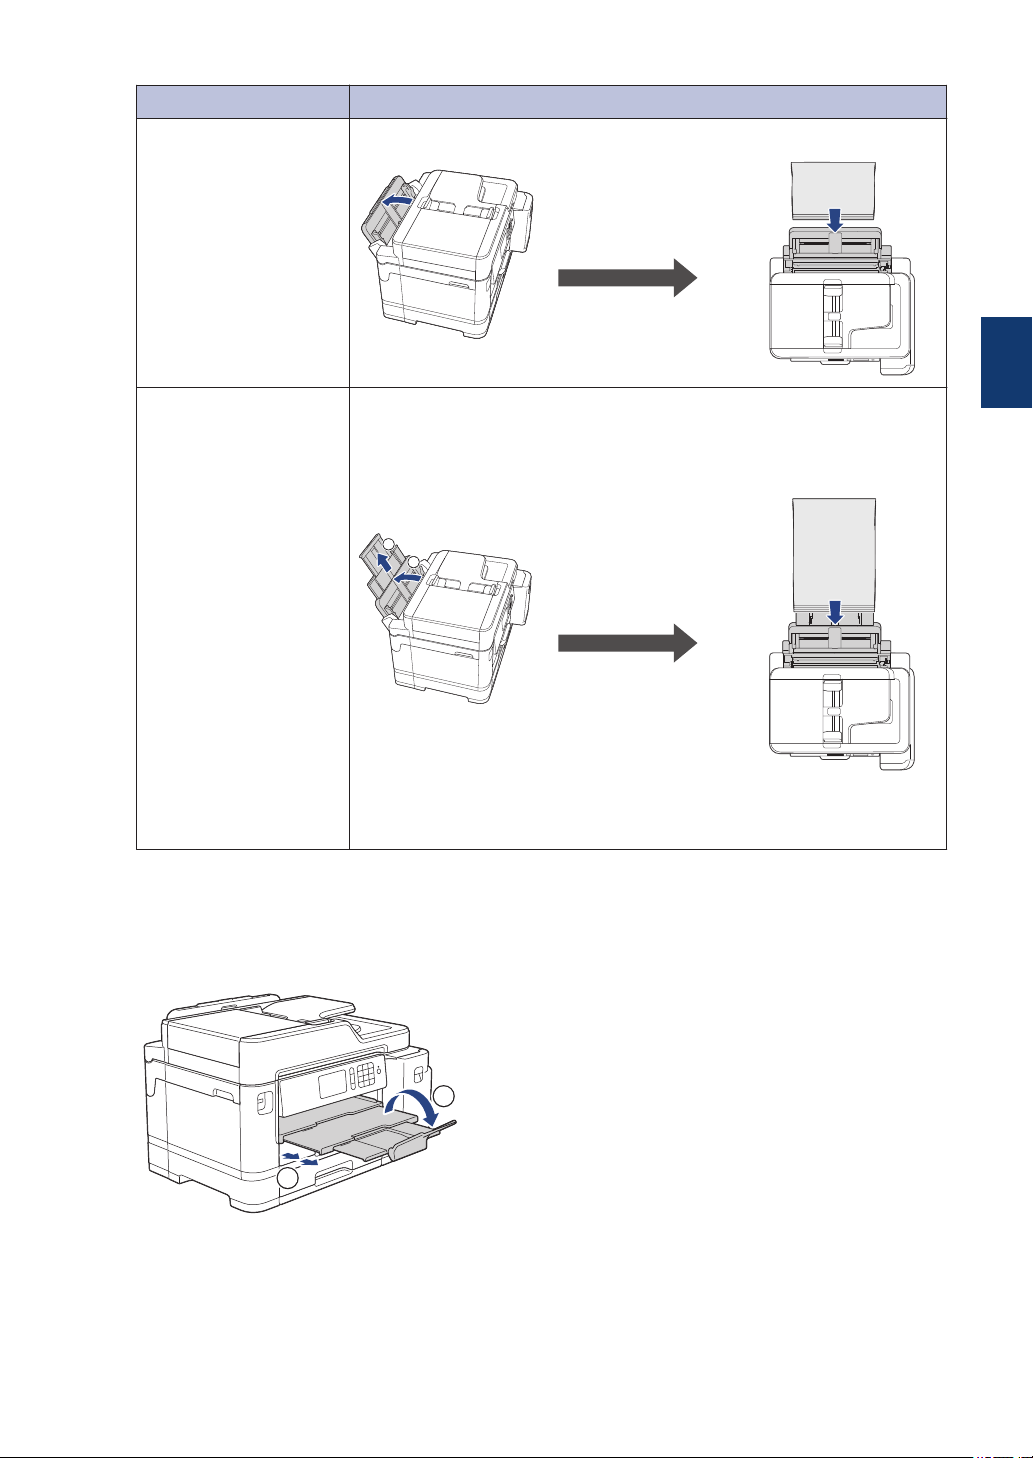
MP Tray How to Load Paper
A4
Letter
Executive
B5 (JIS) ♦
Adjust the MP tray paper
guides.
Landscape orientation
A3
Ledger
B4 (JIS) ♦
Legal
Folio
Mexico Legal
India Legal
A5
A6
Photo
Photo L
Photo 2L
B6 (JIS) ♦
Index card
Envelopes
1
2
Adjust the MP tray paper
guides.
Portrait orientation
For more detailed information, see the Online User's Guide: Load Paper.
♦ Supported only in some countries.
2
Unfold the paper support flap.
2
1
3
Change the paper size setting in the machine's menu, if needed.
2
Paper Handling
7
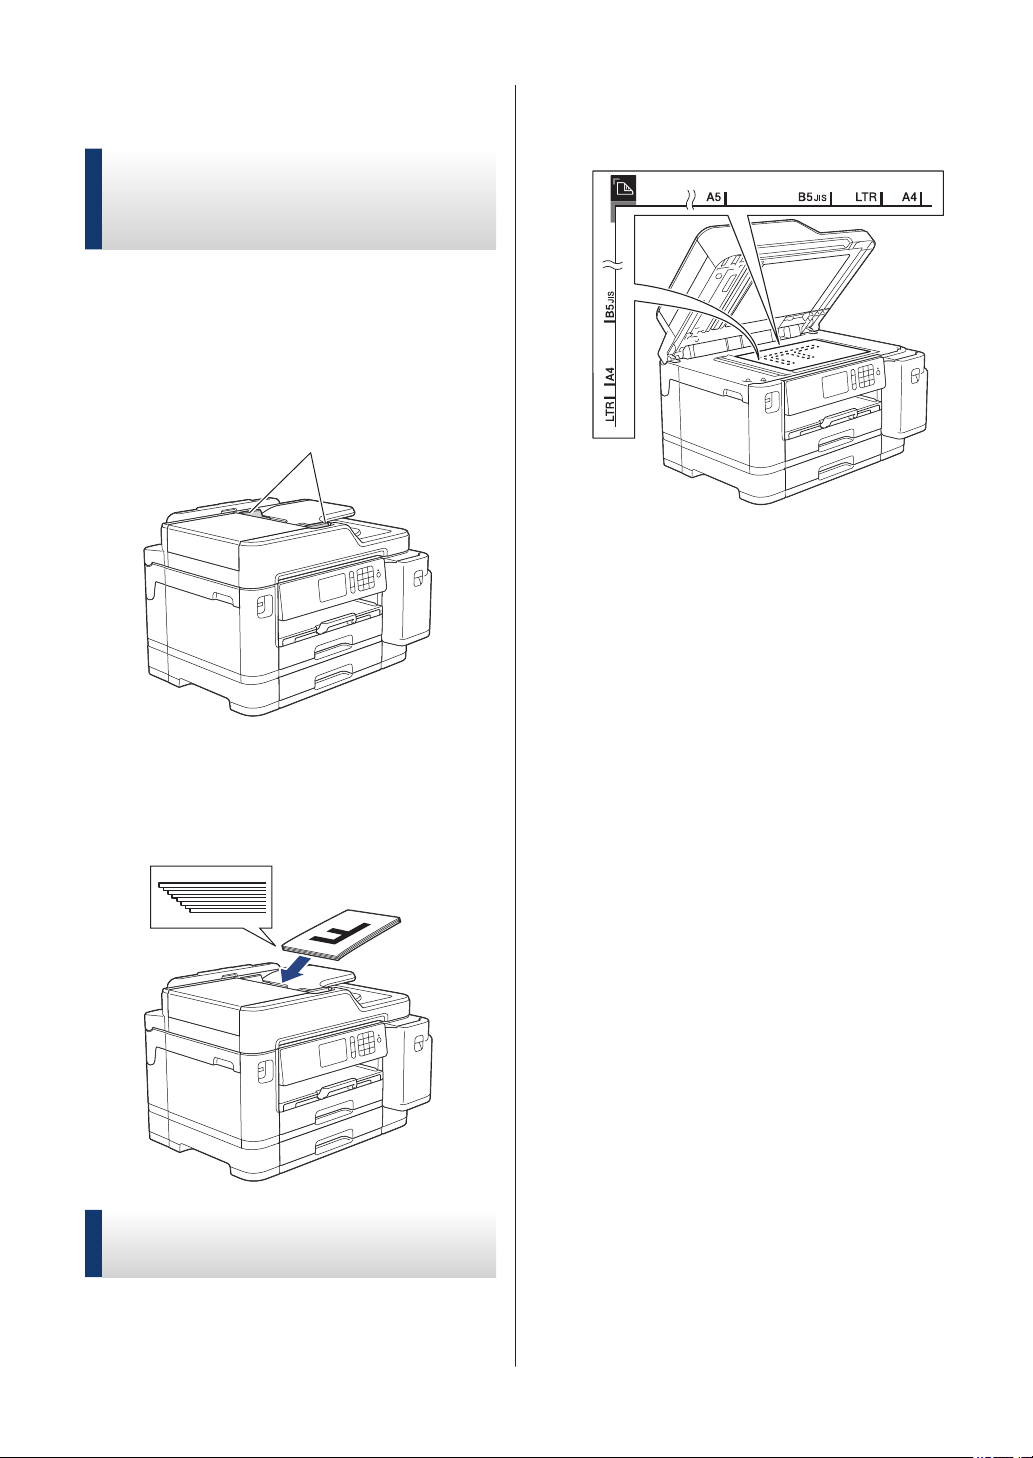
Load Documents
Load Documents in the
Automatic Document Feeder
(ADF)
1
Fan the pages well.
2
Adjust the paper guides (1) to fit the
document size.
1
3
Place your document face up in the
ADF, as shown in the illustration, until
you feel the document touch the feed
rollers and the machine beeps.
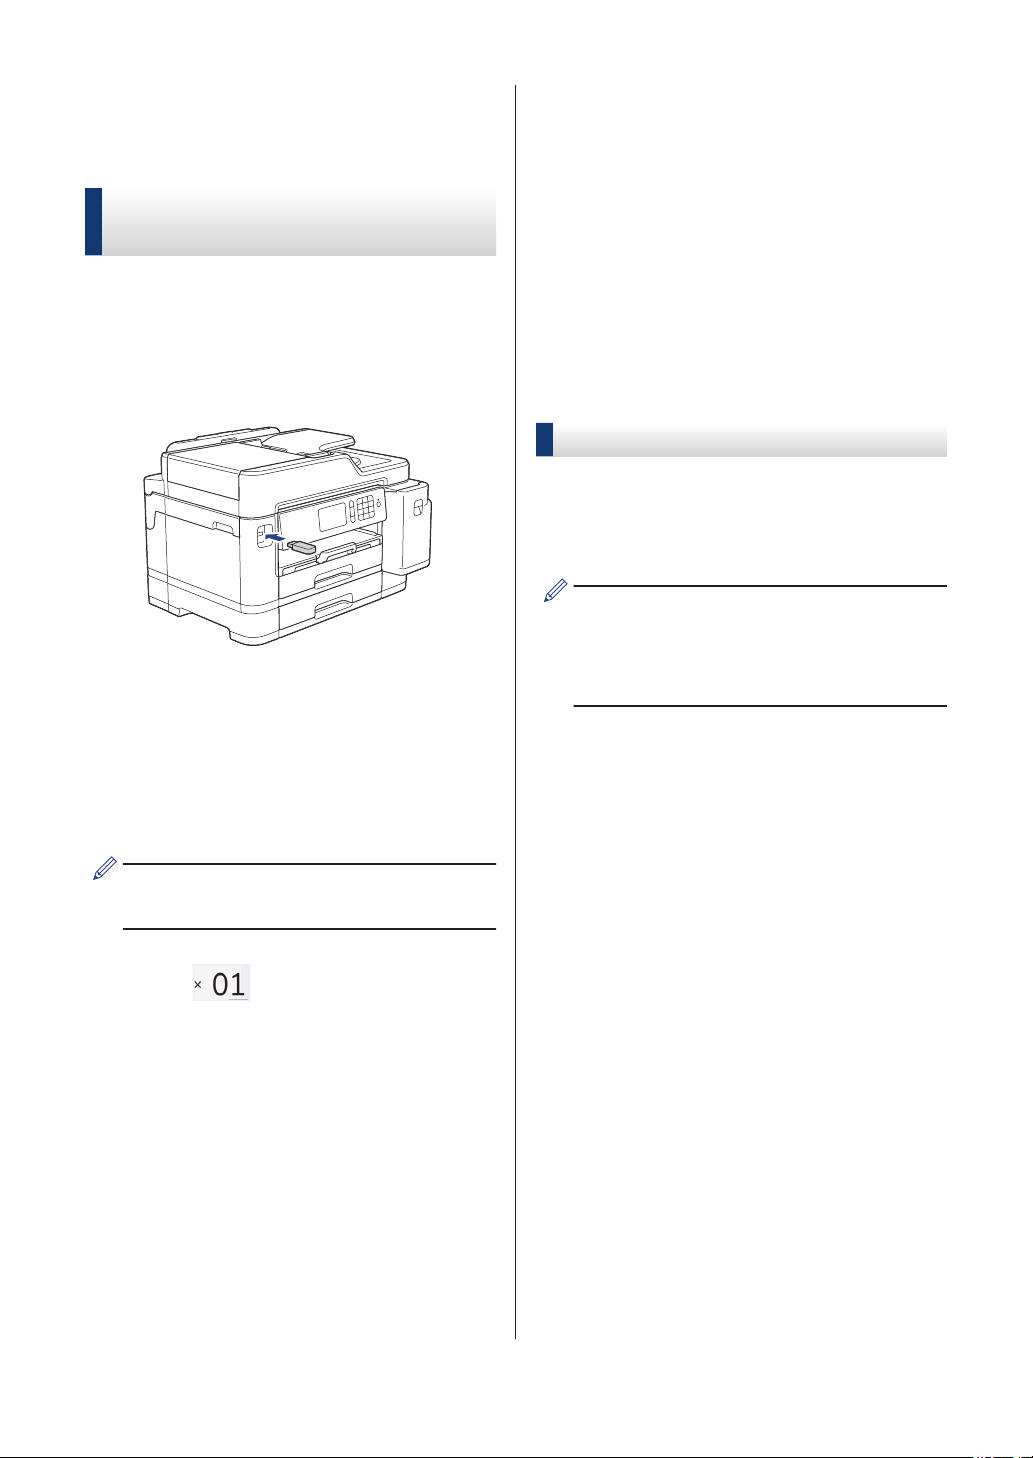
Load Documents on the
Scanner Glass
1
Lift the document cover.
2
Place the document face down in the
upper left corner of the scanner glass as
shown in the illustration.
3
Close the document cover.
8

Print from Your
Computer
Before attempting any printing operation,
confirm the following:
• Make sure you have installed the Brother
software and drivers.
• Make sure the USB or network cable is
connected correctly, or that you are
connected to the network using your
wireless access point/router.
Print a Document
(Windows
®
)
1
Select the print command in your
application.
2
Select Brother MFC-XXXX Printer
(where XXXX is the name of your
model).
3
Click Print.
4
Complete your print operation.
Print a Document (Mac)
1
From an application, such as Apple
TextEdit, click the File menu, and then
select Print.
2
Select Brother MFC-XXXX (where
XXXX is the name of your model).
3
Click Print.
4
Complete your print operation.
Various Printing
To use the various printing features, click the
printing properties or preferences button to
change the printer setting.
Print on Both Sides of the Paper
Automatically
Print More Than One Page on a Single
Sheet of Paper (N in 1)
For Windows
®
:
For more detailed information, see the Online
User's Guide: Print from Your Computer
(Windows
®
).
For Mac:
For more detailed information, see the Online
User's Guide: Print from Your Computer
(Mac).
3
Print
3
Print
9
Print Photos Directly
from a USB Flash Drive
Preview and Print Photos
from a USB Flash Drive
Preview your photos on the LCD before you
print them. Print images that are stored on a
USB flash drive.
1
Put a USB flash drive in the USB slot.
2
Press [JPEG Print] > [Select
Files].
3
Swipe left or right or press d or c to
display the photo you want to print, and
then press it.
To print all photos, press [Print All],
and then press [Yes] to confirm.
4
Press to display the keyboard on
the touchscreen, and then enter the
number of copies using the touchscreen
keyboard. Press [OK].
You can also press [-] or [+] on the
touchscreen, or use the dial pad
numbers.
5
Press [OK].
6
Repeat the last three steps until you
have selected all the photos you want to
print.
7
Press [OK].
8
Read and confirm the displayed list of
options.
9
To change the print settings, press
[Print Settings].
When finished, press [OK].
10
Press [Start].
Print Settings Overview
The Print Settings you change are temporary
for your current printout. The machine returns
to its default settings after printing is
complete.
You can save the print settings you use
most often by setting them as the default.
For more detailed information, see the
Online User's Guide.
10
Print a PDF File Directly
from a USB Flash Drive
You can print a PDF file directly from a USB
flash drive.
PDF files that are 2 GB or more cannot
be printed.
1
Put a USB flash drive in the USB slot.
2
Press [PDF Print].
3
Swipe up or down or press a or b to
display the PDF file you want to print,
and then press it.
4
Press
to display the keyboard on
the touchscreen, and then enter the
number of copies using the touchscreen
keyboard. Press [OK].
You can also press [-] or [+] on the
touchscreen, or use the dial pad
numbers.
5
Read and confirm the displayed list of
options.
6
To change the print settings, press
[Print Settings].
When finished, press [OK].
7
Press [Mono Start] or [Colour
Start].
3
Print
11
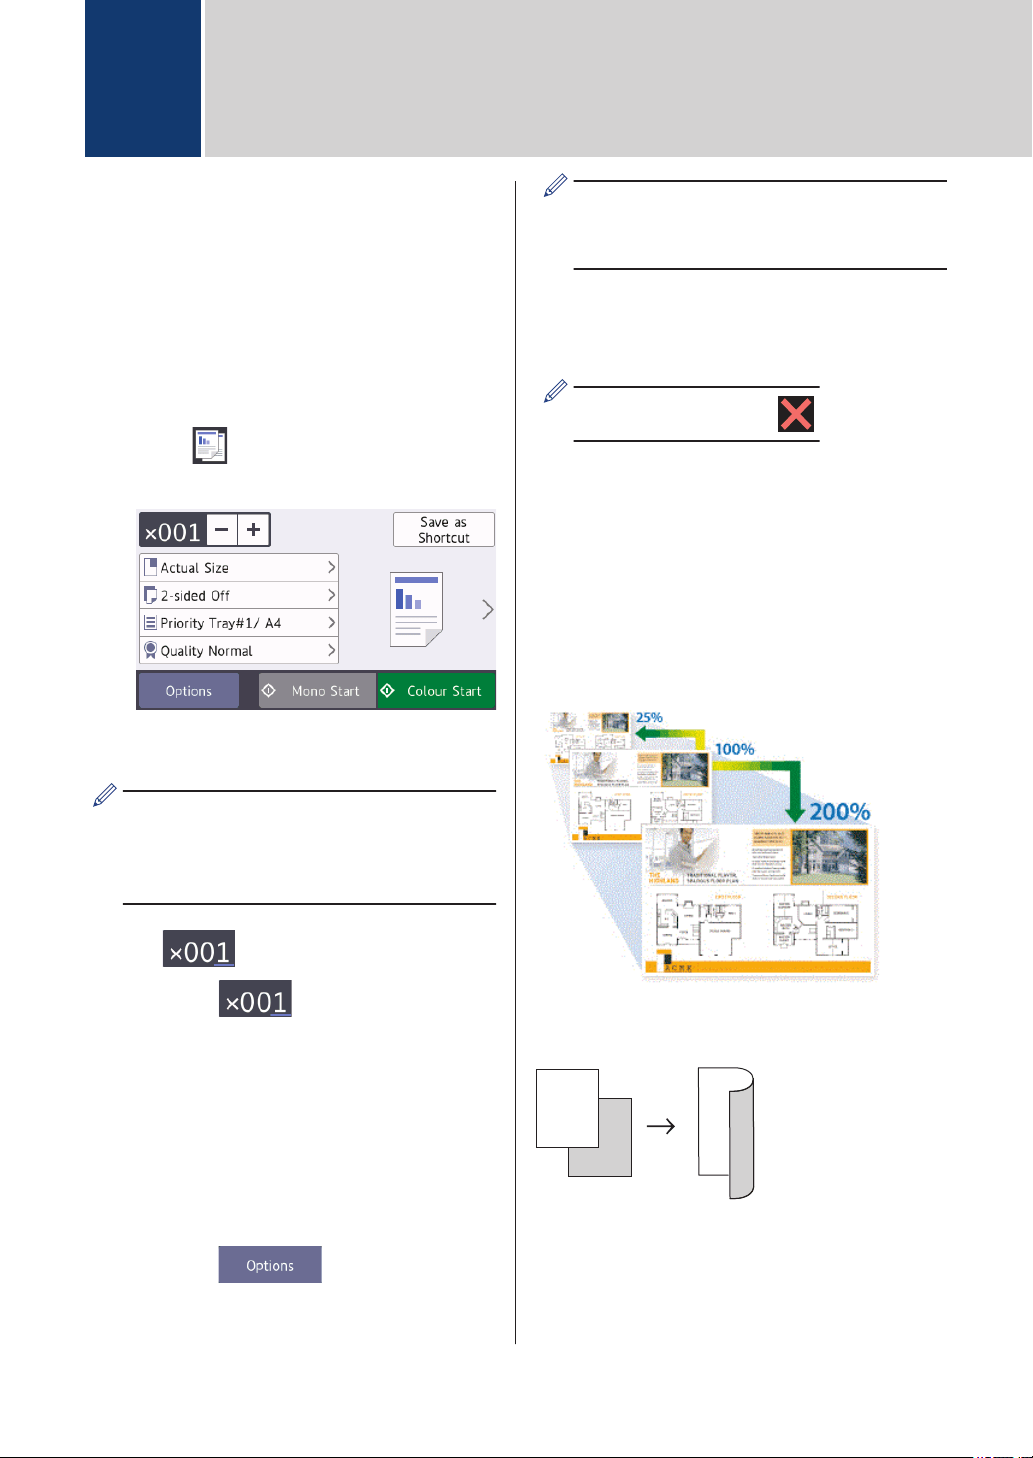
Copy a Document
1
Make sure you have loaded the correct
size paper in the paper tray.
2
Load your document.
3
Press [Copy].
The touchscreen displays:
4
Change the copy settings, if needed.
When you load paper other than A4 size
Plain Paper, you must change the
[Paper Size] and [Paper Type]
settings by pressing [Options].
• (No. of Copies)
Press to display the
keyboard on the touchscreen, and
then enter the number of copies
using the touchscreen keyboard.
Press [OK].
You can also press [-] or [+] on
the touchscreen, or use the dial pad
numbers.
• [Options]
Press
to change the
copy settings for the next copy only.
When finished, press [OK].
After you have finished selecting new
options, you can save them by pressing
the [Save as Shortcut] button.
5
Press [Mono Start] or [Colour
Start].
To stop copying, press .
Other Copy Options
You can use various copy features by
changing copy settings. Press the
[Options] button.
Enlarge or Reduce Copied Images
2-sided Copy
1
2
1
2
For more detailed information, see the Online
User's Guide: Copy.
4
Copy
12

Before Scanning
Before attempting to scan, confirm the
following:
• Make sure you have installed the Brother
software and drivers.
• Make sure the USB or network cable is
connected correctly, or that you are
connected to the network using your
wireless access point/router.
Scan from Your
Computer
There are several ways you can use your
computer to scan photos and documents on
your Brother machine. Use the software
applications provided by Brother, or use your
favourite scanning application.
For more detailed information, see the Online
User's Guide: Scan from Your Computer
(Windows
®
) or Scan from Your Computer
(Mac).
Scan Using the Scan
Button on the Machine
1
Load your document.
2
Press
[Scan].
3
Swipe left or right or press d or c to
display [to PC].
The icon moves to the middle of the
touchscreen and is highlighted in blue.
4
Press [to PC].
5
Press [to File].
6
If the machine is connected over the
network, swipe up or down or press a or
b to display the computer where you
want to send the data, and then press
the computer name.
If the LCD prompts you to enter a PIN,
use the LCD to enter the four-digit PIN for
the computer, and then press [OK].
7
Do one of the following:
• To change the settings, press
[Options] or [Set at Device].
• Press [Start] to start scanning
without changing additional settings.
The machine starts scanning. If using
the machine's scanner glass, follow
the LCD instructions to complete the
scanning job.
To use the [Options] or [Set at
Device] setting, a computer with either
ControlCenter4 (Windows
®
) or Brother
iPrint&Scan (Mac) software installed must
be connected to the machine.
8
To scan both sides of the document,
press [2-sided Scan], and then
select the document type.
9
Change the scan settings you want to
change, such as scan type, resolution,
file type and document size, if needed.
When finished, press [OK].
10
Press [Start].
The machine starts scanning. If using
the machine's scanner glass, follow the
LCD instructions to complete the
scanning job.
5
Scan
5
Scan
13
Before Faxing
Telephone Line Interference/
VoIP
If you are having problems sending or
receiving a fax due to possible interference on
the telephone line or if you are using a VoIP
system, we recommend changing the modem
speed to minimise errors in fax operations.
1
Press [Settings] > [All
Settings] > [Initial Setup] >
[Compatibility].
2
Press the option you want.
• [Basic(for VoIP)] reduces the
modem speed to 9,600 bps and turns
off colour fax receiving and Error
Correction Mode (ECM), except for
colour fax-sending. Unless
interference is a recurring problem on
your telephone line, you may prefer
to use it only when needed.
To improve compatibility with most
VoIP services, Brother recommends
changing the compatibility setting to
[Basic(for VoIP)].
• [Normal] sets the modem speed at
14,400 bps.
• [High] sets the modem speed at
33,600 bps.
3
Press
.
• VoIP (Voice over IP) is a type of phone
system that uses an Internet
connection, rather than a traditional
phone line.
• Brother does not recommend the use
of a VoIP line. VoIP limitations in
general can cause some functions of
the fax machine not to work correctly.
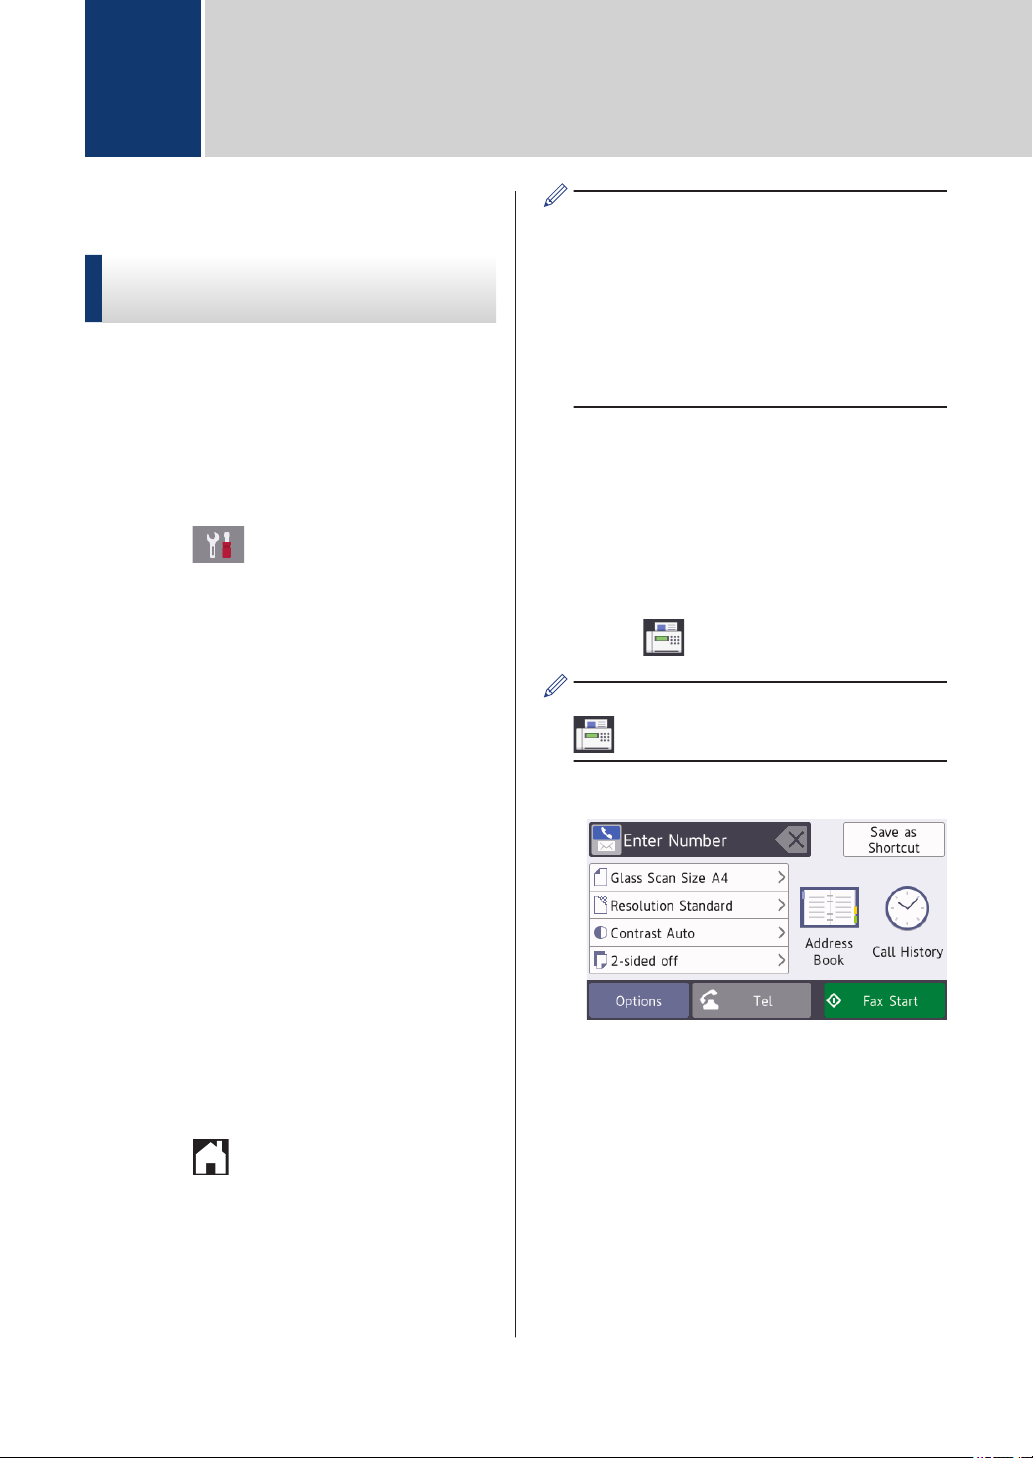
Send a Fax
1
Load your document in the ADF or place
it on the scanner glass.
2
Press
[Fax].
If [Fax Preview] is set to [On], press
[Fax] > [Sending Faxes].
The touchscreen displays:
3
Enter the fax number in one of the
following ways:
• Dial Pad (Enter the fax number
manually.)
Press all digits of the number using
the dial pad.
• [Redial] (Redial the last number
you dialled.)
Press [Call History] >
[Redial].
6
Fax
14

• [Outgoing Call] (Select a
number from the Outgoing Call
history.)
Press [Call History] >
[Outgoing Call].
Select the number you want, and
then press [Apply].
• [Caller ID History] (Select a
number from the Caller ID history.)
(Not available for Taiwan and some
countries)
Press [Call History] > [Caller
ID History].
Select the number you want, and
then press [Apply].
• [Address Book] (Select a number
from the Address Book.)
Press [Address Book].
Do one of the following:
- Select the number you want, and
then press [Apply].
- Press
, and then enter the first
letter of the name and press
[OK]. Press the name you want to
dial. If the name has two numbers,
press the number you want. Press
[Apply].
For more detailed information on how
to store address book numbers, see
the Online User's Guide.
(available only for some countries)
If the LDAP search is available, the result
will be shown on the touchscreen with
.
4
To change the additional settings, press
[Options].
When finished, press [OK].
5
Press [Fax Start].
6
Do one of the following:
• If you are using the ADF, the machine
starts scanning and sending the
document.
• If you are using the scanner glass
and selected [Mono] in the
[Colour Setting], the machine
starts scanning the first page.
Go to the next step.
• If you are using the scanner glass
and selected [Colour] in the
[Colour Setting], the
touchscreen asks if you want to send
a colour fax.
Press [Yes (Colour fax)] to
confirm. The machine starts dialling
and sending the document.
7
When the touchscreen displays [Next
Page?], do one of the following:
• Press [No] when finished scanning
pages. The machine starts sending
the document.
• Press [Yes] to scan another page.
Place the next page on the scanner
glass, and then press [OK]. The
machine starts scanning the page.
Repeat this step for each additional
page.
6
Fax
15
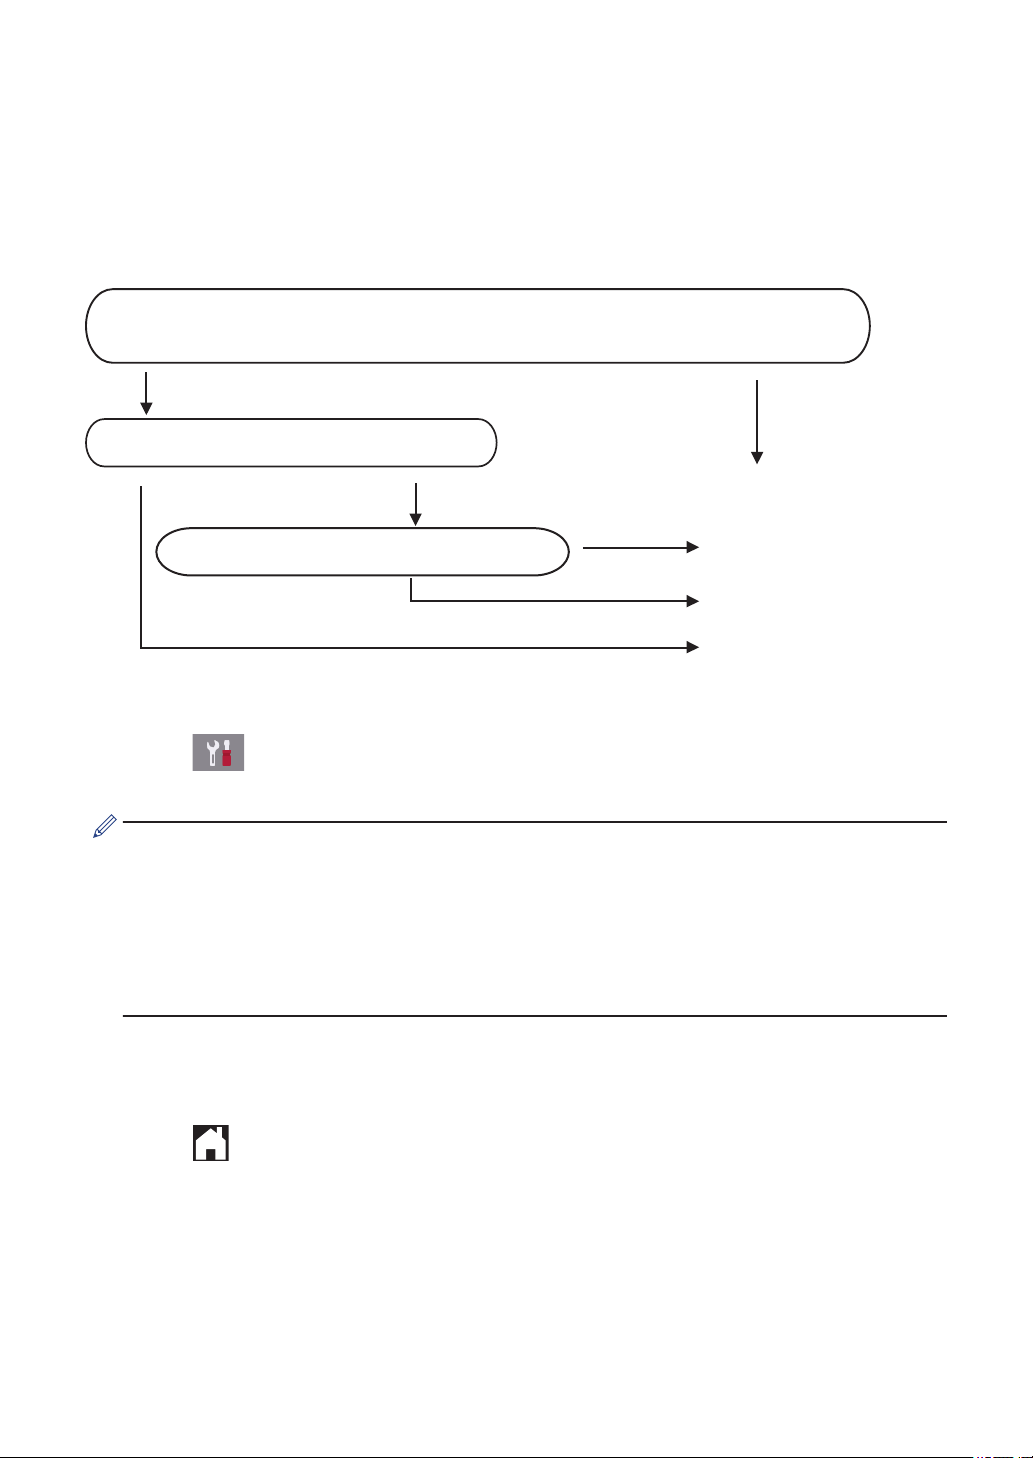
Choose the Correct Receive Mode
You must choose a Receive Mode depending on the external devices and telephone services
you have on your line.
By default, your machine automatically will receive any faxes that are sent to it. The diagram
below will help you select the correct mode.
Do you want to use the telephone features of your machine (if available) or
an external telephone or external telephone answering device connected on the
same line as the machine?
Yes
Fax Only
No
No
No
Manual
Yes
External TAD
Fax/Tel
Are you using the voice message function of
an external telephone answering device?
Do you want the machine to answer fax and
telephone calls automatically?
Yes
1
Press [Settings] > [All Settings] > [Fax] > [Setup Receive] >
[Receive Mode].
(For some countries)
If you cannot change the [Receive Mode] option, make sure the Distinctive Ring feature is
set to [Off].
(For New Zealand)
If you cannot change the [Receive Mode] option, make sure the FaxAbility feature is set
to [Off].
2
Press the [Fax Only], [Fax/Tel], [External TAD] or [Manual] option.
3
Press .
16
Check the Print Quality
If faded or streaked colours and text appear or
if text is missing on your printouts, the print
head nozzles may be clogged. Print the Print
Quality Check Sheet and look at the nozzle
check pattern.
1
Press [Settings] >
[Maintenance] > [Improve Print
Quality] > [Check Print
Quality].
2
Press [Start].
The machine prints the Print Quality
Check Sheet.
3
Check the quality of the four colour
blocks on the sheet.
4
The touchscreen asks about the print
quality. Do one of the following:
• If all lines are clear and visible, press
[No], and then press to finish
the Print Quality check.
• If lines are missing (see Poor, as
follows), press [Yes].
OK
Poor
5
The touchscreen asks you to check the
print quality of each colour. Press the
number of the pattern (1–4) that most
closely matches the printing result.
6
Do one of the following:
• If print head cleaning is needed,
press [Start] to start the cleaning
procedure.
• If print head cleaning is not needed,
the Maintenance screen reappears
on the touchscreen. Press
.
7
After the cleaning procedure is finished,
the touchscreen asks if you want to print
the Print Quality Check Sheet again.
Press [Yes], and then press [Start].
The machine prints the Print Quality
Check Sheet again. Check the quality of
the four colour blocks on the sheet
again.
If you clean the print head and the print has
not improved, try installing a new Brother
Original replacement ink cartridge for each
problem colour. Try cleaning the print head
again. If the print has not improved, contact
Brother customer service or your local Brother
dealer.
A
Routine Maintenance
A
Routine Maintenance
17
IMPORTANT
DO NOT touch the print head. Touching the
print head may cause permanent damage and
may void the print head's warranty.
When a print head nozzle is clogged, the
printed sample looks like this.
After the print head nozzle is cleaned, the
lines are gone.
Check the Print
Alignment from Your
Brother Machine
If your printed text becomes blurred or images
become faded after transporting the machine,
adjust the print alignment.
Before adjusting the print alignment, make
a print quality check first by pressing
[Settings] > [Maintenance] >
[Improve Print Quality] > [Check
Print Quality].
1
Press [Settings] >
[Maintenance] > [Improve Print
Quality] > [Alignment].
2
Press [Next].
3
Press [Yes] after a confirmation
message if a print quality check has
been completed appears on the LCD.
4
Press [Auto] or [Manual].
• If you select the [Auto] mode, the
print alignment is automatically
adjusted by scanning the alignment
check sheet.
• If you select the [Manual] mode,
you need to input information printed
on the alignment check sheet
manually.
5
Select the paper size to print the
alignment check sheet on.
• If you selected the [Manual] mode,
select either [Basic alignment]
or [Advanced alignment] in the
following step.
6
Load specified size paper in the tray,
and then press [Start].
The machine prints the alignment check
sheet.
7
Follow the instructions on the LCD.
When the print alignment is not adjusted
correctly, text looks blurry or crooked, like
this.
After the print alignment is adjusted
correctly, text looks like this.
18
Check the Ink Volume
(Page Gauge)
Although an ink volume icon appears on the
machine's LCD, you can view a larger graph
that displays the ink left in each cartridge.
1
Press
[Settings] >
[Maintenance] > [Ink Volume].
The touchscreen displays the ink
volume and the page gauge
1
.
a
b
c
d ¹
a. Displays the cartridge ink level.
b. Displays the ink level remaining in
the internal ink reservoir.
c. Press to change the display settings
for the approximate page yield.
d. The page gauge
1
shows the
approximate number of remaining
pages that can be printed with the
cartridges.
• When the ink cartridge is near the end
of its life or having a problem, one of
the following icons appears:
The ink level is
low.
The ink cartridge
is at the end of its
life.
There is a
problem with the
ink cartridge.
• To check or print the ink cartridge
model numbers, press (Back) to
return to the [Ink] menu screen.
Press [Ink Cartridge Model],
and follow the instructions on the
touchscreen.
2
Press .
• You can also check the ink volume
from your computer.
• For detailed information about the
measuring methods used for the
approximate yields, visit
support.brother.com/yield.
1
Page Gauge is an estimate for informational purposes only and does not display the actual remaining page yield. For
actual cartridge yield information, refer to
support.brother.com/yield.
A
Routine Maintenance
19
Use this section to resolve problems you may encounter when using your Brother machine.
Identify the Problem
Even if there seems to be a problem with your machine, you can correct most problems yourself.
First, check the following:
• The machine's power cord is connected correctly and the machine's power is on.
• All of the machine's protective parts have been removed.
• The ink cartridges are installed correctly.
• The Scanner Cover and the Jam Clear Cover are fully closed.
• Paper is inserted correctly in the paper tray.
• The interface cables are securely connected to the machine and the computer, or the wireless
connection is set up on both the machine and your computer.
• (For network models) The access point (for wireless), router, or hub is turned on and its link
button is blinking.
To find the error and the solution, check the LCD or the machine's status in Status Monitor on
your computer.
Using the LCD Using the Status Monitor
1. Follow the messages on the LCD.
2. See the instructions in the following Error
and Maintenance Messages table.
3. If you cannot resolve the error, see the
Online User's Guide: Error and Maintenance
Messages.
• Double-click the icon in the task tray.
• Each colour of the icon indicates the
machine's status.
• Click the Troubleshooting button to
access Brother's troubleshooting website.
Error and Maintenance Messages
The most common error and maintenance messages are shown in the table. For more detailed
information, see the Online User's Guide.
B
Troubleshooting
20
You can correct most errors and perform routine maintenance yourself. If you need more tips, go
to your model's FAQs & Troubleshooting page on the Brother Solutions Center at
support.brother.com.
If the touchscreen displays error messages and your Android
™
device supports the NFC
feature, touch your device to the NFC symbol on the control panel to access the Brother
Solutions Center and browse the latest FAQs from your device. (Your mobile telephone
provider's message and data rates may apply.)
Make sure the NFC settings of both your Brother machine and your Android
™
device are set
to On.
Error Message Action
Black and White
Print Only
Replace ink.
One or more of the colour ink cartridges have reached the end of their
lives.
Replace the ink cartridges.
For more detailed information, see the Online User's Guide: Replace
the Ink Cartridges.
The machine may stop all print operations and you may not be able to
use the machine until you install a new ink cartridge in the following
cases:
• If you unplug the machine or remove the ink cartridge.
• If you select the Slow Drying Paper option on the machine or in
the printer driver.
Cannot Detect
Take out the new ink cartridge and reinstall it slowly and firmly until it
locks into place.
For more detailed information, see the Online User's Guide: Replace
the Ink Cartridges.
Remove the used ink cartridge and install a new one.
Replace the cartridge with a Brother Original ink cartridge. If the error
message remains, contact Brother customer service or your local
Brother dealer.
Check the model numbers of the ink cartridges and install the correct
ink cartridges.
Cannot Detect Ink
Volume
Replace the cartridge with a Brother Original ink cartridge. If the error
message remains, contact Brother customer service or your local
Brother dealer.
Data Remaining in
Memory
Press . The machine will cancel the job and clear it from the
memory. Try to print again.
Disconnected
Try to send or receive again.
If calls are stopped repeatedly and you are using a VoIP (Voice over
IP) system, try changing the Compatibility to Basic (for VoIP).
See Related Information: Telephone Line Interference/VoIP at the end
of this section.
B
Troubleshooting
21
Error Message Action
Document Jam/too
Long
The document was not inserted or fed correctly, or the document
scanned from the ADF was too long.
For more detailed information, see the Online User's Guide: Document
Jams.
DR Mode in Use
The machine is in Distinctive Ring mode. You cannot change the
Receive Mode from Manual to another mode.
Set Distinctive Ring to Off.
For more detailed information, see the Online User's Guide: Turn off
Distinctive Ring.
FaxAbility On
The machine is in FaxAbility mode. You cannot change the Receive
Mode from Manual to another mode.
Set FaxAbility to Off.
For more detailed information, see the Online User's Guide: Turn
FaxAbility Off or On.
High Temperature
After cooling the room, allow the machine to cool down to room
temperature. Try again when the machine has cooled down.
Hub is Unusable.
Hubs, including a USB flash drive with a built-in hub, are not
supported. Unplug the device from the USB direct interface.
Ink Absorber
NearFull
The ink absorber box must be replaced soon. Contact Brother
customer service or your local Brother dealer.
• The ink absorber box absorbs the small amount of ink emitted
during print head cleaning.
Ink Absorber Pad
Full
The ink absorber box must be replaced. Contact Brother customer
service or your local Brother Authorised Service Centre to have your
machine serviced.
Ink Low
One or more of the ink cartridges are near the end of their lives.
Order a new ink cartridge. You can continue printing until the
touchscreen displays Replace Ink.
For more detailed information, see the Online User's Guide: Replace
the Ink Cartridges.
• You can still scan even if the ink is low or needs to be
replaced.
Install Ink
Remove the new ink cartridge and re-install it slowly and firmly until it
locks into place.
For more detailed information, see the Online User's Guide: Replace
the Ink Cartridges.
22
Error Message Action
Jam Front/Rear
Jam Front
Jam Rear
Jam MP Tray
Jam Front/MP Tray
Jam Tray2
Repeat Jam XX
Remove the jammed paper.
For more detailed information, see the Online User's Guide: Printer
Jam or Paper Jam.
If there is a repeat paper jam, try another paper jam clear operation.
For more detailed information, see the Online User's Guide: Remove
Paper Scraps.
Make sure the paper guides are set to the correct paper size.
Make sure the paper support is fully inserted into the machine.
For more detailed information, see the Online User's Guide: Paper is
Jammed in the Front of the Machine.
Clean the paper pick-up rollers.
For more detailed information, see the Online User's Guide: Clean the
Paper Pick-up Rollers.
Low Temperature
After warming the room, allow the machine to warm up to room
temperature. Try again when the machine has warmed up.
Media is Full.
Your machine can only save to your USB flash drive if it contains fewer
than 999 files. Delete unused files and try again.
Delete unused files from your USB flash drive to make some free
space, and then try again.
No Caller ID
There is no incoming call history. You did not receive calls or you have
not subscribed to the Caller ID service from your telephone company.
To use the Caller ID feature, contact your telephone company.
For more detailed information, see the Online User's Guide: Caller ID.
No Paper Fed
Do one of the following:
• Refill the paper tray, and then follow the LCD instructions.
• Remove and reload the paper, and then follow the LCD instructions.
The paper was not inserted in the centre position of the MP tray.
Remove the paper and reinsert it in the centre of the MP tray, and then
follow the LCD instructions.
For more detailed information, see the Online User's Guide: Load
Paper in the Multi-purpose Tray (MP Tray).
The Jam Clear Cover is not closed correctly.
Paper dust has accumulated on the surface of the paper pick-up
rollers.
Clean the paper pick-up rollers.
For more detailed information, see the Online User's Guide: Clean the
Paper Pick-up Rollers.
B
Troubleshooting
23
Error Message Action
Out of Fax Memory
Do one of the following:
• Clear the data from the memory. To gain extra memory, you can
turn Memory Receive off.
For more detailed information, see the Online User's Guide: Turn
Off Memory Receive.
• Print the faxes stored in the memory.
For more detailed information, see the Online User's Guide: Print a
Fax Stored in the Machine's Memory.
Out of Memory
If a fax-sending or copy operation is in progress:
• Press or Quit and wait until the other operations that are in
progress finish, and then try again.
• Press Partial Print to copy the pages scanned so far.
• Clear the data in the memory. To gain extra memory, you can turn
Memory Receive off.
For more detailed information, see the Online User's Guide: Turn
Off Memory Receive.
• Print the faxes stored in the memory.
For more detailed information, see the Online User's Guide: Print a
Fax Stored in the Machine's Memory.
Paper Low Tray #1
Paper Low Tray #2
Refill the paper in the paper tray indicated on the LCD.
Paper Size
Mismatch
1. Check that the paper size you selected on the machine's display
matches the size of the paper in the tray.
For more detailed information, see the Online User's Guide:
Change the Paper Size and Paper Type.
2. Make sure you loaded the paper in the correct orientation and set
the paper guides at the indicators for your paper size.
For more detailed information, see the Online User's Guide: Load
Paper.
3. After you have checked the paper size and the paper orientation,
follow the LCD instructions.
If printing from your computer, make sure the paper size you selected
in the printer driver matches the size of paper in the tray.
For more detailed information, see the Online User's Guide: Print
Settings (Windows
®
) or Print Options (Mac).
24

Error Message Action
Paper Tray #1 not
detected
Paper Tray #2 not
detected
Slowly push the paper tray completely into the machine.
Paper or a foreign object has prevented the paper tray from being
inserted correctly.
Pull the paper tray out of the machine, and remove the jammed paper
or foreign object. If you cannot find or remove the jammed paper, see
the Online User's Guide: Printer Jam or Paper Jam.
Repetitive No
Paper Fed
Clean the paper pick-up rollers.
For more detailed information, see the Online User's Guide: Clean the
Paper Pick-up Rollers.
Repetitive Paper
Jams
Remove any foreign objects and paper scraps in the machine.
For more detailed information, see the Online User's Guide: Remove
Paper Scraps.
Replace Ink
One or more of the ink cartridges have reached the end of their lives.
Replace the ink cartridges.
For more detailed information, see the Online User's Guide: Replace
the Ink Cartridges.
• You can still scan even if the ink is low or needs to be
replaced.
Touchscreen
Initialisation
Failed
The touchscreen was pressed before the power on initialisation was
completed.
Make sure nothing is touching or resting on the touchscreen,
especially when plugging the machine in.
Debris may be stuck between the lower part of the touchscreen and its
frame.
Insert a piece of stiff paper between the lower part of the touchscreen
and its frame and slide it back and forth to push out the debris.
Tray #1 Settings
Tray #2 Settings
MP Tray Settings
This message is displayed when the setting to confirm the paper type
and size is enabled.
To not display this confirmation message, change the setting to Off.
For more detailed information, see the Online User's Guide: Change
the Check Paper Size Setting.
B
Troubleshooting
25
Error Message Action
Unable to Clean
XX
Unable to
Initialize XX
Unable to Print
XX
A foreign object, such as a paper clip or a piece of ripped paper, is in
the machine.
Open the scanner cover and remove any foreign objects and paper
scraps from inside the machine. If the error message continues,
disconnect the machine from the power for several minutes, and then
reconnect it.
You can try additional paper jam clear operations.
For more detailed information, see the Online User's Guide: Remove
Paper Scraps.
If you cannot print received faxes, transfer them to another fax
machine or to your computer.
For more detailed information, see the Online User's Guide: Transfer
Your Faxes or Fax Journal Report.
Unable to Scan XX
Disconnect the machine from the power for several minutes, and then
reconnect it.
If you cannot print received faxes, transfer them to another fax
machine or to your computer.
For more detailed information, see the Online User's Guide: Transfer
Your Faxes or Fax Journal Report.
Unusable Device
Disconnect device
from front
connector & turn
machine off &
then on
A broken device is connected to the USB direct interface.
Unplug the device from the USB direct interface, then press to
turn the machine off and then on again.
Unusable Device
Please disconnect
USB device.
A USB device or USB flash drive that is not supported has been
connected to the USB direct interface.
Unplug the device from the USB direct interface. Turn the machine off
and then on again.
Wrong Ink
Cartridge
The ink cartridge model number is not compatible with your machine.
Verify whether the cartridge model number will work with your
machine.
See Related Information: Supply Specifications at the end of this
section.
Wrong Ink Colour
Check which ink cartridges are not matched by colour to their ink
cartridge positions and move them to their correct positions.
Wrong Tray
Settings
Follow the instructions on the touchscreen and try to print again.
Configure the paper size setting for the tray according to the LCD
instructions.
26

Supply Specifications
Ink The machine uses individual Black, Yellow, Cyan and Magenta ink
cartridges that are separate from the print head assembly.
Service Life of Ink
Cartridge
The first time you install a set of ink cartridges the machine will use
an amount of ink to fill the ink delivery tubes for high quality
printouts. This process will only happen once. After this process is
complete the cartridges provided with your machine will have a
lower yield than LC3337 cartridges (approximately 75% for Black
and 65% for colour
1
). With all following ink cartridges you can print
the specified number of pages.
Replacement Supplies <Black> LC3339XLBK
<Yellow> LC3339XLY
<Cyan> LC3339XLC
<Magenta> LC3339XLM
Black - Approximately 6000 pages
1
Yellow, Cyan and Magenta - Approximately 5000 pages
1
<Black> LC3337BK
<Yellow> LC3337Y
<Cyan> LC3337C
<Magenta> LC3337M
Black - Approximately 3000 pages
1
Yellow, Cyan and Magenta - Approximately 1500 pages
1
1
All replacement cartridges will provide approximate page yield stated in accordance with ISO/IEC 24711. For more
page yield information, see
www.brother.com/pageyield.
If using Windows
®
, double-click the Brother Creative Center icon on your desktop to
access our FREE website designed as a resource to help you easily create and print
customized materials for business and home use with photos, text and creative touch.
Mac users can access Brother CreativeCenter at this web address:
www.brother.com/creativecenter
C
Appendix
28

For Australia Only:
Support – For technical support of your Brother Product other than what you
can resolve through the User’s Guide, please visit our website or Solutions
website (see below) to find an answer to FAQs/Troubleshooting, locating
Drivers & Software.
Alternatively, please contact the Product Support Centre for any customer
care/technical support enquiry.
To contact Brother International (Aust) Pty Ltd for support on a Brother
product please see the details listed below:
Product Support Centre:
Australia
Brother International
(Aust) Pty Ltd
Phone:
Solutions Site:
Website:
Email:
02 8875 6000
support.brother.com
http://www.brother.com.au
To submit an e-mail enquiry, visit
http://www.brother.com.au go to Service and
Support area and follow the prompts.
Our Technical Support Consultants are available 5 days a week by phone
during the hours of 8.30am to 5.00pm (AEST/AEDT) Monday to Friday.
For New Zealand Only:
For technical support for your Brother Product please refer to this user guide
and the FAQ’s available on our Brother Solutions website,
support.brother.com.
Drivers, software, user guides and technical references are all available on
our Brother Solutions website.
If you require further assistance please contact Brother International (NZ)
Limited on the following numbers
Technical Brother Support
Technical Support for those not using Genuine Consumables
Fax Assistance
0800 329 111
0900 552 152
0800 837 822
Our Technical Support Consultants are available 7 days a week by phone
during the hours of 8.30am to 5pm Monday to Friday and 9am to 5pm
Saturday and Sunday.
Email Assistance
Please visit http://www.brother.co.nz and submit a helpdesk enquiry from our
Service and Support page.
Web Assistance
Please visit http://www.brother.co.nz under Service and Support for
Frequently Asked Questions, Driver downloads, Warranty information and
Service Centres.