
Instructions for use
使用說明
BRITA Tap

2
Index
I. Congratulations Page 3
II. Ensuring you get the best from your system Page 4 – 16
III. Important notes Page 17
IV. BRITA, quality and satisfaction guaranteed Page 20
I. 恭喜您 頁碼 21
II. 確保獲得本系統最大效益 頁碼 22 – 34
III. 重要須知 頁碼 35
IV. BRITA 品質與滿意保證 頁碼 36
ENGLISH
繁體中文
Installation Video

ENGLISH 3
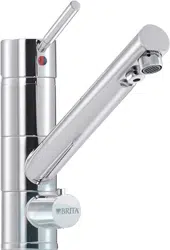
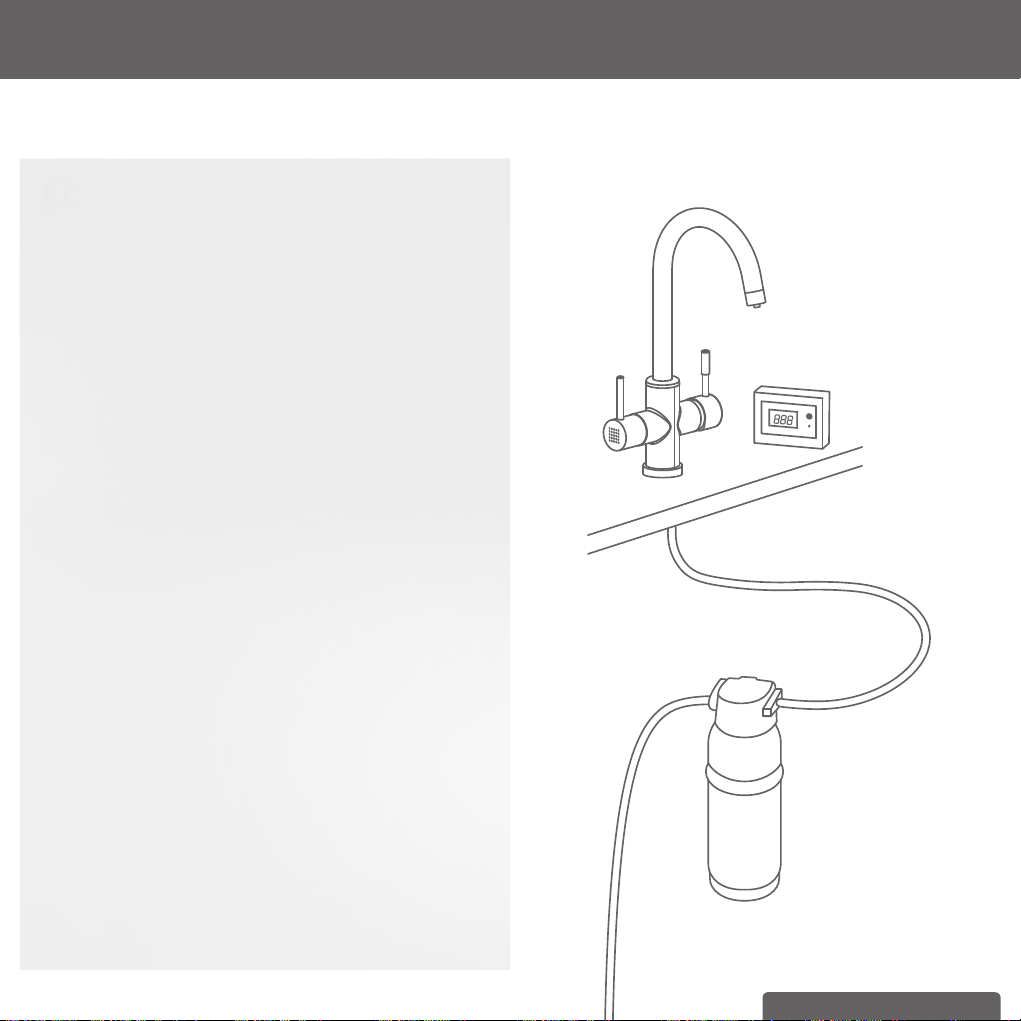
Your BRITA Tap, is the key to cleaner, clearer
great tasting fi ltered water
Next to hot and cold unfi ltered water,
your BRITA system offers many advantages
• You will have great tasting water at your fi ngertips
• It is economical, convenient and easy to use
• It is ideal for cooking healthy food
e.g. rice is fl uffy, naturally white and smells fantastic
your pasta will smell and taste fantastic when cooked with the
best natural ingredients and that includes fi ltered water
leaves your vegetables bursting with colour and fl avour
The BRITA Tap has two levers. One for BRITA fi ltered water and
the other for your regular unfi ltered hot/cold water.
The A 1000 fi lter 0.5 micron carbon block fi lter
cartridge signifi cantly reduces:
• Chlorine, unpleasant tastes and odours
• Small particles (such as rust, dust and sand)
• Organic impurities
Lifetime of the A 1000 fi lter cartridge
A 1000 fi lter cartridge life depends on local water quality.
For optimum performance and hygiene, it is recommended that
the fi lter cartridge be replaced at least six-monthly.
Your digital BRITA cartridge exchange indicator displays the
remaining number of days until the fi lter cartridge is to be replaced
and alerts you with an audible alarm after 180 days to change
the cartridge. You should check the digital display periodically. For
more information, see chapter 3.2.
I. Congratulations on your new BRITA Tap System
You are assured of BRITA quality and our commitment to our
customers.
BRITA Tap
A 1000
fi lter cartridge
BRITA cartridge
exchange indicator

4 ENGLISH
II. Ensuring you get the best from your system
1 Warranty
The BRITA Tap Systems (Models: WD 3010, WD 3020, WD 3030
and WD 3040) are warranted to be free from defects in material
and workmanship at the time of delivery. Any warranty claims will
be voided if defective installation is deemed to have contributed to
malfunction. Installation needs to take place in accordance with the
instructions and all relevant plumbing codes and standards.
The BRITA Tap Systems are designed to operate at a maximum
pressure not exceeding 0.86 MPa (860 kPa or 124 psi) and a maxi-
mum temperature of 30 °C. Ensure that pressure and temperature
do not exceed these limits.
Our goods come with guarantees that cannot be excluded under
the Australian and New Zealand Consumer Law. You are entitled to
a replacement or refund for a major failure and for compensation for
any other reasonably foreseeable loss or damage. You are also enti-
tled to have the goods repaired or replaced if the goods fail to be of
acceptable quality and the failure does not amount to a major failure.
In the event of a warranty claim, for Australia and New Zealand,
please contact BRITA Water Filter System Distributors Pty Ltd,
Level 9, 123 Epping Road North Ryde NSW 2113 Australia
email: solutions@ BRITA.com.au
Phone: Aus: 1300 557 762, NZ: 08004 BRITA
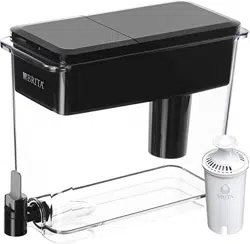
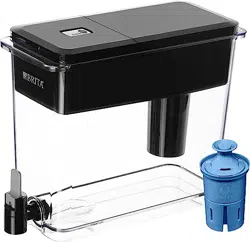
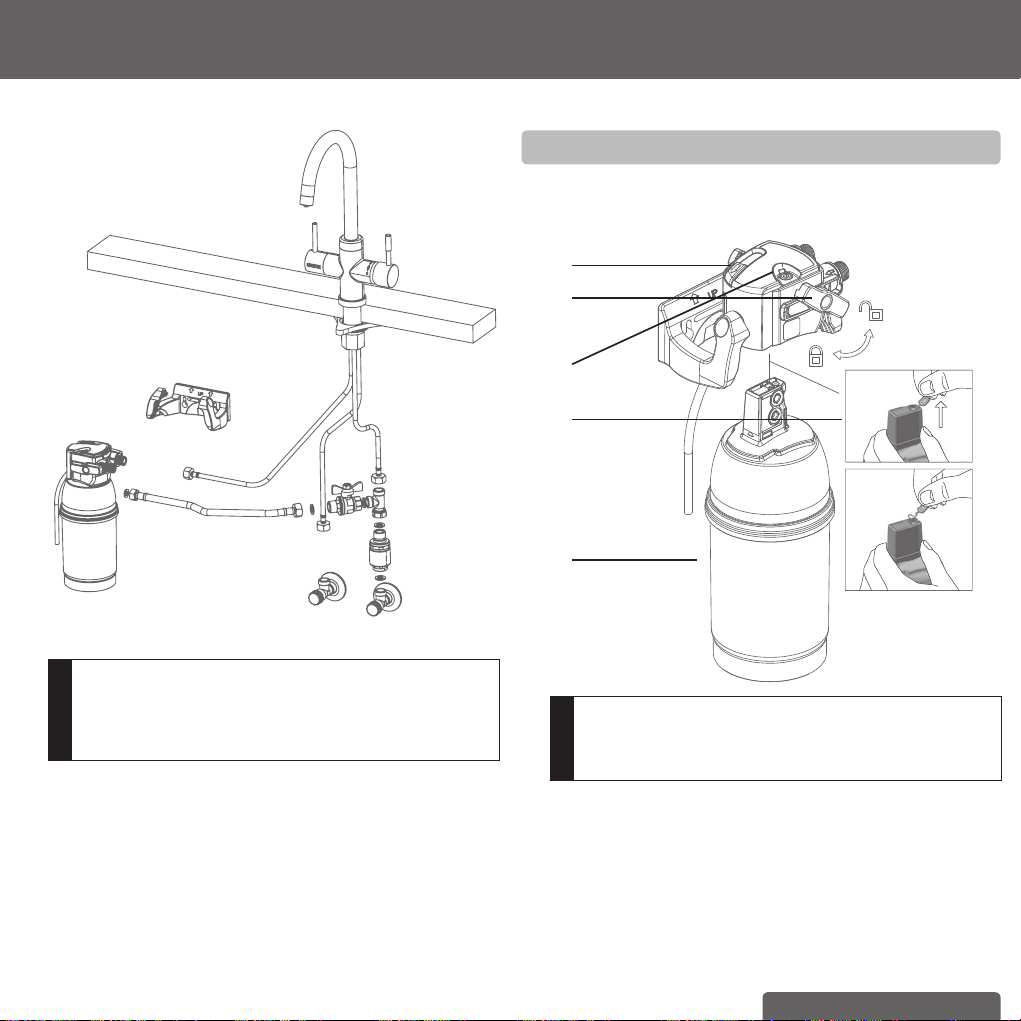
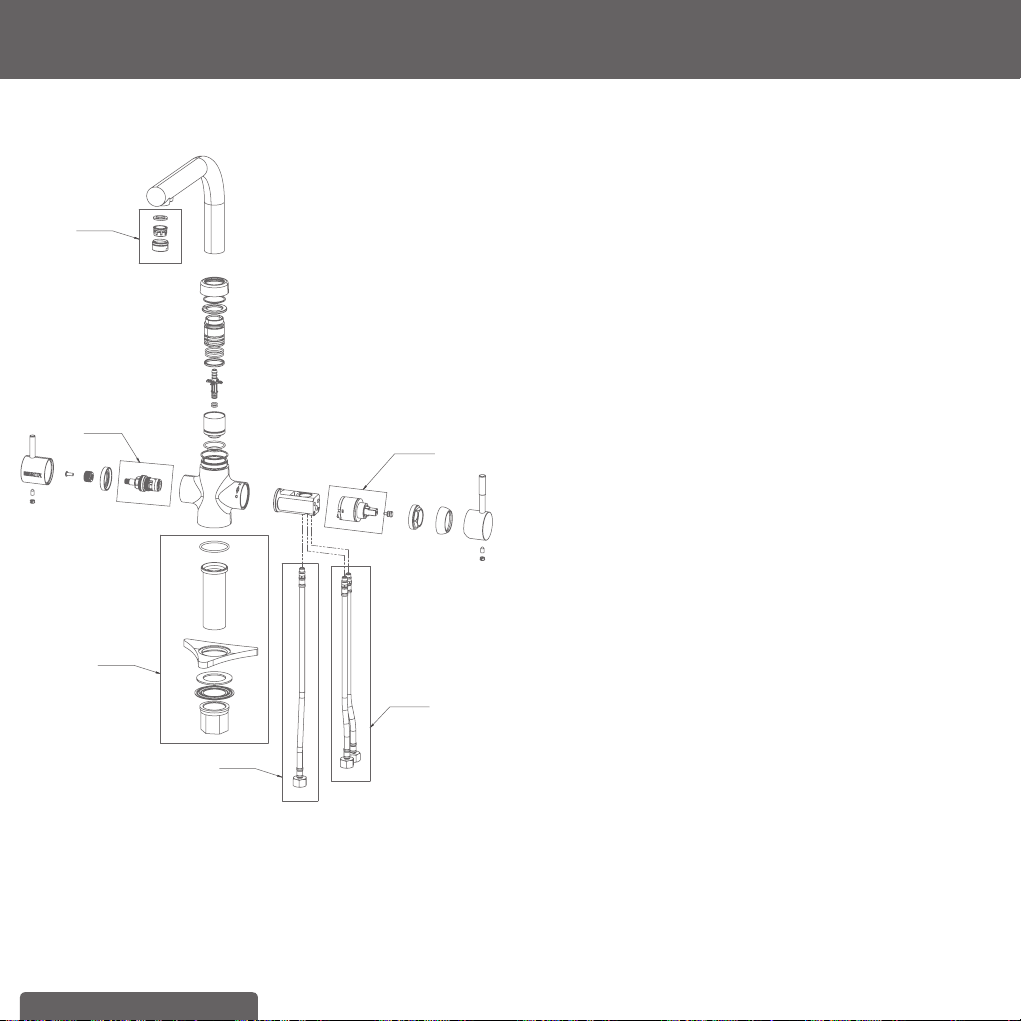
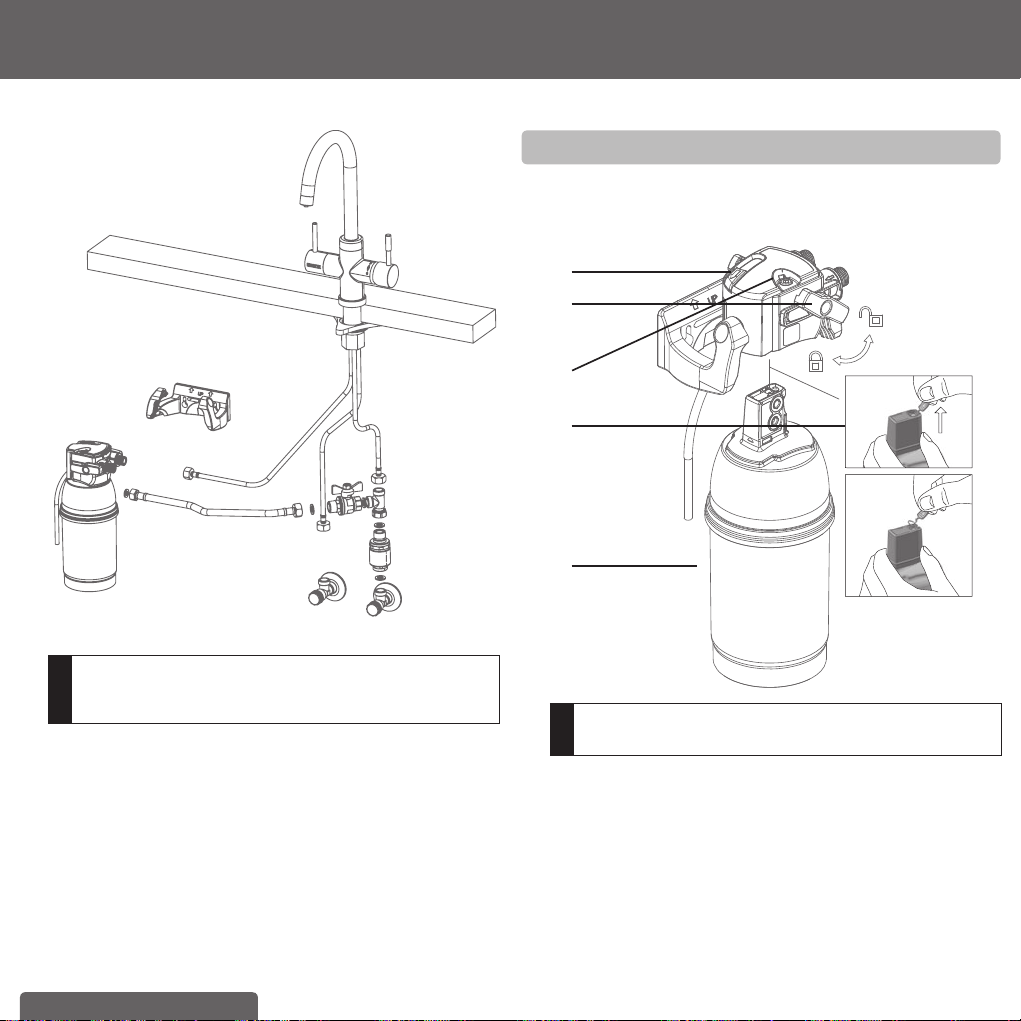
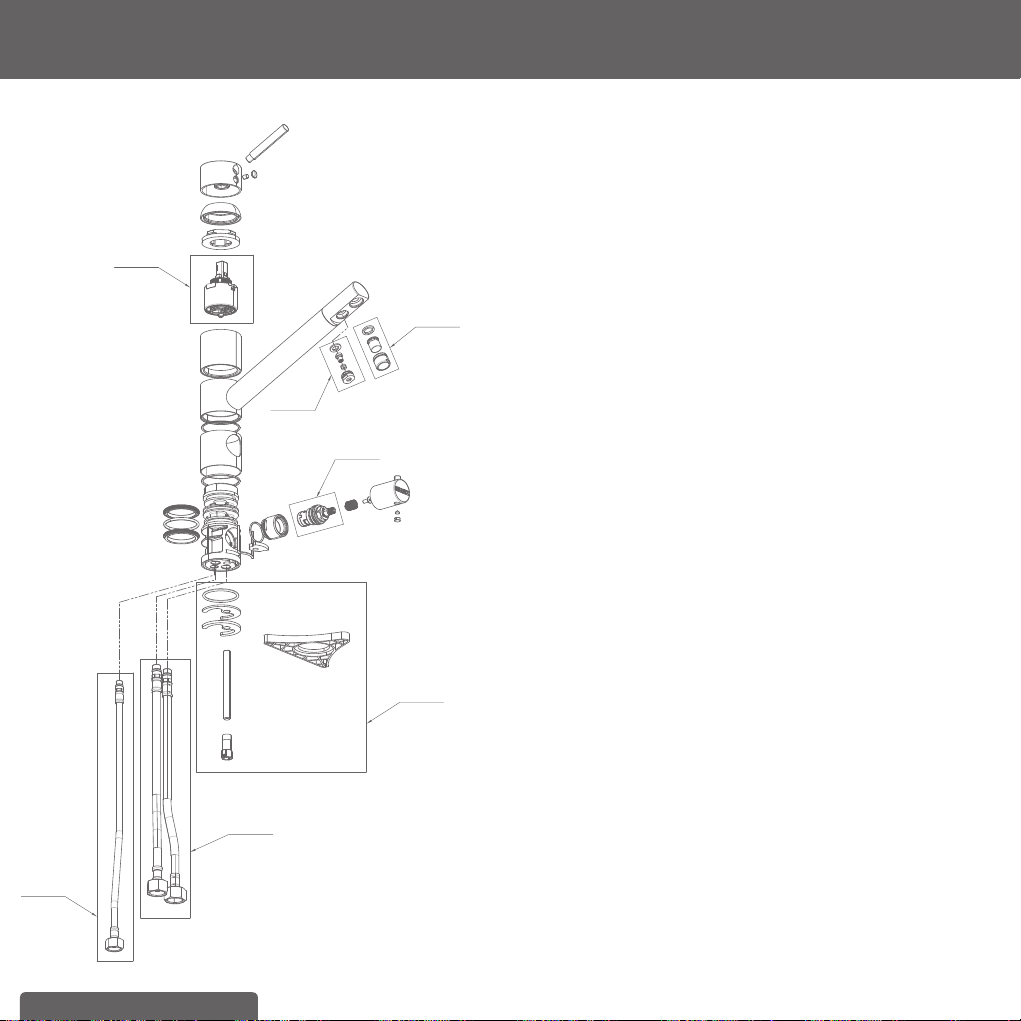
2 Contents of the BRITA Tap Starter Kit
To ensure you get the best result from your BRITA Tap System,
please follow these instructions carefully.
Your BRITA Tap Starter Kit includes the following
(see fi g. 1):
To ensure you get the best result from your BRITA Tap, please
follow these instructions carefully.
Your BRITA Tap Starter Kit includes the following (see fi g. 1):
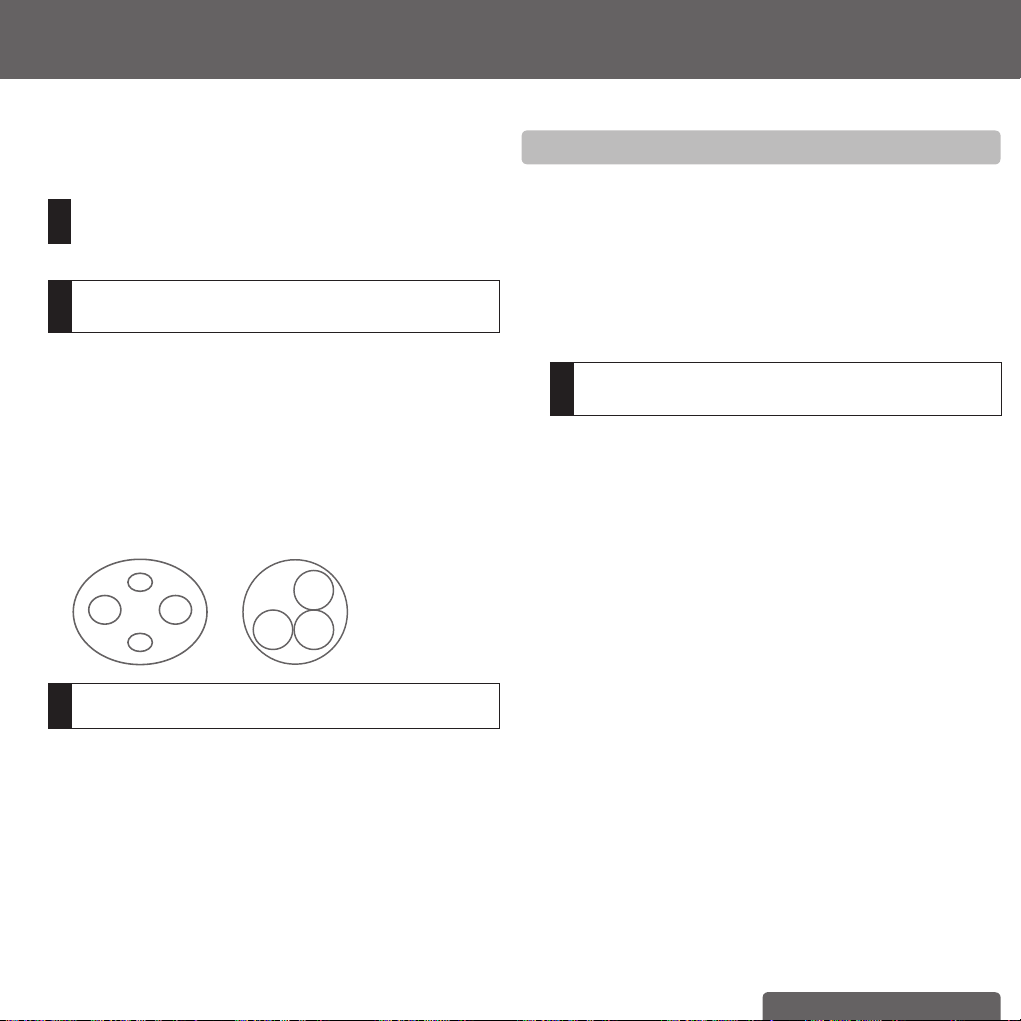
1. Filter head with three settings (“C”, “+”, and ”++”) including
a convenient locking handle
2. Flexible wall mount bracket for fi lter head
3. A 1000 water fi lter cartridge
4. BRITA Tap (design may differ from image shown)
5. Electronic BRITA cartridge exchange indicator with digital display
and audible alarm
6. Hose (1) length = 800 mm, 1/2" nut on one side and M8
connector on the other side, 2 Hoses (2+3), length = 450 mm,
1/2" nut on one side and M8 connectors on the other side
7. Hose (4), length = 800 mm and 1/2" female nut on one end and
3/8" female nut at other end – for connection between cold
1. 2.
3. 4.
5.
6.
7.
8.
10.
(fi g. 1)
9.
11.

ENGLISH 5
water connection point and the inlet side of the fi lter head
(1/2" & 3/8" washers included in washer pack)
8. Usage instructions
9. Isolating (shut-off) valve and Pressure Limiting Valve with
back-fl ow prevention and adapter
10. T-piece
11. Washers
Recommended tools for installation: one Allen hexagonal key (4 mm),
a pipe wrench, adjustable spanner for different sizes.
Recommended for installation of the wall mount bracket: two screws
(e.g. 5 mm in size) and two wall plugs (if necessary).
Please use appropriate screws and wall plugs for the type of wall in
the under-sink compartment.
3 Installation of the BRITA Tap System
!
Installation of the fi lter system must comply with the relevant
state or local plumbing regulations and standards (AS/NZS
3500). Depending on the necessary method of connection to
the cold water supply, additional valves/adaptors/components
may be required, and the services of a licensed plumber may
be necessary. If you do not have an available connection to the
cold water supply and it is necessary to cut into the cold water
supply line, a licensed plumber is required.
Before starting, please check that you have all the components as
listed above (see fi g. 1) as well as the recommended tools.
There are 7 steps to the installation.
!
Prior to installation, read the Technical Data (chapter 8) and
the Important Information (chapter 9). (After storage and
transport below 0°C, the product must be stored in the open
original packaging for at least 24 hours at the stated ambient
temperatures (chapter 8) for operation.) The system cannot
be installed with a low pressure boiler.
3.1 Step 1: Selecting appropriate setting on the
fi lter head
The fi lter head is set to the “++” setting by default. For use with
the supplied A 1000 fi lter cartridge you need to change the setting
in the window to “C”. Use an Allen key (hexagonal socket wrench)
and turn the hexagonal nut in the direction of the arrow in the
window until the “C” appears. Refer fi g. 2)
(fi g. 2)
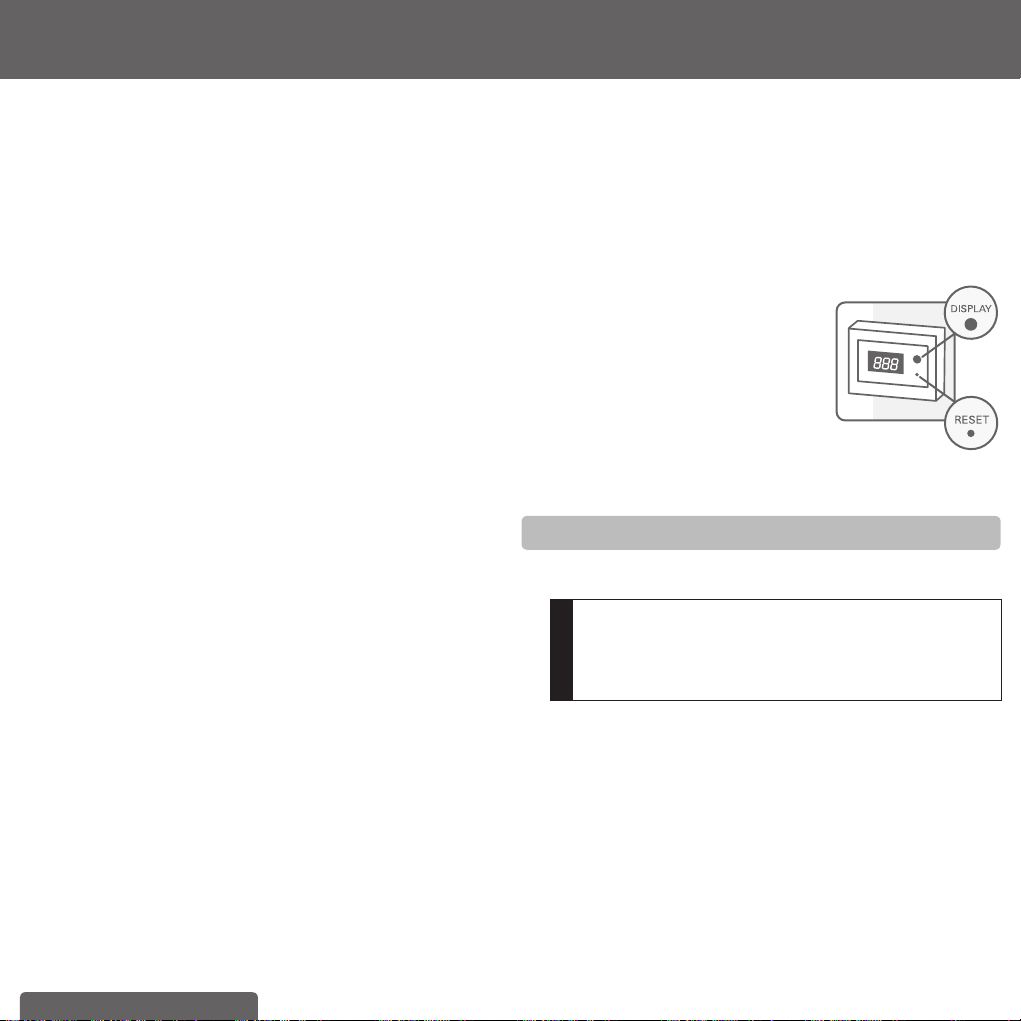
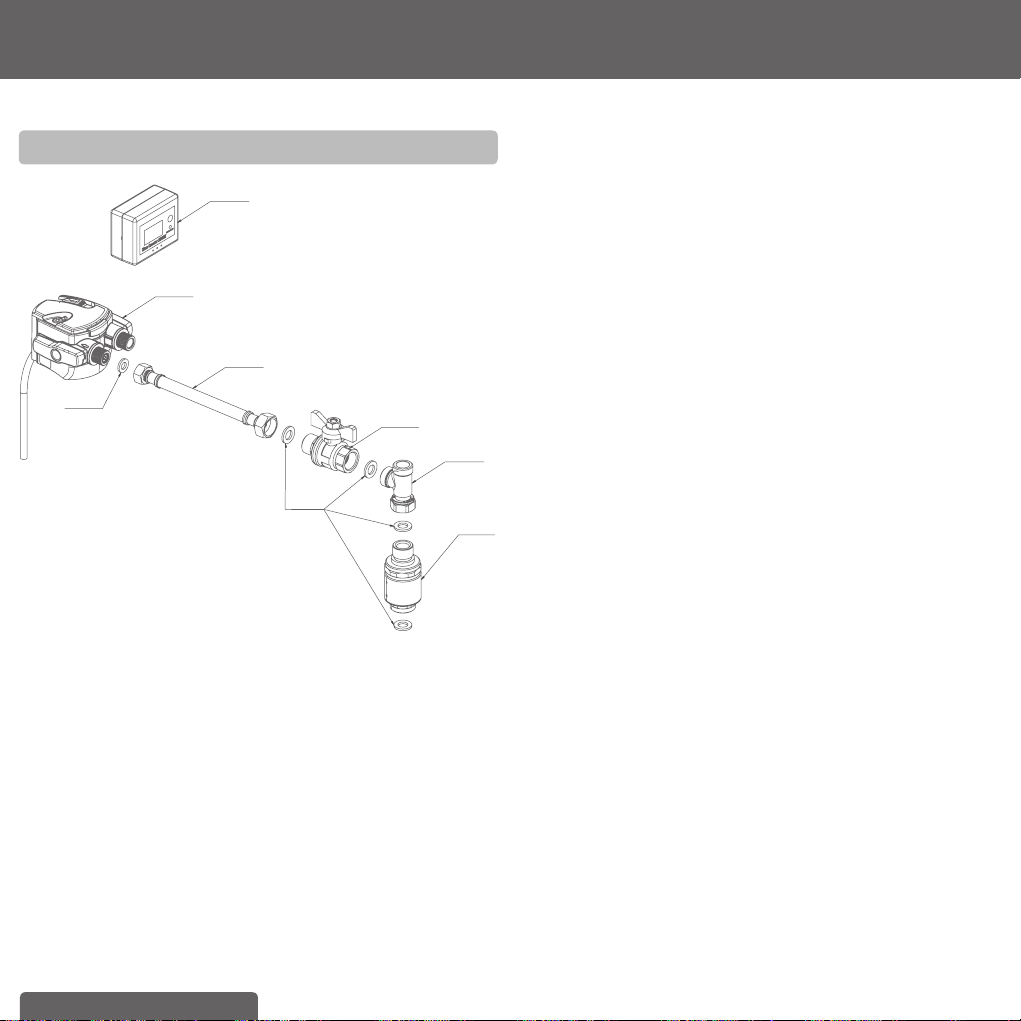
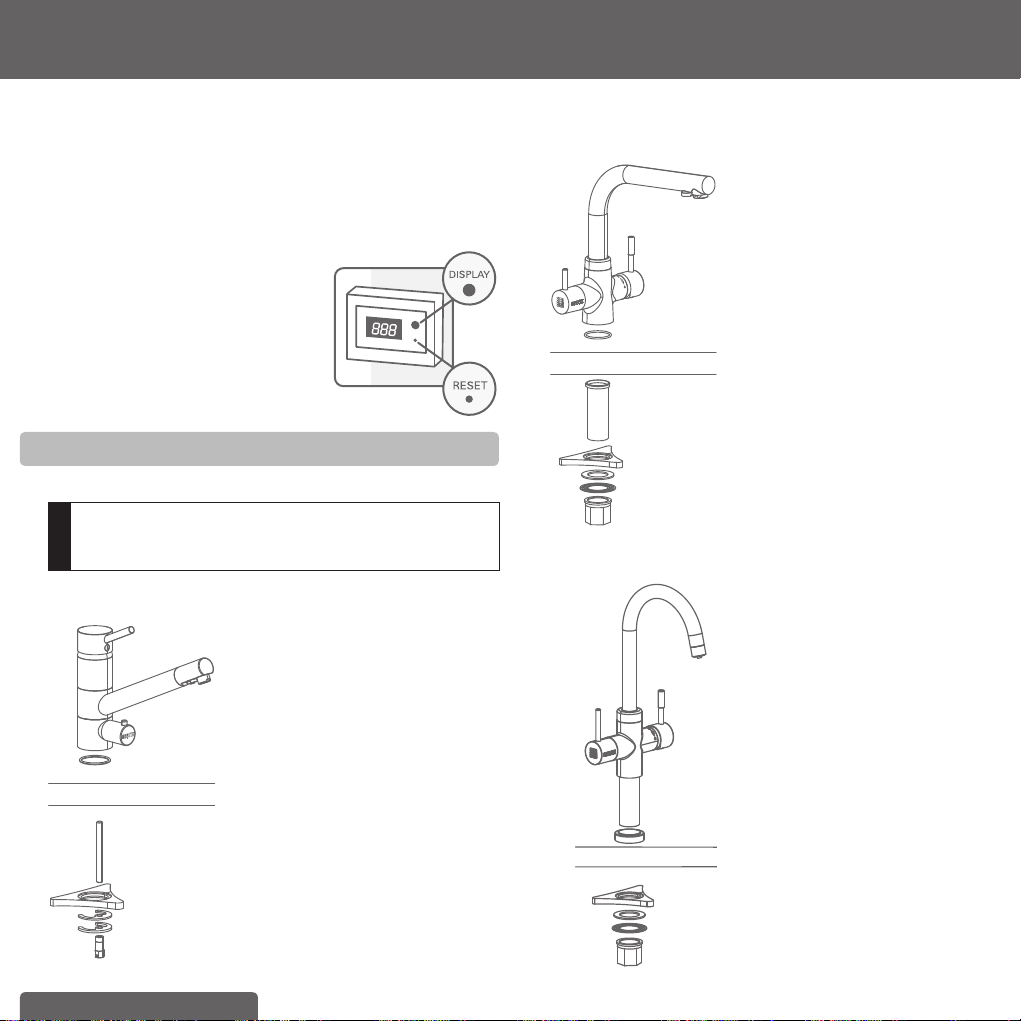
3.2 Step 2: Programming the electronic BRITA
cartridge exchange indicator
A Commissioning:
Please insert the enclosed batteries (2 x AA) into the appropriate
compartment of the electronic BRITA cartridge exchange indicator.
A long beep will sound after insertion of the batteries.
B Initial Programming:
Important: Please program the timer for 180 days.
Note: Please ensure that you activate the electronic BRITA car-
tridge exchange indicator with display during the day-time as the
alert to change the fi lter will start beeping at the exact time of day
you originally set the indicator.
Programming:
a Press the DISPLAY button briefl y to activate the display. Initially,
the default setting of 90 days fl ashes.
b Press and hold the DISPLAY button and then press the START/
RESET button briefl y. This activates the setting mode.
c Switch the display from 90 days to 180 days press the DISPLAY
button briefl y.
d Wait until the time value stops fl ashing or the DISPLAY switches
off.
e Now activate the 180-day timer by briefl y pressing DISPLAY and
then press the START/RESET button.
f A fl ashing spot in the bottom left of the display indicates that the
timer is active.
6 ENGLISH
C Reading the timer status
The display is activated by pressing the DISPLAY button briefl y
during operation. The remaining time until the exchange of the
cartridge is due is shown in days. If the time is exceeded, the time
is displayed with a minus sign.
D Audible signals
a Signal to replace the cartridge: A long signal sounds on the hour
every hour when there are less than 10 days before the end of
the programmed 180 day setting (15 double beeps). A shorter
reminder (5 double beeps) then sounds every 15 minutes until
the next signal.
b Reminder function: Press any button to deactivate the signal for
72 hours if you prefer to be reminded to replace the cartridge at
a later date.
c Battery change signal: When the batteries are depleted, a long
signal sounds (15 single beeps) followed by a short reminder
signal (5 single beeps) every 15 minutes until the next signal on
the hour.
d Switching the device off: This is only possible by removing the
batteries from the battery compartment.
E Activating the reset function when replacing the
cartridge
a Press the DISPLAY button briefl y to activate the display.
b Press and hold the START/RESET button for 5 seconds until a
long beep sounds.
c The last 180 days programmed appear in the display.
d The timer starts automatically.
F Changing the batteries
a After changing the batteries, a long beep sounds.
b After the beep, briefl y press the DISPLAY button to activate the
display.
c The remaining days since the last reset are now displayed.
(Caution: Only possible up to 16 hours after the batteries are
fully depleted. After this time, the device reverts back to the
factory setting and must be reprogrammed – see Point B).
G Installation
You can fi x the electronic BRITA cartridge exchange indicator to an
appropriate and dry place by using the supplied Velcro hook and
loop fastener. We recommend installing it under the sink in a posi-
tion of easy visibility. Avoid contact with water/splashes!
Technical data:
• Batteries: 2 AA (removable)
• Acoustic alarm: when batteries are low, or after 3 or 6 months
• To avoid loss of data, change the battery within 12 hours.
• After 16 hours without power, the appliance switches back to its
factory settings.
• The display automatically switches to stand-by mode after
10 seconds.
(fi g. 3)
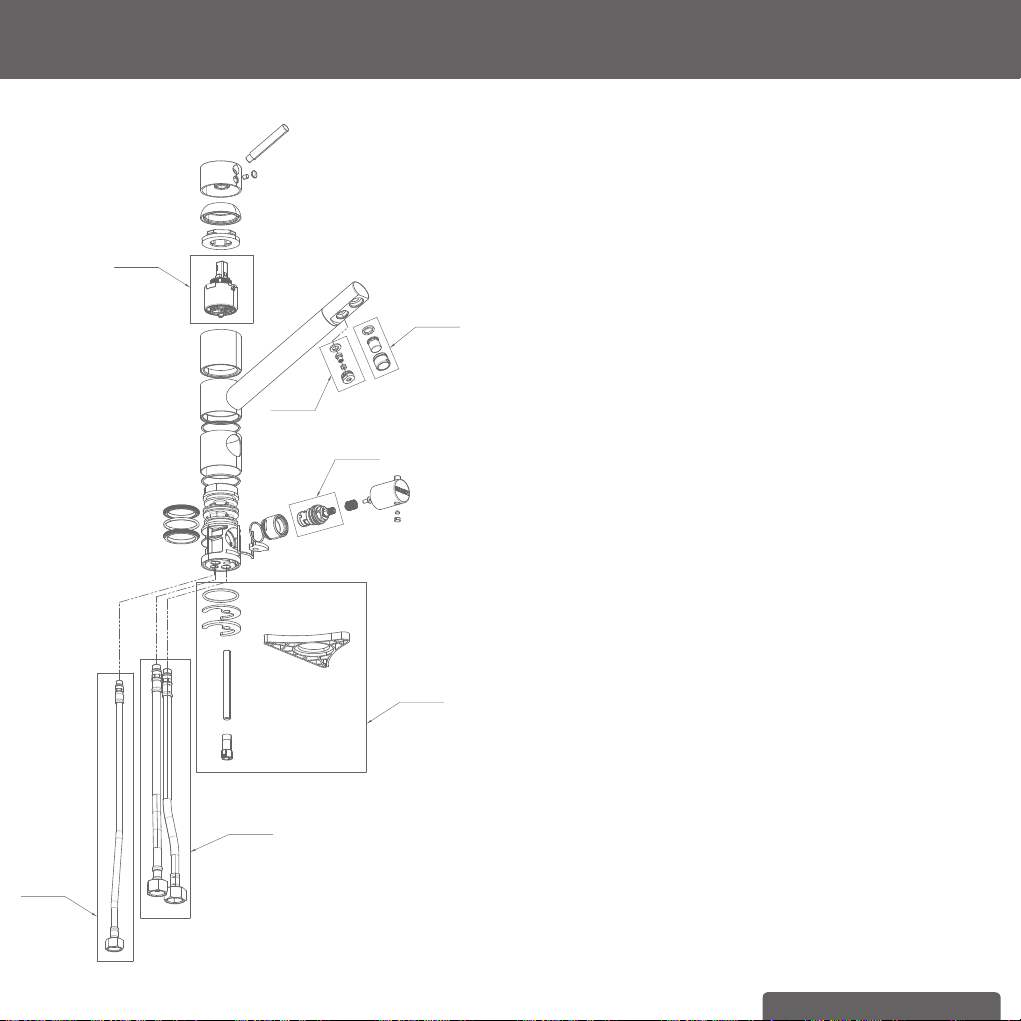
3.3 Step 3: Installing the BRITA Tap
To install the BRITA Tap, fi rstly ensure you have all the components
required.
!
Please, make sure that there is enough room and access
under the sink to allow for the installation of the fi lter head
and cartridge, and to connect the two supplied hoses.
Determine the position for the convenient placement of the
exchange indicator.
ENGLISH 7
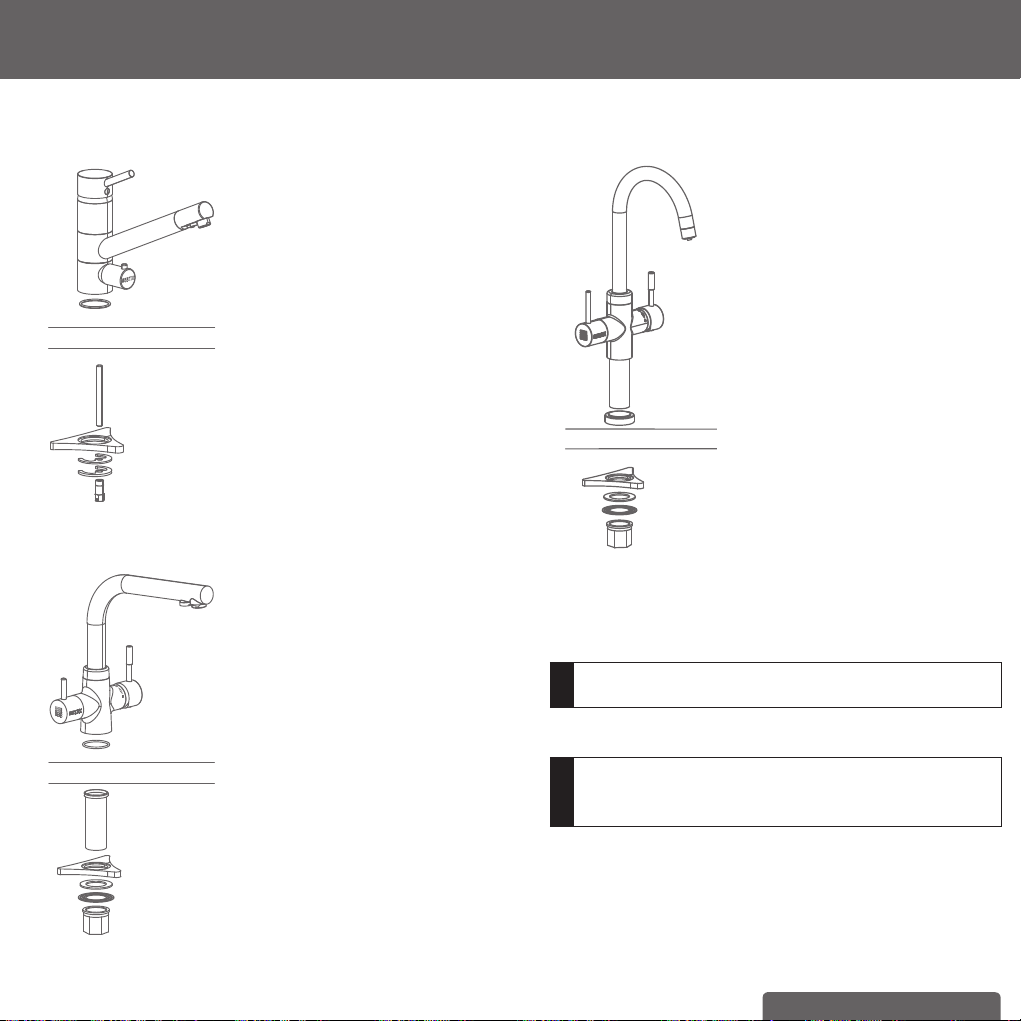
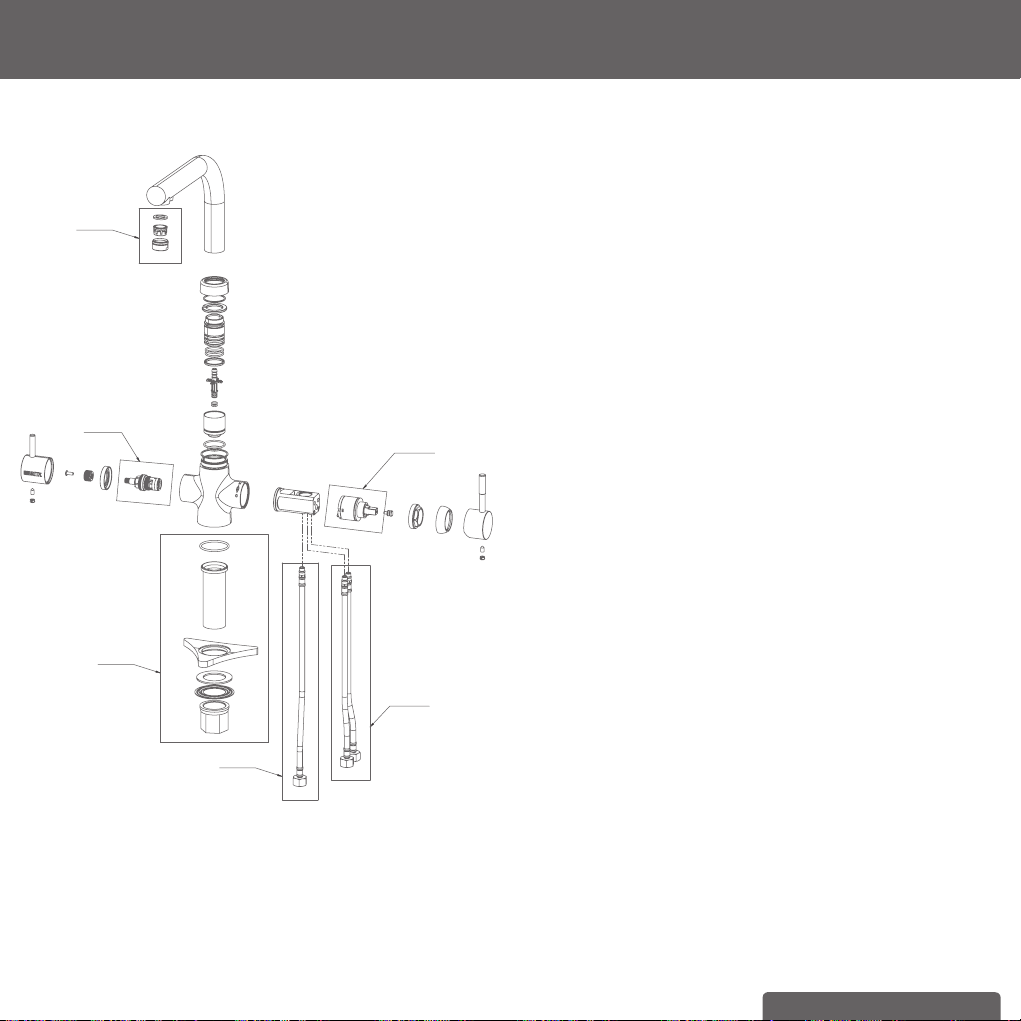
WD 3010
(fi g. 4)
1.
2.
3.
4.
5.
6.
1. BRITA Tap with 3 hoses
2. O-Ring
3. Threaded Bolt
4. Joint (Is only necessary for installa-
tion of the dispenser if you directly
mount it onto your sink. If you
mount it onto your countertop-plate,
you do not necessarily need this
part. It helps stabilizing the tap at
your sink)
5. Flat Gasket
6. Flange
7. Hex nut
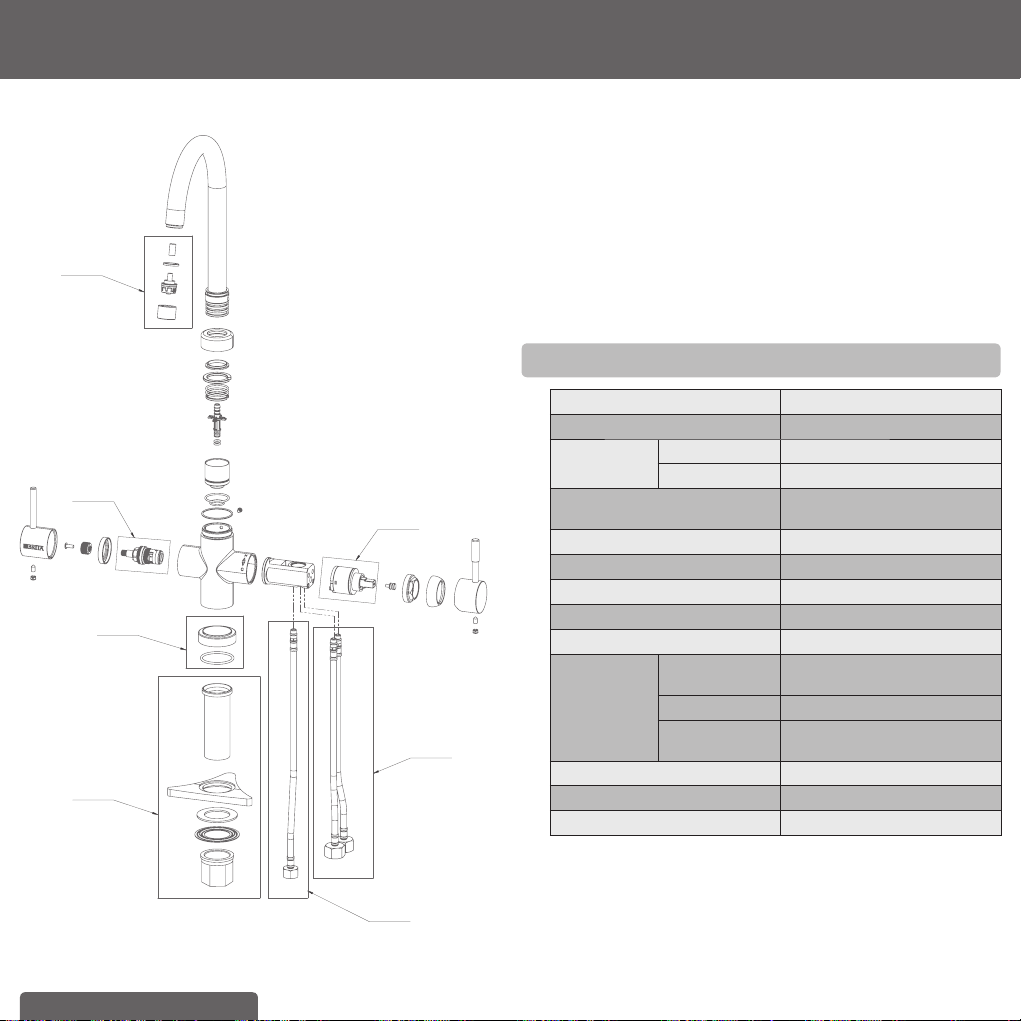
WD 3020
(fi g. 5)
1.
2.
3.
4.
5.
6.
1. BRITA Tap with 3 hoses
2. O-Ring
3. Shank
4. Joint (Is only necessary for installa-
tion of the dispenser if you directly
mount it onto your sink. If you
mount it onto your countertop-plate,
you do not necessarily need this
part. It helps stabilizing the tap at
your sink)
5. Flat Gasket
6. Flange
7. Hex nut
WD 3030/ WD 3040
(fi g. 6)
1.
2.
3.
4.
5.
6.
7.
1. BRITA Tap (design may differ) with
3 hoses
2. Shank
3. Base
4. Joint (Is only necessary for installa-
tion of the dispenser if you directly
mount it onto your sink. If you
mount it onto your countertop-plate,
you do not necessarily need this
part. It helps stabilizing the tap at
your sink)
5. Flat Gasket
6. Flange
7. Hex nut
First of all, dismount your existing kitchen tap.
A a) Turn off the cold and hot water supplies
b) Please make sure you release any pressure by opening all
levers.
!
No water should run through the existing kitchen tap.
c) Unscrew the existing hoses from the cold and hot water
supply.
!
We recommend placing a suitable container under the water
supply as there will be water left in the hoses which will run
down when you unscrew them.
d) Unscrew your kitchen tap – there is no standard mounting but
in general a pipe wrench will help you to dismount it.
e) Pull out both your kitchen tap and the hoses. You’re now
ready to install the BRITA Tap (see fi g. 4).
First of all, screw the shank (2) into the BRITA Tap (1).
Screw the hoses into the dispenser (see fi g. 7).
7.
7.
8 ENGLISH
Screw the M8 connector of the hose with the blue stripe into the
hole C.
Screw the M8 connector of the hose with the red stripe into the
hole H.
Screw the M8 connector of the 800 mm hose into the hole B.
C
B
H
(fi g. 7)
WD 3010
WD 3020/ WD 3030/ WD 3040
C
BH
!
Ensure the connections are screwed tight, but avoid over-
tightening.
Then place the base (3) over the hole and fi x the BRITA Tap (1) in
position using the supplied counter plate (4), the washer (5), the
locking ring (6) and the hexagon nut (7).
3.4 Step 4: Attaching the hoses
!
The supplied hose for connection to the cold water supply
requires the availability of an already installed ½" isolation
or angle valve). Before installation, please ensure you have
such a free ½" isolation or angle valve and that it is work-
ing properly (closeable to 100 %). If not, please contact
a licensed plumber. In accordance with regulations, the
stopcock) which is included in your kit must be installed at
the point of connection to the water supply before the fi lter
system intake hose. Behind the stopcock or isolation valve
a pressure limited valve must always be installed to ensure
the right function of the cartridge. Plumbing tape should
be used on all threads in this sub-assembly and tested to
ensure there are no leaks.
We recommend that you fi rst arrange all parts you need in front of
you.
Recommended tools for installation: one Allen key and an adjust-
able spanner.
Recommended for installation of the wall mount bracket: two
screws (e.g. 5 mm in size suited to the mounting surface) and two
wall plugs (if necessary).
Please follow the diagram below (see fi g. 7) and perform the steps
in the right order.
A Connect supplied T-piece on your cold water supply
a) Insert one 1/2" washer into the female nut of the supplied
T-piece.
b) Connect this end of the t-piece to your cold water supply.
!
If you do have an additional free 1/2" cold water supply for
the BRITA Tap in your kitchen, you do not need to install the
supplied T-piece.
B Connect the hose with the blue stripe to one side of the T-piece
or free ½” cold water supply using washer supplied.
C Take the hose with two 1/2" connectors. Insert the 1/2" washers
into the respective female threads of the two hose ends. Con-
nect one end with the free side of the T-Piece.
D Now connect the other end to the fi lter head inlet. This is labelled
“IN” and marked with an arrow. Make sure that the washers are
seated correctly!
E Connect the 800 mm hose to the “OUT” (connection point on
fi lter head) which labelled with an out arrow.
F Connect the hose with the red stripe with your hot water supply
G Make sure all connections are tightened properly. Avoid over
tightening.
ENGLISH 9
(fi g. 8)
Hot water
supply
Cold water
supply
!
The max. tightening torque for the 1/2" connections may
not exceed 14 Nm! Only hose connections with wash-
ers may be used – hoses with conical screw connections
damage the connections of the fi lter head and invalidate
any warranty claims.
3.5 Step 5: Inserting the fi lter cartridge (see fi g. 9)
A Remove the protective strap (1).
B Insert the fi lter cartridge (4) vertically into the fi lter head (2).
C Turn the locking handle (3) until you it clicks.
(fi g. 9)
A.
B.
3.
2.
1.
4.
5.
!
The fi lter cartridge can only be inserted when the locking
handle (3) is open.
Make sure that the fi lter cartridge is positioned correctly and
all o-rings are correctly positioned.

10 ENGLISH
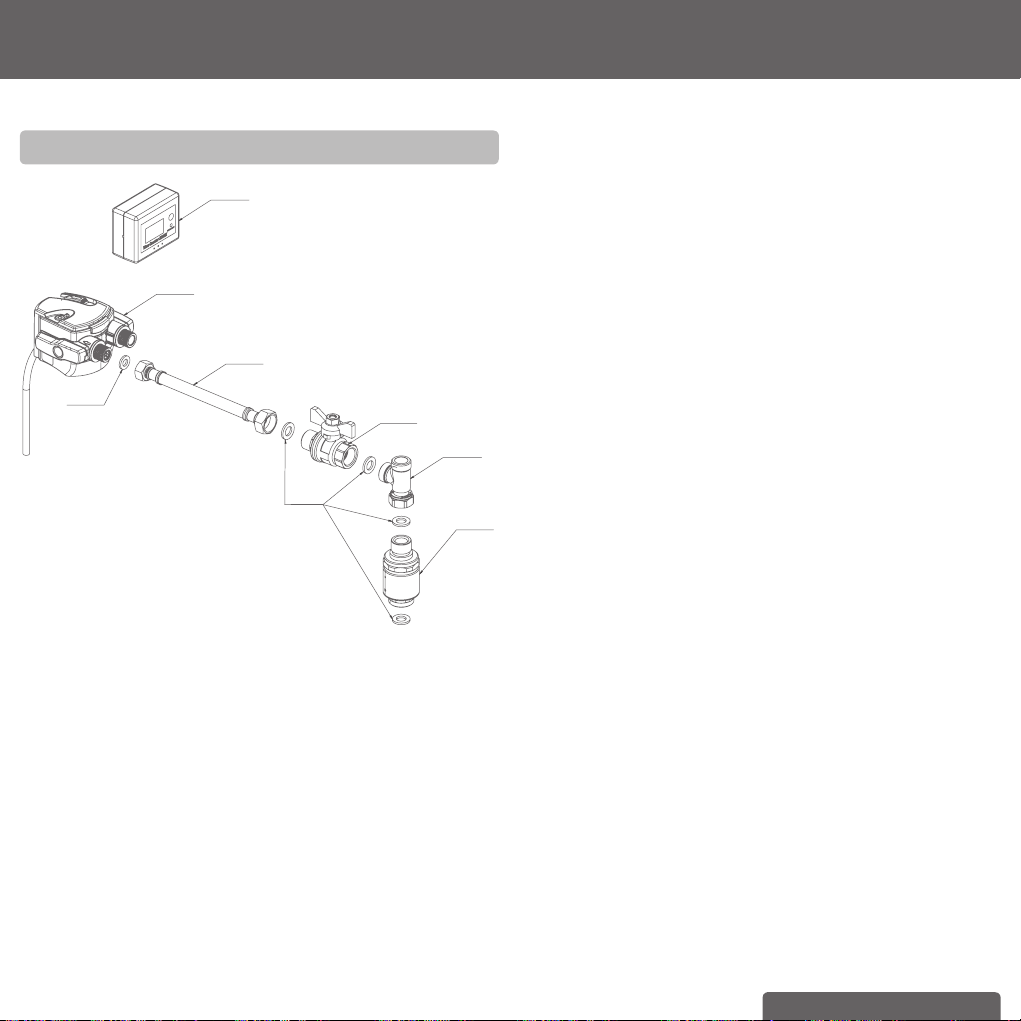
3.6 Step 6: Install fi lter-head wall-mount bracket
(see fi g. 10)
!
During assembly, note the installation dimensions, bending
radii of the hoses and dimensions of the accessories. The
system can be operated with the fi lter cartridge in either
vertical or horizontal positions. Using the mounting bracket,
it should be installed only vertically, with the “UP” arrow on
the bracket correctly positioned.
A Attach the space-saving wall mount bracket (1) in place using two
matching screws and use two wall plugs (not supplied), depend-
ing on the type of wall. Position it in an accessible place to allow
for 90° pivoting of the head for easy exchange of the fi lter.
B Engage the fi lter head (2) in the wall mount (1) using the notches
(4) on the sides of the fi lter head to connect to the arms of the
bracket.
1.
2.
3.
4.
(fi g. 10)
3.7 Step 7: Commissioning
Before use, make sure that you have followed all the steps
correctly and all the parts are fi tted. Place a suitable container
under the cartridge to catch any leakages.
A Turn on the cold and hot water supplies and check the system
carefully for any leaks.
B Open the BRITA Tap and allow water to run until the fi ltered
water runs clear and without any bubbles (at least 1 litre).
4 Replacing the fi lter cartridge
To ensure optimum performance and for hygienic reasons, the
fi lter cartridge is be replaced six months after fi rst use, irrespective
of usage. Monitor the display on the cartridge indicator at regular
intervals and be alert for the audible alarm signal that will sound at
the end of the set 180 days.
!
Read the Operating and Safety Information (chapter 9) prior
to exchange of fi lter.
NOTE
The fi lter cartridge can be pivoted by 90° in the wall mount
bracket for easy removal. When the locking handle is open,
the water supply to the cartridge is interrupted, without the
need to turn off the isolating valve.
Replacing the A 1000 fi lter cartridge (see fi g. 9):
A Open the locking handle (3).
B To release the pressure in the system, fi rst place a suitable
container under the fl ush hose to catch any water, then press the
fl ush button (5).
C Remove the exhausted fi lter cartridge (4) from the fi lter head (2).
D Insert the new fi lter cartridge (see chapter 3.5 Step 5).
E Close the locking handle (3). Open the BRITA Tap and allow
water to run until the fi ltered water runs clear and without any
bubbles (at least 1 litre).
ENGLISH 11
5 Resetting the electronic cartridge
exchange indicator
A Press the DISPLAY button briefl y to activate the display.
B Press and hold the START/RESET button for 5 seconds until a
long beep sounds.
C The previously set “180” days appears in the display.
D The timer starts automatically.
6 Maintenance
Regularly check the fi lter system for leaks. Regularly check the
hoses for kinks. Kinked hoses must be replaced.
The expected in- service life of the complete fi lter system is fi ve
years.
!
Prior to exchanging the fi lter system, read the Technical Data
(chapter 7) and the Operating and Safety Information
(chapter 9).
Regularly clean the outside of the fi lter system with a soft, damp
cloth.
!
Do not use any abrasive chemicals, cleaning solutions or
astringent cleaning agents.
7 Troubleshooting
A No water fl ow
Cause: Water intake closed.
Troubleshooting: Open the water intake at the upstream shut-off
valve or by closing the locking handle (3) on the
fi lter head (2).
B No or low water fl ow in spite of open water intake
Cause: Mains pressure too low.
Troubleshooting: Check mains pressure. If the fault continues,
check the fi lter system and fi lter cartridge and
replace if necessary.
Cause: Filter head not mounted in direction of water
fl ow.
Troubleshooting: Dismantle fi lter head and install in direction of
water fl ow (chapter 3.4).
C Leak
Cause: Screwed connections not fi tted correctly.
Troubleshooting: Check mains pressure. Check all screwed
connections in accordance with chapter 3.4.
D Incorrect display or incorrect settings on the electronic
cartridge exchange indicator with display
Cause: Buttons pressed in wrong order or wrong
buttons pressed.
Troubleshooting: Press and hold the RESET button for 8 seconds.
For models WD 3030 and WD 3040 only
These models have an aerator with two integrated outlets. The
Inner one is for BRITA fi ltered water, the outer area for hot and cold
water. As with every tap aerator, there can be lime scale build up
in the outer area. Therefore it is recommended to clean the aerator
on a regular basis. For cleaning: Unscrew the cap on the end of the
dispenser’s neck. The aerator is connected to a silicon hose. Detach
it carefully and clean the aerator (e.g. with vinegar). After cleaning
connect the long, thin part on the back of the aerator carefully with
the silicon hose. Place the cap over the aerator and screw it tight.
Make sure that the washer in the cap is seated correctly. When
installed correctly there should not be any leaks whilst running hot,
cold or BRITA fi ltered water.
If you want to replace the aerator with a new one, you can order
it from BRITA. You can fi nd the contact details for your BRITA
customer service team next to your country code on the back of this
booklet.
(fi g. 11)
12 ENGLISH
Spare Part Name
1004674
1012909
1004710
1008502
1004713
1004715
1014490
101449
2
(fi g. 12)
Article No. Spare Part Name
1004715 Gasket On Line 3/8" 2 mm CE + AU
1004713 Gasket On Line 1/2" 2 mm CE + AU
1004710 Hose On Line 1/2" IT - 3/8" IT AU
1012909 Filter Head G3/8" BRITA Tap spare part
1004674 BRITA cartridge exchange indicator
1014490 Isolation Valve Spare Part AU
1014492 Pressure Limting Valve Spare Part AU
1008502 T-piece 1/2"
ENGLISH 13
(fi g. 13)
1012560
1012564
1012565
1012561
1012568
1012567
1012562
WD 3010
Article No. Spare Part Name
1012560 Spare Part Mixer Cartridge 40 mm ASM
1012561 Spare Part Open-Close-Valve ASM
1012562 Spare part Hose DN6 800 mm HF M8x1 -
G3-8HN ASM
1012564 Aerator tap Set WD 3010 AU
1012565 Aerator fi ltrat Set WD 3010
1012567 Hose Set Hot and Cold WD 3010 AU
1012568 Montage Set WD 3010
14 ENGLISH
Article No. Spare Part Name
1012555 Aerator Set WD 3020 AU
1012556 Spare Part Mixer Cartridge
1012561 Spare Part Open-Close-Valve ASM
1012562 Spare part Hose DN6 800 mm HF M8x1 -
G3-8HN ASM
1012558 Hose Set WD 3020 AU
1013529 Montage Set WD 3050
(fi g. 14)
1012555
1013529
1012562
1012557
1012556
1012561
WD 3020
ENGLISH 15
1012558
1012562
1013529
1012552
1012556
1012561
1012553
(fi g. 15)
WD 3030/
WD 3040
Article No. Spare Part Name
1012556 Spare Part Mixer Cartridge
1012553 Aerator Set WD 3030 AU
1012561 Spare Part Open-Close-Valve ASM
1012562 Spare part Hose DN6 800 mm HF M8x1 -
G3-8HN ASM
1012558 Hose Set WD 3020 AU
1012552 Base Ring Set WD 3030/3040
1013529 Montage Set WD 3050
16 ENGLISH
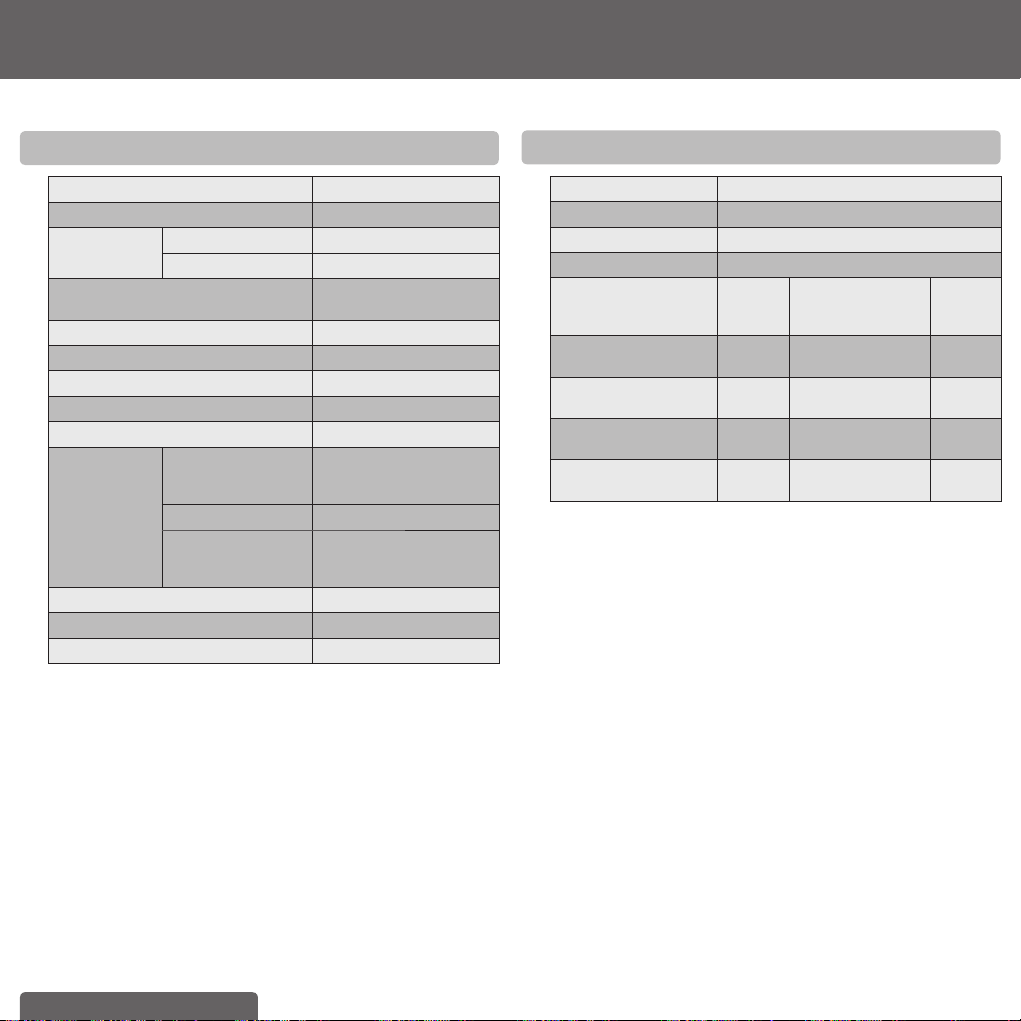
8 Technical data of the A 1000 cartridge
Operating pressure 0.1 MPa to max. 0.86 MPa
Water intake temperature 4°C to 30°C
Ambient tem-
perature during
operation 4°C to 40°C
storage/transport –20°C to 50°C
Working fl ow range and associated
pressure loss
30–180 L/h /
0.02–0.14 MPa
Bed Volume 0.23 L
Weight (dry/wet) 0.4 kg/0.9 kg
Chlorine reduction NSF 42 Class I (50 %)
Particle retention NSF 42 Class I (0.5 µm)
Chlorine reduction DIN EN 14898 Class 1 (>90 %)
Dimensions
(Width/Depth/
Height)
Filter system (fi lter
head with fi lter car-
tridge)
106 mm/92 mm/232 mm
Filter cartridge 86 mm/86 mm/224 mm
Installed dimensions
(vertical installation
with wall mounting)
137 mm/122 mm/232 mm
Operating position Horizontal and vertical
Water inlet connection G3/8"
Water outlet connection G3/8"
8.1 Technical data of the BRITA Tap
Operating pressure 0.05 MPa to max. 1 MPa
cold water connection 4°C to 40°C
warm water connection max. 70°C
Water Rating 6 stars (4.5 L/min)
Weight
Dimensions
(Width/Depth/
Height)
Aerator
WD 3010 1.16 kg
5 cm / 25.5 cm /
19.1 cm
M18x1
WD 3020 1.52 kg
17.3 cm / 28.4 cm /
29.4 cm
M24x1
WD 3030 1.45 kg
17.2 cm / 20.5 cm /
36.3 cm
M22x1
WD 3040 1.57 kg
17.2 cm / 23.7 cm /
34.8 cm
M22x1

ENGLISH 17
Important Notice: Read this data sheet and compare the capabilities to your actual water treatment needs before purchasing.
PERFORMANCE DATA SHEET FOR FILTER CARTRIDGE A 1000
Manufacturer Seller
BRITA GmbH BRITA Water Filter Systems
Heinrich-Hertz-Str. 4 Distributors Pty Ltd
65232 Taunusstein Level 9, 123 Epping Road
Germany North Ryde, NSW, 2113
+49-(0) 6128-746-0 Australia
Tel +61 2 9486 4200
Fax +61 2 9486 4222
www.brita.com.au
PRODUCTS
Water Filter Systems
A 1000 Filterhead 0 % G 3/8"
USE GUIDELINES
• Minimum operating pressure: 0.1 MPa
• Maximum operating pressure: 0.86 MPa
• Do not allow exposure to temperatures below 4 °C.
• Maximum operating temperature: 30 °C
• Nominal fl ow rates:
A 1000 (60l/h)
• This system must be installed according to local plumbing codes
on the cold water line.
Replacement Cartridges
Refi ll A 1000
• This system requires regular replacement of the fi lter cartridge to
maintain proper operation. Varying scale, chlorine, sediment, or
organic substance levels may affect replacement frequency.
• Be sure to change the fi lter cartridge at least as indicated in the
capacity table (refer to your Instruction Guide) or six monthly
which ever occurs fi rst, or whenever you detect a change in
taste, odour, or a decrease in fl ow.
• Please ensure that a backfl ow prevention device, meeting the
requirements of AS/NZS 3500.1, is installed on the water supply
inlet to the fi lter unit.
• Caution: Do not use with water that is microbiologically
unsafe or of unknown quality without adequate disinfection
before or after the system. System is to be supplied only
with cold water.
III. Important notes

18 ENGLISH
SUBSTANCE REDUCTION
The above listed Water Filter Cartridge has been tested and
certifi ed under NSF/ANSI 42 for reduction of chlorine, taste and
odour. The performance of this product has been verifi ed and
substantiated as the test data summarised below indicates. These
substances may not be in your water.
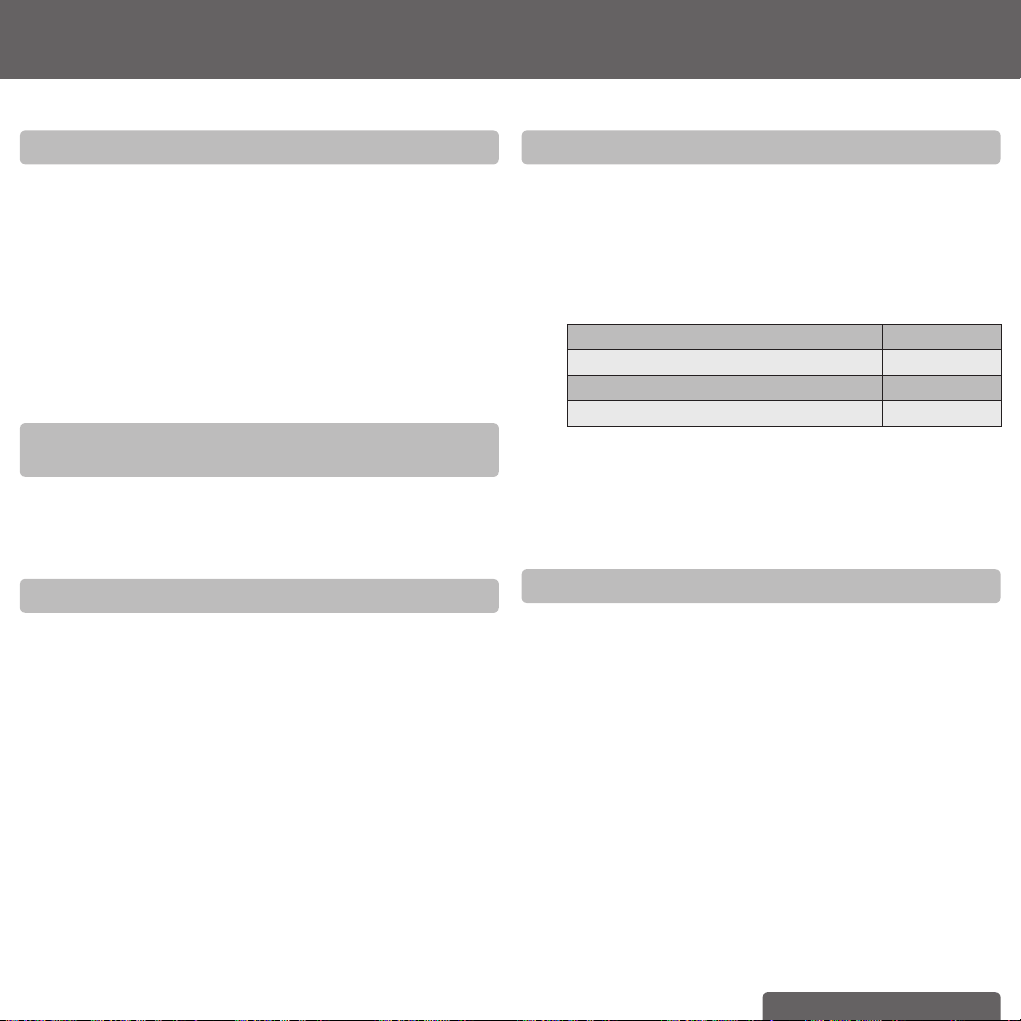
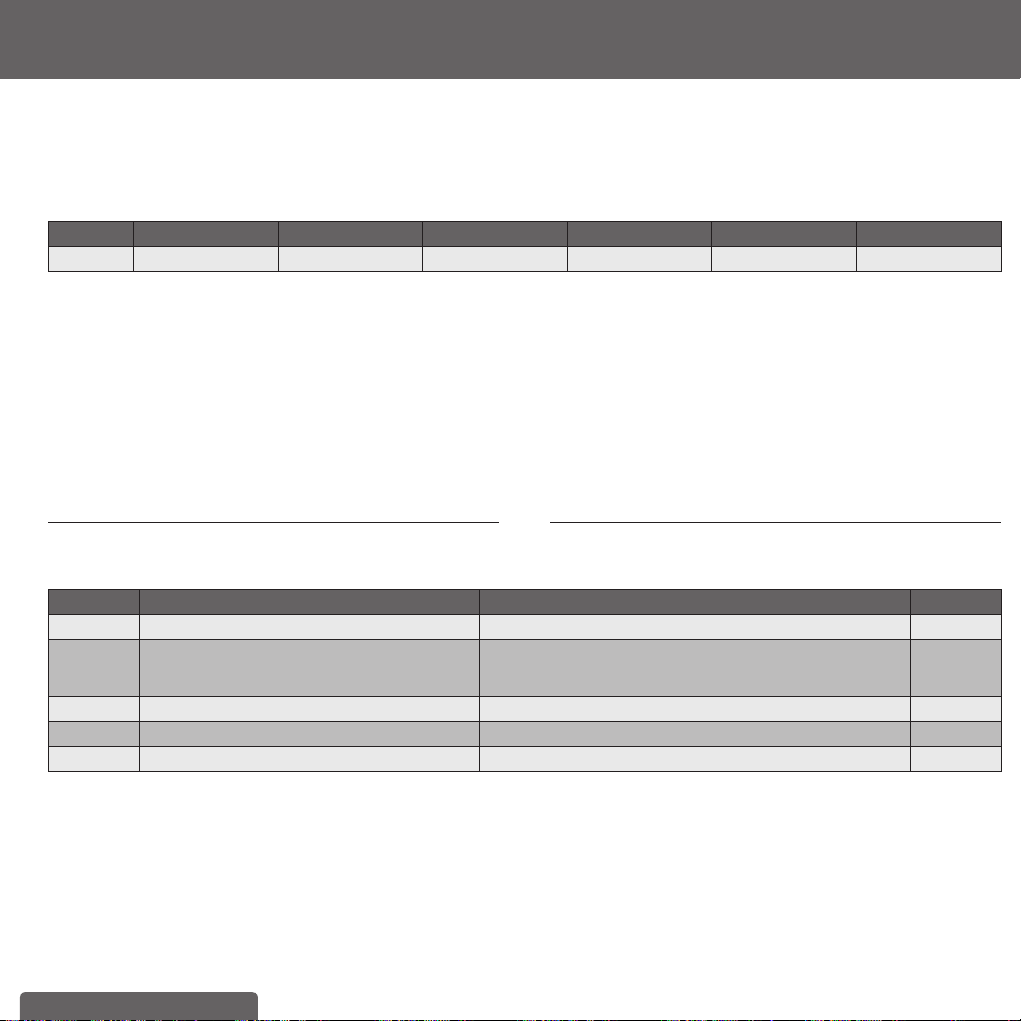
Test Data
Substance Guidelines
Average Infl uent
Concentration
Maximum Effl uent
Concentration
Minimum Percent
Removal
Average Effl uent
Concentration
Average Percent
Removal
Chlorine
NSF/ANSI 42 2.1 mg/l 0.05 mg/l 97.4 % 0.05 mg/l 97.6 %
Testing Conditions:
Flow Rate: 0.8 GPM pH: 7.5 +/– 0.5
Pressure: 60 +/– 3 psi Temperature: 20 +/– 3°C
Refer to your Instruction Guide for more specifi c product and
warranty information and to avoid contamination from improper
handling and installation. Performance will vary based on local
water conditions. The substances reduced by this product are not
necessarily in your water.
Buyer’s Signature Date
Seller’s Signature Date
This appliance meets the domestic water treatment appliance
Standards AS/NZS 3497 and AS/NZS 4348 for the following water
treatment process:
Class Treatment type Function Pass
I Microbiological Status
Bacteriostatic
Will stop bacteria multiplying
N/A
II Microbiological Treatment
Bacteria removal
Virus removal
Protozoa removal
Will remove or inactivate bacteria
Will remove or inactivate virus
Will remove or inactivate Crypto-sporidium and Giardia
N/A
N/A
N/A
III Turbidity and particulate reduction
Reduces cloudiness
N/A
IV Taste and odour reduction
Reduces tastes and odours √
V Chemical treatment
Decreases chlorine √
LEGEND:
√ = pass
N/A = Not Applicable
ENGLISH 19
9 Operation and Safety
Protect the BRITA Tap from direct sunlight and mechanical
damage.
Do not assemble near sources of heat and open fl ames. A stop
valve must be installed before the fi lter system intake hose. If the
water pressure is greater than 0.86 MPa, a pressure reducer must
be installed in front of the fi lter system. The BRITA Tap is only suit-
able for domestic use. Only water of drinking water quality may be
used as intake water for the BRITA water fi lter system.
The BRITA Tap is only suitable for cold water use within the sup-
ply water temperature stated in chapter 8. No microbiologically
impaired water or water of unknown quality may be used without
appropriate disinfection.
The system cannot be installed with a low pressure boiler.
In the event of offi cial water alert:
fi lter fi rst, and then boil
If there are offi cial instructions to boil tap water, the fi lter system
must be decommissioned. When the requirement to boil water
comes to an end, the fi lter cartridge must be replaced and the con-
nections cleaned.
Ultimate hygiene
• For hygiene reasons, the fi lter material of the cartridge is sub-
jected to a special bacteriostatic treatment with silver. A minute
quantity of silver, harmless to health, may be released into the
water, within the guidelines of the World Health Organisation (WHO)
for drinking water.
• It is generally recommended to boil tap water for certain groups
of people (e.g. people with weak immune systems, babies). For
such groups, this would also apply to fi ltered water.
Optimum use
• BRITA recommends that the fi lter system not be decommis-
sioned for a long period. If the BRITA Tap with A 1000 fi lter is
not used for several days (2–3 days), we recommend that the
fi lter system be fl ushed by running the volume X indicated in
the table below. After stagnation periods of over 4 weeks, the
fi lter should be fl ushed by running the volume Y or otherwise
consider replacing the cartridge if it is near the end of its recom-
mended life. Please also note the maximum usage period of the
fi lter cartridge is 6 months.
Flushing volume X after 2–3 days stagnation Flushing volume
A 1000 1 Litre
Flushing volume Y after 4 weeks stagnation Flushing volume
A 1000 10 Litres
• BRITA fi ltered water is designed for human consumption. Use it
within 1–2 days.
• The fi lter system must not be opened or dismantled during
operation. The fi lter cartridge must not be opened.
• The fi lter system fi lter head is designed for a service life of
10 years counted from the date of installation.
Natural traces
As the fi lter cartridge contains carbon, derived from natural
charcoal, as with such natural matter, there may be variations and
this can lead to a slight abrasion of small carbon particles into your
fi ltered water, noticeable as black dust. These particles have no
negative health effects. If ingested, they will not harm the human
body. If you should see any carbon particles in the fi ltered water,
BRITA recommends fl ushing out the A 1000 fi lter cartridge by run-
ning the fi lter tap until the particle deposits are washed out.
20 ENGLISH
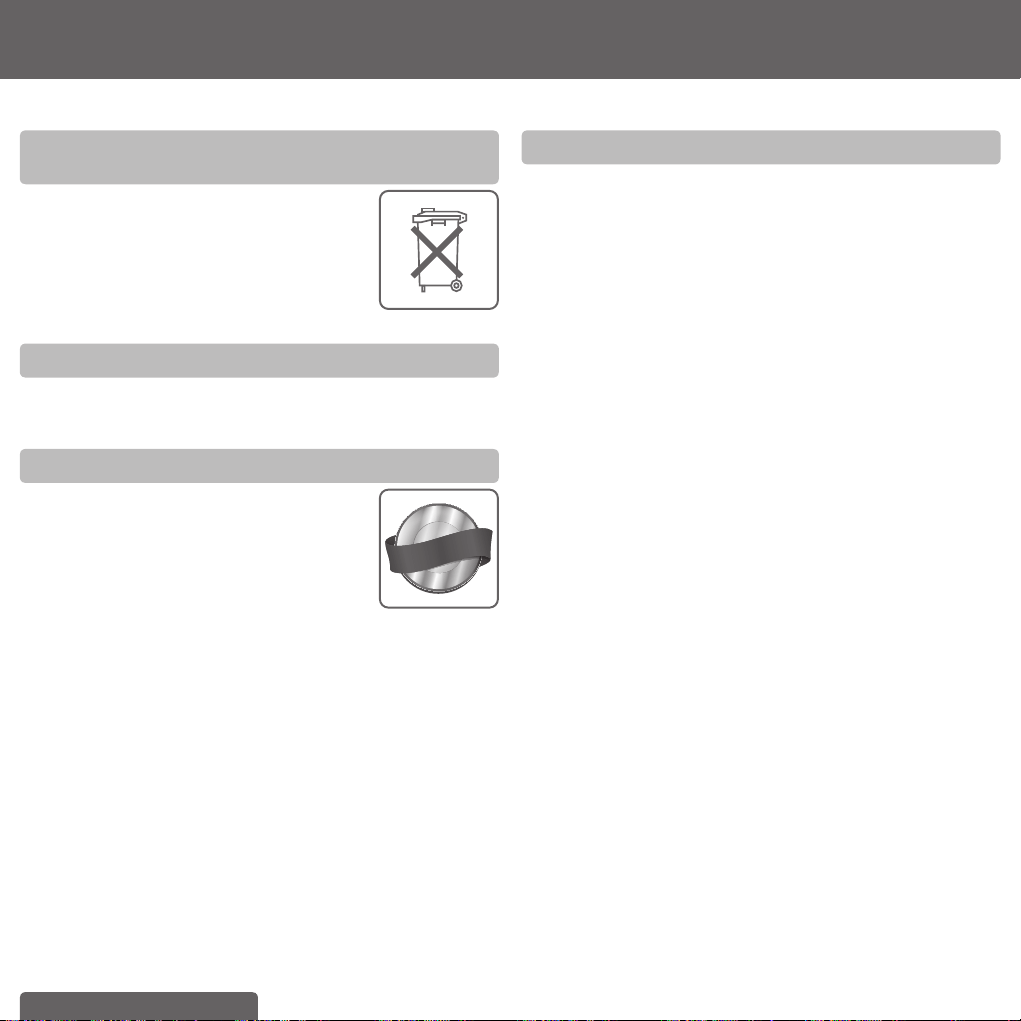
Correctly dispose of the BRITA cartridge
exchange indicator with display
The BRITA cartridge exchange indicator has an
expected useful life of approx. 5 years. At the
end of the useful life of the cartridge exchange
indicator, remember that it must be disposed of
according to the applicable regulations and statu-
tory requirements.
Exclusion of liability
BRITA shall not be held liable for any damage, including subsequent
damage, arising from the incorrect use of the product.
100 % satisfaction: the BRITA Promise
We are confi dent that this BRITA product will
meet your demands in terms of quality and perfor-
mance. If this product does not meet your expec-
tations, your can return it to us within 30 days of
the date of purchase for a full refund. You need to
call the Customer Service Hotline for your country
for a return authorization and postal instructions.
To assist us, you will be asked to explain the
reasons for your dissatisfaction and provide your
proof of purchase (receipt), your phone number
and address.
This promise is conditional on the installation
having been done in complete and correct
accordance with all instructions. There shall be no
compensation for any costs related to the instal-
lation (parts or services) or for damage to fi xtures
or equipment or for consequential loss or damage
of any nature.
M
o
n
e
y
B
a
c
k
G
u
a
r
a
n
t
e
e
3
0
D
a
y
s
The BRITA service hotline cares
Do you have any questions about your BRITA product?
Or on the subject of water fi ltration?
Are you looking for your nearest BRITA retailer?
Do you want more detailed information about BRITA products?
Or about the BRITA company?
Want to make the most of one of BRITA’s service offers?
Give us a call! You can fi nd the contact details for your BRITA
Customer Service team next to your country code on the back of
this booklet.
Up-to-date information, consumer tips, seasonal competitions,
delicious recipes can be found at www.brita.net
AUSTRALIA: www.brita.com.au Call 1300 557 762
NEW ZEALAND: www.brita.co.nz Call 0800 4 BRITA /
0800 427 482
IV. BRITA
®
, quality and satisfaction guaranteed
繁體中文 21
您的 BRITA專用龍頭濾水系統是擁有更純淨、
您的 BRITA專用龍頭濾水系統是擁有更純淨、
更清澈、口感更好過濾水的關鍵
更清澈、口感更好過濾水的關鍵
把您的 BRITA 系統放在未過濾的冷熱水旁,能為您帶來許
把您的 BRITA 系統放在未過濾的冷熱水旁,能為您帶來許
多好處
多好處
BRITA 過濾水
• 可以提升口感
• 經濟實惠,使用方便
• 適合烹煮健康美食
• 可煮出更香軟好吃的米飯
BRITA專用龍頭濾水器有兩個切換桿。 一個是供應標準未過濾的冷
熱水,而 BRITA 標記的切換桿則是供應 BRITA 過濾水。
A 1000 活性碳濾芯可大幅減少:
A 1000 活性碳濾芯可大幅減少:
• 氯氣含量、不佳的口感與氣味
• 微小粒子 (例如灰塵、粉塵和沙子)
• 有機雜質
A 1000 濾芯壽命
A 1000 濾芯壽命
A 1000 濾芯壽命視當地水質而異。建議您至少每六個月更換一次濾
芯,以確保產品最佳性能和衛生。
電子式 BRITA 濾芯更換顯示器可顯示需更換濾芯的剩餘天數,並
在達到 180 天時發出提示音效提醒您更換濾芯。 您應定期查看數
位螢幕。 如需更多資訊,請參閱第 3.2 章。
I. 恭喜您擁有全新 BRITA龍頭濾水系統
您可以安心信賴 BRITA 的品質,以及我們對顧客服務與支援的承諾。
BRITA 濾水龍頭
BRITA 濾水龍頭
A 1000 濾芯
A 1000 濾芯
電子式濾芯更換顯
電子式濾芯更換顯
示器
示器

22 繁體中文
II. 確保獲得本系統最大效益
1 保固條款
保固條款
BRITA 專用龍頭濾水器系統提供 2 年保固。 本 濾水系統的設計適合在
最大壓力不超過 0.86 MPa (860 kPa 或 124 psi)、進水溫度 30°C、環
境溫度 40°C 的條件下操作。 濾水系統自購買日起兩年內享有材料與
製造不含瑕疵之保證 (此保固期不適用於濾芯等耗材)。 此保固明確限
定於任何零件或零件組在有瑕疵之情況下予以更換,但前提是安裝過
程必須完全依照指示,並且符合所有相關水管裝配規範與標準,以及
濾芯操作時的壓力與溫度一律保持在本文件所述之限制範圍內。 安裝
過程造成的機械損害,將導致保固失效。 除非是法律不許可之範圍,
否則此保固將取代其他所有明示或暗示之擔保或條件,並且對後續衍
生或其他損害概不負責。
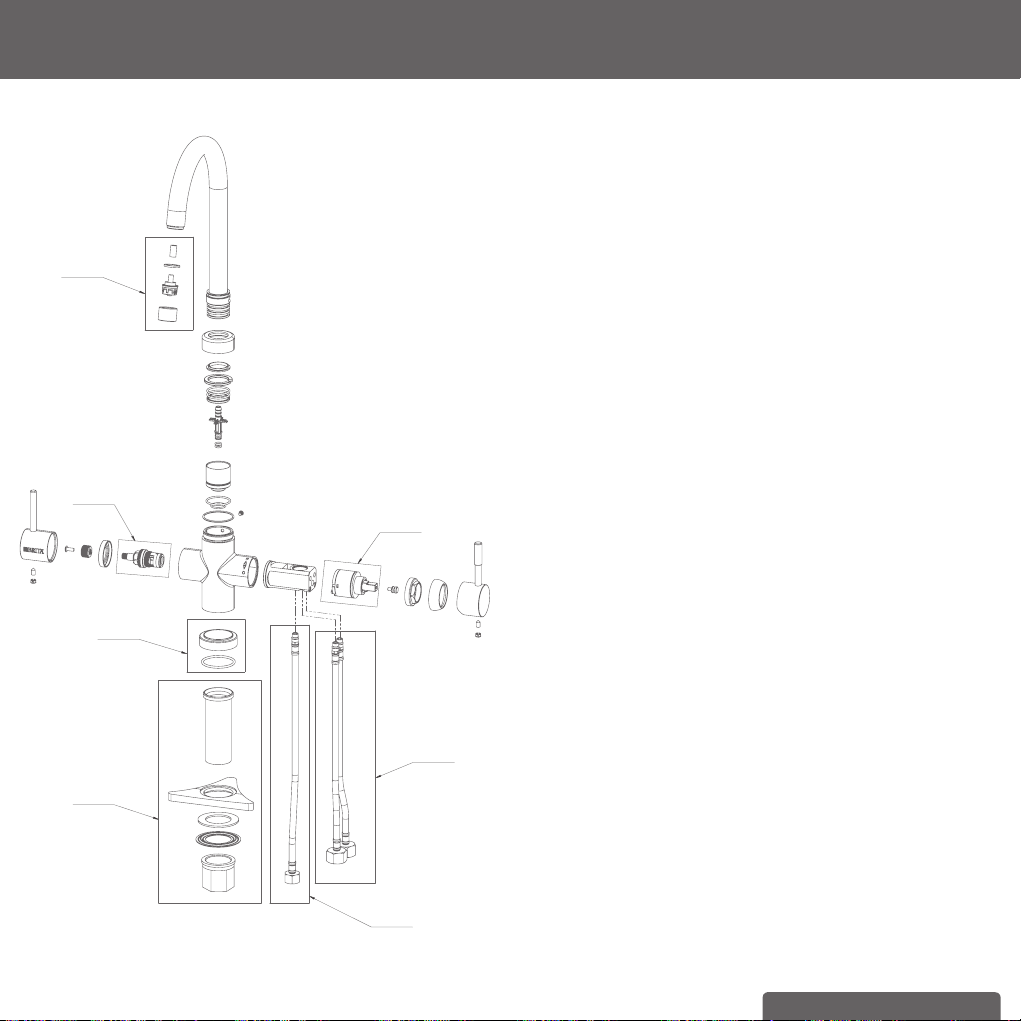
2 BRITA專用龍頭濾水系統入門款內容
BRITA專用龍頭濾水系統入門款內容
為了確保充分發揮 BRITA專用龍頭濾水系統的最佳過濾效果,
請仔細依照以下說明操作。
您的 BRITA專用龍頭濾水系統入門款包括下列內容
您的 BRITA專用龍頭濾水系統入門款包括下列內容
(請見圖 1):
(請見圖 1):
1. 濾芯頭具具備三種設定 (「C」、「+」與「++」),及操作便利的
鎖定把手
2. 濾芯頭具專用彈性壁掛架
3. A 1000 濾芯
4. BRITA 專用龍頭 濾水器 (樣式可能與下圖所示不同)
5. 具有數位螢幕與提示音效的 BRITA 電子式濾芯更換顯示器
6. 水管 (1) 長度 = 800 公釐,一側為 1/2 英吋螺帽,另一側為 M8
連接頭,2 條水管 (2+3),長度 = 450 公釐,一側為 1/2 英吋螺
帽,另一側為 M8 連接頭
7. 水管 (4),長度 = 800 公釐和兩側 1/2 英吋螺帽
8. 使用說明
9. 限壓閥和逆止閥,具有轉接和防止逆流的功能
10. T 型管
11. 墊片
安裝建議工具:六角螺絲小扳手 (4 公釐)、管鉗、活動扳手 (可調整
開口大小)。
安裝前,請先確認 (除了現有的廚房水龍頭與其他已安裝的家電以外)
您有一個可用的 1/2 英吋冷水供水連接點,如此才能連接 濾水系統。
如果您沒有可用的 1/2 英吋冷水供水口,請連絡合格的專業人員。
建議的安裝工具:一支六角螺絲小扳手 (5 公釐)、一支 12 公釐鑽頭
(需適用於 BRITA 濾水龍頭的安裝表面)、3/8 英吋、1/2 英吋與 7/16
英吋的扳手。
壁掛架安裝建議:兩個螺絲 (如 5 公釐) 和兩個壁虎 (如有需要)。 請
針對水槽下方空間牆壁材質,使用合適的螺絲和壁虎。
1.
1.
2.
2.
3.
3.
4.
4.
5.
5.
6.
6.
7.
7.
8.
8.
10.
10.
9.
9.
11.
11.
(
圖
圖 1)

繁體中文 23
3 安裝 BRITA
安裝 BRITA
開始前,請先確定您已備齊上列所有元件 (請見圖 1) 以及建議工
具。
安裝程序共分 7 個步驟。
!
安裝前,請先閱讀第 8 章「技術資料」和第 9 章「重要資
訊」。 (本產品如在 0°C 下進行儲存及運送後,必須在第 8 章
所述的涵蓋溫度區間下,於開啟的原始包裝中放置至少 24 小
時後再進行操作。) 本系統無法安裝於低壓鍋爐。
3.1
3.1
步驟 1:在濾芯頭具上選擇合適的設定
步驟 1:在濾芯頭具上選擇合適的設定
濾芯頭具的預設設定為「++」。 若要搭配隨附的 A 1000 濾芯使
用,您需要將視窗中的設定變更為「C」。 請使用六角螺絲小扳手,
依視窗中箭頭方向轉動六角螺絲,直到「C」出現為止。 請見圖 2)
(圖 2)
3.2
3.2
步驟 2:設定 BRITA 電子式濾芯更換顯示器
步驟 2:設定 BRITA 電子式濾芯更換顯示器
A 啟用:
A 啟用:
請將隨附的電池 (2 顆 AA 電池) 裝入 BRITA 電子式濾芯更換顯示器
的電池槽內。 裝入電池後,會發出嗶聲長鳴。
B 首次設定:
B 首次設定:
重要:請將計時器設定為 180 天。注意:請務必在日間啟動 BRITA
電子式濾芯更換顯示器,如此一來更換濾芯的提示音效才會在您當時
設定顯示器的日間時刻響起。
設定:
a 輕按一下「DISPLAY」(顯示) 按鈕以啟動螢幕。 一開始會閃爍 90
天的預設設定。
b 按住「DISPLAY」(顯示) 按鈕,然後輕按一下「START/
RESET」(開始/重新設定) 按鈕。 這會啟動設定模式。
c 輕按一下「DISPLAY」(顯示) 按鈕,將 90 天切換成 180 天。
d 等候時間值停止閃爍,或「DISPLAY」(顯示) 關閉。
e 輕按一下「DISPLAY」(顯示) 再按「START/RESET」(開始/重新
設定) 按鈕,以啟動 180 天計時器。
f 螢幕左下方的點開始閃爍,即表示計時器已生效。
C 讀取計時器狀態
C 讀取計時器狀態
在操作期間,輕按一下「DISPLAY」(顯示) 按鈕啟動螢幕,即可顯
示需要更換濾芯的剩餘時間。如果超過此更換時間,時間會顯示負
數。
D 提示音效
D 提示音效
a 提示更換濾芯的音效:當設好的 180 天設定剩餘不到 10 天時,每
小時的整點時刻會發出長音提示音效 (15 個雙嗶聲)。 然後在下一
次提示音效前,每隔 15 分鐘會發出較短的提示音效 (5 個雙嗶聲)。
b 提醒功能:如果您想延後幾天再讓音效提醒您更換濾芯,按下任
何按鈕即可使提示音效停止 72 小時。
c 電池更換提示音效:當電池電力耗盡時,每隔 15 分鐘會發出一聲
長音提示音效 (15 個單嗶聲),然後再發出一聲短音提示音效 (5 個
單嗶聲),直到下一個整點時刻發出提示音效。
d 關閉裝置:唯有將電池從電池槽取出,才能關閉本裝置。
E 更換濾芯時啟動重新設定功能
E 更換濾芯時啟動重新設定功能
a 輕按一下「DISPLAY」(顯示) 按鈕以啟動螢幕。
b 按住「START/RESET」(開始/重新設定) 按鈕 5 秒鐘,直到發出
嗶聲長鳴為止。
c 上次設定的 180 天會顯示在螢幕上。
d 計時器會自動啟動。
F 更換電池
F 更換電池
a 更換電池後,會發出一個嗶聲長鳴。
b 在嗶聲之後,輕按一下「DISPLAY」(顯示) 按鈕以啟動螢幕。
c 自從上次重新設定以來的剩餘天數便會顯示。
(注意:在電池電力完全耗盡後,最多只能維持 16 個小時。
在此之後,裝置將回復到原廠設定,且必須重新設定。請參閱要
點 B。)
G 安裝
G 安裝
您可以使用隨附的 Velcro 掛勾及粘扣帶,將 BRITA 電子式濾芯更換
顯示器固定於適當的乾燥處。 我們建議您將其安裝在水槽下方、明
顯可見的位置。 請避免接觸水/水花!
24 繁體中文
技術資料:
技術資料:
• 電池: 2 顆 AA 電池 (可卸除)
• 提示音效: 在3或6個月後,電池消耗殆盡時
• 為避免資料遺失,請在 12 小時內更換電池。
• 在無電力下 16 小時後,裝置會切換回原廠設定。
• 螢幕顯示 10 秒後,會自動切換為待機模式。
(圖 3)
3.3
3.3
步驟 3:安裝 BRITA專用龍頭 濾水器
步驟 3:安裝 BRITA專用龍頭 濾水器
安裝 BRITA 濾水器前,請先將所有需要的工具擺放在您面前。
!
請確認水槽下方有足夠空間及保持暢通,以便安裝濾芯頭具
與濾芯,以及連接兩條供水管。 確定便於擺放濾芯更換顯示
器的位置。
WD 3010
(圖
4
4)
1.
2.
3.
4.
5.
6.
1. 具 3 條水管的 BRITA專用濾水器 龍
頭
2. O 型環
3. 螺絲
4. 接頭 (當直接安裝龍頭於水槽時才需
使用; 安裝於檯面上則不需使用,此可
幫助龍頭穩固於水槽上)
5. 墊片
6. 固定片
7. 六角螺帽
WD 3020
(圖 5)
1.
2.
3.
4.
5.
6.
1. 具 3 條水管的 BRITA專用濾水器 龍
頭
2. O 型環
3. 接腳
4. 接頭 (當直接安裝龍頭於水槽時才需
使用; 安裝於檯面上則不需使用,此可
幫助龍頭穩固於水槽上)
5. 墊片
6. 固定片
7. 六角螺帽
WD 3030/ WD 3040
(圖 6)
1.
1.
2.
2.
3.
3.
4.
4.
5.
5.
6.
6.
7.
7.
1. 具3條水管的 BRITA專用濾水器 龍頭
2. 接腳 (WD 3010 的樣式不同)
3. 底座 (僅限 WD 3030 和 WD 3040 機
型)
4. 接頭 (當直接安裝龍頭於水槽時才需
使用; 安裝於檯面上則不需使用,此可
幫助龍頭穩固於水槽上)
5. 墊片
6. 固定片
7. 六角螺帽
7.
7.
繁體中文 25
首先,請先拆除您現有的廚房水龍頭。
A a) 關掉冷熱水供水出口。
b) 請開啟所有出水桿,確認釋放所有水壓。
!
現有廚房水龍頭不應有水流出。
c) 旋開現有的冷熱水供水管。
!
我們建議在供水出口下方放置適合的容器,因為當您旋開水管
時,水管內殘餘的水會流出。
d) 旋開您的廚房水龍頭 – 這沒有標準的裝配步驟,但通常可使用
管鉗卸除。
e) 拔除您的廚房水龍頭及水管。 您現在可以開始安裝 BRITA專用
龍頭 濾水器 (請見圖 4)。
首先,請將接腳 (2) 旋進 BRITA專用龍頭濾水器 (1)。
將水管旋進濾水器 (請見圖 7)。
將藍色條紋水管的 M8 連接頭旋進孔洞 C。
將紅色條紋水管的 M8 連接頭旋進孔洞 H。
將 800 公釐長水管的 M8 連接頭旋進孔洞 B。
C
B
H
(圖 7)
WD 3010
WD 3020/ WD 3030/ WD 3040
C
BH
!
確認連接處均已鎖緊,但請避免過緊。
然後將底座 (3) 放在孔洞上方,使用隨附的背板 (4)、墊片 (5)、鎖定
拉環 (6) 及六角螺帽 (7),將 BRITA 專用龍頭濾水器 (1) 固定就位。
3.4
3.4
步驟 4:連接水管
步驟 4:連接水管
我們建議您先將會用到的所有零件擺放在您面前。
建議的安裝工具:一支六角螺絲小扳手 (5 公釐)、3/8 英吋與 1/2 英
吋扳手。
壁掛架安裝建議:兩個螺絲 (如適用於安裝表面的 5 公釐螺絲) 和兩
個壁虎 (如有需要)。
請按照下列圖解 (請見圖 7),並以正確的順序進行步驟。
A 將隨附的 T 型管連接在冷水供水出口。
a) 將 1/2 英吋的墊片插入隨附 T 型管的母螺帽。
b) 將 T 型管的此端連接冷水供水出口。
!
如果您的廚房中有額外的 1/2 英吋冷水供水出口可供 BRITA
專用龍頭濾水器使用,就不需要安裝隨附的 T 型管。
B 將藍色條紋水管連接 T 型管的一側。
C 使用具有兩個 1/2 英吋連接頭的水管。 將 1/2 英吋的墊片插入水
管兩頭各自的母螺紋。 將一頭連接 T 型管的一端。
D 現在將另一頭接上濾芯頭具進水口。 進水口會標示「IN」(進水
口) 字樣及箭頭。 確認墊片放置正確!
E 將連接濾水器的 800 公釐長水管接上標示出水口箭頭的濾芯頭具
出水口。
F 將紅色條紋水管連接熱水供水出口。
G 確認所有連接處都有鎖緊。 但請勿鎖得過緊。
26 繁體中文
(圖 8)
Hot water
supply
Cold water
supply
!
1/2 英吋連接的最大鎖緊扭矩值不得超過 14 Nm。
僅能使用隨附的墊片連接水管,因為使用錐形螺絲會損害濾
芯頭具的連接,並使保固無效。
3.5
3.5
步驟 5:插入濾芯 (請見圖 9)
步驟 5:插入濾芯 (請見圖 9)
A 拆下保護蓋 (1)。
B 將濾芯 (5) 垂直插入濾芯頭具 (2)。
C 轉動鎖定把手 (3),直到您感覺已經鎖緊。
(圖 9)
(圖 9)
A.
B.
3.
3.
2.
2.
1.
1.
4.
4.
5.
5.
!
鎖定把手 (3) 必須在開啟狀態,才能插入濾芯。請確定濾芯和
所有 O 形環均放在正確位置。
繁體中文 27
3.6
3.6
步驟 6: 安裝濾芯頭具壁掛架 (請見圖 10)
步驟 6: 安裝濾芯頭具壁掛架 (請見圖 10)
!
進行組裝時,請注意安裝尺寸、水管彎曲半徑和配件尺寸。
無論濾芯呈垂直或水平方向,系統均可配合運作。 使用壁掛
架時,則只能以垂直方式安裝,壁掛架的「UP」箭頭應朝向
正確位置。
A 根據牆壁材質,使用兩個螺絲和壁虎 (未隨附),將壁掛架 (1) 掛
至定位以節省空間。 將其安置在方便操作的位置,讓濾芯頭具能
90° 旋轉,以便更換濾芯。
B 將濾芯頭具 (2) 兩側的凹槽 (4) 卡入壁掛架的支撐臂,即可將濾芯
頭具裝上壁掛架 (1)。
1.
1.
2.
2.
3.
3.
4.
4.
(fi g. 10)
(fi g. 10)
3.7
3.7
步驟 7:啟用
步驟 7:啟用
使用前,請確定您已正確按照所有步驟操作,且所有零件皆安裝妥
當。 將適當的容器放置在濾芯下,以防漏水。
A 打開冷熱水供水出口,請仔細檢查濾水器系統是否有任何漏水。
B 開啟 BRITA 濾水龍頭,讓水流出,直到過濾水變得清澈、無泡沫
(至少 1 公升)。
4 更換濾芯
更換濾芯
無論濾水系統是否使用頻繁,在第一次使用的六個月後都必須更換濾
芯,以發揮產品最佳性能並確保衛生。 定期監控濾芯更換顯示器,
並留意在達到設定的 180 天時所發出的提示音效。
!
更換濾芯前,請先詳閱第 9 章「操作與安全資訊」。
注意
壁掛架上的濾芯可旋轉 90 度,以方便取下。 鎖定把手為開啟
狀態時,濾芯會自動中止進水,因此不必關掉冷水供水出口。
更換 A 1000 濾芯 (請見圖 9):
更換 A 1000 濾芯 (請見圖 9):
A 開啟鎖定把手 (3)。
B 為了釋放系統內部壓力,請先將合適的容器放置於沖洗水管下
方,以防漏水,然後按一下沖洗按鈕。 (6)。
C 將壽命耗盡的濾芯 (5) 從濾芯頭具 (2) 取下。
D 放入新的濾芯 (請參閱第 3.5 章步驟 5)。
E 關閉鎖定把手 (3)。 開啟 BRITA 濾水龍頭,讓水流出,直到過濾
水變得清澈、無泡沫 (至少 1 公升)。
28 繁體中文
5 重新設定電子式濾芯更換顯示器
重新設定電子式濾芯更換顯示器
A 輕按一下「DISPLAY」(顯示) 按鈕以啟動螢幕。
B 按住「START/RESET」(開始/重新設定) 按鈕 5 秒鐘,直到發出
嗶聲長鳴為止。
C 先前設定的「180」天會顯示在螢幕上。
D 計時器會自動啟動。
6 保養
保養
定期檢查濾水系統是否有漏水情形。 定期檢查水管是否糾結。
糾結的水管必須更換。全套濾水系統的預期使用壽命約為五年。
!
更換濾水系統之前,請先詳閱第 8 章「技術資料」與第 9 章
「操作與安全資訊」。
定期使用沾濕的軟布清潔濾水系統外部。
!
請勿使用具腐蝕性的化學物質、清潔液或收斂性清潔劑。
7 疑難排解
疑難排解
A 無水流
原因: 進水口關閉。
疑難排解: 開啟供水源頭的止水閥,或關閉濾芯頭具 (2) 上的鎖定
把手 (3)。
B 儘管已經開啟進水,但仍無水流或水流太小
原因: 水壓太低。
疑難排解: 檢查水壓。 如果問題持續發生,請檢查濾水系統及濾
芯,必要時予以更換。
原因: 未依水流方向安裝濾芯頭具。
疑難排解: 將濾芯頭具拆下,然後依水流方向重新安裝 (第 3.4 章)。
C 漏水
原因: 連接處的螺絲未安裝妥當。
疑難排解: 檢查水壓。 依第 3.4 章所述,檢查所有接頭的螺絲。
D 電子式濾芯更換顯示器顯示器顯示錯誤或設定不正確
原因: 按下的按鈕順序錯誤,或是按到錯誤的按鈕。
疑難排解: 按住「RESET」(重新設定) 按鈕 8 秒。
僅限 WD 3030 和 WD 3040 機型
僅限 WD 3030 和 WD 3040 機型
這些機型配備兩個內建出水口的濾水頭。 內部的是用於 BRITA 過
濾水,外部區域的則是用於冷熱水。 如同每個水龍頭濾水頭,外部
區域可能會有水垢堆積。 因此建議定期清洗濾水頭。 如需清洗:請
旋開濾水器彎管端的保護蓋。 濾水頭是接在矽膠水管上。 請小心
取下,並用如醋等清潔用品清洗濾水頭。 清洗完畢後,請小心地將
濾水頭尾端較細長的部分接上矽膠水管。 將保護蓋放回濾水頭並旋
緊。
確認保護蓋上的墊片放置正確。 安裝成功後,打開冷熱水或 BRITA
過濾水時都應不會漏水。
如欲更換新的濾水頭,您可以向 BRITA 訂購。 您可以在本手冊背
面,於您居住地區的國別碼旁邊找 BRITA 顧客服務部團隊的詳細連
絡資訊。
(圖 11)
(圖 11)
繁體中文 29
零件名稱
零件名稱
1004674
1012909
1004710
1008502
1004713
1004715
1014490
1014492
(圖 12)
(圖 12)
品號
品號
零件名稱
零件名稱
1004715 On Line 3/8" 2 mm CE + AU 防水襯墊
1004713 On Line 1/2" 2 mm CE + AU 防水襯墊
1004710 On Line 1/2" IT-3/8" IT AU 水管
1012909 G 3/8" BRITA 龍頭專用濾芯頭具
1004674 BRITA 電子式濾芯更換顯示器
1014490 逆止閥備用零件AU
1014492 限壓閥備用零件AU
1008502 1/2" T型管
30 繁體中文
(圖 13)
(圖 13)
1012560
1012564
1012565
1012561
1012568
1012567
1012562
WD 3010
品號
品號
零件名稱
零件名稱
1012560 40 mm ASM 濾水混合器
1012561 ASM 開關閥
1012562 DN6 800 mm HF M8x1 G3 8HN ASM 水管
1012564 WD 3010 AU 自來水充氣環組
1012565 WD 3010 過濾水充氣環組
1012567 WD 3010 AU 冷熱水管組
1012568 WD 3010 蒙太奇組合
繁體中文 31
(圖 14)
(圖 14)
1012555
1013529
1012562
1012557
1012556
1012561
WD 3020
品號
品號
零件名稱
零件名稱
1012555 WD 3020 AU 充氣環組
1012556 濾水混合器
1012561 ASM 開關閥
1012562 DN6 800 mm HF M8x1 G3 8HN ASM 水管
1012558 WD 3020 AU 水管組
1013529 WD 3050 蒙太奇組合
32 繁體中文
1012558
1012562
1013529
1012552
1012556
1012561
1012553
(圖 15)
(圖 15)
WD 3030/
WD 3040
品號
品號
零件名稱
零件名稱
1012556 濾水混合器
1012553 WD 3030 AU 充氣環組
1012561 ASM 開關閥
1012562 DN6 800 mm HF M8x1 G3 8HN ASM 水管
1012558 WD 3020 AU 水管組
1012552 WD 3030/3040 底座環組
1013529 WD 3050 蒙太奇組合
8 A 1000 濾芯技術資料
A 1000 濾芯技術資料
操作壓力 0.1 MPa 至最多 0.86 MPa
進水溫度 4°C 至 30°C
涵蓋溫度區間 操作溫度 4°C 至 40°C
儲存/運送溫度 –20°C 至 50°C
作用流量範圍與相關壓力下降
30-180 公升/小時 /
0.02-0.14 MPa
床層體積 0.23 公升
重量 (乾/濕) 0.4 公斤 / 0.9 公斤
除氯 NSF 42 Class I (50%)
顆粒攔截 NSF 42 Class I (0.5 µm)
除氯 DIN EN 14898 Class 1 (>90%)
尺寸 (寬/深/高) 濾水系統 (濾芯
頭具附濾芯)
106 公釐/92 公釐/232 公釐
濾芯 86 公釐/86 公釐/224 公釐
安裝尺寸 (使用
壁掛架垂直安裝)
137 公釐/122 公釐/232 公釐
操作位置 水平及垂直
進水口接頭 G3/8 英吋
出水口接頭 G3/8 英吋
• 最小操作壓力:0.1 MPa
• 最大操作壓力:0.86 MPa
• 請勿暴露在低於 4°C 溫度中
• 最高操作溫度:30°C
• 標準水流速度:A 1000 (60 公升/小時)
• 此系統必須依照當地冷水管線相關的水管裝配規範安裝。
更換濾芯 A 1000濾芯

繁體中文 33
8.1
8.1
BRITA Tap 技術資料
BRITA Tap 技術資料
操作壓力 0.05 MPa 至 1 Mpa
冷水接頭 4°C 至 40°C
溫水接頭 最高溫度70°C
6星水流速 (4.5公升/每分鐘)
重量
尺寸(寛/深/
高)
充氣環
WD 3010 1,16 公斤
5 厘米 / 25,5 厘米 /
19,1 厘米
M18x1
WD 3020 1,52 公斤
17,3 厘米 / 28,4 厘
米 / 29,4 厘米
M24x1
WD 3030 1,45 公斤
17,2 厘米 / 20,5 厘
米 / 36,3 厘米
M22x1
WD 3040 1,57 公斤
17,2 厘米 / 23,7 厘
米 / 34,8 厘米
M22x1
重要須知:購買前,請先閱讀此資料表,並將此容量與您實際的水處
理需求作比較。
濾芯 A 1000 的性能資料表
濾芯 A 1000 的性能資料表
製造商 經銷商
Brita GmbH
Heinrich-Hertz-Str. 4 8F., No.207-3, Sec. 3, Beisin Rd.,
Sindian Dist.,
65232 Taunusstein New Taipei City 231, Taiwan
(R.O.C.)
Germany 電話:+ 886 2 8913 1600
+49-(0) 6128-746-0 傳真:+ 886 2 8913 1655
產品
濾水系統
A 1000 濾芯頭具 0% G 3/8 英吋
使用準則
使用準則
• 此系統必須定期更換濾芯,以維持正常運作。 不同的水垢、
氯氣、沉澱物或有機物質含量,可能會影響更換濾芯頻率。
• 請務必按照容量表 (請見說明指南) 所示期限,或每半年更換濾芯
(兩者以優先到期者為準),或當您感覺到口感不佳、氣味有異或流
量減慢時更換濾芯。
• 請務必在濾水器裝置的進水口安裝符合 AS/NZS 3500.1 規定的防
止回流裝置。
• 注意:請勿將可能遭到微生物污染或水質未明且未經消毒的水源
用於此系統。
34 繁體中文
濾除物質
濾除物質
以上所列濾水系統均已通過根據 NSF/ANSI 42 對於消除氯氣、不佳口感與氣味之測試,並取得認證。 此產品的性能已經過驗證,以下所列之摘
要測試資料可為佐證。 您使用的水質中可能不含這些物質。
測試資料
測試資料
物質 準則 平均進水濃度 最大出水濃度 最低濾除率 平均出水濃度 平均濾除率
氯 NSF/ANSI 42 2.1 毫克/公升 0.05 毫克/公升 97.4% 0.05 毫克/公升 97.6%
測試條件:
水流速度: 0.8 GPM pH: 7.5 +/– 0.5
壓力: 60 psi +/– 3 psi 溫度: 20+/– 3°C
如需更詳細的產品與保固資訊,以及如何避免不當處理與安裝所造成的汙染,請參閱說明指南。 系統性能可能會因當地水質不同而有異。 您使
用的水質可能不含此產品可濾除的物質。
購買人簽章 日期
經銷商簽章 日期
此設備符合家庭用水處理設備標準 AS/NZS 3497 與 AS/NZS 4348 對下列水處理程序的要求:
等級 處理類型 功能 合格
I 微生物狀況、抑菌 防止細菌孳生 N/A
II 微生物處理、消滅細菌、消滅病毒、消滅原生動物 消滅或抑制細菌、
消除或抑制病毒、
消除或抑制隱孢子蟲與梨形鞭毛蟲
N/A
N/A
N/A
III 降低濁度與減少微粒 降低混濁度 N/A
IV 消除不佳口感與氣味 消除不佳口感與氣味 √
V 化學處理 降低氯含量 √
圖例說明:
√ = 合格
N/A = 不適用

繁體中文 35
9 操作與安全
操作與安全
請勿將 BRITA 專用龍頭濾水系統放在日光直射之處,並避免機械性損害。
請勿在靠近熱源或火焰的地方組裝此產品。 安裝濾水系統的進水水管之前,需先安裝止水閥。
如果水壓超過 0.86 MPa,則濾水系統前方必須安裝減壓器。
BRITA專用龍頭濾水系統僅適合居家使用。 唯有符合飲用水品質的水,方可注入 BRITA 濾水系統。
BRITA 濾水系統僅適合使用第 8 章所述溫度範圍內的冷水。
請勿將遭到微生物污染或水質不明且未經過適當消毒的水源用於此系統。如果您有低壓鍋爐,請確認 A 1000 只能連接至裝有斜角閥的冷水供水
出口,而非連接至低壓鍋爐。
本系統無法安裝於低壓鍋爐。
如果官方發佈水質警戒:先過濾,再煮沸
如果官方發佈水質警戒:先過濾,再煮沸
如果官方指示需要將自來水煮沸使用,則請停止使用本濾水系統。 當官方宣布不再需要將水煮沸使用時,請先更換濾芯,並清潔連接管線。
最高衛生標準
最高衛生標準
• 基於衛生考量,濾芯的過濾材質乃經過特殊的銀抗菌處理。 微量的銀可能會轉移至水中,轉移量在世界衛生組織 (WHO) 飲用水標準範圍內,
對健康無害。
• 對於特定族群 (如免疫系統薄弱者、嬰兒),一般建議應將自來水煮沸飲用。 對於這些族群,即便是 BRITA 過濾水也應煮沸飲用。
III. 重要須知

36 繁體中文
IV. BRITA
®
品質與滿意保證
最佳使用方式
最佳使用方式
• BRITA 建議您,濾水系統不應長時間擱置不用。 如果您多天
(2–3 天) 未使用裝有 A1000 濾芯的 BRITA 專用龍頭濾水系統,我
們建議您依據下表指示的水量 X 來沖洗濾水系統。 超過 4 週未使
用時,應使用水量 Y 來沖洗濾水系統;如果已接近建議更換的濾
芯壽命,請考慮直接更換濾芯。 另請注意,濾芯的最長使用期限
為 6 個月。
2 至 3 天未使用的沖洗水量 X 沖洗水量
A 1000 1 公升
4 週未使用的沖洗水量 Y 沖洗水量
A 1000 10 公升
• BRITA 過濾水可供人類飲用, 並請在 1–2 天內飲用完畢。
• 濾水系統運作時,切勿將其開啟或拆解, 也請勿開啟濾芯。
• 濾水系統濾芯頭具的使用壽命為自安裝日起 5 年。
天然殘留物
天然殘留物
由於濾芯含有萃取自天然碳纖維的碳元素,此類天然物質可能產生變
化,導致少量細小碳微粒進入過濾水中,因此出現明顯黑色粉狀物。
這些微粒對於健康沒有任何負面影響, 也不會對人體造成任何傷
害。 若您在過濾水中發現碳微粒,BRITA 建議您開啟濾水系統的水
龍頭,沖洗 A 1000 濾芯,直到微粒沉澱物完全沖掉為止。
正確棄置 BRITA 濾芯更換螢幕顯示器
正確棄置 BRITA 濾芯更換螢幕顯示器
BRITA 濾芯更換顯示器的預期使用壽命約為 10 年。
濾芯更換顯示器使用壽命結束時,請務必將這些裝
置依照相關規定和要求棄置。
免責聲明
免責聲明
因不正確使用本產品而導致的損害 (包括後續損害在內),BRITA 概不
負責。
BRITA 服務專線
BRITA 服務專線
對於 BRITA 產品有任何疑問, 還是有濾水的相關問題嗎?
在尋找離您最近的 BRITA 銷售據點嗎? 想瞭解更多 BRITA 產品, 或
是 BRITA 公司的相關資訊嗎? 想更充分利用 BRITA 的服務嗎?
請立即來電! 您可以在本手冊背面,於您居住地區的國別碼旁邊找到
BRITA 顧客服務部團隊的詳細連絡資訊。

AU
BRITA Water Filter
Systems Distributors
Pty Ltd., Level 9,
123 Epping Road,
North Ryde, NSW 2113,
Australia
Tel. - AUS: 1300 557 762
Tel. - NZ: 0800 4 BRITA /
0800 427 482
www.brita.com.au
www.brita.co.nz
TW
BRITA Taiwan Co. Ltd.,
8F., No. 207-3, Sec. 3,
Beishin Rd., Sindian Dist.,
New Taipei City 231,
Taiwan (R.O.C.)
Tel. 00 886-2-8913-1600
Fax 00 886-2-8913-1655
www.brita.tw
1010396-005
GA BRITA Tap AU