1
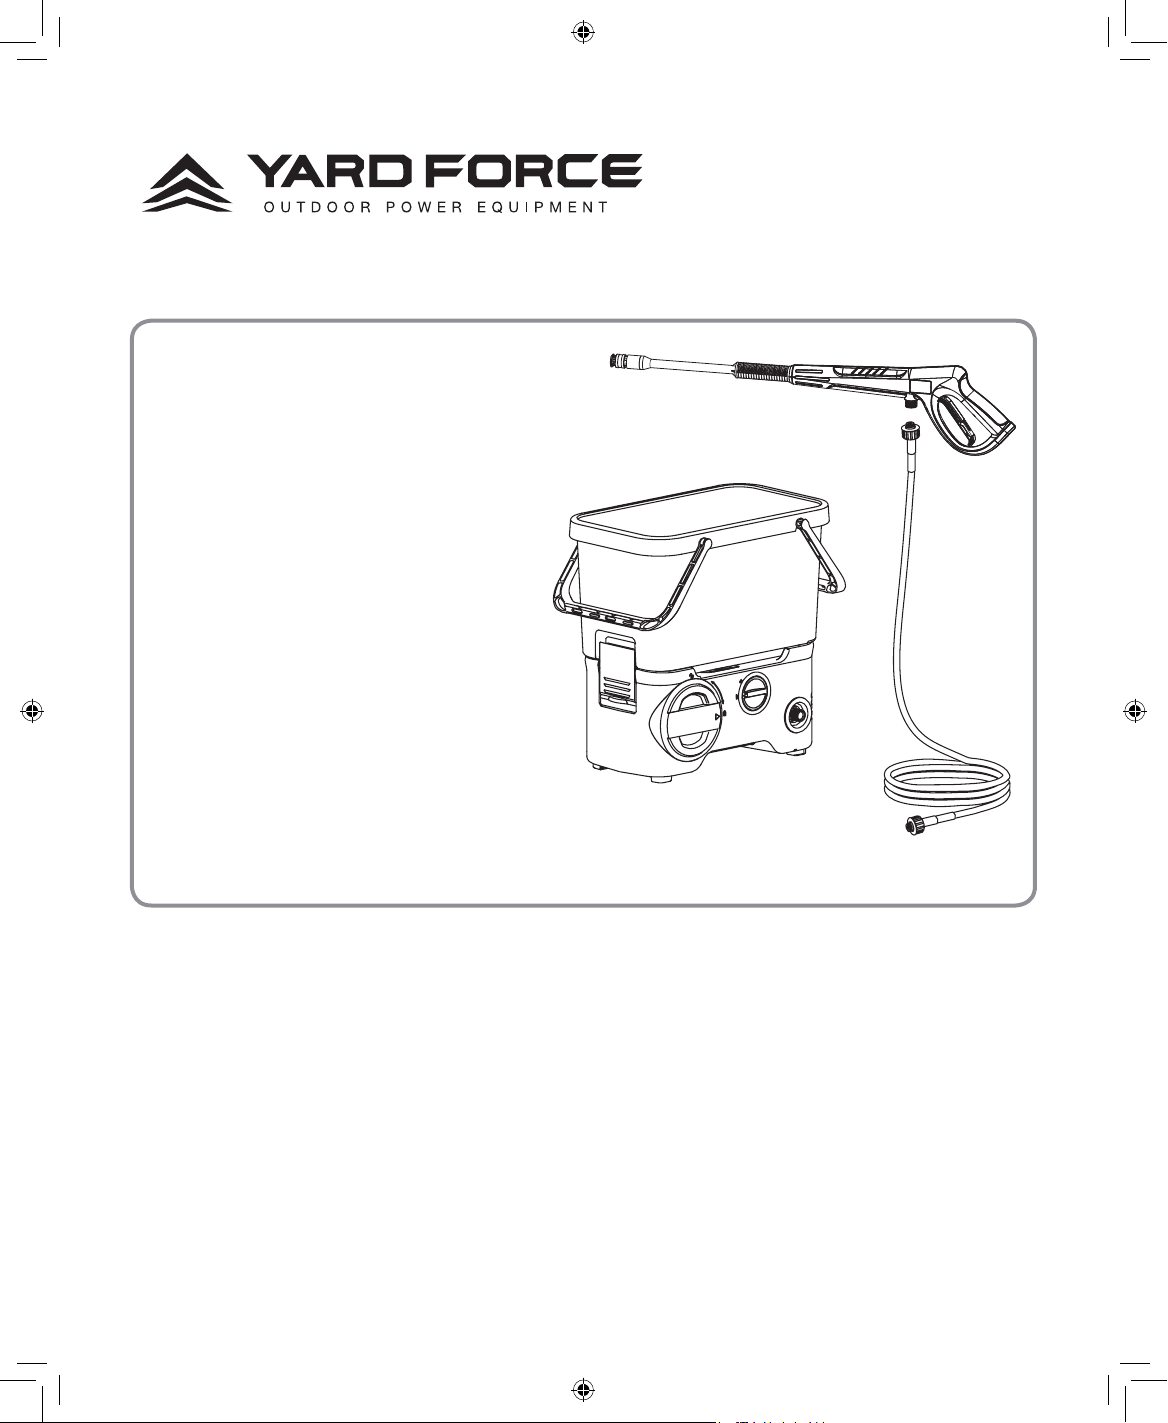
Model YF4050PB
OPERATOR'S MANUAL
40V CORDLESS BUCKET
HIGH PRESSURE WASHER
Before operating this product, please read this manual
thoroughly and retain it for future reference.
SUMEC NORTH AMERICA
3939 Royal Drive NW
Unit #234
Kennesaw, GA30144
YF4050PB.indd 1 15-5-4 ��11:42

2
DO NOT RETURN PRODUCT TO PLACE OF PURCHASE.
IF YOU HAVE ANY QUESTIONS, CALL OUR TOLL-FREE HOTLINE.
(866)-902-9690
ForceToolsUSA.com
YF4050PB.indd 2 15-5-4 ��11:42
I
TABLE OF CONTENTS
YF4050PB Operator’s Manual
Description of Product Parts………………………………………………………………………………......02
Safety Symbols .....................................................................................................................................04
Technical Specifications…………………………………………………………………………………….....05
Intended Use……………………………………..…………………………………………………………......05
Important Safety Instructions……………………………………………………………………………….....06
Assembly……………………………………………………………………………………….........................12
Operation………………………………………………………………………………………........................16
Storing and Maintenance………………………………………………………………………………….......22
Troubleshooting…………………………………………………………………...........................................24
Warranty………………………………………………………………………………………………...............26
YF4050PB.indd 1 15-5-4 ��11:42
2
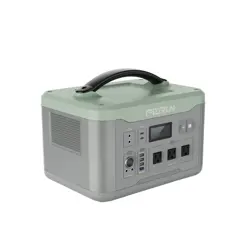
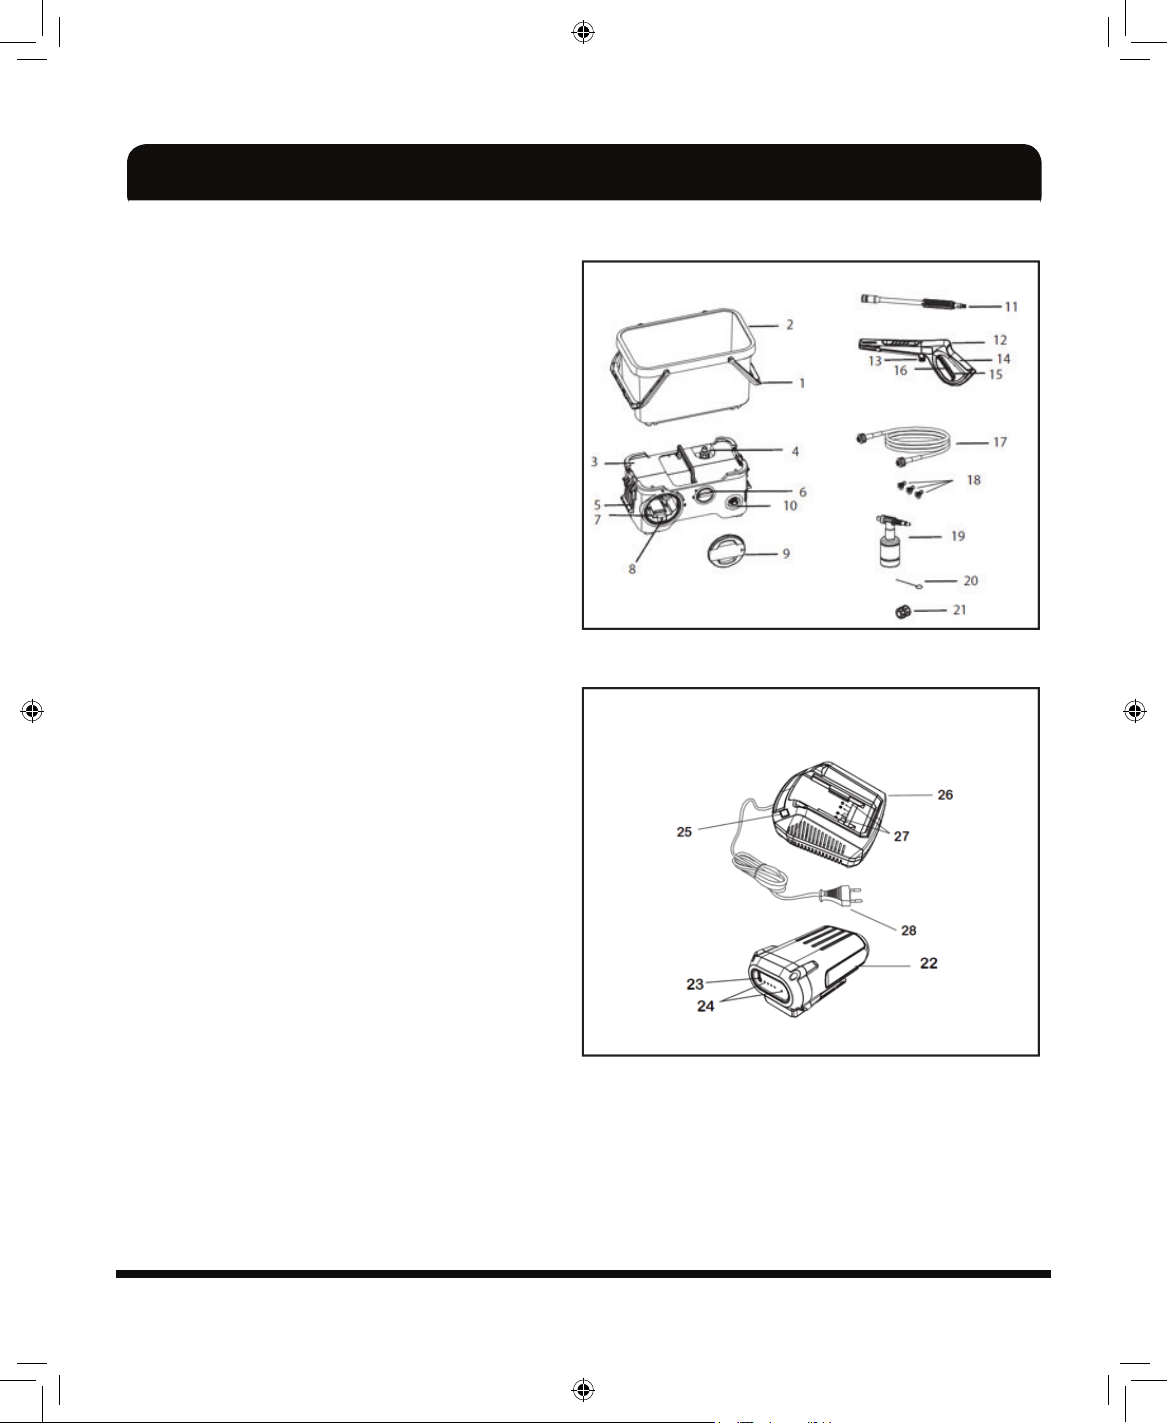
DESCRIPTION OF PRODUCT PARTS
Parts list
As shown in Fig. 1&2
1. Carrying handle
2. Water container
3. High-pressure washer main body
4. Inlet adapter
5. Locking hook
6. ON/OFF switch
7. Battery pack compartment
8. Battery pack releasing button
9. Battery pack compartment cover
10. High-pressure water outlet
11. Quick -connect wand
12. Trigger handle
13. Spray gun water inlet
14. Gripping handle
15. Safety lock
16. Trigger switch
17. High-pressure hose
18. Spray Nozzles
19. Cleaning agent tank
20. Nozzle cleaning needle
21. Female coupling connector
22. Battery pack
23. Power indicator button
24. Power indicator
25. GREEN /RED LED
26. Charger
27. Electric contacts
28. Plug
Fig. 1
Fig. 2
YF4050PB.indd 2 15-5-4 ��11:42
3
Fig. 2
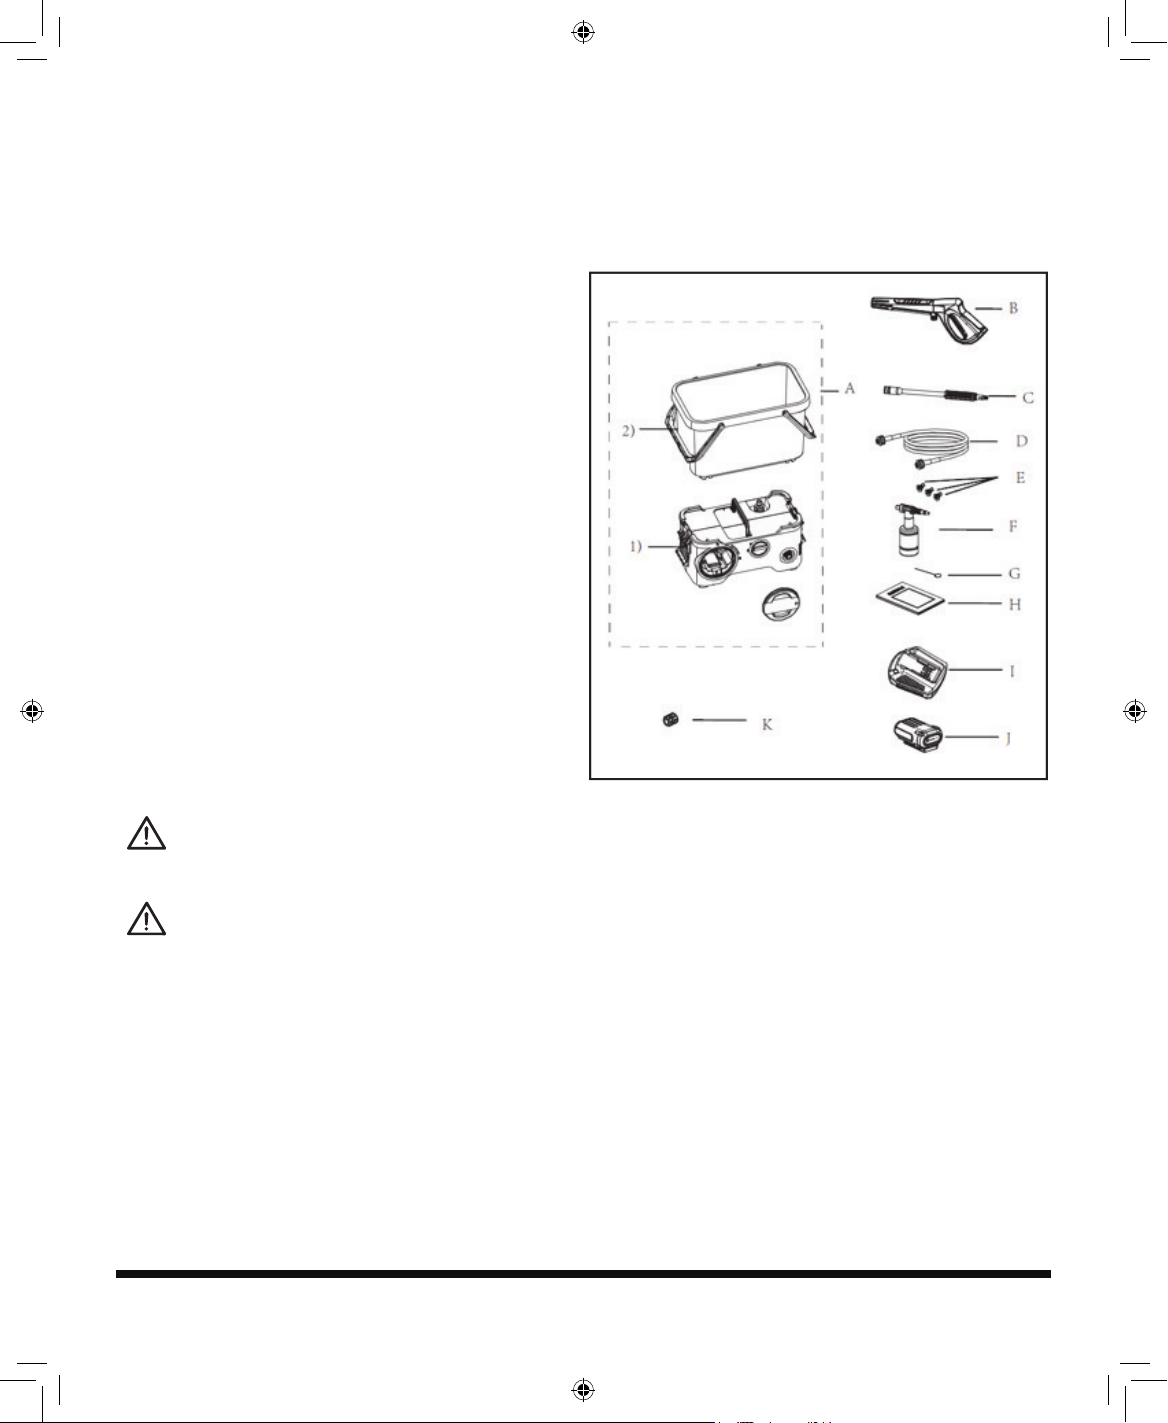
Check the delivery parts
As shown in Fig. 3
Carefully remove the pressure washer and parts from its packaging. Identify all the parts packaged in
the carton against the parts list. Please contact our customer service center (Monday-Friday 8:30AM-
5:00PM ET) at (866) 902 9690 if anything is missing.
A. High-pressure washer include follow items :
1) High-pressure washer main body
include battery pack compartment cover
2) Water container include cap-shape filter
B. Trigger handle 1pc
C. Quick-Connect wand 1pc
D. High-pressure hose 1pc
E. Spray nozzles
Include follow items:
1) 0°Nozzle x1
2) 15°Nozzle x1
3) 40°Nozzle x1
F. Detergent bottle 1pc
G. Nozzle cleaning needle 1 pc
H. Manual 1pc
I. Battery pack 1pc
J. Charger 1pc
K. Female coupling connector 1pc
(Water backflow preventer was built-in)
WARNING: If any parts are damaged or missing, do not operate this tool until the missing parts
are replaced. Failure to heed this warning could result in serious personal injury.
NOTE! Always recycle the packaging in accordance with local recycling schemes.
YF4050PB.indd 3 15-5-4 ��11:42
4
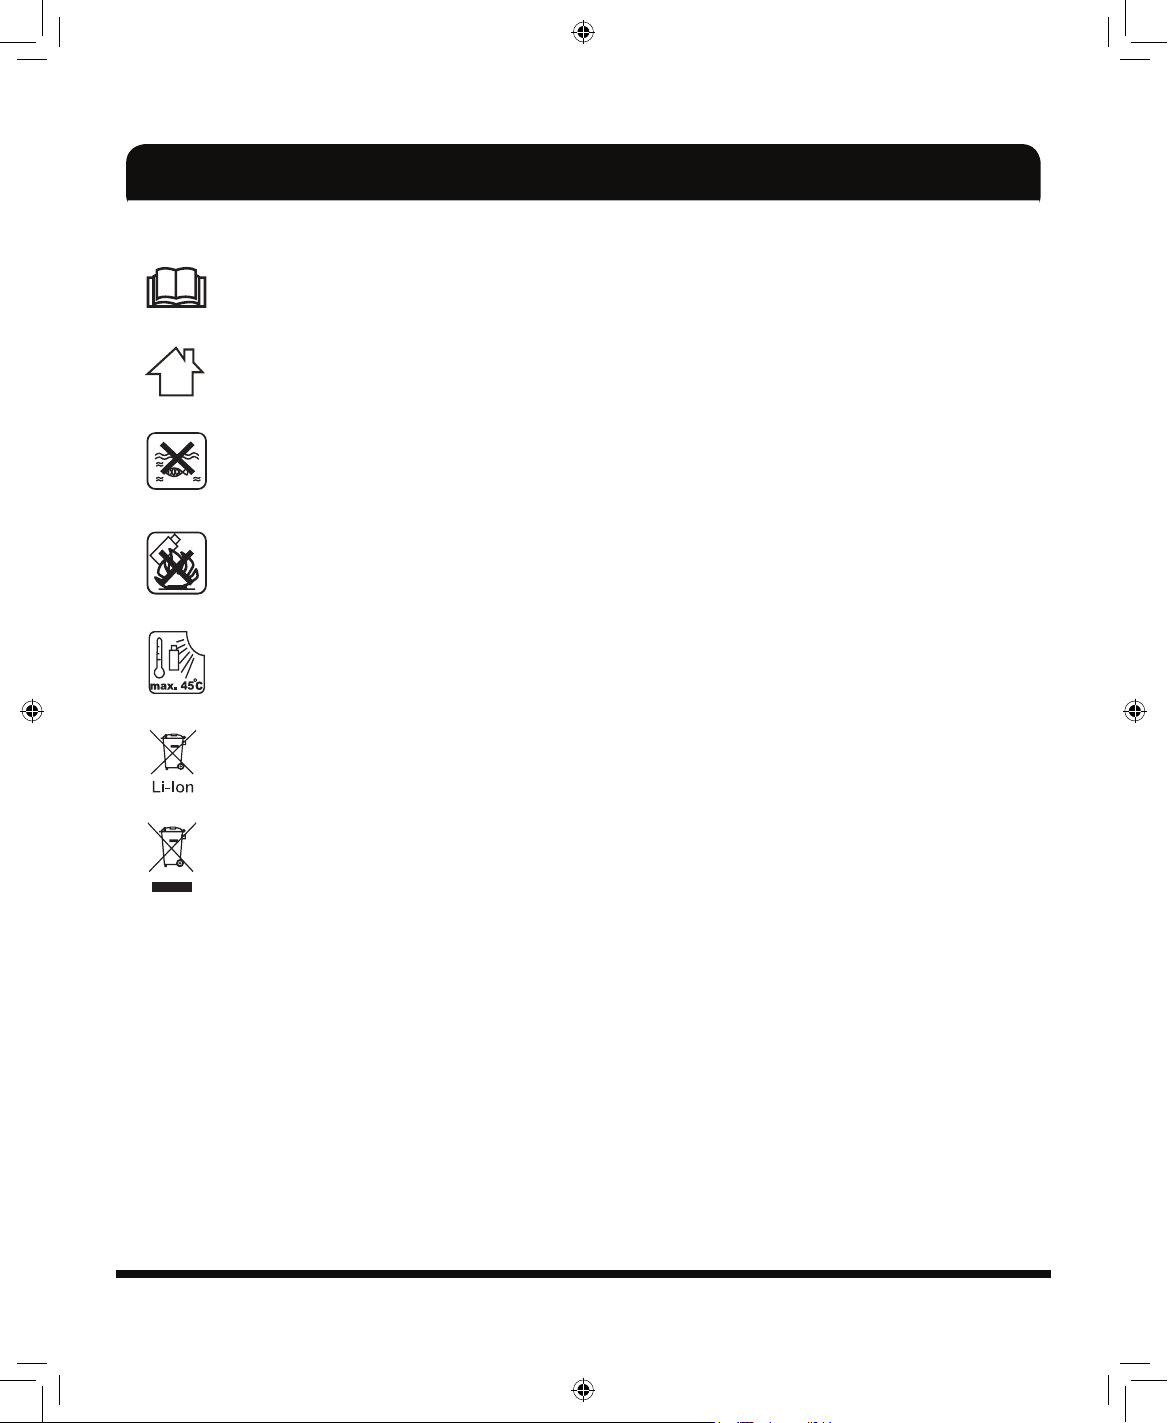
SAFETY SYMBOLS
Read operating manual before using!
Use indoors only!
Keep clean and dry!
Avoid storage in direct sunlight!
Dispose of properly!
Dispose of properly!
YF4050PB.indd 4 15-5-4 ��11:42
Do not expose to heat or fire!
5
TECHNICAL SPECIFICATIONS
INTENDED USE
Model YF4050PB
Nominal voltage with battery 40V, DC, 4Ah
Working pressure with container water 450psi
Working pressure with tap water 500psi
Max pressure 800psi
Flow rate with container water 0.85GPM
Flow rate with tape water 1.00GPM
Inlet pressure 44 psi
Supply water temperature
use cold water only (max.104°F)
High-pressure Hose 19 ft.
Detergent injection rate 3%~12%
Battery Charger
Input 100~120V, 50/60Hz
Output DC40V, 2A
Charger time approx.120 minutes for 4Ah battery pack
The pressure washer is intended for cleaning the walls of buildings, facades,
terraces, footpaths, garden equipment, pressure washer, vehicles, tools, etc. with a
pressure water nozzle. If required, you can also use the pressure washer with added
household cleaning agents.
The pressure washer is to be used only for its prescribed purpose . any other use is
Deemed to be a case of misuse. The user/operator and not the manuafacturer will be
liable for any damage or injuries of any kind caused as a result of this.
Please note that our equipment has not been designed for use in commercial, trade
or industrial applications. Our warranty will be voided if the pressure washer is used
in commercial, trade or industrial businesses or for equivalent purposes.
YF4050PB.indd 5 15-5-4 ��11:42

6
IMPORTANT SAFETY INSTRUCTIONS
Please read all of the safety precautions before operating this pressure washer
every time.
Please pay particular attention to all sections with following symbols.
The following signal words and meanings are intended to explain the levels of risk
associated with this product.
DANGER!
Indicates an imminently hazardous situation which, if not avoided, will result in death
or serious injury.
WARNING!
Indicates a potentially hazardous situation which, if not avoided, could result in death
or serious injury.
CAUTION!
Indicates a potentially hazardous situation which, if not avoided, may result in minor or
moderate injury.
CAUTION!
(Without Safety Alert Symbol) Indicates a situation that may result in property damage.
WARNING! -
When using this product basic precautions should always be
followed, including the following:
1. Read all the instructions before using the pressure washer.
2. To reduce the risk of injury, close supervision is necessary when pressure washer
is used near children.
3. Know how to stop the pressure washer and release pressures quickly. Be
thoroughly familiar with the controls.
4. Stay alert-watch what you are doing.
YF4050PB.indd 6 15-5-4 ��11:42

7
5. Do not operate the pressure washer when fatigued or under the influence of
alcohol or drugs.
6. Keep operating area clear of all persons.
7. Do not overreach or stand on unstable support .keep good footing and balance at
all times.
8. Follow the maintenance instructions specified in the manual.
9. This pressure washer or its power cord contains lead, a chemical known to cause
cancer, birth defects or other reproductive harm. Wash hands after handling.
WARNING -Risk of injection or injury – Do Not Direct Discharge Stream At
persons.
10. Never operate the pressure washer without all components properly connected to
the pressure washer (handle, gun/wand assembly, nozzle, etc.).
11. Never operate pressure washer with broken or missing parts. Check equipment
regularly and repair or replace worn or damaged parts immediately.
12. Never put hand or fingers over the nozzle or spray tip while operating the pressure
washer.
13. Never spray flammable liquids or use pressure washer in areas containing
combustible dust, liquids or vapors. An electric spark could cause an explosion.
14. Never leave the wand unattended while the pressure washer is running or
switched on.
15. Never disconnect the High-pressure discharge hose from the pressure washer
while the system is pressurized. To depressurize pressure washer, turn power
and water supply off, then depress gun trigger 2-3 times.
16. Never cover the pressure washer during operation to allow free air cooling.
17. Always wear safety glasses or goggles when operating or performing
maintenance.
18. Always move switch on unit to “OFF” position before pulling the battery pack out.
19. Always turn water supply “ON” before turning pressure washer “ON” unless
draining for storage. Running pump dry causes serious damage.
20. Always hold gun and wand firmly when starting and operating the pressure
washer.
21. Always follow detergent manufacturer’s label recommendations for proper use
of detergents. Always protect eye, skin and respiratory system from detergent if
used.
22. Always lock the trigger of spray gun in the safety position when not in use.
23. Do not use pressure that exceeds the operating pressure of any of the parts (hoses,
fittings, etc.) in the pressurized system. Never use with any other manufacturer’s
YF4050PB.indd 7 15-5-4 ��11:42

8
accessories or components.
24. Do not spray electrical apparatus and wiring or the pressure washer itself.
25. Do not operate the pressure washer with the inlet water filter removed. Keep filter
clear of debris and sediment.
26. Discharge residual pressure by depressing the trigger until no more water comes
out of the nozzle.
27. Keep clear of nozzle. Never direct high-pressure spray at any person, animal or
self.
28. To minimize the amount of water getting into the pressure washer, the pressure
washer should be placed as far as possible from the cleaning site during
operation.
WARNING
RISK OF INJURY
INJECTION HAZARD
1. Equipment can cause serious injury if the spray penetrates the skin. Do not point
the gun at anyone or any part of the body. In case of penetration, seek medical
aid immediately.
2. This system is capable of producing 870psi. To avoid rupture and injury, do not
operate this pump with components rated less than 870psi working pressure
(including but not limited to spray guns, hose, and hose connections).
3. Before servicing, cleaning, or removal of any part, switch off power and relieve
pressure.
WARNING
RISK OF INJURY
DO NOT DIRECT DISCHARGE STREAM AT SELF OR OTHER
PERSONS.
1. High-Pressure jet can be dangerous if misused.
2. The jet must not be directed at persons, animals, electrical devices, or the unit
itself.
YF4050PB.indd 8 15-5-4 ��11:42

9
WARNING
RISK OF EXPLOSION-DO NOT SPRAY FLAMMABLE LIQUIDS
Do not use acids, alkaline, solvents or any flammable material in this product.
These products can cause physical injuries to the operator and irreversible damage
to the pressure washer.
CAUTION
GUN KICK BACK
1. Hold with both hands.
2. The trigger gun safety lock prevents the trigger from being engaged accidentally.
3. The safety feature does not lock trigger in the ON position.
CAUTION
This pressure washer has been designed for use with detergents that are
specifically approved for pressure washer use. The use of other cleaning
detergents may affect the operation of the pressure washer and void the
warranty.
SAFETY WARNINGS FOR BATTERY PACK
1. Do not dismantle, open or shred cells or battery pack.
2. Do not short-circuit a battery pack. Do not store battery packs haphazardly in a
box or drawer where they may short circuit each other or be short-circuited by
conductive materials. When battery pack is not in use, keep it away from other
metal objects, like paper clips, coins, keys, nails, screws or other small metal
objects, that can make a connection from one terminal to another. Shorting the
battery terminals together may cause burns or a fire.
3. Do not expose battery pack to heat or fire. Avoid storage in direct sunlight.
4. Do not subject battery pack to mechanical shock.
5. In the event of battery leaking, do not allow the liquid to come into contact with
the skin or eyes. If contact has been made, wash the affected area with copious
amounts of water and seek medical advice.
6. Seek medical advice immediately if a cell or battery pack has been swallowed.
7. Keep battery pack clean and dry.
8. Wipe the battery pack terminals with a clean dry cloth if they become dirty.
YF4050PB.indd 9 15-5-4 ��11:42

10
9. Battery pack needs to be charged before use. Always refer to this instruction and
use the correct charging procedure.
10. Do not maintain battery pack on charge when not in use.
11. After extended periods of storage, it may be necessary to charge and discharge
the battery pack several times to obtain maximum performance.
12. Battery pack gives its best performance when it is operated at normal room
temperature (68 °F ± 9 °F).
13. When disposing of battery packs, keep battery packs of different electrochemical
systems separate from each other.
14. Recharge only with the charger specified by manufacturer. Do not use any
charger other than that specifically provided for use with the equipment. A
charger that is suitable for one type of battery pack may create a risk of fire when
used with another battery pack.
15. Do not use any battery pack which is not designed for use with the equipment.
16. Keep battery pack out of the reach of children.
17. Retain the original product literature for future reference.
18. Remove the battery from the equipment when not in use.
19. Dispose of properly.
GENERAL SAFETY WARNINGS FOR YOUR BATTERY CHARGER
WARNING
Read all safety warnings and all instructions.
Failure to follow the warnings and instructions may result in electric shock, fire and/
or serious injury.
Save all warnings and instructions for future reference.
- This pressure wahser is not intended for use by persons (including children)
with reduced physical, sensory or mental capabilities, or lack of experience and
knowledge, unless they have been given supervision or instruction concerning use of
the pressure wahser by a person responsible for their safety.
- Children should be supervised to ensure that they do not play with the pressure
wahser.
Additional Safety Instructions For Your Battery Charger
1. Before charging, read the instructions.
YF4050PB.indd 10 15-5-4 ��11:42

11
2. After charging, disconnect the battery charger from the supply mains. Then
remove the chassis connection and then the battery connection.
3. Do not charge a leaking battery.
4. Do not use chargers for works other than those for which they are designed.
5. Before charging, ensure your charger is matching the local AC supply.
6. For indoor use, or do not expose to rain.
7. The charging device must be protected from moisture.
8. Do not use the charging device in the open.
9. Do not short out the contacts of battery or charger.
10. Respect the polarity “+/-“when charging.
11. Do not open the unit and keep out of the reach of children.
12. Do not charge the batteries of other manufactures or ill-suited models.
13. Ensure that the connection between the battery charger and battery is correctly
positioned and is not obstructed by foreign bodies.
14. Keep battery charger’s slots are free of foreign objects and protect against dirt
and humidity. Store in a dry and frost-free place.
15. When charging batteries, ensure that the battery charger is in a well-ventilated
area and away from inflammable materials. Batteries can get hot during charging.
Do not overcharge any batteries. Ensure that batteries and chargers are not left
unsupervised during charging.
16. Do not recharge non-rechargeable batteries, as they can overheat and break.
17. Longer life and better performance can be obtained if the battery pack is charged
when the air temperature is between 64°F and 75°F. Do not charge the battery
pack in air temperatures below 32°F, or above 113°F. This is important as it can
prevent serious damage to the battery pack.
18. Charge only battery pack of the same model provided by manufacturer and of
models recommended by manufacturer.
YF4050PB.indd 11 15-5-4 ��11:42
12
ASSEMBLY
WARNING!
Remove the battery pack before carrying out any work on the pressure washer, and
use only original parts.
Before starting any cleaning task, it is important to inspect the area for objects that
could create a hazard. Remove any objects from the work area that could be tripped
over, such as toys or outdoor furniture. Ensure that all doors and windows are closed
tightly.
Fig. 4
Fig. 5
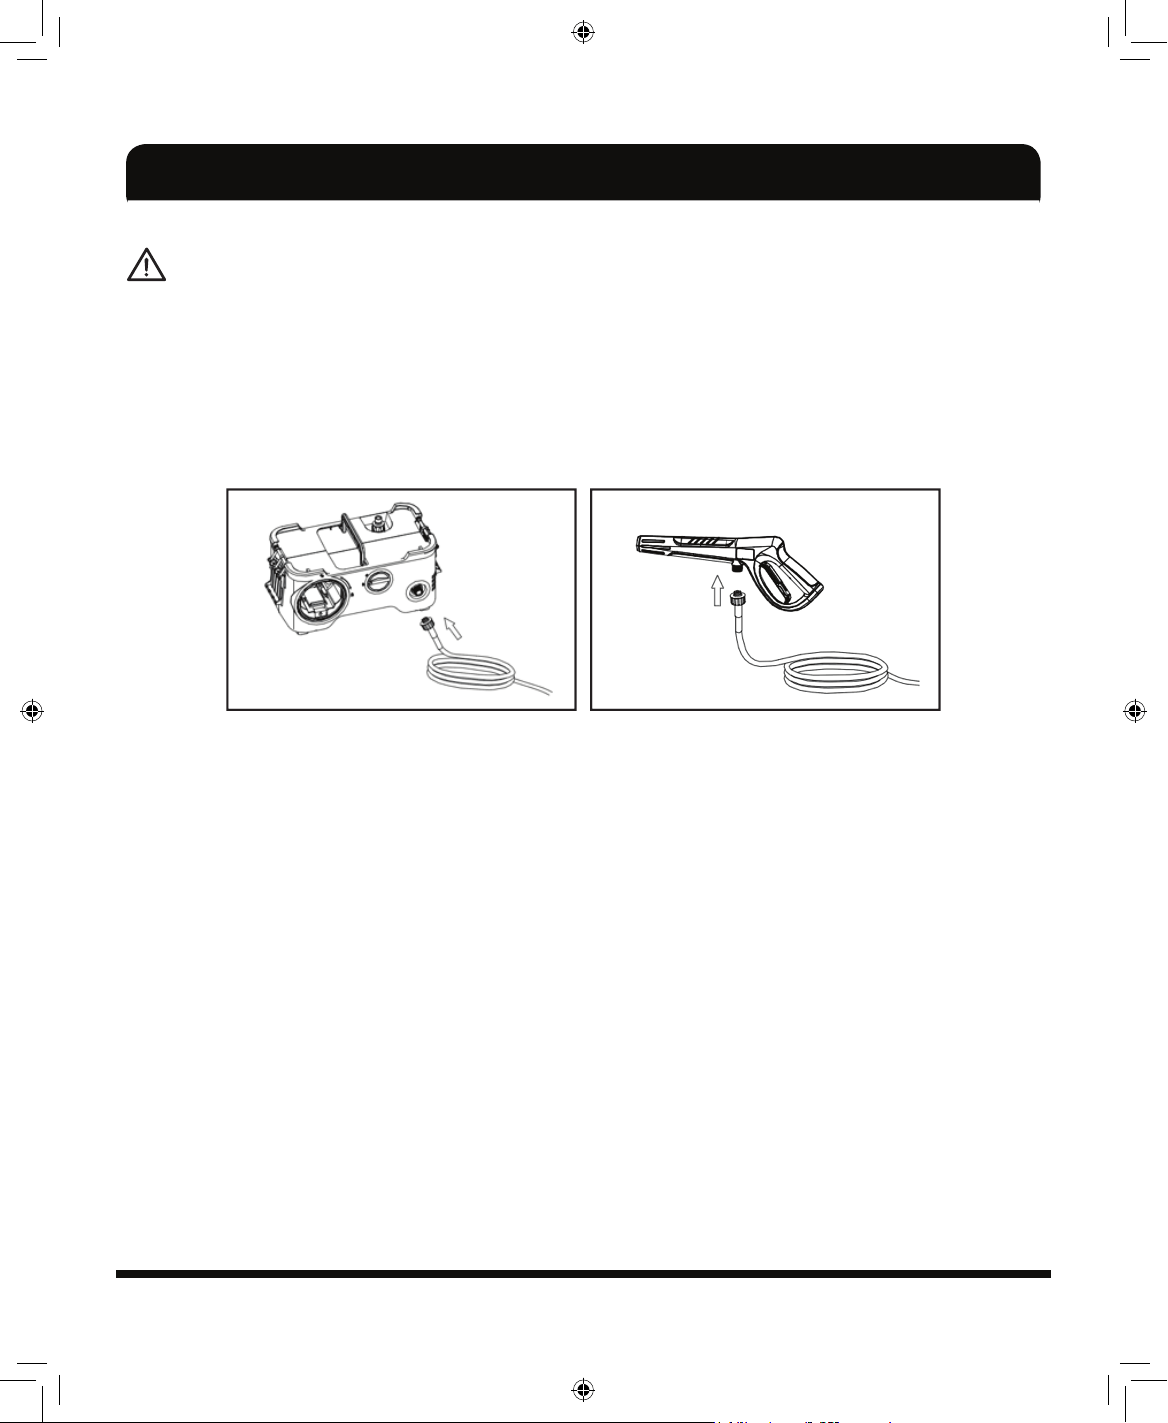
Connect the hose to the pressure washer
As shown in Fig. 4
Attach High-pressure hose to the pressure washer’s water outlet (hand tighten only).
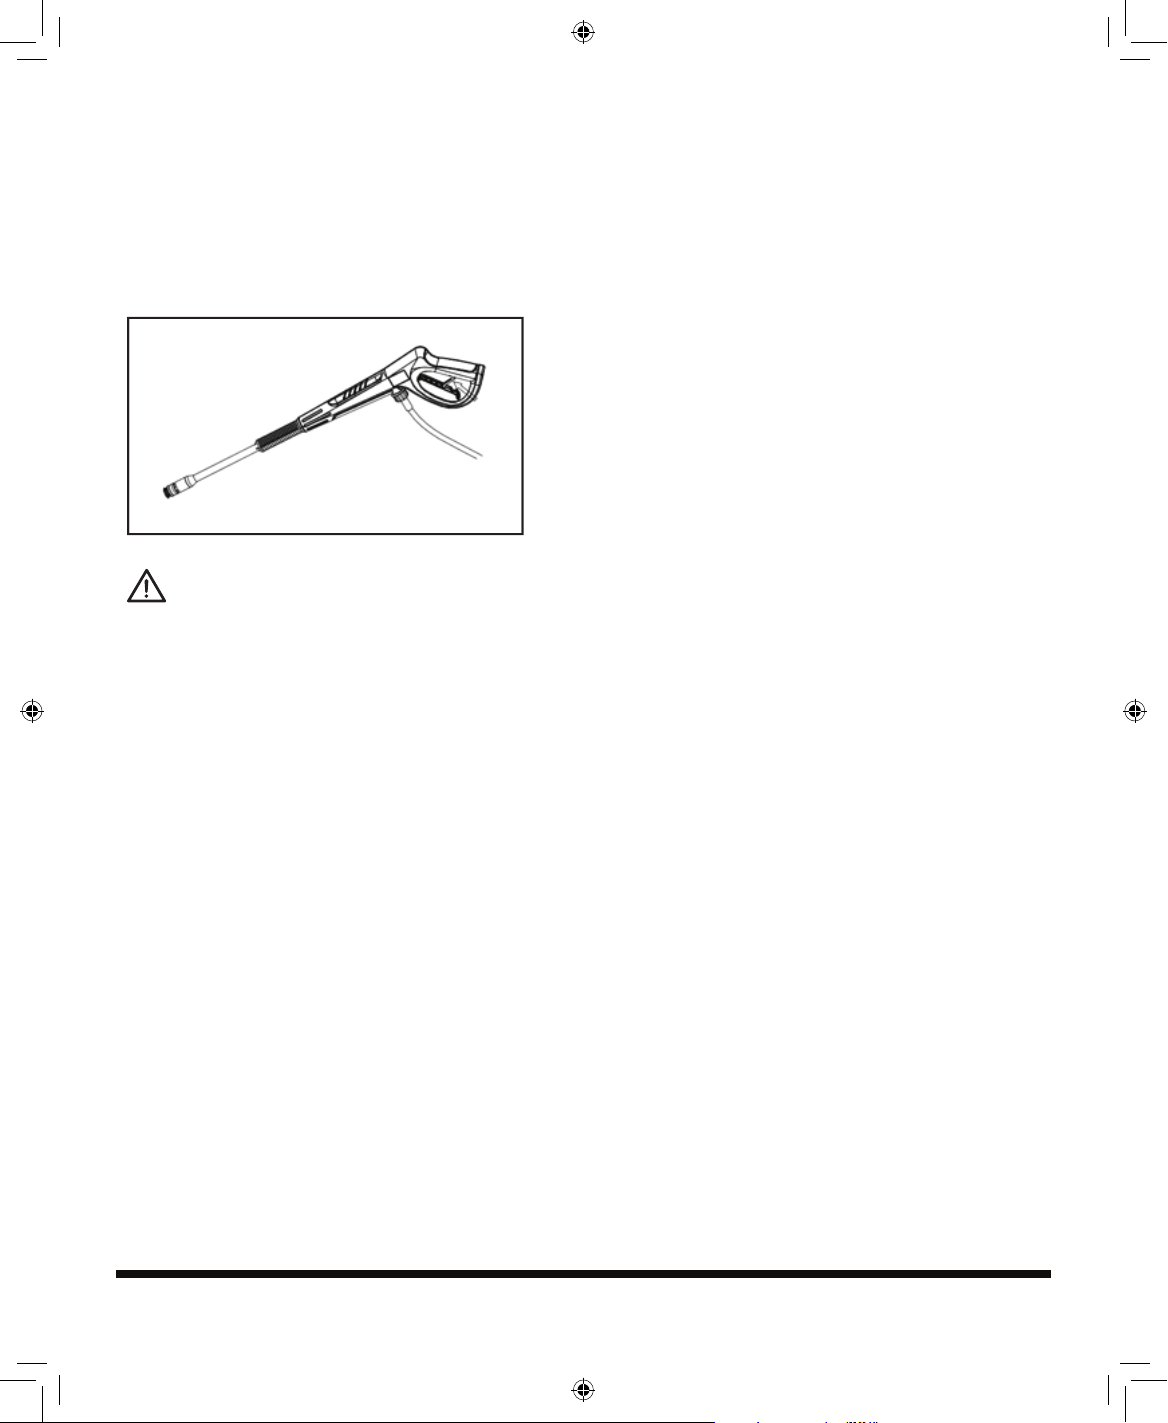
Connect the hose to trigger handle
As shown in Fig. 5
Screw the High-pressure hose firmly onto the trigger handle.
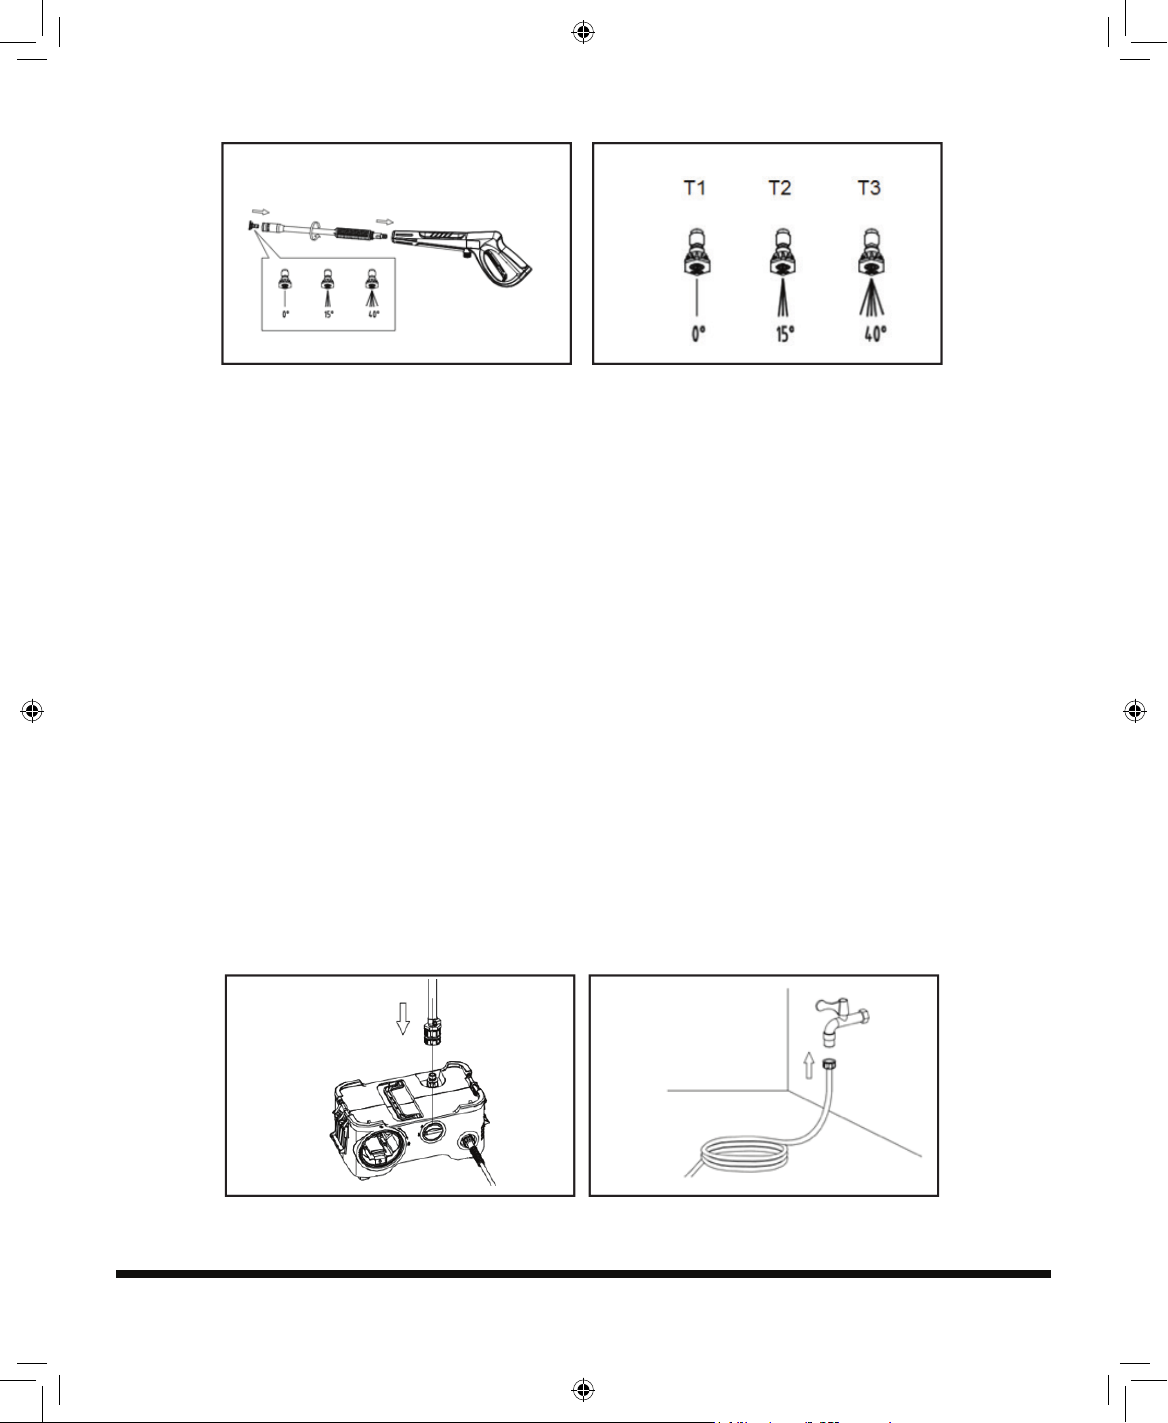
Fit the spray nozzle to trigger handle
As shown in Fig.6
Attach desired color coded spray nozzle to quick-connect wand by pushing to
ensure it is clicked in securely. Insert quick–connect wand into the trigger handle and
twist it, hand tighten until two parts are locked.
YF4050PB.indd 12 15-5-4 ��11:42
13
Fig. 6
Fig. 7
Function of each spray nozzles
As shown in Fig.7
The spray nozzles are for purposes as below:
T1: Red -0 °: Concentrate water flow on work Area, quite useful for cleaning
stubborn dirt.
T2: Yellow-15°: Delivers balanced pressure and flow for general cleaning.
T3: White-40°: For delicate cleaning.
Connect to water supply
Two types of water source are available for this pressure washer. Based on your
actual demand to select one of them.
Option 1: By using female coupling connector with back-flow preventer function
(supplied), connect to potable water source. Or using other back-flow prevention
device which conforming to the requirements of the American Society of Sanitary
Engineers.
Option 2: Using the water container.
Using potable water supply as water source
As shown in Fig.8-9
Fig. 8
Fig. 9
YF4050PB.indd 13 15-5-4 ��11:42
14
WARNING!
Before following action, make sure the ON/OFF switch is on the "OFF "position.
The following accessory is required for connecting to the pressure washer (not
supplied):
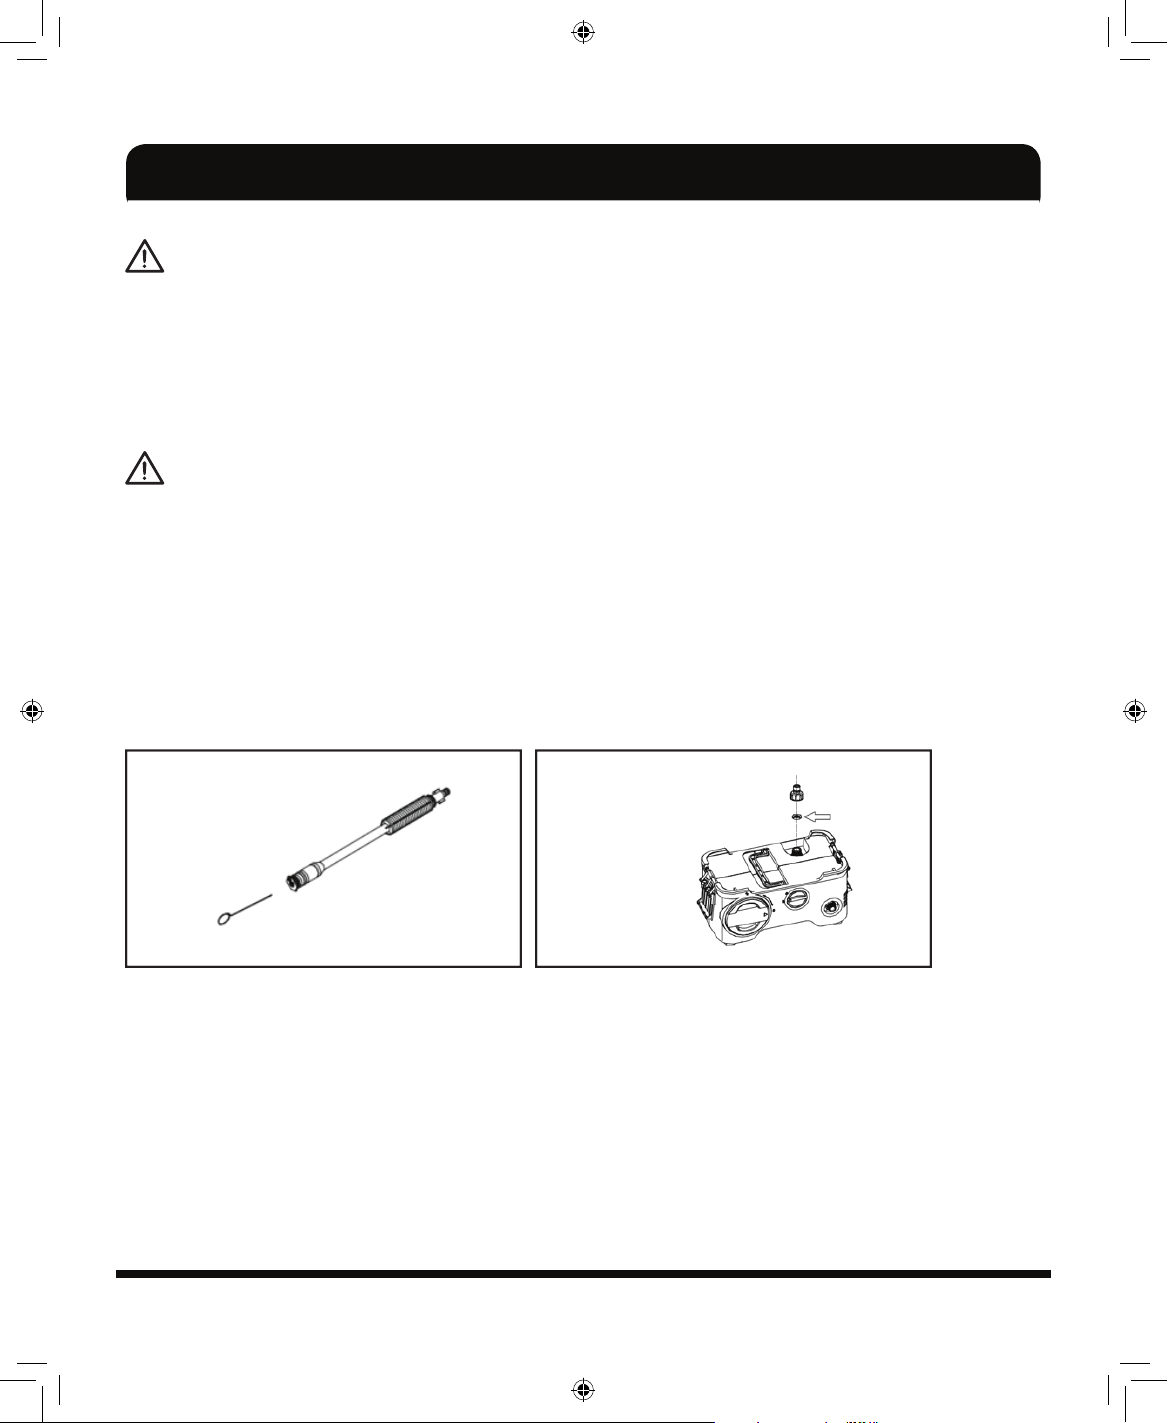
1. A water supply hose – it is a fabric-reinforced hose with a minimum diameter of
½ inch.
2. Screw the inlet adapter onto the pressure washer.
3. Attach a water supply hose with coupling connector(supplied) to the inlet adapter.
4. Connect the other end of water supply hose to the potable water tap.
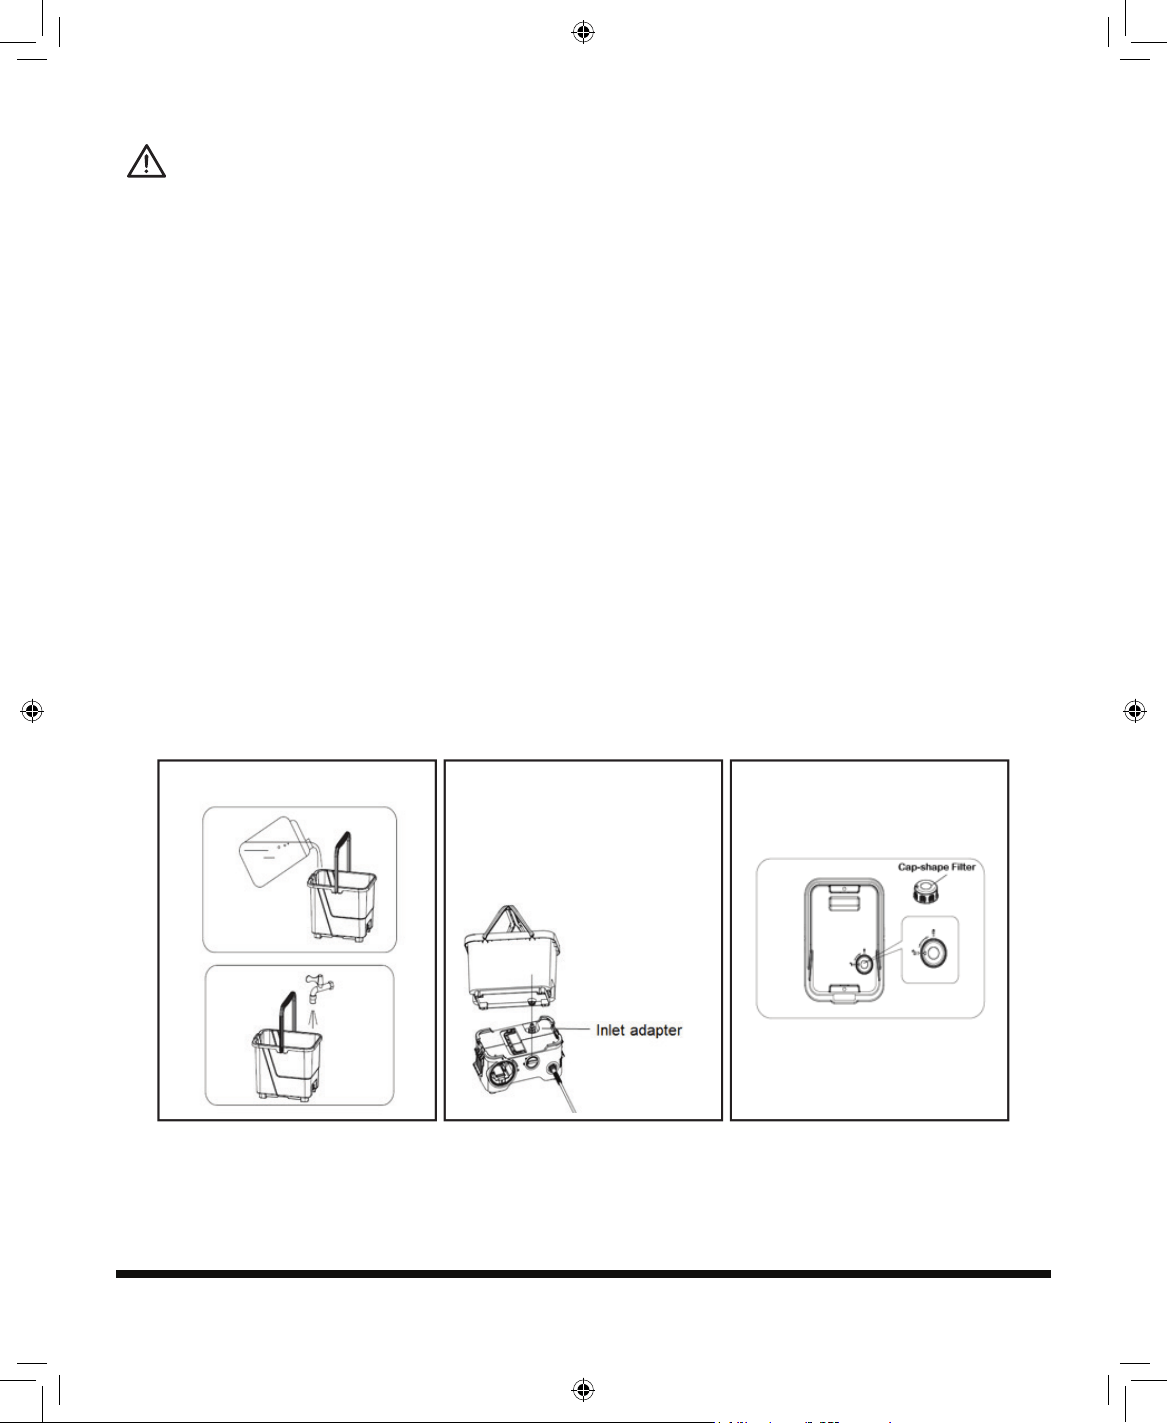
Using the water container as water source
As shown in Fig.10-13
This high-pressure washer is equipped with water container that is convenient to use
in case of no sustainable water supply or far away from the water source .
1. Fill the container with clean water either by using other water carriers or
sustainable water source.
Fig. 10
Fig. 11
Fig. 12
YF4050PB.indd 14 15-5-4 ��11:42
15
NOTE!
1. Make sure the inlet adapter stays on the inlet of the pressure washer.
2. Carefully place the container onto the pressure washer.
3. Align arrow on the cap-shape filter with the unlock position on the container.
then turn the cap-shape filter to lock position.
4. To fix the cap-shape filter in place.
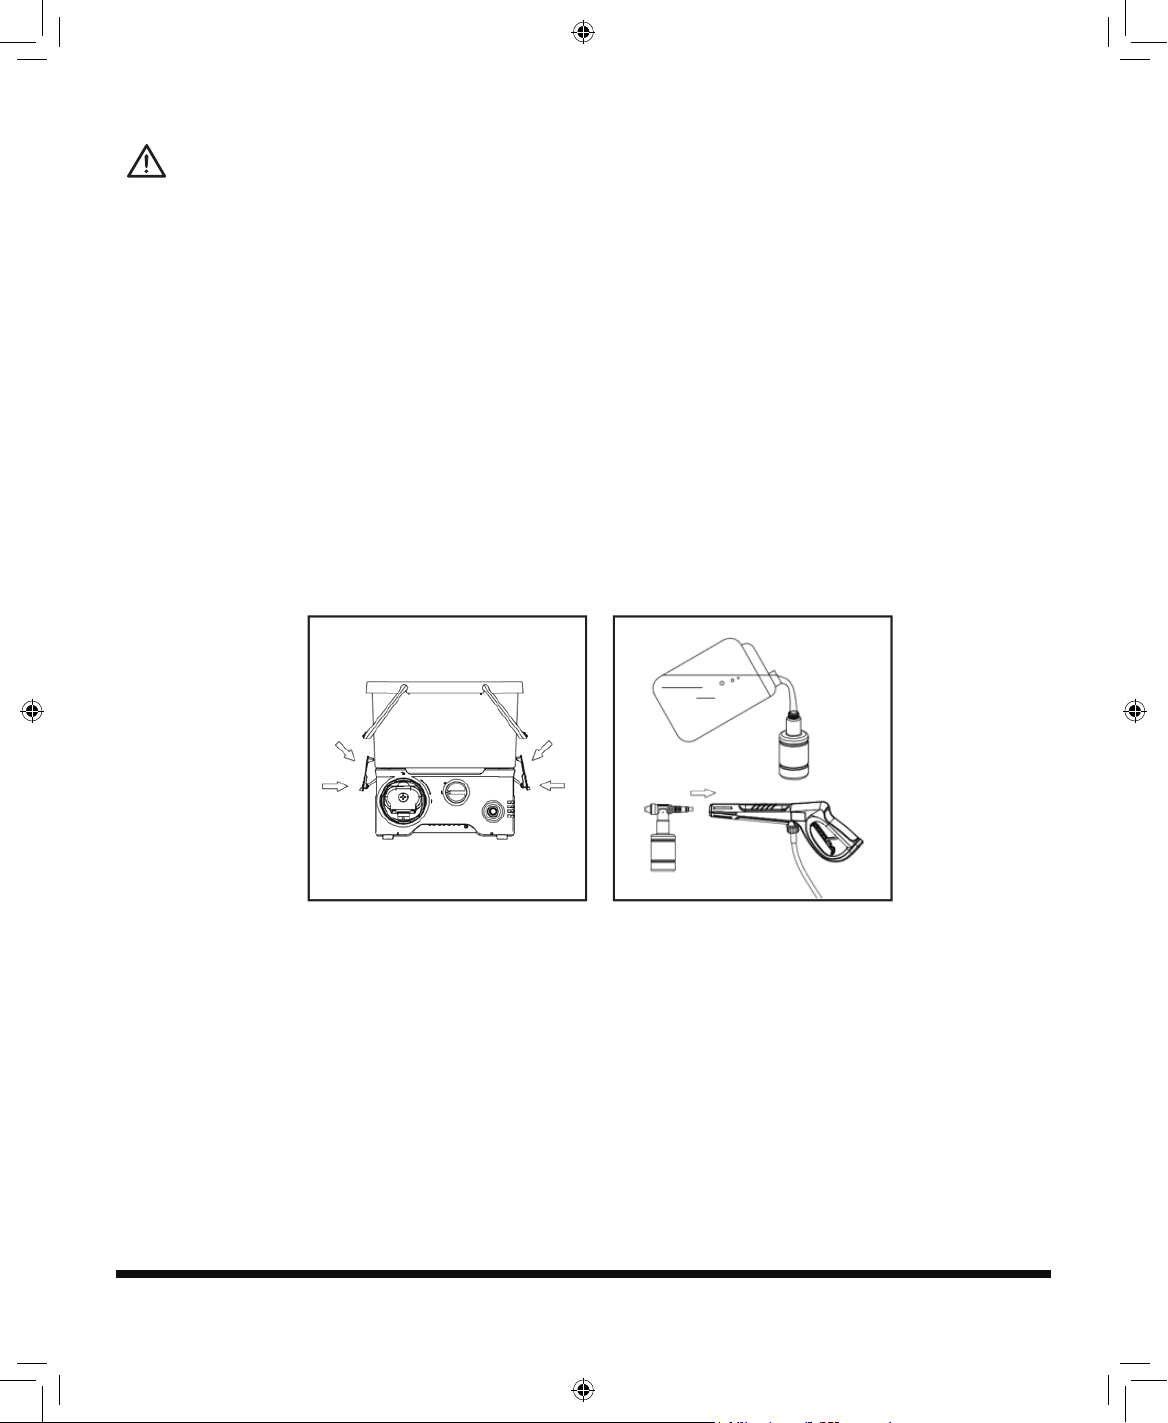
5. Fasten the container to the high-pressure washer by using the locking hook,
make sure that the locking hook locks into place correctly.
Use the detergent bottle
As shown in Fig. 14
1. Stop the pressure washer.
2. Add detergent to the bottle.
3. Attach the detergent wand onto the trigger handle.
Fig. 13 Fig. 14
YF4050PB.indd 15 15-5-4 ��11:42
16
Charging the battery pack
As shown in Fig.15
Fig. 15
NOTE: Remove the battery pack from the charger after it has been fully charged .
NOTE: This battery pack has been shipped in a low charge condition. It should
be fully charged before first use.
WARNING: Make sure the main voltage is the same as rating label which located
on the charger.
1. Connect the charger to a power source. You will hear a beep sound, and the green
LED light will be on.
2. To insert the battery pack into the charger, align the raised ribs of the battery pack
with the grooves of the charger. Then push it in, ensure the battery pack is in its
place.
3. The charger will communicate with the battery pack’s circuitry to evaluate the
capacity of the battery pack.
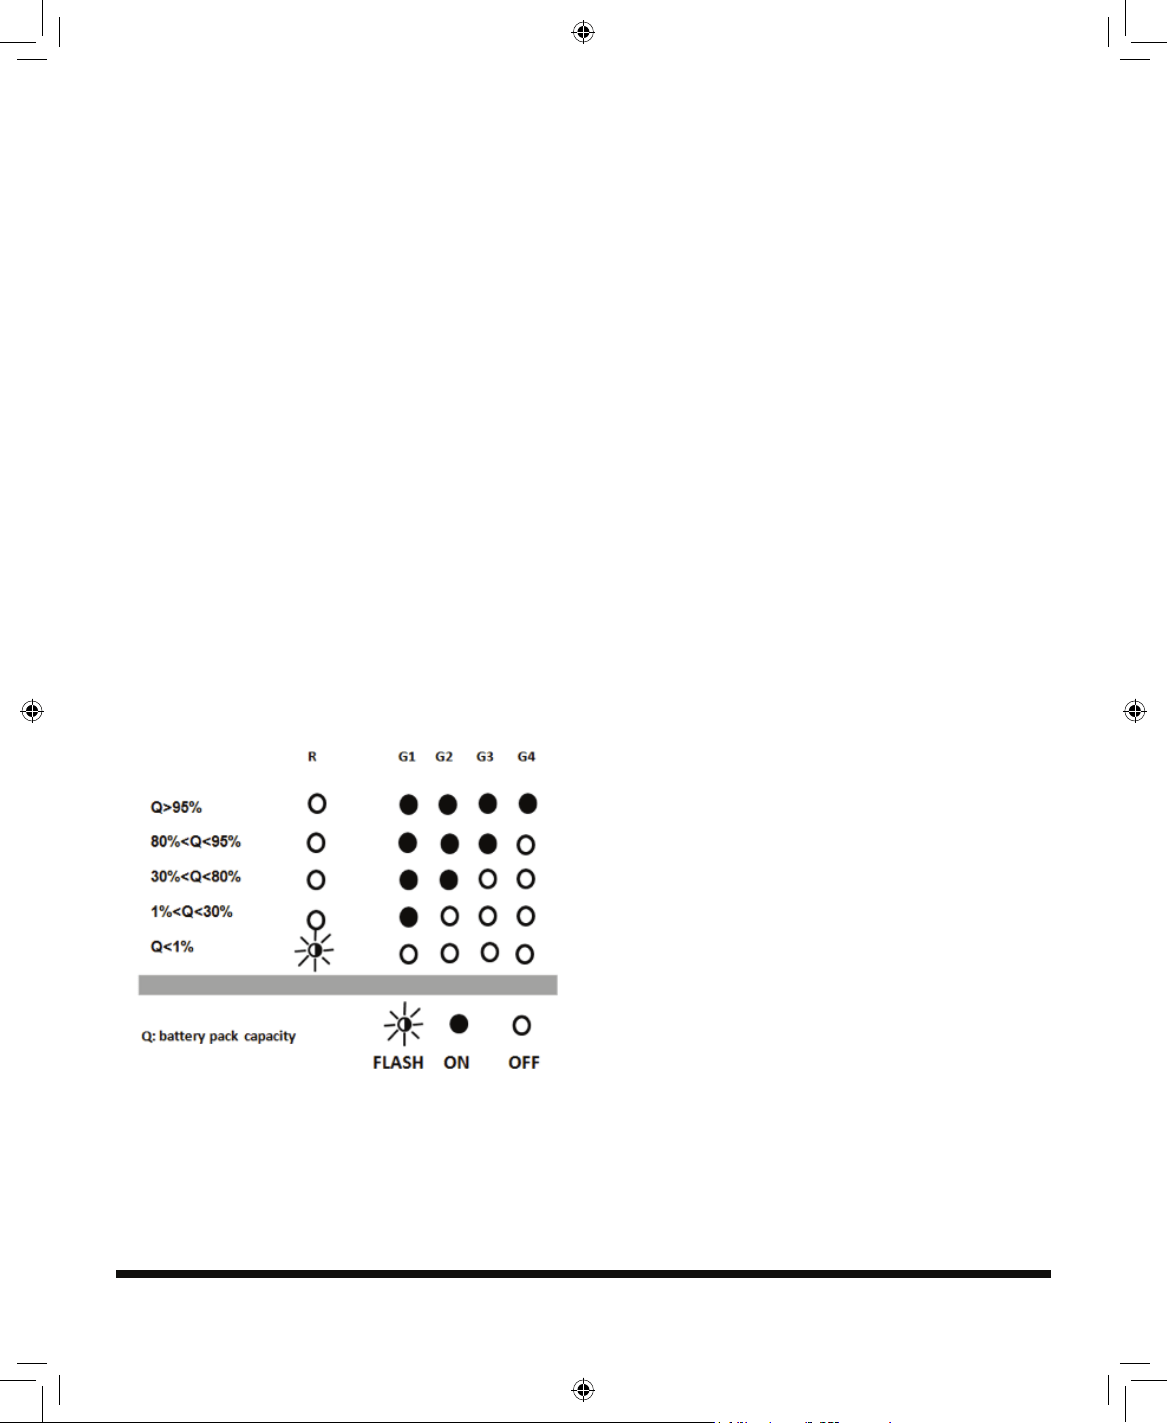
Charging status as following chart:
OPERATION
YF4050PB.indd 16 15-5-4 ��11:42
17
4. The green LED light of the charger will flash continuously during normal charging.
5. After charging is complete, you will hear a beep sound again, the green LED on
the charger will be on and the four green lights of the battery pack will be on for 3-5
seconds then turn off.
If encounter one of following kind of situation, the light of charger will turn red, and
flash, you will hear beep sound per second until the problem has been corrected.
- Wrong communication. It refers to poor connection between charger and battery
pack .
- Internal temperature of the battery pack is out of range from 32°F to 122°F.
- Full voltage of the battery pack less than 32V.
- Short circuit of the output, or overload.
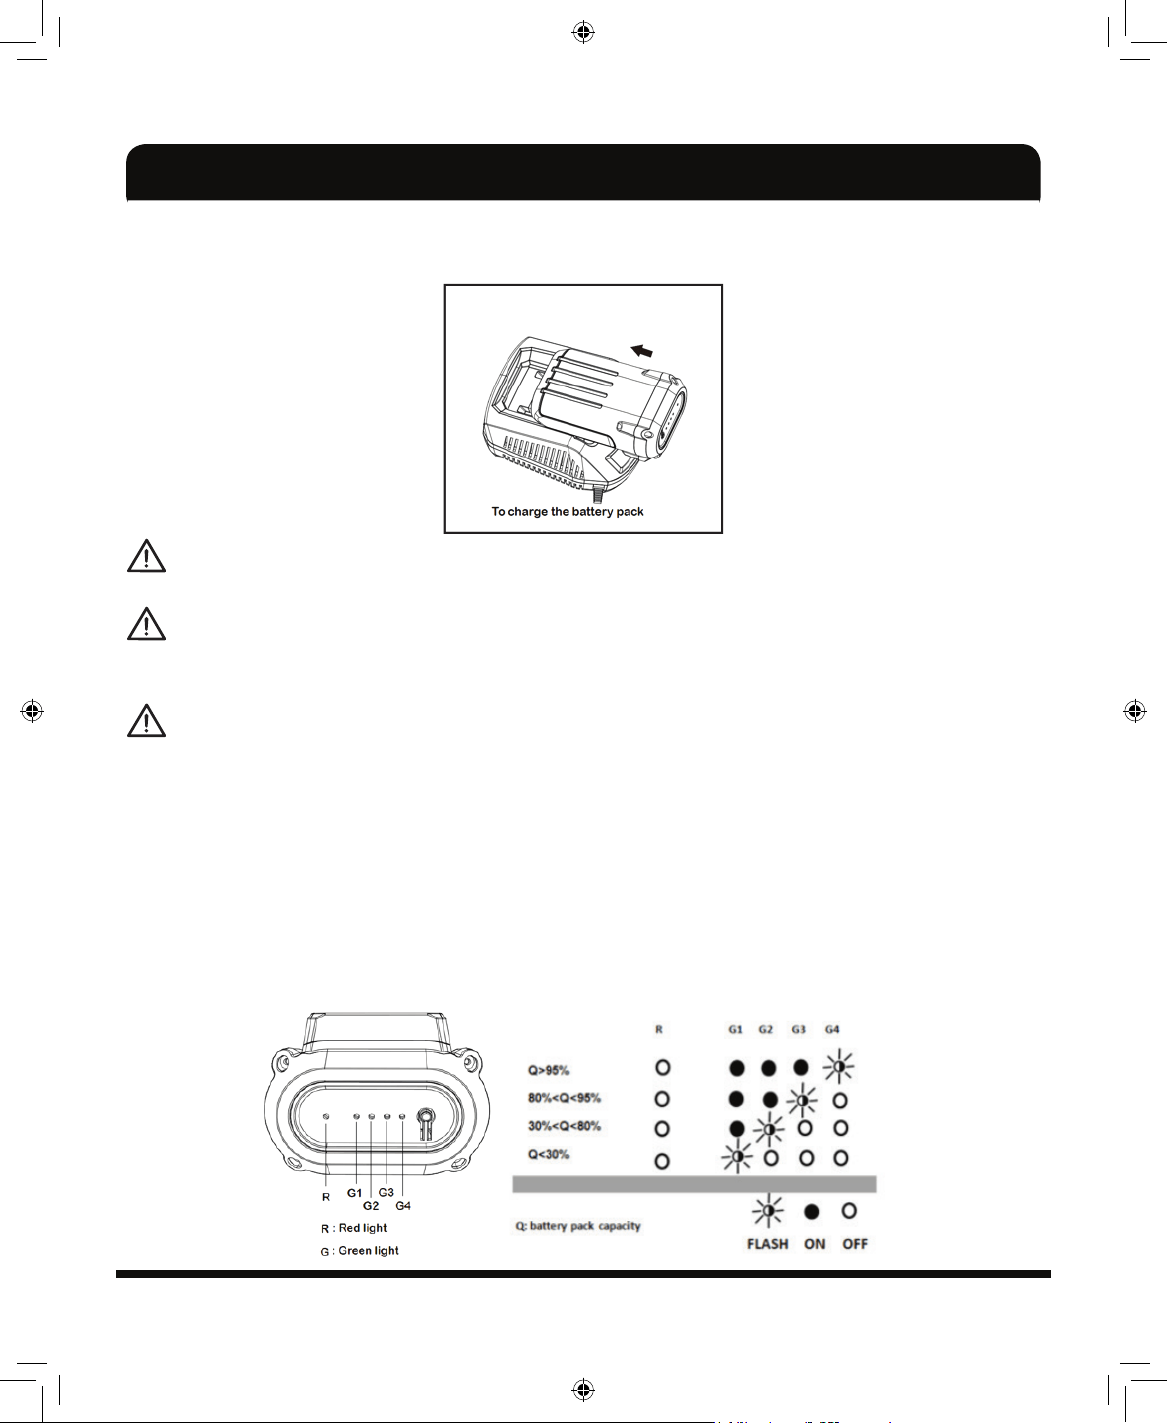
The power indicator LED lights
This Li-Ion battery pack is equipped with a power indicator which is used to give
an indication of the battery pack’s remaining charge. Press the power indicator
button to check battery charge as below. The LEDs will stay lit for approximately 4
seconds.
Meaning of power indicator:
Low capacity warning
Unlike other battery pack types, Lithium-Ion battery packs deliver fade-free power
for their entire run time. The tool will not experience a slow, gradual loss of power as
you work. If red LED on the battery pack begins to flash, the battery pack’s charge is
under 1% capacity and should be recharged.
YF4050PB.indd 17 15-5-4 ��11:42
18
To obtain the best life from the battery
1. Never allow the battery to completely discharge before recharging. The battery
pack should be placed on the charger whenever the battery pack is noticeably
running down or the tool no longer performs a task it previously performed.
2. Avoid conducting short charges. Make sure that the battery is fully charged every
time by allowing the charger to complete its full charging cycle.
3. Avoid allowing lose items like screws or nails etc. to be stored with battery packs
as these or similar items can short battery packs and cause a fire or explosion.
4. Always unplug the charger when not in use and store in a dry secure place.
5. Avoid charging or storing your battery in temperatures below 32°F and above
113°F.
6. Cool down hot battery pack from a just-operated tool for approximately 30
minutes before attempting to recharge.
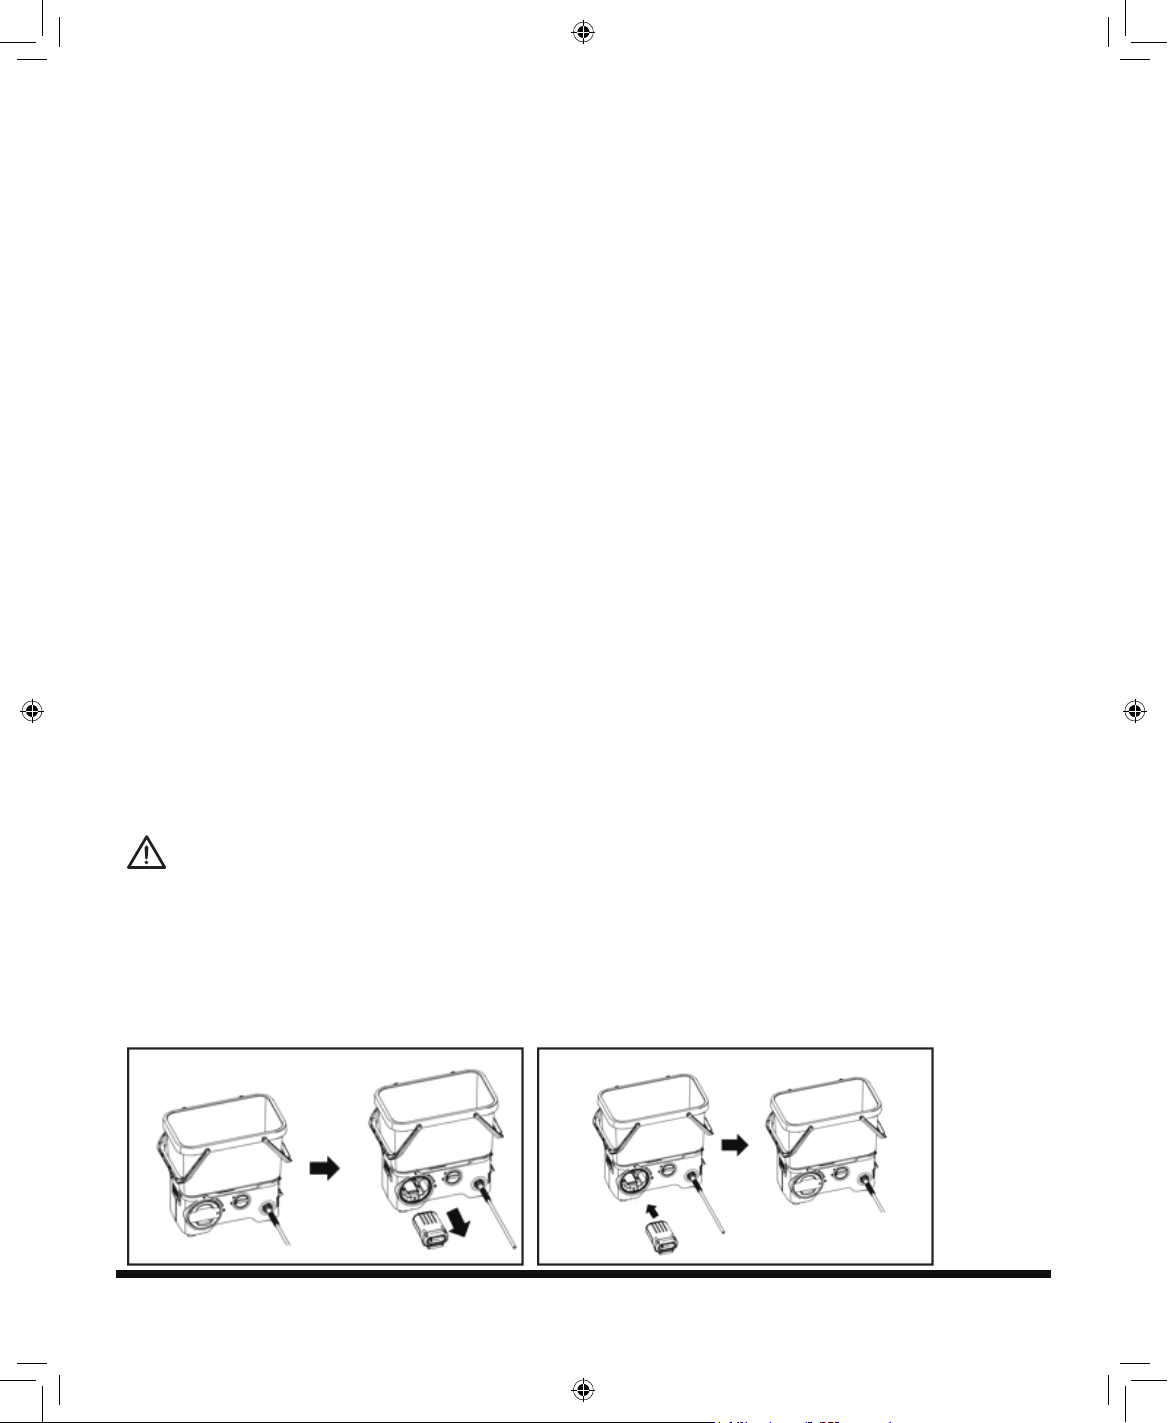
Removing and inserting the battery pack
To remove the battery pack from the tool
As shown in Fig.16
WARNING: Make sure the ON/OFF switch is set in the "OFF" position. Before
installing or removing the battery pack.
Firstly turn the battery pack compartment cover to unlock position and remove it.
Then press the battery pack release button down, the battery pack will come out
automatically and remove it .
Fig. 16
Fig. 17
YF4050PB.indd 18 15-5-4 ��11:42
19
To insert the battery pack
As shown in Fig.17
1. Align the battery pack with its compartment of the tool.
2. Push the battery pack into the hole until hear click sound.
3. It means the battery pack has been locked in position.
4. Turn the battery pack compartment cover to lock position.
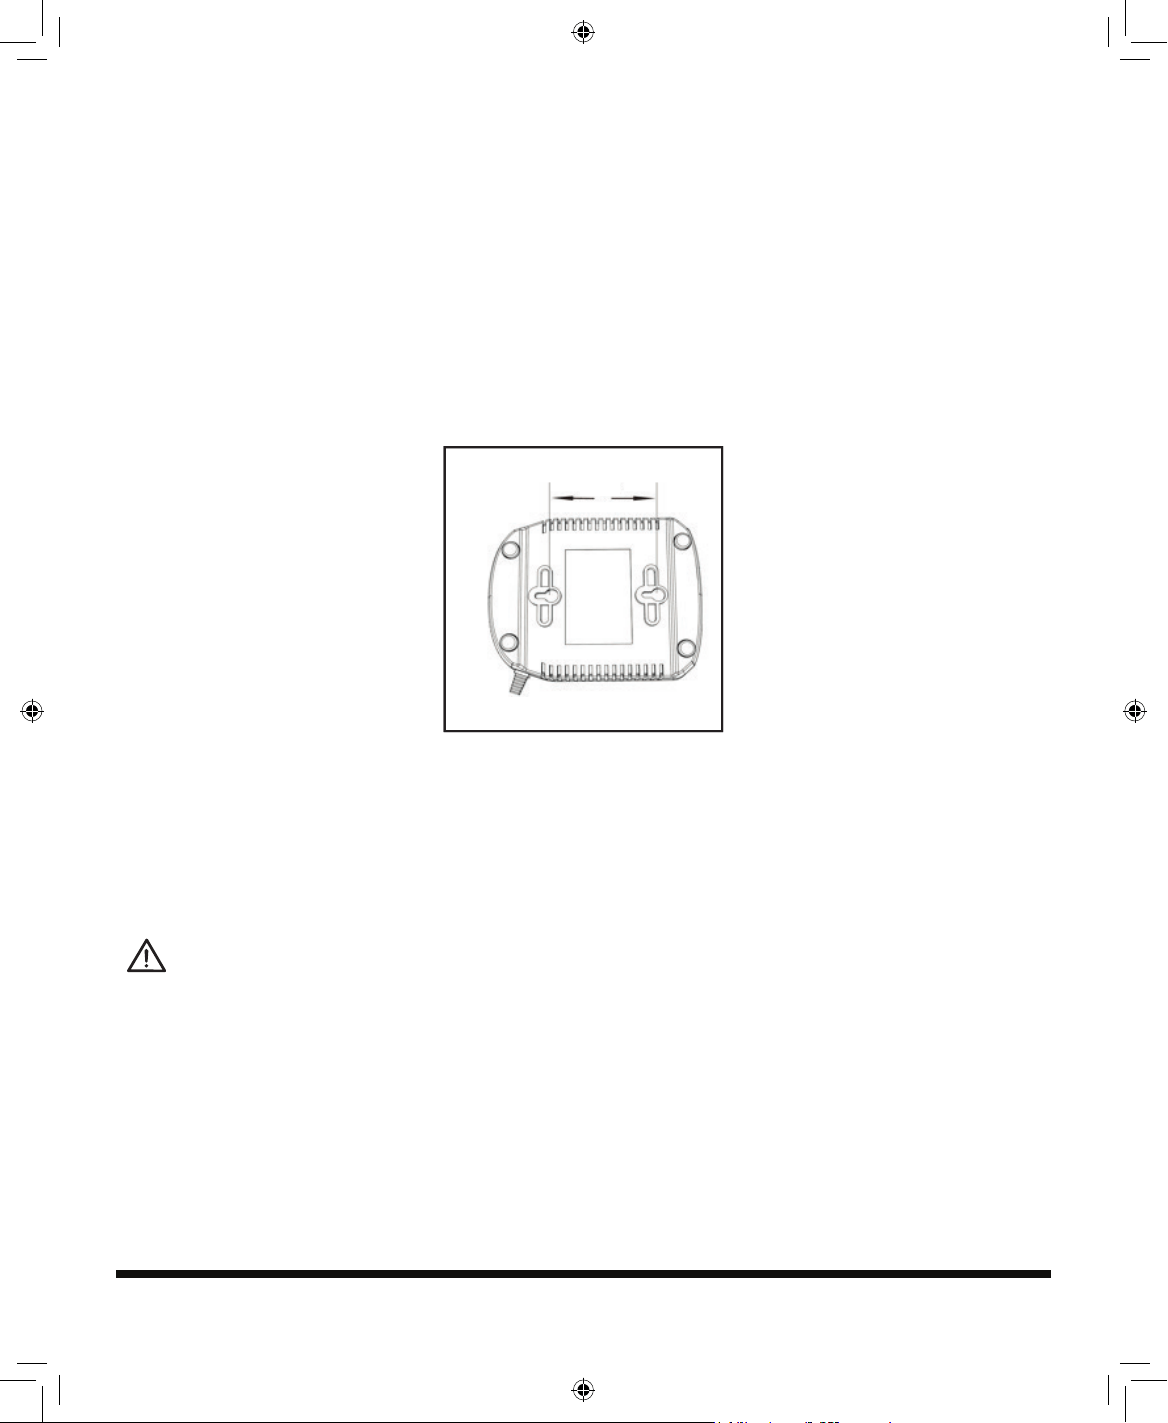
Wall-mount holes
As shown in Fig.18
Fig. 18Fig. 18
3.74 inches
The charger has hanging holes for convenient storage. Install screws in the wall
3.74 inches apart. Use screws sufficiently strong to hold the combined weight of the
charger and battery pack.
Before switching on and off
WARNING!
1) Wear suitable clothing, ears and eyes protecting when working with the pressure
washer.
2) Ensure that the pressure washer is functional before each use.
3) Never use the pressure washer in potentially explosive areas under any
circumstances.
4) The operating temperature must be between 41°F and 104°F.
5) Check the safe condition of the pressure washer:
– Check it for visual defects.
– Check that all parts of the pressure washer have been securely fitted.
– Check if the water connector and the high-pressure hose are tight.
YF4050PB.indd 19 15-5-4 ��11:42
20
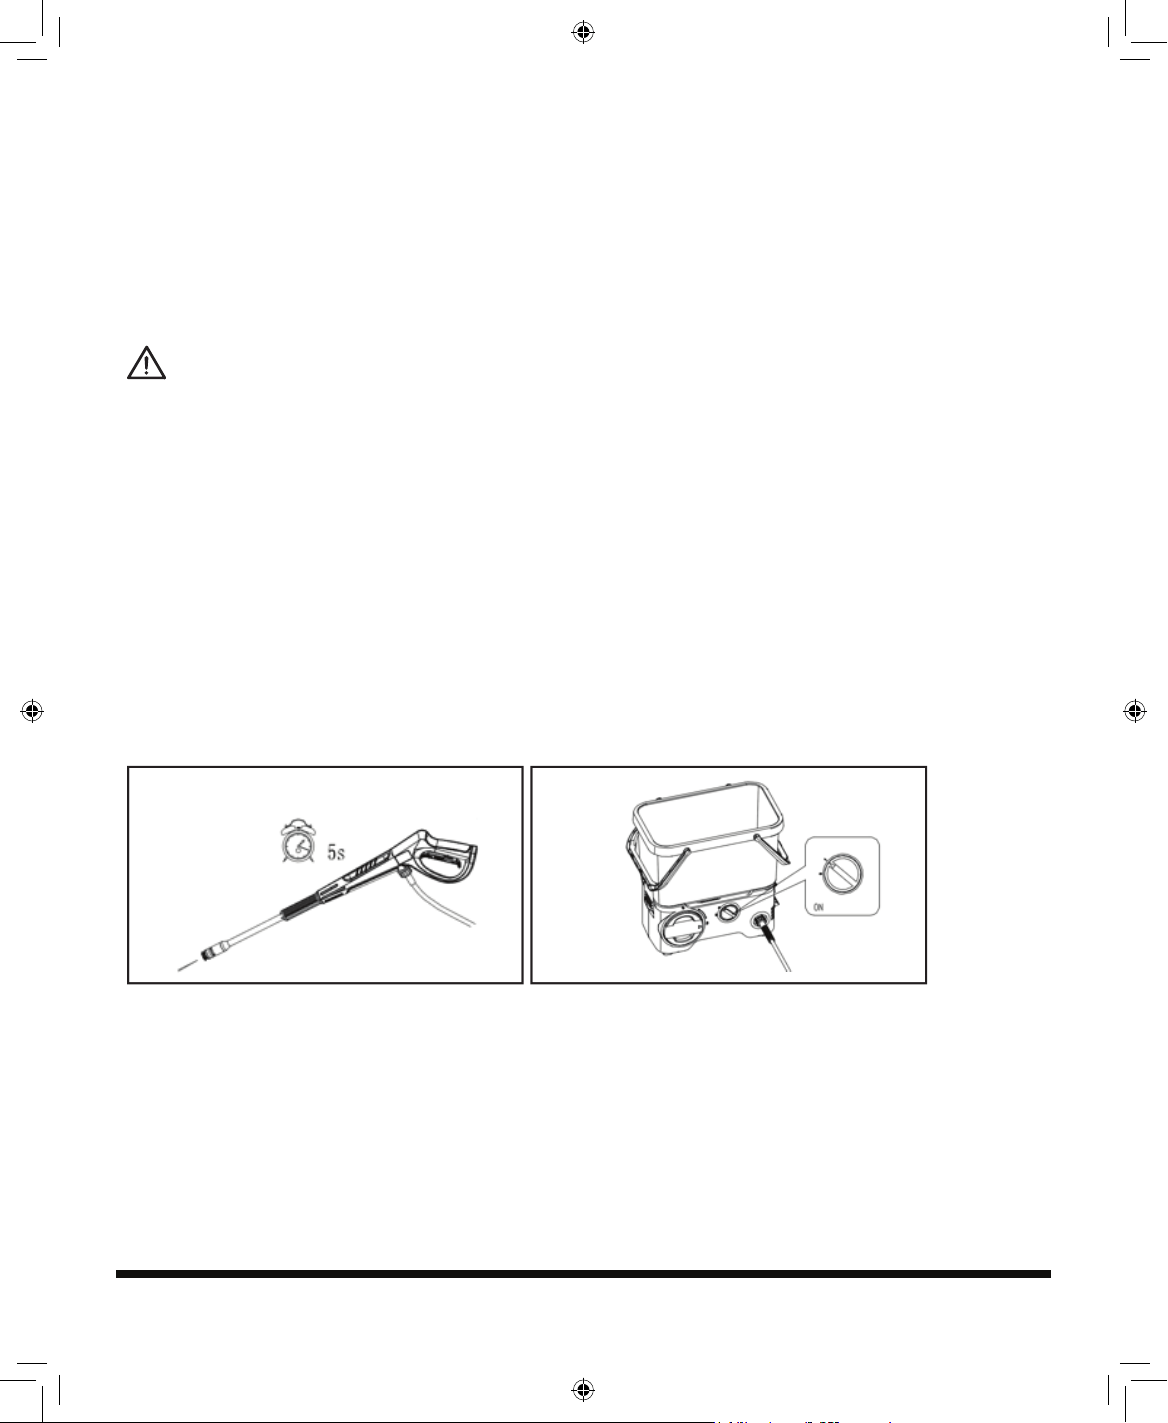
Switching on and off
As shown in Fig.19-20
NOTE! Put the High-pressure washer on a smooth ground. Stand in a secure and
stable position.
WARNING! Before switching on, ensure you have completely assembled the
high-pressure washer and connected all connections.
To switch on
You should maintain the correct operating position every time, use the pressure
washer by placing one hand on the trigger handle and the other on the wand.
1. Open the water inlet valve. (If using the potable water supply as source) If using
the water container as source, get started from step 2 directly.
NOTE! Before switching on, firstly purge pump around 5 seconds by squeezing
trigger handle.
Fig. 19
Fig. 20
2. To switch the pressure washer on, set the On/Off switch to "ON".
3.Unlock the safety trigger lever on the trigger handle, and press the trigger lever until
there is a steady stream of water.
To temporarily switch off
Release the trigger lever, at this point the pressure washer goes to standby. As soon
as you press the trigger lever again, the equipment restarts.
YF4050PB.indd 20 15-5-4 ��11:42
21
To completely switch off
As shown in Fig. 21
1. Release the trigger lever, and replace the safety lock.
2. To switch the pressure washer off, set the On/Off switch to "OFF".
3. Close the water inlet valve.
Fig. 21
Switch off completely
CAUTION! Risk of pressure washer damage!
Never operate the pressure washer without water inlet as dry running may damage
the pump. Use a water filter if the inlet water is contaminated.
Working with the electric high-pressure washer risk of fatal injury!
Use special care when cleaning tires. Vehicle tires/ tire valves may become damaged
or burst when handled improperly. First signs of damage included discolorations on
the tire.damaged vehicle tires/tire valves pose a life-threatening risk. Keep the jet at a
distance of at least 12 inches!
Risk of fatal injury!
The high-pressure jet may be dangerous when handled improperly. The jet may not
be directed towards living beings (persons, animals), live-equipment or the pressure
washer itself.
High-pressure working
Hold the hand-held spray gun and the wand firmly with both hands. Be aware of the
recoil when switching on the high-pressure jet.
Unlock the safety button and press the trigger on the handheld trigger handle.
The high-pressure pump starts running as soon as you operate the handheld trigger
handle.
The high-pressure pump stops running as soon as you release the trigger on the
handheld trigger handle.
YF4050PB.indd 21 15-5-4 ��11:42
22
STORING AND MAINTENANCE
WARNING!
Before performing any repair work, always switch off the pressure washer and
remove the battery pack.
1. Do not spray the pressure washer with water. Ingress of water may destroy the
battery pack and the electric motor.
2. Clean the pressure washer with a cloth, hand brush, etc.
CAUTION! Do not clean the pressure washer using a high-pressure water jet.
3. Keep all nuts, bolts and screws tight to be sure the pressure washer is in safe
working condition.
4. Replace worn or damaged parts for safety.
Clean the nozzle
As shown in Fig.22
Clean the high-pressure jet nozzle by using nozzle neddle.
Fig. 22
Fig. 23
Clean the water filter
As shown in Fig.23
The pressure washer is equipped with a water filter to protect the pump. If the filter
is not kept clean, the water flow to the pressure washer will be restricted and the
pump may be damaged.
YF4050PB.indd 22 15-5-4 ��11:42

23
1. To clean water filter, remove inlet adapter and get the filter out.
2. Rinse filter until it is free of debris and blockage.
3. Replace the filter and inlet adapter.
Battery Maintenance
Use the following procedures to enable optimum usage of the battery:
1. Protect the battery against moisture and water.
2. Store the battery only within a temperature range from 32°F to 113°F. As an
example, do not leave the battery in a vehicle or in the trimmer in direct sunlight.
3. Clean the ventilation slots of the battery occasionally with a soft, clean and dry
brush.
4. A considerably shortened operating time after charging is an indication that the
battery is exhausted and must be replaced.
5. If you do not use the product for a long time, please charge and discharge the
battery pack once every 6 months.
Storage
1. Store the pressure washer where it is dry and well ventilated.
2. When placing the pressure washer out of service for an extended period of time,
remove the cleaning agent and drain all the water left in the hoses.
Transport
Use the original packaging to ship whenever possible.
YF4050PB.indd 23 15-5-4 ��11:42
24
TROUBLESHOOTING
CAUTION!
Before servicing, cleaning, or removal of any part, shut off power and relieve
pressure.
CAUTION!
Improper repairs can result in the product functioning unsafely. This endangers
yourself and your environment.
Faults which cannot be rectified with the aid of following table may be rectified by a
specialist company only (customer service center).
Please be aware that any improper repairs will also invalidate the warranty and
additional costs may be incurred.
Use only genuine spare parts. Only these spare parts are designed and suitable for
the product. The use of other spare parts not only voids the warranty, you can also
endanger yourself and your environment.
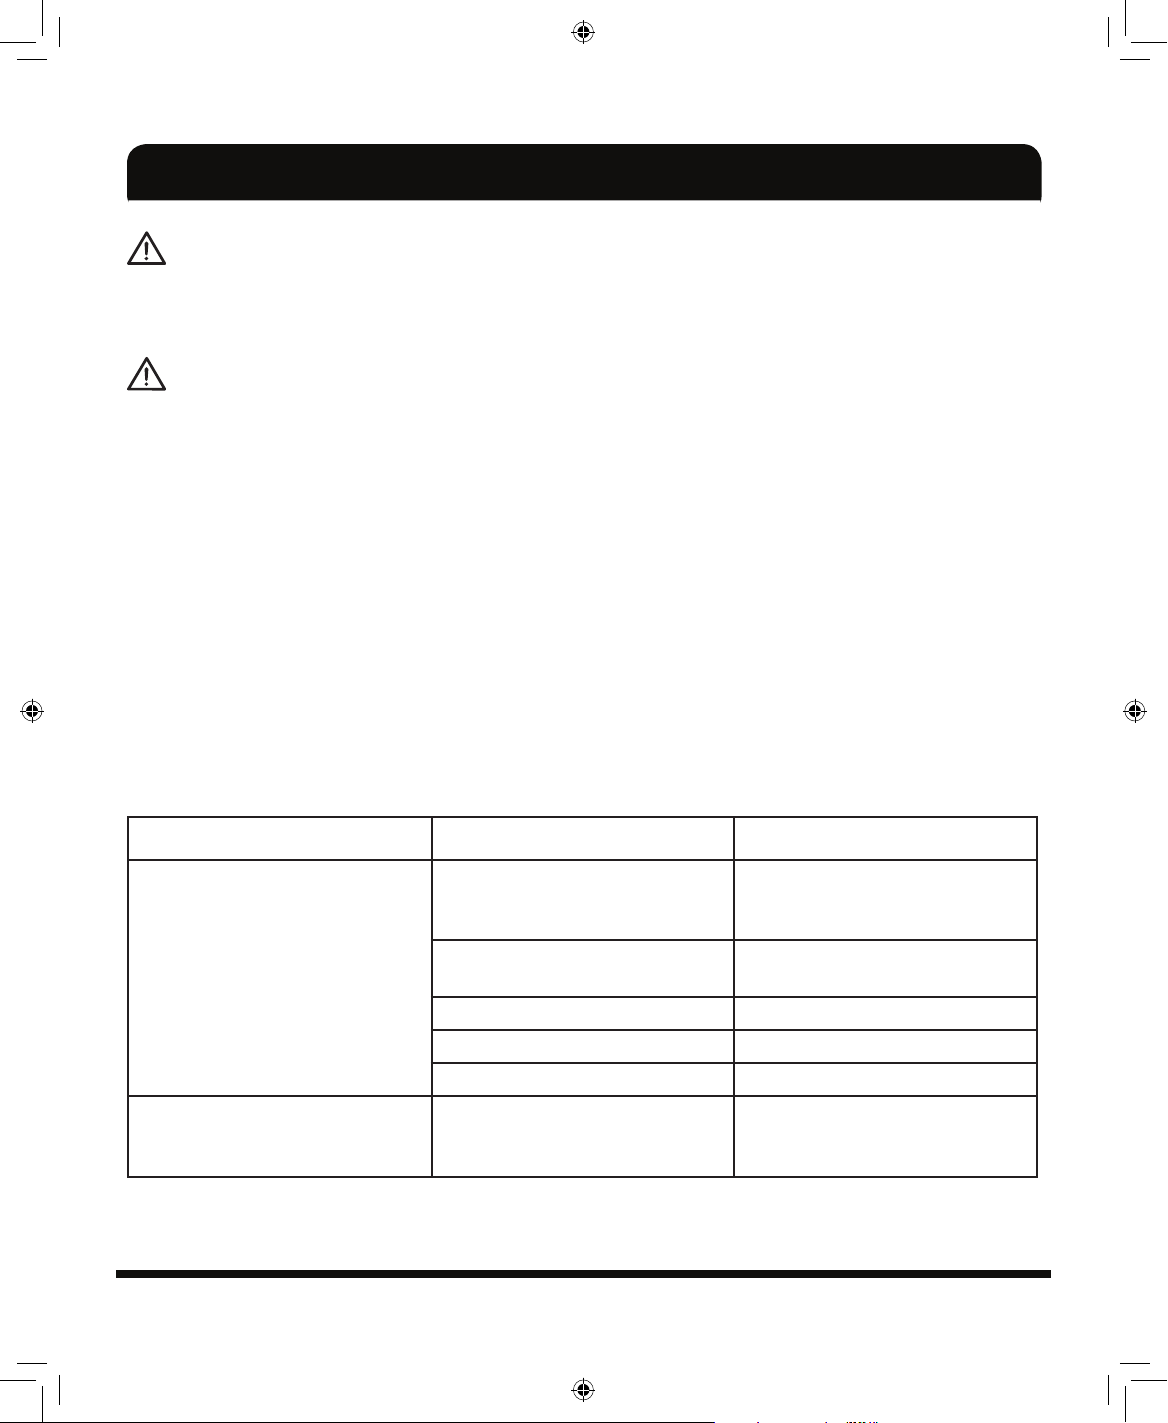
Fault/malfunction Cause Remedy
Pressure washer does not work
Battery discharged? Charge rechargeable battery
Battery pack does not sit its
place correctly
Install the battery pack once
again
On/off switch set to "0" On/off switch set to "I"
Motor protector has activated Allow to cool for 15 minutes
The pump is frozen Check and thaw if necessary
Pressure too low, but steady
High-pressure hose are
damaged or leaks in the
connection
Change the high-pressure
hose or hand-tighten the screw
connection
YF4050PB.indd 24 15-5-4 ��11:42
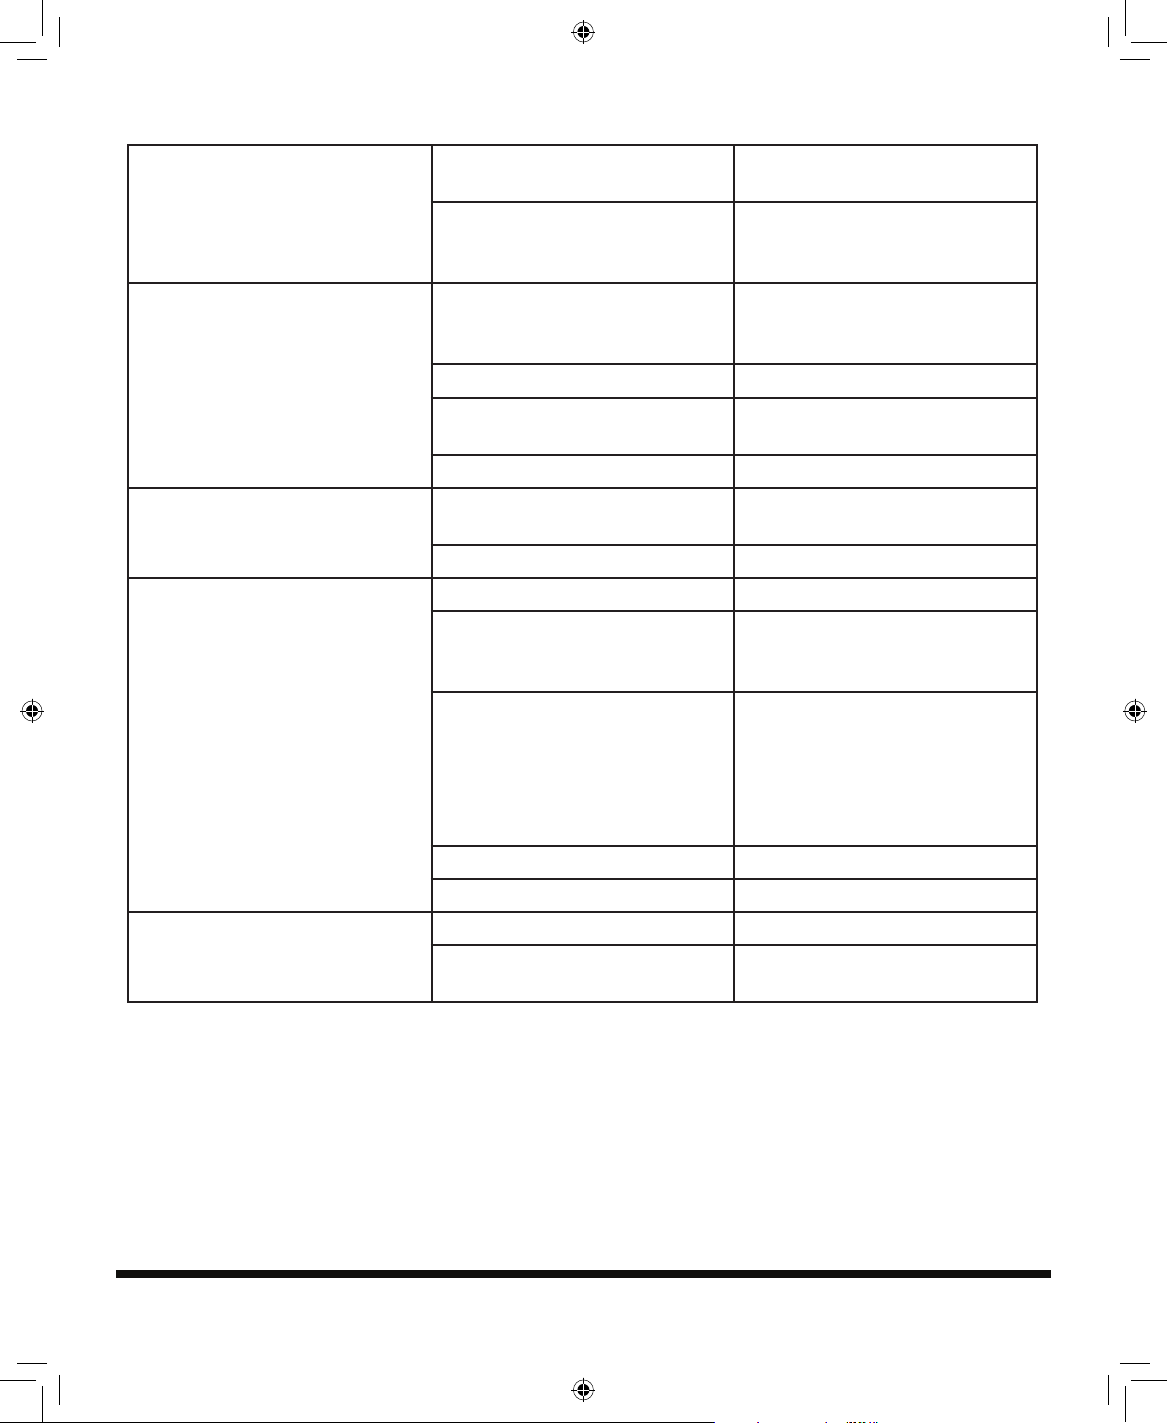
25
Leaks in the pressure washer
Leaks from the pump or internal
connections
Consult customer service
Hose connections loose Hand-tighten the water intake
adapter and the high-pressure
hose screw connection
Irregular operating pressure
Air intake in the water inlet Check the supply hose and
hose connection and replace if
necessary
The water filter is clogged Clean the water filter
Water supply hoses squeezed Straighten out kinked water
supply hoses
Inadequate water supply Check the water supply
The high-pressure washer
operates intermittently
Internal loose electrical
connection
Consult customer service
On/Off switch defective Consult customer service
The motor starts but there is no
buildup of pressure
The water filter is clogged Clean the water filter
Air intake in the water inlet Check the supply hose and
hose connection and replace if
necessary
Air in the system Ventilate the pressure washer!
Run the pressure washer
without the high-pressure hose
connected until water starts
leaking without bubbles. Re-
attach the high-pressure hose
Nozzle partly blocked Clean nozzle
Discharge nozzle is too large Check and replace if necessary
No detergent taken in
Detergent too dense Dilute with water
Deposits or restriction in
detergent circuit
Flush with clean water an
eliminate any restrictions
YF4050PB.indd 25 15-5-4 ��11:42

26
WARRANTY
Product Warranty
Please keep your original purchase receipt in a safe place as proof of purchase.
Warranty coverage for this product must be verified by the original purchase receipt.
The warranty period begins on the day that the product was purchased from an
authorized retailer of Yard Force products. Warranty coverage only applies to the
original purchaser and is not transferrable. Warranty coverage is only provided on
products purchased from authorized Yard Force retailers. Warranty coverage is only
provided on products purchased and used in the USA from authorized Yard Force
retailers. Products purchased or used outside of the USA are not covered by
this warranty.
(2) Two-Year Warranty – Pump and Motor
The YF4050PB has a 2-Year Limited Warranty from the date of purchase against
manufacturer defects for residential use only. Commercial use voids the warranty.
This warranty does not cover accidental damage, unreasonable use, normal wear
and tear, neglect or non-compliance with the Operating, Safety and Maintenance
Instructions. All service, outside of normal maintenance as described in this manual,
must be done by an authorized service technician. Any unauthorized service or
changes to the original configuration of this product will void the warranty. All
parts and accessories used on and with this product must be manufacturer/or and
authorized by SUMEC North America.
(90) Ninety-Day Warranty – Accessories
The accessories included with the YF4050PB; including hose, trigger handle and
wand, and other similar parts are warranted against manufacturer defects for
residential use only for a period of 90 days from date of purchase.
Warranty does not cover loss of use or other consequential damages arising from any
of the above, nor does it cover repairs made or attempted by unauthorized persons.
This warranty is void if the product is used for commercial, rental or industrial
purposes. Certain parts, attachments and accessories are subject to normal wear
and tear and are excluded from the warranty.
YF4050PB.indd 26 15-5-4 11:42

27
Yard Force USA Service Support agents can help you troubleshoot problems over
the phone to get you back up and running as quickly as possible. In the situation
where service or warranty inspection is needed, please follow these steps:
1. Contact Yard Force USA at (866)-902-9690 Monday-Friday between 8:30 AM
and 5:00 PM Eastern Time.
2. Send in proof-of-purchase and serial number (if applicable) to confirm warranty
coverage.
3. If service or a warranty evaluation is requested, Yard Force USA will provide an
RGA number that should be used in all communications with Yard Force USA and is
required to be indicated on the product itself and on the outside of the box.
4. All shipments to Yard Force USA must have an RGA number. Any shipment
received that does not have an RGA number clearly marked on the outside of the
box will be refused.
5. All shipments must be sent pre-paid, Yard Force USA does not pay for any
shipping costs for service or warranty evaluation. Yard Force USA is not responsible
for any packages that are lost by carrier. We recommend that shipments are made
by a carrier that provides tracking and delivery confirmation.
For more information or to ask questions, please call toll-free (866)-902-9690
Monday-Friday between 8:30 AM and 5:00 PM Eastern Time.
SAVE THESE INSTRUCTIONS
YF4050PB.indd 27 15-5-4 11:42
Service and Warranty Claims Process
Contact the Yard Force Support Center toll-free at (866)-902-9690 Monday-Friday
between 8:30 AM and 5:00 PM Eastern Time for service and warranty support.