
Gradateur à
détection de
mouvement
intelligent à
montage mural
From Breaker Box
Out to Light (Load)
C
E
D
A
B
C
A
D
B
E
From Breaker Box
Out to Light (Load)
For more details visit ezzwave.com
INTEROPERABILITY
This product can be included and operated in any Z-Wave network with other Z-Wave certified
devices from other manufacturers and/or other applications. All non-battery operated nodes within
the network will act as repeaters regardless of vendor to increase reliability of the network.
Light sensing – motion sensor only turns light on if
room is dark
MODE: TO SET:
On
Off
(DEFAULT)
Light sensing does not apply in vacancy or manual modes.
Motion sensitivity – amount of motion
required to turn on the light
MODE: TO SET:
High
Medium
(DEFAULT)
Low
In-Wall
Smart
Motion Dimmer
Atenuador de luz
inteligente
para
pared con
sensor de
movimiento
RIESGO DE INCENDIO
RIESGO DE DESCARGA ELÉCTRICA
RIESGO DE QUEMADURAS
CONTROL DE EQUIPOS ELECTRODOMÉSTICOS:
PRECAUCIÓN: A FIN DE DISMINUIR EL RIESGO DE
RECALENTAMIENTO Y DE POSIBLES DAÑOS EN LOS
DEMÁS EQUIPOS, NO INSTALAR PARA CONTROLAR
APARATOS QUE FUNCIONAN A MOTOR, ARTEFACTOS
DE ILUMINACIÓN DE LUZ FLUORESCENTE O APARATOS
ALIMENTADOS CON TRANSFORMADORES.
• USAR EXCLUSIVAMENTE PARA CONTROLAR
BOMBILLAS CFL/LED INCANDESCENTES O
ATENUABLES
• NO SUPERE LOS VALORES NOMINALES ELÉCTRICOS
• NO USAR PARA CONTROLAR DISPOSITIVOS EN LOS
QUE EL FUNCIONAMIENTO NO INTENCIONADO
PODRÍA PROVOCAR SITUACIONES PELIGROSAS
(LÁMPARAS DE CALEFACCIÓN, LÁMPARAS SOLARES,
ETC.)
• NO UTILICE PARA CONTROLAR TOMACORRIENTES
• USE SOLAMENTE EN INTERIORES
RISK OF FIRE
RISK OF ELECTRICAL SHOCK
RISK OF BURNS
CONTROLLING APPLIANCES:
CAUTION: TO REDUCE THE RISK OF OVERHEATING
AND POSSIBLE DAMAGE TO OTHER EQUIPMENT, DO
NOT INSTALL TO CONTROL A MOTOR-OPERATED
APPLIANCE, A FLUORESCENT LIGHTING FIXTURE, OR A
TRANSFORMER SUPPLIED APPLIANCE.
• ONLY USE TO CONTROL INCANDESCENT OR
DIMMABLE CFL/LED BULBS
• DO NOT EXCEED RATINGS
• DO NOT USE TO CONTROL ANY DEVICE WHERE
UNINTENDED OPERATION COULD CAUSE UNSAFE
CONDITIONS (HEAT LAMP, SUN LAMP, ETC.)
• DO NOT USE TO CONTROL RECEPTACLES
• FOR INDOOR USE ONLY
NOT FOR USE WITH MEDICAL OR LIFE SUPPORT
EQUIPMENT
Z-WAVE ENABLED DEVICES SHOULD NEVER BE USED TO
SUPPLY POWER TO, OR CONTROL THE ON/OFF STATUS
OF MEDICAL AND/OR LIFE SUPPORT EQUIPMENT.
NE PAS UTILISER AVEC UN ÉQUIPEMENT MÉDICAL
OU DE SURVIE
LES DISPOSITIFS COMPATIBLES AVEC LA TECHNOLOGIE
Z-WAVE NE DEVRAIENT JAMAIS ÊTRE UTILISÉS POUR
ALIMENTER OU COMMANDER LA MISE EN MARCHE OU
L’ARRÊT DE L’ÉQUIPEMENT MÉDICAL OU DE SURVIE.
SE PROHÍBE SU EMPLEO EN EQUIPO MÉDICO
O EQUIPO PARA EL MANTENIMIENTO DE LAS
FUNCIONES VITALES
LOS DISPOSITIVOS Z-WAVE NUNCA SE DEBEN USAR
PARA SUMINISTRAR ENERGÍA ELÉCTRICA AL EQUIPO
MÉDICO O AL EQUIPO PARA EL MANTENIMIENTO DE
FUNCIONES VITALES, NI PARA CONTROLAR EL ESTADO
DE ENCENDIDO O APAGADO DE DICHOS EQUIPOS.
RISQUE D’INCENDIE
RISQUE DE CHOC ÉLECTRIQUE
RISQUE DE BRÛLURES
COMMANDE DES APPAREILS:
ATTENTION: POUR RÉDUIRE LE RISQUE DE
SURCHAUFFE ET DE DOMMAGES POSSIBLES À
D’AUTRES APPAREILS, NE PAS INSTALLER POUR
COMMANDER UN APPAREIL ACTIONNÉ PAR MOTEUR,
UN APPAREIL D’ÉCLAIRAGE FLUORESCENT OU UN
APPAREIL ALIMENTÉ PAR UN TRANSFORMATEUR.
• UTILISER SEULEMENT POUR COMMANDER
LES AMPOULES À DEL ET FLUOCOMPACTES À
INCANDESCENCE OU À INTENSITÉ RÉGLABLE
• NE PAS DÉPASSER LES CARACTÉRISTIQUES
NOMINALES
• NE PAS UTILISER POUR COMMANDER DES
APPAREILS POUR LESQUELS UN FONCTIONNEMENT
IMPRÉVU POURRAIT ENTRAÎNER DES CONDITIONS
DANGEREUSES (LAMPE À RAYONS INFRAROUGES,
LAMPE SOLAIRE, ETC.)
• NE PAS UTILISER POUR COMMANDER LES PRISES
DE COURANT
• POUR UTILISATION INTÉRIEURE UNIQUEMENT
AVERTISSEMENT
WARNING ADVERTENCIA
WARNING — SHOCK HAZARD
Turn OFF the power to the branch circuit for the dimmer and lighting fixture at the
service panel. All wiring connections must be made with the POWER OFF to avoid
personal injury and/or damage to the switch. This device is intended for installation in
accordance with the National Electric Code and local regulations in the United States,
or the Canadian Electrical Code and local regulations in Canada. If you are unsure or
uncomfortable about performing this installation consult a qualified electrician.
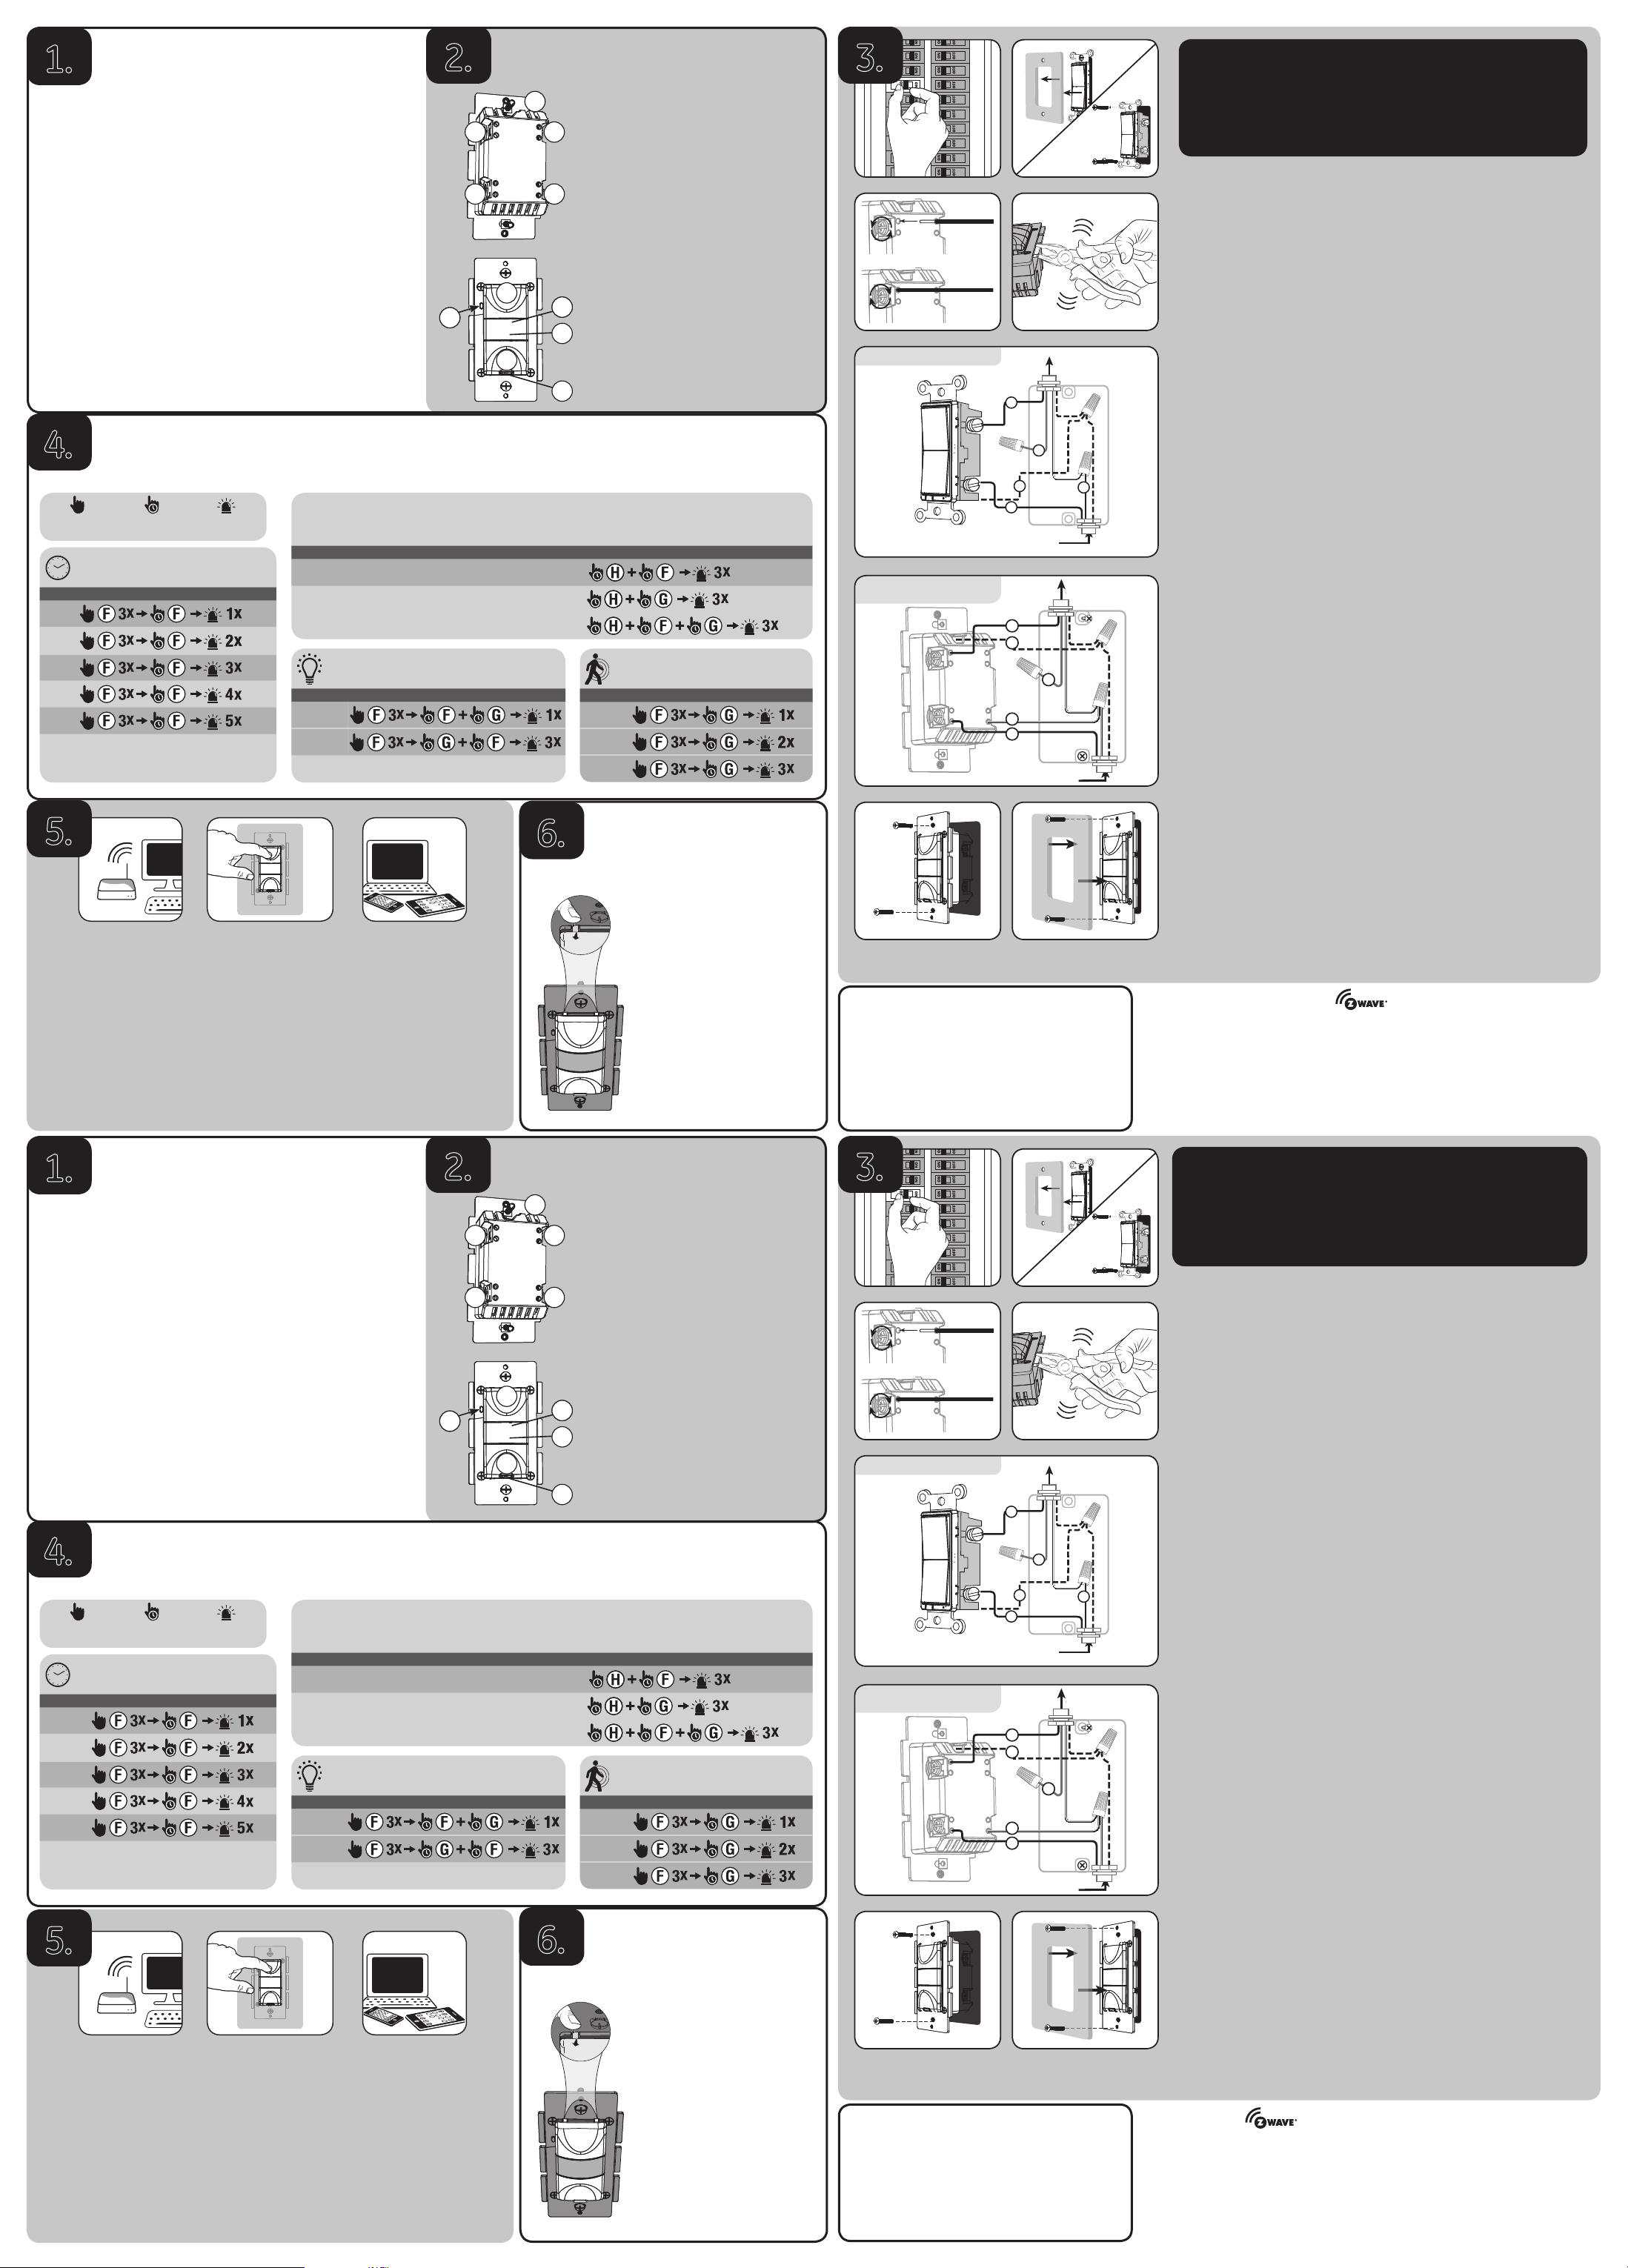
Multi-switch wiring
For 3-way installations, please refer to the GE Add-on Switch manual.
Single-switch wiring
Before you start, you may wish to change the buttons’ color to match your wallplate or decor.
Please proceed to Section 6.
1. Shut off power to the circuit at circuit breaker or fuse box.
IMPORTANT! Verify power is OFF to switch box before continuing.
2. Remove wallplate.
3. Remove the switch mounting screws.
4. Carefully remove the switch from the switch box. DO NOT disconnect the wires.
5. There are up to five screw terminals on the dimmer; these are marked
A. GROUND — Green/Bare
B. LOAD — Black (connected to lighting)
C. LINE (Hot) — Black (connected to power)
D. TRAVELER — Red/Other (only in 3-way installations)
E. NEUTRAL — White
Match these screw terminals to the wires connected to the existing switch.
6. Disconnect the wires from the existing switch. Be careful to label
wires according to the previous terminal connection.
Single, dual and triple gang boxes
When installing the In-Wall Smart Motion Dimmer in multiple-gang boxes, it may be
necessary to break off one or both sides of the scored tabs on the front yoke. This will
affect the electrical rating of the Smart Motion Dimmer (see specifications for details).
Observe important wiring information
IMPORTANT! This switch is rated for and intended to only be used with copper wire.
Wire gauge requirements
Use 14 AWG or larger wires suitable for at least 80°C for supplying Line
(HOT), Load, Neutral, Ground and Traveler connections.
Wire strip length
For attachment to screw terminals, strip insulation 1” (25mm).
For attachment using the enclosure’s holes, strip insulation 5/8” (16mm).
UL specifies that the tightening torque for the screws is 12 lbf-in (14 Kgf-cm).
1. Connect the green or bare copper ground wire to the GROUND terminal.
2. Connect the black wire that goes to the fixture to the terminal marked LOAD.
3. Connect the black wire that comes from the electrical service
panel (Hot) to the terminal marked LINE.
4. Connect the white wire to the NEUTRAL terminal (use included jumper wire if needed).
NOTE:
The traveler terminal is only used for 3-way or 4-way wiring and should remain
insulated if the switch is being installed in a 2-way system (one switch & one load).
5. Insert Dimmer into the switch box being careful not to pinch or crush wires.
6. Secure the Dimmer to the box using the supplied screws.
7. Mount the wallplate.
8. Reapply power to the circuit at fuse box or circuit breaker and test the system.
Basic operation
The connected light can be turned ON/OFF in the following ways:
Occupancy mode (default)
1. The light will turn on automatically when motion is detected, and turn
off automatically after 5 minutes when no motion is detected
2. Remotely with a Z-Wave Controller
Vacancy mode
1. The light will turn on by pressing the top button, and turn off
automatically after 5 minutes when no motion is detected
2. Remotely with a Z-Wave Controller
NOTE:
Lighting will turn on automatically within 15 seconds of sensor time out with motion.
Manual mode
1. Manually from the front panel of the In-Wall Smart Motion Dimmer
2. Remotely with a Z-Wave Controller
Adjust dim level
1. To increase brightness: press and hold the top button
2. To decrease brightness: press and hold the bottom button
The GE-branded Add-on switch is required for Multi-Switch 3-way or
4-way installations.
Connecting the traveler terminal of this switch to a standard, non-GE-
branded switch will cause damage or result in improper function. If
this switch is a part of a 3-way or 4-way multi-switch installation, do
not connect the traveler wire or apply power until GE-branded Add-on
switches are correctly installed. For more information on 3-way or 4-way
installations, view the manual or quick-start guide that comes with the
GE-branded Add-on switch.
PROGRAMMING OPTIONS
Many controllers will offer programming changes through the application. Programming changes can also be made directly at the switch through simple button presses.
To program the device manually, refer to the diagram shown above in Section 2 and follow the instructions as displayed below. Programming capabliities vary based on
program and connected device.
Time-out duration – amount of time the light
stays on after motion stops
MODE: TO SET:
5 sec
1 min
5 min
(DEFAULT)
15 min
30 min
Note:
Continue to hold button until LED cycles to flash the correct
number of times. Time-out duration does not apply in manual
mode.
Single Press Press & hold Flashing LED
Tools you will need
Outils dont vous aurez besoin
Herramientas necesarias
MODE: LIGHT ON WHEN: LIGHTS OFF WHEN: TO SET:
Occupancy
(DEFAULT)
Automatically Automatic
Vacancy
Press & release
top button
Automatic
Manual
Press & release
top button
Press & release
bottom button
Occupancy – Light turns on automatically with motion and off automatically without motion
Vacancy – Light turns on manually and off automatically without motion
Manual – Light only turns on and off manually
Fr
Cet appareil est conforme au paragraphe 15 des normes FCC et au CNR pour les appareils exempts de
licence d’Industrie Canada. Son utilisation est sujette aux deux conditions suivantes : 1) cet appareil ne
doit pas occasionner de brouillage préjudiciable et 2) cet appareil doit accepter toutes les interférences
reçues, notamment les interférences qui peuvent provoquer un fonctionnement non désiré.
NOTE DE LA FCC : Le fabricant n’est pas responsable des interférences sur les fréquences
radioélectriques ou télévisuelles pouvant être causées par des modifications non autorisées de ce
matériel. De telles modifications peuvent annuler le droit de l’utilisateur à utiliser cet appareil.
REMARQUE : Cet appareil a été testé et certifié conforme aux limites relatives aux appareils
numériques de catégorie B définies dans le paragraphe 15 des normes FCC. Ces limites ont été définies
afin de fournir une protection raisonnable contre le brouillage préjudiciable en milieu résidentiel. Cet
appareil produit, utilise et peut émettre des ondes de fréquence radio et, s’il n’est pas installé et utilisé
conformément aux instructions, il peut provoquer un brouillage préjudiciable aux communications
radio. Il n’existe toutefois aucune garantie que des interférences ne se produiront pas au sein d’une
installation donnée. Si cet appareil occasionne un brouillage préjudiciable à la réception radiophonique
ou télévisuelle, il suffit d’allumer et d’éteindre l’appareil pour déterminer sa responsabilité. Nous
encourageons l’utilisateur à essayer de corriger ces interférences en appliquant une ou plusieurs des
mesures suivantes :
— Réorienter ou déplacer l’antenne de réception.
— Augmenter la distance entre l’appareil et le récepteur.
— Brancher l’appareil à une prise secteur différente de celle du récepteur.
— Consulter le revendeur ou un technicien spécialisé en postes radio ou téléviseurs.
Remarque importante : Pour se conformer aux exigences de conformité de la FCC concernant
l’exposition aux RF, aucune modification apportée à l’antenne ou au dispositif n’est autorisée. Toute
modification apportée à l’antenne ou au dispositif pourrait faire en sorte que le dispositif dépasse les
exigences d’exposition aux RF et pourrait annuler le droit de l’utilisateur à utiliser ce dispositif.
En
This device complies with Part 15 of the FCC and Industry Canada license-exempt RSS standard(s).
Operation is subject to the following two conditions:
(1) this device may not cause harmful interference, and (2) this device must accept any
interference received, including interference that may cause undesired operation.
FCC NOTE: The manufacturer is not responsible for any radio or TV interference caused by
unauthorized modifications to this equipment. Such modifications could void the user’s authority to
operate the equipment.
NOTE: This equipment has been tested and found to comply with the limits for a Class B digital device,
pursuant to Part 15 of the FCC Rules. These limits are designed to provide reasonable protection
against harmful interference in a residential installation. This equipment generates, uses and can
radiate radio frequency energy and, if not installed and used in accordance with the instructions, may
cause harmful interference to radio communications. However, there is no guarantee that interference
will not occur in a particular installation. If this equipment does cause harmful interference to radio
or television reception, which can be determined by turning the equipment off and on, the user is
encouraged to try to correct the interference by one or more of the following measures:
— Reorient or relocate the receiving antenna.
— Increase the separation between the equipment and receiver.
— Connect the equipment into an outlet on a circuit different from that to which the
receiver is connected.
— Consult the dealer or an experienced radio/TV technician for help.
Important note: To comply with the FCC RF exposure compliance requirements, no change to the
antenna or the device is permitted. Any change to the antenna or the device could result in the device
exceeding the RF exposure requirements and void user’s authority to operate the device.
Es
Este dispositivo cumple con las Especificaciones del apartado 15 de las normas de la FCC y con las
especificaciones de las normas radioeléctricas (RSS) del Ministerio de Industria de Canadá aplicables
a aparatos exentos de licencia. El funcionamiento está sujeto a las siguientes dos condiciones: (1)
este dispositivo no debe provocar interferencia perjudicial, y (2) este dispositivo debe aceptar toda
interferencia que reciba, incluso la que pudiera causar un funcionamiento no deseado.
NOTA DE LA FCC: El fabricante no se hace responsable de ninguna interferencia de radio o TV
ocasionada por modificaciones no autorizadas efectuadas a este equipo. Dichas modificaciones
podrían anular la autoridad del usuario para utilizar el equipo.
NOTA: Este equipo ha sido probado y cumple con los límites para aparatos digitales de Clase B,
de conformidad con el apartado 15 de las normas de la FCC. Estos límites están diseñados para
proveer protección razonable contra interferencias perjudiciales en una instalación residencial. Este
equipo genera, usa y puede irradiar energía de radiofrecuencias y, si no se instala y usa según las
instrucciones, puede provocar interferencia perjudicial a las radiocomunicaciones. No obstante, no
hay garantías de que no ocurrirá interferencia en una instalación en particular. Si este equipo provoca
interferencia perjudicial a la recepción de radio o televisión, lo que puede determinarse encendiendo
y apagando el equipo, se recomienda que el usuario intente corregir la interferencia por medio de la
implementación de una o más de las siguientes medidas:
— Reorientar o reubicar la antena receptora.
— Incrementar la separación entre el equipo y el receptor.
— Conectar el equipo a un tomacorriente de un circuito diferente del circuito al que está
conectado el receptor.
— Consultar al distribuidor o a un técnico con experiencia en radio/televisión para
solicitar asistencia.
Nota importante: Para cumplir con los requisitos de cumplimiento de exposición de radiofrecuencia
de la FCC, no se permiten cambios a la antena o el dispositivo. Cualquier cambio a la antena o
dispositivo podría hacer que el dispositivo supere los requerimientos de exposición de radiofrecuencia
y anular la autoridad del usuario para operar el dispositivo.
FCC — U2ZZW3008 | IC: 6924A-ZW3008
Jasco Products Company | Model: ZW3008 / 26933
CAN ICES-3(B) / NMB-3(B)
Scan to view
installation guide
Balayez ce code pour
consulter le guide
d’installation.
Escanear para ver
la guía de instalación
26933
ZW3008
Z-Wave
®
Certified Wireless Lighting Control
Certifié Z-Wave
®
Commande d’éclairage sans fil
Control inalámbrico para iluminación certificado por Z-Wave
®
ezzwave.com
All brand names shown are trademarks of their
respective owners.
Tous les noms de marque illustrés sont des marques
de commerce de leurs propriétaires respectifs.
Todas las marcas que aparecen aquí son marcas
registradas de sus respectivos dueños.
MADE IN CHINA/FABRIQUÉ EN CHINE/HECHO EN CHINA
GE IS A TRADEMARK OF GENERAL ELECTRIC COMPANY
AND IS UNDER LICENSE BY JASCO PRODUCTS
COMPANY LLC, 10 E. MEMORIAL RD.,
OKLAHOMA CITY, OK 73114.
©JASCO 2016 | 26933 | ZW3008 | rev. 11/29/16 RT v1
Removing existing switch
Smart Motion Dimmer
WARRANTY
JASCO Products warrants this product to be free from manufacturing defects for a period of
two years from the original date of consumer purchase. This warranty is limited to the repair or
replacement of this product only and does not extend to consequential or incidental damage to other
products that may be used with this product. This warranty is in lieu of all other warranties, expressed
or implied. Some states do not allow limitations on how long an implied warranty lasts or permit the
exclusion or limitation of incidental or consequential damage, so the above limitations may not apply
to you. This warranty gives you specific rights, and you may also have other rights which vary from
state to state. Please contact Customer Service at 800-654-8483 (option 1) between 7AM – 8PM CST
or via our website (www.byjasco.com) if the unit should prove defective within the warranty period.
GARANTIE
JASCO Products garantit que ce produit est exempt de tout défaut de fabrication pour une période de
deux ans à compter de la date de l’achat original par l’acheteur. Cette garantie se limite exclusivement
à la réparation ou au remplacement de ce produit et n’est pas applicable aux dommages indirects
ou accessoires survenus sur d’autres produits utilisés avec ce produit. Cette garantie se substitue à
toute autre garantie expresse ou implicite. Certains États ne permettent pas de restrictions quant à
la durée d’une garantie implicite ou permettent l’exclusion ou la limitation des dommages indirects
et accessoires; il se peut, par conséquent, que cette garantie ne s’applique pas dans votre cas. Cette
garantie vous confère des droits juridiques précis; vous pouvez jouir d’autres droits qui peuvent varier
d’un État à l’autre. Veuillez communiquer avec le service à la clientèle au 1-800-654-8483 (option 1)
entre 7 h et 20 h (heure normale du Centre) ou par l’intermédiaire de notre site web (www.byjasco.
com) si l’appareil s’avère défaillant au cours de la période de garantie.
GARANTÍA
JASCO Products garantiza que este producto está libre de defectos de fabricación durante un periodo
de dos años a partir de la fecha original de compra por parte del consumidor. Esta garantía se
limita a la reparación o sustitución de este producto solamente y no se extiende a daños derivados
o accidentales causados a otros productos que se usen con esta unidad. Esa garantía remplaza
a todas las demás garantías expresas o implícitas. Algunos estados no autorizan limitaciones en
cuanto a la duración de una garantía implícita ni permiten la exclusión o limitación por daños
accidentales o derivados; por lo tanto, puede que las anteriores limitaciones no apliquen en su caso.
Esta garantía le da a usted derechos específicos, y otros que usted puede tener y que varían según
el estado en el que usted reside. Si la unidad resultare defectuosa dentro del periodo de garantía,
comuníquese por favor con Atención al Cliente en el 800-654-8483 (opción 1) entre 7 y 20 h, Hora del
Centro, o a través de nuestro sitio de internet (www.byjasco.com).
JASCO Products Company LLC, Building B
10 E. Memorial Rd. Oklahoma City, OK 73114.
If you have any problems or questions, contact our tech support team at
1-800-654-8483, (option 1) Monday–Friday, 7AM–8PM CST.
For the most up-to-date product support, accessories, electronic (PDF) format
manuals and more, visit www.byjasco.com/support.
• No user serviceable parts in this unit.
Si vous avez des problèmes ou des questions, communiquez avec notre
équipe de soutien technique au 1-800-654-8483, option 1, du lundi au vendredi,
de 7 h à 20 h (HNC).
Pour le soutien relatif aux produits le plus à jour, les accessoires, les manuels en
format électronique (PDF) et plus encore, visitez le site www.byjasco.com/support.
• Aucune des pièces de ce dispositif ne peut être réparée par l’utilisateur.
Si tiene problemas o dudas, comuníquese con nuestro equipo técnico al número:
1-800-654-8483, opción 1 de lunes a viernes, de 7 a.m. a 8 p.m., hora estándar del
centro (CST).
Para recibir el soporte técnico más actualizado sobre productos, accesorios,
manuales en formato digital (PDF), entre otros, visite www.byjasco.com/support.
• Esta unidad no contiene piezas que el usuario pueda reparar.
DO NOT RETURN THIS
PRODUCT TO THE STORE
NE RETOURNEZ PAS
CE PRODUIT AU MAGASIN
NO DEVUELVA ESTE
PRODUCTO A LA TIENDA
STOP
FCC / IC
MANUAL • MANUEL • MANUAL
SPECIFICATIONS
ZW3008
Power: 120 VAC, 60 Hz.
Signal (Frequency): 908.4/916 MHz.
Maximum Loads: 600W, 2-gang 500W or 3-gang 400W incandescent, 150W CFL/LED
Range: Up to 150 feet line of sight between the Wireless Controller or the closest Z-Wave receiver module.
Operating Temperature Range: 32-104° F (0-40° C)
For indoor use only.
Specifications subject to change without notice due to continuing product improvement.
SPÉCIFICATIONS
ZW3008
Tension : 120 V c.a., 60 Hz.
Signal (fréquence) : 908,4/916 MHz.
Charges maximales : 600 watts, 2 compartiments 500 W, 3 compartiments 400 W lampes à incandescent, 150W
CFL/LED
Portée : Distance à vue entre la télécommande et le module de réception Z-Wave le plus proche allant jusqu’à
150 pi.
Plage de températures de fonctionnement : de 32 à 104 °F (de 0 à 40 °C).
Utilisation intérieure uniquement.
En raison d’améliorations continues du produit, les spécifications peuvent faire l’objet de changements sans
préavis.
ESPECIFICACIONES
ZW3008
Energía: 120 VCA, 60 Hz.
Señal (Frecuencia): 908.4/916 MHz.
Cargas máximas: 600 W, Caja para 2 conexiones 500 W, Caja para 3 conexiones 400 W sólo las lámparas
incandescente, 150 W CFL/LED
Alcance: Hasta 150 pies (45.7m) en línea de visibilidad directa entre el control inalámbrico y el módulo receptor
Z-Wave más cercano.
Rango de temperatura de funcionamiento: 32-104 °F (0-40 °C).
Para uso en espacios interiores solamente.
Especificaciones sujetas a cambio sin aviso debido a continuas mejoras del producto.
To change color of the buttons
This step is optional. Before you start you may want
to change the color of the button to match your
wallplate or decor.
1. Pinch both tabs down to release button.
2. Lift the button up and off.
3. Put the new button onto the switch
by inserting the tabs near the motion
sensor first and the tabs on the opposite
side second.
4. Repeat steps 1 + 2 for the button on the
other side.
Once this step has been completed please
return to Section 3.
Note: Additional button colors (black,
brown, ivory) are available at ezzwave.com
IMPORTANT!
The fixture controlled by the Z-Wave In-Wall Smart Motion Dimmer
must not exceed 600 watts (Incandescent); 150W dimmable CFL/LED. The dimmer is designed only for use with
permanently installed fixtures.
IMPORTANT!
Le luminaire branché au gradateur à détection de mouvement intelligent Z-Wave ne doit pas dépasser 600 watts
(ampoules à incandescence); 150 W (ampoules à DEL et fluocompactes à intensité réglable). Le gradateur est
conçu pour être utilisé uniquement avec des appareils d’éclairage installés de façon permanente.
¡IMPORTANTE!
El dispositivo controlado por el atenuador de luz inteligente para pared con sensor de movimiento Z-Wave no
debe exceder los 600 watts (dispositivos incandescentes) o los 150W (dispositivos regulables LFC/LED). Este
atenuador está diseñado para usarse únicamente en instalaciones permanentes.
A
DB
C E
F
G
H
I
J
K
A. Ground (Green/Bare)
B. Load (Black)
C. Line (Black)
D. Traveler (Red/Other)
E. Neutral (White)
F. Top Button — Press & release to turn
the dimmer on, press & hold to increase the
brightness
G. Bottom Button — Press & release to turn the
dimmer off, press & hold to dim
H. Configuration Button — Changes the
operation mode of switch
I. Motion Sensor
J. Blue LED (Behind cover) — indicates
programming confirmation
K. Air Gap Switch — Pull the air gap switch out
to disconnect the power. Push it all the way
back in for normal operation.
Screw terminal installation requires wiring
connections for Line (Hot), Load, Neutral and
Ground. Traveler wire required for 3-way or
4-way installation.
Getting to know your new Z-Wave device
The Smart Dimmer has the following default settings:
• Occupancy mode — The connected light automatically turns on when motion is
detected and turns off when no motion is detected. The sensor must detect no motion
for 20 seconds before activating automatic turn off.
• 5-minute time-out — the connected light will turn off 5 minutes after motion has
stopped
• Light-sensing mode — this mode is disabled. Motion will always turn on the connected
light
Note: Motion sensitivity is set to medium by default
To change any of the above settings, see Programming Options (Section 4).
The Smart Dimmer has the following features:
• Turn ON/OFF and adjust dim levels manually or remotely via the Z-Wave controller
• May be used in single-pole installation or with up to two Jasco Add-on switches in
3-way or 4-way wiring configurations
• Compatible with all incandescent and most dimmable CFL/LED bulbs
• Uses a standard, decorative-size wallplate for single-gang
installations (wallplate not included)
• This Z-Wave device has advanced features that allow you to customize your
experience. These features can be adjusted by a Z-Wave enabled controller that
supports the Z-Wave Configuration command class. For a complete list of adjustable
configurations, visit www.ezzwave.com/config
Adding your device to a Z-Wave network
1. Follow the instructions for your Z-Wave certified
controller to add the smart dimmer to the Z-Wave
network.
2. Once the controller is ready to add your smart
dimmer, press and release the top or bottom
button on the smart dimmer to include it in the
network.
Please reference the controller’s manual for
instructions.
Now you have complete control to turn your lamp
ON/OFF or set Dim levels according to groups, scenes,
schedules and interactive automations programmed
by your controller. If your Z-Wave certified controller
features Remote Access, you can now control your
lighting from your mobile devices.
To remove and reset the device
1. Follow the instructions for your Z-Wave certified
controller to remove a device from the Z-Wave
network.
2. Once the controller is ready to remove your device,
press and release the top button on the smart
dimmer to remove it from the network.
To return to factory defaults
Press and release the top button ten times within 5
seconds. The LED will flash 3 times quickly confirming
change.
Note:
This should only be used in the event your
network’s primary controller is missing or otherwise
inoperable.
This device supports Association Command Class (3 Groups)
• Association Group 1 supports Lifeline, Multi Level Report
• Association Group 2 and Group 3 support Basic Set and are controlled by pressing
the On or Off button with the local load
• Each Association Group supports 5 total nodes
1.
1.
2. 3.
4.
5. 6.
Para obtener más información, visite www.ezzwave.com.
INTEROPERABILIDAD
Este producto se puede incluir y puede
funcionar en cualquier red Z-Wave
con dispositivos de otros fabricantes
y otras aplicaciones que cuenten con
la certificación Z-Wave. Todos los
nodos que formen parte de la red y
que funcionen sin pilas actuarán de
repetidores independientemente del
proveedor con el fin de aumentar la
fiabilidad de la red.
Este dispositivo es compatible con la Clase de comandos de
asociación (3 grupos)
• Grupo de asociación 1: es compatible con la red vital (Lifeline),
informe de conmutador de varios niveles.
• Grupos de asociación 2 y 3: son compatibles con el conjunto básico
(Basic Set) y se controlan presionando el botón de encendido o
apagado con la carga local.
• Cada grupo de asociación es compatible con un total de 5 nodos.
From Breaker Box
Out to Light (Load)
C
E
D
A
B
C
A
D
B
E
From Breaker Box
Out to Light (Load)
ADVERTENCIA — DESCARGA ELÉCTRICA
Interrumpa el suministro de corriente al circuito del atenuador y al artefacto de iluminación desde
el panel de servicio. Todas las conexiones de cableados deben realizarse con el SUMINISTRO DE
CORRIENTE INTERRUMPIDO para evitar lesiones personales o provocar daños al interruptor. Este
dispositivo está diseñado para la instalación conforme al Código de Normas de Electricidad y las
reglamentaciones locales en EE. UU. o el Código de Normas de Electricidad y las reglamentaciones
locales en Canadá. Si no está seguro o tiene dudas sobre cómo realizar la instalación, contacte a
un electricista profesional.
Cableado de interruptores múltiples
Para instalaciones de 3 vías, consulte el manual sobre Interruptores auxiliares de GE.
Cableado de interruptor simple
Antes de comenzar, tal vez necesite cambiar el color del botón para que combine con la placa o la
decoración de pared. Continúe con la sección 6.
1. Interrumpa el suministro de energía al circuito desde el panel de fusibles o el de cortacircuitos.
¡IMPORTANTE! Antes de continuar, compruebe que se ha INTERRUMPIDO la alimentación eléctrica a la
caja del interruptor.
2. Retire la placa.
3. Retire los tornillos de soporte del interruptor.
4. Saque el interruptor de la caja con cuidado. NO desconecte los cables.
5. Hay hasta cinco terminales de tornillo en el atenuador; están marcados de la siguiente manera:
A. GROUND (Tierra): verde/pelado
B. LOAD (Carga): negro (conectada al dispositivo de iluminación)
C. LINE (Hot) (Línea [con corriente]): negro (conectada al suministro eléctrico)
D. TRAVELER (Puente): rojo/otro (solo en instalaciones de 3 vías)
E. NEUTRAL (Neutro): blanco
Haga corresponder estos terminales de tornillo con los cables conectados al interruptor existente.
6. Desconecte los cables del interruptor existente. Tome la precaución de rotular los cables según la
conexión anterior al terminal.
Cajas simples, dobles y triples
Al instalar el atenuador de luz inteligente para pared con sensor de movimiento en cajas múltiples,
puede que sea necesario quitar una o ambas pestañas de la horquilla frontal. Esta acción afectará las
especificaciones eléctricas del atenuador inteligente con sensor de movimiento (lea las especificaciones
para obtener más detalles).
Observe la siguiente información importante sobre el cableado
¡IMPORTANTE! Este interruptor ha sido clasificado para uso exclusivo con cables de cobre y está
diseñado específicamente para ese tipo de cable.
Requisitos de calibre del cableado
Use cables numero 14 AWG o superior, que sean adecuados para una temperatura de al menos 80 °C para
las conexiones line (hot) (línea [con corriente]), load (carga), neutral (neutro), ground (tierra) y traveler (puente).
Longitud de cable sin aislación
Para conectar en terminales de tornillo: pelar 1” (25 mm) de la aislación.
Para conectar utilizando los orificios del recinto: pelar 5/8” (16 mm) de la aislación.
La norma UL especifica que el torque de ajuste de los tornillos debe ser de 14 Kgf-cm (12 lbf-in).
1. Conecte el cable de cobre verde o pelado de conexión a tierra al terminal GROUND (tierra).
2. Conecte el cable negro que va al dispositivo de iluminación al terminal marcado LOAD (carga).
3. Conecte el cable negro que viene del panel de servicio eléctrico (Hot) (con corriente) al terminal marcado
LINE (línea).
4. Conecte el cable blanco al terminal NEUTRAL (neutro) (use el cable del puente incluido, de ser necesario).
Nota: El terminal puente solo se usa para el cableado de 3 o 4 vías y deberá permanecer aislado si el
interruptor se instala en un sistema de 2 vías (un interruptor y una carga).
5. Introduzca el atenuador en la caja del interruptor, teniendo cuidado de no comprimir o presionar los
cables.
6. Asegure bien el atenuador a la caja usando los tornillos que se suministran.
7. Instale la placa de pared.
8. Reanude el suministro de energía al circuito desde el panel de fusibles o el de cortacircuitos y pruebe el
sistema.
Funcionamiento básico
La luz conectada se puede ENCENDER o APAGAR de las siguientes formas:
Modo de ocupación (predeterminado)
1. En forma automática, la luz se encenderá cuando se detecte movimiento y se apagará en 5 minutos
cuando no se detecte movimiento durante 20 segundos.
2. De manera remota, con el controlador Z-Wave
NOTA
: la luz se activará automáticamente dentro de los 15 segundos de que el sensor detecte
movimientos.
Modo de vacío
1. La luz se encenderá al presionar el botón superior y se apagará automáticamente en 5 minutos cuando
no se detecte movimiento durante 20 segundos.
2. De manera remota, con el controlador Z-Wave
Modo manual
1. Para aumentar la intensidad del brillo: presione sin soltar el botón superior.
2. Para disminuir la intensidad del brillo: presione sin soltar el botón inferior.
Para instalaciones de interruptores múltiples de 3 o 4 vías se
requieren interruptores auxiliares GE.
Si conecta el terminal puente de este interruptor a un interruptor
estándar que no sea de GE producirá daños o mal funcionamiento.
Si este interruptor es parte de una instalación de varios interruptores
de 3 o 4 vías, no conecte el cable puente ni suministre electricidad
hasta que los interruptores auxiliares GE estén instalados
correctamente. Para más información sobre instalaciones de 3 o 4
vías, consulte el manual o la guía rápida que viene con el interruptor
auxiliar GE.
3.
Atenuador de luz inteligente
con sensor de movimiento
Hacia la luz (carga)
Desde el panel
Retirar un interruptor existente.
Hacia la luz (carga)
Desde el panel
Sensor de luz – el sensor de movimiento solo
enciende la luz si la habitación está a oscuras
MODO: PARA CONFIGURAR:
Encendido
Apagado
(
predeterminado
)
El sensor de luz no funciona con el modo manual o el de vacío
Détecteur de lumière – Le détecteur de mouvement
n’allume la lumière que si la pièce est sombre.
MODE: POUR RÉGLER :
Arrêt (Off)
(PAR DÉFAUT)
Le détecteur de lumière ne fonctionne pas dans les modes vacant ou manuel.
Sensor de movimiento – cantidad de
movimiento necesaria para encender la luz
MODE: PARA CONFIGURAR:
Alto
Medio
(
predeterminado
)
Bajo
Sensibilité au mouvemen – quantité
de mouvement nécessaire pour allumer
la lumière
MODE: POUR RÉGLER :
Élevé
Moyen
(PAR DÉFAUT)
Faible
OPCIONES DE PROGRAMACIÓN
Los diversos controladores facilitarán cambios en la programación por medio de la aplicación. Los cambios en la programación también pueden realizarse directamente
en el interruptor, simplemente presionando los botones. Para programar el dispositivo manualmente: consulte el diagrama de la sección 2 y siga las instrucciones que se
muestran a continuación. Las funcionalidades de programación varían en función del dispositivo conectado y el programa.
OPTIONS DE PROGRAMMATION
Plusieurs contrôleurs offriront des changements de programmation grâce à l’application. Les changements de programmation peuvent aussi être faits directement sur
le détecteur simplement en appuyant sur les boutons. Pour programmer le détecteur manuellement, reportez-vous au schéma ci-dessus dans la section 2 et suivez les
instructions ci-dessous. Les capacités de programmation varient selon le programme et le dispositif connecté.
Duración del tiempo de espera: – cantidad de
tiempo en que la luz queda encendida una vez
que se detiene el movimiento
MODO: PARA CONFIGURAR:
5 sec
1 min
5 min
(
predeterminado
)
15 min
30 min
Nota: Pulse y mantenga pulsado el botón hasta que parpadee
el número correcto de veces. Tiempo de espera: no se puede
programar en el modo manual.
Durée de temporisation – temps
pendant lequel la lumière demeure
allumée après l’arrêt de mouvement
MODE: TO SET:
5 sec
1 min
5 min
(PAR DÉFAUT)
15 min
30 min
Remarque: Appuyez et maintenez enfoncé le bouton jusqu'à ce
qu'il clignote le nombre de fois. La durée de temporisation ne
fonctionne pas en mode manuel.
MODO: LUCES ENCENDIDAS CUANDO: LUCES APAGADAS CUANDO: PARA CONFIGURAR:
Ocupación
(DEFAULT)
Automáticamente Automático
Vacío
Presione y suelte el
botón superior
Automático
Manual
Presione y suelte el
botón superior
Presione y suelte
el botón inferior
MODE: LUMIÈRES ALLUMÉES SI : LUMIÈRES ÉTEINTES SI: POUR RÉGLER :
Occupé
(PAR DÉFAUT)
Automatiquement Automatique
Vacant
Appuyez sur le bouton
supérieur, puis relâchez-le.
Automatique
Manuel
Appuyez sur le bouton
supérieur, puis relâchez-le.
Appuyez sur le bouton
inférieur, puis relâchez-le.
Ocupación : la luz se enciende automáticamente con el movimiento y se apaga cuando este se interrumpe
Vacío: a luz se enciende manualmente y se apaga automáticamente sin movimiento
Manual: la luz solo se enciende y se apaga manualmente
Occupé – La lumière s’allume automatiquement si un mouvement est détecté et s’éteindra automatiquement si aucun
mouvement n’est détecté.
Vacant – La lumière s’allume manuellement et s’éteint automatiquement si aucun mouvement n’est détecté.
Manuel – La lumière ne s’allume et ne s’éteint que manuellement.
4.
4.
En marche
(On)
Pression unique Maintien du
bouton enfoncé
DEL clignotante
Presione
una vez
Presione y
sostenga
LED
parpadeante
Para cambiar el color de los botones
Este paso es opcional. Antes de comenzar, tal vez
desee cambiar el color de los botones para que
combinen con la placa o la decoración de pared.
1. Presione ambas presillas para soltar
el botón.
2. Levante el botón y sáquelo.
3. Coloque el nuevo botón en el interruptor
al insertar las presillas cercanas al
sensor de movimiento primero, y las del
lado opuesto en segundo lugar.
4. Repita los pasos 1 + 2 para el botón del
otro lado.
Una vez completado este paso, regrese a
la sección 3.
Importante: Se pueden seleccionar teclas
de colores (negro, marrón y marfil) en www.
ezzwave.com.
6.
1.
1.
2.
A. Tierra (verde/pelado)
B. Carga (negro)
C. Línea (negro)
D. Traveler (puente)
(rojo/otro)
E. Neutro (blanco)
F. Botón superior: presione y suelte para
encender el atenuador y presione sin soltar
para aumentar la intensidad del brillo.
G. Botón inferior: presione y suelte para apagar
el atenuador y presione sin soltar para
disminuir la intensidad de brillo.
H. Botón de configuración: cambia el modo de
uso del interruptor
I. Sensor de movimiento
J. LED azul (detrás de la tapa): indica la
confirmación de la programación.
K. Tire del interruptor de entrehierro hacia
AFUERA para desconectar la electricidad.
Empújelo hacia adentro por completo para
un funcionamiento normal.
Instalación de terminales de tornillo: requiere
de conexiones de cables para Line (hot) (línea
[con corriente]), Load (carga), Neutral (neutro)
y Ground (tierra). Se requiere un cable puente
para instalaciones de 3 o 4 vías.
A
DB
C E
F
G
H
I
J
K
Agregar su dispositivo a una red Z-Wave
1. Siga las instrucciones provistas para su controlador
Z-Wave certificado para incluir el atenuador de luz
inteligente a la red Z-Wave.
2. Una vez que el controlador esté listo para incluir
el atenuador de luz inteligente, presione y suelte
el botón superior o inferior del atenuador de luz
inteligente para incluirlo en la red.
Consulte el manual de referencia del controlador para
obtener instrucciones.
Ahora tiene control total para ENCENDER/APAGAR
la lámpara según los grupos, escenas, horarios y
automatizaciones interactivas que su controlador
programó. Si su controlador Z-Wave homologado
cuenta con acceso remoto, entonces puede controlar
la iluminación desde dispositivos móviles.
Para excluir y restablecer el dispositivo
1. Siga las instrucciones provistas para su controlador
Z-Wave certificado para excluir un dispositivo de la
red Z-Wave.
2. Una vez que el controlador esté listo para excluir el
dispositivo, presione y suelte el botón superior del
atenuador de luz inteligente para excluirlo de la red.
Para restablecer los ajustes de fábrica
Presione y suelte el botón superior 10 veces en 5
segundos. La luz LED parpadeará 3 veces rápidamente
para confirmar el cambio.
Nota:
Realice esta acción solo en caso de que falte el
controlador principal de su red o de que no funcione.
From Breaker Box
Out to Light (Load)
C
E
D
A
B
C
A
D
B
E
From Breaker Box
Out to Light (Load)
AVERTISSEMENT — RISQUE D’ÉLECTROCUTION
Coupez l’alimentation dans le circuit de dérivation relatif au gradateur et à l’appareil d’éclairage
sur le panneau de branchement. Tous les branchements de câblage doivent être effectués HORS
TENSION pour éviter de vous blesser ou d’endommager le dispositif. Ce dispositif est prévu pour
une installation conforme au Code national de l’électricité et aux règlements locaux des États-
Unis ou au Code canadien de l’électricité et aux règlements locaux du Canada. Si vous n’êtes
pas certain de la façon d’effectuer cette installation ou si vous ne vous sentez pas à l’aise pour
l’accomplir, veuillez consulter un électricien qualifié.
Câblage des installations multi-interrupteurs
Pour les installations à trois voies, veuillez consulter le manuel complémentaire d’installation pour détecteur
GE.
Câblage avec un seul interrupteur
Avant de commencer, vous pourriez vouloir changer la couleur du bouton pour l’harmoniser à votre plaque
murale ou à la décoration. Veuillez passer à la section 6.
1. Coupez l’alimentation au disjoncteur ou à la boîte à fusibles.
IMPORTANT! Avant de poursuivre, assurez-vous que l’alimentation est COUPÉE à la boîte de jonction.
2. Retirez la plaque murale.
3. Retirez les vis de montage du détecteur.
4. Retirez avec soin le détecteur de la boîte de jonction. NE débranchez PAS les fils.
5. Il y a jusqu’à cinq bornes à vis sur le gradateur. Celles-ci sont indiquées :
A. TERRE (GROUND) — Fil vert/Fil nu
B. CHARGE (LOAD) — Fil noir (relié au luminaire)
C. LIGNE (LINE) (sous tension) — Fil noir (relié à l’alimentation)
D. PENDENTIF (TRAVELER) — Fil rouge ou d’une autre couleur (uniquement pour les
installations à trois voies)
E. NEUTRE (Neutral) — Fil blanc
Faites correspondre ces bornes à vis avec les fils reliés au détecteur existant.
6. Retirez les fils du détecteur existant. Prenez soin de marquer les fils selon leurs raccordements antérieurs
aux bornes.
Boîtiers à un, deux et trois compartiments
Au moment d’installer le gradateur à détection de mouvement intelligent à montage mural dans des boîtiers
constitués de plusieurs compartiments, il peut s’avérer nécessaire de rompre les languettes pointillées sur un
côté de la bride avant ou les deux. Cela aura une incidence sur la valeur électrique nominale du gradateur à
détection de mouvement intelligent (voir les spécifications pour obtenir des détails).
Notez les renseignements importants relatifs au câblage.
IMPORTANT! Ce détecteur est conçu pour et doit être utilisé uniquement avec du fil en cuivre.
Exigences en matière de calibre de fil
Utilisez des fils de calibre 14 AWG ou de calibre supérieur, adaptés à des températures d’au moins 80 °C,
pour les raccordements du fil sous tension, du fil à la charge, du fil neutre, du fil de mise à la terre et du fil
pendentif.
Longueur de fil à dénuder
Pour les fixations aux bornes à vis, dénudez l’isolant sur 1 po (25 mm).
Pour les fixations utilisant les orifices du boîtier, dénudez l’isolant sur 5/8 po (16 mm).
UL précise que le couple de serrage des vis est de 12 kgf/cm (14 lbf/po).
1. Raccordez le fil de mise à la terre vert ou en cuivre nu à la borne de mise à la terre (GROUND).
2. Raccordez le fil noir relié au luminaire à la borne marquée CHARGE (LOAD).
3. Raccordez le fil noir relié au panneau de branchement électrique (sous tension) à la borne marquée
LIGNE (LINE).
4. Raccordez le fil blanc à la borne neutre (NEUTRAL) (utilisez le fil de branchement inclus au besoin).
Remarque : La borne du fil pendentif est seulement utilisée pour le câblage à trois ou quatre voies et doit
rester isolée si le détecteur est installé dans un système à deux voies (un détecteur et une charge).
5. Insérez le gradateur dans la boîte de jonction en prenant soin de ne pas pincer ou écraser les fils.
6. Fixez le gradateur sur la boîte à l’aide des vis fournies.
7. Installez la plaque murale.
8. Rétablissez l’alimentation dans le circuit, à la boîte à fusibles ou au disjoncteur et mettez le système à
l’essai.
Fonctionnement de base
Le luminaire branché peut être allumé ou éteint des façons suivantes :
Mode occupé (par défaut)
1. La lumière s’allumera automatiquement lorsqu’un mouvement est détecté et s’éteindra après cinq
minutes lorsqu’aucun mouvement n’est détecté pendant 20 secondes.
2. À distance, à l’aide de la télécommande Z-Wave.
REMARQUE:
L’éclairage s’allume automatiquement dans les 15 secondes suivant la détection d’un
mouvement par le capteur.
Mode vacant
1. La lumière s’allumera après avoir appuyé sur le bouton supérieur, et elle s’éteindra après cinq minutes
lorsqu’aucun mouvement n’est détecté pendant 20 secondes.
2. À distance, à l’aide de la télécommande Z-Wave.
Mode manuel
1. Pour augmenter la luminosité : Appuyez sur le bouton supérieur et maintenez-le enfoncé
2. Pour diminuer la luminosité : Appuyez sur le bouton inférieur et maintenez-le enfoncé
Le détecteur supplémentaire GE est nécessaire pour les
installations multi-interrupteurs à trois ou quatre voies.
Raccorder la borne du fil pendentif de ce détecteur à un détecteur
standard qui n’est pas de marque GE entraînera des dommages ou
altérera son fonctionnement. Dans le cas où ce détecteur fait partie
d’une installation multi-interrupteurs à trois ou quatre voies, ne
raccordez pas le fil pendentif ou ne le mettez pas sous tension tant
que les détecteurs complémentaires GE ne sont pas correctement
installés. Pour plus de renseignements sur les installations à trois ou
quatre voies, consultez le manuel ou le guide d’installation rapide
livré avec le détecteur supplémentaire GE.
3.
Retirer l’interrupteur en place.
Sortie au luminaire (charge)
Sortie au luminaire (charge)
De la boîte des disjoncteurs
De la boîte des disjoncteurs
Gradateur à détection de
mouvement intelligent
5.
5.
Ce dispositif prend en charge la classe de commandes Association (trois groupes)
• Le groupe d’association 1 prend en charge la ligne de sécurité et le rapport multiniveaux
• Les groupes d’association 2 et 3 prennent en charge le réglage de base est sont commandés
par une pression du bouton de marche et d’arrêt par la charge locale
• Chaque groupe d’association prend en charge un total de cinq nœuds
Pour obtenir de plus amples renseignements, visitez ezzwave.com
INTEROPÉRABILITÉ ENTRE LES DISPOSITIFS
Ce produit peut être utilisé dans un réseau Z-Wave avec d’autres appareils certifiés Z-Wave produits par
d’autres fabricants et d’autres applications. Tous les nœuds fonctionnant sans pile au sein du réseau
joueront le rôle de répétiteurs, quel que soit le fournisseur, afin de rehausser la fiabilité du réseau.
Pour changer la couleur des boutons
Cette étape est facultative. Avant de commencer,
vous pourriez vouloir changer la couleur des
boutons pour l’harmoniser à votre plaque
murale ou à la décoration.
1. Pincez les deux brides vers le bas afin de
relâcher le bouton.
2. Soulevez le bouton et retirez-le.
3. Placez le nouveau bouton sur le
détecteur en insérant les brides d’abord
près du détecteur de mouvement puis
sur le côté opposé.
4. Répétez les étapes 1 et 2 pour le bouton
de l’autre côté.
Une fois cette étape terminée, revenez à
la section 3.
Remarque : Des couleurs de bouton
supplémentaires (noir, marron, ivoire) sont
disponibles sur ezzwave.com
6.
1.
1.
2.
A. Terre (vert/nu)
B. Charge (noir)
C. Ligne (noir)
D. Pendentif (rouge/autre couleur)
E. Neutre (blanc)
F. Bouton supérieur — Appuyez et relâchez
pour allumer le gradateur; appuyez et
maintenez enfoncé pour augmenter la
luminosité.
G. Bouton inférieur — Appuyez et relâchez pour
éteindre le gradateur; appuyez et maintenez
enfoncé pour diminuer la luminosité.
H. Bouton de configuration — Modifie le mode
de fonctionnement du détecteur
I. Détecteur de mouvement
J. DEL bleue (derrière le couvercle) - confirme la
programmation
K. Interrupteur à entrefer — Tirez sur
l’interrupteur à entrefer pour couper
l’alimentation. Réinsérez-le complètement en
le poussant pour un fonctionnement normal.
La borne à vis nécessite des raccordements de
câblage pour le fil sous tension, le fil à la charge,
le fil neutre et le fil de mise à la terre. Un fil
pendentif est requis pour une installation à trois
ou quatre voies.
A
DB
C E
F
G
H
I
J
K
El atenuador de luz Smart Dimmer tiene las siguientes características predeterminadas
• Sensor de movimiento: si detecta movimiento, la luz conectada se enciende
automáticamente; de lo contrario, se apaga. El sensor no debe detectar movimiento
durante 20 segundos, antes de que se active el apagado automático.
• Temporizador de 5 minutos: la luz conectada se apagará si no se detectan movimientos
durante 5 minutos.
• Sensor de luz: este modo está deshabilitado. El movimiento siempre encenderá la luz
conectada.
Importante: El sensor de movimiento está predeterminado en un nivel medio.
Para modificar la configuración mencionada anteriormente, consulte las opciones de
programación (sección 4).
El atenuador de luz Smart Dimmer tiene las siguientes características:
• ENCENDER/APAGAR y regular los niveles de atenuación, manual o remotamente, a través
del controlador Z-Wave.
• Se puede utilizar en una instalación de un solo polo o con hasta dos interruptores auxiliares
Jasco en configuraciones de cables de 3 o 4 vías.
• Compatible con todas las bombillas incandescentes y con la mayoría de las bombillas
atenuables CFL/LED.
• Utiliza una placa decorativa estándar para instalaciones de una sola tecla (no incluye placa).
• Este dispositivo Z-Wave cuenta con características avanzadas que le permiten personalizar
su experiencia. Estas características solo pueden ajustarse por medio
de un controlador Z-Wave que sea compatible con la clase de comandos de
configuración de Z-Wave. Consulte la lista integral de configuraciones ajustables en:
www.ezzwave.com/config.
Características principales de su nuevo dispositivo Z-Wave
Le gradateur intelligent est doté de la configuration usine suivante :
• Mode occupé — le luminaire branché s’allume automatiquement lorsqu’un mouvement
est détecté et s’éteint lorsqu’il n’y a plus de mouvement. Le capteur ne doit pas détecter
de mouvement pendant 20 secondes avant d’activer la mise hors tension automatique.
• Temporisation de 5 minutes — le luminaire branché s’éteint 5 minutes après l’arrêt du
mouvement.
• Mode de détection du niveau de lumière — ce mode est désactivé. Le mouvement fera
toujours allumer le luminaire branché.
Remarque : Par défaut, la sensibilité des mouvements est réglée à moyenne.
Pour modifier la configuration ci-dessus, voir les options de programmation (section 4).
Le gradateur intelligent est doté des fonctions suivantes :
• Mise en marche ou arrêt et réglage de la luminosité manuellement ou à distance au
moyen de la télécommande Z-Wave.
• Peut être utilisé en installation unipolaire ou avec un ou deux détecteurs
supplémentaires Jasco dans des configurations de câblage à trois ou quatre voies.
• Compatible avec toutes les ampoules incandescentes et la plupart des ampoules à DEL
et fluocompactes à intensité réglable.
• Se fixe sur une plaque murale décorative de taille standard pour des installations à
compartiment unique (plaque murale non incluse).
• Cet appareil Z-Wave possède des fonctions avancées qui vous permettent de
personnaliser votre expérience. Ces fonctions peuvent être réglées par une
télécommande compatible avec la technologie Z-Wave qui prend en charge la classe
de commandes de configuration Z-Wave. Pour accéder à une liste complète de
configurations, visitez le site suivant : www.ezzwave.com/config
Familiarisez-vous avec l’utilisation de votre nouvel appareil Z-Wave
Ajoutez votre appareil à un réseau Z-Wave
1. Suivez les instructions relatives à votre contrôleur
certifié Z-Wave afin d’ajouter le module gradateur
intelligent au réseau Z-Wave.
2. Une fois que le contrôleur est prêt à ajouter votre
détecteur intelligent, enfoncez et relâchez le bouton
supérieur ou inférieur du gradateur intelligent afin
de l’ajouter au réseau.
Veuillez consulter le manuel du contrôleur pour obtenir
des instructions.
Vous avez maintenant le contrôle absolu sur la mise
en marche et l’arrêt de votre lampe en fonction
des groupes, des scènes, des horaires et des
automatisations interactives programmés par votre
contrôleur. Si votre contrôleur certifié Z-Wave a une
fonction d’accès à distance, vous pouvez maintenant
contrôler votre éclairage à l’aide de vos appareils
mobiles.
Pour exclure ou réinitialiser un appareil
1. Suivez les instructions relatives à votre contrôleur
certifié Z-Wave afin d’enlever un appareil du réseau
Z-Wave.
2. Une fois que le contrôleur est prêt à enlever votre
appareil, enfoncez et relâchez le bouton supérieur
du gradateur intelligent afin de l’enlever du réseau.
To return to factory defaults
Appuyez sur le bouton supérieur et relâchez le dix fois
en cinq secondes. La DEL clignotera rapidement à trois
reprises pour confirmer la modification.
Remarque :
Cette mesure ne doit être prise que si
le contrôleur principal du réseau est manquant ou
autrement inutilisable.

26932 Parameter and Command Class List
Parameter
number
Parameter: Length Valid value Description
1
Timeout Duration
1
0, 1, 5(default), 15, 30
and 0xFF(-1)
0=Test(5S)
1=1 minute
5=5 minutes
15=15 minutes
30=30 minutes
0xFF=Disable timeout
2
Change brightness of
associated light bulb(s).
1
0x00-0x63, 0xFF(default) 0xFF = last dimming level
3
Operation Mode
1
1,2,3(default)
1=Manual
2=Vacancy
3= Occupancy
5
Invert Switch 1 0 (default), 1 In a 3-way configuration,
invert the connected Add-On
Switch buttons
0=Disabled
1=Enable
6
Enable/Disable Motion Sensor
1 0, 1 (default) 0=Disabled
1=Enable
7
Adjust steps/levels with
Remote
1 1(default)-99
8
Adjust timing of steps/levels
with Remote
2 1,
2,3(default),4-00FF(255)
9
Adjust steps/levels
1
1(default)-99
10
Adjust timing of steps/levels 2 1, 2,3(default),
4-00FF(255)
11
Adjust Steps/levels with “ALL
ON/OFF” command
1 1(default)-99
12
Adjust timing of steps/levels
with “ALL ON/OFF” command
2 1, 2,3(default),
4-00FF(255)
13 Motion sensing sensitivity 1 1,2(default),3 1=High sensitivity
2=Medium sensitivity
3=Low sensitivity
14
Enable/Disable Light Sensing 1 0(default), 1 0=Disabled
1=Enabled
15
Reset cycle 2 0, 1 ,2(default),3,
4, … ,110
0=Disable
1=10 seconds
2=20 seconds
3=30 seconds
4=45 seconds
110 =27 mins 15 seconds
16
Switch Mode 1 0 (default), 1 0=Disabled
1=Enabled
17
Switch Level 1 0(default)-99 0=Disabled
1=Level 1
99=Level 99(full brightness)

26932 Parameter and Command Class List
18 Dim up rate
1 0(default), 1
1 = Dim up the light to the
default level slowly
0 = Dim up the light to the
default level quickly
19 Exclusion mode
1 0(default), 1 0 = Press any button on the
switch
1 = press and release “ X”
button, then press and
release “ ON “ button
COMMAND_CLASS_ZWAVEPLUS_INFO_V2,
COMMAND_CLASS_MANUFACTURER_SPECIFIC_V2,
COMMAND_CLASS_DEVICE_RESET_LOCALLY,
COMMAND_CLASS_POWERLEVEL,
COMMAND_CLASS_SWITCH_MULTILEVEL_V2,
COMMAND_CLASS_SWITCH_ALL,
COMMAND_CLASS_SCENE_ACTIVATION,
COMMAND_CLASS_SCENE_ACTUATOR_CONF,
COMMAND_CLASS_CONFIGURATION,
COMMAND_CLASS_VERSION_V2,
COMMAND_CLASS_NOTIFICATION_V4,
COMMAND_CLASS_MULTI_CHANNEL_V4
COMMAND_CLASS_MULTI_CHANNEL_ASSOCIATION_V3,
COMMAND_CLASS_ASSOCIATION_V2,
COMMAND_CLASS_ASSOCIATION_GRP_INFO,
COMMAND_CLASS_FIRMWARE_UPDATE_MD_V2,
COMMAND_CLASS_CRC_16_ENCAP