This snowthrower is only as safe as the operator. If it is misused, or not maintained correctly, it can be dangerous. Remember you are responsible for your safety and those around you.
When leaving the operating position always disengage the auger, STOP the engine, and remove the key. DO NOT leave a running machine unattended.
DO NOT operate the snowthrower without the correct guards, and other safety protective devices in place and working.
Be careful when you operate the unit on gravel driveways, walkways, or roads. Stay alert for hidden hazards or traffic.
DO NOT operate the snowthrower without good visibility or light. Always be sure of your footing, and keep a firm hold on the handles. Walk; never run.
Be careful to avoid slipping or falling, especially when you operate the snowthrower in reverse. Be careful when you operate the snowthrower on slopes.
If you strike a foreign object, stop the engine, remove the wire from the spark plug, thoroughly inspect the snowthrower for damage, and repair the damage before you start and operate the snowthrower.
DO NOT operate the equipment without wearing adequate winter garments. Avoid loose fitting clothing that can get caught in moving parts. Wear footwear that will improve footing on slippery surfaces.
DO NOT touch a hot muffler or engine. Let the muffler and engine cylinder to cool before touching.
Operating Area
Identify the walkways and driveways where you plan to operate the snowthrower.
Make sure that the area is free of debris or objects that the auger could pick-up and throw from the chute
WARNING
This machine is capable of throwing objects that could injure bystanders or cause damage to buildings.
Before you start the engine, move the snowthrower outdoors and away from windows and doors.
WARNING
Engines give off carbon monoxide, an ordorless, colorless, poison gas. Breathing carbon monoxide can cause nausea, fainting, or death.
Start and operate the engine outdoors.
Do not operate the engine in an enclosed area, even if doors or windows are open.
Make sure that the operating area is clear of bystanders, especially children.
WARNING
This snowthrower is capable of amputating hands and feet, and throwing objects. Read and obey the safety instructions in this manual. Failure to do so could result in death or senous Injury.
Keep children out of the area during operation.
Children are often attracted to the equipment. Be mindful of all persons present.
Be alert and turn the unit off if bystanders enter the area.
Use extra care when you approach blind corners, shrubs, trees, or other objects that can obscure vision.
Engine
Oil Recommendations
Oil Capacity: See the Specifications section.
NOTICE
This engine was shipped from Briggs & Stratton without oil. Equipment manufacturers or dealers may have added oil to the engine. Before you start the engine for the first time, make sure to check the oil level and add oil as specified by the instructions in this manual. If you start the engine without oil, it will be damaged beyond repair and will not be covered under warranty.
We recommend the use of Briggs & Stratton Warranty Certified oils for best performance. Other high-quality detergent oils are permitted if classified for service SF, SG, SH, SJ or higher. Do not use special additives.
Outdoor temperatures determine the correct oil viscosity for the engine. Use the chart to select the best viscosity for the outdoor temperature range expected. Engines on most outdoor power equipment operate well with 5W-30 Synthetic oil. For equipment operated in hot temperatures, Vanguard @ 15W-50 Synthetic oil gives the best protection.
Check and Add Oil
NOTICE
This engine was shipped from Briggs & Stratton without oil. Before you start the engine, make sure that you add oil as specified by the instructions in this manual. If you start the engine without oil, it will be damaged beyond repair and will not be included under the warranty.
Use Briggs & Stratton@ Synthetic 5W-30 Warranty Certified oil for best performance. Other high-quality detergent oils are permitted if classified for service SG, SH, SJ or higher. Do not use additives.
Put the unit on a level surface.
Clean the oil fill area.
Remove the dipstick (A, Figure 3). Use a clean cloth to remove oil from dipstick.
Install the dipstick, and check the oil level. Make sure that the oil level is at the top of the FULL indicator (C).
If the oil level is below the FULL indicator, carefully add oil into the engine oil fill tube (B). DO NOT add too much oil in the oil fill tube.
Wait one minute. Check the oil level again.
When the oil level touches the top of the FULL indicator, install and tighten the dipstick.
Add Fuel
Fuel and its vapors are extremely flammable and explosive. Always handle fuel with extreme care. Failure to obey these safety instructions can cause fire or explosion, which could result in severe burns or death.
When Adding Fuel
Stop the engine and let the engine cool at least 3 minutes before you remove the fuel cap.
Extinguish cigarettes, cigars, pipes, and other sources of ignition.
Fill fuel tank outdoors or in well-ventilated area.
Do not overfill fuel tank. To allow for expansion of the fuel, do not fill above the bottom of the fuel tank neck.
Keep fuel away from sparks, open flames, pilot lights,
Remove unwanted material from the fuel cap area.
Remove from the fuel cap (A,Fingure 4)
Fill the fuel tank(B) with fuel. DO NOT fill above the bottom of the fuel tank neck (C)
Install the fuel cap.
Start the Engine
WARNING
Fuel and its vapors are extremely flammable and explosive. Always handle fuel with extreme care.
Failure to obey these safety instructions can cause a fire or explosion which could result in serve burns or death.
Make sure that spark plug, muffler, fuel cap, and air cleaner (if equipped) are installed correctly.
Do not crank the engine without the spark plug.
Do not use pressurized starting fluids because their vapors are flammable.
Do not over-prime the engine. Read Stati the Engine instructions in this manual.
If the engine floods, set the choke to the OPEN/RUN position, move the throttle to FAST position, and crank the engine until it starts heat, and other ignition sources.
Check fuel lines, tank, cap, and fittings frequently for cracks or leaks. Replace if necessary.
If fuel spills, wait until it evaporates before you start the engine. DO NOT create other ignition sources.
Use only an approved fuel container.
Remove unwanted material from the fuel cap area. Remove the fuel cap (A, Figure 4).
Fill the fuel tank (B) with fuel. DO NOT fill above the bottom of the fuel tank neck (C).
Make sure the auger control (J, Figure 5) and traction control (K) are disengaged.
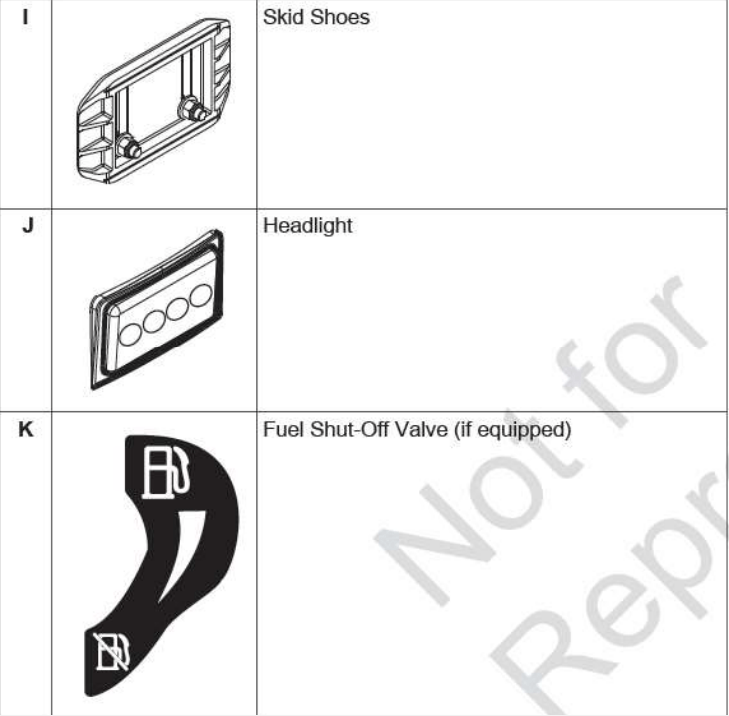
Turn the fuel shut-off valve (A) (if equipped) to the OPEN position.
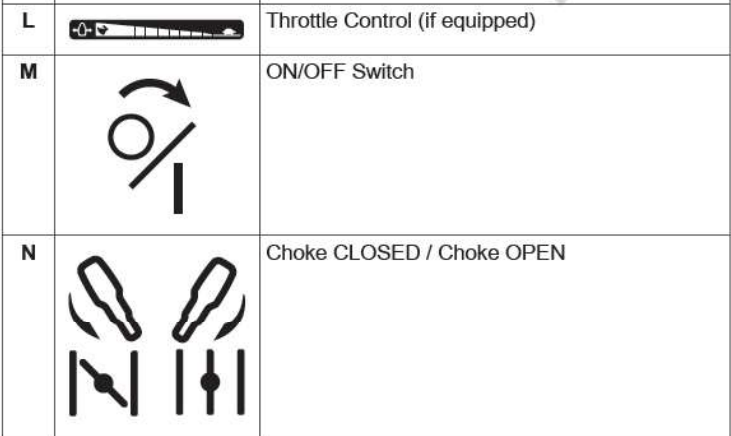
Move the throttle control lever (B) (if equipped) to the FAST position.
Turn the ignition key (C) to the ON position or push in the Push/Pull key.
Turn the choke control (D) to the CLOSED position.
Note: The choke and primer are usually not needed to start a warm engine.
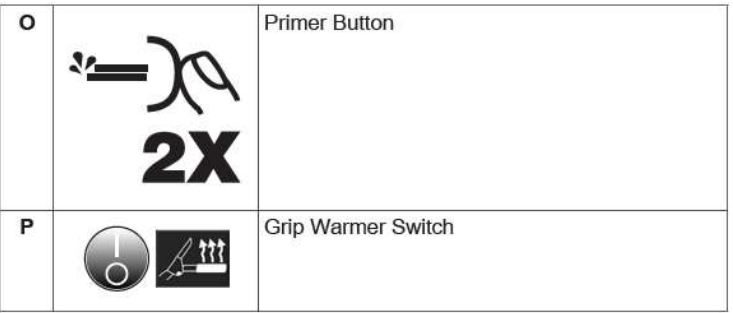
Push the primer button (E) two times.
On rewind start models, hold the starter cord handle (F) tightly. Pull the handle slowly until resistance is felt, then pull rapidly
WARNING
Rapid retraction of the starter cord (kickback) will pull your hand and arm toward the engine faster than you can let go. Broken bones, fractures, bruises, or sprains could result
On electric start models, connect the extension cord (G, Figure 6) to the starter box (H), and then to the wall receptacle. Push the starter box button (l). After the engine starts, disconnect the extension cord from the wall receptacle and then from the starter box.
WARNING
Damaged or non-grounded power cords could cause electric shock. Electric shock could cause severe burns or
Use only a three-conductor power cord that is correctly grounded to the power source.
If the extension cord is damaged, the manufacturer or its service agent or an equivalent qualified person must replace it.
Note: To extend the life of the starter, use short, start cycles at a maximum of five seconds. Wait one minute between start attempts.
9. Let the engine warm for several minutes. Gradually move the choke control (D) to the OPEN position.
Stop the Engine
Turn the ignition key (A, Figure 7) to the OFF position. Remove the ignition key or the Push (Pull key, if equipped.
Keep the key in a safe location out of the reach of children. The engine cannot start without the key.
Adjust the Discharge Chute and Deflector
WARNING
Ice, gravel, or other unintended objects can be picked up by the auger and thrown from the chute with force. Objects thrown from the chute could cause death, serious injury, or property damage.
Always be aware of the direction the snow is being thrown.
Turn the chute rotation crank (D, Figure 8) to set the direction of the discharge chute.
Use the deflector control lever (C) to move the deflector up or down. Raise the deflector to throw snow farther.
use the speed control lever (B) to select the forward or reverse drive speed. Use lower speeds to remove wet heavy snow. Use higher speeds for light snow.
Note: Make sure to release the traction control lever (F) before you change speeds.
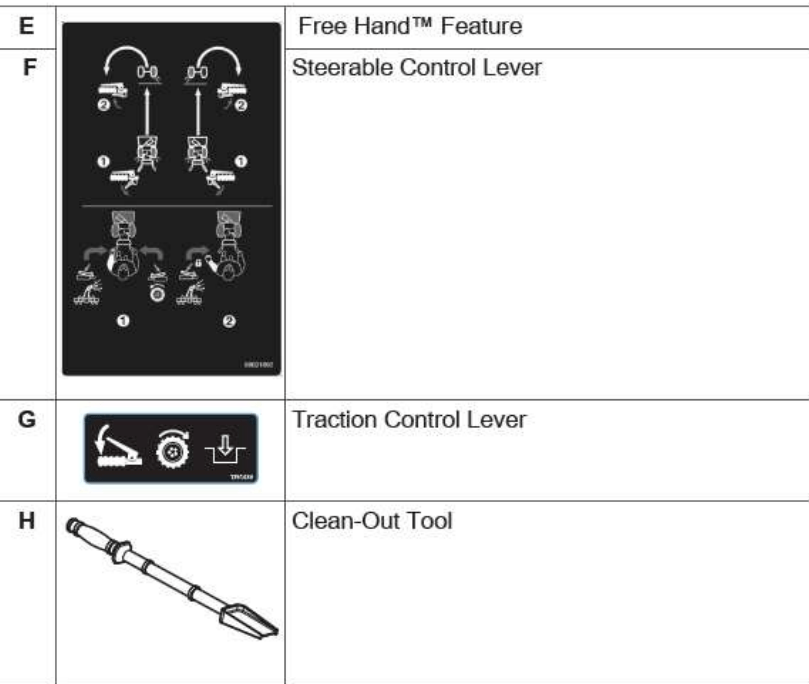
Using the Steering Control Feature
The Steering Control feature helps the operator turn the unit. The Steering Control triggers (P, Figure 13) are below the hand grips. The Steering Control temporarily disengages one drive wheel while the other continues to drive through a turn.
Engage the traction control lever (F, Figure 13) to move the machine forward.
Lift and hold the left Steering Control trigger (P) to turn left.
Release the left trigger, to continue straight.
Lift and hold the right Steering Control trigger (P), to turn right.
Release the right trigger, to continue strainght.
Cleaning a Clogged Discharge Chute
DANGER
The rotating impeller in the discharge chute throws snow. Fingers can quickly become caught in the impeller and result in traumatic amputation or severe laceration. DO NOT use your hands to clean a clogged discharge chute! Always use a clean-out tool
STOP the engine. Remove the ignition key or push/pull key.
Make sure that the impeller does not rotate.
Use a clean-out tool (G, Figure 14) to remove snow from the discharge chute. DO NOT use your hands to clean a clogged discharge chute!
Headlight
Some models are equipped with a headlight that illuminates the area in front of the snowthrower. When you START the engine, the headlight turns ON. There is no switch.
Using the Heated Hand Grips
Turn on the grip warmer switch (A, Figure 15) to activate the heated hand grips.
Turn off the grip warmer switch before you stop the snowthrower
Using the Wheel Release - Lock Pins
For easy transport of the unit, you can temporarily disengage one or both wheels from the drive axles.
1. Open the pull-ring (A, Figure 16) over the wheel hub.
2. Put the retaining pin through the outer hole in the axle and close the pull-ring over the axle.
3. To engage the wheel and axle, align the wheel hub and the inner axle hole, then install the retaining pin fully and close the pull-ring over the wheel hub.
Maintenance and Adjustments
We recommend you contact an Authorized Service Dealer for all maintenance, adjustments, and servicing of the unit. The owner can do some routine maintenance tasks. Refer to the maintenance schedule and procedures that follow.
CAUTION
All the components used to build this product must remain in place for correct operation. Replacement parts must be of the same design and installed in the same position as the original parts. Other parts may not perform as well, damage the unit, and result in injury.
WARNING
This snowthrower must be correctly maintained to ensure safe operation and performance. Failure to obey the safety instructions in this manual could result in death or serious Injury.
Before maintenance or repairs on the snowthrower, STOP the engine and remove the ignition key or the push/pull key.
Maintenance Schedule
First 5 Hours
Change the oil.
Before Each Use
Check the engine oil level.
Check the auger stop time.
After Each Use
Remove accumulated snow and slush to prevent freezing of the controls, wheels, discharge chute, and auger.
Every 25 Hours or Annually
Check the scraper bar for wear.
Change the engine oil.
Check the snowthrower for loose hardware.
Check the auger control cable adjustment.
Check the muffler and muffler guard.
Replace the spark plug (dealer service).
Check the valve clearance* (dealer service).
*Not required unless problems are noted with engine performance.
Emissions Control
Maintenance, replacement, or repair of the emissions control devices and systems can be serviced by a non-road engine repair establishment or individual. However, to obtain "no charge" emissions control service, the work must be serviced by a factory authorized dealer.
Changing the Engine Oil
Discard used oil correctly. Do not discard with household waste. Check with your local authorities, service center, or dealer for safe disposal or recycling facilities.
Use Briggs & Stratton@Synthetic 5W-30 Warranty Certified oil for best performance. Other high-quality detergent oils are acceptable if classified for service SG, SH, SJ or higher. Do not use any additives.
STOP the engine. Turn the ignition key to the OFF position.
Remove the ignition key, or pull out the Push/Pull key (if equipped).
WARNlNG
Fuel and its vapors are extremely flammable, which could cause burns or fire that result in death or serious injury.
When performing maintenance that requires the unit to be tipped, the fuel tank must be empty or fuel can leak out and result in a fire or explosion.
Remove the oil drain plug (D, Figure 17). Tilt the snowthrower a small distance rearward. Drain the oil into an appropriate container.
Install and tighten the oil drain plug.
Put the unit on a level surface.
Clean the oil fill area
Remove the dipstok( A, Fingure 18)
Slowly add oil into the oil fill tube (B). See Specifications for the oil capacity.
Wait one minute. Check the oil level again.
When the oil level touches the top of the full indicator (C) install and tighten the dipstick.
Adjusting the Skid Shoe Height
DANGER
This snowthrower contains a rotating auger that collects snow. Fingers can quickly become caught and can result in a traumatic amputation or a severe laceration.
STOP the engine. Wait for all moving parts to stop. Remove the ignition key or push/pull key before maintenance or repairs.
WARNING
If hit by the auger or impeller, objects such as gravel, rocks, or other unwanted material can be thrown with sufficient force and cause personal injury, property damage, or damage to the snowthrower.
The skid shoes are on each side of the auger housing. They can be adjusted to increase or decrease the distance between the scraper bar and the surface to be cleared
Set the skid shoes at the correct height to maintain ground clearance for the type of surface being cleared.
STOP the engine. Remove the ignition key or push/pull key.
Find the scraper bar clearance needed for the surface to be cleared.
To remove snow from hard surface areas, adjust the skid shoes up to lower the scraper bar closer to the surface.
To remove snow from gravel-covered or uneven surfaces, adjust the skid shoes down to raise the scraper bar further from the surface. This will help en prevent rocks and other unwanted materials from being picked up and thrown by the auger and impeller.
Put the unit on a level surface.
Loosen the mounting nuts (E, Figure 19) on the skid shoe (H).
Under each end of the scraper bar, put a wooden block (y, z, Figure 20) of the same thickness at the desired clearance height.
Make sure that each skid shoe firmly touches the surface. Then tighten the mounting nuts.
NOTICE To prevent contact with the auger, make sure that the mounting nuts are outside the auger housing.
Storage
Off-Season Storage
At the end of the season, or when the unit is in storage for more than 30 days, complete the steps that follow.
WARNING
Gasoline is highly flammable and its vapors are explosive. Fumes can move to a distant ignition source and an explosion and/or fire can result.
If fuel is in the tank, do not keep the unit indoors or in poorly ventilated areas where fumes could reach sparks, open flames, pilot lights, heat, and other ignition sources.
Snowthrower
Clean the unit. Make sure that all nuts, bolts, and screws are tightened.
Examine visible moving parts for damage, breakage, and wear. Replace if necessary.
Lubricate the control lever linkages, chute and deflector, auger assembly, and drive wheel axles. See Maintenance and Adjustments.
For rusted or chipped paint surfaces, sand lightly and apply touch-up paint.
For unpainted or bare metal surfaces, apply a rust preventative product.
Keep the unit indoors and cover it. If kept outdoors, cover it with a heavy tarpaulin.
Returning the unit to Service
Contact an Authorized Service Dealer for annual maintenance tasks. See Maintenance Schedule.
Inspect engine oil level and add oil, if necessary.
Fill the fuel tank with clean fuel.
Check tire pressures.
Make sure that all guards, shields, and covers are attached.
Make sure that all fasteners are tightened.
Inspect the auger and impeller control, and the traction drive control.
Troubleshooting
Problem
Cause
Solution
The auger does not stop when the auger control is released.
The control cable requires adjustment.
See Adjust the Auger Control Cable.
The auger does not turn when the auger control is engaged.
The control cable requires adjustment.
See Adjust the Auger Control Cable
The engine does not start.
The key is set to the OFF position.
The primer button was not pushed 2-times before the starter rope was pulled.
The fuel tank is empty.
The choke is open.
The engine is flooded.
Water is in the fuel or old fuel.
Turn the key to the ON position.
Push the primer button 2-times before you pull the starter rope.
Fill the fuel tank with fresh fuel.
Turn the choke to the CLOSED position before you pull the starter rope.
Turn the choke to open position. Pull the starter rope several times until the engine starts.
Fill the fuel tank with fresh fuel.
The chute rotation or deflector adjustment does not work.
The chute or deflector is frozen.
Keep the snowthrower in a warm area until the snow or ice melts.
The engine is hard to stan or operates poorly.
Incorrect oil
The choke control is set incorrectly.
Change oil to lighter viscosity.
As the engine warms, gradually open the choke control.
Too much vibration.
Loose or damaged parts
Stop the snowmrower immediately. Contact an Authorized Service Dealer.
The snowthrower does not throw snow.
The control cable requires adjustment.
Snow is in the discharge chute.
See Adjust the Auger Control Cable.
STOP THE ENGINE! Make sure that the auger STOPS. Use a clean-out tool to remove snow from the discharge chute. Do not clean a clogged discharge chute with your hands! See Cleaning a Clogged Discharge Chute.

-476523.png)
-981741.png)
-85890.png)
-947215.png)
-814533.png)
-225478.png)
-102790.png)
-926548.png)
-620318.png)
-742347.png)
-240155.png)
-484451.png)
-693080.png)
-972581.png)
-149780.png)
-173123.png)