User Guide for Snow Blower
Features and Controls
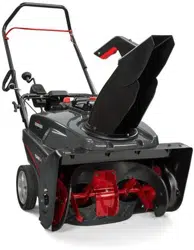
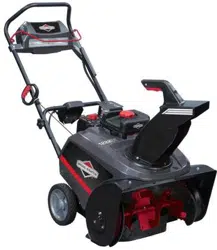
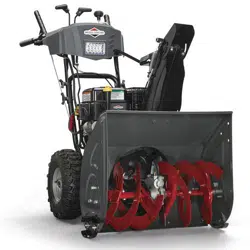
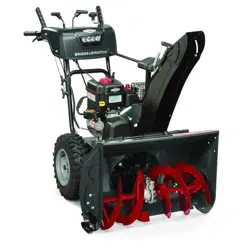
Match the call out letters in Figure 2 to the features and controls listed in the accompanying table.

Control Symbols and Meanings


Operation
WARNING This snowthrower is only as safe as the operator. If it is misused, or not properly maintained, it can be dangerous. Remember you are responsible for your safety and those around you.
• When leaving the operating position always disengage the auger, turn off the engine, and remove the key. Never leave a running machine unattended.
• Never operate the snowthrower without proper guards, and other safety protective devices in place and working.
• Exercise extreme caution when operating on or crossing gravel drives, walks, or roads. Stay alert for hidden hazards or traffic.
• Never operate the snowthrower without good visibility or light. Always be sure of your footing, and keep a firm hold on the handles. Walk; never run.
• Exercise caution to avoid slipping or falling, especially when operating the snowthrower in reverse.
• Exercise extreme caution when operating on slopes.
• After striking a foreign object, stop the engine (motor), remove the wire from the spark plug, disconnect the cord on electric motors, thoroughly inspect the snowthrower for any damage, and repair the damage before restarting and operating the snowthrower.
• Do not operate the equipment without wearing adequate winter garments. Avoid loose fitting clothing that can get caught in moving parts. Wear footwear that will improve footing on slippery surfaces.
• Never touch a hot muffler or engine. Allow muffler/engine cylinder to cool before touching.
Operating Area
1. Familiarize yourself with the area in which you plan to operate the snowthrower. Mark off all boundaries of walkways and driveways.
2. Ensure the area to be cleared is free of debris or objects that could be picked up by the auger and thrown from the chute.
WARNING This machine is capable of throwing objects that could injure bystanders or cause damage to buildings.
3. Before starting the engine, move the snowthrower outdoors and away from windows and doors.
WARNING Engines give off carbon monoxide, an ordorless, colorless, poison gas. Breathing carbon monoxide can cause nausea, fainting, or death.
• Start and run engine outdoors.
• Do not run the engine in an enclosed area, even if doors or windows are open.
4. Ensure the operating area is clear of bystanders, especially children.
WARNING This snowthrower is capable of amputating hands and feet, and throwing objects. Read and observe all the safety instructions in this manual. Failure to do so could result in death or serious injury.
• Keep children out of the area during operation.
• Children are often attracted to the equipment. Be mindful of all persons present.
• Be alert and turn the unit off if bystanders enter the area.
• Use extra care when approaching blind corners, shrubs, tress, or other objects that may obscure vision.
Starting the Engine
Checking Oil
NOTICE The engine was shipped from the factory without oil. Before you start the engine, ensure that you add oil according to the instructions in this manual. If you start the engine without oil, it will be damaged beyond repair and will not be covered under the warranty.
Use Briggs & Stratton Synthetic 5W-30 Warranty Certified oil for best performance. Other high-quality detergent oils are acceptable if classified for service SG, SH, SJ or higher. Do not use any additives.
1. Place the unit on a level surface.
2. Clean the oil fill area of any moisture or debris.
3. Remove the oil dipstick (A, Figure 3) and wipe it with a clean cloth.
4. Insert and tighten the dipstick, then remove it again to check the oil level. It should be at the top of the full indicator (C)
5. To add oil, pour slowly into the engine oil fill (B). Do not overfill.
6. Wait one minute before checking the oil level.
7. When the oil level is at the top of the full indicator (C), install and tighten the dipstick.

Adding Fuel
Fuel must meet these requirements:
• Clean, fresh, unleaded gasoline
• A minimum of 87 octane / 87 AKI (90 RON)
• Up to 10% ethanol is acceptable
NOTICE Do not use unapproved gasolines, such as E15 and E85. Do not mix oil in gasoline or modify the engine to run on alternate fuels. Use of unapproved fuels will cause engine damage that will not be covered under warranty.
At altitudes over 5,000 feet (1524 meters), a minimum 85 octane / 85 AKI (89 RON) gasoline is acceptable. To remain emissions compliant, high altitude adjustment is required. Operation without this adjustment will cause decreased performance, increased fuel consumption, and increased emissions. See an authorized service dealer for high altitude adjustment information. Operation altitudes below 2,500 feet (762 meters) with the high altitude adjustment is not recommended.
WARNING Fuel and its vapors are extremely flammable and explosive. Always handle fuel with extreme care.
Failure to observe these safety instructions can cause a fire or explosion which could result in serve burns or death.
• Do not add fuel while engine is running. Let the engine cool at least 2 minutes before adding fuel.
• Fill the fuel tank outdoors only, using an approved fuel container with the unit directly on the ground.
• Keep fuel away from sparks, open flames, pilot lights, heat, and other ignition sources.
• Allow any spilled fuel to evaporate before starting the engine.
• If fuel is spilled on clothing change clothing immediately.
1. Slowly remove the fuel cap (A, Figure 4) and fill the tank (B) with fuel. Do not fill higher than the bottom of the fuel tank neck (C).
2. Reinstall the fuel cap. Allow any spilled fuel to evaporate before starting the engine.

Starting Engine
WARNING Fuel and its vapors are extremely flammable and explosive. Always handle fuel with extreme care.
Failure to observe these safety instructions can cause a fire or explosion which could result in serve burns or death.
• Ensure that spark plug, muffler, fuel cap, and air cleaner (if equipped) are in place and secured.
• Do not crank the engine with the spark plug removed.
• Do not use pressurized starting fluids because their vapors are flammable.
• Do not over-prime the engine. Follow the engine starting instructions in this manual.
• If the engine floods, set choke (if equipped) to OPEN/RUN position, move throttle (if equipped) to FAST position and crank until engine starts.
1. Ensure the auger control is disengaged.
2. Insert the ignition key (A, Figure 5) and turn it to the ON position or push in the Push/Pull key.
3. Turn the choke control (B) to the Closed position.
Note: Choke is usually not needed when starting a warm engine.
4. Press the primer (C) two times.
Note: Primer is usually not needed when starting a warm engine.
5. Rewind start: Firmly hold the starter cord handle (D). Pull the handle slowly until resistance is felt, then pull rapidly.
WARNING Rapid retraction of the starter cord (kickback) will pull your hand and arm toward the engine faster than you can let go. Broken bones, fractures, bruises, or sprains could result.

6. Electric start: Connect the extension cord (E, Figure 6) to the starter box (F) on the engine and then to the wall receptacle. Press the starter box pushbutton (G). After the engine starts, disconnect the extension cord from the wall receptacle and then from the starter box.
WARNING Damaged or ungrounded power cords could cause electric shock. Electric shock could cause severe burns or death.
• Use only a three-conductor power cord properly grounded to the power source.
• If the extension cord is damaged, it must be replaced by the manufacturer or its service agent or a similarly qualified person.
NOTICE To extend the life of the starter, use short starting cycles (five seconds maximum). Wait one minute between starting attempts.
If the engine does not start after repeated attempts, contact an authorized service dealer or go to our website.
7. Allow the engine to warm up for several minutes. Gradually move the choke control to the Open position.

Stopping the Engine
1. Turn the ignition key (A, Figure 5) to the OFF position and remove it or remove the Push /Pull key, if equipped.
2. Keep the key in a safe place out of the reach of children. The engine cannot be started without the key.
Adjusting the Discharge Chute and Deflector
WARNING Ice, gravel, or other unintended objects can be picked up by the auger and thrown from the chute with force.
Objects thrown from the chute could cause death, serious injury, or property damage.
• Always be aware of the direction the snow is being thrown.
NOTICE Do not use the chute deflector or the chute rotation handle to lift the unit. These were designed for making needed adjustment only.
Chute Rotation - Handle Mount (if equipped)
1. Squeeze and hold the button on the chute control handle (C, Figure 7).
2. Push the handle forward or pull it rearward to rotate the chute.
3. Release the button to lock the chute in the desired position.
NOTICE Do not use excessive force when trying to operate the control.
Chute Rotation - Chute Mount (if equipped)
1. Grasp the chute control handle at the base of the chute (D, Figure 7).
2. Turn the handle left or right to rotate the chute. A tension plate holds the chute in the desired position.
Chute Rotation - Switch Mount (if equipped)
1. Press the switch (E, Figure 7) to rotate the chute.
2. Release the switch to lock the chute in the desired position.
Deflector Adjustment
1. Squeeze and hold the button on the deflector control handle (F, Figure 7), or loosen the wing knob (F).
2. Move the deflector up or down to adjust the snow discharge height and distance.
3. Release the button to lock the deflector in the desired position, or tighten the wing knob.

Engaging the Auger
DANGER The discharge chute contains a rotating auger to throw snow. Fingers or feet can quickly become caught in the auger resulting in traumatic amputation or severe laceration. Failure to observe these safety instructions will result in traumatic amputation or serve laceration.
1. Pull the auger control (A, Figure 7) against the handle to engage the auger.
2. Release the auger control to disengage the auger. The auger must stop within 5 seconds after the auger control is released. If it does not;
• Adjust the control cable. See Adjusting the Auger Control Cable.
• If the auger still does not stop within 5 seconds, see an authorized dealer.
NOTICE Do not overload the machine capacity by attempting to clear snow at too fast of a rate.
Clearing a Clogged Discharge Chute
DANGER The discharge chute contains a rotating auger to throw snow. Fingers can quickly become caught in the auger resulting in traumatic amputation or severe laceration. Never clear a clogged discharge chute with your hands. Always use a clean-out tool.
To safely clear a clogged discharge chute, follow these instructions:
1. Stop the engine and remove the key.
2. Ensure that the auger has stopped rotating.
3. Use a clean-out tool to remove snow from the discharge chute. Never clear a clogged discharge chute with your hands!
Using the Headlight
Some models are equipped with a headlight to help illuminate the area in front of the snowthrower. The headlight is on whenever the engine is running. There is no switch.
Maintenance and Adjustments
We recommend contacting an authorized service dealer for all maintenance, adjustments, and servicing of the unit. Some routine maintenance tasks can be performed by the owner. Refer to the maintenance schedule and procedures that follow.
CAUTION All the components used to build this product must remain in place for proper operation. Replacement parts must be of the same design and installed in the same position as the orginial parts. Other parts may not perform as well, may damage the unit, and may result in injury.
WARNING This snowthrower must be properly maintained to ensure safe operation and performance. Failure to observe the safety instructions in this manual could result in death or serious injury.
• Before performing any maintenance or repairs on the snowthrower, shut OFF the engine and remove the ignition key or the Push/Pull key.
Maintenance Schedule

* Not required unless problems are noted with engine performance.
Emissions Control
Maintenance, replacement, or repair of the emissions control devices and systems may be performed by any non-road engine repair establishment or individual. However, to obtain “no charge” emissions control service, the work must be performed by a factory authorized dealer.
Changing the Engine Oil
Used oil must be disposed of properly. Do not discard with household waste. Check with your local authorities, service center, or dealer for safe disposal or recycling facilities.
Use Briggs & Stratton Synthetic 5W-30 Warranty Certified oil for best performance. Other high-quality detergent oils are acceptable if classified for service SG, SH, SJ or higher. Do not use any additives.
1. With the engine stopped but still warm, turn the ignition key to the OFF position and remove it or pull out the Push/Pull key (if equipped).
WARNING Fuel and its vapors are extremely flammable, which could cause burns or fire resulting in death or serious injury.
• When performing maintenance that requires the unit to be tipped, the fuel tank must be empty or fuel can leak out and result in a fire or explosion.
2. Remove the oil drain plug (D, Figure 8) and tilt the snowthrower slightly to drain the oil into an appropriate container.
3. After the oil has drained, install and tighten the oil drain plug (D).

4. Place the unit on a level surface.
5. Clean the oil fill area of any moisture or debris.
6. Remove the dipstick (A, Figure 9) and wipe it with a clean cloth. Set it aside.

7. To add oil, pour slowly into the engine oil fill tube (B). See Specifications for the oil capacity. Do not overfill.
8. Wait one minute before checking the oil level.
9. Insert and tighten the dipstick, then remove it again to check the oil level. It should be at the top of the full indicator (C).
10. When the oil level is at the top of the full indicator, install and tighten the dipstick.
Adjusting the Auger Control Cable
DANGER The discharge chute contains a rotating auger to throw snow. Fingers or feet can quickly become caught in the auger resulting in traumatic amputation or severe laceration.
• Over-tightening the auger cable may cause the auger to rotate even if the auger control lever is not pressed down.
The auger should rotate only when the auger control is engaged and must stop within 5 seconds when the auger control is released. If the auger does not rotate or does not stop as described, adjust the control cable or contact an authorized service dealer to adjust the control cable.
1. Shut OFF the engine and remove the ignition key or the Push/Pull key.
2. Lift the cable cover (A, Figure 10) to expose the adjustment loops (B) and the cable end fitting (C).

3. Remove the end fitting from the adjustment loop and reinstall as follows:
• If the auger rotates while the auger control is not engaged, lengthen the control cable by installing the end fitting in the next lowest loop (decrease belt tension).
• If the auger does not rotate when the auger control is engaged, shorten the control cable by installing the end fitting in the next highest loop (increase belt tension).
Note: Some slack must remain in the cable when the auger control is not engaged.
4. Lower the cable cover into place.
5. After adjustment, perform the test below:
DANGER Check the operation of the auger control using the test below. If the unit does not operate as described, DO NOT use it. Contact an authorized service dealer to have the unit inspected and adjusted or repaired.
Testing the Auger Control
With the engine running:
• Press down and hold the auger control lever. The auger should rotated.
• Release the auger control lever. The auger must stop within 5 seconds.
Maintaining the Auger and Scraper Bar
1. Shut OFF the engine and remove the ignition key or the Push/Pull key.
2. Check the wear limit on the rubber auger (A, Figure 11) and the gap between the scraper bar support and the ground (B).
• If the wear limit on the rubber auger is reached, the two rubber flights need replacing. Contact an authorized dealer.
• If the scraper bar support makes contact with the ground, the scraper bar needs replacing. Contact an authorized dealer.

Storage
At the end of the season, or whenever the unit will be stored for 30 days or more, follow the storage checklist below.
WARNING Gasoline is highly flammable and its vapors are explosive. Fumes may travel to a distant ignition source and an explosion and/or fire could result.
• If there is fuel in the tank, do not store the unit indoors or in a poorly ventilated area where fumes could reach sparks, open flames, pilot lights, heat, and other ignition sources.
Engine:
Fuel can become stale when stored more than 30 days. Stale fuel can cause acid and gum deposits to form in the fuel system and the carburetor. To keep fuel fresh, add Briggs & Stratton Advanced Formula Fuel Treatment & Stabilizer.
• There is no need to drain the fuel from the engine if a stabilizer is added according to instructions. Run the engine for 2 minutes to circulate the stabilizer throughout the fuel system. If no stabilizer is added, the fuel must be drained from the engine into an approved container. Then run the engine until it stops from lack of fuel.
• While the engine is still warm, change the oil. See Changing the Engine Oil.
Snowthrower:
• Ensure all nuts, bolts, and screws are securely fastened.
• Inspect all external moving parts for damage and wear. Replace parts as necessary.
• For unpainted or bare metal surfaces, apply a rust preventative product.
• Store the unit indoors and cover it.
• If the unit must be stored outdoors, cover it with a heavy tarpaulin.
Returning the Unit to Service:
• Have an authorized service dealer perform annual maintenance tasks. See Maintenance Schedule.
• Check the engine oil level and add oil if necessary.
• Check unit for debris around the muffler and cylinder areas.
• Fill the fuel tank with fresh, clean fuel.
• Ensure all guards, shields, and covers are in place.
• Test the auger control.
Troubleshooting
| Problem |
Cause |
Solution |
| Auger does not stop when auger control is released |
Control cable requires adjustment |
See Adjusting the Auger Control Cable. |
| Auger does not turn when auger control is engaged |
Control cable requires adjustment |
See Adjusting the Auger Control Cable. |
| Engine does not start Chute rotation or deflector adjustment does not work |
Chute or deflector is frozen |
Clear snow or ice from chute and deflector parts; place snowthrower in a heated area until snow or ice melts. |
| Key is off |
Turn key to the ON position. |
| Primer not pressed |
Press primer button twice before pulling starter rope. |
| Out of fuel |
Fill fuel tank with fresh fuel. |
| Choke open - cold engine |
Turn choke to closed position before pulling starter rope. |
| Engine flooded |
Turn choke to open position; pull starter rope several times until engine starts. |
| Water in fuel or old fuel |
Fill fuel tank with fresh fuel. |
| Cord not plugged in or circuit breaker tripped (electric start models) |
Plug in cord or replace defective cord; reset circuit breaker. |
Engine is hard to start or runs poorly
|
Incorrect oil |
Change oil to lighter viscosity (such as 5W-30). |
| Choke control set incorrectly |
Open choke control gradually as engine warms up. |
| Excessive vibration |
Loose parts or damaged parts |
Stop snowthrower immediately. Contact an Authorized Service Dealer. |
| Scraper bar does not clean hard surface |
Scraper bar or auger flight worn |
See Maintaining the Auger and Scraper Bar |
Snowthrower does not discharge snow
|
Control cable requires adjustment |
See Adjusting the Auger Control Cable. |
| Discharge chute clogged with snow |
STOP THE ENGINE! Ensure that the auger has stopped rotating. Use a clean-out tool to remove snow from the discharge chute. Never clear a clogged discharge chute with your hands! See Clearing a Clogged Discharge Chute. |
| Snowthrower does not self-propel |
Rubber auger is worn or damaged |
See Maintaining the Auger and Scraper Bar. |
For all other issues, please see an authorized dealer.