003–3802–042310A
Nautilus,Inc.,WorldHeadquarters,16400SENautilusDr.Vancouver,WA,USA98683,(800)NAUTILUS/(800)628-8458,www.NautilusInc.com-CustomerService:NorthAmerica(800)605-3369,
[email protected]|Europe,MiddleEast&Africa490220320200,[email protected]|Germany&Austria+490220320200,Switzerland+41264607766,UnitedKingdom
+441908267345,AsiaPacific&LatinAmerica(360)859-5180,[email protected]|Patentinformation:ThisproductmaybecoveredbyUSandForeignPatentsandPatentsPending.See
Productformoreinformation.|PrintedinChina|©2010Nautilus,Inc.,Allrightsreserved.™and®indicateatrademarkorregisteredtrademark.Nautilus,Inc.(www.nautilus.com)trademarksinclude
NAUTILUS®,BOWFLEX®,SCHWINN®andUNIVERSAL®andrespectivelogos.Othertrademarksarethepropertyoftheirrespectiveowners.
ParaobtenerestemanualenEspañolLatinoAmericanovayaa:http://www.schwinnfitness.com.
Important Important
Important
Safety Safety
Safety
Instructions Instructions
Instructions
Thisiconmeansapotentiallyhazardoussituationwhich,ifnotavoided,couldresultindeathorseriousinjury.
Obey Obey
Obey
the the
the
following following
following
warnings: warnings:
warnings:
•Readandunderstandallwarningsonthismachine.
•CarefullyreadandunderstandtheAssemblyManual.
•Keepbystandersandchildrenawayfromtheproductyouareassemblingatalltimes.
•Donotconnectpowersupplytothemachineuntilinstructedtodoso.
•Donotassemblethismachineoutdoorsorinawetormoistlocation.
•Makesureassemblyisdoneinanappropriateworkspaceawayfromfoottrafficandexposuretobystanders.
•Somecomponentsofthemachinecanbeheavyorawkward.Useasecondpersonwhendoingtheassemblystepsinvolvingtheseparts.Donotdostepsthat
involveheavyliftingorawkwardmovementsonyourown.
•Setupthismachineonasolid,level,horizontalsurface.
•Donottrytochangethedesignorfunctionalityofthismachine.Thiscouldcompromisethesafetyofthismachineandwillvoidthewarranty.
•IfreplacementpartsarenecessaryuseonlygenuineNautilus
®
replacementpartsandhardware.Failuretousegenuinereplacementpartscancausearisktousers,keep
themachinefromoperatingcorrectlyandvoidthewarranty.
•DonotuseorputthemachineintoserviceuntilthemachinehasbeenfullyassembledandinspectedforcorrectperformanceinaccordancewiththeOwner’sManual.
•ReadandunderstandthecompleteOwner’sManualsuppliedwiththismachinebeforefirstuse.KeeptheOwner’sManualforfuturereference.
•Doallassemblystepsinthesequencegiven.Incorrectassemblycanleadtoinjuryorincorrectfunction.
Before Before
Before
Assembly Assembly
Assembly
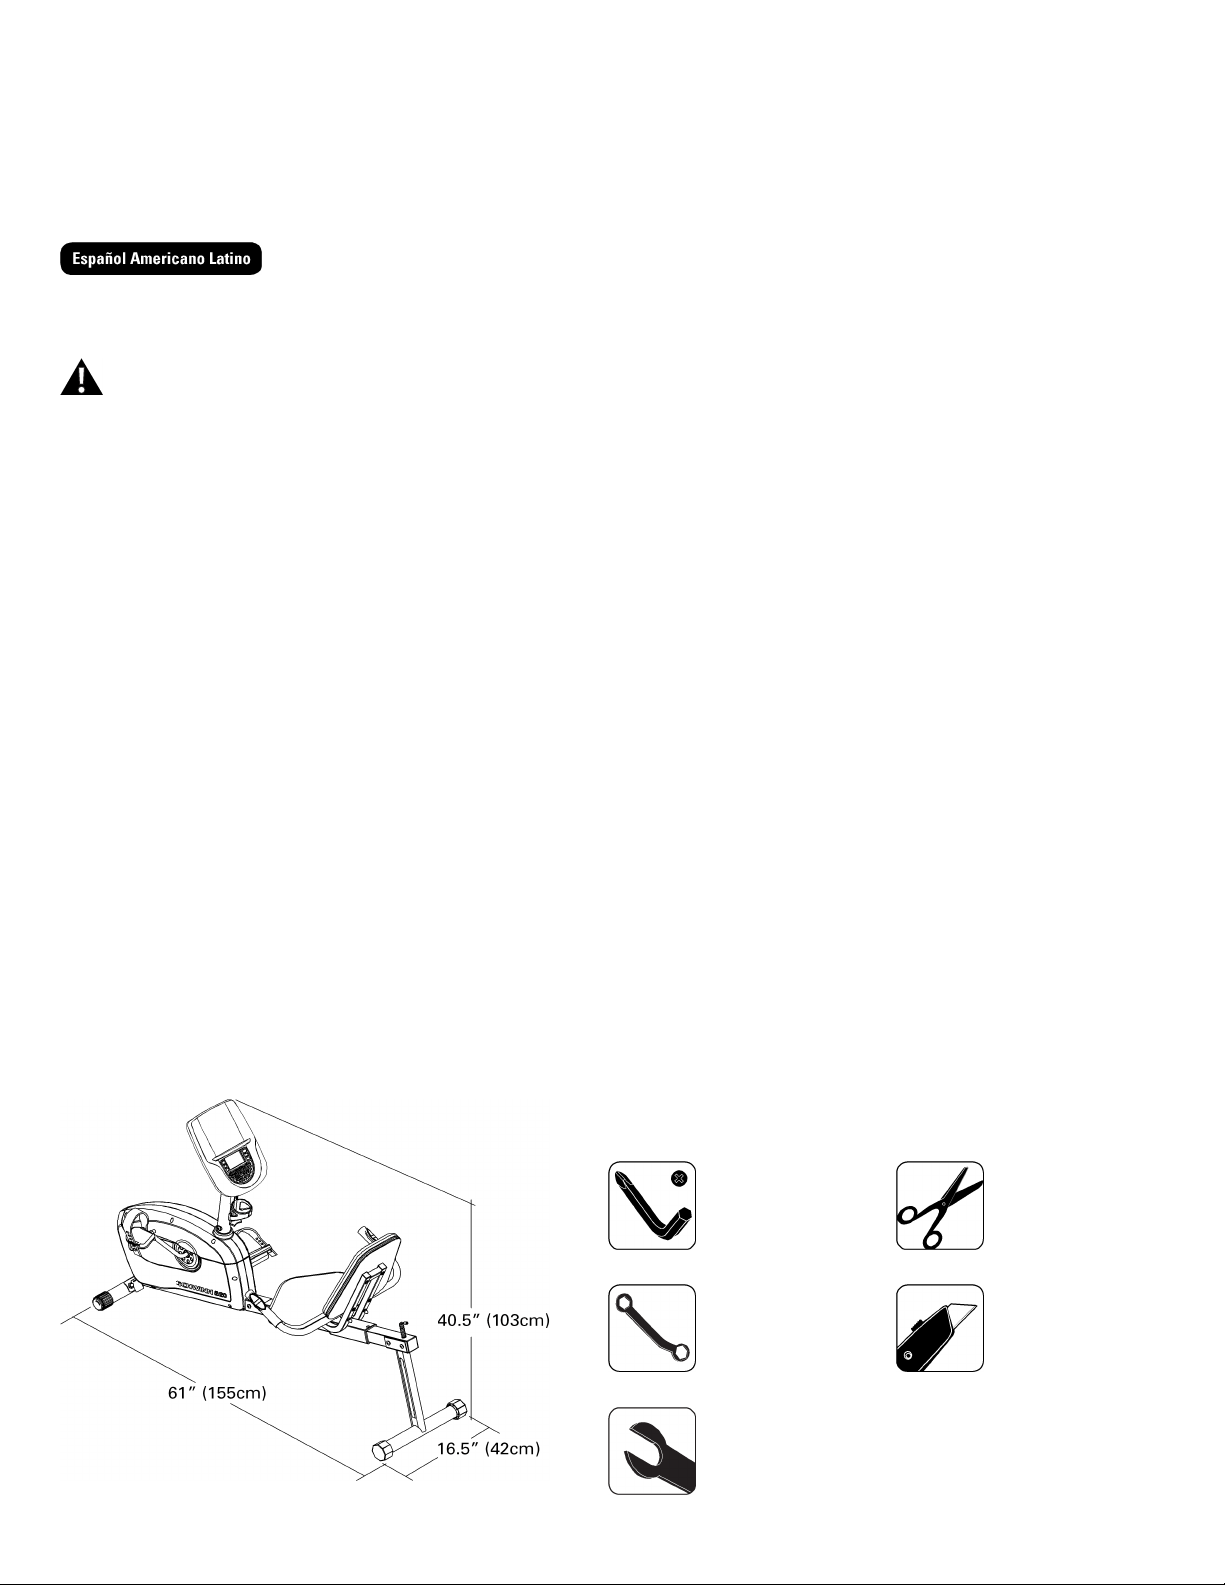
Selecttheareawhereyouaregoingtosetupandoperateyourmachine.Forsafeoperation,thelocationmustbeonahard,levelsurface.Allowaworkoutareaof
minimum100”x58”(254cmx147cm).
Followthesebasicpointswhenyouassembleyourmachine:
1.Readandunderstandthe“ImportantSafetyInstructions”beforeassembly.
2.Collectallthepiecesnecessaryforeachassemblystep.
3.Usingtherecommendedwrenches,turntheboltsandnutstotheright(clockwise)totighten,andtheleft(counterclockwise)toloosen,unlessinstructedotherwise.
4.Whenattaching2pieces,lightlyliftandlookthroughtheboltholestohelpinserttheboltthroughtheholes.
5.Theassemblycanrequire2people.
Specifications Specifications
Specifications
and and
and
T T
T
ools ools
ools
Included Included
Included
Not Not
Not
Included Included
Included
6mm
(recommended)
13mm/17mm
(recommended)
15mm
2 2
2
Parts Parts
Parts
Item Item
Item
Qty Qty
Qty
Description Description
Description
Item Item
Item
Qty Qty
Qty
Description Description
Description
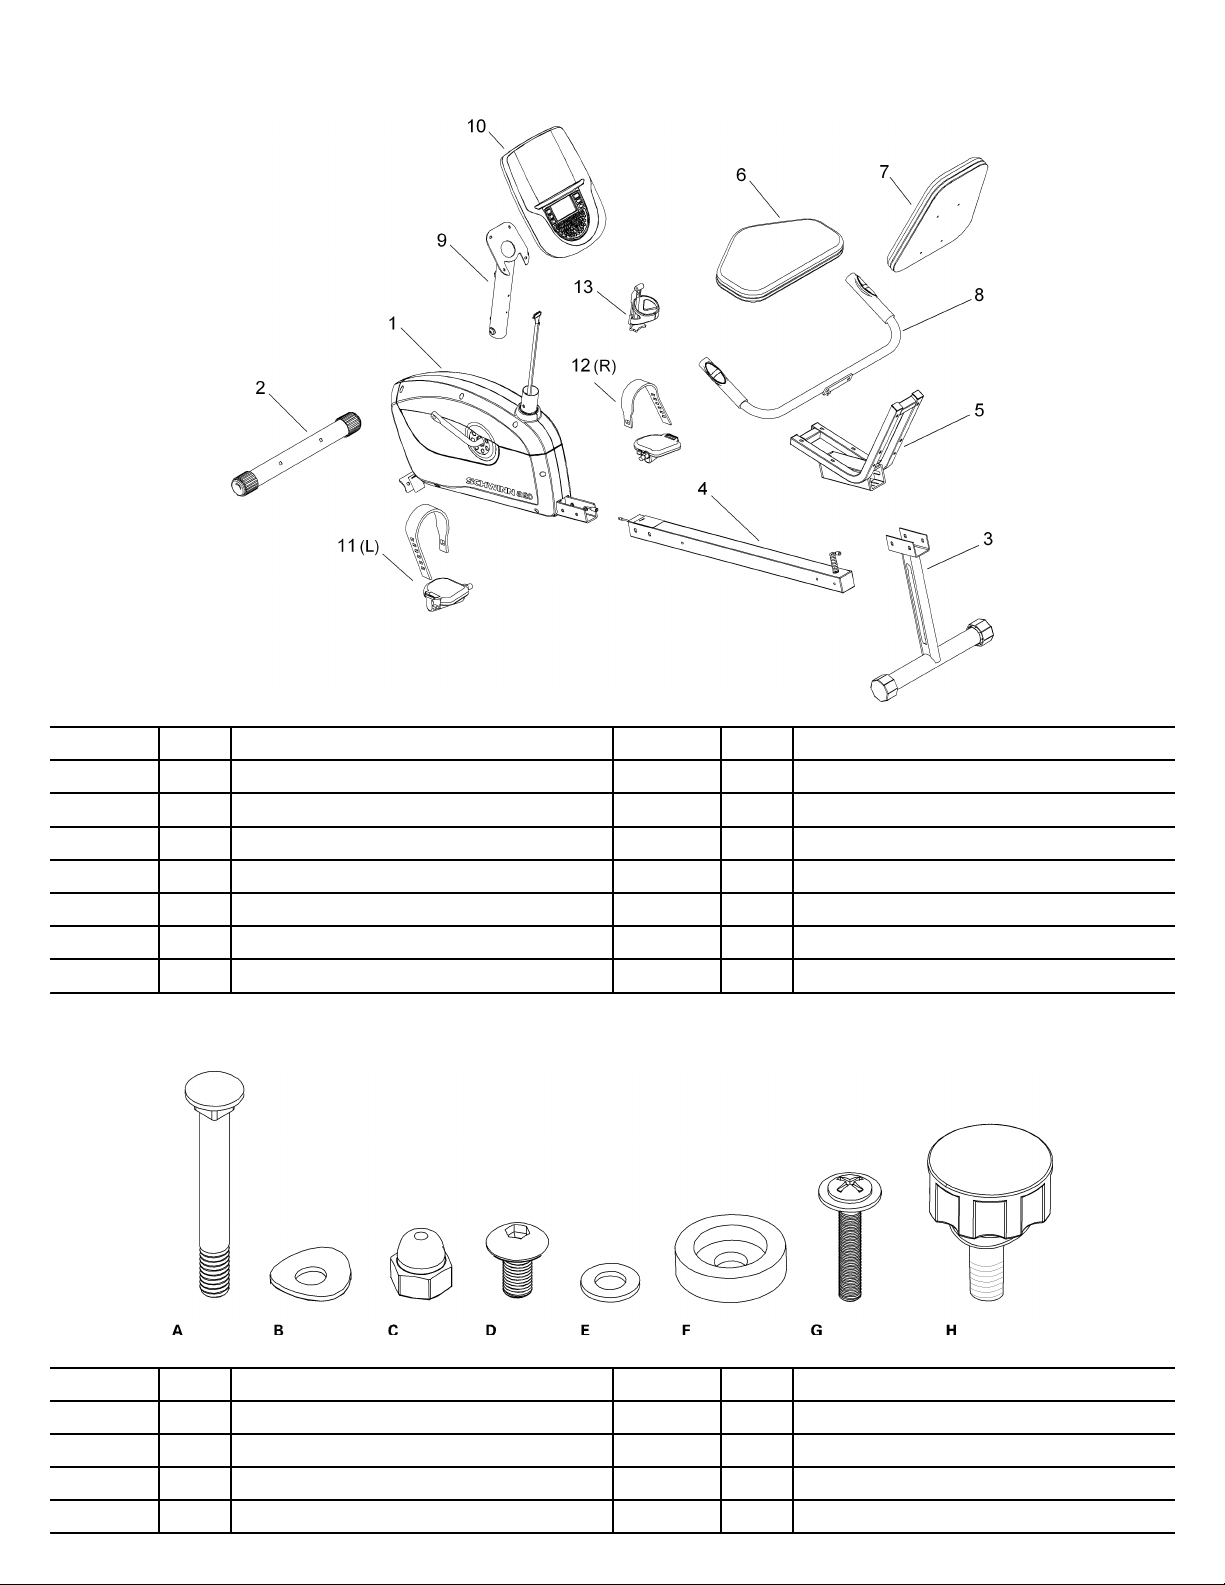
11
MainUnit
8
1
SideHandlebars
2
1
FrontStabilizer
9
1
ConsoleMast
3
1
RearStabilizer
10
1
Console
41
SeatRail
111
Pedal,Left(L)
51
SeatBracketAssembly
12
1
Pedal,Right(R)
6
1
SeatBottom
13
1
WaterBottleHolder
71
SeatBack
Hardware Hardware
Hardware
3 3
3
Item Item
Item
Qty Qty
Qty
Description Description
Description
Item Item
Item
Qty Qty
Qty
Description Description
Description
A
4
CarriageBoltM8x65
E
12
FlatWasher
B
5
ArcWasherF
2
RubberLimitPad
C
4
AcornNut
G
8
PhillipsHeadScrewM6x35
D
15
HexScrewM8x15
H
1
AdjustmentKnob
Assembly Assembly
Assembly
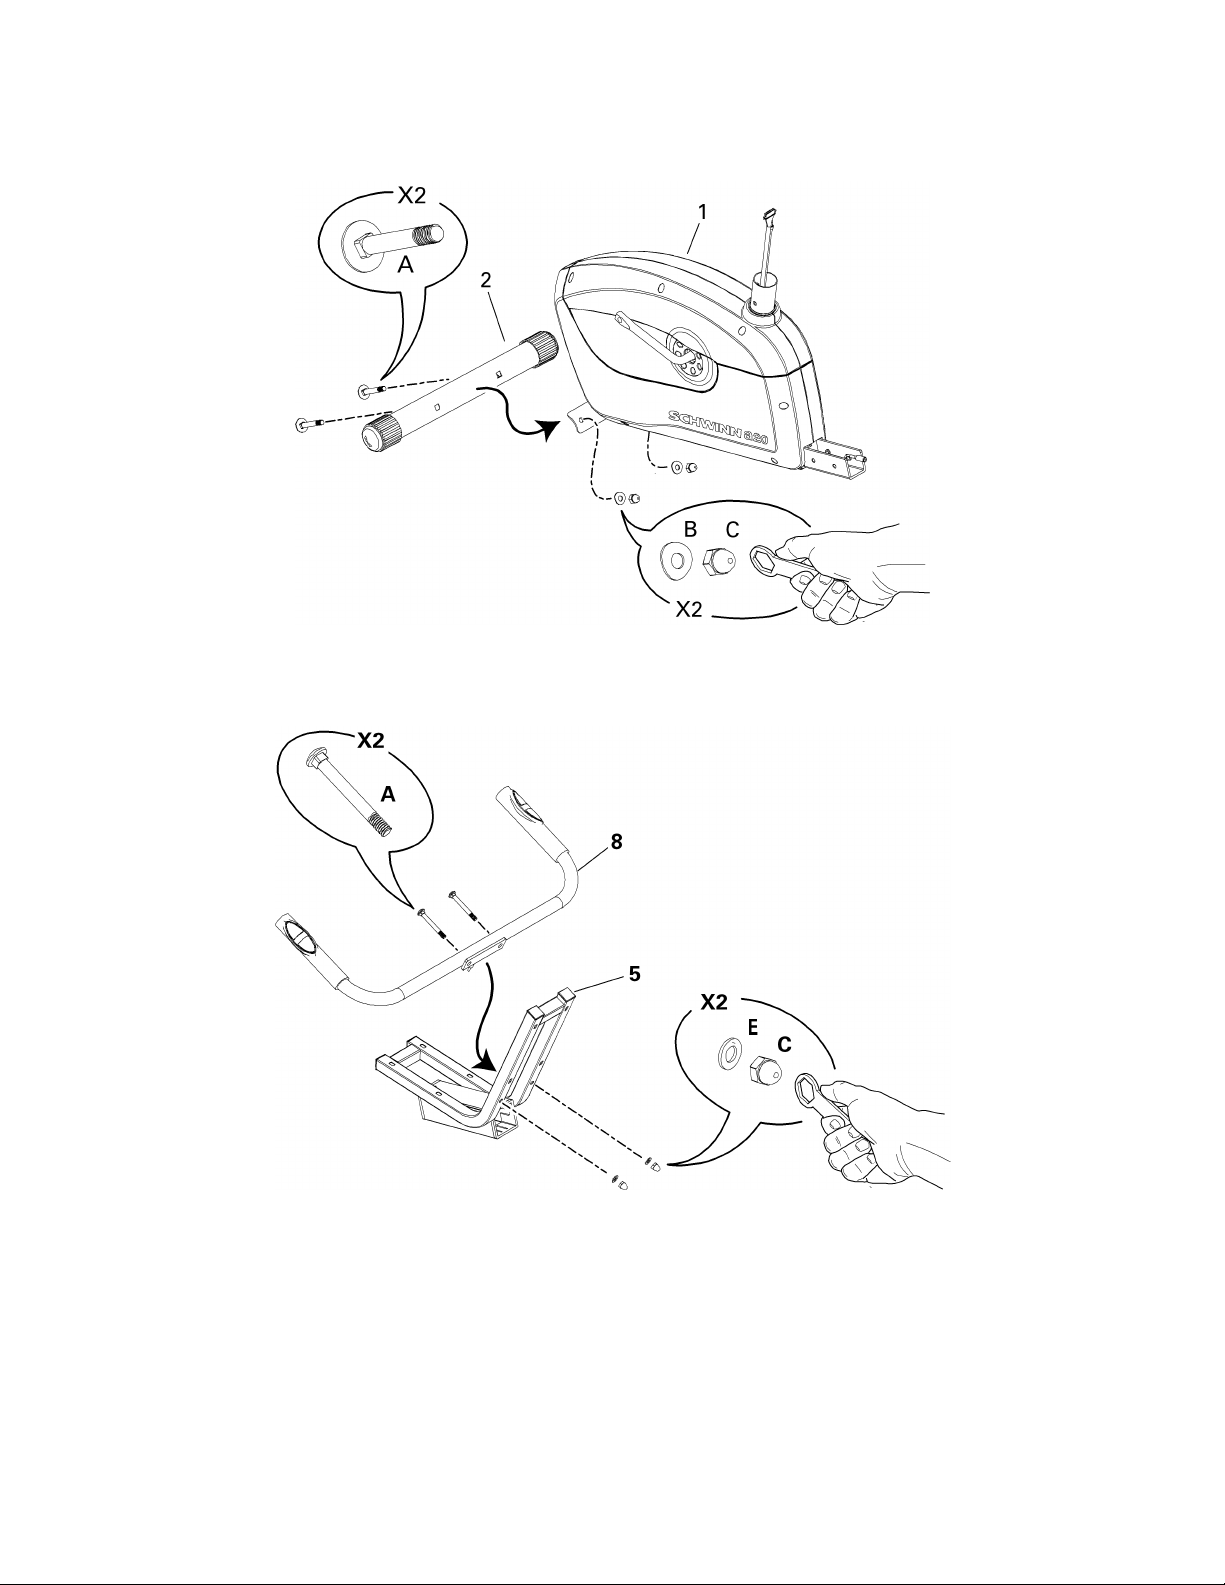
1. 1.
1.
Attach Attach
Attach
Front Front
Front
Stabilizer Stabilizer
Stabilizer
to to
to
Main Main
Main
Unit Unit
Unit
2. 2.
2.
Install Install
Install
Handlebar Handlebar
Handlebar
to to
to
Seat Seat
Seat
Bracket Bracket
Bracket
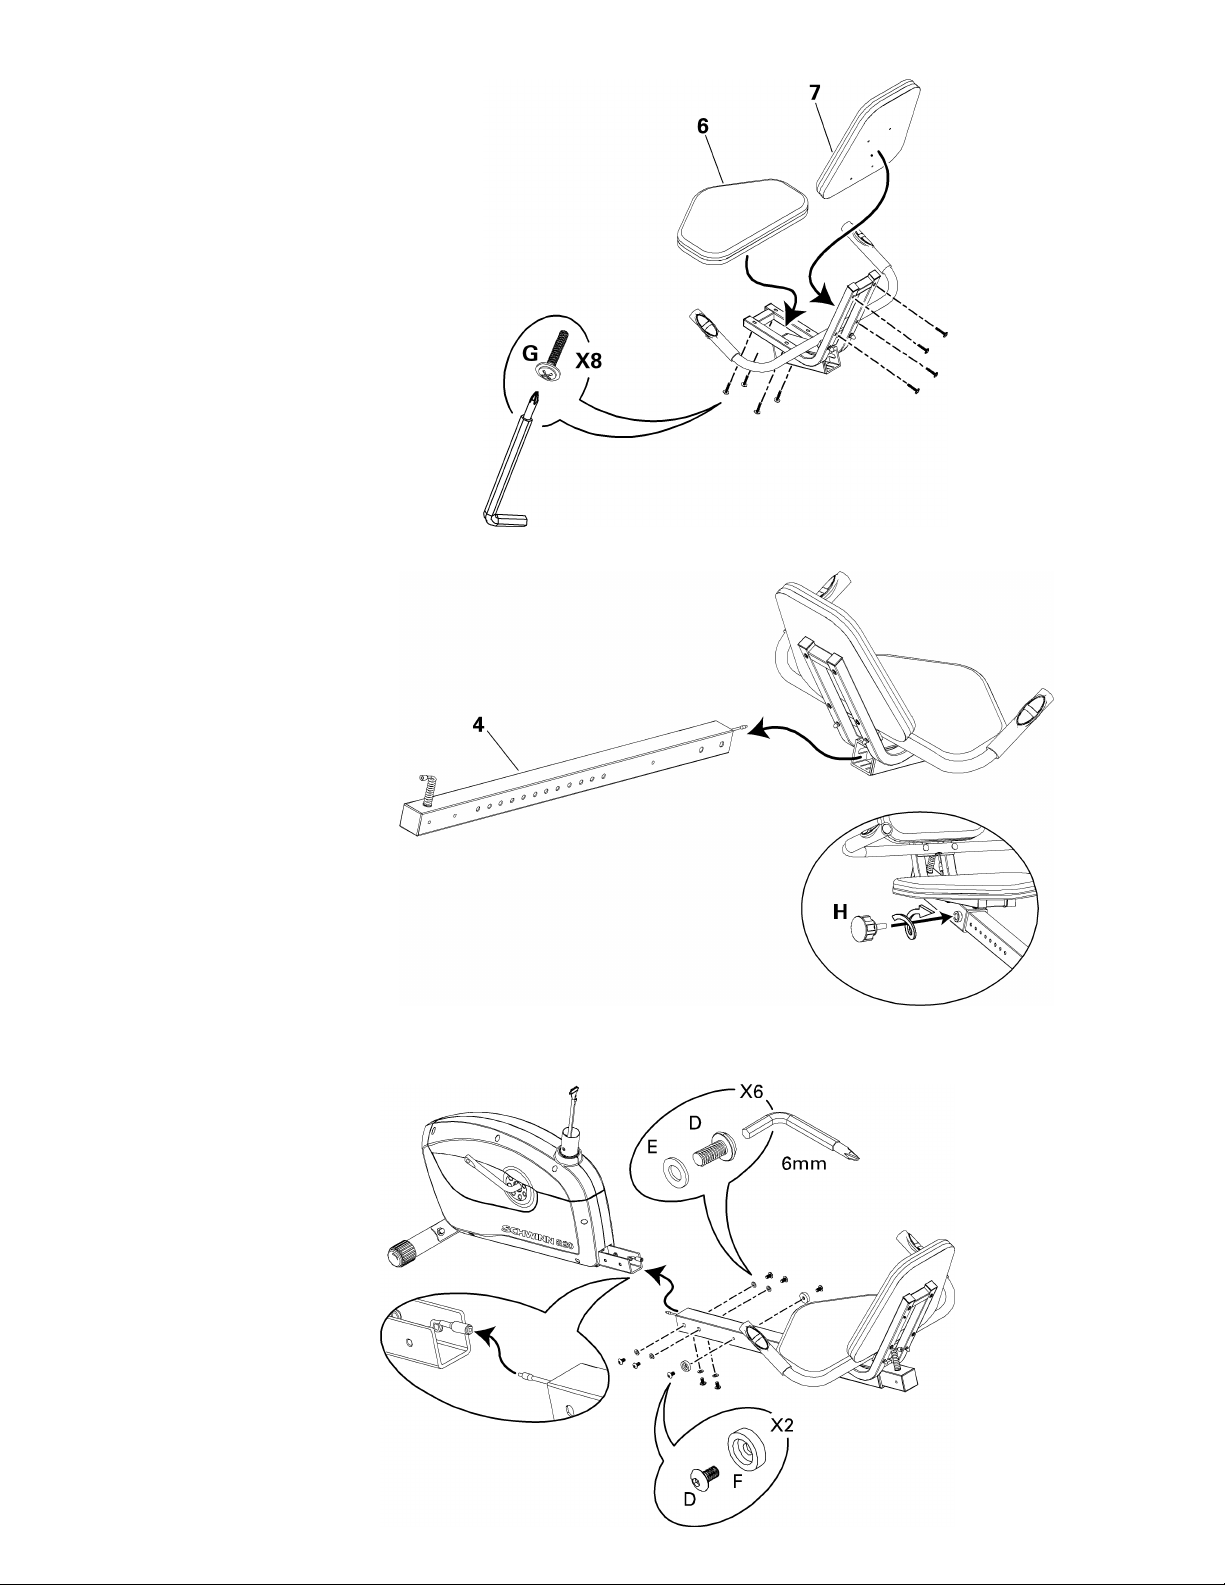
NOTICE:
DonotcrimpcablefromHandlebar.
4 4
4
4. 4.
4.
Slide Slide
Slide
Seat Seat
Seat
Assembly Assembly
Assembly
onto onto
onto
Seat Seat
Seat
Rail Rail
Rail
NOTICE:
Donotcrimpcables.
5. 5.
5.
Install Install
Install
Seat Seat
Seat
Rail Rail
Rail
Assembly Assembly
Assembly
to to
to
Main Main
Main
Assembly Assembly
Assembly
NOTICE:ConnectHeartRate(HR)cablesfromSeatRailandMainUnit.Donotcrimpcables.
5 5
5
3. 3.
3.
Attach Attach
Attach
Seat Seat
Seat
Bottom Bottom
Bottom
and and
and
Seat Seat
Seat
Back Back
Back
to to
to
Seat Seat
Seat
Bracket Bracket
Bracket
NOTICE:
Donotcrimpcable.
NOTICE:ConnectHeartRate(HR)cablesfromSeatRailandHandlebar.Donotcrimpcables.
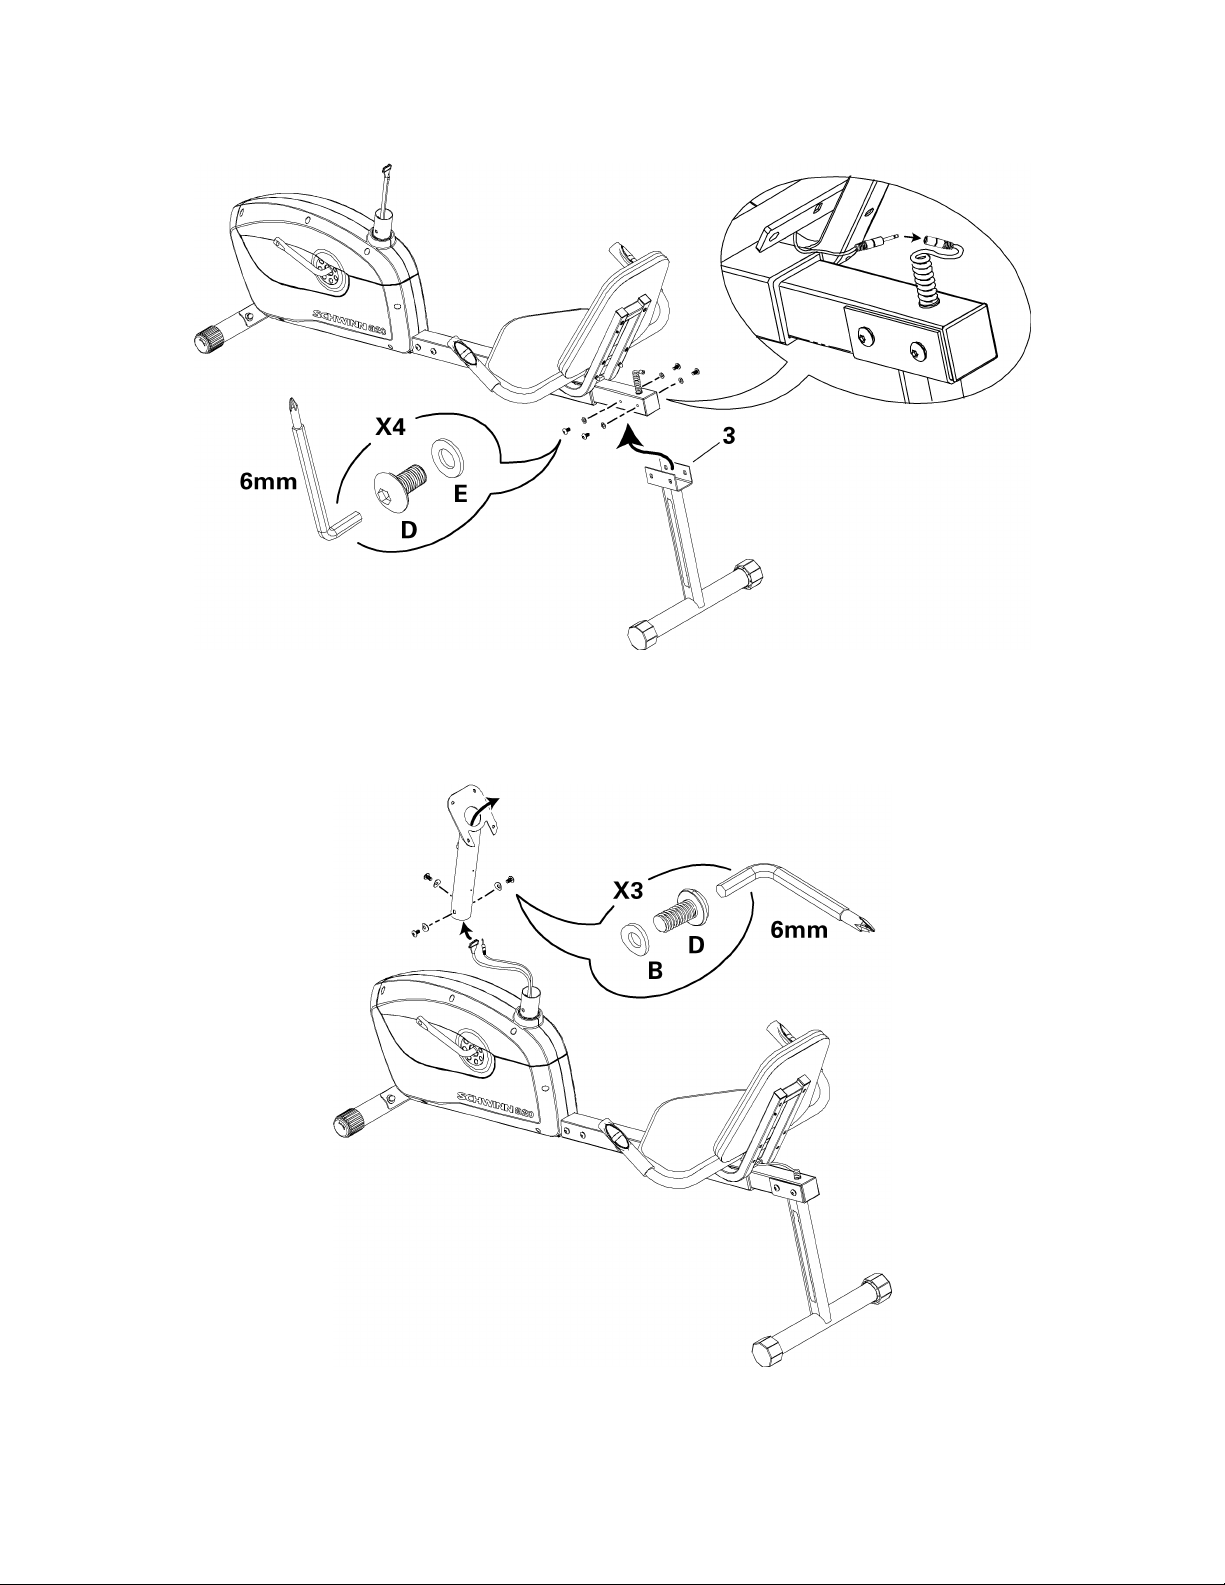
7. 7.
7.
Install Install
Install
Console Console
Console
Mast Mast
Mast
to to
to
Main Main
Main
Assembly Assembly
Assembly
Note: Note:
Note:
Youcanattachawire(orstring)totheConsoleCableandHRCabletohelppullthecablesthroughtheConsoleMast.
NOTICE:
Donotcrimpcables.
6 6
6
6. 6.
6.
Attach Attach
Attach
Rear Rear
Rear
Stabilizer Stabilizer
Stabilizer
to to
to
Seat Seat
Seat
Rail Rail
Rail
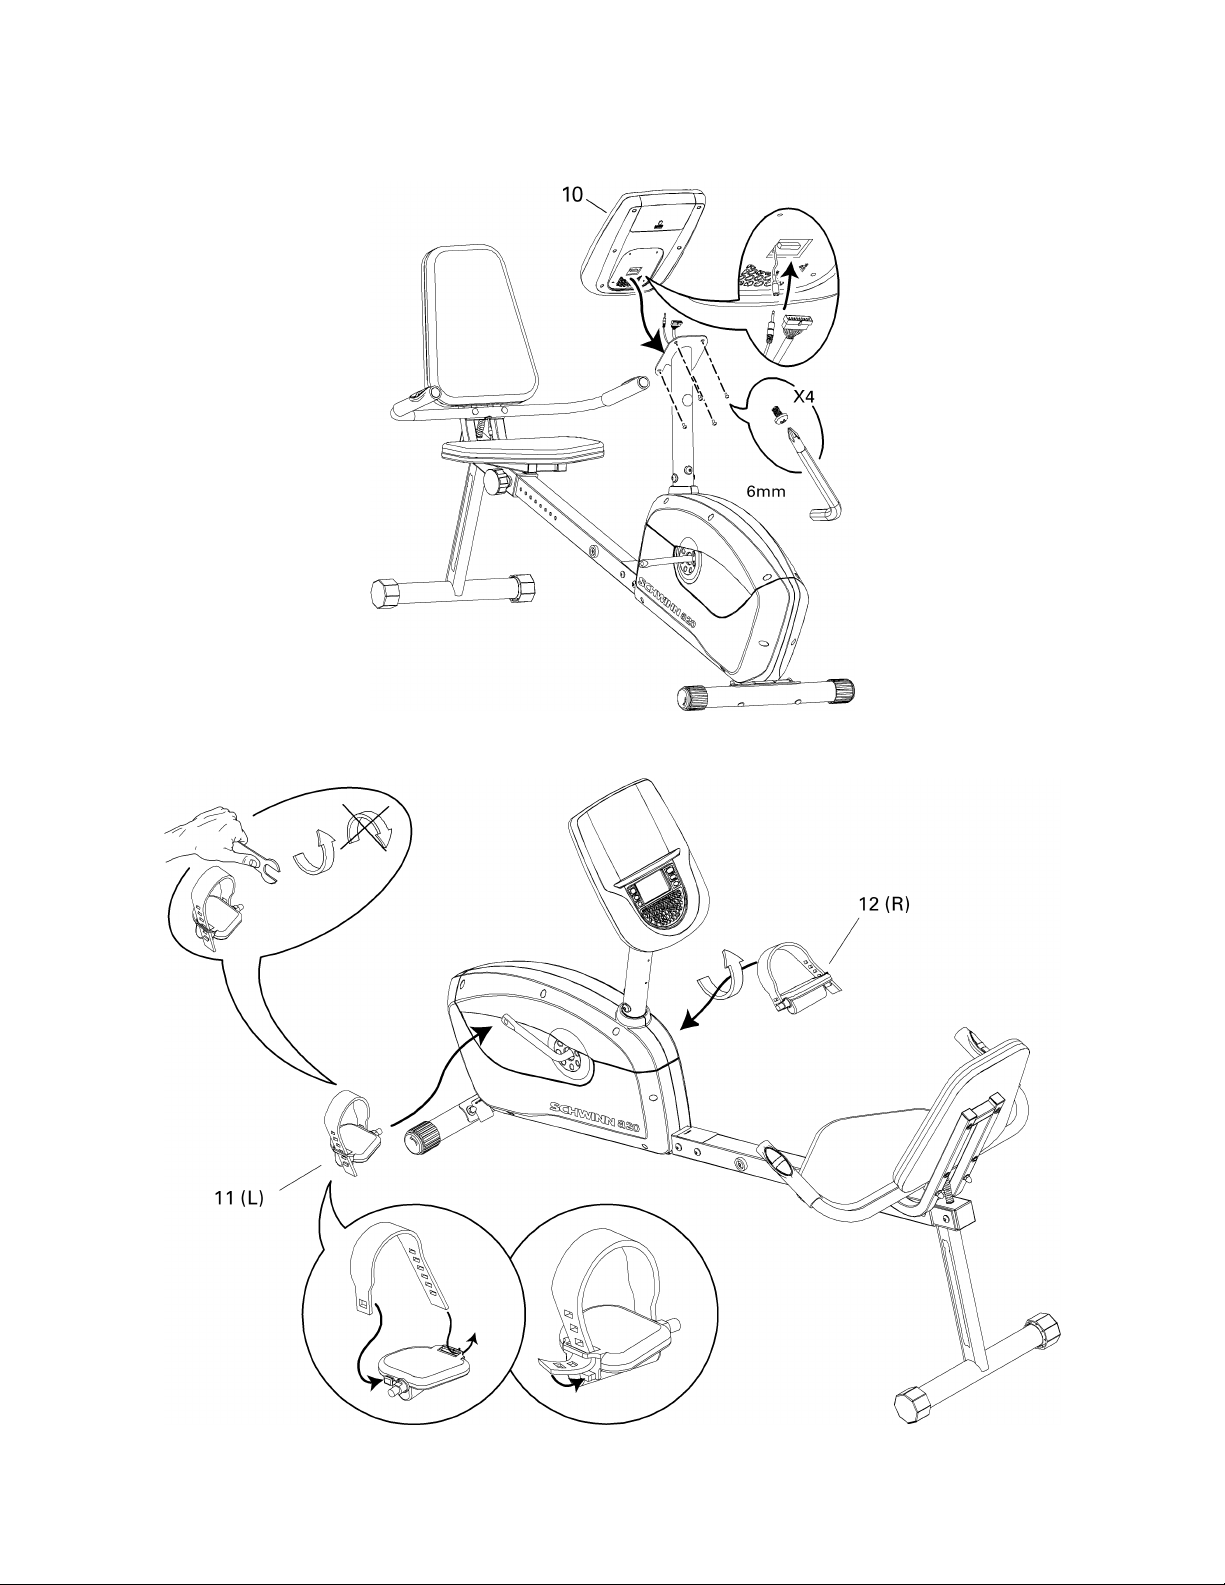
9. 9.
9.
Install Install
Install
Pedals Pedals
Pedals
7 7
7
8. 8.
8.
Install Install
Install
the the
the
Console Console
Console
to to
to
the the
the
Console Console
Console
Mast Mast
Mast
Note: Note:
Note:
Hardwareispre-installedonConsoleandnotonHardwareCard.
NOTICE:Donotcrimpcables.MakesurethattheswitchonthebackoftheConsoleissettoB B
B
.
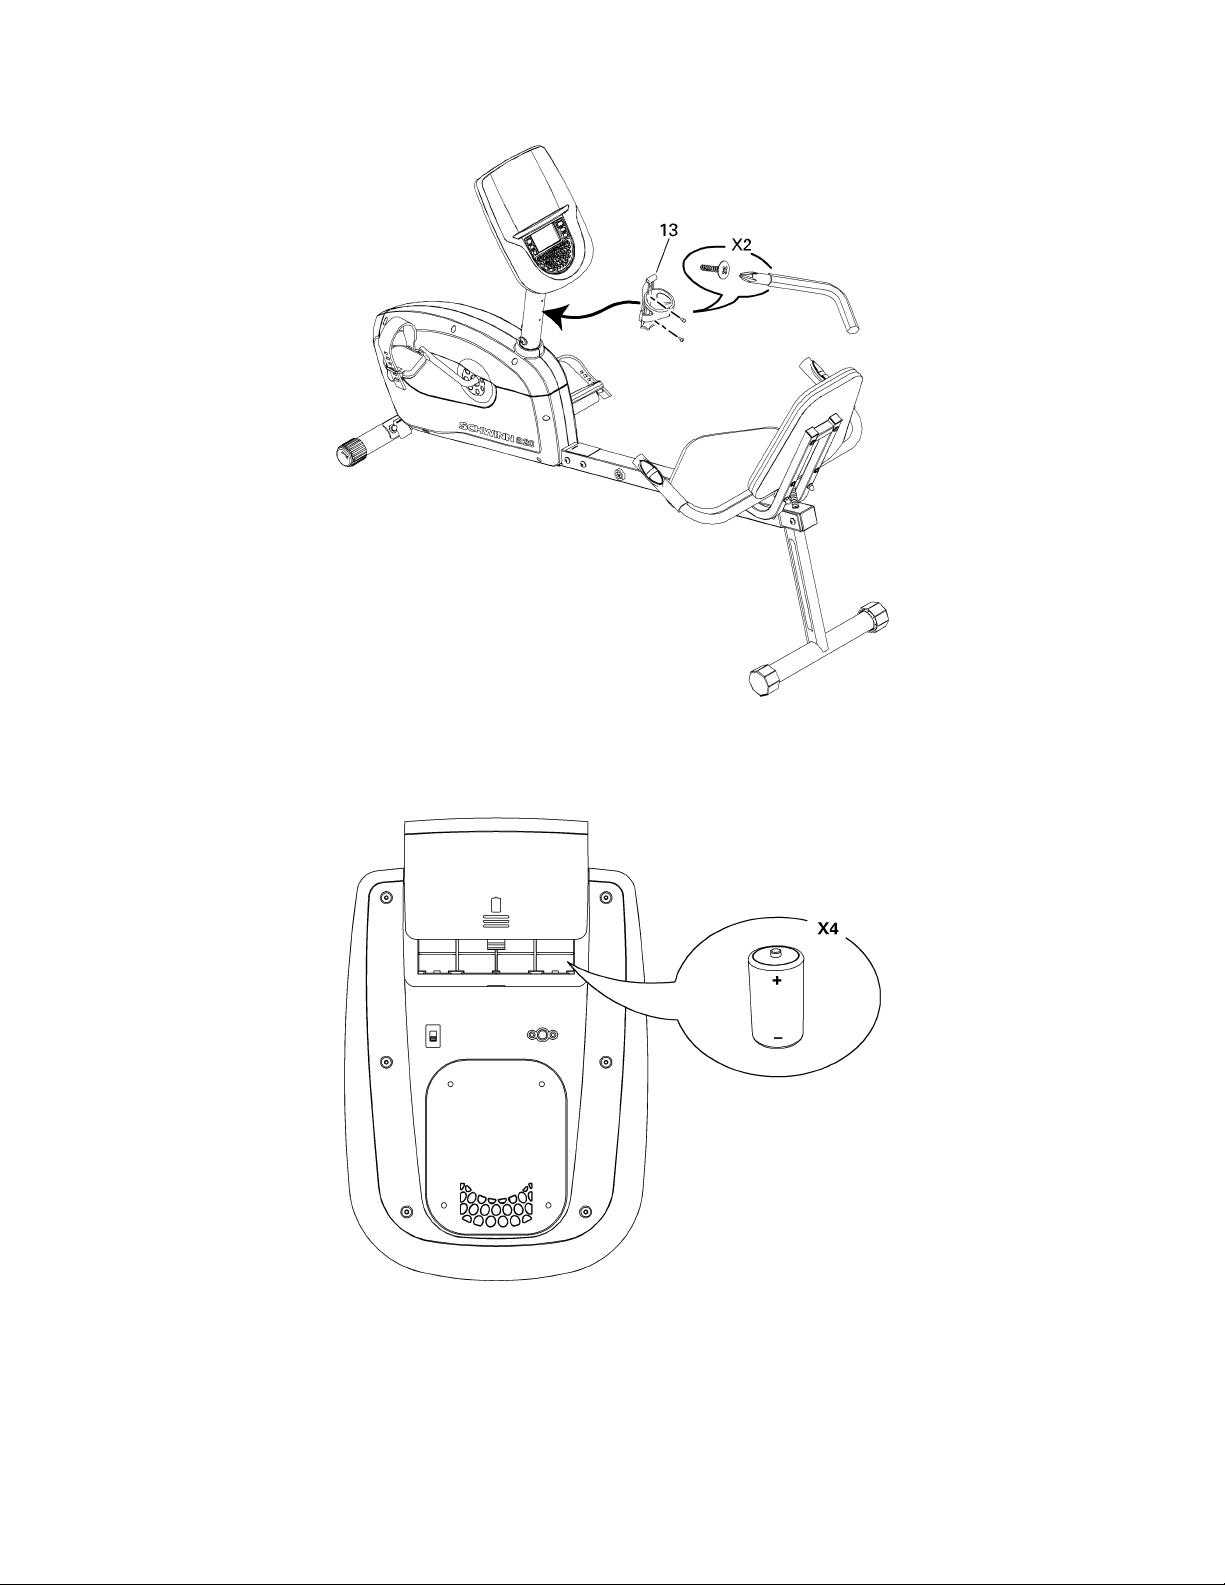
11. 11.
11.
Install Install
Install
Batteries Batteries
Batteries
in in
in
Console Console
Console
Note: Note:
Note:
TheconsoleusesDsizebatteries(LR20).Makesurethebatteriespointinthedirectionofthe+/–indicatorsinthebatterybay.Ifyouuse
rechargeablebatteries,theoptionalpoweradapterwillnotrechargethebatteries.
Optional Optional
Optional
Power Power
Power
Adapter Adapter
Adapter
TheconsoleforyourmachinecanoperateonbatterypowerorACpower.ForACpower,itisnecessarytoordertheoptionalPowerAdapter.IfbatteriesandthePower
Adapterareinstalled,theconsolewillusethePowerAdaptertooperate.
Note: Note:
Note:
Ifyouuserechargeablebatteries,theoptionalPowerAdapterwillnotrechargethebatteries.
Afterthemachineisfullyassembled,connectthePowerAdaptortotheconsoleandthewalloutlet.
8 8
8
10. 10.
10.
Install Install
Install
W W
W
ater ater
ater
Bottle Bottle
Bottle
Holder Holder
Holder
Note: Note:
Note:
Hardwareispre-installedonConsoleMastandnotonHardwareCard.
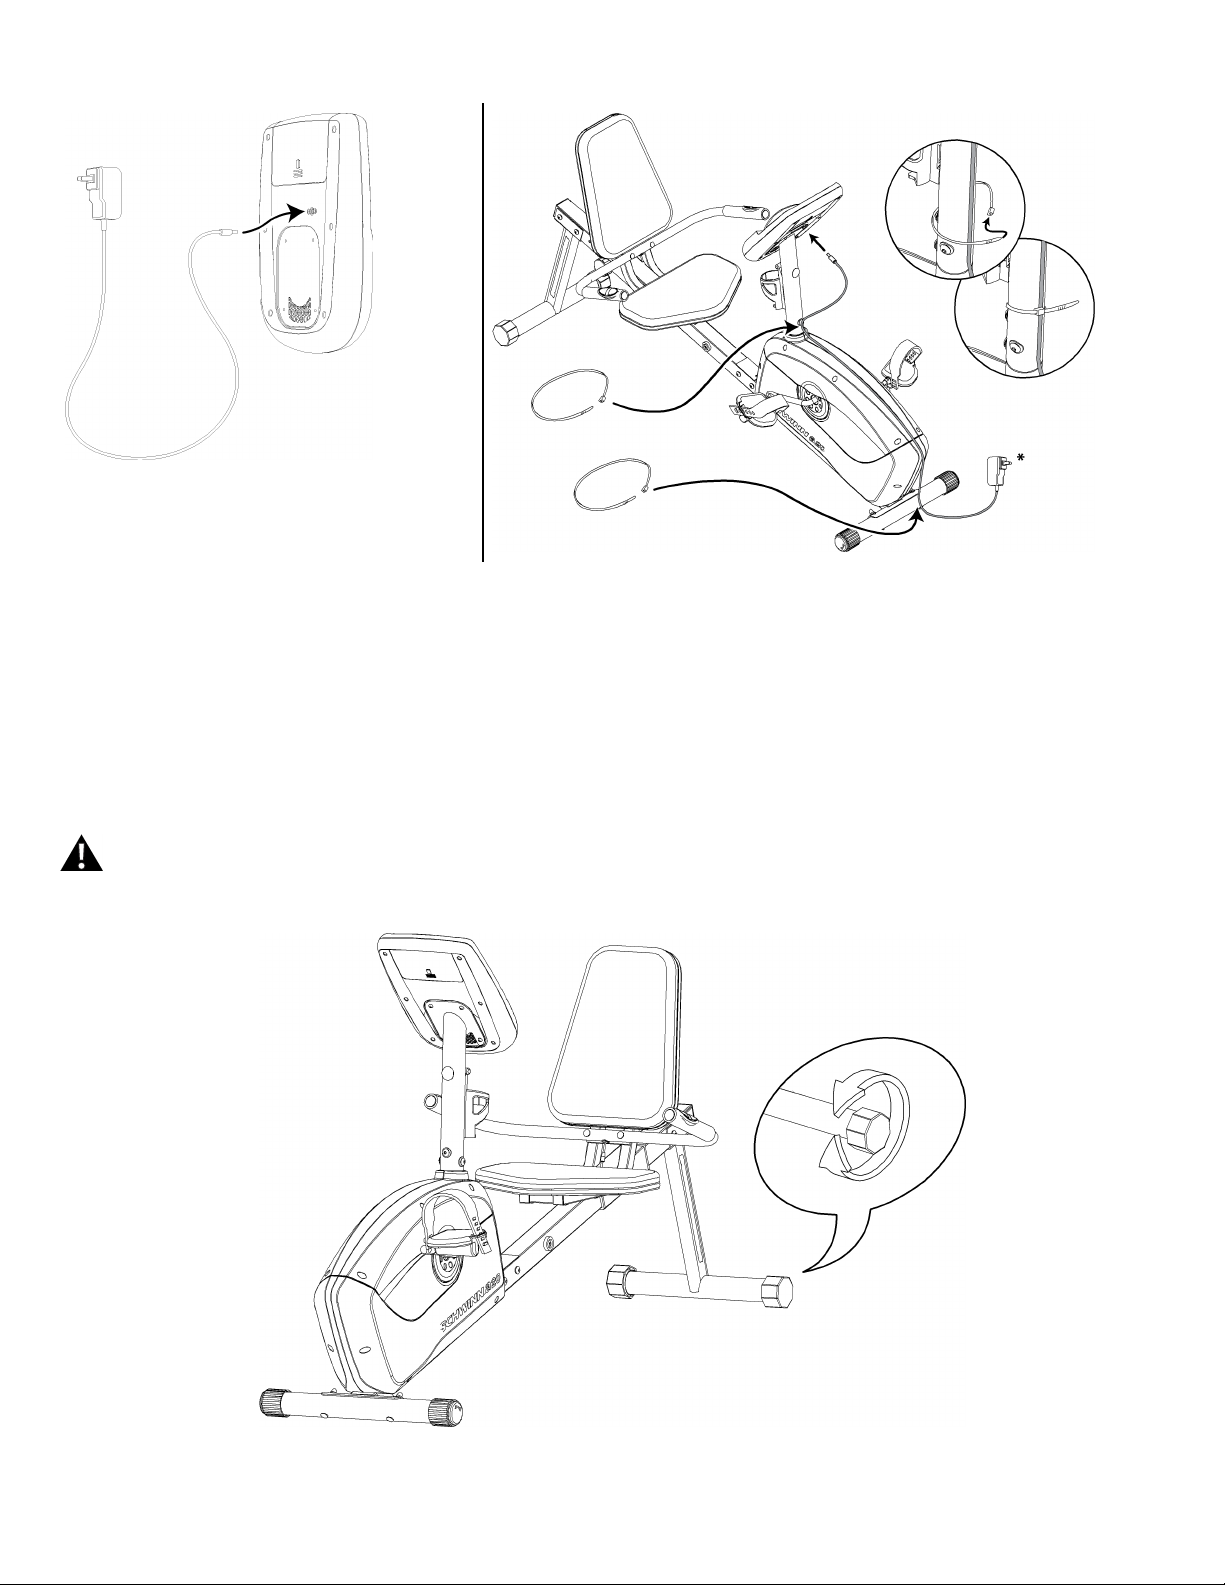
NOTICE:
Ifyouuseapoweradapterforyourbike,makesurethatthecordstaysclearofthepathofthepedals.Attachthecordtothemachineas
shown:
NOTICE:
Itisrecommendedtoremovebatterieswhentheyarenotused,toavoiddamagefrombatterycorrosion.
ToordertheoptionalPowerAdapter,goto:
www.schwinnfitness.com/powersupply
Orcall1(800)605–3369.
Final Final
Final
Inspection Inspection
Inspection
Inspectyourmachinetoensurethatallfastenersaretightandcomponentsareproperlyassembled.
DonotuseorputthemachineintoserviceuntilthemachinehasbeenfullyassembledandinspectedforcorrectperformanceinaccordancewiththeOwner’s
Manual.
Leveling Leveling
Leveling
Y Y
Y
our our
our
Bike Bike
Bike
ThelevelersarethepolygonalendcapsontheRearStabilizer.Turntheendcaptoadjustthelevel.Makesurethebikeislevelandstablebeforeyouexercise.
9 9
9

PrintedinChina