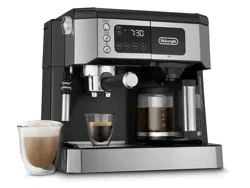
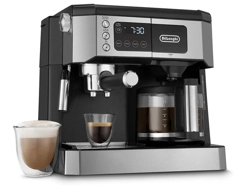
User Manual for Coffee & Espresso Maker
DESCRIPTION (pag. 3)
The terminology below will be used on subsequent pages
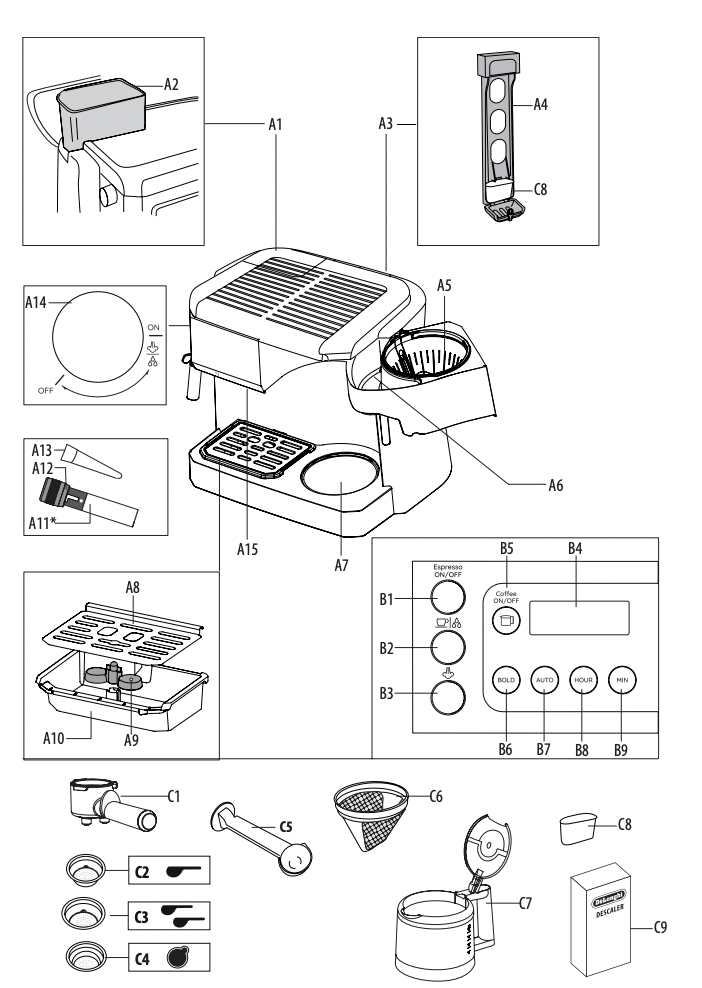
Description of the machine
A1. Espresso water tank lid
A2. Espresso removable water tank
A3. Antichlorine filter extraction handle
A4. Antichlorine filter support
A5. Filter-holder for drip coffee
A6. Water fill compartment
A7. Drip coffee warming plate
A8. Espresso cup tray
A9. Drip tray water level indicator
A10. Drip tray
A11. Frother
A12. Frother selection ring (Adjustable Cappuccino System only)
A13. Steam connection nozzle (COM532)
A14. Steam dial for cappuccino
A15. Boiler outlet
Description of control panel
Espresso section
B1. “Espresso ON/OFF” button with integrated light
B2. Espresso coffee/hot water button with integrated light
B3. Steam button with integrated light
Drip coffee section
B4. Display
B5. “Coffee ON/OFF” button
B6. BOLD button
B7. AUTO button
B8. HOUR button
B9. MIN button
Description of the accessories
C1. Espresso portafilter
C2. One-cup espresso filter
C3. Two-cups espresso filter
C4. Filter for espresso pods
C5. Coffee measuring scoop with tamper
C6. Permanent gold tone filter
C7. Drip Coffee Carafe
C8. Antichlorine filter
C9. Descaler 100ml (1 use)
Installation
- Place the machine on a work surface away from water faucets and sinks.
- Check that the voltage of the outlet corresponds to the value indicated on the machine rating plate. Connect the machine to an efficiently grounded electrical socket with a minimum rating of 10A only. The manufacturer declines all liability for any accidents caused by the absence of an efficient ground system.
- If the plug fitted to the machine does not match the electrical socket, have the outlet replaced with a suitable type by a qualified electrician.
- Never install the machine in environments where the temperature may reach 0°C (32°F) or lower (the machine may be damaged if the water freezes).
ANTICHLORINE FILTER
The filter eliminates the taste of chlorine in the water. To install the filter, proceed as follows:
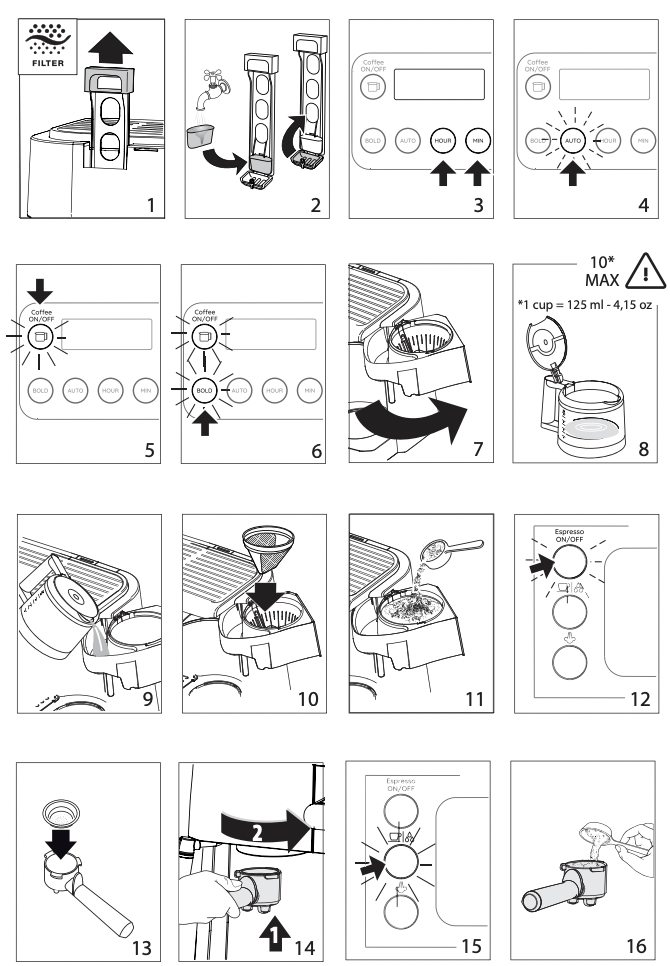
- Release the filter support from its slot by pulling it upwards (fig. 1).
- Remove the Antichlorine filter from the plastic sachet and rinse it under a running tap (fig. 2).
- Open the filter support and carefully put the filter in place as shown in fig. 2.
- Close the filter container carefully (fig. 2), and reposition it in its slot, pushing it firmly downwards.
- The Antichlorine filter should be replaced after 80 cycles, and at least after every 6 months of operation.
FIRST USE
When using the machine for the first time, all the accessories and the internal circuits must be washed as follows:
DRIP COFFEE MAKER:
- Run the coffee machine without using ground coffee for 2 full cycles.
ESPRESSO MAKER:
- Open the lid and remove the water tank.
- Fill the water tank up to the max level.
- Insert the water tank in its housing by pushing the water tank down until the botton and close the lid (it is also possible to fill the tank using a carafe).
- Insert the required coffee filter in the portafilter and attach the empty portafilter onto the machine.
- Place a large container under the spouts (34 fl/oz, 1l capacity).
- Press the “Espresso ON/OFF” and buttons and
 discharge half the tank from the boiler outlet.
- Turn the steam dial to and discharge the remaining water from the cappuccino maker then turn the steam dial back to OFF.
- Empty the container and put it back under the spouts and proceed with a second rinse.
PREPARATION OF DRIP COFFEE
Setting the clock
When the coffee machine is connected to the outlet for the first time, “AM 0:00” will flash on the display.
To set the time, proceed as follows:
- Press and hold the “HOUR” button (Fig. 3) for three seconds until the number of hours flashes on the display.
- Before the display stops flashing (about 5 seconds), set the hour by pressing the “HOUR” button repeatedly.
- Set the minutes by pressing the “MIN” button (Fig. 3) repeatedly. (To speed up the operation, hold the button down.)
- After setting the time, wait 5 seconds. When the display stops flashing, the time set is saved. To reset the time, press and hold the HOUR button for three seconds, and then follow the procedure as described starting from point 2.
Please note: In the event of a temporary power failure, the time set does not remain saved in the memory.
Programming the automatic start (AUTO BUTTON)
The machine can be programmed to make drip coffee automatically. First, make sure that the time is set correctly.
To set the delayed start (i.e. the time you want the coffee to be made), proceed as follows:
- Press and hold the AUTO button (Fig. 4) for about three seconds until 0:00 flashes on the display.
- Before the display stops flashing (about 5 seconds), set the desired hour by pressing the “HOUR” button repeatedly.
- Set the minutes by pressing the “MIN” button repeatedly.
- After 5 seconds, the display will stop flashing and the programmed time will be saved.
- After you have programmed the machine as described above, just press the AUTO button to have coffee made at the time set (The AUTO Button will turn illuminated and will stay illuminated).
Please note:
- If you want to change the start time after it has been set, press the AUTO button for about 2 seconds and then set a new time as described starting from point 2.
- Keep in mind that at the time set, the machine will start to make drip coffee only. The espresso maker does not come on.
- To cancel the automatic start, you have to press the Auto button again (it will turn off and will not stay illuminated).
Keep warming set
The machine is factory-set to keep the coffee warm for two hours after brewing.
However, this setting can be changed as follows:
- Press and hold the “Coffee ON/OFF” button (Fig. 5) for three seconds until 0:00 flashes on the display.
- Modify the time by repeatedly pressing the HOUR button and also the MIN button if required).
- After setting the time, wait 5 seconds. When the display stops flashing, the time will be saved.
Please note: If 0:00 is set, the machine switches off. (You can set a time between 1 minute and 11hours and 59 minutes).
Making drip coffee
- Open the filter-holder door, rotating it towards the right (fig. 7).
- Fill the carafe to the level indicator relative to number of cups of coffee you wish to prepare, taking care not to exceed the MAX level of 10 cups (fig. 8), otherwise, in order to not overfill the machine, the excess water will spill out from the back of the unit.
- Then pour the water into the water-fill compartment of the machine (fig. 9).
- Position the gold tone filter into the filter-holder (fig. 10).
- Put the ground coffee in the filter using the measuring spoon supplied and level it off evenly (fig. 11). As a general rule, use a level measure of coffee (approx 7 grams) for every cup of coffee required (for example, 10 measures to obtain 10 cups).
- Close the filter-holder door and place the carafe, with cover in place, onto the warming plate.
- Press the “Coffee ON/OFF” button. The button illuminmates to indicate that the drip coffee-maker is brewing.
- The coffee will begin to dispense after a short time.
It is perfectly normal for the machine to emit steam while the coffee is percolating.
To keep the coffee hot after the unit is finished percolating it will automatically switch to keep warm for up to the selected time.
- To turn off the machine press the “Coffee ON/OFF” button.
Please note: At the end of coffee dispensing the appliance emits a beep
“BOLD” function
The Bold function enhances the flavor of your coffee. This feature activates a unique brewing process, slowly releasing water into the filter basket; saturating coffee grounds a little at a time extracting the best flavor and aroma from your coffee. To activate, press the “BOLD” button after having pressed the “Coffee ON/OFF” button (fig. 6); the button will illuminate. Press the button again to turn the selection off. This function is recomended when preparing 1 to 4 cups. Do not use this button if brewing an entire carafe of coffee. You can select this function even when using the auto function (see paragraph 7.2).
If you want to activate the bold function for delayed brewing, after you program the timer you need to activate the bold function by pressing the button.
ESPRESSO
Preheating the espresso unit
To make espresso coffee at the right temperature, the coffee maker should be preheated as follows:
- Press the “Espresso ON/OFF”button (fig. 12) to turn the machine on. The integrated light flashes to indicate that the machine is heating up.
- Insert the filter to the portafilter (fig. 13). Attach the portafilter with filter to the machine (fig. 14) without adding pre-ground coffee.
- Place a cup under the portafilter. Use the same cup that will be used to prepare the coffee in order to preheat it.
- Wait until the “Espresso ON/OFF” integrated light stops flashing: now the machine is ready to make espresso.
- Press the button (fig. 15). Continue delivering water until you fill the cup and then interrupt the delivery by pressing the same button and empty the cup.
Please note:
- It is normal for a small and harmless puff of steam to be given off when removing the portafilter.
- Never operate the appliance without water in the tank or without the tank.
How to make espresso using pre-ground coffee
- Preheat the machine and portafilter as described in the previous paragraph.
- Place the ground coffee filter in the portafilter To make one espresso, use the filter with the symbol on the bottom, to make two espressos, use the filter with the
 symbol on the bottom.
- To make just one espresso, place one level measure with the
 scoop provided of pre-ground coffee (about 7 g/0,25 oz) in the filter (fig. 16). To make two espressos, place two level measured scoops with the scoop provided.
Important: For correct operation, before filling with pre-ground coffee, make sure there are no coffee residues left in the filter from the last time you made coffee.
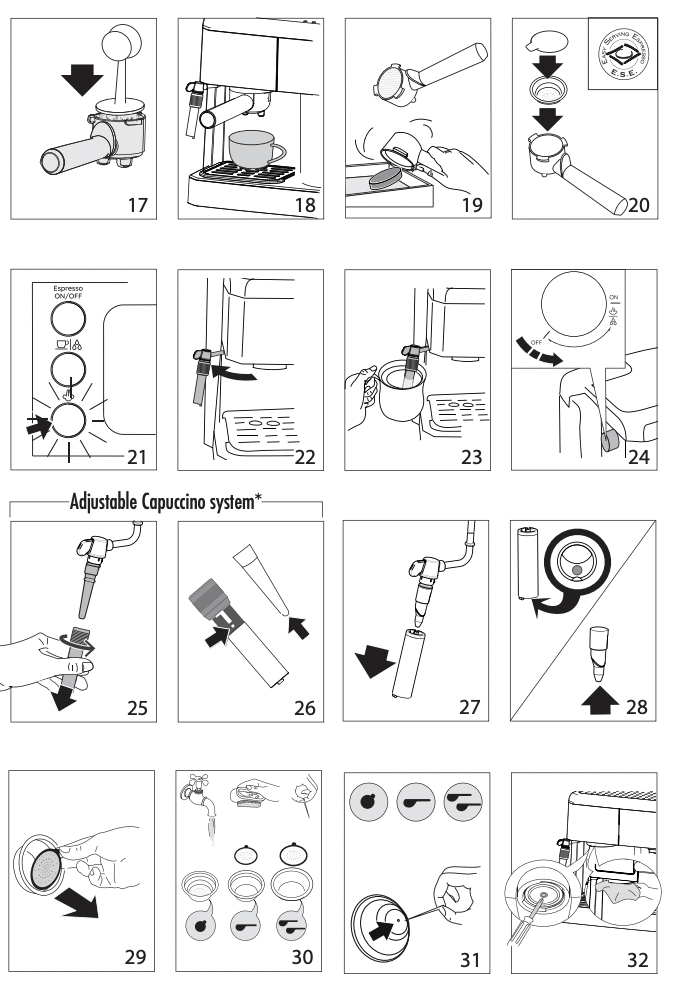
4. Distribute the pre-ground coffee evenly and press with the tamper (fig. 17). Correct pressing of the pre-ground coffee is essential to obtain a good espresso. If pressing is excessive, coffee delivery will be slow and the crema will be dark. If pressing is too light, coffee delivery will be too fast and the crema will be weak and light in color.
5. Remove any excess coffee from the rim of the portafilter and attach to the machine. Turn as far as it will go (fig. 14) to avoid water leaking out.
6. Place the cup or cups under the portafilter spouts (fig. 18). You are recommended to warm the cups before making coffee by rinsing them with a hot water.
7. Make sure the “Espresso ON/OFF” integrated light is solid (if it flashes wait until it stops), then press the
button (fig. 15). When the desired amount of espresso has been delivered, press the same button to interrupt the flow.
8. To remove the portafilter, turn the handle from right to left.
Danger of burns! To avoid splashes, never remove the portafilter while the machine is delivering coffee.
9. To dispose of the used coffee empty the grounds by turning the portafilter upside down and tapping it firmly (fig. 19).
10. To turn the machine off, press the “Espresso ON/OFF” button.
How to prepare espresso using pods
- Preheat the machine as described in the section “PREHEATING THE COFFEE UNIT (8.1)”, making sure the portafilter is attached. This obtains a hotter coffee.
Please note: Use pods conforming to the ESE standard, indicated on the pack by the following symbol.
 |
|
The ESE standard is a system accepted by leading pod producers and enables espresso to be prepared simply and cleanly. |
2. Place the filter for espresso pods (with the symbol on the bottom) in the portafilter (fig. 13).
3. Insert the pod, centering it as far as possible on the filter (fig. 20). Always follow the instructions on the pod pack to position the pod on the filter correctly.
4. Attach the portafilter to the machine. Always turn as far as it will go (fig. 14).
5. Proceed as in points 6, 7 and 8 in the previous section.
HOW TO MAKE CAPPUCCINO OR LATTE
- Prepare the espresso as described in the previous sections, using sufficiently large cups. Ensure that the unit is on by pressing the Espresso On/off button.
- Press the
 button: the integrated light flashes to indicate that the machine is heating up (fig. 21).
- In the meantime, fill a pitcher with about 3.5 oz/100 grams for each cappuccino or 6 oz/170 grams for each latte to be prepared. In choosing the size of the pitcher, keep in mind that the milk doubles or triples in volume.
Please note:
It is recommended to use whole or 2% milk at refrigerator temperature.
4. Models with Adjustable Cappuccino System only:
Make sure the ring on the cappuccino maker is positioned downwards in the CAPPUCCINO position and place the pitcher containing the milk under the cappuccino maker.
5. Wait until the
light stops flashing to indicate that the boiler has reached the ideal temperature for steam production. As the boiler heats up, it is normal for a little water and steam to be given off into the drip tray.
6. Extract the frother by rotating to the left (fig. 22). During this operation, avoid touching the boiler outlet as it is hot. Then place the milk pitcher under the frother.
7. Make sure the frother is immersed in the milk. (fig. 23). Turn the steam dial counterclockwise to the
ON position (fig. 24). Steam is delivered from the frother, giving the milk a creamy frothy texture. For a creamier froth, immerse the frother in the milk and move the container with slow up/down movements.
8. When the required temperature (the ideal is 60°C/140°F) and froth density is reached, interrupt steam delivery by turning the steam dial clockwise to the OFF position and press the
button.
9. Pour the frothed milk into the cups containing the espresso prepared previously. The cappuccino is ready.
Please note:
- To prepare more than one cappuccino, first make all the espressos then at the end prepare the frothed milk for all the cappuccinos.
- To make espresso again after the milk has been frothed, cool down the boiler first or the espresso will be burnt. To cool the boiler, place a container under the boiler outlet, press the button and deliver water until the “Espresso ON/OFF” flashes. Then prepare the espresso as described previously.
- Clean the frother every time you use it, to avoid milk residue or clogging.
You are recommended to deliver steam for a maximum of 60 seconds and never to froth milk more than three times consecutively.
MAKING HOT MILK (WITHOUT FROTH) (ONLY SOME MODELS)
To make hot milk without froth, proceed as described in the previous section, making sure the ring on the frother is positioned upwards in the “HOT MILK” position.
CLEANING THE FROTHER AFTER USE
Important: For hygiene and performance reasons, the frother should always be cleaned after each use
Proceed as follows:
- Deliver a little steam for a few seconds by turning the steam dial counterclockwise (fig. 24). This causes the frother to discharge any milk left inside. Turn the machine off by pressing the “Espresso ON/OFF” button.
- With one hand, hold the frother spout firmly, with the other, release the frother by turning it counterclockwise, then pull off downwards (fig. 27).
- Remove the steam connection nozzle from the spout by pulling it downwards.
- Wash the frother and steam connection nozzle thoroughly with warm water.
- Make sure the two holes shown by the arrows in fig. 28 are not blocked. If necessary, clean with a pin.
- Put the steam connection nozzle back, pressing forcefully upwards to insert it onto the steam tube.
- Replace the frother by pushing upwards and turning clockwise.
HOT WATER
- Press the “Espresso ON/OFF” button(fig. 12) to turn the machine on, the integrated light flashes to indicate that the machine is heating up.
- In the meantime, place a mug under the frother.
- Espresso ON/OFF” integrated light stops flashing, press the button (fig. 15) and at the same time turn the steam dial counterclockwise to ON (fig. 24). Water comes out of the frother.
- To interrupt hot water delivery, press the button again and turn the steam dial clockwise to OFF.
You should not deliver hot water for more than 60 seconds.
CLEANING
Danger!
- While cleaning, never immerse the coffee maker in water. It is an electrical machine.
- Before cleaning the outside of the machine, turn it off, unplug from the mains socket and allow to cool.
Cleaning the drip tray
Important!
The drip tray is fitted with a level indicator (red) showing the level of water it contains. As soon as the indicator begin to protrude from the cup tray, the drip tray must be emptied and cleaned, otherwise the water may overflow the edge and damage the machine, the surface it rests on or the surrounding area.
1. Remove the drip tray.
2. Remove the cup tray, empty the water and clean the drip tray with a cloth, then reassemble the drip tray.
3. Put the drip tray back in place.
Espresso filter cleaning and maintenance
Clean the coffee filters weekly:
1 and 2 cup filters
- Extract the perforated filter by pulling the tab (fig. 29);
- Rinse the filters under running water (fig. 30);
- Make sure the holes are not blocked. If necessary, clean with a pin (figs. 30 and 31);
- Place the perforated filter in the filter housing and press as far as it will go.
Pod filter
Rinse under running water. Make sure the holes are not blocked.
If necessary, clean with a pin (figs. 30 and 31).
Cleaning the boiler outlet
About every 300 espressos, the boiler outlet must be cleaned as follows:
- Make sure the machine is not hot and that it is unplugged from the mains;
- Use a screwdriver to release the screw fixing the espresso boiler outlet (fig. 32);
- Remove the boiler outlet;
- Clean the boiler with a damp cloth (fig. 32);
- Clean the outlet thoroughly with hot water using a brush.
- Make sure the holes are not blocked. If necessary, clean with a pin.
- Rinse under running water, brushing all the time.
- Replace the boiler outlet, making sure it is correctly positioned on its gasket.
Failure to clean as described above voids the warranty.
Other cleaning operations
- Do not use solvents or abrasive detergents to clean the coffee maker. Use a soft damp cloth only.
- Clean the portafilter, filters and water tank regularly.
Danger!
While cleaning, never immerse the coffee maker in water. It is an electrical machine.
TROUBLESHOOTING
Below is a list of some of the possible malfunctions. If the problem cannot be resolved as described, contact Customer Services.
|
PROBLEM
|
POSSIBLE CAUSE
|
SOLUTION
|
|
No espresso is delivered
|
No water in the tank
|
Fill the tank with water
|
|
The holes in the filter holder are blocked
|
Clean the filter holder spout holes
|
|
The espresso boiler outlet is blocked
|
Clean as described in the section “13.3 Cleaning the boiler outlet”
|
|
Scale/hard water deposits in the water circuit
|
Perform the descaling procedure as described in the section “14.1 Descaling the espresso unit”
|
|
The tank is not correctly in place and the valve on the bottom is not open
|
Press the tank down lightly to open the valve on the bottom
|
|
The espresso coffee drips from the edges of the filter holder rather than the holes
|
The filter holder is inserted incorrectly
|
Attach the filter holder correctly and rotate firmly as far as it will go
|
|
The holes in the filter holder spouts are blocked
|
Clean the spout holes.
|
|
The pump is excessively noisy
|
The water tank is empty
|
Fill the tank
|
|
The tank is not correctly in place and the valve on the bottom is not open
|
Press the tank down lightly to open the valve on the bottom
|
|
The espresso is cold
|
The “Espresso ON/OFF” integrated light was flashing when the coffee button was pressed
|
Wait until the “Espresso ON/OFF” integrated light stop flashing
|
|
No preheating was done
|
Preheat as described in the section “8.1 Preheating the coffee unit”
|
|
The cups were not preheated
|
Heat the cups by rinsing them in hot water
|
|
Scale/hard water deposits in the water circuit
|
Perform the descaling procedure as described in the section “14.1 Descaling the espresso coffee unit”
|
|
The espresso crema is too light (delivered from the spout too fast)
|
The pre-ground coffee is not pressed down firmly enough
|
Press the pre-ground coffee down more firmly (fig. 18)
|
|
There is not enough pre-ground coffee
|
Increase the quantity of pre-ground coffee
|
|
The pre-ground coffee is too coarse
|
Use only pre-ground coffee for espresso makers
|
|
The wrong type of pre-ground coffee is being used
|
Change the type of pre-ground coffee
|
|
The espresso crema is too dark (delivered from the spout too slowly)
|
The pre-ground coffee is pressed down too firmly
|
Press the coffee down less firmly (fig. 17)
|
|
There is too much pre-ground coffee
|
Reduce the quantity of pre-ground coffee
|
|
The espresso boiler outlet is blocked
|
Clean as described in the section “13.3 Cleaning the boiler outlet”.
|
|
The pre-ground coffee is too fine or damp
|
Use pre-ground coffee for espresso coffee makers only and make sure it is not too damp
|
|
The wrong type of pre-ground coffee is being used
|
Use a different type of pre-ground coffee
|
|
The filter holder cannot be attached to the appliance
|
Too much coffee has been placed in the filter
|
Use the measuring scoop included and make sure you are using the correct filter for the type of preparation
|
|
No milk froth is formed when making cappuccino
|
Milk not cold enough
|
Always use semi-skimmed milk at refrigerator temperature
|
|
Milk frother not clean
|
Thoroughly clean the holes in the cappuccino maker, in particular those indicated in fig. 26-28
|
|
Models with adjustable capuccino sytem (COM532): The ring of capuccino maker in not in the cappuccino position
|
Place the ring in the cappuccino position
|
|
The drip or espresso has an acid flavor
|
Inadequate rinsing after descaling
|
Rinse the appliance as described in the section ““14.1 Descaling the espresso coffee unit” or “14.2 Descaling the drip coffee unit”
|
|
The drip coffee takes longer to percolate
|
The drip coffee maker needs to be descaled
|
Perform the descaling procedure as described in the section “14.2 Descaling the drip coffee unit”
|
|
Steam button double flashes
|
Descaling is required for espresso
|
|
|
The steam button is blinking
|
Descaling is in process
|
|
|
The BOLD LED is double flashing
|
Descaling is required for the drip coffee unit
|
|
|
BOLD led blinking
|
Descaling is in process
|
|