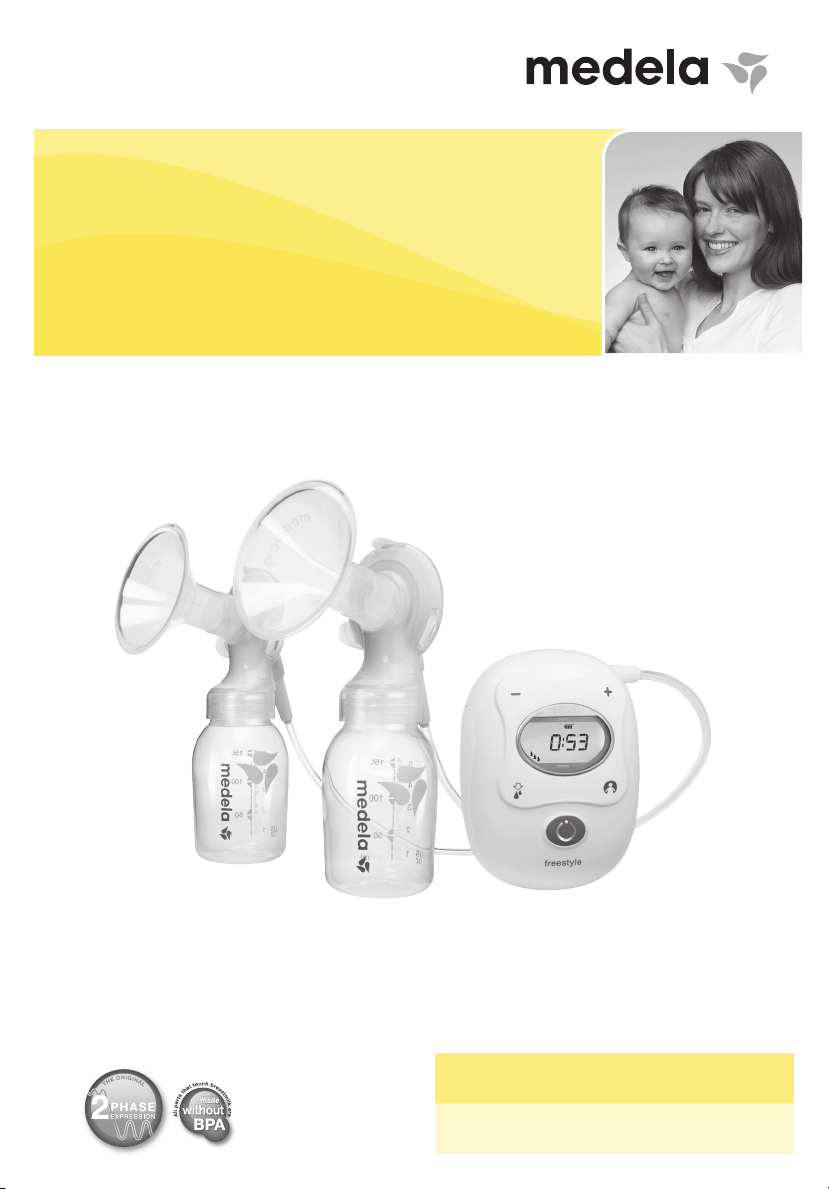
Freestyle
®
Instructions for use
Read all instructions before using this product.
PLEASE SAVE THESE INSTRUCTIONS

2

1. Important Safeguards ................................................................................................5-7
2. Product Description ...................................................................................................8-9
3. Getting Started ............................................................................................................. 10
4. Cleaning Overview ....................................................................................................... 11
5. Wash - Before fi rst use & after each use .............................................................. 12-13
6. Sanitize - Before fi rst use & once per day ............................................................14-15
7. Tubing & Motor Unit Care ......................................................................................16-17
8. Breastfeeding Information .......................................................................................... 18
9. PersonalFit
TM
Sizing .................................................................................................... 19
10. Powering Your Pump .............................................................................................. 20-25
10A Charging & operating your pump ............................................................................. 20
10B Battery operation ................................................................................................ 20-22
10C Power adaptor care................................................................................................. 23
10D Traveling outside the U.S. ........................................................................................ 23
11. Assembly of Pump Kit ............................................................................................ 24-25
12. Pumping...................................................................................................................26-30
12A Before pumping ....................................................................................................... 27
12B Double pumping ...................................................................................................... 27
12C Single pumping ....................................................................................................... 27
12D Pump operation ................................................................................................. 28-30
13. Hands-free Easy Expression
TM
.................................................................................... 31
14. Storing Breastmilk ....................................................................................................... 32
15. Preparing & Feeding Breastmilk ................................................................................ 33
15A Preparing breastmilk ................................................................................................ 33
15B Feeding breastmilk .................................................................................................. 33
16. Troubleshooting ......................................................................................................34-35
17. Supplemental Information .......................................................................................... 36
18. Warranty ....................................................................................................................... 37
19. Meaning of Symbols ............................................................................................... 38-39
20. EMC/Technical Description ...................................................................................39-46
21. Technical Specifi cations/Disposal ............................................................................. 47
Questions? Visit www.medela.com or call us at 1-800-435-8316.
3
Table of Contents

PLEASE SAVE THESE INSTRUCTIONS.
THIS IS A SINGLE USER PRODUCT.
Indication for use
The Freestyle
®
is a powered breastpump to be used by lactating women to express and
collect milk from their breasts. Freestyle is intended for a single user.
It is best to wait until your breastfeeding routine is established (approximately
4weeks) before expressing breastmilk, unless otherwise advised by your
healthcare professional.
If you have medical reasons or other needs for exclusively pumping, it is
recommended that you use a hospital grade breastpump such as our Symphony
®
Breastpump. To learn more, visit www.medelabreastfeedingus.com.
Product Description
Freestyle
®
is a personal-use electric breastpump that includes 2-Phase Expression
®
technology and is capable of single and double pumping.
The Freestyle operating life is defi ned to be approximately three 15 minute sessions per
day, for one year.
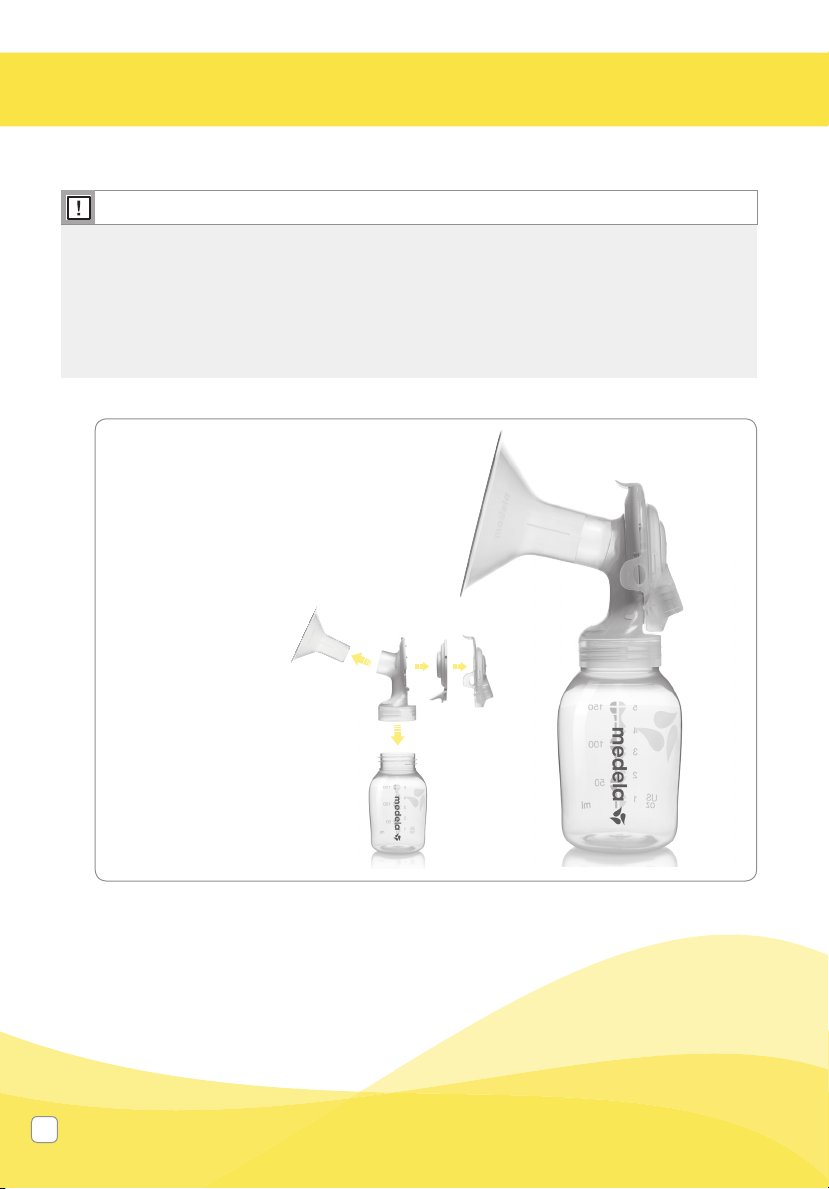
IMPORTANT
• Plastic bottles and component parts become brittle when frozen and
may break when dropped.
• Bottles and component parts may become damaged if mishandled,
e.g. dropped, over-tightened, or knocked over.
• Take appropriate care in handling bottles and components.
• Do not use the breastmilk if bottles or components become damaged.
Note
4
T
The warning symbol identifi es all instructions that are important to safety. Failure to
observe these instructions can lead to injury or damage to the breastpump. When used in
conjunction with the following words, the warning symbols stand for:
WARNING Can lead to serious injury or death.
CAUTION Can lead to minor injury.
NOTE Can lead to material damage.
TIP Useful or important information that is not related to safety.

Questions? Visit www.medela.com or call us at 1-800-435-8316.
5
1. Important Safeguards
When using electrical products, especially when children are present, basic safety
precautions should always be followed.
READ ALL INSTRUCTIONS BEFORE USING THIS PRODUCT.
WARNING: To avoid fi re, electrocution, or serious burns:
• Danger of electrocution! Keep the device dry! Never immerse in water or other liquids! Do not run
water over the pump.
• The Freestyle
®
Breastpump and accessories are not heat-resistant: keep away from radiators and
open fl ames.
• Keep the power adaptor away from heated surfaces.
• Do not reach for any electrical device if it has fallen into water. Unplug immediately.
• Do not use outdoors, or operate where aerosol (spray) products are being used or where oxygen is
being administered.
• The Freestyle Breastpump should never be left unattended when plugged into a power source.
• Never operate an electrical device if it has a damaged cord, plug or battery pack, if it is not working
properly, if it has been dropped or damaged, or dropped into water. If damage is found, immediately
discountinue use of power adaptor or battery pack and call Medela Customer Service at
1-800-435-8316.
• Do not use the Freestyle Breastpump while bathing or showering.
• Close supervision is necessary when the Freestyle Breastpump is used in the vicinity of children.
• Follow the exact order of the steps in powering Freestyle breastpump as listed on page 18 of this
instructions for use.
• Only use the power adaptor supplied with the Freestyle Breastpump.
• Make sure the voltage of the power adaptor is compatible with the power source.
• Do not use force to push the battery into the battery compartment.
DANGER: To reduce the risk of electrocution:
• Always unplug electrical product immediately after use.
• Do not use while bathing.
• Do not place or store product where it can fall or be pulled into a tub or sink.
• Do not place or drop into water or other liquid.
• Do not reach for a product if it has fallen into water. Immediately unplug from electrical outlet.
This is a single user product. Use by more than one person may present a health risk
and performance questions and voids the warranty.

6
1. Important Safeguards (cont.)
WARNING: To avoid health risk and reduce the risk of injury:
• Repairs must be performed only by an authorized service agency. Do not repair yourself! No
modifi cations to the device are permitted.
• Never use a damaged device. Replace damaged or worn parts.
• Use the Freestyle Breastpump only for its intended use as described in this manual.
• Do not use the Freestyle Breastpump while sleeping or overly drowsy.
• This is a single user product. Use by more than one person may present a health risk.
• Do not drive while pumping.
• Inspect all appropriate pump components before each use.
• Do not thaw frozen breastmilk in a microwave or in a pan of boiling water.
• If tubing becomes moldy, discontinue use and replace tubing.
• Never use while pregnant, as pumping can induce labor.
• Clean and sanitize all parts that come into contact with your breast and breastmilk prior to fi rst use.
• Wash all parts that come into contact with your breast and breastmilk after every use.
• If you are a mother who is infected with Hepatitis B, Hepatitis C, or Human Immunodefi ciency Virus
(HIV), pumping breastmilk will not reduce or remove the risk of transmitting the virus to your baby
through your breastmilk.
• Do not use the Freestyle breastpump while operating a moving vehicle.
• The electric breastpump Freestyle should not be used adjacent to or stacked with other
equipment. If adjacent or stacked use is necessary, the electric breastpump Freestyle should be
observed to verify normal operation in the confi guration in which it will be used.

Questions? Visit www.medela.com or call us at 1-800-435-8316.
7
CAUTION: Can lead to minor injury:
• Do not expose the motor unit to direct sunlight.
• Separation from power is only assured through the disconnection of the power adaptor
from the wall socket outlet.
• If you feel pain in your breast or nipple, turn the pump off or slide a fi nger between the fl ange and
your breast to immediately break the suction.
• Contact a healthcare professional or breastfeeding specialist if you experience
problems or pain.
• Portable and mobile radio frequency communications equipment can affect the Freestyle
Breastpump.
• Use only the power adaptor that comes with the Freestyle Breastpump or approved power
options on page 18.
• Make sure the voltage of the power adaptor is compatible with the power source.
• Wash hands thoroughly with soap and water before touching breastpump, kit and breasts and
avoid touching the inside of containers or lids.
• Separate and wash all parts that come in contact with breastmilk immediately after use to avoid
dry up of breastmilk residue and prevent growth of bacteria. Always inspect breastshields,
connectors, valves, membranes and tubing prior to use for cleanliness
• Only use drinking-quality tap or bottled water for cleaning your breast pump and parts.
• Do not store wet or damp parts as mold may develop.
• If tubing becomes moldy, discontinue use and replace tubing. Contact Medela Customer Service
at customer[email protected] or call 1-800-435-8316.
• Do not run pump with wet tubing. Doing so will harm the pump motor.
• While some discomfort may be felt when fi rst using a breastpump, using a breastpump should not
cause pain.
• If you are experiencing discomfort at the base of the nipple due to rubbing of your breast tissue
with the breastshield tunnel, use of a lubricant such as Tender Care
TM
Lanolin may be benefi cial.
For assistance with correct breastshield sizing and comfort please visit www.medelabreastshields.
com or see a lactation consultant/breastfeeding specialist.
• Contact your healthcare professional or breastfeeding specialist if you can express only minimal or
no milk or if expression is painful. See Section 8 for more information.
• Do not try and express with vacuum that is too high and uncomfortable (painful). The pain, along
with potential breast and nipple trauma, may decrease milk output.
• Make sure tubing is not kinked or pinched while pumping.
• Do not hold the pump kit by the bottle. This can lead to blockage of the milk ducts and
engorgement.
• Do not thaw frozen breastmilk in a microwave or in a pan of boiling water.
• Do not microwave breastmilk. Microwaving can cause severe burns to baby’s mouth from hot
spots that develop in the milk during microwaving. (Microwaving can also change the composition
of breastmilk.)
AUTHENTIC
medela spare parts
Quality & performance
you can trust
Authentic Medela Spare Parts are made with the quality materials
and workmanship you expect and trust, only from Medela.
Non-Medela spare parts can vary signicantly in terms of
product design, materials, and workmanship; all of
which may affect the performance of your
Medela breastpump.
2x PersonalFit
™
Breastshields M (24 mm)
2x PersonalFit
™
Breastshields L (27 mm)
(for other breastshield sizes
see Section 9, page 17)
87073 (24 mm)
87274 (27 mm)
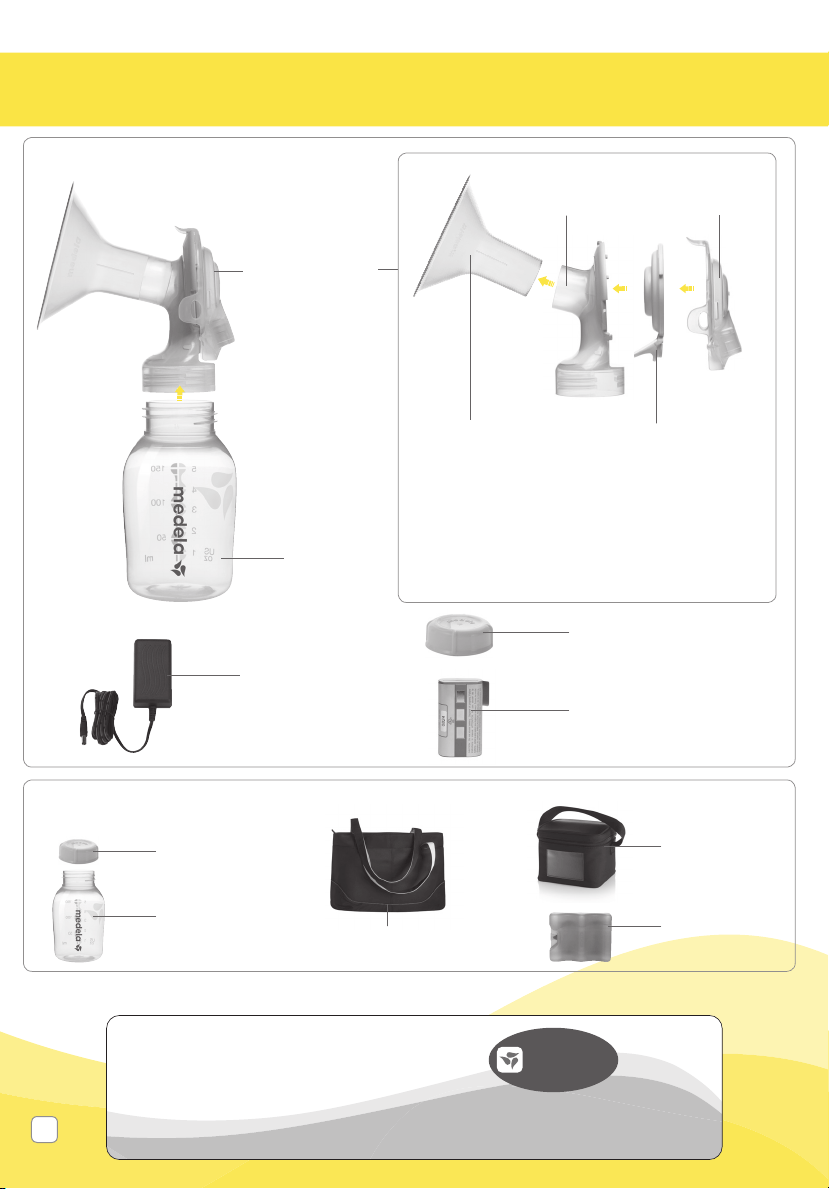
2x Bottles
6007135
1x Ice pack
87092
1x Cooler bag
3007304
1x Power adaptor
9207047
1x Rechargeable battery
9197010
1x Freestyle bag
3007340
2x Lids
8107183
2x membranes
2x Back caps
2x Breastshield
connectors
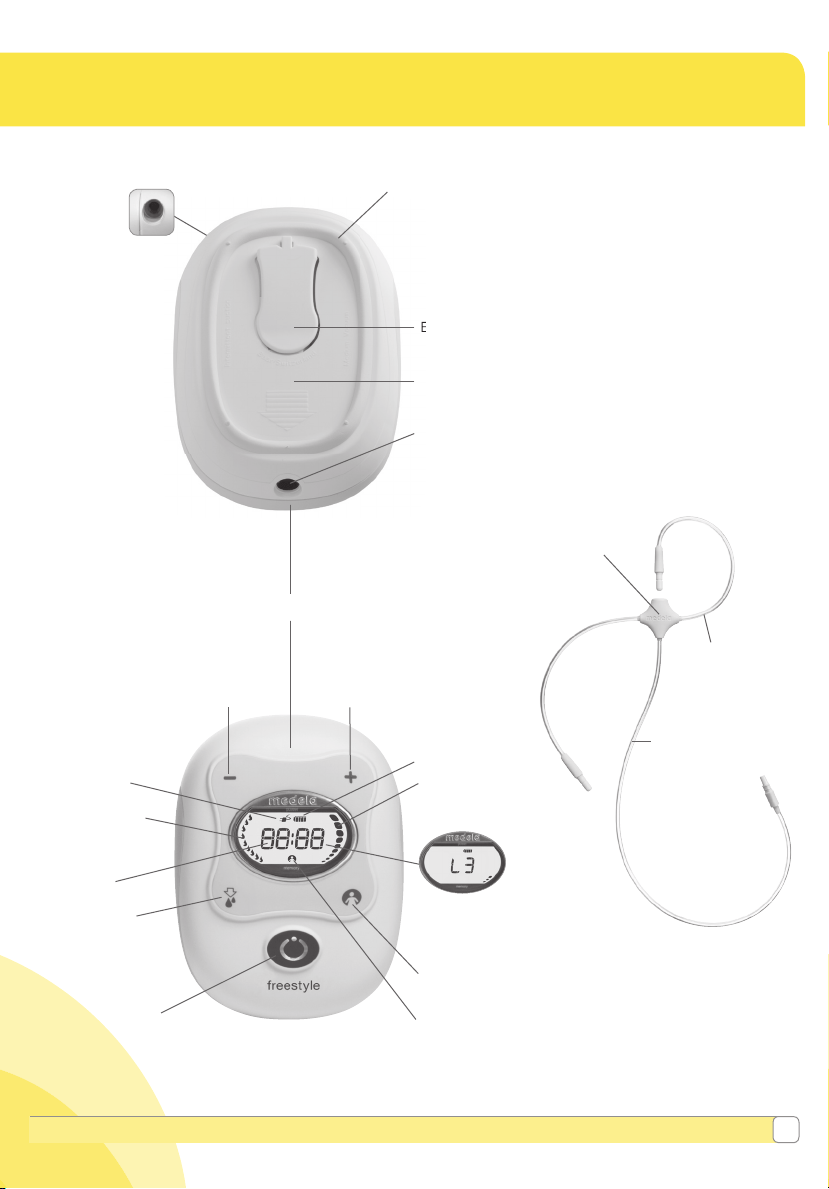
2. Product Description
2x Breastshield
assemblies
67061
Additional contents included with Freestyle Deluxe Confi guration
67060
Your Freestyle breastpump system includes
Quantities and contents may differ depending on Freestyle Breastpump version.
2x Bottles
6007135
2x Lids
8107183
8
1x Ice pack
87092
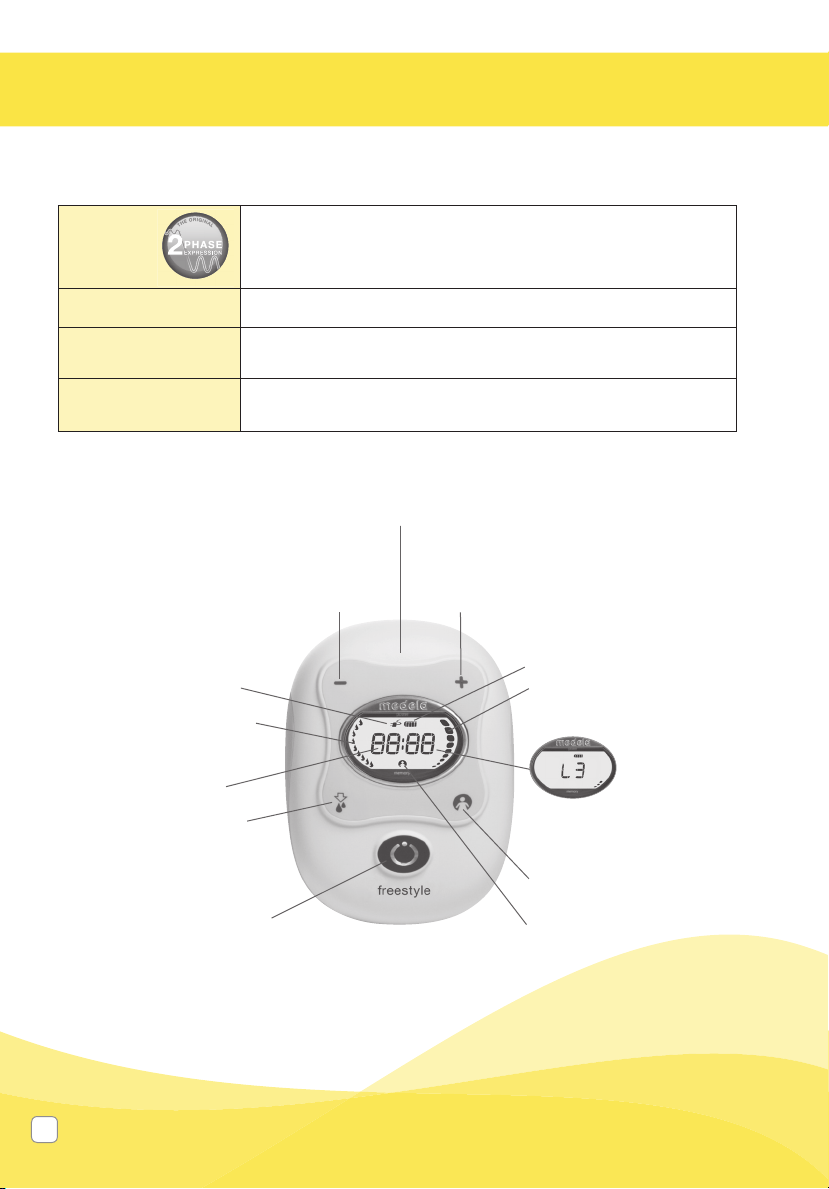
1x Motor unit
Belt clip
Belt clip
Power
adaptor port
On/Off button
Reduce
vacuum
Increase
vacuum
Let-down
button
Speed/vacuum
level indicator
(L:1-L:9)
Memory
function key
Memory “on”
indicator
Timer
Power
indicator
Battery indicator
Expression
phase vacuum
level indicator
Freestyle
tubing port
Battery
compartment
Stimulation
phase vacuum
level indicator
Long tubing
(connects to
pump unit)
Tubing holder
Short tubing
(connects to
breastshield
assemblies)
1x Freestyle tubing
8007232
1x Backplate
2001698
Questions? Visit www.medela.com or call us at 1-800-435-8316.
9
10
3. Getting Started
Parts to clean:
• Breastshields
• Breastmilk bottles
• Lids
• Connectors
• Membranes
• Back caps
Breastshield assemblies come assembled.
Separate all parts that will come into
contact with the breast and breastmilk
before cleaning.
Note
It's important for you to do the following before using Freestyle
®
for the fi rst time:
1. Fully charge the battery 24 hours, uninterrupted (see Section 10)
2. Separate all parts
3. Clean - see instructions:
• Wash – Section 5
• Sanitize – Section 6
Questions? Visit www.medela.com or call us at 1-800-435-8316.
11
4. Cleaning Overview
Detailed cleaning instructions on pages 10-15:
• Wash – Section 5
• Sanitize – Section 6
• Tubing and motor unit care – Section 7
Washing and sanitizing are two different activities and must be done separately to
protect you and the performance of your breastpump.
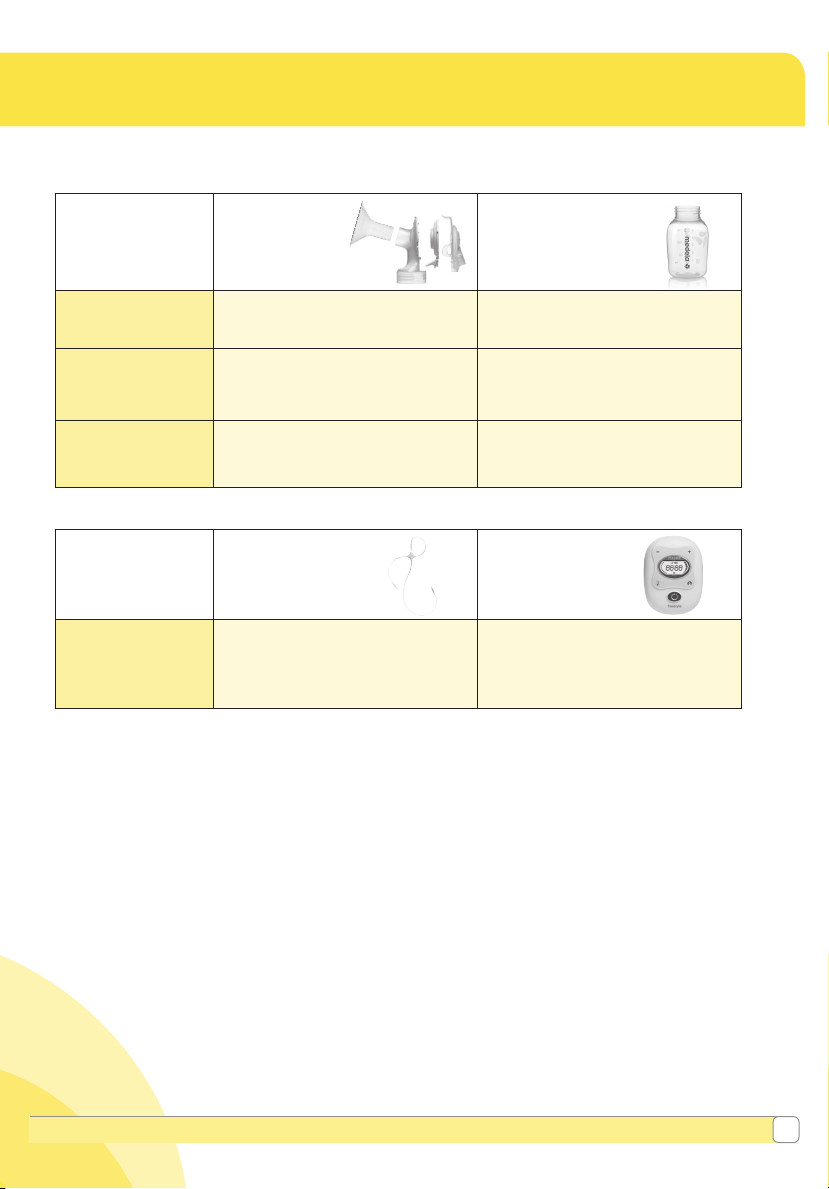
When to Wash
Breastpump
kit
Breastpump
bottles
Before 1st use
✓ wash
✓ sanitize
✓ wash
✓ sanitize
After each use
✓ wash ✓ wash
Once per day
✓ sanitize ✓ sanitize
When to Wash Tubing Motor unit
As needed
✓ wash only if residue or
condensation in tubing
✓ wipe with clean, damp cloth
12
Supplies needed:
• Mild dish soap
• Clean dish cloth or soft
brush
• Clean sink or bowl
• Drinking quality water
Parts to wash:
• Breastshields
• Breastmilk bottles
• Lids
• Connectors
• Membranes
• Back caps
5. Wash – Before first use and after each use
Separate and wash all parts that come in contact with
breastmilk immediately after use to avoid dry up of
breastmilk residue and prevent growth of bacteria.
Caution
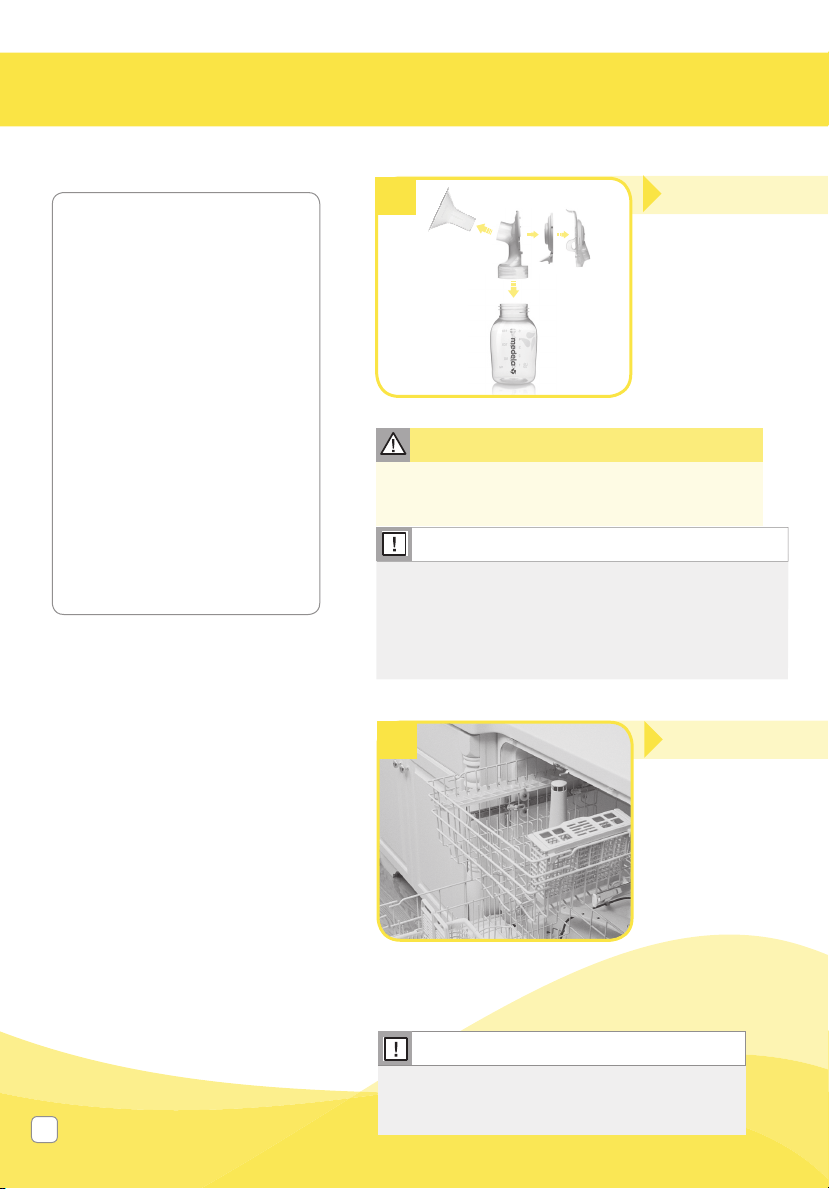
Note
If the individual components of the pump kit are
cleaned in a dish washer, parts may be discolored
by food pigments. This will not impact part function.
Wash in dishwasher
4
• Wash all separated parts on top rack of dishwasher.
• Allow all breastpump parts to air dry in a clean area.
• Store dry parts in a clean, cool place when
not in use.
1
Separate parts for washing
Note
• Wash breastpump kit parts after each use.
• Take care not to damage parts of the pump
kit during cleaning.
• It is not necessary to wash tubing prior to fi rst use.
• Only wash tubing if condensation or residue is
present.
Questions? Visit www.medela.com or call us at 1-800-435-8316.
13
You may also wash your kit parts by
following the instructions on the Quick
Clean
™
Breastmilk Removal Soap bottle.
(sold separately)
5
Note
Store the pump kit in a clean bag/container until next use.
• Place parts on a clean surface and/or towel.
• Allow all parts to air dry.
• Store dry parts in a clean, cool place when
not in use. Do NOT store wet or damp parts.
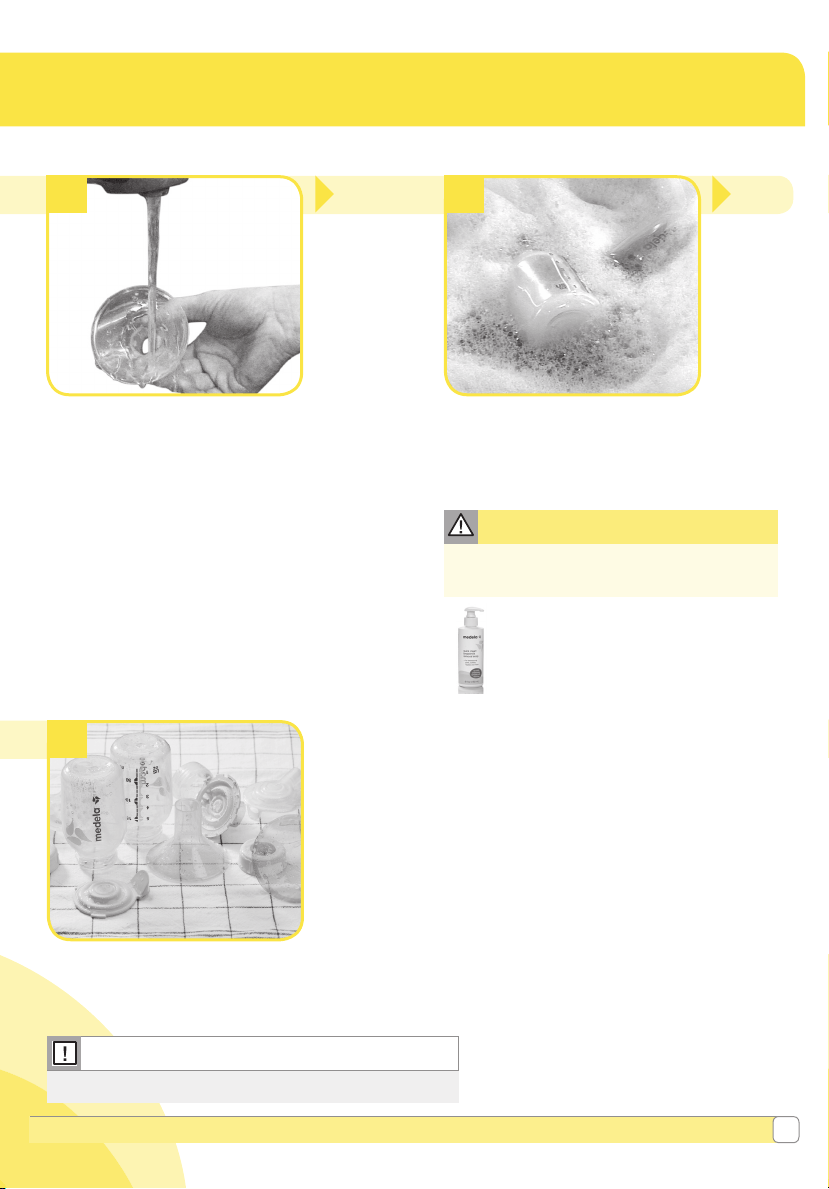
Rinse all separated parts that came in
contact with breast and breastmilk in cool
water to remove breastmilk residue.
• Soak all separated parts in warm, soapy
water for 5minutes.
• Wash each part with a clean dish cloth or
soft brush.
• Rinse all separated parts with clear water.
Wash in sink
Only use drinking-quality tap or bottled
water for cleaning.
Caution
2 3
OR
Allow water to cool and gently
remove parts from water with
tongs.
4
14
Supplies needed:
• Clean pot for boiling water
• Clean dish cloth
• Drinking quality water
• Tongs
Parts to sanitize:
• Breastshields
• Breastmilk bottles
• Lids
• Connectors
• Membranes
• Back caps
6. Sanitize – Before first use and once per day
Note
Sanitize breastpump kit parts once daily.
Separate all parts that come in
contact with breastmilk.
1
You may also sanitize your kit parts by
following the instructions on Medela’s
Quick Clean
™
Micro-Steam
™
bag.
(sold separately)
5
Note
Store the pump kit in a clean
bag/container until next use.
Questions? Visit www.medela.com or call us at 1-800-435-8316.
15
• Place parts on a clean surface and/or towel.
• Allow all parts to air dry.
• Store dry parts in a clean, cool place when
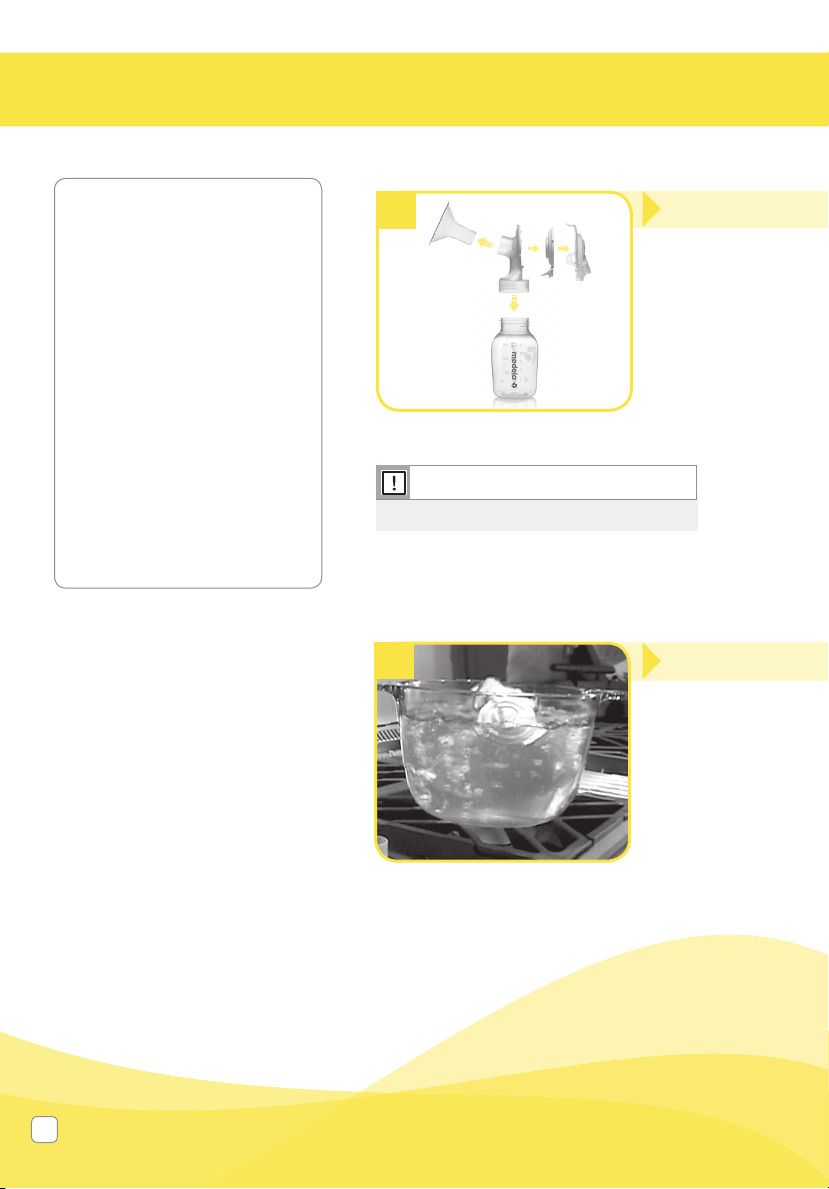
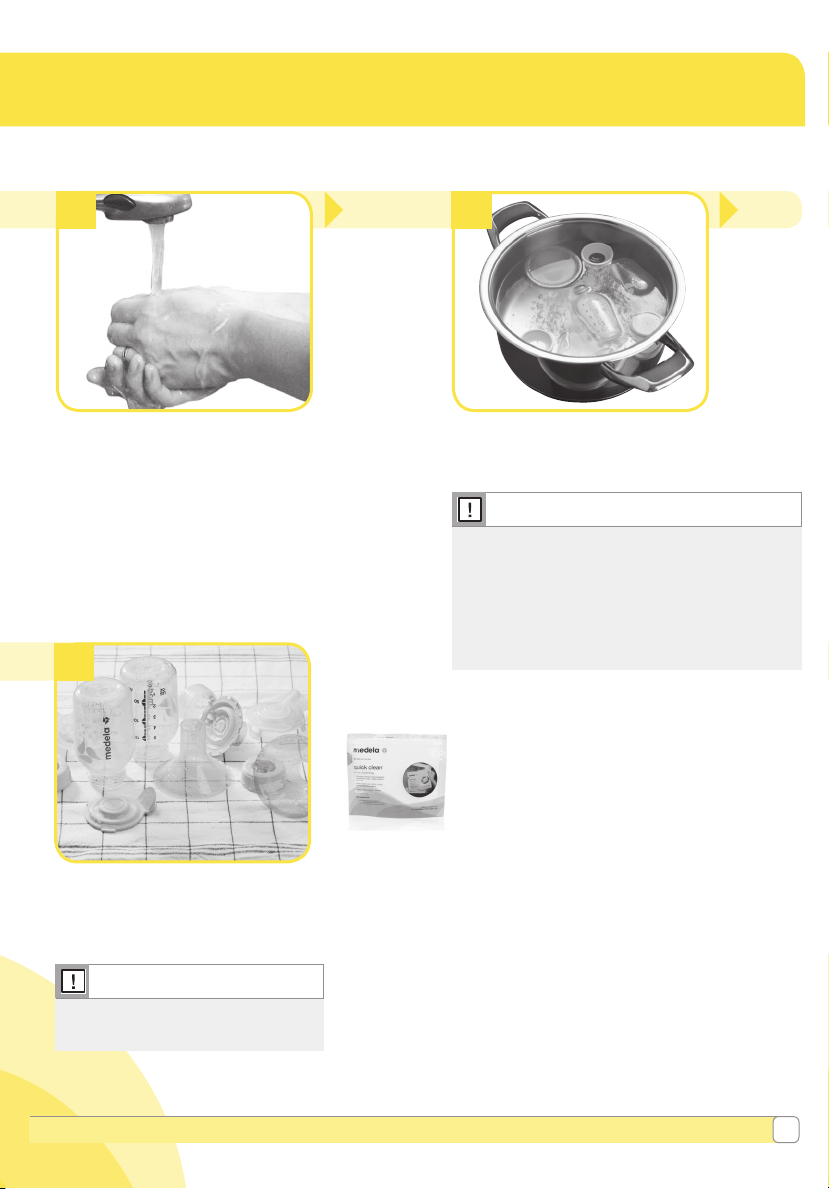
not in use. Do NOT store wet or damp parts.
• Fill a pot with enough water to cover all parts.
• Bring water to a boil.
• Place parts in boiling water for 10 minutes.
2
3
Wash hands thoroughly.
Note
If you notice a white residue on your parts after
boiling, you may have a high mineral content
in your water. Remove residue by wiping
parts with a clean dish cloth and air dry. We
recommended that you boil parts with distilled
water to prevent substantial mineral build-up
over time which may compromise your parts.
6
3
• Tubing should be washed if dirty
or residue is present.
• Tubing should be washed if
condensation is present.
• Cleaning tubing is not necessary
if condensation present is from
previous washings or atmospheric
conditions.
Note
16
Caution
• Do not store wet or damp parts as mold may develop.
• If tubing becomes moldy, discontinue use and replace
tubing. Contact Medela Customer Service at customer.
[email protected] or call 1-800-435-8316.
• Do not run pump with wet tubing. Doing so will harm
the pump motor.
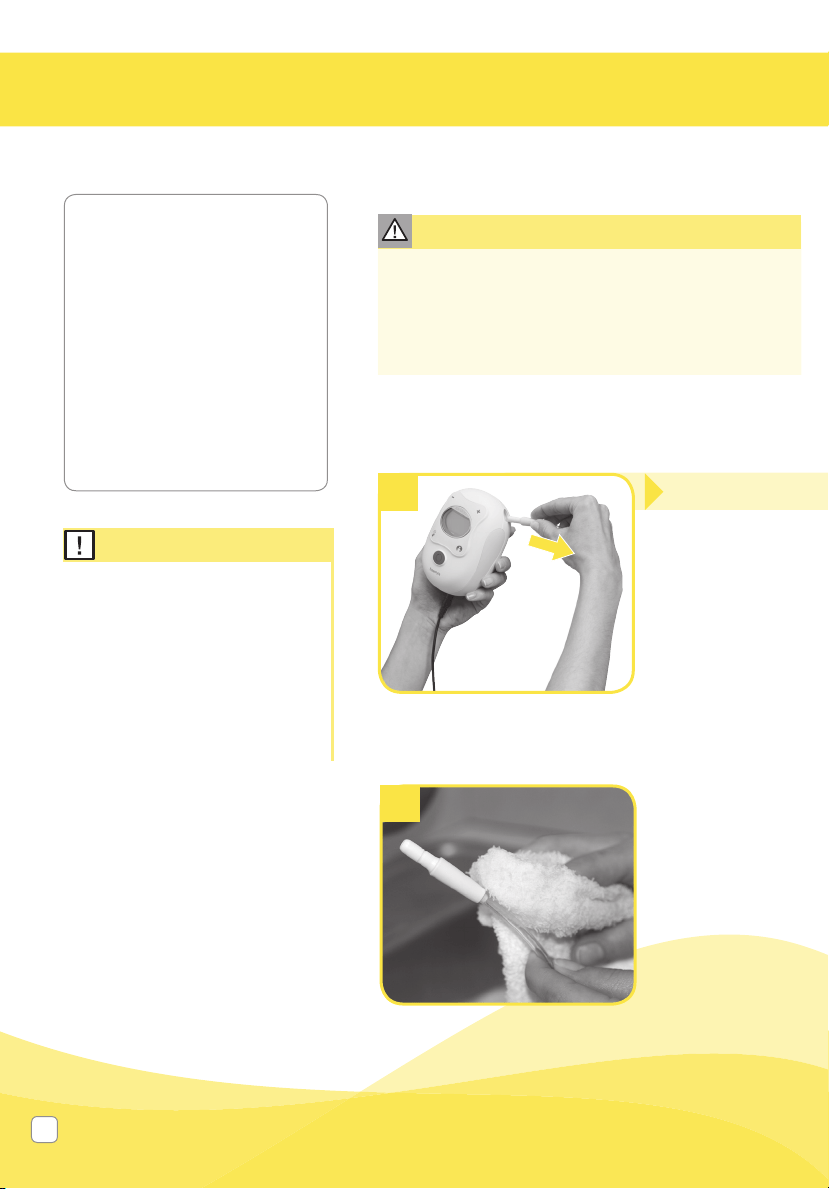
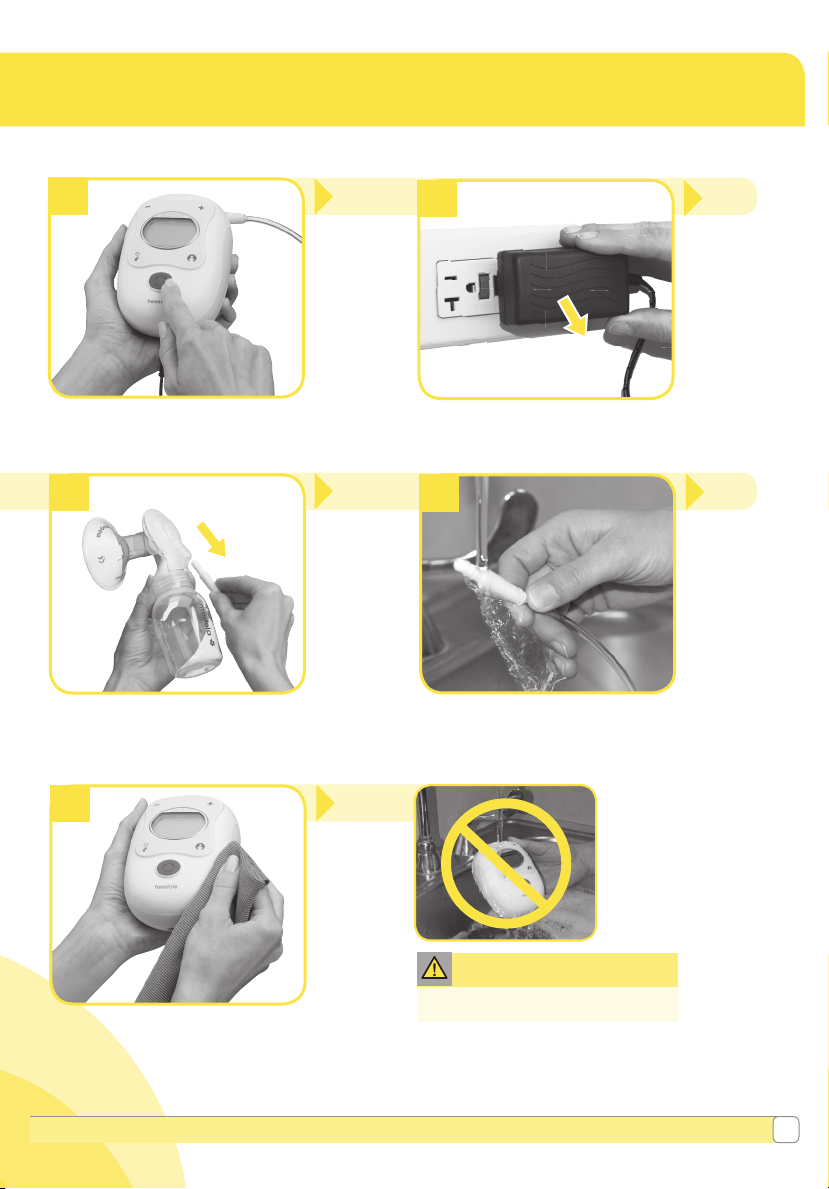
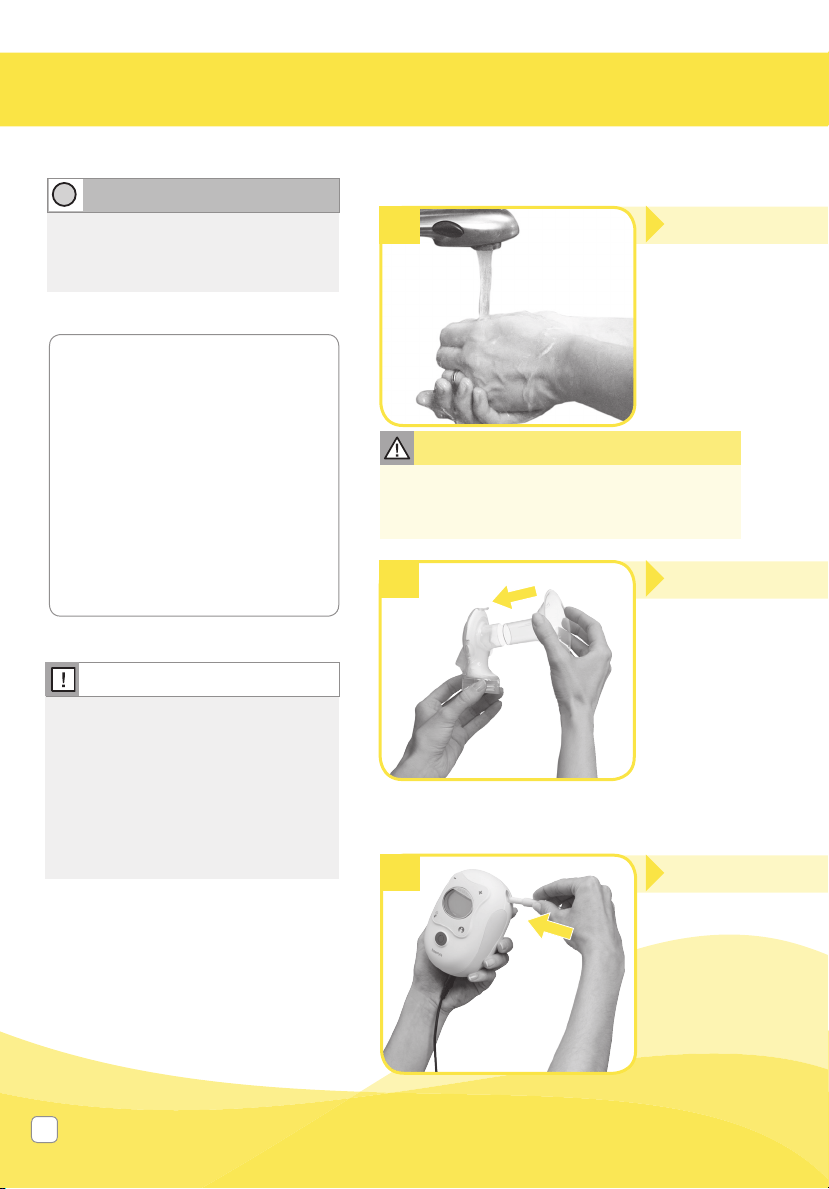
7A. Tubing care
7. Tubing & Motor Unit Care
Remove tubing by pulling straight
out of tubing ports. Do not wiggle or
pull tubing at an angle.
• Wash tubing in warm soapy water.
• Rinse tubing with clear water.
• Shake out water droplets and hang to air dry.
Supplies needed:
• Mild dish soap
• Clean dish cloth
• Clean sink or bowl
• Drinking quality water
Parts needed:
• Tubing
• Motor unit
Inspect tubing after each pumping session.
1
5
4
1
2
Questions? Visit www.medela.com or call us at 1-800-435-8316.
17
Unplug breastpump from power
source.
Rinse tubing in cool water to
remove residue.
Warning
Do not immerse the pump in water;
do not run water over the pump.
Wipe pump unit with a clean,
damp cloth.
Remove tubing from breastshield.
Turn off breastpump.
7B. Cleaning the motor unit

18
Common pumping questions & answers
How often should you pump?
A breastpump is a replacement for when you are separated from your baby. It is important to
pump when the baby would normally be breastfeeding. For example, a working mother may
pump 2-3 times during an 8 hour working day.
How long should your pumping session last?
Pumping times can vary from mother to mother, usually from 15 minutes to 30 minutes.
How should your breasts feel before and after pumping?
Before pumping, your breasts will have a fi rm, heavy feeling. After pumping, your breasts should
feel soft and there should be no fi rm areas. Firm areas could indicate that the breast is not
draining all over. See below for more information.
• While some discomfort may be felt when fi rst using a breastpump, using a breastpump should
not cause pain.
• If you are experiencing discomfort at the base of the nipple due to rubbing of your breast tissue
with the breastshield tunnel, use of a lubricant such as Tender Care
TM
Lanolin may be benefi cial.
• For assistance with correct breastshield sizing and comfort please visit
www.medelabreastshields.com or see a lactation consultant / breastfeeding specialist.
Caution
8. Breastfeeding Information
Questions? Visit www.medela.com or call us at 1-800-435-8316.
19
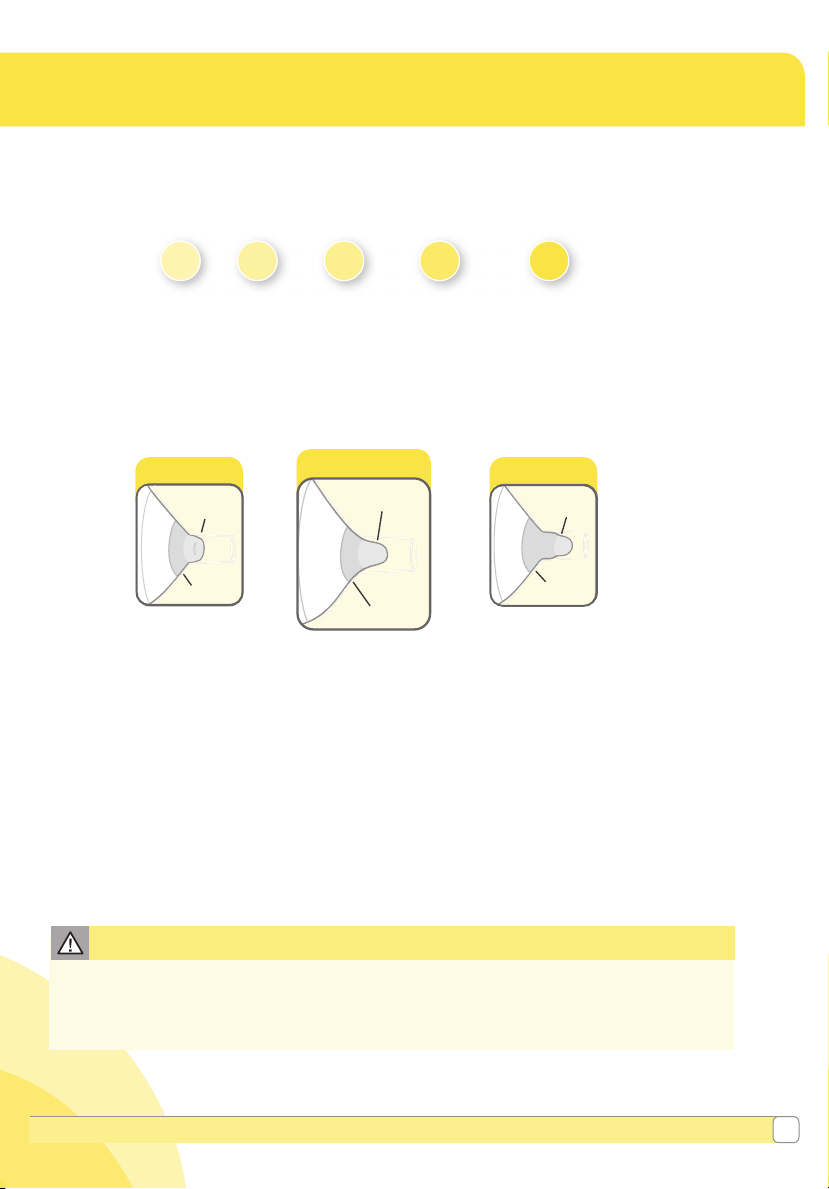
9. PersonalFit
TM
Sizing
Caution
Too Small
Nipple
Areola
Nipple
Areola
Nipple
Areola
Correct Fit
Nipple
Areola
Nipple
Areola
Nipple
Areola
Too Large
Nipple
Areola
Nipple
Areola
Nipple
Areola
• While some discomfort may be felt when fi rst using a breastpump, using a breastpump
should not cause pain. If you are unsure about breastshield sizing, please contact a
healthcare professional or breastfeeding specialist who can help you get a proper fi t.
1. Medela’s PersonalFit
™
sizing
Pumping should not hurt. For maximum comfort and pumping effi ciency, Medela offers fi ve
breastshield sizes.
Visit MedelaBreastshields.com to view the full guide to help you determine your optimal size based on
your nipple diameter.
2. Test your breastshield size
1. Start with the 24 mm that came with your pump, or the size determined by measuring.
2. Center nipple and gently hold breastshield against your breast.
3. Adjust for Maximum Comfort Vacuum™, to achieve optimum suction level.
4. Refer to images while pumping in expression.
3. Should you try a new size?
• Does your nipple rub sides of tunnel, to the point of causing discomfort?
• Do you see excessive areola being pulled into tunnel?
• Do you see any redness?
• Is your nipple or areola turning white?
• Do you feel unexpressed milk after pumping?
If you answered “YES” to any of these questions, consider trying a new size by following the
measuring instructions above.
If you are still unsure if you selected the correct size, see a lactation consultant, breastfeeding
specialist, or visit MedelaBreastshields.com for assistance in choosing the right size breastshield.
36
mm
27
mm
30
mm
24
mm
21
mm
• Nipple rubs along
side of tunnel
• Try a larger size
• Nipple is centered
and moves freely
• Nipple and excessive
areola are pulled into
the tunnel
• Try a smaller size

10A. Charging and operating your pump
10B. Battery operation
• Follow the exact order of the steps.
• Only use the power adaptor supplied with the Freestyle
®
Breastpump.
• Make sure the voltage of the power adaptor is compatible with the power source.
• Do not use force to push the battery into the battery compartment.
Warning
There are 2 ways to power your pump:
Power Adaptor
• Locate adaptor in bag.
• Plug into pump.
• Plug into wall.
Rechargeable Battery
• Locate battery in bag.
• Insert battery in pump by following
instructions on page 19.
• Charge battery uninterrupted for
24 hours.
Power adaptor
connected to socket
Battery charge status
Battery fully charged, approx.
3 hours expression time remaining
fl ashing
20 min. expression time remaining.
Battery removed from motor unit
fl ashing
Low battery, needs charging
“bAtt”
fl ashing
Initial charge and charging after
removing the battery
(up to 24 hours charging time)
“bAtt”
Appears on display before fi rst use
Will not fl ash when pump is
plugged in to power outlet
Battery charge status codes
Before fi rst use, “bAtt” appears
in the display. Fully charge the
battery until the battery indicator
stops fl ashing and “bAtt”
disappears.
1
1 2
20
10. Powering Your Pump
Note
Before fi rst use, fully charge the battery for 24 hours uninterrupted.

Silver tab remains on battery
and should point upward when
battery is inserted.
4
Open the battery compartment on the
back of the pump by sliding the battery
cover in the direction of the arrow.
2
Insert the battery in the direction
shown by “This side down” so that
the gold contacts on the battery
touch the gold contacts in the
device.
3
Close the battery compartment
by sliding the battery cover in the
direction of the arrow.
5
Tip
Do not remove the battery from the
motor unit. Removing the battery requires a
charging time of up to 24 hours.
T
Questions? Visit www.medela.com or call us at 1-800-435-8316.
21
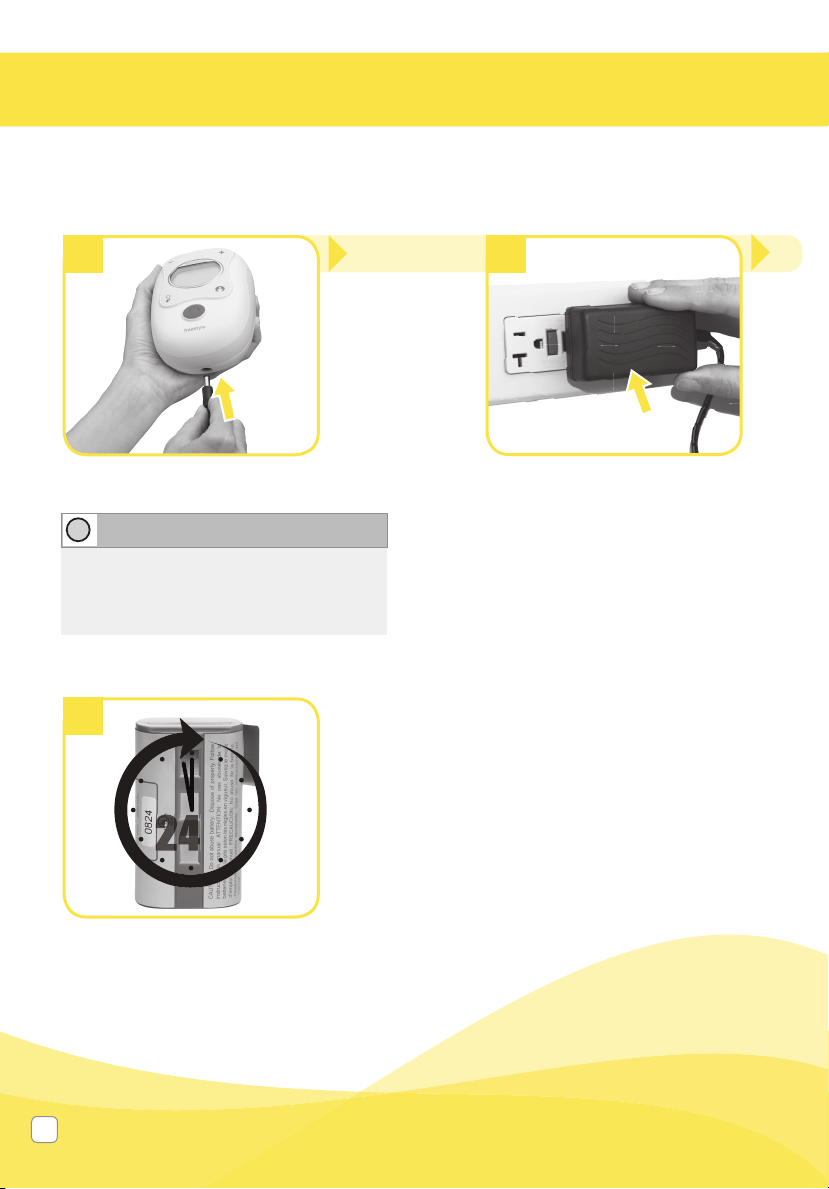
10. Powering Your Pump (cont.)
Plug the power adaptor into
the power outlet.
7
Charge the battery for 24 hours
uninterrupted.
8
24
hours
Plug the power adaptor cord into
the motor unit.
6
Tip
The pump can be used during charging.
The battery is charging as soon as the
pump is connected to a power source
(even if the pump is not in use).
T
22
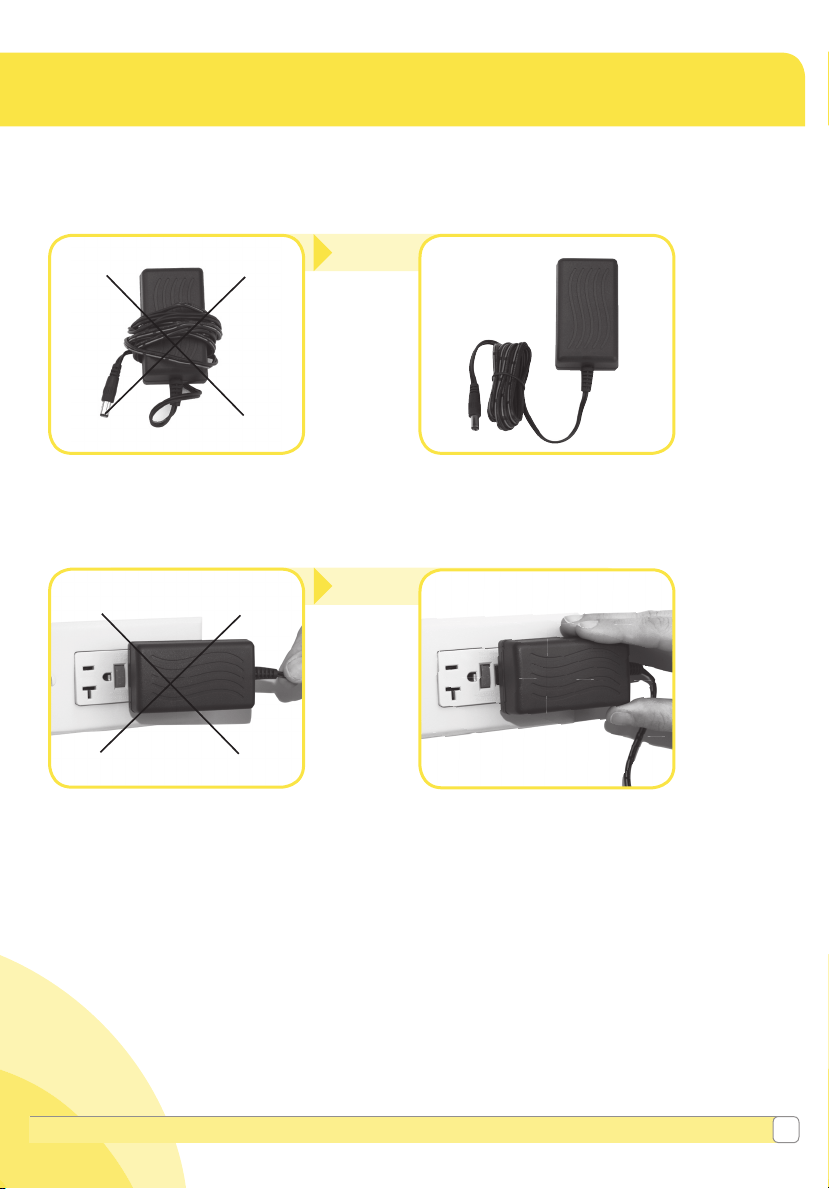
10C. Power adaptor care
To care for your adaptor be sure to follow these storage directions.
10D. Traveling outside of the U.S.
While travelling internationally, we recommend purchasing a Universal Power Plug Adaptor
(not included). Please consult with the country you are visiting to fi nd out what type of adaptor
will work best. Freestyle’s A/C adaptor is two-pronged and does not require a grounded outlet.
Freestyle has a Lithium ION Battery which may be restricted from the country you are visiting.
Please consult with the country you are visiting to fi nd out if there are any restrictions that
pertain to travelling with Lithium ION.
For information about traveling with your breastpump and expressed breastmilk,
visit www.TSA.gov.
Do not wrap cord of power
adaptor around the plug body.
Do not unplug power adaptor by
pulling on the cord.
Correct!
Correct!
Questions? Visit www.medela.com or call us at 1-800-435-8316.
23
1
4
Note
• Use Authentic Medela Spare Parts
only. See page 6 for details.
• Check pump kit components for
wear or damage before use and
replace if necessary.
• All components must be completely
dry before use for proper
performance and to prevent damage
to the pump.
Tip
Carry out all the steps with care and
assemble the pump kit correctly for
optimum performance.
T
24
Push the breastshield onto
the connector.
11. Assembly of Pump Kit
Insert the long tubing into
the motor unit.
7
Wash hands thoroughly with soap and water
before touching breastpump, kit and breasts and
avoid touching the inside of containers or lids.
Caution
Parts Needed:
• Tubing
• Motor Unit
• Breastshields
• Breastmilk bottles
• Lids
• Connectors
• Membranes
• Back caps

2
5
3
6
Questions? Visit www.medela.com or call us at 1-800-435-8316.
25
Carefully insert the light
yellow membrane into the base
of the breastshield connector.
Ensure bottom fl ap on membrane
is inserted into connector.
Fasten the back cap to the
connector.
Make sure that all three connection
points (top and side) snap together.
Screw bottle into connector. Insert the short tubing into
the back cap as far as it will go.
You will see a small gap at the
bottom of the breastshield assembly
when assembled correctly (inset).
Accurately assembled kit.
8
1
2
3
26
Glossary of Terms
12. Pumping
2-Phase
Expression
®
Through research, Medela found that babies nurse in 2 Phases – Stimulation
and Expression. This research is the basis for the technology in all Medela
breastpumps.
Stimulation Phase Fast sucking/pumping rhythm to stimulate milk fl ow.
Expression Phase
Slower sucking/pumping rhythm for gentle and effi cient milk removal after milk
has started fl owing.
Maximum Comfort
Vacuum
™
Highest vacuum setting where pumping still feels comfortable. Different for
every mother.
1x Motor unit
On/Off button
Reduce
vacuum
Increase
vacuum
Let-down
button
Speed/vacuum
level indicator
(L:1-L:9)
Memory
function key
Memory “on”
indicator
Timer
Power
indicator
Battery indicator
Expression
phase vacuum
level indicator
Stimulation
phase vacuum
level indicator
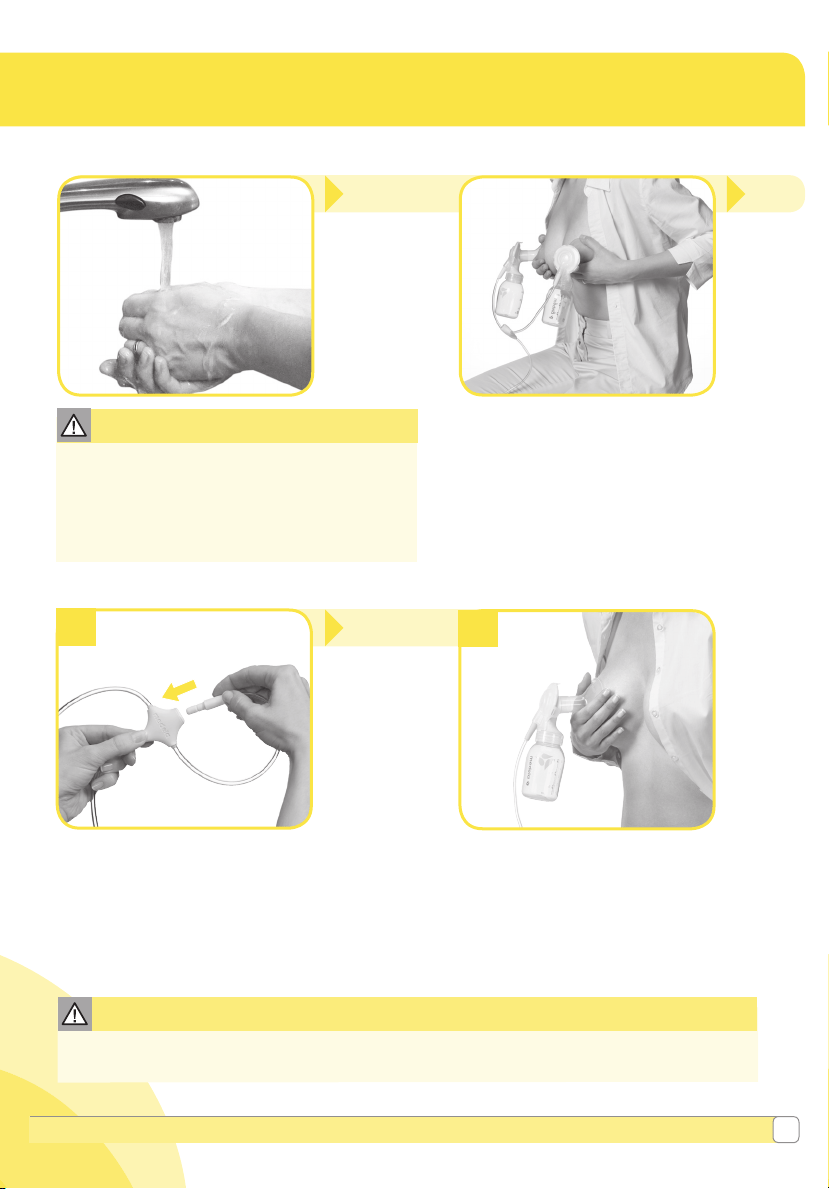
12C. Single pumping
• Make sure tubing is not kinked or pinched while pumping.
• Do not hold the pump kit by the bottle. This can lead to blockage of the milk ducts and engorgement.
Caution
1
2
• Wash hands thoroughly with soap and water before
touching breastpump, kit and breasts and avoid
touching the inside of containers or lids.
• Always inspect breastshields, connectors, valves,
membranes and tubing prior to use for cleanliness.
Caution
12A. Before pumping 12B. Double pumping
Place the breastshields on your breasts
so that your nipples are properly
centered in the tunnels.
Questions? Visit www.medela.com or call us at 1-800-435-8316.
27
Insert the unused short tubing into the
tubing holder.
Hold the breastshield onto your breast with
your thumb and index fi nger. Support your
breast with the palm of your hand.
Refer to Section 9 for breastshield
sizing information.
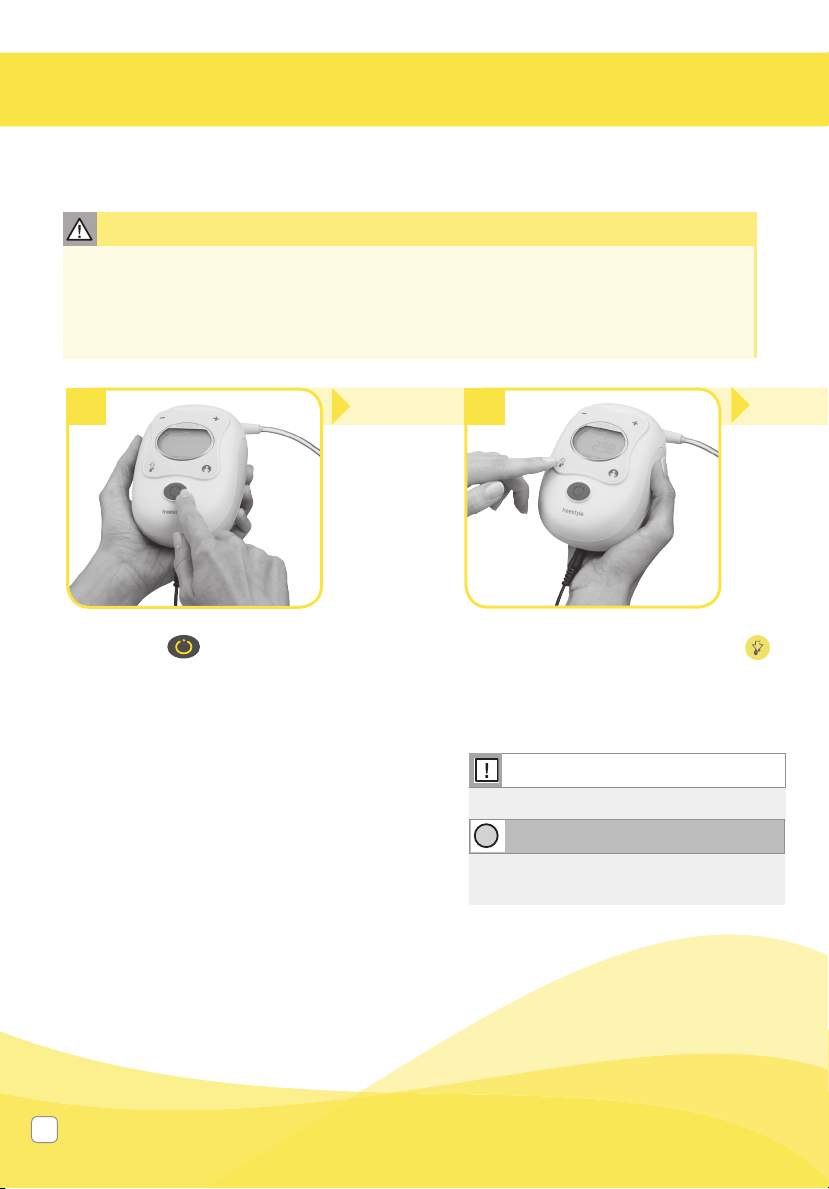
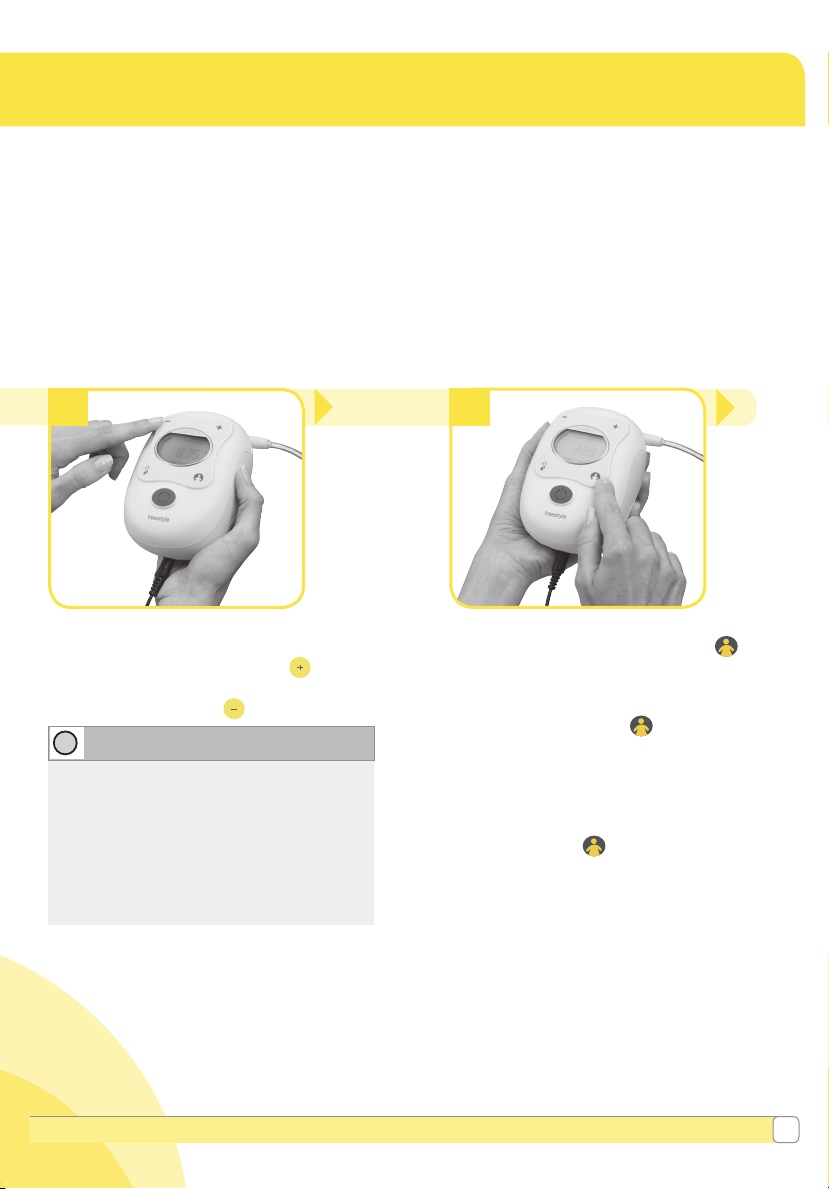
12D. Pump operation
12. Pumping (cont.)
Turn on the breastpump by pressing the
on/off button .
• Timer will start immediately.
• Adjust the speed/vacuum to a comfortable
level.
• Freestyle
®
will begin pumping in the
stimulation phase. The pump will
automatically switch to the expression
phase after 2 minutes.
• The sound of the pump will change
between phases.
If your milk starts to fl ow sooner than
2 minute s, pre ss the let-down button
to switch to the expression phase.
Make sure that the milk is fl owing
into the bottle properly.
• Contact your healthcare professional or breastfeeding specialist if you can express only
minimal or no milk or if expression is painful. See Section 8 for more information.
• Do not try and express with vacuum that is too high and uncomfortable (painful). The pain,
along with potential breast and nipple trauma, may decrease milk output.
Caution
1 2
Note
Only fi ll the bottle to the 150 mL mark.
Tip
• Do not tilt or overfi ll containers when
pumping.
T
28
Set and use the memory function
Press and hold the memory button
for three seconds during the
expression phase to save pumping
pattern.
• The memory indicator on the
display will fl ash three times when
saved and the pump will beep three
times.
• Finish expression as usual.
• To use saved pattern, press the
memory button once when you
begin a pumping session.
If you are experiencing low or no
suction, refer to Troubleshooting,
Section 16.
Find your Maximum Comfort Vacuum
™
Once you are pumping in the expression
phase, increase speed/vacuum until
pumping feels slightly uncomfortable (not
painful), then decrease slightly.
3 4
Tip
• Research has shown that women pump
more effi ciently – get more milk in less
time – when pumping at Maximum Comfort
Vacuum in the expression phase.
• You should reassess your Maximum
Comfort Vacuum throughout your pumping
experience because it can change during
the different stages of lactation.
T
Questions? Visit www.medela.com or call us at 1-800-435-8316.
29
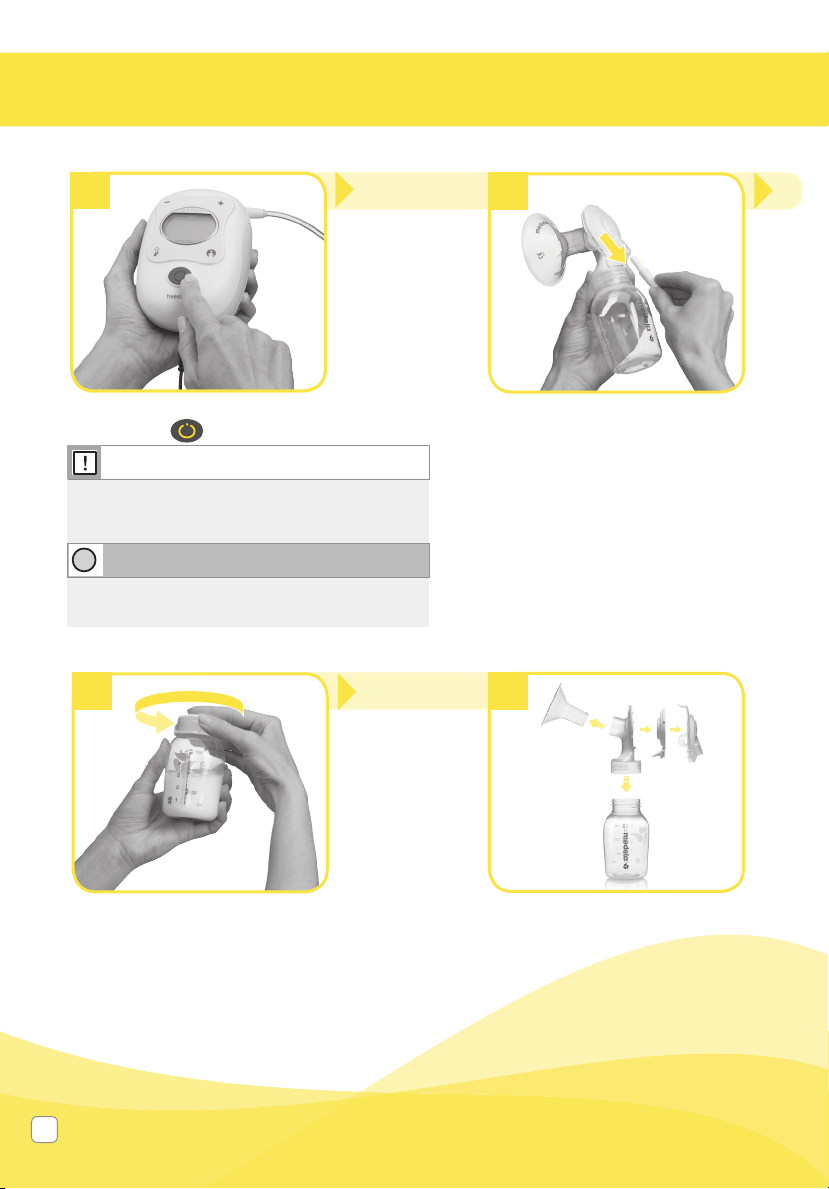
Disassemble and clean per
Section5.
5
7 8
6
Note
Always disconnect Freestyle
®
from the power
source after expression (except if the battery is
charging).
Tip
Freestyle switches off automatically if it has been
running for 30 minutes with no interruptions.
T
30
When your pumping session is over,
unplug tubing from the back of the
breastshield(s) before setting down
the bottles.
Close the bottle with a lid.
• See Section 14 for breastmilk storage
instructions.
12. Pumping (cont.)
Turn off the breastpump by pressing the
on/off button .

You can pump hands-free
using the Easy Expression
hands-free bustier!
13. Hands-Free Pumping with Easy Expression
TM
• Gives you the freedom to multi-task while pumping
• Works great with your Medela Freestyle Breastpump
• Easy to wear and wash
• Available in multiple sizes and colors, see the
back of a package or visit www.medela.com for
sizing information.
• Zipper closure makes it easy to slip on over your
nursing bra
To purchase visit www.shopmedela.com or your
local retailer.
(The literature within your breastpump package contains a
special offer for Easy Expression)
Questions? Visit www.medela.com or call us at 1-800-435-8316.
31

32
• The Freestyle cooler bag requires one contoured ice pack (#87092, included) for cooling
up to four 5 oz bottles of breastmilk for up to 10 hours in a room temperature environment
inside of your pump bag and up to 8 hours in cooler stored outside of pump bag.
• As soon as you are fi nished pumping, place the breastmilk bottle or breastmilk storage
bag in the cooler bag with the ice pack.
• Transfer breastmilk bottles or breastmilk storage bag to the refrigerator or freezer once you
are home.
14. Storing Breastmilk
Storing breastmilk in Freestyle
®
cooler bag
Questions? Visit www.medela.com or call us at 1-800-435-8316.
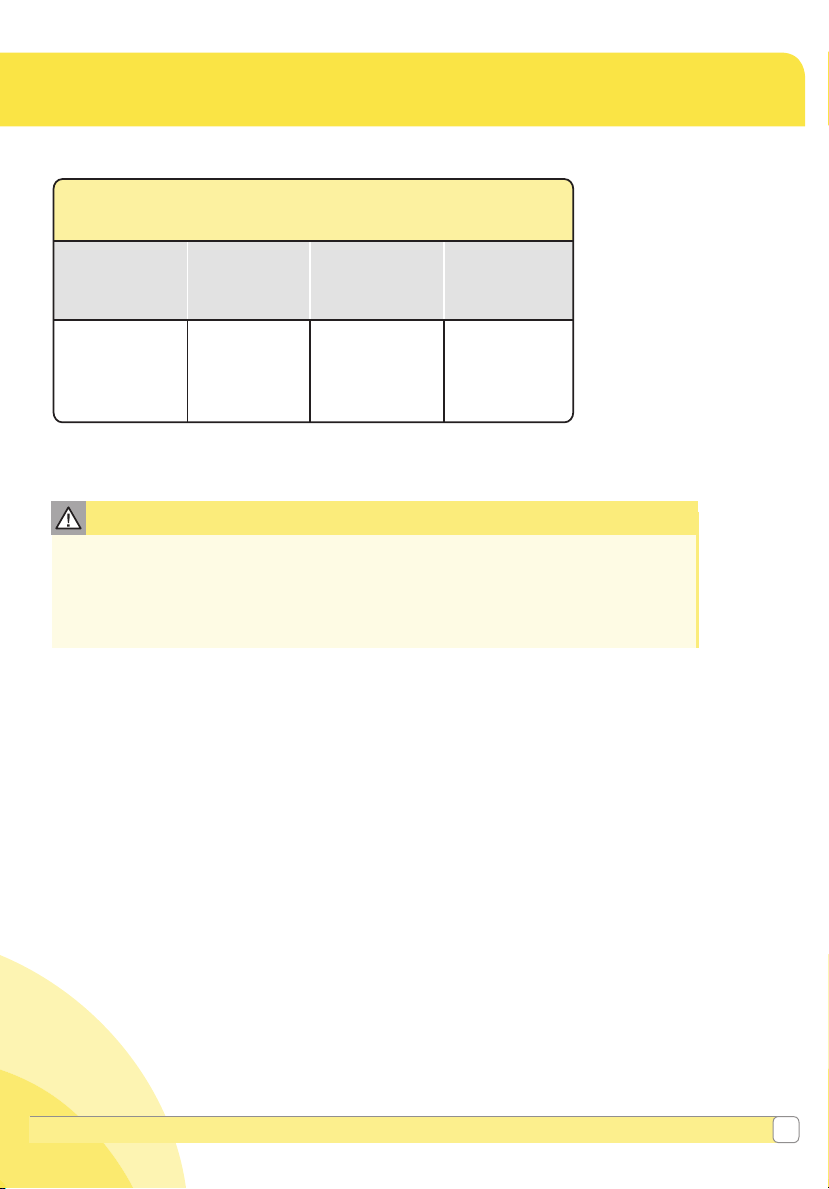
33
Room
Temperature
Cooler with
Ice Pack
Refrigerator Freezer
Freshly Expressed Breastmilk
Storage Guidelines
(For Healthy Term Babies)
4–6 hours
at 66–78 °F
(19–26 °C)
24 hours
at 59 °F
(15 °C)
3–8 days
at 39 °F
or lower
(4 °C)
6–12
months
0–
-
4 °F
(-18–
-
20 °C)
References: www.BreastmilkGuidelines.com
Caution
15A. Preparing breastmilk
• Do not thaw frozen breastmilk in a microwave or in a pan of boiling water.
• Do not microwave breastmilk. Microwaving can cause severe burns to baby’s mouth from
hot spots that develop in the milk during microwaving. (Microwaving can also change the
composition of breastmilk.)
• Thaw breastmilk overnight in the refrigerator. Thawed breastmilk is safe in the
refrigerator for 24hours. Do not refreeze thawed breastmilk.
• Quickly thaw breastmilk by holding the bottle under warm running water.
• Place the sealed bottle in a bowl of warm water for 20minutes to bring it to
body temperature.
• If you are adding expressed breastmilk to a container of already frozen breastmilk,
make sure to add a lesser amount than the already frozen amount.
15B. Feeding breastmilk
It is recommended that breastfeeding is well established prior to bottle feeding your baby.
• Always inspect the bottle, nipple and other components immediately before and after each
use. If nipple appears cracked or torn, discontinue use immediately.
• To prevent possible choking hazard, test strength of nipple by pulling on bulb
portion of the nipple.
• Do not attempt to enlarge the nipple hole.
• Infants must not be bottle fed without adult supervision.
• Nipple should not be used as a pacifi er.
For additional breastmilk collection & storage information,
please visit www.BreastmilkGuidelines.com.
15. Preparing & Feeding Breastmilk
34
Low or no suction Component Check
• Disassemble breastshields, breastshield bodies, membranes, and back caps.
• Inspect all components for chips or cracks.
• Clean and dry all components per Section 5.
• Reassemble per Section 11. Make sure the components are dry before
assembling.
• Check that tubing is not kinked.
• When single pumping, check that unused end is correctly stored in the
tubing holder.
Connection Point Check
Inspect following connection points to ensure attachment is secure
• Back cap snapped at all 3 connection points.
• Tubing adaptor to back cap.
• Tubing adaptor to pump.
• If suction is not improved, contact Medela Customer Service at
1-800-435-8316.
Battery charging
“bAtt” symbol on the
display
T
TIP: Avoid removing the battery as this will reset the battery indicator and
requires a recharging time of up to 24 hours.
If the battery does not charge and there is no battery symbol on the display verify
that the battery is inserted properly. See Section 10.
“bAtt” symbol on the display
• If a “bAtt” symbol appears on the display, it indicates it is in initial charge mode
or the battery was removed and reinserted. Plug in and charge for 24 hours
uninterrupted.
Flashing Battery Symbol outline and 1 bar
• Low battery. Plug in and charge battery.
Battery Indicator fl ashes with 4 bars
• Disconnect the power cord and remove the battery for at least 10 seconds.
Reinsert the battery and plug in to charge for 24 hours.
• If you still have a problem, contact Medela Customer Service at 1-800-435-
8316.
Pump doesn’t run or
power on
• If the Power Adaptor Symbol fl ashes or you see “Err” and hear 3 beeps, contact
Medela Customer Service at 1-800-435-8316.
No “let-down” or
breastmilk expression
• Ensure your breastpump is assembled correctly and there is suction.
• Relax and take a 10-15 minute break if let-down is not achieved.
• Consult with your healthcare professional or breastfeeding specialist if expression
does not occur after 2 consecutive pumping sessions.
16. Troubleshooting

Questions? Visit www.medela.com or call us at 1-800-435-8316.
35
Pump becomes wet • Unplug the power adaptor from the socket.
• Turn off the pump.
• Do not place the pump upside down. Control panel must face upwards.
• Store the pump in a warm, dry place for 24 hours.
Water or breastmilk in
tubing
NOTE: To prevent damage to the Freestyle Breastpump, water or breastmilk
seen in tubing should be cleaned and dried per the instructions in Tubing
Cleaning Section 7A before use.
T
TIP: The Freestyle Breastpump has a membrane in the breastshield
assembly to prevent milk from fl owing into the tubing during pumping.
If you have not resolved the problem with your breastpump or you have further questions,
please contact Medela Customer Service at 1-800-435-8316 or fi ll out the contact us form at
www.medelabreastfeedingus.com.

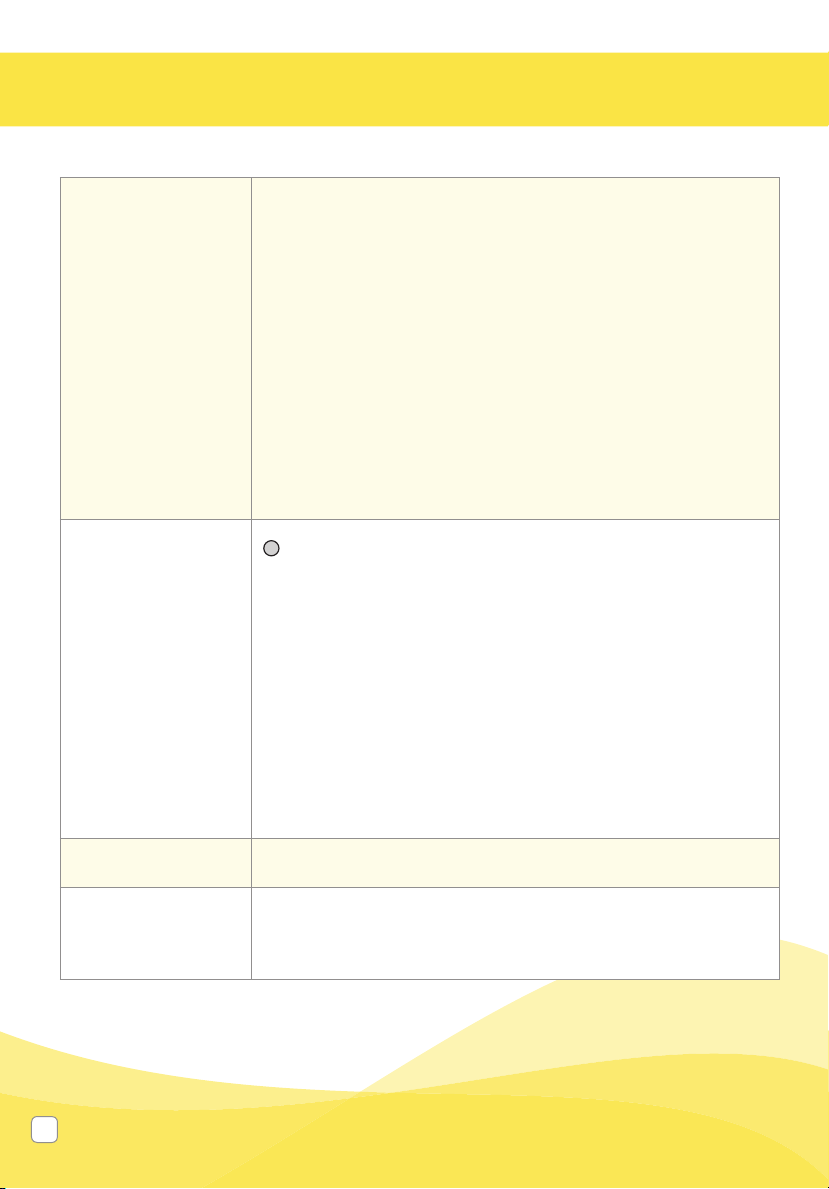
Supplemental Information
Following are some common breastfeeding related conditions. If you experience any of these
symptoms, contact a healthcare professional or breastfeeding specialist.
Symptom Potential Causes
Engorgement Breasts are hard and uncomfortable, possibly
with reddened areas.
Milk not draining properly from breast.
Milk can drain back into the tissue
causing areas to swell and become
tender.
Blocked/Plugged
Ducts
Area of breast will look reddened and may be
tender to touch.
Milk not being drained from a specifi c
duct. The area becomes ‘clogged’ up
and milk is then prevented from fl owing.
Mastitis It often follows engorgement but can just
occur suddenly. The initial symptoms are
similar to fl u – fatigue, headache and muscle
aches, fever and localized breast tenderness.
It can be in one or even both breasts and
needs immediate treatment.
A bacterial infection in the breast tissue
which is often accompanied by cracked
nipples.
A healthcare professional or Breastfeeding Specialist can give you guidance in breastfeeding your baby and
using a breastpump. Their guidance is valuable in terms of the lifetime of health benefi ts for both you and your
baby. A listing of Lactation Professionals are available at www.medelalocator.com or call 1-800-TELL-YOU
(1-800-835-5968).
36
17. Supplemental Information
Questions? Visit www.medela.com or call us at 1-800-435-8316.
37
This product is warranted by Medela, Inc. to the original retail purchaser to be free from
defects in material and workmanship for the period of 1 year for pump mechanism and
rechargeable battery (90 days for other parts and accessories) from the date of purchase. In
the event of a defect, Medela will repair or, at Medela’s option, replace this product, without
charge for such replacement parts or labor. Purchaser shall bear all expense for returning this
product to Medela. This warranty does not apply to any product used commercially or which
has been subjected to misuse, abuse or alteration.
ANY AND ALL IMPLIED WARRANTIES, INCLUDING THE WARRANTY OF
MERCHANTABILITY, ARE LIMITED TO A DURATION OF 3 YEARS FROM DATE OF
PURCHASE. SOME AREAS DO NOT ALLOW LIMITATIONS ON HOW LONG AN IMPLIED
WARRANTY LASTS, SO THE ABOVE LIMITATIONS MAY NOT APPLY TO YOU. THIS
WARRANTY GIVES YOU SPECIFIC LEGAL RIGHTS AND YOU MAY ALSO HAVE OTHER
RIGHTS WHICH VARY FROM STATE TO STATE OR IN YOUR COUNTRY.
Before you make a claim under this warranty, it may save time and expense to call Medela
Customer Service (toll free) at 1-800-435-8316. You may also call this number for additional
information concerning this warranty. If you wish to make a claim under this warranty, you
must return this product to Medela with a return authorization number received from Medela
Customer Service, prepaid, together with your dated bill of sale or other proof of purchase
and a brief statement of the problem to the following address:
Medela, Inc. – Returns, Door 4501
1101 Corporate Dr.
McHenry, IL 60050
ATTENTION: RETURNS
Call fi rst for authorization number. Returns not accepted without an authorization number.
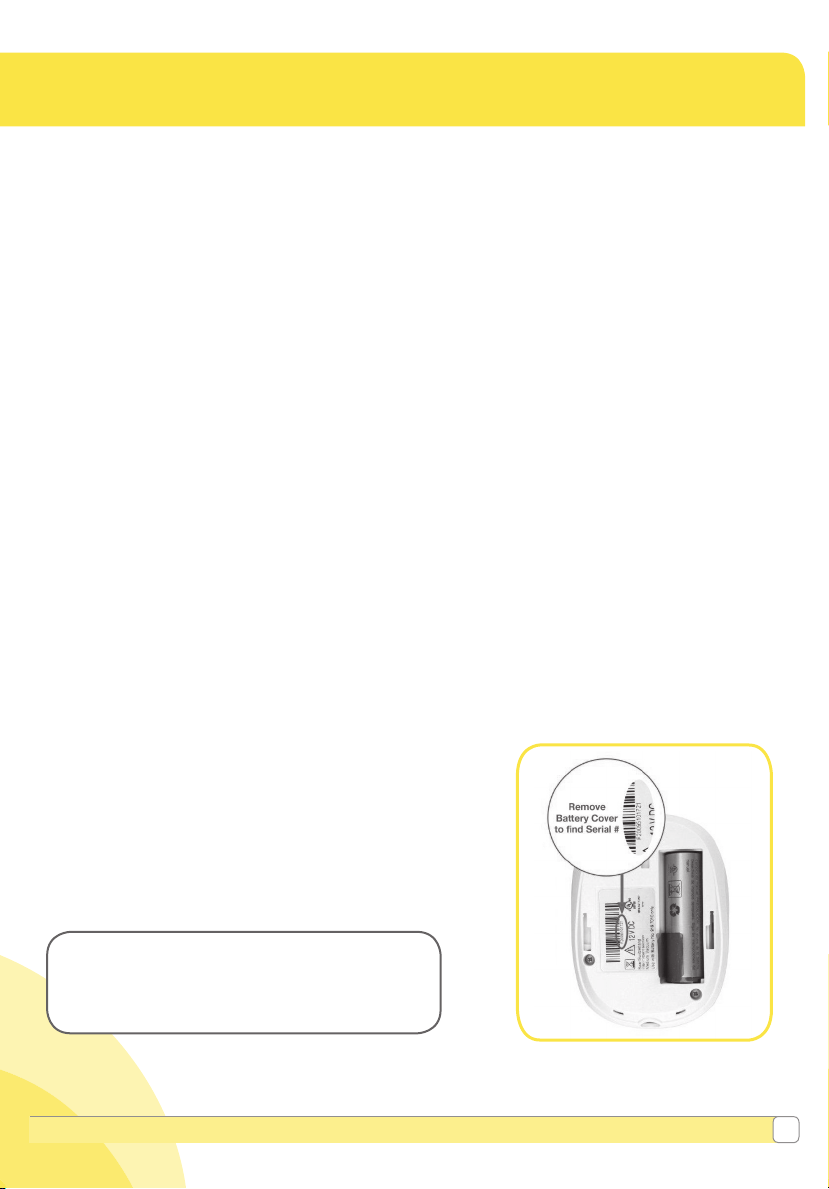
We recommend recording your serial number here
when you fi rst open your pump for easy reference
when contacting Medela Customer Service.
Your serial number can be found on the sticker
under the battery cover.
SERIAL NUMBER:
18. Warranty
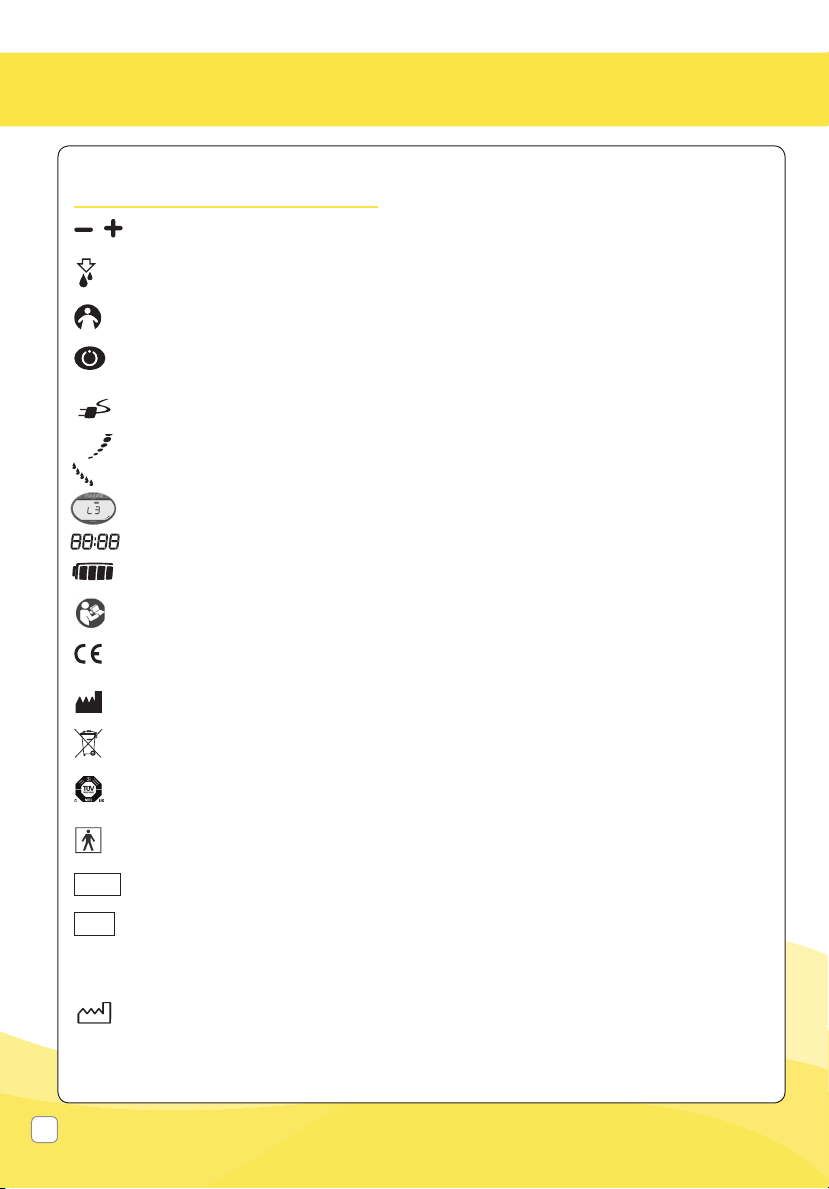
Symbols on the device
Decrease/increase vacuum (+/-)
Let-down button
Memory button
On/off
Power Indicator
Vacuum level indicator, Expression Phase
Vacuum level indicator, Stimulation Phase
Speed/Vacuum level indicator (L:1 - L:9)
Timer indicator
Battery indicator
This symbol indicates to follow instructions for use.
0123
This symbol indicates the compliance with the essential requirements of the Council
Directive 93/42/EEC of 14 June 1993 concerning medical devices.
This symbol indicates the manufacturer.
This symbol indicates do not dispose the device together with unsorted municipal
waste (in accordance with local regulations).
This symbol indicates the compliance with additional USA and Canada safety
requirements for medical electrical equipment.
This symbol indicates compliance with international requirements for protection
from electric shock. (Type BF applied parts.)
REF
This symbol indicates manufacturer's catalog number of the battery.
SN
This symbol indicates manufacturer's serial number of the device.
IP22
This symbol indicates the protection against entrance of solid foreign objects and
against harmful effects due to the entrance of water.
This symbol indicates the date of manufacture (four digits for the year and
two digits for the month).
19. Meaning of Symbols
38
20. EMC / Technical Description
The Freestyle
®
breastpump needs special precautions regarding EMC (Electromagnetic
compatibility) and needs to be installed and put into service according to the EMC information
provided in these instructions for use. Wireless communications equipment such as wireless
home network devices, mobile phones, cordless telephones and their base stations, walkie-
talkies can affect the electric breastpump Freestyle and should be kept at least a distance 1.0 m
away from the equipment. Electromagnetic Compatibility (EMC, IEC 60601-1-2:2007, Table 1)
This device complies with part 15 of the FCC Rules. Operation is subject to the following two
conditions: (1) This device may not cause harmful interference, and (2) this device must accept
any interference received, including interference that may cause undesired operation.
Note
This equipment has been tested and found to comply with the limits for a Class B digital device,
pursuant to part 15 of the FCC Rules. These limits are designed to provide reasonable protection
against harmful interference in a residential installation. This equipment generates, uses and can
radiate radio frequency energy and, if not installed and used in accordance with the instructions,
may cause harmful interference to radio communications. However, there is no guarantee that
interference will not occur in a particular installation. If this equipment does cause harmful
interference to radio or television reception, which can be determined by turning the equipment
off and on, the user is encouraged to try to correct the interference by one or more of the
following measures:
• Reorient or relocate the receiving antenna.
• Increase the separation between the equipment and receiver.
• Connect the equipment into an outlet on a circuit different from that to which the
receiver is connected.
• Consult the dealer or an experienced radio/TV technician for help.
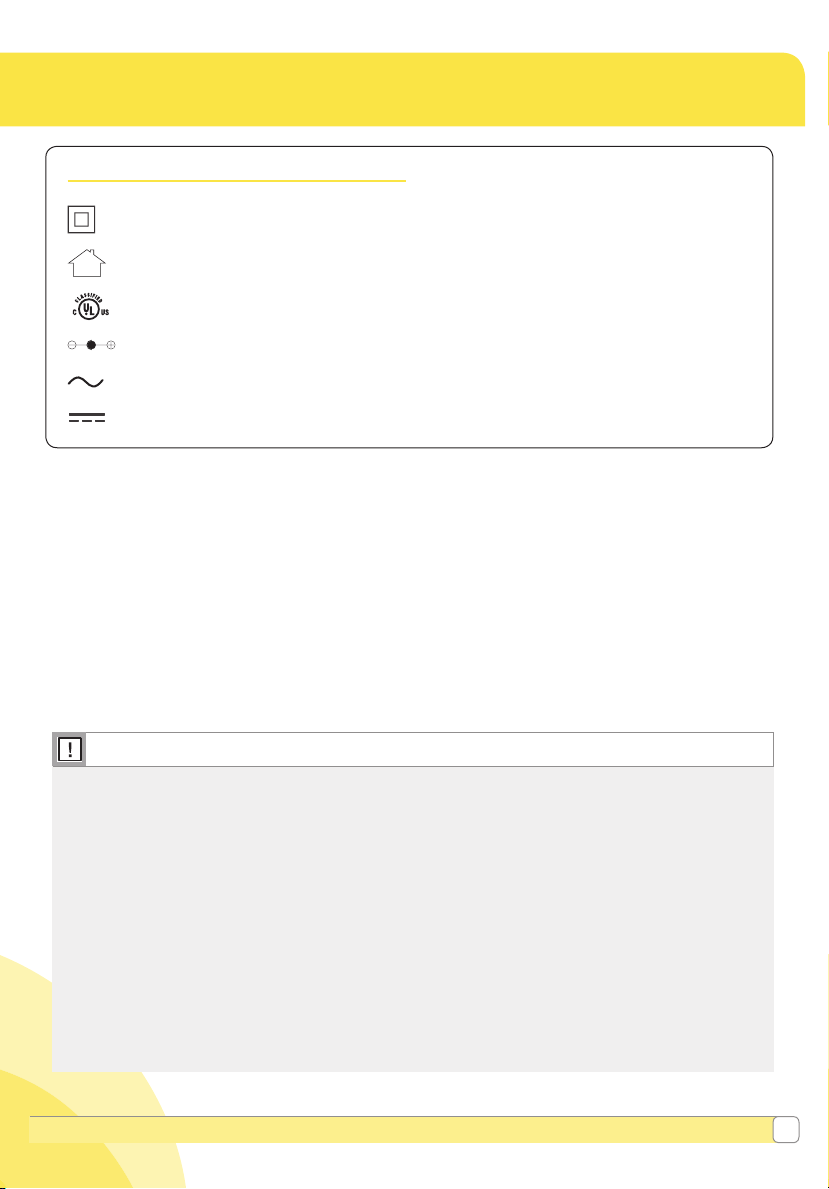
19. Meaning of Symbols
Symbols on the power adaptor
This symbol indicates that the power adaptor is a class II device.
This symbol indicates that the power adaptor is for indoor use only.
This symbol indicates the compliance with USA and Canada safety requirements.
This symbol indicates polarity of d.c. power connector.
This symbol indicates alternating current.
9 VDC
This symbol indicates direct current.
Questions? Visit www.medela.com or call us at 1-800-435-8316.
39

20. EMC / Technical Description (cont.)
Electromagnetic emissions
The electric breastpump Freestyle is intended for use in the electromagnetic environment
specifi ed below. The customer or the user of the electric breastpump Freestyle should assure
that it is used in such an environment.
Emission tests Compliance Electromagnetic environment – guidance
RF emissions
CISPR 11
Group 1
The electric breastpump Freestyle uses RF energy
only for its internal function. Therefore, its RF
emissions are very low and are not likely to cause
any interference in nearby electronic equipment.
RF emissions
CISPR 11
Class B
The electric breastpump Freestyle is suitable
for use in all establishments, including domestic
establishments and those directly connected to
the public low-voltage power supply network that
supplies buildings used for domestic purposes.
Harmonic emissions
IEC 61000-3-2
Class A
Voltage fl uctuations /
fl icker emissions
IEC 61000-3-3
Warning – The electric breastpump Freestyle should not be used adjacent to or stacked with
other equipment. If adjacent or stacked use is necessary, the electric breastpump Freestyle
should be observed to verify normal operation in the confi guration in which it will be used.
Warning
40

Electromagnetic immunity
The electric breastpump Freestyle
®
is intended for use in the electromagnetic environment
specifi ed below. The customer or the user of the electric breastpump Freestyle should
assure that it is used in such an environment.
Immunity test
IEC 60601
test level
Compliance
level
Electromagnetic
environment
– guidance
Electrostatic
discharge ( ESD )
IEC 61000-4-2
± 6 kV contact
± 8 kV air
± 6 kV contact
± 8 kV air
Floors should be wood,
concrete or ceramic tile.
If fl oors are covered with
synthetic material, the
relative humidity should
be at least 30%.
Electrical fast
transient / burst
IEC 61000-4-4
± 2 kV for power
supply lines
± 1 kV for input /
output lines
± 2 kV for power
supply lines
Mains power quality
should be that of a
typical commercial or
hospital environment.
Surge
IEC 61000-4-5
± 1 kV line( s ) to
line(s)
± 2 kV line( s ) to
earth
± 1 kV differential
mode
Mains power quality
should be that of a
typical commercial or
hospital environment.
Electromagnetic Compatibility (EMC, IEC 60601-1-2:2007, Table 2)
20. EMC / Technical Description (cont.)
Questions? Visit www.medela.com or call us at 1-800-435-8316.
41

Voltage dips, short
interruptions and
voltage variations
on power supply
input lines
IEC 61000-4-11
<5 % U
T
(>95 % dip in U
T
)
for 0,5 cycle
40 % U
T
(60 % dip in U
T
)
for 5 cycles
70 % U
T
(30 % dip in U
T
)
for 25 cycles
<5 % U
T
(>95 % dip in U
T
)
for 5 s
<5 % U
T
(>95 % dip in U
T
)
for 0,5 cycle
40 % U
T
(60 % dip in U
T
)
for 5 cycles
70 % U
T
(30 % dip in U
T
)
for 25 cycles
<5 % U
T
(>95 % dip in U
T
)
for 5 s
Mains power quality
should be that of a
typical commercial or
hospital environment.
If the user of the electric
breastpump Freestyle
requires continued
operation during power
mains interruptions, it is
recommended
that the electric
breastpump Freestyle
is powered from an
uninterruptible power
supply or a battery.
Power frequency
(50/60 Hz)
magnetic fi eld
IEC 61000-4-8
3 A/m 3 A/m
Power frequency
magnetic fi elds should be
at levels characteristic of a
typical location in a typical
commercial or hospital
environment.
NOTE U
T
is the a.c. mains voltage prior to application of the test level.
20. EMC / Technical Description (cont.)
42

Electromagnetic immunity
The electric breastpump Freestyle
®
is intended for use in the electromagnetic environment
specifi ed below. The customer or the user of the electric breastpump Freestyle should assure
that it is used in such an environment.
Immunity test
IEC 60601
test level
Compliance
level
Electromagnetic
environment – guidance
Portable and mobile RF
communications equipment
should be used no closer to any
part of the electric breastpump
Freestyle, including cables, than the
recommended separation distance
calculated from the equation
applicable to the frequency of the
transmitter.
Recommended separation distance
d = 1.2√P
d = 1.2√P 80 MHz to 800 MHz
d = 2.3√P 800 MHz to 2,5 GHz
where P is the maximum output
power rating of the transmitter
in watts (W) according to the
transmitter manufacturer and d is the
recommended separation distance in
metres (m).
Field strengths from fi xed RF
transmitters, as determined by an
electromagnetic site survey,
a
should be
less than the compliance level in each
frequency range.
b
Interference may occur in the vicinity of
equipment marked with the following
symbol:
Electromagnetic Compatibility (EMC, IEC 60601-1-2:2007, Table 4)
20. EMC / Technical Description (cont.)
3 Vrms
3 V/m
3 Vrms
150 kHz to
80 MHz
3 V/m
80 MHz to
2,5 GHz
Conducted RF
IEC 61000-4-6
Radiated RF
IEC 61000-4-3
Questions? Visit www.medela.com or call us at 1-800-435-8316.
43

a
Field strengths from fi xed transmitters, such as base stations for radio (cellular/cordless) tele-
phones and land mobile radios, amateur radio, AM and FM radio broadcast and TV broadcast
cannot be predicted theoretically with accuracy. To assess the electromagnetic environment due
to fi xed RF transmitters, an electromagnetic site survey should be considered. If the measured fi eld
strength in the location in which the electric breastpump Freestyle is used exceeds the applicable
RF compliance level above, the electric breastpump Freestyle should be observed to verify normal
operation. If abnormal performance is observed, additional measures may be necessary, such as
re-orienting or relocating the electric breastpump Freestyle.
b
Over the frequency range 150 kHz to 80 MHz, fi eld strengths should be less than 3 V/m.
Note 1 At 80 MHz and 800 MHz, the higher frequency range applies.
Note 2 These guidelines may not apply in all situations. Electromagnetic propagation is
affected by absorption and refl ection from structures, objects and people.
20. EMC / Technical Description (cont.)
44

Recommended separation distances between portable and mobile RF
communications equipment and the electric breastpump Freestyle
The electric breastpump Freestyle
®
is intended for use in an electromagnetic environment
in which radiated RF disturbances are controlled. The customer or the user of the electric
breastpump Freestyle can help prevent electromagnetic interference by maintaining a minimum
distance between portable and mobile RF communications equipment (transmitters) and the
electric breastpump Freestyle as recommended below, according to the maximum output power
of the communications equipment.
Rated maximum
output power of
transmitter W
Separation distance according to frequency of transmitter M
150 kHz to 80 MHz
d = 1.2√P
80 MHz to 800
MHz
d = 1.2√P
800 MHz to 2,5 GHz
d = 2.3√P
0,01 0.12 0.12 0.23
0,1 0.37 0.37 0.74
1 1.2 1.2 2.3
10 3.7 3.7 7.4
100 12 12 23
For transmitters rated at a maximum output power not listed above, the recommended
separation distance d in metres (m) can be estimated using the equation applicable to the
frequency of the transmitter, where P is the maximum output power rating of the transmitter
in watts (W) according to the transmitter manufacturer.
Note 1 At 80 MHz and 800 MHz, the separation distance for the higher frequency range applies.
Note 2 These guidelines may not apply in all situations. Electromagnetic propagation is affected
by absorption and refl ection from structures, objects and people.
Electromagnetic Compatibility (EMC, IEC 60601-1-2:2007, Table 6)
20. EMC / Technical Description (cont.)
Questions? Visit www.medela.com or call us at 1-800-435-8316.
45

Electromagnetic environments
Environment Locations General characteristics
Typical health care
Hospital, large clinic, doctor’s
o f fi c e
Partly controlled, covered
by the general requirements of
this collateral standard
Residential Doctor’s offi ce, small clinic
Not controlled, health care
professional present
Residential Home
Not controlled, health care
professional not normally
present
Transport, mobile
Car, aircraft (fi xed-wing and
helicopter), ambulance
Not controlled, wide variations,
critical receivers nearby, harsh
environments for ESD, RF,
electric and magnetic fi elds
Special
Operating theatre,
emergency room
Case-by-case examination
of environment
20. EMC / Technical Description (cont.)
46
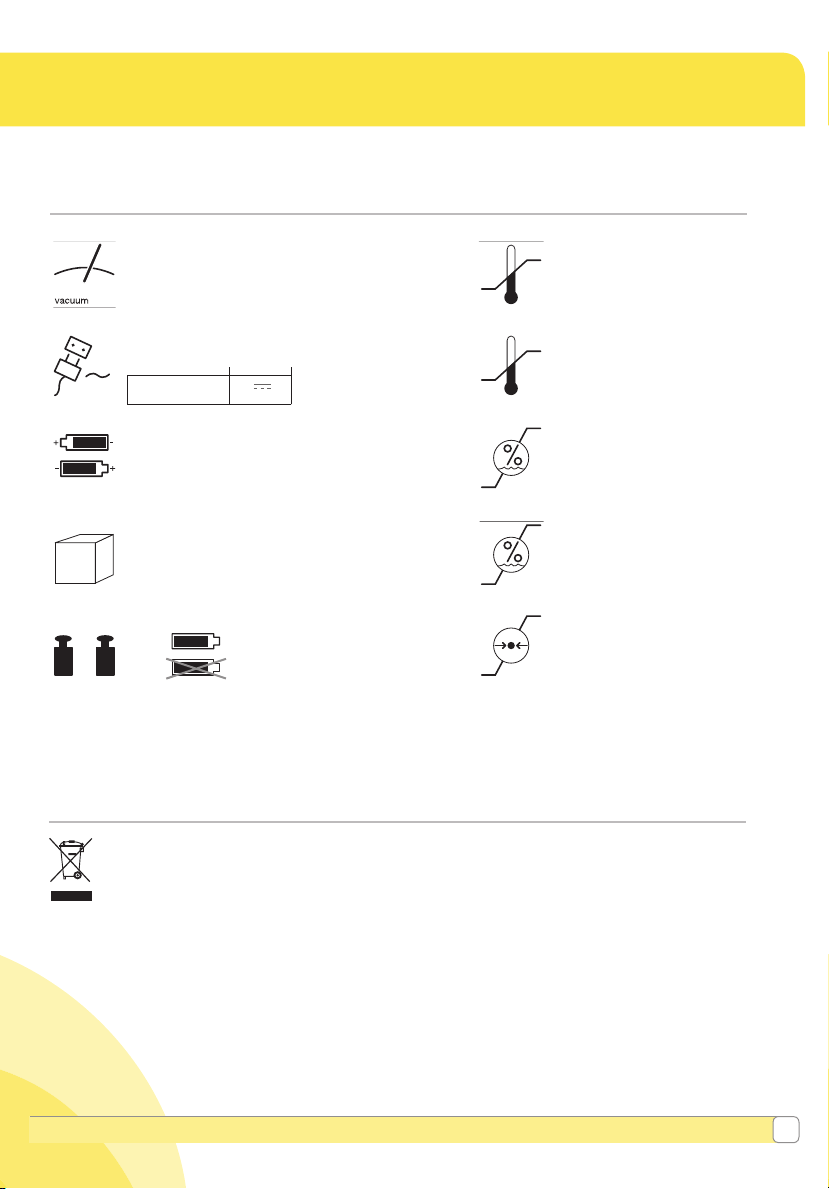
vacuum (approx.)
-20....-270 mmHg
-3....-35 kPa
45 … 120 cpm
Operation
Betrieb
En Service
Utilizzo
Gebruik
Transport / Storage
Transport / Lagerung
Transport / Stockage
Transport / Stoccaggio
Transport / Opslag
7.2 V, 2150mAh
Li-Ion
Operation
Betrieb
En Service
Utilizzo
Gebruik
122 x 90 x 58
Transport / Storage
Transport / Lagerung
Transport / Stockage
Transport / Stoccaggio
Transport / Opslag
370 g
270 g
kPa
In Out
100-240V~ 50/60 Hz
12 V
1 A / 1.5 A
°C
+40
+5
°C
+60
-20
93
15
93
15
kg
106
70
intermittend
21. Technical Specifications/Disposal
Technical Specifi cations
Disposal
The unit is made of various metal and plastics. Before disposal, the device is to
be rendered unusable and it must not be disposed of as unsorted municipal waste
in accordance with local regulations. Use your local return and collection system
for waste electrical and electronic equipment (incl. batteries). Improper disposal
may have harmful effects on the environment and on public health.
Questions? Visit www.medela.com or call us at 1-800-435-8316.
47

Printed in the USA. Medela, Freestyle, Symphony and 2-Phase Expression are registered trademarks of Medela Holding AG.
Quick Clean, Micro-Steam, Easy Expression, Maximum Comfort Vacuum and PersonalFit are trademarks of Medela, Inc.
1908454 A 0115 © 2015 Medela, Inc.
Medela AG
Lättichstrasse 4b
6341 Baar, Switzerland
www.medela.com
Assembled by Medela, Inc.
1101 Corporate Drive
McHenry, IL 60050, USA
Ph: (800) 435-8316 / (815) 363-1166
Email: customer[email protected]
www.medela.com