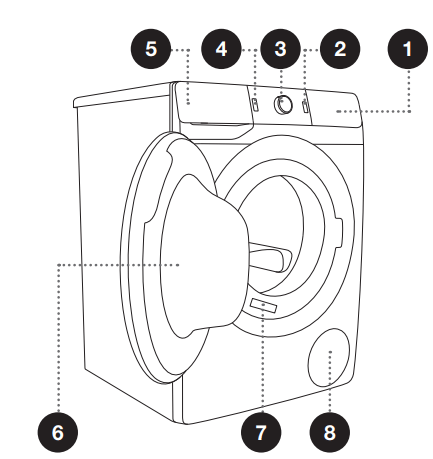
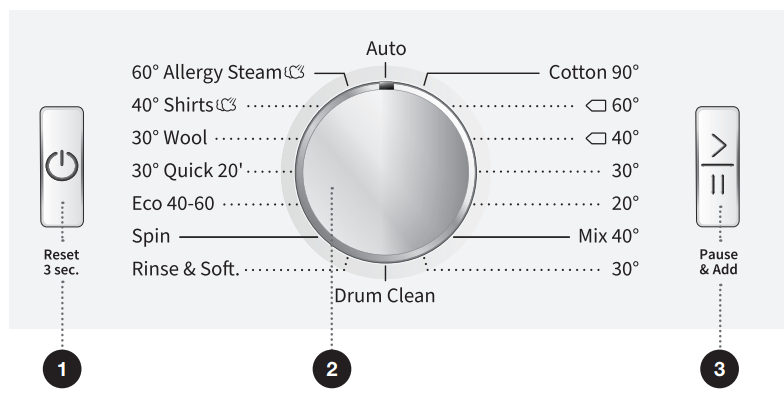
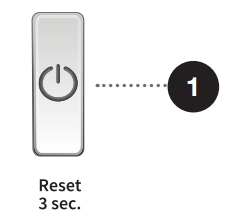
ON/OFF/RESET BUTTON Use this button to turn the washing machine on and off, and to reset the washing programme.
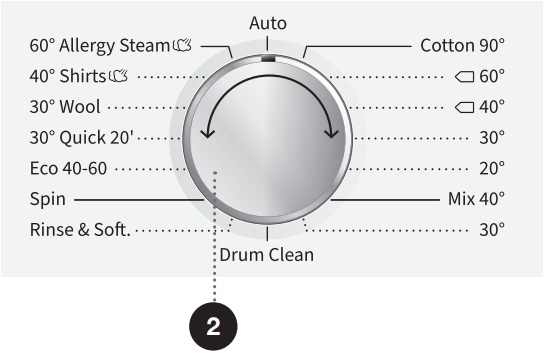
PROGRAMME SELECTOR KNOB
START/PAUSE BUTTON Use this button to start or pause a programme. Upon start-up or during pause, the button backlight will flash; when the programme is started and in progress, it will be lit continuously.
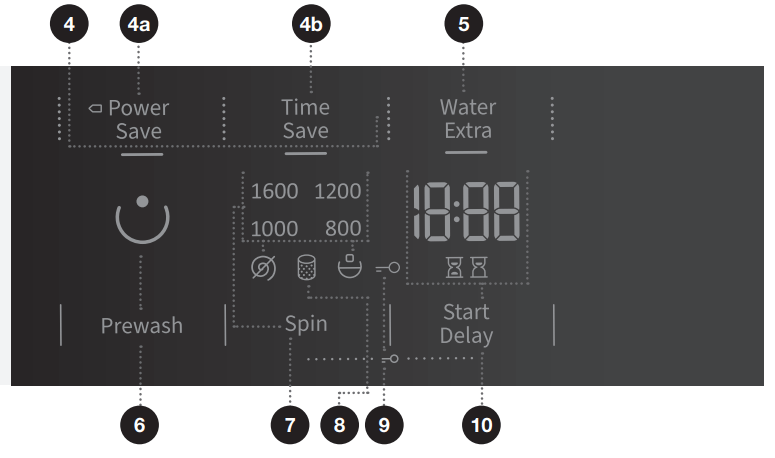
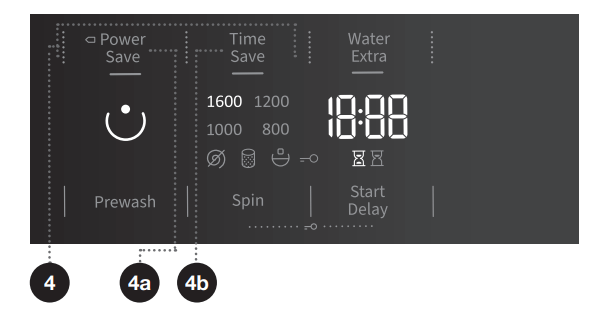
WASHING MODE 4a POWER SAVE 4b TIME SAVE
WATER EXTRA (HIGH WATER LEVEL)
PREWASH
SPIN (SPINNING RATE 1600/DRAIN /PUMP STOP Option to set the spinning rate 8
CLEAN THE PUMP FILTER symbol lighting
CHILD LOCK symbol lighting Press the positions 7+10 and hold them for 3 seconds.
START DELAY Option to set a start delay
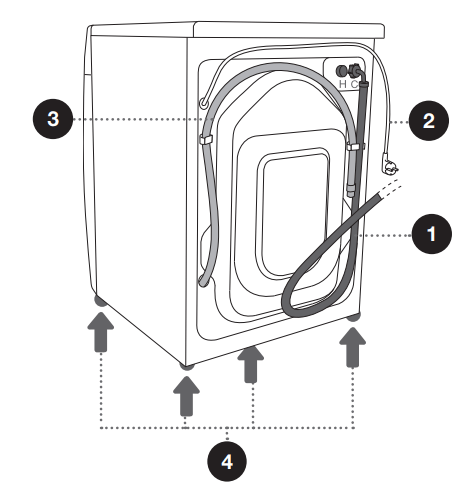
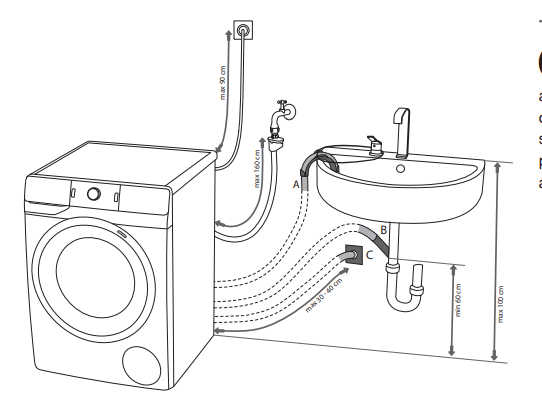
CONNECTING TO WATER SUPPLY
Attach the hose to the water tap by screwing it onto the thread.
For normal washing machine operation, the pressure in the water mains should be between 0.05 and 0.8 MPa (0,5 - 8 bar). Minimum dynamic water pressure can be determined by measuring the water flow. In 15 seconds, 3 litres of water should flow from a fully open tap.
If your model has connections for both hot and cold water, then connect one hose to the cold water supply (blue wing nut or blue mark on the hose) and the other one to the hot water supply (red wing nut or red mark on the hose), as indicated on the back of the washing machine. Connections are labelled with letters C and H (C = cold, H = hot). Warm water (mixture of hot and cold water) is only added for programmes at 40 °C or higher.
Tighten the water supply hose by hand, firmly enough for the hose to have a good seal (max. 2 Nm). After connecting the hose, the seal must be checked for any leaks. Do not use pliers or similar tools when connecting the hose as this could damage the nut thread.
Only use the water supply hose supplied with the appliance. Do not use any used or other hoses.
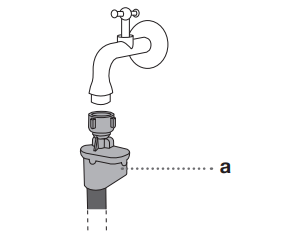
AQUA STOP(ONLY WITH SOME MODELS)
If an internal tube or hose is damaged, a shut-off system is activated that cuts the water supply to the washing machine. In such case, the control glass (a) will turn red. Replace the water supply hose.
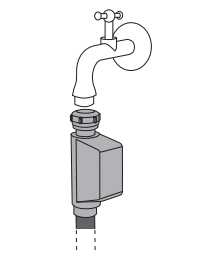
TOTAL AQUA STOP(ONLY WITH SOME MODELS)
If an internal tube or hose is damaged and if water is present on the bottom of the washing machine, a shut-off system is activated that cuts the water supply to the washing machine. In this case, the washing process will be stopped, water supply will be cut off, and the washing machine will switch on the pump and signal an error.
Do not dip the water supply hose with the Aqua stop system in water as it contains an electric valve.
When connecting the water supply hose, make sure to connect it in a way that allows adequate and unobstructed water supply
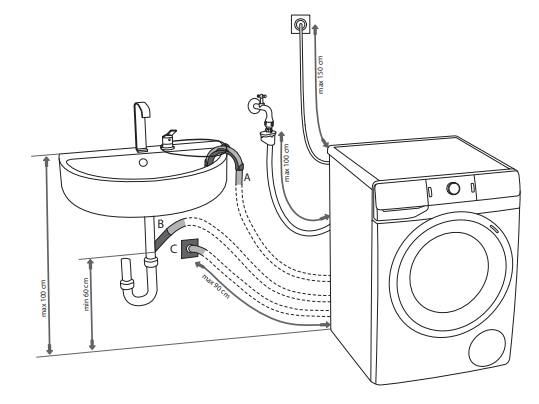
CONNECTING AND SECURING THE WATER DISCHARGE HOSE
Feed the water discharge hose into a washbasin or a bathtub, or connect it directly to a drain (discharge hose minimum diameter 4 cm). The vertical distance from the floor to the end of the discharge hose may be no more than 100 cm and no less than 60 cm. It can be attached in three ways (A, B, C).
A. Discharge hose end may be placed over a washbasin or a bathtub. B Use a string fed through the opening in the elbow support to attach the hose and prevent it from slipping to the floor.
B. Discharge hose may also be attached directly to the washbasin drain.
C. Discharge hose can also be attached to a wall drain with a trap; such trap should be properly installed to allow cleaning.
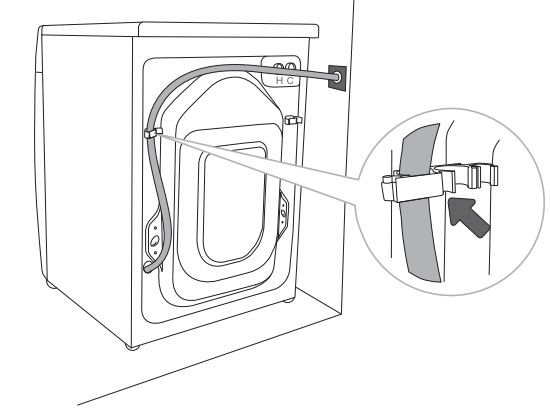
D. The discharge hose has to be attached and affixed to the pin on the back of the washing machine, as shown in the figure.
If the discharge hose is not correctly attached, safe and correct washing machine operation cannot be ensured.
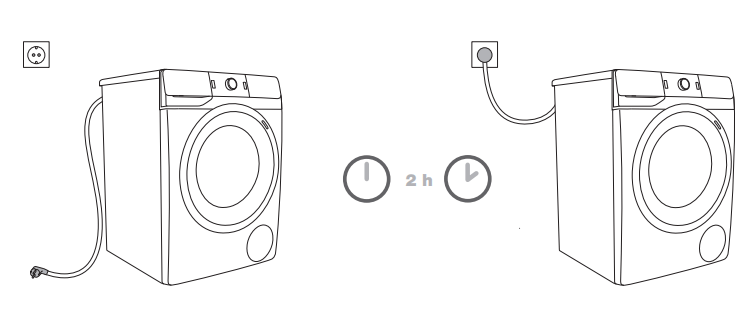
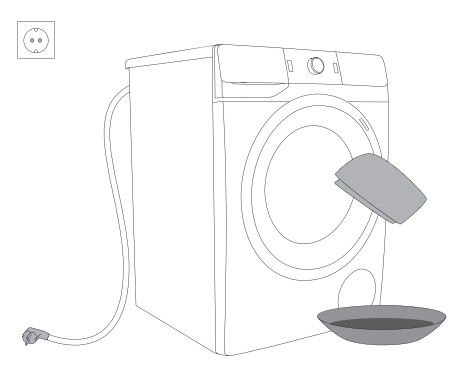
CONNECTING THE APPLIANCE TO THE POWER MAINS
Connect the washing machine to a grounded power outlet. After installation, the wall outlet should be freely accessible. The outlet should be fitted with an earth contact (in compliance with the relevant regulations).
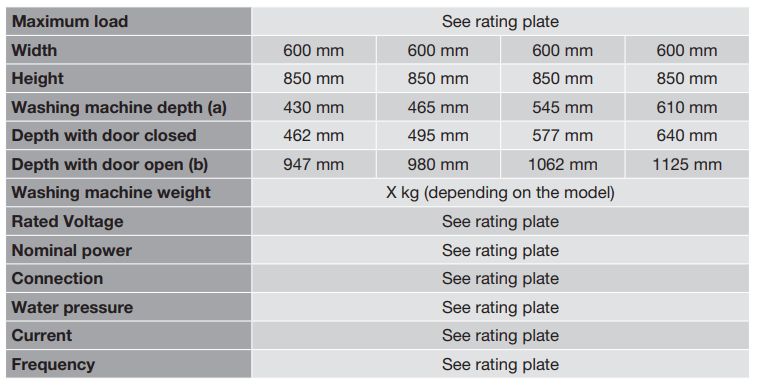
Information on your washing machine is indicated on the rating plate (see chapter »WASHING MACHINE DESCRIPTION/Technical information«).
Do not connect the washing machine to an electrical outlet intended for an electric shaver or hair dryer.
Any repair and maintenance pertaining to safety or performance should be done by trained experts.
A damaged power cord may only be replaced by a person authorized by the manufacturer.
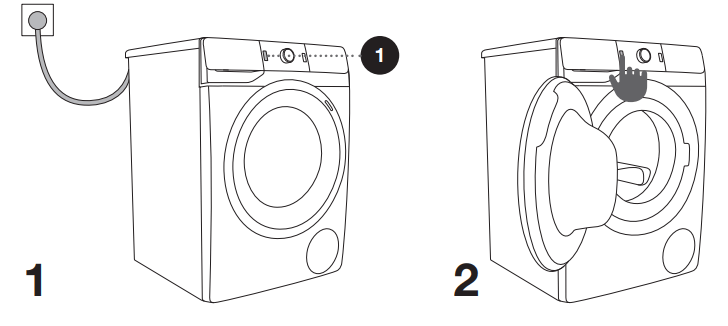
BEFORE USING THE APPLIANCE FOR THE FIRST TIME
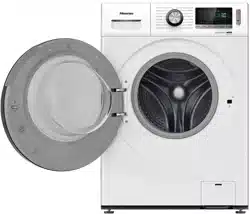
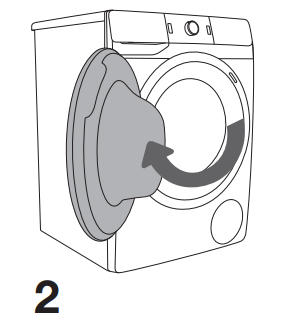
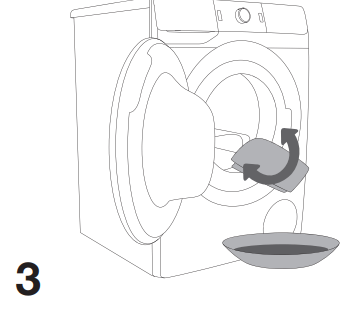
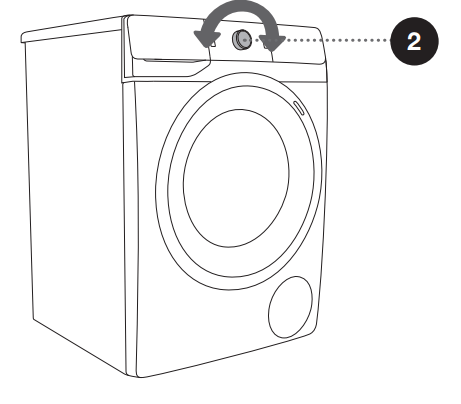
Make sure the washing machine is disconnected from the power mains; then, open the door towards you (figures 1 and 2).
Before first use, clean the washing machine drum with a soft moist cotton cloth and water, or use the Cotton 90°C programme. There should be no laundry in the washing machine drum; the drum should be empty (figures 3 and 4).
WASHING PROCESS, STEP BY STEP (1–7)
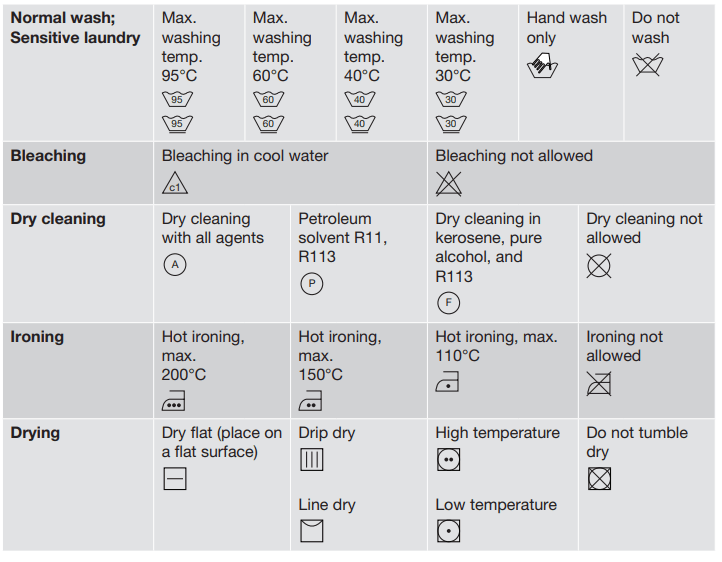
Step 1: Heed the labels on the laundry
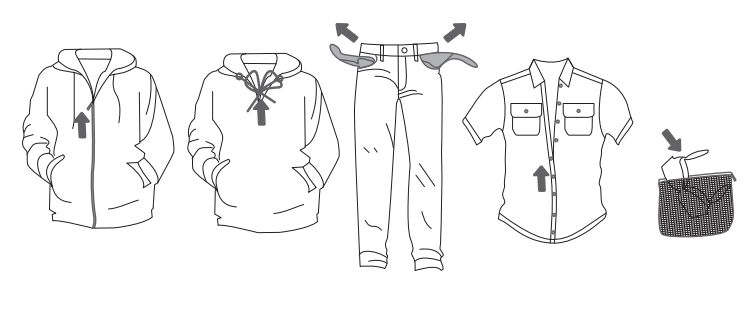
Step 2: Preparing the washing process
1. Sort the laundry by type of fabric, colour, soiling, and allowed washing temperature (see PROGRAMME TABLE).
2. Wash the laundry that sheds a lot of fibre or lint separately from other laundry.
3. Close the buttons and zippers, tie any ribbons, and turn the pockets inside out; remove any metal clips that could damage the laundry and washing machine interior, or clog the drain.
4. Place very sensitive clothes and small items in a special-purpose laundry washing bag. (The special purpose laundry bag is available as an optional accessory.)
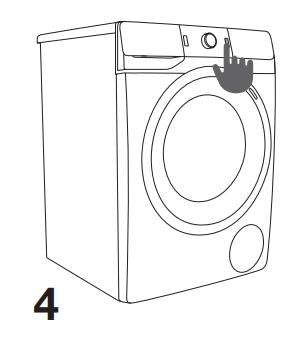
SWITCHING ON THE WASHING MACHINE
Use the power cord to connect the washing machine to power mains, and connect the washing machine to water supply. Press the (1) ON/OFF/RESET button to switch on the washing machine (figures 1 and 2)
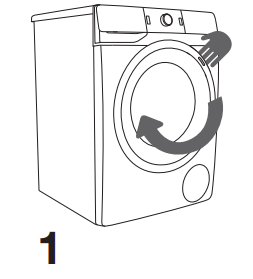
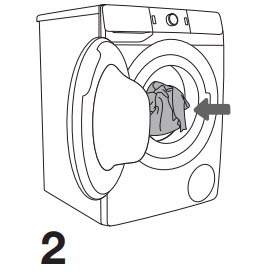
LOADING THE WASHING MACHINE
Open the washing machine door by pulling the handle towards you (figure 1). Insert the laundry into the drum (after making sure the drum is empty) (figure 2).
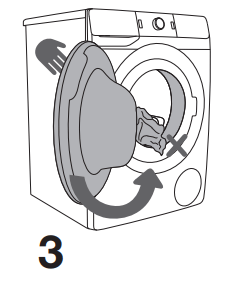
Make sure that no garment is stuck between the door and the rubber gasket. Close the washing machine door (figure 3).
Do not overload the drum! See PROGRAMME TABLE and observe your nominal load as indicated on the rating plate.
If the washing machine drum is too full, the laundry will not be washed as thoroughly.
Step 3: Choosing the washing programme
Choose the programme by rotating the programme selector knob (2) to the left or to the right (depending on the type of laundry and how heavily soiled it is). See PROGRAMME TABLE.
During operation, the programme selector knob (2) will not rotate automatically.
Washing programmes are comprehensive programmes that include all washing stages, including softening and spinning (this does not apply to Partial programmes).
Partial programmes are independent programmes. Use them when you feel you do not need the entire washing programme.
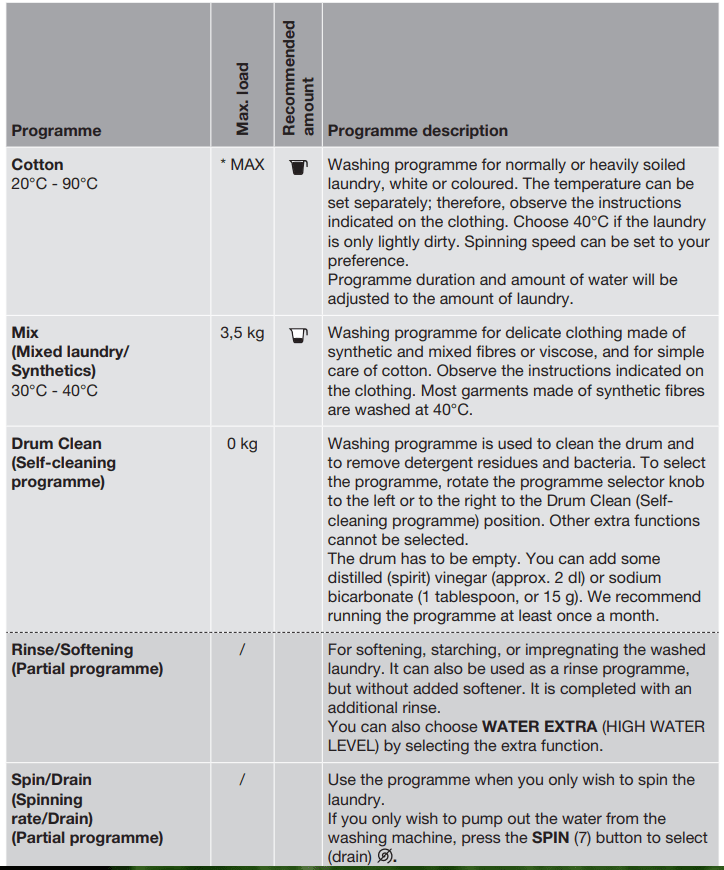
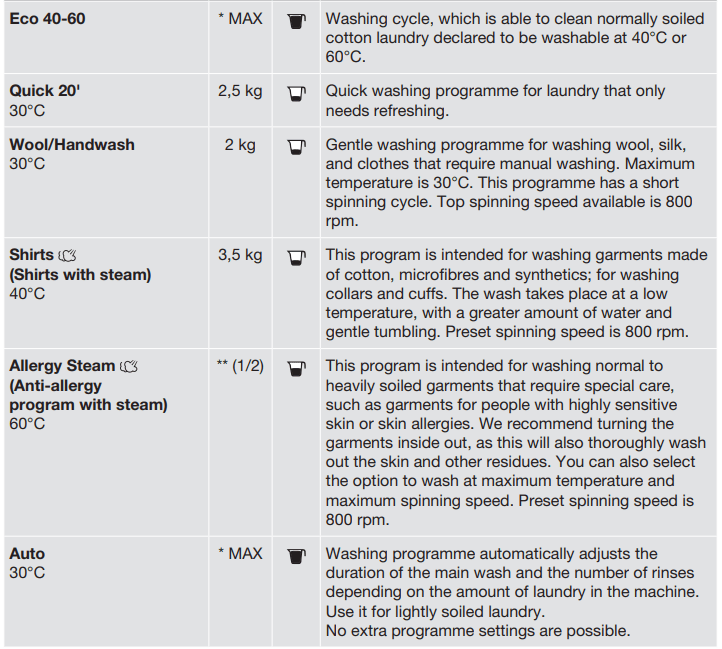
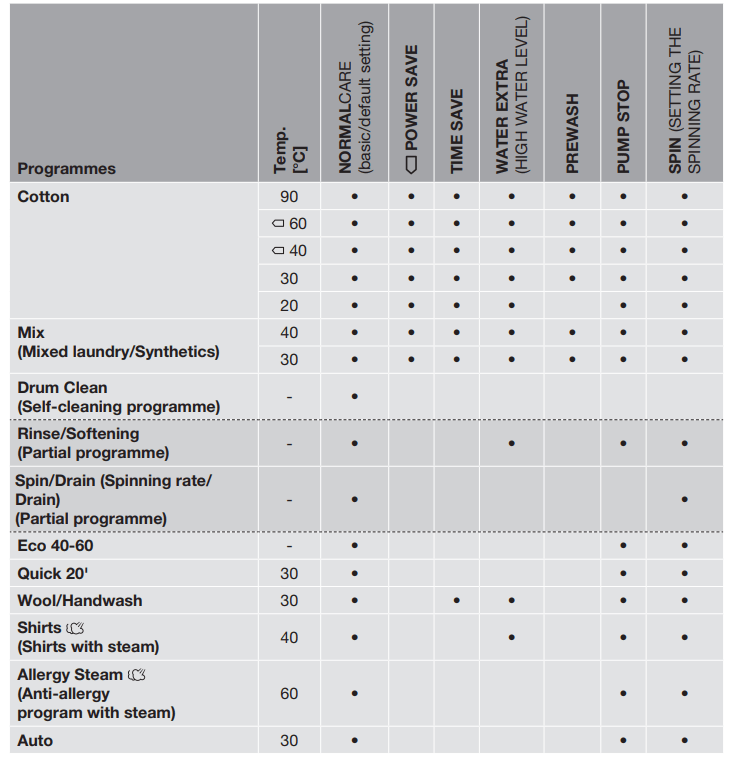
PROGRAMME TABLE
* Maximum load (MAX)
** Half load (1/2)
/ Any load (0 kg – MAX kg)
Add powder or liquid detergents according to the manufacturer's instructions, considering the washing temperature, washing program, how soiled the laundry is, and water hardness.
Maximum amount of laundry in kg (for the cotton programme) is indicated on the rating plate fitted under the washing machine door (see chapter »WASHING MACHINE DESCRIPTION/ Technical information«).
Maximum or nominal load applies to laundry prepared pursuant to the IEC 60456 standard.
For better washing effect, we recommend loading the drum to 2/3 when using the cotton programmes.
Step 4: Choosing the settings
Most programmes feature basic settings, but these settings can be changed.
Adjust the settings by pressing the relevant function button (before pressing the (3) START/PAUSE button).
Functions that cannot be changed with the selected washing programme are partly lit (dimmed). Certain settings cannot be selected with some programmes. Such settings will not be lit, and the button will flash when pressed (see FUNCTION TABLE).
Description of lighting of functions for the selected programme:
• Lit (Basic/preset setting);
• Dimmed (Functions that can be adjusted) and
• Unlit (Functions that cannot be selected).
4. WASHING MODE
NORMAL CARE (basic/default setting)
POWER SAVE (4a) (This mode will save energy; washing time will be longer, and water consumption will be lower.)
TIME SAVE (4b) (This mode will save time as programme duration will be shorter, but it will use more water.)
We recommend a half-load for the Cotton programme.
Light on the button for the selected washing mode is lit.
7. SPIN (SPINNING RATE/DRAIN/PUMP STOP)
For changing the spinning rate, only draining, and stop pump (7). With preset or selected spinning rate, (7a) will be lit on the display unit. If you select draining without spinning, the symbol (7b) will appear on the display unit. If you select »Pump stop«, the symbol (7c) will appear on the display unit.
Select the »Pump stop« (7c) option when you want the laundry to stay soaked in the water from the last rinse cycle in order to prevent it from creasing when you are unable to take it from the washing machine immediately after the washing programme is complete. You may set the desired spinning rate. To continue the program, press the (3) START/ PAUSE button that is lit. Water will be drained (pumped out) and the final spin cycle will be run.
10. CHILD LOCK
A safety feature. To activate the child lock, simultaneously press the (7) SPIN (SPINNING RATE/DRAIN/PUMP STOP) and (10) START DELAY positions and hold them for at least three seconds. The selection will be confirmed by an acoustic signal and by a signal light (the symbol (9) will be lit). Follow the same procedure to deactivate the child lock. As long as the child lock is activated, programme, settings, or additional functions cannot be changed. Child lock remains active even after the washing machine is switched off. For safety reasons, the child lock does not prevent switching off the washing machine with the (1) ON/OFF/RESET button. To select a new programme, the child lock must first be deactivated.
10. START DELAY
Use this function to start the washing cycle after a certain amount of time has elapsed. Press the (10) START DELAY position. -:-- will appear on the display (10a). If, for example, you choose a programme with a duration of 2:39, the time will be indicated on the display unit, and the symbol (10b) will be lit under the time.
If the function (10) START DELAY has been selected, then the symbol (10c) will be lit.
By pressing the (10) START DELAY position, you can adjust the time in 30-minute steps up to 6 hours, and by 1-hour steps up to 24 hours. If nothing is pressed for 5 seconds, actual washing time will be displayed. To set the time to the end of the washing programme again, press the (10) START DELAY position.
The function is activated when the (3) START/PAUSE button is pressed. Washing machine is counting down the set time. When the countdown reaches zero, the selected washing programme will start automatically.
• To interrupt or change the start delay time, press and hold the (1) ON/ OFF/RESET button. Press the (10) START DELAY position to select a new delay time and confirm it by pressing the (3) START/PAUSE button.
• To quickly cancel the start delay, press and hold the position (10) START DELAY for 3 seconds. The washing program will resume.
• In case of a power supply failure before the delay time has elapsed, press the (3) START/PAUSE button to resume the delay time countdown.
Step 5: Selecting additional functions
Activate/deactivate the functions by pressing the desired function (before pressing the (3) START/PAUSE button).
Some settings cannot be selected with certain programmes. Such functions will not be lit on the display unit, and when the corresponding button is pressed, an acoustic signal will be emitted and the light on the button will flash (see FUNCTION TABLE).
5. WATER EXTRA (HIGH WATER LEVEL)
Use this function to wash with a larger amount of water, and with two additional rinse cycles on some programmes.
6. PREWASH
Washing heavily soiled laundry, particularly with stubborn superficial stains.
If you select PREWASH, add the detergent into the prewash compartment .
When the washing machine is switched off, all extra functions return to their basic or custom settings, except for the acoustic signal setting.
If you have set the START DELAY function and you are using liquid detergent, we do not recommend setting a programme without a pre-wash
FUNCTION TABLE
• Additional functions can be used
Standard programme
TIME OPTIMIZATION DURING THE PROGRAMME PROGRESS
In the early stage of the washing programme, the washing machine uses advanced technology to detect the amount of laundry. After load detection, the washing machine adjusts the programme duration.
Step 6: Starting the washing programme
Press the (3) START/PAUSE button.
TIME REMAINING TO THE END OF THE PROGRAMME or START DELAYtime (if set) will appear on the display.
Symbols will be lit on the selected functions. After pressing the (3) START/PAUSE button, the spinning rate can be adjusted (except in the case of the Drum Clean (Self-cleaning programme) and SPIN (SPINNING RATE/DRAIN/PUMP STOP)) and child lock can be activated or deactivated, while other settings cannot be changed.
If anything is flashing on the display unit, the washing machine door is open or not closed correctly. Close the washing machine door and press the (3) button START/PAUSE again to resume the washing programme.
Step 7: Change of washing programme or manual (physical) cancellation
To stop and cancel a washing programme, press the (1) ON/OFF/RESET button and hold it for more than 3 seconds.
The washing programme is temporarily paused when the time remaining until programme completion is flashing on the display unit . At the same time, the washing machine pumps the water out of the washing machine drum. When the water is pumped out, washing machine door will be unlocked. If the water in the washing machine is hot, the washing machine will automatically cool it and pump/drain it out.
Step 8: End of the washing programme
The washing machine will indicate the end of the washing programme with an acoustic signal and »End« will appear on the display until the washing machine switches into low standby mode or switches off. After 5 minutes, the »End« sign will no longer be displayed.
1. Open the washing machine door.
2. Take the laundry from the drum.
3. Wipe the rubber door gasket and the door glass.
4. Close the door!
5. Shut off the water supply tap.
6. Switch off the washing machine (press the (1) ON/OFF/RESET button).
7. Unplug the power cord from the outlet.
INTERRUPTIONS AND CHANGING THE PROGRAMME
MANUAL INTERRUPTION
To stop and cancel a washing programme, press the (1) ON/OFF/RESET button and hold it for more than 3 seconds. Signal lights will flash on the display. At the same time, the washing machine pumps the water out of the washing machine drum. When the water is pumped out, washing machine door will be unlocked. If the water in the washing machine is hot, the washing machine will automatically cool it and pump/drain it out.
PERSONAL SETTINGS
Basic or default settings for each washing programme can also be changed. When you select the programme and additional functions, you may store such combination by pressing the (3) START/ PAUSE button and holding it for five seconds. S C will appear on the display. The programme will remain stored until it is changed using the same procedure. Personal settings can also be reset to factory settings in the user menu.
PERSONAL SETTINGS MENU
Switch on the washing machine by pressing the (1) ON/OFF/RESET button. Simultaneously press the (6) PREWASH and (10) START DELAY positions to open the Personal Settings Menu. Signal lights for POWER SAVE, TIME SAVE, and WATER EXTRA (HIGH WATER LEVEL) will light up on the display unit. Number 1 will appear on the LED display, which also indicates the settings function. Rotate the programme selector knob (2) to the left or to the right to choose the function to change. Number 1 indicates sound settings and number 2 indicates resetting of Personal programme settings to factory defaults. If the desired settings are not selected in 20 seconds, the programme will automatically return to main menu. Press the (7) SPIN (SPINNING RATE/DRAIN/ PUMP STOP)position to confirm the desired functions and their settings; press the (6) PREWASH position to go back one step. Acoustic signal volume can be set at four levels (0 means the sound is off; 1 means that the button sound is activated; 2 means low volume, and 3 means high volume). Choose the volume level by rotating the programme selector knob (2) to the left or to the right. The lowest setting means that the acoustic signal is switched off.
PAUSE BUTTON
The washing programme can always be stopped by pressing the (3) START/PAUSE button. The washing programme is temporarily paused when the time remaining until programme completion is flashing on the display unit . If there is no water in the drum and water temperature is not too high, then the door will unlock after a certain period of time, and they can be opened. To resume the washing program, first close the door and then press the key (3) START/PAUSE button.
ADDING/REMOVING LAUNDRY DURING WASHING MACHINE OPERATION
After a certain period of time, the washing machine door can be opened if the water level and temperature are below a predefined threshold.
If the conditions below are met, then the electronic door lock is released and the washing machine door can be opened:
• water temperature in the drum has to be suitable,
• water level in the drum has to be below a certain value.
In order to add or remove laundry from the washing machine during programme operation, proceed as follows:
1. Press the (3) START/PAUSE button.
2. If all conditions for release of electronic door lock are met, then you can open the washing machine door and add or remove laundry from the drum.
3. Close the washing machine door!
4. Press the (3) START/PAUSE button.
The washing program will resume.
If you add a considerable amount of laundry during the wash, the laundry could be washed less effectively, since the washing machine initially sensed a lower weight of the load of laundry and added a smaller amount of water. Insufficient amount of water relative to the amount of laundry could also cause damage to the laundry (rubbing of dry laundry), and washing time can be longer.
Washing time will resume from the point at which the washing programme was interrupted.
ERRORS
In case of an error or fault, the programme will be interrupted. Flashing signal lights and an acoustic signal will warn about such occurrence (see TROUBLESHOOTING TABLE), and the error will be indicated on the display (E:XX).
POWER SUPPLY FAILURE
In case of a power supply failure, the washing programme is interrupted. When power supply resumes, »PF« (Power Failure) will appear on the display unit. To resume the washing programme, press the button (3) START/PAUSE.
Delay time will not be reset.
Washing time will resume from the point at which the washing programme was interrupted.
OPENING THE DOOR MANUALLY IN CASE OF A POWER OUTAGE - IN CASE OF A PROGRAM PAUSE (ONLY WITH SOME MODELS)
When the program is paused or interrupted, open the filter cap using a suitable tool (flat screwdriver or a similar tool).
Washing machine door can only be opened by simultaneously pulling the special lever (located at the filter) and the door handle.
Open the washing machine door manually by pulling the handle towards you.
OPENING THE DOOR (PAUSE/CANCEL – CHANGE PROGRAMME)
Washing machine door can be opened, if the water level in the machine is low enough and if the water temperature is not excessively high. Otherwise, use manual (physical) interruption (see chapter INTERRUPTIONS AND CHANGING THE PROGRAMME/Manual (physical) interruption)
MAINTENANCE & CLEANING
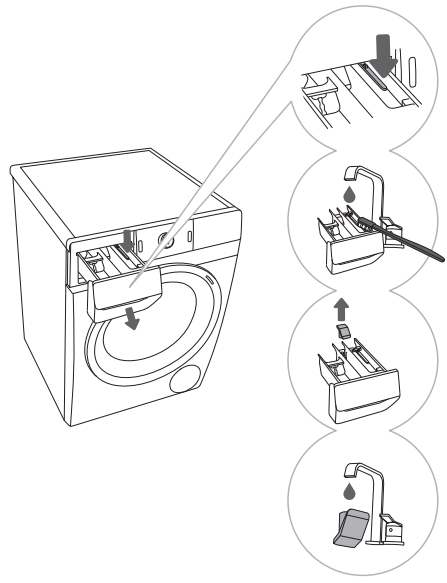
Cleaning the dispenser tray
1. To remove the dispenser tray from the housing, press the small tab.
2. Clean the dispenser tray under running water using a brush, and dry it. Also, remove any detergent residue from the bottom of the housing.
3. If required, remove and clean the plug cap.
4. Clean the plug cap under running water and replace it.
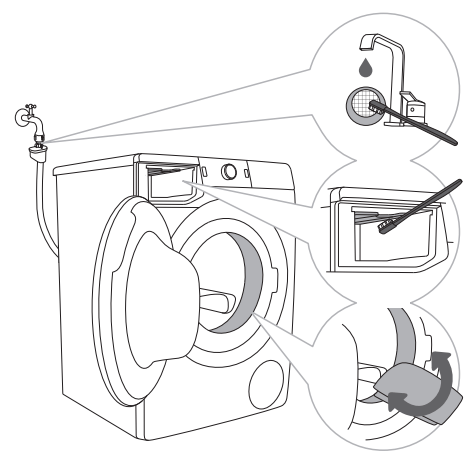
Cleaning the water supply hose, detergent dispenser housing, and rubber door gasket
1. Clean the net filter often under running water.
2. Use a brush to clean the entire washing machine rinsing section, especially the nozzles on the upper side of the rinsing chamber.
3. After every wash, wipe the rubber door seal to extend its useful life.
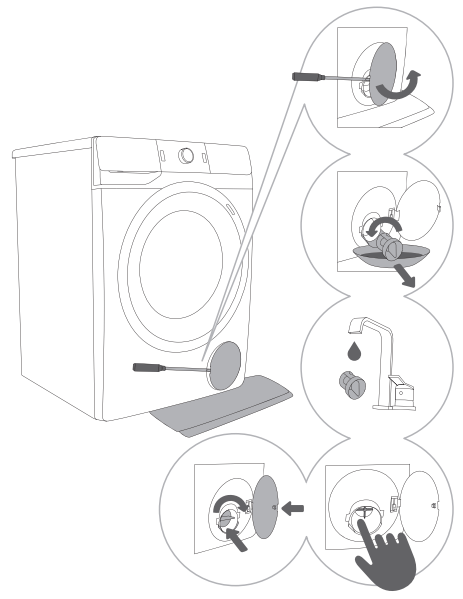
Cleaning the pump filter
1. Open the pump filter cap using a suitable tool (flat screwdriver or a similar tool).
2. Pull out the water outlet funnel before cleaning the pump filter. Rotate the pump filter slowly in the counterclockwise direction. Pull out and remove the pump filter to allow the water to slowly drain.
3. Clean the pump filter thoroughly under running water.
4,5. Remove all and any objects and impurities from the filter housing and the pump propeller. Replace the pump filter as shown in the figure and fasten it by rotating in the clockwise direction. For a good seal, the filter gasket surface should be clean.
Cleaning the washing machine exterior
Clean the washing machine exterior and display unit using a soft damp cotton cloth and water.
Do not clean the washing machine with a jet of water!
TROUBLESHOOTING
What to do ...?
The washing machine shall automatically control the operation of particular functions during the washing cycle. If any irregularity is identified, this will be indicated by reporting (E:XX) on the display. The washing machine will report the error until it is switched off. Disturbances from the environment (e.g. the power grid) may result in various error reports (see TROUBLESHOOTING TABLE). In such case:
• Switch off the washing machine and wait for a few seconds.
• Switch on the washing machine and repeat the washing programme.
• Most errors during operation can be resolved by the user (see TROUBLESHOOTING TABLE).
• If the error persists, call an authorized service unit.
• Repairs may only be carried out by an adequately trained person.
• Repair or any warranty claim resulting from incorrect connection or use of the washing machine shall not be covered by the warranty. In such cases, the costs of repair shall be charged to the user.
Troubleshooting and error table
Problem/ error
Indication on the display unit and problem description
What to do?
E0
Incorrect settings
Restart the programme. If the error reoccurs, call a service technician.
E1
Temperature sensor error.
Inlet water too cold. Repeat the washing programme. If the washing machine reports this error again, call a service technician
E2
Door lock error.
Make sure the washing machine door is closed. Unplug the power cord from the outlet; then, plug the power cord back into the outlet and switch on the washing machine. If the error reoccurs, call a service technician.
E3
Water filling error.
Check the following:
• is the water inlet valve open,
• is the filter on the water supply hose clean,
• is the water supply hose deformed (clipped, clogged etc.),
• is the pressure in the water mains between 0.05 and 0.8 MPa (0,5–8 bar).
Then, press the (3) START/PAUSE button to resume the programme. If the error reoccurs, call a service technician.
E4
Motor error
Restart the programme. If the error reoccurs, call a service technician.
E5
Motor error
Restart the programme. If the error reoccurs, call a service technician.
E6
Water heating error
Restart the programme. If the error reoccurs, call a service technician.
E7
Water draining error
Check the following:
• is the pump filter clean,
• is the discharge hose clogged,
• is the drain clogged,
• if the discharge hose placed is placed below the maximum and above the minimum height (see chapter »INSTALLATION AND CONNECTION/ Connecting and securing the water discharge hose«);
then, press the (3) START/PAUSE button again. If the error reoccurs, call a service technician.
E9
Water detected at the bottom of the washing machine (Total Aqua Stop system)
Turn off the appliance and turn it back on. If the error reoccurs, call a service technician.
E10
Water level sensor error.
Unplug the power cord from the outlet; then, plug the power cord back into the outlet and switch on the washing machine. If the error reoccurs, call a service technician
E11
Water overflow
If there is water in the drum that exceeds a certain level, and an error is reported on the display unit, the washing program will be interrupted and water will be pumped out of the washing machine. Restart the programme. If the error reoccurs, call a service technician. If there is water in the drum that exceeds a certain level, and an error is reported on the display unit, while the washing machine continues to add water, close the water tap and call a service technician.
E12
Motor control error
Restart the programme. If the error reoccurs, call a service technician.
E22
Error while locking the door.
Door is closed, but it cannot be locked. Switch off the washing machine. Switch it back on and restart the washing program. If the error reoccurs, call a service technician.
E23
Error while unlocking the door.
Door is closed, but it cannot be unlocked. Turn off the washing machine, then turn it back on. If the error reoccurs, call a service technician. To open the door, see chapter »INTERRUPTIONS AND CHANGING THE PROGRAMME/Opening the door manually«
E36
Electronics communication failure in the washing machine
Unplug the power cord from the outlet; then, plug the power cord back into the outlet and switch on the washing machine. If the error reoccurs, call a service technician.
E37
Electronics communication failure in the washing machine
Unplug the power cord from the outlet; then, plug the power cord back into the outlet and switch on the washing machine. If the error reoccurs, call a service technician
Water drain system alert. Symbol will appear.
Alert about reduced water flow in the pumping stage. Check the following:
• is the pump filter clean,
• is the discharge hose clogged,
• is the drain clogged,
• if the discharge hose placed is placed below the maximum and above the minimum height (see chapter »INSTALLATION AND CONNECTION/Connecting and securing the water discharge hose«).
Unevenly distributed laundry When the washing programme is complete, the symbol will remain lit on the display unit.
Manually distribute the laundry and run the spinning programme. See additional description under TROUBLESHOOTING TABLE.
cln
System warning to run the Drum Clean (Self-cleaning programme)
After the washing programme is complete, the signs »cln« and »End« will alternate on the display unit.
We recommend running the Drum Clean (Selfcleaning programme).
»PF«
Power supply failure warning (»PF«/Power Failure)
Washing process was interrupted due to power supply failure.
To restart, press the (3) START/PAUSE button.
Unresponsive display unit and all buttons
Manually (physically) stop the programme by pressing the button (1) ON/OFF/RESET and hold it for more than 3 seconds.
Unplug the power cord from the outlet; then, plug the power cord back into the outlet and switch on the washing machine. If the error reoccurs, call a service technician.
Washing machine standing by, ready to resume the washing programme
The time remaining until programme completion is alternately lit and off on the display unit The time remaining until .
To resume the washing program, press the button (3) START/PAUSE, or manually (physically) stop the programme and press the button (1) ON/OFF/RESET and hold it for more than 3 seconds.
Preparation for unlocking the door
Signal lights will flash on the display unit.
Wait until the process is completed. If no error is indicated after the process, then a new programme can be started. Water has to be drained. Wait for the door to unlock.
Noise and vibration
Make sure the appliance is levelled using the adjustable legs and that the jam nuts are securely tightened.
 POWER SAVE
 /PUMP STOP
 lighting
 lighting
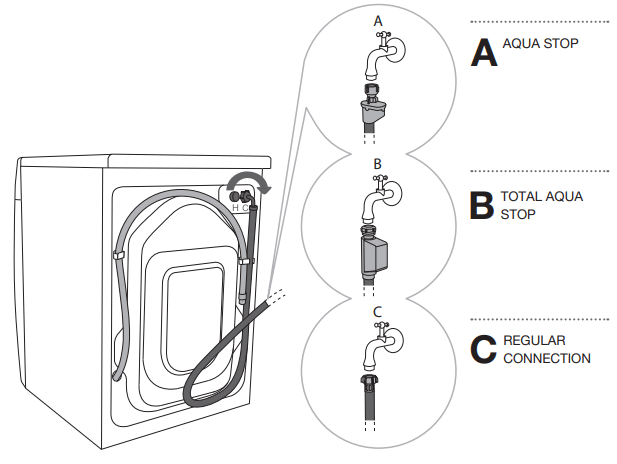


 POWER SAVE (4a) (This mode will save energy; washing time will be longer, and water consumption will be lower.)
 (7b) will appear on the display unit. If you select »Pump stop«, the symbol
  (7c) will appear on the display unit.
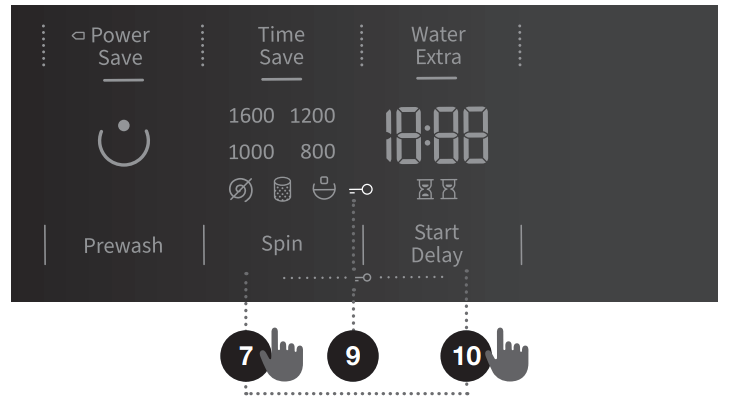
 (9) will be lit). Follow the same procedure to deactivate the child lock. As long as the child lock is activated, programme, settings, or additional functions cannot be changed. Child lock remains active even after the washing machine is switched off. For safety reasons, the child lock does not prevent switching off the washing machine with the (1) ON/OFF/RESET button. To select a new programme, the child lock must first be deactivated.
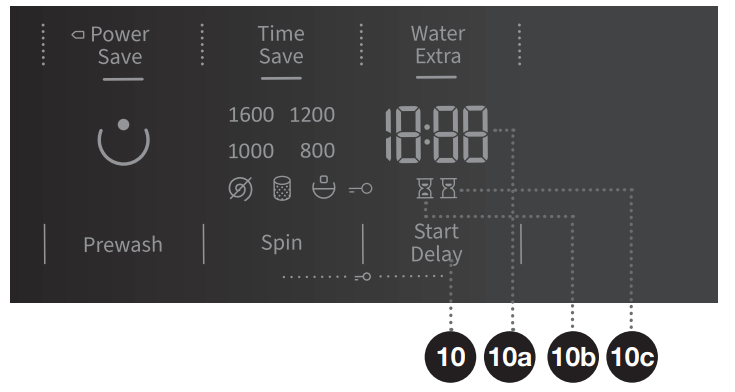
 (10b) will be lit under the time.
 (10c) will be lit.
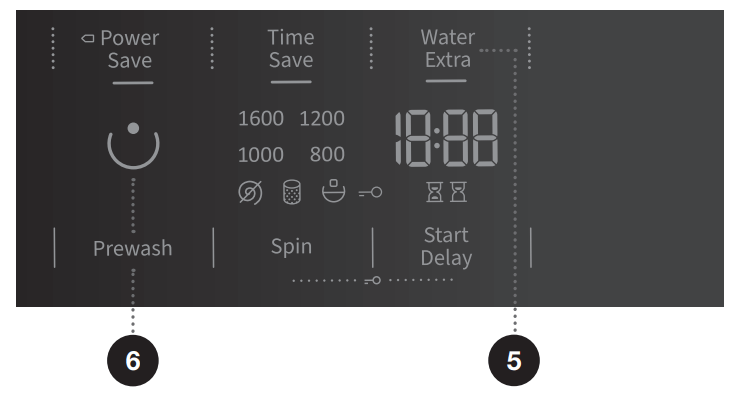

 .
.
 Standard programme
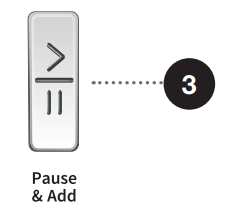
 or START DELAY
  time (if set) will appear on the display.
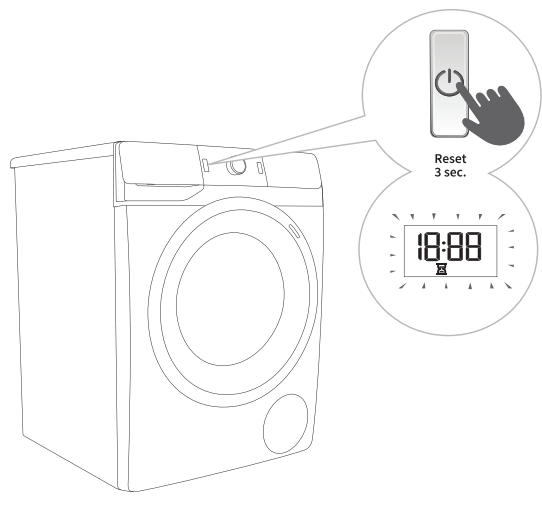
 . At the same time, the washing machine pumps the water out of the washing machine drum. When the water is pumped out, washing machine door will be unlocked. If the water in the washing machine is hot, the washing machine will automatically cool it and pump/drain it out.
 POWER SAVE, TIME SAVE, and WATER EXTRA (HIGH WATER LEVEL) will light up on the display unit. Number 1 will appear on the LED display, which also indicates the settings function. Rotate the programme selector knob (2) to the left or to the right to choose the function to change. Number 1 indicates sound settings and number 2 indicates resetting of Personal programme settings to factory defaults. If the desired settings are not selected in 20 seconds, the programme will automatically return to main menu. Press the (7) SPIN (SPINNING RATE/DRAIN/ PUMP STOP)position to confirm the desired functions and their settings; press the (6) PREWASH position to go back one step. Acoustic signal volume can be set at four levels (0 means the sound is off; 1 means that the button sound is activated; 2 means low volume, and 3 means high volume). Choose the volume level by rotating the programme selector knob (2) to the left or to the right. The lowest setting means that the acoustic signal is switched off.
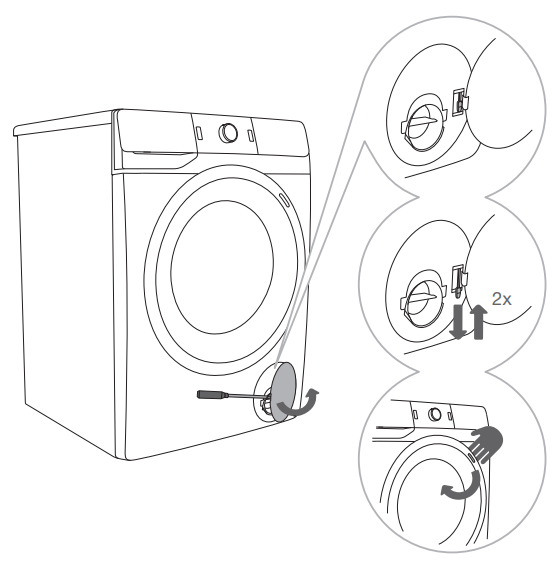


 will appear.
 will remain lit on the display unit.