Documents: Go to download!
User Manual
- User Manual - (English)
- Quick Start Guide - (English)
- Owner's Guide - (French)
- Owner's Guide - (Spanish)
- Ice Kit Installation Instructions - (English)
- Specification Sheet - (English)
- Energy Guide - (English)
- Wiring Diagram - (English)
- Part List - (English)
- Features
- Installation
- Door Removal
- Door Handle Installation (some models)
- Water Supply Connection
- Ice Maker
- Controls and Settings
- Storage Features
- Care and Cleaning
- Troubleshooting
Table of contents
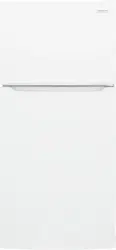
User Manual your Frigidaire Refrigerator
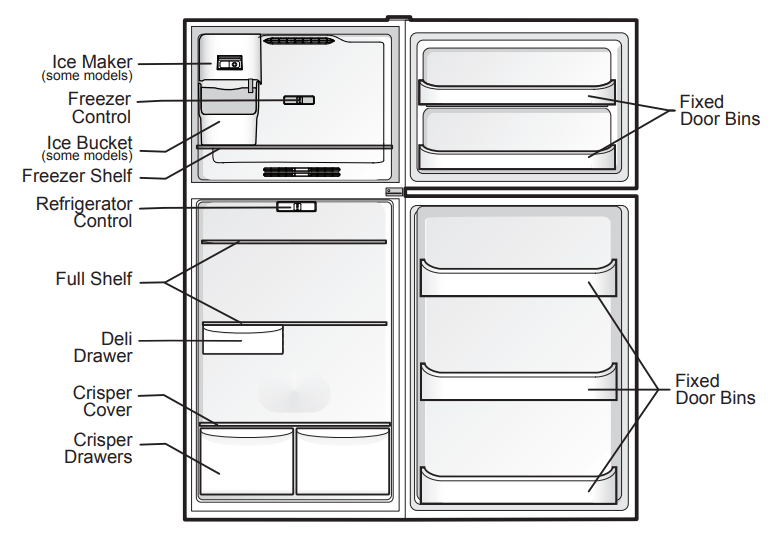
Features
Features may vary according to model
IMPORTANT
Cleaning your Refrigerator Remove tape and glue residue from surfaces before turning the refrigerator on. Rub a small amount of liquid dish soap over the adhesive with your fingers. Rinse with warm water and dry with a soft cloth.
Do not use sharp instruments, rubbing alcohol, flammable fluids, or abrasive cleaners to remove tape or glue. These products can damage the surface of your refrigerator.
After you remove all of the package materials, clean the inside of your refrigerator before using it. See the "CARE AND CLEANING” section in this manual.
IMPORTANT
Moving your Refrigerator Y
our refrigerator is heavy. When moving the refrigerator for cleaning or service, be sure to cover the floor with cardboard or hardboard to avoid floor damage. Always pull the refrigerator straight out when moving it. Do not wiggle or “walk” the refrigerator when trying to move it as you could damage the floor.
This Use & Care Guide provides general operating instructions for your model. Use the refrigerator only as instructed in this Use & Care Guide. Before starting the refrigerator, follow these important first steps.
Location
• Choose a place that is near a grounded electrical outlet. Do Not use an extension cord or an adapter plug.
• If possible, place the refrigerator out of direct sunlight and away from the range, dishwasher or other heat sources
.• The refrigerator must be installed on a floor that is level and strong enough to support a fully loaded refrigerator.
• Consider water supply availability for models equipped with an automatic ice maker. If you do not hook up water to the refrigerator, remember to turn the ice maker off.
Installation
Installation clearances
• Allow the following clearances for ease of installation, proper air circulation, and plumbing and electrical connections:
Sides & Top ⅜ in.
Back 1 in.
Guidelines for final positioning of your refrigerator:
• All 4 corners of the cabinet must rest firmly on the floor.
• The cabinet should be level at the front and rear.
• The sides should tilt ¼ in. (6 mm) from front to back (to ensure that doors close and seal properly).
• Doors should align with each other and be level.
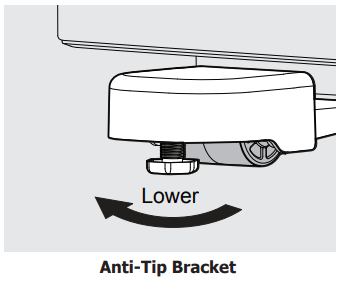
Setting the Anti-tip Brackets
The anti-tip brackets are located on the lower front corners of the cabinet. Lower the anti-tip brackets on each side clockwise until they contact the floor. Do not raise the cabinet.
Door Removal
Door Removal/Reversal
CAUTION Be sure the doors are set aside in a secure position where they cannot fall and cause personal injury
NOTE The direction in which your refrigerator doors open (door swing) can be reversed, from left to right or right to left, by moving the door hinges from one side to the other. Reversing the door swing should be performed by a qualified person.
IMPORTANT Before you begin, turn the refrigerator temperature control to OFF and remove the electrical power cord from the wall outlet. Remove any food from door shelves.
1. Unplug your refrigerator.
2. Remove the top hinge cover (see Figure 1A).
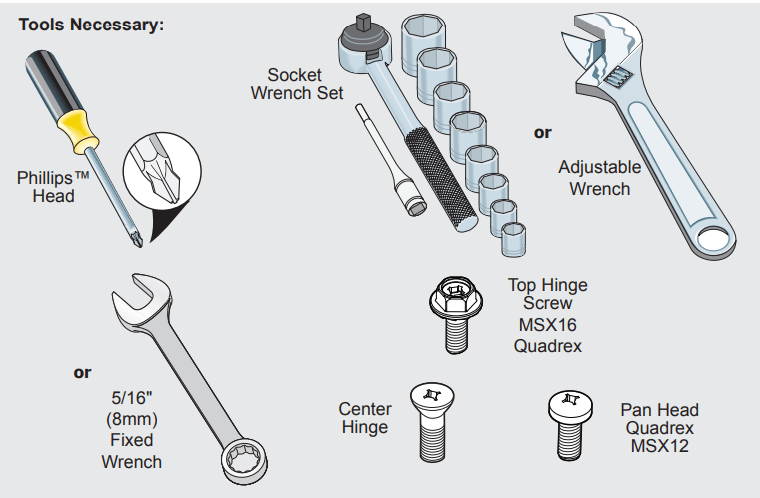
3. Remove the 3 screws from the top hinge using a Phillips screwdriver or 5/16” wrench. Set the hinge aside (see Figure 1B).
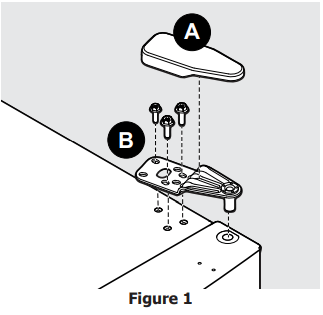
NOTE Keep the screws so they can be used on the opposite side.
4. Open the freezer door and lift the door off the center hinge pin. Set the door aside.
IMPORTANT Place the door on a padded surface to avoid damage.
5. Unscrew the center hinge pin using an adjustable wrench and set it aside (see Figure 2).
6. Open the refrigerator door and lift the door off of the bottom hinge pin. Set the door aside.
7. Remove the 3 center hinge screws using a Phillips screwdriver and set
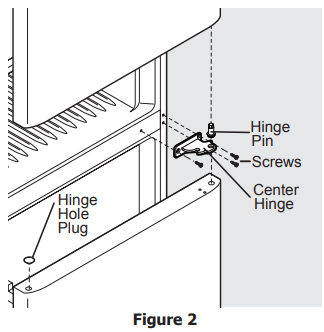
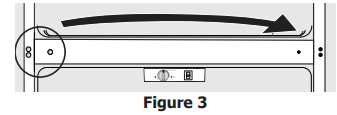
8. Remove the 3 pan head screws at the center of the cabinet (Figure 3) and install them on the opposite side of the cabinet.
9. Remove both lower hinge covers.
10. Remove the screw from the door stopper with a Phillips screwdriver (see Figure 4).
11. Unscrew the bottom hinge pin from the right hand position using an adjustable wrench (see Figure 4).
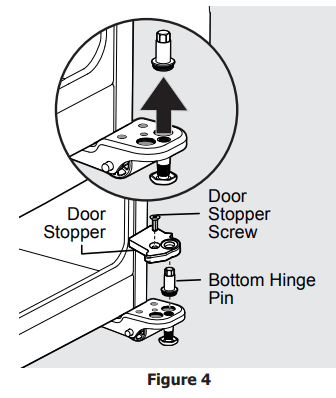
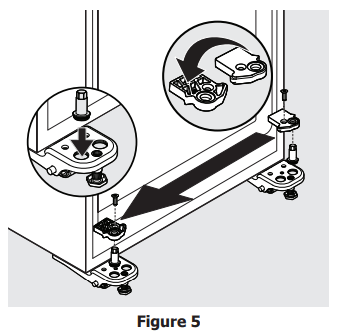
12. Install the bottom hinge pin in the left hand hole of the left hand lower hinge (see Figure 5).
13. Install the door stopper and screw it on top of the hinge pin (see Figure 5).
Door Bearing Reversal For Freezer and Refrigerator Doors
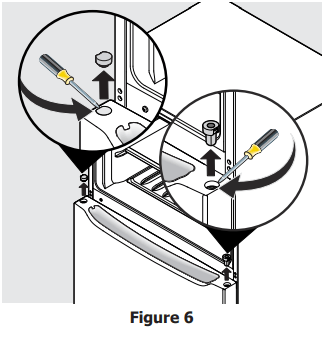
1. Pry out the center hinge bearing from the top of the refrigerator door with a straight screwdriver (see Figure 6).
2. Pry out the center hinge bearing plug from the opposite side of the refrigerator door with a straight screwdriver (see Figure 6).
3. Install the hinge bearing and plug it on opposite sides of each other.
4. Reverse the door handle (see DOOR HANDLE INSTALLATION section if applicable).
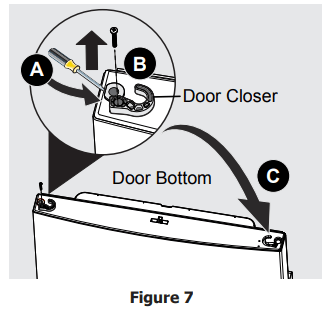
5. Flip the refrigerator door over and remove the screw from the door closer using a Phillips screwdriver and set it aside (see Figure 7A).
6. Pry out the hinge bearing from the door with a straight screwdriver (see Figure 7B).
7. Install the bottom hinge bearing on the opposite side of the door (see Figure 7C).
8. Flip the door closer over and install on the opposite side of the door (see Figure 7C).
9. Repeat steps 1-8 for the freezer door.
10. Lower the refrigerator door over the bottom hinge pin and close the door.
11. Screw in and tighten the center hinge pin using an adjustable wrench.
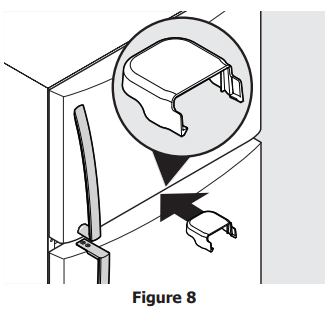
12. Lower the freezer door over the center hinge pin and close door. Place the lower hinge cover between the freezer door and refrigerator door to keep it level while attaching the top hinge (see Figure 8).
13. Attach the top hinge with the 3 screws using a Phillips screwdriver or 5/16” wrench.
14. Tighten the top hinge screws and check the door gasket for open seal condition (see Figure 9).
15. Replace the upper hinge cover. Replace the lower hinge covers.
Door Handle Installation (some models)
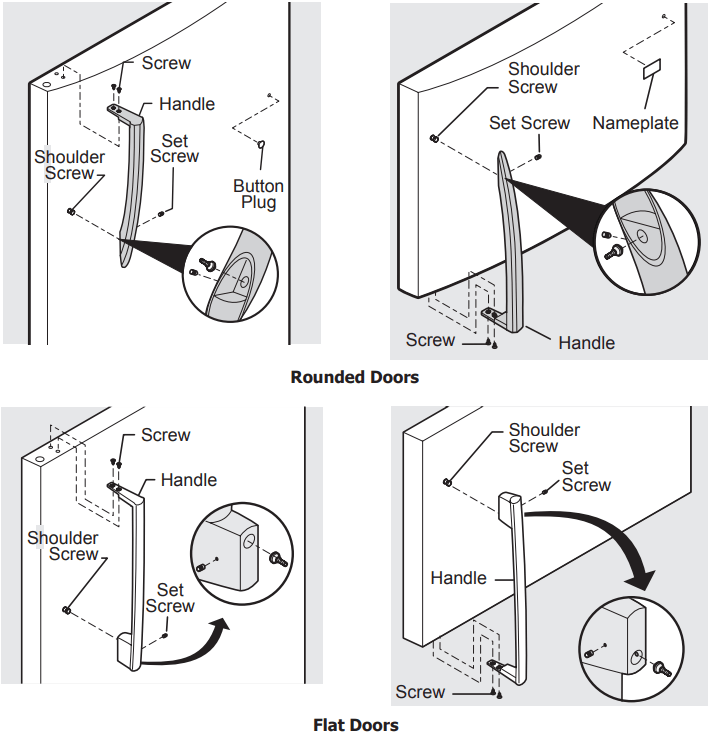
To attach the metal refrigerator handle (Stainless steel, Black Stainless steel, Stainless Steel EZCare):
1. Place the rounded part of handle onto shoulder screw on the face of the door and align the 2 holes in top of handle with the 2 holes in top of the door. Do not tighten the set screw yet.
2. Install the 2 screws into the top of the handle.
3. Tighten the set screw on the rounded part of the handle until the handle is flush with the door; then tighten another ½ turn.
To attach the metal freezer handle (Stainless steel, Black Stainless steel, Stainless Steel EZCare):
1. Place the rounded part of handle onto shoulder screw on the face of the door and align the 2 holes in bottom of handle with the 2 holes in bottom of door. Do not tighten the set screw yet.
2. Install the 2 screws into the bottom of the handle.
3. Tighten the set screw on the rounded part of the handle until the handle is flush with the door; then tighten another ½ turn.
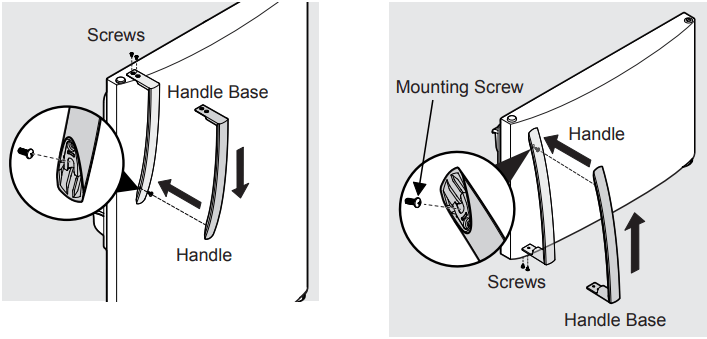
To attach the plastic refrigerator handle (Smooth white/black):
1. With the door open, place the end of the handle on the dove tail mounting screw and pull it down to secure it in place.
2. Align the handle base with the holes in top of the door.
3. Install screws packaged with the handle.
To attach the plastic freezer handle (Smooth white/black):
1. With the door open, place the end of the handle on the dove tail mounting screw and push it up to secure it in place.
2. Align the handle base with holes in the bottom of the door.
3. Install screws packaged with the handle.
To reverse the door handles:
The handles may be easier to reverse while the doors are off.
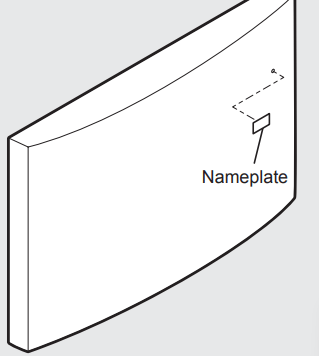
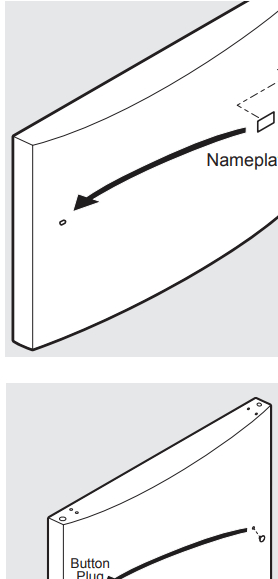
1. Remove the name plate on the freezer door
2. Remove the button plugs in the refrigerator door.
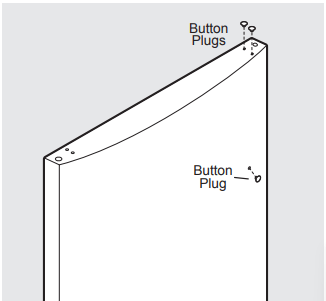
3. Reverse the freezer and refrigerator handles as shown.
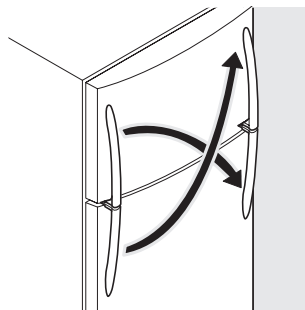
4. Install the button plugs and the name plate on the opposite side of door.
Water Supply Connection
CAUTION
To Avoid Property Damage:
• Stainless Steel braided tubing is recommended for the water supply line. Water supply tubing made of ¼ in. plastic is not recommended to be used. Plastic tubing greatly increases the potential for water leaks, and the manufacturer will not be responsible for any damage if plastic tubing is used for the supply line.
• DO NOT install water supply tubing in areas where temperatures fall below freezing.
• Chemicals from a malfunctioning softener can damage the ice maker. If the ice maker is connected to soft water, ensure that the softener is maintained and working properly.
Before Installing The Water Supply Line, You Will Need:
• Basic Tools: adjustable wrench, flat-blade screwdriver, and Phillips screwdriver
• Access to a household cold water line with water pressure between 30 and 100 psi.
• A water supply line made of stainless steel tubing. To determine the length of tubing needed, measure the distance from the ice maker inlet valve at the back of the refrigerator to your cold water pipe, so the refrigerator can be moved out for cleaning.
• A shutoff valve to connect the water supply line to your household water system. DO NOT use a self-piercing type shutoff valve.
• Do not reuse compression fitting or use thread seal tape.
To Connect Water Supply Line To the Ice Maker Inlet Valve
1. Disconnect refrigerator from electric power source.
2. Place end of water supply line into sink or bucket. Turn ON water supply and flush supply line until water is clear. Turn OFF water supply at shutoff valve.
3. Remove plastic cap from water valve inlet and discard cap.
4. If you use copper tubing, slide brass compression nut, and then ferrule (sleeve) onto water supply line. Push water supply line into water valve inlet as far as it will go (¼ in. / 6.4 mm). Slide ferrule (sleeve) into valve inlet and finger tighten compression nut onto valve. Tighten another ½ turn with a wrench; DO NOT overtighten. See below. If you use braided flexible stainless steel tubing, the nut is already assembled on the tubing. Slide nut onto valve inlet and finger tighten nut onto valve. Tighten another ½ turn with a wrench; DO NOT overtighten. See below.
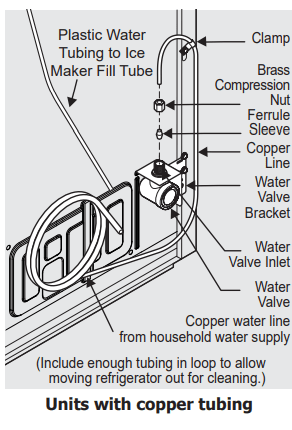
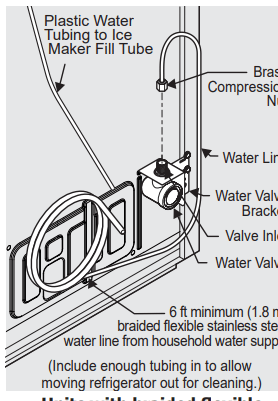
5. With steel clamp and screw, secure water supply line (copper tubing only) to rear panel of refrigerator as shown.
6. Coil excess water supply line (copper tubing only), about 2½ turns, behind refrigerator as shown and arrange coils so they do not vibrate or wear against any other surface.
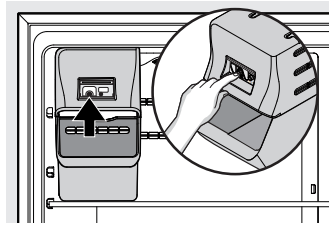
7. To turn ice maker on, press the ice maker’s On/Off power switch so the LED is steadily illuminated.
8. Turn ON water supply at shutoff valve and tighten any connections that leak.
9. Reconnect refrigerator to electrical power source.
Ice Maker
Turning your Ice Maker On
After completely connecting the plumbing, you must open the water supply valve. Place the ice container under the ice maker, pushing it as far back as possible. Press the ice maker’s On/ Off  button.
Turning your Ice Maker Off
To stop the ice maker, press the ice maker’s On/ Off  button. The ice maker regulates the ice production and stops making ice when full and starts again when ice is low in the ice container.
Controls and Settings
Cool Down Period
To ensure safe food storage, allow the refrigerator to operate with the doors closed for at least 8 hours before loading it with food.
Refrigerator & Freezer Controls
NOTE When first turning the refrigerator on, adjust the control to Recommended. After 24 hours, adjust the controls as needed.
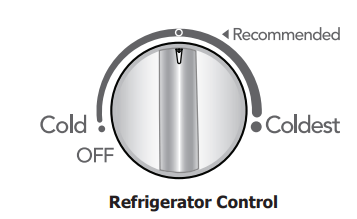
IMPORTANT Adjusting the refrigerator temperature control to OFF turns off the compressor and prevents the refrigerator from cooling, but does not disconnect the power to the light bulb and other electrical components. To turn off power to your refrigerator, you must unplug the power cord from the wall outlet.
Temperature Adjustment
Adjust the temperature gradually: adjust the knob in small increments, allowing the temperature to stabilize.
• For colder temperatures, adjust the knob towards Coldest.
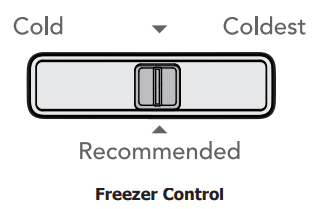
• For warmer temperatures, adjust the knob towards Cold. Adjusting the refrigerator control will change temperatures in both compartments. The freezer control can be left at the factory preset (*Recommended) or adjusted as desired. To maintain temperatures, a fan circulates air in the refrigerator and freezer compartments. For good circulation, do not block cold air vents with food items.
Storage Features
Door Storage
Door bins, shelves, and racks are provided for convenient storage of jars, bottles, and cans. Frequently used items can be quickly selected. The dairy compartment, which is warmer than the general food storage section, is intended for short term storage of cheese, spreads, or butter.
Door Bin
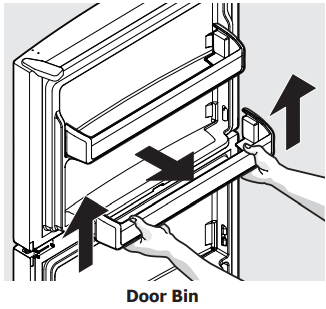
Door bins can accommodate gallon-sized plastic drink containers and economy-sized jars and containers.
To remove the door bin:
1. Lift up on the bin
2. Pull it straight out.
To install the door bin:
1. Push the bin back and down into the locking tabs.
2. The bin sides will lock into the tabs.
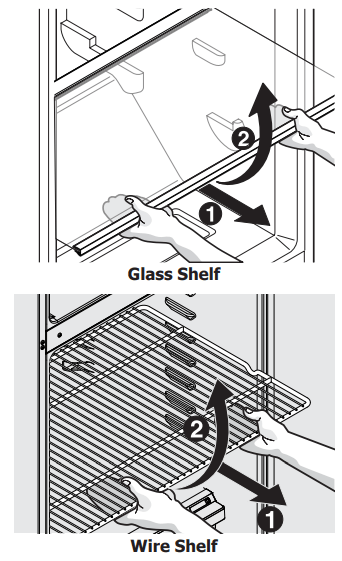
Shelf Adjustment
The shelves are easy to adjust to suit individual needs. Before adjusting the shelves, remove all food.
To adjust shelves, lift the back of the shelf and pull forward.
To replace shelves, insert the rear of the shelf into any pair of shelf rails and carefully push the shelf back into position.
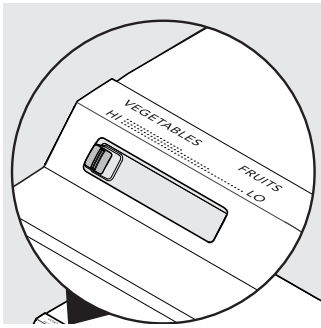
Crisper Humidity Control (some models)
The crisper humidity control, present on the crisper drawers of some models, allows you to adjust the humidity within the crisper. This can extend the life of fresh
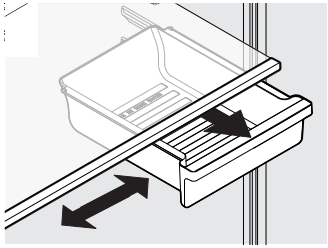
Half Width Deli Drawer (some models)
Some models are equipped with a sliding Deli Drawer for storage of luncheon meats, spreads, cheeses, and other deli items. Please be sure to support the glass when removing the drawer.
Care and Cleaning
Protecting your investment
Keeping your refrigerator clean maintains appearance and prevents odor build-up. Wipe up any spills immediately and clean the freezer and refrigerator compartments at least twice a year. When cleaning, take the following precautions:
• Never use CHLORIDE or cleaners with bleach to clean stainless steel.
• Do not wash any removable parts in a dishwasher.
• Always unplug the electrical power cord from the wall outlet before cleaning.
• Remove adhesive labels by hand. Do not use razor blades or other sharp instruments which can scratch the appliance surface.
• Do not remove the serial plate.
Do not use abrasive cleaners such as window sprays, scouring cleansers, brushes, flammable fluids, cleaning waxes, concentrated detergents, bleaches or cleansers containing petroleum products on plastic parts, interior doors, gaskets or cabinet liners. Do not use paper towels, metallic scouring pads, or other abrasive cleaning materials or strong alkaline solutions.
NOTE If you set your temperature controls to turn off cooling, power to lights and other electrical components will continue until you unplug the power cord from the wall outlet.
CAUTION Pull the refrigerator straight out to move it. Shifting it from side to side may damage flooring. Be careful not to move the refrigerator beyond the plumbing connections
Care and Cleaning Tips
| Part | What To Use | Tips and Precautions |
| Interior & Door Liners |
• Soap and water • Baking soda and water |
Use 2 tbsp of baking soda in 1 qt of warm water. Be sure to wring excess water out of sponge or cloth before cleaning around controls, light bulb or any electrical part. |
| Door Gaskets | • Soap and water | Wipe gaskets with a clean soft cloth. |
| Drawers & Bins | • Soap and water | Use a soft cloth to clean drawer runners and tracks. |
| Glass Shelves |
• Soap and water • Glass cleaner • Mild liquid sprays |
Allow glass to warm to room temperature before immersing in warm water. |
| Exterior & Handles |
• Soap and water • Non Abrasive Glass Cleaner |
Do not use commercial household cleaners containing ammonia, bleach or alcohol to clean handles. Use a soft cloth to clean smooth handles. DO NOT use a dry cloth to clean smooth doors. |
| Exterior & Handles (Stainless Steel Models Only) |
• Soap and water • Stainless Steel Cleaners |
Never use CHLORIDE or cleaners with bleach to clean stainless steel. Clean stainless steel front and handles with nonabrasive soapy water and a dishcloth. Rinse with clean water and a soft cloth. Use a non-abrasive stainless steel cleaner. These cleaners can be purchased at most home improvement or major department stores. Always follow manufacturer’s instructions. Do not use household cleaners containing ammonia or bleach. NOTE: Always clean, wipe and dry with the grain to prevent scratching. Wash the rest of the cabinet with warm water and mild liquid detergent. Rinse well, and wipe dry with a clean soft cloth. |
| Air Filter | • Order Air Filter Housing Kit BRPAULTRA2KIT, which includes a PureAir Ultra IITM air filter | Our PureAir Ultra IITM air filter’s active carbon technology absorbs and captures undesirable odors more effectively than baking soda. |
| Replacing Light Bulbs |
• Unplug appliance • Wear gloves • Remove light cover • Replace old bulb • Replace light cover • Plug in the appliance |
CAUTION: Wear gloves when replacing the AC LED light bulbs to avoid getting cut. Use same wattage when replacing bulb. CAUTION: Use only a 5-watt or less AC LED light bulb. |
Troubleshooting
| Common Occurrences | Before calling for service, review this list. It may save you time and expense. This list includes common occurrences that are not the result of defective workmanship or materials in this appliance. |
| Refrigerator does not run. |
• Ensure the plug is tightly pushed into an electrical outlet. • Check/replace the fuse with a 15-amp time-delay fuse. Reset the circuit breaker. • The refrigerator control is turned to OFF. • Refrigerator may be in defrost cycle. Wait 20 minutes and check again. |
| Freezer temperature is colder than preferred. Refrigerator temperature is satisfactory. | • Set the auxiliary freezer control to a warmer setting until the freezer temperature is satisfactory. Allow 24 hours for the temperature to stabilize. |
| Refrigerator temperature is too cold. Freezer temperature is satisfactory. | • Set the refrigerator control to a warmer setting. Allow 24 hours for the temperature to stabilize. Then check the freezer temperature and adjust as needed. |
| Freezer temperature is warmer than preferred. Refrigerator temperature is satisfactory. | • Set the auxiliary freezer control to a colder setting until the freezer temperature is satisfactory. Allow 24 hours for the temperature to stabilize. |
| Refrigerator temperature is too warm. Freezer temperature is satisfactory. | • Set the refrigerator control to a colder setting. Allow 24 hours for temperature to stabilize. Then check refrigerator temperature and adjust as needed. |
| Refrigerator is noisy or vibrates. |
• The cabinet is not level. • Floor is weak. • See the “NORMAL OPERATING SOUNDS” section. |
| Odors in the refrigerator. |
• The interior needs to be cleaned. • Foods that produce odors should be covered or wrapped. |
| Cabinet light is not working. |
• Replace with only a 5-watt or less AC LED light bulb. • Ensure the plug is tightly pushed into an electrical outlet. • The light switch may be stuck. Push in the light switch, located on the refrigerator side wall, to release. |
| Automatic ice maker is not working (some models) |
• Ensure the ice maker is on (green light). • The ice maker should produce 2 to 2.5 pounds of ice in a 24 hour period. • Ensure the water supply is turned on. • The water pressure may be too low. • The freezer may not be cold enough. |
See other models: FFTR2045VB FRIGCOMBO ICE115-SS-SM FFHT1814WB FFHT1814WW
